


TECUMSEH
Main Menu
T E C H N I C I A N ' S H A N D B O O K
This manual covers engine models:
ECV100 - 120, H22 - 80, HH40 - 70, HHM80, HM70 - 100,
HMSK70 - 110, HMXL70, HS40 - 50, HSK30 - 70, HSSK40 - 50,
HT30 - 35, HXL35, LAV30 - 50, LEV80 - 120, TNT100 - 120,
TVM125 - 220, TVXL170 - 220, TVS75 - 120, TVXL105 - 115,
V40 - 80, VH40 - 70, V60 - 70, VM70 - 100
Model numbers are located on the engine shroud.
3 TO 11 HP
4-CYCLE
L-HEAD
ENGINES

CONTENTS
Main Menu
CHAPTER 1 GENERAL INFORMATION ......................................................................................................... 1
ENGINE IDENTIFICATION ............................................................................................................................... 1
INTERPRETATION OF MODEL NUMBER ...................................................................................................... 1
SHORT BLOCKS .............................................................................................................................................. 2
FUEL ................................................................................................................................................................. 2
ENGINE OIL ..................................................................................................................................................... 3
TUNE-UP PROCEDURE .................................................................................................................................. 3
STORAGE ........................................................................................................................................................ 4
CHAPTER 2 AIR CLEANERS ........................................................................................................................ 5
GENERAL INFORMATION ............................................................................................................................... 5
OPERATION ..................................................................................................................................................... 5
COMPONENTS ................................................................................................................................................ 5
TROUBLESHOOTING OR TESTING .............................................................................................................. 5
SERVICE .......................................................................................................................................................... 6
DISASSEMBLY PROCEDURE ......................................................................................................................... 6
POLYURETHANE-TYPE FILTER ELEMENT...................................................................................................6
PAPER-TYPE FILTER ELEMENT .................................................................................................................... 6
CHAPTER 3 CARBURETORS AND FUEL SYSTEMS ................................................................................... 7
GENERAL INFORMATION ............................................................................................................................... 7
OPERATION ..................................................................................................................................................... 8
FUEL PRIMERS ............................................................................................................................................... 8
IMPULSE FUEL PUMPS .................................................................................................................................. 9
FLOAT STYLE CARBURETORS ..................................................................................................................... 9
DIAPHRAGM (PRESSURE DIFFERENTIAL) CARBURETORS ..................................................................... 9
COMPONENTS .............................................................................................................................................. 10
CARBURETOR IDENTIFICATION ................................................................................................................. 11
DUAL SYSTEM CARBURETORS .................................................................................................................. 11
SERIES 1 CARBURETORS ........................................................................................................................... 11
SERIES 3 & 4 CARBURETORS..................................................................................................................... 11
DIAPHRAGM CARBURETORS ..................................................................................................................... 11
SERIES 6 CARBURETORS 4-CYCLE ........................................................................................................... 12
SERIES 8 ........................................................................................................................................................ 12
SERIES 9 ........................................................................................................................................................ 12
SERIES 10 (EMISSION) ................................................................................................................................. 12
NON-TECUMSEH CARBURETORS -- DELLORTO CARBURETOR........................................................... 12
ENGINE TROUBLESHOOTING CHART ....................................................................................................... 13
CARBURETION TROUBLESHOOTING CHART ........................................................................................... 14
TESTING ........................................................................................................................................................ 15
SERVICE ........................................................................................................................................................ 15
CARBURETOR PRE-SETS AND ADJUSTMENTS ....................................................................................... 15
FINAL ADJUSTMENTS (NON-EMISSION ENGINES) .................................................................................. 16
NON-ADJUSTABLE CARBURETOR ............................................................................................................. 16
DISASSEMBLY PROCEDURE ....................................................................................................................... 17
FLOAT STYLE CARBURETORS ................................................................................................................... 17
DIAPHRAGM CARBURETORS ..................................................................................................................... 19
FLOAT ADJUSTING PROCEDURE ...............................................................................................................19
INSPECTION ..................................................................................................................................................20
ASSEMBLY ..................................................................................................................................................... 21
STANDARD SERVICE CARBURETORS .......................................................................................................24
CHAPTER 4 GOVERNORS AND LINKAGE .................................................................................................26
GENERAL INFORMATION ............................................................................................................................. 26
OPERATION ................................................................................................................................................... 26
INTERNAL COMPONENTS (VARIOUS STYLES) ......................................................................................... 26
TROUBLESHOOTING .................................................................................................................................... 26
ENGINE OVERSPEEDING ............................................................................................................................ 27
ENGINE SURGING ........................................................................................................................................27
SERVICE ........................................................................................................................................................ 27
GOVERNOR ADJUSTMENT .......................................................................................................................... 27
GOVERNOR ADJUSTMENT PROCEDURE FOR SHORT BLOCK INSTALLATIONS ................................. 27
C Tecumseh Products Company
1998
i

GOVERNOR GEAR AND SHAFT SERVICE .................................................................................................28
Main Menu
SPEED CONTROLS AND LINKAGE ............................................................................................................. 29
CHAPTER 5 REWIND STARTERS ................................................................................................................ 35
GENERAL INFORMATION ............................................................................................................................. 35
OPERATION ................................................................................................................................................... 35
COMPONENTS .............................................................................................................................................. 35
SERVICE ........................................................................................................................................................ 35
ROPE SERVICE ............................................................................................................................................. 35
RETAINER REPLACEMENT .......................................................................................................................... 36
STYLIZED REWIND STARTER (TVS, HM, TVM, TVXL), AND STAMPED STEEL STARTER
(HM, VM, TVM, TVXL) ............................................................................................................................... 36
STYLIZED REWIND STARTER WITH PLASTIC RETAINER ........................................................................37
STANDARD STAMPED STEEL AND CAST ALUMINUM STARTER (HM, VM) ............................................38
VERTICAL PULL STARTER HORIZONTAL ENGAGEMENT TYPE .............................................................. 39
VERTICAL PULL STARTER VERTICAL ENGAGEMENT TYPE ................................................................... 40
CHAPTER 6 ELECTRICAL SYSTEMS ....................................................................................................... 42
GENERAL INFORMATION ............................................................................................................................. 42
OPERATION ................................................................................................................................................... 42
STARTING CIRCUIT AND ELECTRIC STARTERS ....................................................................................... 42
CHARGING CIRCUIT ..................................................................................................................................... 42
CONVERTING ALTERNATING CURRENT TO DIRECT CURRENT ............................................................ 43
HALF WAVE RECTIFIER SINGLE DIODE .................................................................................................... 43
FULL WAVE RECTIFIER BRIDGE RECTIFIER ............................................................................................. 43
COMPONENTS .............................................................................................................................................. 43
BATTERY ........................................................................................................................................................ 43
WIRING ........................................................................................................................................................... 43
ELECTRICAL TERMS .................................................................................................................................... 44
BASIC CHECKS ............................................................................................................................................. 45
TROUBLESHOOTING ELECTRICAL STARTER CIRCUIT FLOW CHART .................................................. 46
TROUBLESHOOTING ELECTRICAL CHARGING CIRCUIT FLOW CHART ............................................... 47
TESTING PROCEDURE ................................................................................................................................48
STARTING CIRCUIT ...................................................................................................................................... 48
CHARGING CIRCUIT ..................................................................................................................................... 48
VOLTAGE REGULATIONS ............................................................................................................................. 56
LOW OIL SHUTDOWN SWITCHES............................................................................................................... 56
SERVICE ........................................................................................................................................................ 57
12 VOLT OR 120 VOLT ELECTRIC STARTERS WITH EXPOSED SHAFT ................................................. 57
12 VOLT D.C. OR 120 VOLT A.C. ELECTRIC STARTERS WITH THE STARTER GEAR UNDER
THE CAP ASSEMBLY ............................................................................................................................... 57
INSPECTION .................................................................................................................................................. 58
CHAPTER 7 FLYWHEEL BRAKE SYSTEMS ............................................................................................... 59
GENERAL INFORMATION ............................................................................................................................. 59
OPERATION ................................................................................................................................................... 59
BOTTOM SURFACE SYSTEM....................................................................................................................... 59
INSIDE EDGE SYSTEM ................................................................................................................................. 60
COMPONENTS .............................................................................................................................................. 60
SERVICE ........................................................................................................................................................ 61
FLYWHEEL REMOVAL .................................................................................................................................. 61
BRAKE LEVER AND PAD .............................................................................................................................. 61
IGNITION GOUNDOUT TERMINAL...............................................................................................................61
STARTER INTERLOCK SWITCH .................................................................................................................. 62
CONTROL CABLE .......................................................................................................................................... 62
BRAKE BRACKET REPLACEMENT.............................................................................................................. 62
CHAPTER 8 IGNITION .................................................................................................................................. 63
GENERAL INFORMATION ............................................................................................................................. 63
OPERATION ................................................................................................................................................... 63
SOLID STATE IGNITION SYSTEM (CDI) ......................................................................................................63
MAGNETO IGNITION SYSTEM (POINTS) .................................................................................................... 63
IDENTIFICATION OF TECUMSEH IGNITION SYSTEMS ............................................................................. 64
COMPONENTS .............................................................................................................................................. 64
IGNITION TROUBLESHOOTING .................................................................................................................. 66
ii

TESTING PROCEDURE ................................................................................................................................67
Main Menu
SERVICE ........................................................................................................................................................ 68
SPARK PLUG SERVICE ................................................................................................................................ 68
CONDITIONS CAUSING FREQUENT SPARK PLUG FOULING .................................................................. 68
IGNITION TIMING PROCEDURE .................................................................................................................. 68
SERVICE TIPS ............................................................................................................................................... 71
CHAPTER 9 INTERNAL ENGINE AND CYLINDER ..................................................................................... 72
GENERAL INFORMATION ............................................................................................................................. 72
OPERATION ................................................................................................................................................... 72
4-CYCLE ENGINE THEORY .......................................................................................................................... 72
LUBRICATION SYSTEMS .............................................................................................................................. 73
COUNTERBALANCE SYSTEMS ................................................................................................................... 73
COMPONENTS .............................................................................................................................................. 74
ENGINE OPERATION PROBLEMS ............................................................................................................... 75
TESTING ........................................................................................................................................................ 77
ENGINE KNOCKS .......................................................................................................................................... 77
ENGINE OVERHEATS ................................................................................................................................... 77
SURGES OR RUNS UNEVENLY ................................................................................................................... 77
ENGINE MISFIRES ........................................................................................................................................ 77
ENGINE VIBRATES EXCESSIVELY .............................................................................................................. 78
BREATHER PASSING OIL ............................................................................................................................. 78
EXCESSIVE OIL CONSUMPTION ................................................................................................................. 78
LACKS POWER ............................................................................................................................................. 78
SERVICE ........................................................................................................................................................ 79
DISASSEMBLY PROCEDURE ....................................................................................................................... 79
CYLINDERS ...................................................................................................................................................81
CYLINDER HEADS ........................................................................................................................................ 82
PISTONS, RINGS AND CONNECTING RODS ............................................................................................. 82
CRANKSHAFTS AND CAMSHAFTS ............................................................................................................. 84
VALVES ..........................................................................................................................................................85
CRANKCASE BREATHERS ...........................................................................................................................86
CYLINDER COVER, OIL SEAL, AND BEARING SERVICE .......................................................................... 87
CRANKSHAFT BEARING SERVICE ............................................................................................................. 88
COUNTERBALANCE SERVICE .................................................................................................................... 89
FLYWHEEL SERVICE .................................................................................................................................... 89
CHAPTER 10 ENGINE SPECIFICATIONS ................................................................................................... 90
FOUR CYCLE TORQUE SPECIFICATIONS ................................................................................................. 91
ENGINE SPECIFICATIONS STANDARD POINT IGNITION ......................................................................... 93
SOLID STATE AND EXTERNAL IGNITION ................................................................................................... 97
CHAPTER 11 EDUCATION MATERIALS AND TOOLS ............................................................................. 102
DECIMAL / FRACTION CONVERSIONS ..................................................................................................... 105
SEARS CRAFTSMAN CROSS REFERENCE SUPPLEMENT INCLUDED IN BACK OF BOOK
iii
CHAPTER 1 GENERAL INFORMATION
Main Menu
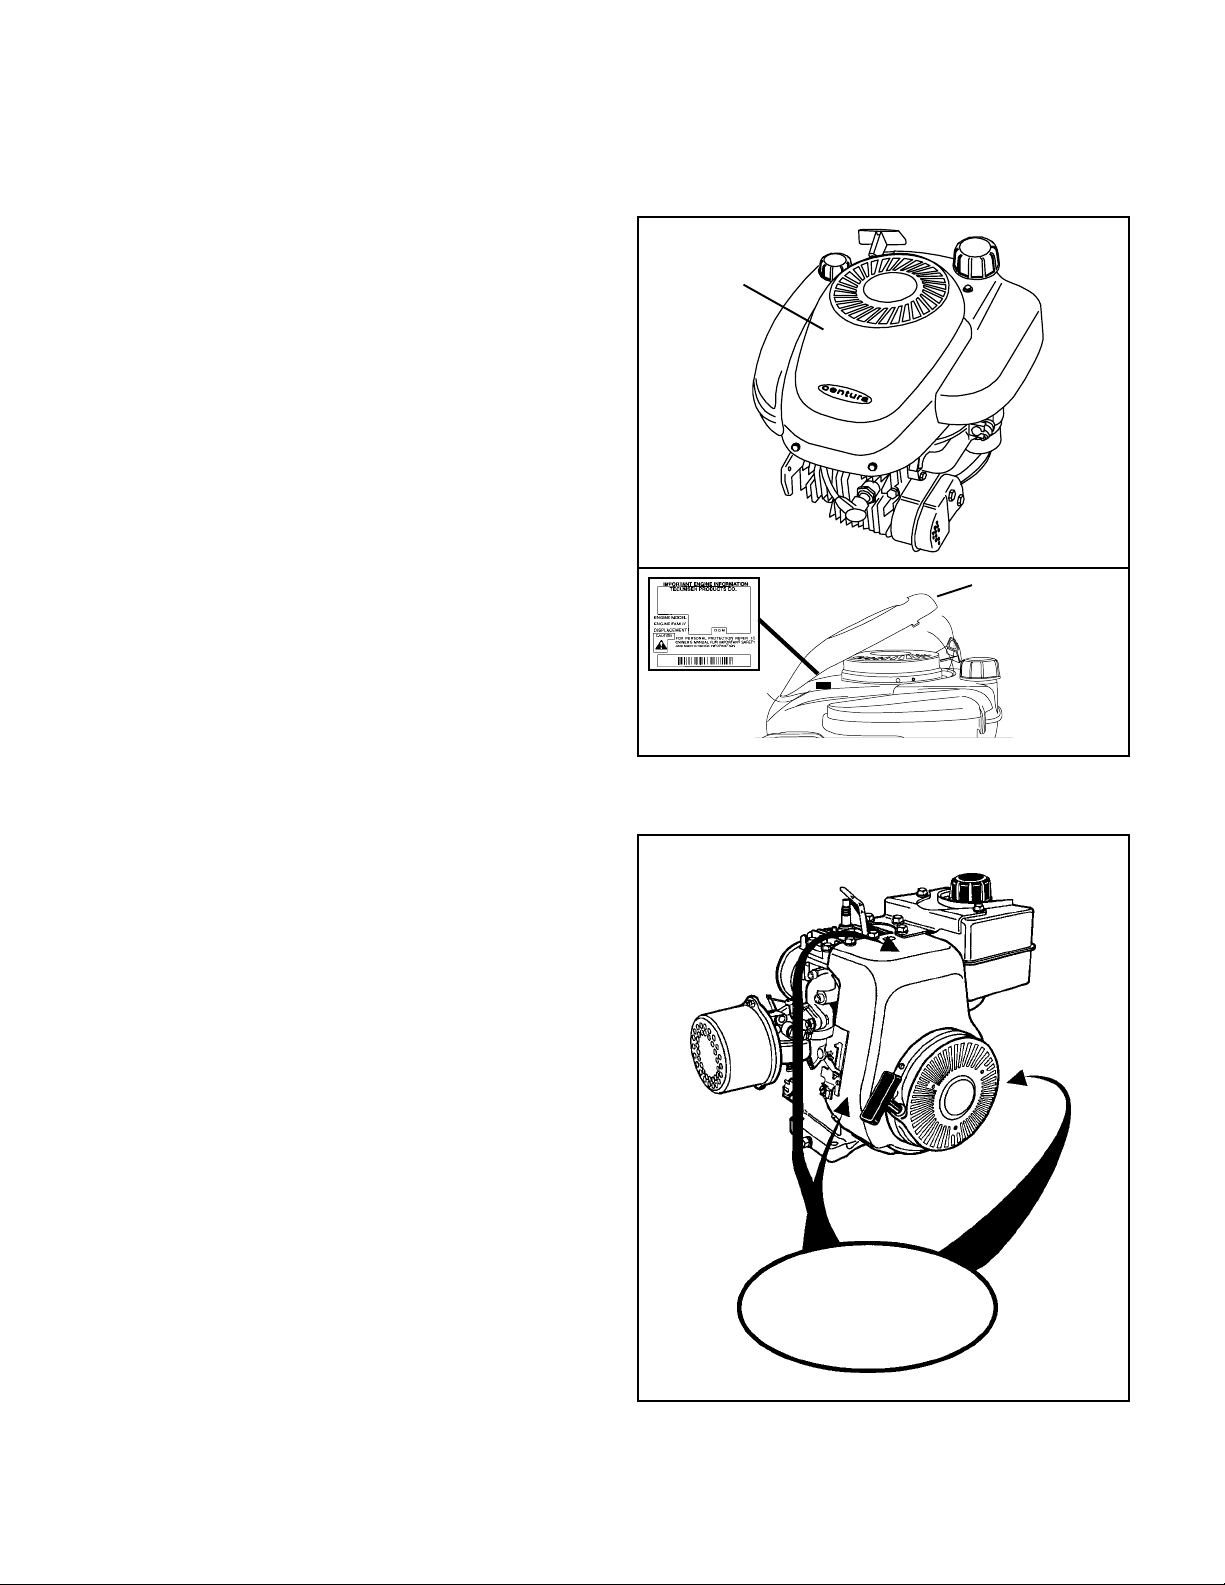
ENGINE IDENTIFICATION
Tecumseh engine model, specification, and serial
numbers or (date of manufacture, DOM) are stamped into
the blower housing or located on a decal on the engine
in locations as illustrated (diag. 1 & 2).
NOTE: On some LEV engines, a cover bezel must be
removed to provide access to the identification decal
(diag. 1).
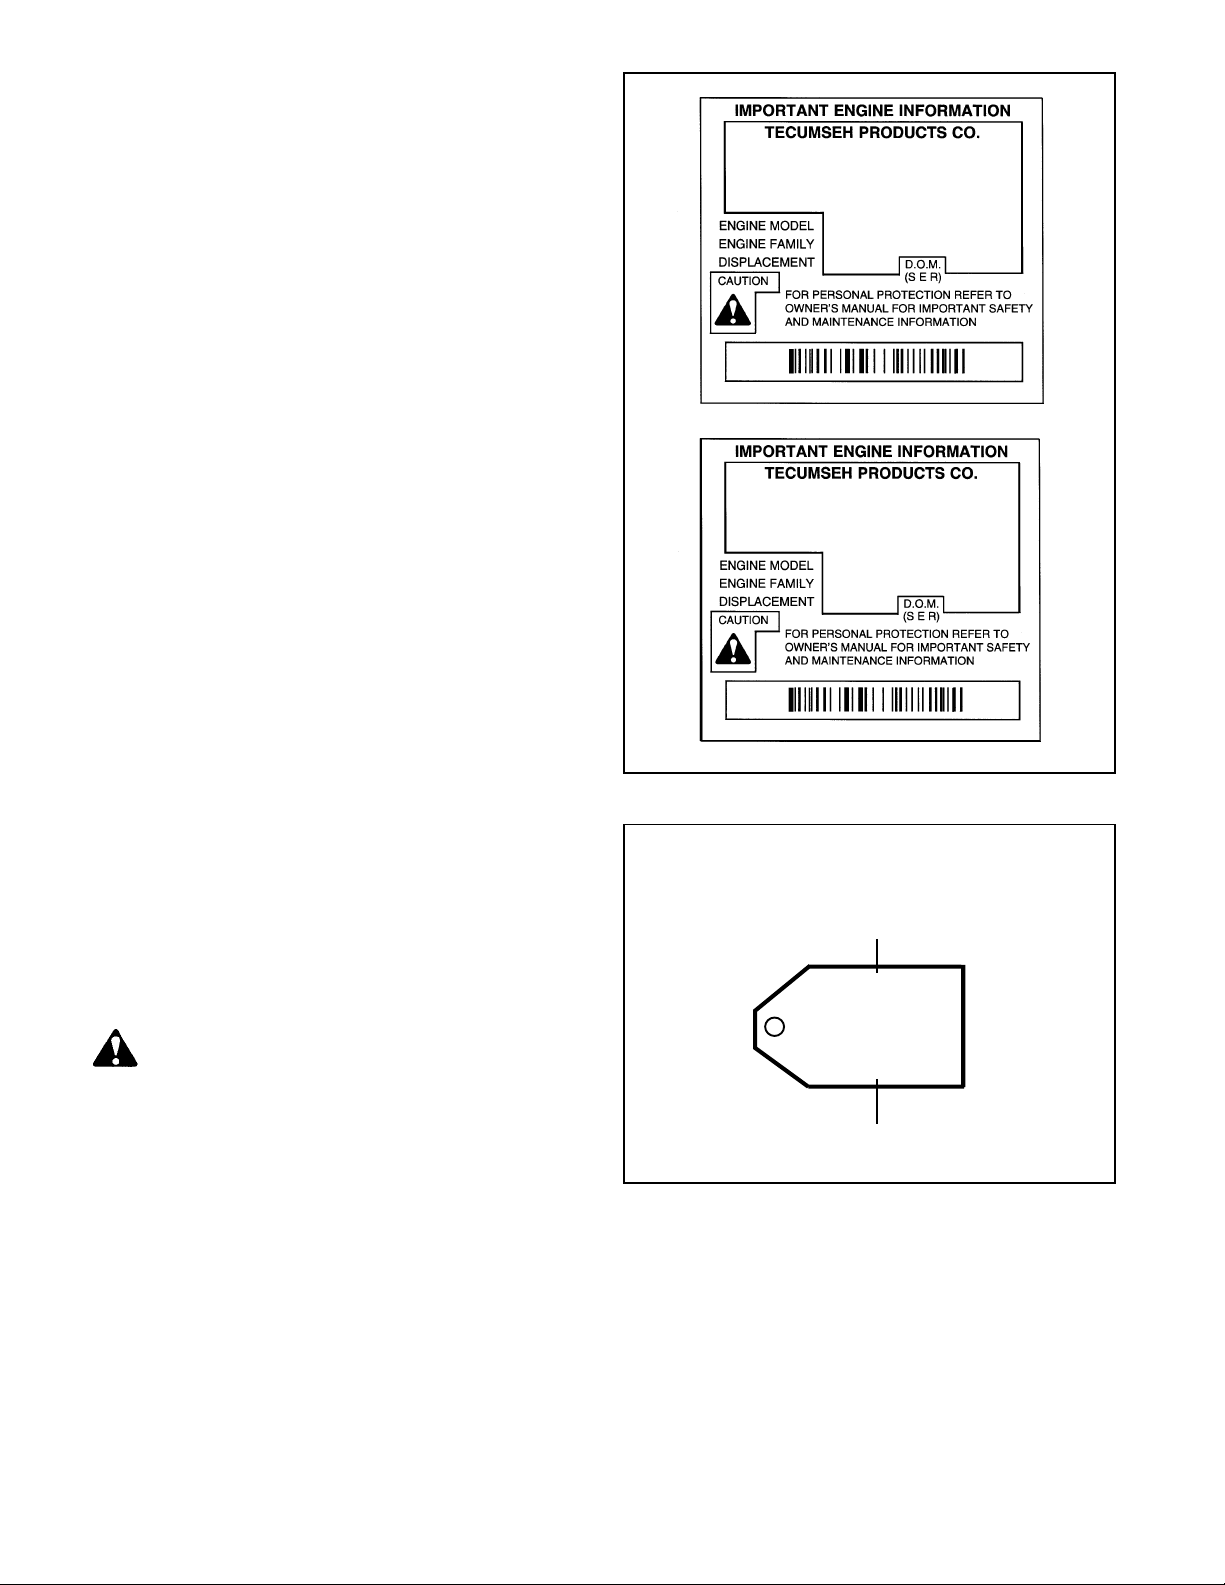
The engine identification decal also provides the
applicable warranty code and oil recommendations (diag.
3).
Emissionized engines that meet the California Air
Resource Board (C.A.R.B.) or the Environmental
Protection Agency (E.P.A.) standards will include
additional required engine information on the engine decal
(diag. 3).
INTERPRETATION OF MODEL NUMBER
The first letter designation in a model number indicates
basic type of engine.
V - V ertical Shaft
LAV - Lightweight Aluminum Vertical
VM - Vertical Medium Frame
TVM - Tecumseh Vertical (Medium Fr ame)
VH - Vertical Heavy Duty (Cast Iron)
TVS - Tecumseh Vertical Styled
TNT - Toro N’ Tecumseh
ECV - Exclusive Craftsman Vertical
TVXL - Tecumseh Vertical Extra Lif e
LEV - Low Emissions Vertical
H - Horizontal Shaft
HS - Horizontal Small Frame
HM - Horizontal Medium Frame
HHM - Horizontal Heavy Duty (Cast Iron) Medium F rame
HH - Hor izontal Heavy Duty (Cast Iron)
ECH - Exclusive Craftsman Horizontal
HSK - Horizontal Snow King
COVER BEZEL
MODEL AND
D.O.M. NUMBER
DECAL
LOCATED
UNDER COVER
(IF SO EQUIPPED)
PRESS IN AND LIFT
HERE TO RELEASE
COVER
Ç
1
HS50 67355H SER 4091D
2
1
The number designations following the letter indicate the
Main Menu
horsepower or cubic inch displacement.
The number following the model number is the
specification number. The last three numbers of the
specification number indicate a variation to the basic
engine specification.
The serial number or D.O .M. indicates the production date.
Using model LEV115-57010B, serial 8105C as an
example, interpretation is as follows:
LEV115-57010B is the model and specification number
LEV Low Emissions Vertical
115 Indicates a 11.5 cubic inch displacement
FUEL REGULAR UNLEADED
OIL, SAE 30 (BELOW 32oF SAE 5W30)
LEV115 57010B (D)
STP185U1G1RA
8105C
57010B is the specification number used for properly
identifying the parts of the engine
8105C is the serial number
8 first digit is the year of manufacture (1998)
105 indicates calendar day of that year (105th day
or April 15, 1998)
C represents the line and shift on which the
engine was built at the factory.
Engine Family: Engine Tracking Information
SHORT BLOCKS
New short blocks are identified by a tag marked S.B.H.
(Short Block Horizontal) or S.B.V. (Short Block Vertical).
Original model identification numbers of an engine should
always be transferred to a new short block for correct
parts identification (diag. 4).
THIS SYMBOL POINTS OUT IMPORTANT
SAFETY INSTRUCTIONS WHICH IF NOT
FOLLOWED COULD ENDANGER THE
PERSONAL SAFETY OF YOURSELF AND
OTHERS. FOLLOW ALL INSTRUCTIONS.
THIS ENGINE MEETS 1995-1998
CALIF. EMISSION REGULATOR FOR
ULGE ENGINES AS APPLICBLE
FUEL: REGULAR UNLEADED OIL: USE SEA30
LEV115 57010B (D)
STP185U1G1RA
8105C
SHORT BLOCK IDENTIFICATION TAG
SBV OR SBH IDENTIFICATION NUMBER
SBV-2316
SER 4291
SERIAL NUMBER
3
4
FUEL
Tecumseh strongly recommends the use of fresh clean unleaded regular gasoline in all engines. Unleaded gasoline
burns cleaner, e xtends engine life and promotes better starting by reducing build-up of comb ustion chamber deposits.
REFORMULATED AND OXYGENATED FUELS
Reformulated fuels containing no more than 10% Ethanol, 15% MTBE, 15% ETBE or premium gasoline can be used
if unleaded regular gasoline is not available . Leaded fuel may be used in countries where unleaded fuel is not availab le.
NEVER USE FUEL CONTAINING METHANOL.
2

ENGINE OIL
Main Menu
Use a clean, high quality detergent oil. Be sure original container is marked: A.P.I. service SF thru SJ. The use of
multigrade oil may increase oil consumption under high temperature, high load applications.
NOTE: DO NO T USE SAE10W40 OIL.
For summer (above 32°F, 0oC) use SAE 30 oil part # 730225 (1 quar t, .946 liter container) in high temperature, high
load applications.
S.A.E.10W30 is an acceptable substitute.
For winter (below 32°F, 0oC) use S.A.E. 5W30 oil part # 730226 (1 quart, .946 liter container)
S.A.E.10W is an acceptable substitute.
S.A.E. 0W30 should only be used when ambient temperature is below 0oF, -18oC.
CAPACITIES: EUROPA MODELS
Engine Model Oz. mL. Oz. mL.
LA V30-50, TVS75-120, LEV80-120 21 63 0 V antage 21 63 0
ECV100-120, TNT100-120 21 63 0 Prisma 21 630
V & VH50, 60, 70 27 810 Synergy 21 630
TVM 125, 140 27 810 Synergy "55" 27 810
TVM & TVXL 170, 195, 220 32 960 Spectra 21 630
VM70, 80, 100 32 960 Futura 21 630
VH100 50 1500 Centura 21 630
H & HSK30, 35, HS & HSK40, 50 21 630 HTL 21 630
H, HH & HSK50, 60, 70 19 570 BVS 21 630
HM & HMSK70, 80, 100 26 720 BH Series 21 630
Geo Tech Series 35-50 21 630
Oil Change Intervals. Change the oil after the first two (2) hours of operation and every 25 hours thereafter, or more
often if operated under dusty or dirty conditions, extreme temperature, or high load conditions.
Oil Check. Check the oil each time the equipment is used or every 5 hours. Position the equipment so the engine is
level when checking the oil.
CAUTION: REMOVE THE SPARK PLUG WIRE BEFORE DOING ANY SERVICE WORK ON THE ENGINE.
Oil Change Procedure: Locate the oil drain plug. On some units this plug is located below the deck through the
bottom of the mounting flange. Other units drain at the base of the engine above the deck or frame. If access to the
drain plug is restricted by the equipment it may be necessary to drain the oil by tipping the mower in a position that
would allow the oil to drain out of the fill tube.
On units that the drain plug is accessible, remove the plug and allow the oil to drain into a proper receptacle. Always
make sure that drain oil is disposed of properly.
Once the oil is drained, reinstall the plug and fill the engine with new oil to the proper capacity.
TUNE-UP PROCEDURE.
The following is a minor tune-up procedure. When this procedure is completed, the engine should operate properly.
Further repairs may be necessary if the engine's performance remains poor.
CAUTION: REMOVE THE SPARK PLUG WIRE BEFORE DOING ANY SERVICE WORK ON THE ENGINE.
1. Service or replace the air cleaner as needed.
2. Inspect the level and condition of the oil and change or add oil as required.
3. Remove the blower housing and clean all dirt, grass or debris from the intake screen, cylinder head, cylinder
4. Make sure the fuel tank, fuel filter and fuel line are clean. Replace any worn or damaged governor springs or
cooling fins, carburetor, governor levers and linkage .
linkage. Make the proper governor adjustments and carburetor presets where required.
3

5. When replacing the spark plug, consult the parts breakdown f or the proper spark plug to be used in the engine being
Main Menu
serviced. Set the spark plug gap to .030" (.762 mm) and install the spark plug in the engine. Tighten the spark plug
to 15 foot pounds of torque (20.4 Nm). If a torque wrench isn’t available, screw the spark plug in as far as possible by
hand, and use a spark plug wrench to turn the spark plug 1/8 to 1/4 turn further if using the old spark plug, or 1/2 turn
further if using a new spark plug.
6. Make sure all ignition wires are free of abrasions or breaks and are properly routed so they will not rub on the
flywheel.
7. Properly reinstall the blower housing, gas tank, fuel line and air cleaner assembly if removed.
8. Make sure all remote cables are properly adjusted for proper operation. See chapter 4 under "Speed Controls and
Linkage".
9. Reinstall the spark plug wire, add fuel and oil as necessary, and start the engine.
STORAGE: (IF THE ENGINE IS TO BE UNUSED FOR 30 DAYS OR MORE)
CAUTION: NEVER STORE THE ENGINE WITH FUEL IN THE TANK INDOORS , IN ENCLOSED POORLY
VENTILATED AREAS WHERE FUEL FUMES MAY REACH AN OPEN FLAME, SPARK OR PILOT LIGHT
AS ON A FURNACE, WATER HEATER, CLOTHES DRYER OR OTHER GAS APPLIANCE.
Gasoline can become stale in less than 30 days and form deposits that can impede proper fuel flow and engine operation.
To prevent deposits from forming, all gasoline must be removed from the fuel tank and the carburetor. An acceptable
alternative to removing all gasoline is adding a fuel stabilizer to the gasoline. Fuel stabilizer (such as Tecumseh's Part
No. 730245) is added to the fuel tank or storage container . Alwa ys f ollow the mix ratio f ound on the stabilizer container .
Run the engine at least 10 minutes after adding the stabilizer to allow it to reach the carburetor .
CAUTION: THE USE OF SOME ANTI-ICING ADDITIVES MAY CREA TE A METHANOL FUEL BLEND. DO NOT
USE ADDITIVES THA T CONT AIN METHANOL. FUEL CONDITIONERS TH AT CONT AIN ISOPROPYL ALCOHOL
IS RECOMMENDED.
Draining the Fuel System:
CAUTION: DRAIN THE FUEL INTO AN APPROVED CONTAINER OUTDOORS, AND AWAY FROM ANY
OPEN FLAME OR COMBUSTION SOURCE. BE SURE THE ENGINE IS COOL.
1. Remove all gasoline from the fuel tank by running the engine until the engine stops, or by draining the fuel tank b y
removing the fuel line at the carburetor or fuel tank. Be careful not to damage the fuel line, fittings, or fuel tank.
2. Drain the carburetor by pressing upward on the bowl drain (if equipped) which is located on the bottom of the
carburetor bowl. On carb uretors without a bo wl drain, the carburetor may be drained by loosening the bowl nut on
the bottom carburetor one full turn. Allow to completely drain and retighten the bowl nut being careful not to
damage the bowl gasket when tightening.
3. If "Gasohol" has been used, complete the above procedure and then put one half pint of unleaded gasoline into
the fuel tank and repeat the above procedure. If Gasohol is allowed to remain in the fuel system during storage,
the alcohol content will cause rubber gaskets and seals to deteriorate.
Change Oil: If the oil has not been changed recently, this is a good time to do it.
Oil Cylinder Bore:
1. Disconnect the spark plug wire and ground the wire to the engine. Remove the spark plug and put 1/2 ounce
(14 ml) of clean engine oil into the spark plug hole.
2. Cover the spark plug hole with a shop towel.
3. Crank the engine over slowly several times.
4. Install the spark plug and connect the spark plug wire.
Clean Engine: Remove the blower housing and clean all dirt, grass or debris from the intake screen, cylinder head,
cylinder cooling fins, carburetor, governor levers and linkage.
4
CAUTION: AVOID SPRAY FROM SPARK PLUG HOLE WHEN SLOWLY CRANKING ENGINE OVER.
CHAPTER 2 AIR CLEANERS
Main Menu
GENERAL INFORMATION
The air cleaner is the device used to eliminate dust and
dirt from the air supply. Filtered air is necessary to assure
that abrasive particles are removed before entering the
carburetor and combustion chamber . Dirt allowed into the
engine will quickly wear the internal components and
shorten the life of the engine.
Tecumseh engines use either a polyurethane or a papertype air filter system. A polyurethane pre-cleaner or a flocked
screen may be used in conjunction with the main filter.
Snow King® engines do not use an air filter.
Extremely dirty conditions may require more frequent filter
cleaning or replacement.
OPERA TION
The outer cover encapsulates the air filter element(s) and
prevents large particles from entering the filter box. Air is
filtered through the pre-cleaner or flocked screen (if
equipped) and the polyurethane or paper filter element. Precleaners or flocked screens provide additional air cleaning
capacity .
In Tecumseh's Kleen Aire® system, air is drawn in through
a rotating screen or recoil cover to be centrifugally cleaned
by the flywheel before the air is dra wn into the air filter .
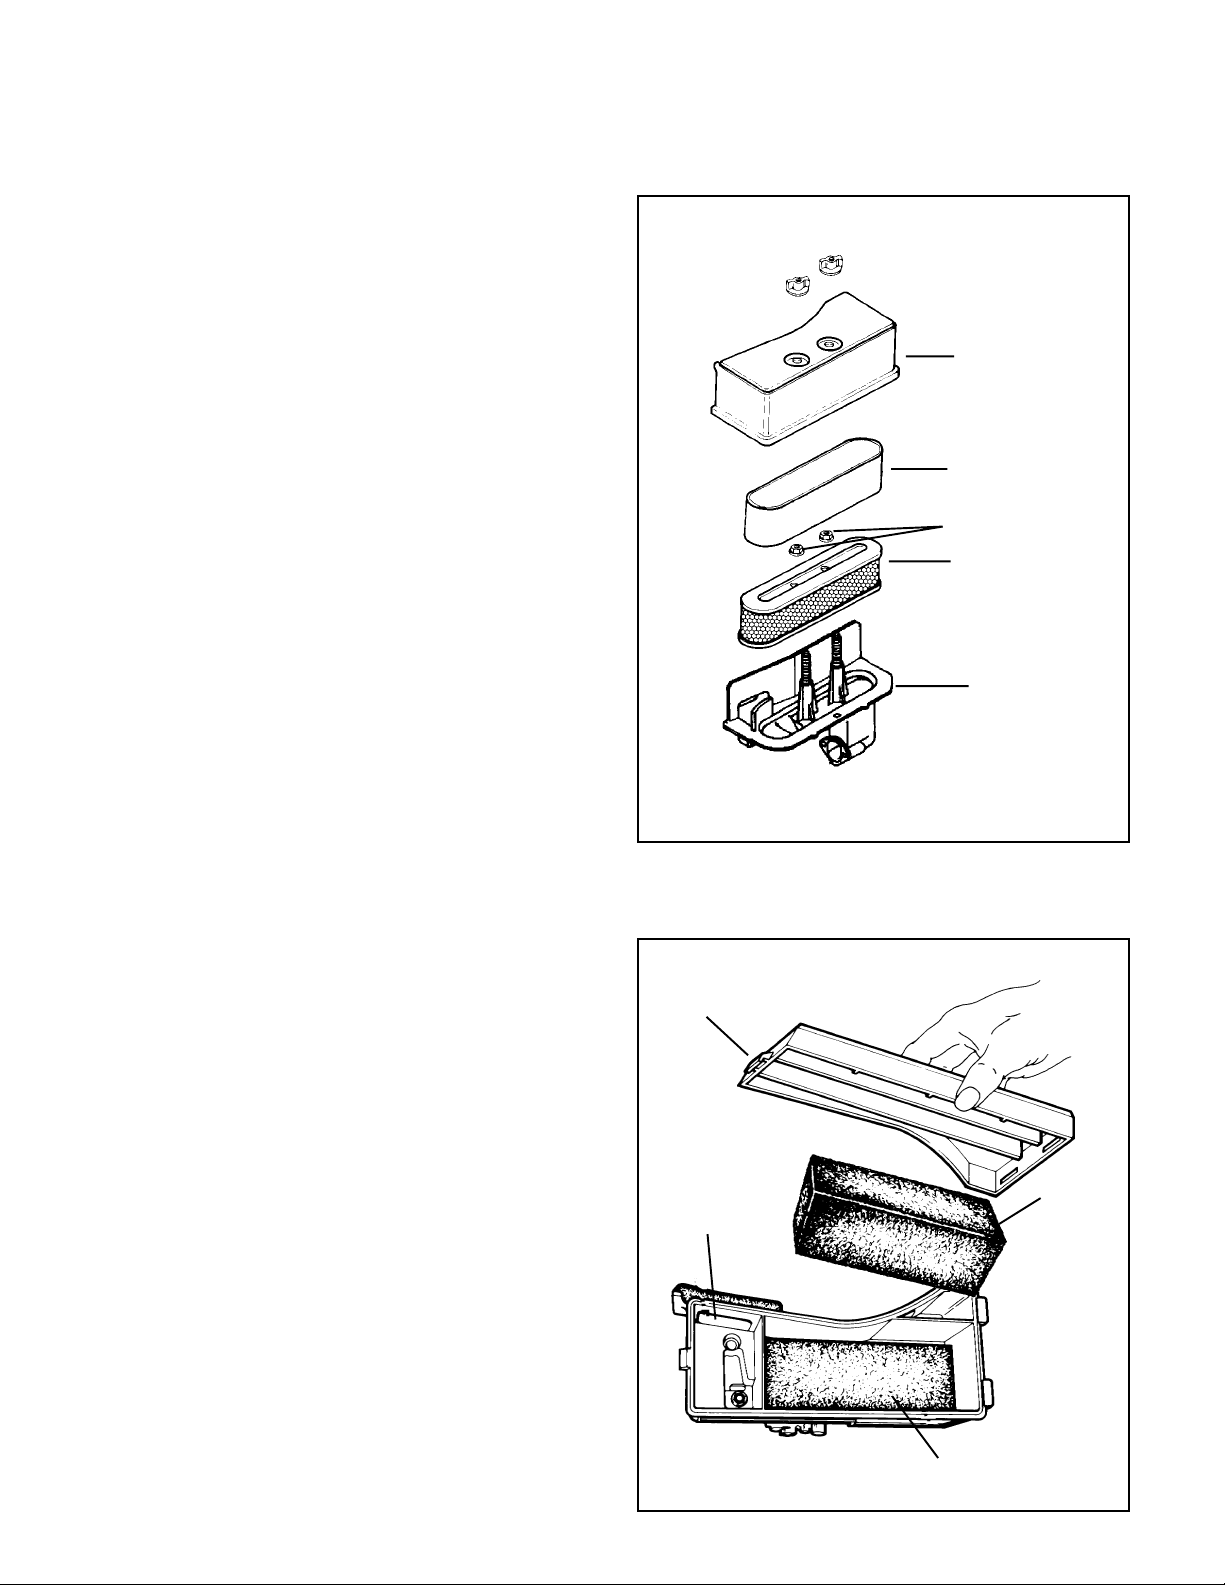
COMPONENTS
The cover holds the filter element and prevents large debris
from entering the filter element.
The polyurethane wrap pre-filter is used on XL or XL/C
engine models with paper filter elements.
(diag 1 & 2)
COVER
POLYURETHANE
WRAP
SEALING NUTS
PAPER
ELEMENT
AIR CLEANER
BODY
1
The paper or polyurethane filter element is the main
filter to trap dust and dirt. Dry-type paper elements have
treated paper folded for increased surface area and rubberlike sealing edges. The polyurethane filter uses an oil film
to trap fine particles found in dust.
The flocked screen is used as an additional filter on XL
or XL/C engine models that use a polyurethane filter
element.
TROUBLESHOOTING OR TESTING
If the engine's performance is unsatisfactory (needs
excessive carburetor adjustments, starts smoking
abnormally , loses power), the first engine component to be
checked is the air cleaner . A dirt restricted or an oil soaked
element will cause noticeable performance problems. A
polyurethane element may be cleaned following the service
procedure listed under "Service" in this chapter. A papertype air filter should only be replaced. A paper-type element
cannot have an oil film present on the paper. Follow the
procedure listed in the "Service" section of this chapter for
replacement. Re-try the engine after filter replacement or
service. If the problem persists after filter service, see
Chapter 9 under "Engine Operation Problems" for additional
causes.
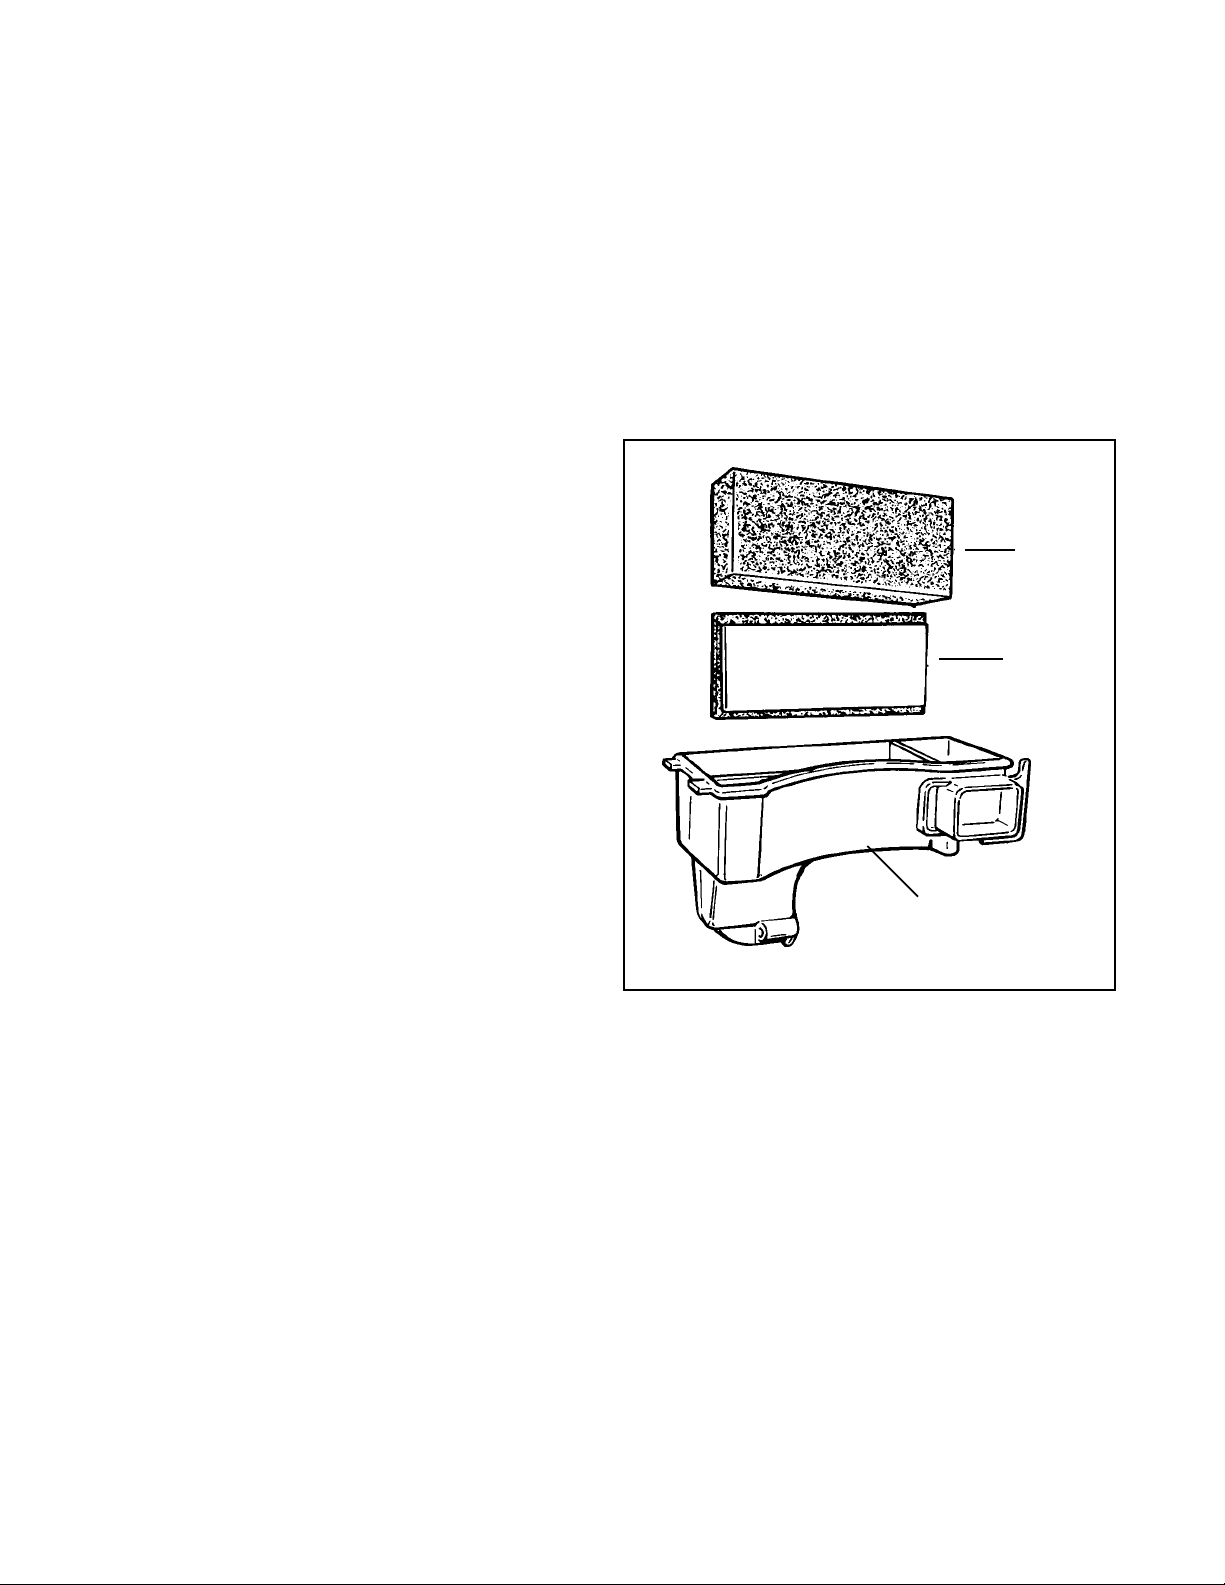
COVER
AIR CLEANER
BODY
FOAM
ELEMENT
FLOCKED SCREEN
2
5
SERVICE
Main Menu
Service on the polyurethane element (cleaning and oiling) is recommended every three months or every twenty five
operating hours, whichev er comes first. Extremely dirty or dusty conditions ma y require daily cleanings.
The paper filter element should be replaced at least once a year or more frequently if operated in dusty or dirty conditions.
NOTE: NEVER RUN THE ENGINE WITHOUT THE COMPLETE AIR CLEANER ASSEMBLY INSTALLED ON THE
ENGINE. AL W A YS REPLA CE THE FIL TER ELEMENT WITH THE PROPER TECUMSEH ORIGINAL REPLACEMENT
PART.
DISASSEMBLY PROCEDURE
1. Unlock the tabs or remove the screws, wingnuts or
snaps holding the air cleaner cover in place.
2. Remove the hex nuts holding the element down if
equipped. New nuts are supplied with a new filter and
MUST be used for proper sealing.
3. Clean the excess contaminants out of the air cleaner
body before removing the old element.
4. Remove the old element and the polyurethane pre-
cleaner if equipped.
5. On air cleaners that use a flocked screen under the
polyurethane element, remove the air cleaner assembly
from the carburetor before removing the flocked screen.
This prevents dirt from entering the carburetor (diag 3).
FOAM
ELEMENT
1/2" (12.7 mm)
FOAM
WITH FLOCKED
SCREEN
ATTACHED
6. Clean the inside of the cover and body, remove the old
gasket between the carburetor and the air cleaner
assembly.
7. Reinstall the air cleaner assembly using a new gasket.
8. Use the reverse procedure for reassembly. When
installing the foam polyurethane pre-cleaner , make sure
the seam is installed to the outside to prevent gaps
AIR CLEANER
BODY
between the paper element and the pre-cleaner.
3
POLYURETHANE-TYPE FILTER ELEMENT
This type of air filter can be serviced when restricted with dust or dirt. Wash the filter or pre-cleaner in a liquid detergent
and water solution until all the dirt is removed. Rinse in clear water to remove the detergent solution. Squeeze the
element (do not twist) to remove the e xcess water . Wrap the element in a clean cloth and squeez e it (do not twist) until
completely dry .
Re-oil the element by applying engine oil and squeezing it vigorously to distribute the oil. Roll the element in a cloth and
squeeze it (do not twist) to remove the excess oil.
Clean the air cleaner housing and cover being careful not to allow dirt to fall into the carburetor or intak e pipe.
PAPER -TYPE FILTER ELEMENT
Paper type air filter elements can only be serviced by replacement. Do not attempt to clean a paper filter element.
6
CHAPTER 3 CARBURETORS AND FUEL SYSTEMS
Main Menu
GENERAL INFORMATION
Tecumseh uses two basic types of carburetors, float and diaphragm type carburetors. Float type carburetors use a
hollow float to maintain the operating lev el of fuel in the carburetor. Diaphragm type carburetors use a rubber-like diaphragm.
One side is exposed to intake manif old pressure and the other side to atmospheric pressure. The diaphragm provides the
same basic function (maintaining the proper fuel level in the carburetor) as the float.
An advantage of the diaphragm carburetor over the float style is that the diaphragm carburetor will allow the engine to
operate at a greater degree of tiltability.
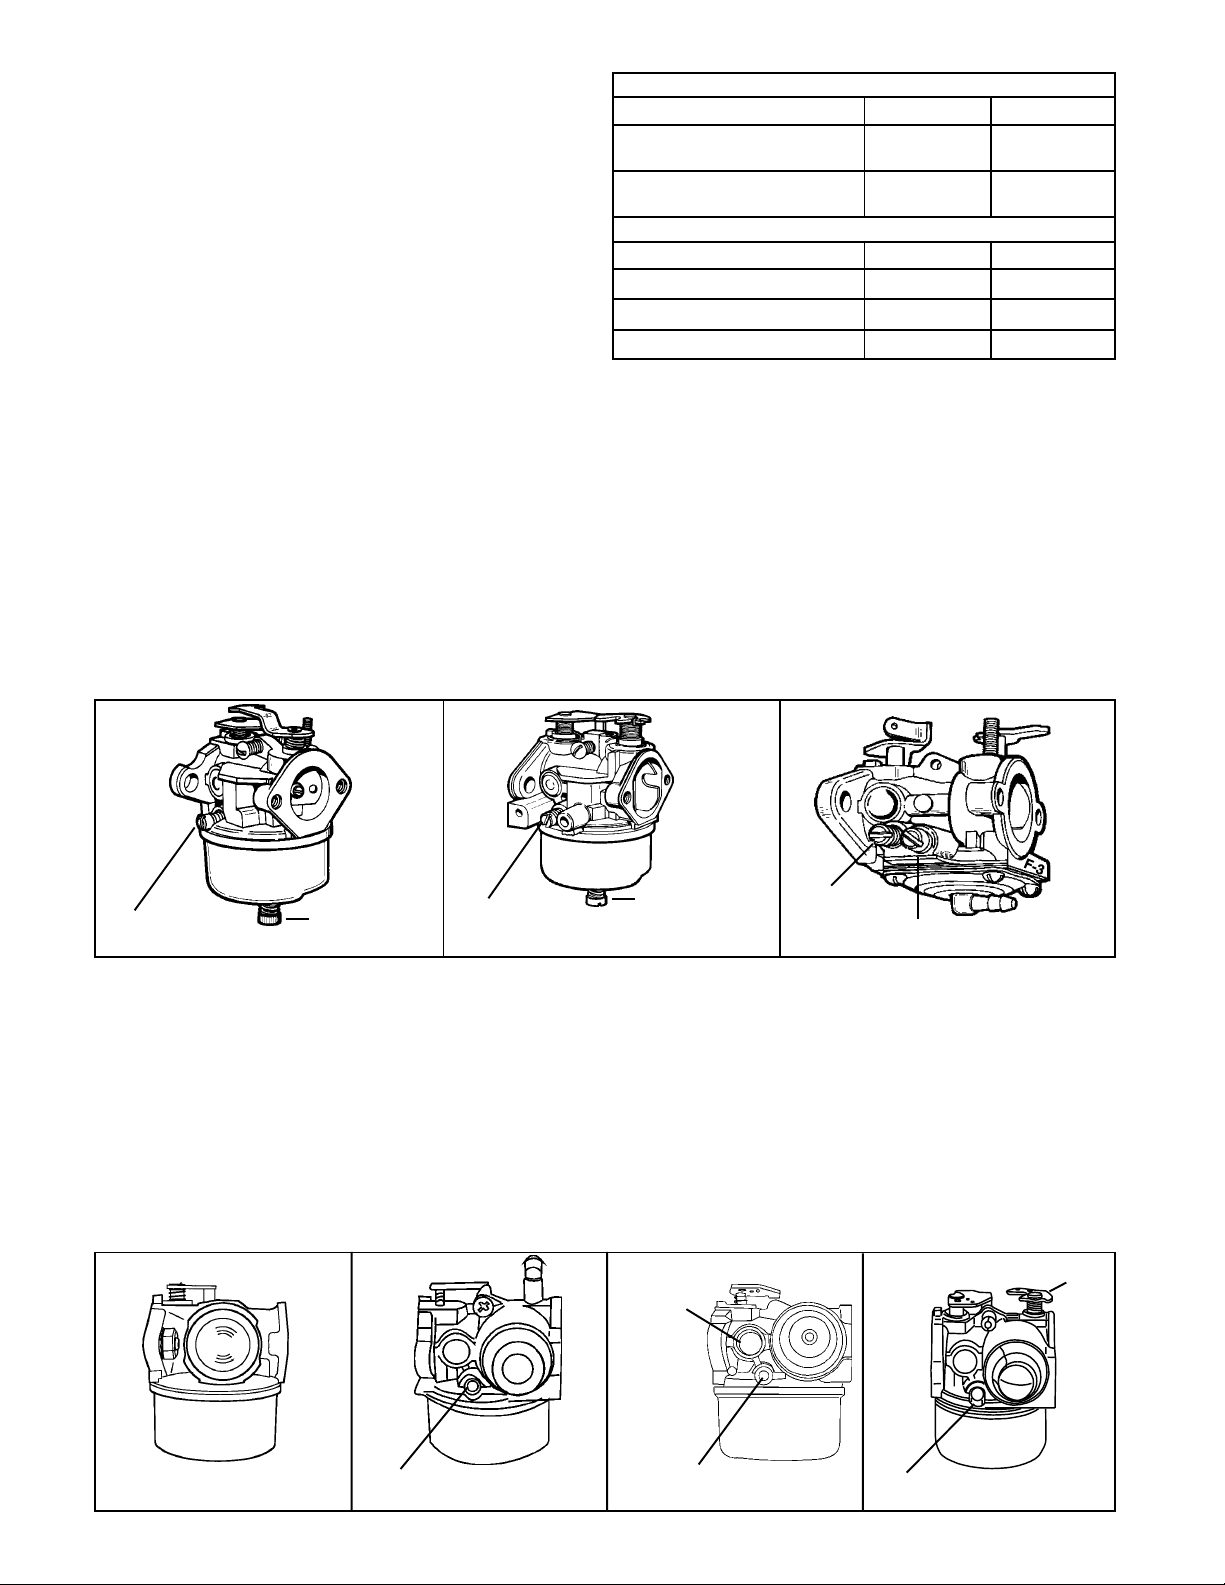
T ecumseh carburetors are identified b y a manufacturing number and date code stamped on the carb uretor as illustrated
(diag. 1).
When servicing carburetors, use the engine model and
specification number to obtain the correct carburetor part
number. An alternate method to finding the correct
carburetor part number is to use the manufacturing number
ALTERNATE LOCATION
FOR MANUFACTURING
NUMBER
89 4F5
and date code stamped on the carburetor and convert this
number to a part number. In the carburetor section of the
Master Parts Manual or Microfiche Catalog or computer
parts look-up system. A cross reference chart will conv ert
a carburetor manufacturing number to a Tecumseh part
number.
89 4F5
Complete carburetor replacement may be accomplished
with a standard service carburetor. A standard ser vice
carburetor is a basic carburetor that may require the use
of original carburetor parts or additional new parts to adapt
to the specification. An instruction sheet is provided with
the new service carburetor or see “SER VICE” in this chapter .
MANUFACTURING
NUMBER
CARBURETOR
DATE CODE
1
CAUTION: DRAIN THE FUEL INTO AN APPROVED CONTAINER OUTDOORS, AND AWAY FROM ANY
OPEN FLAME OR COMBUSTION SOURCE. BE SURE THE ENGINE IS COOL.
NOTE: Todays fuels can cause many problems in an engines performance, due to the fuels quality and short shelf life.
Always check fuel as a primary cause of engine performance.
1. Remove the air filter , heater box, or air cleaner assembly if applicable to visually check that the choke shutter
completely closes or check to see if fuel comes out of the main nozzle during priming.
2. If the fuel flow from the tank is adequate and no fuel is evident during priming, the carburetor will need to be
removed f or service. See “Service” in this chapter or consult the “Carburetion Troubleshooting” chart to diagnose
carburetor symptoms. Improper fuel flow indicates the fuel, fuel line, filter or tank require cleaning or replacement.
3. Check the engine compression using a commercially available compression tester and follow the tester’s
recommended procedure. Lo w compression, a dry spark plug, adequate fuel flow, and a kno wn good functional
carburetor indicates an internal engine problem exists. See under “Troubleshooting.”
4 . A wet spark plug indicates fuel is being supplied by the carburetor . The engine may be flooded by a restricted
air filter, carbon shorted or defective spark plug, excessive choking or over priming, improperly adjusted or
defective carb uretor . With the spark plug removed and a shop towel o ver the spark plug hole, turn the engine
over slowly 3 or 4 times to remove excess gasoline from the engine cylinder.
CAUTION: KEEP ALL COMBUSTIVE SOURCES AWAY. AVOID THE SPRAY FROM THE SPARK PLUG
HOLE WHEN CRANKING THE ENGINE O VER.
5 . Replace the air filter if restricted or oil soaked. Replace the spark plug if questionable. Install the spark plug and
high tension lead and try to start the engine.
6. If the engine floods and fails to start, the carburetor will require service. See the proceeding “Carburetion
T roubleshooting” chart for additional causes. If the carburetor is functioning properly the problem ma y be ignition
timing related. See “T roub leshooting" under "Ignition”.
7

OPERATION
Main Menu
In the “CHOKE” or “START” position, the choke shutter is closed and the only air entering the engine enters through
openings around the shutter. As the engine starts to rotate, downw ard piston trav el creates a lo w air pressure area (or
vacuum) above the piston. Higher pressure (atmospheric) air rushes into the engine and fills this low pressure area.
Since the majority of the air passage is blocked by the choke shutter, a relatively small quantity of air enters the
carburetor at an increased speed. The main nozzle and both idle fuel discharge ports are supplying fuel due to the low air
pressure in the engine intake. Maximum fuel flow through the carburetor orifices combined with the reduced quantity of
air that passes through the carburetor , make a v ery rich fuel mixture which is needed to start a cold engine.
At engine IDLE speed, a relatively small amount of fuel is required to operate the engine. The throttle is almost completely
closed. Fuel is supplied through the primary idle-fuel discharge orifice.
NOTE: Dual system carburetors do not have an idle circuit.
During INTERMEDIATE engine operation, a second orifice is uncovered as the throttle shutter opens, and more fuel
is allowed to mix with the air flowing into the engine.
During HIGH SPEED engine operation, the throttle shutter is fully opened. Air flows through the carburetor at high
speed. The venturi, which decreases the size of the air passage through the carburetor, further accelerates the air
flow. This high speed movement of the air decreases the air pressure at the main nozzle opening. Fuel is forced out
the main nozzle opening due to the difference in the air pressure on the fuel in the carburetor bowl and the reduced
air pressure at the main nozzle opening.
For the fuel to flow, the carburetor bowl must be either
vented externally or internally . Some internally vented float
style carburetors use a tygon tube and a vent within the
air intake. This tube m ust be present for the carb uretor to
operate properly (diag. 2).
Air is bled into the main nozzle and through the air bleed
located in the air horn. This mix es the fuel and air prior to
the fuel leaving the main nozzle. Atomization occurs as
the fuel mixture contacts the fast moving air stream. This
mist then flows into the intake of the engine.
FUEL PRIMERS
Primers may be mounted remotely or as an integral part
of the carburetor. The basic function of the primer is to
supply a charge of air to the carburetor main well, or
carburetor bowl. On diaphragm carburetors it displaces fuel
directly into the carburetor venturi. This displaced fuel
provides a rich mixture necessary for engines to start easily
on the first or second attempt (diag. 3 & 4).
Primers must be vented either internally (a passage in the
carburetor air horn prior to the venturi) or externally
(through a hole in the primer bulb). The vent allows air to
fill the primer bulb after the primer bulb is released. On
diaphragm carburetors a one way valve in the body
prevents the fuel from being forced back into the fuel tank.
Two different methods are used to prime float style
carburetors, leg prime and bowl prime. The leg prime
system is used only on the dual system carburetor . Air is
forced into the center leg of the carburetor, which then
forces an enriched mixture of fuel up the main nozzle. The
bowl prime method is used on Series 6, 8, 9 and 10
carburetors and is distinguished by a stepped or hour glass
shaped primer bulb. A good seal of the primer bulbs center
lip is critical to assure that a full charge of air reaches the
bowl. Also critical is a tight seal around the float bowl.
TYGON TUBE
LOCATION
BOWL PRIME
PRIMER BULB
3
PRIMER BULB
MAIN NOZZLE
EMULSION
TUBE
MAIN JET
2
4
NOTE: Never re-use a bowl gasket.
8
5
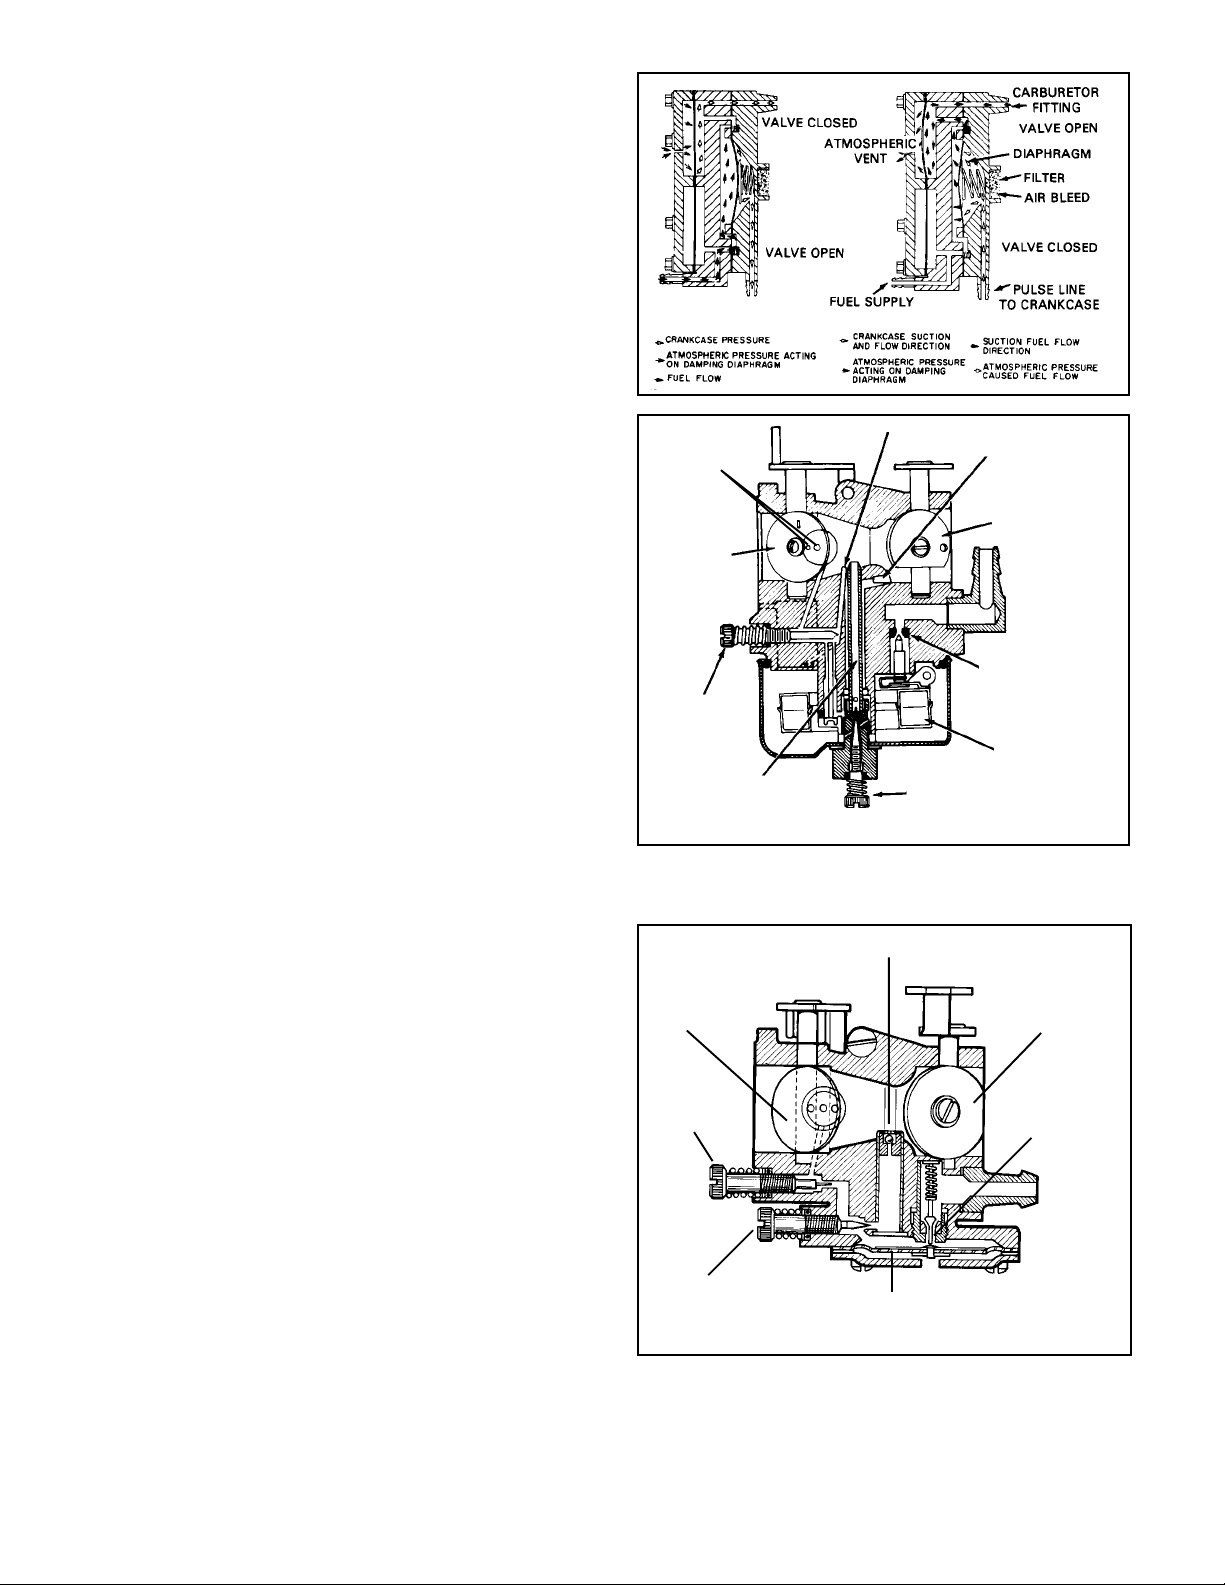
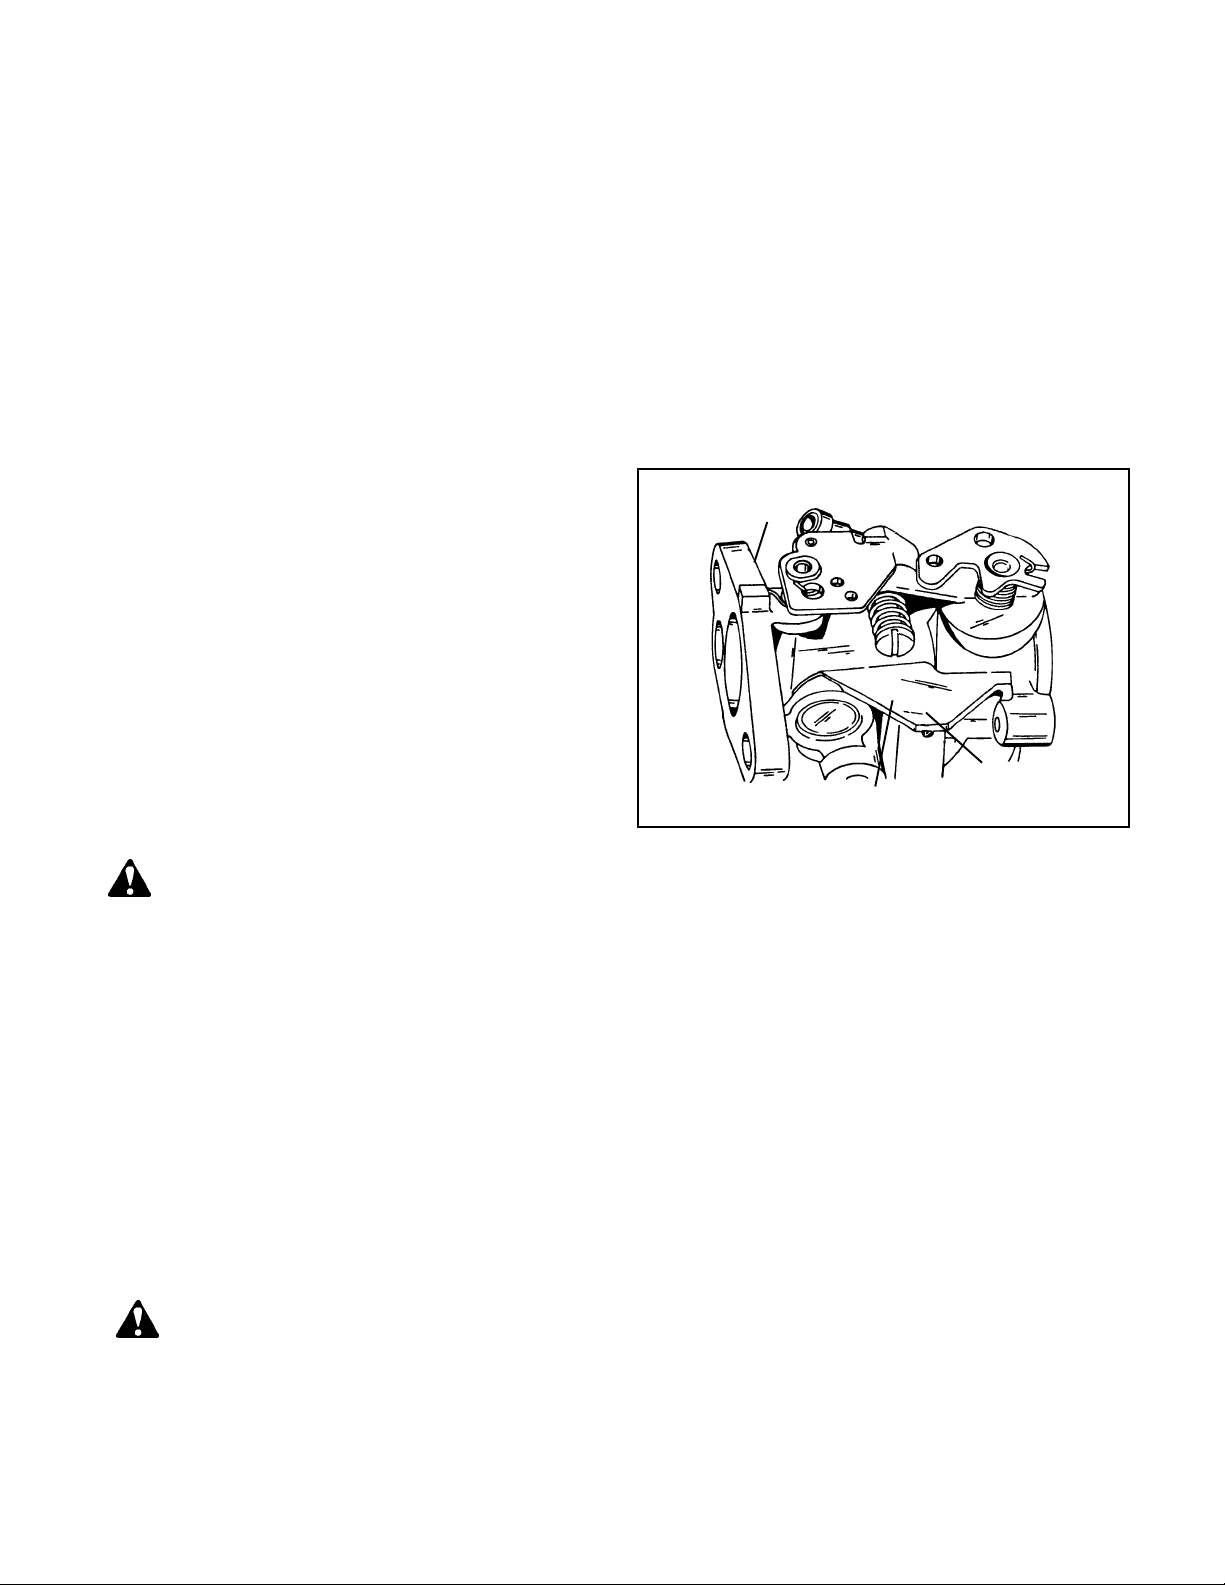
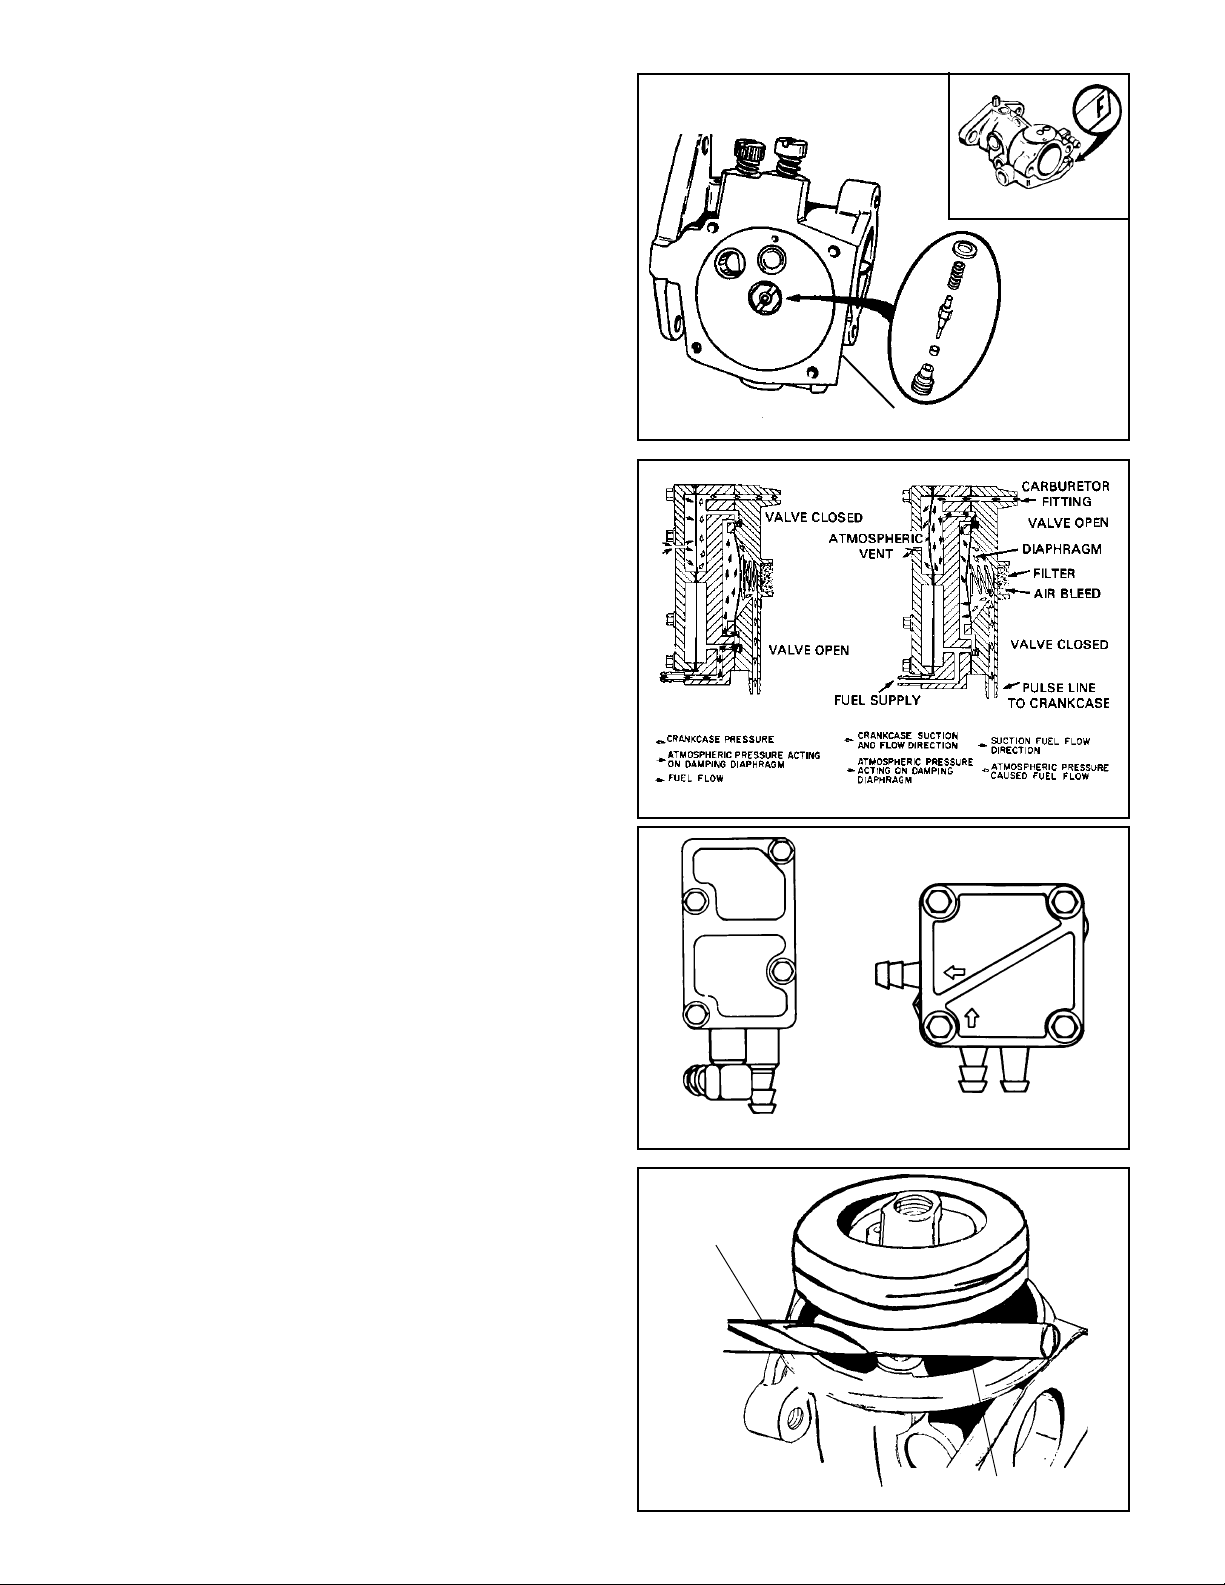
IMPULSE FUEL PUMPS
Main Menu
Impulse fuel pumps may either be mounted externally
onto the carburetor fuel inlet or remotely mounted. These
pumps are connected in the fuel line between the fuel
supply and the carburetor or directly to the fuel inlet.
Impulse fuel pumps are operated by crankcase impulses
created by the up and down movement of the piston. A
hose called a pulse line connects the fuel pump diaphragm
chamber to the crankcase and transmits these impulses
to the pump diaphragm. The impulses actuate the
diaphragm and flap valves to lift the fuel from the fuel tank
to the carburetor (diag. 6).
6
FLOAT STYLE CARBURETORS
A float is used to maintain the operating volume of fuel in
the carburetor bowl. As the fuel is used by the engine, the
fuel volume in the carburetor bowl drops and the float moves
downward. This allows the inlet needle valve to move off
the sealing seat. Fuel flows by gravity or a pulse pump
into the fuel bowl. As the fuel volume in the bowl again
rises, it raises the float. This upward float motion moves
the inlet needle valve to the closed position. When the
needle contacts the seat, the fuel flow is stopped. The
tapered end of the inlet needle varies the fuel flow rate so
that the fuel volume in the carburetor bowl will remain
constant (diag. 7). The float height is set according to the
service procedure.
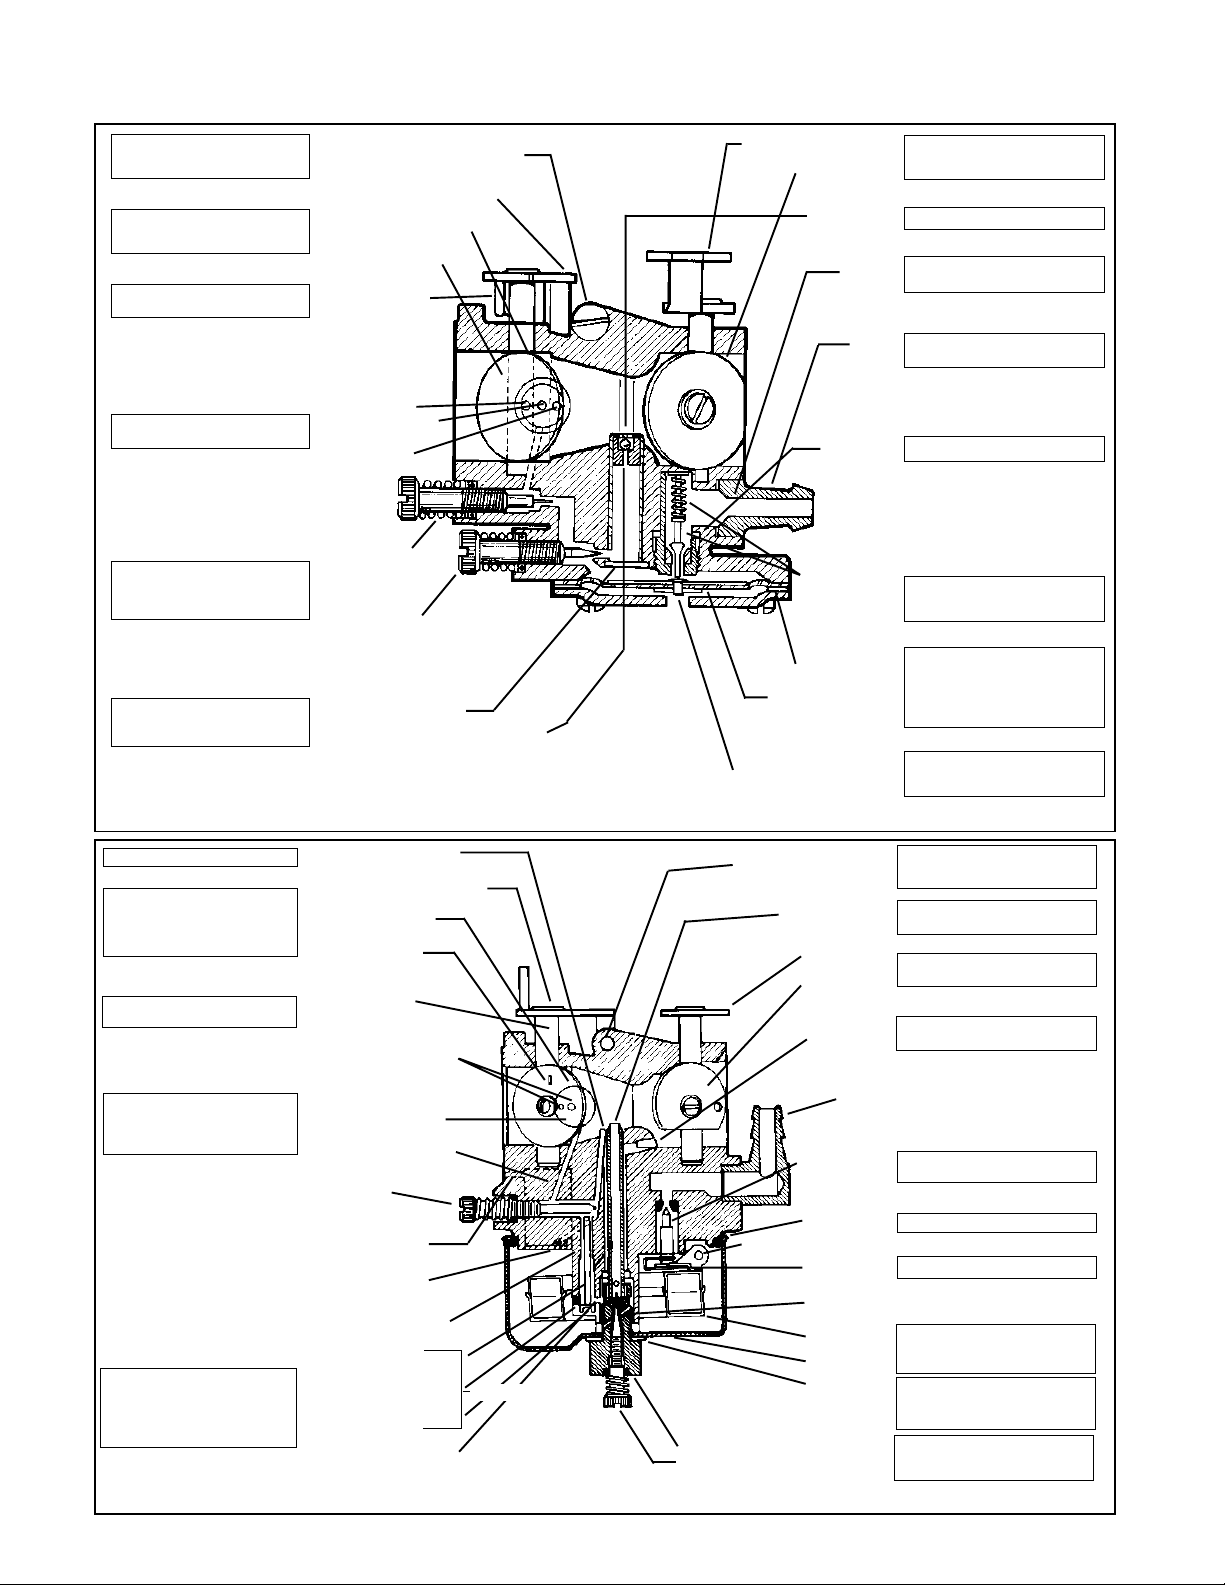
DIAPHRAGM (PRESSURE DIFFERENTIAL)
CARBURETORS
This type of carburetor uses a rubber-like diaphragm which
is exposed to intake manifold pressure on one side and to
atmospheric pressure on the other. T ecumseh diaphragm
carburetors use the diaphragm as a metering device. As
the intake manifold pressure decreases due to downward
piston travel, the atmospheric pressure on the vented side
of the diaphragm moves the diaphragm against the inlet
needle. The diaphr agm mov ement ov ercomes the spring
tension on the inlet needle and moves the inlet needle off
the seat. This per mits the fuel to flow through the inlet
valve to maintain the correct fuel volume in the fuel
chamber. The inlet needle return spring closes the inlet
valve when the pressure on the diaphragm equalizes or a
pressure higher than atmospheric exists on the intake side
(upward piston travel). The diaphragm meters a correct
fuel volume in the fuel chamber to be delivered to the mixing
passages and discharge ports (diag. 8).
IDLE AND
PROGRESSION
HOLES
THROTTLE
SHUTTER
IDLE
ADJUSTMENT
MAIN NOZZLE
EMULSION
TUBE
THROTTLE
SHUTTER
IDLE
ADJUSTMENT
IDLE AIR
BLEED
MAIN
ADJUSTMENT
CHECK BALL
MAIN AIR
BLEED
CHOKE
SHUTTER
INLET NEEDLE
AND SEAT
FLOAT
7
CHOKE
SHUTTER
NEEDLE AND
SEAT ASSEMBLY
A main or idle adjustment needle may be replaced by an
internally fixed jet on some models.
The main nozzle contains a ball check valve. The main
purpose of this ball check is to eliminate air being drawn
down the main nozzle during idle speeds and leaning the
idle mixture.
An advantage of the diaphragm carburetor over the float
system is that the diaphragm carburetor increases the angle
that the engine may be operated at.
MAIN
ADJUSTMENT
DIAPHRAGM
8
9
COMPONENTS
Main Menu
Loosen screw until it just clears
throttle lever, then turn screw in 1
turn.
Place detent reference mark to
proper location.
Check spring for return action and
binding.
Remove welch plug and blow air
through air passages.
Remove adjustment screw. To adjust
20° slant engines, the engine must
be mounted in its normal 20° slant
position.
Check ball is not serviceable on
some models.
Blow air through passage.
Check shaft for looseness or binding. Shutter must be positioned with
detent reference marks on top parallel with shaft and to the right or 3
o'clock position.
Check spring for return action
and binding.
Remove idle adjustment screw.
Check needle tip and condition of "O"
ring. Remove welch plug and blow
out all passages.
NOTE: On models which have
metering rods, do not install idle
adjustment screw with carburetors
upside down, as pin will obstruct
movement of adjustment screw
causing damage
*NON METALLIC ITEMS - CAN BE DAMAGED
BY HARSH CARBURETOR CLEANERS
10
IDLE SPEED ADJUSTMENT SCREW
THROTTLE SHAFT AND LEVER
DETENT REFERENCE MARK
ON THROTTLE SHUTTER
THROTTLE SHUTTER
THROTTLE SHAFT
RETURN SPRING
IDLE PROGRESSION
HOLE
IDLE AIR BLEED
*IDLE MIXTURE
ADJUSTMENT
SCREW AND "O"
RING (If Present)
*MAIN MIXTURE
ADJUSTMENT
SCREW AND "O"
RING (If Present)
WELCH PLUG (If Present)
*MAIN NOZZLE CHECK BALL (If Present)
*NON METALLIC ITEMS - CAN BE DAMAGED
BY HARSH CARBURETOR CLEANERS
IDLE AND INTERMEDIA TE
AIR BLEED
THROTTLE SHAFT AND LEVER
THROTTLE SHUTTER
DETENT
REFERENCE MARK
THROTTLE SHAFT
RETURN SPRING
IDLE AND INTERMEDIA TE
ORIFICES
IDLE AND INTERMEDIA TE
FUEL CHAMBER (COVERED
WITH WELCH PLUG)
IDLE AND INTERMEDIA TE
FUEL MIXTURE PASSAGE
*IDLE ADJUSTMENT SCREW
AND "O" RING
ATMOSPHERIC VENT
SOFT BAFFLE PLUG
IDLE AND INTERMEDIA TE
FUEL TRANSFER PASSAGE
METERING ROD OR PIN IN
FUEL TRANSFER PASSAGE
BALL PLUG
CUP PLUG
IDLE AND INTERMEDIA TE
FUEL TRANSFER PASSAGE
IDLE AND MAIN FUEL PICK UP ORFICE
IDLE
(DO NOT REMOVE)
CHOKE SHAFT AND LEVER
CHOKE SHUTTER
MAIN NOZZLE
*INLET
FITTING
SCREEN
*INLET
FITTING
*INLET SEAT
GASKET
*INLET NEEDLE
SEA T AND
SPRING
ASSEMBLY
*DIAPHRAGM GASKET
*DIAPHRAGM
ATMOSPHERIC VENT HOLE
IDLE SPEED ADJUSTMENT
MAIN NOZZLE
(EMULSION TUBE)
CHOKE SHAFT
AND LEVER
CHOKE PLATE
HIGH SPEED
AIR BLEED
INLET
FITTING
*INLET NEEDLE
AND SEAT
*FLOAT BOWL
GASKET
FLOAT
SHAFT
NUT AND MAIN ADJUSTMENT SEA T
*MAIN ADJUSTMENT SCREW AND
"O" RING SEAL
INLET
NEEDLE CLIP
(If Present)
IDLE FUEL TRANSFER PASSAGE
AND ANNULAR GROOVE
FLOAT
FLOAT BOWL
*GASKET
Check shaft for binding. Position
shutter opening towards inlet fitting
side or air horn.
Blow air through passage.
Part of inlet fitting. If fuel is restricted,
clean or replace fitting.
Bulb primer models have Viton* one
way valve, in or behind fitting.
Remove and replace.
Proper installation of assembly is important.
Gasket and diaphragm sequence
may be reversed on some models.
Head of rivet must touch inlet needle.
Rivet is hooked into inlet needle control lever on some models.
Hole must be clean. On models with
bulb primer, vent hole is very small
and is located off center.
Loosen screw until it just clears
throttle lever, then turn screw in one
turn.
Removable on emission carbs. nonmetallic only .
Check shaft for binding position
opening to bottom of air horn.
Blow air through passage. Do not
remove restrictor if present.
Proper installation is important.
Replace.
Must hook over float tab.
Check float for leaks or dents. Clean
bowl and adjust float level position
gasket or gaskets.
If the carburetor is used on a 20° slant
engine, the engine must be in its
normal 20° slanted position for adjustment.
Check needle for damage and "O"
ring for cracks. Clean all passages
in nut with compressed air.
9
10
CARBURETOR IDENTIFICATION
Main Menu
Tecumseh has a variety of carburetors. To help identify
these carburetors here are some simple procedures to
follow.
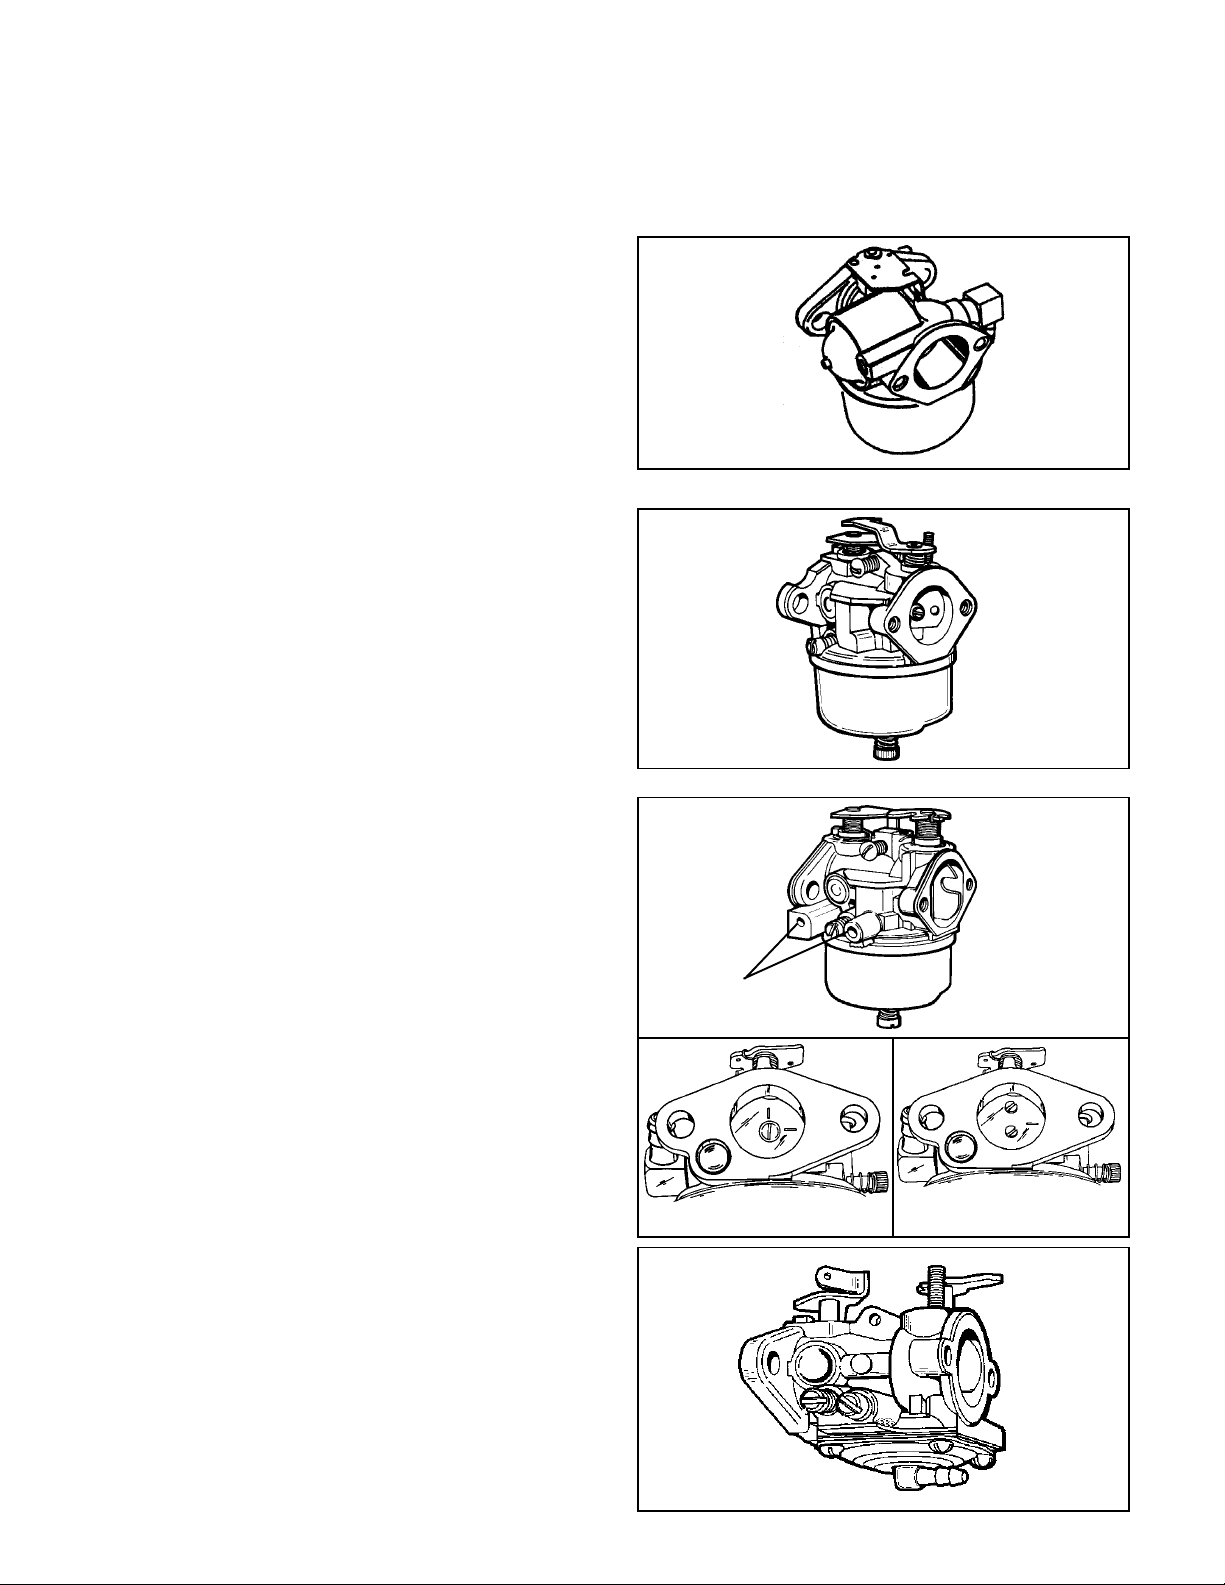
DUAL SYSTEM CARBURETORS
The easiest way to identify the dual system carburetor is
by the presence of a large primer bulb located on the side
of the carburetor. The absence of adjustment needles help
to identify the carb as well. The dual system carburetor is
used on 4-cycle vertical crankshaft rotary mower engines.
(diag. 11).
SERIES 1 CARBURETORS
Series 1 carburetors come in a variety of styles. They are
used on both 2 and 4 cycle vertical and horizontal shaft
engines in the 2 through 7 h.p. range. It is a float style
carburetor with a smaller venturi than the Series 3 and 4
carburetors. Some will have an adjustable idle and main
and others will have a fixed main with an adjustable idle.
There are also some fixed speed applications that will only
have a fixed main system and the idle system will not be
drilled. (diag. 12).
11
12
NOTE: Emissionized carburetors will have a fixed jet.
SERIES 3 & SERIES 4 CARBURETORS
Series 3 and 4 carburetors are generally used on 8 through
12.5 horsepower 4-cycle engines. The v enturi size of these
carburetors are larger than Series 1 and Dual System
Carburetors. The quic kest wa y to identify these carburetors
is by the presence of bosses on each side of the idle
mixture screw. To identify the Series 3 from a Series 4,
view the carburetor from the throttle end. The Series 3 has
(1) screw securing the throttle plate and the Series 4 uses
(2) screws. (diag. 13 - 15)
DIAPHRAGM CARBURETORS
The diaphragm carburetors are unique. These carburetors
can be operated at a more severe angle than float style
carburetors. The y still require that the fuel supply be located
in a position that allows it to be gravity fed. Its most
distinctive feature is the lack of a fuel bowl. (diag. 16).
BOSSES
SERIES 3
14
SERIES 4
13
15
NOTE: Emissionized carburetors will have a fixed jet.
16
11

SERIES 6 CARBURETORS 4-CYCLE
Main Menu
Series 6 carburetors are used on 2 and 4-cycle engines.
They have a larger venturi than the dual system carburetor
and use a simple fixed idle system. Series 6 carburetors
used on both vertical and horizontal applications are
nonadjustable. The 4 cycle v ersion pictured has a stepped
primer bulb. (diag. 17).
SERIES 8
The Series 8 carburetor has both a fixed main and idle
circuit. The fixed idle system uses a restricted jet that
meters the fuel. The idle restrictor jet will be capped to
prevent access unless remo ved. The fix ed main jet is part
of the bowl nut. A ball plug is visible from the bottom,
which seals the metering passage. This carburetor also
has a serviceable main nozzle emulsion tube. It also has
a stepped primer bulb to assist in starting. (diag. 18)
CAPPED FIXED
JET
17
18
SERIES 9
The Series 9 carburetor uses the same body as the Series
8 but has a simple fixed idle system, identical to the one
used on the Series 6 carburetor. It has the idle discharge
port located at the 7 o'clock position on the throttle end of
the carburetor . Identify this carburetor b y the stepped primer
bulb, the presence of a non-drilled idle mixing well and a
serviceable main nozzle emulsion tube. (diag. 19)
SERIES 10 (EMISSION)
The Series 10 carburetor is identical to the Series 8
carburetor with the addition of a choke to assist in cold
weather starts. It also has a fix ed idle and main. The idle
restrictor jet will be capped to prevent access unless the
cap is removed. The fixed main jet is part of the bowl nut.
A ball plug is visible from the bottom, which seals the
metering passage. This carburetor also has a serviceable
main nozzle emulsion tube and a stepped primer bulb to
assist in starting. (diag. 20)
MIXING WELL
CAST BUT NOT
MACHINED
IDLE JET
CAST BUT NOT
MACHINED
19
20
NON-TECUMSEH CARBURETORS
DELLORTO CARBURETOR
The Dellorto carburetor is similar to the dual system
carburetor . It has no adjustments and has a primer assist
start. It has a noncorrosive float and the needle is viton
tipped, eliminating the viton seat found in the dual system
carburetor. The angle of the fuel inlet is adjustable and
attached to the carburetor body with a banjo bolt. This
carburetor is used on some TVS rotary lawnmow er engines.
12
21
ENGINE
Main Menu
TROUBLESHOOTING
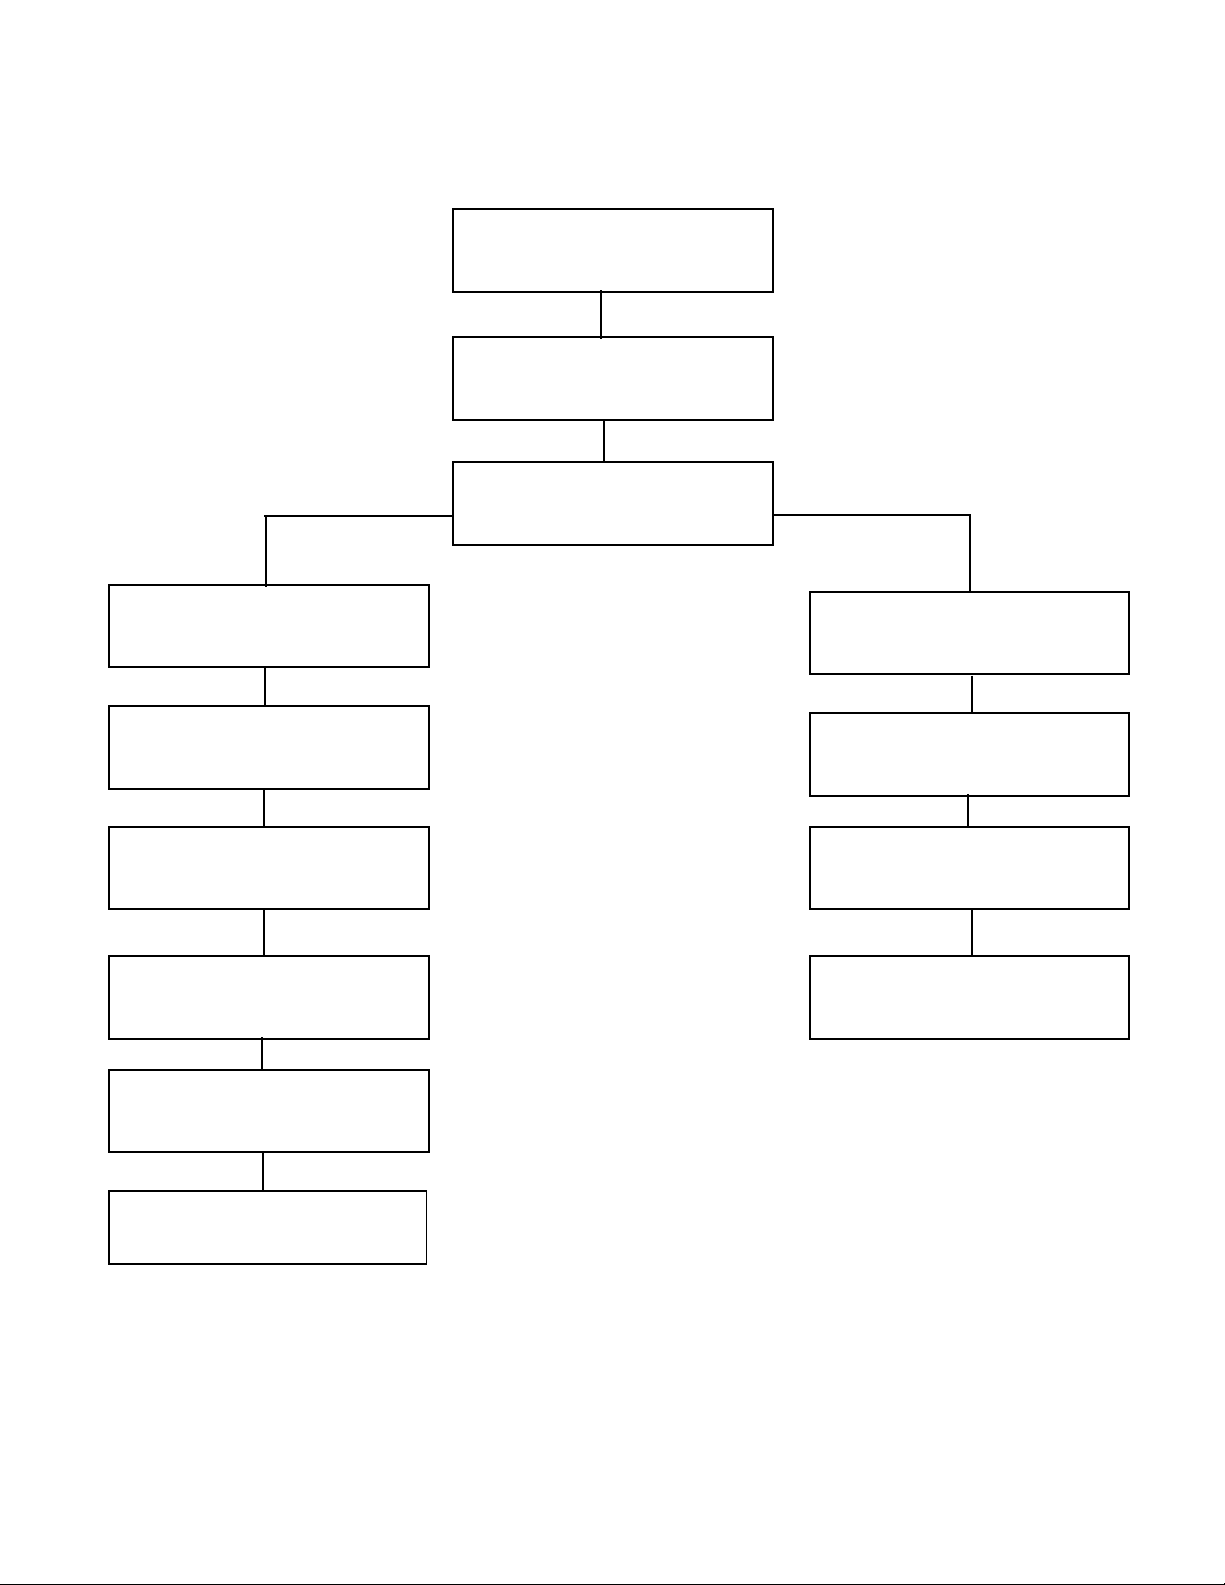
Engine Will Not Start
Check For Spark
Wet Check If Spark Plug Is Wet or Dry Dry
Defective Spark Plug Check Fuel Supply and Fuel
Cap Vent
Restricted Air Filter Restriction in Fuel System
(filter, screen)
Improper or Stale Fuel Carburetion Problem
Sheared or Partially Sheared Poor Compression
Flywheel Key
Carburetion Problems Due to
Flooding, Over Priming, etc.
Ignition System
13

AIR SYSTEM
Main Menu
PROBLEMS
CARBURETION
TROUBLESHOOTING
START IDLE ACCELERATE HIGH SPEED
Will
Not
Run at
High
Speed
Low
Power
Hunts at
High
Speed
Runs with
Needle
Closed
Hard
Starting
Fuel Leak
at
Carburetor
Engine
Floods
Will Not
Idle
Rich Idle
Idles with
Needle
Closed
Hunts -
Erratic
Idle
Idles
Fast -
Lean
Will Not
Acceler-
ate
Over Rich
Accelera-
tion
Hesitates
Engine
Over-
speeds
Plugged Air Filter
Leaky Carburetor
Gasket
Throttle or Choke
Shafts Worn
Choke Not
Functioning
Properly
Plugged
Atmospheric Vent
Air Bleed
Restricted
Damaged or
Leaky "O" Rings
DIAPHRAGM
SYSTEM
PROBLEM
Damaged
Diaphragm
Stuck or Dirty Ball
Check
Diaphragm
Upside Down
Á
Á
Á
Á
Á
ÁÁ
Á
Á
Á
Á
Á
Á
ÁÁ
Á
Á
Á
Á
Á
Á
Á
Á
ÁÁ Á Á
Á
ÁÁ
Á
Á
ÁÁÁÁ
ÁÁ
Á
Á
Á
Á
Á
Á
Á
Á
FUEL SYSTEM
PROBLEM
Plugged Tank
Filter or Vent
Fuel Pick-up
Incorrect Float
Main Nozzle
Needle and Seat
Fuel Inlet Plugged
14
Restricted
Idle Port
Restricted
Damaged
Adjustment
Needles
Height
Restricted
Dirty, Stuck
Á
ÁÁ
Á
Á
Á
Á
Á
Á
Á
Á
ÁÁ
Á
Á
Á
Á
Á
Á
ÁÁ
ÁÁ
Á
Á
Á
ÁÁÁ
ÁÁ
ÁÁ
Á
Á
Á
Á
Á
Á
Á
Á
Á
Á
Á
Á
Á

TESTING
Main Menu
1. After repeated efforts to start the engine using the procedure listed in the operator’s manual fail, check for spark
by removing the high tension lead and the spark plug. Install a commercially av ailable spark plug tester and check
for spark. If spark is evident and acceptable , proceed to step 2. If no or weak spark, see Chapter 8 under "Testing".
2. Visually inspect the spark plug for a wet condition indicating the presence of gasoline in the cylinder.
3. If the spark plug is dry, check for restrictions in the fuel system before the carburetor. If the spar k plug is wet,
continue with step # 7. Chec k to see if the fuel cap vent is open. With a proper draining receptacle, remove the fuel
line clamp on the carburetor fuel inlet and pull the fuel line off the fitting to examine the fuel flow and fuel condition.
4. Remove the air cleaner element or air cleaner assembly to visually check that the choke shutter completely closes
or check to see if fuel comes out from the main nozzle during priming.
5. If the fuel flow is adequate and no fuel is evident during priming, the carburetor will need to be removed for service.
See “Service” in this chapter or consult the “Carburetion T roubleshooting” chart if other problems exist. Improper fuel
flow indicates the fuel, fuel line, filter or tank require cleaning or replacement.
6. Check the engine compression using a commercially availab le compression tester and follow the tester’ s recommended
procedure. Low compression, a dry spark plug, adequate fuel flow, and a known good functional carburetor indicates
an internal engine problem exists. See Chapter 9 under “Engine Operation Prob lems. ”
7. A wet spark plug indicates fuel is being supplied by the carburetor. The engine may be flooded by a restricted air
filter, carbon shorted or defective spark plug, e xcessiv e choking or o v er priming, improperly adjusted or defectiv e
carburetor, or the wrong ignition timing. With the spark plug removed and a shop towel ov er the spark plug hole, turn
the engine over slowly 3 or 4 times to remo ve e xcess gasoline from the engine cylinder.
CAUTION: KEEP ALL COMBUSTIVE SOURCES AWAY. AVOID THE SPRAY FROM THE SPARK PLUG
HOLE WHEN CRANKING THE ENGINE O VER.
8. Replace the air filter if restricted or oil soaked. Replace the spark plug if questionable. Install the spark plug and high
tension lead and retry starting the engine.
9. If the engine floods and fails to start, the carburetor may require service. See the preceding “Carburetion T roub leshooting”
chart for additional causes. If the carb uretor is functioning properly the problem may be ignition timing related. See
Chapter 8 under “Ignition T roub leshooting. ”
SER VICE
CARBURETOR PRE-SETS AND ADJUSTMENT
NOTE: EMISSION GRADE CARBURETORS HA VE FIXED IDLE AND MAIN JETS. THE ABSENCE OF THE ADJUSTING
SCREW INDICATES A FIXED JET OR RESTRICTOR AND NO ADJUSTMENT IS NECESSARY. THE IDLE
RESTRICTOR ON THE SERIES 8 CARBURETOR APPEARS AS AN ADJUSTABLE SCREW. THIS IS NOT
ADJUST ABLE AND MUST REMAIN TIGHT FOR PROPER OPERATION.
Before adjusting any mixture screws the necessary carburetor presets should be made. Check for the proper governor
adjustments as outlined in Chapter 4. Identify the correct carburetor model and manufacturer to find locations of the high
and low speed adjustment screws. Check the throttle control bracket for proper adjustment allowing a full choke shutter
position. See Chapter 4 under "Speed Controls and Linkage". Check to see if the normal maintenance procedures have
been performed (oil changed, fresh fuel, air filter replaced or clean). Consult microfiche card #30 to find the correct
R.P.M. settings for the engine, or consult Service Bulletin #107 for the revised safety specification for rotary type
power lawn mowers. Start the engine and allow it to warm to operating temperature. The carburetor can now be
adjusted.
15
PRE-SETS AND ADJUSTMENTS
Main Menu
(TECUMSEH AND WALBRO
CARBURETORS)
NOTE: OVERTIGHTENING WILL DAMA GE THE T APER
PORTION OF THE NEEDLE. All adjustments should be
made with the carburetor in the operating position.
Turn both the main and idle mixture adjusting screws in
(clockwise) until finger tight.
Now back the mixture screws out (counterclockwise) to
Engine Model
All models with float-type
carburetors
All models with diaphragm-type
carburetors
Carburetor Model Number
LMH
WHG & LME
LMK
Tecumseh Carb uretors
Main Pre-set
1-1/2 turn 1 turn
1 turn 1 turn
Walbro Carburetors
1-1/2 turn
1-1/4 turn
Fixed
Idle Pre-set
1-1/2 turn
1-1/4 turn
1 turn
obtain the pre-set figure in the chart shown at right.
FINAL ADJUSTMENTS (NON EMISSION ENGINES)
Start the engine and allow it to warm up to normal operating temper ature (3 - 5 minutes). Set the speed control to the
HIGH or F AST position. From the recommended preset position, turn the main mixture adjustment screw in (clockwise)
slowly until the engine begins to run erratic (lean). Note the position of the screw . Now , turn the screw out (counterclockwise)
until the engine begins to run erratic (rich). Turn the screw in (clockwise) midway between these tw o positions. This will
be the best setting. (diag. 21, 22 & 23).
Set the speed control to the IDLE or SLOW position. Adjust the idle mixture screw following the same procedure used to
adjust the main mixture adjustment screw .
TECUMSEH CARBURETORS
DIAPHRAGM
23
IDLE MIXTURE
SCREW
SERIES 1
MAIN MIXTURE
SCREW
21
IDLE MIXTURE
SCREW
SERIES 3 & 4
MAIN MIXTURE
SCREW
IDLE MIXTURE
22
SCREW
MAIN MIXTURE
SCREW
If further adjustment is required, the main adjustment should be made under a loaded condition.
If the engine stops or hesitates while engaging the load (lean), turn the main mixture adjusting screw out
(counterclockwise) 1/8 turn at a time, testing each setting with the equipment under load, until this condition is
corrected.
If the engine smokes excessively (rich), turn the main adjusting screw in (clockwise) 1/8 turn at a time, testing each
setting with the equipment under load, until this condition is corrected.
After the main mixture screw is set, move the speed control to the IDLE or SLOW position. If the engine does not idle
smoothly , turn the idle mixture screw 1/8 turn either in (clockwise) or out (counterclockwise) until engine idles smoothly.
Recheck the high and low R.P.M. setting and adjust as necessary.
NON-ADJUST ABLE CARB URET ORS
DUAL SYSTEM AND SERIES 6
SERIES 8
MIXING WELL
CAST BUT
NOT
MACHINED
SERIES 9
SERIES 10
CHOKE
16
NON-ADJUSTABLE
PRIMER NO CHOKE
CAPPED FIXED
24
JET
25
CAST BUT NOT MACHINED
IDLE JET
26
CAPPED IDLE
RESTRICTOR
27

DISASSEMBLY PROCEDURE
Main Menu
NOTE: Engines which are identified as compliant with CARB (California Air Resources Board) or EPA (US
Environmental Pr otection Agency) regulations can NOT be changed from the factory unless specifically authorized.
FLOAT STYLE CARBURETORS
1. Note or mark the high and low mixture adjusting
screws to aid in reassembly (if applicable). Remove
the high speed adjusting screw, bowl nut, and float
bowl. Remove the idle mixture screw assembly.
2. Note the position of the spring clip on the inlet needle
and float, the long end of the clip must face toward the
choke end of the carburetor. Remove the float hinge
pin with a needlenose pliers. Some carburetors use a
float dampening spring to aid the inlet valve in
maintaining a steady position during rough service
applications. Note the position of the hooks before
removing the float hinge pin (diag. 28).
3. Remove the float, clip, and inlet needle.
4. Remove the inlet needle seat using a #4 crochet hook,
a wire or paper clip with a 3/32" (2.38 mm) hook end
as shown. Push the hook through the hole in the
center of the seat to remove it. (diag. 29).
LONG END
OF CLIP
CHOKE
END
3/32" (2.38 mm)
HOOK END
CLIP
OPEN END
OF CLIP
THROTTLE
END
28
5. Note or mark the action of the choke and throttle
shutters, and/or the hook points of the choke or throttle
return spring, or seal retainer springs located on the
top of the choke and/or throttle shaft. Remove the
throttle shutter, throttle shaft, choke shutter, springs
and choke shaft by removing the screw(s) that attach
the throttle or choke shutter to the shaft inside the air
horn.
6. Remove the primer bulb (if equipped) by grasping it
with a pliers and pulling and twisting out of the body.
Remove the retainer by prying and lifting it out with a
screwdriver . Do not re-use the old bulb or retainer (diag.
30).
7. Some Tecumseh float style carburetors have a damper
spring which is installed as shown. (diag. 31)
29
30
POINTS TOWARD
THE CHOKE END
31
17
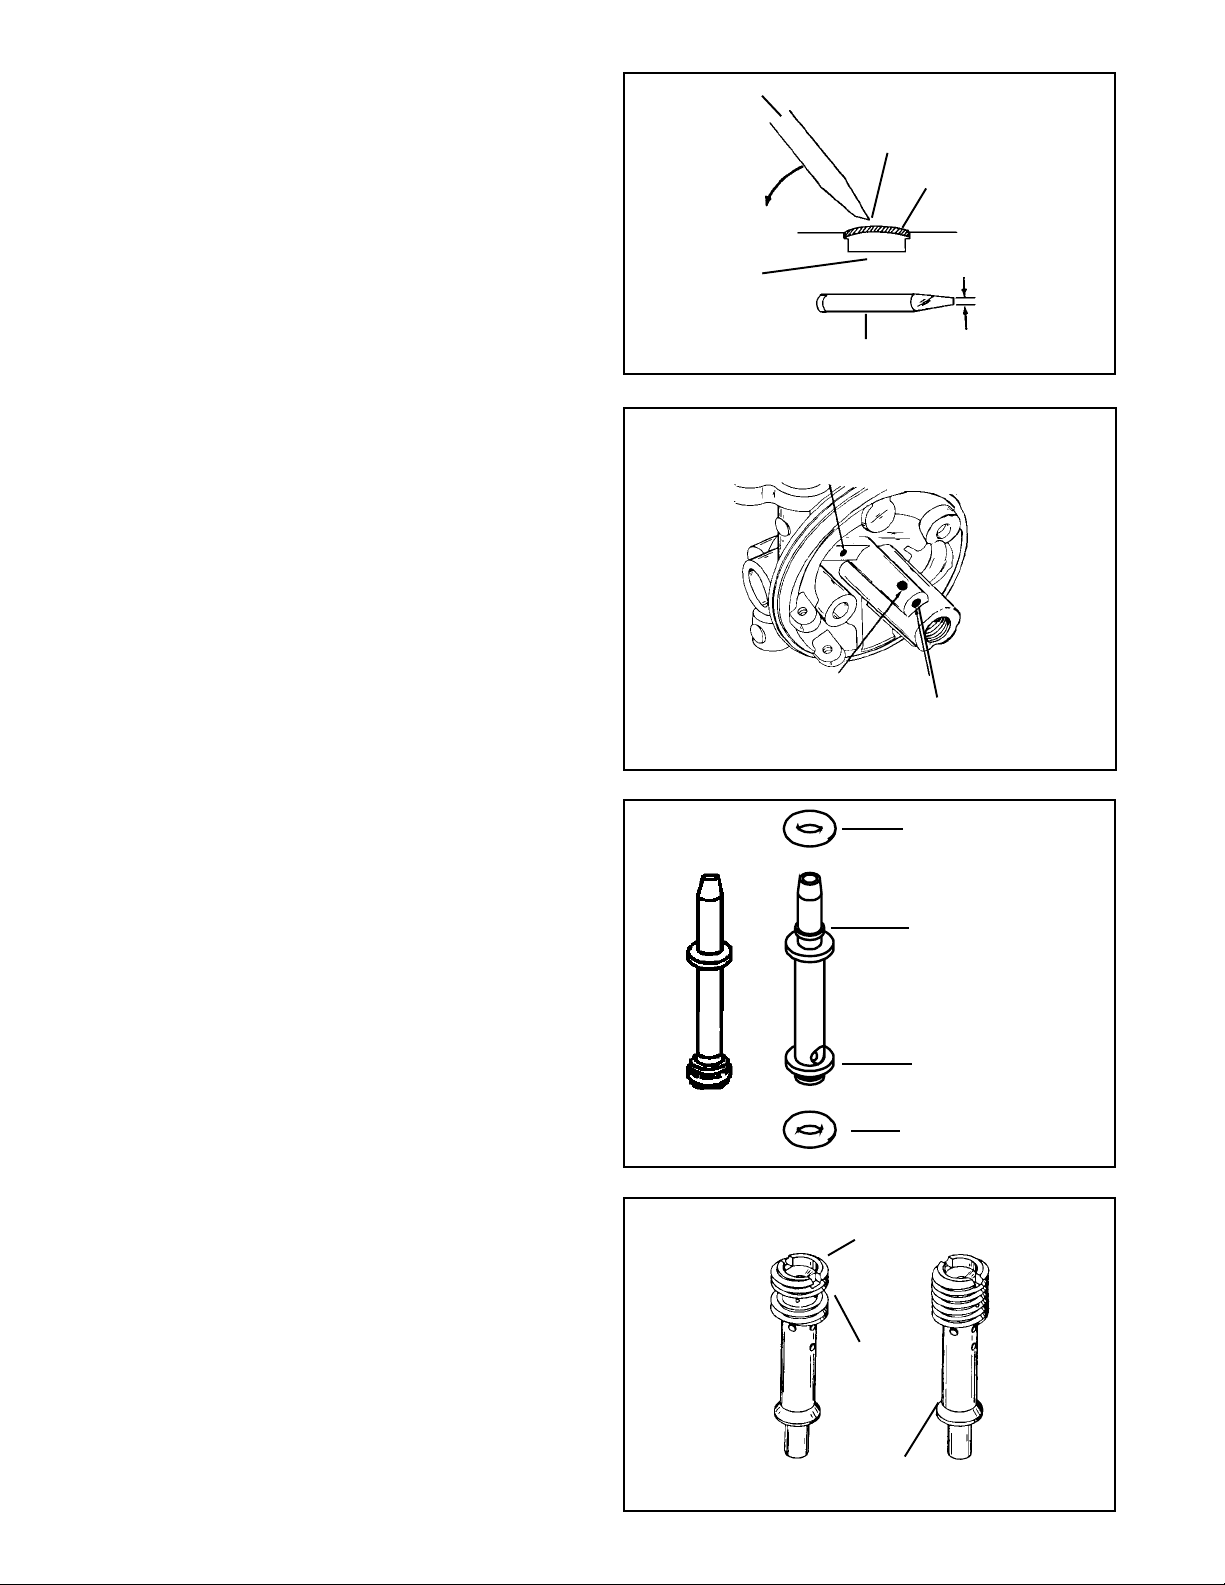
8. Remove all welch plugs if cleaning the carburetor.
Main Menu
Secure the carburetor in a vise equipped with protective
jaws. Use a small chisel sharpened to a 1/8"
(3.175 mm) wide wedge point. Drive the chisel into
the plug to pierce the metal, then push down on the
chisel to pry the plug out of the hole (diag. 32).
NOTE: DO NOT REMOVE ANY BALL OR CUP PLUGS
(diag. 33).
9. Note the direction of the inlet fitting. If necessary the
inlet fitting can be removed. (See page 24).
10. The main nozzle on Series 8 and Series 9 carburetors
can be removed by pressing the tube outward from
the venturi thru the center leg. This nozzle is nonmetallic and has an "O" ring seal on the top and bottom
end of the tube. Do not remove a main nozzle that is
made of brass from any Tecumseh carburetor. These
are pressed in at the factory to a specific depth. When
removing the nozzle, the top "O" ring may not come
out with the tube. The "O" ring must be remo v ed and
placed on the nozzle before it is placed back into the
center leg or it will not seal properly . (diag. 34)
SMALL CHISEL
PRY OUT
PLUG
DO NOT ALLOW
CHISEL POINT
TO STRIKE
CARBURETOR
BODY OR
CHANNEL
REDUCER
BALL PLUG
PIERCE PLUG WITH TIP
SMALL CHISEL
DO NOT REMOVE PLUGS
BRASS OR BALL PLUG
WELCH PLUG TO BE
REMOVED
ABOUT 1/8"
(3.175 mm)
WIDE
32
The main nozzle on some Walbro carburetors are
removable for service. If you remove it, a service
nozzle with the under cut fuel passage must be installed
or problems will occur (diag. 35).
IDLE FUEL PASSAGE
REDUCTION ROD INSIDE
33
NOT USED ON SERIES 7
OR VECTOR CARBS.
"O" RING
ON TOP OF STEP
(IN GROOVE)
"O" RING IN GROOVE
"O" RING
34
SERVICE MAIN NOZZLE
REUSABLE
18
UNDERCUT
ANNULAR
GROVE
ORIGINAL MAIN NOZZLE
DO NOT REUSE
35
Diaphragm Carburetors
Main Menu
1. Remove the screws holding the diaphragm cover on.
2. Remove the cover, gask ets, and diaphr agm noting or
marking the sequence or location to aid in reassembly .
NOTE: If a "F" designation on the choke end of the
carburetor is present, place the diaphragm on first, then
the gasket and cover. If no "F" is present, the gasket
goes first.
3. Note or mark the high and low mixture adjustment
screws. Remove the screw assemblies.
4. Note or mark the action of the choke and throttle
shutters and the hook points of the choke or throttle
return spring or seal retainer springs located on the top
of the choke or throttle shaft. Remove the throttle
shutter, throttle shaft, choke shutter , springs and choke
shaft by removing the screw or screws that attach the
throttle or choke shutter to the shaft inside the air horn.
5. Use a 9/32" (7.144 mm) thin wall socket to unscrew
and remove the inlet needle and seat assembly (diag.
36).
6. Note and mark the direction of the inlet fitting. If
necessary the inlet fitting can be removed by pulling
with a pliers or vise. Some diaphragm carburetors have
a strainer as an integral part of the fuel fitting. If the
strainer is lacquered or cannot be cleaned, the fitting
must be replaced.
7. Remove all welch plugs if cleaning the carburetor.
Secure the carburetor in a vise equipped with protective
jaws. Use a small chisel sharpened to a
1/8" (3.175 mm) wide wedge point. Drive the chisel
into the plug to pierce the metal, then push down on
the chisel to pry the plug out of the hole.
NOTE: DO NO T REMOVE ANY BALL OR CUP PLUGS.
"F" DESIGNATION
"F"
DIAPHRAGM FIRST NOT GASKET
36
37
To ser vice, disassemble the pump by removing the four
(4) screws. Clean all parts with a solvent and install a new
kit which consists of a coil spring, gaskets and diaphragms
(diag. 37 & 38).
All Tecumseh carburetors with an adjustable float require
the correct float height to achieve the proper operation
and easy engine starts. T o chec k the float height, hold the
carburetor in an upside down position. Remove the bowl
nut, float bowl, and "O" ring. Place an 11/64" (4.36 mm)
diameter drill bit across the top of the carburetor casting
on the opposite side and parallel to the float hinge pin
(diag. 39). The float must just touch the drill bit when the
bit is flush with the edge of the float. If the float is too high
or too low, adjust the height by bending the tab
accordingly. If the required adjustment is minor, the tab
adjustment may be made without removing the float and
carefully inserting a small bladed screwdriver to bend the
tab.
Float sticking can occur due to deposits or when the fuel
tank is filled for the first time, this condition can be quickly
corrected by loosening the carburetor bowl nut one full
turn. Turn the bowl 1/4 turn in either direction, then return
the bowl to its original position and tighten the bowl nut.
IMPULSE FUEL PUMP
FLOAT ADJUSTING PROCEDURE
OLD STYLE
11/64" (4.36 mm)
DRILL BIT
NEW STYLE
RIM
38
39
19

INSPECTION
Main Menu
After careful disassembly of the carburetor and the remov al of all non metallic parts, the carburetor body and all other
metallic parts should be cleaned with solvent, or commercial carburetor cleaner, no longer than 30 minutes . Use compressed
air and soft tag wire to clean internal carburetor passages. To do a proper cleaning job, the welch plugs must be removed
to expose the drilled passages.
NOTE: The nylon check balls used in some diaphragm carburetors are not serviceable. Nylon can be damaged if
subjected to harsh cleaners for prolonged periods.
Throttle and Choke
Examine the throttle lever and shaft, choke lever and shaft, and carburetor body at the bearing points and holes into
which the linkage is fastened, and replace if worn or damaged. Any looseness in these areas can cause dirt to enter the
engine and cause premature wear. If dust seals are present, these should be positioned ne xt to the carburetor body.
Idle and High Speed Mixture Adjusting Screw
RETAINER NUT
Examine the idle mixture needle tip and tapered surface
for damage. The tip and tapered surf ace of the needle must
not show any wear or damage at all. If either is worn or
damaged, replace the adjusting needle. Tension is
maintained on the screw with a coil spring. Examine and
replace the “O” ring seal if damaged (diag. 40).
Examine the tapered surface of the high speed mixture
needle. If the tapered surface is damaged or shows wear ,
replace the needle (non-emissioned). Some Tecumseh
carburetors use serviceable jet main nozzles. These are
identified as being non-metallic.
FUEL-
Fuel Bowl Retaining Nut
METERING
PORT
ONE-HOLE TYPE
The retaining nut contains the transfer passage or metering
jet through which fuel is delivered to the high speed and
idle circuit of the carburetor. If a problem occurs with the
idle circuit, examine the small fuel passage in the annular groove in the retaining (metering) nut. This passage must
be clean for the proper transf er of fuel into the idle metering circuit. Torque retaining nut to 50 in. lbs. (5.65 Nm) when
reinstalling.
"O" RING
BRASS WASHER (used to protect the
"O" ring from the spring)
SPRING
HIGH SPEED
ADJUSTMENT SCREW
IDLE FUEL
TRANSFER
PASSAGE
TW0-HOLE TYPE
FUEL-INLET
PORTS
40
41
There are two different types of bowl nuts that are used on adjustable main, float style carburetors. One type has one fuel
metering port at the bottom of the nut, and the other has two fuel inlet por ts at the bottom of the nut. This difference
relates to calibration changes to the carburetor and is dependent on the application (diag. 41).
NOTE: DO NO T INTERCHANGE BOWL NUTS.
The fuel inlet ports must be free of any debris to allow proper fuel flow .
Fuel Bowl, Float, Needle and Seat
The float bowl must be free of dirt and corrosion. Clean with solvent or carb uretor cleaner .
Examine the float for damage. Check the float hinge bearing surf aces for wear , as well as the tab that contacts the inlet
needle. Replace an y damaged or worn parts.
The needle and seat should be replaced if any fuel delivery problems are experienced (flooding or starvation). Sealing
problems with the inlet needle seat may not be visible, so replacement is recommended.
Diaphragms, Pulse Pumps, and Primer Bulbs
Inspect diaphragms, gaskets, and primer bulbs for cracks, tears, hardness or brittleness. Replace if necessary.
20
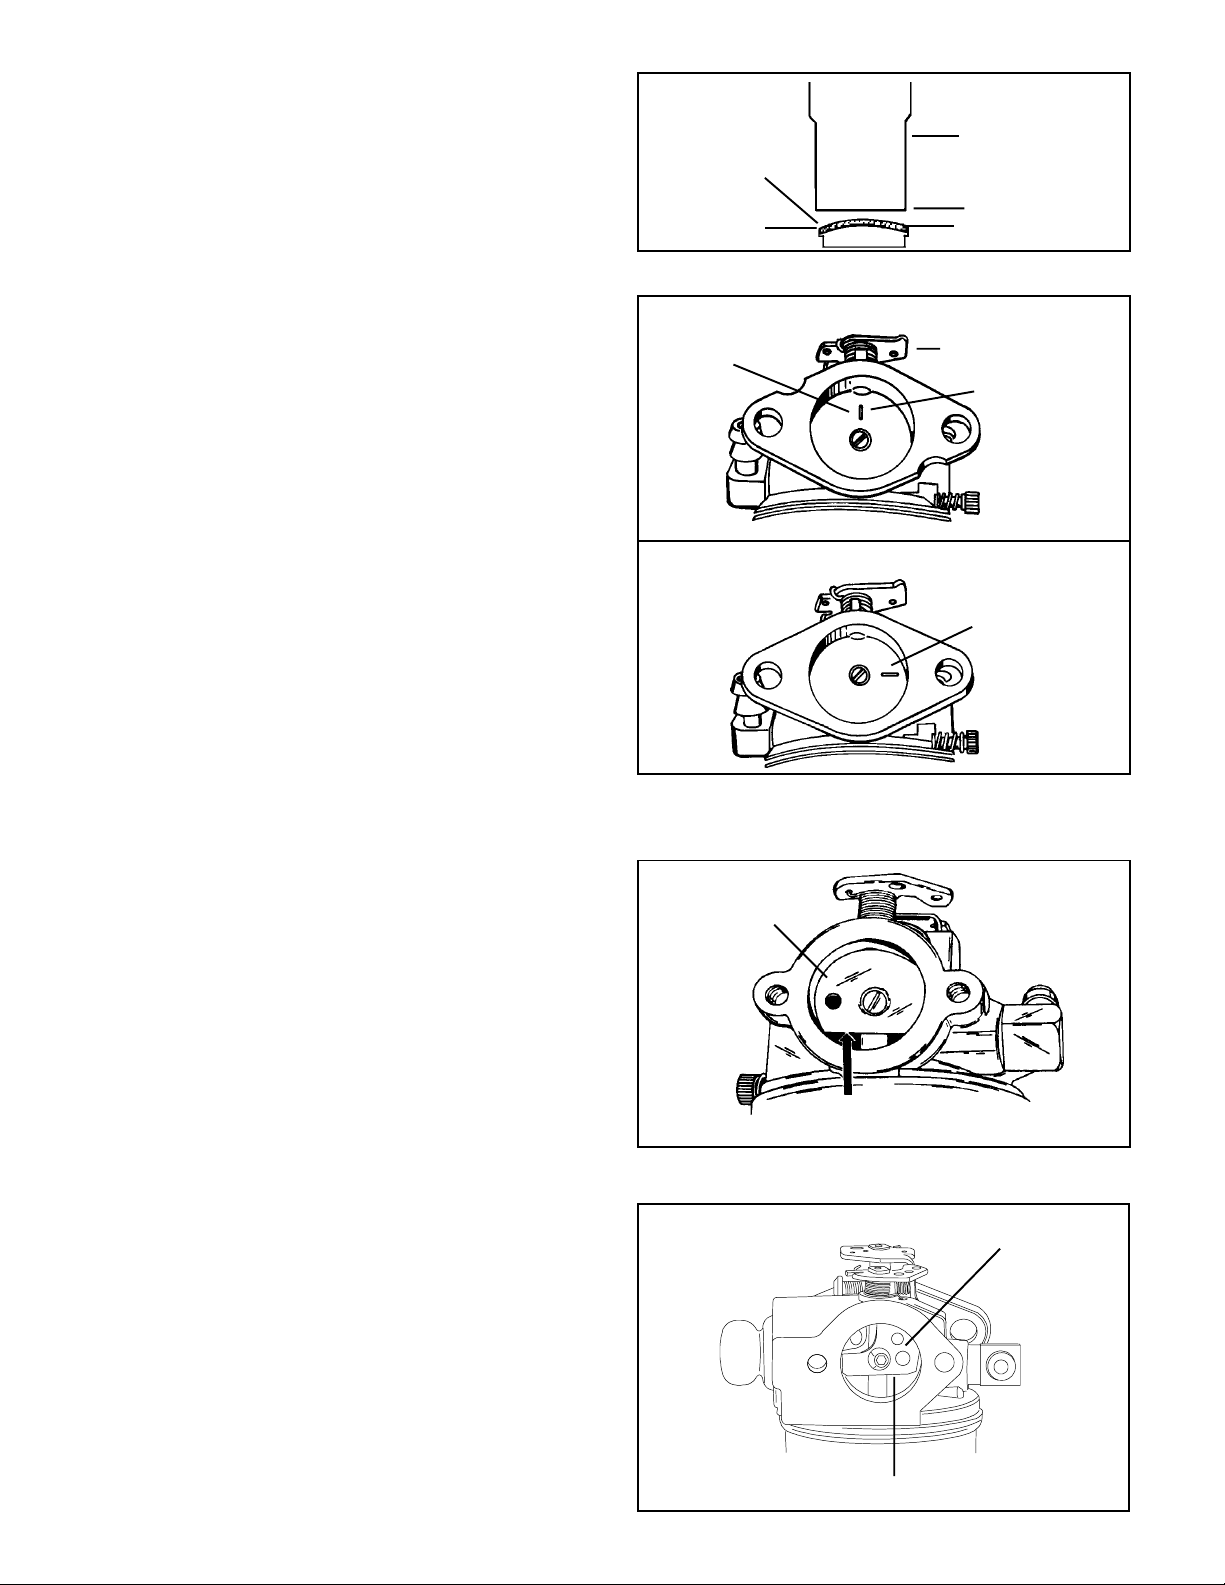
ASSEMBLY
Main Menu
Welch Plugs
To install a new welch plug after cleaning the carburetor,
secure the carburetor in a vise equipped with protective
jaws. Place the welch plug into the receptacle with the
raised portion up. With a punch equal to, or greater than
the size of the plug, merely flatten the plug. Do not dent or
drive the center of the plug below the top surface of the
carburetor. After installation of the welch plug, seal the
outer diameter with finger nail polish or equivalent (diag.
42).
Throttle Shaft and Plate
When reassembling, it is important that the lines or lettering
on the throttle plate are facing out when in the closed
position. Position throttle plate with two lines at 12 and 3
o’clock. If the throttle plate has only one line, the line should
be positioned in the 12 o’clock position on Series 1, 6, 8,
and 9 carburetors, and positioned in the 3 o’clock position
on Series 3 and 4 carburetors (diag. 43 & 44).
Test the operation of the throttle and return spring (if
equipped). If binding occurs, correct by loosening screws
and repositioning throttle plate.
NEW WELCH PLUG
THROTTLE
PLATE
SERIES 1, 6, 8, 9, 10
SERIES 3 AND 4
FLAT END PUNCH
SAME OR LARGER
DIAMETER OF
PLUG
THROTTLE LEVER
TWELVE O'CLOCK
POSITION
THREE O'CLOCK
POSITION
42
43
Always use a new screw(s) when reinstalling the throttle
shutter (Tecumseh screws are treated with dry-type
adhesive to secure them in place).
NOTE: NEVER REUSE OLD SCREWS.
Choke Shaft and Plate
The choke plate is inserted into the air horn of the carburetor
in such a position that the flat surface of the choke is
down. Choke plates will operate in either direction. Make
sure it is assembled properly for the engine. Test the
operation of the choke and return spring function if equipped
(diag. 45).
Always use a new screw(s) when reinstalling the choke
shutter as the screws are treated with dry-type adhesive
to secure them in place.
NOTE: NEVER REUSE OLD SCREWS.
The choke shaft and plate must be in the closed position
prior to tightening the screws. Hard starting may be due to
insufficient choking action because of a misaligned choke
plate. Correct by readjusting the choke plate to close
completely. Note the cut-out position of choke shutter if
applicable.
CHOKE PLATE
FLAT
DOWN
44
45
CHOKE PLATE
Fuel Inlet Fitting
Support the carburetor body with a wood block to avoid
damage to other parts. Use a bench vise or press to install
the fitting squarely . Insert the tip into the carb uretor body,
coat the exposed portion of the shank with Loctite grade
A, then press it in until the shoulder contacts the carburetor
body .
FLAT SIDE DOWN
46
21
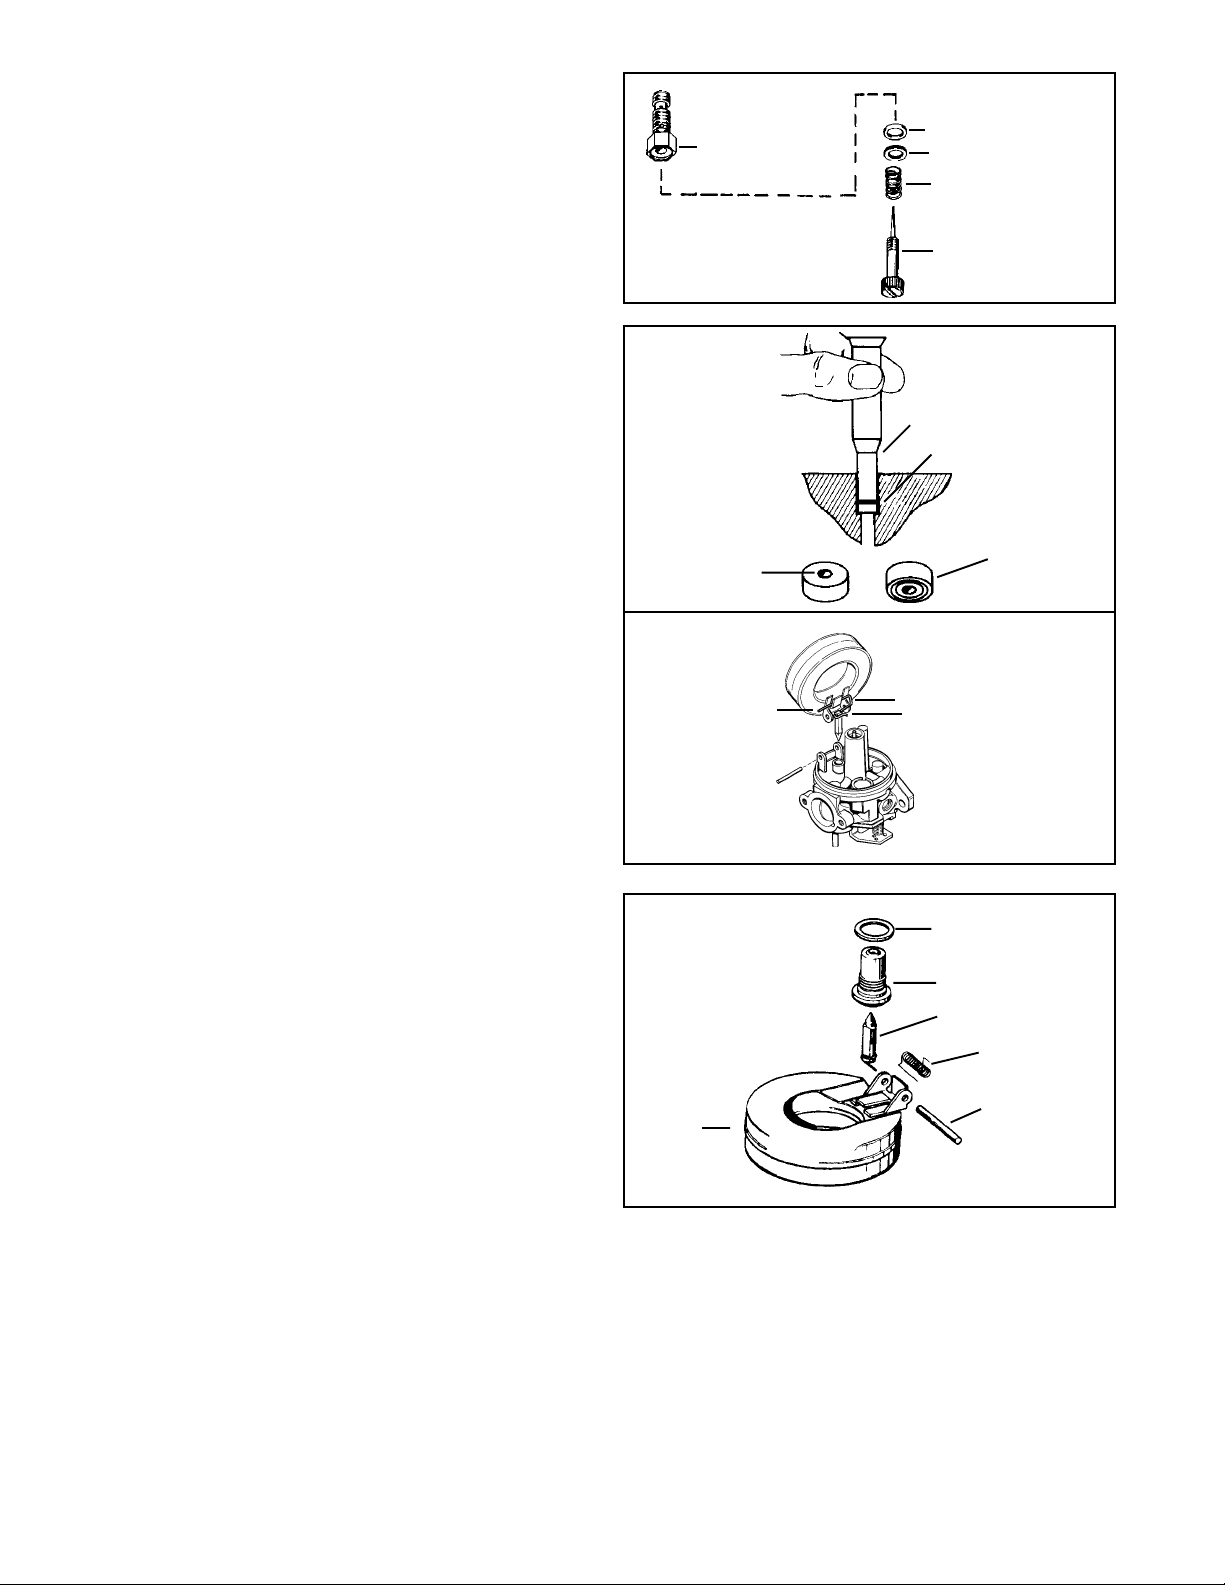
High and Low Speed Adjusting Screw, Main Nozzle
Main Menu
When reassembling, position the coil spring on the
adjusting screws, follo wed by the small brass w asher and
the “O” ring seal. Tur n the high speed adjustment screw
in approximately one turn into the bowl retainer nut to
make an assembly (diag. 47).
On 2-7 hp. engines that use carburetors which have the
metering rod in the idle circuit (carburetor should rattle when
shaking), make certain that the idle adjustment screw is
installed when the carburetor is in an upright position or
the needle will damage the metering rod, adjustment screw
and carburetor casting.
Some carburetors are of the fixed main type and would
not have a high speed adjusting scre w .
Inlet Needle and Seat
On float type carburetors, make sure the seat cavity is
clean. Moisten the seat with oil and insert the seat with
the grooved side down and away from the inlet needle.
Press the seat into the cavity using a flat punch close to
the diameter of the seat, making sure it is firmly seated
(diag. 48).
The inlet needle hooks onto the float tab by means of a
spring clip. To prevent binding, the long, straight end of the
clip should face the air intake end of the carburetor as
shown (diag. 49).
On diaphragm carburetors the inlet needle and seat
assembly are installed by using a socket to tighten the
assembly until seated.
Needle and Seat Pop-Off T est
To test the pop-off pressure, remove the carburetor from
the engine. Be sure to drain any fuel into an approved
container. Inve rt the carburetor and remove the float bowl.
Place a drop of an oil based product such as WD-40 on
the tip of the needle valve. Using a commercially available
0-30 psi pump and gauge, attach the pumps hose to the
carburetor inlet. Apply approximately 6 psi or until the
needle pops off the seat. The needle should seat at 1.5 psi
or greater for a minimum of 5 minutes. If the minimum 1.5
psi cannot be maintained for this period of time, then service
to the needle and seat is required.
RETAINER NUT
TORQUE NUT TO
50 IN. LBS. (5.65 Nm)
DRIVE IN UNTIL
SEAT RESTS ON
BODY SHOULDER
INLET NEEDLE
SEATS AT THIS
POINT
LONG END
OF CLIP
CHOKE
END
"O" RING
BRASS WASHER
SPRING
HIGH SPEED
ADJUSTMENT SCREW
47
5/32" FLAT PUNCH
SEAT
INSERT THIS
FACE FIRST
48
CLIP
OPEN END
OF CLIP
THROTTLE
END
49
WASHER
INLET SEAT
INLET NEEDLE
FLOAT SPRING
Float Installation
Reinstall the inlet needle and float into the carburetor. The
long end of the spring or clip on the inlet needle must point
toward the air intake end of the carburetor. If a float
dampening spring is used, reassemble using the following
steps (diag. 50).
1. Place the float upside down.
2. P osition the spring on the float with the long end around and to the back side of the float’ s center back tang. The ends
3. Place the float, float spring, clip and inlet needle in position between the hinge legs of the carburetor. As the float
22
HINGE PIN
FLOAT
50
must point toward the choke end of the carb uretor. Hook the inlet needle clip on the inside float tang so the clip end
points to the choke end of the carburetor (diag. 50).
assembly nears the hinge legs, wind the outside end of the spring so it goes to the outside of the leg (counterclockwise
looking from the choke end).
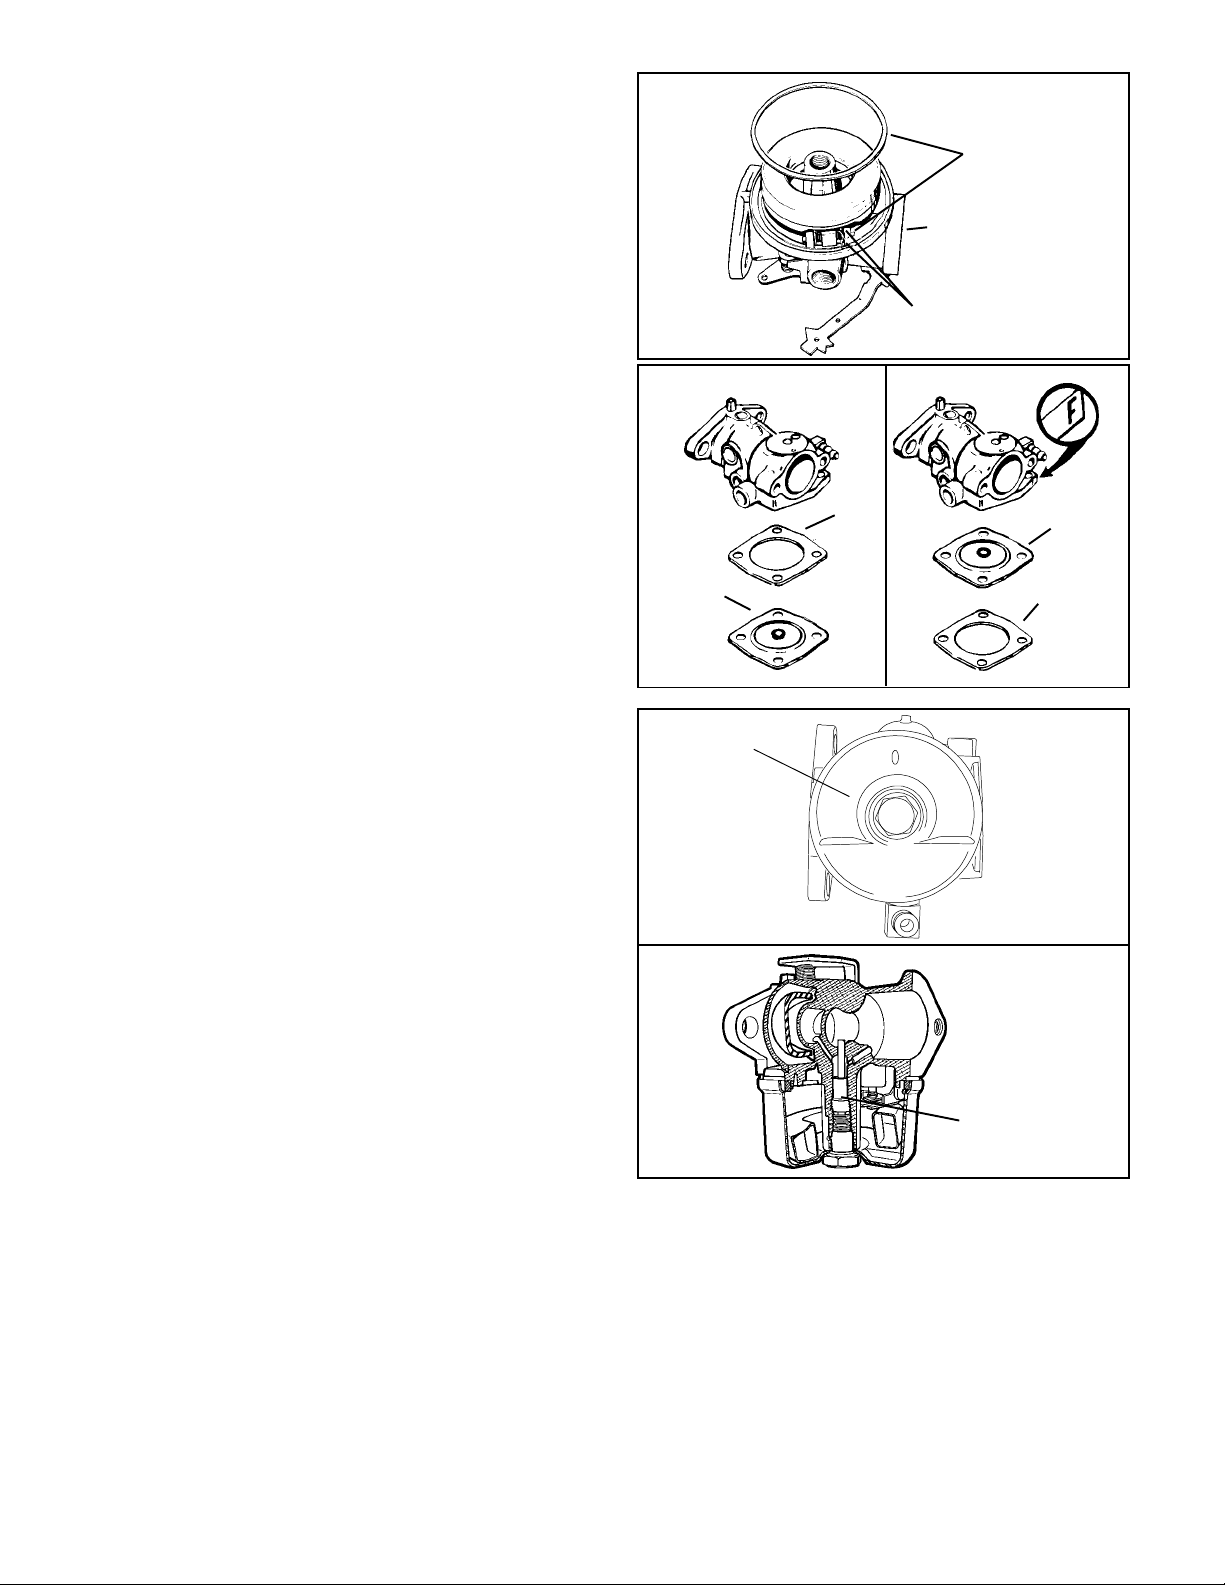
4. Install the hinge pin from the opposite hinge leg. The
Main Menu
bowl gasket must be positioned over the end of the
spring (diag. 51).
5. Set the proper float height. See “Float Adjusting
Procedure” in this chapter .
GASKET GOES
OVER SPRING
Diaphragm Assembly
The rivet head on the diaphragm must always face toward
the inlet needle valve. On carburetors with an “F” cast into
the carburetor flange as illustrated, the diaphragm goes
next to the carburetor body. Other diaphragm carb uretors
have the gasket located between the diaphragm and
carburetor body. Install the cover retaining screws and
tighten (diag. 52).
Fuel Bowl And Bowl Nut
Whenever a carburetor bowl is removed for service, the
fuel bowl “O” ring must be replaced. For easier installation,
lubricate the “O” ring with a small amount oil.
Install the float bowl by placing the detent portion opposite
of the hinge pin. Make sure the deepest end of the bowl is
opposite of the inlet needle. The bo wl has a small dimple
located in the deepest part. The purpose of this dimple is
to minimize the chances of the float sticking to the bottom
of the bowl caused by stale fuel (diag. 53).
On some fixed jet (non-adjustable) and adjustable
carburetors, a fibered washer is required between the
carburetor bowl and the bowl retaining nut.
RIDGE AND
RIVET
HEAD UP
DETENT
GASKET
CHOKE END OF
CARBURETOR
ENDS OF SPRING POINT
TOWARD CHOKE END
OF CARBURETOR
51
RIDGE AND
RIVET HEAD
UP
GASKET
52
Occasionally, on engines equipped with the dual system
carburetor, some rich star ting conditions have occurred
when the engine is warm. This condition can be corrected
by inserting a non-metallic spacer in the center leg of the
carburetor, as shown (part # 632158). This spacer is
designed to reduce the amount of prime charge in the main
nozzle area for better starting under warm engine
conditions. It can only be used on Dual System carburetors
and does not lean out the carburetor mixture. (diag. 54)
This spacer must be reinstalled if originally equipped in
the carburetor .
Impulse Fuel Pump
The diaphragms must be installed against the center body
with the gaskets against the outside covers. The parts are
designed so they cannot be misassembled without damage
(diag. 54).
To test the unit, assemble the carburetor to the engine,
leaving the fuel line from the pump off. Use a different fuel
tank remotely placed above the carburetor to provide gravity
fuel flow to the carburetor inlet to run the engine while
testing the pump. Make sure fuel is available in both fuel
tanks and that the original fuel tank's fuel line is connected
to the fuel pump inlet. Place the pump outlet line in a proper
draining receptacle. With the pulse line connected from
the engine crankcase to the pump and the engine running,
a definite fuel flow should result at the pump outlet.
53
NON-METALLIC
SPACER
54
If the flow is erratic or intermittent, the pump needs repair
or replacement.
23
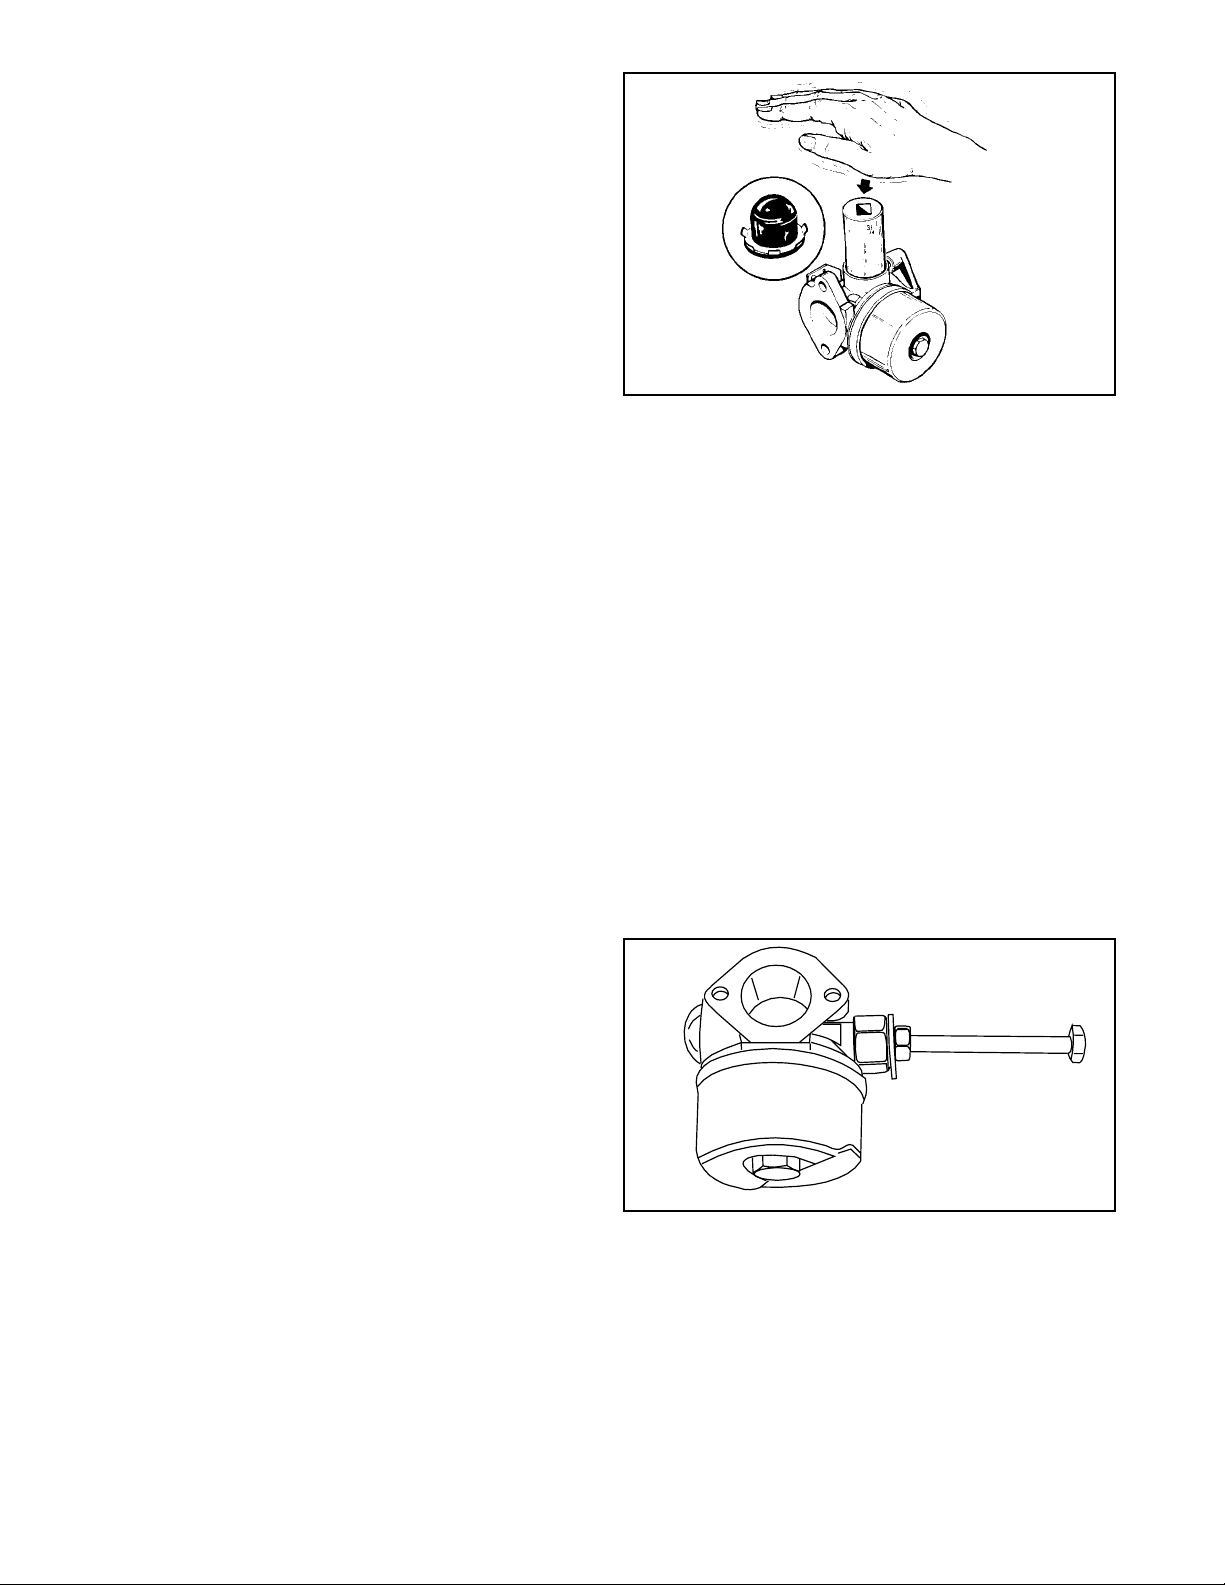
Primer Bulb
Main Menu
To install, start the retainer and bulb into the casting with
the retainer tabs pointed out. Firmly push the bulb and
retainer into position using a 3/4'’ (19.05 mm) deep well
socket (diag. 55).
Final Checks
Before reinstalling a newly o verhauled carburetor , pre-set
the main mixture adjustment screw, the idle mixture
adjustment screw and the idle speed adjustment screw.
See “Pre-sets and Adjustments” in this chapter .
55
STANDARD SERVICE CARBURETORS
T ecumseh supplies some replacement carb uretors on which parts from the old carburetors can be reused or new parts
added. This Standard Service Carburetor helps to reduce dealer inventories .
Standard Service Carburetors are built in both float and diaphragm versions.
The parts from the original carburetor that are necessary to make a standard service carburetor are: choke shaft, shutter
and spring, throttle lever and spring, fuel fitting, idle adjustment screw and spring. If any or all of these old parts are worn
or damaged, replace each part with a new service part to assure proper function and prevent engine damage . Use the
diagrams on the next page as a guide to f acilitate the correct installation of parts (diag. 57 & 58).
Fuel Fitting
NOTE: MOST SER VICE CARBURETORS ARE MARKED “SVC CARB NF” IN THE PRICE LIST. THIS MEANS THAT
THE CARBURETOR COMES WITH NO FUEL FITTING.
Use the parts manual to obtain the same fuel inlet fitting that was installed in the original carburetor. Install the fuel fitting
in the new carburetor body in the same position as on the original carburetor . Support the carburetor body with a wood
block to av oid damage to other parts. Use a bench vise or press to install the fitting squarely. Press it in until it bottoms
out.
NOTE: PRESS FUEL FITTING IN SQUARELY USING CAUTION SO THAT THE CARBURETOR BODY IS NOT
DAMAGED.
Inlet Fuel Fitting
To remove a leaking or damaged fuel inlet fitting, use a
1/4"(6 mm) bolt, 1/4" (6 mm) nut and 1/4" (6 mm) washer ,
along with a 1/2" (12 mm) nut. Use a pliers or vise to
remove the plastic part of the inlet fitting. Tap the inside
of the remaining metal portion of the fitting using a
1/4"- 20 (6 mm) tap. Place a 1/2" (12 mm) nut over the
fuel fitting (it may be necessary to guide one side of
the nut to seat it squarely to the carburetor). Next thread
the 1/4" (6 mm) nut on the bolt until it contacts the shank,
add the washer, and thread the bolt into the fitting until
snug. Tighten the 1/4"- 20 (6 mm) nut until the fitting is
removed. (diag. 56)
56
Choke Shaft
NOTE: Never reuse choke or throttle shutter screws, always replace with new Tecumseh service screws.
Remove the choke shutter scre w from the original carburetor and remov e the choke shaft. Observe the position of the
ends of the choke return spring if one is present. Also observe the position of the cut-out and/or holes in choke shutter .
Some chokes turn clockwise and some turn counterclockwise, note the position of the choke shaft prior to removal from
the old carburetor.
If a choke stop spring is present on the new carburetor and is not used on the old carburetor , cut it off with a side cutter
or pull it out using a pliers.
T est the action of chok e shaft to make sure it moves freely and easily and does not bind in either open or closed position.
If binding occurs, loosen the shutter screw; reposition the shutter and tighten the screw.
24
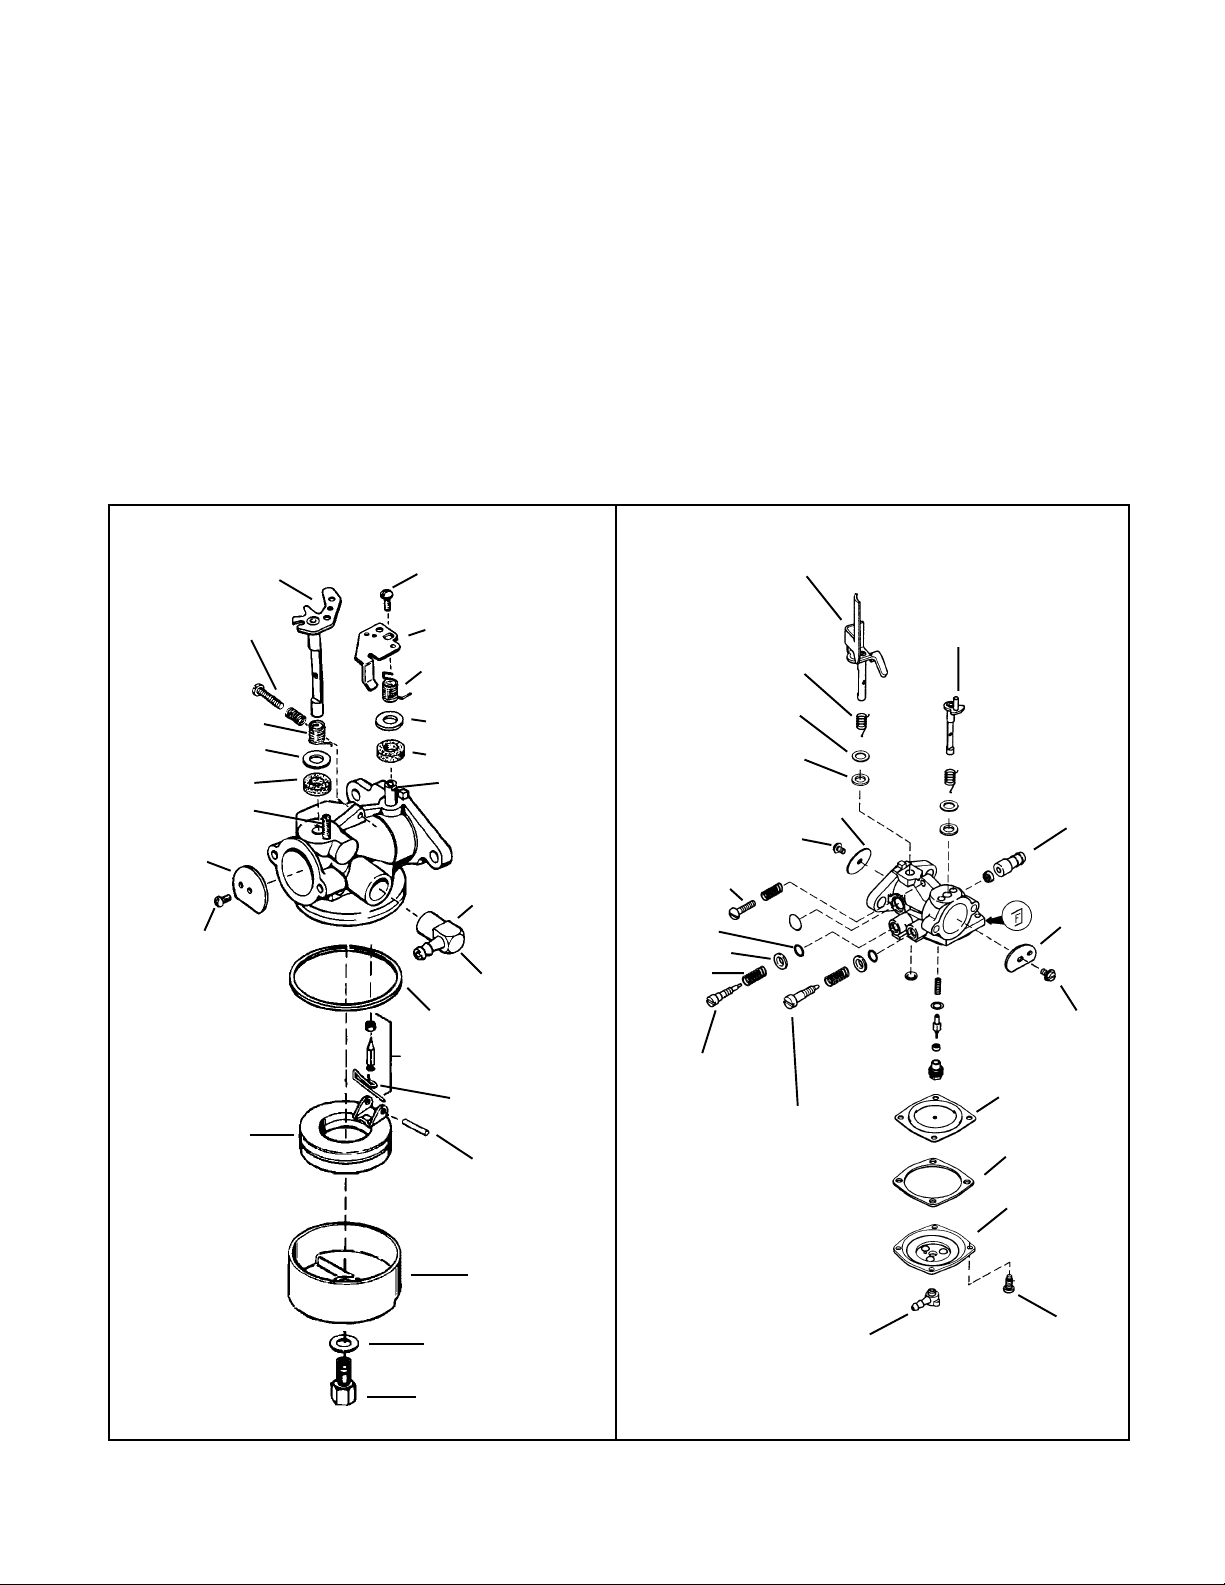
Throttle Lever
Main Menu
Remove the throttle lever and spring and file off the peened end of the throttle shaft until the lever can be removed.
Install the throttle spring and lever on the new carburetor with the self-tapping screw furnished. If dust seals are
furnished, install them under the return spr ing.
Idle Speed Adjustment Screw
Remove the screw assemb ly from the original carburetor and install it in the new carburetor . Turn it in until it contacts the
throttle lever. Then an additional 1-1/2 turns f or a static setting.
Final Checks
Consult the service section under “Pre-sets and Adjustments” and follow the adjustment procedures before placing the
carburetor on the engine.
FLOAT TYPE CARBURETOR DIAPHRAGM TYPE CARBURETOR
CHOKE SHAFT
SELF TAPPING SCREW
THROTTLE LEVER
AND SHAFT
IDLE CRACK
SCREW AND
SPRING
WASHER
FELT SEAL
CHOKE STOP
SPRING
SHUTTER
SCREW
FLOAT
SPRING
LEVER
SPRING
WASHER
FELT SEAL
THROTTLE SHAFT
SHANK
FUEL FITTING
"O" RING
SEAT AND CLIP
INLET NEEDLE
SPRING CLIP
FLOAT SHAFT
FELT SEAL
THROTTLE SHUTTER
SHUTTER SCREW
IDLE
ADJUSTMENT
SCREW
SEAL
WASHER
SPRING
LOW SPEED
ADJUSTMENT
SCREW
SPRING
WASHER
HIGH SPEED
ADJUSTMENT
SCREW
CHOKE LEVER
AND SHAFT
FUEL INLET
CHOKE
SHUTTER
SHUTTER
SCREW
DIAPHRAGM
DIAPHRAGM
GASKET
DIAPHRAGM
COVER
FLOAT BOWL
BOWL NUT WASHER
HIGH SPEED BOWL NUT
57
PRIMER FITTING
DIAPHRAGM
COVER SCREW
58
25

CHAPTER 4 GOVERNORS AND LINKAGE
Main Menu
GENERAL INFORMATION
This chapter includes governor assembly and linkage illustrations to aid in governor or speed control assembly.
Tecumseh 4 cycle engines are equipped with mechanical type governors. The governor’s function is to maintain a
constant R.P.M. setting when engine loads are added or taken away. Mechanical type governors are driven off the
engine’s camshaft gear. Changes in engine R.P.M. cause the governor to move the solid link that is connected from
the governor lever to the throttle in the carb uretor. The throttle is opened when the engine R.P.M. drops and closes as
the engine load is removed.
OPERATION
As the speed of the engine increases, the governor
weights (on the governor gear) move outward by
centrifugal force. The shape of the go vernor weights force
the governor spool to lift. The governor rod maintains
contact with the governor spool due to the governor spring
tension. As the spool rises, the governor rod rotates,
causing the attached outer governor lever to pull the solid
link and close the throttle opening. When the engine
speed decreases, the lower centrifugal force allows the
governor weights to be pulled in by the governor spring.
As the spool lowers, the governor rod rotates and the
solid link pushes the throttle to a more open position (diag.
1).
INTERNAL COMPONENTS (VARIOUS STYLES)
RETAINING
RING
SPOOL
RETAINING
RING
GEAR ASSY.
(GOV.)
WASHER
SHAFT
SPOOL
UPSET
NO RETAINING
RING
SHAFT
GEAR ASSY.
(GOV.)
WASHER
RETAINING
THROTTLE
RING
SPOOL
WASHER
RETAINING
RING
GEAR ASSY.
(GOV.)
WASHER
SPACER
SHAFT
GOVERNOR SHAFT
WEIGHTS
GOVERNOR GEAR
SHAFT
ROD
ASSY
(GOV.)
WASHER
BRACKET
RETAINING
SPRING
SPOOL
RING
GEAR
ASSY.
(GOV)
GOVERNOR
SPOOL
SPOOL
SHAFT
GEAR ASSY.
(GOV.)
WASHER
1
TROUBLESHOO TING
Engine problems where the governor is suspected to be the cause, ma y actually be the result of other engine system
problems. Hunting (engine R.P.M. surging up and down) indicates that the engine is incapable of maintaining a
constant R.P.M. with or without an engine load. Engine overspeeding (either with or without throttle movement) must
be corrected immediately before serious engine damage occurs. Use the following procedure to diagnose a suspected
governor problems.
26
TVS STANDARD
SCREWS
2
TVS UPSET HORIZONTAL LEV
3
MEDIUM FRAME
4
5
6

ENGINE OVERSPEEDING
Main Menu
1. If the engine runs wide open (faster than normal), shut the engine off immediately.
2. Check the condition of the external governor shaft, linkage, governor spring, and speed control assembly for
breakage, stretching or binding. Correct or replace binding or damaged parts.
3. Follow the governor adjustment procedure and reset the governor - see "Service" in this chapter.
4. Run the engine. Be ready to shut the engine off if an overspeed problem still exists. If the problem persists, the
engine will require disassembly to inspect the governor gear assembly for damage, binding, or wear.
5. See Chapter 9 under "Disassembly Procedure" to disassemble the engine.
6. Remove the governor gear assembly. Repair or replace as necessary.
ENGINE SURGING
1. Try to stabilize the engine R.P.M. by holding steady the solid link between the governor arm and the carburetor
throttle, using a pliers or fingers.
2. If the engine R.P.M. stabilizes, the governor or governor adjustment should be checked. See "Ser vice" governor
adjustment procedure in this chapter. If the engine R.P.M. does not stabilize, the engine will require additional
checks, see Chapter 9 under "Troubleshooting".
3. If the problem persists after the gov ernor adjustment, check the engine R.P.M. f ound on microfiche card # 30. The
R.P.M. settings are critical. If the R.P.M. setting for high and low speed are within specification and a slight surge
is experienced, increasing the engine idle R.P.M. setting slightly may eliminate this condition.
4. Check the gov ernor shaft or linkages for binding, wear , or improper hookup. Check the gov ernor spring for adequate
tension. Repair or replace as necessary.
SERVICE
GOVERNOR ADJUSTMENT
With the engine stopped, loosen the screw holding the
governor clamp on the governor lev er. Rotate the clamp
in a direction that will force the throttle shaft open and
allow the governor follower arm to rest on the governor
spool. Push the go v ernor lever connected to the throttle
to the wide open throttle position. Hold the lever and
clamp in this position while tightening the screw (diag.
7).
GOVERNOR ADJUSTMENT PR OCEDURE
FOR SHORT BLOCK INSTALLATIONS
Short block installation on 3-5 h.p. v ertical shaft engines
built prior to 1977 may require the governor clamp
(tinnerman style) to be repositioned to work properly. The
clamp must be removed from the gov ernor rod and turned
to the same position as the original engine. Hook the
solid link and spring to the governor lever and position
the clamp on the governor rod. Follow the abov e governor
adjustment procedure to complete the short block
governor set-up. Units built after 1977 use the normal
governor set up procedure. (diag. 8)
GOVERNOR SHAFT
GOVERNOR SPOOL
GOVERNOR GEAR
Ý
PUSH LEVER
TO OPEN
THROTTLE
Ú
7
Figure A
Before 1977
production
VERTICAL
Figure B
1977 & Later
production
8
27

GOVERNOR GEAR AND SHAFT SERVICE
Main Menu
After the cylinder cover is removed from the engine, the governor spool, gear, or governor shaft can be removed. On
older style governor assemblies, the retaining ring must be removed to allow the spool or gear to slide off the shaft.
Newer style gov ernor shafts (3 - 6.75 model engines) use an upset to hold the governor spool on. If the gear requires
replacement, the governor shaft will have to be removed.
Governor Spool Replacement With Upset Style Governor Shaft
The spool can be replaced without removing the governor
shaft. Grip the original spool in a vise and use a twisting
and pulling motion on the flange until the spool is free.
Install the new spool by starting it on the shaft and then
turning the flange over. This will allow the weights to hang
in the proper position. Place the spool on a solid surface
and push on the flange until the spool seats. The gov ernor
weights must be in position under the spool after
installation. (diag. 9)
Governor Gear or Shaft Replacement, Upset
Style Governor Shaft
1. Grip the original spool in a vise and use a twisting
and pulling motion on the flange until the spool is
free.
2. Clamp the shaft in a vise and pound gently on the
flange with a wooden or plastic mallet to remove the
shaft.
9
NOTE: DO NO T TWIST THE SHAFT WHEN REMO VING.
THE SHAFT BOSS MAY BECOME ENLARGED,
LEA VING THE NEW GOVERNOR SHAFT LOOSE AND
CAUSING SEVERE DAMAGE.
3. To install a new shaft, first assemble the gear and
4. Place the flange in a press with a solid piece
Governor Shaft Replacement, Retaining Ring
Style
1. Remove the retaining ring, spool, gear assemb ly , and
2. Clamp the shaft in a vise and pound gently on the
NOTE: DO NO T TWIST THE SHAFT WHEN REMO VING.
THE SHAFT BOSS MAY BECOME ENLARGED AND
THE NEW GOVERNOR SHAFT WILL BE LOOSE AND
MOVE.
3. Start the new shaft into the shaft boss by tapping
4. Refer to the chart at right for the proper shaft e xposed
5. Reassemble the gover nor and install the retaining
28
washer on the shaft. Start the shaft into the hole with
a few taps from a soft faced hammer.
supporting the area below the shaft boss. Press the
shaft in until a shim, part # 670297 just becomes
snug [.010 - .020 (.254 - .508 mm) clearance].
washers.
flange with a wooden or plastic mallet to remove the
shaft.
with a soft faced hammer.
length. Add a drop of red Loctite 271 and press the
governor shaft to the proper depth using a press or a
vise. Wipe the e xtra Loctite off after installation (diag.
11).
ring.
WASHER
ENGINE MODEL
ECH90
ECV100
H 30, 35
HS 40, 50
LAV 35
LEV (all)
OHH (all)
OVRM (all)
TNT 100, 120
TVS (all)
TVM (all)
V 50, 60, 70
VH 50, 60, 70
HH 100, 120
VH 100
H 50, 60, 70
HH 60, 70
HHM80
HM 70, 80, 100
GEAR
SHIM
SHAFT BOSS
670297 (modified)
10
EXPOSED SHAFT LENGTH
Mounting flange to Top
1.319 - 1.334"
(33.502 - 33.883 mm)
Mounting flange to Top
1.581 - 1.596"
(25.806 - 26.314 mm)
Mounting flange to Top
1.016 - 1.036"
(25.806 - 26.314 mm)
Mounting flange to Shoulder
1.283 - 1.293"
(32.588 - 32.842 mm)
11

SPEED CONTROLS AND LINKAGE
Main Menu
Many different types of speed controls and linkage are used for O.E.M. applications. Linkage attachment points are
best recorded or marked prior to disassembly. This assures the correct placement during reassembly. The solid link is
always connected from the outermost hole in the governor lever to the throttle in the carburetor. The link with the
governor spring attached is connected between the control lever and the lower hole in the governor lever. Horizontal
engines use one location (non-adjustable) speed control brackets. Most vertical engines use an adjustable speed
control bracket mounted above the carburetor. The ignition ground out switch, idle R.P.M. and high speed R.P.M.
adjustment screws are located on the speed control brack et and some models use the idle R.P.M. adjustment on the
carburetor.
Vertical shaft engines must have the speed control bracket aligned when installing. To align the control bracket, use
the following steps.
1. Loosen the two screws on the top of the panel.
2. Move the control lever to full wide open throttle
position and install a wire or aligning pin through the
hole in the top of the panel, the hole in the choke
actuating lever, and the hole in the choke (diag. 12).
3. With the components aligned, tighten the two screws
on the control panel.
The following pages illustrate common linkage
attachment. Whenever the carburetor or the governor
linkage is removed or replaced, the engine R.P.M.'s
should also be checked. Use microfiche card #30 or the
computer parts look-up system for the correct R.P.M.
settings for the engine model and specification.
SNAP IN "STYLE SPEED CONTROL"
This style of speed control is used on 3 - 6.75 model
rotary mower engines and is adjusted by two bendable
tabs. Use the speed adjustment tool (part # 670326) as
illustrated in diag.13 to adjust engine speed.
To adjust high speed, move the speed control lever to
the high speed position and align the high speed pin
holes. Place the adjustment tool on the high speed tab
and move the tab to achieve the correct engine speed.
Move the speed control lever to the low speed position,
place the adjustment tool on the low speed tab and bend
to either increase or decrease to the correct speed.
LOOSEN TO ADJUST
CONTROL LEVER
LOW SPEED TAB
HIGH SPEED
PIN POSITION
HIGH SPEED TAB
DECREASE
INCREASE
TOOL 670326
WIRE
HOLE
12
Þ
Þ
13
29

ADJUSTING RPM ON MEDIUM FRAME
Main Menu
VERTICAL SPEED CONTROL
This speed control is adjusted to the equipment throttle
control by aligning the slot in the speed control lev er with
the alignment hole on the mounting bracket. Place a pin
through the two holes, place the equipment throttle control
to the wide open position, hook the bowden cable end in
the control as shown, and tighten the cable housing clamp.
In this position, the gap of .040" - .070" (1.016 - 1.778
mm) should exist at the gap location as illustrated. This
will assure that the carburetor will go into full choke when
the control is placed in the start position.
ADJUSTING GOVERNED/NON-GO VERNED
With the engine running at its lowest speed, set the
governed idle at the designated RPM by adjusting the
governed idle screw or bending the idle tab . Next set the
non-governed idle by pushing the bottom of the gov ernor
lever away from the control brackets so the throttle lever
contacts the idle speed crack screw (on the carburetor).
Hold the lever in this position and turn the crack scre w to
600 RPM below the governed idle speed. This setting
prevents the throttle plate from closing off when going
from high speed RPM to low speed RPM. If improperly
adjusted, the engine could experience an over lean
condition.
The idle speed is adjusted by turning the idle speed screw
clockwise to increase engine R.P.M. and counterclockwise to decrease R.P.M. Use tool part # 670326 to
adjust the high speed engine R.P.M. Place the slotted
end of the tool onto the adjustment tab and bend the tab
to the left (toward the spark plug end) to increase engine
R.P.M. (diag. 14).
HIGH SPEED
ADJUSTMENT TAB
TOOL
670326
Þ
DECREASE
HIGH SPEED
ADJUSTMENT TAB
BEND AREA
GOVERNED
IDLE ADJUSTING
SCREW
GOVERNED
IDLE SPEED SCREW
GAP OF
.040 - .070
(1.016 - 1.778 mm)
INCREASE
.040 - .070 (1.016 - 1.778 mm)
GAP LOCATION
CHOKE ADJUSTING
TOOL
670326
HIGH SPEED
PIN POSITION
Þ
14
TAB
CONTROL
LEVER
HIGH SPEED
PIN POSITION
DECREASE
INCREASE
15
NOTE: Some engines use nylon bushings on the throttle
and choke linkage hook-up points to extend the life of
the linkage and to enhance the stability of the governor
system. Mak e sure they are in good condition and in place.
ADJUSTING RPM ON MEDIUM FRAME
VERTICAL
(up/down speed control)
T o adjust the high speed RPM on Medium F rame V ertical
engines, move the control lever to the high speed pin
position (align high speed pin holes in the speed control
bracket). Place the slot on the straight end of tool (number
670326) onto the high speed adjustment tab as pictured.
Rotate the bent end of the tool counterclockwise to
increase RPM and clockwise to decrease RPM. (diag.
15).
30

HORIZONTAL SHAFT ENGINES
Main Menu
IDLE SPEED
CRACK SCREW
HORIZONTAL LIGHTWEIGHT
IDLE SPEED
CRACK SCREW
HIGH SPEED
RPM
ADJUSTMENT
SCREW
16
IDLE SPEED
CRACK SCREW
LIGHTWEIGHT R.V. TYPE
HIGH SPEED
RPM
ADJUSTMENT
SCREW
HIGH SPEED
RPM
ADJUSTMENT
SCREW
17
IDLE SPEED
CRACK SCREW
HORIZONTAL MEDIUM FRAME
HIGH SPEED RPM
ADJUSTMENT SCREW
IDLE
MIXTURE
SCREW
MAIN
MIXTURE
SCREW
SMALL FRAME
19
18
IDLE SPEED CRACK SCREW
HIGH SPEED RPM
ADJUSTMENT SCREW
CONSTANT SPEED APPLICATIONS
20
31

HORIZONTAL SHAFT ENGINES (CONTINUED)
Main Menu
HIGH SPEED RPM
ADJUSTMENT SCREW
IDLE SPEED
SCREW
IDLE MIXTURE
SCREW
IDLE SPEED
CRACK SCREW
HORIZONTAL MEDIUM FRAME
IDLE MIXTURE
21
IDLE SPEED
CRACK SCREW
HIGH SPEED RPM
ADUSTMENT SCREW
MEDIUM FRAME
SCREW
HMSK80-100
23
MAIN MIXTURE
SCREW
22
32
BEND LOOP OPEN OR
CLOSED TO ATTAIN
OPERATING RPM'S
SNOW KING ENGINES
IDLE SPEED
CRACK SCREW
MAIN MIXTURE
SCREW
24
TO INCREASE SPEED - CLOSE LOOP
TO DECREASE SPEED - SPREAD LOOP
SNOW KING ENGINES
25

VERTICAL SHAFT ENGINES
Main Menu
HIGH SPEED
ADJUSTMENT
SCREW
IDLE SPEED
CRACK SCREW
VERTICAL SHAFT ENGINES
26
BEND Ó TO INCREASE SPEED
BEND Ô TO DECREASE SPEED
TNT 100 VERTICAL ENGINES
27
TVS 115 ENGINE WITH "SNAP IN"
SPEED CONTROL
IDLE SPEED
CRACK SCREW
IDLE MIXTURE
SCREW
TVXL 220 WITH HORIZONTAL SPEED CONTROL
28
STANDARD TVM ENGINE WITHOUT GOVERNOR
OVERRIDE
3029
33
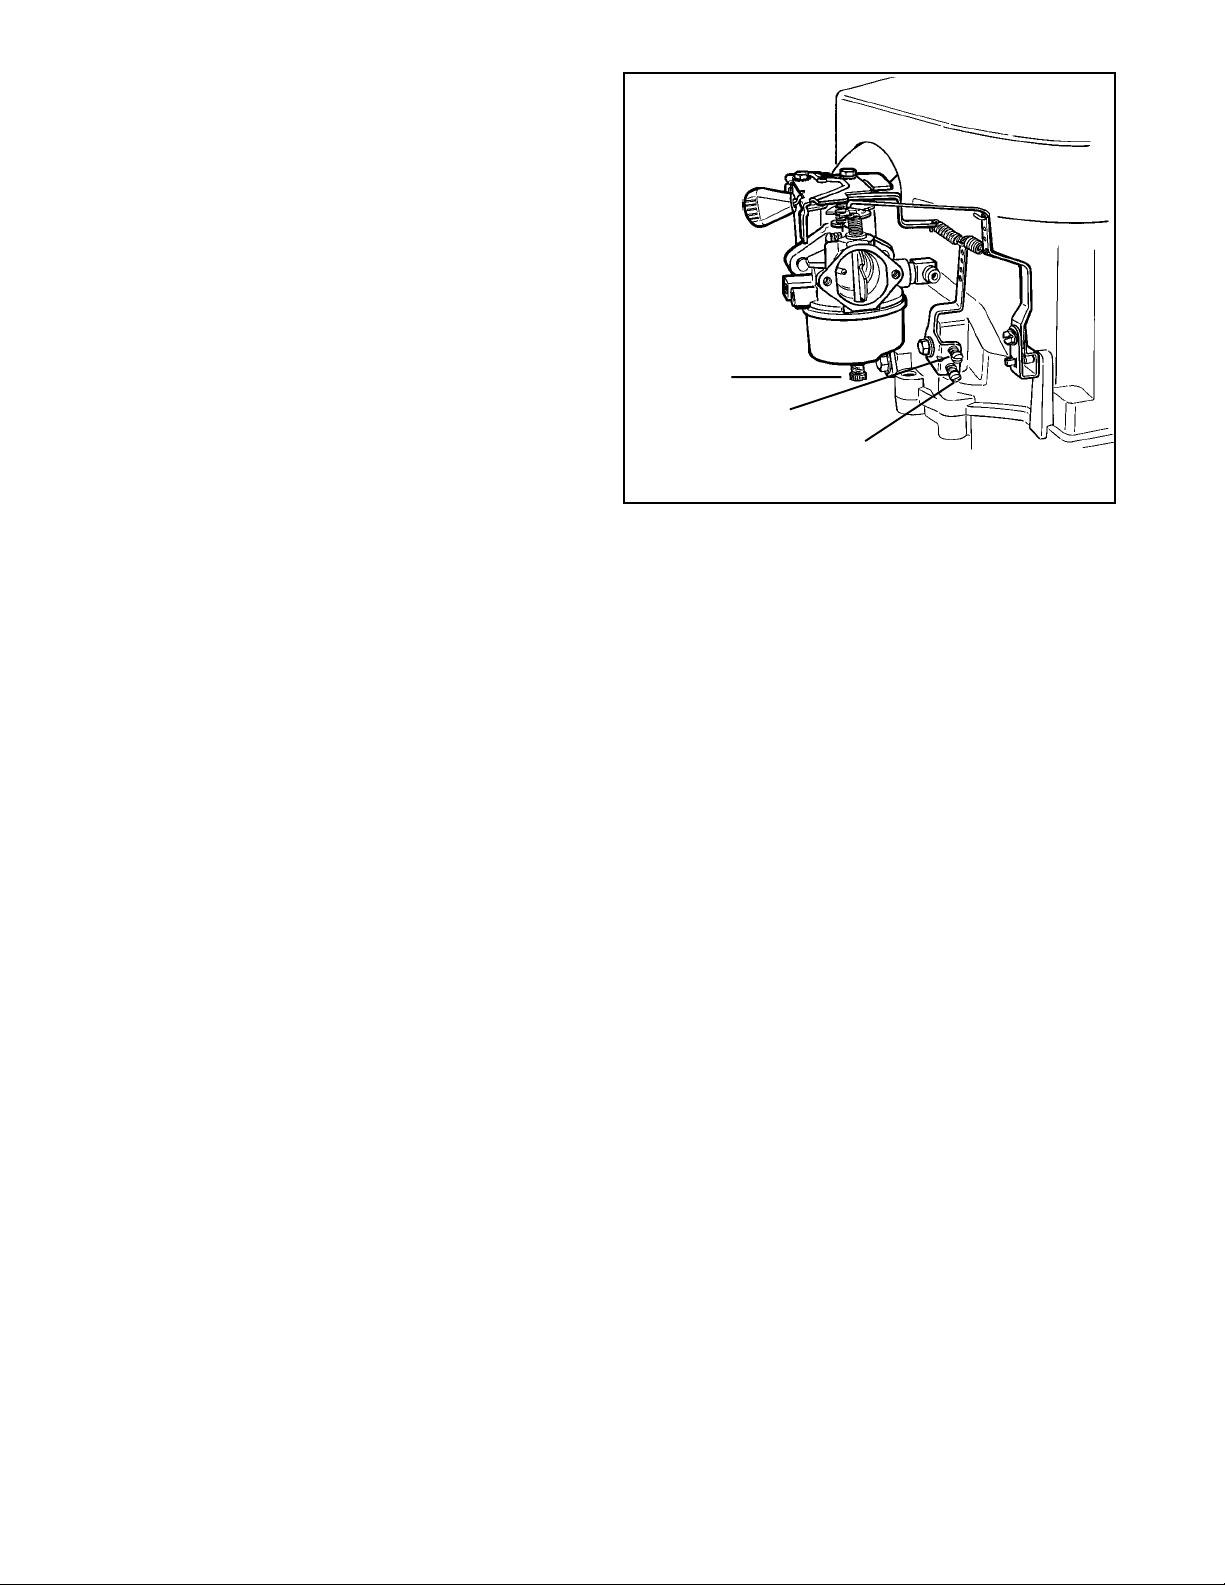
GOVERNOR OVERRIDE SYSTEM FOR
Main Menu
TVM170, 195 AND 220 ENGINES
This system will be found starting on 1985 production
models, and will not retrofit onto older engines. It is
designed to allow the governor to regulate the low and
high speeds of the engine. The high speed is adjusted at
the top screw of the override lever; to increase R.P.M.
turn the screw out (counterclockwise), to decrease R.P.M.
turn the screw in (clockwise). The low speed is adjusted
at the bottom screw of the override lever; to increase
R.P.M. turn the screw in or clockwise, to decrease R.P.M.
turn the screw out or counterclockwise (diag. 31).
GO VERNED / NON-GOVERNED IDLE
With the engine throttle set at its lowest speed, set the
governed idle at the designated RPM by bending the idle
RPM tab or adjusting a screw . Next set the non-go verned
idle by pushing the bottom of the governor lever away
from the control brackets, so the throttle lever contacts
the idle speed screw. Hold the lever in this position and
turn the idle adjustment screw clockwise to increase or
counterclockwise to decrease engine idle speed. The
setting on the carburetor screw should be set 600 RPM
below the governed idle setting. This setting pre v ents the
throttle plate from closing when going from high speed
RPM to low speed RPM. If improperly adjusted, the engine
could experience an over lead condition.
MAIN MIXTURE
SCREW
HIGH SPEED
ADJUSTMENT SCREW
LOW SPEED ADJUSTMENT SCREW
TVM ENGINES WITH GOVERNOR OVERRIDE
31
34

CHAPTER 5 REWIND STARTERS
Main Menu
GENERAL INFORMATION
Rewind starters used on vertical shaft Tecumseh engines are top mount horizontal pull style or side mount vertical
pull style. Horizontal shaft engines use side mounted starters which can be mounted to pull either vertically or horizontally.
All rewind starters except the vertical pull style turn the engine over by engaging a dog(s) into the starter cup attached
to the engine flywheel. The vertical pull starter engages the starter gear into the ring gear of the flywheel to tur n the
engine over. All starters are spr ing loaded to retract the dog(s) or starter gear when the engine speed exceeds the
turning speed of the star ter.
OPERATION
As the starter rope is pulled, the starter pulley rotates on the center pin. The starter dog(s) is pinned or pocketed in the
pulley hub and extends outw ard when the pulley's rotation f orces the starter dog(s) to contact the ears on the retainer.
The retainer ears act as a ramp to fully extend the starter dog(s). The fully extended star ter dog(s) locks in contact
with notches in the starter cup. When the engine fires and the rotational speed of the starter cup exceeds the starter
pulley, the star ter dog(s) disengages from the starter cup. The starter dog spring(s) returns the starter dog(s) to the
disengaged position. The recoil spring turns the starter pulley in the opposite direction, retracting the starter rope until
the handle contacts the stop.
COMPONENTS
HANDLE
ROPE
PULLEY AND REWIND
SPRING ASSY.
STARTER DOG
STARTER HOUSING
DOG SPRING
WASHER
RETAINER
BRAKE SPRING
WASHER
SPRING PIN
1
HANDLE
DOG SPRING
RETAINER
BRAKE SPRING
HOUSING
SPRING & KEEPER
PULLEY
DOG
BRAKE WASHER
CAM DOG
CENTER SCREW
2
SERVICE
Starter related problems will require the starter to be removed from the engine to diagnose the cause. Visually inspect
the starter dog(s), starter cup, retainer, springs, rope, washers, and the starter pulley for wear or breakage. Use one
of the following procedures that applies to your application, to disassemble, repair, and assemble the starter. Always
consult the Tecumseh Master Parts Manual for the correct replacement parts.
ROPE SERVICE
Rope replacement should be done using the correct part number replacement rope or braided rope of the correct
diameter and length. Consult the Tecumseh Master Parts Manual to obtain the correct part number, length, and size
required. Use the following rope chart to convert a numbered rope to a fractional diameter for bulk rope use.
# 4 1/2 rope = 9/64" (3.572 mm) diameter Part No. 730526 100' (30.48 meters) spool
# 5 rope = 5/32" (3.964 mm) diameter Part No. 730514 100' (30.48 meters) spool
# 6 rope = 3/16" (4.762 mm) diameter Part No. 730516 100' (30.48 meters) spool
35

Standard rope lengths
Main Menu
54" (16.5 meters) standard stamped steel star ter
61" (18.6 meters) vertical pull - horizontal engagement
type
65" (20 meters) ver tical pull - vertical engagement
type
85" (26 meters) extended handlebar rope start
(compliance)
Check the old rope for the right length for the application.
Some applications require longer lengths. The rope ends
should be cauterized by burning with a match and wiping
the rope end with a cloth while hot.
LEFT-HAND
KNOT
Rope replacement can be done without the starter being
disassembled on vertical pull starters that have "V"
notches in the bracket. Use the following procedure for
rope replacement.
1. Remove the starter assembly from the engine.
2. Turn the pulley until the staple in the pulley lines up
with the "V" notch. Pry out the staple with a small
screwdriver and remove the original rope (diag. 3).
3. Turn the pulley counterclockwise to fully wind the
starter return spring until tight. Allow the pulley to
unwind until the hole in the pulley lines up with the
"V" notch.
4. Hold the pulley in this position and f eed the new rope
through the hole and tie a left-handed knot on the
rope end. Make sure the rope and knot do not
protrude from the knot cavity and bind the pulley
rotation.
RETAINER REPLACEMENT (DIAGRAM 4)
1. Remove the starter handle if the retainer is a complete
circle design. Remove the staple and old retainer.
2. Slide the rope retainer into the proper position and
insert the staple using a pliers.
3. Install the starter handle and tie a left hand knot to
secure the handle.
STYLIZED REWIND ST ARTER (TVS, HM, TVM,
TVXL), AND ST AMPED STEEL ST A RTER (HM,
VM, TVM, TVXL)
ONE PIECE ROPE RETAINER
HANDLE
ROPE
PULLEY AND REWIND
SPRING ASSY.
STARTER DOG
STARTER HOUSING
DOG SPRING
WASHER
RETAINER
BRAKE SPRING
WASHER
SPRING PIN
3
4
5
Disassembly Procedure
1. After removing the rewind assemb ly from the engine
2. Place a 1" (25 mm) deep well socket under the
3. Use a 5/16" (7.938 mm) or 1/4" (6.35 mm) (for
36
blower housing, release the tension on the rewind
spring. This can be done by removing the starter
handle and carefully allowing the rope to unwind in
the starter housing assembly.
retainer. Set the rewind on a bench, suppor ted on
the socket.
stamped steel) roll pin punch to drive out the center
pin. The stamped steel center pin is driven out from
the top, inside the center hole. Mov e the punch around
while driving the pin to help keep the pin straight.
6

CAUTION: THIS REWIND SPRING IS NOT SECURED IN A CANISTER. PULLEY BOSSES HOLD THE
Main Menu
REWIND SPRING AND COVER, AND CAN BE EASILY DISLODGED DURING HANDLING.
4. Remove the brake spring, spring retainer, washers, and pulley assembly (diag. 7, 8, 9 & 10)
NOTE: THE STARTER DOGS FACE OUT ON THE STAMPED STEEL STAR TER AND THE DOGS FACE IN ON THE
STYLIZED REWIND STARTER.
5. All components in need of service should be replaced.
SPRING PIN 1/8"
FROM TOP
Assembly Procedure
STARTER HOUSING
LEFT-HAND
KNOT
HANDLE
NOTE: It is critical to support the starter on a deep well
socket to prevent damage.
1. Reverse the disassemb ly procedure. The starter dogs
with the dog springs must snap back to the center of
the pulley (disengaged position). When the rope is
pulled, the tabs on the retainer must be positioned
so that they will force the starter dogs to engage the
starter cup. (diag. 7 & 8)
2. Always replace the center spring pin with a new one
upon reassembly. Place the two new plastic washers
between the center leg of the starter and the retainer.
New plastic washers are provided with a new center
spring pin. Discard the old plastic washer.
ROPE
HANDLE INSERT
PULLEY AND REWIND
SPRING ASSY.
STARTER DOG
BRAKE SPRING
SPRING PIN
DOG SPRING
WASHER
RETAINER
WASHER
7
3. Place the rewind on a flat surface and drive the new
center pin in until it is within 1/8" (3.175 mm) of the
top of the starter.
NOTE: DO NO T DRIVE THE CENTER PIN IN TOO FAR.
The retainer will bend and the starter dogs will not
engage the starter cup. On the stamped steel starter
the center pin should be driven in until it contacts the
shoulder in the starter body.
4. Wind the starter pulley counterclockwise four or five
turns to pre-load the recoil spring, thread the rope
through the starter housing eyelet and tie a temporary
knot in the rope. Reattach the starter handle to the
rope using a left-hand knot. Untie the tempor ary knot
and allow the rope to recoil.
STYLIZED REWIND STARTER WITH
PLASTIC RETAINER
Disassembly Procedure
1. After removing the rewind assembly from the engine
blower housing, remove the starter handle by first
pulling a length of rope out using the handle, tying a
temporary knot in the exposed rope, and either
untying the knot in the handle or prying out the staple.
2. Untie the temporar y knot and slowly allow the rope
to fully retract into the starter housing and the recoil
spring to fully unwind.
3. Remove the decal from the center of the starter
housing.
SPRING PIN 1/8"
FROM TOP
STARTER
HOUSING
HANDLE
ROPE
PULLEY AND REWIND
SPRING ASSY.
DOG SPRING
STARTER DOG
WASHER
RETAINER
BRAKE SPRING
WASHER
SPRING PIN
8
4. Use a small Phillips screwdriver or similar tool to pry
the retainer legs apart and lift out the retaining wedge
(or steel clip on newer style starters).
5. Pinch the legs of the retainer together and pull on
the head of the retainer to remove it from the housing.
6. Remove the pulley assembly from the recoil housing.
7. Repair or replace as necessar y.
37

Assembly
Main Menu
1. If replacing the starter rope, see Step 8.
Extreme caution should be used when working
with springs. Always where appropriate safety
equipment.
2. Install a new recoil spring if necessar y by pushing
the new spring out of the holder into the pulley cavity
while aligning the outside spring hook into the deep
notch in the pulley. Push the spring cover in until
seated.
3. Apply a small amount of lithium grease to the inner
bore of the center shaft.
LEFT-HAND
KNOT
RETAINING WEDGE
(STEEL CLIP - NEW STYLE)
STARTER
HOUSING
STARTER PULLEY
SPRING & COVER
4. Replace or check that both starter dogs are in the
pulley pockets and that the dog springs are hooked
on the outer surface of the dog.
5. Pinch the two legs of the plastic retainer together
and start into the center shaft hole.
6. Rotate the retainer so the two tabs on the bottom of
the part fit between the dog and pulley hub (left side
of the dog). Push the retainer in until the leg prongs
pop out of the center shaft.
7. Turn the starter over and snap the locking tab
between the retainer legs, replace the top decal.
NOTE: Ref er to Service Bulletin 122 for steel locking
clip.
8. Wind the starter pulley counterclockwise four or five
turns to pre-load the recoil spring and thread the rope
through the starter housing eyelet. Pull enough rope
through to tie a temporary knot in the rope. Reattach
the starter handle to the rope using a left-hand knot.
Untie the temporary knot and allow the rope to recoil.
STANDARD STAMPED STEEL AND CAST
ALUMINUM STARTER (HM, VM)
Disassembly Procedure
1. Untie the knot in the rope and slowly release the
spring tension.
HANDLE
DOG SPRING
STARTER DOG
DOG RETAINER
9
STARTER
HOUSING
REWIND
SPRING AND
KEEPER ASSY.
2. Remove the retainer screw, retainer cup (cam dog
3. Turn the spring and keeper assembly to remove the
Assembly Procedure
1. Place the rewind spring and keeper assembly into
38
on snow proof type), starter dog(s) and dog spring(s),
and brake spring (diag. 10).
pulley. Lift the pulley out of the starter housing.
Replace all worn or damaged parts.
the pulley. Turn the pulley to lock into position. A light
coating of non-freeze grease should be applied on
the spring.
HANDLE INSERT
ROPE
PULLEY
CAM DOG
WASHER
DOG SPRING
STARTER DOG
DOG RETAINER
RETAINER SCREW
BRAKE SPRING
SPRING PIN
10
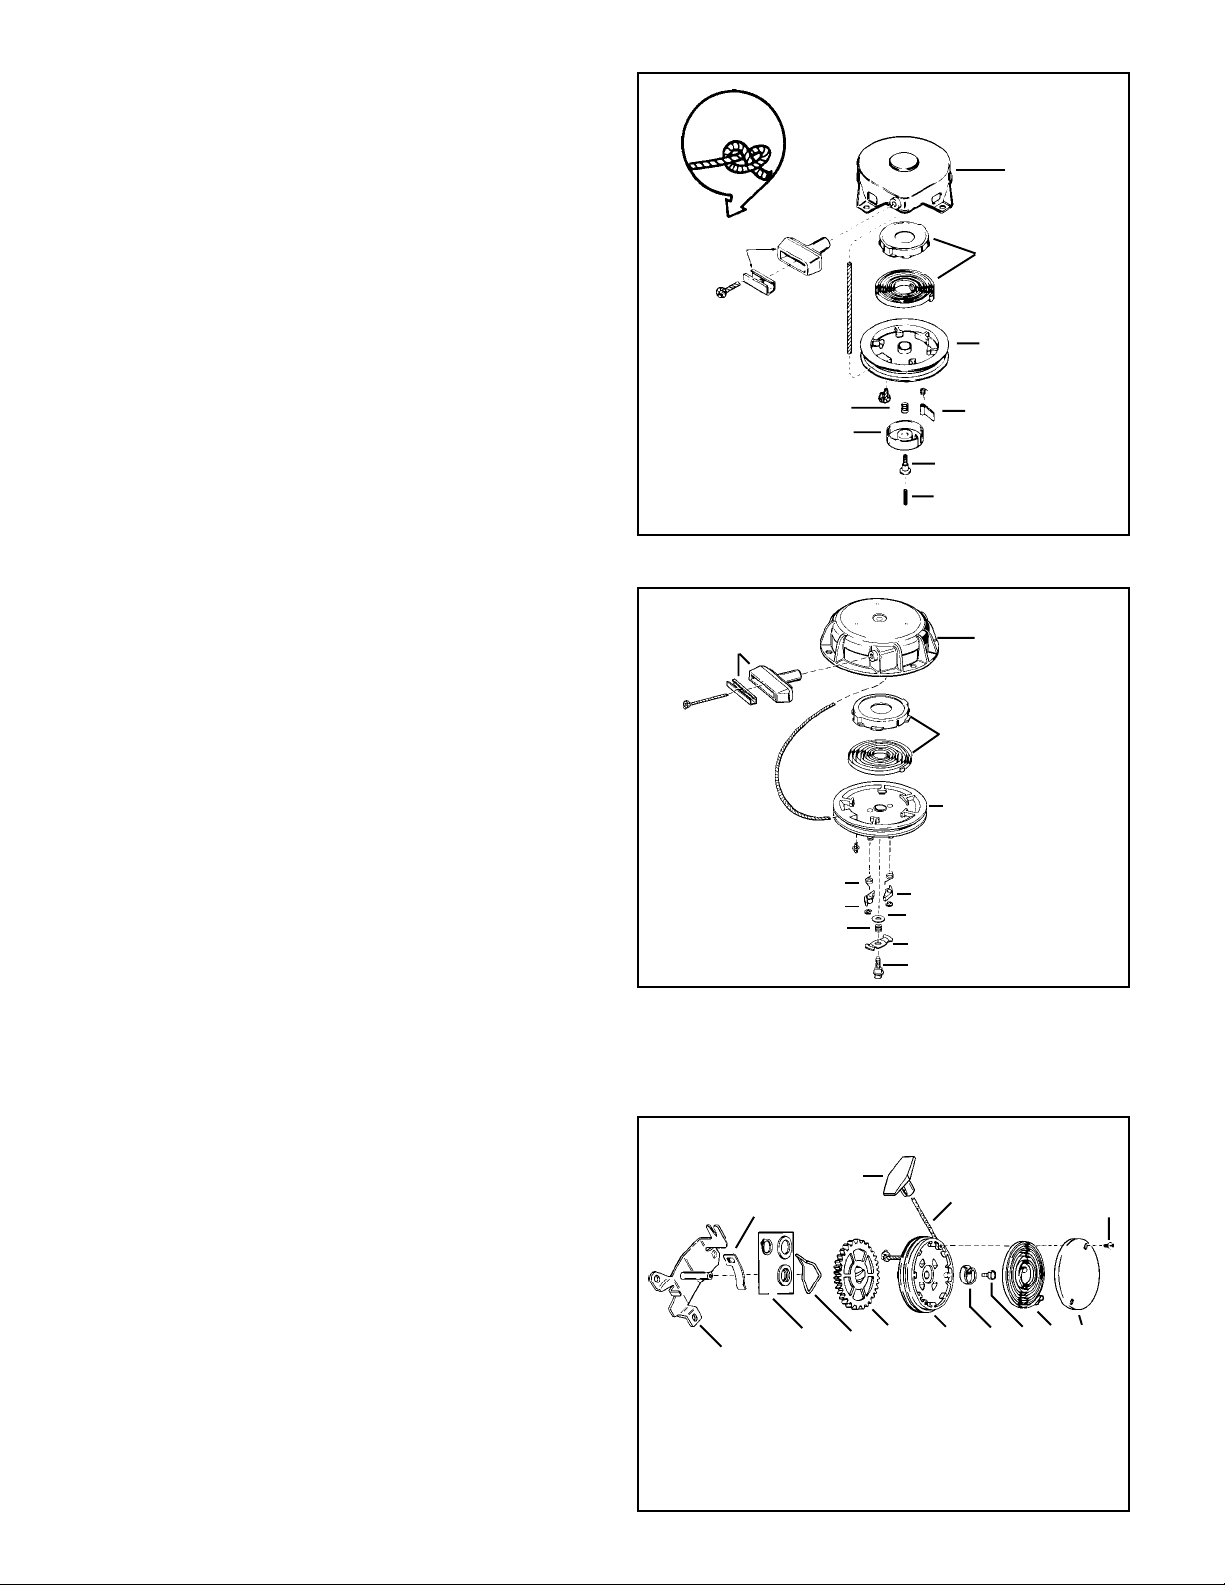
2. Place the pulley assembly into the starter housing.
Main Menu
3. Install the brake spring, star ter dog(s), and starter
dog return spring(s). The starter dog spr ing(s) must
hold the dog(s) in against the pulley. On Snow King
engines the starter dog posts should be lubricated
with S.A.E. 30 engine oil.
4. Replace the retainer cup (cam dog on snow proof
starter) and retainer screw. Tighten to 65 - 75 in. lbs.
Older models that use a 10 - 32 retainer screw can
be replaced with a larger 12 - 28 screw (part #
590409A). Re-drill the screw hole using a 13/64"
(4.35 mm) drill bit. The center screw torque on cast
aluminum starters is 115 to 135 in. lbs (13 - 15 Nm)
(diag. 11 & 12).
5. Add-on alternator starters must have the center
tubular rivet replaced each time the tubular rivet is
removed. The tubular rivet should be pressed to a
depth of 1/4" (3.175 mm) from the top of the starter
housing. Skip this step if not applicable.
6. Apply tension to the recoil spring by winding the pulley
counterclockwise until it becomes tight, then allow
the pulley to unwind until the hole in the pulley lines
up with the rope eyelet in the starter housing. Install
a knotted rope through the pulley and the eyelet and
install the handle. A left-hand knot should be tied on
the end of the rope to secure the handle.
LEFT-HAND
KNOT
HANDLE
BRAKE SPRING
HANDLE
HOUSING
SPRING &
KEEPER ASSY.
PULLEY
DOG SPRNG
RETAINER
RETAINER SCREW
CENTER PIN
11
HOUSING
7. If a center ing pin is used, be sure to align with the
crankshaft (bottom pin in center screw hole). Install
nylon sleev e 1/8" (3.175 mm) onto pin. P osition nylon
sleeve in aligning recess in the crankshaft. START
two mounting screws in blower housing 90o apart.
With sleeve centered in crankshaft, gently push the
starter in place, tighten the two mounting screws,
insert and tighten the other two screws.
VERTICAL PULL STARTER HORIZONTAL
ENGAGEMENT TYPE
Disassembly Procedure
1. Remove the handle and relieve the starter spring
tension by allowing the rope to slip past the rope clip .
2. Remove the spring cover by carefully removing the
two small screws. Carefully take out the spring.
3. Remove the center hub screw and the spring hub.
4. Lift off the gear and pulley assembly. Disassemble
the pulley assembly by removing the snap ring and
washer (diag. 13).
DOG SPRING
RETAINER
BRAKE SPRING
HANDLE
ROPE CLIP
THRUST WASHER
MOUNTING
BRACKET
AND SNAP SCREW
SPRING &
KEEPER
PULLEY
DOG
BRAKE WASHER
CAM DOG
CENTER SCREW
GEAR
BRAKE SPRING
PULLEY
ROPE
SPRING HUB
SCREW
SPRING
SCREW
12
COVER
5. Remove the starter rope if necessar y. Replace all
13
39

worn or damaged parts.
Main Menu
Assembly Procedure
1. Insert the rope through the starter pulley.
LEFT-HAND
KNOT
2. Assemble the gear, pulley, washer, and snap ring.
3. Place a small amount of grease on the center shaft,
place the gear and pulley into position making sure
the brake spring loop is positioned over the metal
tab on the bracket. The rope clip must fit tightly onto
the bracket. The raised section fits into the hole in
the bracket (diag. 14 & 15).
4. Install the hub and hub screw. Torque the hub screw
to 45 - 55 in. lbs. (5 - 6 Nm). A loose hub screw will
prevent the rope from retracting.
5. Install the return spring if necessary. A replacement
spring is installed by placing the spring and its retainer
over the top of the pulley and pushing the spring out
of the retainer into the pulley's recessed area.
6. Install the spr ing cover and the cover screws.
7. Wind the rope onto the pulley by slipping it past the
rope clip. When the rope is fully wound on the pulley ,
wind the pulley assembly two additional turns to put
tension on the spring.
8. Mount the starter on the engine making sure the top
of the starter gear teeth are no closer than 1/16"
(1.59 mm) from the top of the flywheel ring gear teeth.
ROPE CLIP
RECEPTACLE
FOR RAISED
SECTION
RAISED SPOT
14
MOUNTING BRACKET
TAB MUST FIT INTO
SPRING LOOP
BRAKE
15
VERTICAL PULL STARTER, VERTICAL
ENGAGEMENT TYPE
Disassembly Procedure
1. Pull out enough rope to lock the rope in the "V" of the
bracket.
2. Remove the handle if necessary by prying out the
small staple in the handle with a screwdriver.
3. Place the star ter bracket on the top of a deep well
socket that is large enough to receive the head of
the center pin. Use an arbor press to drive out the
center pin.
4. Rotate the spring capsule strut until it is aligned with
the legs of the brake spring. Insert a nail or pin no
longer than 3/4" (19.05 mm) through the hole in the
strut so it catches in the gear teeth. This will k eep the
capsule in the wound position (diag. 16).
5. Slip the sheave out of the bracket.
CAUTION: DO NOT ATTEMPT TO REMO VE THE
SPRING CAPSULE FROM THE SHEAVE
ASSEMBLY UNLESS THE SPRING IS FULLY
UNWOUND.
ROTATE
COUNTERCLOCKWISE
STRUT
PIN
16
6. Squeeze and hold tightly by hand the spring capsule
40

at the outer edge against the gear sheave.
Main Menu
7. Remove the retainer pin from the strut and slowly
relieve the spring tension by allowing the spring
capsule to rotate slowly under control, until completely
unwound. The spr ing capsule can now be removed
from the gear sheave.
Assembly Procedure
ORIGINAL INSTALLATION WITH STAPLE
INSTALL NEW
ROPE BY TYING
LEFT-HAND
KNOT
LEFT-HAND
KNOT
1. Feed the new rope through the hole and tie a lefthanded knot on the rope end. Make sure the rope
and knot do not protrude from the knot cavity and
bind the pulley rotation (diag. 17).
2. Wind the rope on the sheave assembly clockwise,
viewing the gear from the gear side of the sheave.
3. Reinstall the brake spring, being careful not to spread
the spring more than necessary.
4. Install the spr ing capsule, making sure the starter
spring end hooks on the gear hub (diag. 18).
5. Wind the spr ing four full turns and align the brake
spring legs with the strut as shown. Insert the pin in
the strut (diag. 19).
6. If the starter is equipped with a locking or delay pawl
and spring, make sure these are in place before
grasping the gear and spring capsule assembly and
sliding it into the bracket. Make sure the legs of the
brake spring are positioned in the slots of the brack et.
7. Feed the rope end under the rope guide and hook it
into the "V" notch. Remove the pin and the strut will
rotate clockwise against the bracket (diag. 21).
8. Inser t the new center pin by pressing or driving the
pin firmly in place. Reinstall the starter assembly on
the engine (diag. 21).
GEAR HUB
STARTER SPRING
END
SPRING HOOKED ON
GEAR HUB
REINSTALL
LEFT-HANDED
KNOT
ROTATE SPRING
18
PRY STAPLE
OUT TO
REMOVE OLD
ROPE
17
4 FULL TURNS
19
PAWL SPRING *
"V"ROPE WEDGE
BRAKE
CLIP *
KEY*
ROPE CLIP
BRACKET
STARTER HANDLE
ROPE
PULLEY
* USED ON SOME MODELS
SPRING
ASSY.
STRUT
PAWL
LOCKING PAWL*
PIN
20
GUIDE BRAKE ENDS
THROUGH SLOT
WHEN PIN IS REMOVED STRUT
WILL ROTATE 45o CLOCKWISE
21
41

CHAPTER 6 ELECTRICAL SYSTEMS
Main Menu
GENERAL INFORMATION
The electrical system consists of three main elements: a battery, a starting circuit, and a charging circuit. The battery
is part of both the starting and charging circuit. The battery should be checked before going into any extensive starter
or charging system checks. If a battery has a shorted cell, overcharging can result, and the regulator or rectifier may
appear to be at fault. If a cell has an open or high resistance connection, the electric starter operation will be affected.
The power source used to provide the energy to turn an electric starter motor on Tecumseh engines is either 120 volt
A.C. current or 12 volt D.C. An A.C. starter circuit utilizes a 120 volt power source instead of a battery. The 12 volt
battery models require a charging system to maintain proper batter y charge.
The starting circuit includes the batter y, battery cables, starter or ignition switch, safety switches, and an electric
starter motor.
The charging system consists of alternator charge coils, rectifiers or diodes, regulator, ignition s witch, flywheel magnets,
and a battery. All engines that have a charging system will use a combination of some or all of these features.
OPERATION
STARTING CIRCUIT AND ELECTRIC
STARTERS
After all of the safety interlock switches have been
activated, the starter switch will complete the circuit. A
strong magnetic force is produced by the electrical current
running through the armature windings. The armature
magnetism repels the magnetism produced by the
permanent field magnets of the electric starter. The
repelling magnetic forces cause the armature to rotate,
moving the drive pinion laterally on the splined armature
shaft, meshing the starter pinion gear with the flywheel
ring gear. When the drive pinion contacts the stop at the
end of the armature shaft, the pinion rotates along with
the armature shaft to crank the engine. The armature and
pinion remain positively engaged until the engine fires
and the flywheel rotates faster than the armature. The
greater momentum of the flywheel throws the starter
pinion gear out of mesh and forces the starter pinion back
to the disengaged position. After the switch is released,
the starting circuit is opened and the armature coasts to
a stop. A small anti-dr ift spring holds the pinion in the
disengaged position (diag. 1).
CHARGING CIRCUIT
When a conductor (alternating coils) cuts the magnetic
field generated by the magnets in the flywheel, a current
will be induced in the alternator coil. The permanent
magnets in the flywheel have a magnetic field in which
the lines of magnetic force run from the North Pole to the
South Pole. As the flywheel rotates and the position of
the magnets change, the direction of the magnetic field
changes or alternates. The alternating coils are wound in
different directions to allow current to flow as an A.C.
wavefor m (diag. 2).
BRUSH CARD
HOUSING
SPRING
RETAINER
RETAINER
BRUSHES
BRUSH SPRINGS
DUST COVER
ROTA TION OF FLYWHEEL
SPRING
LOCK NUT
BOLT
GEAR
END CAP
WASHER
NUTS
ARMATURE
THRUST WASHER
END CAP
ENGAGING NUT
1
42
2

CONVERTING ALTERNATING CURRENT TO
Main Menu
DIRECT CURRENT
ANODE
CATHODE
In order to charge a battery, it is necessary to convert
alternating current (A.C.) to direct current (D.C.). This is
accomplished by using a diode or rectifier (diag. 3). A
DIRECTION OR FLOW OF CURRENT
Ý
BAND OR OTHER
MARKING INDICATES
CATHODE END
single diode makes use of only one half of the A.C. signal
and is known as HALF W AVE RECTIFICA TION (diag. 4).
This is acceptable in certain applications. In certain
3
situations it is necessary to make use of the entire A.C.
signal. To accomplish this, multiple diodes in a bridge
configuration are used to produce FULL WAVE
RECTIFICATION (diag. 5).
Current flows through a diode when the anode is more positive than the cathode. The cathode end of the diode should
point toward the battery when diode is used between a charging system and a battery.
HALF WAVE RECTIFIER SINGLE DIODE
The single diode allows only the positive half of the A.C. signal through. It does not allow the negative portion through.
HALF WAVE RECTIFIER
+ VOLTAGE
(SINGLE DIODE)
+ VOLTAGE
A.C. INPUT
- VOLTAGE
FULL WAVE RECTIFIER (BRIDGE
RECTIFIER)
- VOLTAGE
+ VOLTAGE
FULL WA VE RECTIFIER
(BRIDGE RECTIFIER)
D.C. OUTPUT
4
The full wave rectifier mak es use of the entire A.C. signal,
converting it to D.C.
COMPONENTS
BATTERY
- VOLTAGE
A.C. INPUT
+ VOLTAGE
A.C. INPUT
+ VOLTAGE
(D.C.)
The batteries used in conjunction with Tecumseh engines
are 12 volt lead acid or “maintenance free” style. The
chemical energy produced by the dissimilar metals of the
battery plates provides a electrical potential that is used
to power the electric starter or unit accessories. Consult
- VOLTAGE
D.C. OUTPUT
5
the original equipment manufacturer’s service manual f or
battery size, capacities, and testing procedure.
WIRING
The wires used in Tecumseh electr ical systems are copper stranded with an insulated coating around the copper
strands.
CONDITION: All wiring must be fully insulated between connection points, securely fastened and free of foreign
material (such as rust and corrosion) at the connection points. This is especially important in the use of batteries
where much of the potential may be lost due to loose connections or corrosion. Remember to check the insulation on
the wire. All it takes is a pin hole to "ground out" on the engine or frame. This is of special concern when moisture or
water is present. This may cause the engine to run erratically or be impossible to start.
43

WIRE GAUGE: The proper thickness of wire is necessary
Main Menu
in all electrical circuits. Wire diameter is measured in
increments of gauge numbers. As the gauge number of
the wire increases, the wire diameter decreases in size
THE LARGER THE NUMBER THE SMALLER THE WIRE
# 18
(diag.6).
1. The starter circuit wiring must be rated at #6 or lo wer
gauge number.
# 6
2. The charging circuit wir ing must be rated at #16 or
lower gauge number (20 amp system requires #14
or lower gauge number).
3. The magneto circuit wir ing (ground circuit) must be rated at #18 or lower gauge number.
Tecumseh's standard engine wiring color codes, effective August, 1992 are as follows:
Code Product
Yellow - Alternator A.C. Leads
Red - Alternator D.C. + Leads
Brown - Alter nator D.C. - Leads
Black - Alternator Ground Leads, Battery Ground Leads
Orange - 12 Volt Starter B + Leads
Dark Green - Ignition Shut-Off Leads
6
NOTE: PRIOR TO AUGUST 1992, WIRE CODES CHANGED ACCORDING TO MODEL AND SPECIFICATION
NUMBERS.
ELECTRICAL TERMS
AL TERNAT OR - An alternator consists of coils of wire
wound around a metal lamination stack. When a magnet
is moved past the coils, a current is induced in the coils.
In general, the greater the number of coils, the greater
the output of the alternator (diag. 7).
IGNITION COIL - The ignition coil is used to fire the spark
plug. It is completely independent from the alternator coils.
RECTIFIERS and DIODES - Charging a battery requires
that the alternating current produced by the alternator
be changed to direct current. This is accomplished by
using a diode or rectifier.
REGULATOR/RECTIFIERS - This combines a regulator
with a rectifier. The regulator prevents overcharging of
the battery and the rectifier changes the alternating
current to direct current (diag.8, 9, 10).
CONDUCTORS - A conductor is a material that allows
an electric current to pass through it. All metals are
conductors of electricity , but some are better conductors
than others. Silv er, copper and gold are some of the better
known conductors. As the temperature of the conductor
increases, the resistance increases.
7
8
9
INSULATORS - An insulator is a material that will not
allow an electric current to pass through it. Some of the
more common materials that are insulators are glass,
plastic, rubber, ceramics and porcelain.
44
10

BASIC CHECKS
Main Menu
Before going into extensive checks, be sure to perform the more basic checks first, such as:
1. Battery defective or not charged.
2. Corroded or loose ter minals and connections, or wrong connections.
3. Cracked insulation or broken wires.
4. A wire "grounding out" in the system.
5. Defective switch.
6. Operator presence system functioning proper ly.*
*NOTE: ALL LAWN AND GARDEN TRACTORS BUILT AFTER JULY OF 1987 ARE REQUIRED TO HAVE AN
OPERATOR PRESENCE SYSTEM AND MANY CAME EQUIPPED WITH SUCH A SYSTEM PRIOR T O THIS D ATE.
IF THE TRACT OR IS "CUTTING OUT" OR WILL NOT START , THIS IS AN AREA THAT SHOULD BE CHECKED OUT.
45

TROUBLESHOO TING ELECTRICAL STARTER CIRCUIT FLOW CHART
Main Menu
NO
Repair or
replace power
source
Starter will not
turn
Is there power
at the power
source?
Check wiring,
connections,
safety switches,
starter switch
NO
YES
Intermittent
starter operation
Is power supplied to the
starter terminal?
NO
Starter turns at
stalls under load
YES
Isolate engine
from the
equipment,
does engine
turn over?
low rpms or
YES
Check starter for
binding brushes,
worn brushes,
dirty or oily
commutator
NO
Internal engine
failure or flywheel
interference
Remove spark
plug, does engine
turn over freely?
NO
Repair or replace
electric starter
YES
Reinstall spark
plug, does
engine bind on
compression
stroke?
Repair or replace
equipment
causing
excessive loading
YES
Check valve lash.
necessary. Does
YES
Internal engine
failure, repair or
replace engine
the engine turn
over without
binding now?
Adjust if
NO
46

TROUBLESHOO TING ELECTRICAL CHARGING CIRCUIT FLOW CHART
Main Menu
Identify the charging system
used by model and specification
number or visually check the
electrical plug
Consult the Technician's
Handbook or Electrical
Troubleshooting booklet for test
procedure for the charging
system used
T est f or either A C or DC voltage
as directed at the proper engine
RPM
NO
Alternator coil
failure, replace
coil assy.
Is AC voltage before diode or
rectifier greater than the minimum
value?
NO
Is the voltage greater than or
equal to the minimum value?
YES
Check diodes,
replace if no
continuity exists or
if continuity exists
reversing test leads
Check fuses,
replace as
necessary
YES
Check wiring, switches, or
ammeter for breaks, shorts
Check switches,
wiring, or lights for
shorts
47

TESTING PROCEDURE
Main Menu
STARTING CIRCUIT
1. Check the power source using an electrical tester and follow the testers recommended procedure. Mak e sure the
battery meets the minimum battery voltage requirements found in the original equipment manufacturer's service
manual.
2. Check the electric starter terminal for the required voltage (12v D.C. or 120 v A.C.) using a voltmeter.
CAUTION: FOLLOW ALL SAFETY PRECA UTIONS WHEN TESTING FOR A.C. V OL TAGE, ELECTRIC SHOCK
CAN KILL.
3. Check wiring, connections, fuses, ignition or starter switch, safety switches, or solenoid for continuity using a
ohmmeter or a continuity light. Repair or replace as necessary.
4. Remove all equipment loads from the engine. Take off all drive belts, chains, and couplers to isolate the engine
from the equipment it is powering.
5. Try to turn the engine over using the recoil assembly if equipped. If the engine doesn’t turn over, a mechanical
binding may be the cause. Chec k for proper lubrication (oil le vel and viscosity), starter gear and flywheel ring gear
interference. If no problem is discovered, the problem is an internal failure.
6. If the engine binds only on the compression stroke, check the engine valve clearance per the specification table
in Chapter 10. If the v alve clearance is within the specifications, the camshaft (compression release) may require
replacement. Valve clearance not within the listed specifications will require either resetting or grinding the valve
stems to obtain the proper clearance.
7. If the engine turns ov er freely, the electric starter should be disassembled and checked. If the preceding steps f ail
to correct the problem, the engine will require disassembly to find the mechanical failure. See Chapter 9 under
"Disassembly Procedure".
CHARGING CIRCUIT
The following pages will show wiring diagrams of several Tecumseh charging systems. The charging system used on
the engine is best identified by obtaining the engine model number and the specification number on the engine.
Consult a Tecumseh dealer or a parts manual to identify the charging system. To make many of the tests it is necessary
to run the engine and measure alternator output with a voltmeter. When making v oltage tests with the engine running,
it is not necessary to take readings at all the listed R.P.M.s. Checking at one of the speeds is sufficient.
In some cases an open circuit D.C. check cannot be made. An SCR (Silicon Controlled Rectifier) is located in the
circuit which requires a minimum “turn on” voltage to allo w it to conduct. Without the battery in the circuit this “turn on”
voltage is not present. The SCR “senses” this and there will be no D.C. output from the regulator or rectifier.
Each charging system has its own testing procedure. T est the charging system using the applicab le procedure on the
following pages.
350 Milliamp Charging System
(+) POSITIVE LEAD
Models: TVS 75-90-100-105-115-120
CHECKING THE SYSTEM: The batter y must be in the
circuit to perform the test properly. Connect a voltmeter
across the battery . The v oltmeter should read the battery
voltage. Start the engine. With the engine running, there
should be an increase in the voltage reading. If there is
no change in the voltage reading, the alternator is
defective and should be replaced. See Chapter 9 for
"Disassembly Procedure" (diag. 11).
NOTE: SET THE VOLTMETER TO THE 0-20 VOLT D.C.
SCALE FOR THE TEST.
MAGNETO GROUND
(GR)
BATTERY
GROUND (BL)
BLACK
(-) ENGINE GROUND
D.C. OUTPUT
LEAD (RED)
ELEC. STARTER
LEAD (ORG)
RED
11
48

18 Watt A.C. Lighting Alternator
Main Menu
Models: H35, HS & HSSK 40-50, HM &
HMSK 70-80-100
CHECKING THE SYSTEM: To check the system,
disconnect the plug from the rest of the lighting system.
Connect a wire lead from the single pin connector coming
out of the engine to one terminal of a No. 4414, 18 watt
bulb. Connect another wire lead to the other terminal of
the bulb and run to a good ground on the engine. Start
the engine and test the circuit using the A.C. voltmeter
as shown (diag. 12).
With the engine running, minimum A.C. voltage across
the bulb should be:
2000 R.P.M. - 6.0 Volts A.C.
ENGINE
YELLOW
3000 R.P.M. - 8.5 Volts A.C.
3600 R.P.M. - 10.0 Volts A.C.
If minimum values are noted, the alternator is okay. If
less than the minimum values, the alternator is defectiv e.
See Chapter 9 for "Disassembly Procedure".
1 Amp (18 Watt) Add-on Alternator
CHECKING THE SYSTEM: To check the system,
disconnect the plug from the rest of the lighting system.
Connect a No. 4414, 18 watt bulb in line with each terminal
in the plug. Start the engine and test the circuit using a
voltmeter as shown (diag. 13).
With the engine running, minimum A.C. voltage values
across the bulb should be:
2000 R.P.M. - 8.0 Volts A.C.
3000 R.P.M. - 10.5 Volts A.C.
3600 R.P.M. - 12.0 Volts A.C.
If minimum values are noted, the alternator is okay. If the
minimum values are not noted, the alternator or A.C.
connector is defective. See Chapter 9 for "Disassembly
Procedure".
#4414 BULB
YELLOW
#4414 BULB
12
YELLOW
13
D.C. Charging Adaptor
Rectifier Bridge Check With Ohmmeter for D.C.
Adaptor
The following tests should be performed without the
engine running to determine the condition of the D.C.
adaptor.
Continuity should exist during one of the two following
tests. No continuity should exist while performing the
opposite test.
If continuity exists during both tests, or if no continuity
exists during both tests, the D.C. adaptor is defective.
TEST NO. 1 - Connect negative probe of meter to red
output lead. Connect positiv e probe of meter to both A.C.
terminals and black output lead (diag. 14).
BLACK
A.C. TERMINALS
(continued on top of next page)
BLACK
RED
OUTPUT LEADS
RED
#4414
BULB
14
49

TEST NO. 2 - Connect the positive probe of meter to red output lead. Connect the negativ e probe of meter to both A.C.
Main Menu
terminals and black output lead.
Connect the negative probe of meter to black output lead. Connect the positive probe of meter to both A.C. terminals
and red output lead.
If the D.C. adaptor is not defective and a known good battery fails to hold a charge, then perform an A.C. output
voltage test.
NOTE: PRIOR TO AUGUST 1992, THE BLACK WIRE WAS BROWN.
CHECKING THE SYSTEM: To check the system, disconnect the D.C. adaptor from the add-on alternator. Connect a
No. 4414, 18 watt bulb in line with each terminal in the alternator. Start engine and test circuit using an A.C. voltmeter
as shown (diag 14).
With the engine running, minimum A.C. voltage values across the bulb should be:
2000 R.P.M. - 8.0 Volts A.C.
3000 R.P.M. - 10.5 Volts A.C.
3600 R.P.M. - 12.0 Volts A.C.
If the minimum values are noted, alternator is okay. If the minimum values are not noted, the alternator or A.C.
connector is defective.
2.5 Amp D.C., 35 Watt Lighting
To check this system follow the meter hook ups at the
right, checking the D .C . negative and D.C . positiv e first. If
output is below standard listed, pull back protective
coating in front of the diode and check A.C. output. If A.C .
is good check each diode it services as requested see
parts list. (diag. 15)
D.C. value (+) or (-) check. A.C. outputs both sides.
R.P.M. D.C . Volts R.P.M. Volts A.C.
2500 - 8.0 Volts D.C . 2500 - 18 Volts A.C.
3000- 9.5 V olts D .C . 3000 - 22 Volts A.C .
3300- 10.5 Volts D .C . 3600 - 26 Volts A.C.
3600- 11.5 Volts D . C.
NOTE: These minimum numbers should be obtained by
your meter and will often be higher.
3 Amp A.C. Lighting Alternator
Models: H & HSK 30- 35, HS & HSSK 40, H &
HSK 50-60, HH50-60, HM & HMSK 70-80-100,
HHM80
Before making any e xterior tests, check for an inoper ative
switch, shorted wires and burned out headlight and/or
stop tail light. To check out the alternator, check the A.C.
lead to ground (diag. 16).
TWO DIODES
A.C.
HEAD & TAIL LIGHT
RED
D.C.
D.C.
YELLOW
TO POSITIVE
SIDE OF
BATTERY
D.C. NEGATIVE
OUTPUT LEAD
(BROWN D.C.)
D.C. POSITIVE
OUTPUT LEAD
(RED D.C.)
15
With engine running, minimum values should read:
2500 R.P.M. - 8.0 Volts A.C.
3000 R.P.M. - 9.5 Volts A.C.
3300 R.P.M. - 10.5 Volts A.C.
3600 R.P.M. - 11.5 Volts A.C.
If the above minimum readings are noted, the alternator
is okay. Check for defective lights, wiring or switches. If
less than the above readings, the alternator is defectiv e.
See Chapter 9 for "Disassembly Procedure".
50
GREEN
YELLOW
IGNITION GROUND
STOP LIGHT
16

NOTE: ON OLDER POINT IGNITION SYSTEMS, THE
Main Menu
A.C. OUTPUT LEADS ARE BLACK AND RED.
3 Amp D.C. Alternator System - Rectifier
Panel
This 3 amp system is readily identified by the rectifier
panel in the circuit. The panel includes two diodes and a
fuse for overload protection. The rectifier panel does not
regulate the output of this system.
CHECKING THE SYSTEM: Check the fuse to determine
if it is good. A continuity light or ohmmeter can detect a
faulty fuse. Replace with a six (6) amp fuse if necessary.
Determine if the diodes are functioning properly. A
continuity light may be used to check diodes. (diag. 17).
GREEN
YELLOW
-
+
17
D.C. VOLTMETER
YELLOW
When replacing the diode in the rectifier panel, locate
the undercut on one end of the diode and match it to the
detent on terminal clip of the rectifier panel.
Test the D.C. output of the rectifier panel as follows:
Disconnect the battery lead from the terminal of rectifier
panel. Use D .C . voltage meter probe on + battery terminal
as shown in the diagram (diag. 18). Connect negative
lead to engine ground.
Minimum values should read:
2500 R.P.M. - 12.0 Volts D.C.
3000 R.P.M. - 14.0 Volts D.C.
3300 R.P.M. - 16.0 Volts D.C.
3600 R.P.M. - 18.0 Volts D.C.
If these minimum readings are noted, the system is okay.
Check for bad battery, ammeter, wiring, etc.
If less than above reading, proceed to make an A.C . output
check. With the battery lead disconnected from rectifier
panel, probe the A.C. terminals with the voltmeter on the
A.C. scale (diag. 19).
Minimum values should read:
PROBE
FUSE
RECTIFIER PANEL
MOUNTED ON
ENGINE
FUSE
+
-
TO ENGINE
GROUND
VOLTMETER
18
A.C.
19
2500 R.P.M. - 24.0 Volts A.C.
3000 R.P.M. - 29.0 Volts A.C.
3300 R.P.M. - 32.0 Volts A.C.
3600 R.P.M. - 35.0 Volts A.C.
If less than above output, generating coil assembly is
defective. See Chapter 9 for "Disassembly Procedure".
NOTE: There is no regulator in this system. The total
output of the two diodes is three (3) AMPS. If the battery
is overcharging (boiling and bubbling), reduce the D.C.
input by one-half by removing one of the diodes.
51

3 Amp DC Alternator System - Diode in
Main Menu
Harness Sleeve
Models: H30-35, HS40, H50-60, HH50-60,
HM70-80-100, HHM80
This system has a diode included in the red wire which
converts the alternating current (A.C.) to direct current.
The direct current (D .C.) is used to provide a trickle charge
for the battery . The leads from the alternator and the type
of connector may vary, but the output readings will be
the same.
CHECKING THE SYSTEM: Remove the fuse from the
fuse holder and check the fuse to make certain it is good.
If faulty, replace with a six (6) AMP fuse.
To check D.C. output, separate the connectors at the
engine. Place the probe (+) in the red wire lead connector .
Ground the other probe to the engine (diag. 20).
With the engine running minimum values should read:
2500 R.P.M. - 8.0 Volts D.C.
GREEN
RED
GROUND
PROBE (+)
20
DIODE
3000 R.P.M. - 9.5 Volts D.C.
3300 R.P.M. -10.5 Volts D.C.
3600 R.P.M. -11.5 Volts D.C.
If these minimum readings are noted, the system is okay.
Check for bad battery, ammeter, wiring, etc.
If less than the above readings , proceed to make an A.C.
output check by pulling back the protective coating from
the fuse holder and diode. Using an A.C. voltmeter , check
voltage from a point between the engine and the diode
as shown in the diagram (diag. 21).
With the engine running, minimum values should read:
2500 R.P.M. - 18.0 Volts A.C.
3000 R.P.M. - 22.0 Volts A.C.
3300 R.P.M. - 24.0 Volts A.C.
3600 R.P.M. - 26.0 Volts A.C.
If low or no voltage is e xperienced, replace the alternator.
If the alternator puts out the minimum A.C. voltage,
replace the diode.
T o replace the diode , disconnect at plug (spade terminal)
and cut the wire on the opposite end of the diode at the
solderless (crimped) connector. Remove 1/4" (6.35 mm)
of insulation from the cut end of the wire and twist the
strands together. Place the solderless connector from the
new diode onto the exposed 1/4" (6.35 mm) wire and
crimp the connector with a standard electricians pliers.
Reconnect plug end (or spade connector (diag. 22).
PROBE (+)
GROUND
SOLDERLESS
CONNECTOR
FUSE HOLDER
Þ
RED
GREEN
21
SPADE
CONNECTOR
22
52

5 Amp Alternator System Regulator-Rectifier
Main Menu
Under Blower Housing
CHECKING THE SYSTEM: An open circuit D. C. voltage
check cannot be made with this system. If a known good
battery fails to maintain a charge, proceed to make an
A.C. voltage test.
To do this, the blower housing must be remov ed, and the
regulator-rectifier must be brought outside of the blower
housing.
Disconnect the red D.C. output connector at the wiring
harness and connect the probes from an A.C. voltmeter
to the wire terminals at the regulator-rectifier (diag. 23).
INSERT PROBES INTO
CONNECTOR SLOTS.
DO NOT REMOVE
CONNECTOR WIRES.
A.C. VOL TMETER
CAUTION: A T NO TIME SHOULD THE ENGINE
BE STARTED WITH THE BLOWER HOUSING
REMOVED.
CAUTION: BLOWER HOUSING MUST BE
INST ALLED WHEN RUNNING ENGINE
23
With the engine running, the minimum values should read:
2500 R.P.M. - 19.0 Volts A.C.
3000 R.P.M. - 23.0 Volts A.C.
3300 R.P.M. - 26.0 Volts A.C.
3600 R.P.M. - 28.0 Volts A.C.
If the minimum values are noted, the alternator is okay; the regulator-rectifier is def ectiv e. If less than above readings,
the alternator is defective. See Chapter 9 for "Disassembly Procedure".
3 Amp D.C. 5 Amp A.C. Alternator
Models: H & HSK 50-60, HH50-60, HM & HMSK 70-80-90-100, TVM125-140-170-195-220,
TVXL195-220
This unit combines a 3 Amp D .C. system used to charge
a battery with a 5 Amp A.C. system used for lighting.
Located in the red wire of the harness is a diode which
converts the alternating current to direct current for
charging the battery. The yellow wire provides the A.C.
voltage for the lighting circuit.
RED
DIODE
YELLOW
D.C .
24
(continued on top of next page)
53

CHECKING THE SYSTEM: To check the system,
Main Menu
disconnect the plug and measure the D.C. voltage at the
red wire terminal (diag. 24). Measure the A.C. voltage at
the yellow wire terminal. With the engine running, the
minimum values should be:
3 Amp D.C.
2500 R.P.M. - 8.0 Volts D.C.
3000 R.P.M. - 11.0 Volts D.C.
3600 R.P.M. - 13.0 Volts D.C.
5 Amp A.C.
RED
2500 R.P.M. - 8.0 Volts A.C.
3000 R.P.M. - 11.0 Volts A.C.
3600 R.P.M. - 13.0 Volts A.C.
If the above minimum values are noted, system is okay.
Check for def ectiv e lights , wiring or switches. If less than
above values are noted, pull back the protective shrink
tubing from the diode. Using an A.C. voltmeter, chec k the
voltage going into the diode from alternator, at the lead
on the alternator side of the diode (diag.25).
All Models
With the engine running, the minimum values should read:
2500 R.P.M. - 20.0 Volts A.C.
3000 R.P.M. - 25.0 Volts A.C.
3300 R.P.M. - 26.5 Volts A.C.
3600 R.P.M. - 29.0 Volts A.C.
If low or no voltage is e xperienced, replace the alternator.
If the alternator puts out the minimum A.C. voltage,
replace the diode.
7 Amp Alternator System Regulator-Rectifier
External to Engine
A.C.
YELLOW
25
D.C. VOLTMETER
B + TERMINAL WIRE
REGULATOR/RECTIFIER
MUST BE GROUNDED
26
CHECKING THE SYSTEM: To check the system,
disconnect the D.C. or B+ wire at the switch end and
measure D .C. voltage between the lead and ground (diag.
26).
With the engine running, minimum values should read:
2500 R.P.M. - 9.0 Volts D.C.
3000 R.P.M. - 11.0 Volts D.C.
3600 R.P.M. - 14.0 Volts D.C.
If the minimum readings are noted, system is okay. Chec k
for defective ammeter, wiring, etc. If less than the above
readings, disconnect the plug from the regulator-rectifier,
and insert the A.C. voltmeter probes in the two outside
terminals (diag. 27).
With the engine running, minimum values should read:
2500 R.P.M. - 12.0 Volts A.C.
3000 R.P.M. - 14.0 Volts A.C.
3600 R.P.M. - 18.0 Volts A.C.
If the minimum readings are noted, the alternator is okay;
the regulator-rectifier is defective. If less than the above
readings, the alternator is defective. See Chapter 9 for
"Disassembly Procedure".
54
A.C.
27

7 Amp Alternator System Regulator-
Main Menu
Rectifier Under Engine Block Housing
Models: H50-60, HH50-60, HM70-80-100,
HHM80, TVM125-140-170-195-220
In this system, the regulator and rectifier are combined
in one solid state unit mounted under the blower housing
of the engine.
Various types of regulator-rectifiers have been used on
different applications. Test procedures for all types are
the same. However, regulator styles are not
interchangeable (diag. 28).
CHECKING THE SYSTEM: An open circuit D. C. voltage
check cannot be made with this system. If a known good
battery fails to maintain a charge, proceed to make an
A.C. voltage test.
To do this, the blower housing must be remov ed, and the
regulator-rectifier must be brought outside of the blower
housing.
Keep the A.C. leads attached to the regulator-rectifier.
Install the blower housing with the regulator-rectifier
outside the housing. With an A.C. voltmeter probe the
regulator as shown (diag. 29)
CAUTION: A T NO TIME SHOULD THE ENGINE
BE STARTED WITH THE BLOWER HOUSING
REMOVED.
With engine running, minimum A.C. voltage from lead to
lead should be:
2500 R.P.M. - 16.0 Volts A.C.
3000 R.P.M. - 19.0 Volts A.C.
3300 R.P.M. - 21.0 Volts A.C.
3600 R.P.M. - 23.0 Volts A.C.
If the minimum readings are noted, the alternator is okay .
If the system fails to charge a known good battery, the
regulator-rectifier must be defective.
MAGNETO GROUND - GREEN
CAUTION: BLOWER
HOUSING MUST BE
INSTALLED WHEN
RUNNING ENGINE
B+ TERMINAL WIRE
D.C. OUTPUT LEAD-RED
INSERT PROBES INTO
CONNECTOR SLOTS
DO NOT REMOVE
CONNECTOR WIRES
YELLOW
28
RED
A.C. VOLTMETER
29
10 Amp Alternator System - RegulatorRectifier-External to Engine
In this system, the regulator and rectifier are combined
in one solid state unit.
CHECKING THE SYSTEM: To check the system,
disconnect the D.C. or B+ wire at the switch end and
measure D .C. voltage between the lead and ground (diag.
30).
With the engine running, minimum values should read:
2500 R.P.M. - 13.0 Volts D.C.
3000 R.P.M. - 16.0 Volts D.C.
3600 R.P.M. - 20.0 Volts D.C.
If the minimum values are noted, the system is okay.
Check for def ective ammeter, wiring, etc. If less than the
above readings, disconnect the plug from the regulatorrectifier, and insert the A.C. voltmeter probes in the two
outside terminals (diag. 31).
GREEN
(continued on top of next page)
YELLOW
REGULATOR/
RECTIFIER MUST BE
GROUNDED
30
31
55

With the engine running, minimum values should read:
Main Menu
2500 R.P.M. - 16.0 Volts A.C.
3000 R.P.M. - 19.0 Volts A.C.
3600 R.P.M. - 24.0 Volts A.C.
If the minimum readings are noted, the alternator is okay;
the regulator-rectifier is defective. If less than above
readings, the alternator is defective. See Chapter 9 for
"Disassembly Procedure".
A.C. OUTPUT
YELLOW
A.C.
32
10 Amp Alternator
Models: H & HSK 50-60, HH50-60, HM & HMSK 70-80-100, HHM80,
TVM125-140-170-195-220
CHECKING THE SYSTEM: Unplug the connector at the wiring harness supplied by the OEM. Proceed to make an
A.C. output check. Place one lead of the A.C. voltmeter on the center plug of the connector. Place the other lead to
engine ground (diag. 32).
With the engine running, minimum values should read:
2500 R.P.M. - 16.0 Volts A.C.
3000 R.P.M. - 20.0 Volts A.C.
3300 R.P.M. - 22.0 Volts A.C.
If less than above output, the alternator assembly is defective. See Chapter 9 for "Disassembly Procedure".
VOLTAGE REGULATORS
If a known good or load tested battery fails to maintain a charge, the charging system and the regulator can be
checked using a voltmeter. Set the voltmeter on the 0-20 Volt D.C. scale and connect the probes across the battery
terminals as shown. Note the battery voltage. Star t the engine, the voltage reading should increase from the noted
battery voltage but not exceed 15 Volts D.C. If no voltage increase is noted, proceed to make an A.C. voltage check
using the applicable procedure. If the batter y voltage exceeds 15 Volts D.C., or the proper minimum A.C. voltage is
noted during the check, replace the regulator.
LOW OIL SHUTDOWN SWITCHES
Check the LOS switch while it is in the engine. The engine must be level, and the oil level at the full mark. Place the
speed control in the run position. Remo ve the spark plug wire from the spark plug. Install a gap type tester connected
to the spark plug wire and a good engine ground. Spin the engine ov er using the electric or recoil starter. A bright b lue
spark should be seen at the tester. If not, remove the blower housing and disconnect the LOS lead from the ignition
module. Reinstall the blower housing and spin the engine over. If spar k occurs now, replace the LOS switch. If no
spark is seen, replace the ignition module.
ON/OFF LIGHTED ROCKER SWITCH W/LO W
OIL SHUTDOWN
56
33

SER VICE
Main Menu
This section covers the service procedures for the 12 and 120 v olt electric starters. For diagnosis of the starting circuit
see “Electrical Starter Troubleshooting” in this chapter. Illustrations may not be identical in configur ation to the starter
being serviced, but procedures and tests apply unless otherwise stated.
12 V OL T OR 120 V OL T ELECTRIC ST ARTERS
WITH EXPOSED SHAFT
1. Remove the plastic dust cover on the armature end
(diag. 34).
2. Push down the spring retainer and remove the
retainer ring.
3. Slide off the spring retainer, anti-dr ift spring, gear,
and drive nut.
4. If inter nal ser vice is necessary, scribe a line across
the cap assemblies and armature housing to aid in
reassembly.
5. Remove the two or four retaining nuts from the
through bolts holding the cap assembly.
6. Slide off the cap assembly. The ter minal insulator
slides out of the commutator cap.
7. Remove the armature.
34
8. Inspect and replace as necessar y.
9. Use the reverse procedure for reassembly.
10. Inspect flywheel ring gear for damage before
installation.
12 VOLT D.C. OR 120 VOLT A.C. ELECTRIC
STARTERS WITH CAP ASSEMBLY
1. Remove the retainer ring from the armature shaft
(diag.35).
2. Remove the two nuts from the through bolts holding
the cap assembly on.
3. Slide off the cap assembly. The engaging nut, gear,
spring, and spring retainer will remain in the cap
assembly.
4. If complete disassembly is required, refer to step # 4
in the previous section for additional steps.
5. Inspect and replace as necessary. Use reverse
procedure for assembly. ( F or ease of assembly , place
the armature into the brush end frame first.)
6. Inspect flywheel ring gear for damage before
installation.
GEAR
DRIVE NUT
SPRING
SPRING
RETAINER
RETAINER
RING
CAP ASSY.
ARMATURE
35
(continued on top of next page)
57

INSPECTION AND REPAIR
Main Menu
1. The pinion gear parts should be checked f or damage
or wear. If the gear does not engage or slips , it should
be washed in solvent ( rubber parts cleaned in soap
and water) to remove dirt and grease, and dried
before reassembly. Also check the armature and drive
nut splines for wear or damage. Replace par ts as
necessary.
2. The brushes and brush card holder should be
checked f or wear . With the armature in place and the
brushes engaging the commutator surface, chec k the
brushes for wear. Brushes should be replaced if the
brush wire approaches the bottom of the brush holder
slot. Brush springs must exhibit enough strength to
keep tension on the brushes and hold them on the
commutator.
3. The field windings can be checked using a continuity
light or ohmmeter. Attach one lead to each field coil
connection. Continuity should exist between each
field coil connection, and no continuity should exist
between the field coil connections and the starter
housing (diag. 36 & 37).
4. The armature should be check ed for glazing or wear .
If necessary the ar mature can be turned down in a
lathe. While rotating, polish the commutator bars
using a piece of 00 sandpaper (diag. 38). Light
pressure and back and forth movement should be
used. Recut the comm utator bars to a depth equal to
the width of the insulators between the bars. Check
for continuity between the copper commutator bars
and the iron of the armature, none should exist (diag.
39). If any is noted the armature must be replaced.
FIELD COIL
CONNECTORS
BRUSH
SPRINGS
12 VOL T
FIELD COIL
CONNECTORS
CONNECTION POINT OF
POWER CORD LEADS
36
120 VOLT
38 39
37
Brush Card Replacement
1. Loosen but do not remove the two nuts on the starter terminal post.
2. Remove the nuts holding the end cap in place. Remove the end cap and the thrust washer.
3. Grasp the thru bolts using a vise gr ip positioned as close to the flanged end as possible to prevent thread
damage. Remove the two nuts holding the driving end cap in place. Remove the armature and driving cap assembly,
followed by the two thru bolts. Notice the position of the brush ground eyelet under the thru bolt flange.
4. Note or mar k the position of the connectors of the brush wires. Use a wire cutter to clip the solid field wires as
close to the connectors as possible.
5. Note or mark the brush card in the starter housing and remove the brush card assembly. Clean the accumulated
dirt off all starter parts. Scrape the insulating varnish off the last 1/2" (12.7 mm) of the solid field wires.
6. Inser t the new brush card into position while guiding the solid field wires through the proper slots in the brush
card.
7. Crimp and solder the brush leads to the solid field wires. Use a needle nose pliers or vise grip to hold the woven
brush lead close to the connector while soldering. This prevents solder and heat from flowing up the brush lead.
Insulate the crimped connection nearest the starter ter minal post using electrical tape or heat shrink tubing.
Route the wires to prevent damage during assembly.
8. Install the ar mature into the housing while spreading the brushes. Install the thru bolts while checking to make
sure the bolts go thru the ground brush eyelet terminals. Install and tighten the drive end thru bolt nuts, b ut do not
overtighten.
9. Install the thrust washer (cupped side faces towards the end cap) on the end of the armature and then install the
starter end cap. Secure the cap with the locking nuts and tighten the nut on the starter terminal post. Rotate the
armature by hand to check for binding before installation on the engine.
58

CHAPTER 7 FLYWHEEL BRAKE SYSTEMS
Main Menu
GENERAL INFORMATION
Tecumseh’s brake systems provide two methods of meeting compliance standards which has become a federal
law as of June 30, 1982. There are two additional methods used by equipment manufacturers that also meet
compliance standards and they are as follows:
1. Use of the blade brake clutch in conjunction with either a top or side mounted recoil starter or 12 volt electric
starter. The blade stops within three seconds after the operator lets go of the blade control bail at the operator
position and the engine continues to run. Starter rope handle is either on the engine or on the equipment
handle.
2. Use of a recoil starter (top or side mounted) with the rope handle on the engine as opposed to within 24 inches
(60.9 cm) of the operator position. This method is acceptable if the mower deck passes the 360 degree foot
probe test. A specified foot probe must not contact the blade when applied completely around the entire blade
housing. This alternative can be used with engine mounted brake systems and typical bail controls. The b lade
stops within three seconds after the operator lets go of the engine/blade control bail at the operator position
and the engine is stopped.
Tecumseh’s Flywheel Brake system provides consumer safety by stopping the engine and blade within three
seconds after the operator releases the engine/blade control bail at the handle of the lawnmower. These systems
are available on both recoil and electric start models. The engine stopping time is affected by the engine R.P.M.
Consult microfiche card #30, the Plus 1 or Parts Smart Look-Up system, or Service Bulletin #107 to determine the
correct engine speed or blade tip speed.
OPERATION
BOTTOM SURFACE SYSTEM
In the stop position with the handle mounted engine / blade control released, the torsion spring rotates the brake
lever forcing the brake pad against the underside of the flywheel, actuates the ignition kill switch and on electric
start models, opens the star ter inter lock switch (diag. 1).
In order to restart the engine, the handle mounted engine / blade control must be applied. This action pulls the
brake pad away from the flywheel, opens the ignition kill switch and on electric start models, closes the starter
interlock switch. This will allow the engine to be started by energizing the starter with a starter switch (diag. 2).
BRAKE
APPLIED
IGNITION
SHORTED
BRAKE
RELEASED
IGNITION
OPEN
INTER-LOCK
SWITCH OPEN
INTER-LOCK
SWITCH CLOSED
21
59

OPERATION (CONTINUED)
Main Menu
INSIDE EDGE SYSTEM
In the stop position the brake pad is applied to the inside edge of the flywheel, at the same time the ignition system
is grounded (diag. 3).
In order to restart the engine, the brake control must be applied. This action pulls the brake pad away from the
inside edge of the flywheel and opens the ignition kill switch. On electric start systems the starter is energized by
an ignition switch or a two motion control. On non-electric start systems, the recoil starter rope must be pulled to
start engine (diag. 4).
IGNITION SHORTED
BRAKE APPLIED
COMPONENTS
Both the Bottom Surface and the Inside Edge systems
use the following components:
The brake lever and pad assembly consists of a steel
lever with a brake pad bonded to the lever (diag. 5).
The ignition kill switch is a plastic block with a wire
extending out of it. The wire is attached to a terminal
which is connected to the ignition kill wire. The brake
lever contacts and g rounds the wire of the switch when
the engine / blade control is released, and the ignition
module is grounded. This in turn kills the ignition (diag.
5).
The interlock switch is a push button switch that is
activated by the brake lever when the engine / blade
control is actuated. If there is a starter switch used to
start the engine, the interlock switch acts as a safety
switch and will not allow the starter to crank unless the
engine / blade control is depressed.
3
BRAKE LEVER
IGNITION KILL
CONTROL CABLE
IGNITION OPEN
AND PAD
SWITCH
INTERLOCK
SWITCH
BRAKE RELEASED
4
TORSION
SPRING
5
Where a two motion control is used the interlock switch
is utilized as the starter switch.
The Torsion Spring supplies the pressure to the brake
lever and brake pad to stop the flywheel.
The Control Cable transfers the motion of the
engine / blade control to the brake system.
60

SERVICE
Main Menu
If the brake system fails to kill the ignition and stop the blade within 3 seconds the following service procedures
should be followed.
FLYWHEEL REMOVAL
NOTE: BEFORE THE FLYWHEEL IS REMOVED OR REPLACED, THE BRAKE PRESSURE ON THE FLYWHEEL
MUST BE RELIEVED AS OUTLINED BELOW UNDER "BRAKE LEVER AND PAD".
Remove the flywheel as outlined in Chapter 9 under "Disassembly".
BRAKE LEVER AND PAD
Bottom Surface
To relieve the brake pressure on the flywheel, remove
the torsion spring by firmly grasping the short end of
the spring with a pliers and unhook the spring from the
bracket then remove the flywheel (diag. 6).
Remove the brake lever and pad assembly. Inspect the
brake pad for dirt, oil or grease contamination. If the
pad is contaminated, or if there is less than .060" (1.524
mm) of brake pad material at the pad's thinnest point,
replacement is necessary. The brake pad is bonded to
the brake lever and must be replaced as an assembly.
Install the brake lever and pad assembly and continue
to reassemble the brake system in the reverse order of
disassembly.
NOTE: WHEN REMOVING THE BRAKE BRACKET THE
TORSION SPRING MUST BE RELEASED BEFORE THE
TOP STARTER BOLT IS REMOVED OR THE THREADS
IN THE CYLINDER BLOCK WILL BE DAMAGED.
Inside Edge
SWITCH
LEVER
UNHOOK TORSION SPRING
6
SHORT END OF SPRING
ALIGN HOLES
670298
T o relie ve the brak e pressure on the flywheel, compress
the spring by moving the lever toward the spark plug,
when the hole in the lever aligns with the hole in the
bracket, secure the lever with alignment tool 670298
then remove the flywheel (diag. 7). Remove the alignment
tool. Release the spring tension by unhooking the short
end of the spring from bracket with a pliers. Remove
the “E” clip from the brake pad shaft. Slide the pad lever
from the shaft and unhook the link. Inspect the brake
pad for dirt, oil or grease contamination. If the pad is
contaminated, or if there is less than .060" (1.524 mm)
of brake pad material at the pad's thinnest point,
replacement is necessary. The brake pad is bonded to
the brake lever and must be replaced as an assembly.
Rehook the link, install the brake lev er and pad assembly ,
install the "E" clip, rehook the short end of the spring
and continue to reassemble the brake system in the
reverse order of disassembly.
IGNITION GROUNDOUT TERMINAL
Inspect the ignition kill switch grounding clip for proper
alignment and contact with the brake arm. Insure that
all electrical connections are clean and secure (diag. 8
& 9).
"E" CLIP
7
GROUNDING CLIP
8
GROUNDING CLIP POSITION
LINKAGE
BRAKE PAD
9
61

STARTER INTERLOCK SWITCH
Main Menu
The engine / blade control must close the interlock s witch
before the starter can be engaged. T o chec k the interlock
switch, use an ohmmeter or continuity light to perform
a continuity check. Continuity should exist between the
two terminals when the interlock switch button is
completely depressed. No continuity should e xist when
the button is released. If the switch fails replace the
switch (diag. 10).
T o replace the interlock s witch, carefully grind the heads
off of the rivets that fasten the interlock switch to the
brake bracket. Remove the rivets from the back side of
brake brack et. Use the self-tapping scre w supplied with
the new switch to make threads in the bracket. Install
the interlock switch onto the brake br acket in the proper
position and secure the switch to the brake brac ket with
the machine screws supplied. Be careful not to overtighten
the screws as switch breakage can occur (diag. 11).
CONTROL CABLE
Bottom Surface
The control cable conduit must be assembled against
the stop in the bracket. Make sure the bottom of the
lever completely depresses the button on the starter
interlock switch, if equipped, when the control is fully
applied. The cable must provide enough travel so the
brake will contact the flywheel. Some slack should exist
in the cable adjustment to compensate for brake pad
wear (diag. 12).
10
SELF TAPPING
SCREW
MACHINE
SCREWS
11
STOP
12
Inside Edge
If replacing the cable conduit screw with a screw other
than a service part replacement, be cer tain that the
screw length is not too long as to prevent free travel of
the lever. Make sure the button on the starter interlock
switch is completely depressed when the control is fully
applied. The cable must provide enough travel so the
brake will contact the flywheel. Some slack should exist
in the cable adjustment to compensate for brake pad
wear (diag. 13).
BRAKE BRACKET REPLACEMENT
The spring tension must be relieved on a bottom surf ace
system prior to the removal of the top electric starter
bolt, or damage to the threads in the cylinder block can
occur.
When installing a inside edge brake bracket assembly,
be sure the slotted holes in the brake bracket are all
the way down on the fasteners. This will properly align
the brake bracket to the flywheel brake surface (diag.
14).
SCREW END MUST
NOT BLOCK LEVER
ACTION
MOUNTING HOLES
Ô
MECHANISM FULL DOWN
BEFORE SCREWS TORQUED
CABLE CLAMP
SCREW
13
Ô
14
62

CHAPTER 8 IGNITION
Main Menu
GENERAL INFORMATION
The ignition systems used on Tecumseh engines are either solid state capacitor discharge modules or magneto
ignition systems. The basic functional difference is that the solid state modules are triggered by an electronic switch
(SCR). Magneto ignition systems rely on the mechanical action of opening and closing a set of moveable contact
points to trigger when the spark will occur.
The solid state ignition system consists of a flywheel magnet and key, charge coil, capacitor, a silicon controlled
rectifier, pulse transformer, trigger coil, high tension lead, and a spark plug. Everything except the flywheel magnet,
key and the spark plug are located in a encapsulated ignition module. This solid state (CDI - Capacitive Discharge
Igntion) module is protected by epoxy filler from e xposure to dirt and moisture. This system requires no maintenance
other than checks of the high tension lead and spark plug.
The Tecumseh magneto ignition consists of a stator assembly made of laminations, a coil, contact points, condenser,
a permanent magnet mounted in the flywheel, high tension lead, and a spark plug. The coil is sealed by epoxy filler,
and the points and condenser are sealed from dirt and moisture by a crankshaft seal and cover gasket.
OPERATION
SOLID STATE IGNITION SYSTEM (CDI)
As the magnets in the flywheel rotate past the charge
coil, electrical energy is produced in the module. The
energy is stored in the capacitor ( approx. 200 v olts) until
it is released by an electrical switch (SCR). As the magnet
continues to rotate, it travels past a trigger coil where a
low voltage signal is produced. This low voltage signal
closes the SCR switch, allowing the energy stored in the
capacitor to flow to a transformer where the voltage is
increased from 200 volts at 200 RPM to 22,000 volts at
3000 RPM. This voltage flows through the high tension
lead to the spark plug where it arcs across the electrodes
and ignites the air-fuel mixture (diag. 1).
MAGNETO IGNITION SYSTEM (POINTS)
As the flywheel turns, the magnets that are mounted in
the wheelpass the coil mounted on the stator. As the
magnet's North Pole enters the area of the center leg of
the stator, a magnetic field is concentrated through the
laminations to the magnet's South Pole. This causes a
generation of current flow in the coil's primary winding.
The ignition points are closed (diag. 2).
As the flywheel continues to rotate, the North Pole
approaches the last leg of the lamination stack. The
magnetic field through the center leg reverses , producing
a large change in the magnetic field, and a high current
in the primary side of the coil (diag. 3).
At this time, the contacts open and the primary current
stops flowing. This change in current causes a v oltage in
the primary, which induces a high voltage in the
secondary winding of the coil. The voltage tra vels through
the spark plug wire, to the spark plug and jumps the gap
of the plug to ignite the air/fuel mixture.
PATH OF MAGNETIC
LINES OF FORCE
MAGNET
FLYWHEEL
ROTA TION
POINTS
CLOSED
POINTS OPEN
1
2
3
63

IDENTIFICATION OF TECUMSEH IGNITION SYSTEMS
Main Menu
INTERNAL IGNITION
SOLID STATE IGNITION (CDI)
EXTERNAL IGNITION
4
5
6
COMPONENTS OF A TECUMSEH MA GNETO
IGNITION SYSTEM (DIAG. 7)
A. Flywheel with magnets
B. Coil
C. Condenser
D. Spark plug
E. Contact points
F. Ignition cam
G. Stator plate (dust cover , cam wiper, and laminations .)
H. Flywheel key
The flywheel with magnets provide the magnetic flux
(or field) which is necessary to induce the low voltage in
the primary circuit. A horseshoe magnet is a good
example of how the magnets function in the flywheel. The
magnets are either cast in or glued onto the flywheel,
and are not a replaceable item (diag. 8).
The ignition coil is used to increase the low voltage in
the primary to high voltage in the secondary, capable of
jumping the spark plug gap. The coil consists of a primary
and a secondary winding of wire. The primary is the low
voltage (200 - 300 volts) winding, consisting of
approximately 150 turns of heavy gauge wire next to the
core. The secondary winding consists of approximately
10,000 turns of very fine wire wrapped over the primary.
When induced by the primary, the secondary winding
generates a voltage of between 10,000 - 20,000 volts,
which can arc the spark plug gap (diag. 9).
A. FLYWHEEL WITH
MAGNETS
D. SPARK PLUG
GROUND LEAD
PRIMARY LEAD
B. COIL
E. CONTACT POINTS
F. IGNITION CAM
PRIMARY WINDING
SECONDARY WIRING
HIGH TENSION LEAD
C. CONDENSER
G. STATOR PLATE
H. FLYWHEEL KEY
7
8
9
64

The condenser acts as an electrical shock absorber to
Main Menu
prevent arcing betw een the contact points as they open.
Arcing will lower the voltage at the spark plug, as well as
burn and pit the contact points. The condenser is a
replaceable item (diag. 10).
The spark plug is made up of two electrodes. The outside
electrode is grounded and secured to the threaded sleeve.
The center electrode is insulated with porcelain. The two
are separated by an air gap which creates a resistance.
A large voltage from the secondary arcs the air gap which
causes a spark and ignites the air-fuel mixture in the
cylinder (diag. 11).
The contact points consist of an insulated, movable point
that connects to the coil primary lead, and a stationar y
point that is grounded to the stator body. Spring tension
holds the points together making a complete path for the
primary circuit, and are opened by the action of the point
arm which rests on the ignition cam. The contact points
are a replaceable item (diag. 12).
The ignition cam is an oblong device which rotates with
the crankshaft, and opens the points for firing the ignition
system. It is important to check the ignition cam for
roughness, if rough replace the cam. When inserting the
ignition cam onto the crankshaft make sure that the side
stamped "TOP", or the side that has an arrow on it f aces
the mechanic (diag. 13).
10
11
12
NOTE: SOME IGNITION CAMS ARE MACHINED
DIRECTLY ONTO THE CRANKSHAFT AND ARE NOT
REPLACEABLE.
The stator plate is an aluminum fixture which houses
the points, cam wiper, condenser , and has the laminations
riveted to it. The laminations are strips of iron riveted
together to form an iron core. Rust or debris in between
the laminations will hamper the performance of the ignition
system. If corrosion on the laminations is se vere, the stator
plate should be replaced (diag. 14).
The flywheel key locates the flywheel to the crankshaft
in the proper position. If a flywheel key is sheared, or
partially sheared, the engine will not star t or be difficult
to start (diag. 15).
13
14
15
65

IGNITION TROUBLESHOOTING
Main Menu
Spark
Check flywheel for
damaged or sheared key
Set proper air gap on
external coil
Set proper point gap, check
condensor and timing
Engine Will
Not Start
Check for spark
Equipment problem,
check switches, wiring
and equipment controls
Spark
Engine runs
erratically or shuts
off, restarts
No Spark
Replace spark plug
Isolate engine and repeat
test
No Spark
Engine problem, check
for shorts or grounds in
wiring
Test
coil for intermittent or
weak spark
Check electric starter and
battery if applicable
Parasitic load
Disconnect ignition
cut-off wire
at the ignition coil &
repeat test
Oil shutdown or
on/off rocker switch
Check for proper air gap
on external
coil and repeat test
Check flywheel magnets
for strength
Test ignition module
66

TESTING PROCEDURE
Main Menu
1. Check for spark using a commercially available spark
tester and following the tester's recommended
procedure.
2. Check for the correct spark plug and for cracks in the
porcelain, pitted or burned electrodes, excessive
carbon buildup, and proper air gap setting. Replace
if questionable.
3/4 " (19.05 mm)
3. Remove the blower housing, disconnect the ignition
ground lead at the ignition coil (solid state only).
Reinstall the blower housing and crank the engine
over . If spark occurs, check the ignition switch, saf ety
interlock switches, electrical wiring for shorting to
ground, or oil shutdown switch.
NOTE: STANDARD POINT IGNITION MAY HA VE T O BE
DISCONNECTED A T THE IGNITION SHUTOFF (AT THE
SPEED CONTROL).
4. Check the air gap between the flywheel magnets and
the laminations of an externally mounted coil or
module. It should be .0125 (.317 mm) or use gauge
part # 670297.
5. Check the flywheel magnets for the proper strength
using this rough test. Hold a screwdriver at the
extreme end of the handle with the blade down, mov e
the blade to within 3/4 inch (19.05 mm) of the
magnets. If the screwdriver blade is attracted to the
magnets, the magnetic strength is satisfactory (diag.
16).
6. Examine the stator components (diag. 17).
A. Check the ignition cam for roughness.
B. Check the movable point arm that rests on the
ignition cam for wear.
MAGNETS
16
17
C. Check the spring steel on the point assembly for
evidence of excessive heat.
D . Check contact points for wear. If they are pitted or
burned, this is an indication that the condenser is
not functioning properly. If any of the above are
faulty, replace accordingly.
E. When replacing the points, also replace the
condenser.
F. After the points are replaced and engine is re-
timed, be sure to clean the points with lint free
paper. An engine will not run smoothly if the points
are improperly set or coated with even a small
quantity of oil, etc.
7. Examine the coil and lamination assembly (either internal or external) for cracks in the insulation or other damage
which would cause shorts or leakage of current. Make sure the electrical leads are intact, especially where they
enter the coil (diag. 18).
8. Check the operation of the coil using an approved tester. Follow the instructions furnished with the test unit or
booklets offered by the Tecumseh Products Co. Engine and Transmission Group Ser vice Division. If the coil or
lamination assembly is defective, replace as necessary.
NOTE: IF LAMINATIONS ARE BAD ON AN INTERNAL COIL ASSEMBLY, THE ENTIRE STATOR BODY MUST BE
REPLACED SINCE THE LAMINATIONS ARE PERMANENTLY RIVETED TO THE STATOR.
External coils are permanently attached to the lamination and must be serviced as an assembly.
18
67

SERVICE
Main Menu
To remove ignition components from the engine, see
Chapter 9 under "Disassembly".
SPARK PLUG SERVICE
Spark plugs should be removed, cleaned, and adjusted
periodically.
Check the air gap with a spark plug gap gauge and adjust
accordingly. Set the spark plug gap at .030" (.762 mm)
(diag. 19).
Replace the plug if the center and ground electrodes are
pitted or burned, or if the porcelain is cracked or
discolored.
When reinstalling the plug make sure it is clean of all foreign material.
NOTE: DO NO T USE A SAND BLASTER T O CLEAN PLUGS, MICR OSCOPIC P AR TICLES LEFT IN THE PLUG CAN
SCORE THE ENGINE CYLINDER DURING OPERATION. USE A SOLVENT AND A WIRE BRUSH T O CLEAN, AND
BLOW OUT THOROUGHLY WITH COMPRESSED AIR.
Replace the spark plug with the proper spark plug. Consult the proper parts breakdown for the spark plug to be used
in the engine being serviced.
Set the spark plug gap at .030" (.762 mm).
Install the spark plug and tighten to 180 inch pounds torque (20.5 Nm). If a torque wrench is not av ailable , screw spark
plug in as far as possible, by hand, and use a spark plug wrench to turn spark plug 1/8 to 1/4 of a turn further if using
the old spark plug or 1/2 of a turn further if using a new spark plug.
19
CONDITIONS CAUSING FREQ UENT SPARK PLUG FOULING
1. Carburetor setting too r ich or air cleaner restricted.
2. Partially closed choke shutter.
3. Poor grade of gasoline.
4. Improper fuel.
5. Restr icted exhaust system.
NORMAL
CARBON DEPOSIT
6. Incorrect spar k plug.
7. Incorrect spar k plug gap.
8. Oil level too high, or breather is restricted.
9. Faulty piston rings.
10. Weak ignition system.
IGNITION TIMING PROCEDURE
In order for an engine to run effectiv ely and efficiently, the spark must ignite the compressed air-fuel mixture when the
piston is in a specific position to deliver maximum power. This position is kno wn as Before Top Dead Center (BTDC).
If the mixture is ignited too soon, kickback can be e xperienced due to preignition. If the mixture is ignited too late , loss
of power can be experienced due to retarded spark.
The Standard P oint System
Internal coils are used on small and medium frame 4 cycle engines. First chec k the specification charts in the back of
this manual or the quick reference chart for the correct ignition dimensions , (point gap setting and timing specification)
depending on the model of engine.
68
WORN
OIL DEPOSIT
20

Begin the procedure by replacing the points if necessary .
Main Menu
T o do this remo ve the nut that secure the mov able portion
of the breaker points. Remove the screw from the
stationary portion of the breaker points and the worn
breaker point assembly. Install a new breaker point
assembly and adjust the point gap. This is done by rotating
the crankshaft until the point arm is resting on the high
side of the ignition cam. Set the point gap by loosening
the screw on the movable point set and insert a feeler
gauge per specification. Adjust the point gap so that a
light drag is felt on the feeler gauge. Tighten the screw
and recheck the gap. Leave the leads unattached for the
timing procedure. Use this procedure on all standard point
ignition systems when point replacement is necessary
(diag. 21).
CRANKSHAFT
ARM
PIVOT
IGNITION
CAM
POINTS
21
DIAL SCREW
Install a dial indicator (Part # 670241), equipped with the
correct tip on the extender leg. Use the small tip for
engines with timing dimensions of between top dead
center (T.D.C.) and .050" (1.27 mm) before top dead
center (B.T .D .C .). Use the large tip f or engines with timing
dimensions of between .051" (1.295 mm) B.T.D.C. to
.150" (3.81 mm) B.T.D.C. Make sure to secure the
extender leg in position to locate the tip directly over the
piston head. Loosen the scre w on the side of the adaptor
sleeve to allo w the sleev e to be turned into the threads of
the spark plug hole, not the entire dial indicator. This will
ensure the proper location of the tip. Once the adapter
sleeve is secured in the hole, tighten screw on sleeve
adaptor to prevent the dial from moving up or do wn, which
would give a false reading (diag. 22).
Find T.D.C. with both valves closed by rotating the
crankshaft clockwise when looking at the magneto end
of the crank, until the needle on the dial stops and
reverses direction. Where the needle stops is T.D.C.
Loosen the screw on the dial, and rotate the dial so that
zero is lined up with the needle at T.D.C. Tighten the screw
on the dial to secure it in place (diag. 23).
While watching the needle on the dial indicator, rotate
the crankshaft counterclockwise when looking at the
magneto end of the crank, .010" (.254 mm) past the
B.T.D. C. dimension. Then rotate the crankshaft clockwise
to the proper B.T.D.C. dimension, this will take out any
slack between the connecting rod and crankshaft
assembly.
SLEEVE
DIAL AT
.090"
(2.286 mm)
SLEEVE
SCREW
22
DIAL AT 0"
23
DIAL AT
.080"
(2.032 mm)
Example: If the specification of .080" (2.032 mm) is the
B.T.D.C. dimension, rotate the crankshaft counterclockwise so that the needle on the dial indicator travels
to .090" (2.286 mm) B.T.D.C. (diag. 24), then rotate the
crankshaft clockwise so that the needle travels to the
specified dimension of .080" (2.032 mm) B.T.D.C. (diag.
25).
Next, if the original breaker points are being used,
disconnect the leads from the point terminal. Reinstall
the nut & tighten. Connect one lead of a continuity light,
or ohmmeter to the point terminal and the other lead to a
good ground. Loosen the two bolts holding down the stator
and rotate the stator until the continuity light or ohmmeter
indicates a break in the circuit. Torque down the stator
bolts while maintaining the stator plate position and the
timing procedure is completed. Reconnect the leads on
the point terminal and tighten the nut making sure that
the leads do not touch the flywheel (diag. 26).
(continued on top of next page)
24
25
26
69

Before putting the dust cover back on the points box,
Main Menu
clean the points by sliding lint free paper back and forth
between the contacts. Manually, open the points when
removing the paper to eliminate paper fibers from
remaining between the contact points (diag. 27).
Fixed Timed System (External coil)
This system has the contact points and condenser
mounted under the flywheel with the laminations and coil
mounted outside the flywheel. This system is identified
by the square hole in the stator, the round configuration
of the coil, and on older coils, the word "Grey Key" is
stamped on the coil to identify the proper flywheel key to
be used. When ordering an e xternal coil f or replacement
from Tecumseh Products, a solid state module will be
received as a replacement. The new module will be
supplied with the proper flywheel key (diag. 28).
T orque down the stator bolts to secure the stator in place .
Next, rotate the crankshaft until the point arm is resting
on the high side of the ignition cam. Set the point gap at
.020" (.508 mm), by loosening the screw on the mov ab le
point, and insert a .020" (.508 mm) feeler gauge between
the contact points (diag. 29). Tighten the screw on the
movable point and then rechec k the point gap . Be sure to
clean contact points with lint free paper (diag. 27).
LINT FREE PAPER
27
28
NOTE: The flywheel key used on engines with an e xternal
coil and points looks similar to the solid state key , ho wev er,
timing will be effected if the wrong key is used.
Reinstall the proper flywheel key, flywheel, washer and
torque down the flywheel nut to specification. Reinstall
the external coil and set the proper air gap to .0125" (.3175
mm) using air gap gauge, part # 670297 between the
magnets and laminations and torque the mounting screws
to specification. Remove the air gap gauge and rotate
the flywheel to check for any possible striking points. If
none are found, the air gap is set correctly and the timing
procedure is completed (diag. 30).
Solid State Ignition Timing
Timing is set using a .0125" (.3175 mm) air gap gauge
(Part No. 670297). Loosen the two hold-down screws,
insert the .0125" (.3175 mm) remove semi-color gauge
between the laminations and the magnet on the flywheel.
Slide the solid state ignition assembly against the air gap
gauge and the flywheel magnet. T orque the tw o hold down
screws to the correct specification and remove the air
gap gauge. Rotate the flywheel one full revolution to chec k
for any possible striking points. If none are found, the air
gap is set correctly and the timing procedure is completed
(diag. 30).
29
.0125
(.3175 mm)
30
70
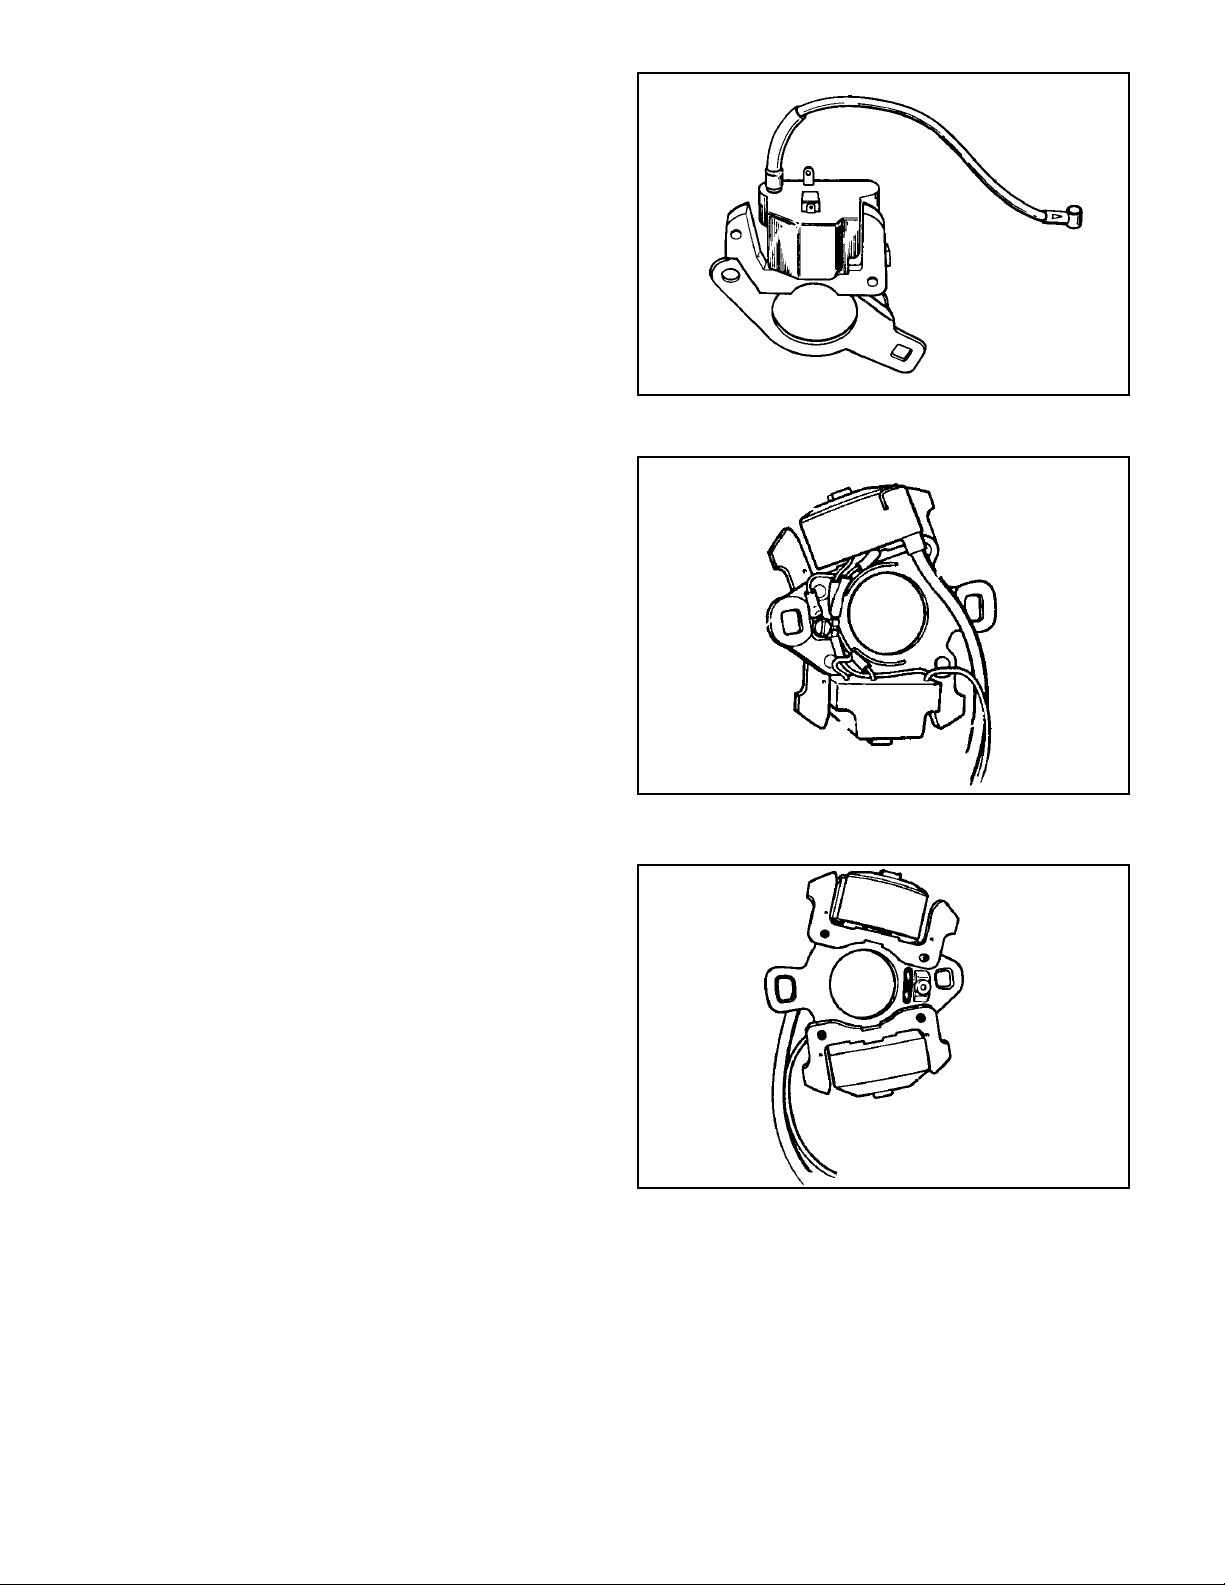
Other Solid State Systems
Main Menu
The following systems are located under the flywheel. All
components are encapsulated into one module. No timing
is necessary with this type (diag. 31, 32, 33).
Check the system by checking for a spark or use a
commercially available test equipment.
SERVICE TIPS
DO NOT :
Interchange flywheels, flywheel keys, spark plugs,
condensers, or points. (Some systems do not use
standard points and condensers.)
Use flywheels with cooling fins that are broken off.
Reglue ceramic magnets back onto the inside of the
flywheel.
Re-oil the cam wiper in a magneto system.
Use a standard business card as an air gap gauge.
File the contact points.
31
Attempt to reglue the spark plug lead back into a coil
or a solid state module.
Store a solid state module within 20 feet (6.1 meters)
of an unshielded welder.
PLEASE DO:
Follow directions carefully.
Lookup the correct ignition dimensions in the proper
mechanic's manual or quick reference chart, for the
engine being repaired.
Clean points with lint free paper after setting gap.
Reinstall the point terminal nut and tighten after
removing leads, before timing procedure.
Remember to correctly TIME a Tecumseh engine,
even when just changing points on a magneto
system.
Remember to use correct air gap gauge.
Check for correct flywheel key which effects timing.
32
33
71

CHAPTER 9 INTERNAL ENGINE AND CYLINDER
Main Menu
GENERAL INFORMATION
This chapter covers the cylinder block, piston and rod assemblies, cylinder head, crankshaft, camshaft, valve train,
breather, cylinder cov er, flywheel, counterbalance systems, and lubrication systems. The go vernors and the gov ernor
systems are covered in Chapter 4.
All Tecumseh engines covered in this manual are four cycle engines with the valv es in the engine block. The crankshaft
position is designated as either horizontal or vertical as the engine rests on its base. The engines identified by decals
or model as XL (Extra Life) or XL/C (Extra Life / Commercial ) are made using aluminum alloy diecast around a cast
iron cylinder liner. However , not all engines with cast iron cylinder liners are identified as XL or XL/C . Engine blocks of
the heavy frame series (HH, VH) are made of cast iron. All other engines use aluminum alloy for the cylinder block
along with pistons that are chromium plated.
OPERATION
4-CYCLE ENGINE THEORY
All 4-cycle engines require four piston strokes to complete
one power cycle. The flywheel on one end of the
crankshaft provides the inertia to keep the engine running
smoothly between power strokes.
The camshaft gear is twice as large as the mating gear
on the crankshaft so as to allow proper engine valve timing
for each cycle. The crankshaft makes two re volutions for
every camshaft revolution.
1. INTAKE. The intake valve is open and the exhaust
valve is closed. The piston is traveling downward
creating a low pressure area, drawing the air-fuel
mixture from the carburetor into the cylinder area
above the piston (diag. 1).
2. COMPRESSION. As the piston reaches Bottom Dead
Center (BDC) the intake valv e closes. The piston then
rises, compressing the air-fuel mixture trapped in the
combustion chamber (diag. 2).
3. POWER. During this piston stroke both valves remain
closed. As the piston reaches the Before Top Dead
Center (BTDC) ignition point, the spark plug fires,
igniting the air-fuel mixture. In the time it takes to ignite
all the available fuel, the piston has moved to Top
Dead Center (TDC) ready to take the full combustive
force of the fuel for maximum po wer during downward
piston travel. The expanding gases force the piston
down (diag. 3).
4. EXHAUST. The exhaust valve opens. As the piston
starts to the top of the cylinder, the exhaust gases
are forced out (diag. 4).
COMPRESSION INTAKE
1
2
After the piston reaches Top Dead Center (TDC), the four
stroke process will begin again as the piston moves
downward and the intake valve opens.
72
POWER
34
EXHAUST

LUBRICATION SYSTEMS
Main Menu
The lubrication system used with all Tecumseh horizontal
crankshaft engines covered in this manual utiliz e a splash
type system. An oil dipper on the connecting rod splashes
oil in the crankcase to lubricate all internal moving parts.
Some engines have the dipper as an integral part of the
connecting rod assembly, while others have a dipper that
is bolted on with one of the rod bolts (diag. 5).
All vertical shaft engines use a positive displacement
plunger oil pump or rotary type oil pump. Oil is pumped
from the bottom of the crankcase, up through the
camshaft and over to the top main bearing. Oil under
pressure lubricates the top crankshaft main bearing and
camshaft upper bearing (diag. 6).
On all Tecumseh vertical shaft 4-cycle engines, the oil is
sprayed out under pressure through a small hole betw een
the top camshaft and crankshaft bearing to lubricate the
piston, connecting rod, and other internal parts (diag. 7).
The plunger style oil pump is located on an eccentric on
the camshaft. As the camshaft rotates, the eccentric
moves the barrel back and forth on the plunger forcing
oil through the hole in the center of the camshaft. The
ball on the end of the plunger is anchored in a recess in
the cylinder cover (diag. 8).
CRANKSHAFT
PASSAGE
PLUG
CAMSHAFT
DRILLED
CAMSHAFT
PASSAGE
DIPPER
SPRAY
MIST HOLE
MAIN BEARING OIL
GROOVE
CRANKSHAFT
OIL PASSAGE
CURRENT
(TVM195, 220)
BARREL TYPE
LUBRICATION
PUMP
ASSEMBLE PUMP BARREL
WITH INSIDE CHAMFER
TOWARD CAMSHAFT GEAR
5
6
Some Tecumseh engines may be equipped with an UltraBalance® counterbalance system. This system uses a
single weighted shaft that is driven off the crankshaft.
The shaft's function is to counteract the imbalance caused
by the counterweights on the crankshaft and the
combustion forces (diag. 9).
SPRAY
MIST HOLE
OIL DRAIN
HOLE
COUNTERBALANCE SYSTEMS
7
DRIVE GEAR
CAMSHAFT
COUNTERBALANCE
SHAFT
GOVERNOR
FLANGE
8
9
73

COMPONENTS
Main Menu
The cylinder bloc k houses the piston, valv es and along with the cylinder cov er all the internal components. The bloc k
is a one piece diecast aluminum alloy or cast iron cylinder casting (diag. 10).
The piston transmits the force of the burning and expanding gases through the connecting rod to the crankshaft.
The piston rings provide the seal between the cylinder wall and the piston. The rings keep the combustion pressures
from entering the crankcase and also wipe the oil off the cylinder wall and return it to the sump.
The connecting rod assembly is the link between the piston (piston pin) and the crankshaft.
The cylinder head is a one piece aluminum alloy or cast iron casting that is bolted to the top of the cylinder bloc k. The
many fins provide cooling for the engine.
The crankshaft converts the up and down piston movement to the rotational force (torque) by an offset crankpin or
rod journal.
The camshaft lobes raise and lower the lifters at the proper time to allow air and fuel in and exhaust out of the
cylinder. Teeth on the camshaft gear time the camshaft to the crankshaft.
The valves allow air-fuel mixture to enter the cylinder and exhaust gases to exit. The valves provide a positive seal
when closed.
The valve springs return the valves to the closed position and must be strong enough to maintain v alve lifter and cam
lobe contact. The valve retainers lock the spring to the valve stem.
The valve lifters maintain contact on the camshaft and push the valves open.
The crankcase breather is a one way check valve that allows air out and prevents air from coming in. It allows the
engine to develop a partial vacuum in the crankcase during operation.
The cylinder cover (or flange on verticals) provides the bearing surface for the power take off (P.T.O.) end of the
crankshaft and camshaft. This bolted on cover is removed to provide access to all internal components.
The oil pump (vertical shaft only) consists of a steel plunger and a nylon housing that rides on the camshaft eccentric.
The flywheel provides the mass to smooth the effects of one po wer stroke e very other crankshaft revolution. Flywheels
are made of aluminum alloy or cast iron. The flywheel fins act as a fan to cool the engine.
CYLINDER COVER
CYLINDER HEAD
CYLINDER BLOCK
PISTON RINGS
PISTON
VALVES
CONNECTING
74
ROD
CRANKSHAFT
VALVE LIFTERS
CAMSHAFT
VALVE SPRINGS
CRANKCASE BREATHER
FLYWHEEL
10

ENGINE OPERA TION PROBLEMS
Main Menu
ENGINE KNOCKS
Associated equipment loose or
improperly adjusted
Check for excessive carbon in
combustion chamber
Loose flywheel, examine key,
keyway, and proper flywheel nut
torque
Incorrect spark plug or Ignition
timing
Loose or worn connecting rod
Worn cylinder
OVERHEATS
Excessive engine loading
Low oil level or wrong viscosity oil
Cooling air flow, obstructed or
clogged cooling fins
Carburetor improperly adjusted or
improper RPM setting
Incorrect spark plug
or Ignition timing
Carbon in the combustion chamber
SURGES OR RUNS UNEVENLY
Fuel cap vent obstructed
Dirty carburetor or air filter
Carburetor improperly adjusted
Governor sticking, binding or
improper RPM setting
Carburetor linkage, shafts or
shutters sticking or binding
Incorrect spark plug or Intermittent
spark, check ignition
Incorrect or damaged flywheel key
EXCESSIVE OIL CONSUMPTION
Oil level above full
Wrong viscosity oil
Excessive engine speed
Engine cooling fins dirty causing
overheating
Breather damaged, dirty or
improperly installed
Lean carb setting causing
overheating (adjustable carb)
Piston rings worn
Worn or glazed cylinder
Valve guides worn excessively
Valve guides worn excessively
Damaged gaskets, seals or
"O" rings
75

ENGINE OPERA TION PROBLEMS
Main Menu
ENGINE MISFIRES
Wrong or fouled spark plug
Carburetor improperly adjusted
Valves sticking or not seating properly
Incorrect spark plug or
Ignition timing
Excessive carbon build up
Improper Valve Lash or
Weak valve springs
ENGINE VIBRATES EXCESSIVELY
Bent crankshaft
Attached equipment out of balance
Loose mounting bolts
If applicable counter balance not
properly aligned
BREATHER PASSING OIL
Oil level too high
Excessive RPM or improper governor
setting
Damaged gaskets, seals or "O" rings
Breather damaged, dirty or improperly
installed
Piston rings not properly seated or ring
end gaps are aligned
Angle of operation too severe
LACKS POWER
Air intake obstructed
Lack of lubrication or improper
lubrication
Carburetor improperly adjusted
Exhaust Obstructed
Improper valve lash
Loss of compression (worn rings,
blown head gasket)
76

TESTING
Main Menu
ENGINE KNOCKS
1. Check the blade hub, blade adapter, or crankshaft coupler for loose fit, loose bolts, or crankshaft key damage.
Remove, inspect, replace if necessary. Reinstall and re-torque the bolts to the proper torque.
2. Check the flywheel key and the flywheel and crankshaft keyway for wear or partial shearing. Replace if any
damage is evident. Tighten the flywheel nut to the proper torque.
3. Check for the correct ignition module air gap or the correct timing (point ignition). Replace the points and condenser
if the points show any wear, oil, or pitting.
4. Remove the cylinder head and check for excessive carbon in the combustion chamber. Also chec k f or the correct
head gasket used, and check the spark plug for proper reach and heat range (correct spark plug for the engine).
5. Check for the proper v alve lash using a feeler gauge, and chec k the internal components (piston, cylinder, connecting
rod, crankshaft journal) for excessive clearance.
ENGINE OVERHEATS
1. Make sure the engine is not being overloaded. Remove excess load (sharpen blades, limit operation speed,
process less material).
2. Check the oil level and viscosity. Add or replace as necessary.
3. Check for clogged cooling fins or obstructions to the air flow. Remove the blower housing, clean and reinstall.
4. Check the carburetor for correct adjustment or remove and clean the carburetor using tag wire and compressed
air. See Chapter 3 under "Ser vice."
5. Check the engine R.P.M. setting using a vibratach or other tachometer and compare it to the R.P.M. settings found
on microfiche card #30 according to the engine model and specification number. Adjust as necessar y.
6. Make sure the correct spark plug is being used. Check the ignition timing. See Chapter 8 "Ignition - Ser vice."
Correct flywheel key or partially sheared key.
7. Remove the cylinder head to check for excessive carbon buildup. Clean as necessar y.
SURGES OR RUNS UNEVENLY
1. Check the fuel cap to make sure it is venting. Loosen the cap and retry engine operation.
2. Replace or clean the air filter.
3. Check the carburetor adjustment or clean the carburetor. See Chapter 3 under "Service."
4. Check the engine R.P.M. setting using a vibratach or other tachometer and compare it to the R.P.M. settings found
on microfiche card #30 according to the engine model and specification number. Adjust as necessar y.
5. Visually check all linkages. Check the gover nor shaft, throttle shaft, or pivot points for binding.
6. Check the ignition module operation using a gap type tester inserted in the high tension lead. Chec k for intermittent
spark, incorrect spark plug, or a fouled condition.
ENGINE MISFIRES
1. Check the spark plug for the proper application or a fouled condition. Replace if questionable.
2. Reset the carburetor following the adjustment procedure or clean the carburetor. See Chapter 3 under "Service."
3. Check the ignition timing. See Chapter 8 under "Service."
4. Check for carbon buildup in the combustion chamber.
5. Inspect the valves and valve seats for leakage. Check for scor ing or discoloration on the valve stem in the valve
guide area. Recut the valves and seats if questionable. See "Valve Service" in this chapter.
(continued on top of next page)
77

ENGINE VIBRATES EXCESSIVELY
Main Menu
1. Check the engine crankshaft on the PTO end for bends using a straight edge, square or a dial indicator . Blades or
adapters must be removed. Any deflection will cause a vibration problem.
2. Check the engine mounting bolts, make sure they are tight.
3. Remove and check the attached equipment for an out of balance condition.
4. If the engine is equipped with a counterbalance shaft, check the gear timing to determine if the counterbalance is
out of time.
BREATHER PASSING OIL
1. Check the oil level, make sure the engine is not overfilled. Also verify that the viscosity rating on the container of
the oil being used is to specification.
2. Check the angle of operation. Avoid prolonged use at a severe angle.
3. Check the engine R.P.M. setting f or e xcessive R.P.M. using a vibratach or other tachometer and compare it to the
R.P.M. settings found on microfiche card # 30 according to the engine model and specification number . Adjust the
high and low R.P.M. as necessary.
4. Check for leaking or damaged gaskets, seals, or "O"-rings. External leaks may not be evident; however, the leak
may prevent the engine from achieving a partial crankcase vacuum.
5. Check the breather for damage, dirty condition, or improper installation. The oil return hole(s) must face down.
6. Check the engine compression using a compression tester. If the engine has weak compression, determine the
cause of weak compression: worn rings, leaking head gasket, or leaking valves. Follow the compression tester's
procedure.
EXCESSIVE OIL CONSUMPTION
1. Check the oil level, oil viscosity on the container of the oil being used, and oil condition. Replace and fill to the
proper level.
2. Check the angle of operation. Avoid prolonged use at a severe angle.
3. Check for leaking or damaged gaskets, seals, or "O"-rings. External leaks may not be evident, however, the leak
may prevent the engine from achieving a partial crankcase vacuum.
4. Check the engine R.P.M. setting using a vibratach or other tachometer and compare it to the R.P.M. settings found
on microfiche card #30 according to the engine model and specification number. Adjust as necessar y.
5. Check the breather for damage, dirty condition, or improper installation. The oil return hole(s) must face down.
6. Clean the cooling fins to prevent overheating.
7. Check the carburetor setting causing a lean running condition, overheating the engine.
8. Check the engine compression using a compression tester. If the engine has weak compression, determine the
cause of weak compression: worn rings, leaking head gasket, or leaking valves. Follow the compression tester's
procedure.
9. Check the valve guide clearance for excessive wear.
LACKS POWER
1. Check the air intake for an obstruction (dirty filter, oil saturated filter, other debris).
2. Check the oil level, oil viscosity on the container of the oil being used and oil condition. Replace and fill to the
3. Readjust the carburetor or remove the carburetor for cleaning. See Chapter 3 under "Ser vice."
4. Check the exhaust for a restriction preventing proper exhaust flow.
78
proper level.
(continued on top of next page)

5. Check the engine valve lash. Reset the valves at the proper lash.
Main Menu
6. Check the valves for proper seating and valve guide lash. Recondition the valves and seats. Replace the valves
if necessary.
7. Check the ignition timing. Check the flywheel key for partial shearing.
SERVICE
DISASSEMBLY PROCEDURE
The following procedures apply to most engine models.
Actual procedure may vary.
1. Disconnect the high tension lead from the spark plug.
Remove the spark plug.
2. Drain the oil from the crankcase. Drain or shut off the
fuel supply.
3. Remove the air cleaner assembly.
4. Remove the fuel tank if it is attached to the engine.
Fuel tanks may be held on with bolts, scre ws, or some
models require taps upward with a soft face hammer
loosening the plastic tank wedged in the blower
housing slots.
On some LEV engine models, removal of the bezel
cover is necessary to view the engine identification
or to provide access to the recoil assembly screws.
Push in toward the spark end (as shown), lift up to
clean the recoil, then pull the cover away from the
spark plug to remove. (diag. 11)
5. Remove the blower housing by first unscrewing the
screw holding the dipstick tube to the blo wer housing
or unscrewing the dipstick tube and removing the
remaining bolts on the blower housing.
6. Unplug the ignition kill wire from the ter minal on top
of the ignition module and unbolt the ignition module.
COVER BEZEL
FLYWHEEL
TOOL
MODEL AND
D.O.M. NUMBER
DECAL
LOCATED
UNDER COVER
(IF SO EQUIPPED)
11
SOCKET WRENCH
FLYWHEEL
12
7. Remove the flywheel nut, washer, and starter cup.
Use a strap wrench (part # 670305) to hold the
flywheel from turning (diag. 12). Thread the
appropriate flywheel knock-off tool part # 670103,
(7/16") or part # 670169 (1/2") on the crankshaft until
it bottoms out, then back-off one complete turn. Using
a large screwdriver, lift upward under the flywheel
and tap sharply and squarely on the knock-off tool to
break the flywheel loose. If necessary, rotate the
flywheel a half turn and repeat until it loosens (diag.
13). A flywheel puller (part # 670306) may be used
on engines with cored holes and also on flywheels
with holes drilled and tapped (diag. 14).
NOTE: DO NO T USE A JAW TYPE PULLER.
8. Remove the flywheel key, stator, and baffle plate.
9. Remove the muffler.
10. Remove the intak e pipe and the carburetor. Be careful
not to bend or damage the linkage when removing.
Mark the hookup points or diagram the linkage
arrangement to aid in reassembly.
11. Remove the cylinder head.
12. Remove the crankcase breather.
METAL HAMMER
KNOCK OFF TOOL
SCREWDRIVER TO
RAISE FLYWHEEL
13
14
(continued on top of next page)
79

13. Remove the cylinder cover or mounting flange using a seal protector positioned in the seal to prevent seal
Main Menu
damage. The crankshaft must be free of rust or scale to slide the cover off the crankshaft. H30-HS50 horizontal
crankshaft engines with ball bearings on the crankshaft require the oil seal and the snap ring to be removed prior
to the cylinder cover removal. On engines equipped with 8 1/2:1 gear reduction, turn the crankshaft to roll the
reduction shaft gear off the crankshaft worm gear when removing the cylinder cover (diag. 15, 16, 17, 18).
1. PTO
Shaft
2. Thin
Washer
3. Gear
4. Tang
Washer
5. Thick
Washer
6. Retainer
OIL SLEEVE TOOL
MOUNTING FLANGE
OIL SEAL
17
15
OIL SEAL REMOVED
WORM GEAR
16
14. Remove the internal components. Align the timing
marks on all engines except VM70, 80, 100, HHM80,
HM70, 80, 100, TVM170, 195, 220 to relieve valve
lifter pressure. On these engines it is necessary to
rotate the camshaft clockwise three (3) teeth past
the aligned position to allow the compression release
mechanism to clear the exhaust valve lifter and to
allow the camshaft to be removed (diag. 19 & 20).
15. Remove the lifters, rod cap, and balance shaft or
gears if applicable.
16. Before removing the piston, remove any carbon from
the top of the cylinder bore to prevent ring breakage.
Push the piston out the top of the cylinder bore.
17. Remove the valves by using a valve spring
compressor to compress the valve spring and rotate
the valve spring retainer to allow the valve stem to
pass through. Lift the v alves out of the cylinder b lock.
Remove the spring assemblies being careful to note
the differences, the original placement of the springs
and the presence of seals. Reinstall the spring
assemblies on the same valve in the reverse order
as they are removed.
SNAP RING
BEVELED TOOTH
CRANKSHAFT
GEAR
CAM GEAR
INTAKE CAM
TIMING MARK
CAMSHAFT GEAR
EXHAUST CAM
ROLL PIN
SPRING
PLUNGER (COMPRESSION RELIEF PIN)
18
19
20
80

CYLINDERS
Main Menu
Visually check the cylinder for broken or cracked fins or a scored cylinder bore. Check the main bearings for wear or
scoring. If the main bearings are worn or scored they can be replaced on some models. See "Crankshaft Bearing
Service" in this chapter.
Use a dial bore gauge or telescoping gauge with a micrometer to accurately measure the cylinder bore. Measure in
the piston travel area appro ximately 1/2 to 3/4 of an inch (12.7 to 19.05 mm) from the top and the bottom . Measure at
90 degrees to the piston pin, 45 degrees to the piston pin, and even with the piston pin as the piston would appear
when assembled. A rigid hone is recommended to "true" any cylinder irregularities. If the cylinder bore is worn more
than .005" (.127 mm) oversize , out of round or scored, it should be replaced or re-siz ed to .010 or .020 ov ersiz e (.254
mm or .508 mm). In some cases engines are b uilt with ov ersize cylinders . If the cylinder is ov ersiz e, the ov ersize v alue
will be imprinted in the top of the cylinder (diag. 23).
To re-size a cylinder, use a commercially available hone of the proper size. Chuck the hone in a drill press with a
spindle speed of about 600 R.P.M.
Start with coarse stones and center the cylinder under the drill press spindle. Lower the hone so the lower end of the
stones contacts the lowest point in the cylinder bore.
Rotate the adjusting nut so that the stones touch the cylinder wall and begin honing at the bottom of the cylinder. A
light honing oil should be used to lubricate and cool while honing. Mov e the hone up and down at a r ate of 50 strok es
per minute to avoid putting ridges in the cylinder wall. Every fourth or fifth strok e, mo v e the hone f ar enough to e xtend
the stones one inch beyond the top and bottom of the
cylinder bore.
Check the bore diameter every twenty or thir ty strokes
for size and a 35o - 45o crosshatch pattern. If the stones
collect metal, clean the stones with a wire brush when
the hone is removed. (diag. 21).
Hone with the coarse stones until the cylinder bore is
within .002 inch (.051 mm) of the desired finish size.
Replace the coarse stones with finishing stones and
continue honing the cylinder to the final size. Tecumseh
recommends using a 390 grit hone for finishing.
Clean the cylinder and crankcase with soap and water
and dry thoroughly.
Replace the piston and the piston rings with the correct
oversize parts as indicated in the parts manual.
Trenching has been incorporated in the cylinders of the
H50, H60, HHM80, and HM100 series of engines, as well
as the TVM125,140, and 220 models. T renching improv es
air/fuel flow and results in increased horsepower in these
engines. When reinstalling the piston, rings, and rod
assembly in these engines, stagger the ring end gaps
and place the ring end gaps out of the trenched area.
This will prevent the rings from possibly catching the
trenched area and breaking during assembly (diag. 22).
TRENCHING
GAPS
GAPS
STAGGER RING END GAPS AWAY FROM TRENCHING
INDICATES
.010 OVERSIZE
CYLINDER
21
22
23
81

CYLINDER HEADS
Main Menu
Check the cylinder head for warpage by placing the head
on a precision flat surface. If war ped in excess of .005"
(.13 mm) replace the head. Slight warpage can be
corrected by placing a sheet of #400 wet /dry sandpaper
on a precision flat surface and rubbing the head gasket
surface in a circular pattern until the entire gasket surf ace
shows evidence of sanding. A small amount of honing oil
on the sandpaper will make it easier to slide the head.
Always replace the head gask et and torque the head bolts
in 50 inch pound increments in the numbered sequence
to 200 inch pounds (22.5 Nm) (diag. 24 & 25).
Engine models V50, H50, H60, H70, VH50, VH60, VH70
require a flat and a belleville washer on bolts numbered
1, 3, and 7. Current production HM80 and HM100 use
flat washers only on bolts numbered 2 and 3 in conjunction
with the gas tank mounting bolts. All other head bolts on
HM80 and HM100 use a flat and a belleville washer on
each bolt.
Engine models V60, V70, TVM125, 140, 195, 220 require
a flat washer and a belleville washer on all head bolts.
PISTONS, RINGS, AND CONNECTING RODS
8
2
ALL MODELS EXCEPT HM,VM, TVM170,195,220
9
3
2
6
TVM170,195,220,VM & HM MODEL ENGINES
4
4
6
1
5
7
3
BELLEVILLE WASHER
5
(CROWN TOWARD
BOLT HEAD)
7
1
8
INDICATES .010
OVERSIZE PISTON
24
FLAT
WASHER
25
Piston
The piston should be checked for wear by measuring at
the bottom of the skirt 90 degrees from the piston pin
hole with a micrometer. Check the ring side clearance
using a feeler gauge with new ring. Clean all carbon from
the piston top and the ring grooves before measuring.
Visually inspect the piston skirt area for scoring or
scratches from dirt ingestion. If scoring or deep scratches
are evident, replace the piston.
If the cylinder bore needs re-sizing, an oversize piston
will be necessary. Oversize pistons are identified by the
imprinted decimal oversize v alue imprinted on the top of
the piston (diag. 26).
Rings
After the cylinder bore diameter has been checked and
is acceptable to rebuild, the ring end gap should be
checked using ne w rings. Place a new compression ring
squarely in the center of the ring travel area. Use the
piston upside down to push the ring down (diag. 28) and
measure the gap with a feeler gauge. The ring end gap
must be within the specification to have adequate oil
control (diag. 29). This procedure will assure correct piston
ring end gap measurement. Ring side clearance should
also be checked with a feeler gauge when using new
rings with an old piston (diag. 27).
PISTON MEASUREMENTS ARE TAKEN AT
BOTTOM OF SKIRT 900 FROM WRIST PIN HOLE
1ST COMPRESSION RING
SIDE CLEARANCE
3RD OIL
2ND
COMPRESSION
RING
CYLINDER
CONTROL RING
PISTON
PISTON RING
26
27
28
Replace the rings in sets and install the piston, rings,
and rod assembly in the cylinder bore with the ring end
gaps staggered. When installing new rings in a used
cylinder, the cylinder wall should be de-glazed using a
commercially available de-glazing tool or hone.
82
29
(continued on top of next page)

Use a ring expander to remove and replace the rings. Do
Main Menu
not spread the rings too wide or breakage will result.
The top compression ring has an inside chamfer, this
chamfer must face UP. If the second compression ring
has an inside chamfer, the chamfer must face DOWN in
all engines except for HM100 and TVM220 engines where
the chamfer faces UP. If there is a notch on the outside
diameter, the notch goes DOWN.
The oil control ring can be installed with either side up.
The expander (if equipped) end gap and the ring end
gap should be staggered (diag. 30).
1ST COMPRESSION RING
2ND COMPRESSION RING
PISTON RING PLACEMENT FOR
HM100, TVM220 ENGINES
EMISSION RINGS
3RD OIL
CONTROL RING
30
1ST
COMPRESSION
RING
Emission Rings
Used on TVS, LEV, H35, VLV, HM80 and TVXL195
engines that comply with emission standards. These rings
have a narrower width and a diff erent profile (barrel faced).
The underside of the oil control ring utilizes a coil type
expander.
These rings conform better to the cylinder allowing for
better oil control by wiping the cylinder wall cleaner. The
coiled expander ring helps create a more uniform load
on the cylinder wall which gives a more consistent
distribution of oil. NOTE: The use of these rings on a
standard non-emission piston will cause ring breakage
due to its wider ring grooves.
Connecting Rods
Some engine models have offset piston pins (not
centered) to centralize the combustion f orce on the piston.
Engine models LAV50, HM70, HM80, HHM80, HM100,
TVM170,195, 220, have offset pistons. When installing
the connecting rod to the piston it is imperative that the
rod be installed correctly . The piston used on these models
will have either an arrow stamped above the piston pin
hole, a number cast on the inside of the piston skirt or
an arrow stamped on the top of the piston (diag. 32 &
33). All other engine models use a centered piston pin. If
the piston does not have an arrow or number cast inside ,
the piston can be installed in either direction on the
connecting rod. On all engine models, the match marks
on the connecting rod must align and face out when
installing the assembly in the engine (diag. 34 & 35).
The arrow on the top of the piston must point toward the
valves when installing it in the cylinder (diag. 32). The
inside casting number (if present) must face toward the
long side of the connecting rod. If there is an arrow on
the side of the piston, the arrow must point toward the
short side of the connecting rod. (diag. 32).
On horizontal shaft engines, oil dippers are attached to
the bottom connecting rod bolt. Some engines have the
oil dipper cast in the rod cap. Consult the specification
chart for the proper rod bolt torque when installing the
cap. The rod bolts should be torqued in 50 inch pound
(5.5 Nm) increments until the specified torque is achieved.
2ND
COMPRESSION
RING
LONG SIDE OF ROD
CASTING NUMBER
VM70, VM100, HM70-100, V80, H80, HHM80, AND TVM SERIES
PISTON AND CONNECTING ROD ASSEMBLIES
WRIST PIN
TVM220 PISTON AND ROD
MATCH MARKS
3RD OIL
CONTROL RING
SHORT SIDE OF ROD
ARROW
DIRECTION
ARROW POINTS
TOWARD THE
VALVES
MATCH MARKS
MATCH
MARKS
31
32
33
3534
83

CRANKSHAFTS AND CAMSHAFTS
Main Menu
Inspect the crankshaft visually and with a micrometer for
wear, scr atching, scoring, or out of round condition. Check
for bends on the P.T .O . end using a str aight edge, square
or a dial indicator.
CAUTION: NEVER TRY TO STRAIGHTEN A
BENT CRANKSHAFT.
CAMSHAFT
GEAR TIMING
MARK
BEVEL
CHAMFER TOOTH
CRANKSHAFT GEAR
PUNCH MARK
SMALL
HOBBING HOLE
The timing marks on the camshaft and the crankshaft
gears must be aligned for proper v alve timing. (diag. 36 &
37).
Camshafts
Check the camshaft bearing surfaces for wear using a
micrometer. Inspect the cam lobes for scoring or
excessive wear. If a damaged camshaft is replaced, the
mating crankshaft and governor gear should also be
replaced. If the crankshaft gear is pressed on it is not
serviceable and the crankshaft must also be replaced.
Clean the camshaft with solvent and blow all parts and
passages dry with compressed air, making sure that the
pins and counterweights are operating freely and
smoothly on mechanical compression relief types.
Camshafts used in rotary mower engines utilize a
composite gear (glass filled nylon) for the purpose of
reducing internal gear noise.
Mechanical Compression Release (MCR) camshafts
have a pin located in the camshaft, that e xtends ov er the
exhaust cam lobe, to lift the valve and relieve the engine
compression for easier cranking. When the engine starts,
centrifugal force moves the weight outward and the pin
will drop back down. The engine will now run at full
compression (diag. 38).
36
CRANKSHAFT
GEAR
KEYWAY
SMALL HOBBING
HOLE
CAMSHAFT
GEAR
37
COMPRESSION
RELEASE
MECHANISM
38
Some engines are equipped with Bump Compression
Release (BCR) camshafts that have a small bump g round
on the exhaust lobe of the camshaft to relieve
compression (diag. 39).
Newer camshafts are designated as Ramp Compression
Release (RCR) and utilize a less aggressive ramp than
what is used on the BCR camshaft.
84
EXHAUST
INTAKE
39

VALVES
Main Menu
The valves should be checked for proper clearance,
sealing, and wear. Valve condition is critical for proper
engine performance. V alve clear ance should be checke d
before removal from the engine block if a valve problem
is suspected or when the valves or seats are recut.
V alve clearance (between the v alve stem and valv e lifter)
should be set or checked when the engine is cold. The
piston should be at T.D.C. on the compression stroke (both
valves closed).
Use a valve grinder or "V" bloc k to hold the v alv e square
when grinding the valve stem to obtain the proper
clearance (diag. 40).
When servicing the valves, all carbon should be remov ed
from the valve head and stem. If the valv es are in a usable
condition, the valve f ace should be g round using a valve
grinder to a 45 degree angle. If after grinding the valve
face the margin is less than 1/32 of an inch (.793 mm),
the valve should be replaced (diag. 41).
Valves are not identical. Valves marked "EX" or "X" are
installed in the exhaust valve location. Valves marked "I"
are installed in the intake valv e location. If the valves are
unmarked, the nonmagnetic valve (head) is installed in
the exhaust valve location.
T o reinstall the v alves, position the valv e caps and springs
in the valve compartment. If the spring has dampening
coils, the valve spring should be installed with the
dampening coils away from the valve cap and retainer
(diag. 42).
RIGHT
1/32"
(.793 mm)
MINIMUM
DIMENSION
FACE
WRONG
MARGIN
FACE
STEM
SPRING MUST BE SQUARE
0
45
DAMPENING COILS
LOCATED CLOSER
TOGETHER
40
41
Install the valves into the guides making sure the correct
valve is in the proper port. The valve stem must pass
through the upper valve cap and spring. Hook the valve
spring retainer on the groove in the valve stem and
release the spring tension to lock the cap in place. Early
models may hav e a pin through the valve stem. Compress
the spring and cap and use a needle nose pliers to insert
the pin in the valve stem hole. Release the spring and
check that the pin is locked under the cap.
NOTE: If the spring has dampening coils, the y always go
toward the stationary surface.
42
85

V alve Seats
Main Menu
V alve seats are not replaceab le . If they are burned, pitted, or distorted they can be reground using a grinding stone or
a valve seat cutting tool. V alve seats are ground to an angle of 46 deg rees. Check the specifications section for proper
width.
The recommended procedure to properly cut a valve seat is to use the Neway Valve Cutting System, which consists
of three different cutters. LEV engines have a small combustion chamber and require the use of a special Neway
cutter #103 for the 46 and 31 degree combination cutter. The 60 degree cutter is Neway cutter #101. The tapered
pilots required are; Neway #100-1/4-1 for the .249 (6.325 mm) exhaust guide, and Neway #100-1/4 for the .250
(6.35 mm) intake guide. Consult the cutter's complete procedure guide for additional information.
NOTE: The v alve seats are cast into the engine bloc k at a slight angle on the LEV engines. When reconditioning valve
seats on the LEV engine, the seat cutter will make simultaneous contact with the seat and the aluminum portion of the
engine block. There is no detrimental effect to performance or life of the valve seat or block from the procedure.
First, use the 60 degree cutter to clean and narrow the seat from the bottom to the center (diag. 43).
Second, use the 31 degree cutter to clean and narrow the seat from the top toward the center (diag. 44).
Third or last, use the 46 degree cutter to cut the seat to a width of 3/64" (1.191 mm) (diag. 45).
BOTTOM
NARROWING
CUTTER
BOTTOM
NARROWING
15
60
TOP
0
0
SEAT
SEAT
NARROWING
CUTTER
43
46
31
0
0
44
TOP
NARROW
3/64"
(1.191 mm)
SEAT
BOTTOM
NARROW
SEAT CUTTER
31
46
0
0
45
V alve Lifters
The valve lifters on some engines are different lengths. The shor ter lifter is installed in the intake position and the
longer lifter is installed in the exhaust position. When removing, mark the lifters to install the lifter in the same position
as it was removed from.
Oversize Valve Guides
The valve guides are permanently installed in the cylinder block. If they get worn excessively, they can be reamed
oversize to accommodate a 1/32" (.793 mm) oversize valve stem.
The guides should be reamed oversize with a straight shanked hand reamer or low speed drill press. Refer to the
"Table of Specifications" (Chapter 10) to determine the correct oversize dimension. Reamers are available through
your local Tecumseh parts supplier. Consult the tool section in Chapter 11 for the correct part numbers.
The upper and lower valve spring caps must be redrilled to accommodate the oversize valve stems.
After oversizing the valve guides, the valve seats must be recut to align the valve seat to the valve guide.
CRANKCASE BREATHERS
The breather element and case can be cleaned using
cleaning solvent. Make sure the small drain hole or holes
are clean and installed facing down, so as to allow oil to
return back into the crankcase.
Top Mounted Breather
This type of breather is mounted in the top and rear of
the cylinder block in vertical shaft engines. The check
valve allows positive pressure to be vented through the
element and out the tube. Some engines have the
breather tube connected to the air cleaner assembly (diag.
46).
86
ELEMENT
BAFFLE
OIL RETURN
TUBE
CHECK VALVE
PRESSURE OUT
46

Late production top mounted breathers use the rubber
Main Menu
boot and breather tube as a push in design. Mark or note
the location of the breather tube. Use a large flat blade
screwdriver to pry the boot up and lift the breather
assembly out. Be careful not to drop the breather body
out of the rubber boot when removing (diag. 47).
A new breather tube boot is recommended for
replacement to assure proper crankcase seal. Apply
engine oil to the breather tube boot and push the breather
in until the top shoulder of the boot contacts the
crankcase.
47
Side Mounted Breather
This type of breather mounts over the valv e compartment
and uses a reed style check valve. Most horizontal shaft
engines use this style of breather. The filter element is
held in place by a small barb in the cover. To remove the
filter, insert a knife blade between the filter element and
the barb, and depress the filter element (diag. 48).
Some engine models have two gaskets installed next to
the cylinder block. If two gaskets w ere originally installed,
replace them using two gaskets (diag. 49).
Integral Breather
Some ECV engines are equipped with breathers that are
part of the cylinder block. V enting is accomplished through
passages drilled in the block to route the air flow to the
outside (diag. 50).
COVER
GASKET
IDENTIFICATION
GASKET
BAFFLE
COVER
PLATE
BODY
REED
DRAIN
HOLE
48 49
RETURN HOLE
ONE WAY
DISC VALVE
ONE WAY
DISC VALVE
WELCH
PLUG
GASKET
FILTER
GASKET
RETURN
HOLE
BODY
GASKET
COVER
COVER PLATE
BAFFLE
TUBE
CYLINDER COVER, OIL SEAL, AND BEARING SERVICE
Cylinder Cover
The following procedures, except oil seal replacement, require engine disassembly. See "Disassembly Procedure" in
this chapter.
Clean and inspect the cover , look for w ear and scoring of the bearing surfaces. Measure the bearing surface diameters
using a micrometer and check the specifications for worn or damaged parts. Replace as necessary.
When reinstalling the cover , apply a drop of Loctite 242 to the cov er screw threads and re-torque to the recommended
specification. Always use new oil seals and gaskets after disassembly.
50
87

Oil Seal Service
Main Menu
NOTE: BEFORE REMOVING THE OIL SEAL, CHECK
TO SEE IF THE SEAL IS RAISED OR RECESSED.
WHEN INSTALLING A NEW OIL SEAL, TAP IT INTO
POSITION GENTLY UNTIL IT IS SEATED INTO ITS
BOSS. SOME SEALS ARE NOT POSITIONED FLUSH
TO THE CYLINDER CO VER. ATTEMPTING TO INSTALL
THE SEAL T OO FAR IN CAN CAUSE DAMA GE T O THE
OIL SEAL AND ENGINE.
OIL SEAL REMOVER
TOOL: POSITIONED FOR
REMOVAL OF OIL SEAL
OIL SEAL
If the crankshaft is removed from the engine , remov e the
old oil seals by tapping them out with a screwdriver or
punch from the inside. If the crankshaft is in place, remov e
the seal by using the proper oil seal puller (diag. 51).
Select the proper seal protector and driver from the tool
list in Chapter 11 to install a new oil seal. Place the oil
seal over the protector (spring side of seal faces inw ard)
and place it over the crankshaft. Drive the seal into position
using the universal driver part no. 670272. The seal
protector will insure that the seal is driven in to the proper
depth (diag. 52).
CRANKSHAFT BEARING SERVICE
Ball Bearing Service (H40-HM100 engines)
To remove the ball bearing from the cylinder cover, the
bearing locks will have to be rotated out of the way. First
loosen the locking nuts with a socket. Turn the retainer
bolts counterclockwise to the unlocked position with a
needle nose pliers (diag. 53). The flat side of the retainer
will face away from the bearing in the unlocked position
(diag. 54).
When reinstalling the locks, the flat side must face the
bearing while the locking nuts should be torqued to
15-22 inch pounds (1.695 - 2.486 Nm).
To remove a ball bearing from the crankshaft, use a
bearing splitter and a puller (diag. 55).
OIL SEAL
LOCKED
INTERIOR OF COVER
51
OIL SEAL
DRIVER 670272
OIL SEAL DRIVER
PROTECTOR
52
UNLOCKED
P.T.O. BALL BEARING
53
When installing the ball bearing to the crankshaft, the
bearing must be heated by either using a hot oil bath or
heat lamp to expand the bearing. This will allow the
bearing to slide on the crankshaft with no interference fit.
Be careful to use adequate protection handling the hot
ball bearing. The bear ing and the thrust washer must
seat tightly against the crankshaft gear.
88
FLAT
TURN COUNTER-
CLOCKWISE TO UNLOCK
BALL
BEARING
BEARING
SPLITTER
FLAT
EXTERIOR OF COVER
TURN CLOCKWISE
TO LOCK
54
PULLER
55

COUNTERBALANCE SERVICE
Main Menu
To correctly align the Ultra-Balance® system, rotate the
piston to top dead center (TDC) and insert the
counterbalance shaft into its boss in the cylinder block
with the arrow on the gear pointing toward the crankshaft.
Slide the drive gear on the crankshaft, making sure the
drive gear is located on the crankshaft key and that the
arrow on the drive gear is aligned with the arrow on the
gear on the counterbalance shaft (diag. 56 & 57).
FLYWHEEL SERVICE
Some Tecumseh engines have polypropylene fans that
are replaceable. A damaged fan can be replaced by
tapping on the outside portion of the fan until it separates
from the iron portion of the flywheel (diag. 58).
DRIVE GEAR
CAMSHAFT
KEYWAY
DRIVE
GEAR
GOVERNOR
FLANGE
56
COUNTER
BALANCE
SHAFT
57
POLYPROPYLENE
PORTION OF
FLYWHEEL
A new fan ma y be installed b y heating the polypropylene
fan in a pan of boiling water. Suspend the fan off the
bottom of the pan while heating. Using adequate
protection, install the hot fan to the flywheel. Make sure
the fan locators fit into the hub area of the flywheel.
Flywheel magnets are factory installed and permanently
bonded to the flywheel. If the magnets are damaged or
lose their magnetic strength, the flywheel must be
replaced.
IRON WHEEL
58
89

CHAPTER 10
Main Menu
ENGINE SPECIFICATIONS
The engine specifications listed on the following
pages include tolerances that are considered
acceptable to achieve normal engine operation.
Observed values inside the listed tolerance range
are satisfactory and require no adjustments.
90

FOUR CYCLE TORQUE SPECIFICATIONS
Main Menu
The torque specifications listed in this chart are to be used for replacing components after disassembly, not for
checking an existing engine bolt torque. Checking a torque value on a new or used engine may be lower due to
torque relaxation that occurs on all engines from thermal expansion and contraction. However, sufficient clamping
force exists and a re-torque is not necessary.
noitacoL.sbl.ni.sbl.tfmN
stloBdaeH.lyC
rorevoC.lyC
egnalF
rorevoC.lyC
egnalF
)kolrewoP(
tuNleehwylF
)munimulA(
tuNleehwylF
tuNleehwylF
0025.615.22 X XXX X X XXXX X X XX
stloBdoR.nnoC
5015.85.11 X XXX X X XX
stloBdoR.nnoC
0714191XX
stloBdoR.nnoC
0125.7142XXXX
5115.931 X XXX X X XXXX X
5215.0141XXXX
0545.7315 X XXX X X X
5740445 XXXX X X
0365.2517 X
LLA
LXVT
LLA
SVT
LLA
TNT
VCE
,V,H
,HH
LLA
HV
VAL
04-03
MVT
KSH
KSSH
SH
,521
041
05V
-05H
06V
06
07V
MV
&MVT
LXVT
KSH
07H
KSMH
,071
022,591
MH
,HH
LXMH
HV
LLA
07-05
VEL
.txEtuNleehwylF
.ngI
gulPkrapS
gnitnuoM.ngI
tceriD(
)rednilyCot
gnitnuoM.ngI
ottceriD(
)rednilyC
gnitnuoM.ngI
dutS(
)rednilyCot
)dutS
otepiPekatnI
rednilyC
otepiPekatnI
rednilyC
otepiPekatnI
rednilyC
otroterubraC
epiPekatnI
rednilyC
0078597 XXX
052125.82 X XXX X X XXXX X X XX
54 4 5X XXX X
095.701 X
5334 XX
ot(gnitnuoM.ngI
54 4 5 X X XXXX X X
59811X XXX X X X
0015.85.11 XX
021015.31XXX
07 6 8X XXX X X XXXX X X XX
otretpadA.braC
5875.9XX
91

FOUR CYCLE TORQUE SPECIFICATIONS - CONTINUED
Main Menu
The torque specifications listed in this chart are to be used for replacing components after disassembly, not for
checking an existing engine bolt torque. Checking a torque value on a new or used engine may be lower due to
torque relaxation that occurs on all engines from thermal expansion and contraction. However, sufficient clamping
force exists and a re-torque is not necessary.
08V
MV
LLA
LXVT
LLA
LLA
noitacoL
gnitnuoMrelffuM
wercSredluohS
relffuM
oNgnitnuoM
wercSredluohS
gnitnuoMrelffuM
)ekacnaP(
gnitnuoMrelffuM
)sbaTkcoL(
gnitnuoMrelffuM
)LTH(
.sbl.ni.sbl.tfmN
SVT
TNT
0015.85.11XXX X
0225.2 X XXX X
5.7334 X
5.2768X XX X
5.785.701X
LLA
VCE
VAL
,V,H
,HH
HV
04-03
MVT
,KSH
KSSH
SH
,521
041
05V
-05H
06V
06
07V
&MVT
LXVT
,071
KSH
,591
07H
022
KSMH
,HH
LXMH
HV
MH
07-05
LLA
VEL
.gtMrelffuM
.gtMrelffuM
degnalF
.gtMrelffuM
tloBredluohS
rednilyCoT
23-8&tnuoM
retratSlioceR
)tnuoMpoT(
retratSlioceR
tnuoMediS(
)citsalP
retratSlioceR
tnuoMediS(
)lateM
retratScirtcelE
rednilyCoT
retratScirtcelE
rednilyCoT
retratScirtcelE
rednilyCoT
0210131 XXXX X X
085.6 9 X X XXXX X X
01195.21 X
rotatSotengaM
565.55.7 X XXX X X XXXX X X
poTretratSlioceR
5.2225.2 X XXX X X X
gnimroFdaerhT
0545.5 X X X XXXX X X XX
5875.9XXX
0657XXX
56
5.55.7 X XXX X X XXXX X X X
59811 XXXX X X
551315.71 X
92

ENGINE SPECIFICATIONS STANDARD POINT IGNITION
Main Menu
All models have point setting of .020" (.508 mm), spark plug gap of .030" (.762 mm), valve seat angle of 460.
All dimensions are in inches.
57SVT,03VAL,52VAL
SNOITACIFICEPS
.S.U
,7891/8otroirP
roirP&2891-03H,52H
cirteM
mm
03H
).onlaireS3891(
.S.U
cirteM
mm
.S.U
53H,53VAL
)roirp&2891(
cirteM
mm
53H
).onlaireS3891(001VCE
.S.U
cirteM
mm
.S.U
cirteM
mm
)cc()³ni(tnemecalpsiD
ekortS
eroB
.miDgnimiT
.C.D.T.B
ecnaraelCevlaV
htdiWtaeSevlaV
ediuGevlaV
.miDezisrevO
dnEtfahsknarC
yalP
lanruoJnipknarC
.aiD
.gaMtfahsknarC
.aiD.grBniaM
.O.T.PtfahsknarC
.aiD.grBniaM
gniraeBtfahsmaC
57.720.72160.905.84160.905.84125.930.65189.975.361
448.1838.64448.1838.64448.1638.64839.1522.94448.1838.64
5213.2
5313.2
560.0156.1530.0988.560.0156.1530.0988.530.0988.
400.
800.
530.
540.
7082.
7182.
500.
720.
0168.
5168.
5378.
0478.
5378.
0478.
5794.
0894.
837.85
367.85
201.
302.
988.
341.1
031.7
551.7
721.
686.
968.12
288.12
781.22
002.22
781.22
002.22
736.21
946.21
0005.2
0105.2
400.
800.
530.
540.
7082.
7182.
500.
720.
0168.
5168.
5899.
0999.
5378.
0478.
5794.
0894.
5.36
525.36
201.
302.
988.
341.1
031.7
551.7
721.
686.
968.12
288.12
263.52
573.52
781.22
002.22
736.21
946.21
0005.2
0105.2
400.
800.
530.
540.
7082.
7182.
500.
720.
0168.
5168.
5378.
0478.
5378.
0478.
5794.
0894.
5.36
525.36
201.
302.
988.
341.1
031.7
551.7
721.
686.
968.12
288.12
781.22
002.22
781.22
002.22
736.21
946.21
0005.2
0105.2
400.
800.
530.
540.
7082.
7182.
500.
720.
5999.
0000.1
5899.
0999.
5899.
0999.
5794.
0894.
5.36
525.36
201.
302.
988.
341.1
031.7
551.7
721.
686.
783.52
004.52
263.52
573.52
263.52
573.52
736.21
946.21
0526.2
0626.2
400.
800.
530.
540.
7082.
7182.
500.
720.
0168.
5168.
5378.
0478.
5378.
0478.
5794.
0894.
576.66
007.66
201.
302.
988.
341.1
031.7
551.7
721.
686.
968.12
288.12
781.22
002.22
781.22
002.22
736.21
946.21
.aiDdoR.nnoC
.grBknarC
retemaiDnotsiP
trikSfOmottoB
evoorGgniR
ecnaraelCediS
.pmoCdn2&ts1
evoorGgniR
ecnaraelCediS
liOmottoB
trikSnotsiP
ecnaraelC
paGdnEgniR
niaMrednilyC
.grB
rednilyC
egnalF/revoC
gniraeBniaM
retemaiD
0268.
5268.
2903.2
0013.2
200.
500.
5000.
5300.
5200.
3400.
700.
710.
5578.
0678.
5578.
0678.
598.12
809.12
456.85
476.85
150.
721.
310.
980.
460.
901.
871.
234.
832.22
052.22
832.22
052.22
0268.
5268.
2594.2
0694.2
200.
500.
5000.
5300.
0400.
8500.
700.
710.
5000.1
0100.1
5578.
0678.
598.12
809.12
873.36
893.36
150.
721.
310.
980.
201.
741.
871.
234.
314.52
524.52
832.22
052.22
0268.
5268.
2594.2
0694.2
200.
500.
5000.
5300.
0400.
8500.
700.
710.
5578.
0678.
5578.
0678.
598.12
809.12
873.36
893.36
150.
721.
310.
980.
201.
741.
871.
234.
832.22
052.22
832.22
052.22
5000.1
0100.1
2594.2
0694.2
200.
500.
5000.
5300.
0400.
8500.
700.
710.
5000.1
0100.1
5000.1
0100.1
314.52
524.52
873.36
893.36
150.
721.
310.
980.
201.
741.
871.
234.
314.52
524.52
314.52
524.52
0268.
5268.
2026.2
0126.2
200.
500.
100.
400.
0400.
8500.
700.
710.
5578.
0678.
5578.
0678.
598.12
809.12
355.66
375.66
150.
721.
520.
201.
201.
741.
871.
234.
832.22
052.22
832.22
052.22
* Check to detemine bore size
Notes: (A) VM & HM80 - Displacement 19.41 (318 cc) (B) VM & HM80 - Bore 3-1/8"(79.375 mm) (C) VM & HM80 Piston Dia. 3.1195/3.1205
(79.235/79.261 mm) (D) VH50, 60 .0015/.0055 (.038/.140mm) (E) VH70 .0038/.0073 (.097/.185 mm) (F) VH, HH50-70 Models .003/.031
(.762/.787 mm)
93

ENGINE SPECIFICATIONS STANDARD POINT IGNITION (CONT.)
Main Menu
All models have point setting of .020" (.508 mm), spark plug gap of .030" (.762 mm), valve seat angle of 460.
All dimensions are in inches.
SNOITACIFICEPS001TNT
.S.U
)cc()³ni(tnemecalpsiD
ekortS
eroB
.miDgnimiT
.C.D.T.B
ecnaraelCevlaV
htdiWtaeSevlaV
ediuGevlaV
.miDezisrevO
dnEtfahsknarC
yalP
lanruoJnipknarC
.aiD
.gaMtfahsknarC
.aiD.grBniaM
89.975.36140.1159.08194.0139.1715.0101.2715.1194.881
448.1838.64052.251.75839.132.94839.132.94839.132.94
0526.2
0626.2
530.0988.050.072.1530.0988.530.0988.530.0988.
400.
800.
530.
540.
7082.
7182.
500.
720.
0168.
5168.
5899.
0999.
cirteM
mm
576.66
007.66
201.
302.
988.
341.1
031.7
551.7
721.
686.
968.12
288.12
263.52
573.52
.S.U
0005.2
0105.2
400.
800.
240.
250.
2343.
2443.
500.
720.
5160.1
0260.1
5899.
0999.
,04HV,B04V-04V
04HH,04H
cirteM
mm
005.36
525.36
201.
302.
760.1
123.1
717.8
347.8
721.
686.
269.62
579.62
263.52
573.52
.S.U
0526.2
0626.2
400.
800.
530.
540.
7082.
7182.
500.
720.
5999.
0000.1
5899.
0999.
,501SVT,04VAL
501LXVT,04SH501VCE011VCE
cirteM
mm
576.66
007.66
201.
302.
988.
341.1
031.7
551.7
721.
686.
783.52
004.52
263.52
573.52
.S.U
0526.2
0626.2
400.
800.
530.
540.
7082.
7182.
500.
720.
5999.
0000.1
5899.
0999.
cirteM
mm
576.66
007.66
201.
302.
988.
341.1
031.7
551.7
721.
686.
783.52
004.52
263.52
573.52
.S.U
0057.2
0157.2
400.
800.
530.
540.
7082.
7182.
500.
720.
5999.
0000.1
0999.
5999.
cirteM
mm
58.96
88.96
201.
302.
988.
341.1
031.7
551.7
721.
686.
783.52
004.52
573.52
783.52
.O.T.PtfahsknarC
.aiD.grBniaM
gniraeBtfahsmaC
.aiDdoR.nnoC
.grBknarC
retemaiDnotsiP
trikSfOmottoB
evoorGgniR
ecnaraelCediS
.pmoCdn2&ts1
evoorGgniR
ecnaraelCediS
liOmottoB
trikSnotsiP
ecnaraelC
paGdnEgniR
niaMrednilyC
.grB
rednilyC
egnalF/revoC
gniraeBniaM
retemaiD
5378.
0478.
5794.
0894.
0268.
5268.
2026.2
0126.2
200.
500.
100.
400.
0400.
8500.
700.
710.
5000.1
0100.1
5578.
0678.
781.22
002.22
736.21
946.21
598.12
809.12
355.66
375.66
150.
721.
520.
201.
201.
741.
871.
234.
314.52
524.52
832.22
052.22
5899.
0999.
0326.
5326.
0360.1
5360.1
5494.2
0594.2
200.
500.
100.
400.
5500.
0700.
700.
710.
5000.1
0100.1
5000.1
0100.1
263.52
573.52
428.51
738.51
000.72
310.72
063.36
373.36
150.
721.
520.
201.
041.
871.
871.
234.
314.52
524.52
314.52
524.52
5899.
0999.
5794.
0894.
5000.1
0100.1
2026.2
0126.2
200.
500.
100.
400.
0400.
8500.
700.
710.
5000.1
0100.1
5000.1
0100.1
263.52
573.52
736.21
946.21
314.52
524.52
355.66
375.66
150.
721.
520.
201.
201.
741.
871.
234.
314.52
524.52
314.52
524.52
5899.
0999.
5794.
0894.
5000.1
0100.1
2026.2
0126.2
200.
500.
100.
400.
0400.
8500.
700.
710.
5000.1
0100.1
5000.1
0100.1
263.52
573.52
314.52
524.52
736.21
946.21
355.66
375.66
150.
721.
520.
201.
201.
741.
871.
234.
314.52
524.52
314.52
524.52
5899.
0999.
5794.
0894.
5000.1
0100.1
0547.2
5547.2
200.
500.
100.
400.
5400.
0600.
700.
710.
5000.1
0100.1
5000.1
0100.1
263.52
573.52
314.52
524.52
736.21
946.21
327.96
637.96
150.
721.
520.
201.
411.
251.
871.
234.
314.52
524.52
314.52
524.52
* Check to detemine bore size
Notes: (A) VM & HM80 - Displacement 19.41 (318 cc) (B) VM & HM80 - Bore 3-1/8"(79.375 mm) (C) VM & HM80 Piston Dia. 3.1195/3.1205
(79.235/79.261 mm) (D) VH50, 60 .0015/.0055 (.038/.140mm) (E) VH70 .0038/.0073 (.097/.185 mm) (F) VH, HH50-70 Models .003/.031
(.762/.787 mm)
94

ENGINE SPECIFICATIONS STANDARD POINT IGNITION
Main Menu
All models have point setting of .020" (.508 mm), spark plug gap of .030" (.762 mm), valve seat angle of 460.
All dimensions are in inches.
SNOITACIFICEPS
.S.U
)cc()³ni(tnemecalpsiD
ekortS
eroB
.miDgnimiT
.C.D.T.B
ecnaraelCevlaV
htdiWtaeSevlaV
ediuGevlaV
.miDezisrevO
dnEtfahsknarC
yalP
lanruoJnipknarC
.aiD
40.2143.79140.2143.79181.2136.99135.3167.12240.5115.642
839.132.94839.132.9452.251.755.25.36235.213.46
0218.2
0318.2
530.0988.530.0988.080.0230.2080.0230.2080.0230.2
400.
010.
530.
540.
7082.
7182.
500.
720.
5999.
0000.1
,021SVT,05VAL
05SH
cirteM
mm
524.17
054.17
201.
452.
988.
341.1
031.7
551.7
721.
686.
783.52
004.52
021TNT
021VCE
.S.U
0218.2
0318.2
400.
010.
530.
540.
7082.
7182.
500.
720.
5999.
0000.1
cirteM
mm
524.17
054.17
201.
452.
988.
341.1
031.7
551.7
721.
720.
783.52
004.52
.S.U
800.
210.
240.
250.
500.
720.
,05HV,05V
05HH,05H,521MVT
cirteM
mm
0526.2
0626.2
2343.
2443.
Feton
5160.1
0260.1
576.66
007.66
302.
503.
760.1
123.1
717.8
347.8
721.
720.
269.62
579.62
800.
210.
240.
250.
500.
720.
,06HV,06V
06HH,06H,041MVT
.S.U
0526.2
0626.2
2343.
2443.
Feton
5160.1
0260.1
cirteM
mm
576.66
007.66
302.
503.
760.1
123.1
717.8
347.8
721.
720.
269.62
579.62
.S.U
800.
210.
240.
250.
2343.
2443.
500.
720.
,07HV,07V
,07MV
07HH,07H
cirteM
mm
0057.2
0157.2
Feton
0681.1
5681.1
58.96
88.96
302.
503.
760.1
123.1
717.8
347.8
721.
720.
421.03
731.03
.gaMtfahsknarC
.aiD.grBniaM
.O.T.PtfahsknarC
.aiD.grBniaM
gniraeBtfahsmaC
.aiDdoR.nnoC
.grBknarC
retemaiDnotsiP
trikSfOmottoB
evoorGgniR
ecnaraelCediS
.pmoCdn2&ts1
evoorGgniR
ecnaraelCediS
liOmottoB
trikSnotsiP
ecnaraelC
paGdnEgniR
niaMrednilyC
.grB
rednilyC
egnalF/revoC
gniraeBniaM
retemaiD
5899.
0999.
5899.
0999.
5794.
0894.
5000.1
0100.1
2708.2
0808.2
200.
500.
100.
400.
0400.
8500.
700.
710.
5000.1
0100.1
5000.1
0100.1
263.52
573.52
263.52
573.52
736.21
946.21
314.52
524.52
303.17
323.17
150.
721.
520.
201.
201.
741.
871.
234.
314.52
524.52
314.52
524.52
5899.
0999.
5899.
0999.
5794.
0894.
5000.1
0100.1
2708.2
0808.2
200.
500.
100.
400.
0400.
8500.
700.
710.
5000.1
0100.1
5000.1
0100.1
263.52
573.52
263.52
573.52
736.21
946.21
314.52
524.52
303.17
323.17
150.
721.
520.
201.
201.
741.
871.
234.
314.52
524.52
314.52
524.52
5899.
0999.
5899.
0999.
0326.
5326.
0360.1
5360.1
0126.2
5126.2
200.
400.
200.
400.
5300.
0500.
Deton
010.
020.
5000.1
0100.1
5000.1
0100.1
263.52
573.52
263.52
573.52
428.51
738.51
000.72
310.72
375.66
685.66
150.
201.
150.
201.
980.
721.
452.
805.
314.52
524.52
314.52
524.52
5899.
0999.
5899.
0999.
0326.
5326.
0360.1
5360.1
0126.2
5126.2
200.
400.
200.
400.
5300.
0500.
Deton
010.
020.
5000.1
0100.1
5000.1
0100.1
263.52
573.52
263.52
573.52
428.51
738.51
000.72
310.72
375.66
5126.2
150.
201.
150.
201.
980.
721.
452.
805.
314.52
524.52
314.52
524.52
5899.
0999.
5899.
0999.
0326.
5326.
0881.1
5881.1
0547.2
5547.2
200.
300.
100.
300.
5400.
0600.
Eeton
010.
020.
5000.1
0100.1
5000.1
0100.1
263.52
573.52
263.52
573.52
428.51
738.51
571.03
881.03
327.96
637.96
150.
670.
520.
670.
411.
251.
452.
805.
314.52
524.52
314.52
524.52
* Check to detemine bore size
Notes: (A) VM & HM80 - Displacement 19.41 (318 cc) (B) VM & HM80 - Bore 3-1/8"(79.375 mm) (C) VM & HM80 Piston Dia. 3.1195/3.1205
(79.235/79.261 mm) (D) VH50, 60 .0015/.0055 (.038/.140mm) (E) VH70 .0038/.0073 (.097/.185 mm) (F) VH, HH50-70 Models .003/.031
(.762/.787 mm)
95

ENGINE SPECIFICATIONS STANDARD POINT IGNITION (Cont.)
Main Menu
All models have point setting of .020" (.508 mm), spark plug gap of .030" (.762 mm), valve seat angle of 460.
All dimensions are in inches.
SNOITACIFICEPS07MH,071MVT
.S.U
)cc()³ni(tnemecalpsiD
ekortS
eroB
.miDgnimiT
.C.D.T.B
ecnaraelCevlaV
htdiWtaeSevlaV
ediuGevlaV
.miDezisrevO
dnEtfahsknarC
yalP
lanruoJnipknarC
.aiD
71.7124.18256.8176.50334.91
235.213.46235.213.46235.2
5739.2
5839.2
090.0682.2090.0682.2090.0682.2090.0682.2090.0682.2
800.
210.
240.
250.
2343.
2443.
500.
720.
0681.1
5681.1
cirteM
mm
316.47
836.47
302.
503.
760.1
123.1
717.8
347.8
721.
686.
421.03
731.03
800.
210.
240.
250.
500.
720.
,*08MV,08V
*08MH,07H
.S.U
0260.3
0360.3
2343.
2443.
0681.1
5681.1
cirteM
mm
577.77
008.77
302.
503.
760.1
123.1
717.8
347.8
721.
686.
421.03
731.03
.S.U
Aeton
Beton
0521.3
0621.3
800.
210.
240.
250.
2343.
2443.
500.
720.
0681.1
5681.1
,591MVT,*08MV
08MHH,*08MH*001MH,001MV*001MH,022MVT
cirteM
mm
64.8132.0280.33328.1236.753
13.46235.213.46235.213.46
573.97
004.97
302.
503.
760.1
123.1
717.8
347.8
721.
686.
421.03
731.03
.S.U
0781.3
0881.3
800.
210.
240.
250.
2343.
2443.
500.
720.
0681.1
5681.1
cirteM
mm
059.08
579.08
302.
503.
760.1
123.1
717.8
347.8
721.
686.
421.03
731.03
.S.U
0213.3
0313.3
800.
210.
240.
250.
2343.
2443.
500.
720.
0681.1
5681.1
cirteM
mm
521.48
051.48
302.
503.
760.1
123.1
717.8
347.8
721.
686.
421.03
731.03
.gaMtfahsknarC
.aiD.grBniaM
.O.T.PtfahsknarC
.aiD.grBniaM
gniraeBtfahsmaC
.aiDdoR.nnoC
.grBknarC
retemaiDnotsiP
trikSfOmottoB
evoorGgniR
ecnaraelCediS
.pmoCdn2&ts1
evoorGgniR
ecnaraelCediS
liOmottoB
trikSnotsiP
ecnaraelC
paGdnEgniR
niaMrednilyC
.grB
rednilyC
egnalF/revoC
gniraeBniaM
retemaiD
5899.
0999.
0781.1
5781.1
0326.
5326.
0881.1
5881.1
5239.2
5339.2
200.
500.
100.
400.
400.
600.
010.
020.
5000.1
0100.1
0981.1
5981.1
263.52
573.52
051.03
361.03
428.51
738.51
571.03
881.03
684.47
115.47
150.
721.
520.
201.
201.
251.
452.
805.
314.52
524.52
102.03
312.03
5899.
0999.
0781.1
5781.1
0326.
5326.
0881.1
5881.1
5750.3
5850.3
Ceton
200.
500.
100.
400.
5300.
5500.
010.
020.
5000.1
0100.1
0981.1
5981.1
263.52
573.52
051.03
361.03
428.51
738.51
571.03
881.03
166.77
686.77
150.
721.
520.
201.
980.
041.
452.
805.
314.52
524.52
102.03
312.03
5899.
0999.
0781.1
5781.1
0326.
5326.
0881.1
5881.1
5911.3
5021.3
200.
500.
100.
400.
5400.
5600.
010.
020.
5000.1
0100.1
0981.1
5981.1
263.52
573.52
051.03
361.03
428.51
738.51
571.03
881.03
532.97
162.97
150.
721.
520.
201.
411.
571.
452.
805.
314.52
524.52
102.03
312.03
5899.
0999.
0781.1
5781.1
0326.
5326.
0881.1
5881.1
5181.3
5281.3
200.
500.
100.
400.
5400.
5600.
010.
020.
5000.1
0100.1
0981.1
5981.1
263.52
573.52
051.03
361.03
428.51
738.51
571.03
881.03
018.08
638.08
150.
721.
520.
201.
411.
571.
452.
805.
314.52
524.52
102.03
312.03
5899.
0999.
0781.1
5781.1
0326.
5326.
0881.1
5881.1
0903.3
5013.3
200.
500.
100.
400.
5100.
0400.
010.
020.
5000.1
0100.1
0981.1
5981.1
263.52
573.52
051.03
361.03
428.51
738.51
571.03
881.03
940.48
780.48
150.
721.
520.
201.
830.
201.
452.
805.
314.52
524.52
102.03
312.03
* Check to detemine bore size
Notes: (A) VM & HM80 - Displacement 19.41 (318 cc) (B) VM & HM80 - Bore 3-1/8"(79.375 mm) (C) VM & HM80 Piston Dia. 3.1195/3.1205
(79.235/79.261 mm) (D) VH50, 60 .0015/.0055 (.038/.140mm) (E) VH70 .0038/.0073 (.097/.185 mm) (F) VH, HH50-70 Models .003/.031
(.762/.787 mm)
96
 Loading...