

Page 1
Page 2
PAG. 2
LED Strobe Panel - Manual
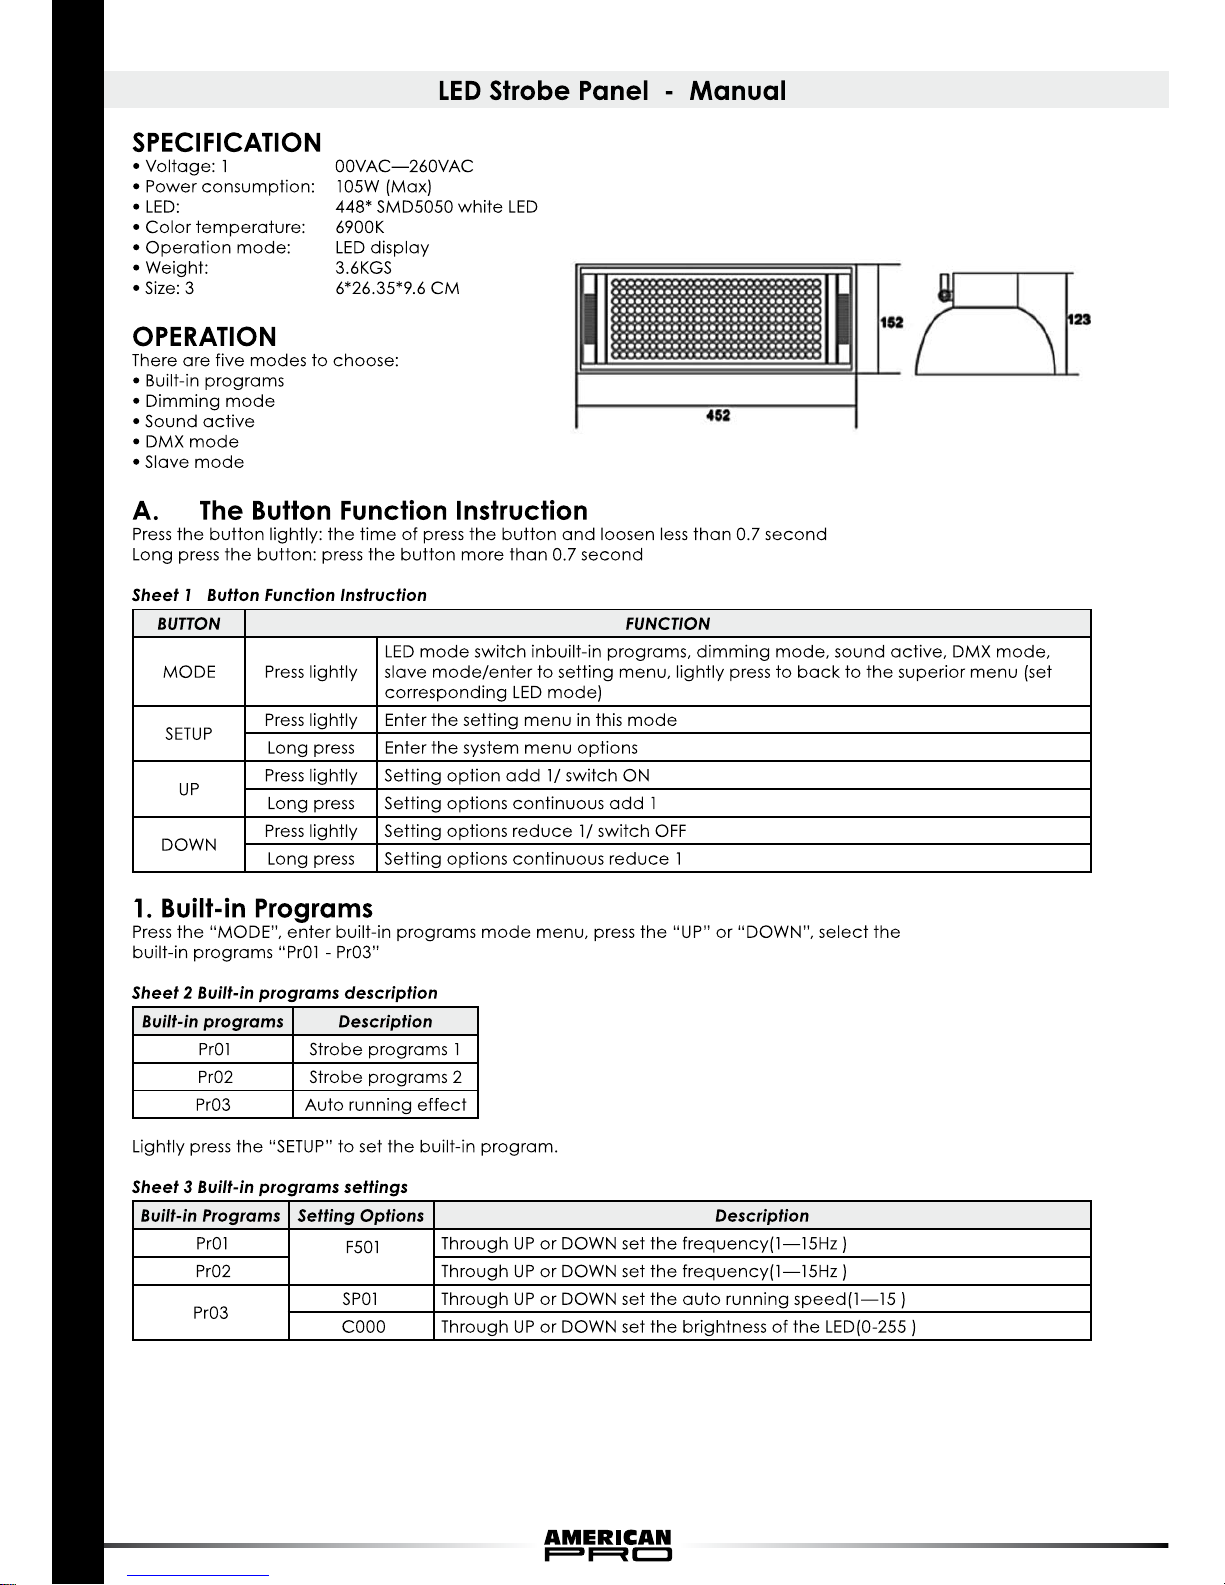
SPECIFICATION
• Voltage: 1 00VAC—260VAC
• Power consumption: 105W (Max)
• LED: 448* SMD5050 white LED
• Color temperature: 6900K
• Operation mode: LED display
• Weight: 3.6KGS
• Size: 3 6*26.35*9.6 CM
OPERATION
There are five modes to choose:
• Built-in programs
• Dimming mode
• Sound active
• DMX mode
• Slave mode
A. The Button Function Instruction
Press the button lightly: the time of press the button and loosen less than 0.7 second
Long press the button: press the button more than 0.7 second
Sheet 1 Button Function Instruction
BUTTON FUNCTION
MODE Press lightly
LED mode switch inbuilt-in programs, dimming mode, sound active, DMX mode,
slave mode/enter to setting menu, lightly press to back to the superior menu (set
corresponding LED mode)
SETUP
Press lightly Enter the setting menu in this mode
Long press Enter the system menu options
UP
Press lightly Setting option add 1/ switch ON
Long press Setting options continuous add 1
DOWN
Press lightly Setting options reduce 1/ switch OFF
Long press Setting options continuous reduce 1
1. Built-in Programs
Press the “MODE”, enter built-in programs mode menu, press the “UP” or “DOWN”, select the
built-in programs “Pr01 - Pr03”
Sheet 2 Built-in programs description
Built-in programs Description
Pr01 Strobe programs 1
Pr02 Strobe programs 2
Pr03 Auto running effect
Lightly press the “SETUP” to set the built-in program.
Sheet 3 Built-in programs settings
Built-in Programs Setting Options Description
Pr01
F501
Through UP or DOWN set the frequency(1—15Hz )
Pr02 Through UP or DOWN set the frequency(1—15Hz )
Pr03
SP01 Through UP or DOWN set the auto running speed(1—15 )
C00 0 Through UP or DOWN set the brightness of the LED(0-255 )
Page 3

PAG. 3
2. Dimming Mode
Press the “MODE”, the LED display will show “CoNS”, enter to LED dimming mode
Lightly press the “SETUP”, to set the lamp brightness.
Sheet 4 dimming mode settings
Settings options Operation
C00 0 LED dimming, through UP or DOWN adjust the brightness value ( 0 —255 )
3. Sound Active
There are four sound programs: sound programs 1, sound programs 2, sound programs 3, sound programs 4.
Press the “MODE” select the sound programs, through UP or DOWN select the built-in sound programs “SoUI
-- SoU4”.
Lightly press the “SETUP”, enter to sound programs settings, as below sheet.
Sheet 5 Sound active programs
SoU1
SU04
Press UP or DOWN set the sound active sensitivity(0 —31) Son2
SoU3
SU04
C00 0 Press UP or DOWN set the LED brightness (0—255)
SoU4
SU04 Press UP or DOWN set the sound active sensitivity(0—31)
C00 0 Press UP or DOWN set the LED brightness (0—255)
4. DMX Mode
Press the “MODE”, the LED display will show “d512”, enter to LED DMX mode main interface.
Lightly press the “SETUP”, enter into DMX address, DMX working mode setting.
Sheet 6 DMX Mode Settings
Setting options Operation instruction
d001 DMX address setting(1 -512), through UP or DOWN set the address
4-ch Through UP or DOWN select CH1, CH4, CH6, CH7 mode
Working mode 1: “1-ch”
Sheet 7 DMX Mode Function Sheet of CH1
CHANNEL VALU E FUNCTION
1 0-255 White, (whole 0-100%)
Working mode 2: “4-ch”
Sheet 8 DMX Mode Function Sheet of CH4
CHANNEL VALU E FUNCTION
1
0-255
Part 1 (bottom-right)
2 Part 2 (bottom-left)
3 Part 3 (upper-right)
4 Part 4 (upper-left)
Working mode 3: “6-ch”
Sheet 9 DMX Mode Function Sheet of CH6
CHANNEL VALU E FUNCTION
1
0-255
Part 1 (bottom-right)
2 Part 2 (bottom-left)
3 Part 3 (upper-right)
4 Part 4 (upper-left)
5 Master Dimming
6
0-9 NO USE
0-255 Strobe, the greater the value, the higher the frequency
ENGLISH .
Page 4

PAG. 4
Working mode 4: “7-ch”
Sheet 10 DMX Mode Function Sheet of CH7
CHANNEL VALU E FUNCTION
1
0-255
Part 1 (bottom-right)
2 Part 2 (bottom-left)
3 Part 3 (upper-right)
4 Part 4 (upper-left)
5 Master Dimming
6
0-39 NO USE
40-59 Built-in program 1
60 -79 Built-in program 2
80-99 Built-in program 3
10 0 -159 NO USE
160 -179 Sound Active 1
180 -19 9 Sound Active 2
200 -219 Sound Active 3
220 -255 Sound Active 4
7 0-255 Built-in programs, strobe or speed, sound active/sound active sensitivity
5. Slave Mode
Press the “MODE”, the LED display will show “SLAv”, enter LED slave mode.
B. System Options
In any state, long press the “SETUP”, enter the main interface of the system options: “67A1”
Lightly press the “SETUP”, select the temperature protection switch options, PCB temperature inquires, LED biggest
gray, restore factory settings.
Setting details as below sheet:
Temperature control switch options
7-on Press UP, will show “7-on”, open temperature control.
roff Press DOWN, will show “roff”, closed temperature.
PCB temperature options 7-33 Press DOWN or UP to update temperature, current is 33ºC
LED biggest gray value L150 Press DOWN or UP update the LED newest brightness (0 —255).
Restore factory setting -ES- Press UP to restore factory settings
On system options, lightly press the “MODE”, return to the system main interface “67A1” , press the “MODE” again,
return before LED mode menu.
C. Restore Factory Settings
There are two kinds of methods to restore factory settings.
1) In menu system options “-ES-” , press the “UP” to restore factory settings.
2) When in power failure situation, press the “MODE” and “SETUP”, power on to restore factory settings.
ENGLISH .
Page 5

PAG. 5
Panel estroboscópico de LEDs - Manual en Español
ESPECIFICACIONES TÉCNICAS
• Voltaje: 100VAC—260VAC
• Consumo de energía: 105W (Max)
• Indicadores LED: 448 indicadores SMD 5050 color blanco
• Temperatura Color: 6900ºK
• Modo de operación Pantalla LED
• Peso: 3.6 KGS
• Dimensiones: 360 x 263,5 x 96 mm.
Modos de OPERACION
Cinco modos disponibles, a saber:
• Built-in programs
• Dimming
• Sound active
• DMX
• Slave
A. Funciones de las Teclas
“Presionar suavemente” (suave): Duración equivalente al pulsado de la tecla (menor a 0,7 segundos)
“Presionar prolongadamente” (prolongada): Duración mayor a 0,7 segundos
Tabla 1: descripción de funciones
TECLA PRESION FUNCION
MODO suave
Alterna entre los modos built-in programs, dimming, sound active, DMX y slave.
En el menú de configuración del modo actual, presione suave esta tecla nuevamente
para volver al menú anterior y seleccionar otro modo de operación.
SETUP
suave Utilice esta tecla para ingresar al menú de configuración del modo actual.
prolongada Utilice esta tecla para ingresar a las opciones del menú del sistema.
UP
suave
Utilice esta tecla para aumentar el valor seleccionado en 1 unidad, y para activar ciertos valores (ON).
prolongada Utilice esta tecla para aumentar el valor seleccionado en forma continua.
DOWN
suave
Utilice esta tecla para disminuir el valor seleccionado en 1 unidad, y para desactivar
ciertos valores (OFF).
prolongada Utilice esta tecla para disminuir el valor seleccionado en forma continua
1. Built-in Programs
Presione la tecla “MODE” para ingresar al menú del modo Built-in Programs. Utilice las opciones “UP” o “DOWN”
para seleccionar el programa incorporado deseado en el rango “Pr01 - Pr03”
Tabla 2: configuración de los programas incorporados
Progr. incorporado Descripción
Pr01 Programa de efecto estrobo 1
Pr02 Programa de efecto estrobo 2
Pr03 Efecto de ejecución continua
Presione suavemente la tecla “SETUP” para configurar el programa incorporado que haya seleccionado.
Tabla 3: configuración de los programas incorporados
Progr. incorporado Opciones conf. Descripción
Pr01
F501 Opciones “UP” o “DOWN” ajustan la frecuencia (1-15 Hz)
Pr02
Pr03
SP01
“UP” o “DOWN” ajustan la velocidad de ejecución automática
de los programas incorporados (1-15)
C00 0 “UP” o “DOWN” ajustan el brillo de los indicadores LED (0-255)
Page 6

PAG. 6
2. Dimming
Presione la tecla “MODE” para ingresar al modo Dimming. En la pantalla, se mostrará el mensaje “CoNS”.
Presione suavemente la tecla “SETUP” para configurar el brillo de la lámpara.
Tabla 4: configuraciones del modo Dimming
Progr. incorporado Descripción
C00 0 Regulación de indicadores LED. “UP” o “DOWN” ajustan el valor de brillo (0 -255).
3. Sound Active
Este producto ofrece cuatro programas de activación por sonido: sound programs 1, sound programs 2, sound
programs 3, sound programs 4.
Presione la tecla “MODE” para seleccionar el programa deseado en el rango “SoUI -- SoU4”. Opciones “UP” o
“DOWN”. Presione suavemente la tecla “SETUP” para configurar el programa de activación por sonido seleccionado, tal como se describe a continuación.
Tabla 5: Programas de activación por sonido
SoU1
SU04
UP o DOWN ajustan la sensibilidad del
programa de activación por sonido seleccionado (0 -31).
Son2
SoU3
SU04
C00 0 UP o DOWN ajustan el brillo de los indicadores LED (0-255).
SoU4
SU04 UP o DOWN ajustan la sensibilidad del programa seleccionado (0-31)
C00 0 UP o DOWN ajustan el brillo de los indicadores LED (0-255).
4. DMX
Presione la tecla “MODE” para ingresar al modo DMX. En la pantalla se mostrará el mensaje: “d512”,.
Presione suavemente la tecla “SETUP” para configurar la dirección DMX.
Tabla 6: configuración del modo DMX
Opciones Config. Descripción
d001 UP o DOWN ajustan la dirección DMX (1-512).
4-ch Use UP o DOWN para seleccionar el modo de canales CH1, CH4, CH6, CH7.
Modo de operación 1: “1-ch”
Tabla 7: funciones DMX en CH1
CANAL VALOR FUNCION
1 0-255 BLANCO, (pleno 0-100%)
Modo de operación 2: “4-ch”
Tabla 8: funciones DMX en CH4
CANAL VALOR FUNCION
1
0-255
Part 1 (inferior-derecho)
2 Part 2 (inferior-izquierdo)
3 Part 3 (superior-derecho)
4 Part 4 (superior-izquierdo)
Modo de operación 3: “6-ch”
Tabla 9: funciones DMX en CH6
CANAL VALOR FUNCION
1
0-255
Part 1 (inferior-derecho)
2 Part 2 (inferior-izquierdo)
3 Part 3 (superior-derecho)
4 Part 4 (superior-izquierdo)
5 Master Dimming
6
0-9 ND
0-255 Estrobo (a mayor valor, mayor frecuencia)
Page 7

PAG. 7
Modo de operación 4: “7-ch”
Tabla 10: funciones DMX en CH7
CANAL VALOR FUNCION
1
0-255
Part 1 (inferior-derecho)
2 Part 2 (inferior-izquierdo)
3 Part 3 (superior-derecho)
4 Part 4 (superior-izquierdo)
5 Master Dimming
6
0-39 ND
40-59 Programa incorporado 1
60 -79 Programa incorporado 2
80-99 Programa incorporado 3
10 0 -159 ND
160 -179 Programa de activación por sonido/ Sound Active 1
180 -19 9 Programa de activación por sonido/ Sound Active 2
200 -219 Programa de activación por sonido/ Sound Active 3
220 -255 Programa de activación por sonido/ Sound Active 4
7 0-255 Programa incorporado, estrobo, velocidad,,sound active/ sensibilidad sound active
5. Modo Slave
Presione la tecla “MODE” para ingresar al menú del modo Slave. En la pantalla, se mostrará el mensaje “SLAv”.
B. Opciones del sistema
En cualquier estado, presione prolongadamente la tecla “SETUP” para ingresar a la interfaz principal de las opciones del sistema: “67A1”
Luego, presione suavemente la tecla “SETUP”. Podrá seleccionar las siguientes opciones: control de temperatura,
temperatura de circuito impreso (PCB), máximo gris en LED, y configuraciones predeterminadas.
Control de temperatura
7-on Presionando UP, control de temperatura activado.
roff Presionando DOWN, control de temperatura desactivado.
Temperatura PCB 7-33 UP o DOWN actualiza la temperatura del equipo (actual 33ºC)
Máximo valor de gris en LED L150 UP o DOWN: valor del brillo de los indicadores LED (0 -255).
Configuraciones predeterminadas -ES- UP restaura las configuraciones de fábrica
Presione suavemente la tecla “MODE” para volver a la interfaz principal del sistema “67A1”. Para volver al menú
del modo anterior, presione nuevamente la tecla “MODE”.
C. Restaurar configuración de fábrica
Este dispositivo ofrece dos métodos para restaurar las configuraciones de fábrica, a saber:
• En la opción “-ES-” del menú correspondiente a las opciones del sistema, presione la tecla “UP” para restaurar
las configuraciones de fábrica.
• En situación de falla de energía, presione la tecla “MODE”, y luego la tecla “SETUP” para encender la unidad y
restaurar las configuraciones predeterminadas.
 Loading...