

Page 1
P. 1
| Tecshow Str atus 1500
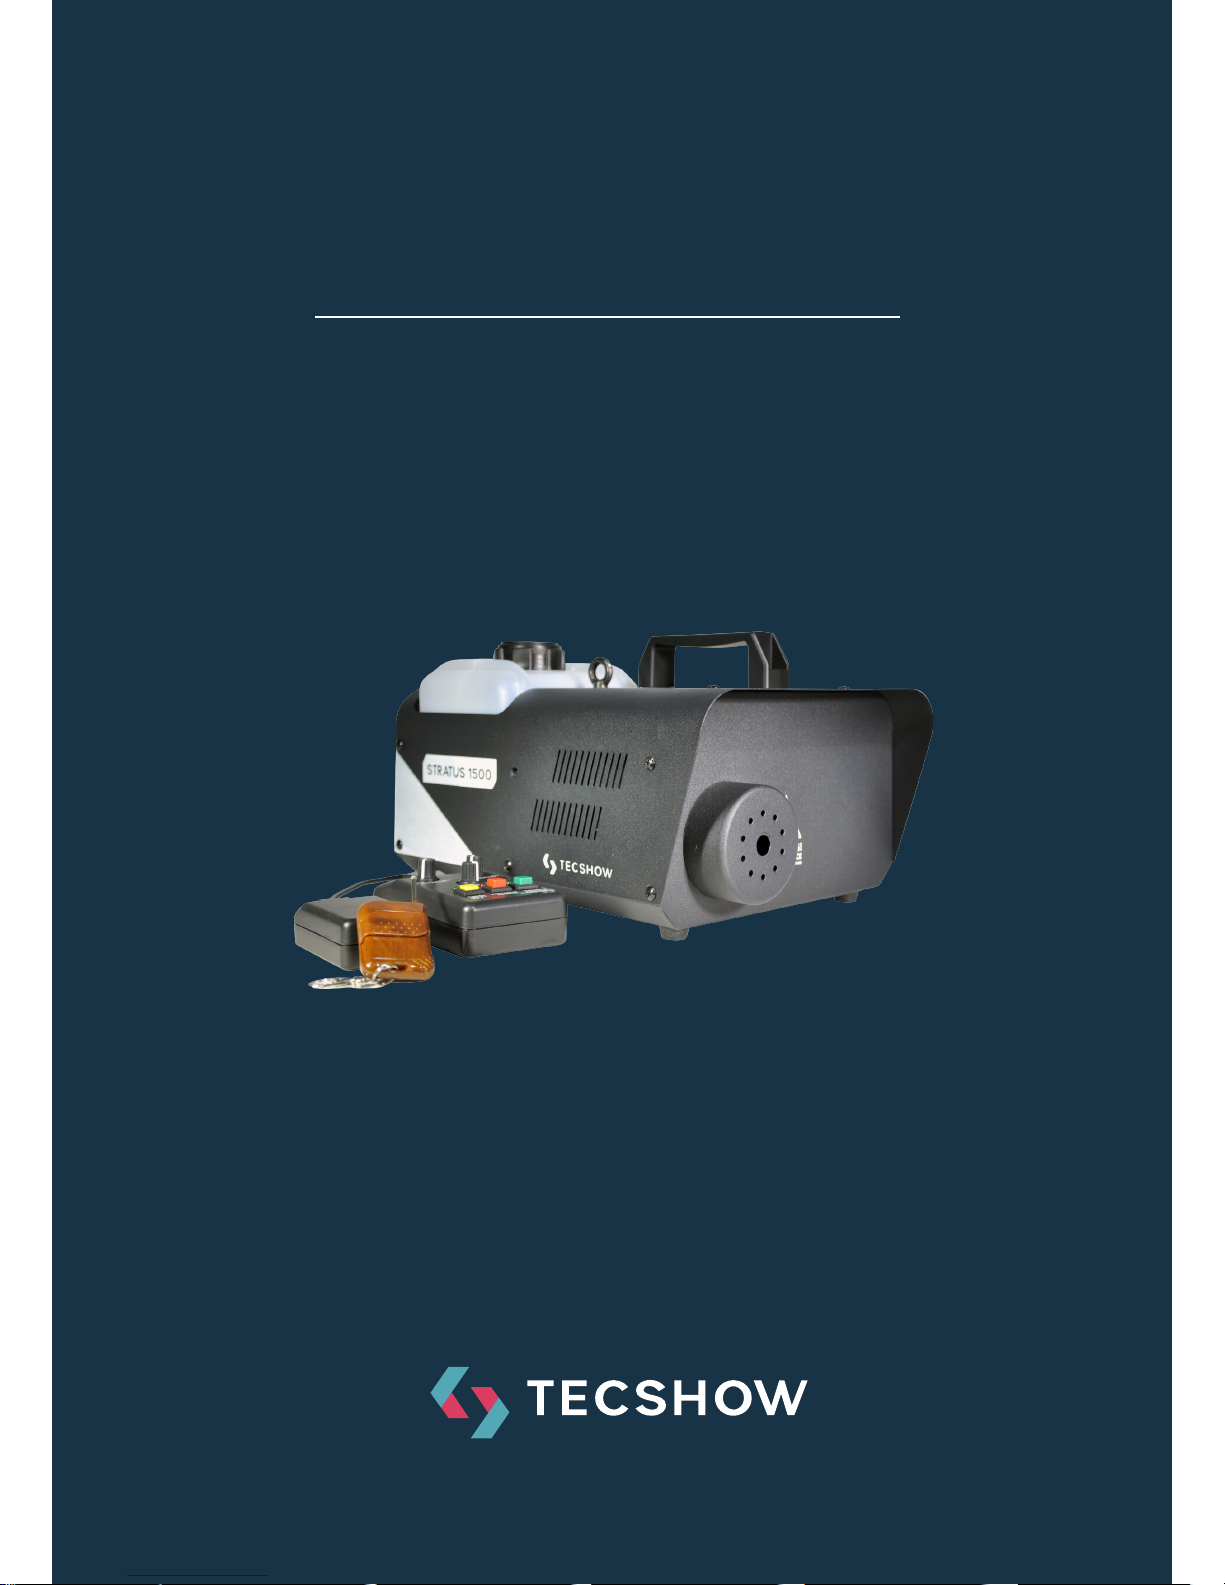
STRATUS 1500
Professional fog machine
USER MANUAL / MANUAL DE USUARIO
PLEASE READ THE INSTRUCTIONS CAREFULLY BEFORE USE
POR FAVOR LEA LAS INSTRUCCIÓNES ANTES DE USAR
Page 2

P. 2
Tecshow Str atus 1500 |
Stratus 1500
Professional fog machine - Wireless control
Stratus 1500 is a high performance fog machine
with an output of 30,000 cubic feet per minute, providing easy operation and a low warm up time of 5
minutes. Its tank has a capacity of 2.5 liters (88 Oz.)
and it can be controlled with the included wireless
remote control. Stratus 1500 is ideal for mobile
applications and social events.
Specications
Output
• Smoke output: 30,000 cubic feet per minute
• Warm up time: 5 minutes
• Tank: 2.5 lts./ 88 Oz.
• Liquid consumption: 125 ml/min / 4.4 oz/min
Control
• Operational modes: Stand alone, Wired remote
control and Wireless remote control
Physical
• Dimensions: 342x315.6x251.7 mm. /
13.5x12.4x9.9 in.
• Weight: 6.5 Kg. / 14.4 Lbs.
1. OVERVIEW
English version
Page 3
P. 3
| Tecshow Str atus 1500
English version
2. BEFORE YOU BEGIN
What Is Included
• Stratus 1500
• FC-T Timed Remote Control
• Hanging Bracket with Mounting Hardwar
• Warranty Card
Unpacking Instructions
Carefully unpack the product immediately and
check the container to make sure all the parts are in
the package and are in good condition.
Claims
If the box or the contents (the product and included
accessories) appear damaged from shipping, or
show signs of mishandling, notify the carrier immediately, not Chauvet. Failure to report damage to
the carrier immediately may invalidate your claim.
In addition, keep the box and contents for inspection. For other issues, such as missing components
or parts, damage not related to shipping, or con-
cealed damage, le a claim with Ampro within 7
days of delivery.
Text Conventions
1—512 A range of values.
50/60 A set of values.
Settings A menu option.
Menu > Settings A sequence of menu options.
<Enter> A button.
Symbols
Critical installation, conguration, or operation information. Not following these instruc-
tions may make the product not work, cause damage to the product, or cause harm to the operator.
Important installation or conguration
information. The product may not function
correctly if this information is not used.
Useful information.
Safety Notes
These notes include important information about
the mounting, usage, and maintenance of this product; read before using the product.
• Always connect the product to a grounded
circuit to avoid the risk of electrocution.
• Always disconnect the product from the power
source before cleaning or replacing the fuse.
• Make sure the power cord is not crimped or
damaged.
• Never disconnect the product from power by
pulling or tugging on the cord.
• If mounting the product overhead, always secure to a fastening device using a safety cable.
• Make sure there are no ammable materials
close to the product when operating.
• Do not touch the product’s housing when operating because it may be very hot.
• Do not mount the product on a ammable
surface (linoleum, carpet, wood, paper, carton,
plastic, etc.).
• The product’s nozzle is very hot during oper-
ation and it remains hot for a long time aer
operation has stopped.
• The fog exits the nozzle at a very high temper-
ature. Keep a minimum distance of 6.5 (2 m)
from the nozzle to the nearest object.
• Do not use the product as a space heater.
• Do not drink or come in contact with the fog uid. If you do, call your local emergency service
(911 in the US) for help.
• Do not add perfume, alcohol, gasoline, or any
other ammables to the fog uid.
• Always make sure that the voltage of
the outlet to which you are connecting the
Page 4

P. 4
Tecshow Str atus 1500 |
English version
product is within the range stated on the decal
or rear panel of the product.
• The product is for indoor use only! (IP20) To
prevent risk of re or shock, do not expose the
product to rain or moisture.
• Always install the product in a location with
adequate ventilation, at least 20 in (50 cm) from
adjacent surfaces.
• Be sure that no ventilation slots on the product’s housing are blocked.
• Never connect the product to a dimmer or
rheostat.
• Make sure to replace the fuse with another of
the same type and rating.
• Never carry the product from the power cord
or any moving part. Always use the hanging/
mounting bracket.
• The maximum ambient temperature (Ta) is 104
°F (40 °C). Do not operate the product at higher
temperatures.
• In the event of a serious operating problem,
stop using the product immediately.
• Never try to repair the product. Repairs carried
out by unskilled people can lead to damage or
malfunction. Contact the nearest authorized
technical assistance center.
• This product is not intended for permanent
installation.
• Use only AMPRO water-based fog uid.
• Drain the tank before transporting or storing
the product.
• To eliminate unnecessary wear and improve its
lifespan, during periods of non-use completely
disconnect the product from power via breaker
or by unplugging it.
Keep this User Manual for future use. If you
sell the product to another user, be sure to
give this document to the next owner.
FCQ (Fog Cleaner Quart) was specically
developed by Chauvet to clean your Stratus
1500. Make sure you use FCQ regularly, no
longer than 90 days between cleanings, to increase
the life of your fogger.
Page 5
P. 5
| Tecshow Str atus 1500
English version
3. INTRODUCTION
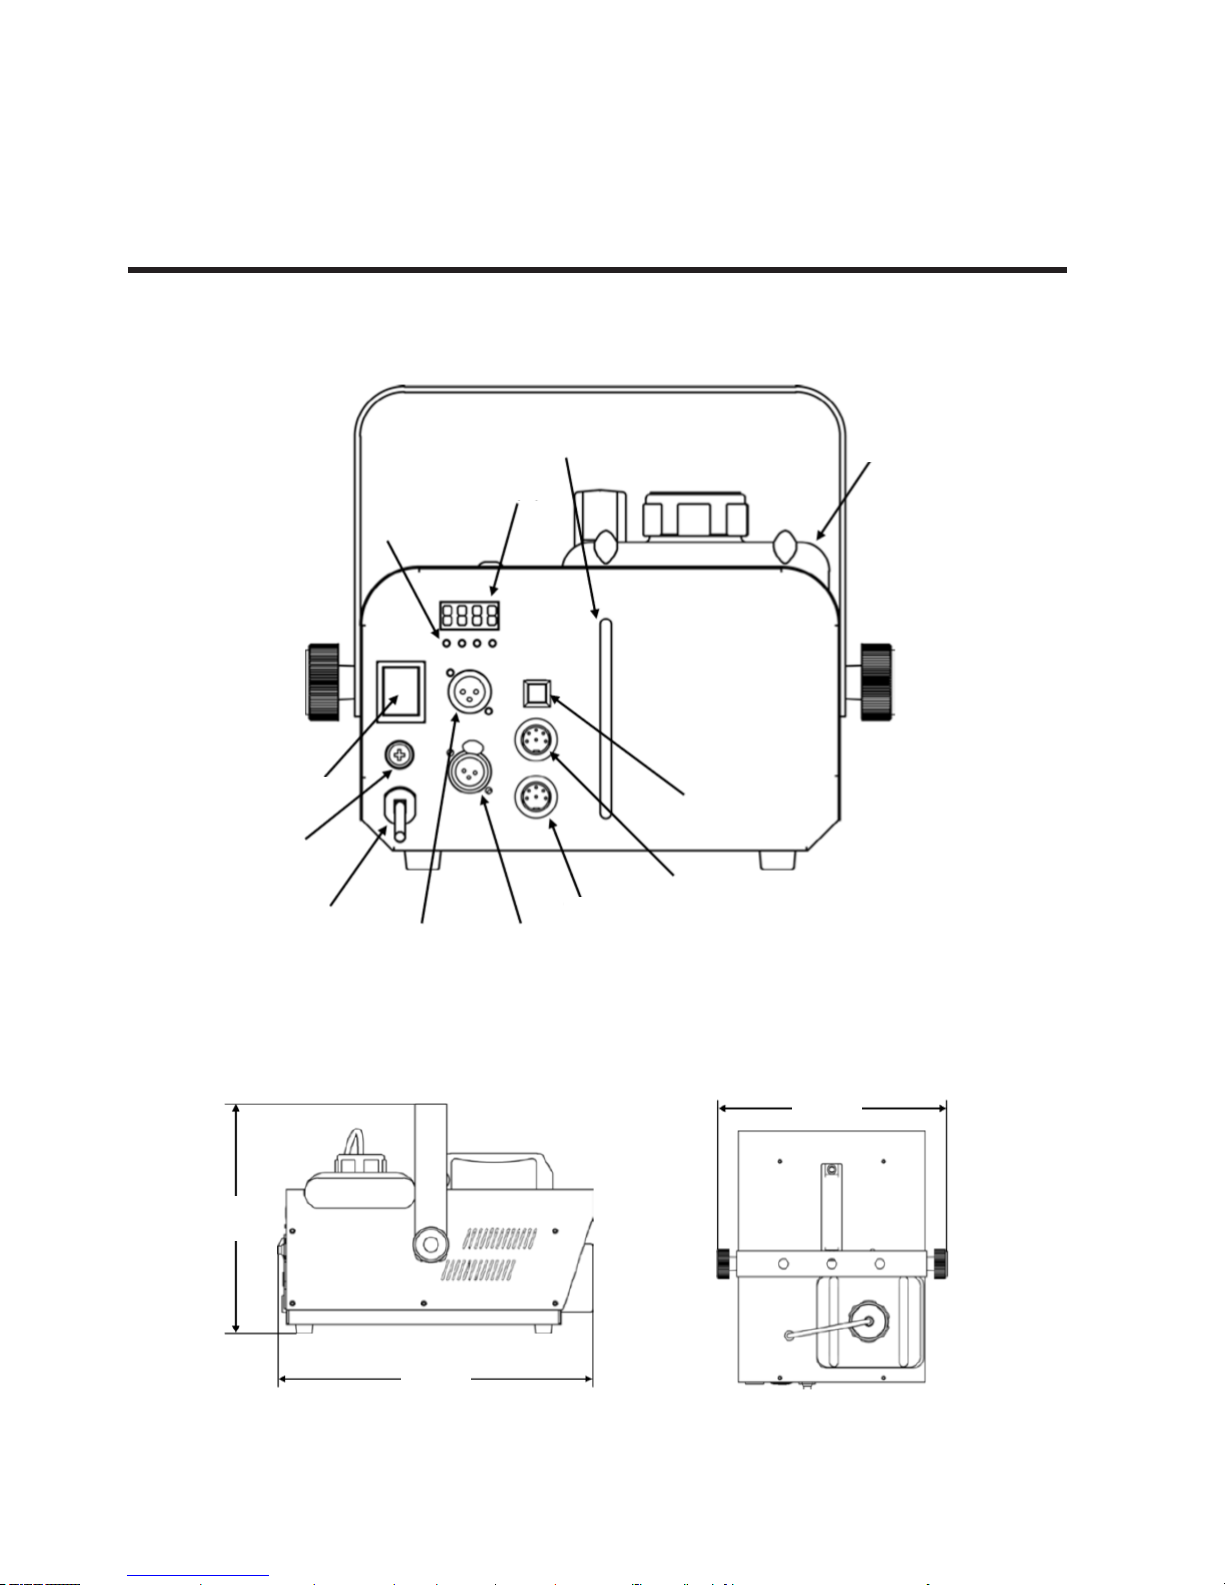
Overview
Dimensions
Fog Fluid
Tanc k
Fluid Level
Indicator
Menu
Buttons
Wireless
Remote
Connector
Manual
Remote
Connector
Back Panel View
Power Cord
Power Switch
Manual-Fog
Button
DMX In
Display
DMX Out
Fuse Holder
10 in
253 mm
13.7 in
348 mm
12.3 in
312 mm
Page 6
P. 6
Tecshow Str atus 1500 |
4. SETUP
AC Power
To determine the product’s power requirements
(circuit breaker, power outlet, and wiring), use the
current value listed on the label aixed to the product’s back panel, or refer to the product’s speci-
cations chart. The listed current rating indicates
the product’s average current draw under normal
conditions.
• Always connect the product to a protected
circuit (circuit breaker or fuse). Make sure the
product has an appropriate electrical ground to
avoid the risk of electrocution or re.
• To eliminate unnecessary wear and improve its
lifespan, during periods of non-use completely
disconnect the product from power via breaker
or by unplugging it.
Never connect the product to a rheostat (variable
resistor) or dimmer circuit, even if the rheostat or
dimmer channel serves only as a 0 to 100% switch.
Fuse Replacement
1. Disconnect the product from power.
2. Twist the fuse holder cap counterclockwise to
loosen the fuse holder and pull straight out.
3. Remove the blown fuse.
4. Replace with a fuse of the same type and rating.
5. Screw the fuse holder cap back in place and
reconnect power.
• Disconnect the product from power before re-
placing the fuse.
• Always replace a blown fuse with another of the
same type and rating.
Mounting
Before mounting the product, read and follow the
safety recommendations indicated in the Safety
Notes.
Orientation
This product may not be tilted. This product should
be level when on a surface or when mounted.
Rigging
• Before deciding on a location, always make
sure there is easy access to the product for
maintenance and uid replenishment.
• Make sure that the structure or surface onto
which you are mounting the product can support the product’s weight (see the Technical
Specications).
• When mounting the product overhead, always
use a safety cable. Mount the product securely
to a rigging point, such as an elevated platform
or a truss.
• When rigging the product onto a truss, you
should use a mounting clamp of appropriate
weight capacity. The bracket has 13-mm holes,
which are appropriate for this purpose.
• The rubber feet also serve as oor supports
and allow for surface mounting. When mount-
ing the product on the oor, make sure that the
product and cables are away from people and
vehicles.
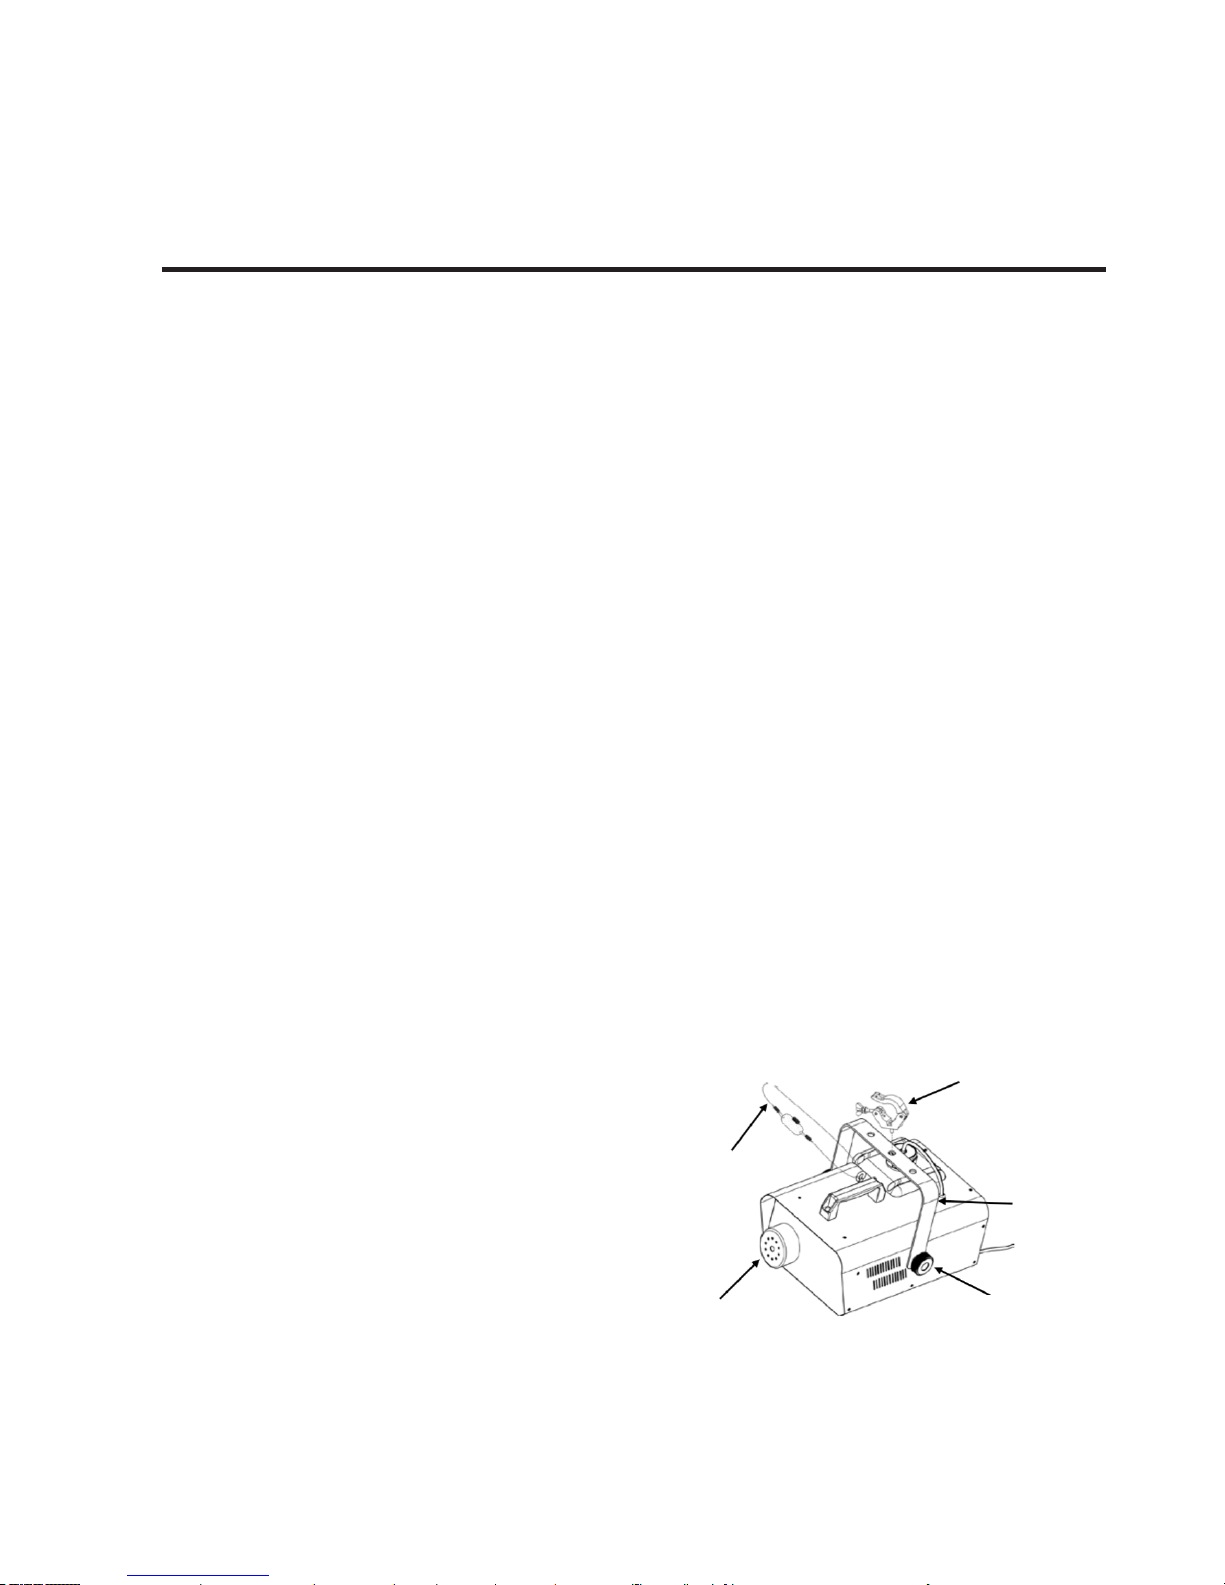
Mounting Diagram
English version
Safety
Cable
Mounting
Clamp
Mounting
Bracket
Nozzle
Bracket Adjustment
Knob
(works with
CH-0 5 from
Ampro)
(such as CLP-1 5
or CLP-15N cl amp
from Amp ro)
Page 7

P. 7
| Tecshow Str atus 1500
5. OPERATION
Control Panel Operation
To access the control panel functions, use the four
buttons located underneath the display. Please
refer to the Product Overview to see the button
locations on the control panel.
Button
Menu: Press to exit from the current menu or func-
tion.
Up: Press to scroll up the list of options or to nd a
higher value.
Down: Press to scroll down the list of options or to
nd a lower value.
Enter: Press to activate a menu option or a selected value.
Menu Map
DMX Linking
The Stratus™ 1500 works with a DMX controller. Information about DMX is in the Ampro® DMX Primer,
which is available from the Ampro website http://
amproweb.com/.
Conguration (DMX)
Set the product in DMX mode to control with a DMX
controller.
While operating the Stratus 1500, make sure there
is adequate fog uid in the machine to prevent
pump and heater damage. When the fog uid level
1. Connect the product to a suitable power outlet,
and turn the power switch to on.
2. Connect a DMX cable from the DMX output of
the DMX controller to the DMX input socket on
the product.
DMX Starting Address
When selecting a starting DMX address, always
consider the number of DMX channels the selected
DMX mode uses. If you choose a starting address
that is too high, you could restrict the access to
some of the product’s channels. The Stratus™ 1500
uses 1 DMX channel, which denes the highest
congurable address as 512. If you are not familiar
with the DMX protocol, download the DMX Primer
from www.amproweb.com. To select the starting
address, do the following:
1. Press <MENU> repeatedly until Addr shows on
the display.
2. Press <ENTER> and A 1–A512 will show on the
display.
3. Use <UP> or <DOWN> to select the starting
address.
4. Press <ENTER>.
becomes low, simply add more fog uid to continue
using the Stratus 1500.
English version
Mode Programming Steps Description
DMX
Mode
Addr A 1–A512 Sets DMX start-
ing address
Temp e -
rature
Ht Hxxx Displays
current heater
temperature
Page 8

P. 8
Tecshow Str atus 1500 |
DMX Channel Assignments
and Values
CH1
Note: Fog output is variable, depending on the
status of the heater and environment.
Remote or Manual Operation
The Stratus™ 1500 can be operated manually, or
with the included wired timer controller (FC-T).The
Manual button is located on the rear of the unit. See
the product Overview. Additionally, the product can
be operated with the FC-M manual wired remote or
the FC-W wireless remote, available separately.
Wired Timer Controller (FC-T) Setup
The FC-T wired timer controller allows you to automatically trigger fog output by setting output, interval time, and duration time. LED indicator lights
display the machine and controller’s current state.
Rotary knobs set interval, output, and duration
times, while manual and continuous buttons allow
overriding control.
1. Plug in the fog machine to power.
2. Plug in the wired timer controller to the Manual
Remote Connector socket on the back of the
fog machine. (See the product Overview.)
3. Allow the Stratus™ 1500 six to seven minutes
to heat up before continuing. (See Fluid Tank
Indicator Lights.)
Wired Timer Controller (FC-T)
Operation
The FC-T wired timer controller has three modes of
operation: timer, continuous, and manual.
Timer Mode
To trigger the Stratus™ 1500 with the timer function, follow the instructions below:
1. Set the desired output level with the OUTPUT
knob.
2. Set the INTERVAL and DURATION knobs to the
desired positions.
• The INTERVAL knob sets the amount of time
in between bursts of fog.
• The DURATION knob sets the length of time
that the fog machine will run during the
burst.
3. Press the <TIMER ON/OFF> latching button. The
LED indicator above the button will light up.
The timer will now run as set by the INTERVAL,
DURATION, and OUTPUT knobs.
4. Press the <TIMER ON/OFF> button again to turn
o the timer.
• The <MANUAL> button will override the timer.
Continuous Mode
To trigger the Stratus™ 1500 to continuously cycle
fog, follow the instructions below:
1. Set the desired output level with the OUTPUT
knob.
2. Press the <CONTINUOUS> latching button. The
LED indicator above the button will light up.
The fog machine outputs fog until the <CONTINUOUS> button is pressed again.
3. Press the <CONTINUOUS> button again to stop
the fog output.
In order for Continuous mode to run uninterrupted,
without the Stratus™ 1500 stopping to reheat, set
the OUTPUT knob no higher than 6. At Output levels
above 6, the fogger will cycle through intermittent
bursts of fog during its reheating program.
• The duration of Continuous fog output is based
Channel Function Value Percent/
Setting
1 Fog Output
000-005 No function
006-255 0–100 %
Uninterrupted Continuous
Mode at Output 6
English version
Page 9

P. 9
| Tecshow Str atus 1500
• The Stratus™ 1500 unit may start producing fog
intermittently to allow for uid reheating aer a
period of continuous fog output. This is a normal
occurrence.
• The duration of manual fog output is based on the
capability of the fog machine.
Optional Wireless Remote (FC-W)
The optional FC-W wireless remote allows the user
to trigger the Stratus™ 1500 to produce fog from up
to 100 away.
1. Plug in the fog machine to power.
2. Plug the FC-W wireless remote receiver into the
Wireless Remote Connector on the back of the
Stratus™ 1500. (See the product Overview.)
3. Allow the Stratus™ 1500 six to seven minutes to
heat up. (See Fluid Tank Indicator Lights.)
4. Press and hold the <1>, <2>, <3>, or <4> button
on the wireless remote. (Download the FC-W
User Manual from www.chauvetlighting.com for
more information on addressing the FC-W)
5. Release the button to stop the fog output.
• Ensure the FC-W has an unobstructed view of the
receiver for maximum performance.
• The <2>, <3>, and <4> buttons are reserved for
future use.
Fluid Tank Indicator Lights
The Stratus™ 1500 has indicator LEDs that light up
the uid tank to indicate the status of the product,
as follows:
• Red - The heater is currently warming up.
• Flashing Red - The heater is currently warming
up and no uid is detected.
• Blue - The heater is ready to produce fog.
• Flashing Blue - The heater is ready to produce
on the capacity of the tank.
• Fluid consumption will be signicantly increased
during Continuous mode.
Manual Mode
To trigger the Stratus™ 1500 manually, do the following:
1. Set the desired output level with the OUTPUT
knob.
2. Press and hold the <MANUAL> button on the
wired timer controller. The LED indicator above
the button will light up. The fog machine will
output fog for as long as you hold down the
<MANUAL> button.
3. Release the <MANUAL> button to stop the fog
output.
The duration of manual fog at any given Output setting is based on the capability of the fog machine.
Optional Wired Manual Remote
Control (FC-M)
The optional FC-M wired manual remote control
allows the user to start and stop the fog output.
It operates the same as the Manual button on the
product, with the addition of a READY indicator
LED.
1. Plug in the fog machine to power.
2. Plug in the wired manual remote control to the
Manual Remote Connector socket on the back
of the fog machine. (See the product Overview.)
3. Wait for the READY indicator LED to light up,
indicating the Stratus™ 1500 is heated enough
to produce fog. (Also see Fluid Tank Indicator
Lights.)
4. Press and hold the <FOG> button on the wired
manual remote control.
5. Release the <FOG> button to stop the fog output.
English version
Page 10

P. 1 0
Tecshow Str atus 1500 |
6. TECHNICAL INFORMATION
Fogger Maintenance
Do not allow the fogger to become clogged. Aer
every 40 hours of continuous operation, use AMPRO
Fog Cleaner Quart (FCQ) through the system to
prevent the accumulation of particulate matter in
the heating element. The recommended cleaning
procedure is as follows.
1. Unplug the product from power.
2. Empty all fog uid from the machine.
3. Add cleaning solution to the tank.
4. Connect the product to power and allow it to
warm up.
5. Run the unit in a well-ventilated area until the
tank is almost empty. Do not allow the pump to
run dry.
6. Rell with fogger uid to continue using the
fogger. Run the machine briey to clear any
remaining cleaning solution from the pump and
heater.
Do Not operate the machine without uid at any
time.
Fog Cleaner Quart (FCQ) was specically developed
by Ampro to clean your Stratus 1500. Make sure you
use FCQ regularly, no longer than 90 days between
cleanings, to increase the life of your product.
Storage
Before storing the fogger, run FCQ through the system as described in the cleaning procedure above;
however, only follow steps 1 through 5. Do not rell
the tank with fog uid if storing the fogger. Cleaning
the system prior to storage will help prevent any
particles from condensing inside the pump or heater while not in use.
• Test-run your Stratus 1500 on a monthly basis to
achieve the best performance.
English version
fog and no uid is detected.
Heater Temperature
To view the current heater temperature, follow the
instructions below:
• Press <MENU> repeatedly until Ht shows on the
display.
• Press <ENTER> and Hxxx (the current heater
temperature) will show on the display.
Page 11

P. 11
| Tecshow Str atus 1500
English version
7. GENERAL TROUBLESHOOTING
Symptom Indicator
Status
Possible Cause Possible Action
No output or
short output
Red Heater warming up
Allow the product to warm up completely.
This should take less than 10 minutes.
Red ashing Air bubble in uid line
Allow the product to warm up completely
Turn fog machine 45° to atten out the bubble and allow the fog uid to ow properly
Turn o the product for 5 seconds, and then
turn it back on. Repeat as necessary. Aer
more than 10 attempts, contact Customer
Service.
Blue
Incorrect uid
Clean thoroughly with AMPRO® FCQ. For full
instructions, see Fogger Maintenance. Rell
with AMPRO® water-based fog uid.
Blocked pipes Contact Customer Service
Failing part Contact Customer Service
Spitting uid
Blue blinking
Incorrect uid
Clean thoroughly with AMPRO® FCQ. For full
instructions, see Fogger Maintenance. Rell
with AMPRO® water-based fog uid.
Blocked pipes Contact Customer Service
Failing part Contact Customer Service
Blue
Incorrect uid
Clean thoroughly with AMPRO® FCQ. For full
instructions, see Fogger Maintenance. Rell
with AMPRO® water-based fog uid.
Blocked pipes Contact Customer Service
Failing part Contact Customer Service
Normal Blue Normal Normal function
Circuit breaker
or fuse keeps
blowing
N/A
Excessive load on the
circuit
Make sure that the total load does not exceed
the recommended capacity of the breaker or
fuse’s nominal current
Short circuit along
the power lines
Check the power lines and power cords
No energy on power
outlet
Check power outlet
Change to another outlet
Product does not
power up
Loose or damaged
power cord
Check the power cord
Blown fuse Replace blown fuse with a good one of the
same type and rating
Page 12

P. 12
Tecshow Str atus 1500 |
English version
If you still experience problems aer trying the
solutions presented here, contact AMPRO Technical
Support.
Design and product specications are subject to
change without prior notice.
Internal problem Send product for repair
Product does not
respond to DMX
Blue
Wrong starting address on the product
Set the correct starting address on the product
Wrong polarity
setting on the DMX
controller
Change the signal polarity on the controller
Loose or damaged
DMX cable
Check the DMX cable entering the faulty unit
Internal problem Send product for repair
Intermittent DMX
Problems
Signal cables are not
DMX compatible
Replace non-DMX cables with true DMX
cables
Interference with AC
or radio signals
Keep DMX cables away from AC wires or radio
equipment
DMX cable too long Use a shorter DMX cable or install an opti-
cally coupled DMX amplier right before the
product with intermittent problems
Terminator not
connected
Install a terminator
False Sensor
Reading (Priming)
Red
Air bubbles in uid
line
Fill the tank. Allow the unit to reach the
normal operating temperature and for the
blue indicator to light. Set the output to the
highest level. Power cycle the unit 1-2 times
until the uid reaches the sensor. The blue
tank indicator light stops ashing.
Fill the tank. While the unit is operating,
pinch the uid line between your thumb
and forenger, and hold for 3 to 5 seconds
creating a vacuum in the system. Release the
pinched portion and allow the uid to ow
naturally
Fill the tank. While the unit is operating;
remove but do not disconnect the uid tank
and tilt the machine at a 45° angle.
Red Empty uid tank Rell tank with the correct AMPRO® wa-
ter-based fog uid
Page 13

P. 13
| Tecshow Str atus 1500
Stratus 1500
Máquina de humo profesional - Control inalámbrico
Stratus 1500 es una máquina de humo profesional
de alto desempeño con una salida de 30,000 pies
cúbicos por minuto, fácil de operar y con un tiempo
de precalentado de 5 minutos. Su tanque tiene una
capacidad de 2.5 litros y como punto saliente trae
incluido un control wireless para manejar el equipo
sin ataduras. Stratus 1500 es ideal para aplicaciones móviles y eventos sociales.
Especicaciones
Salida
• Salida de humo: 30,000 pies cúbicos por minuto
• Tiempo de calentamiento: 5 minutos
• Tanque: 2.5 lts. / 88 Oz.
• Consumo de líquido: 125 ml/min / 4.4 oz/min
Control
• Modos de operación: Stand alone, Control remoto con cable y control remoto inalámbrico
Eléctrico
• Rango de voltaje de entrada: AC 100–240V, 5060Hz
• Consumo de potencia: 1560W
Físico
• Dimensiones: 342x315.6x251.7 mm. /
13.5x12.4x9.9 pulg.
• Peso: 6.5 Kg. / 14.4 Lbs.
1. DESCRIPCIÓN
Versión Español
Page 14

P. 14
Tecshow Str atus 1500 |
2. ANTES DE COMENZAR
Contenido
• Stratus 1500
• Control remoto con cable
• Control remoto inalámbrico
• Tarjeta de garantía
Instrucciones al abrir el producto
Abra el equipo con cuidado y verique que todas
las piezas se encuentren presentes y en buen estado.
Reclamos
En caso de que el contenido (productos y/o accesorios) no funcionase correctamente como
consecuencia de un envío defectuoso, póngase
en contacto con el distribuidor de inmediato. El incumplimiento de esta obligación, puede invalidar la
garantía del producto. A su vez, procure conservar
el embalaje original para su inspección.
Por otras incidencias, como piezas o componentes
faltantes o daños ocultos o no relacionados con el
envío, presente un reclamo con AMPRO dentro de
los 7 días de entrega.
Referencias del texto
1—512 Rango de valores.
50/60 Rango de valores.
Ajustes Opción de menú.
Menú > Ajustes Una secuencia de opciones de
menú.
<Enter> Un botón.
Símbolos
Información de funcionamiento, congura-
ción o instalación primordial. Hacer caso omiso de estas instrucciones puede provocar averías
en el producto o daños en el usuario.
Información de funcionamiento, conguración o instalación importante. Es posible que
el producto no funcione correctamente si se omite
esta información.
Información útil.
Instrucciones de seguridad
Lea atentamente el manual antes de utilizar
el equipo, ya que contiene información importante sobre el funcionamiento, la instalación y
el mantenimiento del equipo.
• Procure la conexión a tierra del equipo para
evitar el riesgo de descarga eléctrica.
• Desconecte el equipo del suministro eléctrico
antes de realizar cualquier tarea de mantenimiento.
• Verique que el cable de alimentación no se
encuentre cortado o dañado.
• Utilice el cable desde el enchufe. Nunca tire del
cable para desconectar la unidad.
• En caso de instalar el equipo en altura, procure
utilizar un cable de seguridad.
• Mantenga el equipo alejado de materiales in-
amables o llamas expuestas.
• Evite entrar en contacto con la cubierta de la
unidad cuando esté en funcionamiento, ya que
podría estar muy caliente.
• Nunca instale el equipo sobre supercies in-
amables (alfombras, madera, papel, plástico,
cartón, etc.).
• No toque la salida de humo. Mantiene una
temperatura elevada varias horas después de
haberse apagado.
• El humo sale por la boquilla a una temperatura
muy elevada. Mantenga una distancia mínima
de 2 metros entre la salida de humo y otros
objetos.
• No utilice la unidad como fuente de calefacción.
• No beba ni entre en contacto con el líquido de humo. En caso de ingerirlo, llame a un
Versión Español
Page 15

P. 15
| Tecshow Str atus 1500
médico de inmediato.
• Compruebe que el voltaje utilizado no sea
superior o inferior al indicado en el presente
manual.
• Este equipo se diseñó para uso en interiores
(IP20). Proteja el equipo de la lluvia y la humedad excesiva para reducir el riesgo de descarga
eléctrica o incendio.
• Instale el equipo en ambientes con ventilación
adecuada y mantenga una distancia mínima de
50 cm de otros objetos o supercies.
• Procure no obstruir las ranuras de ventilación
del equipo.
• No conecte la unidad a un dimmer o reóstato.
• Si precisa sustituir el fusible, asegúrese de utilizar uno del mismo tipo y rango.
• Para trasladar la unidad, tómela siempre de
la manija o del soporte de montaje, nunca del
cable o de las piezas móviles.
• No utilice el equipo si la temperatura ambiente
supera los 40°C (104°F).
• Desconecte el equipo de inmediato si observa
un problema grave de funcionamiento.
• El equipo no contiene piezas que puedan ser
reparadas por el usuario. Las reparaciones
realizadas por personas no calicadas pueden
provocar daños irreversibles en el equipo. En
caso de precisar asistencia, póngase en contacto con el servicio técnico autorizado.
• La unidad no está diseñada para funcionar de
forma permanente.
• Utilice únicamente el líquido de humo a base de
agua recomendado por AMPRO.
Conserve este manual para futuras referencias. En caso de vender la unidad, procure
entregar esta guía al comprador.
FCQ (Fog Cleaner Quart) fue especícamente
desarrollado por AMPRO para limpiar su
Stratus 1500. Asegúrese de utilizar su FCQ
con frecuencia. Procure realizar la limpieza del
equipo cada 90 días para prolongar su vida útil.
Versión Español
Page 16

P. 1 6
Tecshow Str atus 1500 |
Versión Español
3. INTRODUCCIÓN
El producto
Dimensiones
Tanq ue
Indicador
de nivel de
líquido
Botones del
menú
Conector
del control
remoto
inalámbrico
Conector
del control
remoto
manual
Vista dorsal
Cable de
alimentación
Interruptor de
encendido/
apagado
Botón de
emisión de
humo manual
Entrada
DMX
Pantalla
Salida DMX
Fusible
10 in
253 mm
13.7 in
348 mm
12.3 in
312 mm
Page 17

P. 17
| Tecshow Str atus 1500
Versión Español
4. INSTALACIÓN
Alimentación CA
Para determinar los requerimientos de alimentación (disyuntor, cableado y toma de corriente), ve-
rique los valores que aparecen en el panel dorsal
del equipo o consulte las especicaciones técnicas.
Los detalles de capacidad de corriente indican el
consumo de corriente promedio en condiciones
normales de uso.
• Siempre conecte el producto a un circuito pro-
tegido (con disyuntor o fusible). Asegúrese de
que el equipo cuente con una conexión a tierra
para prevenir el riesgo de descarga eléctrica o
incendio.
• Para prolongar la vida útil del equipo, procure
desconectarlo del suministro eléctrico durante
los periodos de inactividad.
Nunca conecte el equipo a un reostato (resistencia
variable) o a un dimmer aunque funcionen solo como
un conmutador de 0 a 100%.
Sustitución del fusible
1. Desconecte el equipo del suministro eléctrico.
2. Gire la tapa de portafusibles hacia la izquierda
y retírela.
3. Extraiga el fusible quemado.
4. Coloque un fusible nuevo del mismo tipo y
rango.
5. Vuelva a colocar la tapa y conecte el equipo
• Desconecte el equipo del suministro eléctrico
antes de reemplazar el fusible.
• Si precisa sustituir el fusible, asegúrese de utilizar
uno del mismo tipo y rango.
Montaje
Antes de realizar el montaje del equipo, lea atentamente las Instrucciones de seguridad.
Orientación
No se permite inclinar el equipo. Siempre instálelo
sobre una supercie plana y estable.
Montaje
• Antes de decidir el punto de instalación, veri-
que que sea una zona de fácil acceso para su
mantenimiento y limpieza.
• Procure que la estructura, donde instalará el
equipo, sea segura y pueda soportar el peso del
equipo (ver Especicaciones técnicas).
• En caso de montaje en altura, siempre utilice un
cable de seguridad. Asegure el equipo rmemente a un punto de instalación como una
plataforma elevada o truss.
• En caso de montar el equipo en un truss, procure utilizar una abrazadera de montaje con la
capacidad de carga adecuada. El soporte de
montaje cuenta con oricios de 13 mm para
este propósito.
• Las patas de goma también funcionan como
apoyo en el suelo y facilitan el montaje en
supercie. En caso de montar el equipo en el
suelo, procure mantener los cables alejados de
personas y vehículos.
Diagrama de montaje
Cable de
seguridad
Abrazadera
Soporte de
montaje
Boquilla
Perilla de ajuste
Page 18

P. 18
Tecshow Str atus 1500 |
Versión Español
5. FUNCIONAMIENTO
Panel de control
Para acceder a las funciones del panel de control,
utilice los cuatro botones ubicados debajo de la
pantalla.
Tecla
Menu: Abandona el menú o función actual.
Up: Incrementa el valor de una función o desplaza
los ítems del menú hacia arriba.
Down: Disminuye el valor de una función o desplaza los ítems del menú hacia abajo.
Enter: Ingresa al menú deseado o conrma un
valor.
Menú de funciones
Enlace DMX
El usuario puede utilizar su Stratus 1500 por medio
de un controlador DMX. Para obtener más información sobre este modo de funcionamiento, visite
la web de AMPRO: http://www.amproweb.com.
Conguración DMX
Utilice el modo DMX para operar el equipo desde un
controlador DMX.
Antes de utilizar su Stratus 1500, verique que haya
líquido suciente en el tanque para prevenir averías
en la bomba y el calentador. Si el nivel de líquido
1. Conecte la unidad al suministro eléctrico y
enciéndala.
2. Conecte un extremo de un cable DMX en la sali-
da DMX del controlador y el otro extremo, en la
entrada DMX de la unidad.
Dirección DMX de inicio
Al seleccionar la dirección DMX de inicio, siempre
considere la cantidad de canales con los que cuenta
el modo DMX seleccionado. Si congura la dirección
DMX con un valor muy alto, puede restringir el acceso a algunos de los canales de la unidad.
Stratus 1500 utiliza un canal DMX que dene la conguración de la dirección más alta en 512.
De no estar familiarizado con el protocolo DMX,
encuentre la información necesaria en la web de
AMPRO www.amproweb.com.
Para seleccionar la dirección de inicio siga los pasos
a continuación:
1. Presione repetidamente <MENU> hasta visu-
alizar Addr en la pantalla.
2. Presione <ENTER> y podrá ver A 1–A512 en la
pantalla.
3. Utilice los botones <UP> o <DOWN> para selec-
cionar el valor deseado.
4. Presione <ENTER> para conrmar la selección.
disminuye, simplemente añada más cantidad para
continuar utilizando el equipo.
Menú Submenú Descripción
DMX
Mode
Addr A 1–A512 Conguración
de la dirección
DMX de inicio
Temp e -
rature
Ht Hxxx Temperatura
actual del
calentador.
Page 19

P. 1 9
| Tecshow Str atus 1500
Versión Español
Cuadro de canales DMX
Canal 1
Observación: La salida de humo varía según el
estado del calentador y del ambiente
Operación manual o vía control
remoto
El usuario puede operar su Stratus 1500 de forma manual o través del temporizador con cable
incluido. El botón de emisión de humo manual se
encuentra en el panel dorsal de la unidad. A su vez,
es posible operar el equipo a través del control
remoto con cable incluido o del control remoto
inalámbrico, disponible por separado.
Conguración de Temporizador con cable
Este dispositivo le permite al usuario activar
automáticamente la emisión de humo con nivel
salida, intervalos y tiempos de duración. El indicador LED señala el estado actual del equipo y el
temporizador. Utilice las perillas para congurar
los intervalos, la emisión de humo y la duración; y
los botones Manual y Continuous para el control
primario del equipo.
1. Conecte el equipo al suministro eléctrico.
2. Conecte el temporizador con cable en el panel
dorsal del equipo. (Ver Descripción del producto.)
3. Aguarde 3-4 minutos hasta que el Stratus 1500
complete el periodo de calentamiento. (Ver
Luces indicadoras del tanque.)
Temporizador con cable
El temporizador cuenta con tres modos de funcionamiento: timer, continuous y manual.
Modo Timer
Para activar este modo, siga los pasos descritos a
continuación:
1. Congure el nivel de salida deseado con la
perilla OUTPUT.
2. Congure los intervalos y la duración con las
perillas INTERVAL y DURATION.
• INTERVAL establece la cantidad de tiempo
que habrá entre emisiones de humo.
• DURATION establece la cantidad de tiempo
que durará cada emisión de humo.
3. Presione el botón <TIMER ON/OFF>. El indicador
LED, ubicado arriba del botón, se encenderá. El
temporizador funcionará de acuerdo a la con-
guración establecida de intervalos y duración.
4. Presione nuevamente el botón <TIMER ON/OFF>
para apagar el temporizador.
• El botón MANUAL anula el modo timer.
Modo Continuous
Para activar este modo, siga los pasos descritos a
continuación:
1. Congure el nivel de salida deseado con la
perilla OUTPUT.
2. Presione el botón CONTINUOUS. El indicador
LED, ubicado arriba del botón, se encenderá.
3. Presione nuevamente el botón CONTINUOUS
para detener la emisión de humo.
Si desea utilizar este modo de forma prolongada,
sin detener el equipo por recalentamiento, con-
gure la perilla de salida en un valor igual o menor a
6. Un nivel de salida superior a 6 hará que el equipo
funcione en ciclos de emisión intermitente durante el
proceso de recalentamiento.
• La duración de la emisión de humo continua
depende de la capacidad del tanque.
• El modo continuous incrementa signicativa-
mente el consumo de líquido.
Canal Función Valor Descripción
1 Salida de
humo
000-005 No function
006-255 0–100 %
Modo continuo e
ininterrumpido con output 6
Page 20

P. 2 0
Tecshow Str atus 1500 |
Versión Español
• Luego de periodos extensos de funcionamiento, es
posible que el Stratus 1500 emita humo de forma
intermitente mientras se recalienta el uido. Se
trata de un proceso normal.
• La duración de la emisión de humo manual de-
pende de la capacidad del tanque.
Control remoto inalámbrico
El control remoto con cable le permite al usuario
activar la emisión de humo a una distancia máxima
de 30 metros.
1. Conecte el equipo al suministro eléctrico.
2. Conecte el receptor del control remoto inalám-
brico en el panel dorsal del equipo. (Ver Descripción del producto.)
3. Aguarde a que se encienda el indicador LED
READY. En ese momento el Stratus 1500 habrá
nalizado el periodo de calentamiento. (Ver
Luces indicadores del tanque.)
4. Mantenga presionado el botón <1>, <2>, <3>, o
<4> para iniciar la emisión de humo. Para obtener más información sobre el uso del control
remoto inalámbrico, visite la web de AMPRO
www.amproweb.com.
5. Suelte el botón para detener la emisión de
humo.
• Para obtener resultados óptimos, procure apun-
tar el control remoto hacia el equipo sin obstrucciones de por medio.
• Los botones 2, 3 y 4 se mencionarán más adelan-
te en el manual.
Luces indicadoras del tanque
Stratus 1500 cuenta con indicadores LED que iluminan el tanque para indicar su estado.
• Rojo: En proceso de calentamiento.
Modo Manual
Para activar este modo, siga los pasos descritos a
continuación:
1. Congure el nivel de salida deseado con la
perilla OUTPUT.
2. Mantenga presionado el botón <MANUAL>. El
indicador LED, ubicado arriba del botón, se
encenderá.
3. Suelte el botón <MANUAL> para detener la
emisión de humo
• La duración de la emisión de humo manual depende de la capacidad del tanque.
Control remoto con cable
El control remoto con cable le permite al usuario
iniciar y detener la emisión de humo. Funciona de la
misma forma que el botón Manual del panel dorsal
del equipo, con el agregado del indicador LED
READY (preparado).
1. Conecte el equipo al suministro eléctrico.
2. Conecte el control remoto con cable en el panel
dorsal del equipo. (Ver Descripción del producto.)
3. Aguarde a que se encienda el indicador LED
READY. En ese momento el Stratus 1500 habrá
nalizado el periodo de calentamiento. (Ver
Luces indicadoras del tanque.)
4. Mantenga presionado el botón FOG.
5. Suelte el botón <MANUAL> para detener la
emisión de humo.
Page 21

P. 2 1
| Tecshow Str atus 1500
Versión Español
6. LINEAMIENTOS GENERALES
Limpieza y mantenimiento
se recomienda la limpieza regular de la unidad para
evitar la obstrucción de los conductos. Cada 40 horas de uso, se recomienda utilizar el limpiador FCQ
de AMPRO para prevenir la acumulación de partículas de suciedad en el sistema térmico de la unidad.
Procedimiento de limpieza sugerido:
1. Desconecte el equipo del suministro eléctrico.
2. Vacíe el tanque de su Stratus 1500.
3. Cárguelo con una solución de limpieza.
4. Conecte la unidad y comience el calentamiento.
5. Ponga en funcionamiento la unidad en un
ambiente bien ventilado hasta que casi vaciar
el tanque. No permita que la bomba funcione
en seco.
6. Vuelva a cargar el tanque con líquido de humo.
Encienda brevemente el equipo para eliminar
cualquier rastro de solución de limpieza de la
bomba y el calentador.
No haga funcionar el equipo sin líquido de humo.
FCQ (Fog Cleaner Quart) fue especícamente desarrollado por AMPRO para limpiar su Stratus 1500.
Asegúrese de utilizar su FCQ con frecuencia. Procure
realizar la limpieza del equipo cada 90 días para
prolongar su vida útil.
Almacenamiento
Antes de almacenar su Stratus 1500, coloque FCQ
en el tanque y siga los pasos 1-5 del procedimiento de limpieza. No vuelva a recargar el tanque con
líquido de humo si va a almacenar el equipo. Limpiar
el sistema antes de almacenarlo, ayudar a prevenir
la condensación de partículas en el interior de la
bomba y el calentador.
Se recomienda llevar a cabo una prueba de funcionamiento una vez al mes para lograr el mejor desempeño de su Stratus 1500.
• Rojo titilante: En proceso de calentamiento. No
se detecta líquido en el tanque.
• Azul: El equipo está listo para la emisión de
humo.
• Azul titilante: El equipo está listo para la
emisión de humo. No se detecta líquido en el
tanque.
Temperatura del calentador
Para ver la temperatura actual del calentador, siga
los pasos descritos a continuación:
• Presione repetidamente <MENU> hasta vi-
sualizar Ht en la pantalla.
• Presione <ENTER> y Hxxx (la temperatura actual) se verá en la pantalla.
Page 22

P. 2 2
Tecshow Str atus 1500 |
Versión Español
7. RESOLUCIÓN DE PROBLEMAS
Problema Indicador de
estado
Posible causa Resolución
Se interrumpe la/
No hay emisión
de humo.
Rojo Calentamiento en
curso.
Permita que el producto se caliente por
completo. Este proceso debería llevar menos
de 10 minutos.
Rojo titilante Burbuja de aire en el
conducto de líquido.
Permita que el producto se caliente por
completo.
Encienda la unidad a 45° para disipar la bur-
buja y que el líquido uya correctamente.
Apague la unidad por 5 segundos y vuelva a
encenderla. Repita todas las veces que sea
necesario. Luego de 10 intentos, contacte al
servicio técnico.
Azul
Líquido incorrecto.
Utilice FCQ de AMPRO para la limpieza. Para
más información, lea las indicaciones de
.Limpieza y Mantenimiento Coloque el líqui-
do de humo recomendado por AMPRO.
Conductos obstruidos. Contacte al servicio técnico.
Piezas defectuosas. Contacte al servicio técnico.
La máquina
arroja líquido
Azul titilante
Líquido incorrecto.
Utilice FCQ de AMPRO para la limpieza. Para
más información, lea las indicaciones de
.Limpieza y Mantenimiento Coloque el líqui-
do de humo recomendado por AMPRO.
Conductos obstruidos. Contacte al servicio técnico.
Piezas defectuosas. Contacte al servicio técnico.
Azul
Líquido incorrecto.
Utilice FCQ de AMPRO para la limpieza. Para
más información, lea las indicaciones de
.Limpieza y Mantenimiento Coloque el líqui-
do de humo recomendado por AMPRO.
Conductos obstruidos. Contacte al servicio técnico.
Piezas defectuosas. Contacte al servicio técnico.
Normal. Azul Funcionamiento
normal.
Todo funciona normalmente.
El fusible/disyuntor se quema
constantemente
N/A
Carga excesiva en el
circuito.
Compruebe que el total de la carga no exce-
da la capacidad recomendada de la corriente
nominal del fusible o disyuntor.
Cortocircuito en la
red eléctrica.
Verique el estado de los cables y de la red
eléctrica.
Falla en la toma de
corriente.
Verique el estado de la toma de corriente.
Utilice otra toma de
Page 23

P. 2 3
| Tecshow Str atus 1500
Versión Español
La unidad no se
enciende.
Cable defectuoso o
suelto.
Verique el estado del cable.
Fusible quemado. Reemplace el fusible por uno del mismo tipo
y rango.
Problema interno. Contacte al servicio técnico.
El equipo no
responde a la
señal DMX.
Azul
Dirección de inicio
incorrecta.
Congure una nueva dirección de inicio.
Polaridad invertida
en el controlador
DMX.
Modique la señal de polaridad en el controlador.
Cable DMX ojo o
defectuoso.
Verique el estado de los cables.
Problema interno. Contacte al servicio técnico.
Problemas intermitentes con la
señal DMX.
Los cables de señal
no son aptos para
DMX.
Reemplace los cables defectuosos por cables
DMX.
Interferencia con CA o
señales de radio.
Aleje los cables DMX de los cables de CA o
equipos de radio.
Cable DMX muy
extenso.
Use un cable DMX más corto o coloque un
amplicador de señal con acoplamiento
óptico.
Terminador desconectado.
Coloque un terminador.
Lectura de sensor
errónea
Rojo
Burbuja de aire en el
conducto de líquido.
Cargue líquido en el tanque. Permita que la
unidad alcance la temperatura de funcio-
namiento normal y que se ilumine el indi-
cador azul. Congure la salida de humo a
máximo nivel. Apague y vuelva a encender
la unidad 1 o 2 veces hasta que el sensor
detecte el líquido. La luz azul del indicador
dejará de titilar.
Cargue líquido en el tanque. Mientras la
unidad esté en funcionamiento, presione el
conducto de líquido con los dedos por 3-5 segundos para generar un vacío en el sistema.
Suelte el conducto y deje que el líquido uya
normalmente.
Cargue líquido en el tanque. Mientras la
unidad esté en funcionamiento, extraiga (sin
desconectar) el tanque e inclínelo 45°.
Rojo Tanque vacío. Cargue líquido en el tanque.
Page 24

P. 2 4
Tecshow Str atus 1500 |
Si no encuentra la solución en esta sección, no intente reparar la unidad por sus medios. Póngase en
contacto con el servicio técnico autorizado.
El proveedor no asumirá responsabilidad por los errores u omisiones del manual. La información de
este manual está sujeta a cambios sin previo aviso.
Versión Español
Page 25

P. 2 5
| Tecshow Str atus 1500
FOR MORE INFO ON THIS PRODUCT PLEASE CHECK WWW.TEC-SHOW.COM /
PARA MAS INFORMACION SOBRE ESTE PRODUCTO VISITE WWW.TEC-SHOW.COM
 Loading...