

Page 1
P. 1
| Tecshow Sat urn
USER MANUAL / MANUAL DE USUARIO
PLEASE READ THE INSTRUCTIONS CAREFULLY BEFORE USE
POR FAVOR LEA LAS INSTRUCCIÓNES ANTES DE USAR
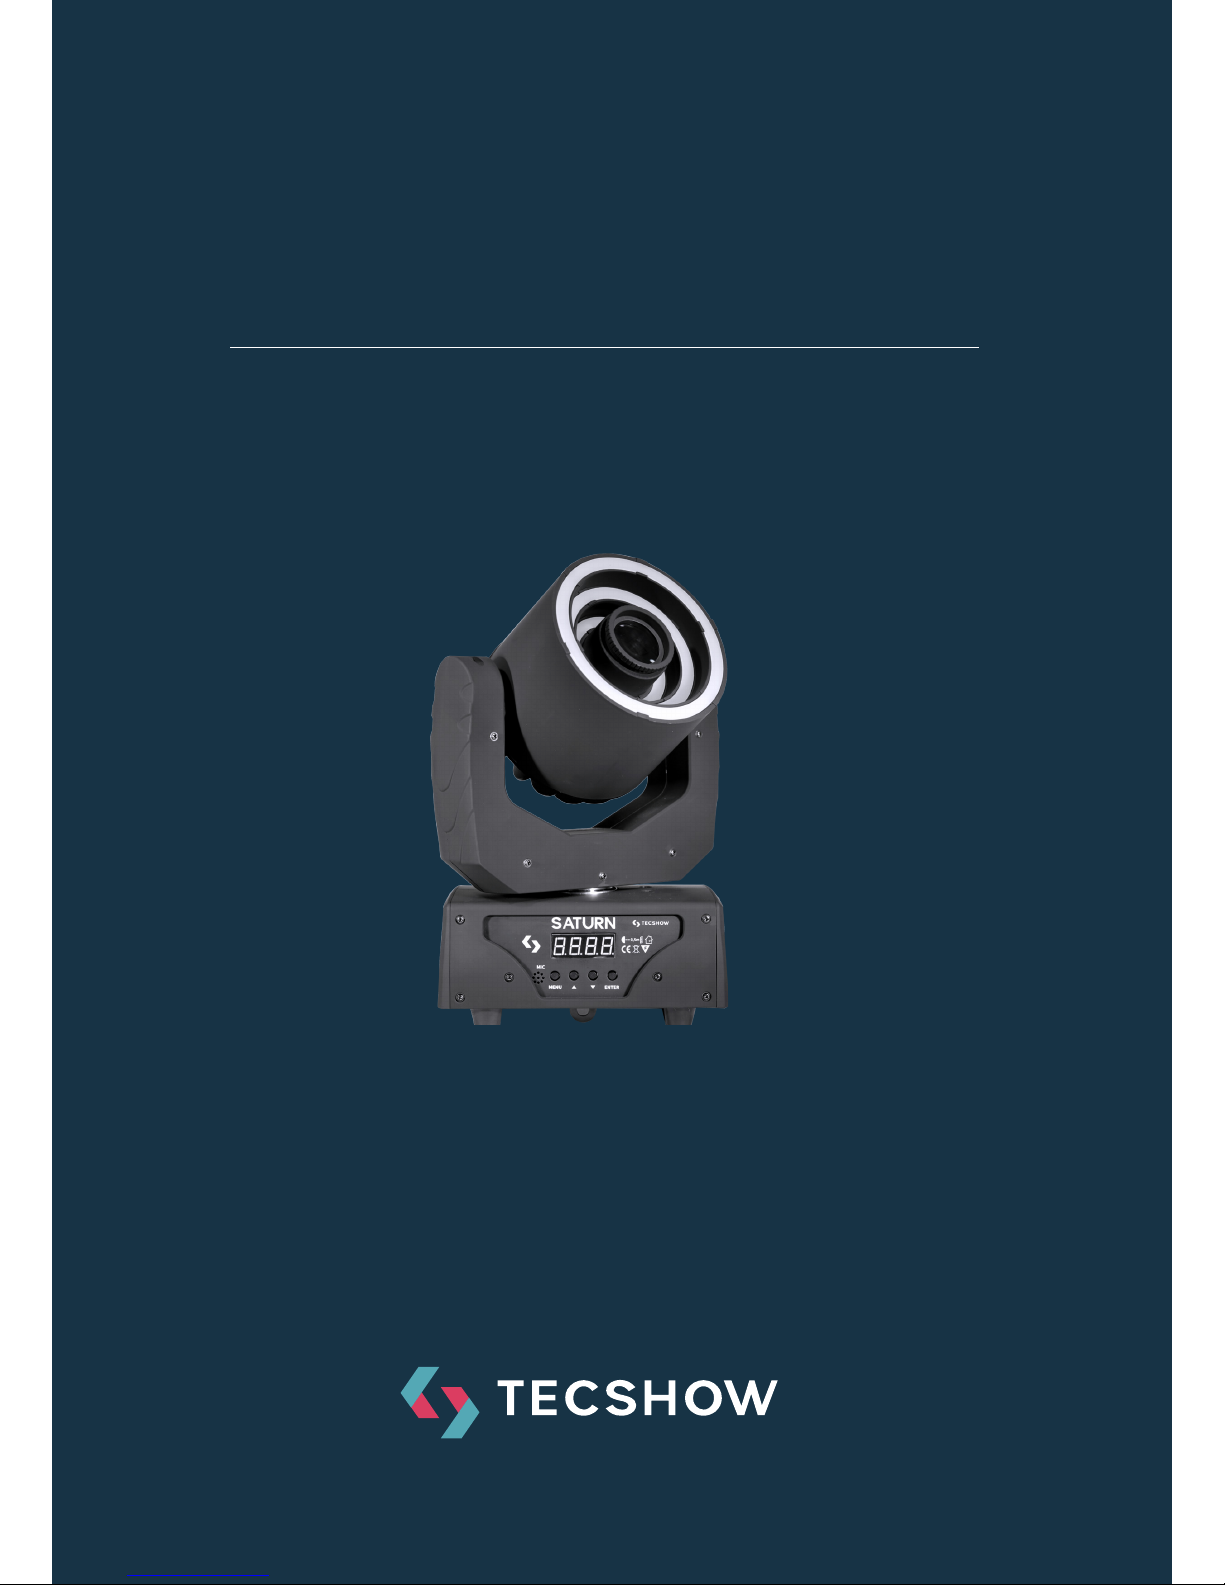
SATU R N
2-in-1 Spot Moving Head - 3 SMD LED Rings
Page 2

P. 2
Tecshow Sat urn |
Saturn
2-in-1 Spot Moving Head - 3 SMD LED Rings
Saturn is a compact spot moving head that features
3 SMD LED rings that allow you to create stunning
visual eects beyond its outstanding beam projection. The unit is equipped with 1 30W white LED plus
76 SMD5050 RGB LEDs, achieving a luminous perfor-
mance of 8,800 lux at 3 meters with a beam angle of
4.7 °. Saturn has 9 dichroic filters + open and 9 stat-
ic gobos, in addition to the 25 built-in programs
that it has in its LED Rings section. Ideal for medium-scale applications, this moving head sports
gobo shaking, strobe eect, 0-100% linear dimmer
and manual focus.
Specications
Source & Optics
• Light Sources:
• 1 30W White LED
• 76 RGB 3-in-1 SMD5050 LED
• LEDs life: 50,000 hours
• Beam angle: 4.7º
Photometric data
• Color temperature: 6500K
• Flux: 8800 lux @ 3m (10 .)
Eects & Functions
• Color wheel: 9 dichroic lters + open
• Static gobo wheel: 9 static gobos + open
• Gobo shaking
• Three SMD LED rings
• 25 built-in LED ring programs
• Dimmer: Full range 0-100%
• Strobe eect
• Manual focus
Control
• DMX channels: 12/23
• Operational modes: DMX, Master/Slave,
Sound-active & Auto-run
Movement
• Pan: 630°
• Tilt: 210°
• 16-bit resolution
• Auto repositioning
Electrical
• Input voltage range: 100–240V, 50-60Hz
• Power consumption: 76W
Physical
• DMX connectors: 2 XLR connectors (XLR-3 In
and Out)
• Power supply connector: InterLock In
• 4-digit LED display
• Dimensions: 264.5x168x368 mm. /
10.4x6.6x14.4 in.
• Weight: 5.1 Kg. / 11 Lbs.
1. OVERVIEW
English version
Page 3

P. 3
| Tecshow Sat urn
Thank you for your patronage. We are condent that our ex-
cellent products and service can satisfy you. For your own
safety, please read this user manual carefully before installing the device.
In order to install , operate, and maintain the light correct-
ly, we suggest that the installation and operation should be
done by the veried technician with following the instruction
strictly.
Every person involved with the installation, operation and
maintenance of this device has to:
• be qualied
• follow carefully the instructions of this manual
English version
Page 4
P. 4
Tecshow Sat urn |
Thank you for having chosen this professional moving
head. You will see you have acquired a powerful and
versatile device. unpack the device. Inside the box
you should nd:
• 1PC DMX connection cable
• 1PC quick lock handle
• 1PC safety rope
• 1PC use manual
• 1PC power cable
• 1PC xture
Please check carefully that there is no damage caused
by transportation. please consult your local dealer in
case of any problem.
Symbol Instruction On The Device
2. INTRODUCTION
English version
CE Certicate
Only indoor using
Environmental protection
Suitable directly installed on the common combustible materials devices
The minimum distance from lighted objects (meter)
0,5m
Be careful with your operations. With a wrong voltage you may suer a
dangerous electric shock when touching wires!
CAUTION!
Keep this device away from rain and moisture!
Unplug mains lead before opening the housting!
CAUTION!
Page 5
P. 5
| Tecshow Sat urn
This device was in perfect condition before leaving
factory. In order to maintain this condition and to
ensure a safe operation, it is absolutely necessary
for the user to follow the safety instructions and
warning notes written in this user manual.
• If the device has been exposed to temperature
changes due to environmental changes, do not
switch it on immediately. The arising condensation could damage the device. Leave the device
switched o until it has reached room temperature.
• Please make sure that the device is earthed
correctly.
• Please replace housing if it is broken. This x-
ture can be used aer installed.
• The electric connection must be carried out by
qualied person.
• Make sure that the available voltage is not high-
er than the stated voltage in this manual.
• Make sure the power cord is never crimped
or damaged by sharp edges. If this happens,
replacement of the cable must be done by an
authorized dealer.
• If the external exible cable or cord of this xture is damaged, it shall be exclusively replaced
by the manufacturer or his service agent or
a similar qualied person in order to avoid a
hazard.
• Please cut o the power before cleaning, maintaining or turn on the xture.
3. SAFETY INSTRUCTIONS
Please be aware that damages caused by manual modications to the device are not subject to
warranty. Keep away from non-professionals.
Never look directly into the light source,
as sensitive persons may suer an epileptic shock.
CAUTION!
Never touch the device during operatipon!
the housing may heat up
CAUTION!
English version
Damages caused by the disregard of this uaser manual are not subject to warranty.
The dealer will not accept liability for any resulting defects of problems.
WARNING!
Page 6
P. 6
Tecshow Sat urn |
• This device is a eect light for professional use
on stages, in discotheques, theaters, etc., the
device is designed for indoor use only.
• This xture is only allowed to be operated with
the max alternating current which is stated in
the technical specications in the last page of
this manual.
• The device can do continuous work for eight
hours. Lighting eects are not designed for permanent operation. Consistent operation may
shorten the xture’s lifespan.
• Handle with care, do not make the device by
strong shocks.
• While choosing the installation-spot, please
make sure that the device is not exposed to
extreme heat, moisture or dust. Please don’t
project the beam onto combustible substances.
The minimum distance between light-output
from the projector and the illuminated surface
must be more than 1 meter.
• Please do not install in damp, overheat or dusty
• The applicable temperature for the lighting is
between -10°C to 45°C. Do not use the lighting
under or above the temperature.
• Before installation, must ensure installation
bracket, handle or truss for this light can hold
10 times of the xture weight for 1 hour with-
out any harming deformation.
environment or use the device. Do not use light
on fuel. The distance between the device and
the projectile to keep at least 1 meter.
• If you use the quick lock cam to hang up the xture, please make sure the quick lock fasteners
can be turned in the quick lock holes correctly.
• Operate the device only aer having familiarized with its functions. Do not permit unqualied people to operate the device. Most damages are caused by unprofessional operation.
• Please use the original packaging if the device is
transported.
• For safety reasons, please be aware that all
modications on the device are forbidden.
• If this device will be operated in any way different to the one described in this manual, the
product may suer damages and the guarantee
becomes void. Furthermore, any other operation may lead to short-circuit, burns, electric
shock, lamp explosion, crash, etc.
• The installation must always be secured with
a secondary safety e.g. an appropriate safety
rope.Never stand directly below the device
when mounting, removing or servicing the
xture.
• The operator has to make sure the safety re-
lating and machine technical installations are
4. GENERAL GUIDELINES & INSTALLATION
Installation Instruction
Please consider the GB7000.15/EN60598-2-17 and the other respective national norms during
the installatión. The installation must only be carried out by a qualied person.
CAUTION!
English version
Page 7

P. 7
| Tecshow Sat urn
approved
• by an expert before taking the device into
operation for the rst time.
• These installations have to be approved by a
skilled person once a year.
• Overhead mounting requires extensive experi-
ence, including others calculating working load
limits, installation material being used, and
periodic safety inspection of all installation material and the device. If you lack these qualications, do not attempt the installation yourself.
Improper installation can result in bodily injury.
Insert the quick-lock fasteners of the
rst holder into the respective holes
on the bottom of the device.Tighten
the quick-lock fasteners fully clock-
wise.
Make the nished installed mounting
bracket tighten on the xed bracket.
Pull the safety rope through the holes
on the bottom of the base and over
the trussing system or other safe
xation spot.
Note: This step is quite important to
ensure that xture will not drop out
by the damage of clamp.
5. RIGGING & DISPLAY
Display
Mounting Bracket
Safet y Rope
Handing Bracket
Rapid locking hook
1. (MENU)
2. (UP)
3. (DOWN)
4. (ENTER)
5. Display
1. DMX in
2. DMX Out
3. ON/OFF
4. Fuse
5. Power
socket
English version
Page 8
P. 8
Tecshow Sat urn |
Display operation
Mode Operation Function Operation
Addr
(address setting)
+/-
set address (001-512)
Chnd
(channel option)
+/-
12Ch
23Ch
Shnd
(show)
+/-
Sh 1
Sh 2
Sh 3
SLnd
(set master/slave
unit)
+/-
Mast (set as master unit)
SL 1 (set as slave unit)
Lost
(DMX lost mode)
+/-
hold (hold the last scene when
DMX is lost)
sound (enter sound activated
mode automatically when
DMX is lost)
Auto (enter auto mode auto-
matically when DMX is lost)
blac (keep black when DMX is
lost)
Sens
(sound sensitivity)
S000-S099
(sound sensitivity)
Angl
(angle)
+/-
630
540
Pint
(PAN reverse)
+/-
yes
no
Tint
(TILT reverse)
+/-
yes
no
Padj
(Pan ne)
+/-
P000-P255
(PAN ne)
Tadj
(TILT ne)
+/-
T000-T255
(TILT ne)
Led (LED display
backlight set)
on (LED display backlight ON)
o (display reverse OFF)
Disp
(display reverse)
on (display reverse ON)
o (display reverse OFF)
Fhrs (working hours) display working hours
press
“ENTER”
to enter,
or press
“MENU”
to exit
press
“ENTER”
to save
and exit,
press
MENU to
exit only
Nenu
(MENU)
English version
Page 9

P. 9
| Tecshow Sat urn
Ver
(soware version)
current soware version
Rest (all reset) all reset
defa
(reset to factory
defaults)
reset to defaults
press
“ENTER”
to enter,
or press
“MENU”
to exit
6. MENU OPERATION
7. MENU FUNCTION SETTING
This xture has 4 keys on front panel for operation,
press these keys to set DMX address, reset, edit and
run programs and so on.
[MENU] press MENU key to enter edit status, in edit
status, if press MENU again, it will return the upper
interface. If no operation 30 seconds aer enter edit
status, the xture will exit the edit status automat-
ically.
[Up] press UP key, the indicator will ash, the address increases one by one, if hold the key continu-
ously, the address will increase rapidly. If no press
within 30 seconds, the indicator stops ashing and
1) DMX address setting
1.Press <MENU> to enter EDIT interface
2. Press <UP/DOWN> to choose, then press
<ENTER> to enter Addr
exit it. In edit status, press UP key, it will display the
options circularly from down to up.
[Down] press DOWN key, the indicator will ash,
the address decreases one by one, if hold the key
continuously, the address will decrease rapidly.
If no press within 30 seconds, the indicator stops
ashing and exit it. In edit status, press DOWN key,
it will display the options circularly from up to down
.
[ENTER] in normal status, no function aer press
ENTER. In edit mode, press ENTER to enter lower
interface.
3. Press <UP/DOWN> to choose address 001~XXX
4. Press <ENTER> to conrm, or press <MENU> to
exit
English version
Page 10

P. 1 0
Tecshow Sat urn |
2) Channel mode Setting
1. Press <MENU> to enter EDIT interface
2. Press <UP/DOWN> to choose, then press ENTER
to enter Chnd
3. Press UP/DOWN to choose each chan-
nel.‘12CH’/‘23CH’
4. Press ENTER to conrm, or press “<MENU> to exit
3) Sound activated show mode Setting
1. Press <MENU> to enter EDIT interface
2. Press <UP/DOWN> to choose, then press ENTER
to enter Shnd
3. Press <UP/DOWN> to choose light’s three
shows:Sh1,Sh2,Sh3 (can choose any show mode
which is activated by sound)
4. Press ENTER to conrm, or press <MENU> to exit.
4) Master-slave setting
1. Press <MENU> to enter EDIT interface
2. Press <UP/DOWN> to choose, then press ENTER
to enter SLnd
3. Press <UP/DOWN> to choose Mast/SL1.
4. Press ENTER to conrm, or press <MENU> to exit.
5) DMX Lost Setting
1. Press <MENU> to enter EDIT interface
2. Press <UP/DOWN> to choose, then press ENTER
to enter Lost
3. Press <UP/DOWN> can choose light’s 4 scenes:
hold, soun, Auto, blac (can choose any scene mode
to operate )
4. Press ENTER to conrm, or press <MENU> to exit.
6) Sound sensitivity Setting
(before this setting, please Press <MENU> into
<Lost> to select <Soun> and save, xture should be
in Sound Mode rst)
1. Press <MENU> to enter EDIT interface
2. Press <UP/DOWN> to choose, then press ENTER
to enter Sens
3. Press <UP/DOWN>, ENTER to adjust the sound
sensitivity from 0%-99%.
4. Press ENTER to conrm, or press <MENU> to exit.
7) Pan angle setting
1. Press <MENU> to enter EDIT interface.
2. Press <UP/DOWN> to choose, then press ENTER
to enter Angl
3. Press <UP/DOWN> to choose ‘630’/‘540’
4. Press ENTER to conrm, or press <MENU> to exit.
8) Pan reverse setting
1. Press <MENU> to enter EDIT interface.
2. Press <UP/DOWN> to choose, then press ENTER
to enter Pint
3. Press <UP/DOWN> to choose ‘YES’/‘NO’
4. Press ENTER to conrm, or press <MENU> to
exit.
9) Tilt reverse setting
1. Press <MENU> to enter EDIT interface.
2. Press <UP/DOWN> to choose, then press ENTER
to enter Tint
3. Press Cto choose ‘YE S’/‘NO’
4. Press ENTER to conrm,or press <MENU> to exit.
10) Pan ne setting
1. Press <MENU> to enter EDIT interface.
2. Press <UP/DOWN> to choose, then press ENTER
to enter Padj
3 Press <UP/DOWN> to choose ‘P000-P255”’
4. Press ENTER to conrm,or press <MENU> to exit.
11) TILT ne setting
1. Press <MENU> to enter EDIT interface.
2. Press <UP/DOWN> to choose, then press ENTER
to enter Tad j
3 Press<Up/Down> to choose ‘T000-T255”’
4.Press <Enter> to conrm,or press “MENU” to exit.
12) LED back light setting
1. Press <MENU> to enter EDIT interface.
2. Press <UP/DOWN> to choose, then press ENTER
to enter LED
3. Press <UP/DOWN> to choose ‘ON’/‘OFF’
4. Press ENTER to conrm, or press “MENU” to exit.
English version
Page 11
P. 11
| Tecshow Sat urn
13) Display reverse setting
1. Press <MENU> to enter EDIT interface.
2. Press <UP/DOWN> to choose, then press ENTER
to enter Disp
3. Press <UP/DOWN> to choose ‘ON’/‘OFF’
4. Press <Enter> to conrm, or press <MENU> to
exit.
14) Working time
1. Press ENTER to enter EDIT interface
2. Press <UP/DOWN>, then press ENTER
Fhrs to check the light’s working time
3. Press ENTER to conrm, or press <MENU> to exit.
15) Soware Version
1. Press ENTER to enter EDIT interface
2. Press <UP/DOWN>, then press ENTER
Ver to check the light’s version information
3.Press ENTER to conrm, or press <MENU> to exit.
16) Whole xture reset
1. Press <MENU> to enter EDIT interface.
2. Press <UP/DOWN> to choose, then press ENTER
to enter Rest
3. Aer reset, it will go back to the upper interface
17) Factory default settings
1. Press <MENU> to enter EDIT interface.
2. Press <UP/DOWN> to choose, then press ENTER
to enter Defa
3. Press ENTER to conrm,or press <MENU> to exit.
8. DMX CHANNEL INSTRUCTION
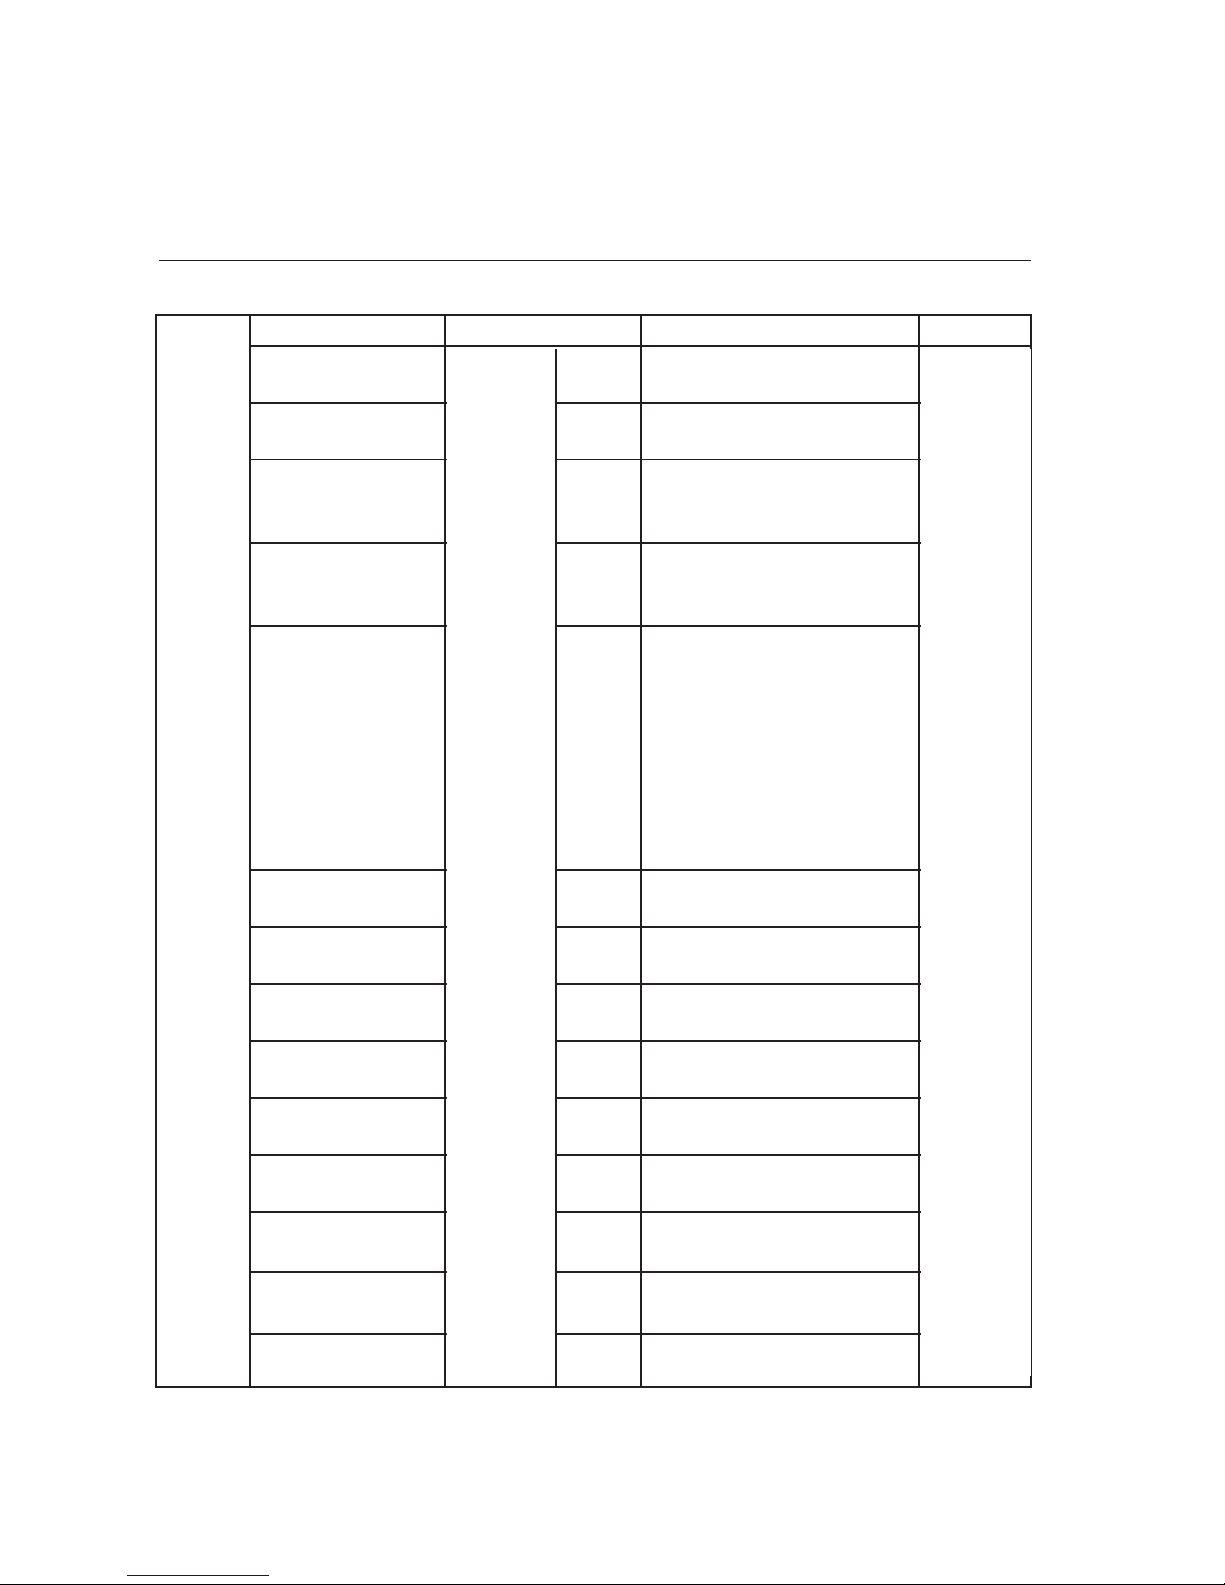
12 DMX Channel chart
Channel Function Value Details
CH1 PAN 000-255 Pan 0-630°
CH2 Tilt 000-255 Tilt 0-210°
CH3 Pan/Tilt Speed 000-255 Pan/Tilt speed from fast to slow
CH4 Dimming 000-255 White LED dimming (0-100%)
CH5 Strobe
000-015 Strobe o
016-096 Strobe (1HZ-25HZ Slow-Fast)
097-175 Strobe (1HZ Slow-Fast)
176-255 Random Strobe
SPL-LED-663S 12 Channel Mode
English version
Page 12
P. 12
Tecshow Sat urn |
CH6 Color wheel
000-030 open
031-055 red
056-080 green
081-105 blue
106-130 yellow
131-155 orange
156-180 magenta
181-205 light green
206-230 purple
231-255 cyan
CH7 Gobo wheel
000-021 open
000-034 gobo 1
035-047 gobo 2
048-060 gobo 3
061-073 gobo 4
074 - 086 gobo 5
087-099 gobo 6
100-112 gobo 7
113-12 5 gobo 8
126-138 gobo 9
139-151 gobo 1 shaking
152-164 gobo 2 shaking
165-177 gobo 3 shaking
178 -190 gobo 4 shaking
191-203 gobo 5 shaking
204-216 gobo 6 shaking
217-229 gobo 7 shaking
230-242 gobo 8 shaking
243-255 gobo 9 shaking
CH8 SMD ring strobe
000-029 SMD ring strobe o
030-225 Strobe on , speed from slow to fast
(valid for CH10 000-070 only)
226-255 SMD ring strobe o
CH9
SMD ring master dim-
ming
000-255 SMD ring master dimming 0-100%
(valid for CH10 000-070 only)
English version
Page 13

P. 13
| Tecshow Sat urn
CH10 SMD ring auto Program
000-035 No Function
036-040 Red
041-045 Green
046-050 Blue
051-055 R&G
056-060 R&B
061-065 G&B
066-070 R&G&B
071-080 RGB Change
081-085 Red-Chase
086-090 Green-Chase
091-095 Blue-Chase
096-100 R&G-Chase
101-105 R&B-Chase
106-110 G&B-Chase
111-115 R&G&B-Chase
116-120 red ring zoom out
121-125 green ring zoom out
126-130 blue ring zoom out
131-135 RGB ring zoom out
136-140 red ring zoom in
141-145 green ring zoom in
146-150 blue ring zoom in
151-155 RGB ring zoom in
156-160 color eect switching
161-165 eect switch between yellow/purple/cyan/white
166-255 color chase in ring 1-4, 9 eects in total, each 10
digits for 1 eect
CH11 SMD ring Speed 000-255 SMD ring speed from slow to fast
CH12 Rest
000-49 No Function
050-099 auto program 1
100-149 auto program 2
149-199 auto program 3
200-249 sound activated program
250-255 All Reset
English version
Page 14

P. 14
Tecshow Sat urn |
23 DMX Channel chart
Channel Function Value Details
CH1 PAN 000-255 Pan 0-630°
CH2 PAN Fine 000-255 Pan ne
CH3 Tilt 000-255 Tilt 0-210°
CH4 Tilt Fine 000-255 Tilt ne
CH5 Pan/Tilt Speed 000-255 Pan/Tilt speed from fast to slow
CH6 Dimming 000-255 White LED dimming (0-100%)
CH7 Strobe
000-015 Strobe o
016-096 Strobe (1HZ-25HZ Slow-Fast)
097-175 Strobe (1HZ Slow-Fast)
176-255 Random Strobe
CH8 Color wheel
000-030 open
031-055 red
056-080 green
081-105 blue
106-130 yellow
131-155 orange
156-180 magenta
181-205 light green
206-230 purple
231-255 cyan
CH9 Gobo wheel
000-021 open
000-034 gobo 1
035-047 gobo 2
048-060 gobo 3
061-073 gobo 4
074 - 086 gobo 5
087-099 gobo 6
100-112 gobo 7
113-12 5 gobo 8
126-138 gobo 9
139-151 gobo 1 shaking
152-164 gobo 2 shaking
165-177 gobo 3 shaking
178 -190 gobo 4 shaking
191-203 gobo 5 shaking
204-216 gobo 6 shaking
217-229 gobo 7 shaking
230-242 gobo 8 shaking
243-255 gobo 9 shaking
English version
Page 15

P. 15
| Tecshow Sat urn
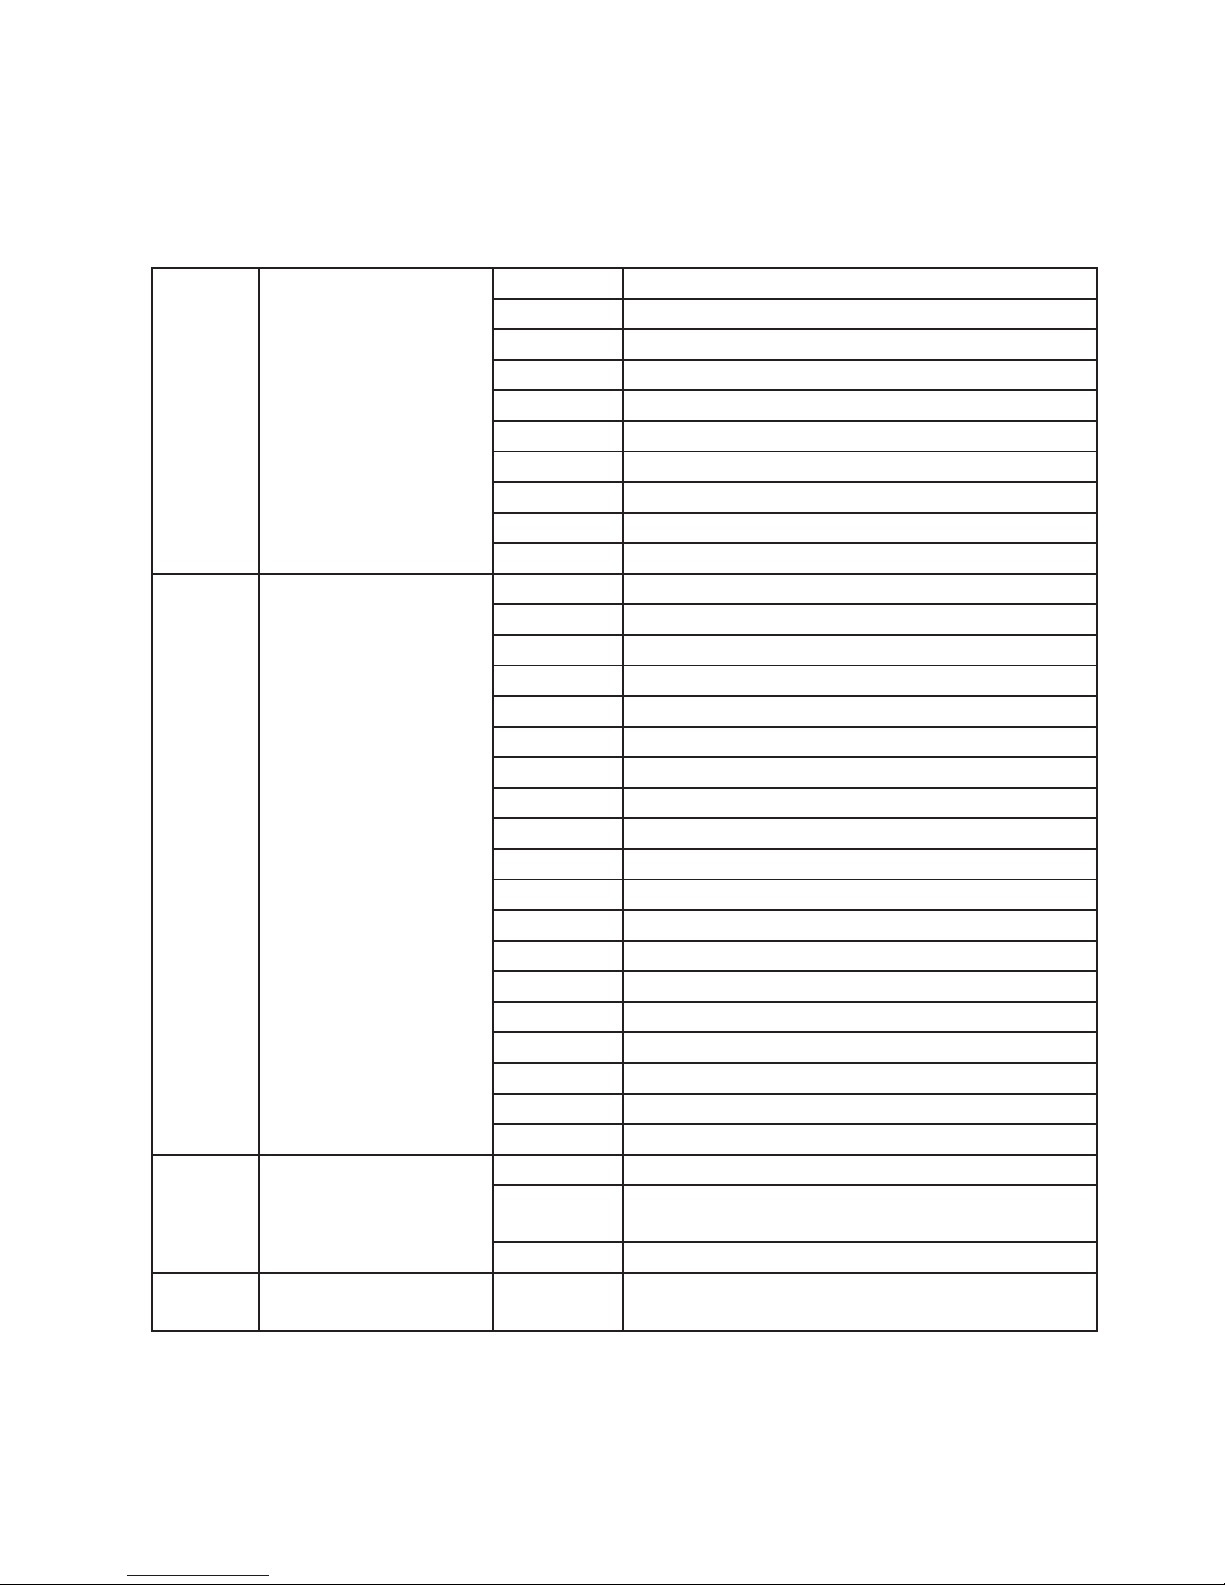
CH10
inner SMD ring 1 red
dimming
000-255 Red1(0 -100%)
CH11
inner SMD ring 1 green
dimming
000-255 Green1(0-100%)
CH12
inner SMD ring 1 blue
dimming
000-255 Blue1(0-100%)
CH13
inner SMD ring 2 red
dimming
000-255 Red2(0-100%)
CH14
inner SMD ring 2 green
dimming
000-255 Green2(0-100%)
CH15
inner SMD ring 2 blue
dimming
000-255 Blue2(0-100%)
CH16
inner SMD ring 3 red
dimming
000-255 Red3(0-100%)
CH17
inner SMD ring 3 green
dimming
000-255 Green3(0-100%)
CH18
inner SMD ring 3 blue
dimming
000-255 Blue3(0-100%)
CH19 SMD ring strobe
000-029 SMD ring strobe o
030-225 strobe on , speed from slow to fast
226-255 SMD ring strobe o
CH20
SMD ring master dim-
ming
000-255
SMD ring master dimming 0-100%
CH21 SMD ring auto Program
000-035 No Function
036-040 Red
041-045 Green
046-050 Blue
051-055 R&G
056-060 R&B
061-065 G&B
066-070 R&G&B
071-080 RGB Change
081-085 Red-Chase
086-090 Green-Chase
091-095 Blue-Chase
096-100 R&G-Chase
101-105 R&B-Chase
106-110 G&B-Chase
111-115 R&G&B-Chase
English version
Page 16

P. 1 6
Tecshow Sat urn |
116-120 red ring zoom out
121-125 green ring zoom out
126-130 blue ring zoom out
131-135 RGB ring zoom out
136-140 red ring zoom in
141-145 green ring zoom in
146-150 blue ring zoom in
151-155 RGB ring zoom in
156-160 eect switch between R/G/B/W
161-165 eect switch between yellow/purple/cyan/white
166-255
color chase in ring 1-4, 9 eects in total, each 10
digits for 1 eect
CH22 SMD ring Speed 000-255 SMD ring speed from slow to fast
CH23 Rest
000-49 No Function
050-099 auto program 1
100-149 auto program 2
149-199 auto program 3
200-249 sound activated program
250-255 All Reset
9. DMX-512 CONNECTION
Connect the provided XLR cable to the male 3-pin XLR output of your controller and the other side to the
female 3-pin XLR input of the light.You can chain multiple lights together through serial linking
The cable needed should be two core, screened cable with XLR input and output connectors.
Please refer to the diagram below.
DMX output
XLR Mounting
socket
DMX input
XLR Mounting
plug
1. Ground
2. Signal (-)
3. Signal (+)
English version
Page 17

P. 17
| Tecshow Sat urn
10. DMX ADDRESS SETTING
Each xture must have a specic starting address.
When receiving signal transmission, xture will
receive channel control signals from DMX controller
through this starting address.
According to dierent requirements or easy to use,
the user can set many xtures to the same address,
also can set up a separately address for every
device.
If more than one xtures have the same address, all
of them receive the same DMX channel signal from
DMX controller. All connected xtures are jointly
controlled, DMX controller can’t control a device
separately.
If each device has a dierent address, each device will be separate and accept separate DMX512
control signal through the separate DMX address,
so that more convenient to control one device
separately. this method must be based on channel
quantity of device to determine a starting address.
This device has 23 channels, so the rst device
starting address set 1, the second is 24(1+23), the
third is 47(24+23) and so on.
Address 47 Address 24 Address 01
English version
Page 18

P. 18
Tecshow Sat urn |
11. CLEANING AND MAINTENANCE
12. ATTENTION
Cleaning should be performed in every 15-day, by using a sponge which is dipped with alcohol, rather than
wet cloth or other chemical liquid, to clean the mirror.
Do not look into light source directly when turn on the light, and make sure power o before do any installation or maintenance.
CAUTION
Turn o power before cleaning and maintenance!
CAUTION!
Never look directly into the light source,
as sensitive persons may suer an epileptic shock.
CAUTION!
Never look directly into the light source,
as sensitive persons may suer an epileptic shock.
English version
Page 19

P. 1 9
| Tecshow Sat urn
We will provide 1 year warranty under the condition that user has operated the light normally and
lifetime service. We won't provide warranty if the damage is caused by articial or force majeure event.
Cost of ttings should be charged by user if product needs maintenance aer 1 year .Please cut this
warranty card and shipped it along with the product to our factory when applying for warranty.
Product: Purchasing date: Code of invoice:
Warranty date: From To
User’s name: Add:
Company: Tel:
WARRANTY CARD
English version
Page 20

P. 2 0
Tecshow Sat urn |
Saturn
Cabezal móvil Spot 2-in-1 con 3 anillos LED SMD
Saturn es un compacto cabezal móvil spot que
cuenta con 3 anillos de LED SMD que le permiten
crear impactantes efectos visuales, más allá de la
proyección del haz. La unidad está equipada con
1 LED blanco de 30W, más 76 LEDs SMD5050 RGB,
logrando un rendimiento luminoso de 8.800 lux a 3
metros con un ángulo de haz de 4,7º. Por otra parte,
Saturn tiene 9 ltros dicroicos más abierto y 9 gobos
estáticos, además de los 25 programas integrados
que posee en su sección de anillos LED. Ideal para
aplicaciones de mediana envergadura, este cabezal
móvil posee gobo shaking, efecto estrobo, dimmer
lineal de 0-100% y foco manual.
Fuente & Óptica
Fuente de luz:
• 1 LED blanco de 30W
• 76 LEDs SMD5050 RGB 3-en-1
• Vida útil promedio: 50.000 horas
• Ángulo de haz: 4,7º
Información fotométrica
• Temperatura color: 6500K
• Flujo lumínico: 8800 lux @ 3m (10 .)
Efectos y Funciones
• Rueda de color: 9 ltros dicroicos + abierto
• Rueda de gobos estáticos: 9 gobos estáticos +
abierto
• Gobo Shake
• Tres anillos LED SMD RGB
• 25 programas integrados de los aros LED
• Dimmer: Rango completo 0-100%
• Efecto Estrobo: 1-25Hz
• Foco Manual
Control
• Canales DMX: 12/23
• Modos de operación: DMX, Audioritmico, auto-
matico y Maestro/Esclavo
Movimiento
• Pan: 630°
• Tilt: 210°
• Pan/Tilt nos
• Auto reposicionamiento
Eléctrico
• Rango de voltaje de entrada: 100–240V, 5060Hz
• Consumo máximo de potencia: 76W
Físico
• Conectores DMX: 2 conectores XLR (XLR-3 de
entrada & salida)
• Conector de alimentación
• Display LED de 4 digitos
• Dimensiones: 264,5x168x368 mm. /
10.4x6.6x14.4 pulg.
• Peso: 5,1 Kg. / 11 Lbs.
1. DESCRIPCIÓN
Versión Español
Page 21

P. 2 1
| Tecshow Sat urn
Gracias por haber elegido el producto Saturn. Confiamos
en que nuestros excelentes productos y servicio no lo defraudarán. Por su seguridad, lea atentamente el manual
antes de utilizar el equipo.
Para la instalación, póngase en contacto con un profesional
certificado y procure seguir las instrucciones de esta guía
para garantizar su funcionamiento y mantenimiento.
Toda persona involucrada con la instalación, operación y
mantenimiento de este dispositivo debe:
• estar calicada para la tarea.
• seguir las instrucciones del manual con atención.
Versión Español
Page 22

P. 2 2
Tecshow Sat urn |
2. INTRODUCCIÓN
Contenido de la caja:
• 1 cable DMX.
• 1 soporte de cierre rápido.
• 1 cable de seguridad.
• 1 manual del usuario. 1 cable
de suministro eléctrico.
• 1 equipo Saturn.
Verique que el equipo no haya sufrido daños durante el envío. En caso de que encuentre daños o
piezas faltantes, póngase en contacto de inmediato
con su distribuidor.
Descripción de símbolos
Certicado CE
Para uso en interiores únicamente
Certicado RoHS
Distancia mínima a objetos iluminados (en metros)
PRECAUCIÓN
PELIGRO
Proteja el equipo de la lluvia y la humedad.
Desconecte el equipo del suministro eléctrico antes de abrirlo.
No manipule los cables. Alto Voltaje. Riesgo de descarga eléctrica.
Versión Español
0,5m
Page 23

P. 2 3
| Tecshow Sat urn
El equipo fue entregado en perfectas condiciones.
Procure seguir las instrucciones y advertencias de
seguridad del manual para garantizar el buen estado del equipo y su funcionamiento seguro.
• En caso de que el equipo haya sido expuesto
a cambios de temperatura drásticos, no lo
encienda de inmediato. La condensación puede
causar daños en el equipo. Manténgalo apagado hasta que alcance la temperatura ambiente.
• Procure la conexión a tierra del equipo.
• Reemplace las piezas ópticas si se dañan e im-
piden el óptimo funcionamiento del equipo.
• La instalación eléctrica del equipo debe ser
realizada por un profesional certicado.
• Compruebe que el voltaje utilizado no sea
superior ni inferior a los valores indicados en el
presente manual.
• Verique que el cable de suministro eléctrico
no se encuentre cortado o dañado. Si ese fuera
el caso, contacte a su distribuidor para reemplazarlo por otro cable en óptimas condiciones.
• Desconecte el equipo del suministro eléctrico
cuando necesite limpieza o cuando no esté en
funcionamiento.
3. INSTRUCCIONES DE SEGURIDAD
La garantía no cubre daños provocados por la introducción de modicaciones manuales en el
equipo. Mantenga el equipo fuera del alcance de niños y usuarios inexpertos.
No mire en forma directa a la fuente de luz.
Las personas fotosensitivas corren riesgo de sufrir convulsiones
PELIGRO
Evite tocar el equipo durante su funcionamiento.
La cubierta alcanza altas temperaturas.
PRECAUCIÓN
Advertencia
La garantía no cubre daños provocados por el uso inapropiado de este producto.
El fabricante y el distribuidor no aceptarán responsabilidad por el mal uso del equipo.
Versión Español
Page 24

P. 2 4
Tecshow Sat urn |
• Esta equipo se diseño para uso profesional en
escenarios, discotecas, teatros, etc. Debe ser
usado únicamente en espacios interiores.
• Utilice el equipo únicamente con la corriente alterna indicada en las especicaciones técnicas,
ubicadas en la página 6 del presente manual.
• Los efectos de luz no están diseñados para
funcionar de forma permanente. Procure que el
equipo descanse luego de 8 horas de funcio-
namiento continuo para prolongar su vida útil.
• No sacuda el equipo. Evite utilizar o instalar el
equipo de forma brusca.
• Al elegir el punto de instalación, procure que el
equipo no quede expuesto al calor, humedad o
polvo en exceso. La distancia mínima requerida
entre la salida de luz del equipo y la supercie a
iluminar debe ser superior a un metro.
• El equipo debe ser instalado a una distancia
de al menos un metro de objetos o supercies
inamables. No proyecte la luz sobre objetos
inamables.
• No utilice el equipo si la temperatura ambi-
ente es inferior a -10 °C o superior a 45 °C.
• Para garantizar una instalación segura, la es-
tructura en la que se je el equipo debe poder
soportar diez veces su peso durante una hora,
sin sufrir deformaciones.
• Si emplea soportes con cierre rápido para la
instalación del equipo, verique que las trabas
estén bien aseguradas.
• Procure familiarizarse con las instrucciones
antes de utilizar el equipo. No permita que personas inexpertas operen la unidad. La mayoría
de los daños son consecuencia del uso inapro-
piado o poco profesional del equipo.
• Utilice el embalaje original si precisa trasladar
el equipo.
• Si opera el equipo de alguna forma no descrita
en el presente manual, el producto puede sufrir
daños severos. La garantía no cubre aquellos
daños provocados por el uso indebido del
equipo. Cualquier otro uso de la unidad puede
causar cortocircuitos, descargas eléctricas,
explosión de la lámpara, etc.
• Por razones de seguridad, no está permitida la
introducción de modicaciones no autorizadas
en el equipo.
• Emplee un cable de seguridad durante la
instalación. Evite situarse debajo del equipo
para realizar su montaje, desmontaje o man-
tenimiento.
• Procure que un técnico revise y apruebe las
instalaciones y medidas de seguridad antes de
4. LINEAMIENTOS GENERALES E INSTALACIÓN
Instalación
Procure respetar las normas GB7000.15/EN60598-2-17
y las regulaciones locales durante la instalación.
Recuerde que la instalación debe ser realizada por un profesional.
ADVERTENCIA
Versión Español
Page 25

P. 2 5
| Tecshow Sat urn
utilizar el equipo.
• La instalación debe ser revisada por un técnico calicado una vez por año.
• Para realizar un montaje en altura se requiere
de experiencia y conocimientos previos para
calcular los límites de peso, los materiales
a emplear, las medidas de seguridad, etc. Si
no cumple con estos requisitos, no realice la
instalación por sus medios. Una instalación
inadecuada podría resultar en lesiones corporales graves.
Coloque los tornillos de cierre rápido
en los oricios ubicados en la base del
equipo. Para ajustarlos, gírelos en el
sentido de las agujas del reloj.
Instale la morza sobre la abrazadera.
Por último, coloque un cable de seguridad en los oricios de la base y por
encima del sistema de trussing o sobre
cualquier otro punto de jación. Verique la correcta disposición del cable
de seguridad con el n de evitar caídas
en caso de que falle la abrazadera.
5. MONTAJE Y PANEL DE CONTROL
Panel de control
Morza
Cable de s eguridad
Abrazadera
Mosquetón
1. (MENU)
2. (UP)
3. (DOWN)
4. (ENTER)
5. Pantalla LCD
1. Entrada DMX
2. Salida DMX
3. Interruptor de
encendido
4. Fusible
5. Tomacorriente
Versión Español
Page 26

P. 2 6
Tecshow Sat urn |
Menú de funciones
Funciones Opciones Descripción Instrucciones
Addr
(address setting)
+/-
Conguración de dirección
DMX (001-512)
Chnd
(selección de canales)
+/-
12Ch
23Ch
Shnd
(show)
+/-
Sh 1
Sh 2
Sh 3
SLnd
(Modo maestro/
esclavo)
+/-
Mast (Congurar como
maestro)
SL1 (Congurar como esclavo)
Lost
(Modo sin señal DMX)
+/-
Hold (Mantener la última escena cuando pierde señal DMX)
Sound (Activar el modo audi-
orítmico cuando pierde señal
DMX)
Auto (Activar el modo au-
tomático cuando pierde señal
DMX)
blac (Activar el modo blackout
cuando pierde señal DMX)
Sens S000-S099
(Sensibilidad de sonido)
Angl
(Ángulo de pan)
+/-
630
540
Pint
(PAN hacia atrás)
+/-
yes (sí)
no
Tint
(TILT hacia atrás)
+/-
yes (sí)
no
Padj
(Pan no)
+/-
P000-P255
(PAN no)
Tadj
(TILT no)
+/-
T000-T255
(TILT no)
Led (Luz de fondo)
on (Luz de fondo encendida)
o (Luz de fondo apagada)
Disp
(Rotar pantalla)
on (Rotar pantalla encendida)
o (Rotar pantalla apagada)
Fhrs Visualizar tiempo de
funcionamiento
Presione
ENTER
para
ingresar
o MENU
para salir
Presione
ENTER para
guardar y
salir. Pre-
sione MENU
para salir
sin guardar
cambios
MENÚ
Versión Español
Page 27

P. 2 7
| Tecshow Sat urn
Ver Versión actual de soware
Rest Restablecer todo
defa
Restablecer valores de fábrica
Presione
ENTER
para
ingresar
o MENU
para salir
6. CONFIGURACIÓN DE FUNCIONES
7. AJUSTES
En el panel frontal se ubican las cuatro teclas
con las que podrá operar el equipo, congurar la
dirección, restablecer los valores, editar y ejecutar
programas.
[MENU] Presione MENU para ingresar a Edit Status
(estado de edición). Si presiona MENU nuevamente,
regresará a la interfaz superior. Si se mantiene
inactivo por 30 segundos, luego de ingresar en el
estado de edición, el equipo saldrá del menú de
edición automáticamente.
[Up] Cuando presione la tecla UP, el indicador
titilará y el valor de dirección aumentará de a uno.
Si mantiene la tecla presionada, el valor aumentará
1) Conguración de dirección DMX
1. Presione <MENU> para acceder a la interfaz EDIT.
2. Presione <UP/DOWN> para desplazarse por el
menú y luego <ENTER> para acceder a Addr.
velozmente. Si se mantiene inactivo por 30 segun-
dos, el indicar se detendrá y se cerrará la función.
En estado de edición, utilice la tecla UP para
desplazarse por las opciones disponibles.
[Down] Cuando presione la tecla DOWN, el indicador titilará y el valor de dirección disminuirá de
a uno. Si mantiene la tecla presionada, el valor
disminuirá velozmente. Si se mantiene inactivo por
30 segundos, el indicar se detendrá y se cerrará la
función. En estado de edición, utilice DOWN para
desplazarse por las opciones disponibles.
[ENTER] Presione la tecla ENTER en estado de
edición para ingresar en la opción seleccionada.
3. Presione <UP/DOWN> para escoger el valor de
dirección 001-512.
4. Presione ENTER para conrmar la selección o
<MENU> para salir.
Versión Español
Page 28

P. 2 8
Tecshow Sat urn |
2) Conguración de canales
1. Presione <MENU> para acceder a la interfaz EDIT.
2. Presione <UP/DOWN> para desplazarse por el
menú y luego ENTER para acceder a Chnd.
3. Presione <UP/DOWN> para escoger entre 12 o 23
canales: ‘12CH/23CH’.
4. Presione ENTER para conrmar la selección o
<MENU> para salir.
3) Modo audiorítmico de escena
1. Presione <MENU> para acceder a la interfaz EDIT.
2. Presione <UP/DOWN> para desplazarse por el
menú y luego ENTER para acceder a Shnd.
3. Presione <UP/DOWN> para escoger las escena:
Sh1, Sh2, Sh3 (utilice cualquier modo de escena
audiorítmico para operar).
4. Presione ENTER para conrmar la selección o
<MENU> para salir.
4) Modo maestro/esclavo
1. Presione <MENU> para acceder a la interfaz EDIT.
2. Presione <UP/DOWN> para desplazarse por el
menú y luego ENTER para acceder a SLnd.
3. Presione <UP/DOWN> para escoger Mast/SL1.
4. Presione ENTER para conrmar la selección o
<MENU> para salir.
5) Modo sin señal DMX
1. Presione <MENU> para acceder a la interfaz EDIT.
2. Presione <UP/DOWN> para desplazarse por el
menú y luego ENTER para acceder a Lost.
3. Presione <UP/DOWN> para escoger la escena:
hold, soun, Auto, blac (utilice cualquier modo de
escena para operar).
6) Sensibilidad de sonido (Antes de congurar
este modo, ingrese al submenú Lost para seleccion-
ar <Soun>. Active el modo Sound primero.)
1. Presione <MENU> para acceder a la interfaz EDIT.
2. Presione <UP/DOWN> para desplazarse por el
menú y luego ENTER para acceder a Sens.
3. Presione <UP/DOWN> y ENTER para ajustar los
valores de 0-99%.
4. Presione ENTER para conrmar la selección o
<MENU> para salir.
7) Ángulo de pan
1. Presione <MENU> para acceder a la interfaz EDIT.
2. Presione <UP/DOWN> para desplazarse por el
menú y luego ENTER para acceder a Angl.
3 Presione <UP/DOWN> para escoger ‘630 o ‘540’.
4. Presione ENTER para conrmar la selección o
<MENU> para salir.
8) Pan hacia atrás
1. Presione <MENU> para acceder a la interfaz EDIT.
2. Presione <UP/DOWN> para desplazarse por el
menú y luego ENTER para acceder a Pint.
3. Presione <UP/DOWN> para escoger ‘YES’ o ‘NO’.
4. Presione ENTER para conrmar la selección o
<MENU> para salir.
9) Tilt hacia atrás
1. Presione <MENU> para acceder a la interfaz EDIT.
2. Presione <UP/DOWN> para desplazarse por el
menú y luego ENTER para acceder a Tint.
3. Presione <UP/DOWN> para escoger ‘YES’ o ‘NO’.
4. Presione ENTER para conrmar la selección o
<MENU> para salir.
10) Pan no
1. Presione <MENU> para acceder a la interfaz EDIT.
2. Presione <UP/DOWN> para desplazarse por el
menú y luego ENTER para acceder a Padj.
3. Presione <UP/DOWN> para escoger entre
‘P000-P255’.
4. Presione ENTER para conrmar la selección o
<MENU> para salir.
11) TILT no
1. Presione<MENU> para acceder a la interfaz EDIT.
2. Presione <UP/DOWN> para desplazarse por el
menú y luego ENTER para acceder a Tadj.
3. Presione <UP/DOWN> para escoger entre
‘T000-T255”’
4. Presione ENTER para conrmar la selección o
<MENU> para salir.
12) Luz de fondo
1. Presione <MENU> para acceder a la interfaz EDIT.
2. Presione <UP/DOWN> para desplazarse por el
Versión Español
Page 29

P. 2 9
| Tecshow Sat urn
menú y luego ENTER para acceder a LED.
3. Presione <UP/DOWN> para escoger entre ‘ON’ y
‘O FF’.
4. Presione ENTER para conrmar la selección o
<MENU> para salir.
13) Rotar pantalla
1. Presione <MENU> para acceder a la interfaz EDIT.
2. Presione <UP/DOWN> para desplazarse por el
menú y luego ENTER para acceder a Disp.
3. Presione <UP/DOWN> para escoger entre ‘ON’ y
‘O FF’.
4. Presione ENTER para conrmar la selección o
<MENU> para salir.
14) Tiempo de funcionamiento
1. Presione <MENU> para acceder a la interfaz EDIT.
2. Presione <UP/DOWN> para desplazarse por el
menú y luego ENTER para acceder a Fhrs y vericar
el tiempo de funcionamiento de la luz.
3. Presione ENTER para conrmar la selección o
<MENU> para salir.
15) Versión de soware
1. Presione <MENU> para acceder a la interfaz EDIT.
2. Presione <UP/DOWN> para desplazarse por el
menú y luego ENTER para acceder a Ver y vericar
la información del soware.
3. Presione ENTER para conrmar la selección o
<MENU> para salir.
16) Restablecer todo
1. Presione <MENU> para acceder a la interfaz EDIT.
2. Presione <UP/DOWN> para desplazarse por el
menú y luego ENTER para acceder a Rest.
3. Luego de restablecer los valores, la pantalla
volverá a la interface superior.
17) Restablecer valores de fábrica
1. Presione <MENU> para acceder a la interfaz EDIT.
2. Presione <UP/DOWN> para desplazarse por el
menú y luego ENTER para acceder a Defa.
3. Presione ENTER para conrmar la selección o
“<MENU> para salir.
8. CUADROS DE CANALES DMX
12 DMX Channel chart
Canal Función Valor Descripción
CH1 PAN 000-255 Pan 0-630°
CH2 Tilt 000-255 Tilt 0-210°
CH3 Velocidad de pan/tilt 000-255 Pan/Tilt velocidad creciente
CH4 Dimmer 000-255 Dimmer de luz blanca (0-100%)
CH5 Estrobo
000-015 Estrobo apagado
016-096 Estrobo (1-25 Hz lento-rápido)
097-175 Estrobo (1Hz lento-rápido)
176-255 Estrobo aleatorio
Modo 12 canales
Versión Español
Page 30

P. 3 0
Tecshow Sat urn |
CH6 Rueda de color
000-030 Abierto
031-055 Rojo
056-080 Verde
081-105 Azul
106-130 Amarillo
131-155 Naranja
156-180 Magenta
181-205 Verde claro
206-230 Púrpura
231-255 Cian
CH7 Rueda de gobos
000-021 Abierto
000-034 Gobo 1
035-047 Gobo 2
048-060 Gobo 3
061-073 Gobo 4
074 - 086 Gobo 5
087-099 Gobo 6
100-112 Gobo 7
113-12 5 Gobo 8
126-138 Gobo 9
139-151 Movimiento de gobo 1
152-164 Movimiento de gobo 2
165-177 Movimiento de gobo 3
178 -190 Movimiento de gobo 4
191-203 Movimiento de gobo 5
204-216 Movimiento de gobo 6
217-229 Movimiento de gobo 7
230-242 Movimiento de gobo 8
243-255 Movimiento de gobo 9
CH8 Estrobo del aro SMD
000-029 Apagado
030-225 Estrobo encendido, velocidad creciente
(válido para el canal 10 000-070 únicamente)
226-255 Apagado
CH9
Dimmer maestro del aro
SMD
000-255 Dimmer 0-100%
(válido para el canal 10 000-070 únicamente)
Versión Español
Page 31

P. 3 1
| Tecshow Sat urn
CH10 Programa automático
del aro SMD
000-035 Sin función
036-040 Rojo
041-045 Verde
046-050 Azul
051-055 Rojo y verde
056-060 Rojo y azul
061-065 Verde y azul
066-070 RGB
071-080 Variación RGB
081-085 Chase rojo
086-090 Chase verde
091-095 Chase azul
096-100 Chase rojo y verde
101-105 Chase rojo y azul
106-110 Chase verde y azul
111-115 Chase RGB
116-120 Anillo rojo zoom out
121-125 Anillo verde zoom out
126-130 Anillo azul zoom out
131-135 Anillo RGB zoom out
136-140 Anillo rojo zoom in
141-145 Anillo verde zoom in
146-150 Anillo azul zoom in
151-155 Anillo RGB zoom in
156-160 Cambio de efecto de color
161-165 Cambio de efecto amarillo, púrpura, cian, blanco
166-255 Chase de color en los anillos 1-4
9 efectos, 10 dígitos por efecto
CH11 Velocidad del aro SMD 000-255 Velocidad creciente
CH12 Restablecer
000-49 Sin función
050-099 Programa automático 1
100-149 Programa automático 2
149-199 Programa automático 3
200-249 Modo audiorítmico
Restablecer todo
Versión Español
Page 32

P. 3 2
Tecshow Sat urn |
Modo 23 canales
Canal Función Valor Descripción
CH1 PAN 000-255 Pan 0-630°
CH2 PAN Fine 000-255 Pan no
CH3 Tilt 000-255 Tilt 0-210°
CH4 Tilt Fine 000-255 Tilt no
CH5 Velocidad de pan/tilt 000-255 Pan/Tilt velocidad decreciente
CH6 Dimmer 000-255 Dimmer de luz blanca (0-100%)
CH7 Estrobo
000-015 Apagado
016-096 Estrobo (1-25Hz lento-rápido)
097-175 Estrobo (1Hz lento-rápido)
Estrobo aleatorio
CH8 Rueda de color
000-030 Abierto
031-055 Rojo
056-080 Verde
081-105 Azul
106-130 Amarillo
131-155 Naranja
156-180 Magenta
181-205 Verde claro
206-230 Púrpura
231-255 Cian
CH9 Rueda de gobos
000-021 Abierto
000-034 Gobo 1
035-047 Gobo 2
048-060 Gobo 3
061-073 Gobo 4
074 - 086 Gobo 5
087-099 Gobo 6
100-112 Gobo 7
113-12 5 Gobo 8
126-138 Gobo 9
139-151 Movimiento de gobo 1
152-164 Movimiento de gobo 2
165-177 Movimiento de gobo 3
178 -190 Movimiento de gobo 4
191-203 Movimiento de gobo 5
204-216 Movimiento de gobo 6
217-229 Movimiento de gobo 7
230-242 Movimiento de gobo 8
Movimiento de gobo 9
Versión Español
Page 33

P. 3 3
| Tecshow Sat urn
CH10
Aro SMD interno 1,
dimmer rojo
000-255 Rojo 1 (0-100%)
CH11
Aro SMD interno 1,
dimmer verde
000-255 Verde 1 (0-100%)
CH12
Aro SMD interno 1,
dimmer azul
000-255 Azul 1 (0-100%)
CH13
Aro SMD interno 2,
dimmer rojo
000-255 Rojo 2 (0-100%)
CH14
Aro SMD interno 2,
dimmer verde
000-255 Verde 2 (0-100%)
CH15
Aro SMD interno 2,
dimmer azul
000-255 Azul 2 (0-100%)
CH16
Aro SMD interno 3,
dimmer rojo
000-255 Rojo 3 (0-100%)
CH17
Aro SMD interno 3,
dimmer verde
000-255 Verde 3 (0-100%)
CH18
Aro SMD interno 3,
dimmer azul
000-255 Azul 3 (0-100%)
CH19 Estrobo del aro SMD
000-029 Apagado
030-225 Estrobo encendido, velocidad creciente
226-255 Apagado
CH20
Dimmer maestro del
aro SMD
000-255
Dimmer 0-100%
CH21 Programa automático
del aro SMD
000-035 Sin función
036-040 Rojo
041-045 Verde
046-050 Azul
051-055 Rojo y verde
056-060 Rojo y azul
061-065 Verde y azul
066-070 RGB
071-080 Variación RGB
081-085 Chase de rojo
086-090 Chase de verde
091-095 Chase de azul
096-100 Chase de rojo y verde
101-105 Chase de rojo y azul
106-110 Chase de verde y azul
111-115 Chase RGB
Versión Español
Page 34

P. 3 4
Tecshow Sat urn |
116-120 Anillo rojo zoom out
121-125 Anillo verde zoom out
126-130 Anillo azul zoom out
131-135 Anillo RGB zoom out
136-140 Anillo rojo zoom in
141-145 Anillo verde zoom in
146-150 Anillo azul zoom in
151-155 Anillo RGB zoom in
156-160 Cambio de efecto de color RGBW
161-165 Cambio de efecto entre amarillo, púrpura, cian,
blanco
166-255
Chase de color en los anillos 1-4
9 efectos, 10 dígitos por efecto
CH22 Velocidad del aro SMD 000-255 Velocidad creciente
CH23 Restablecer
000-49 Sin función
050-099 Programa automático 1
100-149 Programa automático 2
149-199 Programa automático 3
200-249 Modo audiorítmico
250-255 Restablecer todo
9. CONEXIÓN DMX
Conecte el cable XLR a la salida XLR-3 macho de su controlador y el otro extremo, a la entrada XLR-3 hembra
del equipo. Podrá enlazar varios proyectores entre sí gracias a la conexión DMX.
Procure que el cable utilizado sea bipolar y blindado con conectores XLR de entrada y salida. Para obtener
más información, reérase al siguiente diagrama:
Salida DMX
Toma XLR
Entrada DMX
Conector XLR
1. A tierra
2. Señal (-)
3. Señal (+)
Versión Español
Page 35

P. 3 5
| Tecshow Sat urn
10. CONFIGURACIÓN DE DIRECCIÓN DMX
Cada equipo enlazado precisa una dirección DMX
única y especíca. Una vez conectado, el equipo
recibirá comandos del controlador DMX a través de
la dirección asignada.
Para el control independiente de cada equipo es
necesario asignar una dirección única de canales.
La conguración individual de cada equipo permitirá que funcionen por separado. Sin embargo,
es posible congurar la misma dirección para varios
equipos. Si todos los equipos se conguran con la
misma dirección funcionarán de forma sincronizada.
Este equipo cuenta con 23 canales, por lo cual la
dirección DMX del primer equipo será 1, del segundo
será 24 (1+23), del tercero será 47 (24+23), etc.
Dirección 47 Dirección 24 Dirección 01
Versión Español
Page 36

P. 3 6
Tecshow Sat urn |
11. LIMPIEZA Y MANTENIMIENTO
12. ATENCIÓN
Se recomienda realizar la limpieza del equipo cada quince días. Utilice una esponja humedecida con alcohol
para limpiar el cristal. Evite el uso de paños mojados o productos químicos.
PRECAUCIÓN
Desconecte el equipo antes de realizar cualquier tarea
de mantenimiento
ADVERTENCIA DE SEGURIDAD
No mire de forma directa hacia la fuente de luz.
Las personas fotosensitivas o con epilepsia corren riesgo de sufrir convulsiones.
PELIGRO
ALTO VOLTAJE
Un profesional certicado debe realizar la conexión eléctrica
Versión Español
Page 37

P. 3 7
| Tecshow Sat urn
Este equipo es de alto rendimiento y viene provisto con una garantía de un año. El fabricante y el
distribuidor no se responsabilizarán por el mal uso del equipo. Lea atentamente el manual antes de utilizarlo. Los daños causados por caídas no están sujetos a garantía. Luego del año de compra, los costos
de mantenimiento son responsabilidad del usuario. Para hacer uso de la garantía, corte esta tarjeta y
envíela al fabricante o distribuidor.
Producto: Fecha de compra: Número de factura:
Fecha de la garantía: Desde Hasta
Nombre del usuario: Dirección:
Empresa: Tel:
TARJETA DE GARANTÍA
Observación: El proveedor no asumirá responsabilidad por los errores u omisiones del manual. La información de este manual está sujeta a cambios sin previo aviso.
Versión Español
Page 38

P. 3 8
Tecshow Sat urn |
FOR MORE INFO ON THIS PRODUCT PLEASE CHECK WWW.TEC-SHOW.COM /
PARA MAS INFORMACION SOBRE ESTE PRODUCTO VISITE WWW.TEC-SHOW.COM
 Loading...