

Page 1
USER MANUAL / MANUAL DE USUARIO
PLEASE READ THE INSTRUCTIONS CAREFULLY BEFORE USE /
POR FAVOR LEA LAS INSTRUCCIÓNES ANTES DE USAR
Powerbox
Page 2
POWERBOX
P.
2
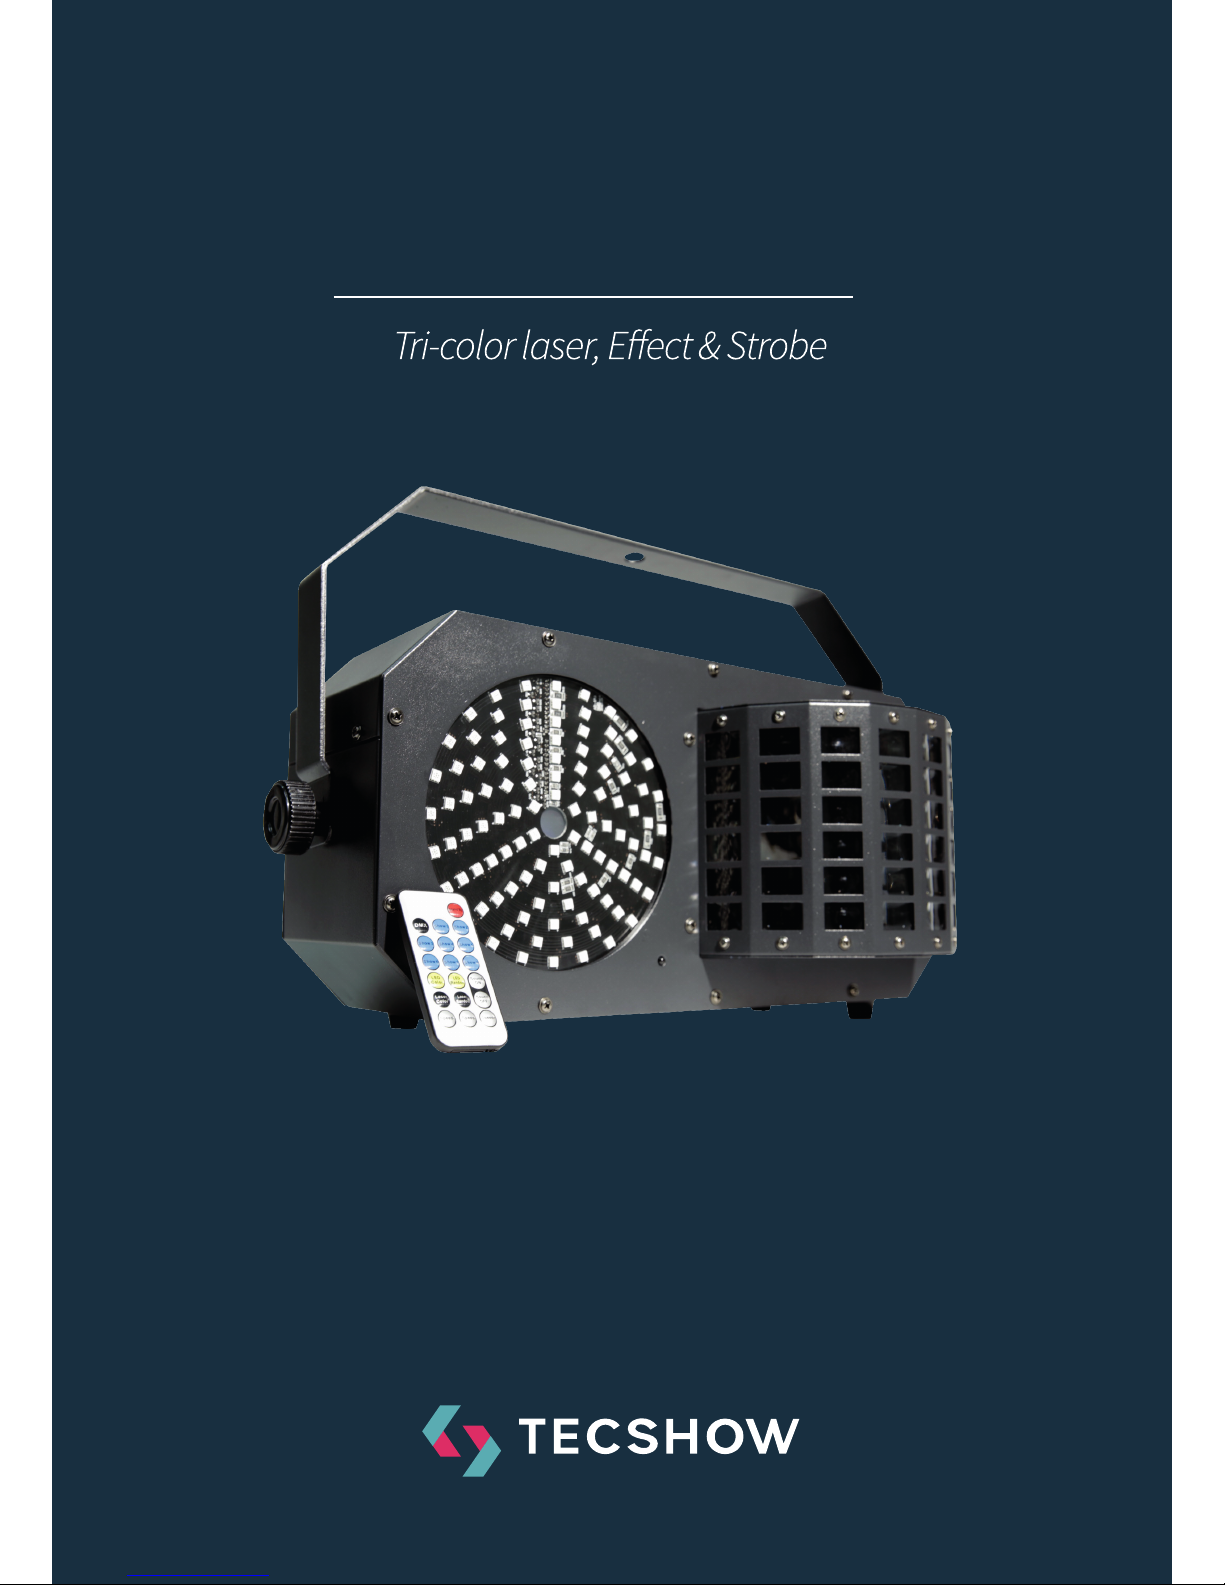
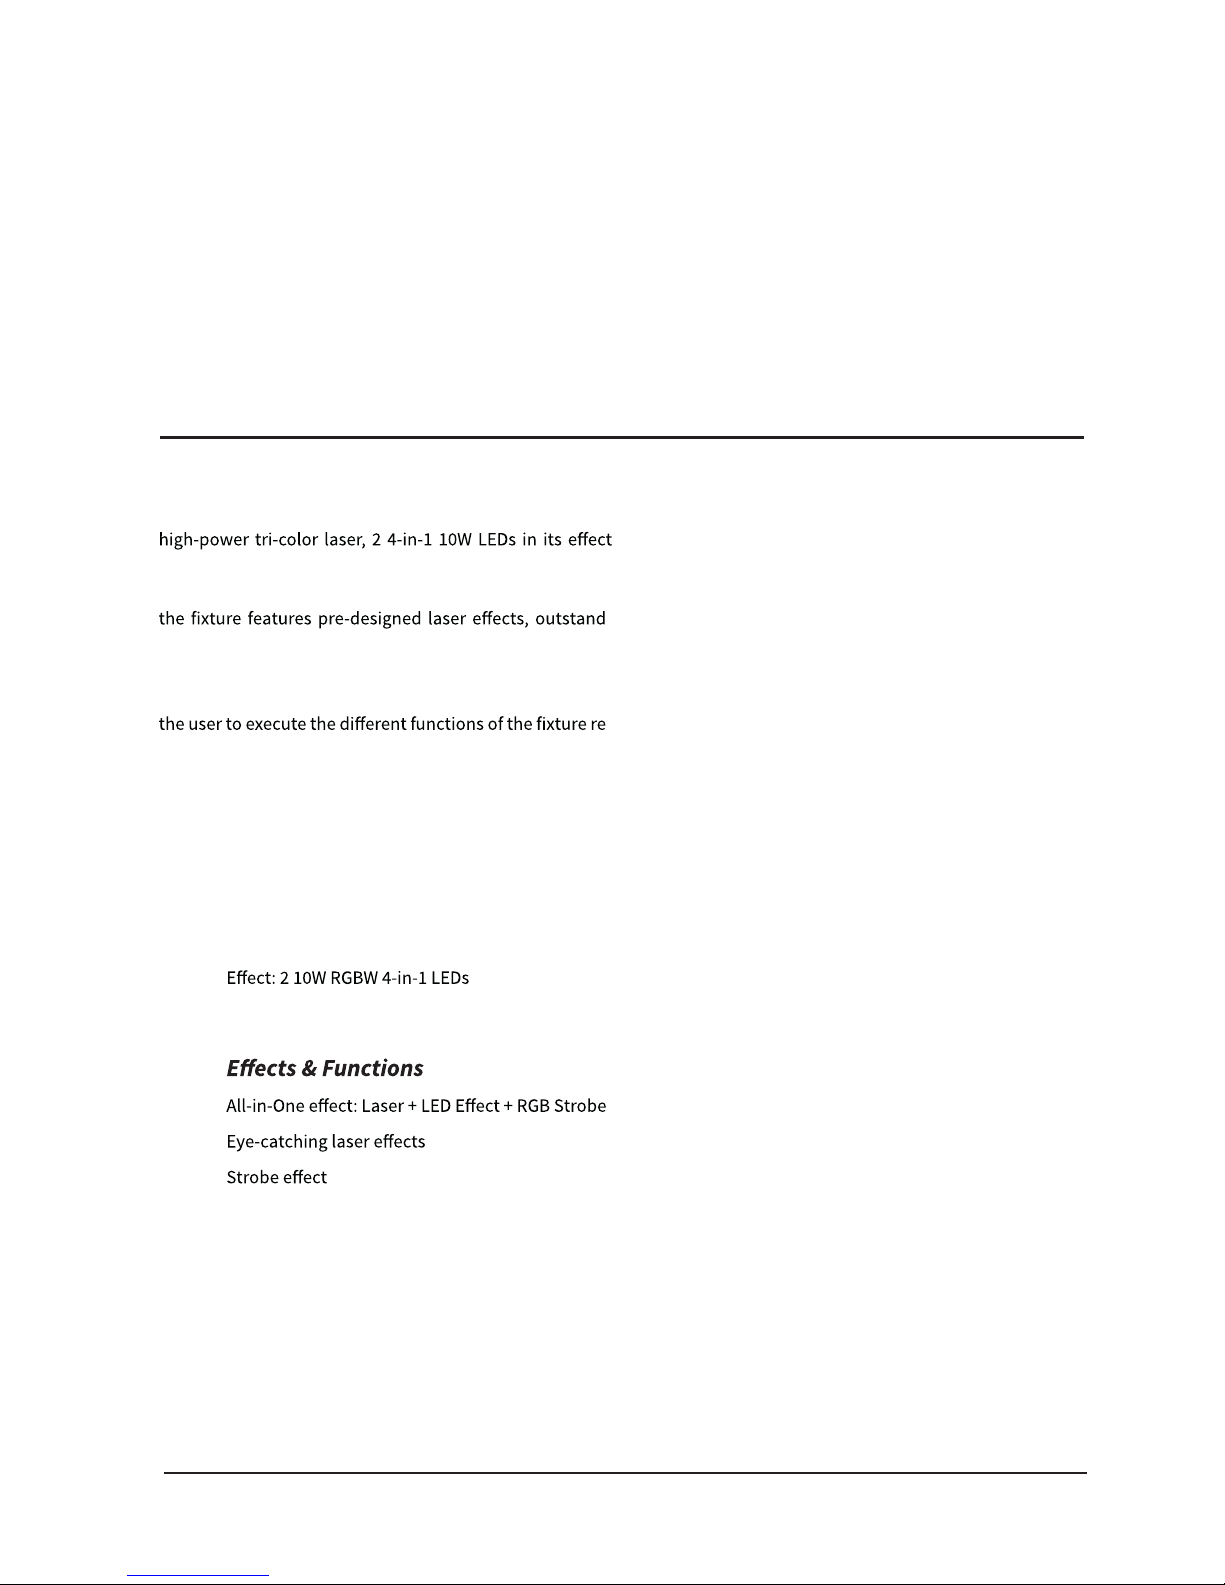
1. Overview
PowerBox is a powerful 3-in-1 fixture equipped with a
section and 105 3-in-1 0.2W LEDs in its strobe & wash
function. Designed to provide both power and versatility,
ing coverage, 15 color macros and 8 built-in shows. Last
but not least, PowerBox sports 5 operating mode, among
which stands out a practical remote control that allows
motely. One team, multiple solutions.
Specifications
Source & Optic
• Laser: Red: 100mw/650nm, Green: 30mw/
532nm, Blue: 80mW/450nm
•
• Strobe: 105 0.2W RGB 3-in-1 LEDs
•
•
•
• RGBW color mix
• Huge coverage
• Razor sharp beams
• 8 built-in shows
• 15 color macros
• IR control included
Control
• Operational modes: Sound Active, DMX, Mas-
ter/Slave, Remote (via IR control) & Auto-run
• Built-in microphone
• 4 modes: Full, Laser, Led & Strobe
• Operating temperature: 10ºC~40ºC
Physical
• 4-digit LED display
• Power supply connectors: Interlock In/Out
• DMX connectors: 2 XLR connectors (XLR-3 In and Out)
• Dimensions: 223x486x208 mm. / 8.7x19x8.2 in.
• Weight: 5.2 Kg. / 11.5 Lbs.
ENGLISH VERSION
Page 3

POWERBOX
P. 3
2. Introduction
Thank you using our LED laser series products. This fixture
is the latest new LED laser product.The product housing
used Aluminum plastic material, beautiful appearance,
with international advanced electronic control technology and excellent industrial design. Product eect more
rich, colorful, and color is gorgeous because of installed
high output light source.
• This product applications widely, installation
simple. Can widely used for small parties, home
parties, small clubs, small stages and so on.
• What’s inside
• 1 light
• User Manual
• Power Cable
ENGLISH VERSION
1. Before delivery, this device has passed strict in spection, Please follow the user manual strictly
for operation, if this fixture is damaged by im-
proper operation and mistake, the fixture will be
out of warranty, and manufacture or dealer won’t
be responsible for it. In case of any technology
change in this manual,we won’t advise in further .
2. Aer you have received this product, please pay
special attention and check cautiously whether
the product was damaged or not during the
transportation, if it is, please do not use this fix ture and contact local dealers or manufacturers
as soon as possible.
3. The applicable temperature for the lighting is be low 40°C. Do not use the lighting above the temp
erature.
4. It must be kept clean; please do not use it around
overheat or dusty environment. Do not touch the
Chemical liquid.
5. Read the instructions before installing anything.
Pay attention to the manual and warning signs
on the equipment, if you have any other ques tions, please contact the dealer or manufacturer
as soon as possible.
6. Any break, please contact professionals: repairs
must be done by technical personnel.
7. Do not power in and open before installation. Let
have a rest when continuous work for eight hours.
It will longer the device using li.
8. Fixed installation, to prevent the strong vibration
or impact of the device.
9. The distance between the device and the projec tile must be at least 0.5 meter.
10. Never look directly into the light source, as sen sitive persons may suer an epileptic shock (espe-
cially meant for epileptics)! When light output
position of the device of dustproof glass break age, cracks or other visible damage, user should
replace the new glass to continue to use.
Installation Instructions
1. When install this equipment please make sure
there’s no flammable surfaces (decorated things,
etc) and minimum distance of 0.5M from the
equipment to the flammable.
2. The installation of the eect has to be built and
constructed in a way that it can hold 10 times the
weight and without any harming deformation.
3. The installation must always be secured with a
secondary safety attachment, e.g. an appropriate
safety rope. Never stand directly below the device
when mounting, removing or servicing.
Caution
Page 4
POWERBOX
P.
4
ENGLISH VERSION
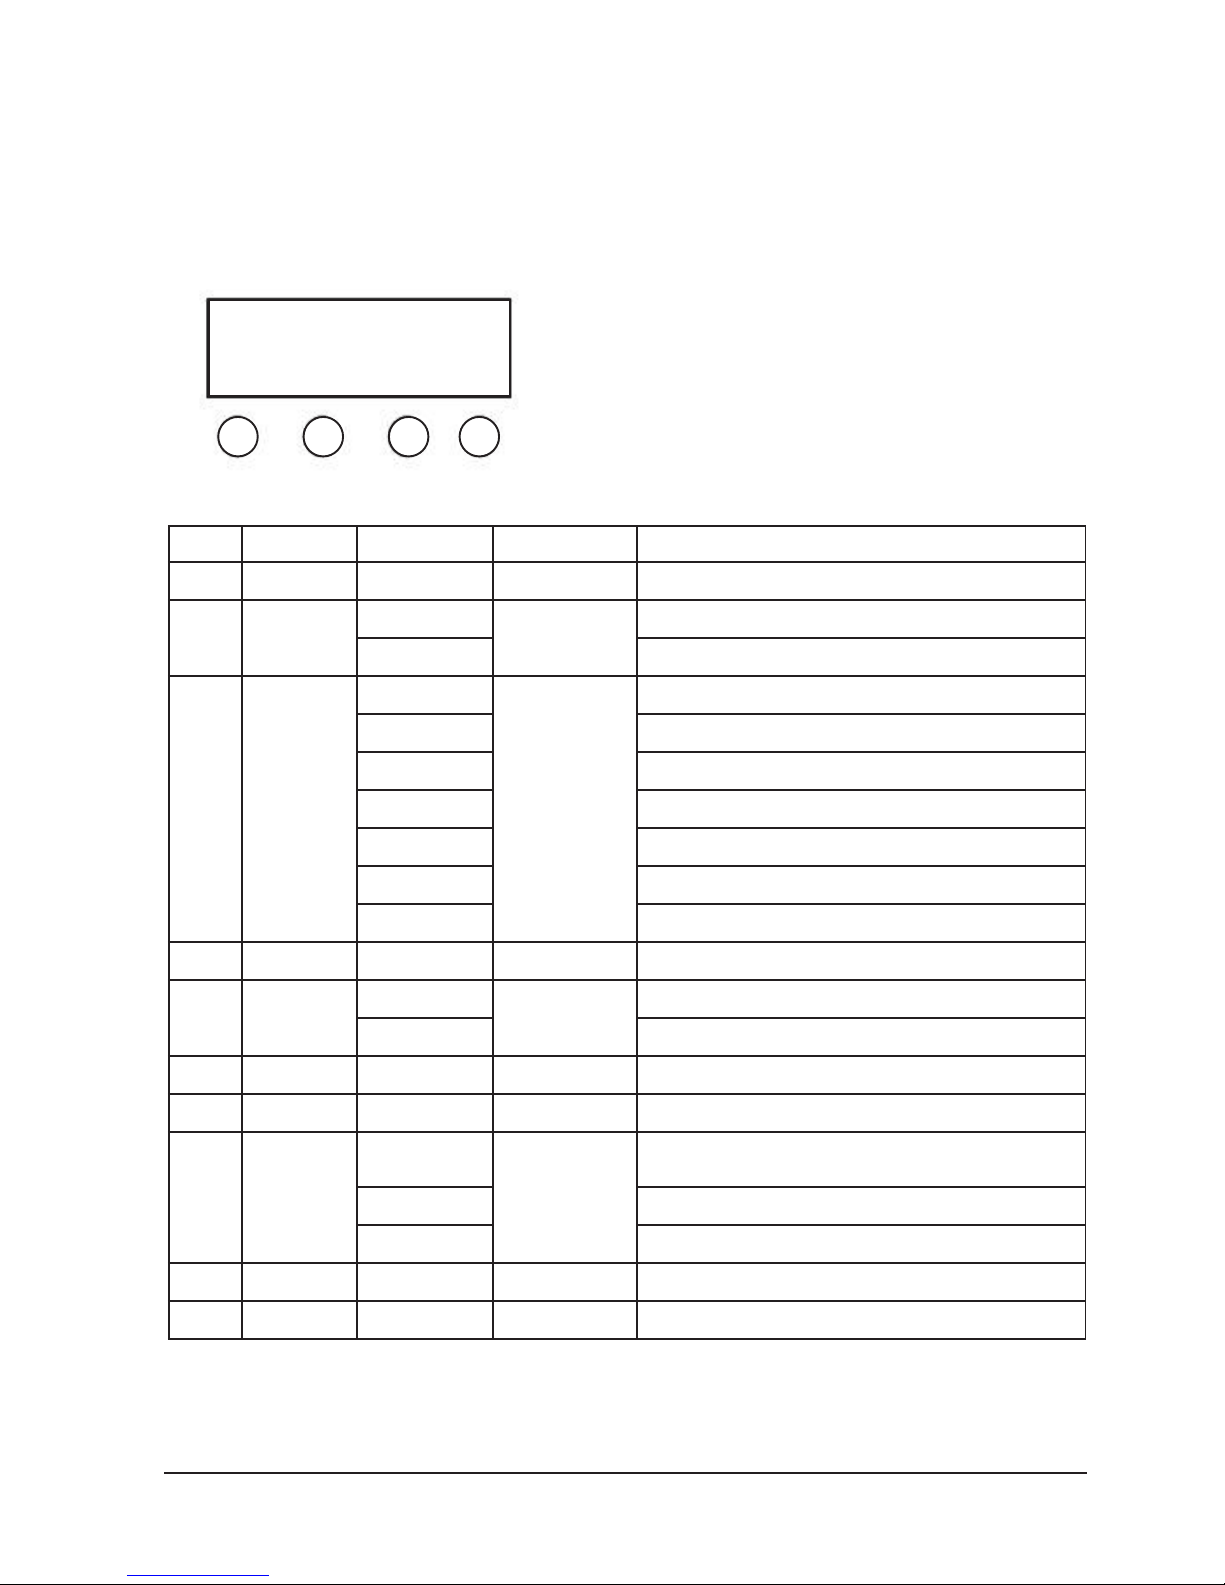
3. Led Display Operation
A. MENU
B. UP
C. DOWN
D. ENTER
E. LED DISPLAY
A B C D
E
MENU UP/DOWN Value Function
1 Addr 1-512 1 Address setting
2 ChMd 14Ch 14Ch 14 channel setting
2Ch 2 channel setting
3 ShNd Sh 1 Sh 7 Show 1 Led
Sh 2 Show 2, Strobe
Sh 3 Show 3, Laser
Sh 4 Show 4, Led+Laser
Sh 5 Show 5, Led+Strobe
Sh 6 Show 6, Laser+Strobe
Sh 7 Show 7 Led + Strobe + Laser
4 SPEE 0-100 90 Sh 1-Sh 7 speed setting
5 SLMD MASt MASt Master mode
SLAV Slave mode
6 SoUn ON/OFF ON Sound on/o
7 SoSE 0-100 90 Sound sensitivity setting
8 NodM Prom Prom No DMX
Master mode
BLAC Standby
HoLd Holding last show
9 LED ON/OFF ON LED Display on/o
10 Ver V10 Version
Page 5

POWERBOX
P. 5
ENGLISH VERSION
• No matter what working condition, when re-
ceiving the controller signal, it will enter the
DMX control mode by auto.
• When several item in Master-slave mode, if
more then 1pc item as the master, program will
pick up one item as the master one randomly.
DMX-512 Value 0-255 Function
CH1 Control Mode 0-9 No function
10-44 Show 1Led
45-79
80-114 Show 3, Laser
115-149 Show 4, Led + Laser
150-184 Show 5, Led + Strobe
185-219 Show 6, Laser + Strobe
220-255 Show 7, Led + Strobe + Laser
CH2 RGBW color select
(CH1<=9)
0-9 black-out
10—198 Choose colors15 groups, each 13 data
for 1 color group
199-225 Color chase1single colorfrom slow to
fast
226-255 Color chase 2(multiple colorfrom slow to
fast
Sound active on/o CH1>9 0-247 Sound control oShow 1-Show 7 from
slow to fast
248-255 Sound control onShow 1-Show 7
CH3 Strobe LED 0-9 LED no strobe
10-244 LED strobe speed from slow to fast
245-255 LED strobe by sound
CH4 LED Motor setting 0-127 LED motor position select
128-255 LED motor scan speed from slow to fast
CH5 Strobe LED Setting 0-9 Strobe LED o
10-255 Strobe, LED chase eect select
CH6 Strobe chase speed 0-127 No strobe, LED chase speed from slow to
fast
127-255 With strobe, LED chase speed from slow to
fast
14-channel Mode
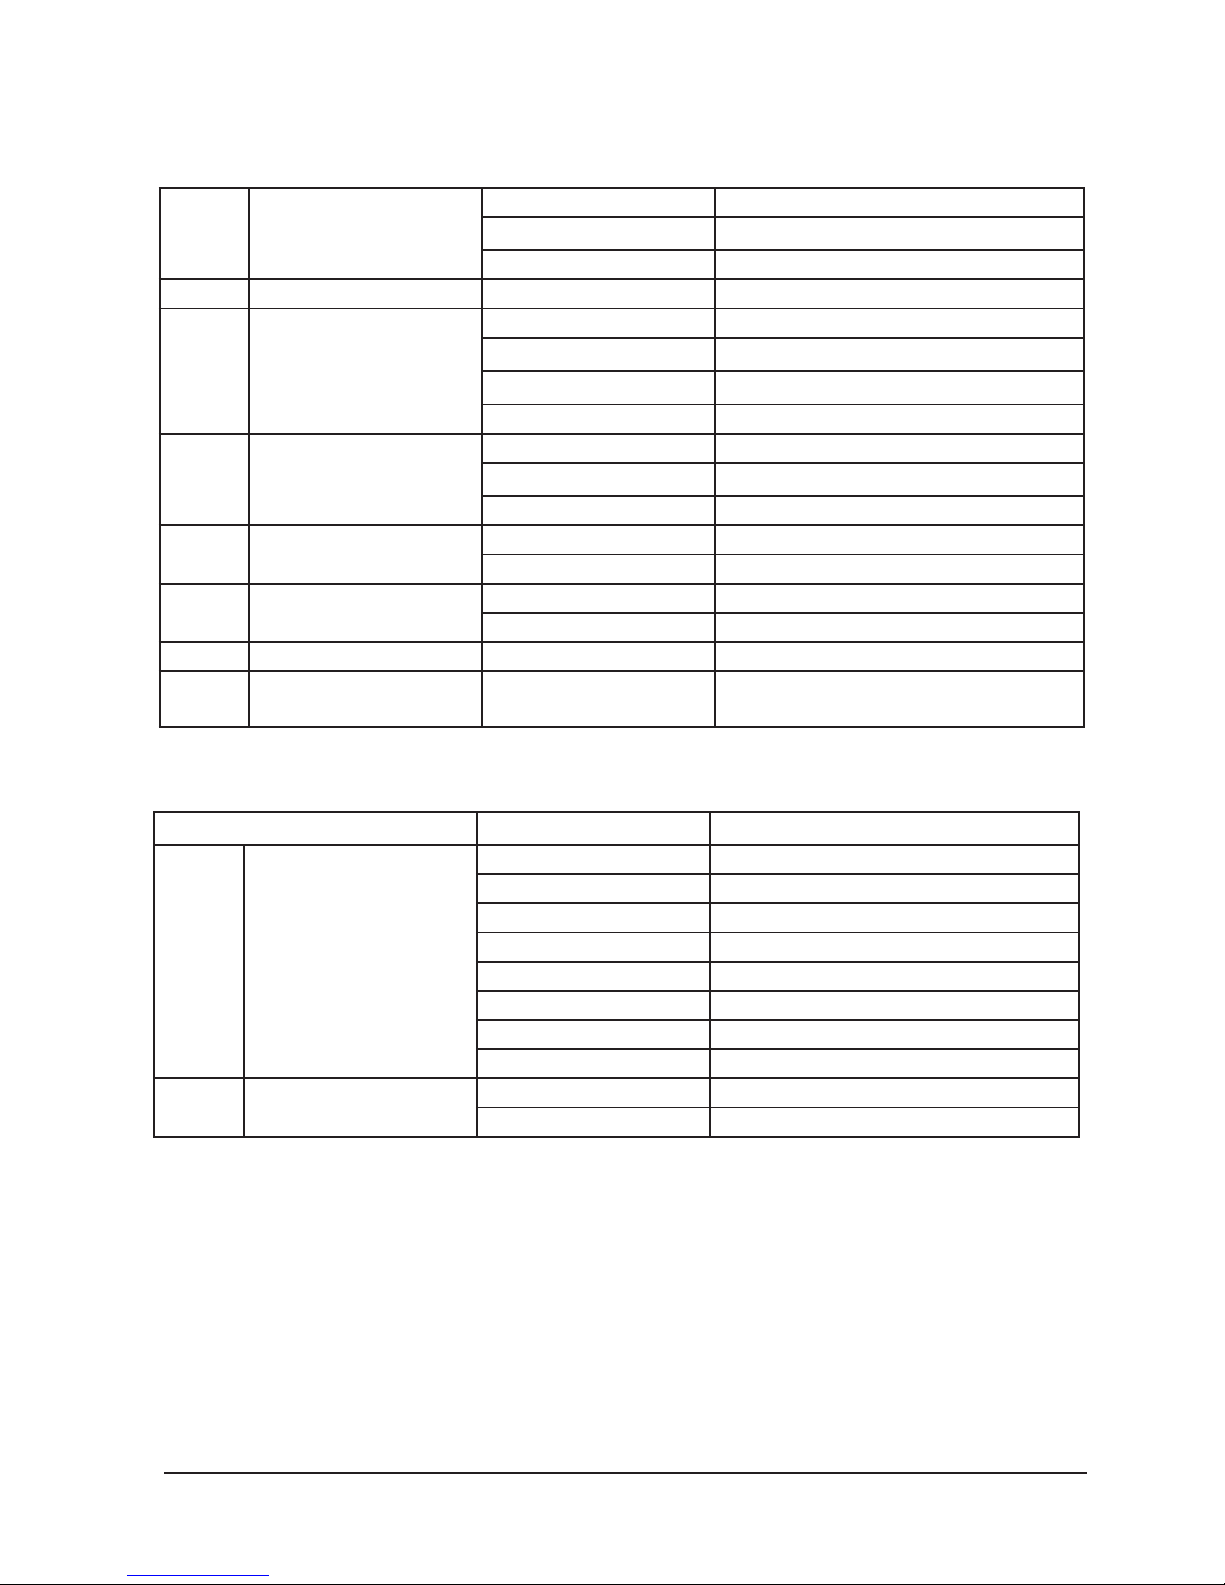
4. DMX Chart
Page 6
POWERBOX
P.
6
ENGLISH VERSION
CH7 Laser color select 0-9 Laser o
10-127 Laser color fixed
128-255 Color chase speed from slow to fast
CH8 Laser pattern select 0-255 Laser pattern select
CH9 Laser pattern size 0-63 Choose patterns size
64-127 From small to large,speed up rate
128-191 From large to small,speed up rate
192-255 Large – small – large, speed up rate
CH10 Laser pattern rotation 0-127 Rotation angle select
128-191 positive rotation speed
192-255 Inverted rotation speed
CH11 Laser pattern pan position 0-127 Horizontal position
128-255 Horizontal move,speed up rate
CH12 Laser pattern tilt position 0-127 Choose vertical position
28-55 Vertical move,speed up rate
CH13 Laser scan track choose 0-255 Track choose
CH14 Laser track scan speed
choose
0-255 Laser track scan speed from slow to fast
DMX-512 Value 0-255 Function
CH1 Show mode 0-9 No function
10-44 Show 1, Led
45-79 Show 2, Strobe
80-114 Show 3, Laser
115-149 Show 4, Led + Laser
150-184 Show 5, Led + Strobe
185-219 Show 6, Laser + Strobe
220-255 Show 7, Led + Strobe + Laser
CH2 Show speed/Sound active 0-247 Show 1-Show 7 speed from slow to fast
248-255 Show 1-Show 7 Sound active
2-channel Mode
Page 7
POWERBOX
P. 7
ENGLISH VERSION
5. Remote
Number Button Function
1 Stand By Stand by
2 DMX Hold on
3-10 Show 1-Show 8 Show1-Show7 (Show 8 hold on)
11 LED Color LED color select
12 LED Random LED color randomly
13 Sound ON Sound on
14 Laser Color Laser color select
15 Laser Random Laser color randomly
16 Sound OFF Sound o
17 Speed - Show 1 - Show 7 speed down
18 Speed Show 1 - Show 7 speed default
19 Speed+ Show 1 - Show 7 speed up
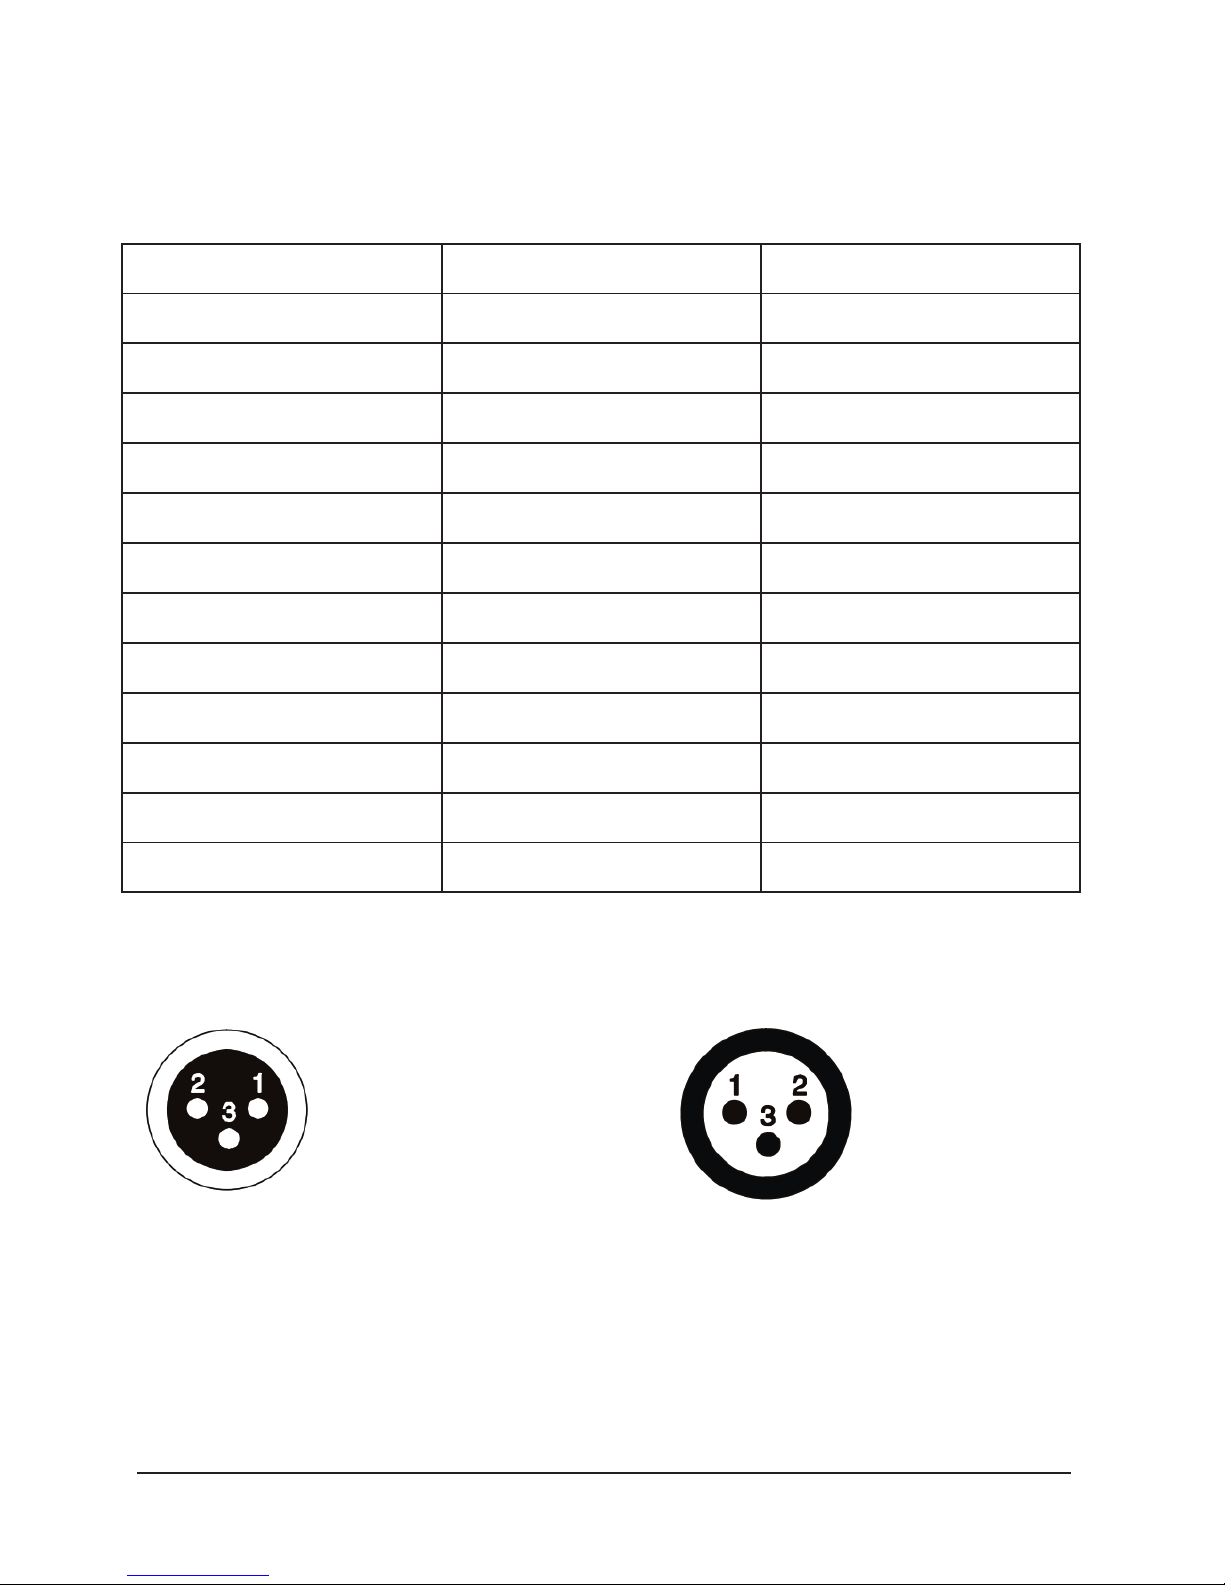
6. DMX-512 connection
3 Pin DMX output 3 Pin DMX input
1 Ground 2 Signal - 3 Signal +
Page 8

POWERBOX
P.
8
ENGLISH VERSION
14-channel example
First one add 001 Second one add 015 Third one add 029
DMX IN DMX OUT
8. DMX address setting
Each fixture must set a specific starting address. When receiving signal, fixture will receive channel control signals
of this address from the DMX controller.
- For easy to use, the user can set the same address
for several fixtures , also can set up a unique ad
dress for every device.
- If you set the same address for all fixtures, all the
fixtures will receive from the same DMX channels
signal. All connecting fixtures are jointly con trolled, controller can’t separately control a devic
- If you set a dierent address for each fixture, each
fixture will receive unique signal and can be con trolled by DMX controller separately.
- This fixture has 14 channels.you should set the
starting address of the first unit to 1, the second
unit to 15(1*14 + 1), the third unit to 29(2*14+ 1),
and so on.
9. Installation
When install this equipment please make sure there’s no
flammable surfaces (decorated things, etc) within at least
2.5M and maintain minimum distance of 0.5M from the
equipment to the walls. Please make sure that there’s no
other equipment or decorating materials obstructed the
exhaust fan and the vent-pipe. Products should be install
immobility.
Clamp
Handle
Page 9

POWERBOX
P. 9
ENGLISH VERSION
10. Product Size
11. Cleaning & Maintenance
Cleaning should be performed every 15-day period, by using a sponge which is dipped with alcohol, rather than wet
cloth or other chemical liquid, to clean the mirror.
Cut o power before cleaning and maintenance!
Page 10

POWERBOX
P.
10
ENGLISH VERSION
This product is made of high-brightness transistor. We will
provide 1 year warranty under the condition that user
has operated the light normally and lifetime service. We
won't provide warranty if the damage is caused by artificial
or force majeure event. Cost of fittings should be charged
by user if product need maintenance aer 1 year .Please cut
this warranty card and shipped it along with the product to
our factory when applying for warranty.
Product Purchasing Date Code of invoice
Warranty Date From To
User’s Name Add
Company Tel
Page 11

POWERBOX
P. 11
ENGLISH VERSION
Page 12

POWERBOX
P.
12
VERSION ESPAÑOL
1. Descripción
PowerBox es un potente equipo 3-en-1 equipado con un
laser tri-color de alta potencia, 2 LEDs 4-en-1 de 10W en
su sección de efecto, y 105 LEDs 3-en-1 de 0.2W en su faceta de estrobo y bañador. Diseñado para aportar tanto
potencia como versatilidad, el equipo cuenta con efectos
laser pre-diseñados, una cobertura fuera de lo normal, 15
macros de color y 8 shows integrados. PowerBox tiene,
además, 5 modos de operación entre los cuales se destaca
un práctico control remoto que permite ejecutar las diferentes funciones del equipo a distancia. Un solo equipo,
múltiples soluciones.
Especificaciones
Fuente & Optica
• Láser: Rojo: 100mw/650nm, Verde: 30mw/532nm,
Azul: 80mW/450nm
• Moonflower: 2 LEDS RGBW 4-en-1 de 10W
• Strobe: 105 LEDs RGB 3-en-1 de 0.2W
Efectos & Funciones
• Efecto todo-en-uno: Láser + Derby LED + Estrobo RGB
• Deslumbrantes efectos laser
• Efecto Estrobo
• Mezcla de color RGBW
• Gran cobertura
• Haces definidos y filosos
• 8 shows integrados
• 15 macros de color
• Control remoto incluido
Control
• Modos de operación: Audiorítmico, DMX, Maes-
tro/Esclavo, remoto & automático
• Micrófono incorporado
• 4 modos: Completo, Laser, Led y Estrobo
• Temperatura de operación: 10ºC~40ºC
Físico
• Display digital de 4 digitos
• Conectores de alimentación: Interlock Entrada/Salida
• Conectores DMX: 2 conectores XLR (XLR-3 de
entrada & salida)
• Dimensiones: 223x486x208 mm. / 8,7x19x8,2 pulg.
• Peso: 5,2 Kg. / 11,5 Lbs.
Page 13

POWERBOX
P. 13
VERSION ESPAÑOL
2. Introducción
• Gracias por haber elegido el producto Powerbox.
Este equipo es de última generación dentro del mercado
de efectos LED. Los materiales de este producto incluyen
plástico y aluminio, los cuales le dan un diseño espléndido. Cuenta con excelente tecnología internacional de
control electrónico de avanzada. Los efectos son más intensos y los colores más vivos gracias a su fuente lumínica
de alto rendimiento.
• Powerbox es un producto muy versátil y de insta-
lación sencilla. Se puede utilizar en acontecimientos de
pequeña escala tales como fiestas, eventos particulares,
clubes y escenarios, entre otros.
• Que incluye
• Equipo
• Manual de usuario
• Cable de suministro eléctrico
• Luego de adquirido el producto, procure retirarlo
de su embalaje con cuidado. Revise detenida mente que no se haya dañado durante el envío.
En caso de que encuentre daños, comuníquese
de inmediato con el fabricante o proveedor local.
• No utilice el equipo si la temperatura ambiente es
superior a Ta=40°C.
• Asegúrese de que todas las partes del equipo
se mantengan limpias y libres de polvo. No utilice
limpiadores químicos.
• Lea las instrucciones antes de proceder con la
instalación del equipo. Siga al pie de la letras las
instrucciones de seguridad y las advertencias
de seguridad del producto. Si le quedan dudas
sobre las medidas de seguridad necesarias para
operar el equipo, póngase en contacto de inmed iato con el fabricante o proveedor local.
• Evite desarmar el equipo. En su interior, no hay -
piezas que puedan ser reparadas por el usuario.
En caso de precisar reparación, pónganse en
contacto con el fabricante o el servicio técnico
autorizado más cercano.
• No utilice el equipo previo a la instalación. Lue
go de ocho horas continuas de funcionamiento,
permita que el equipo descanse antes de volver a
utilizarlo. Esto ayudará a prolongar su vida útil.
• Instale el equipo sobre una superficie fija para
evitar vibraciones o golpes.
• Mantenga una distancia mínima de 0,5 metros
entre el equipo y la superficie a iluminar
Instalación
- El equipo debe instalarse sobre superficies no in flamables. Por cuestiones de seguridad deje 0.5m
de espacio libre alrededor del producto.
- Para garantizar una instalación segura, la estruc tura en la que se fije el equipo debe poder sopor tar diez veces su peso durante una hora, sin sufrir
deformaciones.
- Emplee un cable de seguridad durante la insta lación. Evite situarse debajo del equipo para re alizar su montaje, desmontaje o mantenimiento.
Page 14

POWERBOX
P.
14
VERSION ESPAÑOL
3. Panel de Control
A. MENU
B. UP
C. DOWN
D. ENTER
E. LED DISPLAY
A B C D
E
MENU OPCIONES VALOR DESCRIPCIÓN
1 Addr 1-512 1 Configuración de dirección DMX
2 ChMd 14Ch 14Ch Modo 14 canales
2Ch Modo 2 canales
3 ShNd Sh 1 Sh 7 Show 1: LED
Sh 2 Show 2: Estrobo
Sh 3 Show 3: Láser
Sh 4 Show 4: Led + Láser
Sh 5 Show 5: Led + Estrobo
Sh 6 Show 6: Láser + Estrobo
Sh 7 Show 7: Led + Estrobo + Láser
4 SPEE 0-100 90 Show 1-7: Configuración de velocidad
5 SLMD MASt MASt Modo maestro
SLAV Modo esclavo
6 SoUn ON/OFF ON Modo audiorítmico encendido/apagado
7 SoSE 0-100 90 Configuración de la sensibilidad de sonido
8 NodM Prom Prom Sin señal DMX: Modo maestro
BLAC Stand by
HoLd Mantiene la última configuración
9 LED ON/OFF ON Pantalla LED encendida/apagada
10 Ver V10 Versión de soware
11 Test Prueba de iluminación
Page 15

POWERBOX
P. 15
VERSION ESPAÑOL
• Sin importar el modo de operación, cuando re-
ciba señal el controlador accederá automáti camente al modo DMX.
• Si en el modo maestro/esclavo hay más de un
equipo asignado como maestro, el programa
seleccionará al azar un equipo para que fun cione como el único maestro.
DMX-512 Value 0-255 Function
CH1 Control Mode 0-9 Sin función
10-44 Show 1: Led
45-79 Show 2: Estrobo
80-114 Show 3: Láser
115-149 Show 4: Led + láser
150-184 Show 5: Led + estrobo
185-219 Show 6: Láser + estrobo
220-255 Show 7: Led + estrobo + láser
CH2 RGBW color select
(CH1<=9)
0-9 Black out
10—198 Selección de color (15 grupos)
199-225 Chase de color 1 (un color): Velocidad cre-
ciente
226-255 Chase de color 2 (varios colores): Velocidad
creciente
Sound active on/o CH1>9 0-247 Modo audiorítmico apagado. Show 1-7:
Velocidad creciente
248-255 Modo audiorítmico encendido. Show 1-7
CH3 Strobe LED 0-9 Sin estrobo
10-244 Estrobo: velocidad creciente
245-255 Estrobo: modo audiorítmico
CH4 LED Motor setting 0-127 Selección de la posición del motor LED
128-255 Motor LED: velocidad creciente
CH5 Strobe LED Setting 0-9 Sin estrobo
10-255 Estrobo, selección de efecto de chase LED
CH6 Strobe chase speed 0-127 Sin estrobo, chase LED: velocidad creciente
127-255 Estrobo, chase LED: velocidad creciente
Modo 14 canales
4. Cuadro DMX
Page 16

POWERBOX
P.
16
VERSION ESPAÑOL
CH7 Color láser 0-9 Láser apagado
10-127 Color láser fijo
128-255 Chase de color: velocidad creciente
CH8 Patrón de láser 0-255 Selección de patrón de láser
CH9 Patrón de láser: tamaño 0-63 Tamaño de patrón
64-127 Tamaño de pequeño a grande: frecuencia
creciente
128-191 Tamaño de grande a pequeño: frecuencia
creciente
192-255 Grande - pequeño - grande: frecuencia
creciente
CH10 Patrón de láser: Rotación 0-127 Selección de ángulo de rotación
128-191 Rotación hacia adelante
192-255 Rotación hacia atrás
CH11 Patrón de láser: posición
de pan
0-127 Posición horizontal
128-255 Movimiento horizontal: velocidad creciente
CH12 Patrón de láser: posición
de tilt
0-127 Posición vertical
28-55 Movimiento vertical: velocidad creciente
CH13 Track láser 0-255 Selección de track láser
CH14 Track láser: velocidad 0-255 Velocidad de track láser
Velocidad de track láser creciente
DMX-512 Valor 0-255 DESCRIPCIÓN
CH1 Modo show 0-9 Sin función
10-44 Show 1: Led
45-79 Show 2: Estrobo
80-114 Show 3: Láser
115-149 Show 4: Led + láser
150-184 Show 5: Led + estrobo
185-219 Show 6: Láser + estrobo
220-255 Show 7: Led + estrobo + láser
CH2 Velocidad de show / Modo
audiorítmico
0-247 Show 1-7: Velocidad creciente
Show 1-7: Modo audiorítmico
2-channel Mode
Page 17

POWERBOX
P. 17
VERSION ESPAÑOL
5. Control Remoto
Número Botón Descripción
1 Stand By Stand by
2 DMX En espera
3-10 Show 1-Show 8 Show 1-7 (Show 8 en espera)
11 LED Color Selección de color
12 LED Random Color aleatorio
13 Sound ON Modo audiorítmico encendido
14 Laser Color Selección de color láser
15 Laser Random Color láser aleatorio
16 Sound OFF Modo audiorítmico apagado
17 Speed - Show 1-7 Reducción de velocidad
18 Speed Show 1-7 Velocidad por defecto
19 Speed+ Show 1-7 Aumento de velocidad
6. Conexión DMX
Salida DMX de 3 pines Entrada DMX de 3 pines
1 Tierra 2 Señal negativa (-) 3 Señal positiva (+)
Page 18

POWERBOX
P.
18
VERSION ESPAÑOL
Ejemplo en modo 14 canales
Dirección 001 Dirección 015 Dirección 029
ENTRADA IN DMX SALIDA
8. Configuración DMX
Cada equipo enlazado precisa una dirección DMX específica. Una vez conectado, el equipo recibirá comandos de la
dirección configurada.
- Para el control independiente de cada equipo es
necesario asignar una dirección única de canales.
- La configuración individual de cada equipo per mitirá que funcionen por separado. Sin embargo,
es posible configurar la misma dirección para var ios equipos. Si todos los equipos se configuran
con la misma dirección funcionarán de forma sin cronizada. Es decir, modificar los parámetros de
un canal afectará a todos los equipos por igual.
- Por el contrario, si se configuran con direcciones
diferentes, cada equipo responderá al número
de canal asignado, en correspondencia con la
cantidad de canales de control de la unidad. Por
lo tanto, modificar los parámetros de un canal
afectará solo al equipo que responde a tal canal.
- Este equipo cuenta con 14 canales, por lo cual la
dirección DMX del primer equipo será 1, del se gundo será 15 (1+14), del tercero será 29 (15+14).
9. Instalación
Para garantizar una instalación segura, la estructura en
la que se fije el equipo debe poder soportar diez veces su
peso durante una hora, sin sufrir deformaciones.
Emplee un cable de seguridad durante la instalación. Evite
Abrasadera
Asa
Page 19

POWERBOX
P. 19
VERSION ESPAÑOL
10. Dimensiones
8. Limpieza y mantenimiento
Se recomienda realizar la limpieza del equipo cada quince
días. Utilice una esponja humedecida con alcohol para
limpiar el cristal. Evite el uso de paños mojados o productos químicos. Desconecte el equipo del suministro eléctrico antes de realizar cualquier tarea de mantenimiento.
Un profesional certificado debe realizar la conexión eléctrica. No mire de forma directa hacia la fuente de luz.
Las personas fotosensitivas o con epilepsia corren riesgo
de sufrir convulsion
situarse debajo del equipo para realizar su montaje, desmontaje o mantenimiento.
Instale el equipo en ambientes con ventilación adecuada
y mantenga un espacio libre de 50cm a su alrededor y de,
al menos, 2,5 metros de materiales inflamables (decorados, telas, etc.). Procure no obstruir las ranuras de ventilación. Procure la conexión a tierra de la unidad.
Page 20

POWERBOX
P.
20
VERSION ESPAÑOL
Este equipo es de alto rendimiento y viene provisto con
una garantía de un año. El fabricante y el distribuidor no
se responsabilizarán por el mal uso del equipo. Lea atentamente el manual antes de utilizarlo. Los daños causados
por caídas no están sujetos a garantía. Luego del año de
compra, los costos de mantenimiento son responsabilidad
del usuario. Para hacer uso de la garantía, corte esta tarjeta
y envíela al fabricante o distribuidor.
Producto Fecha de Compra Numero de Fact.
Fecha Garantía Desde Hasta
Nombre User Dirección
Empresa Telefono
Tarjeta de garantía
Page 21

POWERBOX
P. 21
Page 22

FOR MORE INFO ON THIS PRODUCT PLEASE CHECK TECSHOW.AMPROWEB.COM /
PARA MAS INFORMACION SOBRE ESTE PRODUCTO VISITE TECSHOW.AMPROWEB.COM
 Loading...