

Page 1

PAR 1000Z
Professional LED PAR 1 White 100W COB LED
USER MANUAL / MANUAL DE USUARIO
PLEASE READ THE INSTRUCTIONS CAREFULLY BEFORE USE
POR FAVOR LEA LAS INSTRUCCIÓNES ANTES DE USAR
| Tecshow Par 10 00Z
P. 1
Page 2

1. OVERVIEW
PAR 1000Z
Professional LED PAR - 1 White 100W COB LED
Par 1000Z is a high power LED PAR with DMX that
sports 1 white 100W COB LED. Ideal for large scale
applications thanks to its power, the xture has
a manual zoom from 11º to 35º in addition to a
very high 90Ra color rendering. Par 1000Z has ve
dimmer curves, gamma correction and selectable
refresh rate, guaranteeing icker-free operation in
any given situation.
Specications
Source & Optics
• Light Source: 1 100W WW COB LED
• Color temperature: 3000K
• LEDs life: 50,000 hours
• Zoom: 11º-35º linear zoom
Control
• DMX channels: 1/2/3
• Operational modes: DMX, Master/Slave &
Manual
Physical
• LED display
• DMX connectors: 2 XLR connectors (XLR-3 In
and Out)
• Power supply connectors: PowerCON® In
• Dimensions: 491x275x224 mm. / 19.3x10.8x8.8 in.
• Weight: 3.4 Kg. / 7.5 Lbs.
Photometric data
• Flux:
- 11º: 27500 lux @ 2m (6.5 .) / 3700 lux @ 5m
(16 .)
- 35º: 4100 lux @ 2m (6.5 .) / 600 lux @ 5m
(16 .)
• Color rendering: >90Ra
Eects & Functions
• Dimmer: Full range 0-100% (16-bit)
• 5 dimming curves
• Strobe eect
• Gamma correction
• Adjustable PWM (Pulse Width Modulation) to
work icker free in any given situation
P. 2
Tecshow Par 10 00Z |
English version
Page 3

2. SAFETY INSTRUCTIONS
Please read the instruction carefully
which includes important information about the installation, usage
and maintenance.
• Please keep this User Manual for future con-
sultation. If you sell the xture to another user,
be sure that they also receive this intruction
booklet.
• Please unpack and check carefully there is no
transportation damage before using the xture.
• Please disconnect main power before servicing
and mantenance.
• The unit must be installed in a location with ad-
equate ventilation, at least 50cm from adjacent
surfaces.Be sure that no ventilation slots are
blocked.
• The maximum ambient temperature is Ta:40°C.
Do not operate it where the temperature is
higher than this.
• Do not connect the device to any dimmer pack.
• The housing must be replaced if they are visibly
damaged.
• Unit surface temperature may reach up to 85°C.
Don’t touch the housing bare-hand during its
operation. Turn o the power and allow about
15 minutes for the unit to cool down before
replacing or serving.
• There are no user serviceable parts inside the
xture. Do not open the housing or attempt any
repairs by yourself. In the unlikely event your
xture may require service, please contact your
nearest dealer.
• In the event of serious operating problem, stop
using the xture Immediately. Never try to
repair the xture by yourself. Repairs carried
out by unskilled people can lead to damage or
malfunction. Please contact the nearest authorized technical assistance center. Always use
the same type spare parts.
3. INSTALLATION AND CONNECTION
The unit should be mounted via its screw holes on
the bracket. Always ensure that the unit is rmly
xed to avoid vibration and slipping while operating. Always ensure that the structure to which you
are attaching the unit is secure and is able to support a weight of 10 times of the unit’s weight. Also
always use a safety cable that can hold 12 times of
the weight of the unit when installing the xture.
The equipment must be xed by professionals. And
it must be xed at a place where is out of the touch
of people and has no one pass by or under it. The
unit should be mounted in the height of 0 to 30m.
English version
| Tecshow Par 10 00Z
P. 3
Page 4
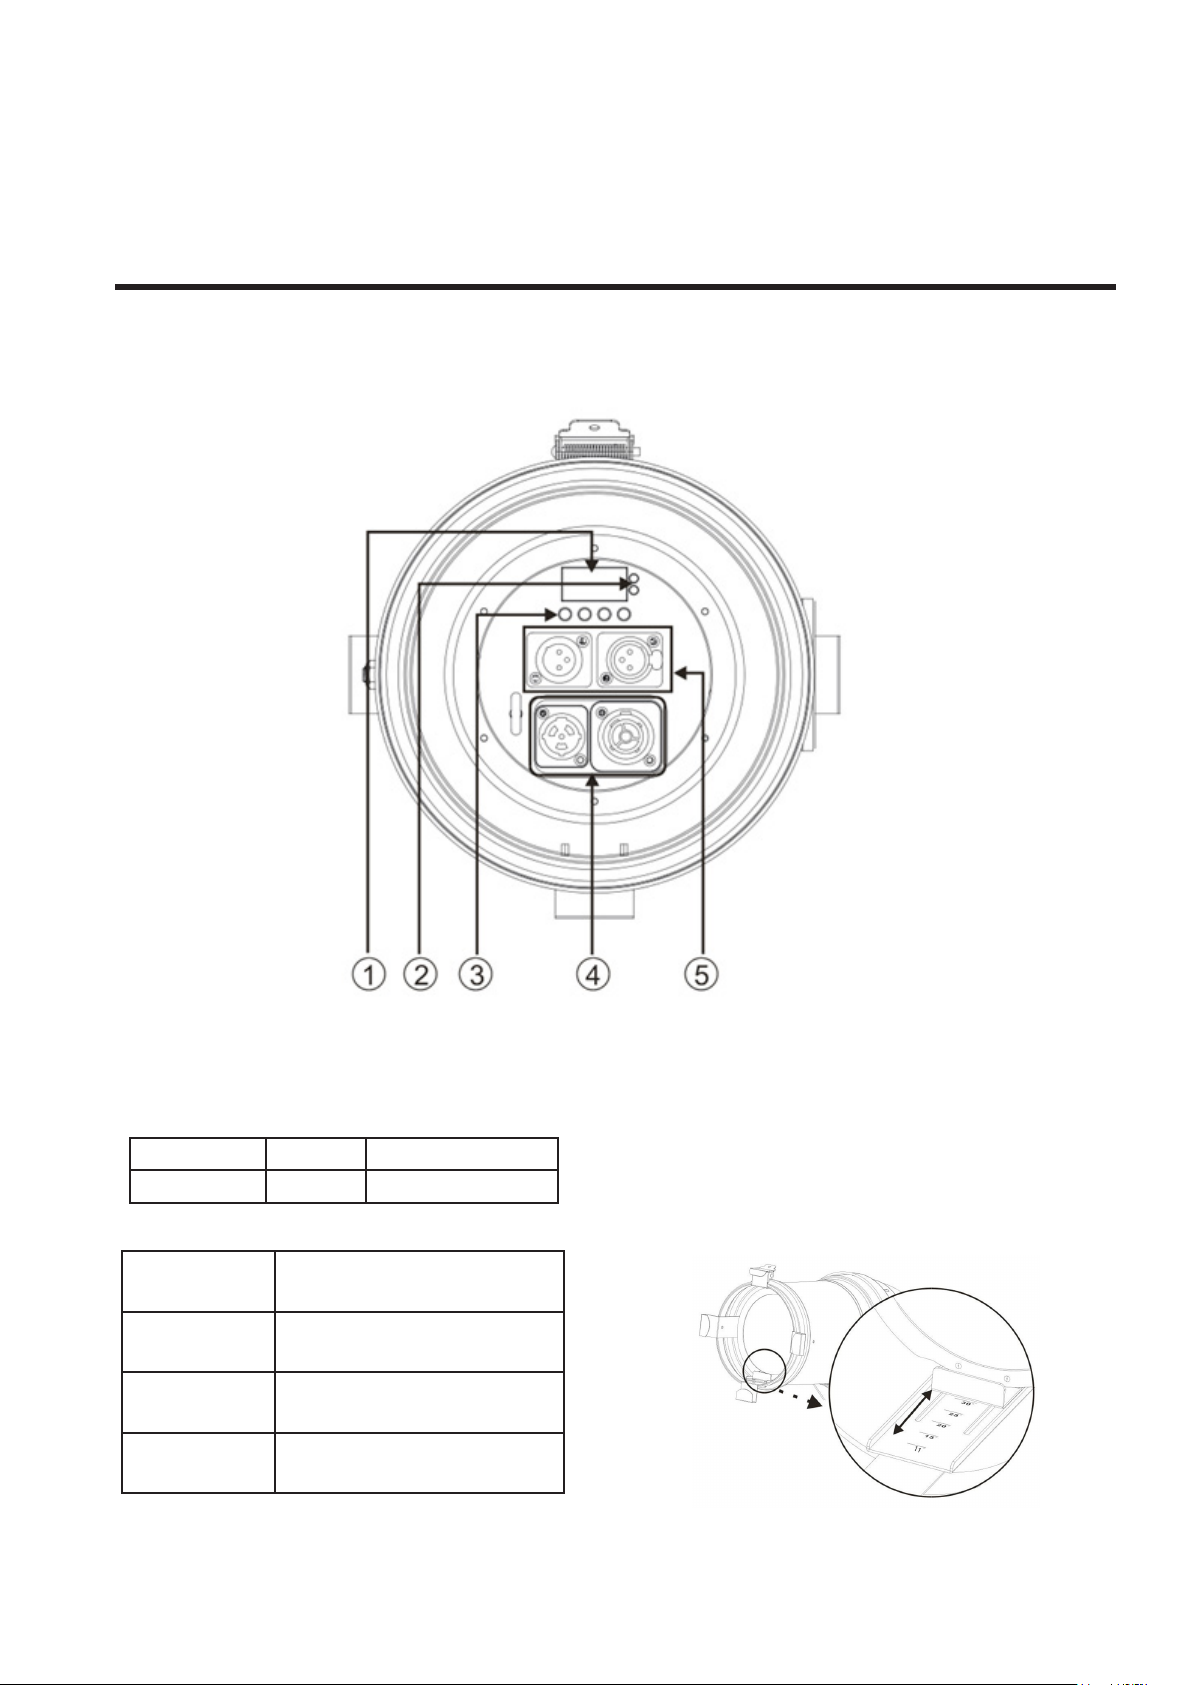
4. HOW TO SET THE UNIT
Rear Panel
1. Display : Show the various menus and the se-
lected functions;
2. LED indicator:
POWER On Power On
DMX On DMX input present
3. Button:
MENU To select the programming
functions
DOWN To go forward in the selected
functions
UP To go backward in the se-
lected functions
ENTER To conrm the selected
functions
P. 4
Tecshow Par 10 00Z | English version
4. Main input/output: PowerCon
5. DMX input/output: For DMX512 link, use 3-pin
XLR plug cable to input DMX signal, and to link
the next unit.
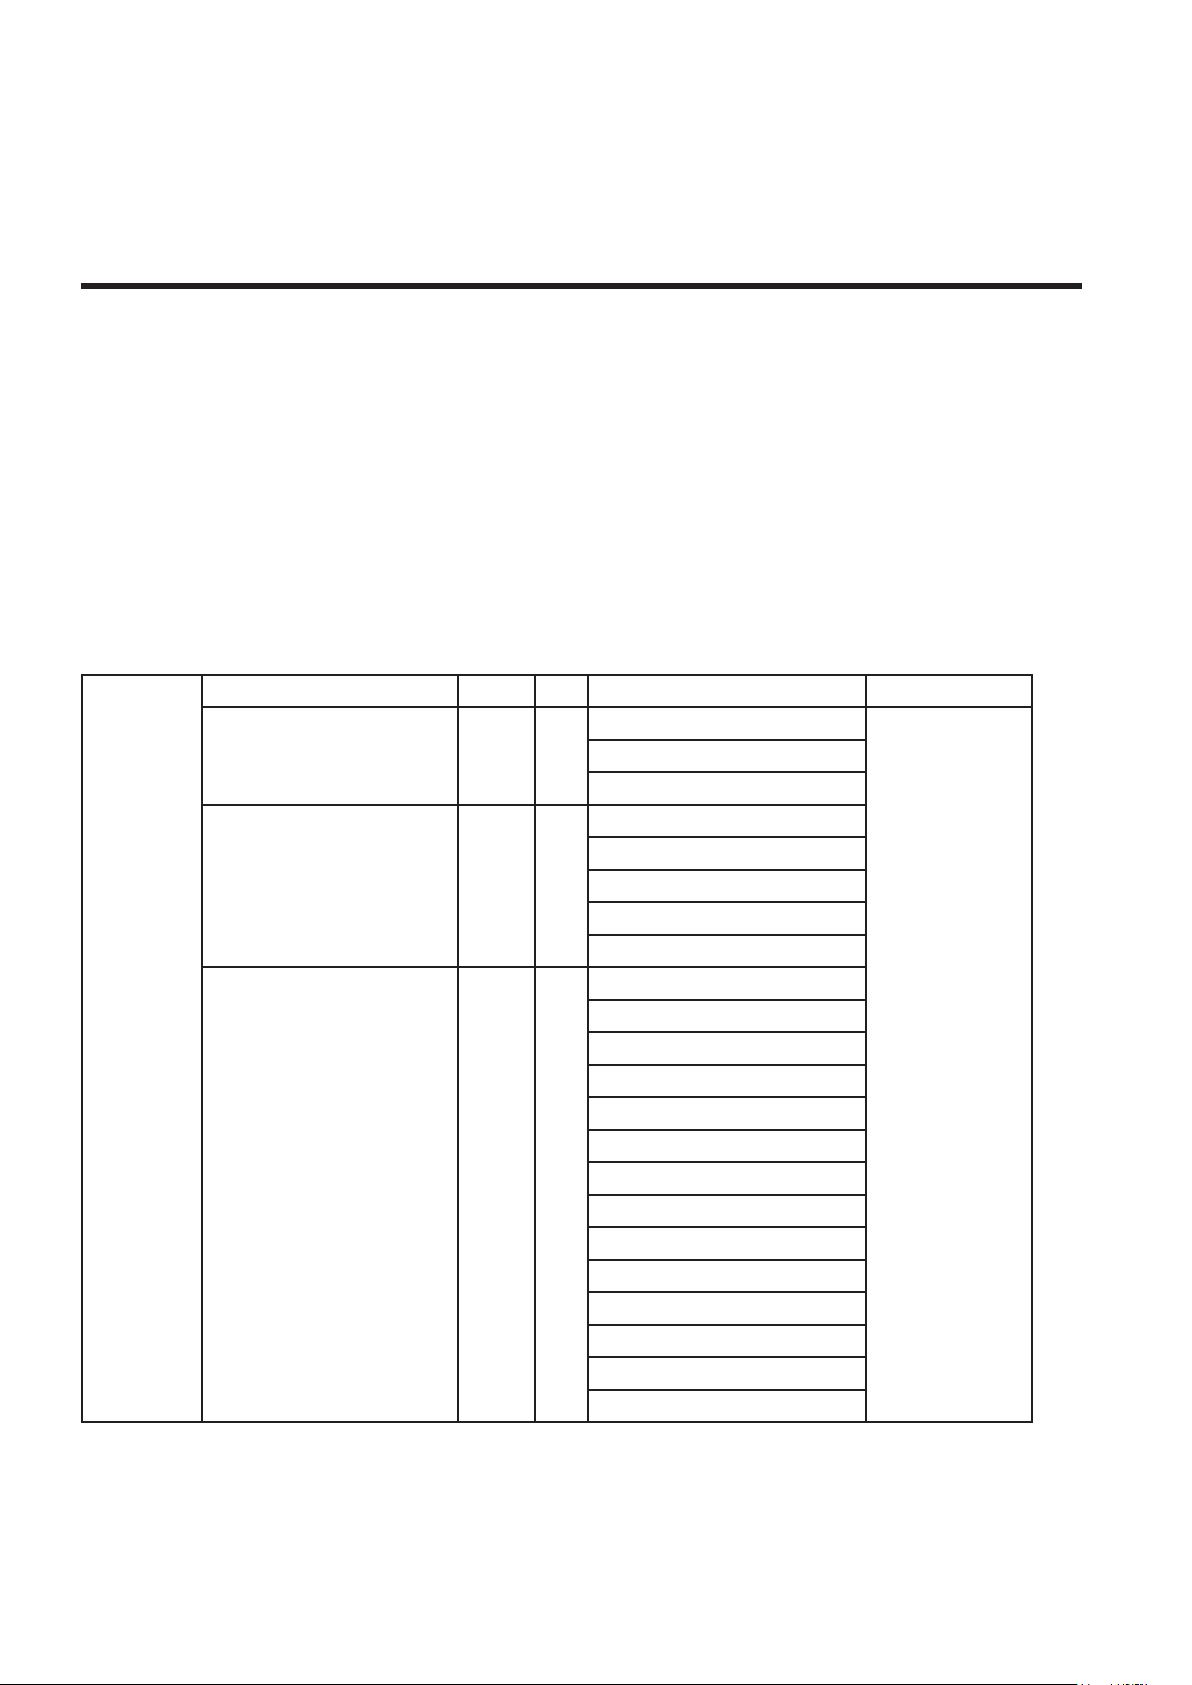
The beam angle can be adjusted manually, stepless
manual zoom from 11°to 35°
Page 5
5. MAIN FUNCTION
To select any functions, press MENU button until
the required one is shown on the display. Select the
fuction by ENTER button. Use DOWN and UP button
to change the mode. Once the required mode has
been selected, press ENTER button to setup or
it will return to the main functions without any
change aer idling 8 seconds automatically. Back
to the functions without any change press MENU
button.
The main function are shown below:
Addr (set address) enter +/- set address (001-512) Remarks
Chnd (channel option) enter +/- 1Ch
Dind (dimmer) enter +/- stda (standard scene)
Freq (dimmer frequency) enter +/- 900Hz
MENU
2Ch
3Ch
stge (stage scene)
tv (TV scene)
aral (building scene)
thal (theatre scene)
1000Hz
1100Hz
1200Hz
1300Hz
1400Hz
1500Hz
2500Hz
4000Hz
5000Hz
10K
15K
20K
25K
Press ENTER to
conrm (save
and exit)
English version
| Tecshow Par 10 00Z
P. 5
Page 6

Gamma correction enter +/- NO
2
2.2
2.4
2.6
2.8
Manual mode enter +/- 000-255
Lost enter +/- hold
blac
Tenp (temperature) enter 00°C-90°C
Led (set backlight) enter on
o
disp (display reverse) enter on
o
Fhrs (working hours) enter total working hour
Ver (soware version) enter soware version
defa (set default) enter default
6. DMX512 CONFIGURATION
Channel Mode
1 Channel Mode
Channel Function Value Details
CH1 Dimmer 000-255 Master Dimmer 0-100%
2 Channel Mode
Channel Function Value Details
CH1 Dimmer 000-255 Master Dimmer 0-100%
000-015 Strobe on
CH2 Strobe
016-095 Strobe (1HZ-25HZ Slow-Fast)
096 -175 Strobe (1HZ Slow-Fast)
176 -255 Random Strobe
P. 6
Tecshow Par 10 00Z |
English version
Page 7

3 Channel Mode
Channel Function Value Details
CH1 Dimmer 000-255 Master Dimmer 0-100%
CH2 Dimmer Fine 000-255 Fine dimmer
CH3 Strobe
7. TROUBLESHOOTING
Following are a few common problems that may
occur during operation. Here are some suggestions
for easy troubleshooting:
000-015 Strobe on
016-095 Strobe (1HZ-25HZ Slow-Fast)
096 -175 Strobe (1HZ Slow-Fast)
176 -255 Random Strobe
A. The xture does not work, no light
1. Check the connection of power and main fuse.
2. Measure the mains voltage on the main connector.
B. Not responding to DMX controller
1. DMX LED should be on. If not, check DMX connectors, cables to see if link properly.
2. If the DMX LED is on and no response to the
channel, check the address settings and DMX polarity.
3. If you have intermittent DMX signal problems,
check the pins on connectors or on PCB of the xture or the previous one.
4. Try to use another DMX controller.
5. Check if the DMX cables run near or run alongside to high voltage cables that may cause damage
or interference to DMX interface circuit.
English version
| Tecshow Par 10 00Z
P. 7
Page 8

8. FIXTURE CLEANING
The cleaning of internal must be carried out periodically to optimize light output. Cleaning frequency
depends on the environment in which the xture
operates: damp, smoky or particularly dirty surrounding can cause greater accumulation of dirt on
the xture’s optics.
• Clean with so cloth using normal glass clean-
ing uid.
• Always dry the parts carefully.
• Clean the external optics at least every 15 days.
Clean the internal optics at least every 30/60
days.
Design and product specications are subject to change without prior notice.
P. 8
Tecshow Par 10 00Z |
English version
Page 9

1. DESCRIPCIÓN
PAR 1000Z
Par LED profesional - 1 LED COB blanco de 100W
Par 1000Z es un par LED de alta potencia con DMX
que cuenta con 1 LED COB blanco de 100W. Ideal para aplicaciones de gran escala gracias a su
potencia, el equipo cuenta con un zoom manual de
11º a 35º, además de poseer una muy elevada reproducción de color de 90Ra. Par 1000Z tiene cinco
curvas de dimmeo, corrección gamma y frecuencia
de refresco seleccionable, garantizando un funcionamiento sin parpadeo en cualquier situación.
Especicaciones
Fuente & Óptica
• Fuente de luz: 1 LED COB blanco cálido de 100W
• Temperatura color: 3000K
• Vida útil promedio: 50.000 horas
• Zoom manual: 11º-35º lineal
Control
• Conectores DMX: 1/2/3
• Modos de operación: DMX, Master/Slave &
Manual
Eléctrico
• Rango de voltaje de entrada: AC100–240V,
50-60Hz
• Consumo de potencia: 115W
Físico
• Display LED
• Conectores DMX: 2 conectores XLR (XLR-3 de
entrada & salida)
• Conectores de alimentación PowerCon
• Dimensiones: 491x275x224 mm. /
19,3x10,8x8,8 pulg.
• Peso: 3,4 Kg. / 7,5 Lbs.
Información fotométrica
• Flujo luminoso:
- 11º: 27500 lux @ 2m (6,5 pies) / 3700 lux @
5m (16 pies)
- 35º: 4100 lux @ 2m (6,5 pies) / 600 lux @ 5m
(16 pies)
• Reproducción de color: >90Ra
Efectos y Funciones
• Dimmer: 0-100% (16-Bit)
• 5 curvas de dimmeo
• Efecto estrobo
• Corrección de gamma
• PWM ajustable para trabajar sin parpadeo en
cualquier situación
Versión Español
| Tecshow Par 10 00Z
P. 9
Page 10

2. INSTRUCCIONES DE SEGURIDAD
Lea atentamente el manual, el cual
incluye información importante sobre instalacion, uso y mantenimiento del equipo.
• Conserve este manual para futuras referencias.
En caso de vender la unidad, procure entregar
esta guía al comprador.
• Abra el embalaje con cuidado y revise que el
equipo se encuentre en buen estado, antes de
utilizarlo.
• Desconecte el equipo del suministro eléctrico
antes de realizar cualquier tarea de mante-
nimiento.
• Instale el equipo en ambientes con ventilación
adecuada y mantenga una distancia mínima de
50 cm con otros objetos o supercies. Procure
no obstruir las ranuras de ventilación del equipo.
• No utilice el equipo si la temperatura ambiente
supera los 40 °C.
• No conecte la unidad a un dimmer.
• Sustituya la cubierta en caso de que se encuen-
tre visiblemente dañada.
• La cubierta del equipo puede alcanzar hasta 85
°C. No toque la cubierta durante el funcionamiento sin cubrirse las manos. Apague el equipo y permita que se enfríe por, al menos, 15 minutos antes
de realizar cualquier tarea de mantenimiento.
• El equipo no contiene piezas que puedan ser
reparadas por el usuario. No abra la cubierta
ni intente realizar reparaciones por sus propios
medios. En caso de precisar asistencia, póngase
en contacto con el servicio técnico autorizado.
• Desconecte el equipo de inmediato si observa
un problema grave de funcionamiento.
• No trate de reparar la unidad por sus propios
medios. Las reparaciones realizadas por personas no calicadas pueden provocar daños
irreversibles en el equipo. En caso de precisar
asistencia, póngase en contacto con el servicio
técnico autorizado. Utilice siempre piezas de
repuesto del mismo tipo.
3. INSTALACIÓN Y CONEXIÓN
Utilice los oricios para tornillos de la abrazadera cuando precise realizar el montaje del equipo.
Instale rmemente el equipo para evitar vibraciones y deslizamientos durante su funcionamiento. Compruebe que la estructura, donde instalará
el equipo, sea segura y pueda soportar diez veces
el peso de la unidad. Siempre utilice un cable de
seguridad que pueda soportar doce veces el peso
de la unidad.
P. 1 0
Tecshow Par 10 00Z |
Versión Español
Un profesional calicado debe realizar la instalación del equipo. El punto de jación del equipo
debe estar fuera del alcance y del camino de las
personas. Instale el equipo en un rango de altura
de 0 a 30m.
Page 11

4. DESCRIPCIÓN DEL EQUIPO
Panel dorsal
1. Pantalla: Visualice los menús y funciones selec-
cionadas.
2. Indicador LED:
POWER Encendido Encender del equipo
DMX Encendido Entrada DMX presente
3. Botones:
MENU Selecciona las funciones de
programación.
DOWN Desplaza los ítems del menú
hacia abajo.
UP Desplaza los ítems del menú
hacia arriba.
ENTER Conrma la función o el
valor seleccionado.
4. Salida/entrada principal: PowerCON.
5. Salida/entrada DMX: Para conexión DMX512,
utilice un cable con conector XLR-3 para recibir
la señal DMX y enlazar el equipo con el siguiente
de la cadena.
El ángulo de haz puede regularse de forma manual,
de la misma manera que el zoom continuo manual,
de 11° a 35°.
Versión Español
| Tecshow Par 10 00Z
P. 11
Page 12

5. FUNCIONES PRINCIPALES
Para seleccionar cualquier función, presione el
botón MENU hasta visualizarla en la pantalla. Luego
presione ENTER para conrmar su selección. Utilice
las echas UP y DOWN para alternar el modo. Una
vez seleccionado el modo, presione ENTER para
conrmar. De lo contrario, el sistema regresará automáticamente a las funciones principales sin guardar cambios, luego de 8 segundos de inactividad.
Para volver al menú principal sin guardar cambios,
presione MENU.
Menú de funciones principales:
Addr (dirección DMX) enter +/- congurar valor (001-512) Observaciones
Chnd (modo de canal) enter +/- 1Ch
Dind (dimmer) enter +/- stda (escena estándar)
MENÚ
Freq
(frecuencia de dimmer)
enter +/- 900Hz
2Ch
3Ch
stge (escena escenario)
tv (escena TV)
aral (escena edicio)
thal (escena teatro)
1000Hz
1100Hz
1200Hz
1300Hz
1400Hz
1500Hz
2500Hz
4000Hz
5000Hz
10K
15K
20K
25K
Presione ENTER
para conrmar,
guardar cambios
y salir
P. 12
Tecshow Par 10 00Z |
Versión Español
Page 13

Corrección gamma enter +/- NO
2
2.2
2.4
2.6
2.8
Modo manual enter +/- 000-255
Lost enter +/- hold
blac
Tenp (temperatura) enter 00°C-90°C
Led (luz de fondo) enter on
o
disp (rotar pantalla) enter on
o
Fhrs
(horas de funcionamiento)
Ver (versión de soware) enter Versión de soware
defa (establecer valores
por defecto)
enter horas de funcionamiento
total
enter default
6. CUADRO DE CANALES DMX
Modo de canal
1 canal
Canal Función Valor Detalles
CH1 Dimmer 000-255 Dimmer maestro 0-100%
2 canales
Canal Función Valor Detalles
CH1 Dimmer 000-255 Dimmer maestro 0-100%
000-015 Encendido
CH2 Estrobo
016-095 Velocidad creciente (1HZ-25HZ)
096 -175 Velocidad creciente (1HZ)
176 -255 Estrobo aleatorio
Versión Español
| Tecshow Par 10 00Z
P. 13
Page 14

3 canales
Canal Función Valor Detalles
CH1 Dimmer 000-255 Dimmer maestro 0-100%
CH2 Dimmer Fino 000-255 Dimmer no
000-015 Encendido
CH3 Estrobo
016-095 Velocidad creciente (1HZ-25HZ)
096 -175 Velocidad creciente (1HZ)
176 -255 Estrobo aleatorio
7. RESOLUCIÓN DE PROBLEMAS
Esta guía le permitirá al usuario resolver problemas
simples. En caso de surgir algún inconveniente con
la unidad, siga los pasos descritos a continuación:
A. El equipo no se enciende, no hay emisión de luz
1. Verique el estado del suministro eléctrico y del
fusible.
2. Verique que la unidad esté conectada al rango
de voltaje correcto.
B. El equipo no responde al controlador DMX
1. Verique que el indicador DMX esté encendido.
De lo contrario, revise la conexión entre los cables y
los conectores DMX.
2. Si el indicador LED está encendido y no responde
al canal, verique los valores de la dirección DMX y
la polaridad.
3. Si observa problemas de señal DMX recurrentes,
verique las clavijas de los conectores o de la placa
de circuito impreso en el equipo y el equipo previo
de la cadena.
4. Utilice otro controlador DMX.
5. Revise que los cables DMX no estén cerca de o
junto a cables de alto voltaje que pueden ocasionar
interferencia en el circuito DMX.
P. 14
Tecshow Par 10 00Z |
Versión Español
Page 15

8. LIMPIEZA Y MANTENIMIENTO
Se recomienda la limpieza regular de las partes
internas y externas del equipo para optimizar la
salida de luz. La frecuencia de limpieza dependerá
del ambiente en el que esté instalado el equipo.
La humedad, el polvo y el humo pueden generar
una mayor acumulación de suciedad en las piezas
ópticas de la unidad.
• Utilice un paño suave con productos para lim-
pieza de vidrios.
• Procure secar las piezas cuidadosamente.
• Limpie las ópticas externas, al menos, cada 15
días. Limpie las ópticas internas cada 30/60 días.
Observación: El proveedor no asumirá responsabilidad por los errores u omisiones del manual.
La información de este manual está sujeta a cambios sin previo aviso.
Versión Español
| Tecshow Par 10 00Z
P. 15
Page 16

FOR MORE INFO ON THIS PRODUCT PLEASE CHECK TECSHOW.AMPROWEB.COM /
PARA MAS INFORMACION SOBRE ESTE PRODUCTO VISITE TECSHOW.AMPROWEB.COM
P. 1 6
Tecshow Par 10 00Z |
Versión Español
 Loading...