

Page 1

USER MANUAL / MANUAL DE USUARIO
PLEASE READ THE INSTRUCTIONS CAREFULLY BEFORE USE /
POR FAVOR LEA LAS INSTRUCCIÓNES ANTES DE USAR
CROSS
OCTOBEAM
Page 2

OCTOBEAM CROSS
P.
2
1. Overview
OctoBeam Cross is a LED Lighting Bar with double movement powered by 8 x 9W White LEDs, that features pixel by
pixel control. With its 10 Built-in programs the unit is capable of creating amazing streaming eects and outstanding
razor sharp beams. OctoBeam Cross is designed to give
you great flexibility with its 4 operational modes (DMX-512,
Master/Slave, sound active, autorun), making it the ideal
solution for any given application.
Specifications
Source and Optics
• Light source: 8 x 9W White LEDs
• LEDs life: 50,000 hours
• Beam angle: 3º
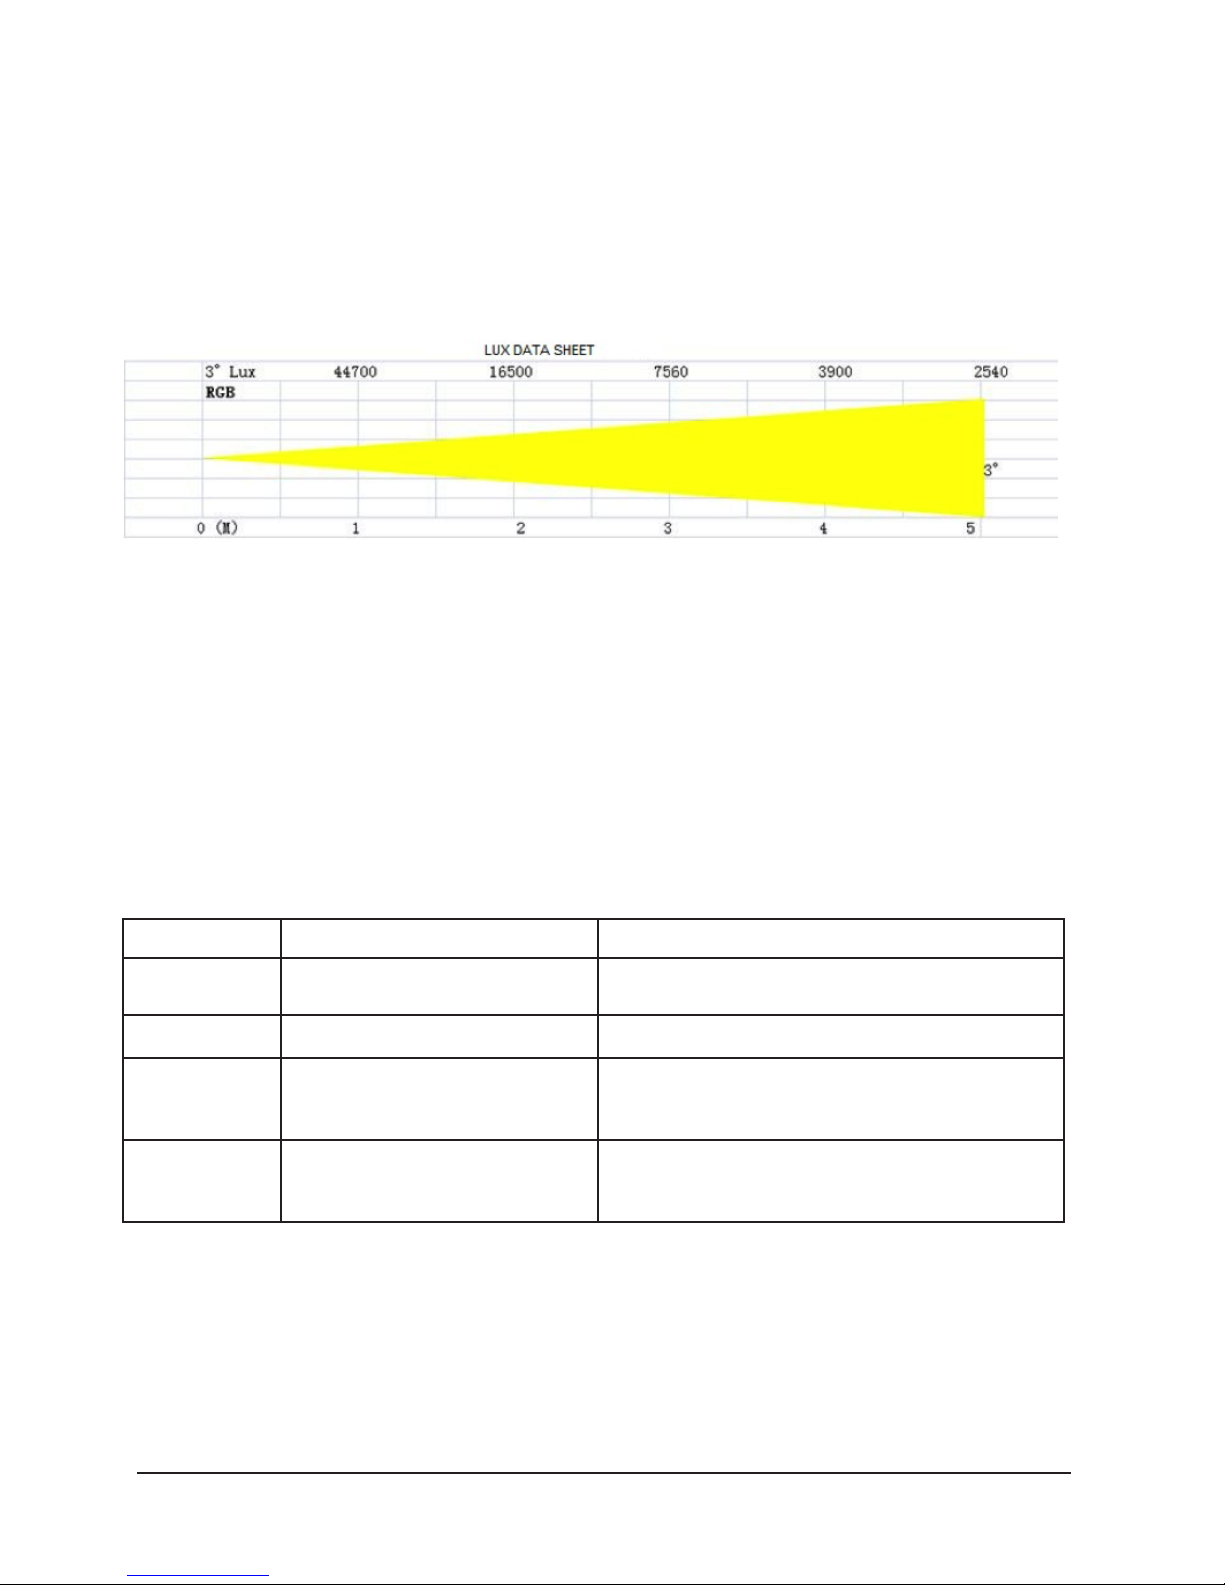
Photometric Data
• Luminous Flux: 16500 lux @ 2m (6.5 .)
Eects and Functions
• Pixel control
• Every LED can be independently controlled
• Razor sharp beams
• Strobe eect: 0-18 flashes per second
• Adjustable speed
• 10 Built-in programs
Control
• Operational modes: DMX, Master/Slave,
Sound-active, Built-in programs & Auto-run
• DMX channels: 1/12/16
Movement
• Tilt: 2 x 265º independently controlled
Electrical
• Input voltage range: AC 100–240V, 50-60Hz
• Power consumption: 108W
Physical
• 4-digit LED display
• Power supply connectors: POWERCON® In/Out
• 2 XLR connectors (XLR-3 In and Out)
• Dimensions: 1064x95x180 mm. / 42x3.7x7 in.
• Weight: 8.7 Kg. / 19 Lbs.
ENGLISH VERSION
Page 3
OCTOBEAM CROSS
P.
3
2. Introduction
Photometric Chart
ENGLISH VERSION
Operation
This fixture has five working modes, press the “MODE”
button to switch between modes.
- Built-in programs
- Auto running
- DMX mode
- Master/slave
- Sound-active
Button Function
Button Function Description
MODE Return to the last menu In main menu, press to enter next mode;
In submenu, press to return to last menu
SETUP Enter the next menu
UP Plus In parameter setting, press to add one
In option menu, press to return to last menu
In mode menu, press to enter next mode
DOWN Substract In parameter setting, press to subtract one
In option menu, press to return to next menu
In mode menu, press to enter last mode
Page 4

OCTOBEAM CROSS
P.
4
ENGLISH VERSION
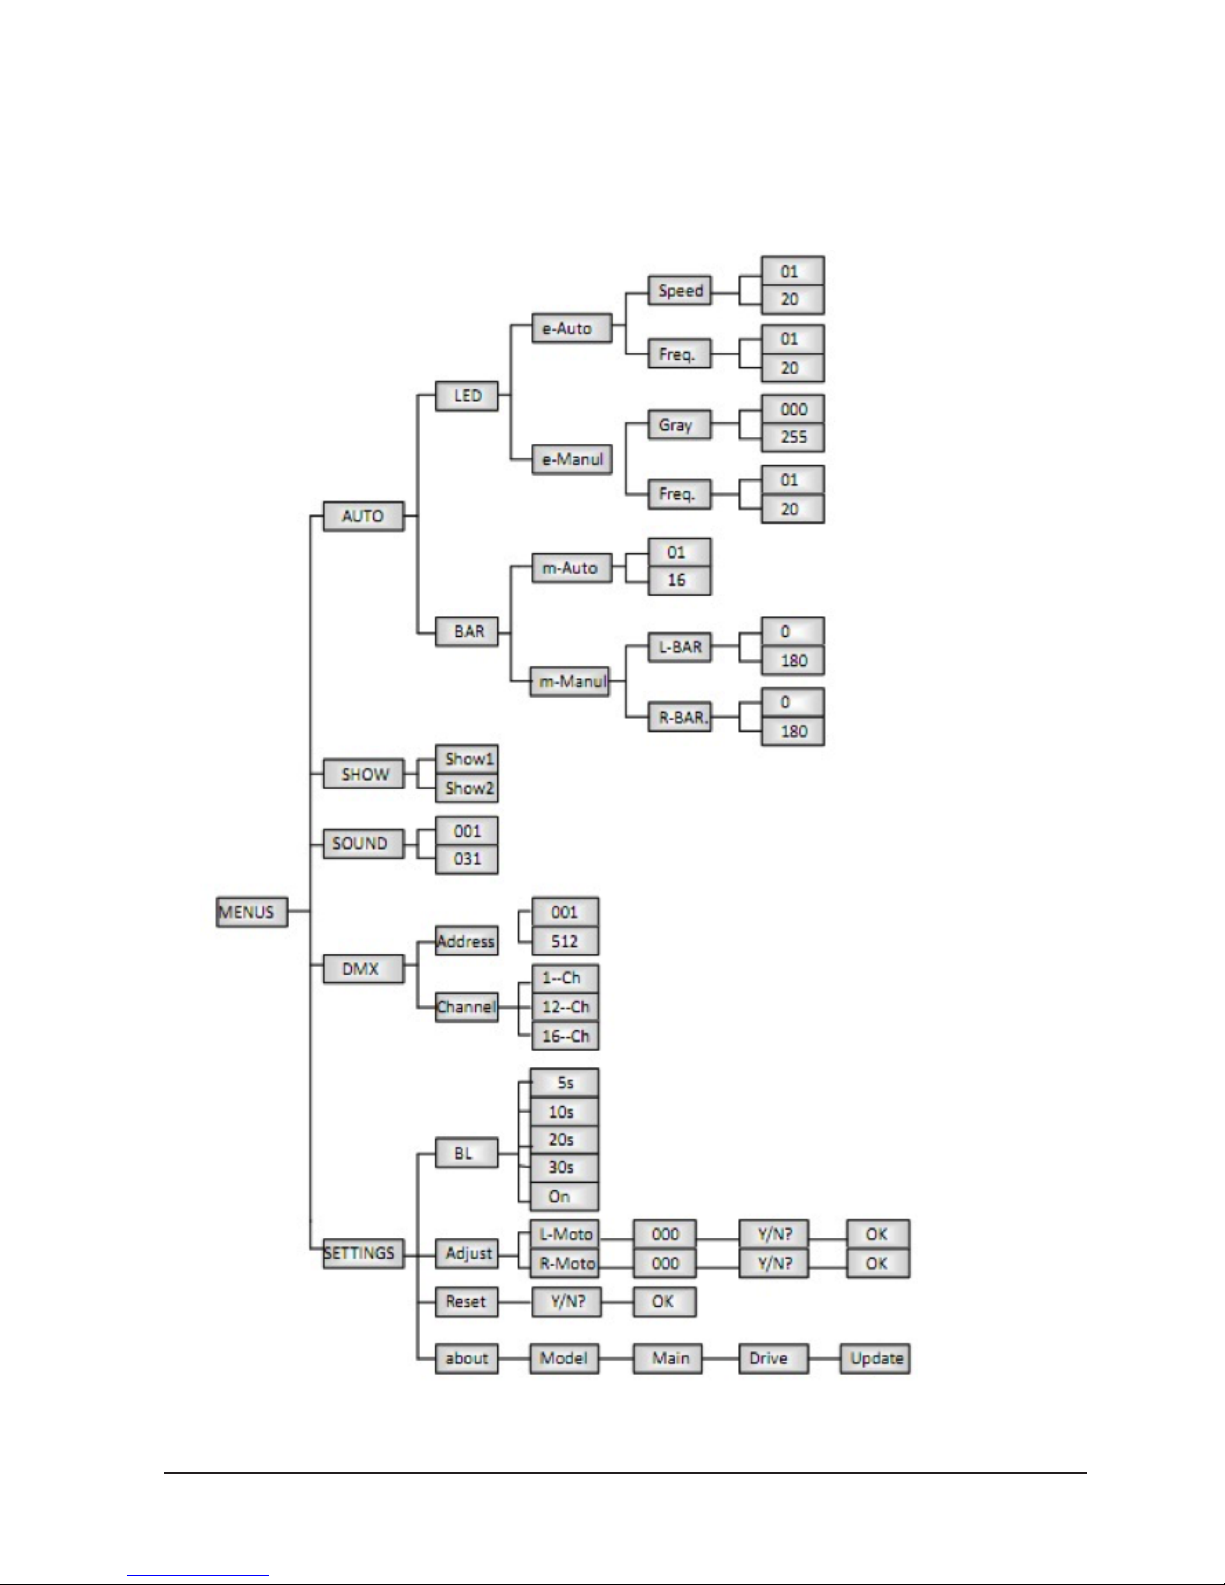
3. LCD Menu struture chart
Page 5

OCTOBEAM CROSS
P.
5
ENGLISH VERSION
a. Auto Running
When the display shows AUTO, the light will run the program that had been set. Press “SETUP” button to enter
the optional menu. Press “UP” and DOWN” to choose:
LED function
- When you choose “LED” and press “SETUP”, you
get into LED auto running parameter setting. You
could choose e-Auto or e-Manul.
- When choose “e-Auto”, press “SETUP” button to
enter the menu.
- Press “UP” and “DOWN” to select the parameter.
When you choose Speed, it will show SPEED 01.
- Press “UP” and “DOWN” to adjust the auto run ning speed from 01-20.
- When choose “Freq.”, press “SETUP” to set the
flash speed.
- Press “UP” and “DOWN” to adjust the auto run-
ning speed 00-20Hz.
- When choose “e-Manul”, press “SETUP” button
to set the LED brightness and the flash speed.
- When you choose “Gray”, press “SETUP” to set
LED gray level. Press “UP” and “DOWN”to set
from 000-255.
- When you choose “Freq.”, press “SETUP” to set
the flash speed. Press “UP” and “DOWN” to set
from 00-20Hz.
Bar function
- Choose “Bar”, then press “SETUP” to set the pa-
rameter. You could choose m-Auto and m-Manul.
- When you choose “m-Auto”, press “SETUP” to
set the speed to 01-16.
- When you choose “m-Manul”, the bar stops stall ing. Press “SETUP” to set the Bar lock position.
- Choose “L-BAR”, press “SETUP” to set the le bar
through “UP” and “DOWN”. When it is 90° the bar
is in the horizontal position. The same method to
set the right bar.
b. Build-in Program
When display shows this menu, SHOW enter to the building program. Press “SETUP” to choose build-in programs.
There are 10 programs inside. Press “UP” and “DOWN” to
choose from Show1 –Show10.
c. Sound Active Mode
- When display shows this menu, SOUND enter to the
sound-active mode.
- Press “SETUP” to adjust the sound sensitivity.
Press “UP” and “DOWN” to adjust from 0-31.
d. DMX Mode
When display shows DMX MODE, enter to the settings
- Press “SETUP” to set the optional menu.
- When choose “Address”, press “SETUP” to set
the DMX address 1-512 through “UP” and “DOWN.
- When choose “Channel”, press “SETUP” to set
the channel through “UP” and “DOWN”.
- There are three channels: 1-ch, 12-ch,
and 16-ch
- Choose 12ch to restore factory settings.
- This product has automatic identification func tions. Once receive DMX signal will enter to DMX
mode. Once the signal disappear, will return the
former mode. When LCD shows DMX In, it means
you got into DMX mode.
Page 6

OCTOBEAM CROSS
P.
6
ENGLISH VERSION
1ch
Channel Number Function
1 0--19 LED close, electronic machine back to the horizontal position
20-29 Show1
30-39 Show2
40-49 Show3
50-59 Show4
60-69 Show5
70-79 Show6
80-89 Show7
90-99 Show8
100-109 Show9
110-119 Show10
120-139 LED close, electronic machine back to the horizontal position
140-255 Sound active
DMX Mode 1:
Page 7

OCTOBEAM CROSS
P.
7
ENGLISH VERSION
DMX Mode 2: 12-ch
12ch
Channel Number Function
1 0--180 Le BAR 0-180°(90° horizontal)
180-255 Le BAR 180°
2 0-255 Le BAR speed, more larger the number, more faster
the speed
3 0-180 Right BAR 0-180°(90° horizontal)
180-255 Right BAR 180°
4 0-255 Le BAR speed, the larger number, more faster the
speed
5 0-255 LED1 0-100%
6 0-255 LED2 0-100%
7 0-255 LED3 0-100%
8 0-255 LED4 0-100%
9 0-255 LED5 0-100%
10 0-255 LED6 0-100%
11 0-255 LED7 0-100%
12 0-255 LED8 0-100%
Page 8

OCTOBEAM CROSS
P.
8
ENGLISH VERSION
DMX Mode 2: 16-ch
16ch
Channel Number Function
1 0-180 Le BAR 0-180°(90° horizontal)
180-255 Le BAR 180°
2 0-255 Adjust Le BAR speed, larger number, faster speed
3 0-180 Right BAR 0-180°(90° horizontal)
180-255 Right BAR 180°
4 0-255 Adjust le BAR speed, larger number, faster speed
5 0-255 LED1 0-100%
6 0-255 LED2 0-100%
7 0-255 LED3 0-100%
8 0-255 LED4 0-100%
9 0-255 LED5 0-100%
10 0-255 LED6 0-100%
11 0-255 LED7 0-100%
12 0-255 LED8 0-100%
13 0-255 Dimming
14 0-9 No function
10-19 LED auto run 1-4 channel control the electronic machine
20-29 Show1
30-39 Show2
40-49 Show3
50-59 Show4
60-69 Show5
70-79 Show6
80-89 Show7
90-99 Show8
100-109 Show9
110-119 Show10
120-139 No function
140-255 Sound active
Page 9

OCTOBEAM CROSS
P.
9
ENGLISH VERSION
e. Master/ Slave Mode
When LCD displays this menu, SLAVE, it means you enter
into the M/S mode.
4. Setup Menu
When it shows “SETTINGS”, it means you enter into the
set the mode. Press “SETUP”, to enter to optional menu.
You could choose four options through pressing “UP” and
“DOWN”.
Bl Time
- Set the LCD time
- When choose “BL Time”, press “SETUP” button
to set the time. Choose 5s, 10s, 20s, 30s, on
through pressing “UP” and “DOWN”.
- If you choose 10s. Aer you restore factory set tings, the time will keep 10s.
Adjust
- Adjust electronic machine
- Choose “Adjust”, press “SETUP” to set the posi-
tion of electronic motor. When the bar is not in
horizontal position, you could adjust it through
this function.
- When display shows “L-MOTO” and “R-MOTO”,
choose the electronic motor that needs to be ad justed. It chooses the right motor.
- Aer testing the origin, check if the bars are paral lel or not by pressing “UP” and “DOWN”.
- When the bars are in parallel position, press
“SETUP” and adjust the reset data.
- When display shows “ADJUST OK” the adjust-
ment is finished.
Reset
- Restore factory settings
- When the electronic motor could not be reset,
LCD shows “MOTO” “NO RESET”.
- Choose “L-Moto” so the le motor may use the
same method.
- Choose “Reset”, press “SETUP” to enter the re store factory setting. At this time, the display will
show a prompt menu: “Factory Reset”.
About
- About product information
- Choose “About”, press “SETUP” button to enter
the product information. Press “UP” and“DOWN”
to scan the information.
- The display will show a product item “Model TPL-
099”(subject to the actual product).
- The display will show the program version “MAIN
V1.01.1” (subject to the actual product).
- The display will show the driver version “DRIVE
V1.01.1” (subject to the actual product).
- The display will show the update date (subject to
the actual product).
5. Restore Factory Settings
Operate in the setup menu, please refer to the operation
Press “MODE”, “SETUP” and make power on. When LCD
prompts the following process “FACTORY RESET”, release
the button and restore factory settings.
15 0-255 Led speed LED auto run
16 0-14 LED no strobe
15-255 LED strobe the larger value, the faster speed
Page 10

OCTOBEAM CROSS
P.
10
VERSION ESPAÑOL
1. Descripción
OctoBeam Cross es una barra de LED con movimiento doble que tiene 8 LEDs blancos de 9W que vienen con control
de pixel por pixel. Gracias a sus 10 programas integrados,
la unidad es capaz de crear efectos increíbles y haces de
luz muy definidos. El equipo está diseñado para brindarle gran flexibilidad con sus 4 modos de operación (DMX,
Master/Slave, Auto-run, audiorítimico). Octobeam Cross
es la solución ideal para cualquier aplicación.
Especificaciones
Fuente y Óptica
• Fuente de luz: 8 LEDs blancos de 9W
• Vida útil promedio: 50,000 horas
• Ángulo de haz: 3º
• Iluminación Fotométrica
• Flujo lumínico: 16500 lux @ 2m (6.5 .)
• Efectos y Funciones
• Control de pixel: cada LED puede ser contro-
lado de forma independiente
• Haces bien definidos
• Efecto estrobo: 0-18 flashes por segundo
• Velocidad ajustable
• 10 programas integrados
Movimiento
• 2 x 265º de tilt controlados independientemente
Eléctrico
• Rango de voltaje: entrada: AC 100–240V, 50-60Hz
• Consumo de potencia: 108W
Control
• Modos de operación: DMX, Master/Slave, audio
rítmico, Auto-run & programas integrados
• Canales DMX: 1/12/16
Físico
• Pantalla LED de 4 dígitos
• Conectores de alimentación: PowerCON® Entra
da y Salida
• Conectores DMX: 2 Conectores XLR (XLR-3 de en
trada & salida)
• Dimensiones: 1064x95x180 mm. / 42x3.7x7 pulg.
• Peso: 8.7 Kg. / 19 Lbs.
Page 11

OCTOBEAM CROSS
P.
11
VERSION ESPAÑOL
2. Introducción
Cuadro Fotométrico
Instrucciones de Uso
La unidad dispone de cinco modos de funcionamiento.
Presione la tecla MODE para seleccionar el modo deseado.
- Programas incorporados
- Ejecución automática
- Modo DMX
- Modo maestro/esclavo
- Modo audiorítmico
Panel de Control
Botón Función Descripción
MODE Regresa al menú anterior En el menú principal, presione MODE para acceder al
modo siguiente.
En un submenú, presione MODE para regresar al menú
anterior.
SETUP Accede al menú siguiente
UP Aumenta el valor de la selección En Configuración de parámetros, presione UP para
aumentar un punto el valor de la selección.
En Opciones, presione UP para regresar al último menú.
En Modo, presione UP para acceder al modo siguiente.
DOWN Disminuye el valor de la selección En Configuración de parámetros, presione DOWN para
disminuir un punto el valor de la selección.
En Opciones, presione DOWN para ir al siguiente menú.
En Modo, presione DOWN para acceder al último modo
Page 12
OCTOBEAM CROSS
P.
12
VERSION ESPAÑOL
3. Menú de Funciones
Page 13

OCTOBEAM CROSS
P.
13
VERSION ESPAÑOL
a. Ejecución automática
Cuando en la pantalla visualice AUTO, La luz se ejecutará
como el programa seleccionado. Presione la tecla SETUP
para acceder a las opciones del menú. Utilice las teclas UP
y DOWN para seleccionar entre LED y BAR.
Opción LED
- Dentro de la opción LED, presione la tecla SETUP
para acceder a la configuración de parámetros.
Seleccione entre E-AUTO y E-MANUL.
- Seleccione E-AUTO, luego presione SETUP para
acceder al menú de SPEED Y FREQ.
- Utilice las teclas UP y DOWN para seleccionar
el parámetro SPEED (velocidad). En la pantalla
visualizará lo siguiente: LED SPEED 01
- Utilice las teclas UP y DOWN para seleccionar la
velocidad deseada entre 01-20.
- Luego seleccione FREQ (frecuencia) y presione la
tecla SETUP para configurar la velocidad de flash.
- Utilice las teclas UP y DOWN para regular la vel
ocidad de ejecución automática de 0-20 Hz.
- Seleccione E-MANUL, luego presione SETUP para
acceder al menú de opciones de brillo y veloci-
dad de flash.
- Seleccione GRAY y presione la tecla SETUP para
configurar los niveles de gris. Utilice las teclas UP
y DOWN para seleccionar el valor de 000-255.
- Luego seleccione FREQ y presione la tecla SETUP
para configurar la velocidad de flash. Utilice las
teclas UP, DOWN para regular la velocidad 0-20HZ
Barras
- Dentro de la opción BAR, presione la tecla SETUP
para acceder a la configuración de parámetros.
Seleccione entre M-AUTO y M-MANUL.
- Seleccione M-AUTO, luego presione la tecla SET-
UP para configurar la velocidad de 01-16.
- Seleccione M-MANUL, luego presione la tecla
SETUP para configurar la posición de la barra.
- Seleccione L-BAR y luego presione la tecla SET
UP para configurar la barra izquierda con las te-
clas UP y DOWN. Cuando la pantalla indique
“90°” la barra estará en posición horizontal. Se leccione R-BAR y reitere estos pasos para config-
urar la barra derecha.
b. Programas Incorporados
Cuando en la pantalla visualice SHOW, presione SETUP
para acceder a los programas incorporados.
- Octobeam Cross cuenta con 10 programas. Uti lice las teclas UP y DOWN para seleccionar el pro grama deseado.
c. Modo Audiorítmico
Cuando en la pantalla visualice SOUND presione SETUP
para ingresar al modo audiorítmico y regular la sensibilidad del sonido.
- Utilice las teclas UP y DOWN para seleccionar el
valor deseado de 0-31.
d. MODO DMX
Cuando en la pantalla visualice DMX MODE, presione SETUP para ingresar al modo DMX y acceder al menú de las
distintas opciones.
- Seleccione ADDRESS y luego presione la tecla
SETUP para acceder. Utilice las teclas UP y DOWN
para establecer la dirección DMX entre 1-512.
- Seleccione CHANNEL y luego presione SETUP
para acceder. Utilice las teclas UP y DOWN para
seleccionar el modo de canales.
- Hay 3 canales: 1-CH, 12-CH y 16-CH
- 12CH restablecerá los valores a fábrica
- Octobeam Cross dispone de identificación au tomática de funciones, por lo cual ingresará en
modo DMX en cuanto reciba señal DMX. Cuando
pierda la señal, volverá al modo previo.
- En la pantalla visualizará DMX IN, habrá ingresa do al modo DMX:
Page 14

OCTOBEAM CROSS
P.
14
VERSION ESPAÑOL
Modo 1 canal
Canal Número Función
1 0--19 Salida de luz cerrada. Unidad en posición horizontal
20-29 Show 1
30-39 Show 2
40-49 Show 3
50-59 Show 4
60-69 Show 5
70-79 Show 6
80-89 Show 7
90-99 Show 8
100-109 Show 9
110-119 Show 10
120-139 Salida de luz cerrada. Unidad en posición horizontal
140-255 Modo audiorítmico
Cuadro de Canales DMX
Page 15

OCTOBEAM CROSS
P.
15
VERSION ESPAÑOL
Cuadro de Canales DMX
Modo 12 canales
Canal Número Función
1 0--180 Barra izquierda 0-180° (horizontal en 90°)
180-255 Barra izquierda 180°
2 0-255 Velocidad de barra izquierda. Cuanto mayor sea el
número, mayor será la velocidad
3 0-180 Barra derecha 0-180° ( horizontal en 90°)
180-255 Barra derecha 180°
4 0-255 Velocidad de barra izquierda. Cuanto mayor sea el
número, mayor será la velocidad
5 0-255 LED 1 0-100%
6 0-255 LED 2 0-100%
7 0-255 LED 3 0-100%
8 0-255 LED 4 0-100%
9 0-255 LED 5 0-100%
10 0-255 LED 6 0-100%
11 0-255 LED 7 0-100%
12 0-255 LED 8 0-100%
Page 16

OCTOBEAM CROSS
P.
16
VERSION ESPAÑOL
Cuadro de Canales DMX
Modo 16 canales
Canall Número Función
1 0-180 Barra izquierda 0-180° (horizontal en 90°)
180-255 Barra izquierda 180°
2 0-255 Velocidad de barra izquierda. Cuanto mayor sea el número,
mayor será la velocidad
3 0-180 Barra derecha 0-180° ( horizontal en 90°)
180-255 Barra derecha 180°
4 0-255 Velocidad de barra izquierda. Cuanto mayor sea el número,
mayor será la velocidad
5 0-255 LED 1 0-100%
6 0-255 LED 2 0-100%
7 0-255 LED 3 0-100%
8 0-255 LED 4 0-100%
9 0-255 LED 5 0-100%
10 0-255 LED 6 0-100%
11 0-255 LED 7 0-100%
12 0-255 LED 8 0-100%
13 0-255 Dimming
14 0-9 Sin función
10-19 Ejecución automática. Control de unidad con canales 1-4
20-29 Show 1
30-39 Show 2
40-49 Show 3
50-59 Show 4
60-69 Show 5
70-79 Show 6
80-89 Show 7
90-99 Show 8
100-109 Show 9
110-119 Show 10
120-139 Sin función
140-255 Modo audiorítmico
Page 17

OCTOBEAM CROSS
P.
17
VERSION ESPAÑOL
e. Modo Maestro/ Esclavo
Cuando en la pantalla visualice SLAVE habrá ingresado al
modo maestro/esclavo.
4. Menú de Configuración
Cuando en la pantalla visualice “SETTINGS”, habrá in-
gresado al menú de configuración. Presione SETUP para
acceder a las opciones del menú. Utilice las teclas UP y
DOWN para seleccionar entre las 4 opciones disponibles:
Bl Time
- Tiempo de retroiluminación de pantalla.
- Seleccione BL TIME y luego presione SETUP para
establecer el tiempo de retroiluminación de la
pantalla. Utilice las teclas UP y DOWN para selec cionar entre 5s, 10s, 20s y 30s.
- Si escoge y confirma 10s, luego de restablecer
los valores de fábrica, el tiempo de retroilumi nación se mantendrá en 10 segundos.
Adjust
- Ajustes del motor electrónico.
- Seleccione ADJUST y luego presione SETUP para
establecer la posición del motor electrónico. Po drá hacerlos siempre que la barra no
esté en posición horizontal
- Cuando la pantalla muestre “L-MOTO” y “R-MO-
TO”, seleccione el motor que necesita ajustar. En
este caso es el derecho.
- Verifique que las barras estén paralelas y luego
utilice las teclas UP y DOWN.
- Luego presione la tecla SETUP y ajuste el reinicio
de datos.
- Cuando en la pantalla visualice ADJUST OK,
habrá finalizado el proceso de ajuste.
Reset
- Restablecer valores de fábrica.
- En caso de que no se haya reiniciado el motor,
en la pantalla visualizará el siguiente mensaje:
“MOTO NO RESET”.
- Seleccione L-MOTO para ajustar el motor izquier-
do utilizando el mismo método.
- Seleccione RESET y luego presione SETUP para
acceder a la opción de restablecer valores de fá brica. Visualizará el mensaje: RESET Y/N.
- Presione SETUP y confirme que desea restablecer
los valores de fábrica.
About
- Información del producto.
- Seleccione ABOUT y luego presione SETUP para
acceder a la información del producto. Utilice las
flechas UP y DOWN para explorar los datos
- El display mostrará el modelo del producto:
“Model TPL-099”(sujeto al producto actual).
- El display mostrará la Versión del programa (su jeta al producto real): “MAIN V1.01.1”
- El display mostrará la versión de soware (sujeta
al producto real): “DRIVE V1.01.1”
- El display mostrará la fecha de actualización (su jeta al producto real):
15 0-255 Velocidad de LED (ejecución automática de LED)
16 0-14 LED sin estrobo
15-255 LED con estrobo. Cuanto mayor sea el número, mayor será la
velocidad
Page 18

OCTOBEAM CROSS
P.
18
VERSION ESPAÑOL
6. Limpieza y mantenimiento
El equipo está diseñado para uso profesional. La garantía
no cubre daños causados por el uso inapropiado de este
producto. Evite desarmar el equipo. En su interior no hay
piezas que puedan ser reparadas por el usuario. En caso
de precisar reparación, pónganse en contacto con el servicio técnico autorizado.
• Evite que líquidos, aceites o productos grasos en tren en contacto con las piezas ópticas.
• Se recomienda la limpieza regular del equipo
para prolongar su vida útil y optimizar la salida
de luz. Utilice un paño suave que no genere pelu sa para las piezas ópticas, el ventilador y el tubo
de flujo de aire.
• Asegúrese de que no haya personas ajenas a la
instalación al momento de fijar el equipo.
• Apague el quipo, desconéctelo de la corriente
eléctrica y aguarde a que se enfríe antes de re alizar cualquier tarea de mantenimiento.
• Ajuste bien todos los tornillos que se utilicen
para la instalación del equipo y procure que no
muestren signos de corrosión.
• La cubierta, las herramientas de fijación y los
puntos de instalación (cielos rasos, suspensiones
y sistemas de truss) deben estar libres de defor maciones para su correcta instalación.
• Conserve los cables principales en buenas condi ciones. Reemplácelos de forma inmediata si de tecta algún problema.
5. Restablecer valores fábrica
Presione la tecla MODE y, al mismo tiempo, SETUP para
encender la unidad. Cuando visualice FACTORY RESET,
suelte las teclas. La unidad comenzará a restablecer los
valores de fábrica.
Page 19

OCTOBEAM CROSS
P.
19
Page 20

FOR MORE INFO ON THIS PRODUCT PLEASE CHECK WWW.TEC-SHOW.COM /
PARA MAS INFORMACION SOBRE ESTE PRODUCTO VISITE WWW.TEC-SHOW.COM
 Loading...