

Page 1
P. 1
| Nebula Tri
RGB LED WASH LIGHT
80 x 3-in-1 3W LEDs
USER MANUAL / MANUAL DE USUARIO
PLEASE READ THE INSTRUCTIONS CAREFULLY BEFORE USE
POR FAVOR LEA LAS INSTRUCCIÓNES ANTES DE USAR
Page 2
P. 2
Nebula Tri |
1. OVERVIEW
English version
NEBULA TRI
RGB LED WASH LIGHT - 80 x 3-in-1 3W LEDs
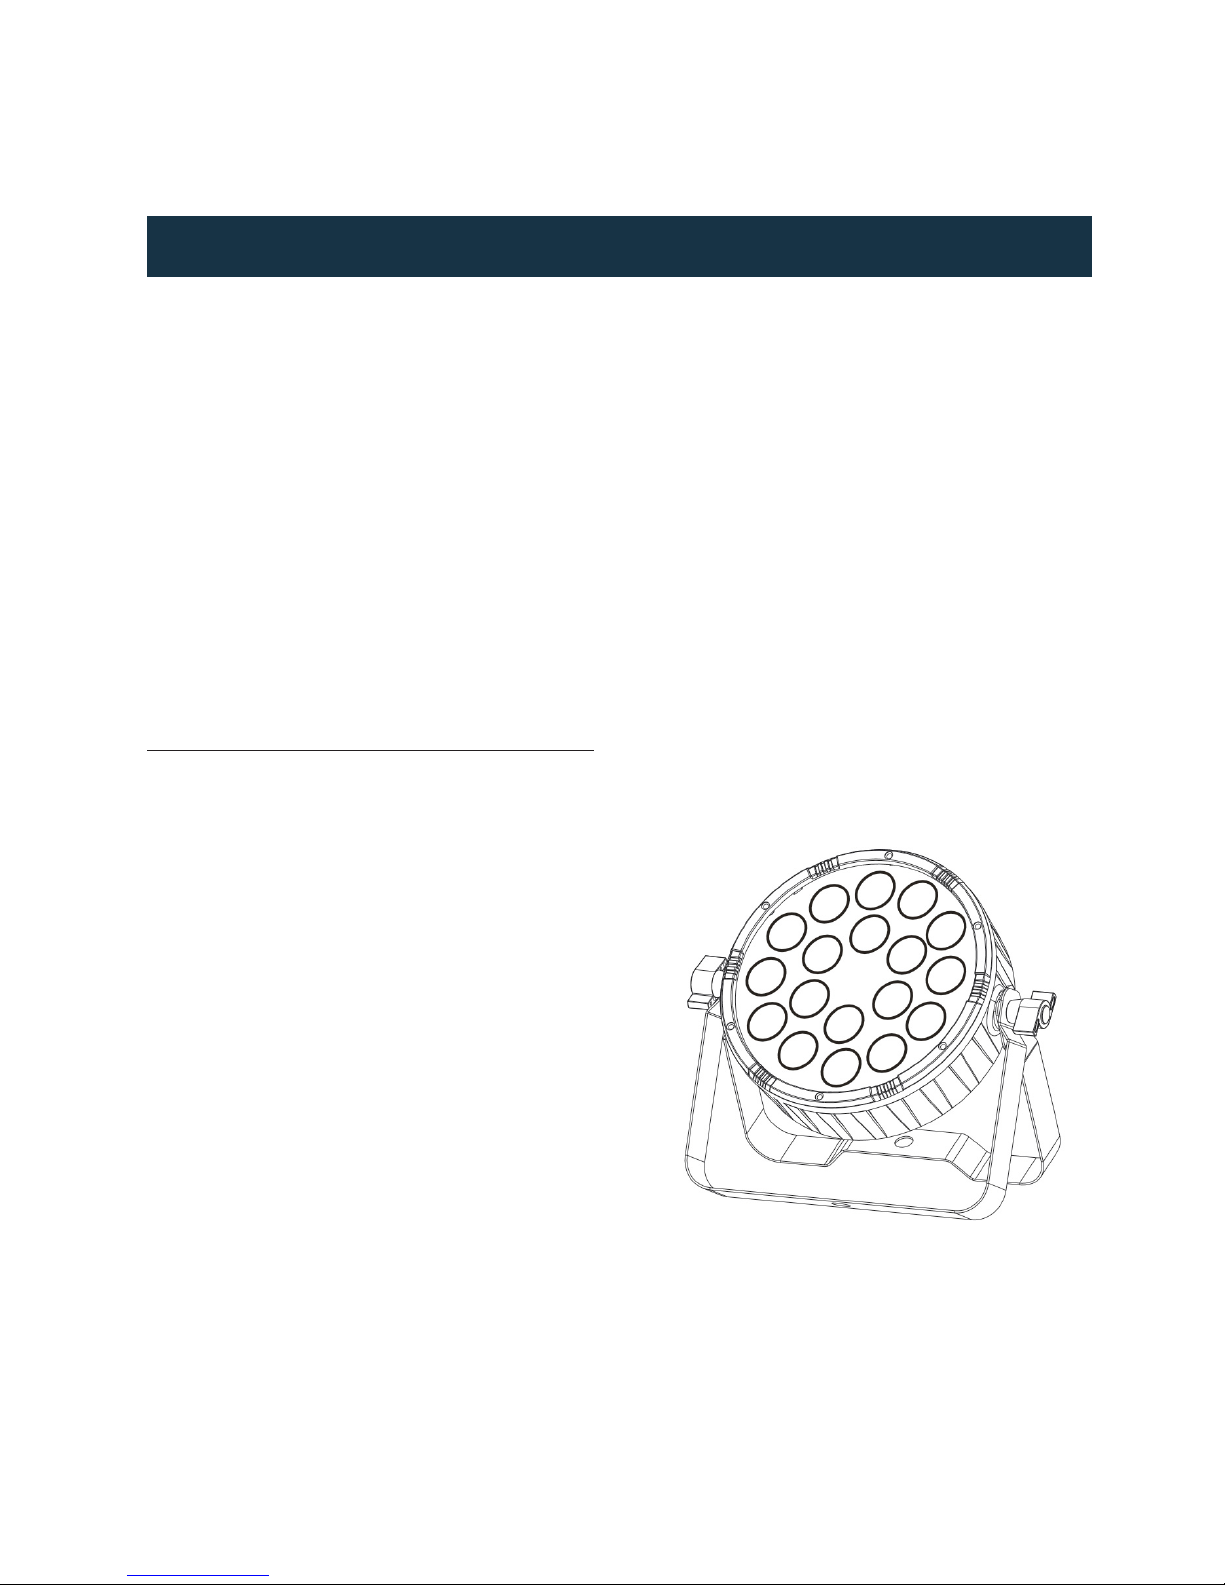
NEBULA TRI is an indoor LED par powered by 18
x 3-in-1 RGB 1W LEDs. The xtures comes in a lightweight and compact design and its ideal for floor
applications, thanks to its double bracket. Provided with a 25º beam angle and 0-100% electronic
dimming, Nebula Tri is an excellent tool for creating
stunning ambiances and gives you great exibility
with its 3 operational modes (Master/Slave, Sound
Active, DMX).
Source & Optics
• Light Source: 18 x 3-in-1 RGB 1W LEDs
• LEDs life: 50,000 hours
• Beam angle: 25º
Photometric data
• Luminous Flux: 950 lux @ 3m (10 .)
Eects & Functions
• Dimmer: Full range 0-100% general & for all four
colors
• Strobe eect
• Built-in programs
Control
• DMX channels: 3/7
• Operational modes: DMX, Master/Slave &
Sound-active
Physical
• LED display
• DMX connectors: 2 XLR connectors (XLR-3 In
and Out)
• Power supply connectors (In/Out)
• Dimensions: 240x80x235 mm. / 9.4x3.1x9.2 in.
• Weight: 1 Kg. / 2.2 Lbs.
Page 3

P. 3
| Nebula Tri
English version
Compare LED Par light with traditional par light , Led par
light have more rich color effects, color mixing effect rich,
color mixing effect of trichromatic LED of up to 16700000,
the classification of LED par light: use is divided, One,It
is a commercial lighting, also called the spotlight, mainly plays the role of illumination, high power LED Bulb,LED
bulb usually use a single color, small size, are often used
in shopping malls, hotels, guesthouses, square fountain
etc.. Two,Stage lighting, mainly to lighting, color change,
making the stage atmosphere, the size of the power LED
has, LED Bulb color has red, green, blue, white. Oen used
for stage performances, wedding etiquette, exhibition and
conference time.
Page 4
P. 4
Nebula Tri |
2. SAFETY INTRODUCTIONS
English version
• Please keep this User Guide for future consultation. If you sell the unit to another user, be sure
that they also receive this instruction booklet.
• All xtures are intact from the manufacturer,
please operate follow up the user manual, articial fault are not under guarantee repair.
• Unpack and check carefully that there is no
transportation damage before using the unit.
• The unit is for indoor use only. Use only in a dry
location.
• Do install and operate by operator.
• Use safety chain when xes the unit. Don’t han-
dle the unit by taking its head only, but always
by taking its base.
• The unit must be installed in a location with adequate ventilation, at least 50cm from adjacent
surfaces.
• Be sure that no ventilation slots are blocked,
otherwise the unit will be overheated.
• Before operating, ensure that the voltage and
frequency of power supply match the power
requirements of the unit.
• It’s important to ground the yellow/green conductor to earth in order to avoid electric shock.
• Maximum ambient temperature TA : 40°. Don’t
operate it where the temperature is higher than
this.
• Don’t connect the device to any dimmer pack.
• First run, there will be smoke or smells, and all
disappearing a few minutes later.
• Make sure there are no ammable materials
close to the unit while operating, as it is re
hazard.
• Look over power wires carefully, replace immediately if there is any damage.
• Never run on for a long time lest shortening
lifespan. Avoid any inammable liquids, water
or metal objects entering the unit.
• Once it happen, cut o the mains power immediately.
• Do not operate in dirty and dusty environment, also cleaning xtures regularly.
• Do not allow children to operate the xture.
• Do not touch any wire during operation as
there might be a hazard of electric shock.
• Avoid power wires together around other
cables.
• Disconnect mains power before fuse/lamp
replacement or servicing.
• Replace fuse only with the same type.
• In the event of serious operating problem,
stop using the unit immediately.
• Never turn on and o the unit time aer time.
• The housing, the lenses, or the ultraviolet lter
must be replaced if they are visibly damaged.
• Do not open the unit as there are no user serviceable parts inside.
• Never try to repair the unit by yourself. Repairs carried out by unskilled people can lead
to damage or malfunction. Please contact
the nearest authorized technical assistance
center.
• Disconnect the mains power if the xture is
not used for a long time.
• Do use original packing materials once trans-
Please read the instructions carefully which includes important
information about the installation, operation and maintenance.
WARNING!
Page 5
P. 5
| Nebula Tri
English version
The unit should be mounted via its screw holes on
the bracket. Always ensure that the unit is rmly
xed to avoid vibration and slipping while operating. Always ensure that the structure to which you
are attaching the unit is secure and is able to support a weight of 10 times of the unit’s weight. Also
always use a safety cable that can hold 12 times of
the weight of the unit when installing the xture.
The equipment must be xed by professionals. And
it must be xed at a place where is out of the touch
of people and has no one pass by or under it.
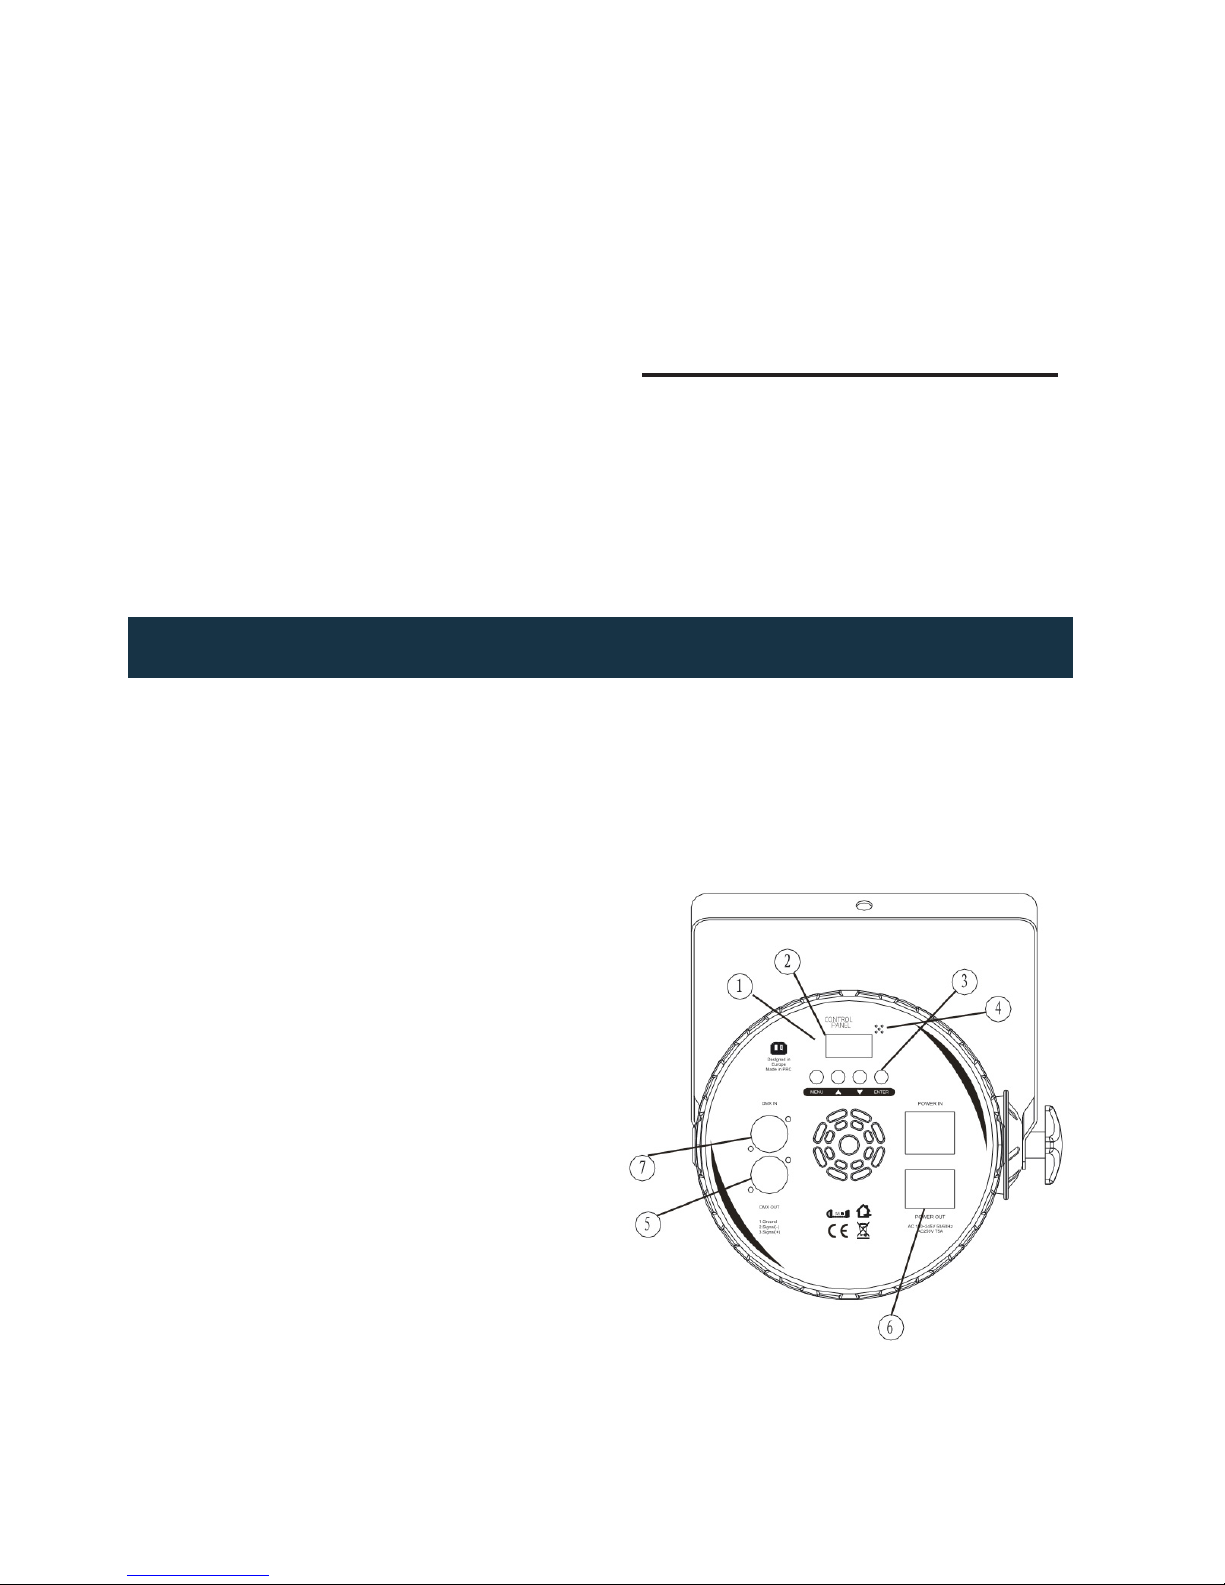
How to Set the Fixture
1.The indicating light
2.Function display: display menu and the selected
function
3.Menu button
4.Microphone
5.DMX signal output
6.Power supply socket
7.DMX signal input
port it again.
• Do not look directly at the LED light beam while
the xture is on.
For power supply, do not connect in series
much more than 7 units, use another mains
supply for next 7 units.
3. INSTALLATION
Page 6
P. 6
Nebula Tri |
English version
4. MENU
Page 7

P. 7
| Nebula Tri
English version
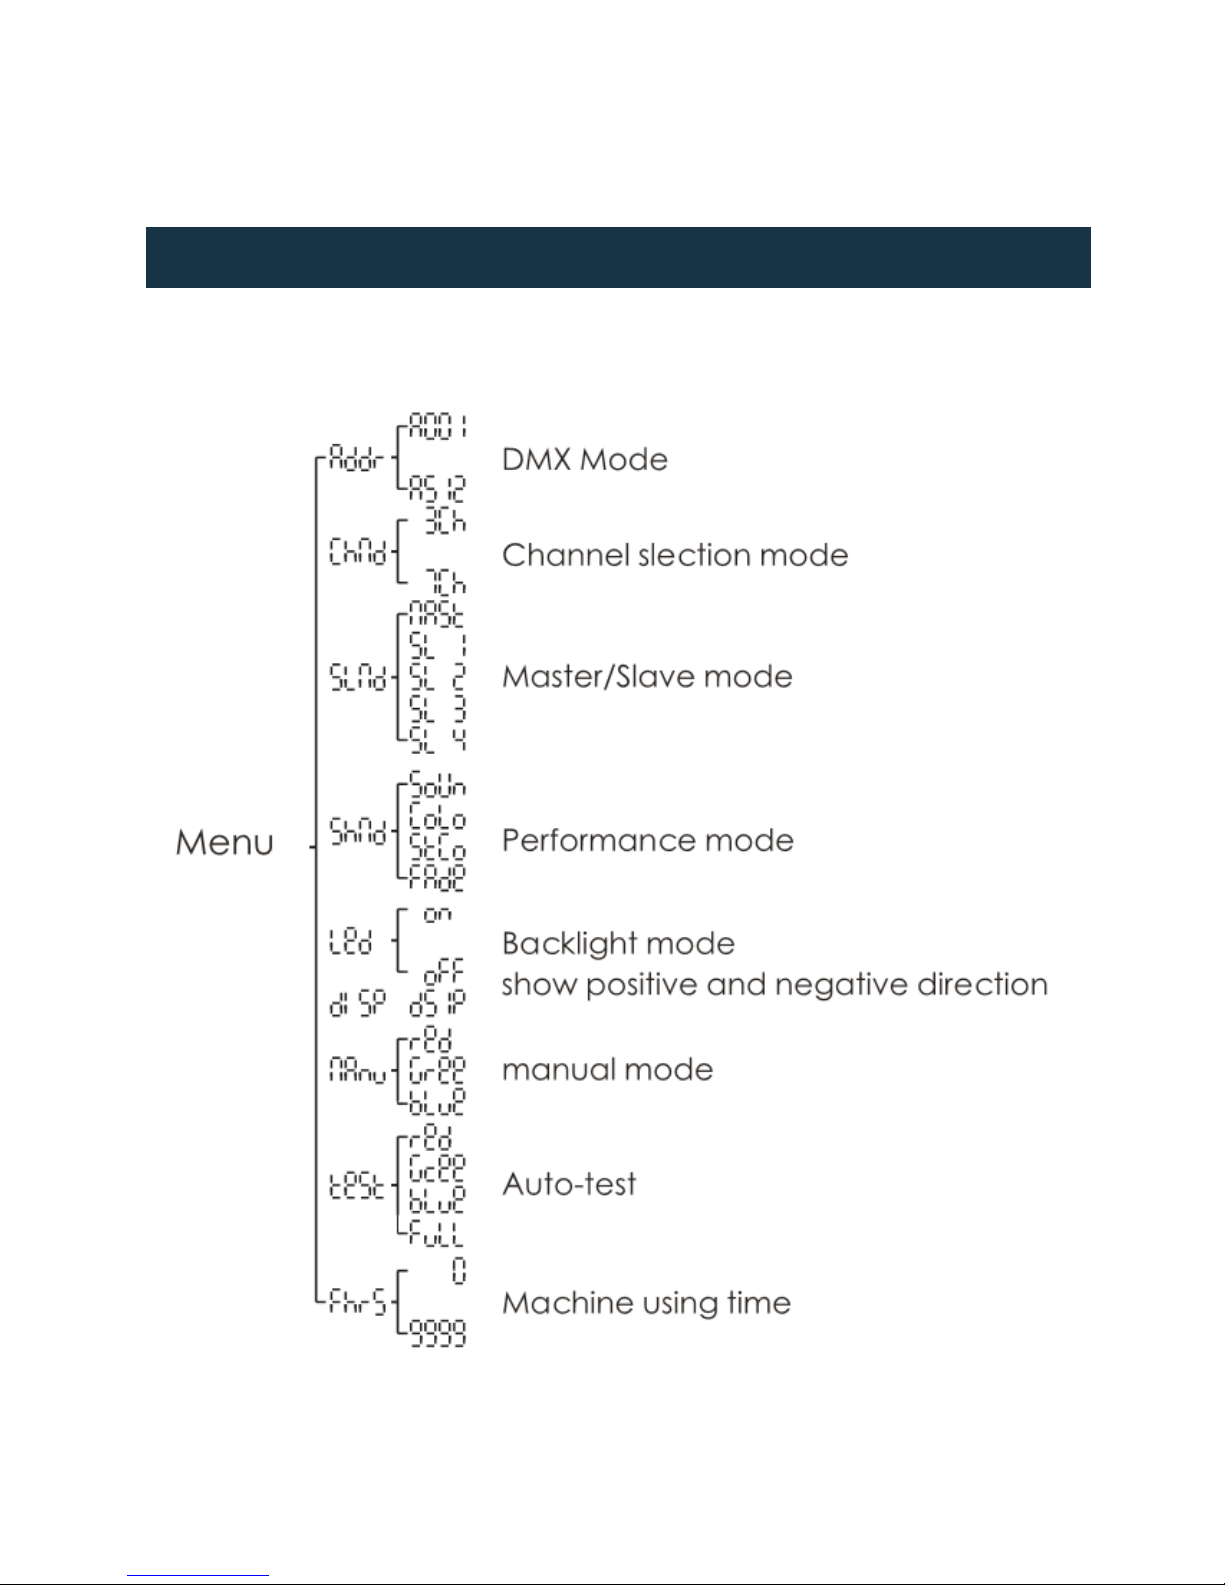
• DMX Mode
Select the Addr menu, press the ENTER key to conrm. Then use the initial address code DOWN/UP
button to set this light (A001 ~ A512). Once you have
set your initial address code, press ENTER to dene
and save. Not to make any changes, wait a minute
to automatically exit the menu and save. The main
menu, please press the MENU button.
• Channel selection model
Select the Chnd menu, press the ENTER key to
determine. To use the DOWN/UP button to channel mode: 3Ch (3 Channel).7Ch (7 Channels) mode.
Select the desired channel mode, press ENTER to
determine and save. Not to make any changes, wait
a minute to automatically exit the menu and save.
The main menu, please press the MENU button.
• Master/Slave mode
Select the SLnd menu, press the ENTER key to conrm. To use the DOWN/UP key set of Master-Slave
mode need: NAST (master.SL 1 (Slave 1). SL 2( Slave
2). SL 3( Slave 3). SL 4 (Slave 4). Select the desired
mode, press ENTER to determine and save. Not to
make any changes, wait a minute to automatically
exit the menu and save. The main menu, please
press the MENU button
• Performance mode
Select the Shnd menu,press the ENTER key to
determine.To use DOWN/UP button to performace
mode: FADE (Gradient), SOUN (Sound), Auto (Automatic), COLOR (Color) mode, Select the desired
mode, press ENTER to determine and save. Not to
make any changes, wait a minute to automatically
exit the menu and save. The main menu, please
press the MENU Button FADE (Gradient) SP 1-SP 8
8 fades speed selection.Uuse DOWN/UP button to
select the gradient speed required.according to ENTER, determine and save. Not to make any changes,
wait a minute and automatically exit the MENU and
save. The main menu.plase press the MENU button
Color (Color) CO 1-CO 16 16 program mode, And
also press Stro (Strobe) have 0-255 to adjust the
speed, use the DOWN/UP button to select the
desired mode. Press ENTER to determine and ave.
NOT to make any changes,wait a minute to automatically exit the menu and save.
• Backlight mode
Select the LED menu, press the ENTER key to
determine. Then use the DOWN/UP button to set
the backlight mode: ON (Open). OFF (Close). Select
the desired mode, press ENTER to determine and
save. Not to make any changes, wait a minute to
automatically exit the menu and save. The main
menu, please press the MENU button.
• White Balance
Select the BALA menu, Press the ENTER key to
determine. To use the DOWN/UP to display mode:
Red (Red), Gree (Green,Blue(BLue), select the
desired mode, Press ENTER to determine and
save. Not to make any changes, Wait a moment to
automatically exit the menu and save. The main
menu, Please press the MENU button Red (Red)
with 125-255 using the DOWN/UP button to brightness. Press ENTER to dene and save. Not to make
any changes, wait a minute to automatically exit
the menu and save. The main menu, Please press
the MENU button Gree (Green) with 125-255 using
the DOWN/UP button to brightness. Press ENTER
to dene and save. Not to make any changes, wait
a minute to automatically exit the menu and save.
• Show positive and negative direction
Select the dISP menu, press the ENTER key to
determine. To use the DOWN/UP button to display mode: dISP (positive). DSIP (reverse). Select
the desired mode, press ENTER to determine and
save. Not to make any changes, wait a minute to
automatically exit the menu and save. The main
menu, please press the MENU button.
Page 8

P. 8
Nebula Tri |
5. DMX 512 CONNECTIONS
English version
The DMX 512 is widely used in intelligent lighting control, with a maximum of 512 channels.
Termination reduces signal errors and avoids signal transmission problems and interference. lt is always
advisable to connect a DMX terminal. (Resistance 120 ohm 1/4W) between pin 2 (DMX-) and pin 3 (DMX+) of the
last xture.
• Auto-test
Select the Test menu, press the ENTER key to determine. The machine will start automatically detect
color. Not to make any changes, wait a minute to
automatically exit the menu and save. The main
menu, please press the MENU button.
• Fhrs
Select the Fhrs menu, press the ENTER key to determine. You can see the use of machine time / h.
Not to make any changes, wait a minute to automatically exit the menu and save. The main menu,
please press the MENU button.
• Temperature
Select the Tenp menu, press the ENTER key to determine. You can see the machine light board temperature / degree. Not to make any changes, wait
a minute to automatically exit the menu and save.
The main menu, please press the MENU button.
COMMON
DMX +
DMX -
DMX OUTPUT
DMX INPUT
Page 9

P. 9
| Nebula Tri
7. 7 CH CHANNEL MODE
6. 3 CH CHANNEL MODE
English version
Page 10

P. 1 0
Nebula Tri |
English version
8. FIXTURE CLEANING
The cleaning of internal must be carried out periodically to optimize light output. Cleaning frequency depends
on the environment in which the xture operates: damp, smoky or particularly dirty surrounding can cause
greater accumulation of dirt on the xture’s optics.
• Clean with so cloth using normal glass cleaning uid.
• Always dry the parts carefully.
• Clean the external optics at least every 20 days.
• Clean the internal optics at least every 30/60 days.
Page 11

P. 11
| Nebula Tri
Versión Español
1. DESCRIPCION
NEBULA TRI
LED para interior que tiene 18 LEDs 3-en-1 RGB de 1W
NEBULA TRI es un par de LED para interior que tiene
18 LEDs 3-en-1 RGB de 1W. El equipo cuenta con
un compacto y ligero diseño y es ideal para aplicaciones al piso gracias a su doble bracket. La unidad tiene un ángulo de haz de 25º y un dimmer
electrónico de 0-100%. Nebula Tri es una excelente
herramienta para crear ambientes sofisticados y
brinda gran flexibilidad gracias a sus 3 modos de
operación ((DMX, Master/Slave & audiorítmico).
Fuente & Óptica
• Fuente de luz: 18 LEDs 3-en-1 RGB de 1W
• Vida útil promedio: 50,000 horas
• Ángulo de haz: 25º
Información fotométrica
• Flujo lumínico: 950 lux @ 3m (10 .)
Efectos y Funciones
• Dimmer: Rango completo 0-100% general &
para todos los colores
• Efecto estrobo
• Programas integrados
Control
• Canales DMX: 3/7
• Modos de operación: DMX, Master/Slave & audi-
orítmico
Físico
• Display LED
• Conectores DMX: 2 conectores XLR (XLR-3
Entrada y Salida)
• Conectores de alimentación (Entrada/Salida)
• Dimensiones: 240x80x235 mm. / 9.4x3.1x9.2 in.
• Peso: 1 Kg. / 2.2 Lbs.
Page 12

P. 12
Nebula Tri |
Versión Español
Nebula Tri es un par LED de alto rendimiento. En comparación
con un equipo tradicional, este nuevo par LED dispone de
colores más vivos que permiten la mezcla de colores de LEDs
tricromáticos con hasta 16.700.000 variedades.
A su vez, Nebula Tri cuenta con amplio espectro de usos. Por
un lado, en aplicaciones comerciales, puede utilizarse como
reflector para iluminación habitual con una bombilla LED
de gran potencia. Esta bombilla LED pequeña y de un único
color se aplica con frecuencia en centros comerciales, hoteles, fuentes de agua, etc. Por otro lado, este tipo de par LED
se utiliza también en la iluminación de escenarios, debido a la
mezcla de colores que genera una puesta en escena extraordinaria. La bombilla LED está provista de cuatro colores: rojo,
verde, azul y blanco. Colores que aportan versatilidad para
múltiples aplicaciones, desde bodas y obras de teatro a exhibiciones y conferencias.
Page 13

P. 13
| Nebula Tri
Versión Español
2. INSTRUCCIONES DE SEGURIDAD
• Conserve este manual para futuras referencias.
En caso de vender la unidad, procure entregar
esta guía al comprador.
• Previo a su entrega, este equipo fue sometido
a estrictas inspecciones que avalan su funcionamiento. Lea atentamente el manual antes de
utilizar el equipo. La garantía no cubre daños
provocados por el uso inapropiado de este
producto.
• Abra el embalaje con cuidado y revise que el
equipo se encuentre en buen estado, antes de
utilizarlo.
• Este equipo se diseñó para uso en interiores.
Manténgalo alejado de ambientes extremadamente húmedos.
• Un profesional calicado debe realizar la instalación del equipo.
• En caso de instalar el equipo en altura, procure
utilizar un cable de seguridad.
• Para trasladar la unidad, tómela siempre de la
base, nunca del cable o de las piezas móviles.
• Instale el equipo en ambientes con ventilación
adecuada y mantenga una distancia mínima de
50 cm con otros objetos o supercies.
• Procure no obstruir las ranuras de ventilación
del equipo.
• Compruebe que el voltaje utilizado no sea
superior o inferior al indicado en el presente
manual.
• Procure la conexión a tierra del equipo para
evitar el riesgo de descarga eléctrica.
• No utilice el equipo si la temperatura ambiente
supera los 40°C.
• No conecte la unidad a un dimmer.
• Durante la puesta en marcha inicial, es pro-
bable que se genere algo de humo u olor.
Es un proceso normal que no implica que el
dispo- sitivo esté dañado. Tanto el humo como
el olor desaparecerán gradualmente.
• Mantenga el equipo alejado de llamas expuestas o materiales inamables.
• Verique que el cable de suministro eléctrico
no se encuentre cortado o dañado. Compruebe el estado del cable con frecuencia.
• La unidad no está diseñada para funcionar
de forma permanente. Procure que el equipo
descanse para prolongar su vida útil.
• Evite el ingreso de líquidos, objetos de metal o
sustancias inamables dentro del equipo. En
caso de que suceda, desconecte el equipo del
suministro eléctrico de inmediato.
• No opere la unidad en ambientes con polvo o
suciedad en exceso.
• No permita que el equipo sea operado por
niños.
• Para reducir el riesgo de descarga eléctrica,
evite entrar en contacto con los cables cuando
el equipo esté en funcionamiento.
• En ningún caso deje que los cables de alimentación entren en contacto con cables de otro
tipo.
• Desconecte el equipo del suministro eléctrico
antes de realizar cualquier tarea de mantenimiento.
• Si precisa sustituir el fusible, asegúrese de
Lea atentamente el manual antes de utilizar el equipo y procure seguir las
instrucciones. Consérvelo para futuras referencias ya que contiene información
importante sobre el uso, la instalación y el mantenimiento del equipo.
ATENCIÓN
Page 14

P. 14
Nebula Tri |
Versión Español
utilizar uno del mismo tipo y rango.
• Desconecte el equipo de inmediato si observa
un problema grave de funcionamiento.
• Luego de apagar la unidad, aguarde unos minutos antes de volver a encenderla.
• Sustituya el lente, el ltro y la cubierta en caso
de que se encuentren rayados o dañados.
• El equipo no contiene piezas que puedan ser
reparadas por el usuario. En caso de precisar
asistencia, póngase en contacto con el servicio
técnico autorizado.
• Para prolongar la vida útil del equipo, procure
desconectarlo del suministro eléctrico durante los periodos de inactividad.
• Utilice el embalaje original para transportar la
unidad.
• No mire de forma directa a la salida de luz.
El usuario podrá conectar hasta siete unidades
en la misma toma de corriente. Si desea conectar más unidades, utilice una toma de corriente
diferente.
4. Micrófono.
5. Salida DMX.
6. Fuente de alimentación.
7. Entrada DMX.
• Utilice los oricios para tornillos de la abrazadera cuando precise realizar el montaje del
equipo.
• Asegúrese de instalar rmemente el equipo
para evitar vibraciones y deslizamientos durante su funcionamiento.
• Compruebe que la estructura, donde instalará
el equipo, sea segura y pueda soportar diez
veces el peso de la unidad.
• Siempre utilice un cable de seguridad que
pueda soportar doce veces el peso de la uni-
dad.
• Un profesional calicado debe realizar la insta-
lación del equipo en una zona fuera del alcance
de las personas.
Descripción del equipo
1. Luz indicadora.
2. Pantalla: para visualizar el menú y la función
seleccionada.
3. Teclas de menú.
3. INSTALACIÓN
Page 15

P. 15
| Nebula Tri
Versión Español
4. MENU
Page 16

P. 1 6
Nebula Tri |
Versión Español
• Modo DMX
Seleccione el menú Addr y presione la tecla ENTER para conrmar. Utilice las fechas UP y DOWN
para establecer la dirección deseada (A001-A512).
Presione ENTER para conrmar y guardar los cambios. Si no desea guardar los cambios, aguarde un
minuto y el sistema abandonará el menú automáticamente. Presione MENU para volver al menú
principal.
• Selección del modo de canales
Seleccione el menú Chnd y presione la tecla ENTER
para acceder. Utilice las fechas UP y DOWN para
establecer el modo de canales: 3Ch (3 canales) o
7Ch (7 canales). Presione ENTER para conrmar y
guardar los cambios. Si no desea guardar los cambios, aguarde un minuto y el sistema abandonará
el menú automáticamente. Presione MENU para
volver al menú principal.
• Modo maestro/esclavo
Seleccione el menú SLnd y presione la tecla ENTER
para acceder. Utilice las fechas UP y DOWN para
establecer el modo maestro/esclavo: NASt (maestro), SL 1 (esclavo 1), SL 2 (esclavo 2), SL 3 (esclavo
3) y SL 4 (esclavo 4). Presione ENTER para conrmar
y guardar los cambios. Si no desea guardar los cambios, aguarde un minuto y el sistema abandonará
el menú automáticamente. Presione MENU para
volver al menú principal.
• Modo de operación
Seleccione el menú Shnd y presione la tecla ENTER
para acceder. Utilice las fechas UP y DOWN para
establecer el modo de operación: SOUN (sonido),
COLOR (color), STCO (estrobo) o FADE (cambio gradual). Presione ENTER para conrmar y guardar los
cambios. Si no desea guardar los cambios, aguarde
un minuto y el sistema abandonará el menú automáticamente.
• De haber establecido COLOR (color), utilice
las echas UP y DOWN para seleccionar el modo de
programa entre Co1-Co16.
• De haber establecido STCO (estrobo),
utilice las echas UP y DOWN para seleccionar la
velocidad entre 0-255.
• De haber establecido FADE (cambio gradual), utilice las echas UP y DOWN para seleccionar
la velocidad de fade entre SP1-SP8.
Luego, presione ENTER para conrmar y guardar
los cambios. Si no desea guardar los cambios,
aguarde un minuto y el sistema abandonará el
menú automáticamente. Presione MENU para
volver al menú principal.
• Luz de fondo
Seleccione el menú LED y presione la tecla ENTER
para acceder. Utilice las fechas UP y DOWN para
seleccionar entre ON (encendida) y OFF (apagada).
Presione ENTER para conrmar y guardar los cambios. Si no desea guardar los cambios, aguarde
un minuto y el sistema abandonará el menú
automáticamente. Presione MENU para volver al
menú principal.
• Modo manual
Seleccione el menú BALA y presione la tecla
ENTER para acceder. Utilice las fechas UP y DOWN
para establecer el color deseado: red (rojo), Gree
(verde) o blue (azul). Presione ENTER para conrmar y guardar los cambios. Si no desea guardar los
cambios, aguarde un minuto y el sistema abandonará el menú automáticamente.
• De haber seleccionado red (rojo), utilice las
echas UP y DOWN para regular el brillo entre 125-
255.
• De haber seleccionado Gree (verde), utilice
las echas UP y DOWN para regular el brillo entre
125-255.
• De haber seleccionado blue (azul), utilice
las echas UP y DOWN para regular el brillo entre
125-255.
Presione ENTER para conrmar y guardar los cambios. Si no desea guardar los cambios, aguarde
un minuto y el sistema abandonará el menú
Page 17

P. 17
| Nebula Tri
Versión Español
automáticamente. Presione MENU para volver al
menú principal.
• Dirección positiva y negativa
Seleccione el menú dISP y presione la tecla ENTER
para acceder. Utilice las fechas UP y DOWN para
establecer la dirección de pantalla deseada: dISP
(positiva) o DSIP (negativa). Presione ENTER para
conrmar y guardar los cambios. Si no desea guardar los cambios, aguarde un minuto y el sistema
abandonará el menú automáticamente. Presione
MENU para volver al menú principal.
• Prueba automática
Seleccione el menú Test y presione la tecla ENTER
para acceder. El equipo comenzará la detección del
color de manera automática. Si no desea guardar
los cambios, aguarde un minuto y el sistema abandonará el menú automáticamente. Presione MENU
para volver al menú principal.
• Tiempo de funcionamiento
Seleccione el menú Fhrs y presione la tecla ENTER
para acceder. En la pantalla, visualizará el tiempo
de funcionamiento de la unidad. Luego, aguarde un
minuto y el sistema abandonará el menú automáticamente. Presione MENU para volver al menú
principal.
• Temperatura
Seleccione el menú Tenp y presione la tecla ENTER
para acceder. En la pantalla, visualizará la temperatura del tablero de la unidad. Luego, aguarde un
minuto y el sistema abandonará el menú automáticamente. Presione MENU para volver al menú
principal.
Page 18

P. 18
Nebula Tri |
Versión Español
5. CONEXIÓN DMX 512
El protocolo DMX512 se utiliza ampliamente en el control de iluminación inteligente con un máximo de 512
canales.
Se recomienda la colocación de un terminador
DMX (120 ohm 1/4 W) entre las clavijas 2 (DMX-)
y 3 (DMX+) de la última unidad de la cadena con
el n de reducir los errores, la interferencia
y prevenir los problemas de transferencia de
señal.
COMMON
DMX +
DMX -
DMX OUTPUT
DMX INPUT
Referencia de imagen
DMX input Entrada DMX
Common Tierra
DMX + DMX +
Dmx - DMX DMX ouput Salida DMX
Page 19

P. 1 9
| Nebula Tri
Versión Español
7. 7 CH CHANNEL MODE
6. MODO DMX: 3 CANALES
ROJO
CANAL 1 CANAL 2 CANAL 3
VERDE AZUL
ROJO DIMMER
CANAL 1 CANAL 4CANAL 2 CANAL 5CANAL 3 CANAL 6
CANAL 10
VERDE ESTROBOAZUL
CAMBIO DE
COLOR
0-7
Sin función
8-99 Es trobo
(velocida d creciente)
100 -149
Estrobo (ve loci-
dad decreci ente)
150 -199
Efecto estr obo 1
200 -245
Efecto estrob o 2
246 -255
Estrobo
(velocidad máxima)
MODO
AUDIORÍTIMICO
0-7
Sin función
8-25 5
Color
automático
0-7
Sin función
8-19 9
Velocida d
de color
automático
200 -255
Modo
audiorítmico
Page 20

P. 2 0
Nebula Tri |
8. LIMPIEZA Y MANTENIMIENTO
Se recomienda la limpieza regular de las partes internas y externas del equipo para optimizar la salida de luz.
La frecuencia de limpieza dependerá del ambiente en el que esté instalado el equipo. La humedad, el polvo y
el humo pueden generar una mayor acumulación de suciedad en las piezas ópticas de la unidad.
• Utilice un paño suave con productos para limpieza de vidrios.
• Procure secar las piezas cuidadosamente.
• Limpie las ópticas externas cada 20 días.
• Las ópticas internas, cada 30/60 días.
Observación: El proveedor no asumirá responsabilidad por los errores u omisiones del manual. La información de este manual está sujeta a cambios sin previo aviso.
Versión Español
Page 21

P. 2 1
| Nebula Tri
FOR MORE INFO ON THIS PRODUCT PLEASE CHECK WWW.TEC-SHOW.COM /
PARA MAS INFORMACION SOBRE ESTE PRODUCTO VISITE WWW.TEC-SHOW.COM
 Loading...