

Page 1

USER MANUAL / MANUAL DE USUARIO
PLEASE READ THE INSTRUCTIONS CAREFULLY BEFORE USE
POR FAVOR LEA LAS INSTRUCCIÓNES ANTES DE USAR
Indoor DMX LED Par - 36 x 1W LEDs
1
Page 2

NEBULA 1 - 36x1 W LED PAR LIGHT
English Version
p. 2
English Version
Compare LED Par light with traditional par light, Led par light
have more rich color eects, color mixing eect rich, color
mixing eect of trichromatic LED of up to 16700000, the classication of LED par light: use is divided, One,It is a commercial lighting, also called the spotlight, mainly plays the role of
illumination, high power LED Bulb,LED bulb usually use a single color, small size, are oen used in shopping malls, hotels,
guesthouses, square fountain etc.. Two,Stage lighting, main-
ly to lighting, color change, making the stage atmosphere,
the size of the power LED has, LED Bulb color has red, green,
blue, white. Oen used for stage performances, wedding etiquette, exhibition and conference time.
Page 3

Safety instructions
Please read the instructions carefully which includes important information about the installation, operation and maintenance.
WARNING!
• Please keep this User Guide for future consultation. If
you sell the unit to another user, be sure that they also
receive this instruction booklet.
• All xtures are intact from the manufacturer, please operate follow up the user manual, articial fault are not
under guarantee repair.
• Unpack and check carefully that there is no transportation damage before using the unit.
• The unit is for indoor use only. Use only in a dry location.
• Do install and operate by operator.
• Use safety chain when xes the unit. Don’t handle the unit
by taking its head only, but always by taking its base.
• The unit must be installed in a location with adequate
ventilation, at least 50cm from adjacent surfaces.
• Be sure that no ventilation slots are blocked, otherwise
the unit will be overheated.
• Before operating, ensure that the voltage and frequency of
power supply match the power requirements of the unit.
• It’s important to ground the yellow/green conductor to
earth in order to avoid electric shock.
• Maximum ambient temperature TA : 40°C. Don’t operate
it where the temperature is higher than this.
• Don’t connect the device to any dimmer pack.
• First run, there will be smoke or smells, and all disap-
pearing a few minutes later.
• Make sure there are no ammable materials close to the
unit while operating, as it is re hazard.
• Look over power wires carefully, replace immediately if
there is any damage.
• Never run on for a long time lest shortening lifespan.
• Avoid any inammable liquids, water or metal objects
entering the unit.
• Once it happen, cut o the mains power immediately.
• Do not operate in dirty and dusty environment, also
cleaning xtures regularly.
• Do not allow children to operate the xture.
• Do not touch any wire during operation as there might
be a hazard of electric shock.
• Avoid power wires together around other cables.
• Disconnect mains power before fuse/lamp replacement
or servicing.
• Replace fuse only with the same type.
• In the event of serious operating problem, stop using the
unit immediately.
• Never turn on and o the unit time aer time.
• The housing, the lenses, or the ultraviolet lter must be
replaced if they are visibly damaged.
• Do not open the unit as there are no user serviceable
parts inside.
• Never try to repair the unit by yourself. Repairs carried
out by unskilled people can lead to damage or malfunction. Please contact the nearest authorized technical assistance center.
• Disconnect the mains power if the xture is not used for
a long time.
• Do use original packing materials once transport it again.
• Do not look directly at the LED light beam while the x-
ture is on.
For power supply, do not connect in series much more
than 7 units, use another mains supply for next 7 units.
p. 3NEBULA 1 - 36x1 W LED PAR LIGHT
English Version
Page 4
Installation
The unit should be mounted via its screw holes on the bracket. Always ensure that the unit is rmly xed to avoid vibration and slipping while operating. Always ensure that the
structure to which you are attaching the unit is secure and is
able to support a weight of 10 times of the unit’s weight. Also
always use a safety cable that can hold 12 times of the weight
of the unit when installing the xture.
The equipment must be xed by professionals. And it must
be xed at a place where is out of the touch of people and has
no one pass by or under it.
Technical Specications
• Three operational modes: DMX, Master/Slave and
Sound Active
• DMX Channel mode: 4/8 CH
• Three built-in programs. Control Master/Slave mode
by voice
• 0-100% smooth dimming function
• Suitable for disco, bar mobile Dj, etc.
• LEDs: 36 x 1W RGBW LEDs
• Net weight: 1 Kg.
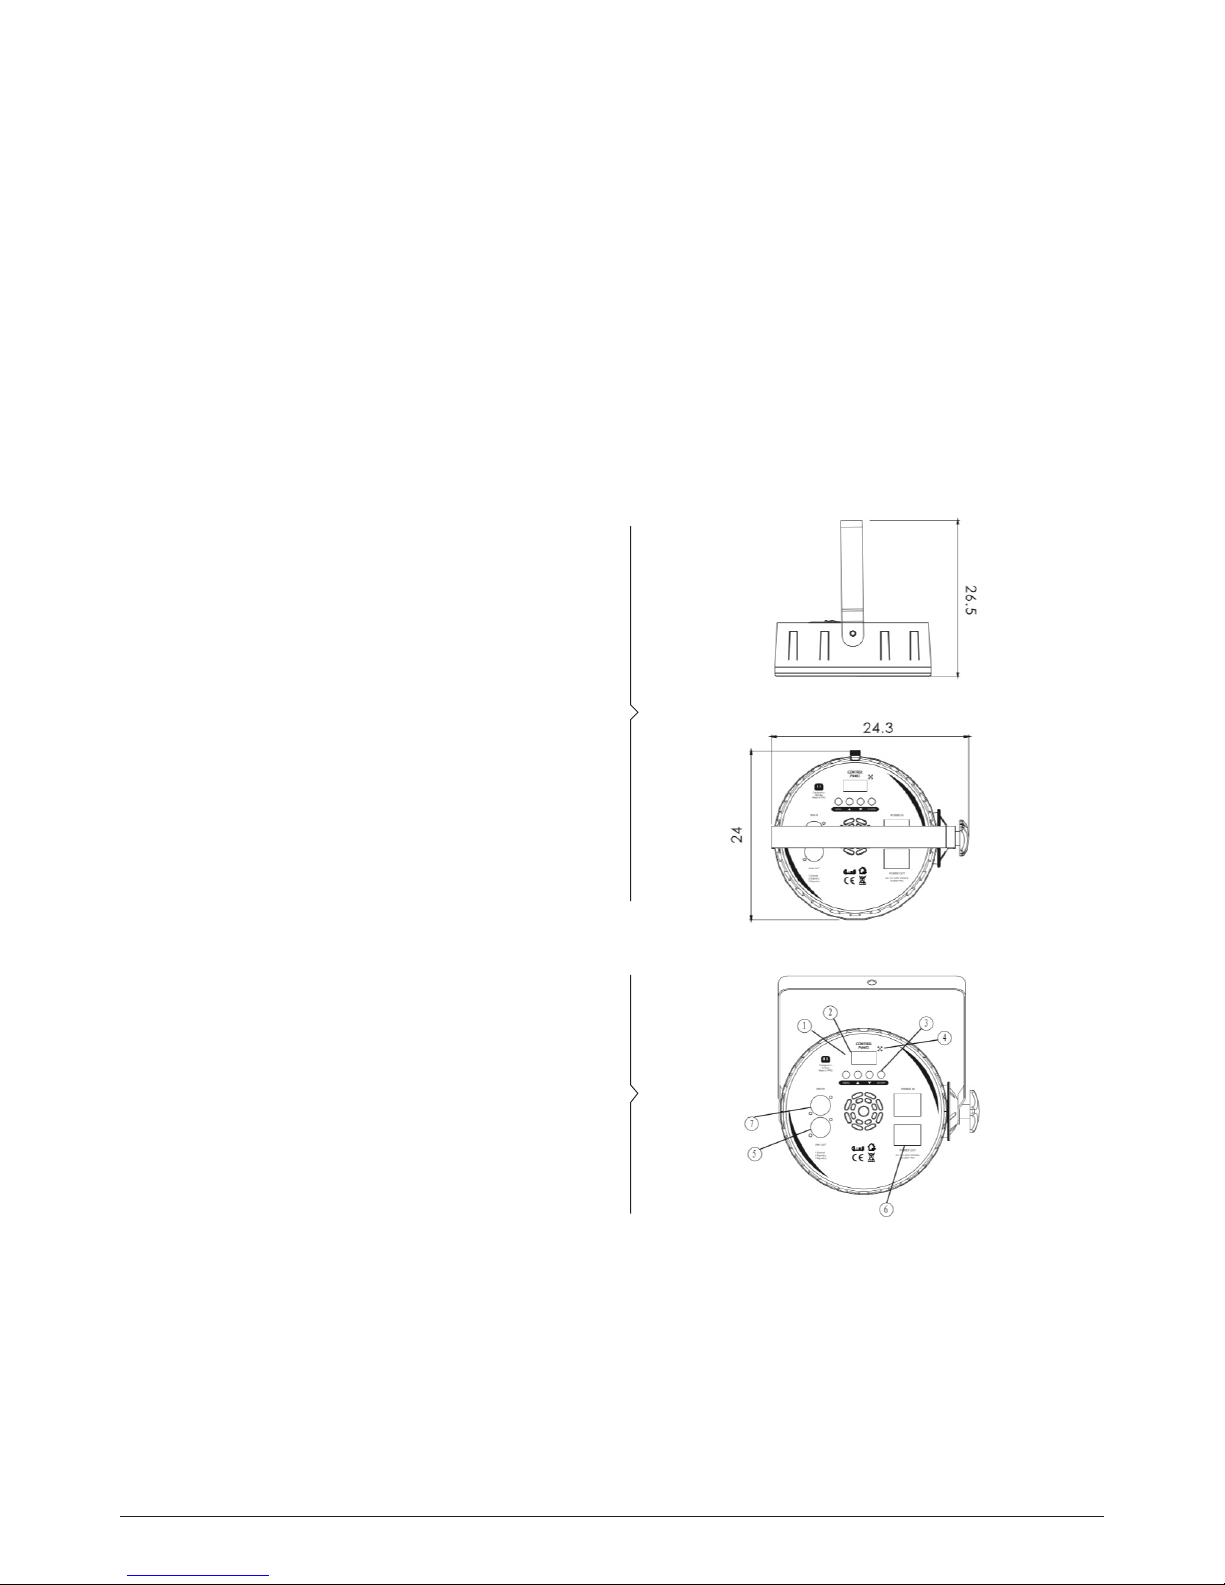
• Dimensions: 24x8x23.5 Cm.
How to Set the Fixture
1. The indicating light
2. Function display: display menu and the selected function
3. Menu button
4. Microphone
5. DMX signal output
6. power supply socket
7. DMX signal input
p. 4NEBULA 1 - 36x1 W LED PAR LIGHT
English Version
Page 5
p. 5
DMX Mode
Channel Selection Mode
Master/Slave Mode
Performance Mode
Backlightmode
Manual Mode
Auto-test
Machine using time
Show positive and negative direction
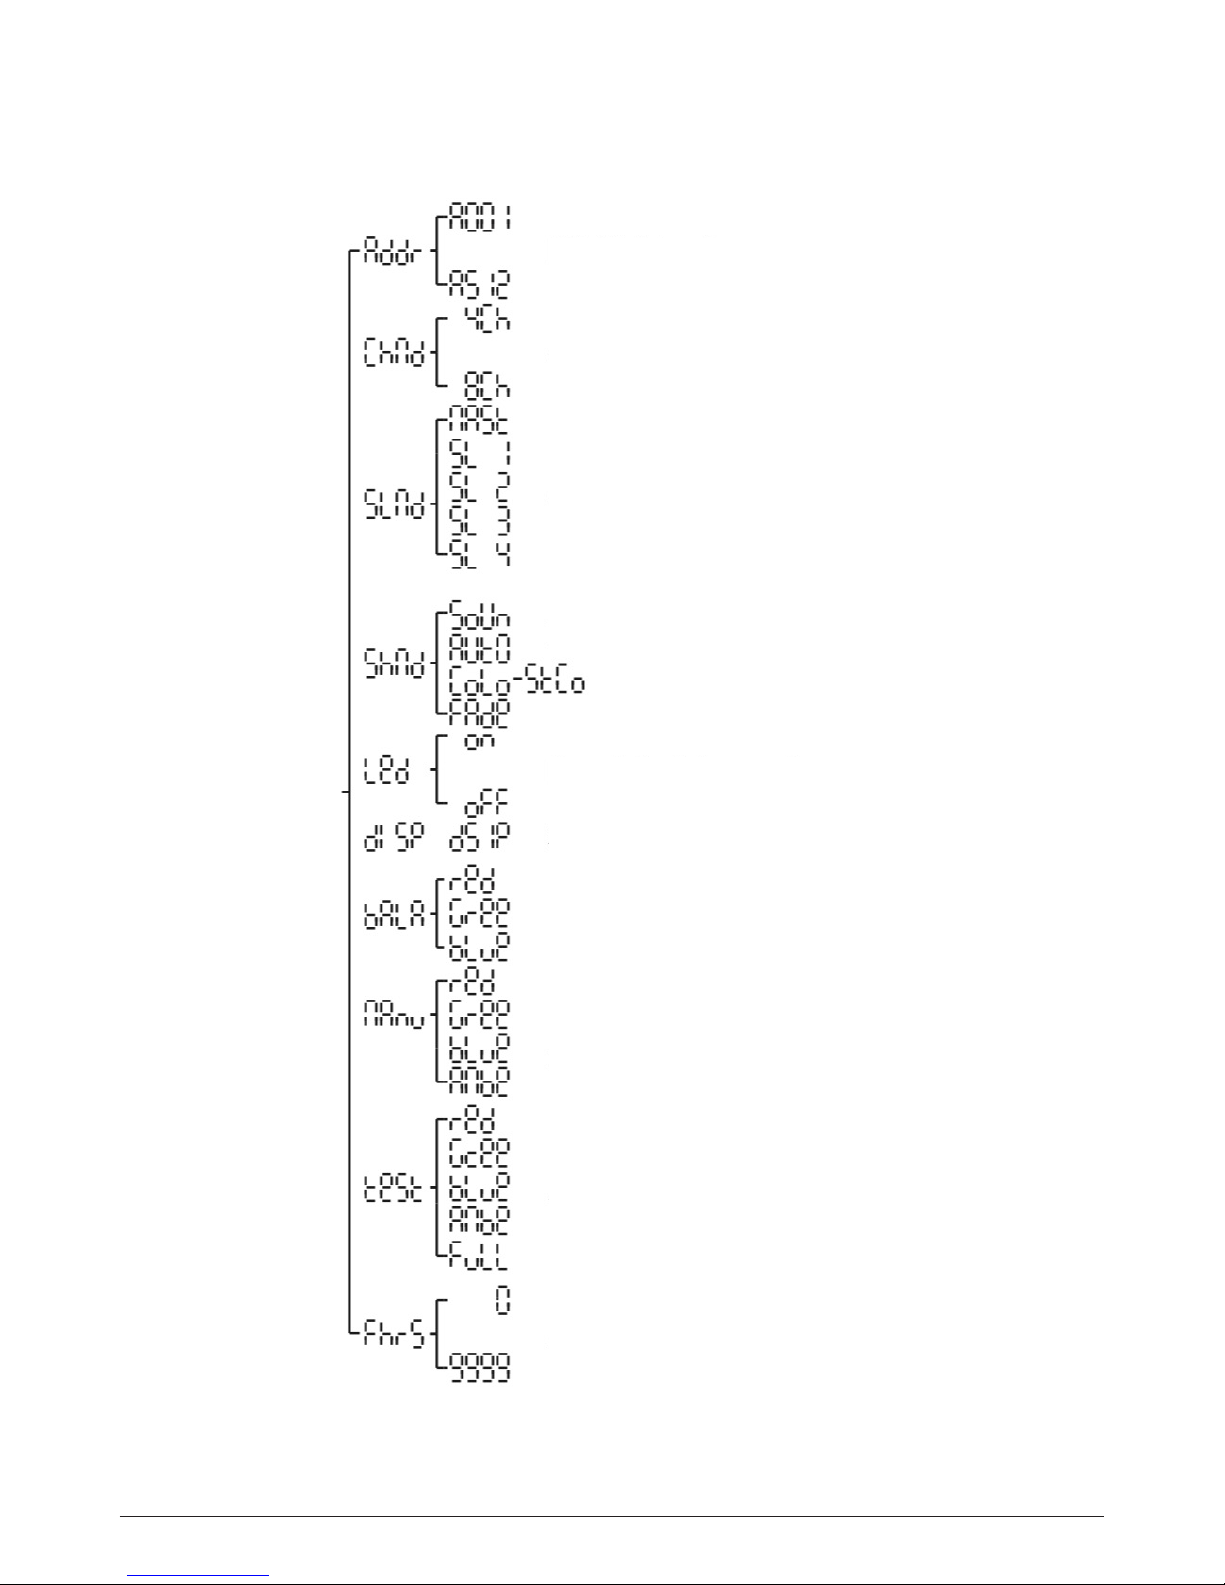
MENU
NEBULA 1 - 36x1 W LED PAR LIGHT
English Version
Page 6

DMX Mode
Select the Addr menu, press the ENTER key to conrm. Then
use the initial address code DOWN/UP button to set this light
(A001 ~ A512). Once you have set your initial address code,
press ENTER to dene and save. Not to make any changes,
wait a minute to automatically exit the menu and save. The
main menu, please press the MENU button
Channel selection mode
Select the Chnd menu, press the ENTER key to determine.
To use the DOWN/UP button to channel mode: 5Ch (5 Channel).9Ch (9 Channels) mode. Select the desired channel
mode, press ENTER to determine and save. Not to make any
changes, wait a minute to automatically exit the menu and
save. The main menu, please press the MENU button
Master/Slave mode
Select the SLnd menu, press the ENTER key to conrm. To
use the DOWN/UP key set of Master-Slave mode need: NASt
(Master). SL 1 (Slave 1). SL 2 (Slave 2) mode. Select the desired
mode, press ENTER to determine and save. Not to make any
changes, wait a minute to automatically exit the menu and
save. The main menu, please press the MENU button
Performance mode
Select the Shnd menu, press the ENTER key to determine. To
use the DOWN/UP button to Performance mode: SoUo (Sound).
CoLo (color).StCo (Strobe).Fade (Gradient) mode. Select the desired mode, press ENTER to determine and save. Not to make
any changes, wait a minute to automatically exit the menu and
save. The main menu, please press the MENU button CoLo (color) Co1 ~ Co12 12 program mode, use the DOWN/UP button to
select the desired mode, press ENTER to determine and save.
Not to make any changes, wait a minute to automatically exit
the menu and save. The main menu, please press the MENU
button StCo (STROBE) have 0 ~ 255 to adjust the speed, use the
DOWN/UP button to select the desired speed, according to ENTER, determine and save. Not to make any changes, wait a minute to automatically exit the menu and save. The main menu,
please press the MENU button Fade (Gradient) SP1 ~ SP8 8 fade
speed selection, use the DOWN/UP button to select the gradient
speed required, according to ENTER, determine and save. Not
to make any changes, wait a minute to automatically exit the
menu and save. The main menu, please press the MENU button
Backlight mode
Select the LED menu, press the ENTER key to determine.
Then use the DOWN/UP button to set the backlight mode: ON
(Open).OFF (Close). Select the desired mode, press ENTER to
determine and save. Not to make any changes, wait a minute
to automatically exit the menu and save. The main menu,
please press the MENU button
White balance
Select de BALA menu, press the ENTER key to determine. To
use the DOWN/UP to display mode: Red (red), Gree green),
Blue (blue), select the desired mode and press enter to determine and save. Not to make any changes, wait a moment
to automatically exit the menu and save. The main menu,
please press the MENU button Red (red) with 125-255 using
the DOWN/UP button for brightness. Press ENTER to dene
and save. Not to make any changes, wait a minute to automatically exit the menu and save. The main menu, please
press the MENU button Gree (green) with 125-255 using the
DOWN/UP button for brightness. Press ENTER to dene and
save. Not to make any changes, wait a minute to automatically exit the menu and save.
Show positive and negative direction
Select the dISP menu, press the ENTER key to determine. To
use the DOWN/UP button to display mode: dISP (positive).
DSIP (reverse). Select the desired mode, press ENTER to determine and save. Not to make any changes, wait a minute
to automatically exit the menu and save. The main menu,
please press the MENU button
Auto-test
Select the Test menu, press the ENTER key to determine. The
machine will start automatically detect color. Not to make
any changes, wait a minute to automatically exit the menu
and save. The main menu, please press the MENU button
Fhrs
Select the Fhrs menu, press the ENTER key to determine. You
can see the use of machine time / h. Not to make any changes, wait a minute to automatically exit the menu and save.
The main menu, please press the MENU button
Temperature
Select the Tenp menu, press the ENTER key to determine. You
can see the machine light board temperature / degree. Not
to make any changes, wait a minute to automatically exit the
menu and save. The main menu, please press the MENU button
p. 6NEBULA 1 - 36x1 W LED PAR LIGHT
English Version
Page 7
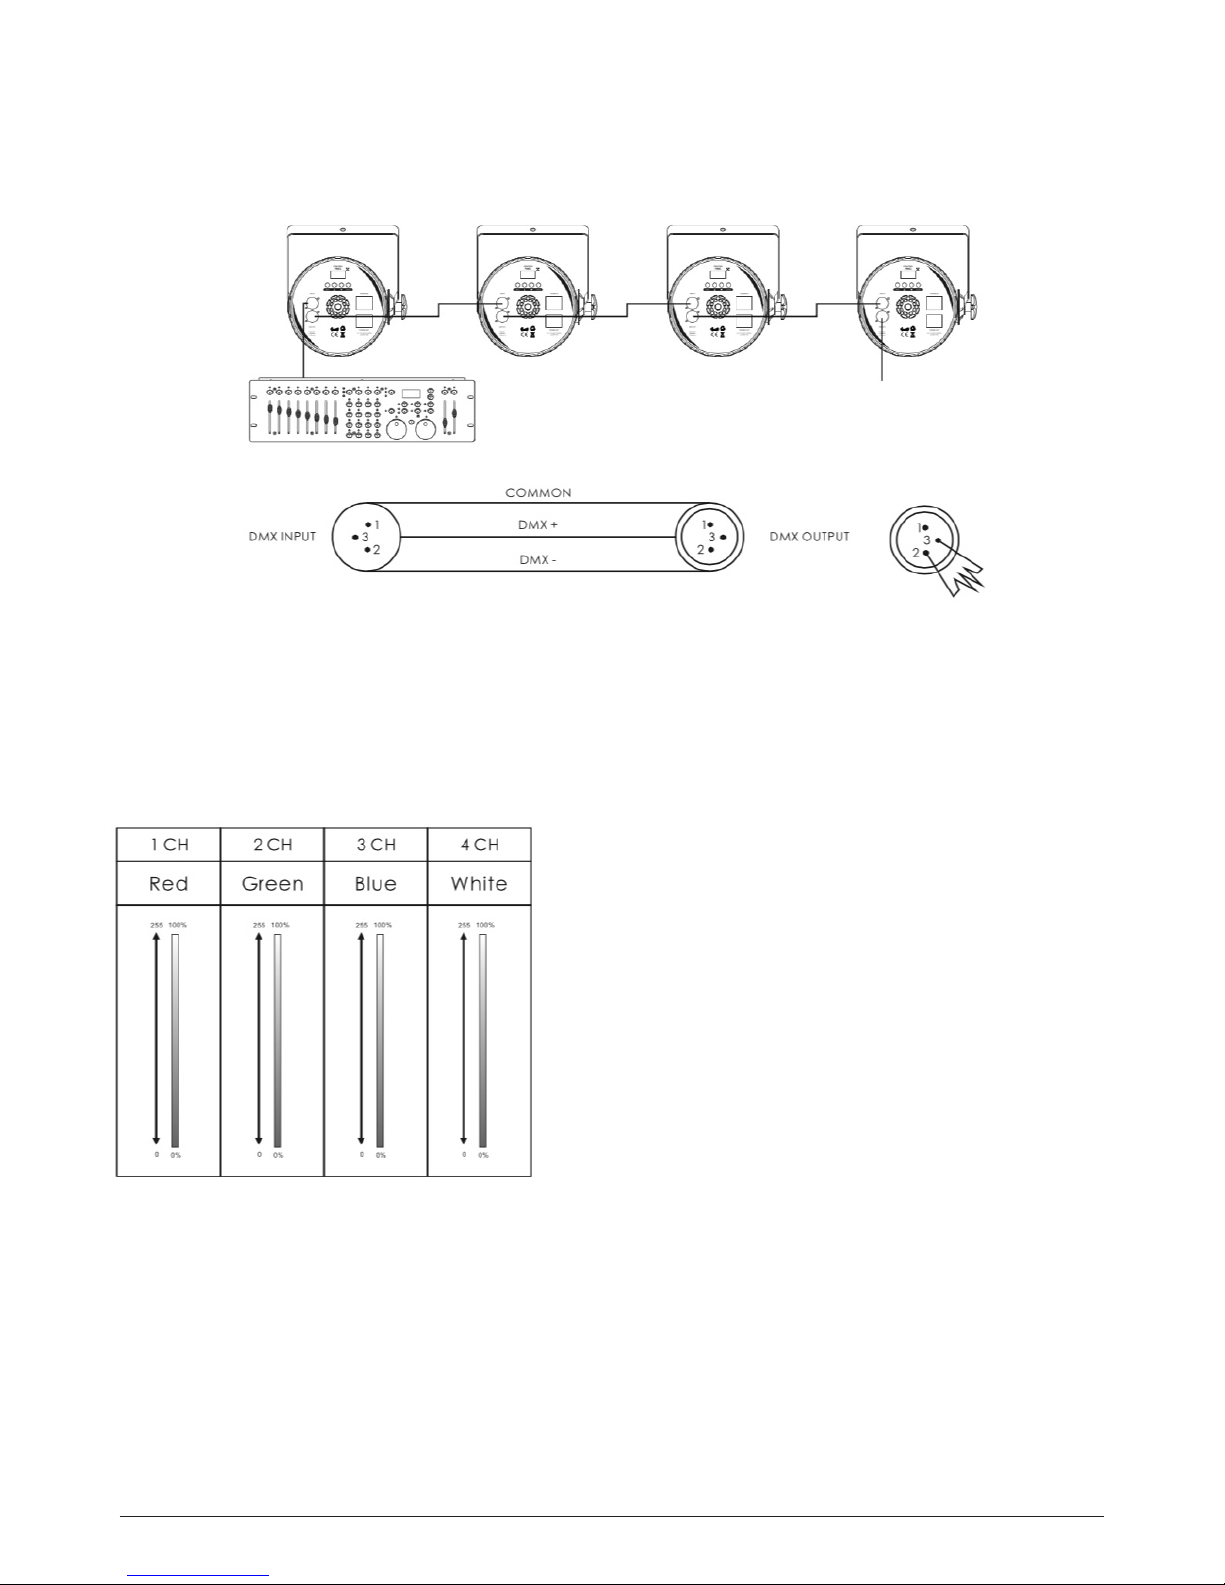
DMX-512 Connections
The DMX-512 is widely used in intelligent lighting control
with a maximum of 512 channels.
Temperature reduces signal error and avoids signal transmission problems and interference. It is always advisable to
connect a DMX terminal. (Resistance 120 ohm 1/4W) between
pin2 (DMX-) and pin3 (DMX+) of the last xture
4CH Channel mode
p. 7NEBULA 1 - 36x1 W LED PAR LIGHT
English Version
Page 8

8CH Channel mode
p. 8
Fixture Cleaning
The cleaning of internal must be carried out periodically to
optimize light output. Cleaning frequency depends on the
environment in which the xture operates: damp, smoky or
particularly dirty surrounding can cause greater accumulation of dirt on the xture’s optics.
• Clean with so cloth using normal glass cleaning uid.
• Always dry the parts carefully.
• Clean the external optics at least every 20 days. Clean
the internal optics at least every30/60 days
NEBULA 1 - 36x1 W LED PAR LIGHT
English Version
Page 9

Versión Español
En comparación con el producto PAR tradicional, este nuevo equipo PAR LED ofrece efectos con colores más ricos, lo
que permite mezclas de colores de LED tricromáticos de
hasta 16 700 000 variantes. El producto PAR LED puede tener diferentes usos. Por un lado, en aplicaciones comerciales (como spotlight), donde podrá utilizarlo principalmente
para funciones de iluminación con una bombilla LED de
alta potencia. La pequeña bombilla LED, de un único color,
se utiliza, por lo general, en establecimientos comerciales,
hoteles y fuentes de agua, entre otras aplicaciones. Por otro
lado, este equipo se utiliza para aplicaciones de iluminación
en escenarios, principalmente dado que aprovecha las funciones de cambio de colores, lo que genera una puesta en
escena inigualable, gracias al poder de la iluminación LED.
La bombilla LED cuenta con cuatro colores: rojo, verde, azul y
blanco. Se utiliza, por lo general, en representaciones teatrales, bodas, exhibiciones y conferencias.
NEBULA 1 - 36X1 W - PAR LED
Versión Español
p. 9
Page 10

p. 10
¡ADVERTENCIA!
• Conserve este Manual del Usuario para referencias futuras. En caso de vender la unidad, procure entregar esta
guía al comprador.
• El fabricante ha entregado la unidad en buen estado
de funcionamiento. Procure seguir las instrucciones
consignadas en este manual, dado que la garantía no
cubre daños provocados por el uso inapropiado de
este producto.
• Desembale la unidad y verique que no se encuentre
dañada como consecuencia de su transporte. El producto ha sido diseñado para su uso en espacios interiores
únicamente. Utilice el equipo en ambientes secos. La
unidad debe ser instalada y utilizada por un operador
calicado.
• Utilice un cable de seguridad para instalar esta unidad.
Para trasladar el equipo, utilice siempre su base, no solamente el cabezal.
• Coloque la unidad en ambientes que permitan una adecuada ventilación. Deberá dejar un espacio de al menos
50 cm entre el dispositivo y otros equipos.
• Procure no obstruir las ranuras de ventilación, ya que
la unidad podría sobrecalentarse. Antes de utilizar el
equipo, asegúrese de que el voltaje y la frecuencia del
suministro eléctrico coincida con los requerimientos de
la unidad.
• Para evitar el riesgo de shock eléctrico, conecte a tierra
el conductor amarillo/verde.
• Temperatura ambiente máxima: 40 °C. Procure no operar
la unidad en ambientes con una temperatura superior.
• Nunca conecte el dispositivo a un dimmer pack.
• Al operar la unidad por primera vez, es posible que perc-
iba humo u olores, que desaparecerán luego de unos
minutos. Mantenga los materiales inamables alejados
de la unidad mientras esté en funcionamiento, ya que
representan un riesgo de incendio.
• Controle periódicamente el estado de los cables y reemplace inmediatamente aquellos que se encuentren
dañados.
• Procure no operar la unidad por períodos de tiempo prolongados, ya que esto acortaría su vida útil.
• No permita el ingreso de líquidos inamables, agua
u objetos metálicos dentro de la unidad. En caso de
que esto ocurra, interrumpa el suministro eléctrico de
manera inmediata.
• No opere la unidad en condiciones de suciedad o polvo.
Procure limpiar el dispositivo de manera periódica.
• No permita que el equipo sea operado por niños.
• Para evitar un riesgo de shock eléctrico, procure no tocar
los cables durante la operación del equipo.
• Procure mantener separados los cables de alimentación
de los demás cables.
• Antes de reparar la unidad o reemplazar el fusible o la
lámpara, desenchufe el equipo.
• Utilice fusibles de repuesto del mismo tipo que utiliza
la unidad.
• Si el equipo no funciona correctamente, interrumpa su
uso de manera inmediata.
• Luego de apagar la unidad, espere un período de tiempo
considerable para volver a encenderla.
• En caso de daño evidente, reemplace la cubierta, los
lentes o el ltro ultravioleta.
• Nunca abra la unidad. Las partes interiores del equipo
no pueden ser reparadas por el usuario.
• No intente solucionar el inconveniente por su cuenta.
Las reparaciones realizadas por personas no calicadas
podrían derivar en desperfectos o daños. Comuníquese
con el centro de asistencia técnica autorizado más cercano a su domicilio.
• En caso de no utilizar la unidad por un período prolongado, desenchúfela.
• Utilice los materiales originales de embalaje para transportar el equipo.
• Nunca mire jo al haz de luz LED mientras la unidad se
encuentra encendida.
Podrá conectar hasta 7 unidades en un tomacorriente.
Si desea utilizar más unidades, procure utilizar otro
tomacorriente.
Instrucciones de seguridad
Lea atentamente este manual, que contiene información importante sobre la instalación, operación y mantenimiento de la unidad.
NEBULA 1 - 36X1 W - PAR LED
Versión Español
Page 11

p. 11
Instalación
El montaje de la unidad debe efectuarse utilizando los oricios para tornillos ubicados en el soporte. Asegúrese de instalar rmemente el equipo para evitar vibraciones y desplazamientos durante su operación. Asimismo, asegúrese de
que la estructura donde planea montar la unidad sea segura
y pueda tolerar un peso equivalente a 10 veces el peso del
equipo. Para la instalación, utilice un cable de seguridad que
pueda tolerar un peso equivalente a 12 veces el peso de la
unidad.
La instalación de la unidad debe ser efectuada por un profesional. Procure colocar el equipo en una ubicación alejada
del alcance de las personas y asegúrese de que estas no permanezcan debajo del dispositivo.
Especicaciones técnicas
• Tres modos de operación: DMX, Master/Slave y activación por sonido.
• Modo de canales DMX: 4/8 canales.
• El programa incorporado controla la luz en modo mas-
ter/slave mediante activación por sonido.
• Suave dimming de 0~100 % y efectos para cada tipo de
estrobo.
• Aplicaciones: discotecas, bares, DJ, etc.
• Lámparas LED: 36 piezas de 1 W (RGBW).
• Peso neto: 1 k.
• Tamaño: 24x8x23,5 cm.
Cómo instalar la unidad
1. Indicador luminoso
2. Pantalla: muestra el menú y la función seleccionada
3. Tecla de menú
4. Micrófono
5. Salida de señal DMX
6. Alimentación
7. Entrada de señal DMX
NEBULA 1 - 36X1 W - PAR LED
Versión Español
Page 12

Modo DMX
Seleccione el menú Addr y presione la tecla ENTER para conrmar. Para congurar la dirección inicial, utilice las teclas
DOWN/UP (valores: A001~A512). Una vez indicada la dirección
inicial, presione ENTER para guardar los cambios realizados.
Para salir de esta función sin guardar los cambios, espere un
minuto y regresará automáticamente al menú. Para volver al
menú principal, presione la tecla MENU.
Modo de selección de canales
Seleccione el menú Chnd y presione la tecla ENTER para conrmar. Utilice las teclas DOWN/UP para congurar el modo deseado: 4Ch (4 canales) u 8Ch (8 canales). Seleccione el modo
de canales deseado y presione la tecla ENTER para guardar los
cambios realizados. Para salir de esta función sin guardar los
cambios, espere un minuto y regresará automáticamente al
menú. Para volver al menú principal, presione la tecla MENU.
Modo master/slave
Seleccione el menú SLnd y presione la tecla ENTER para
conrmar. Utilice las teclas DOWN/UP para congurar el
modo deseado: NAST (master), SL1 (slave 1), SL2 (slave 2),
SL3 (slave 3) o SL4 (slave 4). Seleccione el modo deseado y
presione la tecla ENTER para guardar los cambios realizados.
Para salir de esta función sin guardar los cambios, espere un
minuto y regresará automáticamente al menú. Para volver al
menú principal, presione la tecla MENU.
Modo de presentación
Seleccione el menú Shnd y presione la tecla ENTER para conrmar. Utilice las teclas DOWN/UP para congurar el modo deseado: FAdE (degradado), SoUn (sonido), Auto (automático) o
CoLo (color). Seleccione el modo deseado y presione la tecla
ENTER para guardar los cambios realizados. Para salir de esta
función sin guardar los cambios, espere un minuto y regresará
automáticamente al menú. Para volver al menú principal, presione la tecla MENU. Modo FADE (degradado): ofrece 8 velocidades de degradado (SP1-SP8). Utilice las teclas DOWN/UP
para seleccionar la velocidad de degradado deseada. Presione
ENTER para guardar los cambios realizados. Para salir de esta
función sin guardar los cambios, espere un minuto y regresará
automáticamente al menú. Para volver al menú principal, presione la tecla MENU. Modo COLO (color): ofrece 16 programas
de colores (CO1-CO16). Para ajustar la velocidad del color, seleccione la opción Stro (estrobo) y el valor deseado (0-255).
Utilice las teclas DOWN/UP para seleccionar el modo deseado.
Presione ENTER para guardar los cambios realizados. Para salir
de esta función sin guardar los cambios, espere un minuto y
regresará automáticamente al menú.
Modo de retroiluminación
Seleccione el menú LED y presione la tecla ENTER para conrmar. Utilice las teclas DOWN/UP para seleccionar el modo deseado: ON (encendido) u OFF (apagado). Seleccione el modo
deseado y presione la tecla ENTER para guardar los cambios
realizados. Para salir de esta función sin guardar los cambios,
espere un minuto y regresará automáticamente al menú. Para
volver al menú principal, presione la tecla MENU.
Balance de blancos
Seleccione el menú BALA y presione la tecla ENTER para conrmar. Utilice las teclas DOWN/UP para congurar el modo
deseado: Red (rojo), Gree (verde) o Blue (azul). Seleccione el
modo deseado y presione ENTER para guardar los cambios
realizados. Para salir de esta función sin guardar los cambios, espere un minuto y regresará automáticamente al menú.
Para volver al menú principal, presione la tecla MENU. Modo
Red (rojo): utilice las teclas DOWN/UP para ajustar el valor de
brillo (125-255). Presione ENTER para guardar los cambios
realizados. Para salir de esta función sin guardar los cambios, espere un minuto y regresará automáticamente al menú.
Para volver al menú principal, presione la tecla MENU. Modo
Gree (verde): utilice las teclas DOWN/UP para ajustar el valor
de brillo (125-255). Presione ENTER para guardar los cambios
realizados. Para salir de esta función sin guardar los cambios, espere un minuto y regresará automáticamente al menú.
Modo de inversión
Seleccione el menú dISP y presione la tecla ENTER para conrmar. Utilice las teclas DOWN/UP para congurar el modo
deseado: dISP (normal) o DSIP (inverso). Seleccione el modo
deseado y presione la tecla ENTER para guardar los cambios
realizados. Para salir de esta función sin guardar los cambios, espere un minuto y regresará automáticamente al menú.
Para volver al menú principal, presione la tecla MENU.
Prueba automática
Seleccione el menú Test y presione la tecla ENTER para conrmar. La unidad comenzará a detectar automáticamente
los colores. Para salir de esta función sin guardar los cambios, espere un minuto y regresará automáticamente al menú.
Para volver al menú principal, presione la tecla MENU.
p. 12
NEBULA 1 - 36X1 W - PAR LED
Versión Español
Page 13

p. 13
Tiempo de uso
Seleccione el menú Fhrs y presione la tecla ENTER para conrmar. Podrá visualizar el tiempo de uso de la unidad, expresado en horas. Para salir de esta función sin guardar los
cambios, espere un minuto y regresará automáticamente al
menú. Para volver al menú principal, presione la tecla MENU.
Temperatura
Seleccione el menú Tenp y presione la tecla ENTER para conrmar. Podrá visualizar la temperatura del panel de luces de
la unidad, expresado en grados. Para salir de esta función sin
guardar los cambios, espere un minuto y regresará automáticamente al menú. Para volver al menú principal, presione la
tecla MENU.
NEBULA 1 - 36X1 W - PAR LED
Versión Español
Page 14

p. 14
Conexiones DMX512
En general, la conexión DMX512 se utiliza para el control
inteligente de equipos de iluminación, con un máximo de
512 canales.
Para reducir errores en las señales y evitar problemas de
transmisión e interferencias, se recomienda utilizar un terminador DMX.
Para generar una terminación, ubique un resistor de 120 Ω y
1/4 W entre el pin 2 (DMX-) y el pin 3 (DMX+) de la última unidad.
Modo de 4 canales
REFERENCIAS DE LA IMAGEN
COMMON COMÚN
DMX- DMXDMX INPUT ENTRADA DMX
DMX OUTPUT SALIDA DMX
DMX+ DMX+
REFERENCIAS DE LA IMAGEN
Blue Azul
Green Verde
Red Rojo
White Blanco
NEBULA 1 - 36X1 W - PAR LED
Versión Español
Page 15

Modo de 8 canales
REFERENCIAS DE LA IMAGEN
0-7 No function 0-7 Sin función
100-149 Strobe (from fast to slow) 100-149 Estrobo (velocidad decreciente)
150-199 Strobe eect 1 150-199 Efecto estrobo 1
200-245 Strobe eect 2 200-245 Efecto estrobo 2
200-255 Sound control 200-255 Activación por sonido
246-255 Strobe the fastest strobe eect
246-255 Efecto estrobo velocidad máxima
8-199 color auto speed 8-199 Velocidad automática de colores
8-255 color auto 8-255 Color automático
8-99 Strobe (from slow to fast) 8-99 Estrobo (velocidad creciente)
Blue Azul
Color walking Cambio de colores
Dimmer Dimmer
Green Verde
Red Rojo
Sound control Activación por sonido
Strobe Estrobo
White Blanco
p. 15
NEBULA 1 - 36X1 W - PAR LED
Versión Español
Page 16

p. 16
Limpieza de la unidad
Comparando as caraterísticas de um Led Par Light e um
Par tradicional, o Led Par Light, tem cores muito mais
vivas e mixagem homogênea e uma pastilha concentra 4
cores, o vermelho, o verde, o azul e o branco que permite a
combinação de 1.670.000 cores, ao contrário do par comum
que tem só uma cor.
Podemos dividir os Par LED em 2 categorias:
• Iluminação para uso comercial que são os chamados
Spots (pontos), geralmente são monocromáticos com
LEDs de alta potência e são usados na iluminação de
shopping centers, hotéis, pousadas, fontes, etc.
• luminação prossional usados em palco, casamentos,
eventos corporativos, etc. Os LEDs desses reetores são
os chamados 4 em 1 onde na mesma cápsula tem as
cores descritas acima, dando assim muitas possibilidades e variações de cor.
NEBULA 1 - 36X1 W - PAR LED
Versión Español
Page 17

p. 17NEBULA 1 - 1 W * 36PCS - LED PAR LIGHT
Versão em Português
Versão em Português
Comparações
Comparando as caraterísticas de um Led Par Light e um Par
tradicional, o Led Par Light, tem cores muito mais vivas e
mixagem homogênea e uma pastilha concentra 4 cores, o
vermelho, o verde, o azul e o branco que permite a combinação de 1.670.000 cores, ao contrário do par comum que
tem só uma cor.
Podemos dividir os Par LED em 2 categorias:
1. Iluminação para uso comercial que são os chama-
dos Spots (pontos), geralmente são monocromáticos com
LEDs de alta potência e são usados na iluminação de shopping centers, hotéis, pousadas, fontes, etc.
2. Iluminação prossional usados em palco, casa-
mentos, eventos corporativos, etc. Os LEDs desses reetores são os chamados 4 em 1 onde na mesma cápsula tem as
cores descritas acima, dando assim muitas possibilidades e
variações de cor.
Page 18

p. 18
Instruções de Segurança
• Por favor leia cuidadosamente as instruções por que incluem informações importantes sobre a instalação, operação e manutenção deste equipamento.
• Guarde o manual do usuário para consultas futuras. Se
você vender o reetor para outra pessoa verique que o
manual esteja junto com os acessórios.
• Todas as luminárias vem intactas de fábrica, por favor as
utilize seguindo as instruções deste manual, já que falhas de uso não estão cobertas pela garantia.
• Desembale com cuidado e verique se a embalagem ou
o reetor tiveram algum dano no transporte.
• Este reetor é de uso exclusivo indoor, use ele em lugar
absolutamente seco.
• Faça a instalação e opere o refletor com pessoal especializado.
• Use cabo de segurança para pendurar o reetor, nunca
manuseie pela cabeça, sempre pela base ou alça.
• Verique que as ranhuras de ventilação estejam livres de
pó para evitar sobre aquecimento.
• Antes de operar verique que a tensão e a frequência
tenham alcançado o valor de funcionamento.
• É importante conectar o o-terra para evitar choques
elétricos.
• A temperatura de operação máxima é de 40 graus não
podendo ser superada em nenhuma circunstância.
• Não conectar o reetor a nenhum Rack Dimer.
• Recomenda-se nunca tentar arrumar o reetor, contrate
pessoal especializado, consertos feitos por pessoas despreparadas podem causar dano ao equipamento.
• Na primeira vez ao ligar o reetor, haverá um pouco de
cheiro e de fumaça que se dissiparão em alguns minutos.
• Verique que não haja materiais inamáveis perto do equipamento durante a operação, para evitar risco de incêndio.
• Examine os cabos cuidadosamente e substitua os se observar algum dano.
• Evite usar o reetor por intervalos longos de tempo,
porque diminuirá a vida útil dos LEDs.
• Evite que líquidos inamáveis ou objetos metálicos
entrem no reetor, se isso ocorrer desligue ele imediatamente.
• Não operar o reetor em lugar úmido ou empoeirado e
limpe o equipamento regularmente.
• Não permita que crianças manuseiem o reetor.
• Não toque em nenhum o durante a operação para evi-
tar choques elétricos.
• Evite colocar cabos de alta tensão junto com os de sinal,
para evitar condução elétrica.
• Desconecte o reetor para trocar o fusível ou algum LED.
• Substitua o fusível por um da mesma caraterística.
• No caso de problema durante a operação, pare de usá-lo
e desligue o imediatamente.
• Nunca ligue/desligue o reetor repetidamente.
• A carcaça, as lentes e o ltro U.V. devem ser trocados
quando estiverem visualmente danicados.
• Desconecte o cabo de força do reetor, se não for usado
por muito tempo.
• Não olhe diretamente ao facho de luz, pois pode danicar sua visão.
• Não conecte mais de 7 reetores em uma mesma linha.
NEBULA 1 - 1 W * 36PCS - LED PAR LIGHT
Versão em Português
Page 19

p. 19
Instalação
A unidade pode ser montada com parafusos nos orifícios da
alça. Assegure-se sempre que esteja bem xado para evitar
vibrações ou deslizamentos durante a operação, também
que a estrutura onde vai montado esteja rme e seja capaz
de suportar um peso equivalente a 10 vezes o peso do reetor. É aconselhável que o cabo de segurança comporte um
peso de 12 vezes o peso do reetor.
O equipamento deve ser instalado por prossionais e deve
car longe do alcance do público.
Especicações Tecnicas
• 3 modos de operação: DMX, MASTER/SLAVE, SOUND
CONTROL.
• Os programas pre-gravados podem ser executados em
forma áudio rítmica.
• Modo de canais DMX: 4/8 CANAIS.
• Função DIMMER de 0-100%.
• Adequado para BARES, DISCOTECAS e Djs
• Leds: 36 X 1W (RGBW)
• Peso: 1Kgs
• Medidas: 24x8x23.5cm
Como Congurar
1. Luz indicadora
2. Função do display: Menu e Funções
3. Botão Menu
4. Microfone
5. Sinal DMX output
6. Tomada de alimentação
7. Sinal DMX input
NEBULA 1 - 1 W * 36PCS - LED PAR LIGHT
Versão em Português
Page 20

p. 20
Modo DMX
Selecione o Addr Menu, pressione a tecla ENTER para conrmar. Em seguida, use o código de endereço inicial DOWN /
UP para denir essa luz (A001~ A512). Depois de ter denido
o seu endereço inicial, pressione ENTER para denir e salvar.
Não faça quaisquer alterações, espere um minuto para sair
automaticamente do menu e salve. Para o menu principal
pressione o botão MENU.
Seleção de Modo de Canal
Selecione o menu CHND, pressione a tecla ENTER para conrmar. Use os botões de DOWN / UP para selecionar a quantidade de canais : 5Ch (5 canais) .9Ch (9 canais). Selecione o
modelo de canal desejado, pressione ENTER para conrmar
e salvar. Não faça quaisquer alterações, espere um minuto
para sair automaticamente do menu e salve. Para o menu
principal pressione o botão MENU.
Modo Master/Slave
Selecione SLND no menu e pressione a tecla ENTER para conrmar. Use os botões de DOWN / UP para selecionar o modo
Master-Slave de acordo com a necessidade: Nast (Master). SL
1 (Slave 1)Modo 2 (Slave 2) SL. Selecione o modo desejado,
pressione ENTER para conrmar e salvar. Não faça quaisquer
alterações, espere um minuto para sair automaticamente do
menu e salve. Para o menu principal pressione o botão MENU.
Modo Performance
Selecione Shnd no menu e pressione a tecla ENTER para conrmar.Use os botões de DOWN / UP para escolher o modo de
uso : SoUo (Som) .CoLo (cor) .StCo (Strobo) .Fade (Gradiente).
Selecione o modo desejado e pressione ENTER para conrmar
e salvar. Não faça quaisquer alterações, espere um minuto para
sair automaticamente do menu e salve. Para o menu principal
pressione o botão MENU. Colo (cor) Co1 ~ Co12 12 modo de
programação, use o DOWN / UP
para selecionar o modo desejado, pressione ENTER para conrmar e salvar.Não faça quaisquer alterações, espere um minuto para sair automaticamente do menu e salve. Para o menu
principal pressione o botão MENU. StCo (STROBO) têm 0 ~ 255
para ajustar a velocidade, use o DOWN / UP para selecionar a
velocidade desejada , e pressione ENTER para salvar. Não faça
quaisquer alterações, espere um minuto para sair automaticamente do menu e salve. Para o menu principal pressione o
botão MENU. FADE (Gradiente) SP1 ~ SP8 8 seleção da velocidade de fade. Use o DOWN / UP para selecionar a velocidade
necessária e pressione ENTER para salvar. Não faça quaisquer
alterações, espere um minuto para sair automaticamente do
menu e salve. Para o menu principal pressione o botão MENU.
Modo Backight
Selecione o menu LED, pressione a tecla ENTER para conrmar . Em seguida, use os botões DOWN / UP para denir o
modo de backlight : ON (Aberto) . OFF (Fechado). Selecione
o modo desejado, pressione ENTER para salvar. Não faça
quaisquer alterações, espere um minuto para sair automaticamente do menu e salve. Para o menu principal pressione o
botão MENU.
Mostrar direção Positiva e Negativa
Selecione o menu DISP e pressione a tecla ENTER para conrmar. Use os botões DOWN / UP para o Modo de exibição: dISP
(positivo) .DSIP (reverso). Selecione o modo desejado, pressione ENTER para conrmar e salvar. Não faça quaisquer alterações, espere um minuto para sair automaticamente do menu
e salve. Para o menu principal pressione o botão MENU
NEBULA 1 - 1 W * 36PCS - LED PAR LIGHT
Versão em Português
Page 21

Modo Manual
Selecione o menu NAnu e pressione a tecla ENTER para conrmar. Use os botões DOWN / UP para determinar o modo
de visualização : vermelho (red) .Gree (verde) and.Blue (azul)
.Anbe (Âmbar) .Ublt (branco). Selecione o modo desejado,
pressione ENTER para salvar. Não faça quaisquer alterações,
espere um minuto para sair automaticamente do menu e
salve. Para o menu principal pressione o botão MENU. Pressione o botão MENU red (vermelho), de 0 a 255 usando o
DOWN / UP para determinar a intensidade do brilho, pressione
ENTER para salvar. Não faça quaisquer alterações, espere um
minuto para sair automaticamente do menu e salve. Para o
menu principal pressione o botão MENU. Pressione o botão
MENU Gree (verde) de 0 ~ 255 usando o DOWN / UP determinar a intensidade do brilho, pressione ENTER para denir e
salvar.Não faça quaisquer alterações, espere um minuto para
sai automaticamente do menu e salve. Para o menu principal
pressione o botão MENU. Pressione o botão Menu Blue (azul)
de 0 a 255 usando o DOWN / UP para determinar a intensidade do brilho , pressione ENTER para denir e salvar.Não
faça quaisquer alterações, espere um minuto para sair automaticamente do menu e salve. Para o menu principal pressione o botão MENU. Pressione o botão MENU Anbe (Âmbar)
de 0 ~ 255 utilizando o DOWN / UP determinar a intensidade
do brilho, pressione ENTER para denir e salvar. Não faça
quaisquer alterações, espere um minuto para sair automaticamente do menu e salve. Para o menu principal pressione
o botão MENU. Pressione o botão MENU Ublt (branco) de 0
~ 255 usando o DOWN / UP para determinar a intensidade
do brilho, pressione ENTER para denir e salvar. Não faça
quaisquer alterações, espere um minuto para sair automaticamente do menu e salve. Para o menu principal pressione o
botão MENU.
Auto teste
Selecione o menu Test , pressione a tecla ENTER para conrmar . A máquina vai começar detectar automaticamente
a cor. Não faça quaisquer alterações, espere um minuto para
sair automaticamente do menu e salve. Para o menu principal pressione o botão MENU.
Fhrs
Selecione o menu Fhrs, pressione a tecla ENTER para conrmar
. Você pode ver o uso de Time Machine / h. Não faça quaisquer
alterações, espere um minuto para sair automaticamente do
menu e salve. Para o menu principal pressione o botão MENU.
Temperatura
Selecione o menu TENP, pressione a tecla ENTER para conrmar . Você pode ver a temperatura da placa de luz / grau.
Não faça quaisquer alterações, espere um minuto para sair
automaticamente do menu e salve. Para o menu principal
pressione o botão MENU.
p. 21NEBULA 1 - 1 W * 36PCS - LED PAR LIGHT
Versão em Português
Page 22

CONEXÕES DMX 512
DMX 512 é utilizado em controle de iluminação com um máximo de 512 canais.
Terminal reduz erros de sinal e evita problemas de transmissão de sinal e interferência.
É aconselhável sempre usar um terminal DMX.
( Resistência 120 ohm 1/4W ) entre o pin2 (DMX ) e pin3 ( DMX )
do ultimo aparelho.
MODO 4 CANAIS
p. 22
REFERENCIAS DE LA IMAGEN
COMMON COMÚN
DMX- DMXDMX INPUT ENTRADA DMX
DMX OUTPUT SALIDA DMX
DMX+ DMX+
REFERENCIAS DE LA IMAGEN
Blue Azul
Green Verde
Red Rojo
White Blanco
NEBULA 1 - 1 W * 36PCS - LED PAR LIGHT
Versão em Português
Page 23

MODO 8 CANAIS
p. 23
REFERENCIAS DE LA IMAGEN
0-7 No function 0-7 Sin función
100-149 Strobe (from fast to slow) 100-149 Estrobo (velocidad decreciente)
150-199 Strobe eect 1 150-199 Efecto estrobo 1
200-245 Strobe eect 2 200-245 Efecto estrobo 2
200-255 Sound control 200-255 Activación por sonido
246-255 Strobe the fastest strobe eect
246-255 Efecto estrobo velocidad máxima
8-199 color auto speed 8-199 Velocidad automática de colores
8-255 color auto 8-255 Color automático
8-99 Strobe (from slow to fast) 8-99 Estrobo (velocidad creciente)
Blue Azul
Color walking Cambio de colores
Dimmer Dimmer
Green Verde
Red Rojo
Sound control Activación por sonido
Strobe Estrobo
White Blanco
NEBULA 1 - 1 W * 36PCS - LED PAR LIGHT
Versão em Português
Page 24

Limpeza da unidade
A limpeza interna deve ser realizada periodicamente para
otimizar a saída de luz
A freqüência de limpeza depende do ambiente em que está instalado o reetor: como lugares úmidos ou com muita fumaça
pode causar maior acúmulo de sujeira nas unidades óticas.
• Limpar com um pano apropriado e limpa vidros líquido.
• Sempre secar as peças cuidadosamente.
• Limpar as lentes óticas externas a cada 20 dias.
• Limpar as lentes óticas internas pelo menos a cada
30/60 dias.
p. 24NEBULA 1 - 1 W * 36PCS - LED PAR LIGHT
Versão em Português
Page 25

tecs how.amproweb.com
 Loading...