

Page 1
P. 1
| Tecshow Navi gator Split RDM
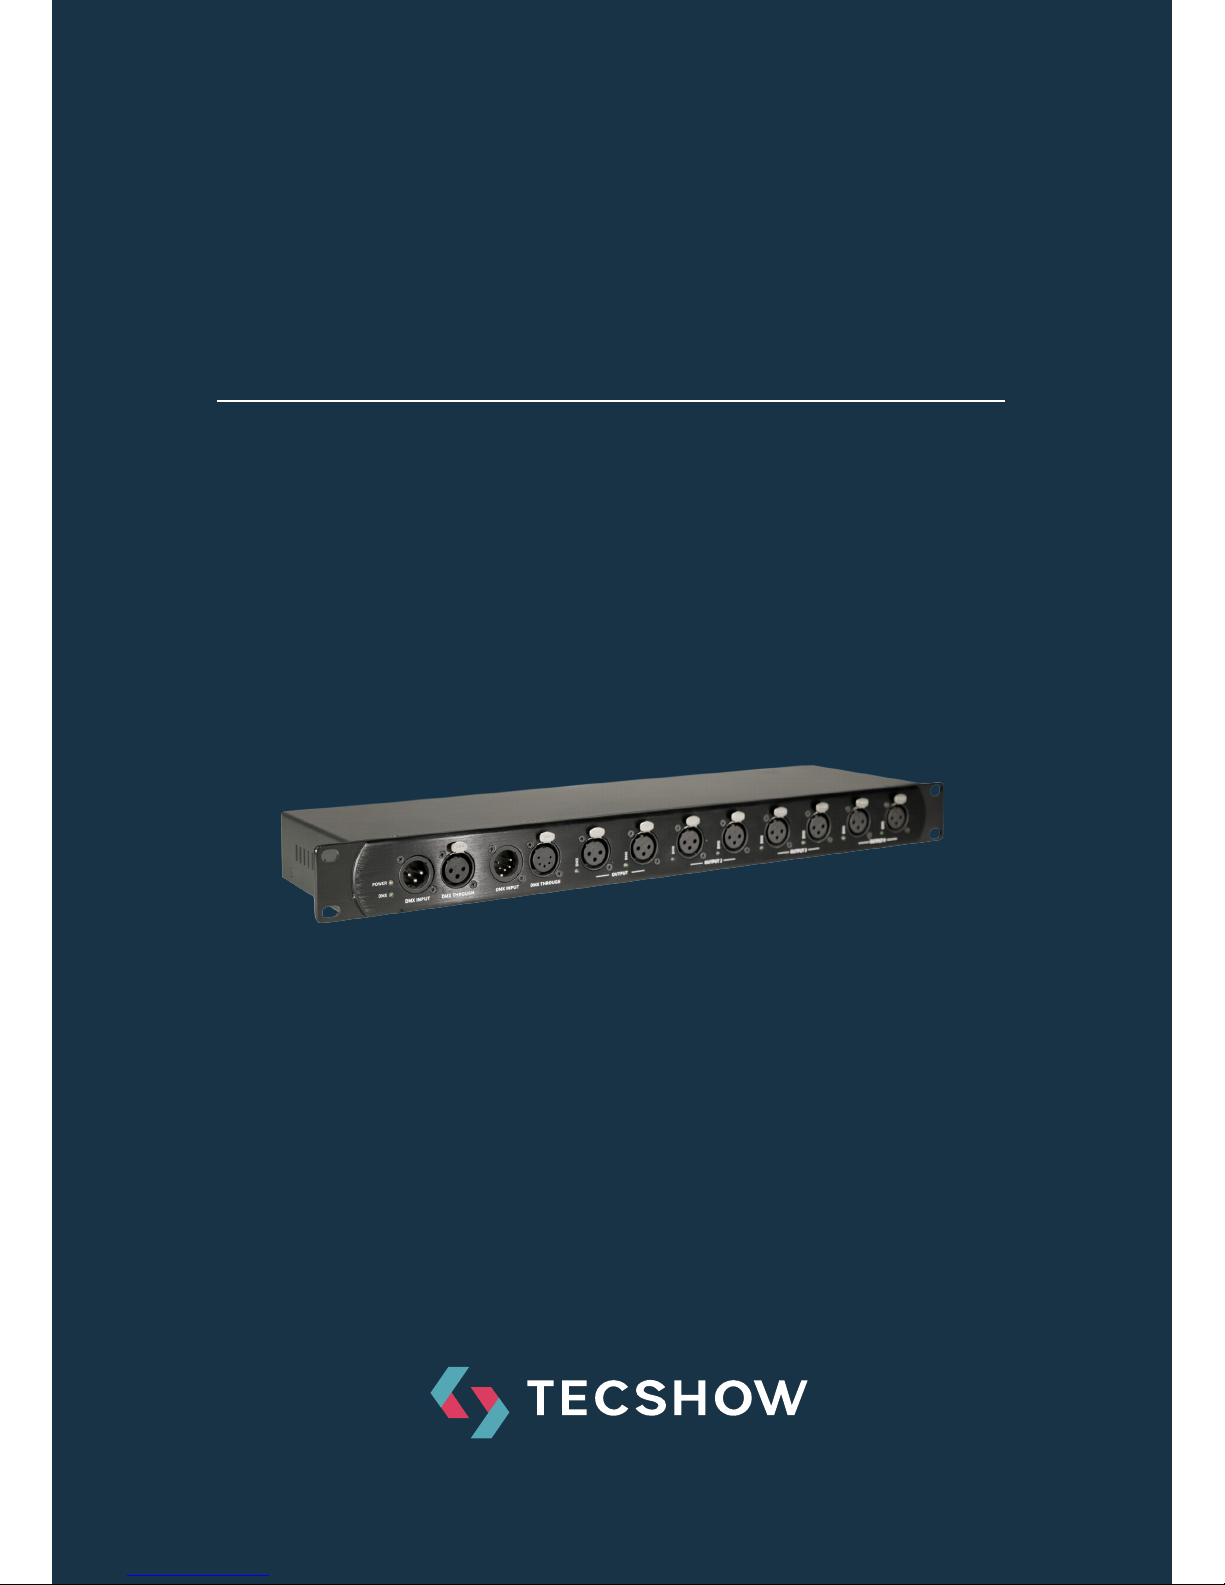
NAVI GATO R
SPLIT RDM
DMX & RDM Splitter - 2 inputs / 4 outputs
USER MANUAL / MANUAL DE USUARIO
PLEASE READ THE INSTRUCTIONS CAREFULLY BEFORE USE
POR FAVOR LEA LAS INSTRUCCIÓNES ANTES DE USAR
Page 2

P. 2
Tecshow Navi gator Split RDM |
Navigator Split RDM
DMX & RDM Splitter - 2 inputs / 4 outputs
Navigator Split RDM is a DMX & RDM splitter that
features four outputs with XLR-3 & XLR-5 connectors, which can be connected to any of the two
inputs. Each of the signal ports are optically isolated and sport a LED to show its status at a glance.
Navigator Split RDM is an ideal solution for for those
who want a reliable yet versatile splitter with RDM
function.
Specications
Features
• DMX splitter / booster
• RDM capable (bidirectional)
• 19 inch rack mountable
• 4 outputs (with 3 & 5-pin connectors)
• Optically isolated
• Support DMX upgrade
Technical
• DMX: ANSI E1.11
• RDM: ANSI E1.20
• Power input connector: 1 PowerCon connector
Physical
• Dimensions: 146x482.6x44.5 mm. / 5.7x19x1.75
in.
• Weight: 2.1 Kg. / 4.6 Lbs.
1. OVERVIEW
English version
Page 3
P. 3
| Tecshow Navi gator Split RDM
English version
2. WARNING
For your own safety, please read this
user manual carefully before your initial start-up!
Unpacking Instructions
Immediately upon receiving this product, carefully unpack the carton and check the contents to
ensure that all parts are present, and have been
received in good condition.
Your shipment includes
• Navigator Split RDM
• Pro power cable (1,4m)
Caution! Keep this device away from
rain and moisture! Unplug mains lead
before opening the housing!
Safety Instructions
Every person involved with the installation, operation and maintenance of this device has to:
• be qualied
• follow the instructions of this manual
Caution! Be careful with your operations. With a dangerous voltage you can
suer a dangerous electric shock when
tourching the wires!
Before your initial start-up, please make sure that
there is no damage caused by transportation.
Should there be any, consult your dealer and do not
use the device.
To maintain perfect condition and to ensure a safe
operation, it is absolutely necessary for the user to
follow the safety instructions and warning notes
written in this manual.
This device contains no user-serviceable parts.
Refer servicing to qualied technicians only.
Important
• Never let the power cord come into contact
with other cables! Handle the power cord and
all connections with the mains with particular
caution!
• Never remove warning or informative labels
from the unit.
• Never use anything to cover the ground contact.
• Never look directly into the light source.
• Never leave any cables lying around.
• Never use the device during thunder storms,
unplug the device immediately.
• Never leave various parts of the packaging
(plastic bags, polystyrene foam, nails, etc.)
within children’s reach, as they are potential
sources of danger.
• Do not insert objects into air vents.
• Do not open the device and do not modify the
device.
• Do not connect this device to a dimmer pack.
• Do not shake the device. Avoid brute force
when installing or operating the device.
• Do not switch the device on and o in short
intervals, as this would reduce the system’s life.
• Do not touch the device’s housing bare-handed
during its operation (housing becomes hot).
• Only use device indoors, avoid contact with
water or other liquids.
• Only operate the device aer having familiar-
ized with its functions.
• Only install the device with the hanging-bracket.
• Avoid ames and do not put close to ammable
liquids or gases.
• Always keep case closed while operating.
• Always allow free air space of at least 50 cm
around the unit for ventilation.
• Always disconnect power from the mains, when
device is not used or before cleaning! Only handle the power cord by the plug. Never pull out
the plug by tugging the power cord.
Page 4

P. 4
Tecshow Navi gator Split RDM |
English version
• Make sure that the device is not exposed to
extreme heat, moisture or dust.
• Make sure that the available voltage is not higher than stated on the rear panel.
• Make sure that the power cord is never crimped
or damaged. Check the device and the power
cord from time to time.
• Make sure that no side forces can impact on the
truss system.
• The cable insert or the female part in the device
must never be strained. There must always
be suicient cable to the device. Otherwise,
the cable may be damaged which may lead to
deadly electrical shocks.
• If the external cable is damaged, it has to be
replaced by a qualied technician.
• If the lens is obviously damaged, it has to be
replaced, so that its functions are not impaired
due to cracks or deep scratches.
• If device is dropped or struck, disconnect
mains power supply immediately. Have a quali-
ed engineer inspect for safety before operating.
• If the device has been exposed to drastic tem-
perature uctuation (e.g. aer transportation),
do not switch it on immediately. The arising
condensation water might damage your de-
vice. Leave the device switched o until it has
reached room temperature.
• If your device fails to work properly, discontinue
use immediately. Pack the unit securely (preferably in the original packing material), and
return it to your dealer for service.
• For adult use only. The device must be installed
out of the reach of children. Never leave the unit
running unattended.
• For replacement use fuses of same type and
ratingonly.
• The user is responsible for correct positioning
and operating of the RDM Splitter. The manufacturer will not accept liability for damages
caused by the misuse or incorrect installation
of this device.
• This device falls under protection class I. Therefore it is essential to connect the yellow/green
conductor to earth.
• Repairs, servicing and electric connection must
be carried out by a qualied technician.
• WARRANTY: Till one year aer date of purchase.
Operating Determinations
• This device is not designed for permanent operation. Consistent operation breaks will ensure
that the device will serve you for a long time
without defects.
• The maximum ambient temperature ta = 40°C
must never be exceeded.
• The relative humidity must not exceed 50 %
with an ambient temperature of 40°C.
• If this device is operated in any other way, than
the one described in this manual, the product
may suer damages and the warranty becomes
void.
• Any other operation may lead to dangers like
short-circuit, burns, electric shock, crash,etc.
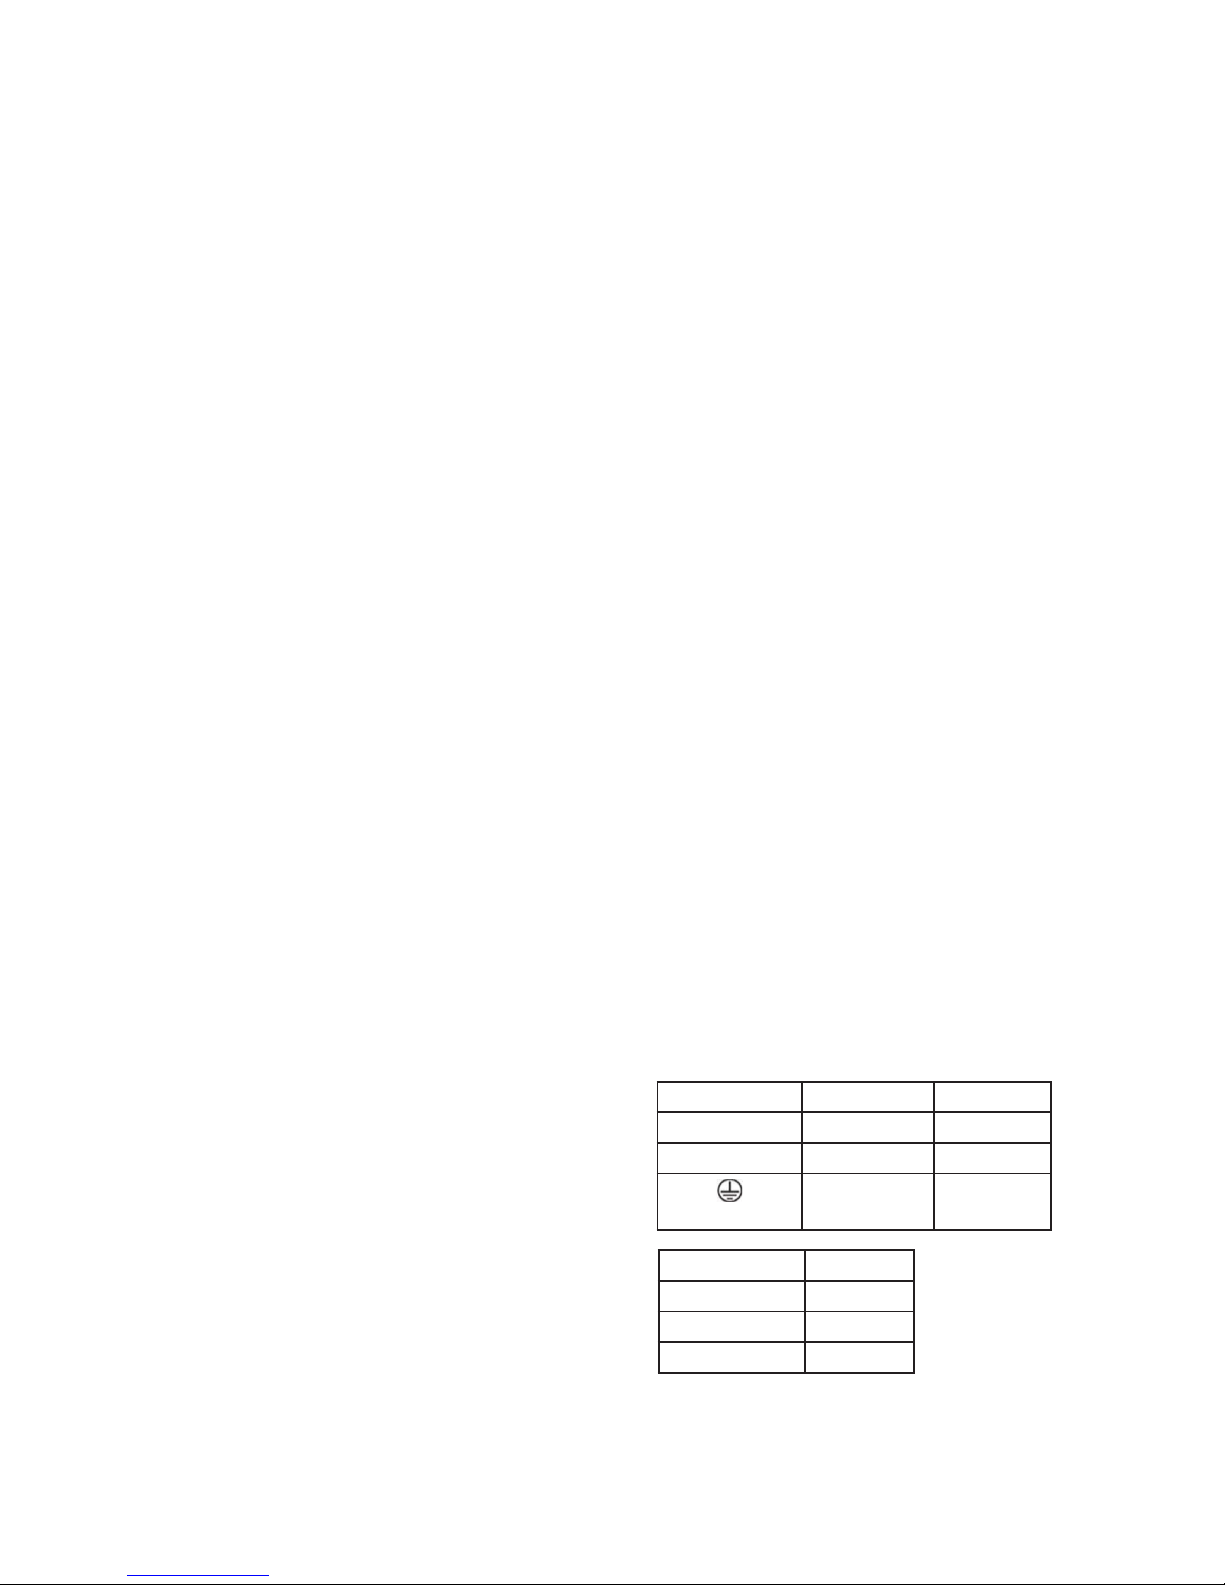
Connection with the mains
Connect the device to the mains with the power-plug. Always check if the right color cable is
connected to the right place.
International EU Cable UK Cable
L Brown Red
N Blue Black
Yellow/Green Green
US Cable Pin
Yellow/Copper Phase
Silver Neutral
Green Protective
Ground
Page 5
P. 5
| Tecshow Navi gator Split RDM
English version
3. DESCRIPTION OF THE DEVICE
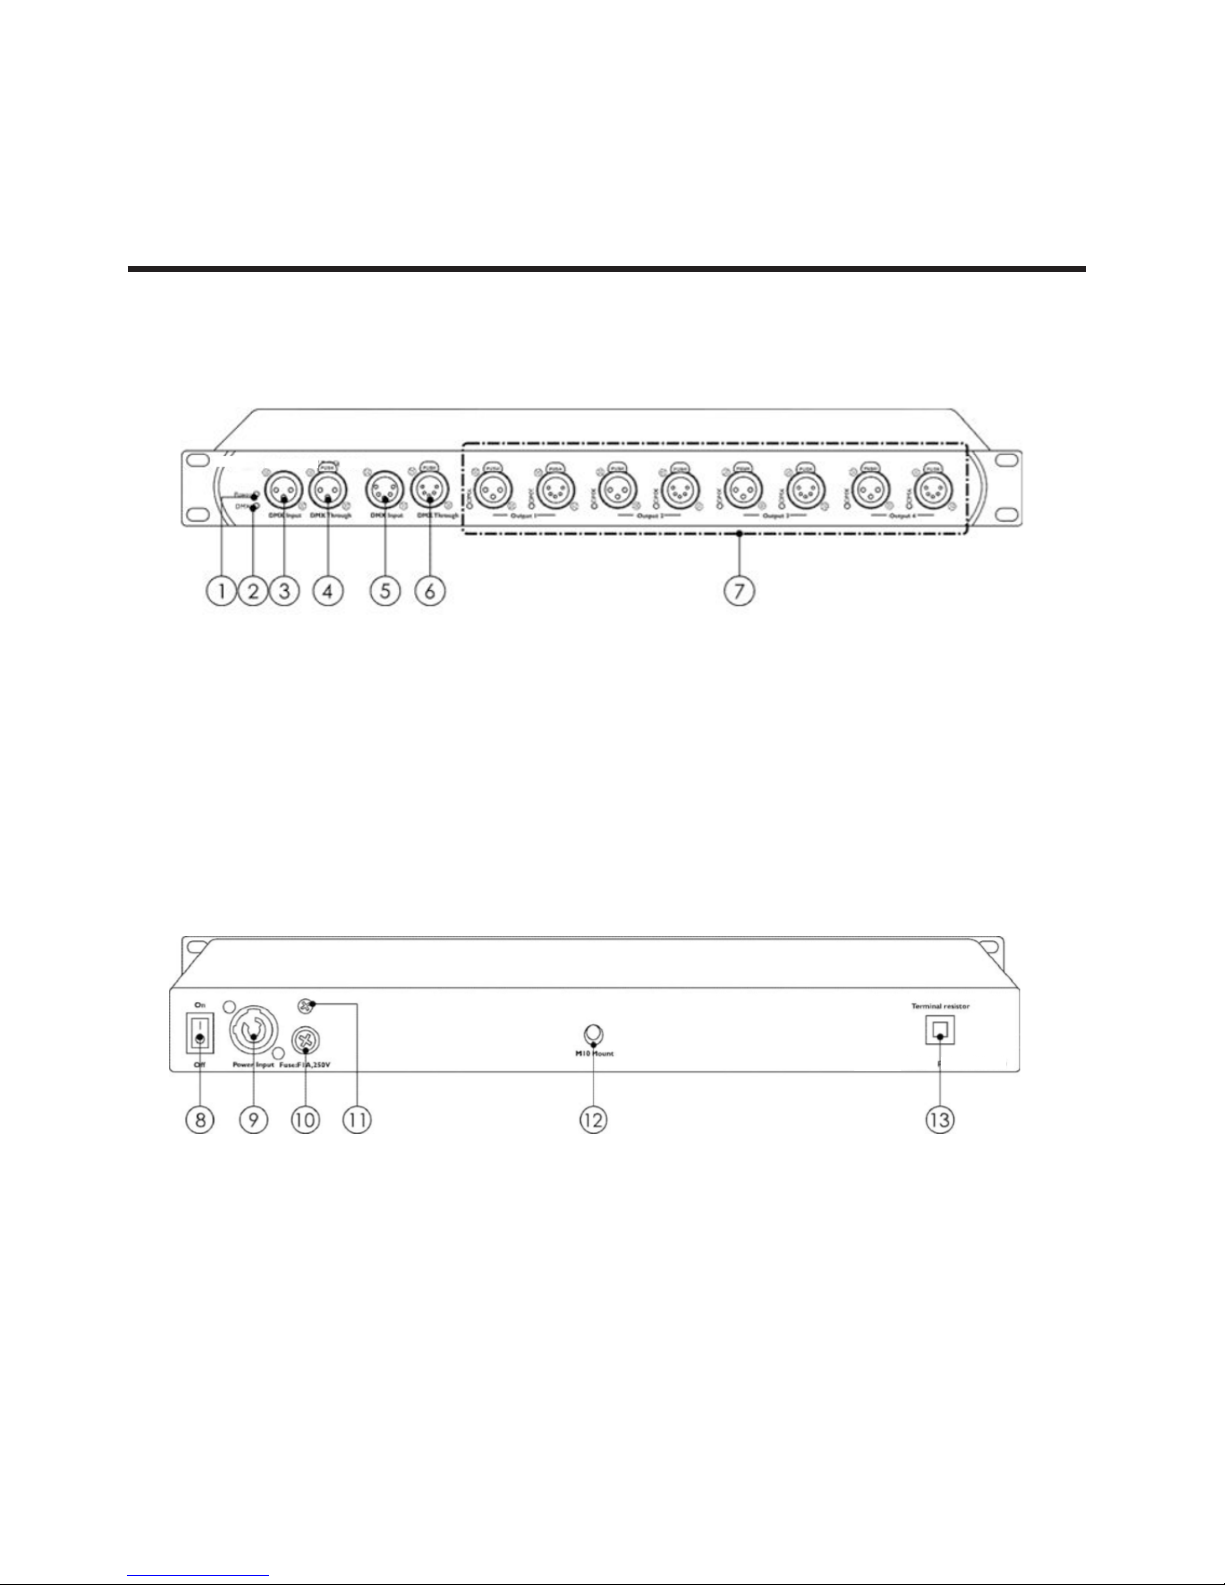
Front side
Back side
1) Power LED indicator
2) DMX LED indicator
3) 3-pin DMX signal connector IN
4) 3-pin DMX signal connector THROUGH
8) Power switch ON/OFF
9) Pro power connector IN
10) Fuse 1A/250V
5) 5-pin DMX signal connector IN
6) 5-pin DMX signal connector THROUGH
7) 3/5-pin DMX signal connectors OUT
11) Ground/earth connection
12) M10 clamp thread
13) Terminal resistor
Page 6
P. 6
Tecshow Navi gator Split RDM |
English version
4. INSTALLATION
5. SET UP AND OPERATION
Remove all packing materials from the Navigator
Split RDM. Check if all foam and plastic padding is
removed. Connect all cables.
• Do not supply power before the whole system is set up and connected properly.
• Always disconnect from electric mains power supply before cleaning or servicing
Follow the directions below, as they pertain to your
preferred operation mode. Before plugging the
unit in, always make sure that the power supply
matches the product specication voltage. Do not
attempt to operate a 120V specication product on
230V power, or vice-versa. Connect the device to
the main power supply.
Control Modes
Multiple RDM Splitters (DMX control)
1) Fasten the distributor to a 19-inch rack.
2) Use a 3-pin/5-pin XLR cable to connect the Navigator Split RDM and other devices.
3) Connect the rst unit’s "in" socket to a light
controller.
4) Link the units as shown in gure. Connect the
rst unit's DMX "link" socket with the second unit's
"in" socket, using a DMX signal cable. Repeat this
process to link the second, third, and fourth units.
5) Connect light xtures to the unit’s DMX "out"sockets.
6) Supply electric power: Plug the unit’s mains power cord into proper electric power supply sockets,
starting with the rst unit. Do not supply power
before the whole system is set up and connected
properly.
Page 7

P. 7
| Tecshow Navi gator Split RDM
English version
6. MAINTENANCE
The Navigator Split RDM requires almost no maintenance. However, you should keep the unit clean.
Disconnect the mains power supply, and then wipe
the cover with a damp cloth. Do not immerse in
liquid. Do not use alcohol or solvents. Keep connections clean. Disconnect electric power, and then
wipe the DMX/RDM connections with a damp cloth.
Make sure connections are thoroughly dry before
linking equipment or supplying electric power.
Replacing the Fuse
Power surges, short-circuit or inappropriate electrical power supply may cause a fuse to burn out.
If the fuse burns out, the product will not function
Fixture Linking
You will need a serial data link to run light shows
of one or more xtures using a DMX-512 controller or to run synchronized shows of two or more
xtures set to a master/slave operating mode. The
combined number of channels required by all the
xtures on a serial data link determines the number
of xtures the data link can support.
Important: Fixtures on a serial data link must be
daisy-chained in a single line. To comply with the
EIA485 standard, no more than 30 devices should
be connected on one datalink. Connecting more
than 30 xtures on one serial data link without the
what so ever. If this happens, follow the directions
below.
1) Unplug the unit from electric power source.
2) Insert a screwdriver into the fuse holder. Turn the
fuse holder counter clockwise. The fuse holder will
come out.
3) Remove the used fuse. If brown or unclear, it is
burned out.
4) Insert the replacement fuse into the holder
where the old fuse was. Reinsert the fuse holder. Be
sure to use a fuse of the same type and specication. See the product specication label for details.
use of a DMX optically isolated splitter may result
in deterioration of the digital DMX signal. Maximum
recommended DMX data link distance: 100 meters
Maximum recommended number of xtures on a
DMX data link: 30 xtures.
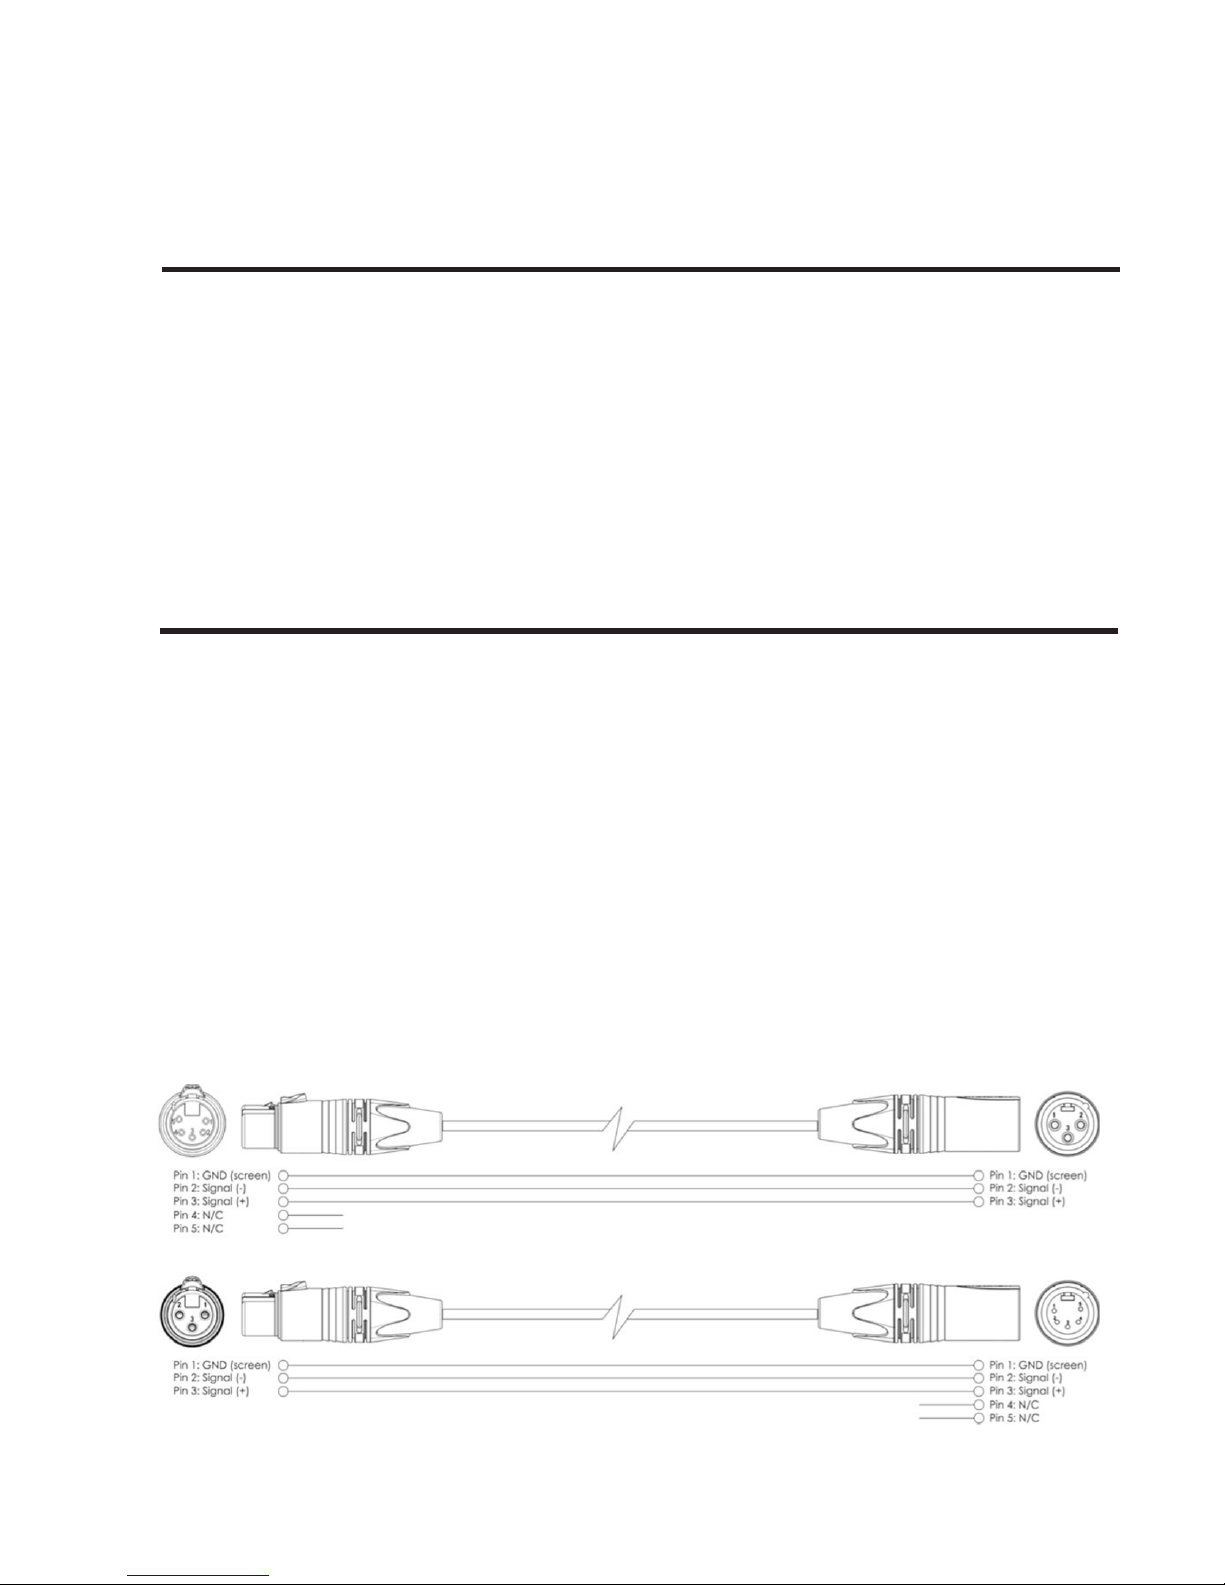
Data Cabling
To link xtures together you must obtain data cables. If you choose to create your own cable please
use data grade cables that can carry a high quality
signal and are less prone to electromagnetic interference.
Page 8

P. 8
Tecshow Navi gator Split RDM |
English version
7. TROUBLESHOOTING
No Light
If the light eect does not operate properly, refer
servicing to a technician. Suspect three potential
problem areas as: the power supply, the splitter,
the fuse.
1) Power supply. Check that the unit is plugged into
an appropriate power supply.
2) The splitter. Return Navigator Split RDM to your
dealer.
3) The fuse. Replace the fuse. See Replace fuse sec-
tion for replacing the fuse.
4) If all of the above appears to be O.K., plug the
unit in again.
5) If you are unable to determine the cause of the
problem, do not open the Navigator Split RDM, as
this may damage the unit and the warranty will
become void.
6) Return the device to your dealer.
No Response to DMX
Suspect the DMX cable or connectors, a distributor
malfunction, a controller malfunction, a light eect
DMX card malfunction.
1) Check the DMX setting. Make sure that DMX addresses are correct.
2) Check the DMX cable: Unplug the unit; change
the DMX cable; then reconnect to electrical power.
Try your DMX control again.
3) Determine whether the distributor, controller or
light eect is at fault. If the distributor or controller
does not operate properly, take the distributor or
controller in for repair. Otherwise, take the DMX
cable and the light eect to a qualied technician.
Problem Probable cause (s) Solution
One or more xtures do not
function at all
No power to the xture ■ Check if power is switched on
and cables are plugged in
Primary fuse blown ■ Replace fuse
Fixtures reset correctly, but all
respond erratically ornot at all to
the controller
The contoller is not connected. ■ Connect controller
3-pin/5-pin XLR Out of the control-
ler does not match XLR Out of the
rst xture on the link (i.e. signal
is reversed)
■ Install a phase reversing cable
between the controller and the
rst xture on the link
Fixtures reset correctly, but some
respond erratically or not at all to
the controller
Poor data quality ■ Check data quality. If muchlower
than 100 percent, the problem
may be a bad data link connection, poor quality or broken
cables, missing termination plug,
or a defective xture disturbing
the link
Bad data link connection ■ Inspect connections and cables.
Correct poor connections. Repair
or replace damaged cables
Page 9

P. 9
| Tecshow Navi gator Split RDM
English version
Data link not terminated with 120
Ohm termination plug
■ Insert termination plug in output
jack of the last xture on the link
Incorrect addressing ohe xtures ■ Check address setting
One of the xtures is defective
and disturbs data transmission on
the link
■ Bypass one xture at a time until
normal operation is restored: unplug both connectors and connect
them directly together
■ Have the defective xture serviced by a qualied technician
3-pin/5-pin XLR Out on the x-
tures does not match (pins 2 and 3
reversed)
■ Install a phase-reversing cable
between the xtures or swap pin
2 and 3 in the xture that behaves
erratically
No light or LEDs/lamp cuts out
intermittently
Fixture is too hot ■ Allow the xture to cooldown
■ Clean the fan
■ Make sure air vents in control
panel and the front lens are not
blocked
■ Turn up the air conditioning
LEDs/lamp damaged ■ Disconnect the xture and re-
turn it to your dealer
The power supply settings do
not match local AC voltage and
frequency
■ Disconnect xture. Check settings and correct if necessary
Design and product specications are subject to change without prior notice.
Page 10

P. 1 0
Tecshow Navi gator Split RDM |
Version Español
Navigator Split RDM
Splitter DMX & RDM - 2 entradas / 4 salidas
Navigator Split RDM es un splitter DMX y RDM que
tiene cuatro salidas con conectores XLR-3 y XLR-5,
las cuales pueden ser conectadas a cualquiera de
las dos entradas que también posee. Cada uno de
los puertos de señal están ópticamente aislados y
cuentan con un LED que permite ver su status facilmente. Navigator Split RDM es una solución ideal
para aquellos que buscan un splitter conable que
incluya funcionalidad RDM y cuente con conectores
de 3 y 5 pines.
Especicaciones
Características
• Splitter DMX
• RDM compatible (bidireccional)
• Rackeable de 19 pulgadas
• 4 salidas (con conectores XLR de 3 y 5 pines)
• Señales ópticamente aisladas
• Soporta actualización DMX
Técnica
• DMX: ANSI E1.11
• RDM: ANSI E1.20
• Conector de alimentación de entrada: 1
conector PowerCon
Físico
• Dimensiones: 146x482,6x44,5 mm. / 5,7x19x1,75
pulg.
• Peso: 2,1 Kg. / 4,6 Lbs.
1. DESCRIPCIÓN
Page 11

P. 11
| Tecshow Navi gator Split RDM
Versión Español
2. ADVERTENCIA
Lea atentamente el manual antes de
comenzar a utilizar el equipo.
Instrucciones al abrir el producto
Cuando reciba el equipo, ábralo de inmediato con
cuidado y verique que todas las piezas se encuentren presentes y en buen estado.
Contenido
• Navigator Split RDM
• 1 cable de alimentación.
Precaución: Proteja el equipo de la lluvia y la humedad. Desconecte el equipo
del suministro eléctrico antes de abrirlo.
Instrucciones de seguridad
Toda persona involucrada con la instalación, operación y mantenimiento de este dispositivo debe:
• estar calicada para la tarea;
• seguir las instrucciones del manual con
atención.
Peligro: No manipule los cables. Alto
voltaje. Riesgo de descarga eléctrica.
Antes de la puesta en marcha inicial, revise el
equipo y asegúrese de que no haya sufrido daños
durante el envío. En caso de que faltasen piezas o
alguna no funcionase correctamente, póngase en
contacto con el distribuidor de inmediato.
Procure seguir las instrucciones y advertencias de
seguridad del manual para garantizar el buen estado del equipo y su funcionamiento seguro.
El equipo no contiene piezas que puedan ser reparadas por el usuario. En caso de precisar asistencia,
póngase en contacto con un profesional idóneo.
Importante
• No permita que el cable de suministro eléctrico
entre en contacto con otros cables. Utilice el
cable y todas las conexiones con extrema precaución.
• No retire las etiquetas informativas o de advertencia de la unidad.
• No obstruya ni elimine el contacto a tierra de la
unidad.
• Nunca mire en forma directa a la salida de luz.
• No deje cables sueltos en las inmediaciones del
equipo.
• En caso de tormentas eléctricas, no utilice el
equipo y manténgalo desconectado.
• Mantenga el material de embalaje (bolsas de
plástico, polietileno, etc.) fuera del alcance de
los niños.
• No introduzca objetos de ningún tipo en las
ranuras de ventilación.
• Evite abrir la unidad e introducirle modica-
ciones.
• No conecte la unidad a un dimmer
• No sacuda el equipo. Evite utilizar o instalar el
equipo de forma brusca.
• Evite encender y apagar la unidad contantemente, ya que puede reducir su vida útil.
• Evite tocar la unidad sin guantes mientras esté
encendida (la cubierta alcanza temperaturas
elevadas).
• Este equipo se diseñó para uso en interiores.
Manténgalo alejado del agua u otros líquidos.
• Procure familiarizarse con todas las funciones
antes de utilizar el equipo.
• Utilice una abrazadera de montaje al momento
de instalar el equipo.
• Mantenga el equipo alejado de llamas expues-
tas o líquidos inamables.
• Verique que la cubierta esté bien cerrada
antes de operar el equipo.
• Instale el equipo a una distancia mínima de 50
Page 12
P. 12
Tecshow Navi gator Split RDM |
Versión Español
cm de otros objetos para garantizar la buena
circulación de aire.
• Desconecte el equipo cuando no esté en funcionamiento o antes de realizar cualquier tarea
de mantenimiento. Utilice el cable desde el
enchufe. Nunca tire del cable para desconectar
la unidad.
• No permita que el equipo quede expuesto al
calor, humedad o polvo en exceso.
• Compruebe que el voltaje utilizado no sea superior o inferior al indicado en el panel dorsal.
• Verique con frecuencia que el cable de suministro eléctrico no se encuentre cortado o
dañado.
• Asegúrese que no haya fuerzas laterales que
puedan dañar el sistema de trussing.
• Nunca ejerza presión sobre las clavijas del
enchufe. Procure que siempre haya suciente
cable para el producto. De lo contrario, el cable
puede sufrir daños severos y causar descargas
eléctricas.
• En caso de que el cable de suministro eléctrico
se encuentre cortado o dañado, póngase en
contacto con un técnico para que lo reemplace.
• Sustituya el lente en caso de que se encuentre
rayado o dañado para garantizar la óptima
salida de luz.
• No utilice el equipo si ha recibido un golpe
brusco o se ha caído. Desconéctelo de inmediato y póngase en contacto con el servicio técnico
autorizado antes de volver a utilizarlo.
• En caso de que el equipo haya sido expuesto
a cambios de temperatura drásticos, no lo
encienda de inmediato. La condensación puede
causar daños en el equipo. Manténgalo apagado hasta que alcance la temperatura ambiente.
• Desconecte el equipo de inmediato si observa un funcionamiento anómalo. Coloque la
unidad en su embalaje original y llévelo a su
distribuidor para que lo revise.
• Este equipo solo puede ser operado por adultos. Mantenga la unidad alejada del alcance de
los niños. No deje la unidad en funcionamiento
y sin supervisión.
• Utilice repuestos originales y del mismo tipo en
caso de ser necesario.
• El usuario es responsable de la instalación y
buen funcionamiento de la unidad. La garantía
no cubre daños por el uso inapropiado del
producto.
• El equipo cuenta con grado de protección I, por
lo cual debe conectar el cable amarillo/verde a
tierra.
• Las reparaciones deben ser realizadas única-
mente por técnicos calicados.
• Garantía: Un año desde la fecha de compra.
Indicaciones de uso
• Los efectos de luces no están diseñados para
funcionar de forma permanente. Procure que
el equipo descanse antes de volver a utilizarlo
para prolongar su vida útil.
• El nivel de humedad no debe exceder el 50% en
una temperatura ambiente de 40°C.
• Si opera el equipo de alguna forma no descrita
en el presente manual, el producto puede sufrir
daños severos. La garantía no cubre daños
provocados por el uso inapropiado del equipo.
• El uso inadecuado del equipo puede ocasionar
quemaduras, cortocircuitos, shock eléctrico, etc.
Conexión
Utilice el cable proporcionado para conectar la
unidad al suministro eléctrico.
Verique que el cable esté conectado en el lugar
correcto de acuerdo con su color.
Internacional EU UK
L Marrón Rojo
N Azul Negro
Amarillo/
Verde
Verde
EE.UU. Clavija
Amarillo/Cobre Fase
Plateado Neutro A
Verde Tierra
Page 13

P. 13
| Tecshow Navi gator Split RDM
Versión Español
3. DESCRIPCIÓN DEL PRODUCTO
Vista frontal
Vista trasera
1) Indicador LED de encendido.
2) Indicador LED DMX.
3) Conector de entrada DMX XLR-3.
4) Conector thru DMX XLR-3.
8) Interruptor de encendido/apagado.
9) Conector de entrada Pro power.
10) Fusible 1A/250 V.
5) Conector de entrada DMX XLR-5.
6) Conector thru DMX XLR-5.
7) Conector de salida DMX XLR-3 y XLR-5.
11) Conexión a tierra.
12) Oricio M10 para abrazadera.
13) Resistencia terminal
Page 14

P. 14
Tecshow Navi gator Split RDM |
Versión Español
4. INSTALACIÓN
5. PUESTA EN MARCHA Y FUNCIONAMIENTO
Retire todos los materiales de embalaje de la
unidad. Verique que no hayan quedado cubiertas
plásticas o de goma espuma adheridas. Conecte
todos los cables.
• Procure conectar la unidad luego de haber
instalado y congurado el sistema.
• Recuerde desconectar la unidad del sumi-
Siga las instrucciones a continuación ya que
guardan relación con el uso responsable y seguro
del equipo. Antes de conectar el equipo al sumi-
nistro eléctrico, verique que el rango de voltaje
de entrada coincida con el indicado en la presente
guía. Nunca conecte un equipo de 120 V a una red
de 230 V o viceversa. Una vez realizados los pasos
anteriores, conecte el equipo al suministro eléctrico.
Modos de control
Varios splitters RDM (DMX)
1) Coloque la unidad en un bastidor estándar de 19
nistro eléctrico antes de realizar cualquier
tarea de mantenimiento.
pulgadas.
2) Conecte un cable XLR-3 o XLR-5 para enlazar los
Navigator Split RDM y otros dispositivos.
3) Conecte la entrada de la primera unidad al controlador de luces.
4) Enlace las unidades como se indica en la gura
3. Utilice un cable DMX para conectar la salida de
la primera unidad con la entrada de la segunda
unidad. Reitere este último paso para enlazar todas
las unidades necesarias.
5) Conecte las unidades de iluminación a las salidas
DMX del equipo.
Page 15

P. 15
| Tecshow Navi gator Split RDM
Versión Español
6. MANTENIMIENTO
Navigator Split RDM es un equipo que prácticamente no requiere de mantenimiento. Sin embargo, se recomienda mantener la unidad limpia.
Desconecte la unidad del suministro eléctrico y
luego limpie la cubierta con un paño humedecido.
No sumerja el equipo en el agua. Evite el uso de
alcohol o solventes.
Mantenga los conectores limpios y en buen estado.
Como con la cubierta, desconecte la unidad del
suministro eléctrico y luego limpie los conectores
DMX/RDM con un paño humedecido. Verique que
los conectores estén secos y sin rastros de humedad antes de conectar la unidad o enlazarla con
otros equipos.
Sustitución del fusible
Los picos de tensión, los cortocircuitos o un rango de voltaje inadecuado pueden causar que se
6) Conexión al suministro eléctrico: Conecte un extremo de cada cable de alimentación en los conectores de todas las unidades, y el otro extremo, a la
fuente de alimentación. Comience siempre por la
primera unidad de la cadena. Enlace las unidades
antes de conectar todo a la fuente de alimentación.
Enlace de equipos
El usuario va a precisar de una conexión de datos
en serie para armar shows de luces y efectos con
uno o más equipos que utilicen un controlador DMX
o para ejecutar shows sincronizados en dos o más
equipos enlazados en modo maestro/esclavo. El
número total de canales requeridos por todas las
unidades enlazadas determina el número de unidades que el enlace de datos puede sostener.
queme el fusible. Para reemplazarlo, siga los pasos
a continuación:
1) Desconecte la unidad del suministro eléctrico.
2) Coloque un destornillador plano en una de las
ranuras de la cubierta del fusible. Gírelo hacia la
izquierda mientras hace presión. El portafusible se
saldrá.
3) Retire el fusible usado. Si tiene un color amarronado o turbio, está quemado.
4) Ubique el nuevo fusible en el portafusibles.
Vuelva a colocar la cubierta. Asegúrese de utilizar
un fusible del mismo tipo. Para obtener más infor-
mación, reérase a las especicaciones técnicas
del producto.
Importante: Los equipos deben estar enlazados en
una sola línea. Conforme con la norma EIA-485, un
enlace de datos no puede superar las 30 unidades
interconectadas.Superar esta cifra sin el uso de un
splitter DMX aislado ópticamente puede perjudicar
la señal digital transmitida.
Distancia máxima recomendada para enlaces de
datos DMX: 100 metros.
Número máximo recomendado de proyectores
enlazados: 30 unidades.
Cables de datos
Asegúrese de contar con cables de datos para
enlazar las unidades entre sí. Si decide construir
su propio cable, recuerde utilizar cables de datos
trenzados que pueden transmitir señal de alta calidad y que son menos propensos a la interferencia
electromagnética.
Page 16

P. 1 6
Tecshow Navi gator Split RDM |
Versión Español
7. RESOLUCIÓN DE PROBLEMAS
No hay emisión de luz
Si el equipo funciona con inconvenientes, póngase
en contacto con el servicio técnico autorizado. El
suministro eléctrico, el fusible y el splitter son las
principales causas de desperfectos.
1) Suministro eléctrico. Verique que la unidad esté
conectada al rango de voltaje correcto.
2) El splitter. Devuelva la unidad al proveedor.
3) El fusible. Reemplace el fusible. Para obtener
información sobre el fusible, vea la página 9.
4) Si todos los aspectos mencionados en el paso
anterior no presentan errores, vuelva a conectar la
unidad.
5) Si no ha podido determinar la causa del problema, no desarme la unidad, puesto que podría
dañarla e invalidar la garantía.
6) Devuelva la unidad al proveedor.
No hay respuesta la señal DMX
Si la unidad no responde a la señal DMX, es posible
que exista algún desperfecto con el cable DMX,
los conectores, el controlador o la tarjeta DMX de
efectos.
1) Verique que las direcciones DMX estén correctamente asignadas.
2) Verique el estado del cable DMX. Desconecte
la unidad del suministro eléctrico, cambie el cable
DMX, luego vuelva a conectar la unidad. Intente
utilizar el control DMX nuevamente.
3) Determine si el controlador o el efecto de luz tienen fallas. Si no funcionan correctamente, lleve el
controlador DMX al servicio técnico. De lo contrario,
lleve el cable DMX y el efecto de luz a un técnico
autorizado.
Problema Causas posibles Solución
Una o más unidades no funcionan.
La unidad no recibe alimentación. ■ Verique que la unidad esté en-
cendida y los cables conectados.
El fusible está quemado Reemplace el fusible.
Las unidades se reinician
correctamente, pero funcionan
erráticamente o no responden al
controlador.
El controlador no está conectado. ■ Conecte el controlador.
La salida XLR-3/XLR-5 del contro-
lador no coincide con la salida XLR
de la primera unidad de la cadena
(señal invertida).
■ Coloque un cable de fase invertida entre el controlador y la
primera unidad.
Las unidades se reinician
correctamente, pero algunas
funcionan erráticamente o no
responden al controlador.
Mala calidad de datos. ■ Verique la calidad de los datos.
Si es menor a 100%, el problema
puede radicar en conexión de
datos con fallas, de mala calidad,
cables dañados,ausencia de un
terminador o un unidad defectuosa que afecta la cadena.
Conexión de datos con fallas. ■ Revise las conexiones y los
cables. Corrija las conexiones de
los cables. Reemplace o repare los
cables dañados.
Page 17

P. 17
| Tecshow Navi gator Split RDM
Versión Español
Enlace de datos sin terminador de
120 Ω
■ Coloque un terminador en la
salida de la última unidad de la
cadena.
Dirección DMX incorrecta. ■ Corrija la dirección DMX.
Uno de los equipos está averiado
y entorpece la transmisión de
datos en la cadena.
■ Revise los equipos uno a uno,
hasta detectar el inconveniente.
Desenchufe ambos conectores y
conéctelos directamente entre sí.
■ Lleve la unidad defectuosa al
servicio técnico.
La salida XLR-3/XLR-5 de los
equipos no coincide (clavijas 2 y 3
invertidas).
■ Coloque un cable de fase inverti-
da entre los equipos o intercambie
las clavijas 2 y 3 en el equipo que
funciona erráticamente.
No hay salida de luz o la lámpara
se apaga de forma intermitente.
Protección térmica. ■ Limpie el ventilador.
■ Compruebe que no estén obstru-
idas las ranuras de ventilación.
■ Encienda el aire acondicionado.
Lámpara/LEDs dañados. ■ Desconecte el equipo y
devuélvalo al proveedor.
El rango de voltaje de entrada no
coincide con el requerido por el
equipo.
■ Desconecte el equipo. Revise la
conguración y corríjala, de ser
necesario.
Observación: El proveedor no asumirá responsabilidad por los errores u omisiones del manual.
La información de este manual está sujeta a cambios sin previo aviso.
Page 18

P. 18
Tecshow Navi gator Split RDM |
FOR MORE INFO ON THIS PRODUCT PLEASE CHECK WWW.TEC-SHOW.COM /
PARA MAS INFORMACION SOBRE ESTE PRODUCTO VISITE WWW.TEC-SHOW.COM
 Loading...