

Page 1

P. 1
| Tecshow Navi gator 3+
NAV I GATO R 3+
Dmx moving lights controller – 384 channels
USER MANUAL / MANUAL DE USUARIO
PLEASE READ THE INSTRUCTIONS CAREFULLY BEFORE USE
POR FAVOR LEA LAS INSTRUCCIÓNES ANTES DE USAR
Page 2

P. 2
Tecshow Navi gator 3+ |
Navigator 3+
DMX moving lights controller - 192 channels
Navigator 3+ is a multifunction controller that can
be used as a DMX console and as a MIDI controller.
In its DMX facet the team has a total of 384 channels, being able to control up to 32 parameters in
the 12 luminaires it supports. Navigator 3+ has 30
memory banks with 8 programmable scenes per
bank and also sports 12 chases with 240 steps each.
A large display, the full integration of MIDI and the
incorporation of a high precision joystick to control
the movements of the luminaires are some of the
features that make it one of the most complete
controllers in its segment.
Specications
Interface
• 7-segment LCD display
• 8 faders for manual control - 4 pages
• Joystick - Pan and Tilt
• Blackout master button
• Fog machine button
• Speed and fade time faders
Features
• 384 DMX channels - 12 xtures of 32 DMX channels
• 12 programmable chases with 240 scenes
• 30 memory banks
• 8 scenes per memory bank
• Fade time assignable
• Manual override
• Controllable via MIDI
• Built-in microphone
Connectors
• 1 XLR-3 DMX Output connector
• 2 MIDI connectors (In/Out)
• 1 DIN connector: Fog Machine
• 1 RCA connector
• 1 USB port
• 1 DB-9 connector for Ext Step control
• 1 Power input
Physical
• Dimensions: 483x135x82 mm. / 19x5.3x3.2 in.
• Weight: 2.2 kg. / 4.8 lbs.
1. OVERVIEW
English version
Page 3
P. 3
| Tecshow Navi gator 3+
English version
2. SAFETY PRECAUTIONS
Warnings
• This unit is intended for indoor user only.
• Do not allowa for any ammable liquids, water,
or metal objects to enter the unit.
• To reduce the risk of re or electric shock, do
not expose the unit to rain or high levels of
moisture.
• No user serviceable parts inside, do not dismantle the unit yourself.
• Repairs must be done by qualied personnel
only.
• Please do not allow children to play and tamper
with this product.
Cautions
• When unpacking, please ensure that the unit
is not damaged. Should something be wrong,
please contact us immediately.
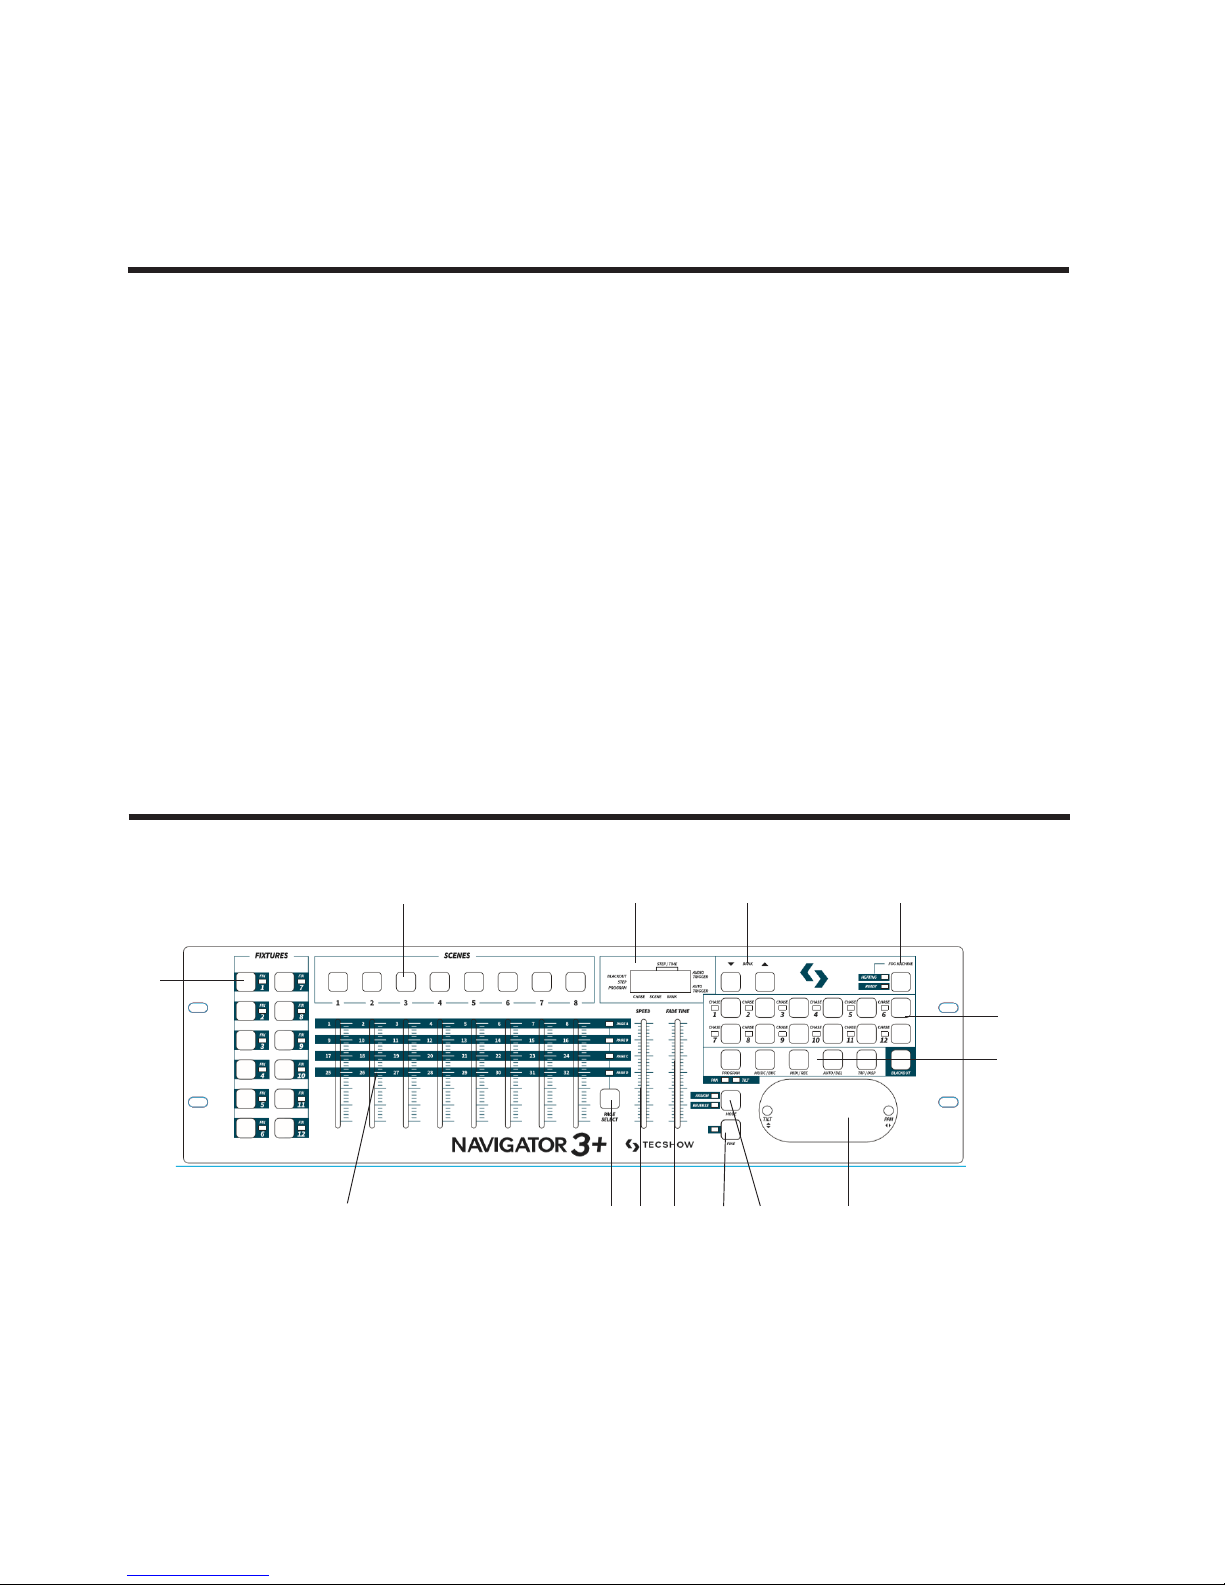
3. FRONT PANEL OVERVIEW
1. Fixture buttons (1-12): Used to select relevant
xtures for control.
2. Channel faders (1-8): Used to control the output
of each corresponding xture channel.
3. Channel Bank button: Used to switch between
channels 1-8, 9-16, 17-24 and 25-32).
4. Speed fader: Used to adjust chase speed (range
is 0.1 second to 10 minutes per step).
5. Fade Time fader: Used to adjust chase fade
time (range is 0 to 30 seconds).
9
2 3 4 5 6 7 8
13
14-19
1
10 11 12
Page 4
P. 4
Tecshow Navi gator 3+ |
English version
6. Fine button: Used in conjunction with the
joystick. When the Fine button is engaged,
adjusting the joystick will be more precise when
needing to hit a specic area with a scanner or
moving head.
7. Mode button: This is a multi-function button
that is used when assigning the joystick & Fade
setting.
8. Joystick: Traditionally used to adjust the X/Y
channels of a moving light.
9. Scene buttons (1-8): Used when storing or
playing back programmed scenes. Also used
when backing up data to a USB Stick or through
a ULink Cable.
10. LED display: The LED display shows you relevant
information depending on current operation.
11. Bank Up/Down button: Used to select a scene
bank or chase step. Also used to view les in
memory stick.
12. Fog-machine button: Used to trigger fog machine which should be connected to rear of
console.
13. Chase buttons (1-12): Used when storing or
playing back relevant chases.
14. Program button: Used to enter and exit Record
mode when programming.
15. Music/Bkc button: Used to engage audio mode
for chase synchronization and to copy a bank of
scenes to another.
16. MIDI/Rec button: Used to record scenes and
chase steps. Also used to setup MIDI operation.
17. Auto/Del button: Used to enter AUTO mode for
automatic scene bank sequence or to delete a
scene or chase.
18. Tap/Disp button: Used to tap sync chase playback and to change display view operation.
19. Black-out button: Used to bring all current output down to zero.
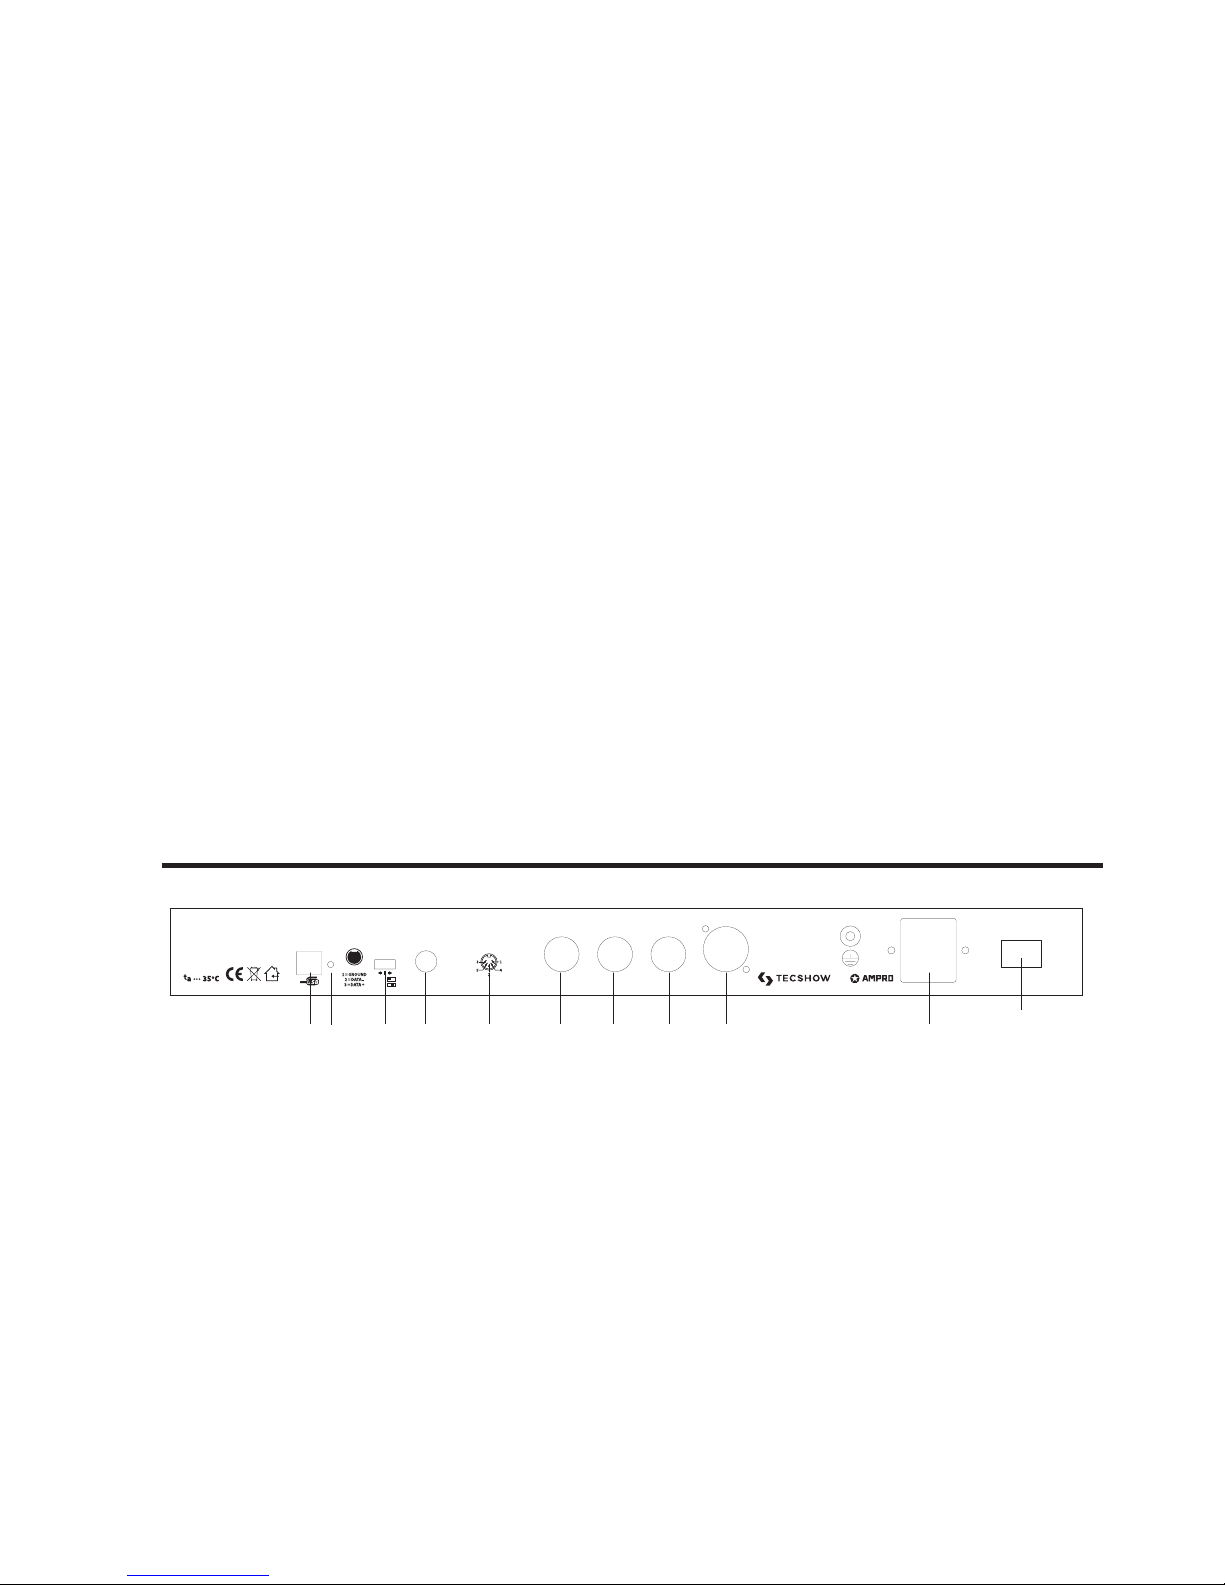
4. REAR PANEL OVERVIEW
1. Label: Lists model, serial number, and production date.
2. Audio input: To connect line level input for audio trigger (0.1V-1Vp-p).
3. DB-9 connector: To connect optional external
chase step controller. NOTE: No longer included
in units manufactured aer Feb. 2018.
4. MIDI IN: To receive MIDI information from a midi
sequencer or compatible device.
5. Fog machine connector: To connect a compati-
ble fog machine.
6. 3 Pin Female XLR: DMX Output. Connect to rst
device in line.
7. DC INPUT: Connects the included power supply
to this input. (DC 9V~15V, 500mA Min).
8. Power Switch: Used to switch the units power
on and o.
9. USB Interface: Outputs the MIDI signal via USB
interface when connected to MIDI controller.
10. LED Lamp: Indicates the working state of USB
interface.
11. Switch: Switches the function of DMX controller
or MIDI controller. The change will work aer
re-startup.
12. MIDI Out Socket: output the MIDI signal when
connected to the MIDI controller.
8
7
6512432119 10
Page 5

P. 5
| Tecshow Navi gator 3+
English version
5. JOYSTICK SET UP
Assign Joystick
1. Press and hold down the Program button for
approximately 2 seconds or until the PROG
indicator in the LED display ashes. Once the
indicator is ashing, record mode is engaged
and you may release the Program button.
2. Press and hold down the MODE button and
then tap the FINE button.The “Assign” and
“Pan” LED’s should illuminate.
3. "Assign Joystick Reverse" (Pan/Tilt Invert)
Operation Guide Select the xtures that you
wish to assign the "Pan" for by pressing the
FIXTURES# buttons, 1-12, so the selected xture
LED´s illuminate.
4. Press the Tap/Disp button to switch between
“PL.XX” & “PH.XX”. “PL.XX” represents the Low
Byte or Fine channel, generally listed as the Pan
Fine channel and PH.XX represents the High Byte
or Coarse channel, generally listed as the Pan
channel. Set it to “PH.XX” and press and hold
down the MODE button and then tap the SCENE
button that corresponds to the Pan channel of
your xture. For example, if your xtures Pan
channel is 1 then you´d press the SCENE #1
button. Please refer to the xtures DMX chart. If
your xture includes a pan ne channel, press
the Tap/Disp button so the display reads "PL.XX.
Press and hold down the MODE button and then
tap the SCENE button tha corresponds to the
Pan Fine channel of your xture. For example,
if your xtures Pan Fine channel is 2 then you´d
press the SCENE #2 button.
5. Press the BANK UP or DOWN buttons to switch
between “TL.XX” & “TH.XX”. “TL.XX” represents
the Low Byte or Fine channel, generally listed as
the Tilt Fine channel and TH.XX represents the
High Byte or Coarse channel, generally listed as
the Tilt channel. Set it to “TH.XX” and press and
hold down the MODE button and then tap the
SCENE button that corresponds to the Tilt chan-
nel of your xture. For example, if your xtures
Tilt channel is 3 then you´d press the SCENE #3
button. Please refer to the xtures DMX chart. If
your xtures includes a Tilt Fine channel, press
the Tap/Disp button so the display reads "TL.XX".
Press and hold down the MODE button and then
tap the SCENE button that corresponds to the
Tilt Fine channel of your xture. For example, if
your xtures PAn Fine channel is 2 then you´d
press the SCENE #4 button.
6. Press and hold down the Program button and
approximately 2 seconds or until the PROG
indicator in the LED display stops ashing. A
ashing Blackout indicator in the LED display
conrms that the controller is out of Program
mode.
Assign Joystick Reverse
(pan/tilt invert)
1. Press and hold down the Program button for
approximately 2 seconds or until the PROG
indicator in the LED display ashes. Once the
indicator is ashing, record mode is engaged
and you may release the Program button.
2. Press and hold down the MODE button and
then tap the FINE button. The “Assign” and
“Pan” LED’s should illuminate.
3. Once again, press and hold down the MODE
button and then tap the FINE button. The “Reverse” LED should illuminate.
4. Select the xtures that you wish to assign the
"Pan Reverse" & "Tilt Reverse" for by pressing
the FIXTURES # buttons, 1-12, so the selected
xtures LED´s illuminate. Ideally, you should
assign opposite xtures for Pan/Tilt Reverse.
For example, xtures 1, 3, 5, 7, etc... should be
assigned normal as described in the previous
section and xtures 2, 4, 6, etc... should be
assigned reversed so that when moving the joy-
stick around, xtures movements are reversed
Page 6

P. 6
Tecshow Navi gator 3+ |
English version
from one another. This feature is traditionally
referred to as Pan/Tilt invert.
5. Press the Tap/Disp button to switch between
“PL.XX” & “PH.XX”. “PL.XX” represents the Low
Byte or Fine channel, generally listed as the Pan
Fine channel and PH.XX represents the High Byte
or Coarse channel, generally listed as the Pan
channel. Set it to “PH.XX” and press and hold
down the MODE button and then tap the SCENE
button that corresponds to the Pan channel of
your xture. For example, if your xtures Pan
channel is 1 then you´d press SCENE #1 button.
Please refer to the xtures DMX chart. If your xture includes a pan ne channel, press tha Tap/
Disp button so the display reads "PL.XX". Press
and hold down the MODE button and the tap
the SCENE button that corresponds to the Pan
Fine channel of your xture. For example, if your
xtures PAn Fine channel is 2 then you´d press
the SCENE #2 button.
6. Press the BANK UP or DOWN buttons to switch
between “TL.XX” & “TH.XX”. “TL.XX” represents
the Low Byte or Fine channel, generally listed as
the Tilt Fine channel and TH.XX represents the
High Byte or Coarse channel, generally listed as
the Tilt channel. Set it to “TH.XX” and press and
hold down the MODE button and then tap the
SCENE button that corresponds to the Tilt chan-
nel of your xture. For example, if your xtures
Tilt channel is 3 then you´d press the SCENE #3
button. Please refer to the xtures DMX chart. If
your xture includes a Tilt Fine channel, press
the Tap/Disp button so the display reads "TL.
XX". Press and hold down the MODE button and
then tap the SCENE button that corresponds to
the Tilt Fine channel of your xture. For example,
if your xtures Pan Fine channel is 2 then you´d
press the SCENE #4 button.
7. Press and hold down the Program button for
approximately 2 seconds or until the PROG
indicator in the LED display stops ashing. A
ashing Blackout indicator in the LED-display
conrms that the controller is out of Program
mode.
Delete Joystick Pan/Tilt Assignment
1. Press and hold down the Program button for
approximately 2 seconds or until the PROG
indicator in the LED display ashes. Once the
indicator is ashing, record mode is engaged and
you may release the Program button.
2. Press and hold down the MODE button and
then tap the FINE button. The “Assign” and
“Pan” LED’s should illuminate.
3. Select the xtures that you wish to delete the
joystick Pan/Tilt settings for by pressing the relevant FIXTURES # buttons, 1-12, so the relevant
LEDps illuminate.
4. Press and hold down the MODE button, and the
tap the Auto/DEL button to delete the settings
fot the selected xtures. All LED´s will ash three
times to conrm that the settings were erased.
5. Press and hold down the Program button for
aproximately 2 seconds or until the PROG indicator in the LED display stops ashing. A ashing
Blackout indicator in the LED display conrms
that the controller is out of Program mode.
Delete Pan/Tilt Joystick Settings
For All Fixtures
1. Flip the Operator power switch to OFF. The
switch is located at the rear of the unit.
2. Simultaneously, press and hold down the Auto/
Del and MODE buttons and ip the power
switch ON. All LED´s will ash three times to con-
rm that the Pa/Tilt settings were erased.
Page 7

P. 7
| Tecshow Navi gator 3+
English version
6. MANUAL CONTROL
7. RECORDING SCENES
When powered ON, this console defaults to Manual/Blackout mode. All output will be in a blackout
state until the Blackout button is deselected. To
determine blackout status there is an indicator light
in the display that ashes when engaged and OFF
when disengaged. To gain manual control, disen-
gage blackout, select the xtures that you wish to
control by selecting the relevant xture buttons on
the le then use the eight channel faders, joystick
and the channel bank button to manually control
the xtures.
Note: In most cases, for the joystick to work, you
must rst assign it. Please see the Assign Joystick
section of this manual.
1. Select the xtures that you wish to include into
your scene by pressing the FIXTURES # buttons,
1-12, so the selected xture LED´s illuminate.
2. Press and hold down the Program button for
approximately 2 seconds or until the PROG
indicator in the LED display ashes. Once the
indicator is ashing, record mode is engaged
and you may release the Program button.
3. Set your scene using the eight Channel faders,
joystick or Channel Bank button if needed. The
Channel Bank button should be used to switch
between channel banks 1-8, 9-16, 17-24 and
25-32.
4. Once you are satised with the look of your
scene, press the MIDI/RED button to Record it.
5. Using the BANK UP & DOWN buttons, select a
scene bank to store to. There are 30 available
Scene Banks and you can view them in the
LED-display by referring to the furthest two
digits to the right.
6. Press a Scene button, 1-8, to store to. Once
pressed, all LED´s will ash indicating that your
scene was stored. There are 8 Scene buttons
to store to for each bank. Make sure you select
a dierent scene button each time you store a
scene so you don’t record over something that
you wanted to keep.
7. To Record additional scenes, repeat steps 2
through 6.
8. Once you’ve stored all of your scenes, press and
hold down the Program button or approximately 2 seconds to exit. A ashing Blackout indica-
tor in the LED display, is indicative that you are
out of program mode.
Page 8

P. 8
Tecshow Navi gator 3+ |
English version
8. EDITING SCENES
9. COPY A SCENE
1. Press and hold down the Program button for
approximately 2 seconds or until the PROG
indicator in the LED display ashes. Once the
indicator is ashing, record mode is engaged
and you may release the Program button.
2. Using the UP/Down BANK button, select the
bank that contains the scene that you want
to edit. You can view the active bank in the
LED-display.
3. Press the Scene button, 1-8 , that you want to
edit so the scene comes on.
4. Select the xture or xtures that you wish to
1. Press and hold down the Program button for
approximately 2 seconds or until the PROG
indicator in the LED display ashes. Once the
indicator is ashing, record mode is engaged
and you may release the Program button.
2. Select the bank that contains the scene you
want to copy with the Bank UP/DOWN buttons.
3. Select the Scene # button, 1-8, that you want to
copy.
4. Use the UP/DOWN BANK buttons to change the
scene bank if desired.
5. Press the Midi/Rec button followed by the
Scene # button, 1-8, that you want to copy the
scene to. All LED´s should ash three times to
conrm and save settings.
6. Press and hold down the Program button for
approximately 2 seconds or until the PROG
indicator in the LED display stops ashing. A
ashing Blackout indicator, in the LED display,
is indicative that you are out of the program
mode.
change settings for in the current scene by
pressing the relevant Fixture #, 1-12. The selected xture LED´s should illuminate.
5. Make your changes using the faders or joystick.
6. Press the MIDI/RED button and the press the
scene # button that you are editing. All LED´s
will ash three times to conrm that your new
settings were saved.
7. Press and hold down the Program button for
approximately 2 seconds to exit. A ashing
Blackout indicator, in the LED display, is indicative that you are out of program mode.
Page 9

P. 9
| Tecshow Navi gator 3+
English version
10. DELETE A SCENE
11. DELETE ALL SCENES
12. SCENE PLAYBACK
1. Press and hold down the Program button for
approximately 2 seconds or until the PROG indicator in the LED display stops ashing. Once the
indicator is ashing, record mode is engaged
and you may release the Program button.
2. Select the bank that contains the scene you want
to delete with the Bank UP/DOWN buttons.
3. Simultaneously, press the Auto/Del button then
press the Scene # button, 1-8, that you want
to delete. All LED´s should ash three times to
conrm that the scene was deleted.
4. Repeat steps 2 & 3 to delete additional scenes.
1. Flip the Operators power switch OFF which is
located at the rear of the unit.
2. Simultaneously, press and hold down the Pro-
gram and Bnk Down buttons and ip the power
switch ON. All LED´s will ash three times to
conrm that all scenes were deleted.
Manual Trigger
1. When powered ON, this console defaults to
Manual/Blackout mode. All output will be in
a blackout state until the Blackout button is
deselected. To determine blackout status, there
is an indicator light in the display that ashes
when engaged and OFF when disengaged.
5. Press and hold down the Program button for
approximately 2 seconds or until the PROG
indicator in the LED display stops ashing. A
ashing Blackout indicator, in the LED display, is
indicative that you are out of program mode.
Press the Blackout button so the indicator
stops ashing.
2. Press the Bank UP/DOWN buttons to select the
scene bank that contains the scene that you
want to playback.
3. Press the Scene # button, 1-8, that you want to
playback. The selec ted scene will engage. Press
the same scene # button again to disable the
Page 10

P. 1 0
Tecshow Navi gator 3+ |
English version
scene or the Blackout button to bring all output
to a blackout state.
4. Repeat steps 2 & 3 to manually playback additional scenes.
Auto Trigger
1. Press the AUTO/Del button, the Auto Trigger
indicator light will illuminate in the LED display.
This indicates you that you are now in the Auto
trigger mode.
2. Press the Bank UP/DOWN buttons to select a
desired scene bank, 1-30, for automatic playback. All eight scenes in the selected scene
bank will sequence.
3. At any time, you can adjust the Speed and
Fade fader to the adjust your scene sequence
playback state. You can also press the Tap/Disp
button twice to establish a sequence rate. The
rate will be determined by the tempo at which
you press the Tap/Disp button. Pressing the
Auto/Del button again will disengage automatic
playback mode.
Audio Trigger
1. Press the Music/Rec button, the Audio Trigger
indicator light will illuminate in the LED display.
This indicates you that you are now in the Audio
trigger mode.
2. Press the Bank UP/DOWN buttons to select a
desired scene bank, 1-30, or a chase # button,
1-12. The selected scene bank or chases will trigger to audio via the internal microphone or line
level input if connected. Pressing the Music/Rec
button again will disengage audio mode.
13. RECORDING CHASES
This product has 12 programmable chases. Each of
which can store up to 240 scenes/steps. Please see
the below instructions for chase setting.
1. Press and hold down the Program button for
approximately 2 seconds or until the PROG
indicator in the LED display ashes. Once the
indicator is ashing, record mode is engaged
and you may release the Program button.
2. Select a Chase # button, 1-12, that you wish
to record to. The relevant Chase LED should
illuminate.
3. Using the BANK UP & DOWN buttons, select
the scene bank, 1-30, that contains the scene
you want added to your chase. You can view
the scene banks in the LED display by referring
to the furthest two digits to the right. You can
also set your scene using the eight Channel
faders, joystick, or Channel Bank button on the
y if desired. The Channel Bank button should
be used to switch between channel banks 1-8,
9-16, 17-24 and 25-32.
4. PRess the MIDI/REC button to record the chase
step. All LES´s will ash three times to conrm
that the chase step was recorded.
5. Repeat steps 3 & 4 to record additional steps.
6. Once you’ve recorded all of your steps, press
and hold down the Program button for approximately 2 seconds to exit. A fjashing Blackout
indicator, in the LED display, is indicative that
you are out of program mode.
Recording A Bank Of Scenes To A
Chase
1. Press and hold down the Program button for
approximately 2 seconds or until the PROG
indicator in the LED display ashes. Once the
Page 11

P. 11
| Tecshow Navi gator 3+
English version
14. EDITING CHASES
Add A Chase Step
1. Press and hold down the Program button for
approximately 2 seconds or until the PROG
indicator in the LED display ashes. Once the
indicator is ashing, record mode is engaged
and you may release the program button.
2. Select the Chase # button, 1-12, that you wish
to add a step to. The relevant Chase LED should
illuminate.
3. Press the Tap/Disp button, the Step indicator
light should illuminate in the LED display.
4. Press the Bank UP/DOWN buttons to manually
step through the chase steps. Find the chase
step that you wish to add a step aer.
5. Press the Tap/Disp button disengage Step
mode. The Step indicator, in the LED display,
should be OFF.
6. Using the BANK UP & DOWN buttons, select the
scene bank, 1-30, that contains the scene you
want to add. You can view the scene banks in
the LED display by referring to the furthest two
digits to the right.
7. Press the MIDI/REC button to record the step
into you chase. All LEDs should ash three times
to conrm that the chase step was added.
indicator is ashing, record mode is engaged
and you may release the program button.
2. Select a Chase # button, 1-12, that you wish
to record to. The relevant Chase LED should
illuminate.
3. Using the BANK UP & DOWN buttons, select the
scene bank, 1-30, that you want added to your
chase. You can view the scene banks in the LED
display by referring to the furthest two digits to
the right.
4. Simultaneously press the Music/Bkc and Midi/
8. Repeat steps 3 through 7 to add additional
chase steps.
9. Press and hold down the Program button for
approximately 2 seconds to exit. A ashing
Blackout indicator, in the LED display, is indicative that you are out of program mode.
Deleting Chase Steps
1. Press and hold down the Program button for
approximately 2 seconds or until the PROG
indicator in the LED display ashes. Once the
indicator is ashing, record mode is engaged
and you may release the Program button.
2. Select the Chase # button, 1-12, that you want
to delete a step in. The relevant chase LED
should illuminate
3. Press the Tap/Disp button, the Step indicator
light should illuminate in the LED display.
4. Press the Bank UP/DOWN buttons to manually
step through the chase steps. Find the chase
step that you want to delete.
5. Press the Auto/Del button to delete the chase
step. All LED´s should ash three times to conrm that the chase step was deleted.
6. Repeat steps 4 & 5 to delete additional chase
steps.
Rec buttons to record the entire scene bank. All
LED´s will ash three times to conrm that the
scene bank was recorded. Scenes will record in
the exact same sequence as stored in the bank.
5. Repeat steps 3 & 4 to record additional scene
banks.
6. Once you’ve recorded all of your steps, press
and hold down the Program button for approximately 2 seconds to exit. Aashing Blackout
indicator, in the LED display, is indicative that
you are out of program mode.
Page 12

P. 12
Tecshow Navi gator 3+ |
7. Press and hold down the Program button for
approximately 2 seconds or until the PROG
indicator in the LED display stops ashing. A
ashing Blackout indicator, in the LED display, is
indicative that you are out of program mode.
Delete A Chase
1. Press and hold down the Program button for
approximately 2 seconds or until the PROG
indicator in the LED display ashes. Once the
indicator is ashing, record mode is engaged
and you may release the Program button.
2. Select the Chase # button, 1-12, that you want
to delete.
3. Simultaneously, press the Auto/Del button then
press the same Chase # button that you select-
ed in step 2. All LED´s should ash three times
to conrm that the case was deleted.
4. Repeat steps 2 & 3 to delete additional scenes.
5. Press and hold down the Program button for
approximately 2 seconds or until the PROG
indicator in the LED display stops ashing. A
ashing Blackout indicator, in the LED display, is
indicative that you are out of program mode.
Delete All Chases
1. Flip the Operators power switch OFF which is
located at the rear of the unit.
2. Simultaneously, press and hold down the Auto/
Del and Bank Down buttons and ip the power
switch ON. All LED´s will ash three times to
conrm that all chases were deleted.
15. CHASE PLAYBACK
Manual Trigger
1. When powered ON, this console defaults to
Manual/Blackout mode. All output will be in
a blackout state until the Blackout button is
deselected. To determine blackout status there
is an indicator light in the display that ashes
when engaged and OFF when disengaged.
Press the Blackout button so the indicator
stops ashing.
2. Press the Chase # button, 1-12, that you want
to playback. The selected chase LED should
illuminate.
3. Press the BANK UP & DOWN buttons, as desired,
to manual step through your chase steps. You
can also manually adjust the Fade Time fader
if you wish to incorporate a crossfade between
step.
4. Repeat steps 2 & 3 to manually playback additional chases.
Auto Trigger
1. Press the AUTO/Del button, the Auto Trigger
indicator light will illuminate in the LED display.
This indicates you that you are now in the Auto
trigger mode.
2. Press the Chase # button, 1-12, that you wish to
playback. The selected Chase LED should illuminate and begin to play. You can select more
than one chase # button at a time to create a
chase sequence.
3. At any time, you can adjust the Speed and Fade
fader to set your chase playback state. You can
also press the Tap/Disp button twice to establish a chase rate. The rate will be determined
by the tempo at which you press the Tap/Disp
button.
Audio Trigger
1. Press the Music/Rec button, the Audio Trigger
indicator light will illuminate in the LED display.
English version
Page 13

P. 13
| Tecshow Navi gator 3+
16. BANK COPY & FIXTURE COPY
17. FADE TIME
Bank Copy
1. Enter the Program mode.
2. Use the Bank UP/DOWN buttons to select the
bank to be copied.
3. Tap the Midi/Rec button, and then use the Bank
UP/DOWN buttons to select the bank that you
want to copy to.
4. Tap the Music/Rec button. All LED´s will ash three
times to conrm your bank copy operation.
1. Press and hold down the MODE button, then
tap the Tap/Disp button. The LED display will
display “ONLY” or “ALL”, for 3 seconds, depending on the current setting. “ONLY” indicates that
the Pan/Tilt channels will only be aected by
the fade time fader while "ALL" indicates that all
channels will be aected by the fade time fader.
2. To change this setting, tap the Tap/Disp button
while pressing and holding down the Mode button. Doing so, should switch between the only
and ALL options.
This indicates you that you are now in the Audio
trigger mode.
2. Press the Chase # button, 1-12, that you want
to playback. The selected Chase LED should
illuminate and engage. The selected chase will
Fixture Copy
1. Enter the Program mode.
2. Press the Fixture # button, 1-12, that you wish
to copy.
3. Using channel faders 1-8 or joystick, set your
look for the light.
4. Press and hold down the same Fixture button,
then tap the Fixture # button that you want to
copy the same settings to.
trigger to sound via the internal microphone
or to audio via the line level input if connected.
Pressing the Music/Rec button again will disengage audio mode.
English version
Page 14

P. 14
Tecshow Navi gator 3+ |
18. MIDI CHANNEL SETTING
Set MIDI Channel
1. Press and hold down the Midi button for 2 seconds or until the LED-display displays “In:XX”.
“:XX” represents the current set midi channel.
2. Use UP/DOWN BANK buttons to set your desired
Midi channel from 01 to 16.
3. Press and hold down the MIDI button for 2 sec-
onds or until all LED´s ash three times to save
your setting.
MIDI Control
This unit can receive MIDI data to trigger or activate
Banks 1-30, Chases 1-12 and the Blackout function.
See Midi chart below.
By xture 1-13, Scene 1-13, Chase 1-13 and Fade
Time Slider, the Navigator 3+ can function as a
simple MIDI controller. The MIDI control function
are falls into 10 pages. The following diagram is the
details:
MIDI Note Function
0-11 Turn on/o Chase 1-12
12-19 Turn on/o Scene 1-8
20-49 Select Bank 1-30
50 Enable/disable Audio
51 Enable/disable Auto
52 Enable/disable Blackout
Page Chase 1-12 Scene 1-12 Fixture 1-12 Slider 1-8 Slider 9-16
1 Note 0-11 Note 12-19 Note 20-31 CC 0-7 CC 8-15
2 Note 0-11 Note 12-19 Note 32-43 CC 16-23 CC 24-31
3 Note 0-11 Note 12-19 Note 44-55 CC 32-39 CC 56-63
4 Note 56-67 Note 68-75 Note 76-87 CC 48-55 CC 56-63
5 Note 88-99 Note 100-107 Note 108-119 CC 64-71 CC 72-79
6 Note 88-99 Note 120-127 Note 108-119 CC 80-87 CC 88-95
7 Note 08-19 Note 0-7 Note 20-31 CC 9 6-103 CC 104-111
8 Note 40-51 Note 32-39 Note 52-63 CC 112-119 CC 120-127
9 Note 64-75 Note 76-83 Note 84-95 CC 0-7 CC 8-15
English version
Page 15

P. 15
| Tecshow Navi gator 3+
19. DMX ADDRESSING
The Fade Time Slider controls the function of Program Change.
• Cc is short for Control change.
• You can select page by Bank UP/DOWN button.
• Hold down MIDI/Bkc and press the UP/DOWN
buttons to alter the MIDI channel.
10 Note 96-107 Note 108-115 Note 116-127 CC 0-7 CC 8-15
Fixture # DMX Fixture Address
1 1
2 33
3 65
4 97
5 129
6 161
7 193
8 225
9 257
10 289
11 321
12 353
Design and product specications are subject to change without prior notice.
English version
Page 16

P. 1 6
Tecshow Navi gator 3+ |
Navigator 3+
Controlador DMX para iluminación móvil
384 canales
Navigator 3+ es un controlador multifunción que
puede ser utilizado como una consola DMX y, también, como un controlador MIDI. En su faceta DMX el
equipo cuenta con un total de 384 canales, pudiendo controlar hasta 32 parametros en las 12 lumi-
narias que soporta. Navigator 3+ tiene 30 bancos de
memoria con 8 escenas programables por banco, a
la vez que cuenta con 12 chases con 240 pasos por
cada uno. Un display de gran tamaño, la total integración de MIDI y la incorporación de un joystick de
alta precisión para manejar los movimientos de las
luminarias son algunas de las características que lo
hacen uno de los controladores más completos de
su segmento.
Especicaciones
Interface
• Display LCD de 7 segmentos
• 8 faders para control manual - 4 páginas
• Joystick - Control de Pan & Tilt
• Botón directo para realización de Blackout
• Botón directo para maquina de humo
• Faders para velocidad y tiempo de fade
Características
• 384 canales DMX - 12 dispositivos de 32 canales
DMX
• 12 chases programables con 240 escenas por
chase
• 30 bancos de memoria
• 8 escenas por banco de memoria
• Tiempo de fade asignable
• Override manual
• Controlable via MIDI
• Micrófono incorporado
Conectores
• 1 XLR-3 de salida DMX
• 2 conectores MIDI (entrada/salida)
• 1 conector DIN para maquina de humo
• 1 conector RCA
• 1 puerto USB
• 1 conector DB-9 para control Ext Step
• 1 Entrada de alimentación
Físico
• Dimensiones: 483x135x82 mm. / 19x5,3x3,2
pulg.
• Peso: 2,2 kg. / 4,8 lbs.
1. DESCRIPCIÓN
Versión Español
Page 17

P. 17
| Tecshow Navi gator 3+
Versión Español
2. SEGURIDAD
Advertencia
• Este equipo se diseñó para uso en interiores.
• Evite el ingreso de líquidos, objetos de metal o
sustancias inamables dentro del equipo.
• Para reducir el riesgo de descargas eléctricas o
incendios, no exponga la unidad a la lluvia o la
humedad excesiva.
• El equipo no contiene piezas que puedan ser
reparadas por el usuario. En caso de precisar
asistencia, póngase en contacto con el servicio
técnico autorizado.
• El equipo sólo debe ser utilizado por adultos.
No permita que los niños jueguen con el equipo
o lo manipulen.
Precaución
• Abra el equipo con cuidado y verique que
todas las piezas se encuentren presentes y en
buen estado. En caso de que encuentre daños,
pónganse en contacto con el distribuidor.
3. DESCRIPCIÓN DEL PANEL FRONTAL
1. Botones xture 1-12: Selecciona los equipos
que el usuario desee controlar.
2. Faders de canal 1-8: Regula la salida de cada
canal de equipo.
3. Botón Channel bank: Alterna entre los canales
1-8, 9-16, 17-24 y 25-32.
4. Fader Speed (velocidad): Regula la velocidad del
chase (de 0,1 segundo a 10 minutos por paso).
5. Fader Fade time: Regula el tiempo de fade del
chase (de 0 a 30 segundos).
9
2 3 4 5 6 7 8
13
14-19
1
10 11 12
Page 18

P. 18
Tecshow Navi gator 3+ |
Versión Español
6. Botón Fine: Se utiliza junto con el joystick.
Cuando el botón FINE está activado, el uso del
joystick será más preciso cuando necesite enfo-
car un área especíca con un escáner o cabezal
móvil.
7. Botón MODE: Es un botón multifunción que se
utiliza al asignar el joystick y la conguración
de fade.
8. Joystick: Regula los canales X/Y de una luz móvil.
9. Botones Scene 1-8: Almacenan y reproducen
escenas programadas. Asimismo, se utilizan
para realizar copias de datos en memorias USB
o a través de cables ULink.
10. Pantalla LED: Muestra información relevante de
la función o acción que se encuentre activa.
11. Botones Bank arriba/abajo: Seleccionan un banco de escena o paso de chase. También se utiliza
para ver los archivos de una memoria USB.
12. Botón Fog Machine (para máquina de humo):
En caso de contar con una máquina de humo,
conéctele al panel dorsal de la consola y actívela con este botón.
13. Botones Chase 1-12: Almacenan y reproducen
chases.
14. Botón Program: Ingresa y abandona el modo
grabación.
15. Botón Music/Bkc: Activa el modo audio para la
sincronización de chases y copia un banco de
escenas en otro.
16. Botón MIDI/Rec: Graba escenas y pasos de
chase. Asimismo, se utiliza para congurar las
funciones MIDI.
17. Botón Auto/Del: Ingresa el modo automático
para las secuencia automática de banco de
escenas o para eliminar una escena/chase.
18. Botón Tap/Disp: Sincroniza la reproducción de
chases y modica el modo de visualización de
la pantalla.
19. 19. Botón Blackout: Reduce los valores de
todas las salidas a cero.
4. DESCRIPCIÓN DEL PANEL DORSAL
1. Etiqueta: Modelo, número de serie y fecha de
producción del equipo.
2. Entrada de audio: Conecta la entrada de nivel
de línea para activar el audio (0,1V-1Vp-p).
3. Conector DB-9: Conecta el controlador de
chase externo opcional.
4. Observación: Ya no incluido en las unidades
fabricadas con fecha posterior a febrero 2018.
5. Entrada MIDI: Recibe información MIDI de un
secuenciador MIDI o dispositivo compatible.
6. Conector para máquina de humo: Para máqui-
nas de humo compatibles.
7. XLR-3 hembra: Salida DMX. Conecte el primer
equipo de la cadena aquí.
8. Entrada de CC: Conecte aquí la fuente de ali-
mentación incluida. (CC 9V~15V, 500mA Min).
9. Interruptor de encendido/apagado: Enciende y
apaga el equipo.
10. Puerto USB: Conectado a un controlador MIDI,
envía la señal MIDI a través de un dispositivo
USB.
11. Indicador LED: Muestra el estado de funcionamiento de la interfaz USB.
12. Interruptor: Alterna entre la función de con-
8
7
6512432119 10
Page 19

P. 1 9
| Tecshow Navi gator 3+
Versión Español
trolador DMX y controlador MIDI. El cambio se
aplicará luego de reiniciar el equipo.
13. Salida MIDI: Conectado a un controlador MIDI,
envía la señal MIDI.
5. CONFIGURACIÓN DEL JOYSTICK
Asignar Joystick
1. Mantenga presionado el botón Program por
2 segundos o hasta que titile el indicador LED
PROG. Cuando titile el indicador, Se habrá acti-
vado el modo grabación y podrá soltar el botón
Program.
2. Mantenga presionado el botó MODE y, sin
soltarlo, presione el botón FINE. Los indicadores LED “Assign” y “Pan” se iluminarán.
3. Presione los botones Fixtures 1-12 para selec-
cionar los equipos a los cuales desea asignarles
pan. Los indicadores LED de cada equipo se
iluminarán.
4. Presione el botón Tap/Disp para alternar entre
“PL.XX” y “PH.XX”. “PL.XX” representa el byte
bajo o canal no, que aparece generalmente
como el canal pan no. “PH.XX” representa el
byte alto o canal grueso, que aparece general-
mente como el canal pan. Seleccione “PH.XX”,
mantenga presionado el botón MODE y luego
presione el botón SCENE que se corresponda
con el canal pan de su equipo. Por ejemplo, si
en su equipo el canal pan es el 1, presionará el
botón SCENE 1. Para obtener más información,
reérase al cuadro de dispositivos DMX. Si su
equipo cuenta con un canal pan no, presione
el botón Tap/Disp. En la pantalla visualizará
“PL.XX”. Mantenga presionado el botón MODE
y luego presione el botón SCENE que se co-
rresponda con el canal pan no de su equipo.
Por ejemplo, si en su equipo el canal pan no es
el 2, presionará el botón SCENE 2.
5. Presione el botón BANK arriba/abajo para
alternar entre “TL.XX” y “TH.XX”. “TL.XX” rep-
resenta el byte bajo o canal no, que aparece
generalmente como el canal tilt no. “TH.XX”
representa el byte alto o canal grueso, que
aparece generalmente como el canal tilt. Seleccione “TH.XX”, mantenga presionado el botón
MODE y luego presione el botón SCENE que
se corresponda con el canal tilt de su equipo.
Por ejemplo, si en su equipo el canal tilt es el
3, presionará el botón SCENE 3. Para obtener
más información, reérase al cuadro de dispositivos DMX. Si su equipo cuenta con un canal tilt
no, presione el botón Tap/Disp. En la pantalla
visualizará “TL.XX”. Mantenga presionado el
botón MODE y luego presione el botón SCENE
que se corresponda con el canal tilt no de su
equipo. Por ejemplo, si en su equipo el canal tilt
no es el 4, presionará el botón SCENE 4.
6. Mantenga presionado el botón Program por 2
segundos o hasta que deje de titilar el indicador
LED PROG. Cuando titile el indicador LED Black-
out, el controlador habrá abandonado el modo
programación.
ASIGNAR JOYSTICK INVERSO
(Pan/tilt hacia atrás)
1. Mantenga presionado el botón Program por
2 segundos o hasta que titile el indicador LED
PROG. Cuando titile el indicador, se habrá acti-
vado el modo grabación y podrá soltar el botón
Program.
2. Mantenga presionado el botón MODE y, sin
soltarlo, presione el botón FINE. Los indica-
Page 20

P. 2 0
Tecshow Navi gator 3+ |
Versión Español
dores LED “Assign” y “Pan” se iluminarán.
3. Nuevamente mantenga presionado el botón
MODE y, sin soltarlo, presione el botón FINE. El
indicador LED “Reverse” se iluminará.
4. Presione los botones Fixtures 1-12 para selec-
cionar los equipos a los cuales desea asignarles
el pan y tilt hacia atrás. Los indicadores LED de
cada equipo se iluminarán. Se recomienda asignar equipos opuestos. Por ejemplo, asigne los
canales 1, 3, 5, 7 de forma normal, como se indi-
ca en el apartado anterior y asigne los canales 2,
4, 6, 8 de forma inversa. Así, al mover el joystick,
los equipos se moverán de forma opuesta el
uno del otro. A esta función se la conoce normalmente como “Pan/tilt hacia atrás”.
5. Presione el botón Tap/Disp para alternar entre
“PL.XX” y “PH.XX”. “PL.XX” representa el byte
bajo o canal no, que aparece generalmente
como el canal pan no. “PH.XX” representa el
byte alto o canal grueso, que aparece general-
mente como el canal pan. Seleccione “PH.XX”,
mantenga presionado el botón MODE y luego
presione el botón SCENE que se corresponda
con el canal pan de su equipo. Por ejemplo, si
en su equipo el canal pan es el 1, presionará el
botón SCENE 1. Para obtener más información,
reérase al cuadro de dispositivos DMX. Si su
equipo cuenta con un canal pan no, presione
el botón Tap/Disp. En la pantalla visualizará
“PL.XX”. Mantenga presionado el botón MODE
y luego presione el botón SCENE que se co-
rresponda con el canal pan no de su equipo.
Por ejemplo, si en su equipo el canal pan no es
el 2, presionará el botón SCENE 2.
6. Presione el botón BANK arriba/abajo para
alternar entre “TL.XX” y “TH.XX”. “TL.XX” re-
presenta el byte bajo o canal no, que aparece
generalmente como el canal tilt no. “TH.XX”
representa el byte alto o canal grueso, que
aparece generalmente como el canal tilt. Seleccione “TH.XX”, mantenga presionado el botón
MODE y luego presione el botón SCENE que
se corresponda con el canal tilt de su equipo.
Por ejemplo, si en su equipo el canal tilt es el 3,
presionará el botón SCENE 3. Para obtener más
información, reérase al cuadro de dispositivos
DMX. Si su equipo cuenta con un canal tilt no,
presione el botón Tap/Disp. En la pantalla visualizará “TL.XX”. Mantenga presionado el botón
MODE y luego presione el botón SCENE que se
corresponda con el canal tilt no de su equipo.
Por ejemplo, si en su equipo el canal tilt no es
el 4, presionará el botón SCENE 4.
7. Mantenga presionado el botón Program por 2
segundos o hasta que deje de titilar el indicador
LED PROG. Cuando titile el indicador LED Black-
out, el controlador habrá abandonado el modo
programación.
Eliminar La Asignación Pan/Tilt del
Joystick
1. Mantenga presionado el botón Program por
2 segundos o hasta que titile el indicador LED
PROG. Cuando titile el indicador, soltar el botón
Program.
2. Mantenga presionado el botón MODE y, sin
soltarlo, presione el botón FINE. Los indicadores LED “Assign” y “Pan” se iluminarán.
3. Presione los botones Fixture 1-12 que se co-
rrespondan con los equipos a los cuales desea
eliminarles la asignación de pan/tilt. Los LEDs
relevantes se iluminarán.
4. Mantenga presionado el botón MODE y, sin
soltarlo, presione el botón Auto/DEL para eli-
minar la conguración de los equipos seleccionados. Todos los LEDs titilarán para conrmar
que se ha eliminado la asignación.
5. Mantenga presionado el botón Program por 2
segundos o hasta que deje de titilar el indicador
LED PROG. Cuando titile el indicador LED Black-
out, el controlador habrá abandonado el modo
programación.
Eliminar La Asignación De Pan/Tilt
De Todos Los Equipos
1. Apague el equipo desde el interruptor de
alimentación. El interruptor se encuentra en el
panel dorsal de la unidad.
Page 21

P. 2 1
| Tecshow Navi gator 3+
Versión Español
2. Luego, mantenga presionados los botones
Auto/DEL y MODE al mismo tiempo y encienda
el equipo. Todos los LEDs titilarán tres veces
para conrmar que se ha eliminado la asignación de todos los equipos.
6. CONTROL MANUAL
7. GRABAR ESCENAS
La consola se enciende en el modo Manual/Blackout de forma predeterminada. Todas las salidas
estarán en valor cero (blackout) hasta que deseleccione el botón Blackout. El equipo cuenta con un
indicador LED en la pantalla que señala el estado
blackout: titila cuando está activado y se apaga
cuando está desactivado. Para pasar al control
manual, desactive el modo blackout y seleccione
los equipos que desea controlar a través de los
1. Presione los botones Fixture 1-12 para selec-
cionar los equipos que desea incluir en una
escena. Los indicadores LED correspondientes
se iluminarán.
2. Mantenga presionado el botón Program por
2 segundos o hasta que titile el indicador LED
PROG. Cuando titile el indicador, se habrá acti-
vado el modo grabación y podrá soltar el botón
Program.
3. Congure la escena con los ocho faders de
canal, el joystick o el botón Channel bank de ser
necesario. Presione el botón Channel bank para
alternar entre los bancos de canales 1-8, 9-16,
17-24 y 25-32.
4. Cuando esté conforme con el diseño de la escena, presione el botón MIDI/REC para grabarla.
5. Utilice el botón Bank arriba/abajo para selec-
botones xture que se encuentran a la izquierda.
Luego use los ocho faders de canal, joystick y el
botón Channel bank para controlar los equipos de
forma manual.
Observación: En la mayoría de los casos, para que
funcione el joystick, primero debe asignarlo. Re-
érase al apartado “Asignar joystick” para obtener
más información.
cionar un banco de escenas donde almacenarla. Hay 30 bancos de escenas disponibles
que el usuario puede ver en la pantalla, consultando los últimos dos dígitos de la derecha.
6. Presione un botón Scene 1-8. Todos los LEDs
titilarán para indicar que se ha almacenado la
escena correctamente. Hay ocho botones de
escenas para almacenar cada banco. Asegúrese
de seleccionar un botón de escena diferente
cada vez que almacene una para no grabar
sobre una escena que desea conservar.
7. Reitere los pasos 2-6 para grabar más escenas.
8. Una vez almacenadas todas las escenas,
mantenga presionado el botón Program por 2
segundos para salir. Cuando titile el indicador
LED Blackout, el controlador habrá abandonado el modo programación.
Page 22

P. 2 2
Tecshow Navi gator 3+ |
Versión Español
8. EDITAR ESCENAS
9. COPIAR UNA ESCENA
1. Mantenga presionado el botón Program por
2 segundos o hasta que titile el indicador LED
PROG. Cuando titile el indicador, Se habrá acti-
vado el modo grabación y podrá soltar el botón
Program.
2. Utilice los botones Bank arriba/abajo para
seleccionar el banco que contenga la escena
que desea editar. Podrá ver el banco activo en
la pantalla LED.
3. Presione el botón Scene 1-8 que desea editar
para que aparezca la escena.
4. Presione el botón xture 1-12 para seleccionar
el equipo o equipos con la escena que desea
1. Mantenga presionado el botón Program por
2 segundos o hasta que titile el indicador LED
PROG. Cuando titile el indicador, Se habrá acti-
vado el modo grabación y podrá soltar el botón
Program.
2. Utilice el botón Bank arriba/abajo para selec-
cionar el banco que contenga la escena que
desea copiar.
3. Presione el botón Scene 1-8 para seleccionar la
escena que desea copiar.
4. Utilice los botones Bank arriba/abajo para
cambiar el banco de escenas (en caso de ser
necesario).
5. Presione el botón Midi/Rec seguido del botón
Scene 1-8 al cual desea copiar la escena. Todos
los LEDs titilarán tres veces para conrmar el
copiado.
6. Mantenga presionado el botón Program por 2
segundos o hasta que deje de titilar el indica-
modicar. Los indicadores LEDs correspon-
dientes se iluminarán.
5. Realice las modicaciones con los faders o el
joystick.
6. Presione el botón Midi/Rec y luego el botón de
la escena que está editando. Todos los LEDs
titilarán tres veces para conrmar que las modicaciones se han guardado correctamente.
7. Mantenga presionado el botón Program por 2
segundos para salir. Cuando titile el indicador
LED Blackout, el controlador habrá abandonado el modo programación.
dor LED PROG. Cuando titile el indicador LED
Blackout, el controlador habrá abandonado del
modo programación.
Page 23

P. 2 3
| Tecshow Navi gator 3+
Versión Español
10. ELIMINAR UNA ESCENA
11. ELIMINAR TODAS LAS ESCENAS
12. REPRODUCIR UNA ESCENA
1. Mantenga presionado el botón Program por 2
segundos o hasta que deje de titilar el indicador LED PROG. Cuando titile el indicador LED
Blackout, se habrá activado el modo grabación
y podrá soltar el botón Program.
2. Utilice los botones Bank arriba/abajo para se-
leccionar el banco que contenga la escena que
desea eliminar.
3. Al mismo tiempo, presione el botón Auto/Del
seguido del botón Scene 1-8 que desea eliminar.
Todos los LEDs titilarán tres veces para conrmar
que se ha eliminado la escena correctamente.
1. Apague el equipo desde el interruptor de ali-
mentación que se encuentra en el panel dorsal
de la unidad.
2. Luego, mantenga presionados los botones Program y Bank abajo al mismo tiempo y encienda
el equipo. Todos los LEDs titilarán tres veces
Ejecución Manual
1. La consola se enciende en el modo Manual/
Blackout de forma predeterminada. Todas las
salidas estarán en valor cero (blackout) hasta
que deseleccione el botón Blackout. El equipo
cuenta con un indicador LED en la pantalla que
señala el estado blackout: titila cuando está
4. Reitere los pasos 2-3 para eliminar más escenas.
5. Mantenga presionado el botón Program por 2
segundos o hasta que deje de titilar el indicador
LED PROG. Cuando titile el indicador LED Black-
out, el controlador habrá abandonado el modo
programación.
para conrmar que se han eliminado todas las
escenas.
activado y se apaga cuando está desactivado.
Presione el botón Blackout para que el indicador LED deje de titilar.
2. Utilice los botones Bank arriba/abajo para se-
leccionar el banco que contenga la escena que
desea reproducir.
3. Presione el botón Scene 1-8 para seleccionar la
escena que desea reproducir. Se activará la esce-
Page 24

P. 2 4
Tecshow Navi gator 3+ |
Versión Español
na seleccionada. Presione el mismo botón Scene
nuevamente para deshabilitar la escena o el
botón Blackout para cancelar todas las salidas.
4. Reitere los pasos 2-3 para reproducir más
escenas.
Ejecución Automática
1. Presione el botón AUTO/Del. El indicador Auto
se iluminará en la pantalla para indicar que se
encuentra en el modo de ejecución automática.
2. Utilice los botones Bank arriba/abajo para
seleccionar un banco 1-30 para la reproducción
automática. Las ocho escenas del banco seleccionado se reproducirán en secuencia.
3. En cualquier momento, el usuario puede regu-
lar la velocidad y el fade para regular el estado
de reproducción de la secuencia de su escena.
Asimismo, puede presionar el botón Tap/Disp
dos veces para establecer un ritmo de secuencia. El ritmo se determinará por el tempo en el
cual presione el botón Tap/Disp. Para desactivar la reproducción automática, presione el
botón Auto/Del nuevamente.
Ejecución De Audio
1. Presione el botón AUTO/Rec. El indicador Auto
se iluminará en la pantalla para indicar que se
encuentra en el modo de ejecución de audio.
2. Utilice los botones Bank arriba/abajo para
seleccionar un banco 1-30 o un botón de chase
1-12. El banco o chase seleccionado se activará
por audio a través del micrófono interno o de
la entrada de nivel de línea (si está conectada).
Para desactivar la ejecución de audio, presione
el botón Music/Rec. nuevamente.
13. GRABAR CHASES
Navigator 3+ cuenta con 12 chases programables.
Cada chase puede almacenar hasta 240 escenas/pa-
sos. Lea las siguientes instrucciones para congurar
chases.
1. Mantenga presionado el botón Program por
2 segundos o hasta que titile el indicador LED
PROG. Cuando titile el indicador, se habrá acti-
vado el modo grabación y podrá soltar el botón
Program.
2. Presione el botón chase 1-12 donde desea
grabar. El indicador LED correspondiente se
iluminará.
3. Utilice los botones Bank arriba/abajo para
seleccionar el banco de escenas 1-30 que contenga la escena que desea agregar a su chase.
Podrá ver los bancos de escenas en la pan-
talla, consultando los últimos dos dígitos de la
derecha. Asimismo, puede congurar su escena
con los ocho faders de canal, el joystick o el
botón Channel bank de ser necesario. Presione
el botón Channel bank para alternar entre los
bancos de canales 1-8, 9-16, 17-24 y 25-32.
4. Presione el botón Midi/Rec para grabar el paso
del chase. Todos los LEDs titilarán para indicar
que el paso se grabó correctamente.
5. Reitere los pasos 3-4 para grabar más pasos.
6. Una vez grabados todos los pasos, mantenga
presionado el botón Program por 2 segundos
para salir. Cuando titile el indicador LED Blackout, el controlador habrá abandonado el modo
programación
Grabar Un Banco De Escenas En Un
Chase
1. Mantenga presionado el botón Program por
2 segundos o hasta que titile el indicador LED
Page 25

P. 2 5
| Tecshow Navi gator 3+
Versión Español
14. EDITAR CHASES
Añadir Un Paso Al Chase
1. Mantenga presionado el botón Program por
2 segundos o hasta que titile el indicador LED
PROG. Cuando titile el indicador, se habrá acti-
vado el modo grabación y podrá soltar el botón
Program.
2. Presione el botón Chase 1-12 donde desea agregar un paso. El indicador LED correspondiente
se iluminará.
3. Presione el botón Tap/Disp. El indicador Step se
iluminará en la pantalla.
4. Presione los botones Bank arriba/abajo para
recorrer manualmente los pasos del chase.
Ubíquese en el paso anterior al que desea
añadir.
5. Presione el botón Tap/Disp para desactivar el
modo paso. El indicador LED Step se apagará
en la pantalla.
6. Utilice los botones Bank arriba/abajo para se-
leccionar el banco de escenas 1-30 que contenga la escena que desea añadir. El usuario puede
ver los bancos de escenas en la pantalla, con-
sultando los últimos dos dígitos de la derecha.
PROG. Cuando titile el indicador, se habrá acti-
vado el modo grabación y podrá soltar el botón
Program.
2. Presione el botón chase 1-12 donde desea
grabar. El indicador LED correspondiente se
iluminará.
3. Utilice los botones Bank arriba/abajo para
seleccionar el banco de escenas 1-30 que desea
agregar a su chase. El usuario puede ver los
bancos de escenas en la pantalla, consultando
los últimos dos dígitos de la derecha.
4. Al mismo tiempo, presione los botones Music/
Bkc y Midi/Rec para grabar el banco de escenas
7. Presione el botón Midi/Rec para grabar el paso
en su chase. Todos los LEDs titilarán tres veces
para conrmar que se ha añadido el paso co-
rrectamente.
8. Reitere los pasos 3-7 para añadir más pasos.
9. Mantenga presionado el botón Program por 2
segundos para salir. Cuando titile el indicador
LED Blackout, el controlador habrá abandonado el modo programación.
Eliminar Pasos De Un Chase
1. Mantenga presionado el botón Program por
2 segundos o hasta que titile el indicador LED
PROG. Cuando titile el indicador, se habrá acti-
vado el modo grabación y podrá soltar el botón
Program.
2. Presione el botón Chase 1-12 del cual desea
eliminar un paso. El indicador LED correspondiente se iluminará.
3. Presione el botón Tap/Disp. El indicador Step se
iluminará en la pantalla.
4. Presione los botones Bank arriba/abajo para
recorrer manualmente los pasos del chase.
completo. Todos los LEDs titilarán tres veces
para conrmar que el banco de escena se grabó
correctamente. Las escenas se grabarán en la
misma secuencia en la que estaban almacenadas en el banco.
5. Reitere los pasos 3-4 para grabar más bancos
de escenas.
6. Una vez grabados todos los pasos, mantenga
presionado el botón Program por 2 segundos
para salir. Cuando titile el indicador LED Blackout, el controlador habrá abandonado el modo
programación.
Page 26

P. 2 6
Tecshow Navi gator 3+ |
Versión Español
Ubíquese en el paso que desea eliminar.
5. Presione el botón Auto/Del para eliminar el
paso. Todos los LEDs titilarán tres veces para
indicar que se ha eliminado el paso del chase
correctamente.
6. Reitere los pasos 4-5 para eliminar más pasos
de un chase.
7. Mantenga presionado el botón Program por 2
segundos o hasta que deje de titilar el indicador
LED PROG. Cuando titile el indicador LED Black-
out, el controlador habrá abandonado el modo
programación.
Eliminar Un Chase
1. Mantenga presionado el botón Program por
2 segundos o hasta que titile el indicador LED
PROG. Cuando titile el indicador, se habrá acti-
vado el modo grabación y podrá soltar el botón
Program.
2. Presione el botón Chase 1-12 que desea eliminar.
3. Al mismo tiempo, presione el botón Auto/Del
seguido del botón Chase que seleccionó en el
paso 2. Todos los LEDs titilarán tres veces para
conrmar que se ha eliminado el chase co-
rrectamente.
4. Reitere los pasos 2-3 para eliminar más escenas.
5. Mantenga presionado el botón Program por 2
segundos o hasta que deje de titilar el indicador
LED PROG. Cuando titile el indicador LED Black-
out, el controlador habrá abandonado el modo
programación.
Eliminar Todos Los Chases
1. Apague el equipo desde el interruptor de ali-
mentación que se encuentra en el panel dorsal
de la unidad.
2. Luego, mantenga presionados los botones
Auto/Del y Bank abajo al mismo tiempo y
encienda el equipo. Todos los LEDs titilarán
tres veces para conrmar que se han eliminado
todas los chases.
15. REPRODUCIR UN CHASE
Ejecución Manual
1. La consola se enciende en el modo Manual/
Blackout de forma predeterminada. Todas las
salidas estarán en valor cero (blackout) hasta
que deseleccione el botón Blackout. El equipo
cuenta con un indicador LED en la pantalla que
señala el estado blackout: titila cuando está
activado y se apaga cuando está desactivado.
Presione el botón Blackout para que el indicador LED deje de titilar.
2. Presione el botón Chase 1-12 que desea re-
producir. El indicador LED correspondiente se
iluminará.
3. Presione los botones banco arriba/abajo para
recorrer manualmente los pasos del chase. Asi-
mismo, puede regular manualmente el tiempo
de fade si desea añadir un crossfade entre pasos.
4. Reitere los pasos 2-3 para reproducir más chases.
Ejecución Automática
1. Presione el botón AUTO/Del. El indicador Auto
se iluminará en la pantalla para indicar que se
encuentra en el modo de ejecución automática.
2. Presione el botón Chase 1-12 que desea repro-
ducir. El indicador LED correspondiente se iluminará y comenzará a reproducirse. El usuario
puede seleccionar más de un botón Chase a la
vez para crear una secuencia.
3. En cualquier momento, el usuario puede
regular la velocidad y el fade para regular el
Page 27

P. 2 7
| Tecshow Navi gator 3+
Versión Español
16. COPIAR UN BANCO - COPIAR UN EQUIPO
17. TIEMPO DE FADE
Copiar Un Banco
1. Acceda al modo programación.
2. Utilice los botones Bank arriba/abajo para se-
leccionar el banco que desea copiar.
3. Presione el botón Midi/Rec y luego utilice los
botones Bank arriba/abajo para seleccionar el
banco destino en el que hacer la copia.
4. Presione el botón Music/Bkc. Todos los LEDs
titilarán tres veces para conrmar que se ha
copiado el banco correctamente.
1. Mantenga presionado el botón MODE y, sin
soltarlo, presione el botón Tap/Disp. En la pantalla, visualizará “ONLY” o “ALL” por 3 segundos
según la conguración actual. “ONLY” indica
que solo los canales de pan y tilt se verán alcanzados por el tiempo de fade, mientras que “ALL”
indica que todos los canales se verán alcanza-
dos por el tiempo de fade.
2. Para modicar esta conguración, mientras
estado de reproducción del chase. Asimismo,
puede presionar el botón Tap/Disp dos veces
para establecer un ritmo de chase. El ritmo se
determinará por el tempo al cual presione el
botón Tap/Disp.
Ejecución De Audio
1. Presione el botón AUTO/Rec. El indicador Auto
se iluminará en la pantalla para indicar que se
encuentra en el modo de ejecución de audio.
Copiar Un Equipo
1. Acceda al modo programación.
2. Presione el botón Fixture 1-12 que desea copiar.
3. Utilice los faders de canal 1-8 o el joystick para
congurar el diseño de la luz.
4. Mantenga presionado el mismo botón Fixture y
luego presione el botón Fixture del equipo en el
que desea copiar la misma conguración.
mantiene presionado el botón MODE, presione
el botón Tap/Disp. De esta forma podrá alternar
entre el modo “ONLY” y “ALL”.
2. Presione el botón Chase 1-12 que desea re-
producir. El indicador LED correspondiente
se iluminará y activará. El chase seleccionado
se activará por audio a través del micrófono
interno o de la entrada de nivel de línea (si está
conectada). Para desactivar la ejecución de audio, presione el botón Music/Rec. nuevamente.
Page 28

P. 2 8
Tecshow Navi gator 3+ |
18. CONFIGURAR EL CANAL MIDI
Conguración Del Canal MIDI
1. Mantenga presionado el botón Program por 2
segundos o hasta que en la pantalla visualice
“In:XX”. “:XX” representa el canal Midi actual-
mente congurado.
2. Utilice los botones Bank arriba/abajo para con-
gurar el canal MIDI deseado de 01 a 16.
3. Mantenga presionado el botón Midi por 2 se-
gundos o hasta que todos los LEDs titilen tres
veces para guardar su conguración.
Funciones MIDI
Navigator 3+ puede recibir datos MIDI para activar
o ejecutar los bancos 1-30, chases 1-12 y la función
blackout. Para más información, vea el cuadro a
continuación:
Por equipo 1-13, por escena 1-13, por chase 1-13 y
por deslizador de fade, Navigator 3+, puede funcionar como un controlador MIDI simple. Las funciones
de control MIDI se dividen en diez páginas. Para
más detalles, reérase al diagrama a continuación:
Notas MIDI Función
0-11 Encender/apagar chase 1-12
12-19 Encender/apagar escena 1-8
20-49 Seleccionar banco 1-30
50 Activar/desactivar audio
51 Activar/desactivar modo auto
52 Activar/desactivar blackout
Página Chase 1-12 Escena 1-12 Equipo 1-12 Deslizador 1-8 Deslizador 9-16
1 Nota 0-11 Nota 12-19 Nota 20-31 CC 0-7 CC 8-15
2 Nota 0-11 Nota 12-19 Nota 32-43 CC 16-23 CC 24-31
3 Nota 0-11 Nota 12-19 Nota 44-55 CC 32-39 CC 56-63
4 Nota 56-67 Nota 68-75 Nota 76-87 CC 48-55 CC 56-63
5 Nota 88-99 Nota 100-107 Nota 108-119 CC 6 4-71 CC 72-79
6 Nota 88-99 Nota 120-127 Nota 108-119 CC 80-87 CC 88-95
7 Nota 08-19 Nota 0-7 Nota 20-31 CC 96-103 CC 104-111
Versión Español
Page 29

P. 2 9
| Tecshow Navi gator 3+
19. DIRECCIÓN DMX
El deslizador de tiempo de fade controla la función
de cambio de programa.
• CC signica “cambio de control”.
• Utilice el botón Bank arriba/abajo para seleccionar la página deseada.
• Mantenga presionado el botón “MIDI/Bkc” y,
al mismo tiempo, presione los botones arriba/
abajo para modicar el canal MIDI.
8 Nota 40-51 Nota 32-39 Nota 52-63 CC 112-119 CC 120-127
9 Nota 64-75 Nota 76-83 Nota 84-95 CC 0-7 CC 8-15
10 Nota 96-107 Nota 108-115 Nota 116-127 CC 0-7 CC 8-15
Equipo Dirección DMX
1 1
2 33
3 65
4 97
5 129
6 161
7 193
8 225
9 257
10 289
11 321
12 353
Observación: El proveedor no asumirá responsabilidad por los errores u omisiones del manual.
La información de este manual está sujeta a cambios sin previo aviso.
Versión Español
Page 30

P. 3 0
Tecshow Navi gator 3+ |
Versión Español
FOR MORE INFO ON THIS PRODUCT PLEASE CHECK TECSHOW.AMPROWEB.COM /
PARA MAS INFORMACION SOBRE ESTE PRODUCTO VISITE TECSHOW.AMPROWEB.COM
 Loading...