

Page 1
P. 1
| Tecshow Navi gator 24 MKII
NAVIGATOR 24 MKII
DMX controller for xed lighting
USER MANUAL / MANUAL DE USUARIO
PLEASE READ THE INSTRUCTIONS CAREFULLY BEFORE USE
POR FAVOR LEA LAS INSTRUCCIÓNES ANTES DE USAR
Page 2

P. 2
Tecshow Navi gator 24 MKII |
1. OVERVIEW
English version
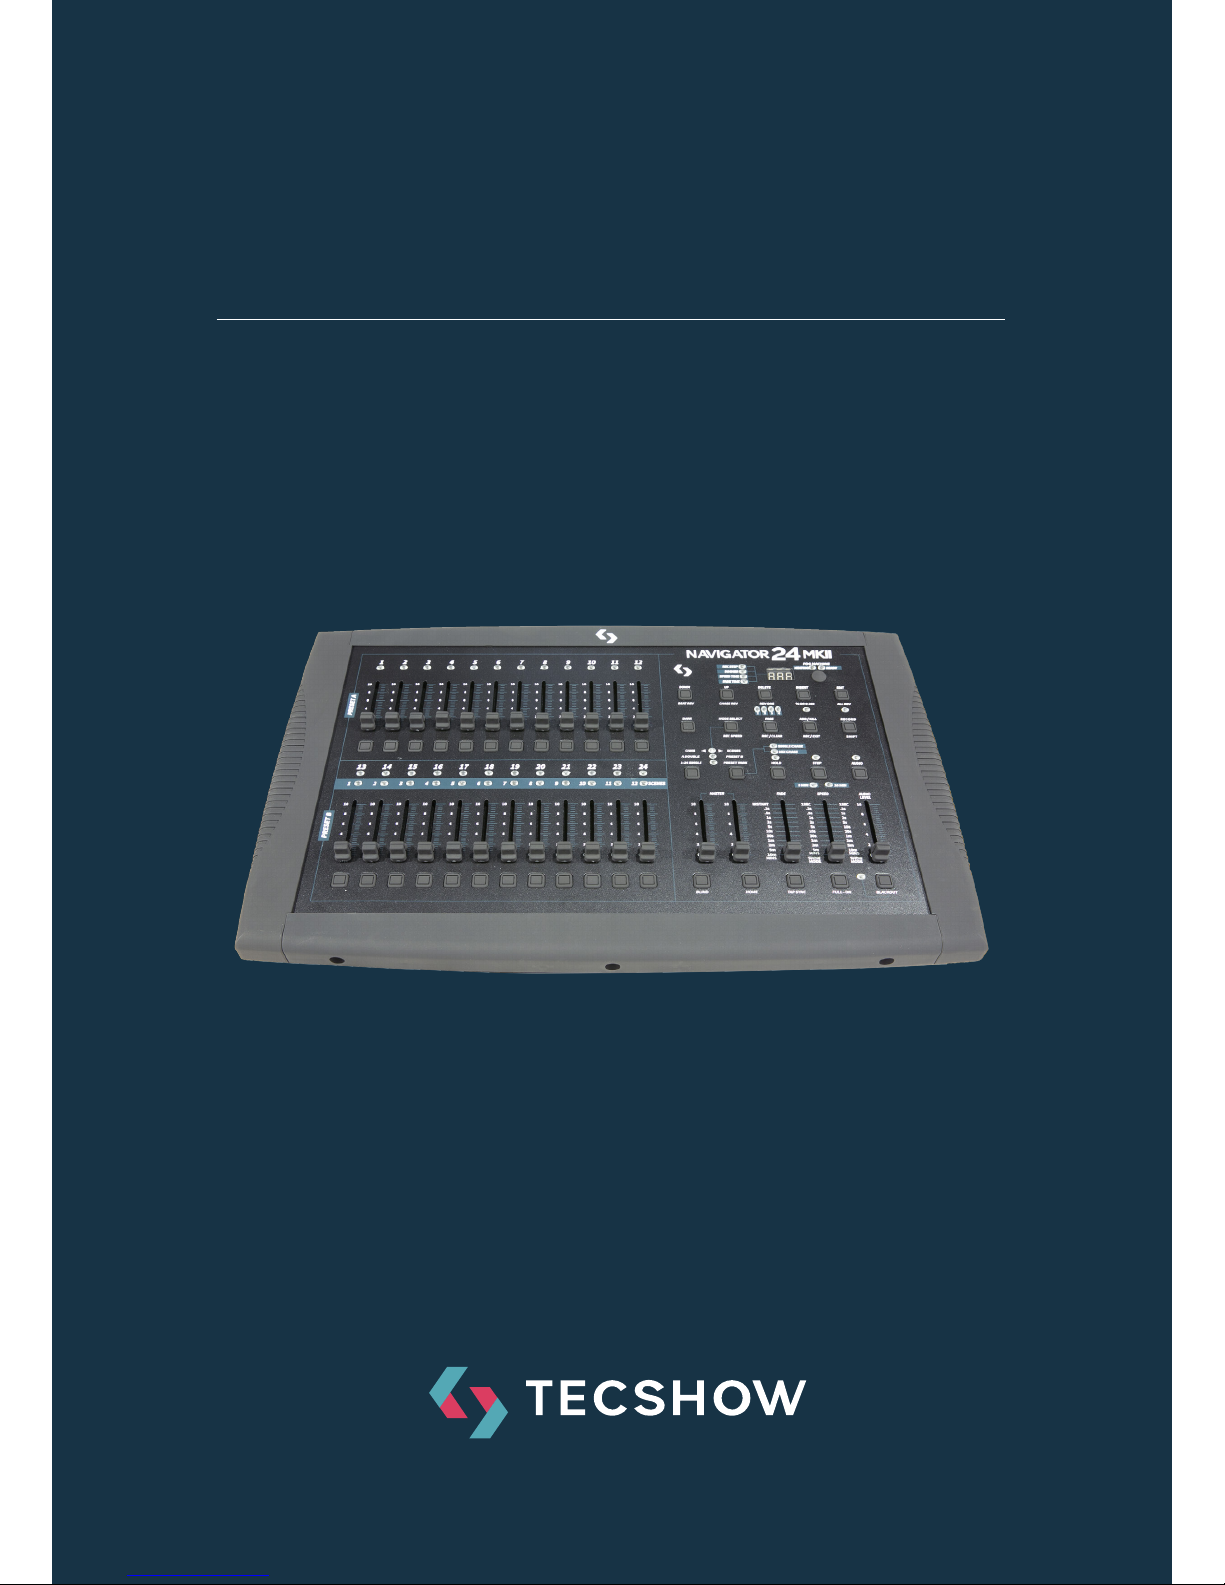
Navigator 24 MKII
DMX controller for xed lighting
Navigator 24 MKII is a 24-channel DMX console
for xed lights, with 24 faders and an interface
designed to give dynamism to programming and
playback. The controller has 48 chases, 4580
scenes, a dedicated button for the fog machine and
a function to manually control a channel during the
execution of the chase. Navigator 24 MKII is an ideal
console for small & medium scale mobile applications, sporting speed variation, fade time and two
master faders to control the general output and the
chase separately.
Specications
Interface
• 3-segment display
• 24 faders
• Blackout button
• Fog machine button
• Speed and fade time faders
• Audio input fader
• 2 Master faders: Main & chase control
• Tap Sync button
• Full On button
• Blind button
• Audio button
• 2-scenes operation
Features
• 24 DMX channels
• 4580 programmable scenes
• 48 programmable chases
• Solo function
• Speed & fade time control
• Fog machine control
• Manual override
• DMX polarity switcher
• Blind function
• Optimized audio-active mode with line input
and built-in microphone
• Controllable via MIDI
Connectors
• 1 XLR-3 DMX Output connector
• 3 MIDI connectors (in/out/thru)
• 1 DIN connector: Fog Machine
• 1 TRS 1/4" audio input
• 1 TRS 1/4" remote control input
• 1 Power input
Physical
• Dimensions: 482x264x85 mm. / 19x10.4x3.3 in.
• Weight: 4.6 kg. / 10.1 lbs.
Page 3

P. 3
| Tecshow Navi gator 24 MKII
English version
2. GENERAL INSTRUCTIONS
Read the instruction in this manual carefully and
thoroughly, as they give important information
regarding safety during use and maintenance. Keep
this manual with the unit, in order to consult it in
the future. If the unit is sold or given to another operator, make certain that it always has its manual,
to enable the new owner to read about its operation and relative instructions.
Warnings
• Do not make any inammable liquids, water or
metal objects enter the unit. Should any liquid
be spilled on the unit, disconnect the power
supply to the unit immediately.
• Stop using the unit immediately in the event of
serious operation problems and either contact your local dealer for a check or contact us
directly.
• Do not open the unit there are no user serviceable parts inside.
• Never try to repair the unit yourself. Repairs
by unqualied people could cause damage or
faulty operation. Contact your nearest dealer.
Cautions
• This unit is not intended for home use.
• Aer having removed the packaging check that
the unit is not damaged in any way. If in doubt,
don't use it and contactan authorized dealer.
• Packaging material (plastic bags, polystyrene
foam, nails, etc.) Must not be le within children's reach, as itcan be dangerous.
• This unit must only be operated by adults. Do
not allow children to tamper or play with it.
• Never use the unit under the following
conditions:
• In places subject to excessive humidity.
• In places subject to vibrations or bumps.
• In places with a temperature of over 45 C/113
F or less than 2 C/35.6 F. Protect the unit
from excessive dryness or humidity (ideal
conditions are between 35% and 80%).
• DO NOT dismantle or modify the unit.
Page 4
P. 4
Tecshow Navi gator 24 MKII |
English version
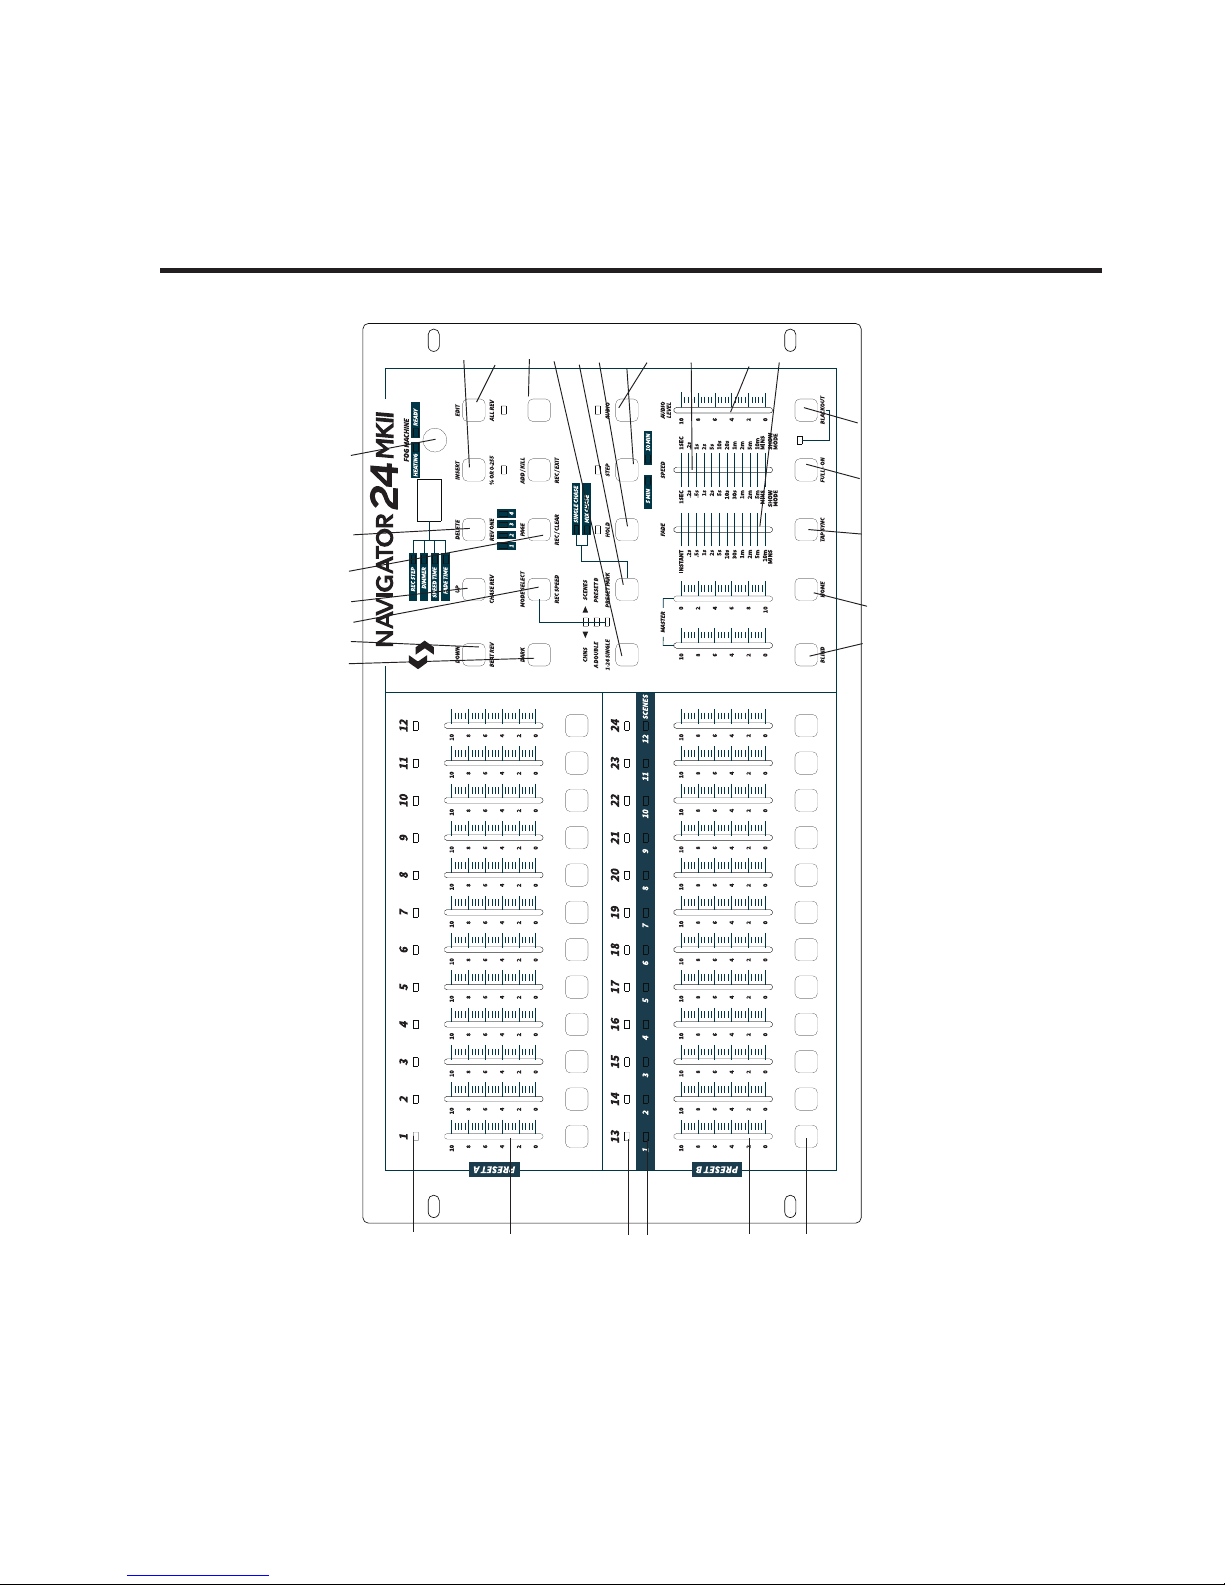
3. CONTROLS AND FUNCTIONS
1
15
8 9 10 11 12 13 14 34
16
17
19
20
21
22
23
32
33
31
24 26 27 25 28 29 30
2
3
4
5
6
7
RECORD
SHIFT
Page 5

P. 5
| Tecshow Navi gator 24 MKII
English version
Front View
1. Preset A LEDs - Show the current intensity of
the relevant channel numbered from 1 to 12.
2. Channel Sliders 1-12 - These 12 sliders are
used to control and /or program the intensities
of channels 1-12.
3. Flash Buttons 1-12 - These 12 buttons are used
to bring an individual channel, to full intensity.
4. Preset B LEDs - Show the current intensity of
the relevant channel numbered from 13-24.
5. SCENE LEDs - Light when relevant scenes are
active.
6. Channel Sliders 13-24 - These 24 sliders are
used to control and /or program the intensities
of channels 13-24.
7. Flash Buttons 13-24 - These 24 buttons are
used to bring an individual channel, to full intensity. They also are used for programming.
8. Dark Button - This button is used to momen-
tarily black out overall output.
9. Down/Beat Rev - DOWN functions to modify a
scene in Edit mode; BEAT REV is used to reverse
the chasing direction of a program with regular
beat.
10. Mode Select/Rec Speed - Each tap will acti-
vate the operating mode in the order: CHNS /
SCENES, Double Preset and Single Preset. Rec
Speed: Set the speed of any of the programs
chasing in Mix mode.
11. Up/Chase Rev - Up is used to modify a scene in
Edit mode. Chase Rev is to reverse the chasing
direction of a scene under Speed Slider control.
12. Page Button - Tap to select pages of scenes
from Page 1-4.
13. Delete/Rev One - Delete any step of a scene or
reverse the chasing direction of any program.
14. Segment Display - Shows the current activity
or programming state.
15. Insert / % or 0-255 - Insert is to add one step or
steps into a scene. % or 0-255 is used to change
display value cycle between % and 0-255.
16. Edit /All Rev - Edit is used to activate Edit
mode. All Rev is to reverse the chasing direction
of all programs.
17. Add or Kill/ Rec Exit - In Add mode, multiple
scenes or Flash buttons will be on at a time. In
Kill mode, pressing any Flash button will kill any
other scenes or programs. Rec Exit is used to
exit from Program or Edit mode.
18. Record/ Shi - Record is used to activate
Record mode or program a step. Shi functions
only used with other buttons.
19. Master A Button - Brings channel 1-12 to full of
current setting.
20. Park Button - Used to select Single/Mix Chase,
bring Channel 13-24 to full of current setting,
or momentarily program a scene into Master B
slider, depending on the current mode.
21. Hold Button - This button is used to maintain
current scene.
22. Step Button - This button is used to go to next
step when the Speed Slider is pushed to the
bottom or in Edit mode.
23. Audio Button - Activates audio sync of chase
and audio intensity eects.
24. Master Slider A - This slider controls overall
output of all channels.
25. Master Slider B - This slider controls the chase
of all programs.
26. Blind Button - This function takes the channel
out of the chase of a program in CHNS /SCENE
mode.
27. Home Button - This button is used to deacti-
vate the Blind.
28. Tap Sync Button - Repeatedly tapping this
button establish the chase speed.
29. Full On Button - This function bring overall
output to full intensity.
30. Black Out Button - This button is used to kill
all output with exception for that resulting from
Flash and Full On.
31. Fade Time Slider - Used to adjust the Fade
Time.
32. Speed Slider - Used to adjust the chase speed.
33. Audio Level Slider - This slider controls the
sensitivity of the Audio input.
34. Fog Machine button
Page 6
P. 6
Tecshow Navi gator 24 MKII |
English version
4. OPERATION GUIDE
Begin Programming
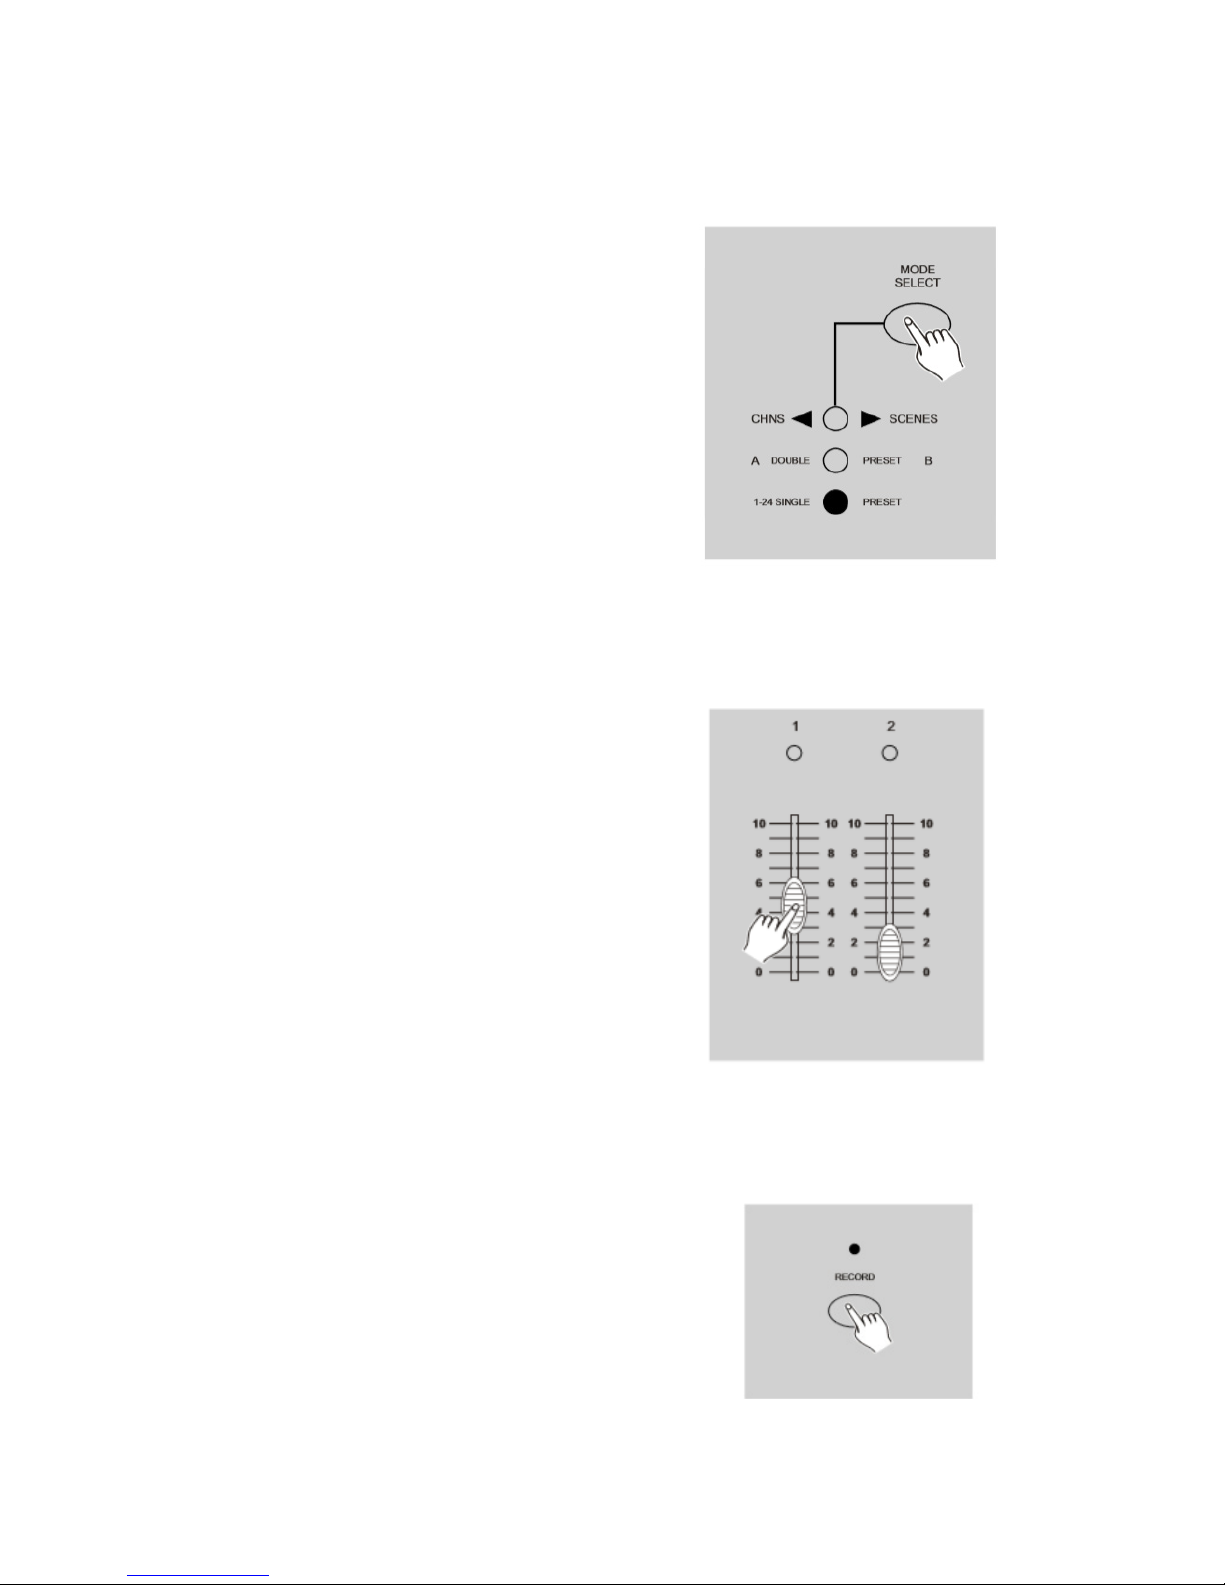
Record Enable
1. Press and hold down the Record button.
2. While holding down the Record button, tap the
Flash buttons 1, 6, 6 and 8 in sequence.
3. Release the Record button, the Record LED
lights up, now you can begin programming your
chase patterns.
Note: The rst time you turn on your unit, the
default setting of the Record Code is Flash buttons
1, 6, 6 and 8. You may change the Record Code to
protect your programs.
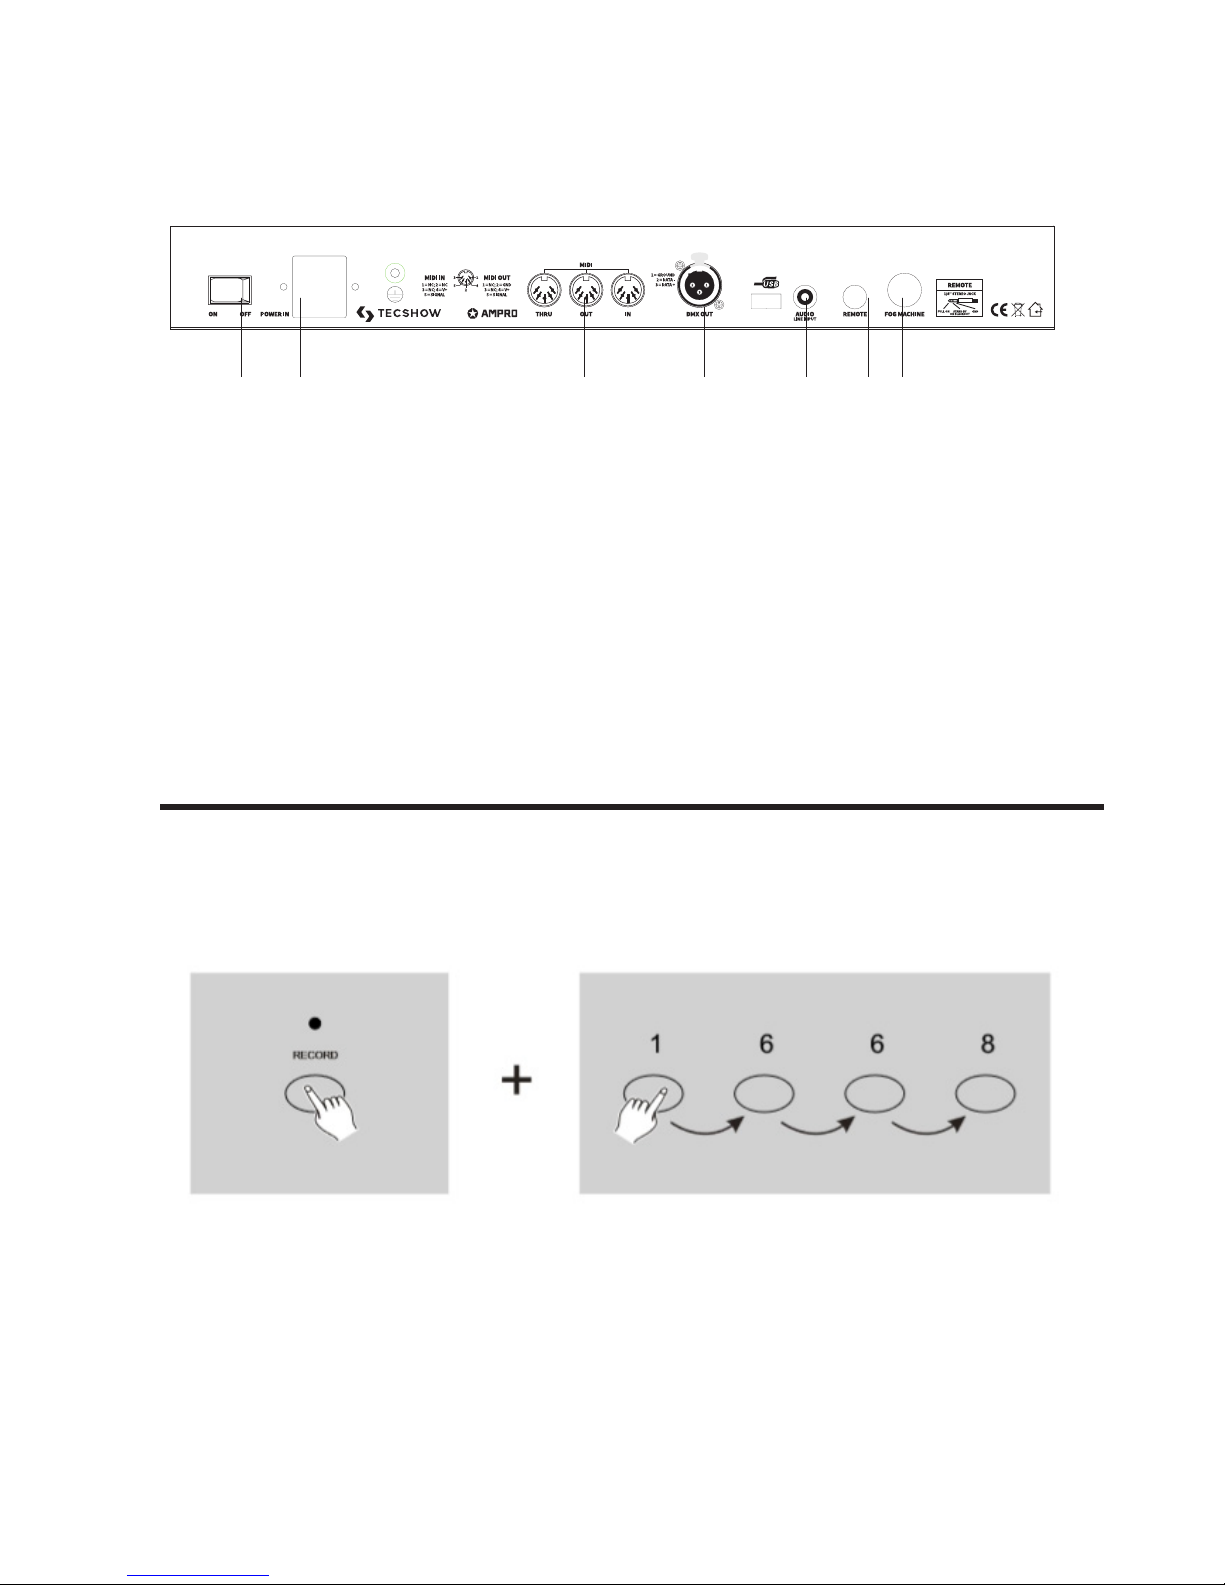
Rear View
35. Power Switch - This switch controls turning on
or o of the power.
36. DC Input - DC 12-20V, 500 mA Min.
37. MIDI Thru/Out/In - MIDI ports for connection to
a sequencer or MIDI device.
38. DMX Out - This connector sends your DMX value
to the DMX xture or DMX pack.
39. Audio Input - This jack accepts a line level au-
dio input signal ranged from 100mV to 1Vpp.
40. Remote Input - Black Out and Full On may be
controlled by a remote control using a standard
1/4"stereo jack.
41. Fog Machine Connector
35 36 37 38 39 40 41
Page 7
P. 7
| Tecshow Navi gator 24 MKII
English version
Security for Your Programs
To protect your programs from any editing by others, you may change the Record Code.
1. Enter current Record Code (Flash buttons 1, 6, 6
and 8).
2. Press and hold down the Record and Edit buttons at a time.
3. While holding the Record and Edit buttons, tap
the desired Flash button to enter a new Record
Code The Record Code consists of 4 Flash buttons (the same button or dierent buttons), be
sure your new Record Code consists of 4 Flash
buttons.
4. Enter your new Record Code a second time, all
channel LEDs and scene LEDs will ash three
times, now the Record Code is changed.
5. Exit Record mode. Tap the Rec Exit button while
pressing and holding down the Record button,
release the two buttons at a time, the Record
mode is disengaged.
Important: Always remember to exit Record mode
when you won't continue your programming, otherwise you may lose control of your unit.
Note: The second time you enter your new Record
Code dierent from that of the rst time, the LEDs
will not ash, which means you've failed to change
the Record Code.
When you've entered a new Record Code the rst
time, and now you want to cancel the new Record
Code, you may press and hold down the Record
and Exit buttons at a time to exit.
Program Scenes
1. Record Enable.
2. Select the 1-24 Single mode by tapping the the
Mode Select button. This will give you control of
all 24 channels as you program.
Be sure that Master A & B are both set at maximum.
(Master A is at its maximum in the fully up position,
while Master B is at its maximum in the fully down
position.)
3. Create a desired scene using Channel Sliders
1-24. At 0% or DMX 0, these sliders should be
at 0 position, and at 100% or DMX 255, these
sliders should be at 10 position.
4. Once the scene is satisfactory, tap the Record
button to program the scene as a step into the
memory.
Page 8

P. 8
Tecshow Navi gator 24 MKII |
5. Repeat step 3 and step 4 until all desired steps
have been programmed into memory. You may
program up to 1000 steps into memory.
6. Select a chase bank or scene master to store
your program. Tap the Page button to select a
page to store your scenes.
7. Press a Flash button between 13-24 while
holding down the Record button. All LED will
ash indicating the scenes have been programmed into memory.
8. You can continue programming or exit. To exit
Program mode, tap the Exit button while holding down the Record button, the Record LED
should go out.
Example: Program a 16 steps chase with channel 1-16
at full in sequence into Flash button 15 of Page 1.
1. Record enable.
2. Push Master A & B to maximum position and Fade
slider to top.
3. Tap the Mode Select button to select 1-24 Single
mode.
4. Push Channel slider 1 to the top position, its LED
light at full intensity.
5. Tap the Record button to program this step into
memory.
6. Repeat steps 4 and 5 until you've programmed
Channel sliders 1-16.
7. Tap the Page button causing Page 1 LED lights.
8. Tap the Flash button 15 while holding down
the Record button, all LEDs will ash indicating
you've programmed the chase into memory.
Editing
Edit Enable
1. Record enable.
2. Use the Page button to select the page the
program you wish to edit is on.
3. Tap the Mode Select button to select
CHNS ◀▶ SCENES.
English version
Page 9
P. 9
| Tecshow Navi gator 24 MKII
4. Press and hold down the Edit button.
5. While holding down the Edit button, tap the
Flash button that corresponds to the program
you wish to edit.
6. Release the Edit button, the relevant scene
LED should light indicating you are in the Edit
mode.
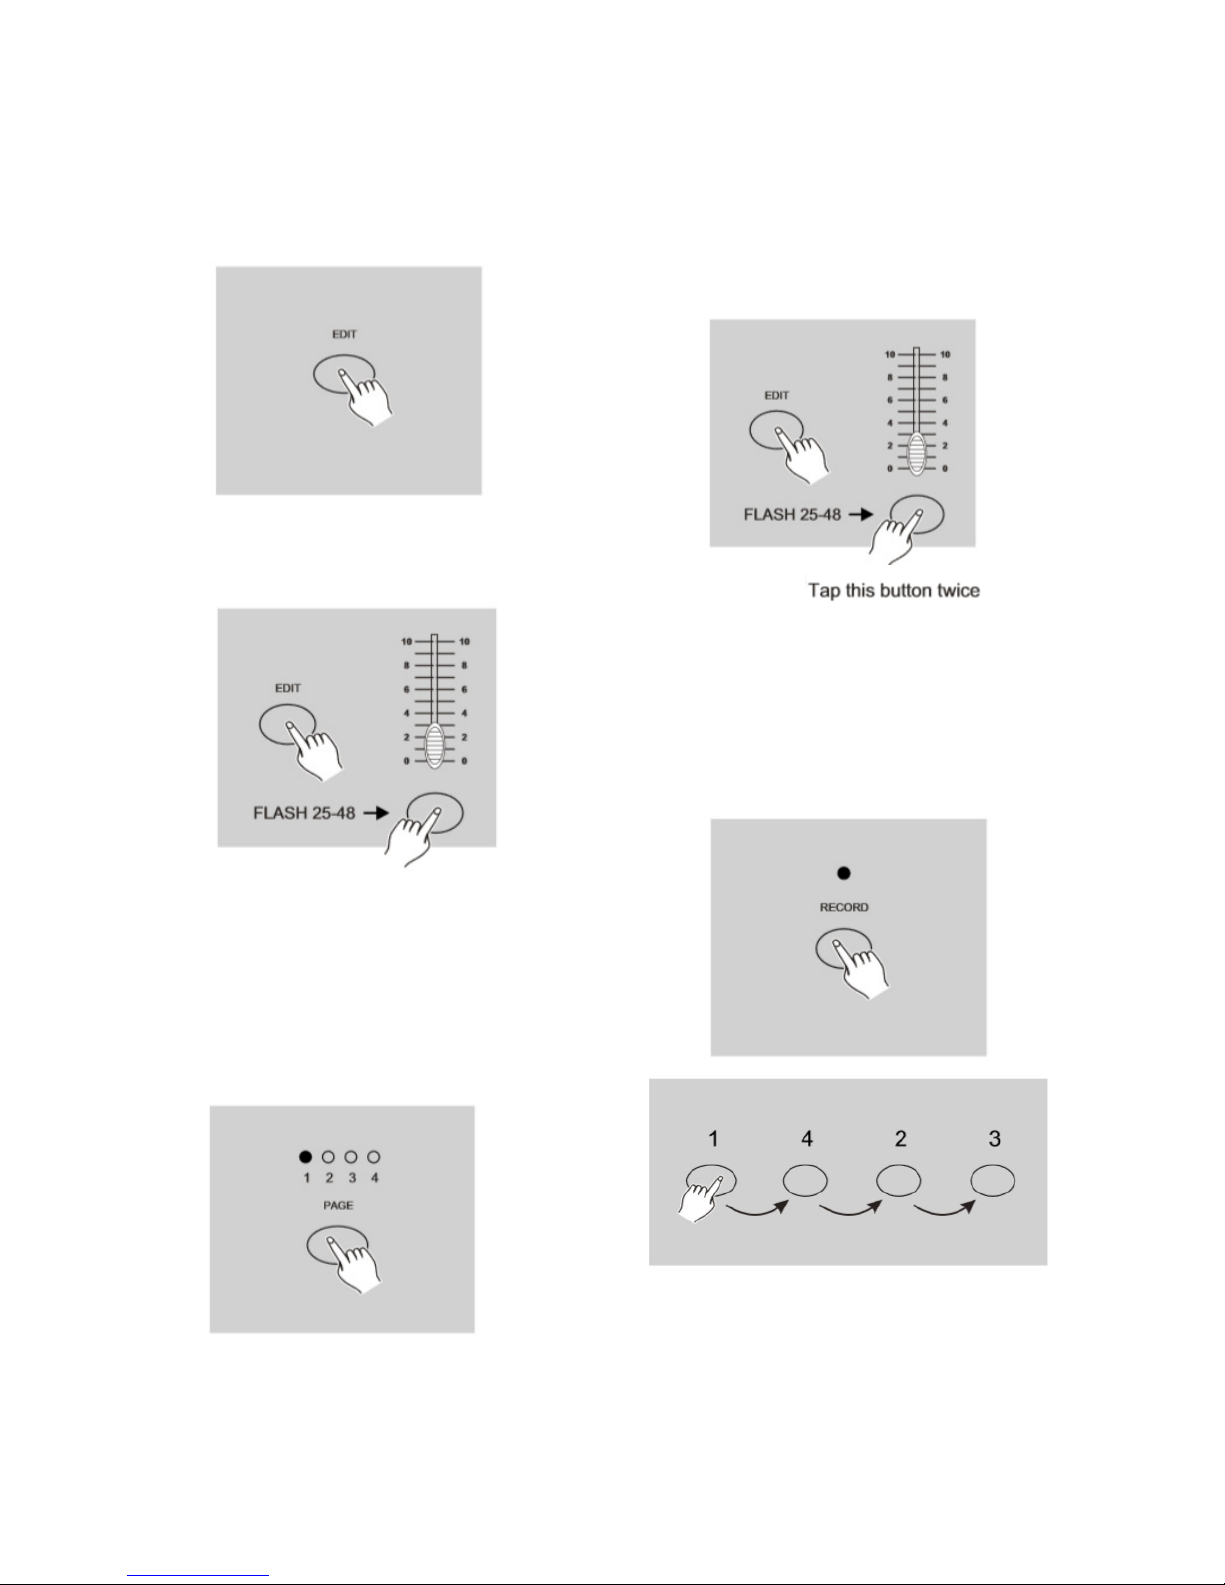
Erase a Program
1. Record enable.
2. Use the Page button to select the page the
program you wish to erase is on.
3. While holding down the Edit button, tap the
Flash button (13-24).
4. Release the two buttons, all LEDs ash, indicat-
ing the program is erased.
Erase All Programs
1. Press and hold the Record button.
2. Tap the Flash buttons 1, 4, 2 and 3 in sequence
while holding the Record button. All LEDs will
ash, indicating all programs stored in memory
have been erased.
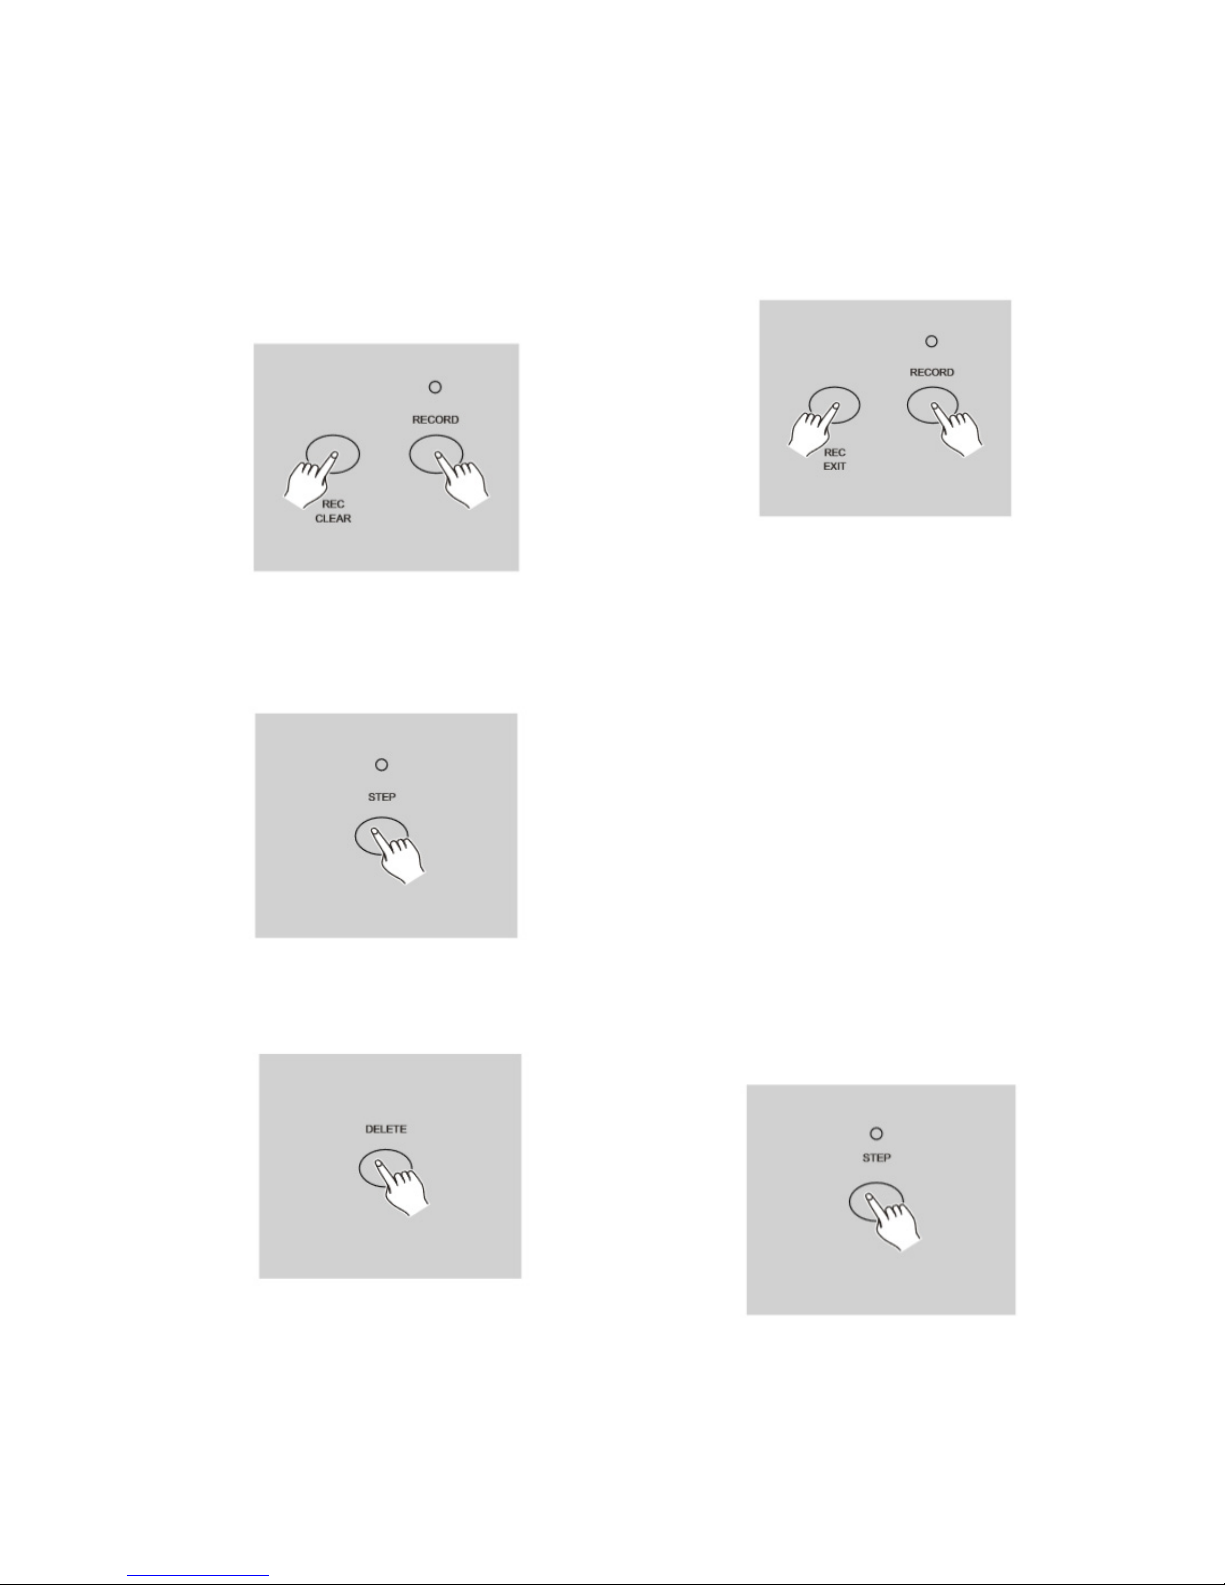
Clear a Scene or Scenes
1. Record enable.
2. Record a scene or scenes.
English version
Page 10
P. 1 0
Tecshow Navi gator 24 MKII |
3. If you are not satised with the scene or scenes,
you may tap the Rec Clear button while pressing and holding the Record button, all LEDs will
ash, indicating the scenes have been cleared.
Delete a Step or Steps
1. Enter the Edit mode.
2. Tap the Step button to scroll to the step you
wish to delete.
3. Tap the Delete button when you reach to the
step you wish to delete, all LEDs will ash
briey indicating the deletion of the step.
4. Continue steps 2 and 3 until all the unwanted
steps have been deleted.
5. Tap the Rec Exit button while pressing and
holding down the Record button, the Scene
LED goes out, indicating the exit of Edit mode.
Example: Delete the third step of the program on
Flash button 15 on Page 2.
1. Record enable.
2. Tap the Mode Select button to select CHNS ◀▶
SCENE mode.
3. Tap the Page button until Page 2 LED lights.
4. Tap the Flash button 15 while pressing and holding down the Edit button, the Scene LED lights.
5. Tap the Step button to scroll to the third step.
6. Tap the Delete button to delete the step.
7. Tap the Rec Exit button while pressing and holding down the Record button to exit Edit mode.
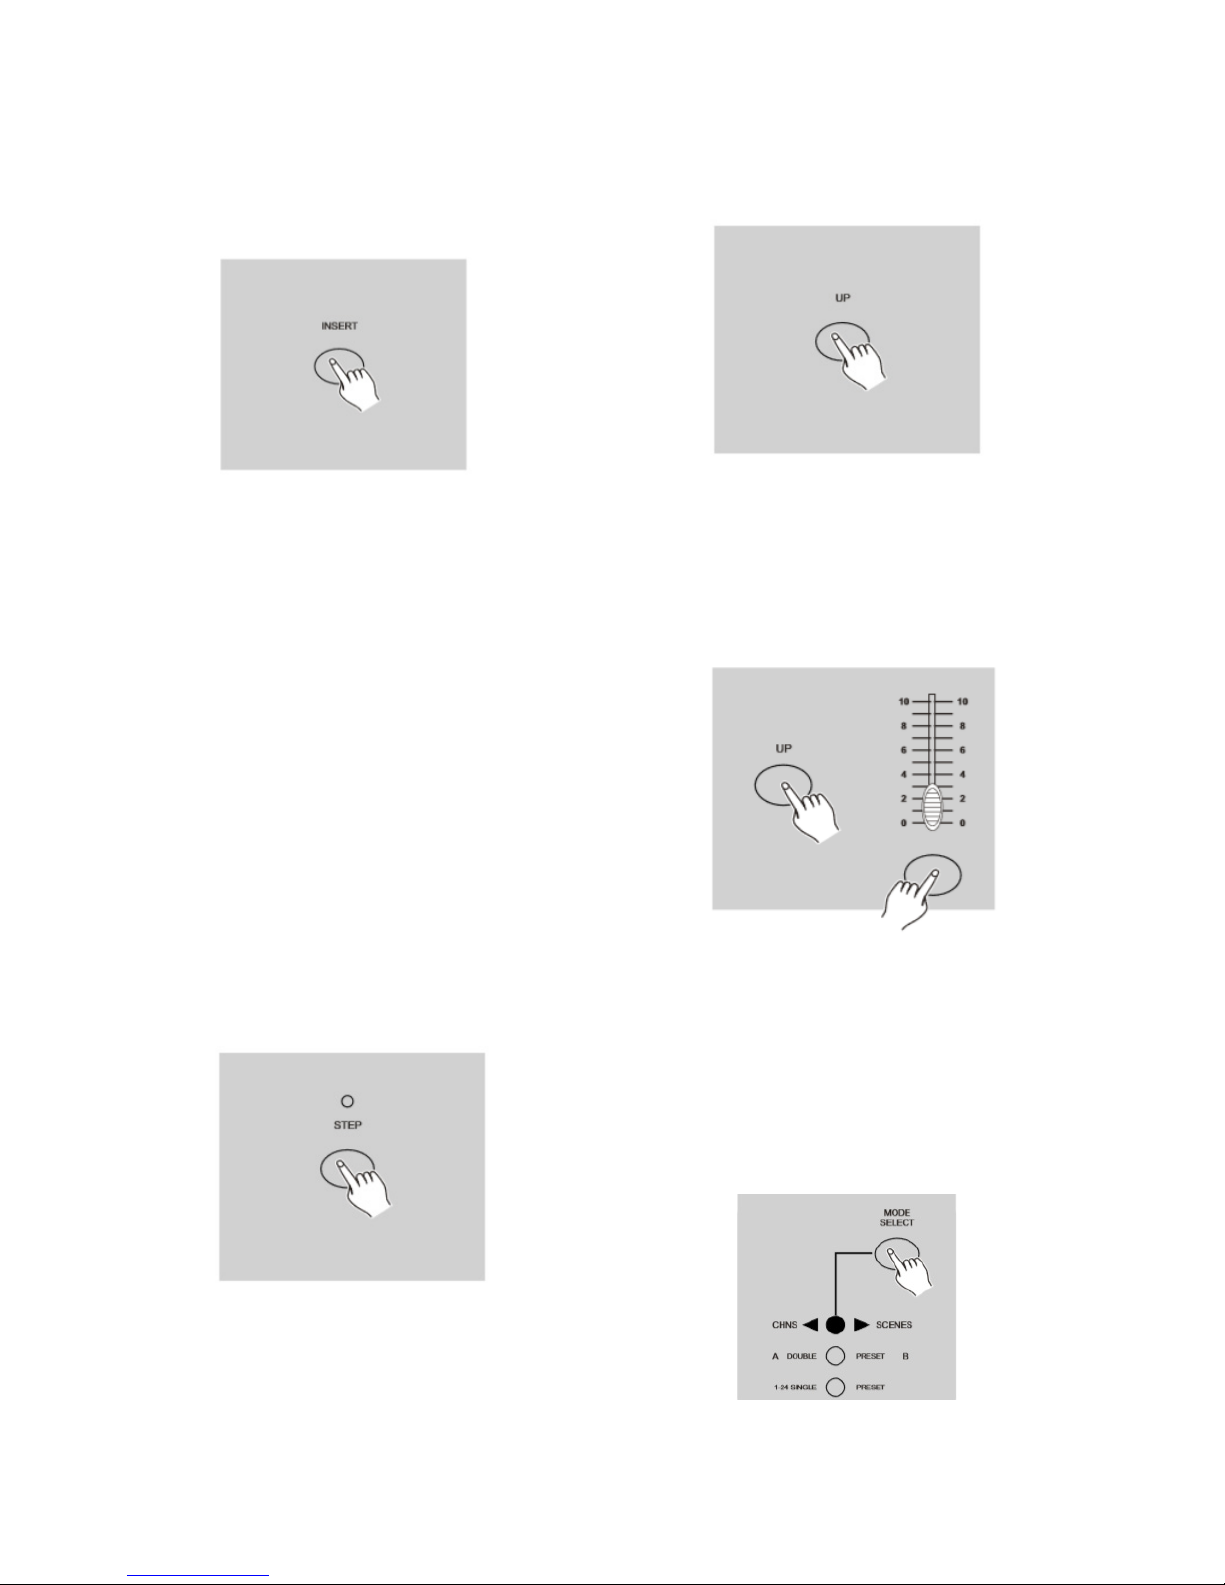
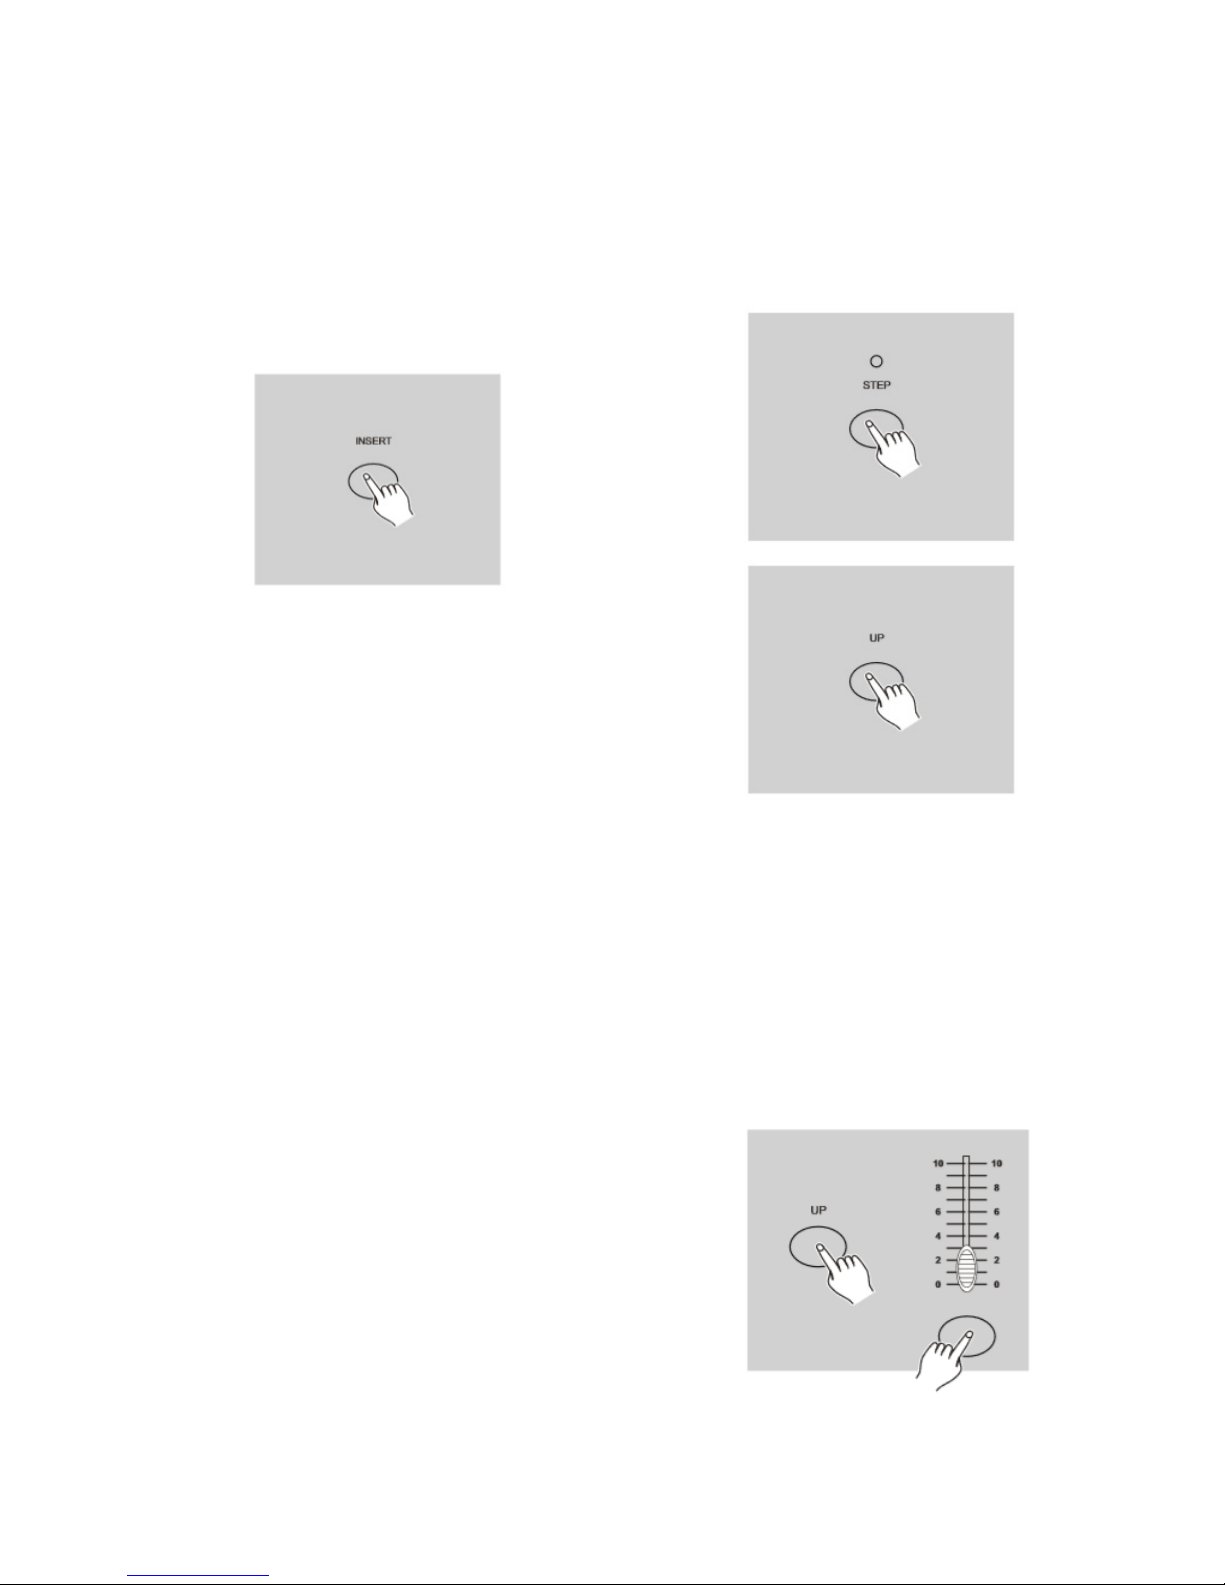
Insert a Step or Steps
1. Record a scene or scenes you wish to insert.
2. Be sure you're in CHNS ◀▶ SCENE and Enter the
Edit mode.
3. Tap the Step button to scroll to the step which
you wish to insert before. You may read the step
from the Segment Display.
4. Tap the Insert button to insert the step you've
created before, all LEDs will ash, indicating
English version
Page 11
P. 11
| Tecshow Navi gator 24 MKII
the step is inserted.
5. Exit Edit mode.
Example: Insert a step with channels 1-12 fully on at
a time between step 4 and step 5 of program 35.
1. Record enable.
2. Push Channel sliders 1-12 to the top and record
the scene as a step.
3. Tap the Mode Select button to select CHNS ◀▶
SCENE mode.
4. Tap the Page button until Page 2 LED lights.
5. Tap the Flash button 35 while holding down the
Edit button, the corresponding scene LED lights.
6. Tap the Step button to scroll to the step 4.
7. Tap the Insert button to insert the scene you've
created before.
Modify a Step or Steps
1. Enter Edit mode.
2. Tap the Step button to scroll to the step you
wish to modify.
3. Press and hold the Up button if you want to
raise the intensity. If you want to lower the intensity, press and hold down the Down button.
4. While holding down the Up or Down button,
tap the Flash button corresponding to the DMX
channel of the scene you wish to modify until
you reach the desired intensity value read from
the Segment Display. Then you may tap the
Flash buttons until you are satised with the
new scene.
5. Repeat steps 2, 3 and 4 until all the steps have
been modied.
6. Exit Edit mode.
Running
Running Chase Programs
1. Tap the Mode Select button to select CHNS ◀▶
SCENE mode indicated by the red LED.
English version
Page 12

P. 12
Tecshow Navi gator 24 MKII |
2. Tap the Page button to select the correct page
the program you wish to run is located.
3. Push Master Slider B to its maximum position
(fully down).
4. Move the desired Channel slider (13-24) to its
maximum position to trigger the program, and
the program will fade in depending upon current fade time. You may press and hold down
the relevant Flash button(13-24) to trigger the
program.
5. Move the Channel slider to adjust the output
of the current program.
Running a Program To Audio
1. Use built-in microphone or plug the audio
source into the RCA Audio jack.
2. Select your program as described above.
3. Tap the Audio button until its LED lights, indicating Audio mode is active.
4. Use the Audio Level slider to adjust the music
sensitivity.
5. To return to normal mode, tap the Audio button
a second time causing its LED goes out, the
Audio mode is disengaged.
English version
Page 13

P. 13
| Tecshow Navi gator 24 MKII
Running a Program With the Speed Slider
1. Be sure the Audio mode is disengaged, that is,
the Audio LED goes out.
2. Select your program as described above.
3. Move the Speed slider to the SHOW MODE
position (the bottom), then tap the Flash button
(13-24) while pressing and holding down the
Rec Speed button, the corresponding program
will not run with the Standard beat any longer.
4. Now you may move the Speed Slider to select
your desired speed.
Note: The step 3 is not necessary if the selected pro-
gram is not recorded with the Standard Beat.
Running a Program With the Standard Beat
1. Be sure the Audio is disengaged. Tap the Mode
Select button to select CHNS ◀▶ SCENE mode.
2. Tap the Park button to select Mix Chase mode,
the LED lights indicating this selection.
3. Select your program as described above.
4. Move the Speed slider until the Segment Display reads your desired value. You may tap the
Tap Sync button twice to dene your beat time.
5. While pressing and holding down the Rec
Speed button, tap the Flash button (13-24) that
stores the program.
6. The program will then run with the set time or
beat when engaged.
7. Repeat steps 4 and 5 to set a new beat time.
English version
Page 14

P. 14
Tecshow Navi gator 24 MKII |
Change the Speed Mode between 5 Minutes and
10 Minutes
1. Press and hold the Record button.
2. Tap the Flash button 5 or 10 three times while
holding down the Record button.
3. The 5MIN or 10MIN should light up indicating
the Speed slider is set to run in the 5 or 10
minute mode.
English version
Page 15

P. 15
| Tecshow Navi gator 24 MKII
5. MIDI OPERATION
Setting MIDI IN
1. Tap the Flash button 1 three times while
holding down the Record button, the Segment
Display reads "CHI" indicating MIDI IN channel
setup is available.
2. Tap the Flash button numbered from 1-16 to
assign MIDI IN channel 1-16, the relevant channel LED lights indicating MIDI IN channel is set.
Setting MIDI OUT
1. Tap the Flash button 2 three times while holding down the Record button, the Segment Display reads "CHO" indicating MIDI OUT channel
setup is available.
2. Tap the Flash button numbered from 1-16 to
assign MIDI OUT channel 1-16, the relevant
channel LED lights indicating MIDI OUT channel
is set.
Exit MIDI Setting
Press and hold down the Record button. While
holding down the Record button tap the Rec Exit
button to exit MIDI setting.
Receiving MIDI File Dump
Tap the Flash button 3 three times while holding
down the Record button, the Segment Display
reads "IN" indicating the controller is ready to receive MIDI le dump.
English version
Page 16

P. 1 6
Tecshow Navi gator 24 MKII |
Sending MIDI File Dump
Tap the Flash button 4 three times while holding
down the Record button, the Segment Display
reads "OUT" indicating the controller is ready to
send a le.
Note: During le dump, all other operations will not
function. Functions will automatically return when
the le dump is completed.
1. File dump will be interrupted and stop if errors
occur or power failure.
Implementation
1. During receiving and sending MIDI data, all MIDI
scenes and channels being run will automatically paused if there is no response within 10
minutes.
2. During receiving and sending le dump, the
controller will automatically search for or send
Device ID of 55H(85), a le named DC2448 with
an extension of "BIN(SPACE)".
3. File dump allows this controller to send its MIDI
data to next unit or other MIDI devices.
4. There are two types of le dump mode described as below:
Open Loop Mode
Close Loop Mode
5. The controller will send and receive Note On
and Note O data via the Flash buttons.
CONTROLLER RECEIVER
MIDI OUT MIDI OUT MIDI IN MIDI IN
CONTROLLER RECEIVER
MIDI OUT MIDI OUT MIDI IN MIDI IN
Note No. Velocity Functions
22-69 24 Program
master
turn on or o
program 1-48
70-93 24 Channel
intensity
Activate Channel
1-24
94 Full-On
95 Dark
96 Hold
97 Turn on or o
AUDIO
98 CHNS ◀▶ SCENES
99 Double Preset Mode
100 Single Preset Mode
101 Step
102 Black Out
English version
Page 17

P. 17
| Tecshow Navi gator 24 MKII
6. BRIEF OF MAIN FUNCTIONS
Reverse the direction of the scene
1. Reverse the direction of all the scenes: Press
the ALL REV Button, all the scenes should
change their directions.
2. Reverse the chasing direction of all the programs with speed control. Press the Chase Rev
Button.
3. Reverse the chasing direction of all the programs with standard beat: Press the Beat Rev
Button.
4. Revers chasing direction of any program:
Press and hold down the Rec One Button, then
press down the Flash Button corresponding to
your desired program and release together.
Fade Time
1. The amount of time it will take for the dimmer
to go from zero output to maximum output,
and vice verse.
2. Fade time is adjusted through the Fade Time
Slider, which varies from instant to 10 minutes.
Tap Sync Button
1. The Tap Sync button is used to set and synchronize the chase rate (the rate at which all
scenes will sequence) by taping the button
several times. The chase rate will synchronize
to the time of the last two taps. The LED above
the Step Button will ash at the new chase rate.
The chase rate may be set anytime whether or
not a program is running.
2. Tap Sync will override any previous setting
of the speed slider control until the slider is
moved again.
3. Use of Tap Sync in setting a standard beat is the
same with speed control slider.
Master Slider
Master Slider control provides proportional level control over all channels and scenes with the
exception of the Flash Buttons. For example:
Whenever the Master slider control is at minimum
all stage outputs will be at zero except for any
resulting from a Flash Button or FULL ON Button. If
the Master is at 50%, all outputs will be at only 50%
of the setting of current channel or scenes except
for any resulting from a Flash Button or FULL ON
Button. If the Master is at full all outputs will follow
the unit setting.
Master A always controls outputs of channels.
Master B controls the program or a scene except in
Double Preset Mode.
Single Mode
1. All programs will run in sequential order start-
ing in the order of program number.
2. The Segment Display will read the running pro-
gram number.
3. All programs will be controlled by the same
Speed Slider .
4. Press the MODE SELECT BUTTON and select "
CHNS ◀▶ SCENES".
5. Press the PARK BUTTON to select SINGLE
CHASE MODE. A red LED will indicate this selection.
Mix Mode
1. Will run all programs synchronously.
2. All programs can be controlled by the same
SLIDER SPEED, or each programs speed may be
controlled individually. (See Speed Setting ).
3. Press the MODE SELECT BUTTON and select
"CHNS ◀▶ SCENES".
4. Press the PARK BUTTON to select MIX CHASE
MODE. A yellow LED will indicate this selection.
Dimmer Display
1. The 3-Digit Segment Display is used to display
intensity percentage or absolute DMX value.
2. To change between percentage and absolute
English version
Page 18

P. 18
Tecshow Navi gator 24 MKII |
value: Press and hold the Shi Button. While
holding down the Shi button press the % or
0-255 Button to switch between percentage
and absolute values.
3. If the Segment Display reads, for example,
"076", it means a percentage value 76%. If the
Segment Display reads "076.", it means the DMX
value 76.
Blind and Home
1. Blind function takes channels temporally out
from a chase, when the chase is running, and
gives you manual control over the channel.
2. Press and hold the Blind Button and tap the
relative Flash Button you want to temporarily
take out of the chase.
3. To return to normal chase again press and hold
the Home Button and push the Flash Button
you want to return to normal chase.
Park
1. In CHNS ◀▶ SCENES Mode, press down the
button you can change the chasing mode of
programs between Single Mode and Mix Mode.
2. In Double Preset Mode, pressing down this
button is equal to pushing Master Slider B to
the top.
3. In Single Preset Mode, this button could temporally record current output, with Master
Slider B to adjust.
Add and Kill
The ADD/KILL Button changes the mode of the ash
buttons. Normally the ash buttons are in Add
mode, whereas pressing any ash button will not
kill other scenes, allowing multiple scenes to be on
at a time. The Kill mode is activated by pressing
the Add/Kill button and illuminating the LED above
it. Pressing any ash button will kill other active
SCENE or Program.
In Kill Mode, the killed program does not stop running but can not output.
Double Preset
1. Press Mode Select Button to enter A Double
Preset Mode.
2. In this mode, Channel Sliders 1-24 and channel
sliders 25-48 both control Channel 1-24.
3. Master A controls channel Slider 1-24 while Master B controls Channel Sliders 25-48. 4. In this
Mode, no scene could be recorded.
Example
1. Enter the Double Preset Mode.
2. Push Channel Sliders 1 to 6 to the top and move
Channel Sliders 19 to 24 to the maximum.
3. Move Master A and B to the same level and
push them to the same direction, you will get a
scene.
Attention!
1. To retain your programs from loss, this unit
must be powered not less than two hour every
month.
2. The Segment Display shows "LOP" if the voltage
is too low.
Design and product specications are subject to change without prior notice.
English version
Page 19

P. 1 9
| Tecshow Navi gator 24 MKII
Navigator 24 MKII
Controlador DMX para luces jas
Navigator 24 MKII es una consola DMX para lu-
ces jas de 24 canales, con 24 faders y una interfaz
diseñada para darle dinamismo a la programación y
reproducción. El controlador cuenta con 48 chases,
4580 escenas, un botón dedicado para la máquina
de humo y una función para pasar a control manual
un canal durante la ejecución del chase. Navigator 24 MKII es una consola ideal para aplicaciones
móviles de pequeña y mediana escala, contando con
variación de velocidad, tiempo de fade y dos master
faders para controlar la salida general y el chase de
forma separada.
Especicaciones
Interface
• Display de 3 segmentos
• 24 faders individuales
• Botón directo para realización de Blackout
• Botón directo para maquina de humo
• Faders para velocidad y tiempo de fade
• Fader para controlar la sensibilidad del audio
entrante
• 2 Master faders: Uno para el control general y
otro del chase
• Botón de Tap Sync
• Botón Full On: 100% intensidad en todos los
canales
• Botón Blind: Apaga el canal durante la eje-
cución del chase
• Botón audio: Activa el modo audioritmico
• Operación en 2 escenas
Características
• 24 canales DMX
• 4580 escenas programables
• 48 chases programables
• Función Solo
• Control de velocidad
• Entrada para máquina de humo & botón de
disparo
• Override manual
• Selector de polaridad DMX
• Función Blind para saltear chases durante la
reproducción
• Modo audioritmico optimizado con entrada
de línea y micrófono incorporado
• Controlable via MIDI
Conectores
• 1 conector XLR-3 de salida DMX
• 3 conectores MIDI (entrada/salida/thru)
• 1 conector DIN para maquina de humo
• 1 conector TRS 1/4" para control remoto
• 1 conector TRS 1/4" para entrada de audio
• 1 conector de alimentación
Físico
• Dimensiones: 482x264x85 mm. / 19x10,4x3,3
pulg.
• Peso 4,6 kg. / 10,1 lbs.
1. DESCRIPCIÓN
Versión Español
Page 20

P. 2 0
Tecshow Navi gator 24 MKII |
Versión Español
2. INSTRUCCIONES
Lea atentamente el manual antes de utilizar el
equipo, ya que contiene información importante
sobre el funcionamiento, la instalación y el mantenimiento del equipo. Conserve este manual para
futuras referencias. En caso de vender o regalar la
unidad, procure entregar esta guía al comprador o
nuevo dueño.
Advertencias
• Evite el ingreso de sustancias inamables, líqui-
dos u objetos de metal dentro del equipo. En
caso de que se haya derramado líquido sobre el
equipo, desconéctelo del suministro eléctrico
de inmediato.
• Si observa un problema grave de funcionamien-
to, desconecte el equipo y póngase en contacto
con el fabricante o el servicio técnico autorizado.
• El equipo no contiene piezas que puedan ser
reparadas por el usuario. En caso de precisar
asistencia, póngase en contacto con el servicio
técnico autorizado.
• No intente reparar la unidad por sus
propios medios. Las reparaciones efectuadas
por personas no calicadas pueden causar
daños irreparables.
Precaución
• Este equipo no está diseñado para uso hoga-
reño. Una vez recibido el equipo, abra el embalaje con cuidado y revise que se encuentre
en buen estado. Si observa piezas dañadas o
faltantes, no lo utilice y póngase en contacto
con el fabricante de inmediato.
• Mantenga el material de embalaje (bolsas de
plástico, polietileno, etc.) fuera del alcance de
los niños.
• El equipo sólo debe ser utilizado por adultos.
No permita que los niños jueguen con el equipo
o lo manipulen.
• No utilice la unidad bajo las siguientes condi-
ciones:
• en lugares con humedad excesiva;
• en lugares propensos a las vibraciones o
sacudidas;
• en lugares con temperatura superior a 45
C/113 °F o inferior a 2 °C/35,6 °F.
• Proteja el equipo de la humedad excesiva.
Los valores de humedad aceptable se encuentran entre 35-80%.
• No introduzca modicaciones no autorizadas
en el equipo.
Page 21

P. 2 1
| Tecshow Navi gator 24 MKII
Versión Español
3. CONTROLES Y FUNCIONES
1
15
8 9 10 11 12 13 14 34
16
17
19
20
21
22
23
32
33
31
24 26 27 25 28 29 30
2
3
4
5
6
7
RECORD
SHIFT
Page 22

P. 2 2
Tecshow Navi gator 24 MKII |
Versión Español
Vis t a f ron ta l
1. LEDs del preset A - Indica la intensidad actual
del canal 1-12 utilizado.
2. Deslizadores de canal 1-12 - Utilice los desliza-
dores para controlar y/o programar la intensidad de los canales 1-24.
3. Botones ash 1-12 - Lleva un canal individual a
su intensidad máxima.
4. LEDs del preset B - Indica la intensidad actual
del canal 13-24 utilizado.
5. LEDs de escena - Los LEDs se encenderán cuan-
do estén activas las escenas correspondientes.
6. Deslizadores de canal 13-24 - Utilice los
deslizadores para controlar y/o programar la
intensidad de los canales 13-24.
7. Botones ash 13-24 - Lleva un canal individual
a su intensidad máxima. Asimismo, se utiliza
para programar.
8. Botón Dark - Oscurece todas las salidas de luz
momentáneamente.
9. Down/Beat Rev - DOWN modica una escena
en modo edición. BEAT REV invierte la dirección
de chase de un programa con ritmo regular.
10. Mode Select/Rec Speed - Cada vez que pre-
sione el botón, activará el modo de operación
en este orden: CHNS/SCENES, preset doble y
preset único. Rec Speed: Congura la velocidad
de cualquier chase en modo mezcla.
11. Up/Chase Rev - Up: Modica una escena en
el modo edición. Chase Rev: Invierte la dirección de chase de una escena bajo el control de
velocidad.
12. Botón Page - Selecciona las páginas de escenas
1-4.
13. Delete/ Rev One - Delete: Elimina una esce-
na. Rev one: Invierte la dirección de chase de
cualquier programa.
14. Visualizador de segmentos - Muestra la activi-
dad actual o el estado del programa.
15. Insert / % or 0-255 - Insert: Agregue pasos en
una escena.% or 255: Intercambia los valores de
% a 0-255.
16. Edit / All Rev - Edit: activa el modo edición. All
Rev: Invierte la dirección de chase de todos los
programas.
17. Add or Kill/ Rec Exit - En modo Add, enciende
varias escenas o teclas ash al mismo tiempo.
En modo Kill, si presiona cualquier tecla ash,
interrumpirá cualquier otra escena o programa.
Rec exit: Abandona los modos programación o
edición.
18. Record/Shi - Record: Programa un paso o ac-
tiva el modo grabación. Shi: Activa la función
alternativa de otros botones.
19. Botón Master A - Lleva un canal individual (1-
12) a su intensidad máxima.
20. Botón Park - Selecciona un chase en modo
single/mix, lleva los canales 13-24 al valor
máximo de conguración actual o programa
momentáneamente una escena en el deslizador master B, dependiendo del modo en que se
encuentre.
21. Botón Hold - Mantiene momentáneamente la
escena actual.
22. Botón Step - Se dirige al siguiente paso cuando
el deslizador Speed (velocidad) está en modo
edición o hacia abajo.
23. Botón Audio - Activa la sincronización de audio
de un chase y los efectos de audio Regula la
salida general de todos los canales.
24. Deslizador Master A - Regula la salida general
de todos los programas.
25. Deslizador Master B - Regula la salida general
de todos los programas.
26. Botón Blind - Remueve temporalmente el ca-
nal de un programa en modo CHNS/SCENE.
27. Botón Home - Desactiva el botón Blind.
28. Botón Tap Sync - Presione esta tecla varias
veces para establecer la velocidad de chase.
29. Botón Full On - Lleva la salida de los canales a
su intensidad plena.
30. Botón Black out - Interrumpe todas las salidas,
salvo las que corresponde a los botones Flash y
Full on.
31. Deslizador Fade - Regula el tiempo de fade.
32. Deslizador Speed (velocidad) - Regula la
velocidad de ejecución de chases.
33. Deslizador Audio Level (nivel de audio) - Re-
gula la sensibilidad de la entrada de audio.
34. Botón Fog Machine (para máquina de humo)
Page 23

P. 2 3
| Tecshow Navi gator 24 MKII
Versión Español
4. GUÍA DE FUNCIONAMIENTO
Programación
Habilitar grabación
1. Mantenga presionada el botón Record.
2. Sin soltarlo, presione tres veces los botones
ash número 1, 6, 6 y 8 en secuencia.
3. Suelte el botón Record. El indicador LED se iluminará. Ahora ya puede comenzar a programar
patrones de chase.
Observación: La primera vez que encienda la unidad, la conguración predeterminada del código de
grabación son los botones ash 1, 6, 6 y 8.
El usuario puede modicar el código de grabación
para proteger sus programas.
Vista dorsal
35. Interruptor de encendido/apagado - Enciende
y apaga el equipo.
36. Entrada de CC - CC 12-20 V, 500 mA Min.
37. MIDI de entrada, salida y thru - Puertos MIDI
para conectar un secuenciador o dispositivo
MIDI.
38. Salida DMX - Este conector envía el valor DMX
al equipo o pack DMX.
39. Entrada de audio - Admite una entrada de
audio de nivel de línea de 100 mV a 1 Vpp.
40. Entrada de control remoto - Los botones
Black Out y Full On pueden utilizarse con un
control remoto con entrada estándar de 1/4”.
41. Conector para máquina de humo
35 36 37 38 39 40 41
Page 24

P. 2 4
Tecshow Navi gator 24 MKII |
Versión Español
Seguridad para sus programas
Para evitar que sus programas sean editados por
terceros, el usuario puede modicar el código de
grabación.
1. Ingrese el código actual (botones ash 1, 6, 6, 8).
2. Mantenga presionados los botones Record y
Edit al mismo tiempo.
3. Sin soltar los botones Record y Edit, presione
el botón ash deseado para ingresar un nuevo
código.El código de grabación consiste de cuatro botones ash (el mismo botón o diferentes).
Asegúrese de ingresar cuatros botones para el
nuevo código.
4. Ingrese el nuevo código una segunda vez, todos
los indicadores LED de escenas y canales titilarán tres veces para indicar que se ha modicado el código.
5. Abandone el modo grabación. Para hacerlo,
mantenga presionado el botón Record y, a la
vez, presione el botón Rec Exit. Suelte ambos
botones al mismo tiempo para salir del modo
grabación.
Importante: Procure abandonar el modo grabación
cuando haya terminado de programar. De lo contrario, puede perder el control de la unidad.
Observación: Si al modicar el código de grabación,
ingresa un código diferente la segunda vez que se solicita ingresar el dato, los indicadores LED no titilarán
para indicar que no se ha modicado el código. Si
luego de ingresar un nuevo código de grabación, el
usuario desea cancelarlo, solo mantenga presionados los botones Record y Exit al mismo tiempo para
abandonar el menú.
Escenas de programas
1. Presione el botón Record.
2. Presione el botón Mode Select para seleccionar
el modo “1-24 single”. Esto le dará control de los
24 canales al programar.
Asegúrese de que los deslizadores Master A y B
estén congurados al máximo. (Master A estará
al máximo si lo desliza hacia arriba por completo,
Master B, si lo desliza hacia abajo por completo.)
3. Utilice los deslizadores de canal 124para crear
una escena. A 0% o DMX 0, los deslizadores
deben estar en la posición 0. A 100% o DMX 255,
los deslizadores deben estar en la posición 10.
4. Una vez nalizada la escena, presione el botón
Record para programar la escena como un paso
dentro de la memoria.
Page 25

P. 2 5
| Tecshow Navi gator 24 MKII
Versión Español
5. Reitere los pasos 3 y 4 para programar todos los
pasos deseados en la memoria. El usuario puede
programar hasta 1000 pasos en la memoria.
6. Seleccione un banco de chase o un master de
escena para almacenar su programa. Presione
el botón Page para seleccionar una página (1-4)
donde almacenar sus escenas.
7. Mantenga presionado el botón Record y presione un botón Flash entre 13-24. Todos los
indicadores LED titilarán para indicar que las
escenas se programaron en la memoria.
8. El usuario puede continuar la programación
o salir del menú. Para salir del modo programación, mantenga presionado el botón Record
y, a la vez, presione el botón Rec Exit. El indicador LED de Record se apagará.
Ejemplo: Para programar un chase de 16 pasos con
los canales 1-16 en secuencia completa en el botón
ash 15 de la página 1, siga los pasos a continuación:
1. Presione el botón Record.
2. Arrastre los deslizadores Master A y B a su posición
máxima y el deslizador Fade, hacia arriba.
3. Para seleccionar el modo 1-24 Single, presione el
botón Mode Select.
4. Arrastre el deslizador de canal 1 hacia arriba. El
indicador LED se ilumina a máxima intensidad.
5. Presione el botón Record para programar este
paso en la memoria.
6. Retire los pasos 4 y 5 hasta programar los
deslizadores de canal 1-16.
7. Presione el botón Page. Los indicadores LED de la
página 1 se iluminarán.
8. Mantenga presionado el botón Record y, al mismo tiempo, presione el botón Flash 15. Todos los
indicadores LED se iluminarán para indicar que
se programó un chase en la memoria.
Edición
Habilitar edición
1. Presione el botón Record.
2. Utilice el botón Page para seleccionar la página en la que se ubica el programa que desea
editar.
Page 26

P. 2 6
Tecshow Navi gator 24 MKII |
Versión Español
3. Presione el botón Mode Select para seleccionar
CHNS ◀▶ SCENES.
4. Mantenga presionado el botón Edit.
5. Sin soltarlo, presione el botón EDIT Flash que
corresponda al programa que desea editar.
6. Suelte el botón Edit. El indicador LED de la escena correspondiente se iluminará para indicar
que usted se encuentra en el modo edición.
Eliminar un programa
1. Presione el botón Record.
2. Utilice el botón Page para seleccionar la página en la que se ubica el programa que desea
eliminar.
3. Mientras mantiene presionado el botón Edit,
presione el botón ash (13-24) dos veces.
4. Suelte ambos botones. Los indicadores LED
titilarán para indicar que se ha eliminado el
programa.
Eliminar todos los programas
1. Mantenga presionado el botón Record.
2. Sin soltarlo, presione los botones ash 1, 4, 2 y
3 en secuencia. Todos los indicadores LED titilarán para indicar que se eliminaron todos los
programas almacenados en la memoria.
Presione este botón
dos veces
Page 27

P. 2 7
| Tecshow Navi gator 24 MKII
Versión Español
Limpiar una o todas las escenas
1. Presione el botón Record.
2. Grabe una o varias escenas.
3. Si no está conforme con las escenas creadas,
mantenga presionado el botón Record y, al mismo tiempo, presione el botón Rec Clear para
eliminarlas. Todos los indicadores LED titilarán
para indicar que el proceso se ha completado
correctamente.
Eliminar un paso o pasos
1. Acceda al modo edición.
2. Presione el botón Step hasta llegar al paso que
desea eliminar.
3. Presione el botón Delete cuando haya llegado
al paso que desea eliminar. Todos los indicadores LED se iluminarán para indicar que el
proceso se ha completado correctamente.
4. Reitere los pasos 2 y 3 hasta eliminar todos los
pasos no deseados.
5. Mantenga presionado el botón Record y, al
mismo tiempo, presione el botón Rec Exit. El indicador LED de escena se apagará para indicar
que ha salido del modo edición.
Ejemplo: Para eliminar el tercer paso de un programa
en el botón Flash 15 de la página 2, proceda de la
siguiente manera:
1. Presione el botón Record.
2. Presione el botón Mode Select para seleccionar el
modo CHNS ◀▶ SCENE.
3. Presione el botón Page hasta que se ilumine el
indicador LED de la página 2.
4. Mantenga presionado el botón Edit y, al mismo
tiempo, presione el botón Flash 15. El indicador
LED de la escena se iluminará.
5. Presione el botón Step hasta llegar al tercer
paso.
6. Presione el botón Delete para eliminar el paso.
7. Mantenga presionado el botón Record y, al mismo tiempo, presione el botón Rec Exit para salir
del modo edición.
Añadir un paso o pasos
1. Grabe una o varias escenas que desee añadir.
Page 28
P. 2 8
Tecshow Navi gator 24 MKII |
Versión Español
2. Asegúrese de acceder al modo edición, CHNS
◀▶ SCENE.
3. Presione el botón Step hasta llegar al paso
anterior al que desea añadir. Podrá visualizar el
número de paso en la pantalla.
4. Presione el botón Insert para añadir el paso
previamente creado. Todos los indicadores LED
se iluminarán para indicar que el proceso se ha
completado correctamente.
5. Abandone el modo edición.
Ejemplo: Para añadir un paso con los canales 1-12
completamente encendidos entre los pasos 4 y 5 del
programa 35, proceda de la siguiente manera:
1. Presione el botón Record.
2. Arrastre los deslizadores de canal 1-12 hacia
arriba y grabe la escena como un paso.
3. Presione el botón Mode Select para seleccionar el
modo CHNS SCENE.
4. Presione el botón Page hasta que se ilumine el
indicador LED de la página 2.
5. Mantenga presionado el botón Edit y, al mismo
tiempo, presione el botón Flash 23. El indicador
LED de la escena se iluminará.
6. Presione el botón Step hasta llegar al cuarto
paso.
7. Presione el botón Insert para añadir la escena
previamente creada.
Modicar un paso o pasos
1. Acceda al modo edición.
2. Presione el botón Step hasta llegar al paso que
desea modicar.
3. Mantenga presionado el botón Up si desea
incrementar la intensidad. Si desea disminuir
la intensidad, mantenga presionado el botón
Down.
4. Mientras mantiene presionado el botón Up o
Down, presione el botón Flash correspondiente
al canal DMX de la escena que desea modicar
hasta obtener el valor de intensidad deseado en la pantalla. Luego puede presionar los
botones Flash hasta quedar conforme con la
nueva escena.
5. Reitere los pasos 2 , 3 y 4 hasta modicar todos
los pasos deseados.
6. Abandone el modo edición.
Page 29

P. 2 9
| Tecshow Navi gator 24 MKII
Versión Español
Ejecución
Ejecutar programas
1. Presione el botón Mode Select para seleccionar
el modo CHNS ◀▶ SCENE.
2. Utilice el botón Page para seleccionar la página en la que se ubica el programa que desea
ejecutar.
3. Mueva el deslizador Master B a su posición máxima (completamente hacia abajo).
4. Mueva el deslizador de canal (13-24) deseado a
su posición máxima para activar el programa.
El programa hará un fade in según el tiempo de
fade actual. También puede mantener presionado el botón Flash (13-24) correspondiente
para activar el programa.
5. Mueva el deslizador de canal para regular la
salida del programa actual.
Ejecutar un programa en modo audiorítmico
1. Utilice el micrófono integrado o conecte una
fuente de audio en el conector de audio RCA.
2. Seleccione el programa como se describe arriba.
3. Presione el botón Audio hasta que se encienda el indicador LED para señalar que el modo
audiorítmico está activo.
4. Mueva el deslizador Audio Level para regular la
sensibilidad de la música.
5. Para regresar al modo normal, presione el
botón Audio una vez más. El indicador LED se
apagará y el modo Audio quedará desactivado.
Page 30

P. 3 0
Tecshow Navi gator 24 MKII |
Versión Español
Ejecutar un programa con el deslizador de
velocidad
1. Verique que esté desactivado el modo Audio, es
decir, que el indicador LED Audio esté apagado.
2. Seleccione el programa como se describe arriba.
3. Mueva el deslizador Speed a la posición SHOW
MODE (hacia abajo). Luego presione el botón
ash (13-24), mientras mantiene presionado el
botón Rec Speed. A partir de ese momento, el
programa correspondiente ya no se ejecutará al
ritmo estándar.
4. Ahora puede mover el deslizador Speed para
seleccionar la velocidad deseada.
Observación: El paso tres no es necesario si el programa seleccionado no se graba con el ritmo estándar.
Ejecutar un programa con el ritmo estándar
1. Verique que esté desactivado el modo Audio.
Presione el botón Mode Select para seleccionar
el modo CHNS ◀▶ SCENE.
2. Presione el botón Park para seleccionar el
modo Mix Chase. El indicador LED se iluminará
para conrmar la selección.
3. Seleccione el programa como se describe arriba.
4. Mueva el deslizador Speed hasta ver el valor deseado en la pantalla. Puede presionar el botón
Tap Sync dos veces para denir el tiempo del
ritmo.
5. Mientras mantiene presionado el botón Rec
Speed, presione el botón Flash (13-24) que
almacena el programa.
6. El programa se ejecutará con el tiempo o ritmo
establecidos cuando se active.
7. Retire los pasos 4 y 5 para congurar un nuevo
tiempo de ritmo.
Page 31

P. 3 1
| Tecshow Navi gator 24 MKII
Versión Español
Modicar el modo de velocidad entre 5 y 10
minutos
1. Mantenga presionado el botón Record.
2. Mantenga presionado el botón Record y pre-
sione tres veces el botón Flash 5 ó 10.
3. El indicador LED de 5MIN o 10MIN se iluminará
para indicar que el deslizador Speed se conguró en modo 5 minutos o 10 minutos.
Page 32

P. 3 2
Tecshow Navi gator 24 MKII |
5. FUNCIONES
Congurar la entrada MIDI
1. Mientras mantiene presionado el botón Record,
presione tres veces el botón Flash 1. La pantalla
mostrará “CHI” para indicar que la conguración de la entrada MIDI está disponible.
2. Presione un botón Flash 1-16 para asignar el
canal MIDI de entrada 1-16. El indicador LED
correspondiente se iluminará para indicar que
está congurado el canal MIDI de entrada.
Congurar la salida MIDI
1. Mientras mantiene presionado el botón Record,
presione tres veces el botón Flash 2. La pantalla
mostrará “CHO” para indicar que la conguración de la entrada MIDI está disponible.
2. Presione un botón Flash 1-16 para asignar el
canal MIDI de salida 1-16. El indicador LED correspondiente se iluminará para indicar que está
congurado el canal MIDI de salida.
Salir de la conguración MIDI
Mantenga presionado el botón Record. Mientras
mantiene presionado el botón Record, presione Rec
Exit para salir de la conguración MIDI.
Recibir un archivo de volcado MIDI
Mientras mantiene presionado el botón Record,
presione tres veces el botón Flash 3. La pantalla
mostrará “IN” para indicar que el equipo está listo
para recibir un archivo de volcado MIDI.
Presione este botón
tres veces
Presione este botón
tres veces
Versión Español
Page 33

P. 3 3
| Tecshow Navi gator 24 MKII
Enviar un archivo de volcado MIDI
Mientras mantiene presionado el botón Record,
presione tres veces el botón Flash 4. La pantalla
mostrará “OUT” para indicar que el equipo está
listo para enviar un archivo de volcado MIDI.
Observación: Durante el volcado de archivos, el resto
de las funciones se desactivarán. Dichas funciones
volverán automáticamente cuando se complete el
volcado de archivos.
1. En caso de haber errores o una falla de energía,
el volcado de archivos se interrumpirá.
Puesta en práctica
1. Durante la recepción y el envío de datos MIDI,
todas las escenas y canales MIDI que se estén
ejecutando se pausarán automáticamente si no
hay respuesta en 10 minutos.
2. Durante la recepción y el envío de archivos de
volcado, el controlador buscará o enviará la
ID del equipo de 55H (85), un archivo llamado
DC2448 con una extensión "BIN (SPACE)".
3. El volcado de archivos permite que este contro-
lador envíe sus datos MIDI a la siguiente unidad
o a otros dispositivos MIDI.
4. Existen dos clases de archivos de volcado que
se describen a continuación:
Open Loop Mode
Modo de bucle Cerrado
5. El controlador enviará y recibirá datos Note On
y Note O a través de los botones Flash.
CONTROLADOR RECEPTOR
ENTRADA
MIDI
SALIDA
MIDI
SALIDA
MIDI
ENTRADA
MIDI
CONTROLADOR RECEPTOR
SALIDA
MIDI
ENTRADA
MIDI
SALIDA
MIDI
ENTRADA
MIDI
Nota No. Velocidad Funciones
22-69 24 Programa
master
Encender o apagar
programa 1-24
70-93 24 Intensidad
del canal
Activar canal 1-24
94 Todo encendido
95 Dark
96 Hold
97 Encender o apagar
audio
98 CHNS ◀▶ SCENES
99 Modo preset doble
100 Modo preset único
101 Paso
102 Black Out
Presione este botón
tres veces
Presione este botón
tres veces
Versión Español
Page 34

P. 3 4
Tecshow Navi gator 24 MKII |
6. SÍNTESIS DE LAS FUNCIONES PRINCIPALES
Invertir la dirección de una escena
1. Para invertir la dirección de todas las escenas:
Presione el botón All Rev, y todas las escenas
modicarán su dirección.
2. Invierta la dirección de chase de todos los programas con el control de velocidad. Presione el
botón Chase Rev.
3. Invierta la dirección de chase de todos los programas con ritmo estándar: Presione el botón
Beat Rev.
4. Invierta la dirección de chase de cualquier programa: Mantenga presionado el botón Rec One,
luego presione el botón Flash que corresponde
al programa deseado y suéltelos a la vez.
Tiempo de fade
1. Es el tiempo que le llevará al dimmer para ir de
salida cero a máxima intensidad y viceversa.
2. El tiempo de fade se regula a través del deslizador Fade Time, el cual tiene un rango que va
desde instantáneamente a 10 minutos.
Botón Tap Sync
1. Presione varias veces el botón Tap Sync para
congurar y sincronizar la velocidad de chase
(el ritmo al que se suceden las escenas). La velocidad de chase se sincronizará con el tiempo
de las últimas dos presiones. El indicador LED
del botón Step titilará cuando haya una nueva velocidad de chase. La velocidad de chase
se puede congurar en cualquier momento,
aunque no haya un programa en ejecución.
2. Este botón tendrá prioridad sobre cualquier
conguración previa del deslizador Speed hasta que se vuelva a mover el deslizador.
3. Utilizar el botón Tap Sync para congurar un
ritmo estándar y hacerlo con el deslizador de
control de velocidad es indistinto. Funcionan de
la misma manera.
Deslizador Master
El deslizador Master brinda control de nivel proporcional sobre todos los canales y las escenas, con la
excepción de los botones Flash. Por ejemplo:
Siempre que el deslizador Master esté en su
posición mínima, todas las salidas tendrán valor
cero, salvo las que correspondan a un botón Flash
o Full On. Si el deslizador está al 50%, todas las
salidas tendrán su conguración de canal o escena al 50%, salvo las que correspondan a un botón
Flash o Full On. Si el deslizador está en su posición
máxima, todas las salidas reejarán la conguración de la unidad. El deslizador Master A controla
las salidas de los canales. El deslizador Master B
controla un programa o escena, excepto en modo
Double Preset.
Modo Single
1. Todos los programas se ejecutarán en orden
secuencial, siguiendo los números de los programas.
2. El usuario podrá ver el número del programa en
la pantalla del equipo.
3. Todos los programas se controlarán con el
deslizador Speed.
4. Presione el botón Mode Select para seleccionar
"HNS ◀▶ SCENES".
5. Presione el botón Park para seleccionar el
modo Single Chase. Un LED rojo indicará su
selección.
Modo Mix
1. Este modo ejecutará los programas de forma
sincronizada.
2. El usuario podrá controlar todos los programas
con el deslizador Speed o podrá controlar la
velocidad de cada canal individualmente.
3. Presione el botón Mode Select para seleccionar
"CHNS ◀▶ SCENES".
4. Presione el botón Park para seleccionar el modo
Versión Español
Page 35

P. 3 5
| Tecshow Navi gator 24 MKII
Mix Chase. Un LED amarillo indicará su selección.
Pantalla
1. La pantalla de tres dígitos mostrará la inten-
sidad en valores DMX absolutos o porcentuales.
2. Para alternar entre valor porcentual y valor
absoluto: Mantenga presionado el botón Shi.
Sin soltarlo, presione el botón % or 0-255 para
seleccionar el modo de valor deseado.
3. Si en la pantalla aparece, por ejemplo, “076”,
signica que el valor porcentual es 76%. Si en
la pantalla aparece “076”, signica que el valor
DMX absoluto es 76.
Botones Blind y Home
1. La función Blind quita temporalmente los canales de un chase mientras dicho chase se está y le
proporciona al usuario control manual del canal.
2. Mantenga presionado el botón Blind y, al mismo tiempo, presione el botón Flash del programa que desea sacar del chase.
3. Para regresar al chase normal, mantenga
presionado el botón Home y, al mismo tiempo, presione el botón Flash del programa que
desea regresar al chase.
Botón Park
1. En modo CHNS ◀▶ SCENES, presione el botón
Park para modicar el modo de chase de los
programas entre Modo Single y Modo Mix.
2. En modo Double Preset, presionar este botón
equivale a mover el deslizador Master B hacia
arriba de todo.
3. En modo Single Preset, el botón Park puede
grabar temporalmente la salida actual, con el
deslizador Master B para regular.
Botón Add/Kill
El botón ADD/KILL se utiliza para modicar el modo
de los botones Flash. Normalmente, los botones
Flash están en modo Add (añadir), en el que presionar cualquier botón Flash no nalizará otras
escenas, permitiendo que varias escenas estén
activas a la vez. Presione el botón ADD/KILL para
activar el modo Kill (nalizar). El indicador LED que
se encuentra sobre el botón, se encenderá. Luego
presione cualquier botón Flash para nalizar otras
escenas o programas activos.
En modo Kill, el programa nalizado no deja de
ejecutarse, pero no se emite.
Double Preset
1. Presione el botón Mode Select para acceder al
modo A Double Preset.
2. En este modo, tanto los deslizadores de canal
1-12 como 13-24 controlan los canales 1-12.
3. El deslizador Master A controla los deslizadores
de canal 1-12, mientras que el deslizador Master
B controla los deslizadores de canal 13-24.
4. No es posible grabar escenas en este modo.
Ejemplo
1. Acceda al modo Double Preset.
2. Mueva los deslizadores de canal 1 a 6 hacia
arriba y los deslizadores 19 a 24, a su posición
máxima.
3. Mueva los deslizadores Master A y B al mismo
nivel y en la misma dirección para obtener una
escena.
Observación
1. Para evitar la pérdida de sus programas,
conecte la unidad al menos dos horas al mes.
2. En la pantalla leerá “LOP” si el voltaje es demasiado bajo.
Observación: El proveedor no asumirá responsabilidad por los errores u omisiones del manual.
La información de este manual está sujeta a cambios sin previo aviso.
Versión Español
Page 36

P. 3 6
Tecshow Navi gator 24 MKII |
Versión Español
FOR MORE INFO ON THIS PRODUCT PLEASE CHECK TECSHOW.AMPROWEB.COM /
PARA MAS INFORMACION SOBRE ESTE PRODUCTO VISITE TECSHOW.AMPROWEB.COM
 Loading...