

Page 1
P. 1
| Tecshow USB 2 .0
LINK USB 2.0
USB audio interface
USER MANUAL / MANUAL DE USUARIO
PLEASE READ THE INSTRUCTIONS CAREFULLY BEFORE USE
POR FAVOR LEA LAS INSTRUCCIÓNES ANTES DE USAR
Page 2

P. 2
Tecshow USB 2 .0 |
Link USB 2.0
USB audio interface
Link USB 2.0 is an USB interface that has a stereo
input - with a phono/line selector - and a stereo and
S/PDIF output. The equipment is USB bus-powered,
has a preamplier for phono signal and is compatible with both PC and Mac, without the need to
install any drivers. Link USB 2.0 is an ideal device to
merge the analog world with the digital one, being
able to process instruments, or even amplify or
record what is being worked on the computer.
Specications
Features
• 2 analog signal input and output
• 1 S/PDIF digital signal coaxial output
• Switchable Phono/Line input mode
• LED power status indicator
• USB bus-powered
• Soware: Windows 2000, XP, 7 or higher & Apple
Mac OS9.0.4 or higher
Specications
• Frequency response: 22Hz-20kHz, (±0.5dBu)
• THD: 0.05% @ 1 kHz
• Signal-to-noise ratio: 90dB
• Crosstalk: -80dB
• Line/phono input impedance: 25kOhms
• Line max. input level: 2dB
• Phono max. input level: -36dB @ 1kHz
• Line output impedance: 220ohms
• Line max. output level: 2dB
• S/PDIF output output impedance: 75ohms
• S/PDIF max. output level: 0.5V PCM Stereo
• Sigma-delta converters: 16-bit
• Sampling rates: 44.1kHz, 48kHz
Connectors
• 2 x Stereo RCA Unbalanced
• 1 Coaxial S/PDIF RCA
Physical
• Weight: 0.09 Kg. / 0.2 Lbs.
• Dimensions: 91.5x62x28.3 mm. /
13.6x2.44x1.11 in.
1. OVERVIEW
English version
Page 3

P. 3
| Tecshow USB 2 .0
English version
2. SAFETY AND PRECAUTIONS
FCC COMPLIANCE NOTICE
This device complies with part 15 of the FCC rules.
Operation is subject to the following two conditions:
1. This device may not cause harmful interference.
2. This device must accept any interference
received,including interference that may cause
undesired operation.
Caution: Changes or modications not expressly
approved by the party responsible for compliance could void the user's authority to operate
the equipment.
Note: This equipment has been tested and found
to complywith the limits for a Class B digital device,
pursuant to part 15 of the FCC Rules. These limits
are designed to provide reasonable protection
against harmful interference in a residential instal-
lation.
This equipment generates, uses, and can radiate
radio frequency energy and, if not installed and/
or used in accordance with the instruction manual,
may cause harmful interference to radio communications. However,there is no guarantee that interference will not occur in a particular installation.If
this equipment does cause harmful interference to
radio or television reception,which can be deter-
mined by turning the equipment o and on,the user
is encouraged to try to correct the interference by
one or more of the following measures:
• Reorient or relocate the receiving antenna.
• Increase the separation between the equipment and receiver.
• Connect the equipment into an outlet on a
circuit dierent from that to which the receiver is
connected.
• Consult the dealer or an experienced radio/TV
technician for help.
Disposing of this product should not be
placed in municipal waste and should be
separate collection.
Caution: Describes precautions that should be
observed to prevent danger of the apparatus.
Page 4
P. 4
Tecshow USB 2 .0 |
English version
3. FEATURES
• 2 analog signal input and output
• 1 S/PDIF digital signal coaxial output
• Switch-able Phono/LINE input mode
• LED power status indicator
• USB bus-powered
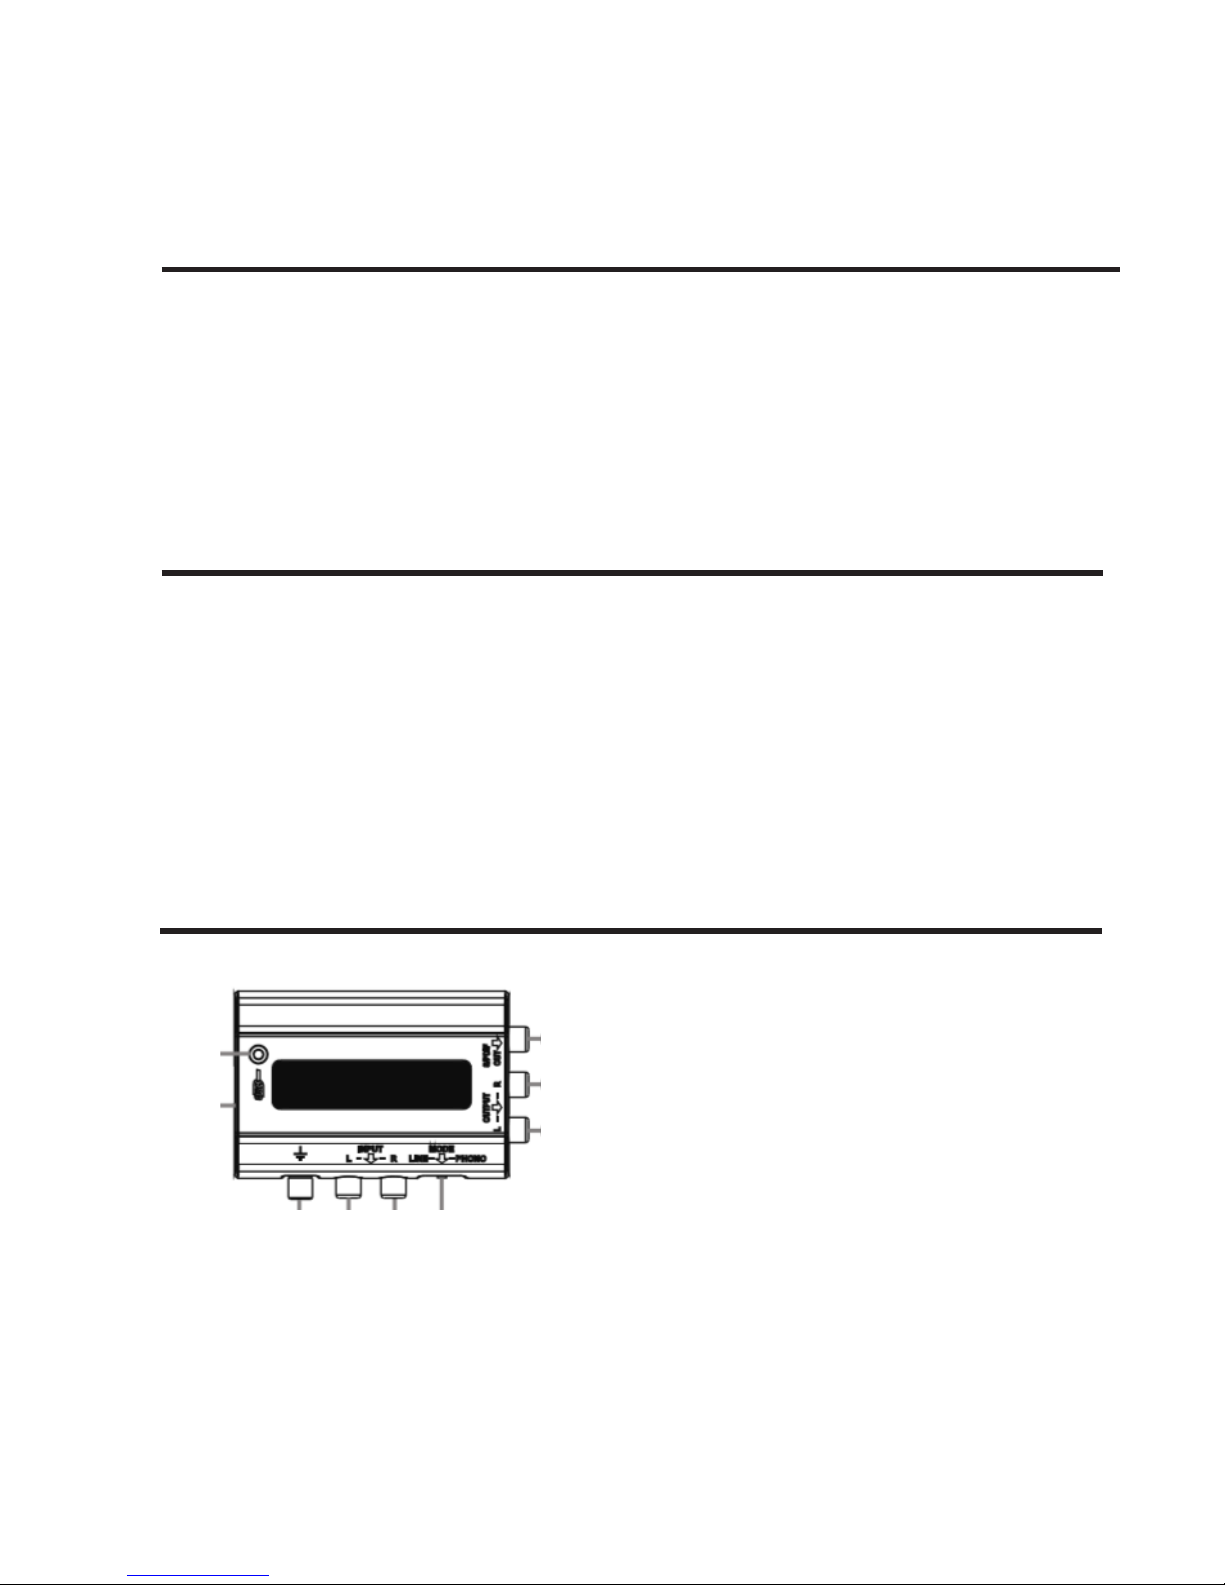
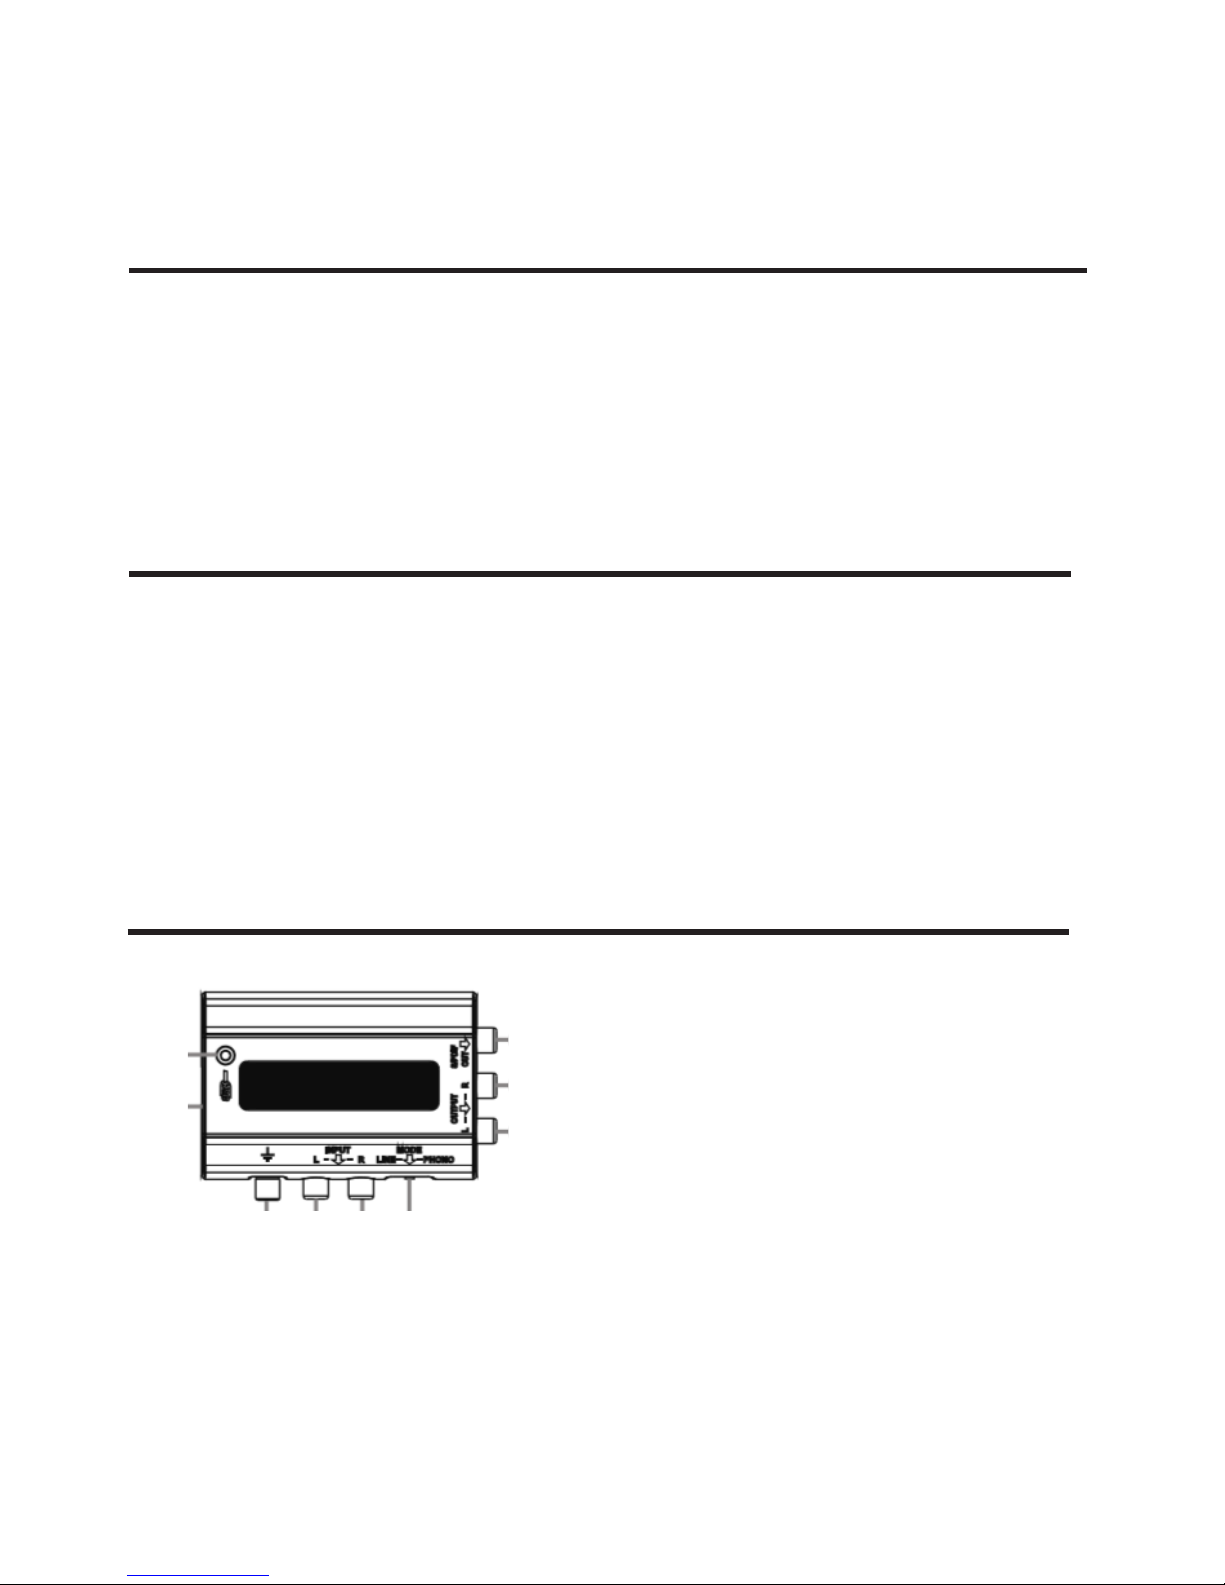
3. Grounding pillar: Generally, when the phono
input source is selected, grounding pillar is connected to the phono signal ground, which can
reduce input noise;
4. Le/right inputs: Receive the output signal from
the audio source like tape recorder and /or
phono etc.
5. Phono/ line mode switch: When input high
level audio source(like tape) is selected, turn
this switch to "LINE"; while input phono audio
source is selected, turn it to "PHONO";
6. Le/right outputs: Used to connect active
speakers;
7. S/PDIF digital signal outputs: Used to connect audio amplier with S/PDIF digital input
through coaxial RCA cable.
4. BEFORE OPERATION
5. CONTROL ELEMENTS
Please read this manual carefully to take full advan-
tages of Link USB 2.0. Make sure that Link USB 2.0
works at a place with good ventilation. Do not put
it on a heavy heater source (as amplier, electric
oven). Link USB 2.0 is directly powered by USB
power supply. Therefore, please comply with the
relative safety regulations during operation.
1. USB poert: A type B USB port, connect to PC
with the B inverting A type connector USB
cable;
2. Power Indicator: Connect to PC with the Bin-
verting Atype connector USB cable, the LED will
light on;
1
3 4 4 5
6
6
7
2
Page 5

P. 5
| Tecshow USB 2 .0
English version
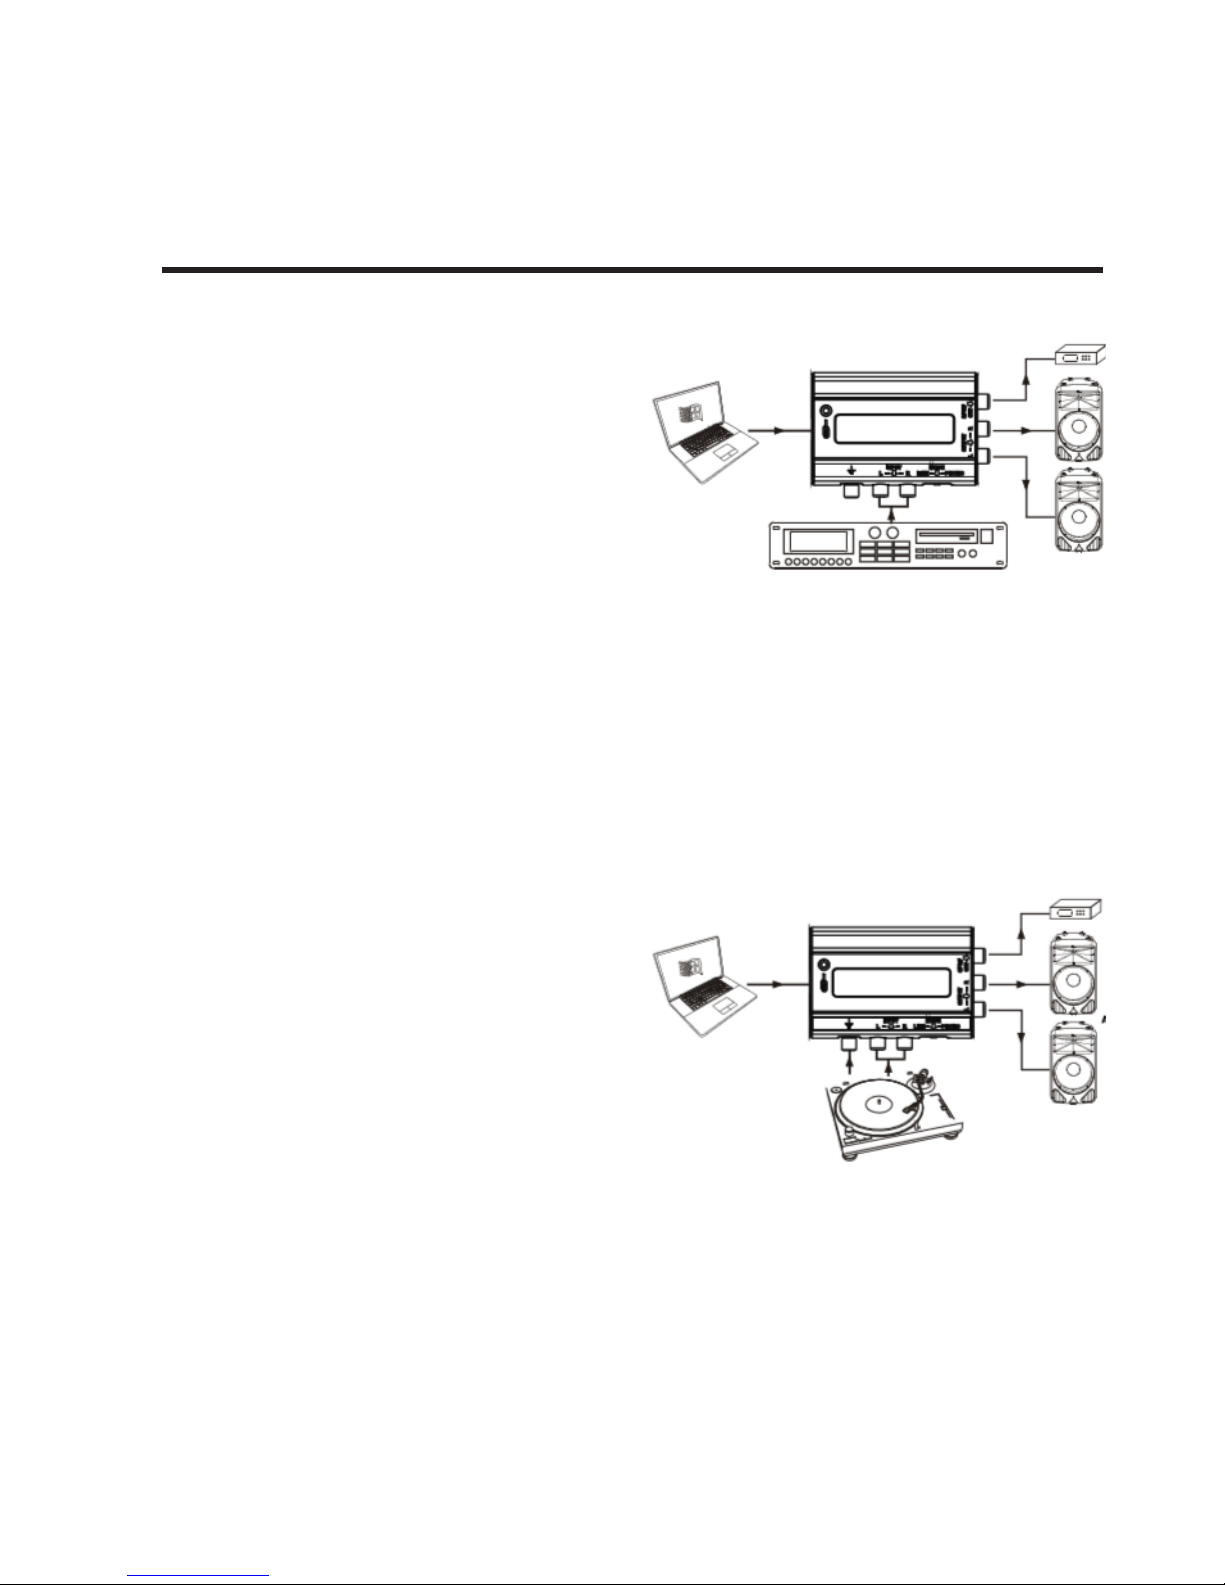
6. INSTALLATION AND CONNECTION
Tape recorder connection
1. Set input mode selective switch to "LINE";
2. Connect output (L&R) of tape recorder and Link
USB 2.0 inputs(L&R) with a RCA cable (le output to le input, right output to right input);
3. Connect Link USB 2.0 output and active moni-
tor speakers with a RCA cable.
4. Link USB 2.0 and PC using an A type inverting B
type connector USB cable.
Note: before connect USB cable, the recording and
playing sound eects will be better, if connect
signal GND of tape recorder to that of amplier with
two 22AWG or bigger cables from Link USB 2.0 GND.
Phono Connection
1. Set input mode selective switch to PHONO;
2. Connect phono output (L&R) and Link USB 2.0
input interface (L&R) (le output to le input,
right output to right input) using RCA signal
cable;
3. Connect Link USB 2.0 output and active moni-
tor speakers using RCA signal cable
4. Connect Link USB 2.0 GND pillar and phono
GND with a 22AWG or bigger cable.
5. Link USB 2.0 and PC with an A type inverting B
type connector USB cable.
RECORDER
Active Speaker
Digita l AMP
PC
PHONO
Active Speaker
Digita l AMP
PC
Page 6

P. 6
Tecshow USB 2 .0 |
English version
Design and product specications are subject to change without prior notice.
7. RECORDING TIPS
Install a recording soware (not attach this soware, need to purchase). Connect Link USB 2.0 to
PC to start music recording. Please take notes of
the following points:
1. Set up computer's sound eect, please choose
USB sound eects apparatus (Link USB 2.0);
2. Turn the volume of the audio source (like tape
recorder, phono) to low;
3. Adjust the recording soware volume control
to a proper position to get the best recording
sound. Too loud, the recording sound will be
distorted; too low, the recording sound will be
lack of dynamics and loudness. We suggest
making a short piece of recording rst to gain
best eect and performance before formal
recording.
Page 7

P. 7
| Tecshow USB 2 .0
Versión Español
Link USB 2.0
Interface de audio USB
LINK USB 2.0 es una interface USB que cuenta con
una entrada estéreo - con un selector de phono/
línea - y una salida estéreo y S/PDIF. El equipo no
necesita de alimentación externa, cuenta con un
preamplicador para señal phono y es compatible
tanto con PC como con Mac, sin la necesidad de
instalar ningún driver. LINK USB 2.0 es un equipo
ideal para unir el mundo análogo con el digital,
pudiendo procesar instrumentos, o inclusive ampli-
car o grabar aquello que se está trabajando en el
ordenador.
Especicaciones
Características
• 2 conectores de entrada y salida de señal
• 1 salida coaxial para señal S/PDIF
• Selector de entrada Phono/Linea
• LED indicador de alimentación
• Alimentación via USB
• Compatible con Windows 2000, XP, 7 o posterior
& Apple Mac OS9.0.4 o posterior
Especicaciones
• Respuesta en frecuencia: 22Hz-20kHz (±0.5dBu)
• Distorsión por intermodulación: 0,05% @ 1kHz
• Relación señal-a-ruido: 90dB
• Diafonía: -80dB
• Impedancia de entrada Linea/Phono: 25kOhms
• Nivel máximo de entrada de línea: 2dB
• Nivel máximo de entrada phono: -36dB @ 1kHz
• Impedancia de salida de línea: 220ohms
• Nivel máximo de salida de línea: 2dB
• Impedancia de salida S/PDIF: 75ohms
• Nivel máximo de salida S/PDIF: 0.5V PCM estéreo
• Conversores sigma-delta: 16-bit
• Frecuencia de muestreo: 44,1kHz, 48kHz
Conectores
• 2 RCA estéreo desbalanceados
• 1 RCA coaxial S/PDIF
Físico
• Peso: 0,09 Kg. / 0,2 Lbs.
• Dimensiones: 91,5x62x28,3 mm. /
13,6x2,44x1,11 pulg.
1. DESCRIPCIÓN
Page 8

P. 8
Tecshow USB 2 .0 |
Versión Español
2. INSTRUCCIONES DE SEGURIDAD
AVISO DE CONFORMIDAD CON FCC
Este equipo cumple con el apartado 15 de la normativa FCC. El funcionamiento de este equipo está
sujeto a dos condiciones:
1. Este dispositivo no puede causar interferencias
perjudiciales.
2. Este dispositivo debe admitir las interferencias
recibidas, incluso aquellas que causen un funcionamiento no deseado.
Precaución: Los cambios o modicaciones no
aprobados expresamente por el fabricante podrían invalidar la autorización del usuario para
utilizar el equipo.
Observación: Este equipo ha sido comprobado y
cumple los límites estipulados para un dispositivo
digital clase B, según el apartado 15 de la normativa FCC. Estos límites se han previsto para ofrecer
una protección razonable contra interferencias en
instalaciones residenciales.
Este equipo genera, utiliza y puede irradiar energía
de radiofrecuencia y, si no se instala y se utiliza
de acuerdo con las instrucciones suministradas,
podría ocasionar interferencias perjudiciales para
las comunicaciones por radio. No obstante, no se
puede garantizar que no se vaya a producir este
tipo de interferencias en una instalación en particular. Si este equipo ocasiona interferencias perjudiciales en la recepción de radio o televisión, lo que
puede comprobarse encendiendo y apagando el
equipo, se recomienda que intente corregir la interferencia mediante una de las siguientes acciones:
• Reoriente o reubique la antena receptora.
• Aumente la separación entre el equipo y el
receptor.
• No conecte el equipo en la toma del mismo
circuito que el receptor.
• Consulte con su distribuidor o con un técnico
de radio y televisión.
Al desechar este producto, procure no
depositarlo en un contenedor municipal
común. Respete las normas locales de
recolección selectiva.
Precaución: Este aviso describe precauciones
que el usuario debe observar para prevenir
daños en el dispositivo.
Page 9
P. 9
| Tecshow USB 2 .0
Versión Español
3. CARACTERÍSTICAS
• Dos entradas y salidas de señal analógica.
• 1 Una salida digital coaxial S/PDIF.
• Modo de entrada conmutable Phono/Line.
• Indicador LED de estado.
• Alimentación a través de bus USB.
selecciona la entrada phono, la puesta tierra
se conecta a la señal a tierra de phono para
reducir el ruido de entrada.
4. Inputs L/R: Las entradas derecha e izquierda
reciben la señal de salida de la fuente de audio
(grabador, phono, etc.).
5. Interruptor Phono/line: Cuando utilice una
fuente de audio de alto nivel (casetes), selec-
cione "LINE"; cuando utilice un tocadiscos
como fuente de audio, seleccione "PHONO".
6. Outputs L/R: Utilice las salidas derecha e izquierda para conectar altavoces activos.
7. S/PDIF out: Utilice esta salida digital para
conectar un amplicador de audio con la entrada digital S/PDIF, a través de un cable coaxial.
4. ANTES DE COMENZAR
5. DESCRIPCIÓN DEL PRODUCTO
Lea atentamente el manual antes de comenzar a
utilizar el equipo.Utilice el equipo en un ambiente
con buena ventilación. No coloque el equipo cerca
de fuentes de calor (hornos eléctricos, amplicadores, etc.). Link USB 2.0 se alimenta directamente
vía USB. Por lo tanto, procure cumplir con las nor-
mas de seguridad durante su funcionamiento.
1. Puerto USB: Puerto USB tipo B. Conecte el
puerto A invertido del cable USB a su PC.
2. Indicador de encendido: Conecte el cable USB a
su PC y el LED se encenderá.
3. Puesta a tierra: Por lo general, cuando se
1
3 4 4 5
6
6
7
2
Page 10
P. 1 0
Tecshow USB 2 .0 |
Versión Español
6. INSTALACIÓN Y CONEXIÓN
Conexión de un grabador
1. Utilice el interruptor para seleccionar el modo
de entrada LINE.
2. Conecte un extremo de un cable RCA en la sa-
lida (L&R) del grabador y el otro extremo en la
entrada (L&R) del Link USB 2.0 (salida izquierda
a entrada izquierda, salida derecha a entrada
derecha).
3. Conecte un cable RCA en la salida del Link USB
2.0 y en altavoces activos.
4. Utilice un cable USB para enlazar su PC con el
Link USB 2.0.
Observación: Antes de conectar el cable USB, la
grabación y reproducción de los sonidos será mejor.
Procure utilizar dos cables calibre 22AEG (o superior)
para conectar el grabador con un amplicador.
Conexión de tocadiscos
1. Utilice el interruptor para seleccionar el modo
de entrada PHONO.
2. Conecte un extremo de un cable RCA en la
salida phono (L&R) y el otro extremo en la interfaz de entrada (L&R) del Link USB 2.0 (salida
izquierda a entrada izquierda, salida derecha a
entrada derecha).
3. Conecte un cable RCA en la salida del Link USB
2.0 y en altavoces activos.
4. Utilice un cable calibre 22AWG (o superior) para
conectar la puesta a tierra del equipo.
5. Utilice un cable USB para enlazar su PC con el
Link USB 2.0
GRABADOR
Altavoces activos
Ampli cador digital
PC
TOCADISCO
Altavoces activos
Ampli cador digital
PC
Page 11

P. 11
| Tecshow USB 2 .0
Versión Español
7. CONSEJOS DE GRABACIÓN
Instale un soware de grabación (no incluido).
Conecte el Link USB 2.0 a su PC para comenzar
la grabación. Tenga en cuenta los puntos a conti-
nuación:
1. Al congurar el sonido de la PC, seleccione el
dispositivo USB.
2. Baje el volumen de la fuente de audio (graba-
dor, tocadiscos) al mínimo.
3. Regule el control de volumen del soware de
grabación para obtener el mejor sonido posi-
ble. Si el volumen está muy elevado, el sonido
se distorsionará. Si está muy bajo, el sonido no
tendrá dinamismo ni potencia. Se aconseja hacer una grabación corta de prueba para vericar que el sonido sea esté en su nivel óptimo.
Observación: El proveedor no asumirá responsabilidad por los errores u omisiones del manual.
La información de este manual está sujeta a cambios sin previo aviso.
Page 12

P. 12
Tecshow USB 2 .0 |
FOR MORE INFO ON THIS PRODUCT PLEASE CHECK TECSHOW.AMPROWEB.COM /
PARA MAS INFORMACION SOBRE ESTE PRODUCTO VISITE TECSHOW.AMPROWEB.COM
Versión Español
 Loading...