

Page 1
HALO 80 LED
Beam moving head
USER MANUAL/MANUAL DE USUARIO
PLEASE READ THE INSTRUCTIONS CAREFULLY BEFORE USE
POR FAVOR LEA LAS INSTRUCCIÓNES ANTES DE USAR
- Tecshow Halo 80 LED
P. 1
Page 2

1. OVERVIEW
HALO 80 LED
Beam moving head – 1 x 80W White LED
Halo 80 LED is a compact and powerful beam mov-
ing head that sports 1 x 80W White LED, comparable
to a 1R lamp. Its sharp 2º beam angle stands out
naturally in small and medium-scale mobile appli-
cations. The equipment has a wheel of 13 colors +
white + rainbow eect and an independent wheel
of 6 colors + white that allows gobos in rainbow
eect. Halo 80 LED has also two independent 8 and
24 facets prisms that can be operated independent-
ly or together, thus providing multiple options at
the time of a staging.
Source & Optics
• Light Source: 1 x 80W White LED
• LEDs life: 50,000 horas
• Beam angle: 2°
• Color Temperature: 7800K
• Gobos: 11 xed + white
• Gobo shake
• Frost lter
• Double Prism: 8 and 24 facet prisms
• Focus: linear adjustable de 0-100%
• Dimmer: Full range 0-100%
• Strobe eect: Synchronized and random
• Advanced RDM function
• High eiciency cooling system, temperature
control, overheating auto-protection.
Control
• DMX Channels: 16/20
• Operational modes: DMX, Master/Slave, Auto
& Sound/Active
Movement
• Pan: 540°
• Tilt: 270°
• 16-bit resolution
• Auto repositioning
Photometric data
• 2º beam angle: 100.000 Lux @ 5m (16 .)
Eects & Functions
• Color Wheel: 13 colors + White + Rainbow eect
• 7-color eect: Independent 6-color eect +
white that allows rainbow eect gobos
P. 2
Tecshow Halo 80 LED - English version
Physical
• DMX coonectors: 2 XLR (XLR-3 in & out)
• Power supply: PowerCON® in/out
• LCD display
• Dimensions: 280x215x510 mm. / 11x8.5x20.1
in.
• Weight: 11.9 Kg. / 26.2 Lbs.
Page 3

2. SAFETY INSTRUCTIONS
Warning To prevent or reduce the risk of electri-
cal shock or re, do not expose this unit to rain or
moisture.
Caution There are no user serviceable parts inside
this unit. Do not attempt any repairs yourself. Doing
so will void your manufactures warranty. In the
unlikely event your unit may require service please
contact us.
• Please keep this User Guide for future consultation. If you sell the unit to another user, be sure
that they also receive this instruction booklet.
• Unpack and check carefully there is no transportation damage before using the unit.
• Before operating, ensure that the voltage and
frequency of power supply match the power
requirements of the unit.
• It’s important to ground the yellow/green conductor to earth in order to avoid electric shock.
• The unit is for indoor use only. Use only in a dry
location.
• The unit must be installed in a location with adequate ventilation, at least 50cm from adjacent
surfaces. Be sure that no ventilation slots are
blocked.
• Disconnect main power before replacement or
servicing.
• Make sure there are no ammable materials
close to the unit while operating as it is re
hazard.
• Use safety cable when xes this unit. DO NOT
handle the unit by taking its head only, but
always by taking its base.
• Maximum ambient temperature is Ta: 40°. Do
not operate it where the temperature is higher
than this.
• Unit surface temperature may reach up to 85°.
Do not touch the housing bare-hand during its
operation. Turn o the power and allow about
15 minutes for the unit to cool down before
replacing or serving.
• In the event of serious operating problem, stop
using the unit immediately. Never try to repair
the unit by yourself. Repairs carried out by
unskilled people can lead to damage or mal-
function. Please contact the nearest authorized
technical assistance center. Always use the
same type spare parts.
• Do not touch any wire during operation as high
voltage might be causing electric shock.
Warning
• To prevent or reduce the risk of electrical shock
or re, do not expose the unit to rain or moisture.
• Do not open the unit within ve minutes aer
switching o.
• The housing, the lenses, or the ultraviolet lter
must be replaced if they are visibly damaged.
Caution
There are no user serviceable parts inside the unit.
DO NOT open the housing or attempt any repairs
yourself. In the unlikely event your unit may require
service, please contact your nearest dealer.
• If using a 230V 50Hz power supply, do not connect in series more than 11 units; use another
main supply for the next 11 xtures.
• If using a 120V 60Hz power supply, do not connect in series more than 5 units; use another
main supply for the next 5 xtures.
Installation
The unit should be mounted via its screw holes on
the bracket. Always ensure that the unit is rmly
xed to avoid vibration and slipping while operat-
ing. And make sure that the structure to which you
are attaching the unit is secure and is able to sup-
- Tecshow Halo 80 LEDEnglish version
P. 3
Page 4
port a weight of 10 times of the unit’s weight. Also
always use a safety cable that can hold 12 times of
the weight of the unit when installing the xture.
The equipment must be xed by professionals. And
it must be xed at a place where is out of the touch
of people and has no one pass by or under it.
3. INTERFACE DESCRIPTION
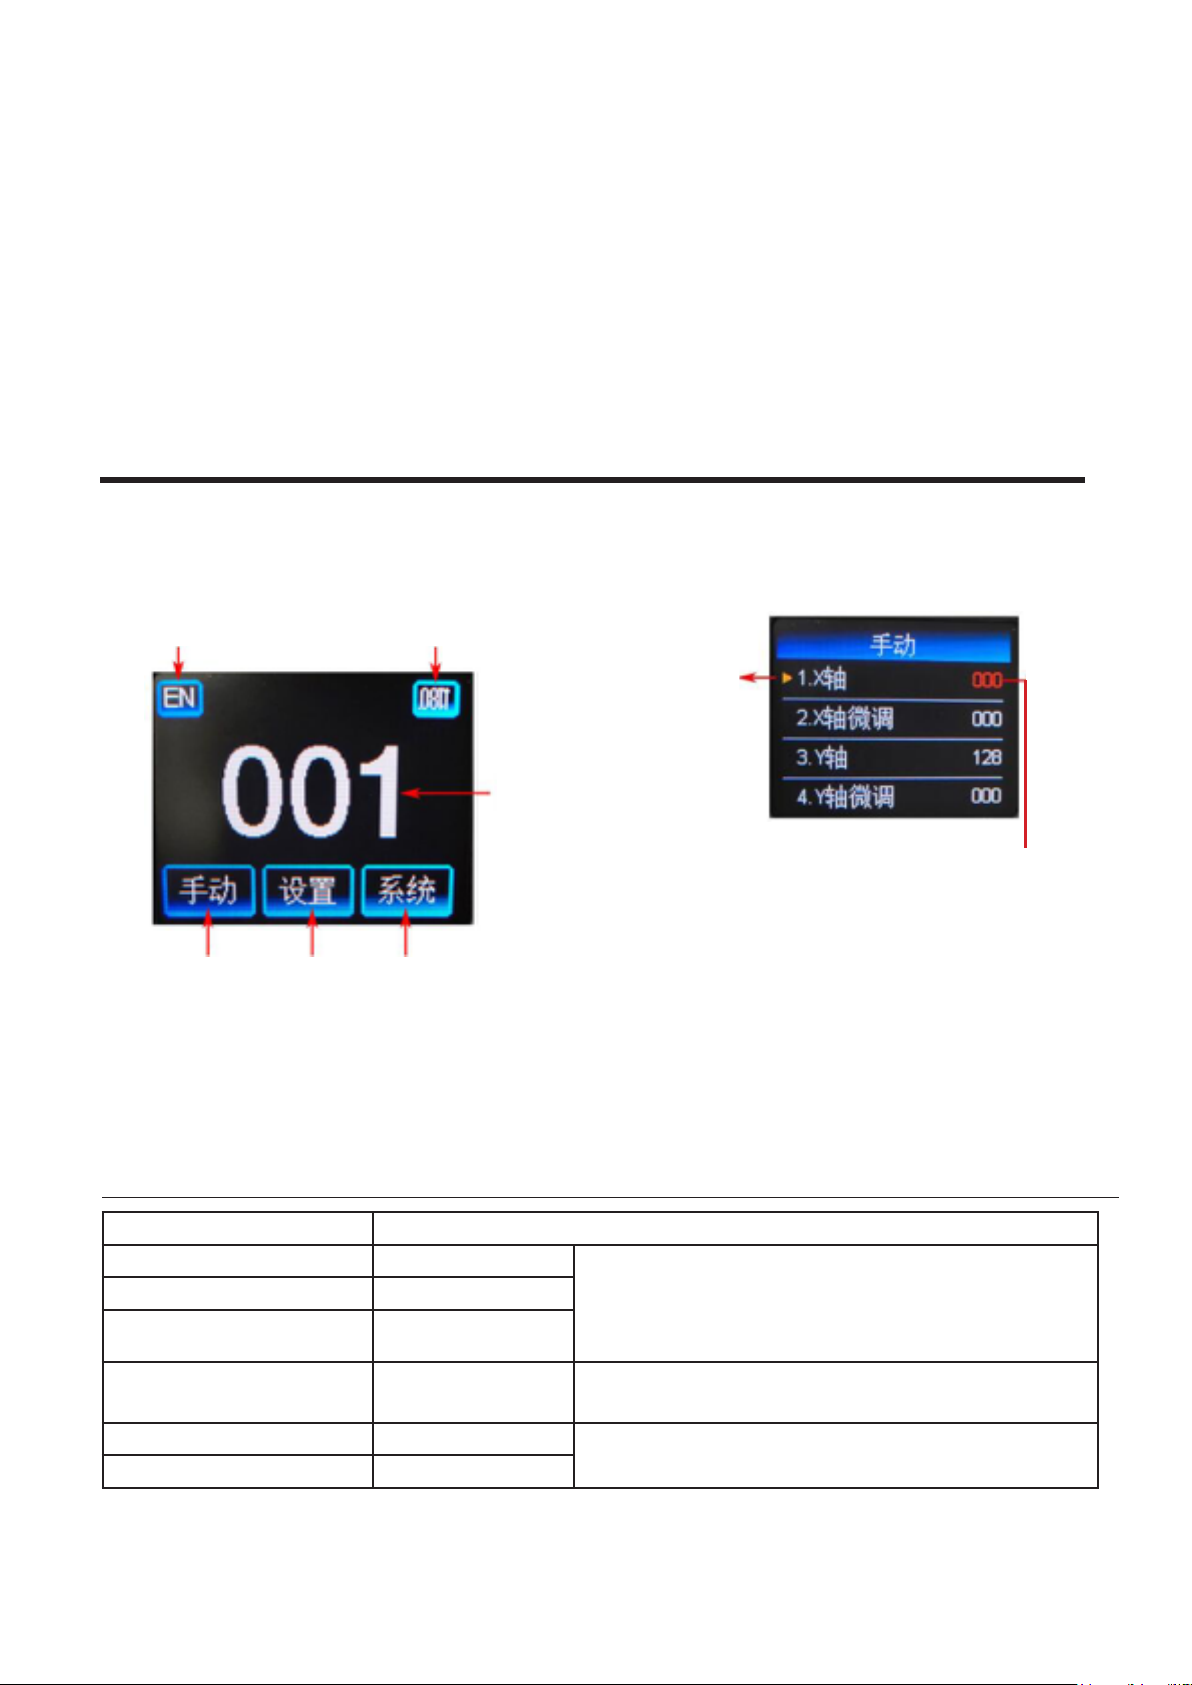
Main Interface Subinterface
Chinese/English
surface
Reverse 180
displayed
DMX
Address
Manual Control
(1)Yellow ar-
row indicates
selected
(2) Press “OK” key enter into Edit
status, the word is red, then press
“UP” “DOWN” to select, press “OK”
save and Exit edit status.
Control Setting System
Information
Option Description
1CH. Pan 0-255 Yellow arrow indicates selected, Press “OK” key en-
…… 0-255
15CH. Frost 0-255
16CH. Reset Press “OK” to see the conrmation dialog box, press
17CH. Pan/Tilt Speed 0-255 Channel Mode is”Extended 20-channel” can display
18CH. Color Wheel Speed 0-255
This interface is used to control the current luminaire and automatically enters the host state (does
not receive the DMX signal and sends a DMX signal
to the slave to the host).
The manual menu will display 16 channels or 20
channels according to the standard 16-channel or
extended 20-channel mode set in the setup menu.
ter into Edit status, the word is red, then press “UP”
“DOWN” to select, press “OK” save and Exit edit status.
“OK” again to enter the reset interface, all motor reset
P. 4
Tecshow Halo 80 LED -
English version
Page 5

19CH.Dimmer-Prism-Frost
Speed
20CH. Gobo Wheel Speed 0-255
Setting
0-255
(1)Yellow arrow
indicates selected
(2) Press “OK” key enter into
Edit status, the word is red,
then press “UP” “DOWN” to
select, press “OK” save and Exit
edit status.
Option Description
Run Mode DMX Slave status: Receive DMX signals from the console or
Master
AUTO 1 Auto run ;
AUTO 2 Master status: Auto run and send DMX signal to slave
Random
Sound
DMX Address 001-512 Press “OK” key enter into edit status, then press “UP”
“DOWN” to change DMX address. press “OK” key save and
exit edit status.
Channel Mode 16 CH Standard 16 Channel Mode, 17-20CH No Function
20 CH Extend 20 Channel Mode, 17-20CH for speed control (please
check the detail on Channel table.)
Invert Pan OFF ON for starting and ending , the default is OFF.
ON
Invert Tilt OFF ON for starting and ending , the default is OFF.
ON
Pan-Tilt Swap OFF
ON Exchange Pan/Tilt channel (include Pan/Tilt Fine)
Pan-Tilt Encoder ON Use encoder (optocoupler) to determine out of step and
automatically correct position
OFF Correct position without encoder (optocoupler)
DMX Signal KEEP Continue running as it is
CLEAR All motors return to the position and stop running.
English version
- Tecshow Halo 80 LED
P. 5
Page 6
Linear Color ON Color liner change
OFF Color nonlinear change, half color change
Load Default Press the “OK” button to see the conrmation dialog, press
“OK” again.
The key restores the default settings
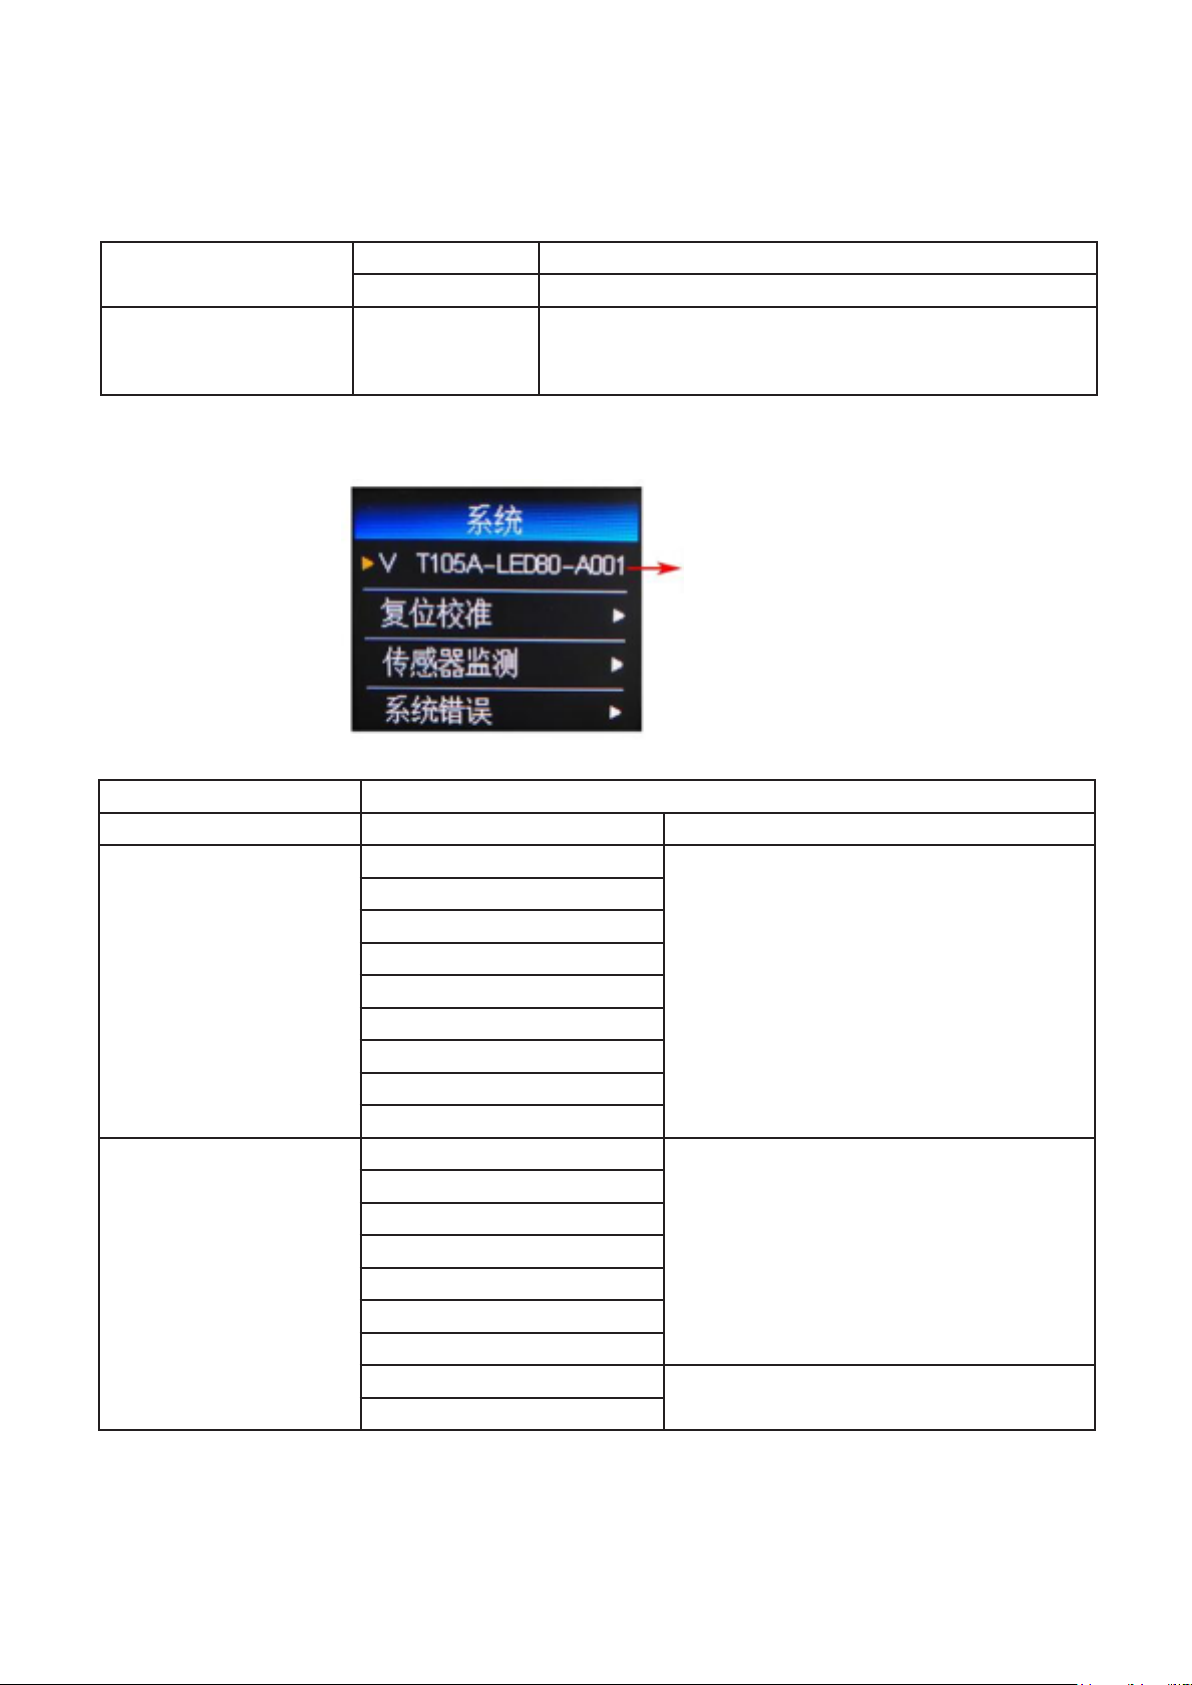
System
Version No.
Option Description
Version No.(V) Version No.
Reset Calibration Pan Calibration Aer entering the sub-interface, you can
Tilt Calibration
Color Calibration
Gobo Calibration
Focus Calibration
Prism1 Calibration
Prism2 Calibration
Rainbow Calibration
Frost Calibration
Sensor Monitor Pan Hall 0 when magnetic is detected, otherwise 1
Tilt Hall
Color Hall
Gobo Hall
Focus Hall
Prism1 Hall
Prism2 Hall
Panwheel State 2 digits, each corresponding to a photoelec-
Tiltwheel State
adjust the motor such as X-axis and Y-axis.
Reset position to compensate for errors in
hardware installation,
Adjustment range -128~+127, +0 means no
adjustment.
tric switch in the encoder disc
P. 6
Tecshow Halo 80 LED -
English version
Page 7
Panwheel Step When walking in the positive direction, the
Tiltwheel Step
step value should increase, when going back,
The step value should be reduced. The value
is the same every time you go to a certain
point.
System Error (See common mistakes Rear) If the red ERR indicator is lit, the luminaire is
running.
An error can be made by going to the sub-interface for details.
Aer viewing, you can press the “Clear” button to clear the error record.
DMX Monitor This enters the sub-interface and displays
the channel values as values for viewing.
Error Description
The driver board did not respond. Serial communication line connect-
MT board connection failed
ing display panel and driver board.
There is a problem, or there is a problem with the driver board.
Pan Reset failed X-axis photoelectric switch, or problem with X-axis motor
Tilt Reset failed Y-axis photoelectric switch, or problem with Y-axis motor
Pan Hall failed Pan Hall have problem
Tilt Hall failed Tilt Hall have problem
Color Wheel Reset failed Color Wheel Hall , or Color Wheel motor have problem
Gobo Wheel Reset failed Gobo Wheel Hall , or Gobo Wheel motor have problem
Focus Reset failed Focus Hall , or Focus motor have problem
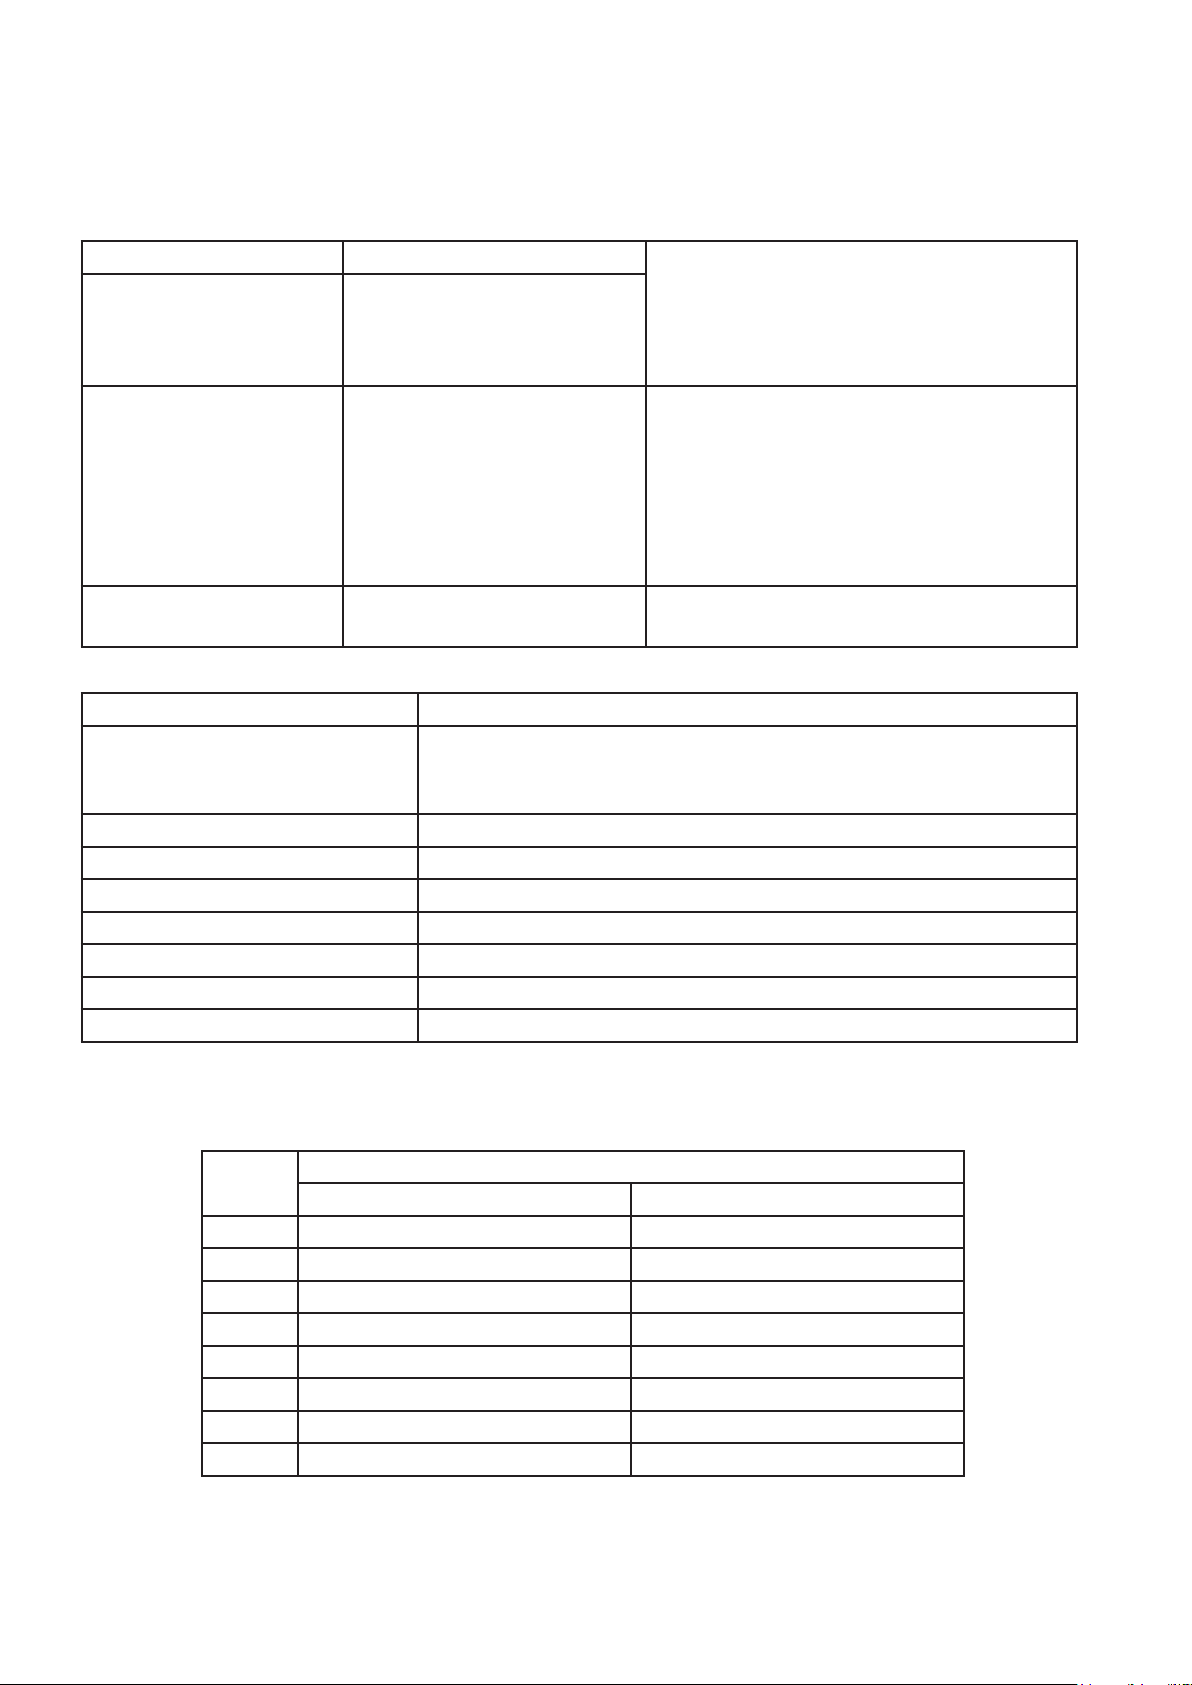
DMX Channel Table
CH Channel Mode
1 Pan Pan
2 Pan Fine Pan Fine
3 Tilt Tilt
4 Tilt Fine Tilt Fine
5 Dimmer Dimmer
6 Strobe/Shutter Strobe/Shutter
7 Color Wheel Color Wheel
8 Gobo Wheel Gobo Wheel
16CH 20CH
English Version
- Tecshow Halo 80 LED
P. 7
Page 8

9 Prism 1 Prism 1
10 Prism 1 Rotation Prism 1 Rotation
11 Prism 2 Prism 2
12 Prism 2 Rotation Prism 2 Rotation
13 Focus Focus
14 7-Color Eect 7-Color Eect
15 Frost Frost
16 Reset Reset
17 Pan/Tilt Speed
18 Color Wheel Speed
19 Dimmer-Prism-Frost Speed
20 Gobo Wheel Speed
16/20 DMX Channel Description
CH Function Value Eect
1 Pan 000-255 Pan 540 degree scan
2 Pan Fine 000-255 Pan 1.2 degree scan
3 Tilt 000-255 Tilt 270 degree scan
4 Tilt Fine 000-255 Tilt 1.2 degree scan
5 Dimmer 000-255 From dark to bright
6 Strobe
7 Color Wheel
000-003
004-251
252-255
000-004
005 -009
010 – 014
015 – 019
020 – 024
025 – 029
030 – 034
035 – 039
040 – 044
045 – 049
050 – 054
055 – 059
060 – 064
065 – 069
070 – 074
Strobe from slow to fast
ON→(control by dimmer channel)
OFF
White
White + Color1
Color 1
Color 1 + Color 2
Color 2
Color 2 + Color 3
Color 3
Color 3 + Color 4
Color 4
Color 4 + Color 5
Color 5
Color 5 + Color 6
Color 6
Color 6 + Color 7
Color 7
P. 8
Tecshow Halo 80 LED -
English version
Page 9

075 – 079
080 – 084
085 – 089
090 – 094
095 – 099
100 -104
105 -109
110 -114
115 -119
120 -124
125 -129
130 -134
135 -139
140 -200
201 - 255
000 – 004
005 – 009
010 – 014
015 – 019
020 – 024
025 – 029
030 – 034
035 – 039
040 – 044
045 – 049
050 – 054
055 – 059
8 Gobo Wheel
060 – 064
065 – 069
070 – 074
075 – 079
080 – 084
085 – 089
090 – 094
095 – 099
100 – 104
105 – 109
110 – 114
115 – 119
120 – 189
190 – 255
9 Prism 1 000-127
128-255
Color 7 + Color 8
Color 8
Color 8 + Color 9
Color 9
Color 9 + Color 10
Color 10
Color 10 + Color 11
Color 11
Color 11 + Color 12
Color 12
Color 12 + Color 13
Color 13
Color 13 + White
Positive ow (from fast to slow)
Reverse ow (from slow to fast)
Gobo 1
Gobo 2
Gobo 3
Gobo 4
Gobo 5
Gobo 6
Gobo 7
Gobo 8
Gobo 9
Gobo 10
Gobo 11
Gobo 12
Gobo 1 shake (from slow to fast)
Gobo 2 shake (from slow to fast)
Gobo 3 shake (from slow to fast)
Gobo 4 shake (from slow to fast)
Gobo 5 shake (from slow to fast)
Gobo 6 shake (from slow to fast)
Gobo 7 shake (from slow to fast)
Gobo 8 shake (from slow to fast)
Gobo 9 shake (from slow to fast)
Gobo 10 shake (from slow to fast)
Gobo 11 shake (from slow to fast)
Gobo 12 shake (from slow to fast)
Positive ow (from fast to slow)
Reverse ow (from slow to fast)
Prism 1 out
Prism 1 in
English Version
- Tecshow Halo 80 LED
P. 9
Page 10

10 Prism 1 Rotation
11 Prism 2
12 Prism 2 Rotation
000-127
128-190
191-192
193-255
000-127
128-255
000-127
128-190
191-192
193-255
Prism angle adjustment
Reverse rotation (from fast to slow)
Stop
Forward rotation (from slow to fast)
Prism 2 out
Prism 2 in
Prism angle adjustment
Reverse rotation (from fast to slow)
Stop
Forward rotation (from slow to fast)
13 Focus 000-255 Pattern denition from far to near
14 7-Color Eect
15 Frost
16 Reset
000-127
128-255
000-127
128-255
000-049
050-099
100-199
200-255
7-Color Eect out
7-Color Eect in
Frost out
Frost in
No Function
Small Motor Reset
Big Motor (Pan/Tilt) Reset
All Motor Reset
Extend Channel
17 Pan/Tilt Speed 000-255 Speed from fast to slow
18 Color Wheel
Speed
19 Dimmer-Prism-
Frost Speed
20 Gobo Wheel
Speed
4. SPECIAL INSTRUCTIONS
1. During the reset process, press and hold the 5
seconds “OK” button to interrupt the reset.
2. Press and hold the “OK” key during power-on
to interrupt the reset process and enter test
mode.
3. Set the DMX address to 512, return to the main
interface, press and hold the 10 seconds “OK”
P. 10
Tecshow Halo 80 LED -
English version
button to set the “display”.Or “hidden” the
LOGO.
4. Signal indicator:
• The ERR red indicator ashes to indicate
that there is an error message and enters
the “System Information” -> System Error”
view information.
Page 11

• DMX green indicator light, steady light indicates that the DMX signal is received, and
frequent o indicates no DMX signal.
• The green indicator on the motor drive
board ashes quickly at 1 second intervals,
indicating that it is received.The serial port
signal sent by the display board; if it ashes
slowly at 2 second intervals, it means no
string Port signal, the ashing of the light is
used to indicate that the system is running;
if the indicator light is always on or o, it
means There is a problem with the motor
drive board.
Design and product specications are subject to change without prior notice.
English Version
- Tecshow Halo 80 LED
P. 11
Page 12

1. DESCRIPCIÓN
HALO 80 LED
Cabezal móvil Beam– 1 x 80W White LED
Halo 80 LED es un compacto y potente cabezal
móvil beam que cuenta con 1 LED blanco de 80W,
de rendimiento equiparable a una lámpara 1R. Su
loso ángulo de haz de 2º se destaca naturalmente
en aplicaciones móviles de pequeña y mediana
escala. El equipo posee una rueda de 13 colores +
blanco + efecto arcoíris y una rueda independiente
de 6 colores + blanco que permite realizar gobos
en efecto arcoíris. Halo 80 LED tiene a su vez con
dos prismas independientes de 8 y 24 facetas que
pueden ser accionados de forma independiente
o conjunta, brindando de esta manera múltiples
opciones a la hora de una puesta en escena.
efecto arcoiris
• Gobos: 11 jos + blanco
• Gobo shake
• Filtro frost
• Prisma doble: rotativo de 8 facetas y de 24 facetas
• Foco linear ajustable de 0-100%
• Dimmer: Rango completo 0-100%
• Efecto estrobo sincronizado y random
• Función RDM avanzada
• Sistema de enfriamiento de alta eciencia,
control de temperatura, protección automáti-
ca de sobrecalentamiento
Control
• Canales DMX: 16/20
• Modos de operación: DMX, Master/Slave, Au-
tomático y audiorítmico
Fuente & Ópticas
• Fuente de luz: 1 LED blanco de 80W
• Vida útil promedio: 50,000 horas
• Ángulo de haz: 2º
• Temperatura de color: 7800K
Información fotométrica
• 2º Ángulo de haz: 100.000 Lux @ 5M (15 pies)
Efectos y Funciones
• Rueda de color: 13 colores + blanco y efecto
arcoíris
• Efecto de 7 colores: Rueda independiente de 6
colores + blanco que permite realizar gobos en
Movimiento
• Pan: 540°
• Tilt: 270°
• Resolución de 16-bit
• Reposicionamiento automático
Físico
• Conectores DMX: 2 conectores XLR (XLR-3 de
entrada & salida)
• Conectores de alimentación: PowerCON®
Entrada/Salida
• Display LCD
• Dimensiones: 280x215x510 mm. / 11x8.5x20.1
pulg.
• Peso: 11.9 Kg. / 26.2 Lbs
P. 12
Tecshow Halo 80 LED -
Versión Español
Page 13

2. INSTRUCCIONES DE SEGURIDAD
Advertencia Para reducir el riesgo de descarga
eléctrica o incendio, mantenga la unidad alejada de
la lluvia y la humedad excesiva.
Precaución El equipo no contiene piezas que
puedan ser reparadas por el usuario. No intente desarmar o reparar el equipo por su cuenta. Las repa-
raciones no autorizadas por el fabricante anularán
la garantía. En caso de precisar asistencia, póngase
en contacto con el servicio técnico autorizado.
• Conserve este manual para futuras referencias.
En caso de vender la unidad, procure entregar
este manual al comprador.
• Abra el embalaje con cuidado y revise que el
equipo se encuentre en buen estado antes de
utilizarlo.
• Compruebe que la frecuencia y el voltaje
utilizados no sean superiores o inferiores a los
indicados en el presente manual.
• Procure la conexión a tierra del equipo para
evitar el riesgo de descarga eléctrica.
• Este equipo se diseñó para uso en interiores.
Manténgalo alejado de ambientes con humedad excesiva.
• Instale el equipo en ambientes con ventilación
adecuada y mantenga una distancia mínima de
50 cm con otros objetos o supercies. Procure
no obstruir las ranuras de ventilación del equipo.
• Desconecte el equipo del suministro eléctrico
antes de realizar cualquier tarea de mantenimiento.
• Mantenga el equipo alejado de llamas vivas o
materiales inamables.
• En caso de instalar el equipo en altura, procure
utilizar un cable de seguridad. Para trasladar la
unidad, sujétela siempre de la base, nunca del
cable o de las piezas móviles.
• Temperatura ambiente máxima: 40º C. No utilice el equipo si la temperatura es superior.
• Cuando el equipo está en funcionamiento, la
cubierta puede alcanzar los 85°. No toque la
cubierta sin guantes protectores. Luego de
apagar la unidad, aguarde 15 minutos antes de
realizar cualquier tarea de mantenimiento.
• Desconecte el equipo de inmediato si observa
un problema grave de funcionamiento. El equipo no contiene piezas que puedan ser reparadas por el usuario. Las reparaciones llevadas a
cabo por personal inexperto pueden ocasionar
daños irreparables en el equipo. En caso de
precisar asistencia, póngase en contacto con
el servicio técnico autorizado. Utilice siempre
piezas de repuesto del mismo tipo.
• Para reducir el riesgo de descarga eléctrica,
evite entrar en contacto con los cables cuando
esté en funcionamiento el equipo.
Advertencia
• Para reducir el riesgo de descarga eléctrica o
incendio, mantenga la unidad alejada de la lluvia
y la humedad excesiva.
• Una vez apagada la unidad, aguarde al menos
cinco minutos antes de abrirla.
• Sustituya la cubierta, el lente o el ltro UV en
caso de que se encuentren rayados o dañados.
Precaución
El equipo no contiene piezas que puedan ser reparadas por el usuario. No intente desarmar o reparar
el equipo por su cuenta. En caso de precisar asistencia, póngase en contacto con el servicio técnico
autorizado.
• Si utiliza una fuente de alimentación de 230V,
50Hz, no conecte más de 11 equipos en serie.
Procure utilizar otra fuente de alimentación si
debe conectar más equipos.
• Si utiliza una fuente de alimentación de 120V,
60Hz, no conecte más de 5 equipos en serie.
Versión Español
- Tecshow Halo 80 LED
P. 13
Page 14

Procure utilizar otra fuente de alimentación si
debe conectar más equipos.
Instalación
• Utilice los oricios para tornillos de la abrazadera cuando precise realizar el montaje del
equipo. Asegúrese de instalar rmemente el
equipo para evitar vibraciones y deslizamientos
durante su funcionamiento. Compruebe que
la estructura, donde instalará el equipo, sea
segura y pueda soportar diez veces el peso de
la unidad. Siempre utilice un cable de seguridad que pueda soportar doce veces el peso de
la unidad.
• Un profesional calicado debe realizar la insta-
lación del equipo en una zona fuera del alcance
de las personas. Nunca se ubique directamente
debajo del equipo durante la instalación, desinstalación o reparación del equipo.
3. MENÚ
Interfaz principal Subinterface
Idioma chino/
inglés
Rotación de
pantalla 180º
Manual Control
(1)Yellow ar-
row indicates
selected
Dirección
DMX
(2) Press “OK” key enter into Edit
status, the word is red, then press
“UP” “DOWN” to select, press “OK”
save and Exit edit status.
Control
manual
1CH. Pan 0-255 La echa amarilla señala la selección. Presione OK para
15CH. Frost 0-255
Conguración Información
del sistema
Menú Descripción
…… 0-255
Utilice esta interfaz para controlar la salida de luz
del equipo y acceder automáticamente al estado
maestro (no recibe señal DMX, pero la envía al equi-
po esclavo).
El menú manual cuenta con 16 o 20 canales según
el modo de canales seleccionado en el menú de
conguración.
editar. El valor se verá en rojo. Utilice UP o DOWN para
congurar y OK para guardar y salir.
P. 14
Tecshow Halo 80 LED -
Versión Español
Page 15

16CH. Reset Presione OK para ver el cuadro de diálogo de conr-
mación. Presione OK nuevamente para restablecer
todos los motores.
17CH. Pan/Tilt Speed 0-255 Modo de 20 canales extendidos.
18CH. Color Wheel Speed 0-255
19CH.Dimmer-Prism-Frost
0-255
Speed
20CH. Gobo Wheel Speed 0-255
Interfaz secundaria
(1) La echa
amarilla señala la
selección
(2) Presione OK para editar. El
valor se verá en rojo. Utilice UP
o DOWN para congurar y OK
para guardar y salir.
Menú Descripción
Run Mode DMX Modo esclavo: Recibe la señal DMX de la consola o un equipo
maestro.
AUTO 1 Ejecución automática
AUTO 2 Modo maestro: Ejecución automática y envío de señal DMX a
Random
equipos esclavos.
Sound
DMX Address 001-512 Presione OK para editar. Utilice UP o DOWN para seleccionar una
dirección DMX. Presione OK para guardar y salir.
Channel Mode 16 CH Modo estándar de 16 canales. Modos 17-20 canales sin función.
20 CH Modo extendido de 20 canales. Modos 17-20 canales para control
de velocidad (más información en el cuadro de canales DMX).
Invert Pan OFF Valor predeterminado: OFF. Utilice ON para iniciar y nalizar.
ON
Invert Tilt OFF Valor predeterminado: OFF. Utilice ON para iniciar y nalizar.
ON
Pan-Tilt Swap OFF
ON ntercambie los canales pan/tilt (incluye pan/tilt nos).
Pan-Tilt Encoder ON Utilice el codicador (optoacoplador) para determinar la posición
fuera de paso y corregirla.
OFF Corrija la posición sin usar el codicador (optoacoplador).
Versión Español
- Tecshow Halo 80 LED
P. 15
Page 16

DMX Signal KEEP Mantener el modo de ejecución actual
CLEAR Todos los motores vuelven a su posición inicial y se detendrán.
Linear Color ON Cambio de color lineal.
OFF Cambio de color no lineal, cambio de medio color.
Load Default Presione OK para ver el cuadro de diálogo de conrmación.
Presione OK nuevamente.
Esta opción restablece los valores predeterminados.
Información del sistema
Número de
versión
Menú Descripción
Version No.(V) Número de versión
Reset Calibration Pan Calibration En la interfaz secundaria, regule los motores
Tilt Calibration
Color Calibration
Gobo Calibration
Focus Calibration
de los ejes X e Y.
Restablezca posiciones para compensar
errores en la instalación del hardware.
Rango de ajuste -128~+127. +0 signica sin
conguración.
Prism1 Calibration
Prism2 Calibration
Rainbow Calibration
Frost Calibration
Sensor Monitor Pan Hall Valor 0 cuando se detecta el magnetismo. De
Tilt Hall
lo contrario el valor es 1.
Color Hall
Gobo Hall
Focus Hall
Prism1 Hall
Prism2 Hall
Panwheel State El usuario verá 2 dígitos, cada uno co-
Tiltwheel State
rrespondiente a un interruptor fotoeléctrico
del disco codicador.
P. 16
Tecshow Halo 80 LED -
Versión Español
Page 17

Panwheel Step En la dirección correcta, el valor del paso
Tiltwheel Step
incrementará. En la dirección opuesta,
el valor del paso disminuirá.
System Error (See common mistakes Rear) Si se enciende el indicador rojo ERR, el equi-
po está en funcionamiento.
Para ver más información del error, acceda a
la interfaz secundaria.
Cuando nalice, presione el botón CLEAR
para limpiar el registro de errores.
DMX Monitor Acceda a la interfaz secundaria y visualice los
valores del canal.
Error Descripción
La placa del controlador no responde. Hay un problema con la línea
MT board connection failed
de comunicación que conecta el panel de visualización y la placa del
controlador. De lo contrario el problema la placa del controlador.
Pan Reset failed Hay un problema con el motor o el interruptor fotoeléctrico del eje X.
Tilt Reset failed Hay un problema con el motor o el interruptor fotoeléctrico del eje Y.
Pan Hall failed Hay un problema con el pan.
Tilt Hall failed Hay un problema con el tilt.
Color Wheel Reset failed Hay un problema con la rueda de color o su motor.
Gobo Wheel Reset failed Hay un problema con la rueda de gobo o su motor.
Focus Reset failed Hay un problema con el foco o su motor.
Cuadro de canales DMX
Canal Modo
1 Pan Pan
2 Pan Fino Pan Fino
3 Tilt Tilt
4 Tilt Fino Tilt Fino
5 Dimmer Dimmer
6 Strobo/Shutter Strobo/Shutter
7 Rueda de color Rueda de color
8 Rueda de gobos Rueda de gobos
16CH 20CH
Versión Español
- Tecshow Halo 80 LED
P. 17
Page 18

9 Prisma 1 Prisma 1
10 Rotación del prisma 1 Rotación del prisma 1
11 Prisma 2 Prisma 2
12 Rotación del prisma 2 Rotación del prisma 2
13 Foco Foco
14 Efecto de 7 colores Efecto de 7 colores
15 Frost Frost
16 Restablecer Restablecer
17 Velocidad de pan/tilt
18 Velocidad de la rueda de color
19 Velocidad de dimmer/prisma/frost
20 Velocidad de la rueda de gobos
Descripción de los canales DMX
Canal Función Valor Descripción
1 Pan 000-255 Scan de pan de 540º
2 Pan Fino 000-255 Scan de pan de 1,2º
3 Tilt 000-255 Scan de Tilt de 270º
4 Tilt Fino 000-255 can de Tilt de 1,2º
5 Dimmer 000-255 De oscuro a brillante
6 Estrobo
7 Rueda de color
000-003
004-251
252-255
000-004
005 -009
010 – 014
015 – 019
020 – 024
025 – 029
030 – 034
035 – 039
040 – 044
045 – 049
050 – 054
055 – 059
060 – 064
065 – 069
070 – 074
Estrobo velocidad creciente
Encendido (control con el canal de dimmer)
Apagado
Blanco
Blanco + color 1
Color 1
Color 1 + color 2
Color 2
Color 2 + color 3
Color 3
Color 3 + color 4
Color 4
Color 4 + color 5
Color 5
Color 5 + color 6
Color 6
Color 6 + color 7
Color 7
P. 18
Tecshow Halo 80 LED -
Versión Español
Page 19

075 – 079
080 – 084
085 – 089
090 – 094
095 – 099
100 -104
105 -109
110 -114
115 -119
120 -124
125 -129
130 -134
135 -139
140 -200
201 - 255
000 – 004
005 – 009
010 – 014
015 – 019
020 – 024
025 – 029
030 – 034
035 – 039
040 – 044
045 – 049
050 – 054
055 – 059
8 Rueda de gobos
060 – 064
065 – 069
070 – 074
075 – 079
080 – 084
085 – 089
090 – 094
095 – 099
100 – 104
105 – 109
110 – 114
115 – 119
120 – 189
190 – 255
9 Prisma 1 000-127
128-255
Color 7 + color 8
Color 8
Color 8 + color 9
Color 9
Color 9 + color 10
Color 10
Color 10 + color 11
Color 11
Color 11 + color 12
Color 12
Color 12 + color 13
Color 13
Color 13 + blanco
Flujo positivo (velocidad decreciente)
Flujo invertido (velocidad creciente)
Gobo 1
Gobo 2
Gobo 3
Gobo 4
Gobo 5
Gobo 6
Gobo 7
Gobo 8
Gobo 9
Gobo 10
Gobo 11
Gobo 12
Movimiento de gobo 1 (velocidad creciente)
Movimiento de gobo 2 (velocidad creciente)
Movimiento de gobo 3 (velocidad creciente)
Movimiento de gobo 4 (velocidad creciente)
Movimiento de gobo 5 (velocidad creciente)
Movimiento de gobo 6 (velocidad creciente)
Movimiento de gobo 7 (velocidad creciente)
Movimiento de gobo 8 (velocidad creciente)
Movimiento de gobo 9 (velocidad creciente)
Movimiento de gobo 10 (velocidad creciente)
Movimiento de gobo 11 (velocidad creciente)
Movimiento de gobo 12 (velocidad creciente)
Flujo positivo (velocidad decreciente)
Flujo invertido (velocidad creciente)
Prisma 1 afuera
Prisma 1 adentro
Versión Español
- Tecshow Halo 80 LED
P. 19
Page 20

10 Rotación del
prisma 1
11 Prisma 2
12 Rotación del
prisma 2
000-127
128-190
191-192
193-255
000-127
128-255
000-127
128-190
191-192
193-255
Rotación hacia atrás (velocidad decreciente)
Rotación hacia adelante (velocidad creciente)
Rotación hacia atrás (velocidad decreciente)
Rotación hacia adelante (velocidad creciente)
Ajusta de ángulo de prisma
Detención
Prisma 2 afuera
Prisma 2 adentro
Ajusta de ángulo de prisma
Detención
13 Foco 000-255 Denición de patrón de lejos a cerca
14 Efecto de 7
colores
15 Frost
16 Restablecer
000-127
128-255
000-127
128-255
000-049
050-099
100-199
200-255
Efecto de 7 colores afuera
Efecto de 7 colores adentro
Frost afuera
Frost adentro
Sin función
Restablecer motores pequeños
Restablecer motores grandes (pan/tilt)
Restablecer todos los motores
Canal extendido
17 Velocidad de pan/
000-255 Velocidad decreciente
tilt
18 Velocidad de la
rueda de color
19 Velocidad de dim-
mer/prisma/frost
20 Velocidad de la
rueda de gobos
4. OBSERVACIONES
• Si desea detener el restablecimiento de
motores, mantenga presionado el botón
OK durante cinco segundos.
• Presione el botón OK durante el encendido
del equipo para interrumpir el restableci-
P. 20
Tecshow Halo 80 LED -
Versión Español
miento de motores y acceder al modo de
prueba.
• Congure la dirección DMX en 512, regrese
a la interfaz principal, mantenga presionado el botón OK durante diez segundos para
Page 21

congurar la pantalla u ocultar el logo.
• Indicador de señal:
• El indicador rojo ERR titilará para indicar
que hay un mensaje de error. Para obtener
más información, acceda a SYSTEM INFORMATION/SYSTEM ERROR.
• El indicador verde DMX se iluminará para
indicar que se está recibiendo señal DMX.
De lo contrario, permanecerá apagado.
• El indicador verde en la placa del controlador del motor titilará velozmente en intervalos de un segundo para indicar que se
recibió la señal del puerto de serie. Si titila
lentamente en intervalos de dos segundos,
indica que no hay señal de puerto. La luz
titila para señalar que el sistema está en
ejecución. Si la luz está siempre encendida
o apagada, hay un problema en la placa del
controlador del motor.
El proveedor no asumirá responsabilidad por los errores u omisiones del manual. La información de
este manual está sujeta a cambios sin previo aviso.
Versión Español
- Tecshow Halo 80 LED
P. 21
Page 22

P. 2 2
Tecshow Halo 80 LED -
tecshow.amproweb.com
 Loading...