

Page 1
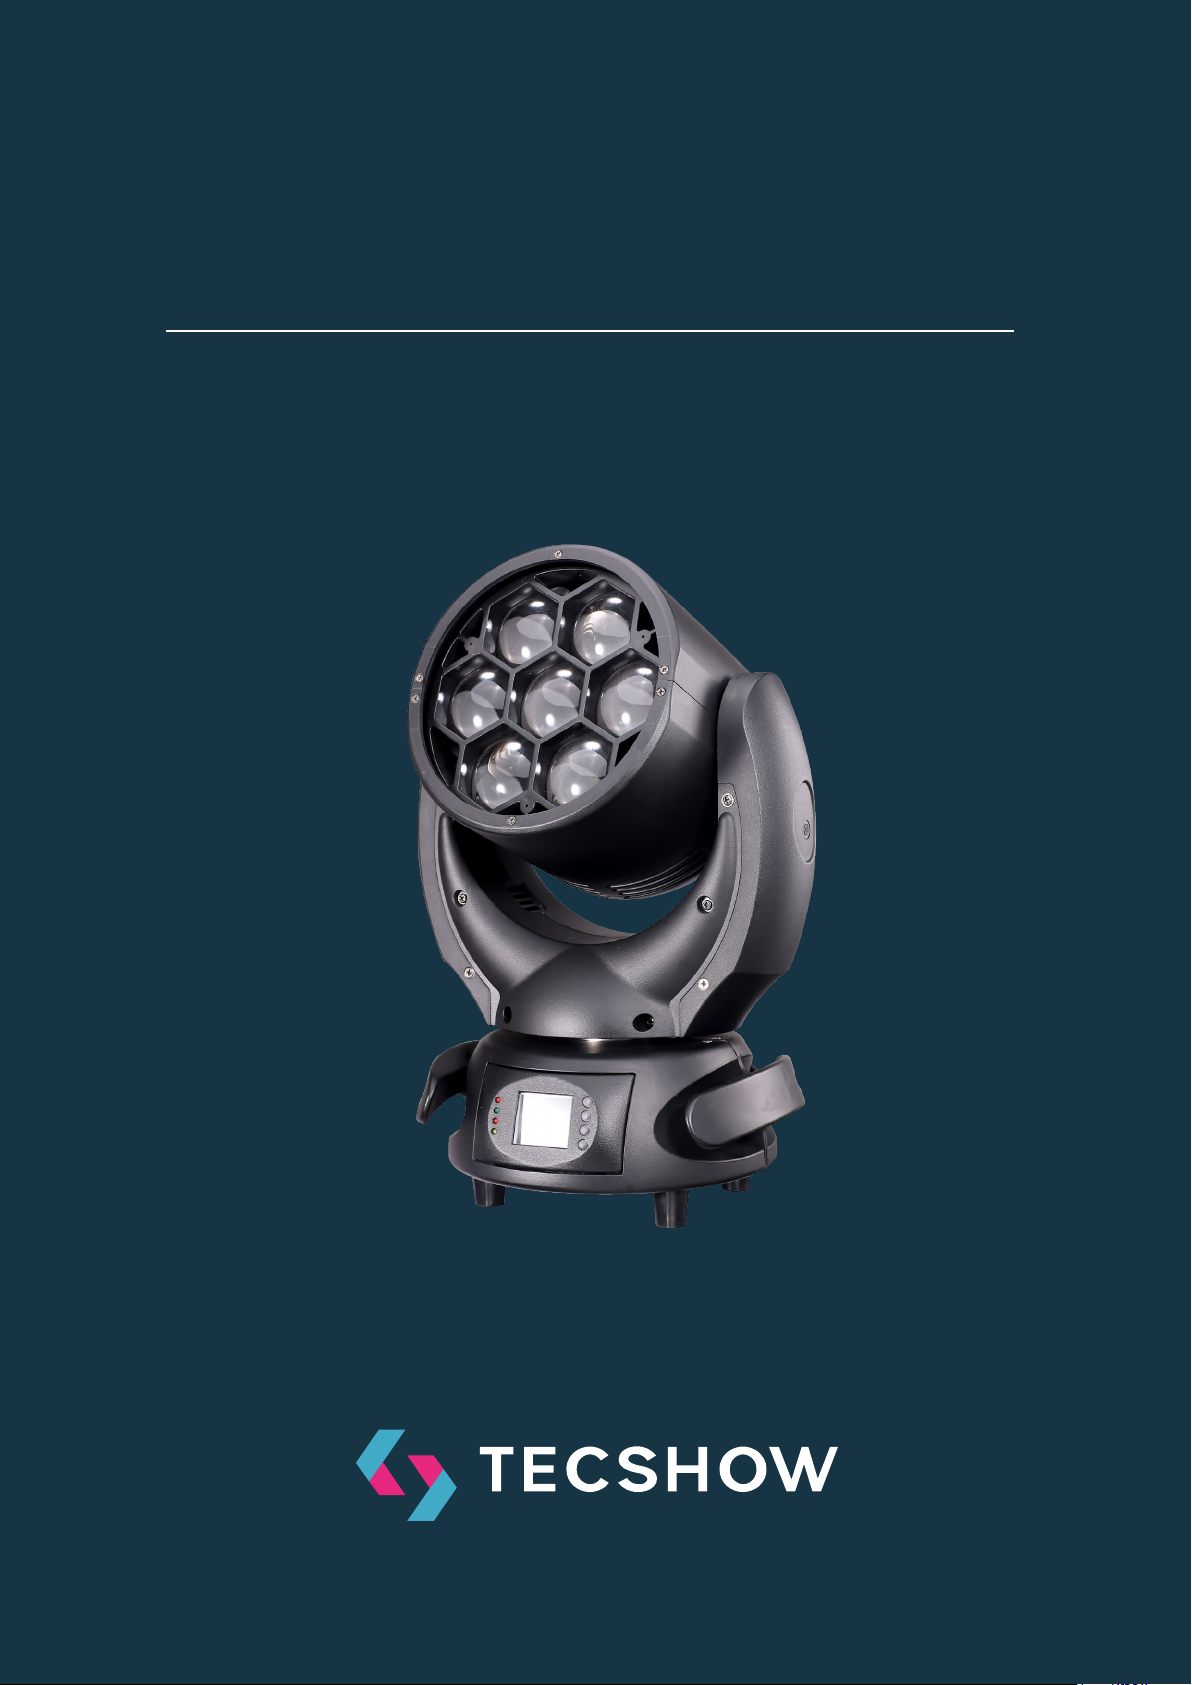
HALO 740 XL
Wash moving head
USER MANUAL/MANUAL DE USUARIO
PLEASE READ THE INSTRUCTIONS CAREFULLY BEFORE USE
POR FAVOR LEA LAS INSTRUCCIÓNES ANTES DE USAR
- Tecshow Halo 740 XL
P. 1
Page 2

1. OVERVIEW
HALO 740XL
Verstile moving head - 7 x 40W 4-in-1 LEDs
Control
Halo 740XL is a versatile and compact moving head
that sports 7 x 40W 4-in-1 LEDs and a zoom function
to have a variable 5º-70º beam angle. Thanks to its
compact and lightweight design, the equipment is
ideal for mobile applications of small and medium
scale. With its four-color LED technology Halo 740XL
achieves a smooth RGBW mix without multicolor
shadows, being the user able to vary its color temperature via DMX
Source & Optics
• Light Source: 7 x 40W 4-en-1 LEDs
• LEDs life: 50,000 horas
• Beam angle: 5º-70º Zoom
Photometric data
• 5º beam angle: 28.560 Lux @ 3M (10 .)
• 70º beam angle: 1.260 Lux @ 3M (10 .)
• DMX Channels: 11/15/14
• Operation modes: DMX, Master/Slave, Auto
and Sound/Active
Movement
• Pan: 540°
• Tilt: 220°
• 16-bit resolution
• Automatic repositioning
Physical
• DMX connectors: 2 XLR (XLR-3 in & out)
• Power supply: PowerCON® In/Out
• LCD display
• Dimensions: 310x226x412 mm. / 12.2x8.9x16.2
in.
• Weight: 10.6 Kg. / 23.4 Lbs
Eects & Functions
• Dimmer: Full range 0-100%
• Strobe eect
• 4-in-1 LED technology: Smooth RGBW mix
• Vivid, saturated and uniformed colors
• Adjustable color temperature
• LEE® lters color selector
P. 2
Tecshow Halo 740 XL - English version
Page 3

2. SAFETY INSTRUCTIONS
Warning Please read the instruction carefully
which includes important information about the
installation, usage and maintenance.
• Please keep this User Manual for future consultation. If you sell the unit to another user,
be sure that they also receive this instruction
booklet.
• Unpack and check carefully there is no transportation damage before using the unit.
• Before operating, ensure that the voltage and
frequency of power supply match the power
requirements of the unit.
• It’s important to ground the yellow/green conductor to earth in order to avoid electric shock.
• The unit is for indoor use only. Use only in a dry
location.
• The unit must be installed in a location with adequate ventilation, at least 50cm from adjacent
surfaces. Be sure that no ventilation slots are
blocked.
• Disconnect main power before replacement or
servicing.
• Make sure there are no ammable materials
close to the unit while operating as it is re
hazard.
• Use safety cables when xing this unit. DO NOT
handle the unit by its head only, always carry by
its base.
• Maximum ambient temperature is Ta: 40 degrees C. DO NOT operate it where the temperature is higher than this.
• Unit surface temperature may reach up to 75
degrees C. DO NOT touch the housing with
bare-hands during its operation. Turn o the
power and allow about 15 minutes for the unit
to cool down before replacing or serving.
• In the event of a serious operating problem,
stop using the unit immediately. Never try to
repair the unit by yourself. Repairs carried out
by unskilled people can lead to damage or malfunction. Please contact the nearest authorized
technical assistance center. Always use the
same type spare parts.
• Do not touch any wire during operation as high
voltage may cause electric shock.
Warning
• To prevent or reduce the risk of electrical shock
or re, do not expose the unit to rain or moisture.
• The housing and lenses must be replaced if
they are visibly damaged.
Caution
There are no user serviceable parts inside the unit.
Do not open the housing or attempt any repairs
yourself. In the unlikely event your unit may require
service, please contact your nearest dealer.
Installation
The xture should be mounted via its Omega Quick
Release Clamp bracket. Always ensure that the
unit is rmly xed to avoid vibration and slipping
while operating and make sure that the structure
to which you are attaching the unit is secure and is
able to support a weight of 10 times of the xtures
weight. Always use a safety cable that can hold 12
times of the weight of the xture when installing.
The equipment must be installed by professionals.
It must be installed in a place where is out of the
reach of people and no one can pass by or under it.
- Tecshow Halo 740 XLEnglish version
P. 3
Page 4

3. HOW TO SET THE UNIT
Control
1. Display Shows the various menus and the selected functions.
2. LED
POWER On Power On
DMX On DMX input
present
3. Button
Menu To select the programming functions
▼ Down
▲ Up
Enter To conrm the selected functions
4. DMX input DMX512 link, use 5-pin XLR cable to
link the unit and DMX controller
5. DMX input DMX512 link, use 3-pin XLR cable to
link the unit and DMX controller
6. DMX output DMX512 link, use 5-pin XLR cable to
link the next unit
7. DMX output DMX512 link, use 3-pin XLR cable to
link the next unit
8. Mains input Connects to power supply
9. Mains output Connects to next xture 10. Fuse
To go backward in the selected
functions
To go forward in the selected
functions
(T 6.3A): Protects the unit from over-voltage or short
circuit
Main Function
To select any of the given functions, press the MENU
button until the required function is showing on the
display. Select the function by pressing the ENTER
button and the display will blink. Use the DOWN/
UP buttons to change the mode. Once the required
mode has been selected, press the ENTER button
to setup, to go back to the functions without any
change press the MENU button again. Press and
hold the MENU button for about one second or wait
for one minute to exit the menu mode.
The main functions are shown overleaf (next page):
P. 4
Tecshow Halo 740 XL -
English version
Page 5
English version
- Tecshow Halo 740 XL
P. 5
Page 6

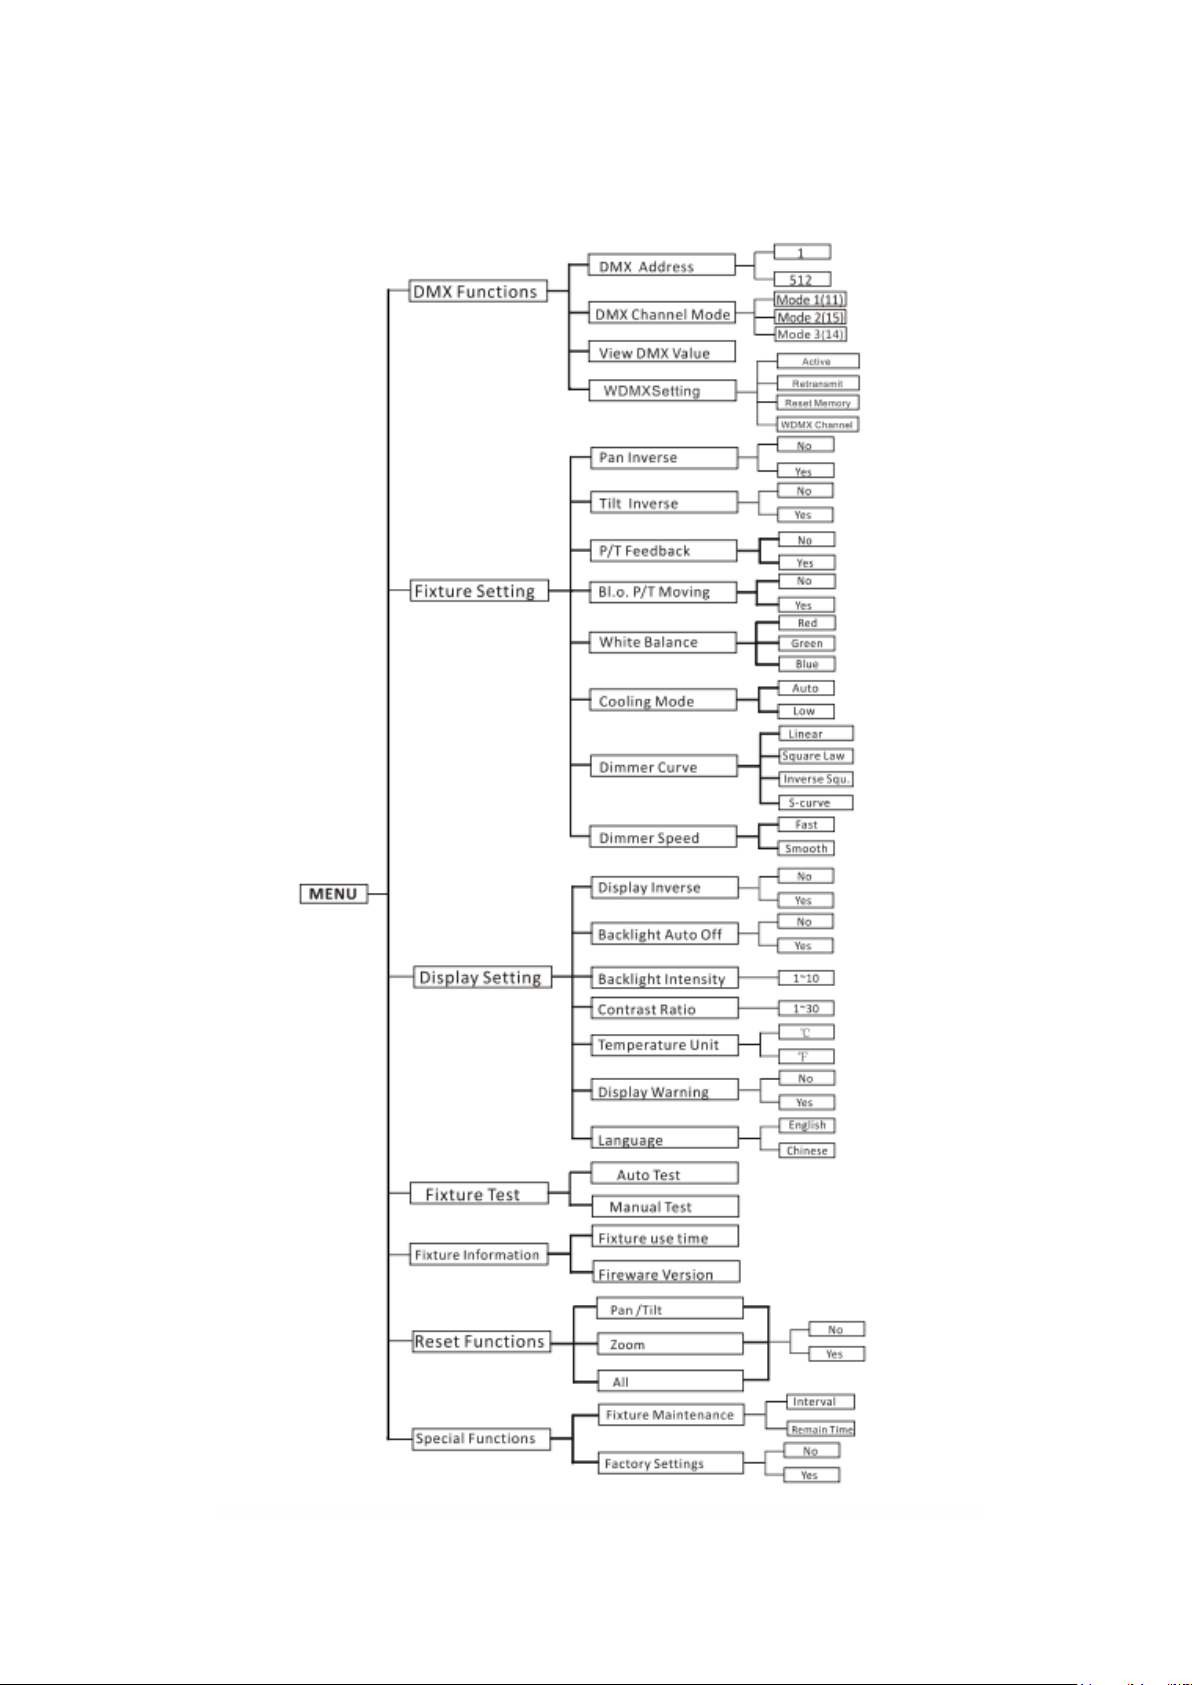
DMX Functions
Enter MENU mode, select DMX Functions, press the
ENTER button to conrm, use the UP/DOWN button
to select DMX Address, DMX Channel Mode, View
DMX Value or WDMX Setting.
DMX Address
To select DMX Address, press the ENTER button to
show the DMX ADDRESS on the display. Use the UP/
DOWN button to adjust the address from 001 to 512,
press the ENTER button to setup. Press the MENU
button back to the last menu or let the unit idle one
minute to exit menu mode.
DMX Channel Mode
To select DMX Channel Mode, press the ENTER button to show the DMX CHANNEL MODE on the display.
Use the UP/DOWN button to select Mode 1(11) ,Mode
2(15) or Mode 3 (14), press the ENTER button to set-
up. Press the MENU button back to the last menu or
let the unit idle one minute to exit menu mode.
View DMX Value
To select View DMX Value, press the ENTER button
to show the VIEW DMX VALUE on the display. Use the
UP/DOWN button to view the DMX channel values.
Press the MENU button back to the last menu or let
the unit idle one minute to exit menu mode.
WDMX Setting
To select WDMX Setting, press the ENTER button to
show the WDMX SETTING on the display. Use the UP/
DOWN button to select Active, Retransmit, Reset
Memory orWDMX Setting, press the ENTER button to
setup. Press the MENU button back to the last menu
or let the unit idle one minute to exit menu mode.
Fixture Setting
Enter MENU mode, select Fixture Setting, press the
ENTER button to conrm, use the UP/DOWN button
to select Pan Inverse, Tile Inverse, P/T Feedback,
BL.O. P/T Moving, White Balance, Cooling Mode,
Dimmer Curve or Dimmer Speed.
Pan Inverse
To select Pan Inverse, press the ENTER button to
show the PAN INVERSE on the display. Use the UP/
DOWN button to select No (normal) or Yes (pan inverse), press the ENTER button to setup. Press the
MENU button back to the last menu or let the unit
idle one minute to exit menu mode.
Tilt Inverse
To select Tilt Inverse, press the ENTER button to
show the TILT INVERSE on the display. Use the UP/
DOWN button to select No (normal) or Yes (tilt inverse), press the ENTER button to setup. Press the
MENU button back to the last menu or let the unit
idle one minute to exit menu mode.
P/T Feedback
To select P/T Feedback, press the ENTER button to
show the PAN/TILT FEEDBACK on the display. Use the
UP/DOWN button to select No (Pan or tilt’s position
will not feedback while out of step) or Yes (Feedback
while pan/tilt out of step), press the ENTER button to
setup. Press the MENU button back to the last menu
or let the unit idle one minute to exit menu mode.
BL.O. P/T Moving
To select BL.O. P/T Moving, press the ENTER button
to show the BLACKOUT WHILE PAN/TILT MOVING
on the display, use the UP/DOWN button to select
No (normal while pan/tilt moving) or Yes (blackout
while pan/tilt moving), press the ENTER button to
setup. Press the MENU button back to the last menu
or let the unit idle one minute to exit menu mode.
White Balance
To select White Balance, press the ENTER button to
show the WHITE BALANCE on the display, use the
UP/DOWN button to select Red, Green or Blue. Once
selected, press the ENTER button to conrm, and
use the UP/DOWN button to adjust the value from
125 to 255, press the ENTER button to setup. Press
the MENU button back to the last menu or let the
unit idle one minute to exit menu mode.
P. 6
Tecshow Halo 740 XL -
English version
Page 7
Cooling Mode
To select Cooling Mode, press the ENTER button to
show the COOLING MODE on the display. Use the UP/
DOWN button to select Auto (Normal) or Low (Low
speed). Once selected, press the ENTER button to
setup. Press the MENU button back to the last menu
or let the unit idle one minute to exit menu mode.
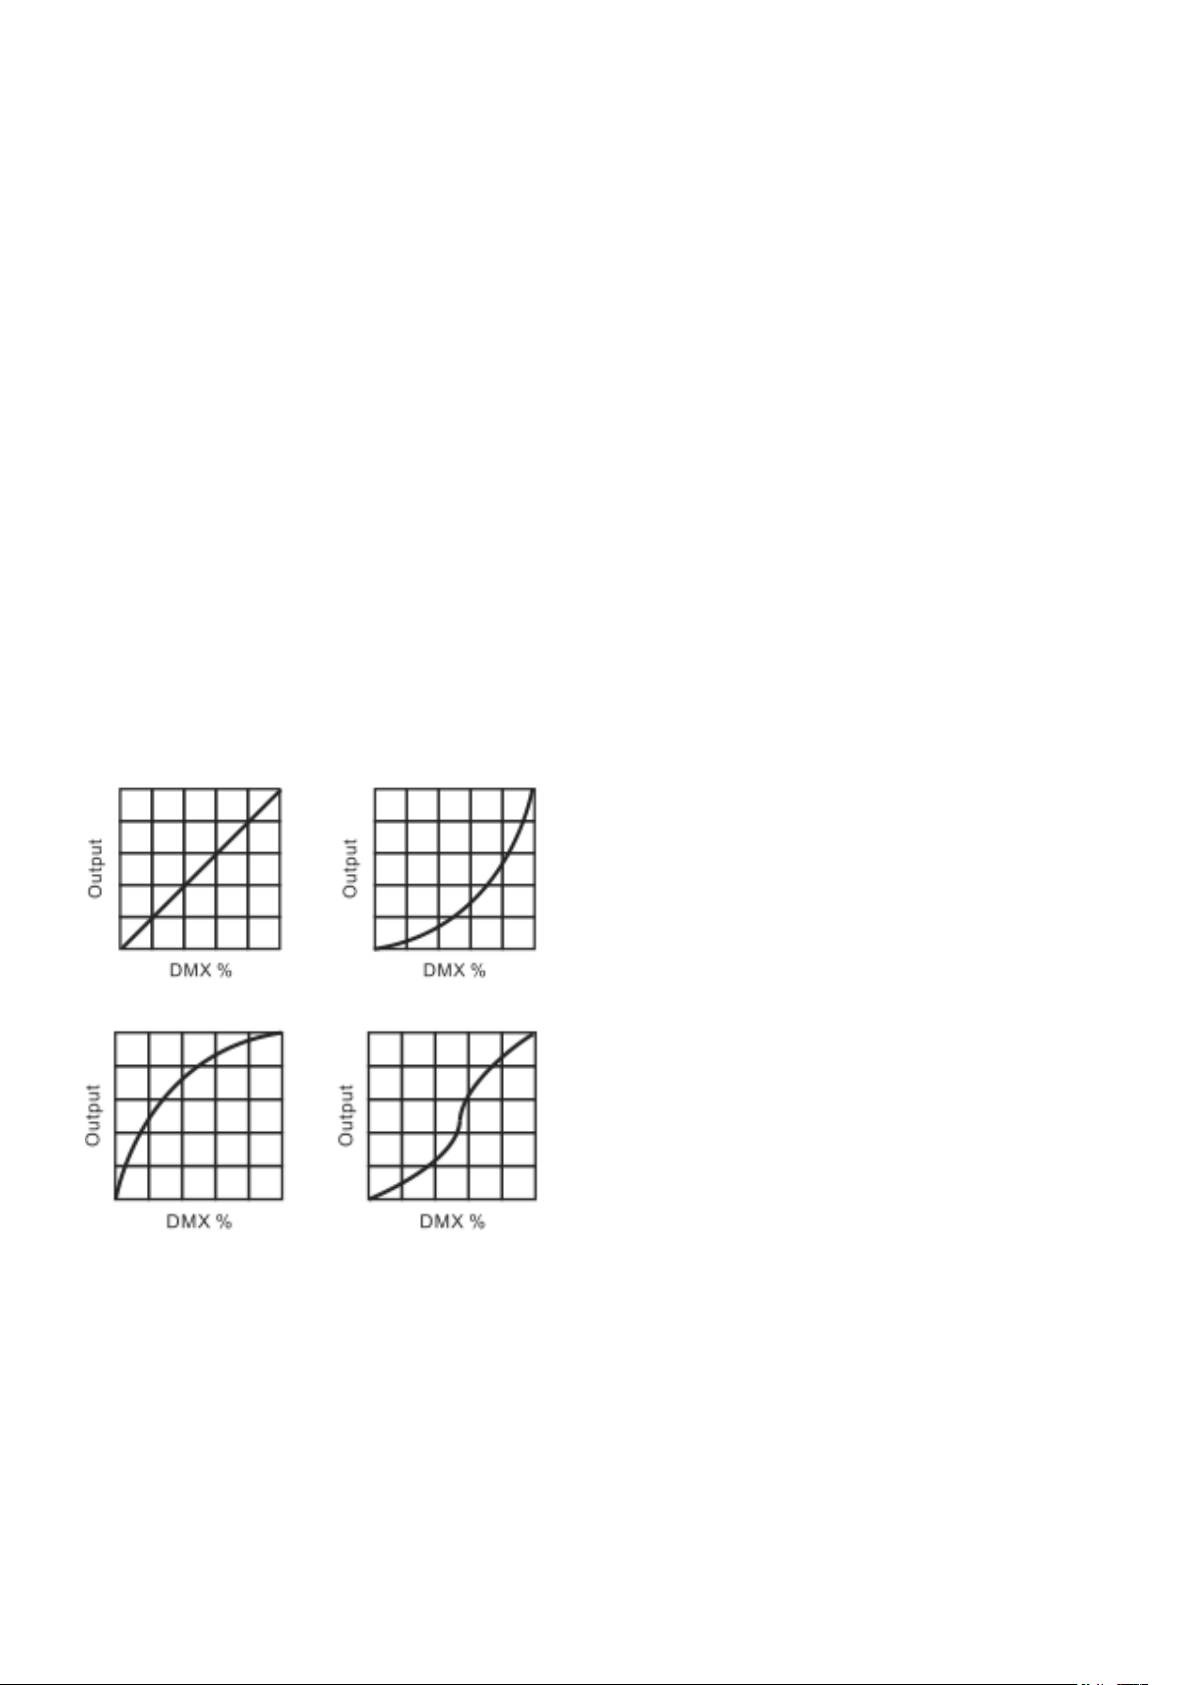
Dimmer Curve
To select Dimmer Curve, press the ENTER button
to show the DIMMER CURVE on the display, use the
UP/DOWN button to select Linear, Square Law, Inverse Squ. or S-curve. Once selected, press the ENTER button to store. Press the MENU button back to
the last menu or let the unit idle one minute to exit
menu mode.
els and coarser at medium levels.
Dimmer Speed
To select Dimmer Speed, press the ENTER button
to show the DIMMER SPEED on the display. Use the
UP/DOWN button to select Fast or Smooth. Once selected, press the ENTER button to setup. Press the
MENU button back to the last menu or let the unit
idle one minute to exit menu mode.
Display Setting
Enter MENU mode, select Display Setting, press the
ENTER button to conrm, use the UP/DOWN button
to select Display Inverse, Backlight Auto O, Back-
light Intensity, Constrast Ratio ,Temperature unit,
Display Warning or Language.
Dimmer Modes
Optically Linear Square Law
Inverse Square Law S-curve
Linear The increase in light intensity appears to be
linear as DMX value is increased.
Square Law Light intensity control is ner at low
levels and coarser at high levels.
Inverse Square Law Light intensity control is coars-
er at low levels and nger at high levels. S-cure Light
intensity control is nger at low levels and high lev-
Display Inverse
To select Display Inverse, press the ENTER button to
show the DISPLAY INVERSE on the display. Use the
UP/DOWN button to select No (normal) or Yes (display inverse). Once selected, press the ENTER but-
ton to store. Press the MENU button back to the last
menu or let the unit idle one minute to exit menu
mode.
Backlight Auto O
To select Backlight Auto O, press the ENTER button
to show the BACKLIGHT AUTO OFF on the display.
Use the UP/DOWN button to select No (display al-
ways on) or Yes (display goes o one minute aer exiting menu mode). Once selected, press the ENTER
button to conrm and store. Press the MENU button
back to the last menu or let the unit idle one minute
to exit menu mode.
Backlight Intensity
To select Backlight Intensity, press the ENTER button
to show the BACKLIGHT INTENSITY on the display.
Use the UP/DOWN button to adjust the intensity
from 1 (dark) to 10 (bright). Once selected, press the
ENTER button to setup and store. Press the MENU
button back to the last menu or let the unit idle one
minute to exit menu mode.
English Version
- Tecshow Halo 740 XL
P. 7
Page 8

Contrast Ratio
To select Contrast Ratio, press the ENTER button to
show the CONTRAST RATIO on the display. Use the
UP/DOWN button to adjust the intensity from 1 to
30. Once selected, press the ENTER button to setup
and store. Press the MENU button back to the last
menu or let the unit idle one minute to exit menu
mode.
Temperature Unit
To Select Temperature Unit, press the ENTER button
to show the TEMPERATURE UNIT on the display. Use
the UP/DOWN button to select °C or °F, press the ENTER button to store. Press the MENU button back to
the last menu or let the unit idle one minute to exit
menu mode.
Display Warning
To select Display Warning, press the ENTER button
to show the DISPLAY WARNING on the display. Use
the UP/DOWN button to select No (Normal) or Yes
(display will show the error warning when the unit
went wrong), press the ENTER button to store. Press
the MENU button back to the last menu or let the
unit idle one minute to exit menu mode.
Language
To select Language, press the ENTER button to show
the LANGUAGE on the display. Use the UP/DOWN
button to select English or Chinese, press the ENTER button to store. Press the MENU button back to
the last menu or let the unit idle one minute to exit
menu mode.
automatically test pan, tilt and zoom. Press the
MENU button back to the last menu or exit menu
mode aer auto test.
Manual Test
To select Manual Test, press the ENTER button to
show the MANUAL TEST on the display. Press the
ENTER button, and then use the UP/DOWN button to
select channel, and adjust the channel value. Once
selected, press the ENTER button to setup, the xture will run as the channel value indicates. Press
the MENU button back to the last menu or exit menu
mode let the unit idle one minute.
(All channels value will become 0 aer exiting Manual Test menu).
Fixture Information
Enter MENU mode, select Fixture Information,
press the ENTER button to conrm, use the UP/
DOWN button to select Fixture use time or Firmware Version.
Fixture use time
To select Fixture use time, press the ENTER button
to show the FIXTURE USE TIME on the display. Press
the ENTER button, the xture working hours will
show on the display. Press the MENU button to exit.
Firmware Version
To select Firmware Version, press the ENTER button to show the FIRMWARE VERSION on the display.
Press the ENTER button and the xture soware version will show on the display. Press the MENU button
to exit.
Fixtu re Test
Enter MENU mode, select Fixture Test, press the EN-
TER button to conrm, use the UP/DOWN button to
select Auto Test or Manual Test
Auto Tes t
To select Auto Test, press the ENTER button to
show the AUTO TEST on the display. Press the ENTER button, the unit will run built-in programs to
P. 8
Tecshow Halo 740 XL -
English version
Reset Functions
Enter MENU mode, select Reset Function, press the
ENTER button to conrm, use the UP/DOWN button
to select Pan/Tilt, Zoom or All.
11G
Pan/Tilt
To Select Pan/Tilt, press the ENTER button to show
the PAN/TILT on the display. Use the UP/DOWN but-
ton to select Yes (the unit will run built-in program
Page 9
to reset pan and tilt to their home positions) or No,
press the ENTER button to store. Press the MENU
button to exit menu mode.
ton to show the FIXTURE MAINTENANCE on the display. Use the UP/DOWN button to select Interval or
Remain Time.
Zoom
To select Zoom, press the ENTER button to show the
ZOOM on the display. Use the UP/DOWN button to
select Yes (the unit will run built-in program to reset
zoom to its home positions) or No, press the ENTER
button to store. Press the MENU button to exit menu
mode.
All
To select All, press the ENTER button to show the
ALL on the display. Use the UP/DOWN button to se-
lect Yes (the unit will run built-in program to reset all
motors to their home positions) or No, press ENTER
button to store. Press MENU button to exit menu
mode.
Special Functions
Enter MENU mode, select Special Functions, press
the ENTER button to conrm, use the UP/DOWN button to select Fixture Maintenance or Factory Setting.
Interval
To select Interval, press the ENTER button to con-
rm, the interval time will be shown on the display.
Press the MENU button to exit.
Remain Time
To select Remain Time, press the ENTER button to
conrm, the remaining time will be shown on the
display. Press the ENTER button to conrm, use the
UP/DOWN button to select Exit or Reset time, press
the MENU button to exit.
Factory Setting
To select Factory Setting, press the ENTER button
to show the FACTORY SETTING on the display. Press
the ENTER button to conrm, use the UP/DOWN button to select No or Yes (the xture will reset to factory settings and exit menu mode).
Fixture Maintenance
To select Fixture Maintenance, press the ENTER but-
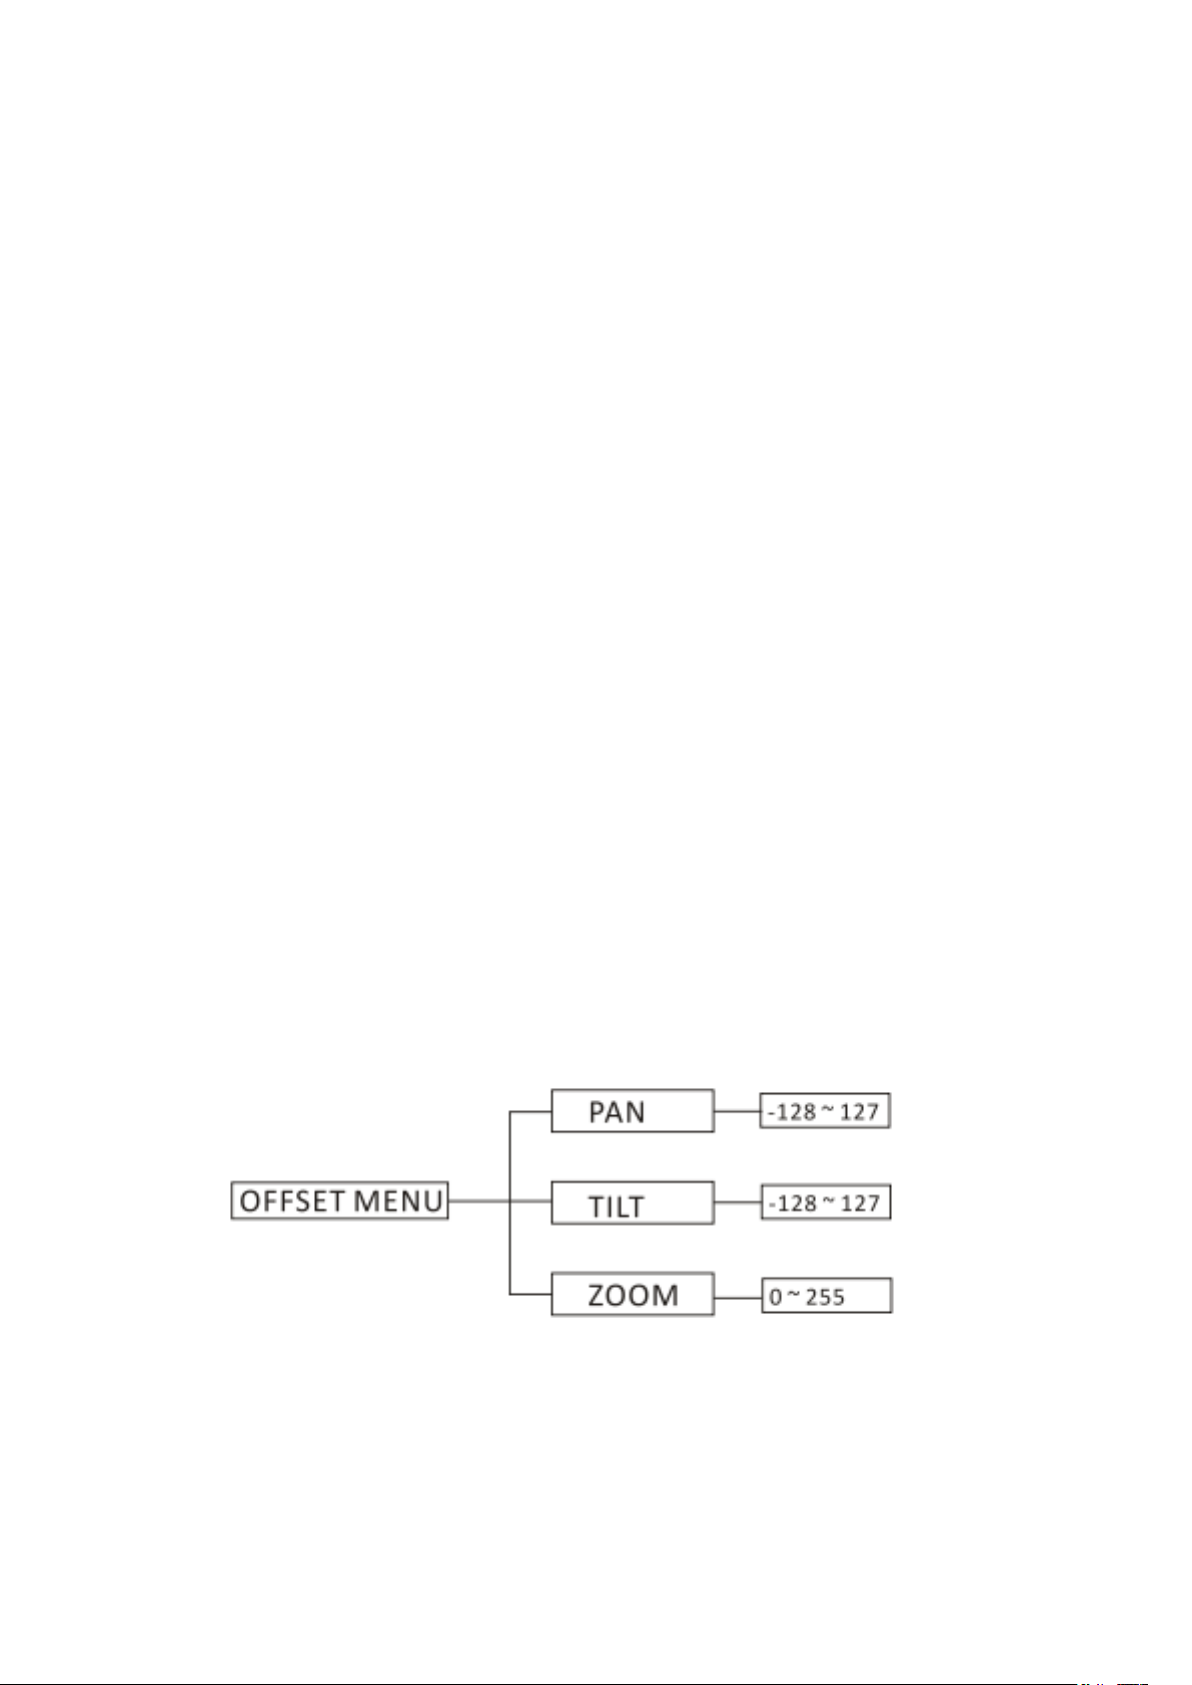
Home Position Adjust
In the main functions, hold the ENTER button for at
least 3 seconds into oset mode, use the DOWN/UP
button up to select Pan Oset, Tilt Oset or Zoom
Oset, and press the ENTER button to conrm. Use
the DOWN/UP button to adjust the home position of
the Pan, Tilt or Zoom, Once the position has been
selected, press the ENTER button to setup, to go
back to the functions without any change press the
English Version
- Tecshow Halo 740 XL
P. 9
Page 10
MENU button again. Press and hold the MENU button about one second or wait for about one minute
to exit the menu mode.
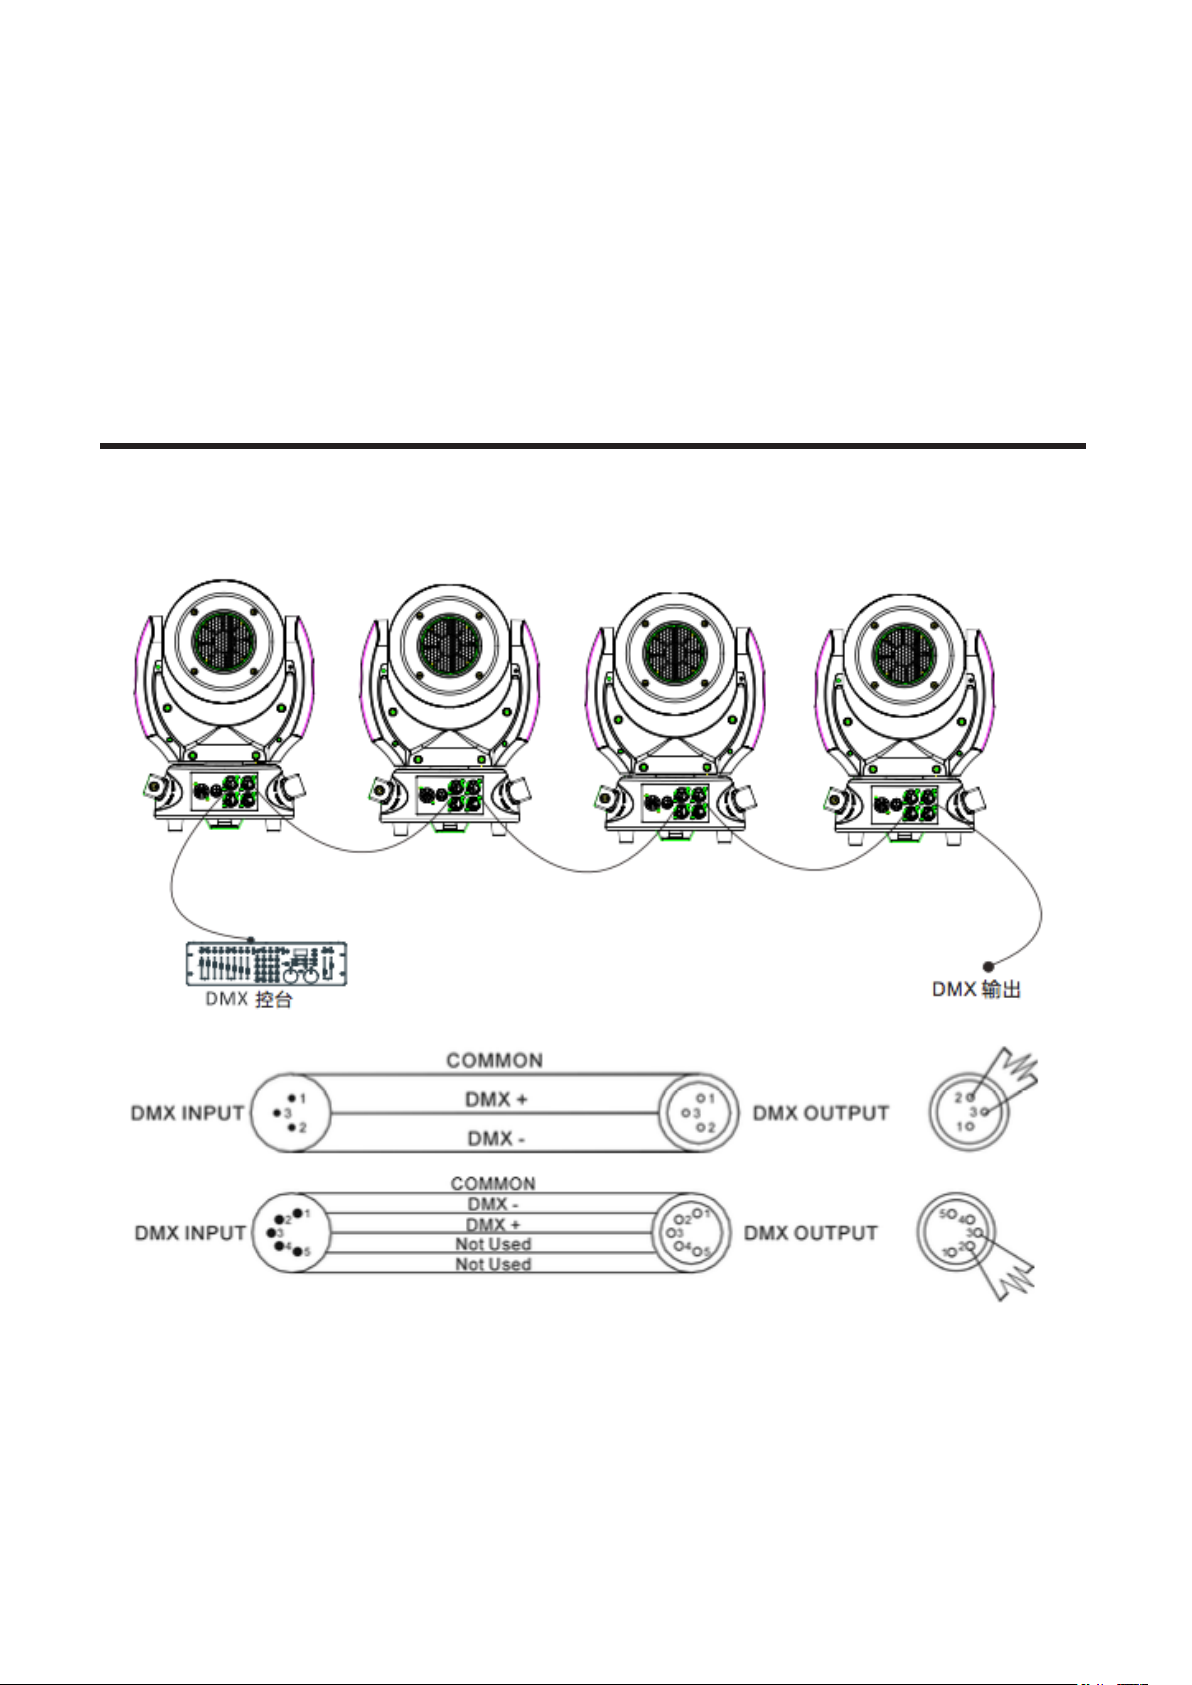
4. CONTROL BY UNIVERSAL DMX CONTROLLER
DMX 512 Connection
1. If you using a controller with 5 pins DMX output,
you need to use a 5 to 3 pin adapter-cable.
2. At last unit, the DMX cable has to be terminated
with a terminator. Solder a 120 ohm 1/4W resis-
tor between pin 2(DMX-) and pin 3(DMX+) into a
P. 10
Tecshow Halo 740 XL -
English version
3-pin XLR-plug and plug it in the DMX-output of
the last unit.
3. Connect the unit together in a `daisy chain` by
XLR plug from the output of the unit to theinput
of the next unit. The cable can not branched or
Page 11
split to a `Y` cable. DMX 512 is a very high-speed
signal. Inadequate or damaged cables, soldered
joints or corroded connectors can easily distort
the signal and shut down the system.
4. The DMX output and input connectors are passthrough to maintain the DMX circuit, when one
of the units’ power is disconnected.
5. Each lighting unit needs to have an address set
to receive the data sent by the controller. The
address number is between 0-511 (usually 0 & 1
are equal to 1).
6. The end of the DMX 512 system should be terminated to reduce signal errors.
7. 3 pin XLR connectors are more popular than 5
pin XLR.
• 3 pin XLR: Pin 1: GND, Pin 2: Negative signal
(-), Pin 3: Positive signal (+)
• 5 pin XLR: Pin 1: GND, Pin 2: Negative sig-
nal (-), Pin 3: Positive signal (+), Pin 4/Pin 5:
Not used.
Address Setting
If you use a universal DMX controller to control the
units, you have to set DMX address from 1 to 512 so
that the units can receive DMX signal.
Press MENU button to enter menu mode, select DMX
Functions, press the ENTER button to conrm, use
the UP/DOWN button to select DMX Address, press
the ENTER button to conrm, the present address
will blink on the display, use the UP/DOWN button
to adjust the address from 001 to 512, and press the
ENTER button to store. Press the MENU button back
to the last menu or let the unit idle 7 seconds to exit
menu mode.
Please refer to the following diagram to address
your DMX512 channel for the rst 4 units:
Channel mode Unit 1 Address Unit 2 Address Unit 3 Address Unit 4 Address
11 channels 1 12 33 44
15 channels 1 16 31 46
14 channels 1 15 29 43
DMX 512 Configuration
11CH MODE (MODE 1):
CHANNEL VALUE FUNCTION
1
000 – 255 0° - 540°
2
000 – 255 0° - 220°
3
000 – 255 PAN/TILT SPEED
000 – 019 O
020 – 024 Open
4
025 – 064 Strobe: Fast - Slow
065 – 069 Open
070 – 084 Pulse, fast close slow open
PAN
TILT
Fast - Slow
SHUTTER:
English Version
- Tecshow Halo 740 XL
P. 11
Page 12
085 – 089 Open
090 – 104 Pulse, fast open slow close
105 – 109 Open
110 – 124 Dimmer macro random strobe
125 - 129 Open
130 – 144 Dimmer macro random fast close slow open
145 - 149 Open
150 – 164 Dimmer macro random fast open slow close
165 - 169 Open
170 – 184 Dimmer macro burst pulse
185 - 189 Open
190 – 204 Dimmer macro random burst pulse
205 - 209 Open
210 - 224 Dimmer macro slow close slow open
225 - 229 Open
230 - 244 Dimmer macro burst little
245 - 255 Open
5 000 – 255 RED: 0% - 100%
6 000 – 255 GREEN: 0% - 100%
7 000 – 255 BLUE: 0% - 100%
8 000 – 255 WHITE: 0% - 100%
9 000 – 255 DIMMER: 0% - 100%
10 000 – 255 ZOOM: 0% - 100%
SPECIAL FUNCTION:
000 - 009 Null
11
010 - 014 Reset All
015 - 255 Null
15CH MODE (MODE 2):
CHANNEL VALUE FUNCTION
SHUTTER
000-019 O
020-024 Open
1
025-064 Strobe: Fats - Slow
065-069 Open
070-084 Pulse, fast close slow open
085-089 Open
P. 12
Tecshow Halo 740 XL -
English version
Page 13

090 -104 Pulse, fast open slow close
105-109 Open
110-124 Dimmer macro random strobe
125-129 Open
130 -144 Dimmer macro random fast close slow open
145 - 149 Open
150 – 164 Dimmer macro random fast open slow close
165 - 169 Open
170 – 184 Dimmer macro burst pulse
185 - 189 Open
190 – 204 Dimmer macro random burst pulse
205 - 209 Open
210 - 224 Dimmer macro slow close slow open
225 - 229 Open
230 - 244 Dimmer macro burst little
245 - 255 Open
2 000 – 255 DIMMER: 0% - 100%
3 000 – 255 ZOOM: 0% - 100%
PAN
4
000 – 255 0° - 540°
5 000 – 255 PAN FINE
TILT
6
000 – 255 0° - 220°
7 000 – 255 TILT FINE
8 000 – 255 PAN/TILT SPEED
SPECIAL FUNCTION
000 - 009 Null
9
010 - 014 Reset All
015 - 255 Null
Color
000 – 009 Open
010 – 014 Color 1
015 – 019 Color 2
10
020 – 024 Color 3
025 – 029 Color 4
030 – 034 Color 5
035 – 039 Color 6
040 – 044 Color 7
English Version
- Tecshow Halo 740 XL
P. 13
Page 14

045 – 049 Color 8
050 – 054 Color 9
055 – 059 Color 10
060 – 064 Color 11
065 – 069 Color 12
070 – 074 Color 13
075 – 079 Color 14
080 – 084 Color 15
085 – 089 Color 16
090 – 094 Color 17
095 – 099 Color 18
100 – 104 Color 19
105 – 109 Color 20
110 – 114 Color 21
115 – 119 Color 22
120 – 124 Color 23
125 – 129 Color 24
130 – 134 Color 25
135 – 139 Color 26
140 – 144 Color 27
145 – 149 Color 28
150 – 154 Color 29
155 – 159 Color 30
160 – 164 Color 31
165 – 169 Color 32
170 – 174 Color 33
175 – 179 Open
180 - 201 CCW Rotation : fast → slow
202 – 207 Stop
208 – 229 CW Rotation: slow → fast
230 – 234 Open
235 – 239 Random color rotation (fast speed)
240 – 244 Random color rotation (medium speed)
245 – 249 Random color rotation (slow speed)
250 - 255 Open
11 000 – 255 RED: 0% - 100%
12 000 – 255 GREEN: 0% - 100%
13 000 – 255 BLUE: 0% - 100%
P. 14
Tecshow Halo 740 XL -
English version
Page 15

14 000 – 255 WHITE: 0% - 100%
15 000 – 255 CTC: 0% - 100%
14CH MODE (MODE 3):
CHANNEL VALUE FUNCTION
PAN
1
000 – 255 0° - 540°
2 000 – 255 PAN FINE
TILT
3
000 – 255 0° - 220°
4 000 – 255 TILT FINE
5
000 – 255 PAN/TILT SPEED
Fast - Slow
RESET
000-009 No Function
6
010-014 Reset All
015-255 No Function
DIMMER
7
000 – 255 0% - 100%
SHUTTER
000 – 019 O
020 – 024 Open
025 – 064 Strobe: Fast - Slow
065 – 069 Open
070 – 084 Pulse, fast close slow open
085 – 089 Open
090 – 104 Pulse, fast open slow close Open
105 – 109 Open
8
110 – 124 Dimmer macro random strobe
125 - 129 Open
130 – 144 Dimmer macro random fast close slow open
145 - 149 Open
150 – 164 Dimmer macro random fast open slow close
165 - 169 Open
170 – 184 Dimmer macro burst pulse
185 - 189 Open
190 – 204 Dimmer macro random burst pulse
English Version
- Tecshow Halo 740 XL
P. 15
Page 16

205 - 209 Open
210 - 224 Dimmer macro slow close slow open
225 - 229 Open
230 - 244 Dimmer macro burst little
245 - 255 Open
9 000 – 255 Red 0% - 100%
10 000 – 255 Green 0% - 100%
11 000 – 255 Blue 0% - 100%
12 000 – 255 White 0% - 100%
COLOR MACRO
13
000-009
010-014
015-019
020-024
025-029
030-034
035-039
040-044
045-049
050-054
055-059
060-064
065-069
070-074
075-079
080-084
085-089
090-094
095-099
100-104
105-109
110-114
115-119
120-124
125-129
130-134
135-139
140-144
145-149
150-154
LEE 790 – Moroccan Pink
LEE 332 – Special Rose Pink
LEE 328 – Follies Pink
LEE 345 – Fuchsia Pink
LEE 194 – Surprise Pink
LEE 181 – Congo Blue
LEE 071 – Tokyo Blue
LEE 120 – Deep Blue
LEE 079 – Just Blue
LEE 132 – Medium Blue
LEE 200 – Double CT Blue
LEE 161 – State Blue
LEE 201 – Full CT Blue
LEE 202 – Half CT Blue
LEE 117 – Steel Blue
LEE 353 – Lighter Blue
LEE 118 – Light Blue
LEE 116 – Medium Blue Green
LEE 124 – Dark Green
LEE 139 – Primary Green
LEE 089 – Moss Green
LEE 122 – Fern Green
LEE 738 – JAS Green
LEE 088 – Lime Green
LEE 100 – Spring Yellow
LEE 104 – Deep Amber
LEE 179 – Chrome Orange
Open
LEE 157 – Pink
LEE 105 – Orange
P. 16
Tecshow Halo 740 XL -
English version
Page 17

155-159
160-164
165-169
170 -174
LEE 021 – Gold Amber
LEE 778 – Millennium Gold
LEE 135 – Deep Gold Amber
LEE 164 – Flame Red
175 -179
Color wheel rotation eect
180-201
202-207
208-229
Stop (this will stop wherever the color is at the time) Counter-clock-
Clockwise, fast - slow
wise, slow - fast
230-234
Random color
235-239
240-244
Medium
245-249
250-255
14 000 – 255 ZOOM: 0% - 100%
5. TROUBLESHOOTING
Open
Open
Fast
Slow
Open
Following are a few common problems that may occur during operation. Here are some suggestions for
easy troubleshooting:
A. The unit does not work, no light and the fan
does not work.
1. Check the connection of power and main fuse.
2. Measure the mains voltage on the main connector. 3. Check the power on LED.
B. Not responding to DMX controller.
1. DMX LED should be on. If not, check DMX connectors, cables to see if link properly.
2. If the DMX LED is on and no response to the
channel, check the address settings and DMXpolarity.
3. If you have intermittent DMX signal problems,
check the pins on connectors or on PCB of theunit or the previous one.
4. Try to use another DMX controller.
5. Check if the DMX cables run near or run along-
side to high voltage cables that may cause damage or interference to DMX interface circuit.
C. One of the channels is not working well.
1. The stepper motor might be damaged or the cable connected to the PCB is broken.
2. The motor’s drive IC on the PCB might be out of
condition.
English Version
- Tecshow Halo 740 XL
P. 17
Page 18

6. FIXTURE CLEANING
The cleaning must be carried out periodically to
optimize light output. Cleaning frequency depends
on the environment in which the xture operates:
damp, smoky or particularly dirty surrounding can
cause greater accumulation of dirt on the unit’s optics.
• Clean with so cloth using normal glass cleaning
uid.
• Always dry the parts carefully.
• Clean the external optics at least every 30 days.
Design and product specications are subject to change without prior notice.
P. 18
Tecshow Halo 740 XL -
English version
Page 19

1. DESCRIPCIÓN
HALO 740XL
Cabezal móvil versátil - 7 LEDs 4-en-1 de 40W
Halo 740XL es un compacto y versátil cabezal
móvil que tiene 7 LEDs 4-en-1 de 40w con función
zoom que le permite variar su ángulo de haz entre
5º y 70º. Gracias a su compacto y liviano diseño el
equipo es ideal para aplicaciones móviles de pequeña y mediana escala. Con su tecnología LED de
cuatro colores, por otra parte, Halo 740XL logra una
mezcla RGBW suave sin sombras multicolor, pudiendo inclusive variar su temperatura color via DMX.
Fuente & Ópticas
• Fuente de luz: 7 LEDs 4-en-1 de 40W
• Vida útil promedio: 50,000 horas
• Ángulo de haz: Zoom de 5° a 70°
Información fotométrica
• 5º Ángulo de haz: 28.560 Lux @ 3M (10 pies)
• 70º Ángulo de haz: 1.260 Lux @ 3M (10 pies)
Control
• Canales DMX: 11/15/14
• Modos de operación: DMX, Master/Slave, Automático y audiorítmico
Movimiento
• Pan: 540°
• Tilt: 220°
• Resolución de 16-bit
• Reposicionamiento automático
Físico
• Conectores DMX: 2 conectores XLR (XLR-3 de
entrada & salida)
• Conectores de alimentación: PowerCON®
Entrada/Salida
• Display LCD
• Dimensiones: 310x226x412 mm. /
12.2x8.9x16.2 pulg.
• Peso: 10.6 Kg. / 23.4 Lbs
Efectos y Funciones
• Dimmer: Rango completo 0-100%
• Efecto estrobo
• Tecnología LED 4-en-1: Mezcla RGBW suave sin
sombras
• Colores vividos, saturados e uniformes
• Temperatura color ajustable
• Selector de color con base en ltros LEE®
Versión Español
- Tecshow Halo 740 XL
P. 19
Page 20

2. INSTRUCCIONES DE SEGURIDAD
Advertencia Lea atentamente el manual antes
de utilizar el equipo ya que contiene información
importante sobre el uso, la instalación y el mantenimiento del equipo.
• Conserve este manual para futuras referencias.
En caso de vender la unidad, procure entregar
este manual al comprador.
• Abra el embalaje con cuidado y revise que el
equipo se encuentre en buen estado antes de
utilizarlo.
• Compruebe que la frecuencia y el voltaje
utilizados no sean superiores o inferiores a los
indicados en el presente manual.
• Procure la conexión a tierra del equipo para
evitar el riesgo de descarga eléctrica.
• Este equipo se diseñó para uso en interiores.
Manténgalo alejado de ambientes con humedad excesiva.
• Instale el equipo en ambientes con ventilación
adecuada y mantenga una distancia mínima de
50 cm con otros objetos o supercies. Procure
no obstruir las ranuras de ventilación del equipo.
• Desconecte el equipo del suministro eléctrico
antes de realizar cualquier tarea de mantenimiento.
• Mantenga el equipo alejado de llamas vivas o
materiales inamables.
• En caso de instalar el equipo en altura, procure
utilizar un cable de seguridad. Para trasladar la
unidad, sujétela siempre de la base, nunca del
cable o de las piezas móviles.
• Temperatura ambiente máxima: 40° C. No utilice el equipo si la temperatura es superior.
• Cuando el equipo está en funcionamiento, la
cubierta puede alcanzar los 75°. No toque la cubierta sin guantes protectores. Luego de apagar
la unidad, aguarde 15 minutos antes de realizar
cualquier tarea de mantenimiento.
• Desconecte el equipo de inmediato si observa
un problema grave de funcionamiento. El equipo no contiene piezas que puedan ser reparadas por el usuario. Las reparaciones llevadas a
cabo por personal inexperto pueden ocasionar
daños irreparables en el equipo. En caso de
precisar asistencia, póngase en contacto con
el servicio técnico autorizado. Utilice siempre
piezas de repuesto del mismo tipo.
• Para reducir el riesgo de descarga eléctrica,
evite entrar en contacto con los cables cuando
esté en funcionamiento el equipo.
Advertencia
• Para reducir el riesgo de descarga eléctrica o
incendio, mantenga la unidad alejada de la lluvia
y la humedad excesiva.
• Sustituya la cubierta y el lente en caso de que se
encuentren rayados o dañados.
Precaución
El equipo no contiene piezas que puedan ser reparadas por el usuario. No intente desarmar o reparar
el equipo por su cuenta. En caso de precisar asistencia, póngase en contacto con el servicio técnico
autorizado.
Instalación
Utilice el soporte omega de rápido desacople
para realizar el montaje del equipo. Asegúrese de
instalar rmemente el equipo para evitar vibraciones y deslizamientos durante su funcionamiento. Compruebe que la estructura, donde instalará
el equipo, sea segura y pueda soportar diez veces
el peso de la unidad. Siempre utilice un cable de
seguridad que pueda soportar doce veces el peso
de la unidad. Un profesional calicado debe realizar la instalación del equipo en una zona fuera
del alcance de las personas.
P. 20
Tecshow Halo 740 XL -
Versión Español
Page 21

3. CONFIGURACIÓN DE LA UNIDAD
Control
1. Pantalla Despliega los menús y las funciones seleccionadas.
2. LED
POWER On Power On
DMX Encendido Entrada DMX
presente
3. Panel de control
Menu Selecciona las funciones de progra-
mación
▼ Down
▲ Up
Enter Conrma el valor de la función actual.
3. Entrada DMX Enlace DMX. Utilice un cable XLR-5
para enlazar la unidad con un controlador DMX.
4. Entrada DMX Enlace DMX. Utilice un cable XLR-3
para enlazar la unidad con un controlador DMX.
5. Salida DMX Enlace DMX. Utilice un cable XLR-5
para enlazar una unidad con la unidad siguiente.
6. Salida DMX Enlace DMX. Utilice un cable XLR-3
para enlazar una unidad con la unidad siguiente.
7. Entrada de red Conexión a la fuente de alimentación.
Permite desplazarse hacia abajo o disminuir el valor de la función actual.
Permite desplazarse hacia arriba o
disminuir el valor de la función actual.
8. Salida de red Conexión a la siguiente unidad.
9. Fusible (T 6.3A) Protección contra sobretensión y
cortocircuitos.
Funciones principales
Para seleccionar una función, presione el botón
MENU hasta visualizar la función deseada en la pantalla. Seleccione la función y presione ENTER. La
pantalla titilará. Utilice los botones UP/DOWN para
modicar los valores disponibles. Presione ENTER
para conrmar su selección. Para salir sin guard-
ar cambios, presione el botón MENU nuevamente.
Mantenga presionado el botón MENU por un segundo o aguarde un minuto para salir automáticamente
del modo menú.
A continuación se detalla el menú de funciones prin-
cipales (siguiente página):
Versión Español
- Tecshow Halo 740 XL
P. 21
Page 22

P. 2 2
Tecshow Halo 740 XL -
Versión Español
Page 23

DMX Functions
Presione MENU, seleccione DMX Functions y pre-
sione ENTER para conrmar. Utilice los botones UP/
DOWN para seleccionar DMX Address, DMX Channel
Mode, View DMX Value o WDMX Setting.
DMX Address
Seleccione DMX Address y presione ENTER para con-
rmar. En la pantalla se verá la dirección DMX. Utilice los botones UP/DOWN para congurar el valor
de dirección entre 001 y 512. Presione ENTER para
conrmar. Presione MENU para regresar al menú
principal o deje que la unidad esté inactiva por un
minuto para salir automáticamente.
DMX Channel Mode
Seleccione DMX Channel Mode y presione ENTER
para conrmar. En la pantalla se verá el modo de
canales DMX. Utilice los botones UP/DOWN para
seleccionar entre Mode 1 (11), Mode 2 (15) o Mode
3 (14) y presione ENTER para conrmar. Presione
MENU para regresar al menú principal o deje que
la unidad esté inactiva por un minuto para salir automáticamente.
View DMX Value
Seleccione View DMX Value y presione ENTER para
conrmar. En la pantalla se verá el valor DMX. Utilice los botones UP/DOWN para ver los valores de los
canales DMX. Presione MENU para regresar al menú
principal o deje que la unidad esté inactiva por un
minuto para salir automáticamente.
WDMX Setting
Seleccione WDMX Setting y presione ENTER para
conrmar. En la pantalla se verá la conguración
WDMX. Utilice los botones UP/DOWN para seleccionar entre Active, Retransmit, Reset Memory o WDMX
Setting. Presione ENTER para conrmar. Presione
MENU para regresar al menú principal o deje que
la unidad esté inactiva por un minuto para salir automáticamente.
Fixture Setting
Presione MENU, seleccione Fixture setting y ENTER
para conrmar. Utilice los botones UP/DOWN para
seleccionar entre Pan Inverse, Tilt Inverse, P/T Feedback, BL.O. P/T Moving, White Balance, Cooling
Mode, Dimmer Curve o Dimmer Speed.
Pan Inverse
Seleccione Pan Inverse y presione ENTER para con-
rmar. En la pantalla se verá la conguración del
pan hacia atrás. Utilice los botones UP/DOWN para
seleccionar entre No (desactivado) o Yes (pan hacia atrás activado). Presione ENTER para conrmar.
Presione MENU para regresar al menú principal o
deje que la unidad esté inactiva por un minuto para
salir automáticamente.
Tilt Inverse
Seleccione Pan Inverse y presione ENTER para con-
rmar. En la pantalla se verá la conguración del
tilt hacia atrás. Utilice los botones UP/DOWN para
seleccionar entre No (desactivado) o Yes (tilt hacia
atrás activado). Presione ENTER para conrmar.
Presione MENU para regresar al menú principal o
deje que la unidad esté inactiva por un minuto para
salir automáticamente.
P/T Feedback
Seleccione P/T Feedback y presione ENTER para
conrmar. En la pantalla se verá la conguración de
la retroalimentación entre pan y tilt. Utilice los botones UP/DOWN para seleccionar entre No (desacti-
vada) o Yes (retroalimentación activada mientras el
pan y el tilt están desfasados). Presione ENTER para
conrmar. Presione MENU para regresar al menú
principal o deje que la unidad esté inactiva por un
minuto para salir automáticamente.
BL.O. P/T Moving
Seleccione BL.O. P/T Moving y presione ENTER para
conrmar. En la pantalla se verá la conguración de
blackout durante el pan y el tilt.
Utilice los botones UP/DOWN para seleccionar entre
Versión Español
- Tecshow Halo 740 XL
P. 2 3
Page 24

No (desactivado) o Yes (blackout activado). Presione
ENTER para conrmar. Presione MENU para regresar
al menú principal o deje que la unidad esté inactiva
por un minuto para salir automáticamente.
White Balance
Seleccione White Balance y presione ENTER para
conrmar. En la pantalla se verá la conguración de
balance de blancos. Utilice los botones UP/DOWN
para seleccionar entre Red, Green o Blue. No (de-
sactivada) o Yes (retroalimentación activada mientras el pan y el tilt están desfasados). Presione ENTER para conrmar. Presione MENU para regresar
al menú principal o deje que la unidad esté inactiva
por un minuto para salir automáticamente.
Cooling Mode
Seleccione Cooling Mode y presione ENTER para
conrmar. En la pantalla se verá la conguración del
modo de refrigeración. Utilice los botones UP/DOWN
para seleccionar entre Auto (normal) o Low (velocidad baja). Presione ENTER para conrmar. Presione
MENU para regresar al menú principal o deje que la
unidad esté inactiva por un minuto para salir automáticamente.
Dimmer Curve
Seleccione Dimmer Curve y presione ENTER para
conrmar. En la pantalla se verá la conguración de
la curva de dimmer. Utilice los botones UP/DOWN
para seleccionar entre Linear, Square Law, In- verse
Squ. o S-curve. Presione ENTER para conrmar. Presione MENU para regresar al menú principal o deje
que la unidad esté inactiva por un minuto para salir
automáticamente.
Dimmer Modes
Ley cuadrática inversa Curva S
Lineal: El incremento de la intensidad lumínica es
lineal al incremento del valor DMX.
Ley cuadrática: El control de la intensidad lumínica
es más no en niveles bajos y más grueso en niveles
altos.
Ley cuadrática inversa: El control de la intensidad
lumínica es más grueso en niveles bajos y más no
en niveles altos.
Curva S: El control de la intensidad lumínica es más
no en niveles bajos y altos mientras que es más
grueso en niveles medios.
Dimmer Speed
Seleccione Dimmer Speed y presione ENTER para
conrmar. En la pantalla se verá la conguración
de la velocidad de dimmer. Utilice los botones UP/
DOWN para seleccionar entre Fast (rápido) o Smooth
(suave). Presione ENTER para conrmar. Presione
MENU para regresar al menú principal o deje que
la unidad esté inactiva por un minuto para salir automáticamente.
Display Setting
Presione MENU, seleccione Display Setting y ENTER
para conrmar. Utilice los botones UP/DOWN para
seleccionar entre Display Inverse, Backlight Auto O,
Back- light Intensity, Constrast Ratio ,Temperature
unit, Display Warning o Language.
Ópticamente lineal Ley cuadrática
P. 24
Tecshow Halo 740 XL -
Versión Español
Display Inverse
Seleccione Display Inverse y presione ENTER para
conrmar. En la pantalla se verá la conguración
de la rotación de pantalla. Utilice los botones UP/
DOWN para seleccionar entre No (desactiva) o Yes
(activada). Presione ENTER para conrmar. Presione
MENU para regresar al menú principal o deje que la
Page 25

unidad esté inactiva por un minuto para salir automáticamente.
Backlight Auto O
Seleccione Backlight Auto O y presione ENTER para
conrmar. En la pantalla se verá la conguración del
apagado de la luz de fondo. Utilice los botones UP/
DOWN para seleccionar entre No (desactivado) o
Yes (activado. La luz se apagará luego de un minuto). Presione ENTER para conrmar. Presione MENU
para regresar al menú principal o deje que la unidad
esté inactiva por un minuto para salir automáticamente.
Backlight Intensity
Seleccione Backlight Intensity y presione ENTER
para conrmar. En la pantalla se verá la conguración de la intensidad de la luz de fondo. Utilice los
botones UP/DOWN para regular la intensidad entre
1 (oscura) y 10 (brillante). Presione ENTER para conrmar. Presione MENU para regresar al menú princi-
pal o deje que la unidad esté inactiva por un minuto
para salir automáticamente.
Contrast Ratio
Seleccione Contrast Ratio y presione ENTER para
conrmar. En la pantalla se verá la conguración
de la relación de contraste. Utilice los botones UP/
DOWN para regular la intensidad entre 1 y 30. Pre-
sione ENTER para conrmar. Presione MENU para
regresar al menú principal o deje que la unidad esté
inactiva por un minuto para salir automáticamente.
Temperature Unit
Seleccione Temperature Unit y presione ENTER para
conrmar. En la pantalla se verá la conguración de
la temperatura. Utilice los botones UP/DOWN para
seleccionar entre °C o °F. Presione ENTER para conrmar. Presione MENU para regresar al menú principal o deje que la unidad esté inactiva por un minuto
para salir automáticamente.
Display Warning
Seleccione Display Warning y presione ENTER para
conrmar. En la pantalla se verá la conguración de
la advertencia en pantalla. Utilice los botones UP/
DOWN para seleccionar entre No (desactivada) o
Yes (activada. Cuando el equipo funcione mal, aparecerá un mensaje de error en la pantalla). Presione
ENTER para conrmar. Presione MENU para regresar
al menú principal o deje que la unidad esté inactiva
por un minuto para salir automáticamente.
Language
Seleccione Language y presione ENTER para con-
rmar. En la pantalla se verá la conguración del
idioma del equipo. Utilice los botones UP/DOWN
para seleccionar entre English o Chinese. Presione
ENTER para conrmar. Presione MENU para regresar
al menú principal o deje que la unidad esté inactiva
por un minuto para salir automáticamente.
Fixture Test
Presione MENU, seleccione Fixture Test y presione
ENTER para conrmar. Utilice los botones UP/DOWN
para seleccionar entre Auto Test o Manual Test.
Auto Tes t
Seleccione Auto Test y presione ENTER para con-
rmar. En la pantalla se verá la conguración de
la prueba automática. Presione ENTER para conrmar. La unidad ejecutará los programas integrados para probar de forma automática el pan,
el tilt y el zoom. Presione
MENU para regresar al menú principal o salga del
modo menú luego de la prueba.
Manual Test
Seleccione Manual Test y presione ENTER para con-
rmar. En la pantalla se verá la conguración de la
prueba manual. Presione ENTER. Utilice los botones
UP/DOWN para seleccionar un canal y regular su
valor. Presione ENTER para conrmar. La unidad se
ejecutará según el valor de canal indicado. Presione
el botón MENU para regresar al menú principal o
deje que la unidad esté inactiva por un minuto para
salir automáticamente.
Versión Español
- Tecshow Halo 740 XL
P. 2 5
Page 26

Los valores de los canales volverán a 0 cuando abandone el menú Manual Test.
Fixture Information
Presione MENU, seleccione Fixture Information
y ENTER para conrmar. Utilice los botones UP/
DOWN para seleccionar entre Fixture use time o
Firmware Version.
Fixture use time
Seleccione Fixture use time y presione ENTER para
conrmar. Presione ENTER para conrmar. En la
pantalla aparecerán las horas de funcionamiento
del equipo. Presione el botón MENU para regresar al
menú principal o deje que la unidad esté inactiva
por un minuto para salir automáticamente.
Firmware Version
Seleccione Firmware Version y presione ENTER para
conrmar. Presione ENTER para conrmar. En la
pantalla aparecerá la versión del soware del equi-
po. Presione el botón MENU para regresar al menú
principal o deje que la unidad esté inactiva por un
minuto para salir automáticamente.
lice los botones UP/DOWN para seleccionar entre
Yes (la unidad ejecutará los programas integrados
para restablecer el zoom a su posición inicial) o No.
Presione ENTER para conrmar. Presione el botón
MENU para regresar al menú principal o deje que
la unidad esté inactiva por un minuto para salir automáticamente.
All
Seleccione All y presione ENTER para conrmar. En
la pantalla se verá la conguración del todos los
motores. Utilice los botones UP/DOWN para selec-
cionar entre Yes (la unidad ejecutará los programas
integrados para restablecer todos los motores a su
posición inicial) o No. Presione ENTER para conrmar. Presione el botón MENU para regresar al menú
principal o deje que la unidad esté inactiva por un
minuto para salir automáticamente.
Special functions
Presione MENU, seleccione Special Functions y pre-
sione ENTER para conrmar. Utilice los botones UP/
DOWN para seleccionar entre Fixture Maintenance o
Factory Setting.
Reset Functions
Presione MENU, seleccione Reset Functions y pre-
sione ENTER para conrmar. Utilice los botones UP/
DOWN para seleccionar entre Pan/Tilt, Zoom o All.
Pan/Tilt
Seleccione Pan/tilt y presione ENTER para con-
rmar. En la pantalla se verá la conguración del
menú pan/tilt. Utilice los botones UP/DOWN para
seleccionar entre Yes (la unidad ejecutará los programas integrados para restablecer el pan y el tilt a
las posiciones iniciales) o No. Presione ENTER para
conrmar. Presione el botón MENU para regresar al
menú principal o deje que la unidad esté inactiva
por un minuto para salir automáticamente.
Zoom
Seleccione Zoom y presione ENTER para conrmar.
En la pantalla se verá la conguración del zoom. Uti-
Fixture Maintenance
Seleccione Fixture Maintenance y presione ENTER
para conrmar. En la pantalla se verá la conguración del mantenimiento del equipo. Utilice los bo-
tones UP/DOWN para seleccionar entre Interval o
Remain Time.
Interval
Seleccione Interval y presione ENTER para conrmar. En la pantalla se verá el tiempo de intervalo.
Presione el botón MENU para regresar al menú principal o deje que la unidad esté inactiva por un minuto para salir automáticamente.
Remain Time
Seleccione Remain Time y presione ENTER para con-
rmar. En la pantalla se verá el tiempo restante. Presione ENTER para conrmar. Utilice los botones UP/
DOWN para seleccionar entre Exit para salir o Reset
time. Presione el botón MENU para regresar al menú.
P. 26
Tecshow Halo 740 XL -
Versión Español
Page 27

Factory Setting
Seleccione Factory Setting y presione ENTER para
conrmar. En la pantalla se abrirá la conguración
de fábrica. Presione ENTER para conrmar. Utilice
Con guración de la posición inicial
los botones UP/DOWN para seleccionar entre No o
Yes (restablecer el equipo con la conguración de
fábrica). Presione el botón MENU para regresar al
menú principal.
En las funciones principales, mantenga presionado
ENTER por 3 segundos hasta activar el modo oset.
Utilice los botones UP/DOWN para seleccionar entre
Pan Oset, Tilt Oset o Zoom Oset. Presione ENTER para conrmar.
Utilice los botones UP/DOWN para regular la
posición inicial del pan, tilt o zoom. Presione ENTER
para conrmar su selección. Para salir sin guardar cambios, presione el botón MENU nuevamente.
Mantenga presionado el botón MENU por un segundo o aguarde un minuto para salir automáticamente
del modo menú.
Versión Español
- Tecshow Halo 740 XL
P. 27
Page 28

4. CONEXIÓN Y PROTOCOLO DMX
Conexión DMX 512
1. Si utiliza un controlador con salida DMX de 5
clavijas deberá emplear un cable adaptador de
5 a 3 clavijas.
2. Se recomienda la colocación de un terminador DMX en la última unidad de la serie. Sim-
P. 28
Tecshow Halo 740 XL -
Versión Español
plemente suelde una resistencia de 1/4W y 120
Ω entre las clavijas 2 (DMX-) y 3 (DMX+) de un
conector XLR-3 macho y conéctelo a la salida
DMX de la última unidad.
3. Conecte las unidades en cadena con un conec-
Page 29

tor XLR. Comience por la salida de la primera
unidad y continúe por la entrada de la siguiente
unidad. El cable no puede ramicarse ni dividirse en un cable Y griega. El protocolo DMX 512
es una señal de datos de alta velocidad. El uso
de cable dañados o inadecuados, juntas soldadas o conectores oxidados puede distorsionar la
señal con facilidad y apagar el sistema.
4. Los conectores DMX de entrada y salida mantienen el circuito DMX en funcionamiento cuando
se desconecta la alimentación de una de las unidades.
5. Cada unidad debe contar con una dirección es-
pecíca donde recibirá los datos que envía el
controlador. Esa dirección es un número entre
0-511 (normalmente 0 y 1 equivales a 1).
6. Utilice un terminador de señal en el sistema
para reducir los errores de señal.
7. Es más frecuente el uso de conectores XLR-3
que XLR-5.
• XLR-3: Clavija 1: Tierra. Clavija 2: Señal nega-
tiva (-). Clavija 3: Señal positiva (+).
Dirección DMX de inicio
Si utiliza un controlador DMX universal con las
unidades, es necesario que congure una dirección
DMX entre 1-512 para que las unidades reciban la
señal de datos DMX.
Presione MENU, seleccione DMX Functions y ENTER
para conrmar. Utilice los botones UP/DOWN para
seleccionar DMX Address. Presione ENTER para con-
rmar. La dirección actual titilará en la pantalla.
Utilice los botones UP/DOWN para congurar una
nueva dirección entre 001 y 512. Presione ENTER
para conrmar su selección. Presione MENU para
regresar al menú principal o deje que la unidad esté
inactiva por un minuto para salir automáticamente.
Para obtener más información sobre la conguración de la dirección DMX de inicio, reérase al
siguiente diagrama como ejemplo para 4 unidades:
Modo de canales Dirección unidad 1 Dirección unidad 2 Dirección unidad 3 Dirección unidad 4
11 canales 1 12 33 44
15 canales 1 16 31 46
14 canales 1 15 29 43
Cuadro de canales DMX
Modo 11 canales (Modo 1):
CANAL VALOR FUNCIÓN
1
000 – 255 0° - 540°
2
000 – 255 0° - 220°
3
000 – 255 VELOCIDAD DE PAN/TILT
000 – 019 Apagado
020 – 024 Abierto
4
025 – 064 Estrobo Rápido - Lento
065 – 069 Abierto
070 – 084 Efecto pulse. Cierre rápido, abertura lenta
PAN
TILT
Rápida - Lenta
SHUTTER:
Versión Español
- Tecshow Halo 740 XL
P. 29
Page 30

085 – 089 Abierto
090 – 104 Efecto pulse. Apertura rápida, cierre lento
105 – 109 Abierto
110 – 124 Macro de dimmer, estrobo aleatorio
125 - 129 Abierto
130 – 144 Macro de dimmer aleatorio. Cierre rápido, apertura lenta
145 - 149 Abierto
150 – 164 Macro de dimmer aleatorio. Abertura rápida, cierre lento
165 - 169 Abierto
170 – 184 Macro de dimmer. Efecto pulse ráfaga
185 - 189 Abierto
190 – 204 Macro de dimmer. Efecto pulse ráfaga aleatorio
205 - 209 Abierto
210 - 224 Macro de dimmer. Cierre lento, apertura lenta
225 - 229 Abierto
230 - 244 Macro de dimmer. Efecto ráfaga pequeña
245 - 255 Abierto
5 000 – 255 ROJO: 0% - 100%
6 000 – 255 VERDE: 0% - 100%
7 000 – 255 AZUL: 0% - 100%
8 000 – 255 BLANCO: 0% - 100%
9 000 – 255 DIMMER: 0% - 100%
10 000 – 255 ZOOM: 0% - 100%
FUNCIÓN ESPECIAL
000 - 009 Sin uso
11
010 - 014 Restablecer todo
015 - 255 Sin uso
Modo 15 canales (Modo 2):
CANAL VALOR FUNCIÓN
SHUTTER
000-019 Apagado
020-024 Abierto
1
025-064 Estrobo Rápido - Lento
065-069 Abierto
070-084 Efecto pulse. Cierre rápido, abertura lenta
085-089 Abierto
P. 30
Tecshow Halo 740 XL -
Versión Español
Page 31

090 -104 Efecto pulse. Apertura rápida, cierre lento
105-109 Abierto
110-124 Macro de dimmer, estrobo aleatorio
125-129 Abierto
130 -144 Macro de dimmer aleatorio. Cierre rápido, apertura lenta
145 - 149 Abierto
150 – 164 Macro de dimmer aleatorio. Abertura rápida, cierre lento
165 - 169 Abierto
170 – 184 Macro de dimmer. Efecto pulse ráfaga
185 - 189 Abierto
190 – 204 Macro de dimmer. Efecto pulse ráfaga aleatorio
205 - 209 Abierto
210 - 224 Macro de dimmer. Cierre lento, apertura lenta
225 - 229 Abierto
230 - 244 Macro de dimmer. Efecto ráfaga pequeña
245 - 255 Abierto
2 000 – 255 DIMMER: 0% - 100%
3 000 – 255 ZOOM: 0% - 100%
PAN
4
000 – 255 0° - 540°
5 000 – 255 PAN FINO
TILT
6
000 – 255 0° - 220°
7 000 – 255 TILT FINO
8 000 – 255 VELOCIDAD DE PAN/TILT
FUNCIÓN ESPECIAL
000 - 009 Sin función
9
010 - 014 Restablecer todo
015 - 255 Sin función
Color
000 – 009 Abierto
010 – 014 Color 1
015 – 019 Color 2
10
020 – 024 Color 3
025 – 029 Color 4
030 – 034 Color 5
035 – 039 Color 6
040 – 044 Color 7
Versión Español
- Tecshow Halo 740 XL
P. 31
Page 32

045 – 049 Color 8
050 – 054 Color 9
055 – 059 Color 10
060 – 064 Color 11
065 – 069 Color 12
070 – 074 Color 13
075 – 079 Color 14
080 – 084 Color 15
085 – 089 Color 16
090 – 094 Color 17
095 – 099 Color 18
100 – 104 Color 19
105 – 109 Color 20
110 – 114 Color 21
115 – 119 Color 22
120 – 124 Color 23
125 – 129 Color 24
130 – 134 Color 25
135 – 139 Color 26
140 – 144 Color 27
145 – 149 Color 28
150 – 154 Color 29
155 – 159 Color 30
160 – 164 Color 31
165 – 169 Color 32
170 – 174 Color 33
175 – 179 Abierto
180 - 201 Rotación hacia la izquierda: velocidad decreciente
202 – 207 Cese
208 – 229 Rotación hacia la derecha: velocidad creciente
230 – 234 Abierto
235 – 239 Rotación de color aleatorio (velocidad rápida)
240 – 244 Rotación de color aleatorio (velocidad media)
245 – 249 Rotación de color aleatorio (velocidad lenta)
250 - 255 Abierto
11 000 – 255 ROJO: 0% - 100%
12 000 – 255 VERDE: 0% - 100%
13 000 – 255 AZUL: 0% - 100%
P. 32
Tecshow Halo 740 XL -
Versión Español
Page 33

14 000 – 255 BLANCO: 0% - 100%
15 000 – 255 Corrección de temperatura de color: 0% - 100%
Modo 14 canales (Modo 3):
CANAL VALOR FUNCIÓN
PAN
1
000 – 255 0° - 540°
2 000 – 255 PAN FINO
TILT
3
000 – 255 0° - 220°
4 000 – 255 TILT FINO
5
000 – 255 VELOCIDAD DE PAN/TILT
Rápida - Lenta
RESTABLECER
000-009 Sin función
6
010-014 Restablecer todo
015-255 Sin función
DIMMER
7
000 – 255 0% - 100%
SHUTTER
000 – 019 Apagado
020 – 024 Abierto
025 – 064 Estrobo Rápida - Lenta
065 – 069 Abierto
070 – 084 Efecto pulse. Cierre rápido, abertura lenta
085 – 089 Abierto
090 – 104 Efecto pulse. Apertura rápida, cierre/apertura lento
105 – 109 Abierto
8
110 – 124 Macro de dimmer, estrobo aleatorio
125 - 129 Abierto
130 – 144 Macro de dimmer aleatorio. Cierre rápido, apertura lenta
145 - 149 Abierto
150 – 164 Macro de dimmer aleatorio. Abertura rápida, cierre lento
165 - 169 Abierto
170 – 184 Macro de dimmer. Efecto pulse ráfaga
185 - 189 Abierto
190 – 204 Macro de dimmer. Efecto pulse ráfaga aleatorio
Versión Español
- Tecshow Halo 740 XL
P. 3 3
Page 34

205 - 209 Abierto
210 - 224 Macro de dimmer. Cierre lento, apertura lenta
225 - 229 Abierto
230 - 244 Macro de dimmer. Efecto ráfaga pequeña
245 - 255 Abierto
9 000 – 255 ROJO: 0% - 100%
10 000 – 255 VERDE: 0% - 100%
11 000 – 255 AZUL: 0% - 100%
12 000 – 255 BLANCO: 0% - 100%
MACROS DE COLOR
13
000-009
010-014
015-019
020-024
025-029
030-034
035-039
040-044
045-049
050-054
055-059
060-064
065-069
070-074
075-079
080-084
085-089
090-094
095-099
100-104
105-109
110-114
115-119
120-124
125-129
130-134
135-139
140-144
145-149
150-154
LEE 790 – Moroccan Pink
LEE 332 – Special Rose Pink
LEE 328 – Follies Pink
LEE 345 – Fuchsia Pink
LEE 194 – Surprise Pink
LEE 181 – Congo Blue
LEE 071 – Tokyo Blue
LEE 132 – Medium Blue
LEE 200 – Double CT Blue
LEE 201 – Full CT Blue
LEE 202 – Half CT Blue
LEE 353 – Lighter Blue
LEE 116 – Medium Blue Green
LEE 124 – Dark Green
LEE 139 – Primary Green
LEE 089 – Moss Green
LEE 122 – Fern Green
LEE 088 – Lime Green
LEE 100 – Spring Yellow
LEE 104 – Deep Amber
LEE 179 – Chrome Orange
Abierto
LEE 157 – Pink
LEE 120 – Deep Blue
LEE 079 – Just Blue
LEE 161 – State Blue
LEE 117 – Steel Blue
LEE 118 – Light Blue
LEE 738 – JAS Green
LEE 105 – Orange
P. 3 4
Tecshow Halo 740 XL -
Versión Español
Page 35

155-159
160-164
165-169
170 -174
LEE 021 – Gold Amber
LEE 778 – Millennium Gold
LEE 135 – Deep Gold Amber
LEE 164 – Flame Red
175 -179
Efecto de rotación de la rueda de color
180-201
202-207
208-229
Cese (se detendrá donde esté el color en ese momento)
Rotación hacia la derecha, rápido - lenta
Rotación hacia la izquierda, lenta - rápida
230-234
Color aleatorio
235-239
240-244
245-249
250-255
14 000 – 255 ZOOM: 0% - 100%
5. RESOLUCIÓN DE PROBLEMAS
Abierto
Abierto
Rápido
Medio
Lento
Abierto
Esta guía le permitirá al usuario resolver problemas
simples de funcionamiento.
A. La unidad no funciona. No hay salida de luz y el
ventilador no gira.
1. Verique la fuente de alimentación y el fusible.
2. Mida la tensión de red en el conector principal.
3. Verique el encendido del LED.
B. La unidad no responde al controlador DMX.
1. El indicador LED DMX debe estar encendido. De
lo contrario, verique que los cables y conectores DMX estén bien enlazados.
2. Si el indicador LED está encendido y no hay
respuesta en el canal, verique la conguración
de la dirección y la polaridad DMX.
3. Si tiene problemas de señal DMX intermitente,
verique las clavijas de los conectores o la placa
de circuito impreso de la unidad actual y la anterior.
4. Intente utilizar otro controlador DMX.
5. Verique si los cables DMX se encuentran cerca
de cables de alto voltaje que puedan ocasionar
daños o interferencia al circuito de interfaz DMX
C. Uno de los canales no funciona correctamente.
6. El motor paso a paso puede estar dañado o el
cable conectado a la placa de circuito impreso
está roto.
7. El controlador del motor en la placa de circuito
impreso no está en buenas condiciones.
Versión Español
- Tecshow Halo 740 XL
P. 3 5
Page 36

6. LIMPIEZA Y MANTENIMIENTO
Se recomienda la limpieza regular del equipo para
optimizar la salida de luz. La frecuencia de limpieza
dependerá del ambiente en el que esté instalado
el equipo. La humedad, el polvo y el humo pueden
generar una mayor acumulación de suciedad en las
piezas ópticas de la unidad.
• Utilice un paño suave con productos para lim-
pieza de vidrios.
• Procure secar las piezas cuidadosamente.
• Limpie las ópticas externas, al menos cada 30
días.
La información de este manual está sujeta a cambios sin previo aviso.
P. 36
Tecshow Halo 740 XL -
Versión Español
Page 37

tecshow.amproweb.com
- Tecshow Halo 740 XL
P. 37
 Loading...