

Page 1
P. 1
| Tecshow Halo 17
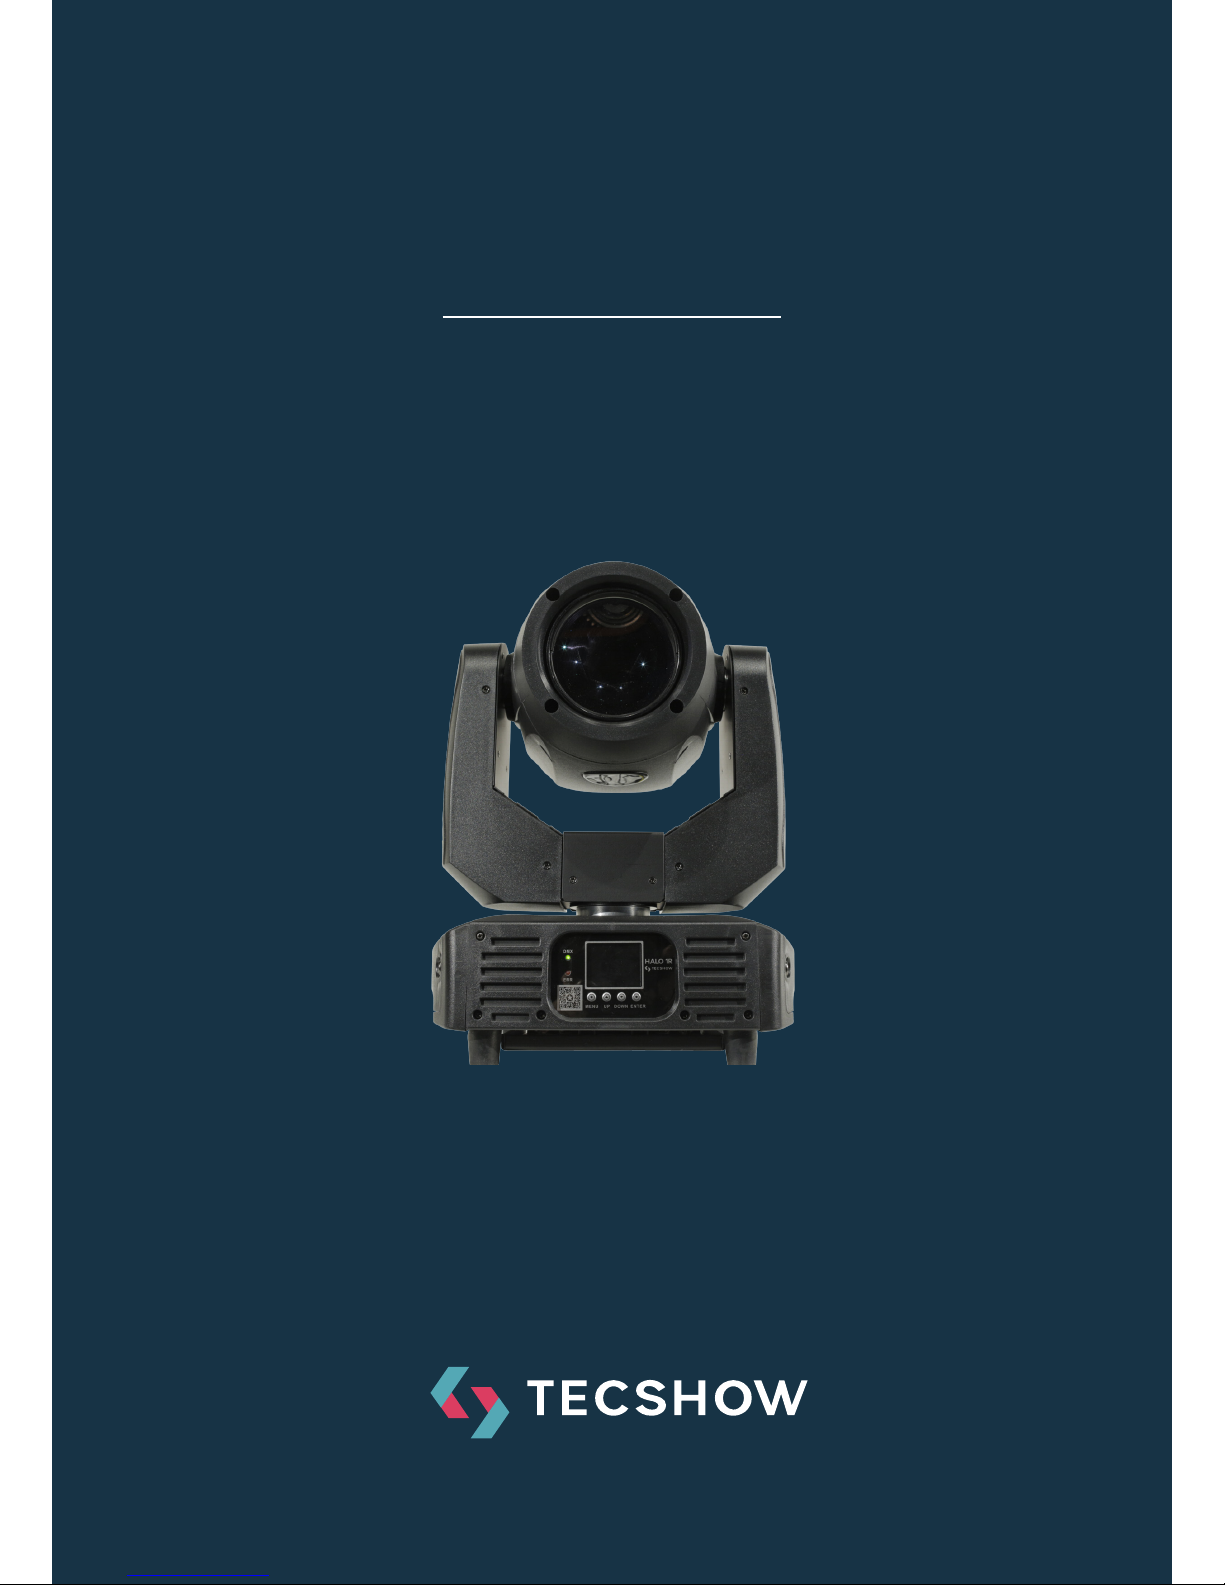
HALO 1R
Beam Moving Head
USER MANUAL / MANUAL DE USUARIO
PLEASE READ THE INSTRUCTIONS CAREFULLY BEFORE USE
POR FAVOR LEA LAS INSTRUCCIÓNES ANTES DE USAR
Page 2

P. 2
Tecshow Halo 1R |
HALO 1R
Beam Moving Head – Powered by 1R 120W Lamp
Halo 1R is a very compact beam moving head that
features a 120W 1R lamp. With a 3.5º beam angle,
the xture delivers a powerful parallel beam that
stands out naturally in small and medium scale applications. Halo 1R sports a complete array of fea-
tures including 12 dichroic lters, 11 static gobos,
8-facet prism and a speed of movements that
highlights it from the average. With a performance
of 196,400 Lux at 5 meters (15 feet), the xture
achieves an unprecedented consumption-to-output ratio.
Specications
Source & Optics
• Light Source: 1R 120W discharge lamp
• Color temperature: 8,500K
• Lamp life: 2,000 hours
• Beam angle: 3.5º
Photometric data
• Luminous Flux: 196,400 Lux @ 5M (15 .)
Eects & Functions
• Color wheel: 12 dichroic lters + open
• Static gobo wheel: 11 gobos + open
• Gobo shaking
• 8-facet rotating prism
• Dimmer: Full range 0-100%
• Strobe: 1-13 ashes per second
Control
• DMX channels: 12
• Operational modes: DMX, Master/Slave & au-
to-run
Movement
• Pan: 540°
• Tilt: 250°
• 16-bit resolution
• Auto repositioning
Physical
• DMX connectors: 2 XLR connectors (XLR-3 In
and Out)
• Power supply connector: PowerKON® In
• LED display
• Dimensions: 310x230x390 mm. / 12.2x9x15.3 in.
• Weight: 9 Kg. / 19.8 Lbs.
1. OVERVIEW
English version
Page 3

P. 3
| Tecshow Halo 17
English version
Before the rst time to use it, please check whether
the damage in transit, if happen damages in transit,
please do not use this lamp, and please asap contact distributors or manufacturers.
Please don't install the lamp in the ordinary combustible material on the surface. Lamp should be
installed in the well ventilated place, and the distance of the wall to keep it over 10 cm, at the same
time, please check the fan hole was clear.
Do not use lamp direct project in ammable
objects, lamp and the radiation of the distance
between the objects please keep it over 12 m.
Do not use direct lamp project light source , to
avoid damage the eyes.
Before installation, please make sure your use power supply voltage and marked voltage.
Note: Before any install,maintain and clean lamp,
please conrm cut o the power supply.
2. SAFETY WARNING INFORMATION
Page 4
P. 4
Tecshow Halo 1R |
English version
Menu: Main Interface
Set
• Run mode
• DMX Address
• Channel mode
• Sound Sense
• Invert Pan
• Invert Tilt
• Pan-Tilt Swap
• No DMX Signal
• Display
• Lamp on @ Start up
• Linear Color
• Load Default
Manu
Sys
• Ver
• DMX monitor
• System errors
• Total Fixture hours
• Partial Fixture hours
• Total Lamp hours
• Partial Lamp hours
Advan
• Sensor monitor
• Reset calibration
• Zero Point Correction
• Lamp Life hours
• Lamp hours clear
Chinese-English switch
Display screen reverse
3. CONTROL BOARD
Option instruction
Run Mode
DMX Slave state:Accept control table or main engine
Auto1
Master State: Auto running and send DMX signal for Slave.
…
Auto 8
Sound
Random
DMX Address 1-512
Press OK key into edit state, Then selected hundreds place. Press up or
down, change address code. Press OK key again, selected ten place and
edit. Press OK key again, select the rst place and edit. Press it to exit
the edit state.
Channel Mode 12 12CH Mode
Sound Sense 0-100
Invert Pan
OFF
ON
Set up the interface
Page 5
P. 5
| Tecshow Halo 17
English version
This interface use for control present light, And
then auto enter into master mode (didn’t received
DMX signal, sent the dmx signal to slave light)
Manual menu will according to standard 12Channel
to set menu.
Invert Tilt
OFF
ON
Pan-Tilt Swap
OFF
ON Change the channel of Pan-Tilt axis (include Pan-Tilt Fine)
No DMX Signal
KEEP According to the original state continues to run.
CLEAR Motor reset, stop running.
Display
ON Closing backlight aer free 30 seconds.
OFF Backlight still lighting.
Lamp on @
start up
OFF Reset directly aer Power on , lamp o (need to use the menu or control
table to manual let lamp light)
ON Lamp light directly aer power on, And must wait for the lamp light up
success then reset.
Linear Color
ON Color wheel linear change.
OFF
Load Defaut
Press ok key see the conrmation dialog box, Press OK key to restore to
default set.
Manual control interface
System information
Option Instruction
1CH. Pan 0~255 Press OK key into edit state, Then selected hundreds place.
Press up or down, change address code. Press OK key again,
selected ten place and edit. Press OK key again, select the rst
place and edit. Press it to exit the edit state.
…… 0~255
11CH. Shutter/Strobe 0~255
12CH. Lamp power/Reset Press ok key see the conrmation dialog box, Press OK key to
reset surface, all motors reset.
Option Instruction
Ver Current soware version: A101
DMX Monitor Enter into sub-surface, using value and percentage show the DMX channel to
check.
Page 6
P. 6
Tecshow Halo 1R |
English version
System errors
If the red ERR indicator light light on, it means xture running error, and enter
the sub-surface to check the details. Press “Clear” to empty the error record
aer nish check. Note: Sometimes it not the installation problem of Hall or
optocoupler. It is because the motor cable inversely connect.
Total Fixture hours Total using hour (accurate to minute)
Partial Fixture hours The using hour from the power on (accurate to minute)
Total lamp hours Total lighting hour (accurate to minute)
Partial lamp hours This time lighting hour (accurate to minute)
Error information Instruction
Reset fail, uart error Driver board no respond. There is problem in the uart communication
line of display board and driver board. Or the driver board problem.
Pan reset fail X photoelectric switch, or X Motor problem.
Tilt reset fail Y photoelectric switch, or Y Motor problem.
Pan Hall error Problem in X Hall.
Tilt Hall error Problem in Y Hall.
Motor Colour reset fail There is problem in Color wheel hall, or Color wheel motor.
Motor Gobo reset fail There is problem in Gobo wheel hall, or Gobo wheel motor.
Lamp control fail Lamp light on or o fail, there is problem in ballast or lamp.
lamp hours too long, pls replace The total lamp light hour over the Maximum lamp light hour in “high
class” menu. Remind the user change the lamp in time. And then clear
the lamp light hour in “high class”, timer reset.
In hear to set a password, to prevent the non-specialize person to faulty operate. Default password
is “UP DOWN UP DOWN”. Press “Enter” to verify the
password.
Advanced interface
Option Instruction
Sensor Monitor
Tilt Hall state 0 means the magnet closure, 1 means the magnet stagger.
Color hall state 0 means the magnet closure, 1 means the magnet stagger.
Gobo hall state 0 means the magnet closure, 1 means the magnet stagger.
Pan codewheel state 2digit, each digit corresponding to the photoelectricity
switch on the coding disc.
Tilt codewheel state 2digit, each digit corresponding to the photoelectricity
switch on the coding disc.
Pan codewheel step Running in positive direction, the step value adding, Run-
ning in negative direction, the step value reduced.
Tilt codewheel step Running in positive direction, the step value adding, Run-
ning in negative direction, the step value reduced.
Page 7
P. 7
| Tecshow Halo 17
English version
Note: When the xture in the Auto mode, and
connect with the DMX Controller. The signal will be
conicted. So please turn the xture to DMX Mode
before connect the controller. [Set up]--[Running
Mode]--[DMX].
4. DMX CHANNEL
Channel Value Function
1 0---255 PAN
2 0---255 PAN FINE
3 0---255 TILT
4 0---255 TILT FINE
5 0---255 PAN-TILT Speed
6
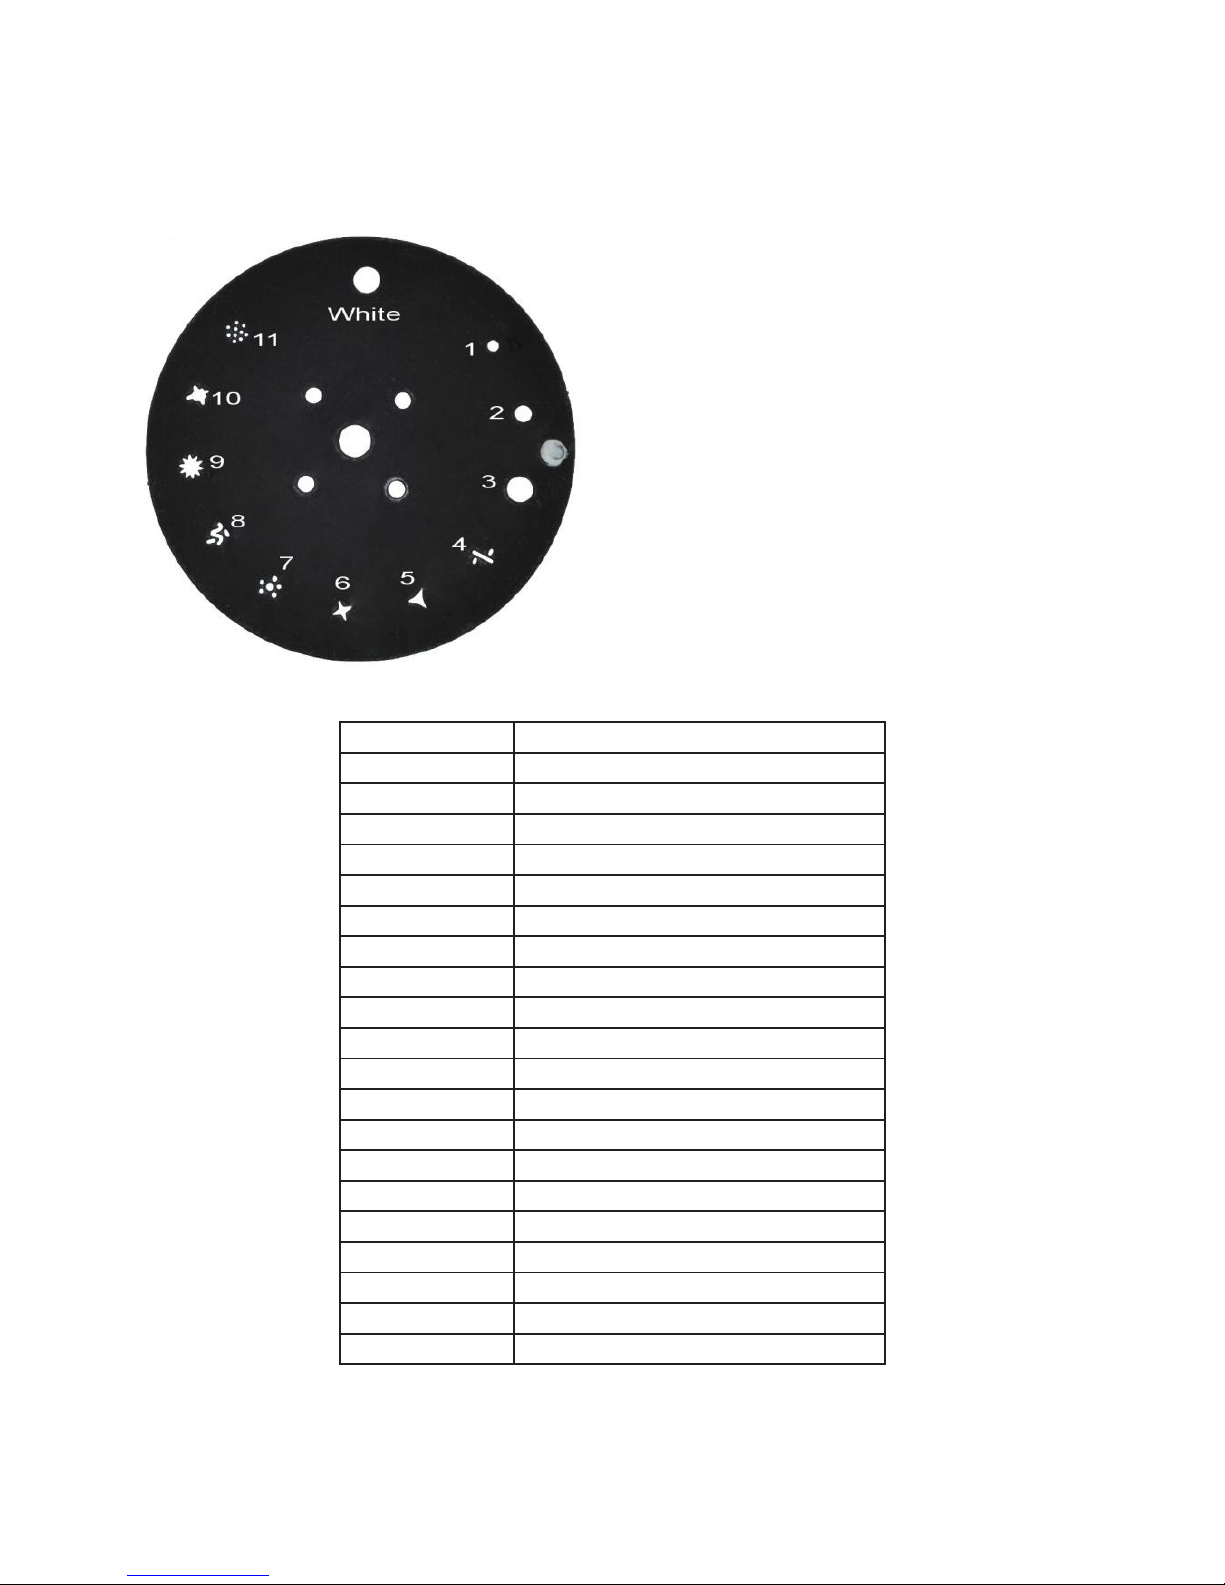
COLOR
0---4 White
5---9 White+color1
10---14 Color1
15---19 Color1+color2
20---24 Color2
25---29 Color2+color3
30---34 Color3
35---39 Color3+color4
40--44 Color4
Reset calibration
Pan calibration Pan Fine
Adjustment range:-128~+127,
+0 shows no adjustment.
Tilt calibration Tilt Fine
Color calibration Color wheel ne
Gobo calibration Gobo wheel ne
Eects calibration Eects ne
Dimmer calibration Dimmer ne
Zero Point
correction
ON
OFF
Lamp Life hours 0-9999hours, The alarm sounded once over the maximum
lamp lighting hour.
Lamp hours clears Aer clear the lamp light hour, timer reset.
Page 8
P. 8
Tecshow Halo 1R |
English version
45---49 Color4+color5
50---54 Color5
55---59 Color5+color6
60---64 Color6
65---69 Color6+color7
70-74 Color7
75-79 Color7+color8
80-84 Color8
85-89 Color8+color9
90-94 Color9
95-99 Color9+color10
100-104 Color10
105-109 color10+color11
110-114 Color11
115-119 Color11+color12
120-124 Color12
125-129 Color12+White
130-200 Color wheel forward rotation from fast to slow
201-255 Color wheel reverse rotation from slow to fast
7
GOBO
0---4 White
5---9 Gobo1
10---14 Gobo2
15---19 Gobo3
20---24 Gobo4
25---29 Gobo5
30---34 Gobo6
35---39 Gobo7
40--44 Gobo8
45---49 Gobo9
50---54 Gobo10
55---59 Gobo11
60 --119 Gobo wheel shake from slow to fast. Every 5 values a gobo
120--185 Gobo wheel reverse rotation from fast to slow
186--190 Stop
191--255 Gobo wheel Forward rotation from slow to fast
8
0---127
PRISM
128---255
Page 9

P. 9
| Tecshow Halo 17
English version
9 RPRISM rotation
0---63 Position
64---150 forward rotation from slow to fast
151---154 Stop
155---235 reverse rotation from fast to slow
236--255 Shake
10 0---255 Dimmer
11
Shutter/Strobe
0---3 Closed
4-130 Strobe slow to fast
131-135 Stop
136-251 Pulse strobe
252-255 Stop
12
Lamp Power/Reset
0---39 None
40---59 Lamp on
60---79 Lamp o
80-99 None
100--149 Reset the small motors
150--199 Reset X/Y motors
200---255 Reset all motors
PAN - channel 1
PAN FINE - channel 2
TILT - channel 3
TILT FINE - channel 4
PAN/TILT Speed – channel 5
Color wheel - channel 6
Page 10

P. 1 0
Tecshow Halo 1R |
English version
Bit Eect
201--255 SLOW - FAST REVERSE ROTATION
130--200 FAST –SLOW FORWARD ROTATION
125 CTO 8000 + WHITE
120 CTO 8000
115 FLUORESCENCE + CTO 8000
110 FLUORESCENCE
105 BROWN + FLUORESCENCE
100 BROWN
95 YELLOW + BROWN
90 YELLOW
85 YELLOW GREEN + YELLOW
80 YELLOW GREEN
75 PURPLE RED + YELLOW GREEN
70 PURPLE RED
65 BLUE + PURPLE RED
60 BLUE
55 DARK YELLOW + BLUE
50 DARK YELLOW
45 ROSE RED +DARK YELLOW
40 ROSE RED
35 GREEN + ROSE RED
30 GREEN
25 LIGHT YELLOW + GREEN
20 LIGHT YELLOW
15 RED + LIGHT YELLOW
10 RED
5 WHITE + RED
0 WHITE
Page 11
P. 11
| Tecshow Halo 17
English version
Bit Eect
191--255 SLOW-FAST FORWARD ROTATION
186 STOP
120--185 FAST - SLOW REVERSE ROTATION
115 GOBO 11 SHAKE SLOW TO FAST
…… ……
70 GOBO 2 SHAKE SLOW TO FAST
65 GOBO 1 SHAKE SLOW TO FAST
60 White SHAKE SLOW TO FAST
55 GOBO 11
50 GOBO 10
45 GOBO 9
40 GOBO 8
35 GOBO 7
30 GOBO 6
25 GOBO 5
20 GOBO 4
15 GOBO 3
10 GOBO 2
5 GOBO 1
0 WHITE
STATIC GOBO CHANGE - channel 7
Page 12

P. 12
Tecshow Halo 1R |
PRISM INSERTION - channel 8
PRISM ROTATION - channel 9
DIMMER - channel 10
STROBE - channel 11
LAMP POWER & RESET - channel 12
English version
Bit Eect
236 Shake
235 reverse rotation Slow rotation
…… ……
155 reverse rotation Fast rotation
151 Stop
150 forward rotation Fast rotation
…… ……
64 forward rotation Slow rotation
0-63 POSITION
Bit Eect
252 Stop
136 Pulse strobe
131 Stop
4-130 Strobe from slow to fast
0-3 Closed
Bit Eect Remark
200-255 COMPLETE RESET
Reset is activated passing through the
unused range and staying 5 seconds.
150-199 PAN/TILT RESET
100-149 Reset small motors
80-99 UNUSED RANGE
60 -79 LAMP OFF
Lamp switch passing through the unused
range and staying 5 seconds.
40-59 Lamp ON
0-39 UNUSED RANGE
Bit Eect
128-255 PRISM INSERTED
0-127 PRISM EXCLUDED
Page 13

P. 13
| Tecshow Halo 17
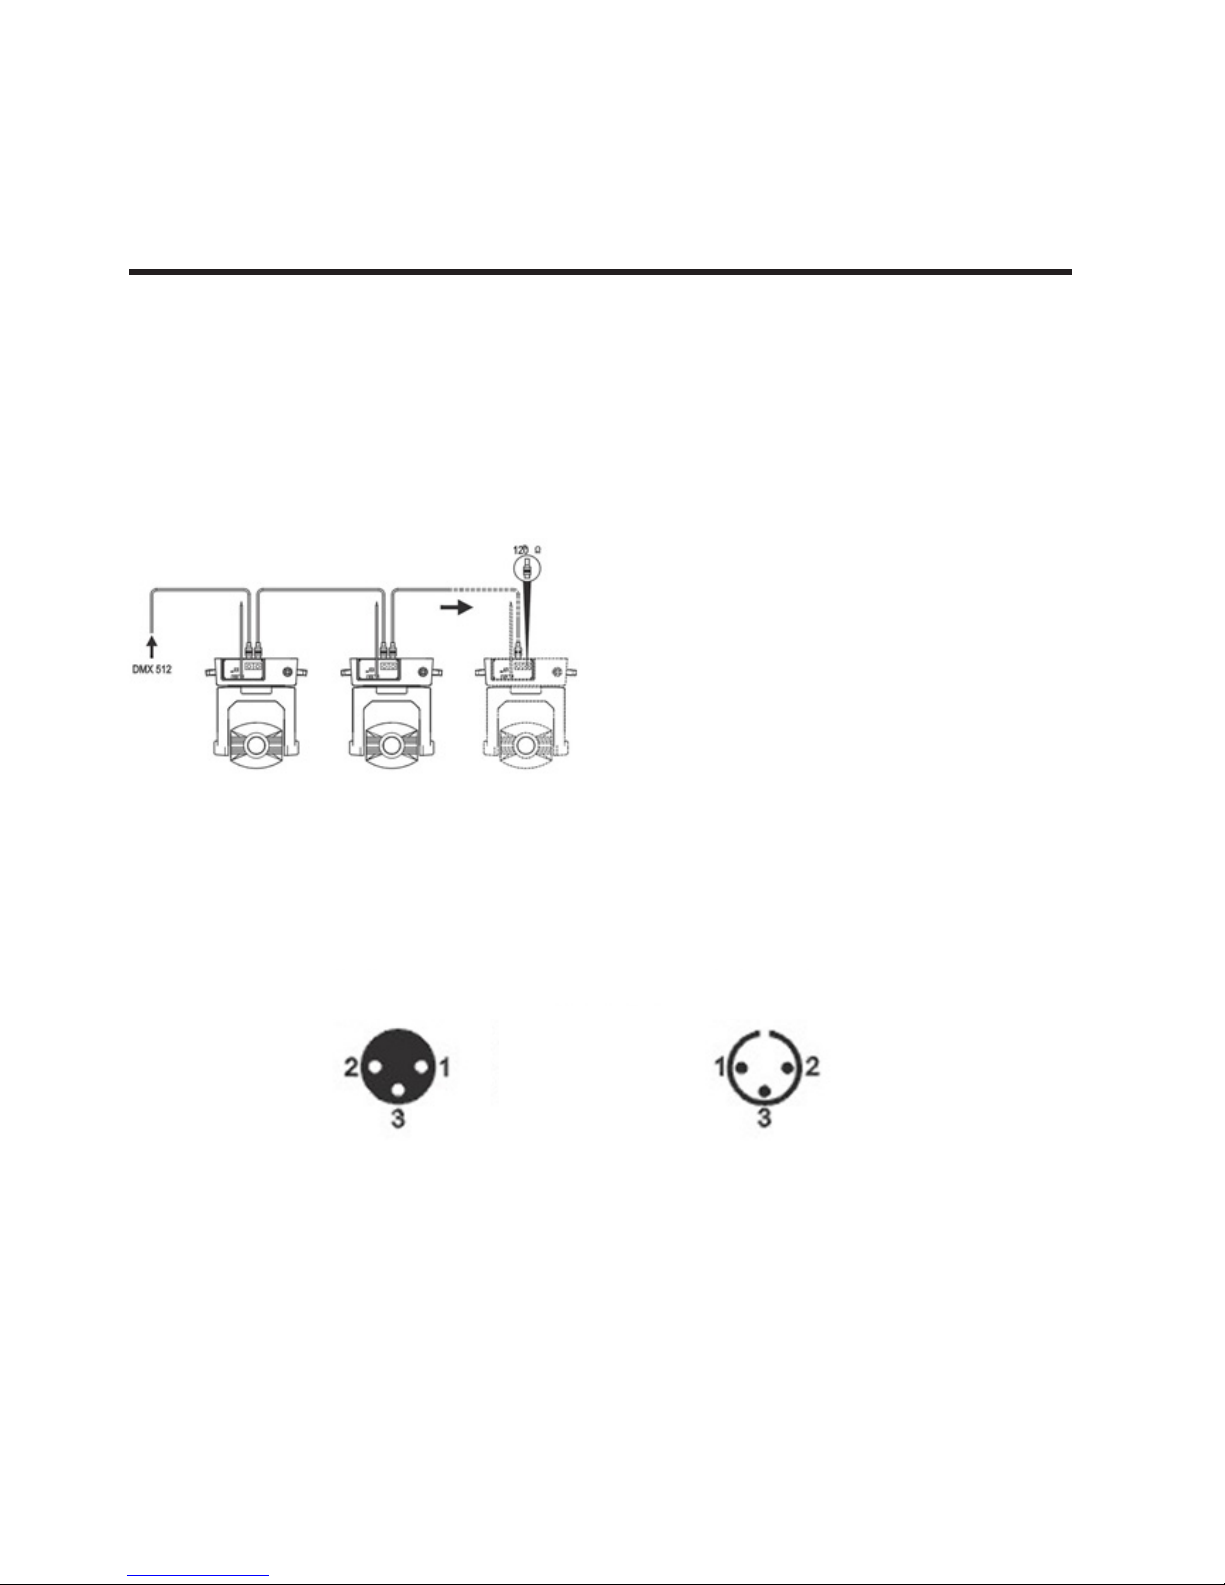
Use the CLR-XLR controller line connect every
light’s DMX input port from controller’s DMX input
port, and start from the rst light’s DMX input port
connect to the second light’s DMX input port, in this
way, until connect all of the lights, and then use the
loop accompanied connect to the last light's signal
input port the connect complete, as the follow
picture:
Note: Please remember that in the last table lamps
and lanterns signal outlet connection a loop plug.
In this loop inserted in The CANON plug between
2 and 3 feet . Connect a 120 European resistance,
connect this loop plug can avoid DMX512 signal reection phenomenon in the transmission process
of signal.
This lamp use 3 core XLR plug (plug seat). If use 3
core XLR plugs (plug seat), you must use a conversion line (5 core to 3 core), as shown:
5. CONTROL SIGNAL WIRE CONNECTION
English version
Output Input
Pin 1: Screen
Pin 2: Signal Pin 3: Signal +
Page 14

P. 14
Tecshow Halo 1R |
The conversion of three and ve core plug (male and female)
Three core canon plug DMX512 interface circuit
Pin 1: GND (Screen)
Pin 2: Signal (-)
Pin 3: Signal (+)
Pin 4: N/C
Pin 5: N/C
Pin 1: GND (Screen)
Pin 2: Signal (-)
Pin 3: Signal (+)
Pin 4: N/C
Pin 5: N/C
Pin 1: GND (Screen)
Pin 2: Signal (-)
Pin 3: Signal (+)
Pin 1: GND (Screen)
Pin 2: Signal (-)
Pin 3: Signal (+)
a. If the light’s lens damaged or broken, and
should need change the new lens, if the bulb
damaged or have any deformation, make the
light dim, it says that the bulb had run out of it’s
life., should change in time. There are 3 thermal
protection device, using for cut o the lights
power when it is heating. If the thermal pro-
tection device set up, and then need to check
whether the fan is normal.
b. It need Periodically to clean the out and in
optical lens and the reector’s. Out put for the
optimization lighting eect, clean time need
to see the lights operating frequency and the
using of the surrounding environment, using
the so cloth or general glass cleaning products
to clean. Suggest clean the external optical
system every 20 day, at least clean the internal
optical system every 60 days.
c. Please don’t to use the alcohol etc organic sol-
vent clean the out shell, in case it is damaged.
6. MAINTENANCE
English version
Page 15

P. 15
| Tecshow Halo 17
Design and product specications are subject to change without prior notice.
a. When the products manufactured, they are
good performance, complete packaging. All
users should comply with the warnings and instructions stated above. Any damage caused by
misuse is not within the scope of the company's
warranty. Operation manual of neglect caused
problems and the fault is not in the dealer is
responsible within the scope of Neglect operation manual due to problem is out of dealer
responsibility.
b. This handbook stated related matters explana-
tion right belongs to our company. This lamp
use 3 core XLR plug (plug seat). If use 3 core XLR
plugs (plug seat), you must use a conversion
line (5 core to 3 core), as shown: The conversion
of three and ve core plug (male and female)
7. STATEMENT
English version
Page 16

P. 1 6
Tecshow Halo 1R |
HALO 1R
Cabezal móvil tipo beam – Lámpara 1R de 120W
Halo 1R es un muy compacto cabezal móvil tipo
beam que cuenta con una lámpara 1R de 120W. Con
un ángulo de haz de 3,5º, el equipo proyecta un haz
paralelo y potente que se destaca naturalmente
en aplicaciones móviles de pequeña y mediana
escala. Halo 1R tiene 12 ltros dicroicos, 11 gobos
estáticos, prisma de 8 facetas y una velocidad de
movimientos que lo destaca de la media. Con un
rendimiento de 196.400 Lux a 5 metros (15 pies) de
distancia, el cabezal logra una relación potencia/
consumo sin precedentes.
Especicaciones
Fuente & Óptica
• Fuente de luz: Lámpara 1R de 120W
• Temperatura de color: 8.500K
• Vida útil promedio: 2.000 horas
• Ángulo de haz: 3,5º
Información fotométrica
• Flujo lumínico: 196.400 Lux @ 5M (15 pies)
Efectos y funciones
• Rueda de color: 12 ltros dicroicos + blanco
• Rueda de gobo estática: 11 gobos + abierto
• Efecto gobo shake
• Prisma rotativo de 8 caras
• Dimmer: Rango completo 0-100%
• Estrobo: 1-13 ashes por segundo
Control
• Canales DMX: 12
• Modos de operación: DMX, Master/Slave &
automático
Movimiento
• Pan: 540°
• Tilt: 250°
• Resolución: 16-bit
• Reposicionamiento automático
Físico
• Conectores DMX: 2 conectores XLR (XLR-3 de
entrada & salida)
• Alimentación: PowerKON de entrada
• Display LED
• Dimensiones: 310x230x390 mm. / 12,2x9x15,3
pulg.
• Peso: 9 Kg. / 19,8 Lbs.
1. DESCRIPCIÓN
Versión Español
Page 17

P. 17
| Tecshow Halo 17
Versión Español
Antes de utilizar el equipo por primera vez, abra el
embalaje con cuidado revise que se encuentre en
buen estado. En caso de que faltasen piezas o alguna no funcionase correctamente como consecuencia de un envío defectuoso, póngase en contacto
con el distribuidor de inmediato.
No instale la unidad sobre supercies inamables.
Instale el equipo en ambientes con ventilación adecuada y mantenga una distancia mínima de 10cm
con otros objetos o supercies. Procure no obstruir
las ranuras de ventilación.
No apunte la salida de luz hacia objetos inamables, lámparas o radiadores. Mantenga dichos obje-
tos a una distancia mínima de 12 m de la unidad.
No mire de forma directa a la salida de luz.
Compruebe que el voltaje utilizado no sea superior
o inferior al indicado en el presente manual.
2. INSTRUCCIONES DE SEGURIDAD
Page 18
P. 18
Tecshow Halo 1R |
Versión Español
Menú: Interfaz principal
Set
• Run mode
• DMX Address
• Channel mode
• Sound Sense
• Invert Pan
• Invert Tilt
• Pan-Tilt Swap
• No DMX Signal
• Display
• Lamp on @ Start up
• Linear Color
• Load Default
Manu
Sys
• Ver
• DMX monitor
• System errors
• Total Fixture hours
• Partial Fixture hours
• Total Lamp hours
• Partial Lamp hours
Advan
• Sensor monitor
• Reset calibration
• Zero Point Correction
• Lamp Life hours
• Lamp hours clear
Chinese-English switch
Display screen reverse
3. PANEL DE CONTROL
Opción Descripción
Run Mode
DMX Modo esclavo: Acepta comandos de un controlador o del equipo principal.
Auto1
Modo maestro: Ejecución automático y envío de señal DMX a equipos
esclavos.
…
Auto 8
Sound
Random
DMX Address 1-512
Dirección DMX: Presione el botón OK para editar el valor de la dirección
DMX. Presione UP o DOWN para modicar la primera cifra. Vuelva a
presionar OK, seleccione la segunda cifra y edítela. Vuelva a presionar
OK, seleccione la tercera cifra y edítela. Presione nuevamente OK para
salir de modo de edición.
Channel Mode 12 Modo de canales DMX: 12.
Sound Sense 0-100 Sensibilidad de sonido
Invert Pan
OFF
Inversión de pan (encendido/apagado)
ON
Conguración de la interfaz
Page 19

P. 1 9
| Tecshow Halo 17
Versión Español
Esta interfaz se utiliza para controlar el equipo
actual y acceder al modo maestro del equipo (envío
de señal DMX a otros equipos esclavos).
El menú manual funciona de acuerdo con el modo
estándar de 12 canales.
Invert Tilt
OFF
Inversión de tilt (encendido/apagado)
ON
Pan-Tilt Swap
OFF
ON Modique el canal de los ejes X, Y (incluye el pan y tilt nos)
No DMX Signal
KEEP Sin señal DMX, el equipo mantendrá el último modo ejecutado.
CLEAR El equipo detendrá cualquier modo en ejecución.
Display
ON La luz de fondo se apagará luego de 30 segundos.
OFF La luz de fondo se mantiene encendida.
Lamp on @
start up
OFF El equipo se encenderá luego de reiniciar, sin lámpara (utilice el menú o
controlador para encenderla manualmente).
ON La lámpara se encenderá al iniciar el equipo. Debe esperar a que se
encienda la lámpara para reiniciar.
Linear Color
ON Cambio lineal en la rueda de color.
OFF
Load Defaut
Presione la tecla OK para ver el cuadro de diálogo de conrmación. Presione OK nuevamente para restablecer los valores predeterminados.
Interfaz de control manual
Información del sistema
Opción Manual de instrucciones
1CH. Pan 0~255 Presione el botón OK para editar el valor de la dirección DMX.
Presione UP o DOWN para modicar la primera cifra. Vuelva
a presionar OK, seleccione la segunda cifra y edítela. Vuelva
a presionar OK, seleccione la tercera cifra y edítela. Presione
nuevamente OK para salir de modo de edición.
…… 0~255
11CH. Shutter/estrobo 0~255
12CH. Encendido de
lámpara/Restablecer
Presione la tecla OK para ver el cuadro de diálogo de conr-
mación. Presione OK nuevamente para restablecer todos los
valores.
Opción Descripción
Ver Ver la versión actual del soware: A101.
DMX Monitor Ingrese a la interfaz secundaria, utilice el valor y el porcentaje para mostrar el
canal DMX a vericar.
Page 20

P. 2 0
Tecshow Halo 1R |
Versión Español
System errors
Si se ilumina la palabra ERR en rojo, hay un error en el equipo. Ingrese a la
interfaz secundaria para obtener más detalles. Presione “clear” para limpiar
el registro de errores luego de nalizar con el chequeo.
Observación: En ocasiones, no hay errores de óptica o instalación, sino que
se encuentra mal conectado el cable principal.
Total Fixture hours Tiempo de funcionamiento del equipo (exactitud al minuto).
Partial Fixture hours Tiempo de uso desde el arranque (exactitud al minuto).
Total lamp hours Tiempo de funcionamiento de la lámpara (exactitud al minuto).
Partial lamp hours Tiempo de uso de la lámpara durante la última sesión (exactitud al minuto).
Tipo de error Descripción
Reset fail, uart error La tarjeta del controlador no responde. Existe un problema en la línea de
comunicación de la tarjeta del controlador y el panel de visualización.
Pan reset fail Existe un problema en el motor o el interruptor fotoeléctrico del eje X.
Tilt reset fail Existe un problema en el motor o el interruptor fotoeléctrico del eje Y.
Pan Hall error Existe un problema en el eje X
Tilt Hall error Existe un problema en el eje Y
Motor Colour reset fail Existe un problema en el eje o el motor de la rueda de color
Motor Gobo reset fail Existe un problema en el eje o el motor de la rueda de gobos
Lamp control fail Si falla el encendido o apagado de la lámpara, existe un problema con
el balasto o la bombilla
lamp hours too long, pls replace Si observa este mensaje, la lámpara ha nalizado su vida útil. El sis-
tema le recordará al usuario que debe sustituir la lámpara. Luego de
eliminar las horas de la lámpara, reinicie el temporizador.
Procure generar una contraseña para evitar que
usuarios inexpertos operen el equipo. La con-
traseña predeterminada es UP, DOWN, UP DOWN.
Presione “Enter” para validar la contraseña.
Interfaz avanzada
Opción Descripción
Sensor Monitor
Tilt Hall state 0 indica el cierre del imán. 1 indica que el imán se tambalea.
Color hall state 0 indica el cierre del imán. 1 indica que el imán se tambalea.
Gobo hall state 0 indica el cierre del imán. 1 indica que el imán se tambalea.
Pan codewheel state El usuario verá 2 dígitos. Cada dígito corresponde al inter-
ruptor fotoeléctrico en el disco de codicación.
Tilt codewheel state El usuario verá 2 dígitos. Cada dígito corresponde al inter-
ruptor fotoeléctrico en el disco de codicación.
Pan codewheel step Si se ejecuta hacia adelante, el valor de paso añade. Si se
ejecuta hacia atrás, el valor de paso, disminuye.
Tilt codewheel step Si se ejecuta hacia adelante, el valor de paso añade. Si se
ejecuta hacia atrás, el valor de paso, disminuye.
Page 21
P. 2 1
| Tecshow Halo 17
Versión Español
Reset calibration
Pan calibration Pan no
Rango de ajuste: -128 a 127.
+0 no muestra ajuste
Tilt calibration Tilt no
Color calibration Rueda de color no
Gobo calibration Rueda de gobo no
Eects calibration Efectos nos
Dimmer calibration Dimmer no
Zero Point
correction
ON
OFF
Lamp Life hours Vida útil de la lámpara: 0-9999 horas. Sonará una alarma
cuando se exceda la vida útil de la lámpara.
Lamp hours clears Luego de eliminar las horas de la lámpara, reinicie el tem-
porizador.
Observación: Cuando el equipo esté en modo
automático y conectado a un controlador DMX, la
señal entrará en conicto. Por lo tanto, procure
congurar el equipo en modo DMX antes de conec-
tarlo al controlador. Ruta: [Set up]--[Running
Mode]--[DMX].
4. CUADRO DE CANALES DMX
Canal Valor Función
1 0---255 PAN
2 0---255 PAN FINO
3 0---255 TILT
4 0---255 TILT FINO
5 0---255 Velocidad de PAN/TILT
6
COLOR
0---4 Blanco
5---9 Blanco + color 1
10---14 Color 1
15---19 Color 1 + color 2
20---24 Color 2
25---29 Color 2 + color 3
30---34 Color 3
35---39 Color 3 + color 4
40--44 Color 4
Page 22

P. 2 2
Tecshow Halo 1R |
Versión Español
45---49 Color 4 + color 5
50---54 Color 5
55---59 Color 5 + color 6
60---64 Color 6
65---69 Color 6 + color 7
70-74 Color 7
75-79 Color 7 + color 8
80-84 Color 8
85-89 Color 8 + color 9
90-94 Color 9
95-99 Color 9 + color 10
100-104 Color 10
105-109 Color 10 + color 11
110-114 Color 11
115-119 Color 11 + color 12
120-124 Color 12
125-129 Color 12 + blanco
130-200 Rueda de color, rotación de hacia adelante, velocidad decreciente.
201-255 Rueda de Color, rotación hacia atrás, velocidad creciente.
7
GOBO
0---4 Blanco
5---9 Gobo 1
10---14 Gobo 2
15---19 Gobo 3
20---24 Gobo 4
25---29 Gobo 5
30---34 Gobo 6
35---39 Gobo 7
40--44 Gobo 8
45---49 Gobo 9
50---54 Gobo 10
55---59 Gobo 11
60 --119 Movimiento de rueda de gobos, velocidad creciente. Un gobo cada 5
valores.
120--185 Rueda de color, rotación de hacia atrás, velocidad decreciente
186--190 Detención
191--255 Rueda de gobos, rotación hacia adelante, velocidad creciente
Page 23

P. 2 3
| Tecshow Halo 17
Versión Español
8
0---127
PRISMA
128---255
9 Rotación de prisma
0---63 Posición
64---150 Rotación hacia adelante, velocidad creciente
151---154 Detención
155---235 Rotación hacia atrás, velocidad decreciente
236--255 Movimiento
10 0---255 Dimmer
11
Shutter/estrobo
0---3 Cerrado
4-130 Estrobo, velocidad creciente
131-135 Detención
136-251 Estrobo con efecto pulse
252-255 Detención
12
Encendido de lámpara/Restablecer
0---39 Sin función
40---59 Lámpara encendida
60---79 Lámpara apagada
80-99 Sin función
100--149 Restablecer todos los motores
150--199 Restablecer motores X e Y
200---255 Restablecer todos los motores
PAN - canal1
PAN FINE - canal2
TILT - canal 3
TILT FINE - canal 4
Velocidad de PAN/TILT - canal 5
Rueda de color - canal 6
Page 24

P. 2 4
Tecshow Halo 1R |
Versión Español
Bits Efecto
201--255 ROTACIÓN HACIA ATRÁS, VELOCIDAD
CRECIENTE
130--200 ROTACIÓN HACIA ADELANTE, VELOCIDAD
DECRECIENTE
125 CTO 8000 + BLANCO
120 CTO 8000
115 FLUORESCENCIA + CTO 8000
110 FLUORESCENCIA
105 MARRÓN + FLUORESCENCIA
100 MARRÓN
95 AMARILLO + MARRÓN
90 AMARILLO
85 VERDE AMARILLENTO + AMARILLO
80 VERDE AMARILLENTO
75 ROJO PÚRPURA + VERDE AMARILLENTO
70 ROJO PÚRPURA
65 AZUL + ROJO PÚRPURA
60 AZUL
55 AMARILLO OSCURO + AZUL
50 AMARILLO OSCURO
45 ROJO ROSADO + AMARILLO OSCURO
40 ROJO ROSADO
35 VERDE + ROJO ROSADO
30 VERDE
25 AMARILLO CLARO + VERDE
20 AMARILLO CLARO
15 ROJO + AMARILLO CLARO
10 ROJO
5 BLANCO + ROJO
0 BLANCO
Page 25

P. 2 5
| Tecshow Halo 17
Versión Español
Bits Efecto
191--255 ROTACIÓN HACIA ADELANTE, VELOCIDAD CRECIENTE
186 DETENCIÓN
120--185 ROTACIÓN HACIA ATRÁS, VELOCIDAD DECRECIENTE
115 MOVIMIENTO DE GOBO 11, VELOCIDAD CRECIENTE
…… ……
70 MOVIMIENTO DE GOBO 2, VELOCIDAD CRECIENTE
65 MOVIMIENTO DE GOBO 1, VELOCIDAD CRECIENTE
60 BLANCO, MOVIMIENTO CON VELOCIDAD CRECIENTE
55 GOBO 11
50 GOBO 10
45 GOBO 9
40 GOBO 8
35 GOBO 7
30 GOBO 6
25 GOBO 5
20 GOBO 4
15 GOBO 3
10 GOBO 2
5 GOBO 1
0 BLANCO
CAMBIO DE GOBO ESTÁTICO - canal 7
Page 26
P. 2 6
Tecshow Halo 1R |
Versión Español
INSERCIÓN DE PRISMA - canal 8
ROTACIÓN DE PRISMA - canal 9
DIMMER - canal 10
ESTROBO - canal 11
ENCENDIDO DE LÁMPARA y RESTABLECER - canal 12
Bits Efecto
236 Movimiento
235 Rotación hacia atrás, lenta
…… ……
155 Rotación hacia atrás, rápida
151 Detención
150 Rotación hacia adelante, rápida
…… ……
64 Rotación hacia adelante, lenta
0-63 POSICIÓN
Bits Efecto
252 Detención
136 Estrobo con efecto pulse
131 Detención
4-130 Estrobo, velocidad creciente
0-3 Cerrado
Bits Efecto Observación
200-255 RESTABLECER POR COMPLETO Esta función se activa al pasar por el
rango no utilizado y permanecer allí 5
segundos.
150-199 RESTABLECER PAN/TILT
100-149 Restablecer motores pequeños
80-99 RANGO NO UTILIZADO
60 -79 LÁMPARA APAGADA Esta función se activa al pasar por el
rango no utilizado y permanecer allí 5
segundos.
40-59 Lámpara encendida
0-39 RANGO NO UTILIZADO
Bits Efecto
128-255 PRISMA INCLUIDO
0-127 PRISMA EXCLUIDO
Page 27
P. 2 7
| Tecshow Halo 17
Versión Español
Utilice un cable CLR-XLR para enlazar varias unidades desde la entrada DMX del controlador. Para
comenzar, conecte la entrada DMX de la primera
unidad con la entrada DMX de la segunda unidad.
Repita este paso hasta enlazar todas las unidades
deseadas. Luego use el cable para conectar al
puerto de entrada de la última luz y así nalizar la
conexión, como describe la imagen a continuación:
Observación: Procure colocar un terminador (de
120 Ohm) entre las clavijas 2 y 3 de la última unidad
de la cadena para garantizar la transmisión ecaz
de los datos DMX y evitar la pérdida de señal en el
cableado.
Este equipo utiliza conectores XLR-3. Si no utiliza
conectores XLR-3 (enchufe), debe emplear un cable
de conversión (5 núcleos a 3 núcleos), como se
muestra a continuación:
5. CONEXIÓN DMX
Salida Entrada
Clavija 1: Tierra
Clavija 2: Señal Clavija 3: Señal +
Page 28

P. 2 8
Tecshow Halo 1R |
Versión Español
Diagrama de conectores de 3 y 5 clavijas (macho y hembra)
Circuito de interfaz DMX512 de tres clavijas
Clavija 1: Tierra
Clavija 2: Señal -
Clavija 3: Señal +
Clavija 4: Sin función
Clavija 5: Sin función
Clavija 1: Tierra
Clavija 2: Señal -
Clavija 3: Señal +
Clavija 4: Sin función
Clavija 5: Sin función
Clavija 1: Tierra
Clavija 2: Señal -
Clavija 3: Señal +
Clavija 1: Tierra
Clavija 2: Señal -
Clavija 3: Señal +
a. Sustituya el lente y la lámpara en caso de que
se encuentren rayados o dañados. Si observa
que la lámpara está deformada por el calor o
que existe una disminución en la salida de luz,
es hora de reemplazarla. Hay 3 dispositivos de
protección térmica, que se utilizan para apagar
las luces cuando hay sobrecalentamiento. Si el
dispositivo de protección térmica está activado, procure vericar el estado del ventilador.
b. Se recomienda la limpieza regular de las partes
internas y externas de las ópticas para optimizar la salida de luz. La frecuencia de limpieza
dependerá del ambiente en el que esté instalado el equipo. Utilice un paño suave con productos para limpieza de vidrios. Se recomienda
limpiar las ópticas externas, al menos, cada 20
días. Y las piezas ópticas internas, cada 60 días.
c. Evite el uso de productos que contengan alco-
hol o solventes para limpiar la cubierta.
6. MANTENIMIENTO
Page 29

P. 2 9
| Tecshow Halo 17
Observación: La información de este manual está sujeta a cambios sin previo aviso.
Versión Español
a. Procure revisar que el equipo se encuentre
en buen estado, antes de utilizarlo. Siga las
instrucciones y advertencias de seguridad del
manual para garantizar el buen estado del
equipo y su funcionamiento seguro. La garantía
no cubre daños causados por el incumplimiento de las instrucciones del manual. El fabricante
y el distribuidor no aceptarán responsabilidad
por el mal uso del equipo.
b. B. El material del presente manual es de uso
exclusivo para equipos de AMPRO. Este equipo
utiliza conectores XLR-3. Si no utiliza conectores XLR-3 (enchufe), debe emplear un cable
de conversión (5 núcleos a 3 núcleos), como se
muestra a continuación: Diagrama de conec-
tores de 3 y 5 clavijas (macho y hembra).
7. AVISO
Page 30

P. 3 0
Tecshow Halo 1R |
tecshow.amproweb.com
 Loading...