

Page 1

USER MANUAL / MANUAL DE USUARIO
PLEASE READ THE INSTRUCTIONS CAREFULLY BEFORE USE /
POR FAVOR LEA LAS INSTRUCCIÓNES ANTES DE USAR
CUBEX 360
MOVING HEAD
Page 2

CUBEX 360
P.
2
1. Overview
Cubex 360 is a moving head that combines six razor-sharp
beams with 12 ultra-bright strips, achieving stunning
visual eects. Equipped with 6 CREE® RGBW 10W LEDs and
12 RGB SMD 5050 strips, the fixture is a true 2-in-1 moving
head with 9º beams and limitless color combinations. Regarding functions, Cubex 360 sports endless tilt rotation,
0-100% dimmer and high-speed strobe eect. Controllable via DMX, the fixture has color macros, built-in programs and an optimized sound-active mode. Cubex 360 is
an all-in-one moving head ideal for small/medium-scale
applications.
Specifications
Source & Optic
• Light Source:
- 6 x 4-in-1 CREE® 10W LEDs
- 12 x 4 SMD 5050 RGB LEDs
• LEDs life: 50,000 hours
• Beam angle: 6 x 9º
Photometric Data
• Luminous flux: 650 lux @ 3M (10 .)
• Color temperature: 6500K
Eects & Functions
• 6 razor sharp beams
• 12 high-brightness strips
• Quad-color LED technology: Smooth RGBW mix
with no multi colored shadows
• Dimmer: Full range 0-100%
• Strobe eect
• Built-in eects
• Color macros
• Unlimited tilt movement
• Flicker free operation
Control
• DMX Channels: 14/16
• Operational modes: DMX, Sound active, Mas-
ter/Slave & Autorun
Movement
• Pan: 630º
• Tilt: Unlimited
• 16-bit resolution
• Auto repositioning
Electrical
• Input voltage range: 100–240V, 50-60Hz
• Max. power consumption: 83W
Physical
• DMX Connectors: 2 XLR connectors (XLR-3 input & output)
• Power supply connectors: Interlock In
• 4-digit LED display
• Dimensions: 362x265x170.4 mm. / 14x10x6.7 in.
• Weight: 4.3 Kg. / 9.5 Lb.
ENGLISH VERSION
Page 3

CUBEX 360
P.
3
2. Introduction
Thank you for having chosen this professional
moving head. You will see you have acquired a
powerful and versatile device.
Unpack the device. Inside the box you should find:
1. One DMX connection cable
2. One quick lock handle
3. One safety rope
4. One use manual
5. One power cable
ENGLISH VERSION
3. Safety and maintenance
Information
• This device has le the factory in perfect condi-
tion. In order to maintain this condition and to
ensure a safe operation, it is absolutely necessa ry for the user to follow the safety instructions
and warning notes written in this user manual.
• Damages caused by the disregard of this user
manual are not subject to warranty. The dealer
will not accept liability for any resulting defects
or problems.
• If the device has been exposed to temperature
changes due to environmental changes, do not
switch it on immediately. The arising condensa tion could damage the device. Leave the device
switched o until it has reached room temperature.
• Please make sure that the device be earthed.
• Please replace housing if it is broken. This fixture
can be using aer finished installed.
• T he electric connection must carry out by qualified person.
• Make sure that the available voltage is not higher
than stated at the end of this manual.
• Make sure the power cord is never crimped or
damaged by sharp edges. If this would be the
case, replacement of the cable must be done by
an authorized dealer.
Page 4

CUBEX 360
P.
4
ENGLISH VERSION
• If the external flexible cable or cord of this lumi-
naire is damaged, it shall be exclusively replaced
by the manufacturer or his service agent or a simi lar qualified person in order to avoid a hazard.
• Please cut o the power if don’t use the fixture
or want to clean, maintenance.
• Please be aware that damages caused by manu-
al modifications to the device are not subject to warranty. Keep away from non-professionals.
Guidance
• This device is a lighting eect for professional use
on stages, in discotheques, theaters, etc., the de
vice was designed for indoor use only.
• This fixture is only allowed to be operated with
the max alternating current which stated in the
technical specifications in the last page of this manual.
• The device can do continuous work for eight
hours. Lighting eects are not designed for per manent operation. Consistent operation breaks
may ensure that the device will serve you for a
long time without defects.
• Handle with care, do not make the device by
strong shocks.
• While choosing the installation-spot, please
make sure that the device is not exposed to ex treme heat, moisture or dust. Please don’t pro ject the beam onto combustible substances.The
minimum distance between light-output from
the projector and the illuminated surface must
be more than 1 meter.
• Please do not in damp, overheat or dusty envi-
ronment install and use the device. Do not use
light on fuel. The distance between the device
and the projectile to keep at least 1 meter.
• If you use the quick lock cam in hanging up the
fixture, please make sure the quick lock fasteners
turned in the quick lock holes correctly.
• Operate the device only aer having familiarized
with its functions. Do not permit operation by
persons not qualified for operating the device.
• Most damages are the result of unprofessional operation.
• Please use the original packaging if the device is
to be transported.
• For safety reasons, please be aware that all mod-
ifications on the device are forbidden.
If this device will be operated in any way dier ent to the one described in this manual, the prod uct may suer damages and the guarantee be comes void. Furthermore, any other operation
may lead to short-circuit, burns, electric shock,
lamp explosion, crash, etc.
Page 5
CUBEX 360
P.
5
ENGLISH VERSION
4. Installation
• The applicable temperature for the lighting is be-
tween -25°C to 45°C. Do not use the lighting under
or above the temperature.
• The installation of the eect has to be built and
constructed in a way that it can hold 10 times the
weight for 1 hour without any harming deformation.
• The installation must always be secured with a
secondary safety attachment, e.g. an appropriate
safety rope.Never stand directly below the device
when mounting, removing or servicing the fixture.
• The operator has to make sure the safety relating
and machine technical installations are approved
• by an expert before taking the device into opera-
tion for the first time.
• These installations have to be approved by a
skilled person once a year.
• Overhead mounting requires extensive experi-
ence, including amougst others calculating work ing load limits, installation material being used,
and periodic safety inspection of all installation
material and the device. If you lack these qualifi cations, do not attempt the installation yourself.
Improper installation can result in bodily injury.
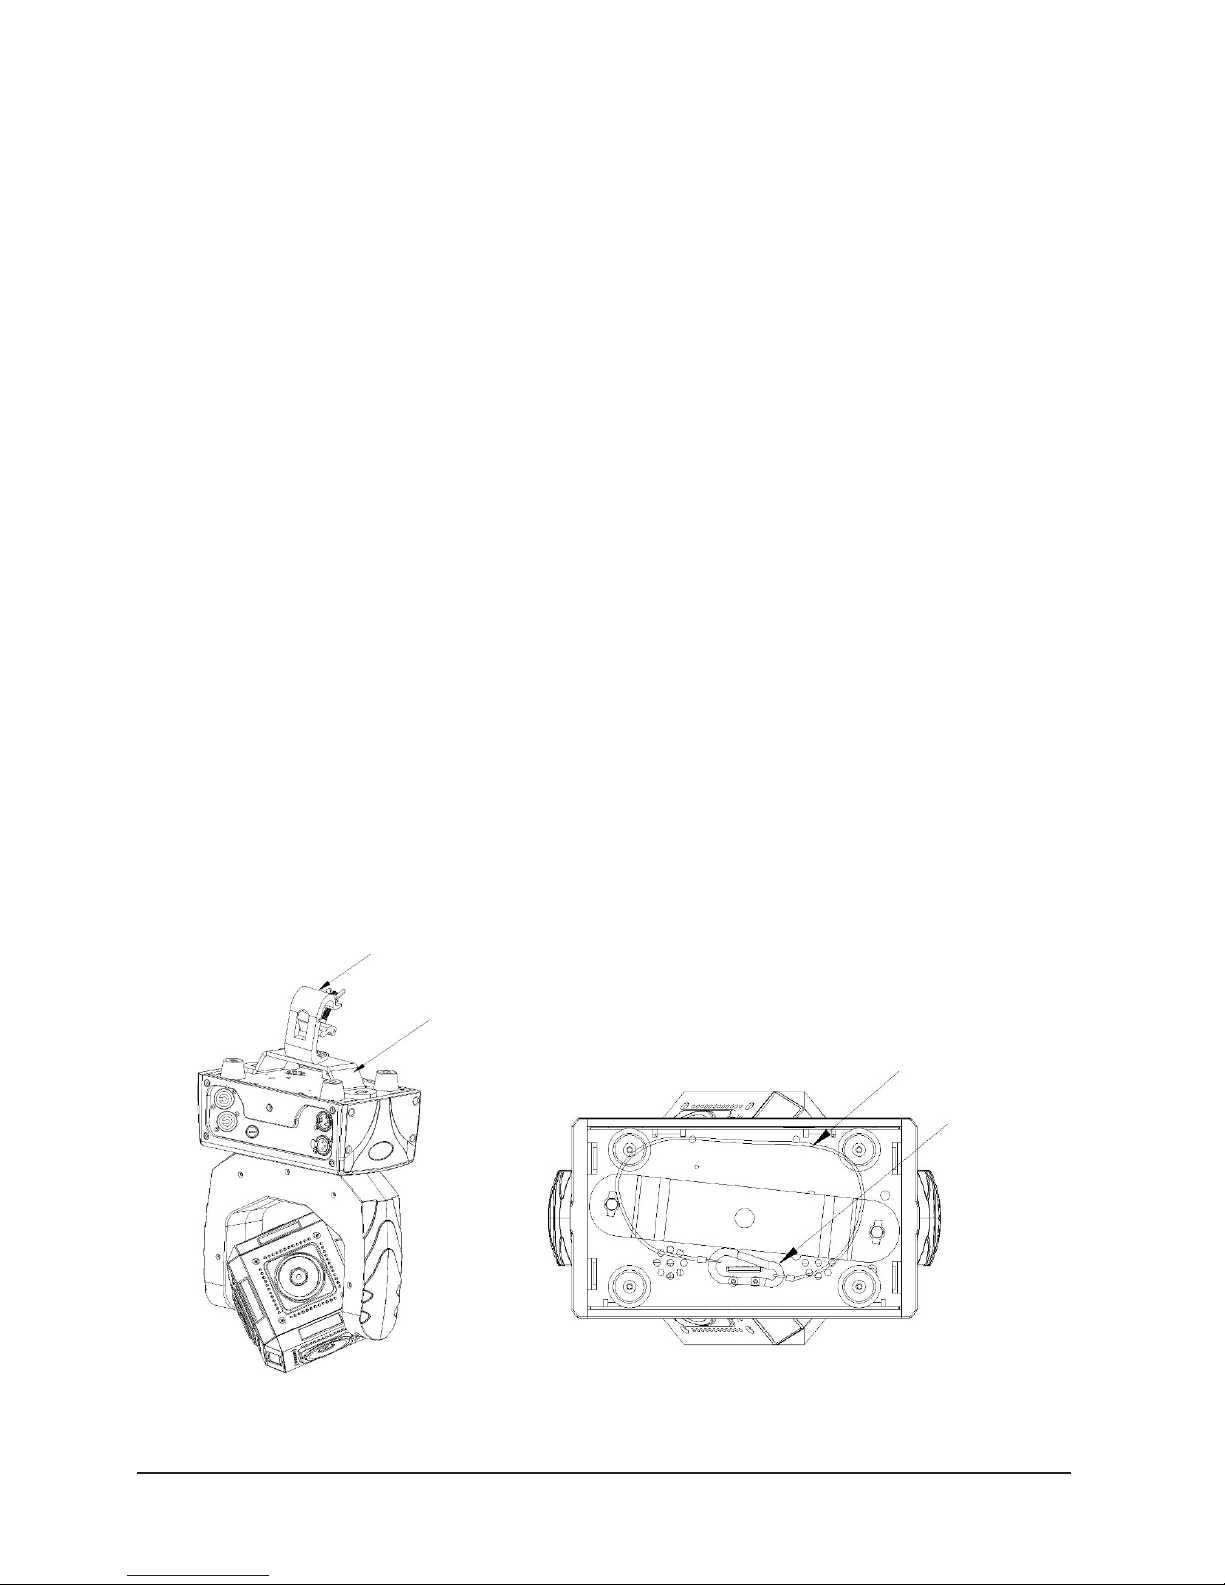
Rigging
Mounting Bracket
Handing Bracket
Safety Rope
Rapid locking hook
Page 6
CUBEX 360
P.
6
ENGLISH VERSION
1. Insert the quick-lock fasteners of the first hold er into the respective holes on the bottom of the
device. Tighten the quick-lock fasteners fully clockwise.
2. Make the finished installed mounting bracket
tighten on the fixed bracket.
3. Pull the safety rope through the holes on the bot tom of the base and over the trussing system or
other safe fixation spot.
4. Note:This step is quite important to ensure that
fixture will not drop out by the damage of clamp.
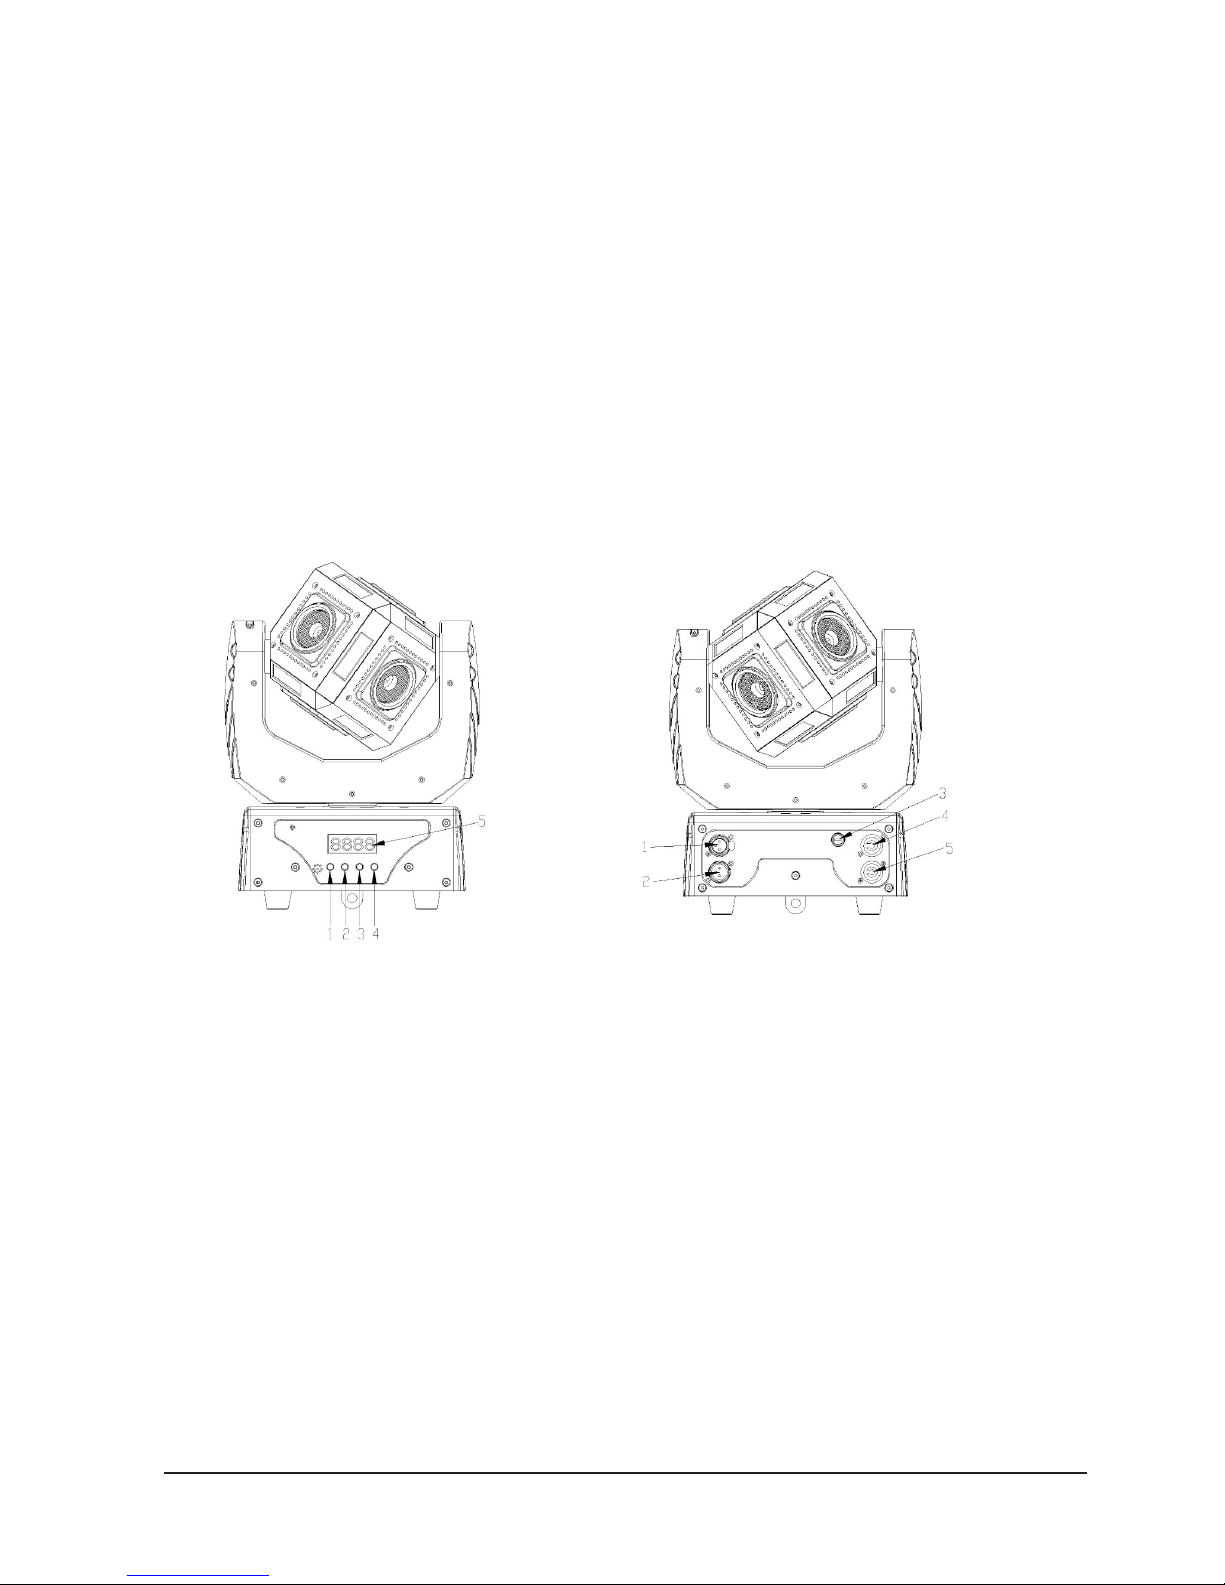
LCD display
1. MENU
2. UP
3. DOWN
4. ENTER
5. DISPLAY
1.DMX IN
2.DMX OUT
3.FUSE
4.POWER IN
5.POWER OUT
Page 7
CUBEX 360
P.
7
ENGLISH VERSION
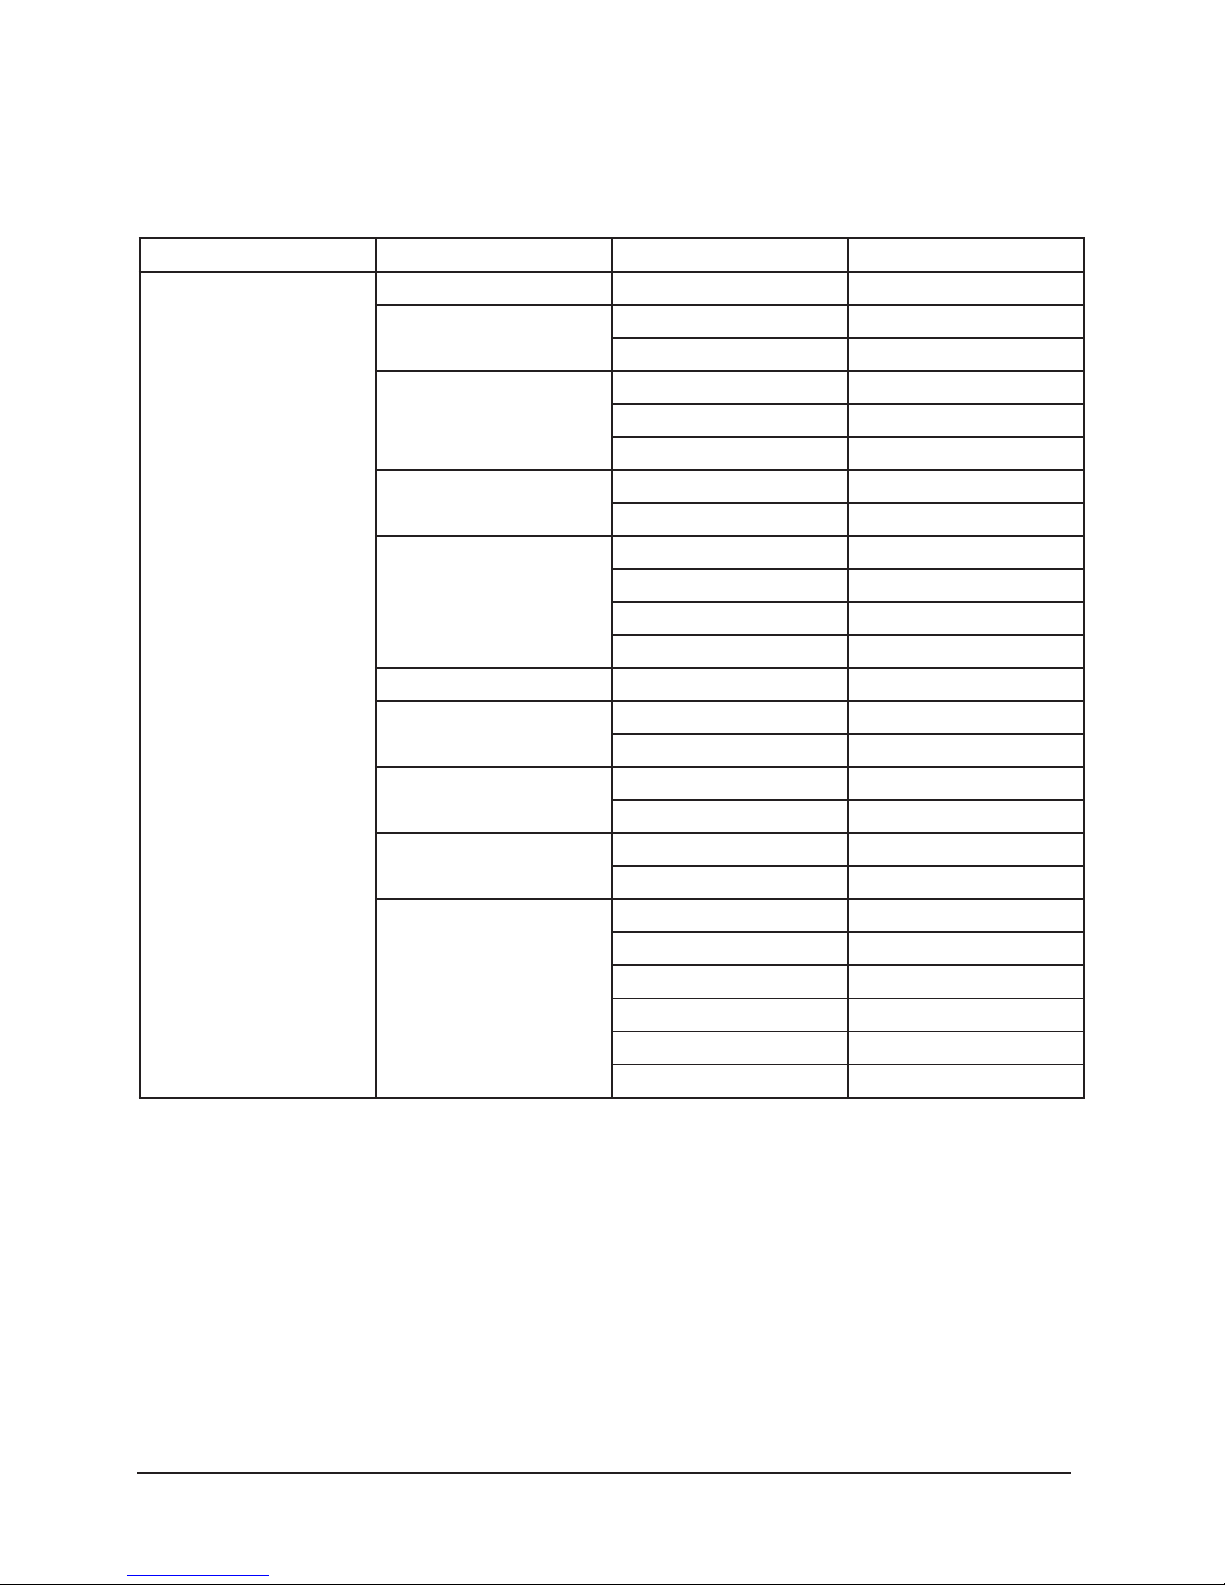
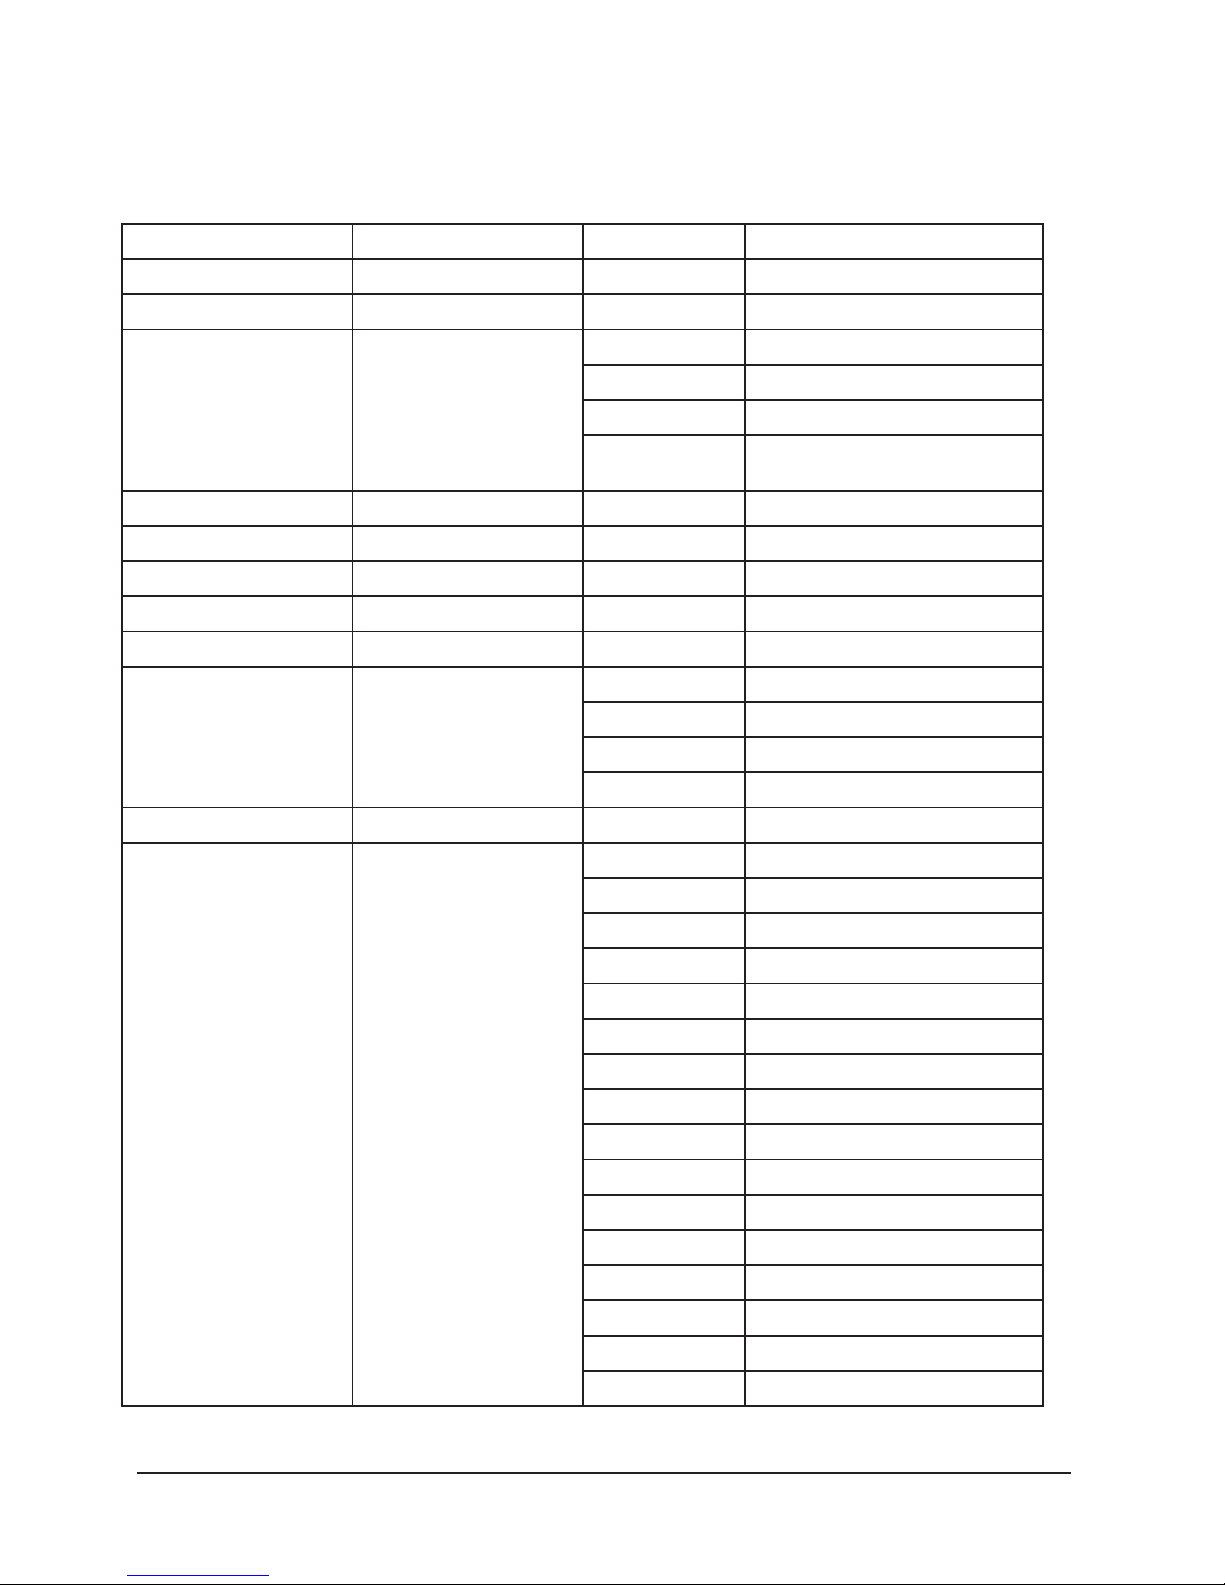
LED Digit display operation
Main Menu Sub-menu Function Show Instruction
Menu
Addr 000-512 Address setting
Chnd 14Ch Channel 14
16Ch Channel 16
Shnd Sh1 Scene mode 1
Sh2 Scene mode 2
Sh3 Scene mode 3
Slnd Mast Master mode
SL1 Slave mode
Lost Hold Keep mode
Soun Sound mode
Auto Auto mode
Blac Black mode
Sens S000~S099 Sound sensitivity
Angl 630 Pan 630 degree
540 Pan 540 degree
Pint yes Pan reverse Yes
No Pan reverse No
Tint Yes Tilt reverse Yes
No Tilt reverse No
Menu
Pan Pan Manual test 000-255
Til Tilt Manual test 000~255
Til2 Tilt2 Manual test 000~255
Red Red Manual test 000~255
Gren Green Manual test 000~255
Blue Blue Manual test 000-255
Page 8
CUBEX 360
P.
8
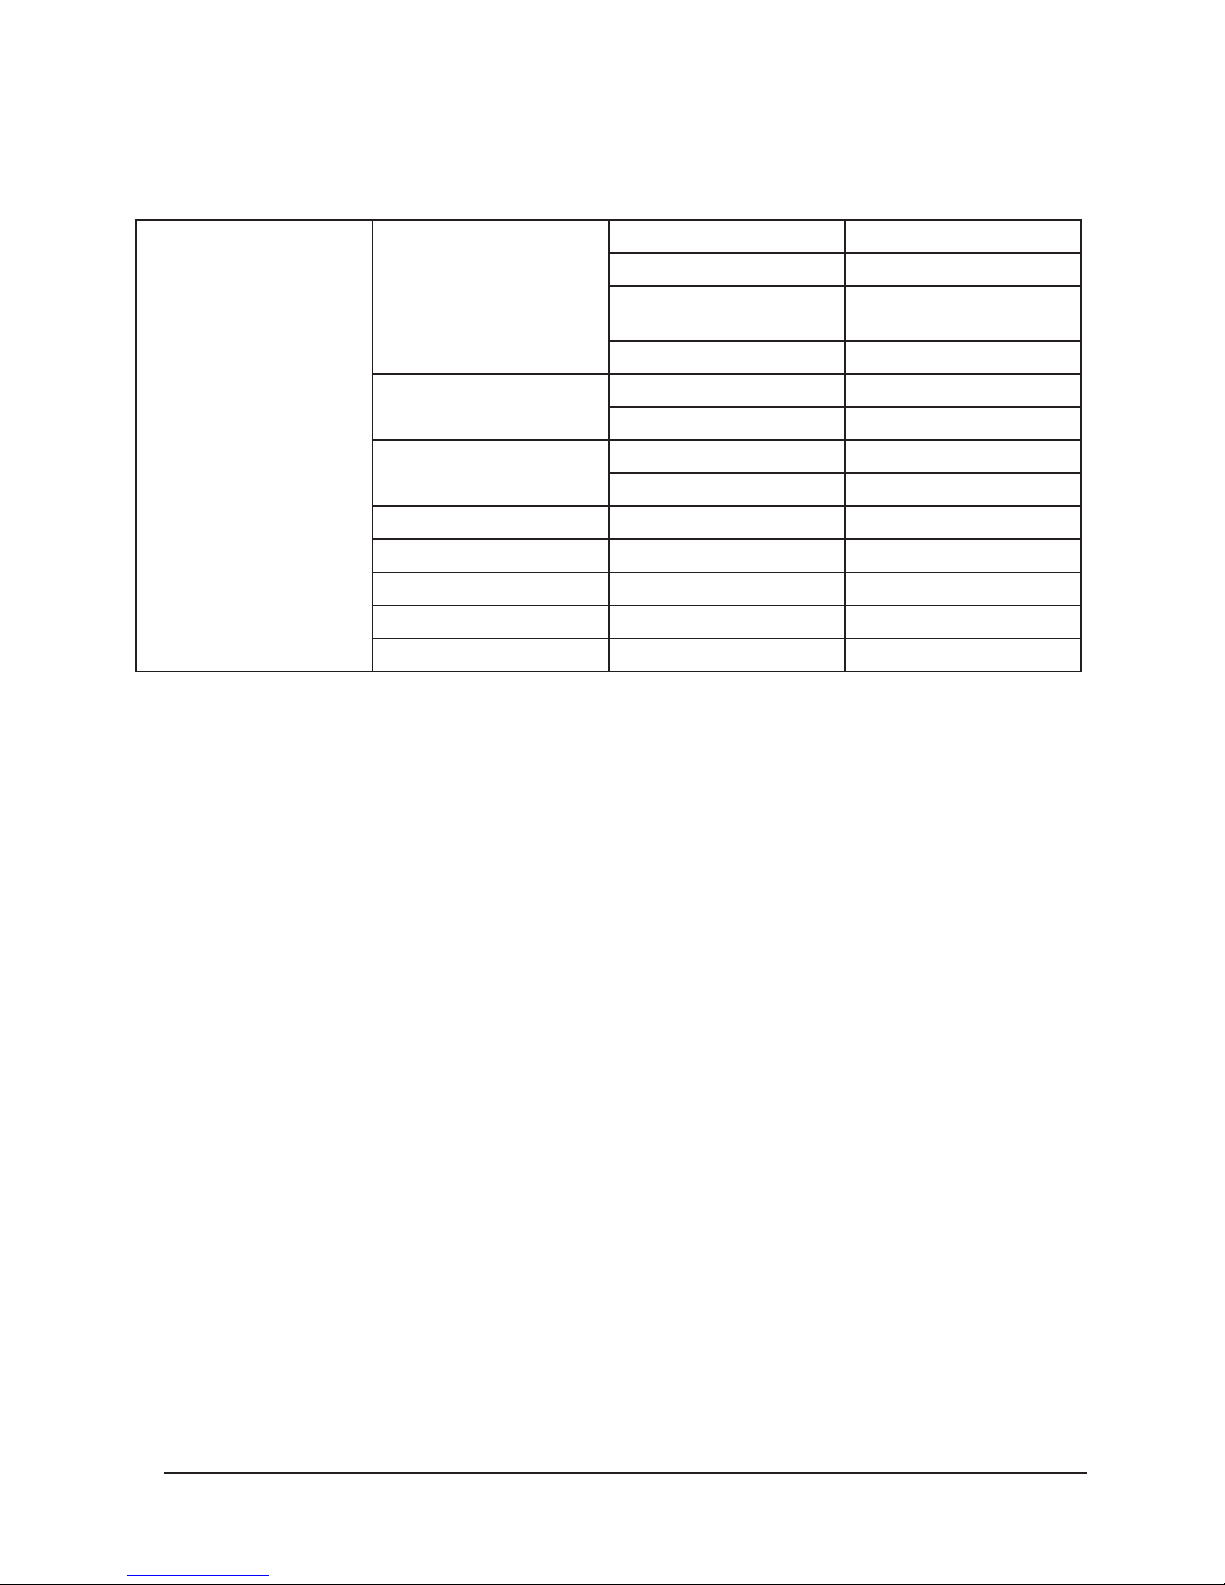
ENGLISH VERSION
Whit White Manual test 000-255
Stro Strobe Manual test 000-255
Dim Dimmer Manual test 000-
255
led Led Manual test 000-255
Led on LED black out on
o LED black out o
Disp on Display reverse on
o Display reverse o
Test Whole Function Test
Fhrs Operate Time
Ver Soware Version
Rest Whole Reset
Defa Default
MENU operation
This fixture has 4 keys on front panel for operation, press
these to set address, reset, edit and run programs and so
on.
• MENU: press MENU key to enter edit status, in edit sta-
tus, if press MENU again, it will return the upper inter
face. If no operation 30 seonds aer enter edit status,
the fixture will exit the edit status automatically.
• Up: press UP key, the indicator will flash, the address
increases one by one, if hold the key continuously, the
address will increase rapidly. If no press within 30 sec onds, the indicator stops flashing and exit it. In edit
status, press UP key, it will display the options circu larly from down to up.
• Down: press DOWN key, the indicator will flash, the
address decreases one by one, if hold the key contin uously, the address will decrease rapidly. If no press
within 30 seconds, the indicator stops flashing and
exit it. In edit status, press DOWN key, it will display
the options circularly from up to down.
• ENTER: in normal status, no function to press ENTER.
In edit mode, press ENTER to enter lower interface.
Function setting
DMX address setting
1.Press MENU to enter EDIT interface
2. Press UP/DOWN to choose, then press ENTER.
3. Press Up/Down to choose address 001~XXX
4. Press ENTER to confirm, or press “MENU” to exit
Channel Setting
1. Press MENU to enter EDIT interface
2. Press UP/DOWN to choose, then press ENTER
to enter Chnd.
3. Press UP/DOWN to choose each chan-
nel.‘14CH’/‘16CH’
4. Press ENTER to confirm, or press “MENU” to exit
Scene mode Setting
(before this setting, please Press MENU into Lost
to select Soun or Auto and save, user should be in
S ound/Auto Mode first, the different scene can be selected)
1. Press MENU to enter EDIT interface
Page 9

CUBEX 360
P.
9
ENGLISH VERSION
2. Press UP/DOWN to choose, then press ENTER
to enter Shnd.
3. Press UP/DOWN can choose light’s three
scene: Sh1, Sh2, Sh3 (can choose any scene mode
to operate )
4. Press Enter to confirm, or press “MENU” to exit.
Master-slave setting
1. Press MENU to enter EDIT interface
2. Press UP/DOWN to choose, then press ENTER
to enter SLnd.
3. Press UP/DOWN to choose Mast/SL1.
4. Press Enter to confirm, or press “MENU” to exit.
DMX Lost Setting
1. Press MENU to enter EDIT interface.
2. Press UP/DOWN to choose, then press ENTER
to enter Lost.
3. Press UP/DOWN can choose light’s three scene:
hold, soun, Auto, blac.
(you can choose any scene mode to operate )
4. Press Enter to confirm, or press “MENU” to exit.
Sound sensitivity Setting
(before this setting, please Press MENU into Lost
to select Soun and save, user should be in Sound
M ode first, the different Sound sensitivity can be selected)
1. Press MENU to enter EDIT interface
2. Press UP/DOWN to choose, then press ENTER
to enter Sens.
3. Press Up/Down, Enter to adjust the sound sen sitivity from 0%-99%.
4. Press Enter to confirm, or press “MENU” to exit.
Pan angle setting
1. Press MENU to enter EDIT interface.
2. Press UP/DOWN to choose, then press ENTER
to enter Angl.
3 Press<Up/Down> to choose ‘630’,/‘540’
4. Press <Enter> to confirm, or press “MENU” to exit.
Pan reverse setting
1. Press MENU to enter EDIT interface.
2. Press UP/DOWN to choose, then press ENTER
to enter Pint.
3. Press Up/Down to choose ‘YES’/‘NO’
4. Press Enter to confirm, or press “MENU” to exit.
Tilt reverse setting
1. Press MENU to enter EDIT interface.
2. Press UP/DOWN to choose, then press ENTER
to enter Tint.
3. Press Up/Down to choose ‘YES’/‘NO’
4. Press Enter to confirm,or press “MENU” to exit.
Manual test
1. Press MENU to enter EDIT interface
2. Press UP/DOWN to choose, then press ENTER
to enter Manu.
3. Press Up/Down, to choose PAN, TIL, TIL2, Red,
Gren, Blue, Whit, Stro, Dim, LED.
Pan
1.Press <Enter> into【PAN,
2. Press <Up/Down> to choose ‘000~255’
3. Press <Enter> to confirm, or press “MENU” to exit.
TILT
1. Press Enter into TIL.
2. Press Up/Down to choose ‘000~255’.
3. Press Enter to confirm, or press “MENU” to exit.
TILT2
1. Press Enter intoTIL2.
2. Press Up/Down to choose ‘000~255’.
3. Press Enter to confirm, or press “MENU” to exit.
Red
1. Press Enter into Red.
2. Press Up/Down to choose ‘000~255’
3. Press Enter to confirm, or press “MENU” to exit.
Green
Page 10

CUBEX 360
P.
10
ENGLISH VERSION
1. Press Enter into Gren.
2. Press Up/Down, Choose ‘000~255’
3. Press Enter to confirm, or press “MENU” to exit.
Blue
1. Press Enter into Blue.
2. Press Up/Down choose ‘000~255’
3. Press Enter to confirm, or press “MENU” to exit.
White
1. Press Enter into Whit.
2. Press Up/Down choose ‘000~255’
3. Press <Enter> to confirm, or press “MENU” to exit.
Strobe
1. Press Enter into Stro.
2. Press Up/Down choose ‘000~255’
3. Press Enter to confirm, or press “MENU” to exit.
Dimmer
1. Press Enter into Dim.
2. Press Up/Down choose ‘000~255’
3. Press Enter to confirm, or press “MENU” to exit.
LED
1. Press Enter into led.
2. Press Up/Down choose ‘000~255’
3. Press Enter to confirm, or press “MENU” to exit.
LED setting
1. Press MENU to enter EDIT interface.
2. Press UP/DOWN to choose, then press ENTER
to enter LED.
3. Press Up/Down to choose ‘ON’/‘OFF’
4. Press Enter to confirm, or press “MENU” to exit.
Display reverse setting
1. Press MENU to enter EDIT interface.
2. Press UP/DOWN to choose, then press ENTER
to enter Disp.
3. Press Up/Down to choose ‘ON’/‘OFF’
4. Press Enter to confirm, or press “MENU” to exit.
Whole test
1. Press ENTER to enter EDIT interface
2. Press UP/DOWN, then press ENTER Test to do whole test
3. Press Enter to confirm, or press “MENU” to exit.
Operate time
1. Press ENTER to enter EDIT interface
2. Press UP/DOWN, then press ENTER Fhrs
to check the light’s working time
3. Press Enter to confirm, or press “MENU” to exit.
Soware Version
1. Press ENTER to enter EDIT interface
2. Press UP/DOWN, then press ENTER Ver to
check the light’s version information
3. Press Enter to confirm, or press “MENU” to exit.
Whole reset
1. Press MENU to enter EDIT interface.
2. Press UP/DOWN to choose, then press ENTER
to enter Rest.
3. Aer reset, it will go back to the upper interface
Restore factory settings
1. Press MENU to enter EDIT interface.
2. Press UP/DOWN to choose, then press ENTER
to enter Defa.
3. Press Enter to confirm,or press “MENU” to exit.
Page 11
CUBEX 360
P.
11
ENGLISH VERSION
Channel Value Function
CH1 Pan 000-255 Pan 0-630°
CH2 Tilt 000-255 Tilt 0-200°
CH3 Infinite tilt 000-030 Stop
031-140 clockwise,from fast to slow
141-145 Stop
146-255 Counter-Clockwise from slow to
fast
CH4 Speed 000-255 Pan/Tilt Speed from fast to slow
CH5 Red 000-255 Red(0-100%)
CH6 Green 000-255 Green(0-100%)
CH7 Blue 000-255 Blue(0-100%)
CH8 White 000-255 White(0-100%)
CH9 Strobe 000-015 No Function (open)
016-095 Strobe 1HZ-25Hz Slow-Fast
096-175 Strobe 1Hz Fast-Slow
176-255 Random Strobe (Slow-Fast)
CH10 Dimmer 000-255 Master Dimmer 0-100%
CH11 LED strip program 000-036 No Function
037-056 Red
057-077 Green
078-098 Blue
099-119 R&G
120-140 R&B
141-161 G&B
162-176 R&G&B
177-186 RGB Change
187-196 Red-Chase
197-206 Green-Chase
207-216 Blue-Chase
217-226 R&G-Chase
227-236 R&B-Chase
237-246 G&B-Chase
R&G&B-Chase
Channel Instructions 14 channels
Page 12

CUBEX 360
P.
12
ENGLISH VERSION
CH12 LED Strip Speed 000-255 Speed from slow to fast
CH13 Color Macro 000-045 No Function
046-065 Red
066-085 Green
086-105 Blue
106-125 White
126-145 R&G
146-165 R&B
166-185 G&B
186-205 R&G&B&W
206-255 RGB Change Fast-Slow
CH14 Function 000-049 No Function
050-069 Auto 1
070-089 Auto 2
090-109 Auto 3
110-119 Sound (5s aer start sound mode)
120-249 No Function
Whole Reset
Channel Value Function
CH1 Pan 000-255 Pan 0-630°
CH2 Pan Fine 000-255 Pan Fine
CH3 Tilt 000-255 Tilt 0-200°
CH4 Tilt Fine 000-255 Tilt Fine
CH5 Infinite tilt 000-030 Stop
031-140 clockwise,from fast to slow
141-145 Stop
146-255 Counter-Clockwise from slow to
fast
CH6 Speed 000-255 Pan/Tilt Speed from fast to slow
CH7 Red 000-255 Red(0-100%)
Channel Instructions 16 channels
Page 13

CUBEX 360
P.
13
ENGLISH VERSION
CH8 Green 000-255 Green(0-100%)
CH9 Blue 000-255 Blue(0-100%)
CH10 White 000-255 White(0-100%)
CH11 Strobe 000-015 No Function (open)
016-095 Strobe 1HZ-25Hz Slow-Fast
096-175 Strobe 1Hz Fast-Slow
176-255 Random Strobe (Slow-Fast)
CH12 Dimmer 000-255 Master Dimmer 0-100%
CH11 LED strip program 000-036 No Function
037-056 Red
057-077 Green
078-098 Blue
099-119 R&G
120-140 R&B
141-161 G&B
162-176 R&G&B
177-186 RGB Change
187-196 Red-Chase
197-206 Green-Chase
207-216 Blue-Chase
217-226 R&G-Chase
227-236 R&B-Chase
237-246 G&B-Chase
R&G&B-Chase
Page 14

CUBEX 360
P.
14
ENGLISH VERSION
CH13 LED Strip Program 000-036 No Function
037-056 Red
057-077 Green
078-098 Blue
099-119 R&G
120-140 R&B
141-161 G&B
162-176 R&G&B
177-186 RGB Change
187-196 Red-Chase
197-206 Green-Chase
207-216 Blue-Chase
217-226 R&G-Chase
227-236 R&B-Chase
237-246 G&B-Chase
247-255 R&G&B-Chase
CH14 LED Strip Speed 000-255 Speed from slow to fast
CH15 Color Macro 000-045 No Function
046-065 Red
066-085 Green
086-105 Blue
106-125 White
126-145 R&G
146-165 R&B
166-185 G&B
186-205 R&G&B&W
206-255 RGB Change Fast-Slow
CH16 Function 000-049 No Function
050-069 Auto 1
070-089 Auto 2
090-109 Auto 3
110-119 Sound (5s aer start sound mode)
120-249 No Function
Whole Reset
Page 15

CUBEX 360
P.
15
ENGLISH VERSION
DMX-512 control connection
Connect the provided XLR cable to the male 3-pin XLR
output of your controller and the other side to the female
3-pin XLR input of the light.You can chain multiple lights
together through serial linking
The cable needed should be two core, screened cable with
XLR input and output connectors. Please refer to the diagram below.
DMX OUTPUT DMX INPUT
1: Ground
2: Signal (-)
3: Signal (+)
DMX address setting
Each fixture must set a specific starting address. When receiving signal transmission, fixture will receive channels
control signals which from the starting address.
According to dierent requirements or easy to use, the
user can set many fixtures to the same address, also can
set up a separately address for every device.
If more than one fixtures set to the same address, all of
them receive from DMX channels signal. All connections
fixtures are jointly controlled, controller can't separate
control a device.
If each device set to a dierent address, each device will
be separate from its particular set the starting address and
began accepting DMX512 control signal, so that more convenient separate control one of device. Using this method
must be based on channel quantity of device to determine
a starting address.
This device have 16 channels, so the first device starting address set 1, second is 17(1+16), third is 33(17+16) and so on.
Page 16

CUBEX 360
P.
16
Address33 Address 17 Address 01
Cleaning and maintenance
• Cleaning should be performed every 15-day peri-
od, by using a sponge which is dipped with alco
hol, rather than wet cloth or other chemical liq uid, to clean the mirror.
• Cut o power before cleaning and maintenance!
• Do not see directly light source when open the
light, and make sure power o before do any in stallation or maintenance.
• Wires connection must be done professional
ENGLISH VERSION
Page 17

CUBEX 360
P.
17
Warranty Card
This product is made of high-brightness transistor. We will provide 1 year warranty
under the condition that user has operated the light normally and lifetime service. We
won't provide warranty if the damage is caused by artificial or force majeure event.
Cost of fittings should be charged by user if product need maintenance aer 1 year
.Please cut this warranty card and shipped it along with the product to our factory
when applying for warranty.
Product Purchasing date Code of invoice
Warranty date: From To
User’s name Add
Company Tel
ENGLISH VERSION
Page 18

CUBEX 360
P.
18
VERSION ESPAÑOL
1. Descripción
Cubex 360 es un cabezal móvil que combina 6 haces
definidos con 12 tiras ultra-brillantes, logrando efectos de
gran impacto visual. Equipado con 6 LEDs CREE® RGBW de
10W y 12 tiras SMD 5050 de 4 LEDs RGB cada una, el equipo
proyecta haces de 9º, resultando en un efecto 2-en-1 que
permite controlar los haces por un lado y las tiras por otro.
En cuanto a sus funciones y prestaciones, Cubex 360 cuenta con movimiento tilt ilimitado, dimmer 0-100% y efecto
estrobo de alta velocidad. Controlable mediante DMX, el
cabezal posee macros de color y programas integrados,
además de un sistema audiorritmico optimizado. Cubex
360 es un cabezal que brinda un efecto integral, ideal para
aplicaciones de pequeña/mediana escala.
Especificaciones
Fuente & Optica
• Fuente de luz:
• - 6 LEDs CREE® 4-en-1 de 10W
• - 12 x 4 LEDs SMD 5050 RGB
• Vida útil promedio: 50.000 horas
• Ángulo de haz: 6 x 9°
Información Fotométrica
• Flujo lumínico: 650 lux @ 3m (10 .)
• Temperatura color: 6500K
Efectos y Funciones
• 6 haces definidos y potentes
• 12 tiras de alto brillo con programas preseteados
• Tecnología LED 4-en-1: Mezcla RGBW suave sin sombras
• Dimmer lineal de 0-100%
• Efecto estrobo
• Presets de efectos integrados
• Macros de color
• Movimiento tilt ilimitado
• Funcionamiento sin parpadeo (ideal broadcasting).
• Control
• Canales DMX: 11/13
• Función RDM
• Indica temperatura de base, brazo & lámpara
• IC de comunicación de respaldo
• Actualización del soware vía DMX
• Velocidad de refrigeración ajustable de acuer
do a la temperatura
Movimiento
• Pan: 630° / 540°
• Tilt: 265°
• Motor de 3 fases
• Resolución de 16-bit
• Reposicionamiento automático
Eléctrico
• Rango de voltaje de entrada: 100–240V, 50-60Hz
• Alimentación: Rango automático
• Consumo de potencia: 420W
Físico
• Conectores DMX: 2 conectores XLR (XLR-3 de
entrada & salida)
• Conectores de alimentación PowerCON® de Entrada
• Display COG de 2 pulg.
• Dimensiones: 343x250x501 mm. / 13,5x9,8x19,7 pulg.
• Peso: 15 Kg. / 33 Lbs.
Page 19

CUBEX 360
P.
19
VERSION ESPAÑOL
2. Introducción
Gracias por haber elegido el producto Cubex 360. Por su
seguridad, lea atentamente el manual antes de utilizar el
equipo. Para la instalación, póngase en contacto con un
profesional certificado y procure seguir las instrucciones
de esta guía para garantizar su funcionamiento y mantenimiento.
- 1 equipo.
- 1 manual del usuario.
- 1 cable DMX.
- 1 cable de suministro eléctrico.
- 1 soporte de cierre rápido
- 1 Cable de seguridad.
Verifique que el equipo no haya sufrido daños durante el
envío. En caso de que encuentre daños o piezas faltantes,
póngase en contacto de inmediato con su distribuidor.
3. Instrucciones de seguridad
• El equipo fue entregado en perfectas condi-
ciones. Procure seguir las instrucciones y advert encias de seguridad del manual para garantizar
e l b uen estado del equipo y su funcionamiento seguro.
• La garantía no cubre daños provocados por el uso
inapropiado de este producto. El fabricante y el
distribuidor no aceptarán responsabilidad por el
mal uso del equipo.
• En caso de que el equipo haya sido expuesto a
cambios de temperatura drásticos, no lo encien da de inmediato. La condensación puede causar
daños en el equipo. Manténgalo apagado hasta
que alcance la temperatura ambiente.
• Procure la conexión a tierra del equipo.
• Reemplace las piezas ópticas si se dañan e impi
den el óptimo funcionamiento del equipo.
• La instalación eléctrica del equipo debe ser real-
izada por un profesional certificado.
• Compruebe que el voltaje utilizado no sea supe-
rior ni inferior a los valores indicados.
Page 20

CUBEX 360
P.
20
VERSION ESPAÑOL
• Verifique que el cable de suministro eléctrico no
se encuentre cortado o dañado. Si ese fuera el
caso, contacte a su distribuidor para reempla zarlo por otro cable en óptimas condiciones.
• Desconecte el equipo del suministro eléctrico
cuando necesite limpieza o cuando no esté en
funcionamiento.
• Evite tocar el equipo durante su funcionamiento.
La cubierta alcanza altas temperaturas.
• No mire en forma directa a la fuente de luz. Las
p e rsonas fotosensitivas corren riesgo de sufrir convulsiones.
• La garantía no cubre daños provocados por la
introducción de modificaciones manuales en el
equipo. Mantenga el equipo fuera del alcance
de niños y usuarios inexpertos.
Lineamientos generales
• Esta equipo se diseño para uso profesional en
escenarios, discotecas, teatros, etc. Debe ser usa
do únicamente en espacios interiores.
• Utilice el equipo únicamente con la corriente al-
terna indicada en las especificaciones técnicas,
ubicadas en la página 5 del presente manual.
• Los efectos de luz no están diseñados para fun-
cionar de forma permanente. Procure que el
equipo descanse luego de 8 horas de funcionam iento continuo para prolongar su vida útil.
• No sacuda el equipo. Evite utilizar o instalar el
equipo de forma brusca.
• Al elegir el punto de instalación, procure que el
equipo no quede expuesto al calor, humedad o
polvo en exceso. La distancia mínima requerida
entre la salida de luz del equipo y la superficie a
iluminar debe ser superior a los 3 metros.
• El equipo debe ser instalado a una distancia de al
menos 1 metro de objetos o superficies inflamables.
• Si emplea soportes con cierre rápido para la in-
stalación del equipo, verifique que las trabas es tén bien aseguradas.
• Procure familiarizarse con las instrucciones antes
de utilizar el equipo. No permita que personas in
expertas operen la unidad. La mayoría de los
daños son consecuencia del uso inapropiado o
poco profesional del equipo.
• Utilice el embalaje original si precisa trasladar el equipo.
• Si opera el equipo de alguna forma no descrita
en el presente manual, el producto puede su frir daños severos. La garantía no cubre aquel
los daños provocados por el uso indebido del
equipo. Cualquier otro uso de la unidad puede
causar cortocircuitos, descargas eléctricas, ex plosión de la lámpara, etc.
Page 21

CUBEX 360
P.
21
VERSION ESPAÑOL
4. Instalación
• Temperatura de operación: -25°C-40°C. No utilice
el equipo fuera de este rango de temperatura.
• Para garantizar una instalación segura, la estruc-
tura en la que se fije el equipo debe poder sopor tar diez veces su peso durante una hora, sin sufrir
deformaciones.
• Emplee un cable de seguridad durante la insta-
lación. Evite situarse debajo del equipo para re alizar su montaje, desmontaje o mantenimiento.
• Procure que un técnico revise y apruebe las insta-
l a ci o ne s y medidas de seguridad antes de utilizar el equipo.
• La instalación debe ser revisada por un técnico
calificado una vez por año.
• Para realizar un montaje en altura se requiere
de experiencia y conocimientos previos para cal cular los límites de peso, los materiales a emplear,
las medidas de seguridad, etc. Si no cumple con
estos requisitos, no realice la instalación por sus
medios. Una instalación inadecuada podría re sultar en lesiones corporales graves.
Anclaje
Morza
Abrazadera
Cable de Segurdiad
Mosquetón
Page 22

CUBEX 360
P.
22
VERSION ESPAÑOL
1. Coloque los tornillos de cierre rápido en los orifi cios ubicados en la base del equipo. Para ajustar los, gírelos en el sentido de las agujas del reloj.
2. Instale la morza sobre la abrazadera.
3. Por último, coloque un cable de seguridad en los
orificios de la base y por encima del sistema de
trussing o sobre cualquier otro punto de fijación.
4. Verifique la correcta disposición del cable de se
guridad con el fin de evitar caídas en caso de que
falle la abrazadera.
Pantalla LCD
1. MENU
2. UP
3. DOWN
4. ENTER
5. PANTALLA
1. ENTRADA DMX
2. SALIDA DMX
3. FUSIBLE
4. ENTRADA DE POTENCIA
5. SALIDA DE POTENCIA
Page 23

CUBEX 360
P.
23
VERSION ESPAÑOL
Descripción del menú
Menú principal Submenú Función Descripción
Menu
Addr 000-512 Configuración de dirección
Chnd 14Ch Canal 14
16Ch Canal 16
Shnd Sh1 Modo de escena 1
Sh2 Modo de escena 12
Sh3 Modo de escena 13
Slnd Mast Modo maestro
SL1 Modo esclavo
Lost Hold Modo mantener estado
Soun Modo audiorítmico
Auto Modo automático
Blac Modo blackout
Sens S000~S099 Sensibilidad de sonido
Angl 630 Pan 630º
540 Pan 540º
Pint yes Pan hacia atrás activado
No Pan hacia atrás desactivado
Tint Yes Tilt hacia atrás activado
No Tilt hacia atrás desactivado
Menu
Pan Prueba manual Pan
000-255
Til Prueba manual de tilt 000~255
Til2 Prueba manual de tilt2 000~255
Red Prueba manual de rojo 000~255
Gren Prueba manual de verde 000~255
Blue Prueba manual de azul 000-255
Page 24

CUBEX 360
P.
24
VERSION ESPAÑOL
Whit Prueba manual de blanco 000-255
Stro Prueba manual de estrobo 000-255
Dim Prueba manual de dimmer 000-255
led Prueba manual de LED 000-255
Led on LED blackout activado
o LED blackout desactivado
Disp on Inversión de pantalla activado
o Inversión de pantalla desactivado
Test Prueba de funciones
Fhrs Tiempo de operación
Ver Versión de soware
Rest Restablecer todo
Defa Valores de fábrica
MENU de operaciones
En el panel frontal se ubican las cuatro teclas con las que
podrá operar el equipo, configurar la dirección, restablecer
los valores, editar y ejecutar programas.
• [MENU]: Presione MENU para ingresar a Edit Sta-
tus (estado de edición). Si presiona MENU nuevamente,
regresará a la interfaz superior. Si se mantiene inactivo por
30 segundos, luego de ingresar en el estado de edición, el
equipo saldrá del menú de edición automáticamente.
• [Up]: Cuando presione la tecla UP, el indicador
titilará y el valor de dirección aumentará de a uno. Si mantiene la tecla presionada, el valor aumentará velozmente.
Si se mantiene inactivo por 30 segundos, el indicar se detendrá y se cerrará la función. En estado de edición, utilice
la tecla UP para desplazarse por las opciones disponibles.
• [Down] Cuando presione la tecla DOWN, el indi-
cador titilará y el valor de dirección disminuirá de a uno.
Si mantiene la tecla presionada, el valor disminuirá velozmente. Si se mantiene inactivo por 30 segundos, el indicar
se detendrá y se cerrará la función. En estado de edición,
utilice DOWN para desplazarse por las opciones disponibles.
• [ENTER] Presione la tecla ENTER en estado de
edición para ingresar en la opción seleccionada.
Configuración de funciones
Configuración de dirección DMX
1. Presione <MENU > para acceder a la interfaz EDIT.
2. Presione <UP/DOWN> para desplazarse por el
menú y luego <ENTER> para acceder a Addr.
3. Presione <Up/Down> para escoger el valor de
dirección 001~XXX.
4. Presione <ENTER> para confirmar la selección
o "MENU" para salir.
Configuración de canales
1. Presione <MENU> para acceder a la interfaz EDIT.
2. Presione <UP/DOWN> para desplazarse por el
menú y luego <ENTER> para acceder a【Chnd【.
3. Presione UP/DOWN para escoger entre 14 o 16
canales: ‘14CH’/‘16CH’.
4. Presione ENTER para confirmar la selección o
"MENU" para salir.
Modo de escena
(Antes de configurar este modo, ingrese al sub
menú < Lost> para seleccionar <Soun> o <Auto>.
Active el modo Sound/Auto primero. Luego podrá
seleccionar las diferentes escenas.)
Page 25

CUBEX 360
P.
25
VERSION ESPAÑOL
1. Presione <MENU> para acceder a la interfaz EDIT.
2. Presione <UP/DOWN> para desplazarse por el
menú y luego <ENTER> para acceder a Shnd.
3. Presione <UP/DOWN> para escoger las escena:
Sh1, Sh2, Sh3.
4. Presione ENTER para confirmar la selección o
"MENU" para salir.
Modo maestro/esclavo
1. Presione <MENU> para acceder a la interfaz EDIT.
2. Presione <UP/DOWN> para desplazarse por el
menú y luego <ENTER> para acceder a SLnd.
3. Presione <UP/DOWN> para escoger Mast/SL1.
4. Presione <Enter> para confirmar la selección o
"MENU" para salir.
Modo sin señal DMX
1. Presione <MENU> para acceder a la interfaz EDIT.
2. Presione <UP/DOWN> para desplazarse por el
menú y luego <ENTER> para acceder a Lost.
3. Presione <UP/DOWN> para escoger la escena:
hold, soun, Auto, blac.
4. Presione <Enter> para confirmar la selección o
"MENU" para salir.
Sensibilidad de sonido
(Antes de configurar este modo, ingrese al sub
menú <Lost> para seleccionar <Soun>. Active el
modo Sound primero. Luego podrá seleccionar
los diferentes valores.)
1. Presione <MENU> para acceder a la interfaz EDIT.
2. Presione <UP/DOWN> para desplazarse por el
menú y luego <ENTER> para acceder a Sens.
3. Presione <UP/DOWN> y <Enter> para ajustar
los valores de 0%-99%.
4. Presione <Enter> para confirmar la selección o
"MENU" para salir.
Ángulo de pan
1. Presione <MENU> para acceder a la interfaz EDIT.
2. Presione <UP/DOWN> para desplazarse por el
menú y luego <ENTER> para acceder a Angl.
3 Presione <UP/DOWN> para escoger ‘630 o ‘540’.
4. Presione <Enter> para confirmar la selección o
"MENU" para salir.
Pan hacia atrás
1. Presione <MENU> para acceder a la interfaz EDIT.
2. Presione <UP/DOWN> para desplazarse por el
menú y luego <ENTER> para acceder a【Pint【.
3. Presione <UP/DOWN> para escoger ‘YES’ o ‘NO’.
4. Presione <Enter> para confirmar la selección o
"MENU" para salir.
Tilt hacia atrás
1. Presione <MENU> para acceder a la interfaz EDIT.
2. Presione <UP/DOWN> para desplazarse por el
menú y luego <ENTER> para acceder a Tint.
3. Presione <UP/DOWN> para escoger ‘YES’ o ‘NO’.
4. Presione <Enter> para confirmar la selección o
"MENU" para salir.
Prueba manual
1. Presione <MENU> para acceder a la interfaz EDIT.
2. Presione <UP/DOWN> para desplazarse por el
menú y luego <ENTER> para acceder a Manu.
3. Presione <UP/DOWN> para escoger PAN, TIL,
TIL2, Red, Gren, Blue, Whit, Stro, Dim, LED.
Pan
1) Presione <Enter> para acceder a【PAN【.
2)Presione <Up/Down> para escoger entre ‘000~255’.
3) Presione <Enter> para confirmar la selección o
"MENU" para salir.
TILT
1) Presione <Enter> para acceder a TIL.
2)Presione <Up/Down> para escoger entre ‘000~255’.
3) Presione <Enter> para confirmar la selección o
"MENU" para salir.
TILT2
1) Presione <Enter> para acceder a TIL2.
2)Presione <Up/Down> para escoger entre ‘000~255’.
3) Presione <Enter> para confirmar la selección o
"MENU" para salir.
Page 26

CUBEX 360
P.
26
VERSION ESPAÑOL
Red
1) Presione <Enter> para acceder a Red.
2)Presione<Up/Down> para escoger entre ‘000~255’.
3) Presione <Enter> para confirmar la selección o
"MENU" para salir.
Green
1) Presione <Enter> para acceder a【Gren【.
2)Presione<Up/Down> para escoger entre ‘000~255’.
3) Presione <Enter> para confirmar la selección o
"MENU" para salir.
Blue
1) Presione <Enter> para acceder a Blue.
2) Presione <Up/Down> para escoger entre ‘000~255’.
3) Presione <Enter> para confirmar la selección o
"MENU" para salir.
White
1) Presione <Enter> para acceder a【Whit【.
2)Presione<Up/Down> para escoger entre ‘000~ 255’.
3) Presione <Enter> para confirmar la selección o
"MENU" para salir.
Strobe
1) Presione <Enter> para acceder a【Stro【.
2) Presione <Up/Down> para escoger entre ‘000~255’.
3) Presione <Enter> para confirmar la selección o
"MENU" para salir.
Dimmer
1) Presione <Enter> para acceder a Dim.
2)Presione <Up/Down> para escoger entre ‘000~255’.
3) Presione <Enter> para confirmar la selección o
"MENU" para salir.
LED
1) Presione <Enter> para acceder a led.
2) Presione <Up/Down> para escoger entre ‘000~255’.
3) Presione <Enter> para confirmar la selección o
"MENU" para salir.
Configuración de LED
1. Presione <MENU> para acceder a la interfaz EDIT.
2. Presione <UP/DOWN> para desplazarse por el
menú y luego <ENTER> para acceder a LED.
3. Presione <Up/Down> para escoger entre ‘ON’ y ‘OFF’.
4. Presione <Enter> para confirmar la selección o
"MENU" para salir.
Inversión de pantalla
1. Presione <MENU> para acceder a la interfaz EDIT.
2. Presione <UP/DOWN> para desplazarse por el
menú y luego <ENTER> para acceder a Disp.
3. Presione <Up/Down> para escoger entre ‘ON’ y ‘OFF’.
4. Presione <Enter> para confirmar la selección o
"MENU" para salir.
Prueba de funciones
1. Presione <MENU> para acceder a la interfaz EDIT.
2. Presione <UP/DOWN> para desplazarse por el
menú y luego <ENTER> para acceder a Test y re-
alizar la prueba.
3. Presione <Enter> para confirmar la selección o
"MENU" para salir.
Tiempo de funcionamiento
1. Presione <MENU> para acceder a la interfaz EDIT.
2. Presione <UP/DOWN> para desplazarse por el
menú y luego <ENTER> para acceder a Fhrs y
verificar el tiempo de funcionamiento de la luz.
3. Presione <Enter> para confirmar la selección o
"MENU" para salir.
Versión de soware
1. Presione <MENU> para acceder a la interfaz EDIT.
2. Presione <UP/DOWN> para desplazarse por el
menú y luego <ENTER> para acceder a【Ver【y
verificar la información del soware.
3. Presione <Enter> para confirmar la selección o
"MENU" para salir.
Restablecer todo
1. Presione <MENU> para acceder a la interfaz EDIT.
2. Presione <UP/DOWN> para desplazarse por el
menú y luego <ENTER> para acceder a Rest.
3. Luego de restablecer los valores, la pantalla
volverá a la interface superior.
Restablecer valores de fábrica
1. Presione <MENU> para acceder a la interfaz EDIT.
2. Presione <UP/DOWN> para desplazarse por el
menú y luego <ENTER> para acceder a【Defa【.
3. Presione <Enter> para confirmar la selección o
"MENU" para salir.
Page 27

CUBEX 360
P.
27
VERSION ESPAÑOL
Canal Modo de canal Valor Función
CH1 Pan 000-255 Pan 0-630°
CH2 Tilt 000-255 Tilt 0-200°
CH3 Tilt infinito 000-030 Detenido
031-140 En sentido horario, velocidad
decreciente
141-145 Detenido
146-255 En sentido anti-horario, velocidad
creciente
CH4 Velocidad 000-255 Pan/tilt velocidad decreciente
CH5 Rojo 000-255 Rojo (0-100%)
CH6 Verde 000-255 Verde (0-100%)
CH7 Azul 000-255 Azul (0-100%)
CH8 Blanco 000-255 Blanco (0-100%)
CH9 Estrobo 000-015 Sin función (abierto)
016-095 Estrobo 1 HZ-25 Hz lento-rápido
096-175 Estrobo 1 Hz rápido-lento
176-255 Estrobo aleatorio (lento-rápido)
CH10 Dimmer 000-255 Dimmer maestro (0-100%)
CH11 Programa LED strip 000-036 Sin función
037-056 Rojo
057-077 Verde
078-098 Azul
099-119 Rojo y verde
120-140 Rojo y azul
141-161 Verde y azul
162-176 RGB
177-186 Variación RGB
187-196 Chase rojo
197-206 Green-Chase verde
207-216 Blue-Chase azul
217-226 R&G-Chase rojo y verde
227-236 R&B-Chase rojo y azul
237-246 G&B-Chase verde y azul
R&G&B-Chase RGB
Cuadro de canales: 14 canales
Page 28

CUBEX 360
P.
28
VERSION ESPAÑOL
CH12 Velocidad de programa
LED Strip
000-255 Velocidad creciente
CH13 Macro de color 000-045 Sin función
046-065 Rojo
066-085 Verde
086-105 Azul
106-125 Blanco
126-145 Rojo y verde
146-165 Rojo y azul
166-185 Verde y azul
186-205 RGBW
206-255 Variación RGB (rápido-lento)
CH14 Función 000-049 Sin función
050-069 Automático 1
070-089 Automático 2
090-109 Automático 3
110-119 Modo audiorítmico (5s después de
iniciado)
120-249 Sin función
Restablecer todo
Canal Modo de canal Valor Función
CH1 PAN 000-255 Pan 0-630°
CH2 Pan fino 000-255 Pan fino
CH3 Tilt 000-255 Tilt 0-200°
CH4 Tilt fino 000-255 Tilt fino
CH5 Tilt infinito 000-030 Detenido
031-140 En sentido horario, velocidad
decreciente
141-145 Detenido
146-255 En sentido anti-horario, velocidad
creciente
CH6 Velocidad 000-255 Pan/tilt velocidad decreciente
Cuadro de canales: 16 canales
Page 29

CUBEX 360
P.
29
VERSION ESPAÑOL
CH7 Rojo 000-255 Rojo (0-100%)
CH8 Green 000-255 Verde (0-100%)
CH9 Blue 000-255 Azul (0-100%)
CH10 White 000-255 Blanco (0-100%)
CH11 Strobe 000-015 Sin función (abierto)
016-095 Estrobo,1 Hz-25 Hz lento-rápido,
096-175 Estrobo,1 Hz lento-rápido,
176-255 Estrobo aleatorio (lento-rápido)
CH12 Dimmer 000-255 Dimmer maestro (0-100%)
CH13 LED strip program 000-036 Sin función
037-056 Rojo
057-077 Verde
078-098 Azul
099-119 Rojo y verde
120-140 Rojo y azul
141-161 Verde y azul
162-176 RGB
177-186 Variación RGB
187-196 Chase rojo
197-206 Green-Chase verde
207-216 Blue-Chase azul
217-226 R&G-Chase rojo y verde
227-236 R&B-Chase rojo y azul
237-246 G&B-Chase verde y azul
247-255 RGB-Chase RGB
Page 30

CUBEX 360
P.
30
VERSION ESPAÑOL
CH14 LED Strip Speed 000-255 Velocidad creciente
CH15 Color Macro 000-045 Sin función
046-065 Rojo
066-085 Verde
086-105 Azul
106-125 Blanco
126-145 Rojo y verde
146-165 Rojo y azul
166-185 Verde y azul
186-205 RGBW
206-255 Variación RGB (rápido-lento)
CH16 Function 000-049 Sin función
050-069 Automático 1
070-089 Automático 2
090-109 Automático 3
110-119 Modo audiorítmico (5s después de
iniciado)
120-249 Sin función
250-255 Restablecer todo
Page 31

CUBEX 360
P.
31
VERSION ESPAÑOL
Conexión DMX 512
Conecte el cable XLR a la salida XLR-3 macho de su controlador y el otro extremo, a la entrada XLR-3 hembra del
equipo. Podrá enlazar varios proyectores entre sí gracias a
la conexión DMX. Procure que el cable utilizado sea bipolar
y blindado con conectores XLR de entrada y salida. Para
obtener más información, refiérase al siguiente diagrama:
DMX OUTPUT DMX INPUT
1: A tierra
2: Señal negativa (-)
3: Señal positiva (+)
Configuración de dirección DMX
Cada equipo enlazado precisa una dirección DMX específica. Una vez conectado, el equipo recibirá comandos de la
dirección configurada.
Para el control independiente de cada equipo es necesario
asignar una dirección única de canales. La configuración individual de cada equipo permitirá que funcionen por separado. Sin embargo, es posible configurar la misma dirección
para varios equipos. Si todos los equipos se configuran con
la misma dirección funcionarán de forma sincronizada.
Este equipo cuenta con 16 canales, por lo cual la dirección
DMX del primer equipo será 1, del segundo será 17 (1+16),
del tercero será 33 (17+16), etc.
Page 32

CUBEX 360
P.
32
VERSION ESPAÑOL
Dirección 33 Dirección 17 Dirección 01
Limpieza y mantenimiento
• Se recomienda realizar la limpieza del equipo
cada quince días. Utilice una esponja humedecida con alcohol para limpiar el cristal. Evite el uso de paños mojados
o productos químicos.
• Desconecte el equipo antes de realizar cualquier
tarea de mantenimiento.
• No mire de forma directa hacia la fuente de luz.
• Las personas fotosensitivas o con epilepsia cor-
ren riesgo de sufrir convulsiones.
• Un profesional certificado debe realizar la conex-
ión eléctrica
Page 33

CUBEX 360
P.
33
VERSION ESPAÑOL
Tarjeta de Garantía
Este equipo es de alto rendimiento y viene provisto con una garantía de un año. El fabricante y el distribuidor no se responsabilizarán por el mal uso del equipo. Lea atentamente el manual antes de utilizarlo. Los daños causados por caídas no están sujetos a
garantía. Luego del año de compra, los costos de mantenimiento son responsabilidad
del usuario. Para hacer uso de la garantía, corte esta tarjeta y envíela al fabricante o
distribuidor.
Producto Fecha compra Factura Número
Garantía Desde Hasta
Nombre de user Dirección
Empresa Tel
Page 34

FOR MORE INFO ON THIS PRODUCT PLEASE CHECK WWW.TEC-SHOW.COM /
PARA MAS INFORMACION SOBRE ESTE PRODUCTO VISITE WWW.TEC-SHOW.COM
 Loading...