

Page 1

BUBBLE
MASTER 2
USER MANUAL / MANUAL DE USUARIO
PLEASE READ THE INSTRUCTIONS CAREFULLY BEFORE USE
POR FAVOR LEA LAS INSTRUCCIÓNES ANTES DE USAR
Page 2

Features
Bubble Master 2 is a professional bubble machine that al-
lows the user to cover large areas. Its design includes 3 double
wheels thus providing a wealth of bubbles without any pauses. Bubble Master 2 comes in an ultra resistant case making it an ideal solution for demanding moving applications.
Output
3 double-bubble wheel
Fluid consumption: 1 lt. (33 oz) in 3 hours
Tank: 1.7 lts / 57 Oz.
Control
Operational modes: Analog
Controllers: Built-in button
Electrical
Input voltage range: 100–240V, 50-60Hz
Max power consumption: 88W
Physical
Dimensions: 483x381x305 mm. / 19x15x12 in.
Weight: 5.9 Kg. / 13.2 Lbs.
BUBBLE MASTER 2
ENGLISH VERSION
p. 2
Page 3
What Is included
Bubble Master II
Hanging Bracket with Mounting Hardware
Power Cord
Quick Reference Guide
Product Description
The Bubble Master II features 3 double wands, a manual bubble button, and an extremely high output for when you need
bubbles for a large area.
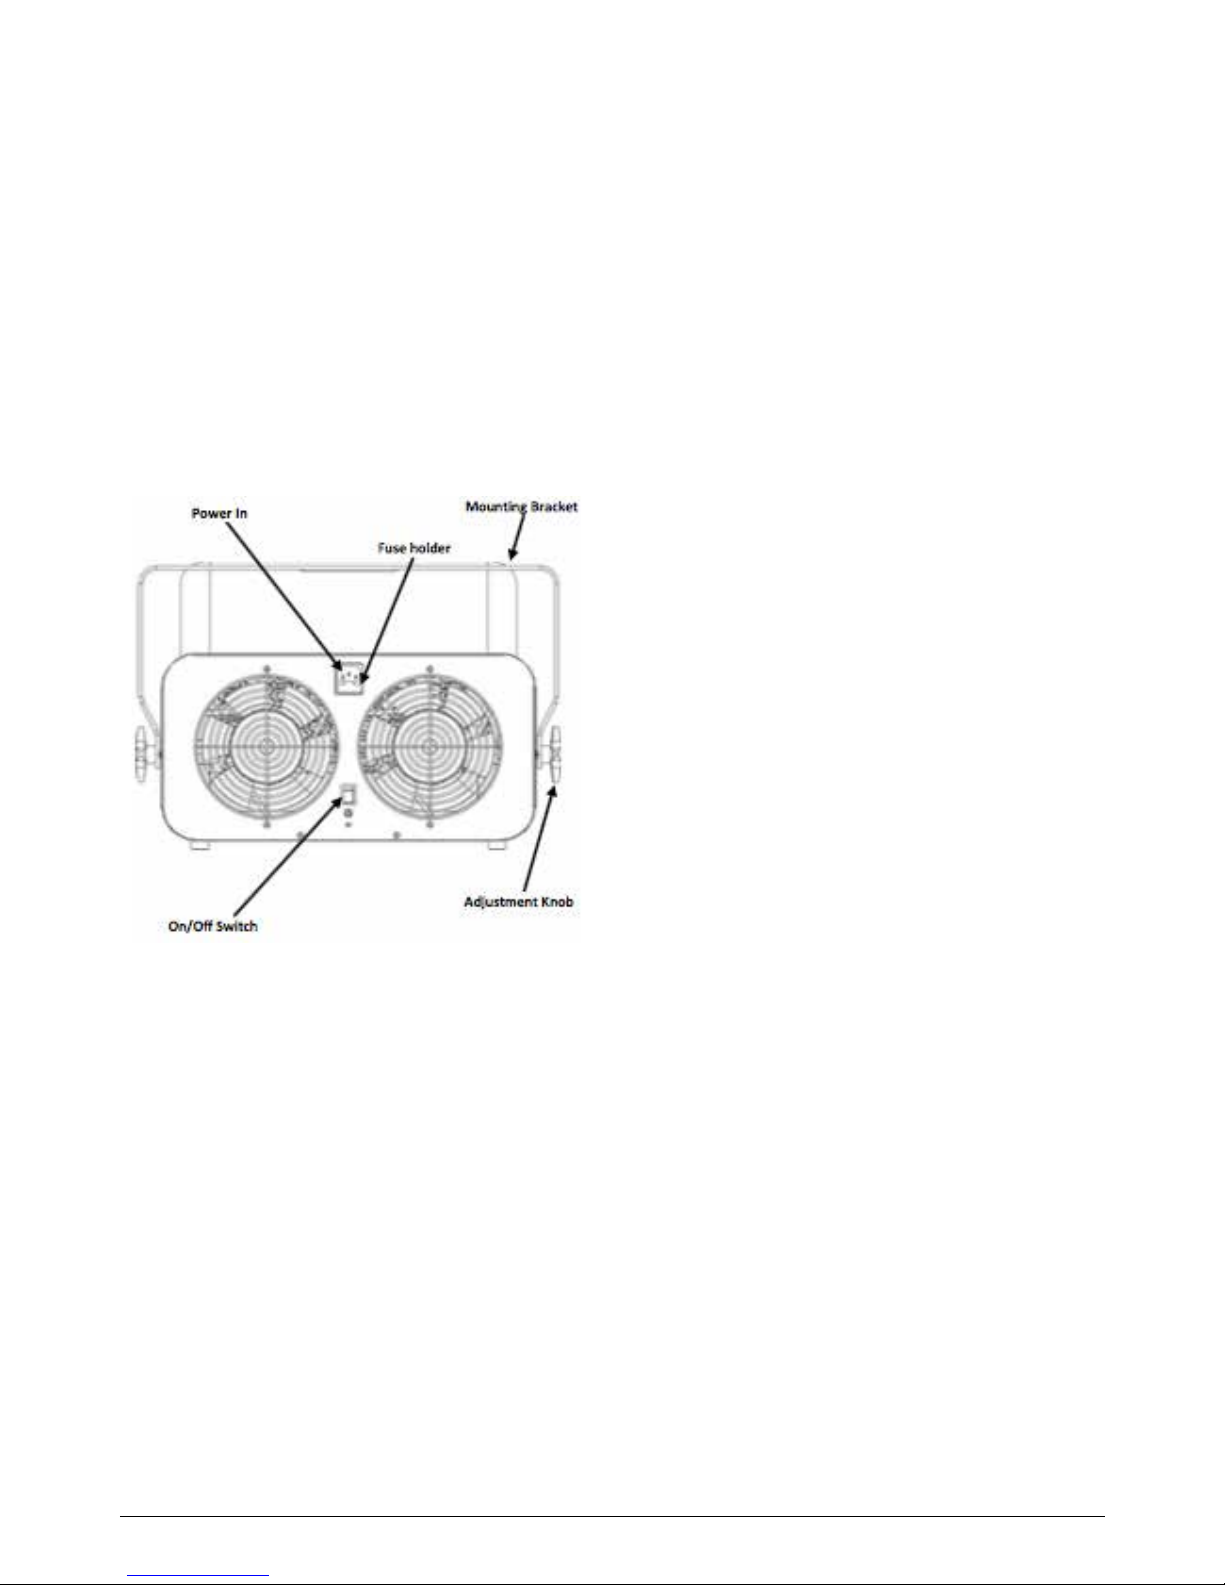
Product Overview
BUBBLE MASTER 2
ENGLISH VERSION
p. 3
Mounting
Before mounting this product, read the Safety Notes. Place
bubbler on a flat, level surface or use the mounting brackets
provided. Ensure that the bubbles are not shooting directly
in anyone’s face or above heavy traic areas, as bubble fluid
leaves a slippery surface. The bubble machine must not have
more than a 5° angle of inclination.
AC Power
This product has a voltage-specific power supply that can work
with an input voltage of 120 VAC, 60 Hz or 230 VAC, 50 Hz.
To eliminate wear and improve its lifespan, during periods of
non-use completely disconnect from power via breaker or by
unplugging it.
Fuse Replacement
1. Disconnect the product from power.
2. Wedge the tip of a flat-head screwdriver into the slot of the
fuse holder.
3. Pry the fuse holder out of the housing.
4. Remove the blown fuse from the holder.
5. Replace with a fuse of the exact same type and rating.
6. Insert the fuse holder back in place and reconnect power.
Page 4

Setup
Install the sleeve to the front of the bubbler, using the 4 provided screws.
Fill / Replace Bubble Fluid
1. Place the B ubble Master II on a level surface and loosen the
4 thumb screws on either side of the unit for fluid tank access.
2. Once removed, li the cover.
3. Fill the tank with bubble fluid.
DO NOT FILL PAST TOP OF FLUID RESERVOIR.
4. Lower the cover and tighten thumb screws.
Operation
1. Plug into a suitable wall outlet.
2. Turn on the Bubble Master II.
Note: Do not leave unused fluid in the reservoir for an extended period. The fluid may thicken in the reservoir. Remove all
fluid before packing or shipping.
Front view
BUBBLE MASTER 2
ENGLISH VERSION
p. 4
Page 5

Caracteristicas
Bubble Master 2 es una máquina de burbujas profesional
que permite cubrir largas áreas. Su diseño incluye tres ruedas dobles, permitiendo así un gran caudal de burbujas,
sin pausas. El equipo viene en un gabinete ultra-resistente,
ideal para aplicaciones móviles muy demandantes.
Salida
Tres ruedas dobles de burbujas
Consumo de fluido: 1 lt. cada 3 horas
Tanque: 1.7 lts.
Control
Modos de operación: Análogo
Controladores: Botón integrado
Eléctrico
Rango de voltaje de entrada: AC 100–240V, 50-60Hz
Consumo de potencia: 88W
Físico
Dimensiones: 483x381x305 mm. / 19x15x12 in.
Peso: 5.9 Kg. / 13.2 Lbs.
BUBBLE MASTER 2
VERSIÑON ESPAÑOL
p. 5
Page 6

Qué va Incluido
• Bubble Master II
• Cable de alimentación
• Soporte para Colgar con Material de Montaje
• Guía de Referencia Rápida
Descripción del Producto
Bubble Master II incorpora 3 ruedas dobles y un botón de
burbujas manual, ofreciendo una emisión excepcional cuando se necesitan burbujas para una zona extensa.
Vista general del producto
Montaje
Antes de montar este producto, lea las Notas de seguridad.
Coloque la máquina de burbujas sobre una superficie plana y
nivelada o utilice los soportes de montaje incluidos. Asegúrese
de que las burbujas no son lanzadas directamente a la cara de
alguien o sobre zonas de mucho tráfico, ya que el líquido de
burbujas deja una superficie resbaladiza. La máquina de burbujas no debe tener más de 5° de ángulo de inclinación.
Corriente Alterna
Este producto tiene una fuente de alimentación de tensión
específica que puede funcionar con una tensión de entrada
de 120 VCA, 60 Hz o 230 VCA, 50 Hz.
Para evitar un desgaste innecesario y alargar su vida útil,
desconecte complemente el producto de la alimentación,
mediante el interruptor o desenchufándolo, durante los
periodos en los que no se use.
Sustitución del Fusible
1. Desconecte el producto de la alimentación.
2. Haga cuña con la punta de un destornillador plano en la
ranura del portafusibles.
3. Saque la tapa de seguridad de la carcasa.
4. Quite el fusible fundido de la sujeción en la parte frontal de
la tapa de seguridad y sustituya el fusible con otro del mismo
tipo y categoría.
5. Vuelva a insertar el portafusibles y conecte de nuevo la alimentación.
BUBBLE MASTER 2
VERSIÑON ESPAÑOL
p. 6
Page 7

5. Instalación
Instale la boca en el frontal de la máquina de burbujas con
los 4 tornillos suministrados
Rellenar / Sustituir el líquido de burbujas
1. Coloque el Bubble Master II en una superficie nivelada y
afloje los 4 tornillos de mano de cada lado de la unidad para
acceder al depósito de fluido.
2. Una vez quitados, levante la tapa.
3. Llene el tanque de líquido de burbujas.
NO LO LLENE MÁS ALLÁ DEL BORDE DEL DEPÓSITO DE FLUIDO.
4. Baje la tapa y apriete los tornillos de mano.
Funcionamiento
1. Enchufe en una toma de corriente adecuada.
2. Encienda el Bubble Master II.
Nota: no deje líquido sin utilizar en el depósito durante
mucho tiempo. El líquido puede espesarse dentro del depósito. Quite todo el fluido antes de embalar o transportar.
Vista Frontal
BUBBLE MASTER 2
VERSIÑON ESPAÑOL
p. 7
Page 8

FOR MORE INFO ON THIS PRODUCT PLEASE CHECK WWW.TEC-SHOW.COM
PARA MAS INFORMACION SOBRE ESTE PRODUCTO VISITE WWW.TEC-SHOW.COM
 Loading...