

Page 1
P. 1
| Tecshow Bea mpix 14
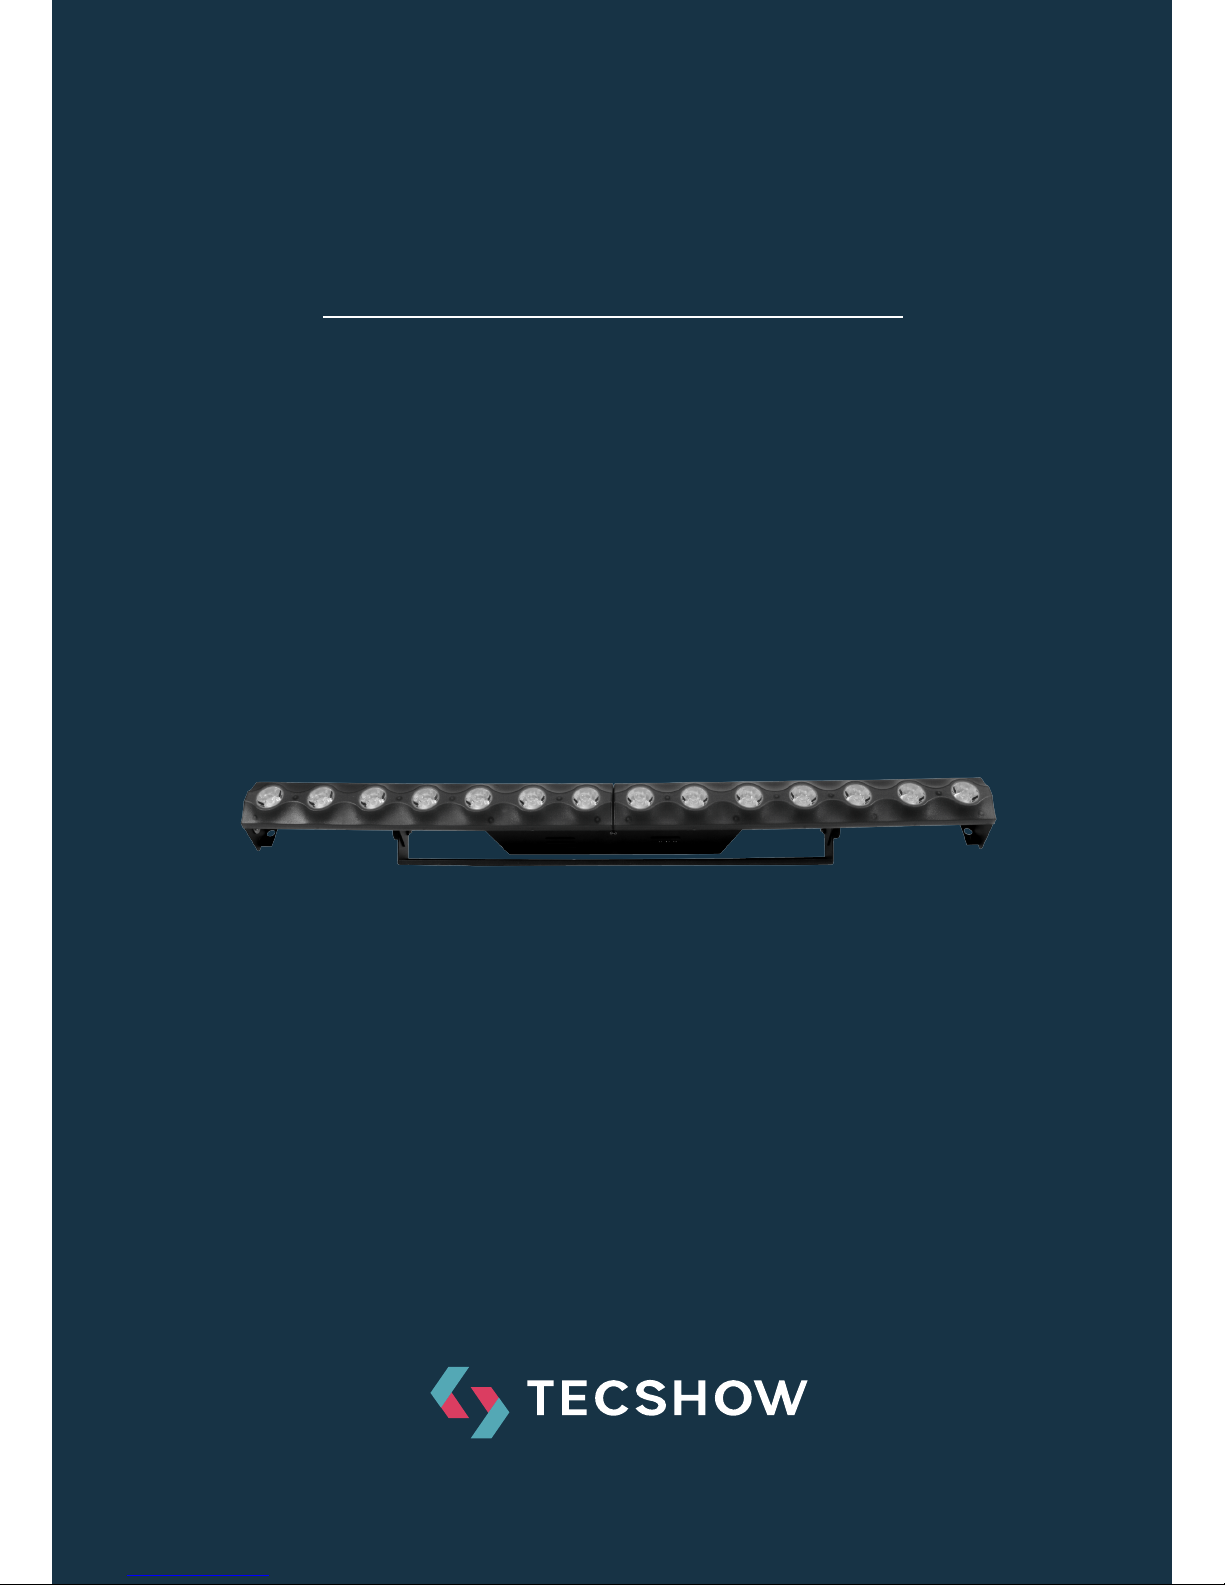
BEAMPIX 14
2-in-1 LED Bar with pixel by pixel control
USER MANUAL / MANUAL DE USUARIO
PLEASE READ THE INSTRUCTIONS CAREFULLY BEFORE USE
POR FAVOR LEA LAS INSTRUCCIÓNES ANTES DE USAR
Page 2

P. 2
Tecshow Bea mpix 14 |
BeamPix 14
2-in-1 LED Bar with pixel by pixel control
BeamPix 14 is a LED bar with pixel by pixel control that sports 14 warm white 3W LEDs and 56
SMD5050 RGB LEDs. Thanks to its innovative
design, the xture achieves a 2-in-1 eect by
combining its sharp and dened white beams with
the visual eect generated by its RGB LEDs. With
an extended mode of 60 DMX channels that allows
controlling each LED independently, BeamPix 14
also has 59 integrated programs, strobe eect and
a precise dimmer.
Specications
Source & Optics
• Light Sources:
• 14 3W Warm white LEDs
• 56 RGB 3-in-1 SMD5050 LEDs
• LEDs life: 50,000 hours
• Beam angle: 4.5º
Photometric data
• Flux: 7,000 lux @ 2m (6.5 .)
Eects & Functions
• 2-in-1 eect: Razor sharp beams + RGB visual
eect
• Pixel by pixel control
• Tri-color LED technology: Smooth RGB mix with
no multi-colored shadows
• Dimmer: Full range 0-100%
• Strobe eect
• 59 built-in programs with speed control
Control
• DMX channels: 6/8/12/60
• Operational modes: DMX, Master/Slave,
Sound-active & Auto-run
Physical
• 4-digit LED display
• DMX connectors: 2 XLR connectors (XLR-3 In
and Out)
• PowerCON® In/Out power supply connectors
• Dimensions: 1000x70x100 mm. / 39.4x2.75x3.9 in.
• Weight: 2.66 Kg. / 5.9 Lbs.
1. OVERVIEW
English version
Page 3
P. 3
| Tecshow Bea mpix 14
English version
Be careful with your operations. With
adangerous voltage you can Suer a
dangerous electric shock when touching
wire.
This device has le the factory in perfect condition.
In order to maintain this condition and to ensure
a safe operation, It is absolutely necessary for the
user to follow the safety instructions and warning
notes written in this user manual.
Damages caused by the disregard of this
user manual are not subject to warranty. The dealer will not accept liability for
any resulting defects or problems.
• If the device has been exposed to temperature
changes due to environmental changes, do not
switch it on immediately. The arising condensa-
tion could damage the device. Leave the device
switched off until it has reached room temperature.
• This device falls under protection-class I. Therefore it is essential that the device be earthed.
• The electric connection must carry out by qual-
ied person.
• The device shall only be used with rate voltage
and frequency.
• Make sure that the available voltage is not higher than stated at the end of this manual.
• Make sure the power cord is never crimped or
damaged by sharp edges. If this wold be the
case, replacement of the cable must be done by
an authorized dealer.
• Always disconnect from the mains, when the
device is hot in use or before cleaning it.
• Only handle the power cord by the plug. Never
pull out the plug by tugging the power cord.
• During initial start-up some smoke or smell may
arise. This is a normal process and does not
necessarily mean that the device is defective. It
should decrease gradually.
• Please don’t project the beam onto combustible substances.
• Fixtures can not be installed on combustible
substances. Keep more than 50cm distance
with wall for smooth air ow. So there should
be no shelter for fans and ventilation for heat
radiation.
• If the external exible cable or cord of this
luminaire is damaged. It shall be exclusively
replaced by the manufacturer or his service
agent or a similar qualied person in order to
avoid a hazard.
2. SAFETY INSTRUCTIONS
Page 4

P. 4
Tecshow Bea mpix 14 |
English version
• The Beampix 14 is for wash eect for onsite
decoration purpose.
• Don’t turn on the xture if it’s been through
sever temperature dierence like aer transportation because it might damage the light
due to the environment changes. So make sure
to operate the xture until it is in normal temperature.
• This light should be keep away from strong shaking during any transportation or movement.
• Don’t expose the xture in overheat, moisture
or environment with too much dust when
installing it. And don’t lay any power cables on
the oor. Or it might cause electronic shock to
the people.
• Make sure the installation place is in good safe-
ty condition before installing the xture.
• Make sure to put the safety chain and check
whether the screws are screwed properly when
installing the xture.
• Make sure the lens are in good condition. It’s
recommended to replace the units if there are
any damages or severe scratch.
• Make sure the xture is operated by qualied
personnel who knows the xture before using
• Keep the original packages id any second shipment is needed.
• Don’t try to change the xtures without any in-
struction by the manufacturer or the appointed
repairing agencies.
• It is not in warranty range if there are any mal-
functions from not following the user manual to
operate or any illegal operation like shock short
circuit, electronic shock, lamp broke, etc.
3. OPERATION INSTRUCTIONS
Page 5
P. 5
| Tecshow Bea mpix 14
English version
Cautions: For added protection mount
the xtures in areas outside walking
paths, seating areas, or in areas were
the xture might be reached by unauthorized
personnel.
• Before mounting the xture to any surface,
make sure that the installation area can hold
a minimum point load of 10 times the devices’
weight.
• Fixture installation must always be secured
with a secondary safety attachment, such an
appropriate safety cable.
• Never stand directly below the device when
mounting, removing, or servicing the xture
from a ceiling, or set on a at level surface. Be
sure this xture is kept at least 1.5m(1.5) away
from any ammable materials(decoration etc).
• Always use and install the supplied safety cable
as a safety measure to prevent accidental damage and/or injury in the event the clamp fails.
Mounting Points
Overhead mounting requires extensive experience,
including amongst others calculating working load
limits, a ne knowledge of the installation material being used, and periodic safety inspection of
all installation material and the xture. If you lack
these qualications, do not attempt the installation
yourself improper installation can result in bodily
inquiry. Be sure to complete all rigging and installation procedures before connecting the man power
cord to the appropriate wall outlet.
Clamp Mounting
The LED wall washer provides a unique mounting
bracket assembly that integrates the bottom of the
base and the safety cable rigging point in one unit.
As an added safety measure be sure to attached at
least one properly rated safety cable to the xture
using on of the safety cable rigging point integrated
in the base assembly.
Regardless of the rigging option you choose for
your wall washer, always be sure to only use the
designated rigging point for the safety cable and
never secure a safety cable to a carrying handle.
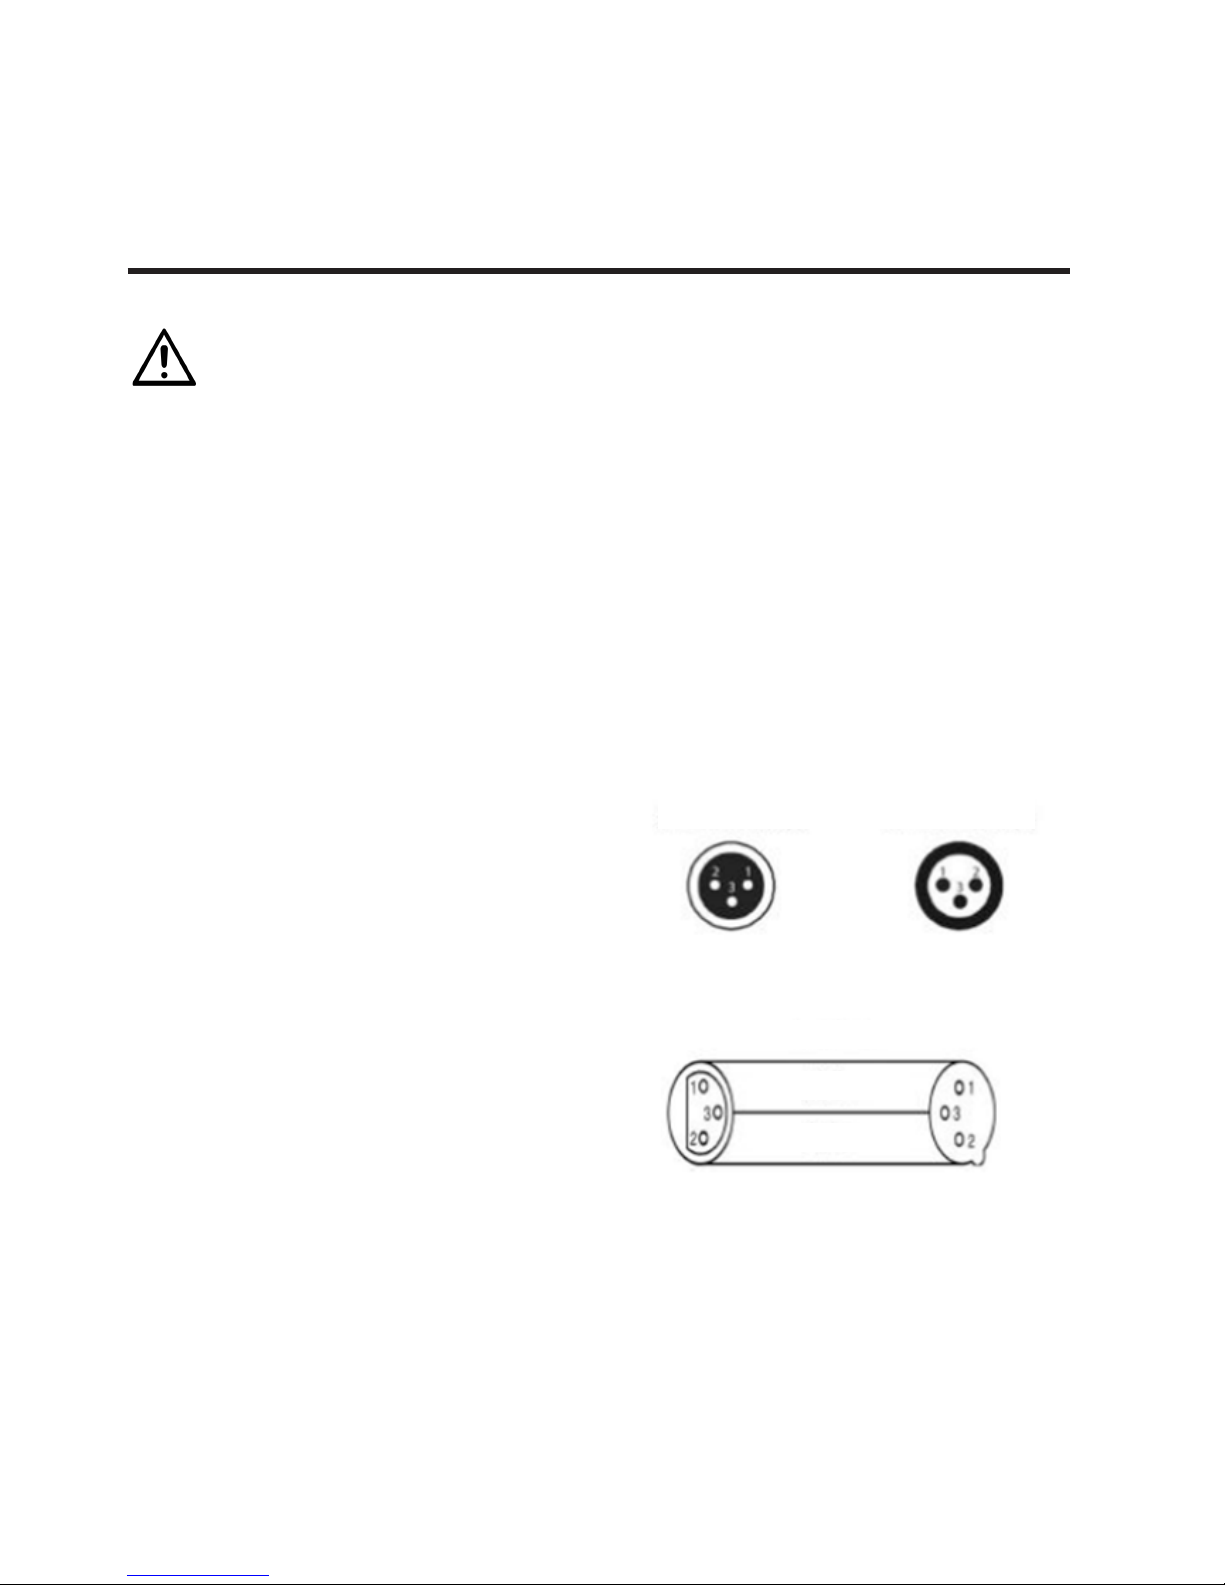
DMX-512 control connections
Connect the provided XLR cable to the female 3-pin
XLR output of your controller and the other side
to the male 3-pin XLR input the led wall washer.
You can chain multiple led wall washer together
through serial linking. The cable needed should be
two core screened cable with XLR input and output
connectors. Please refer to the diagram below.
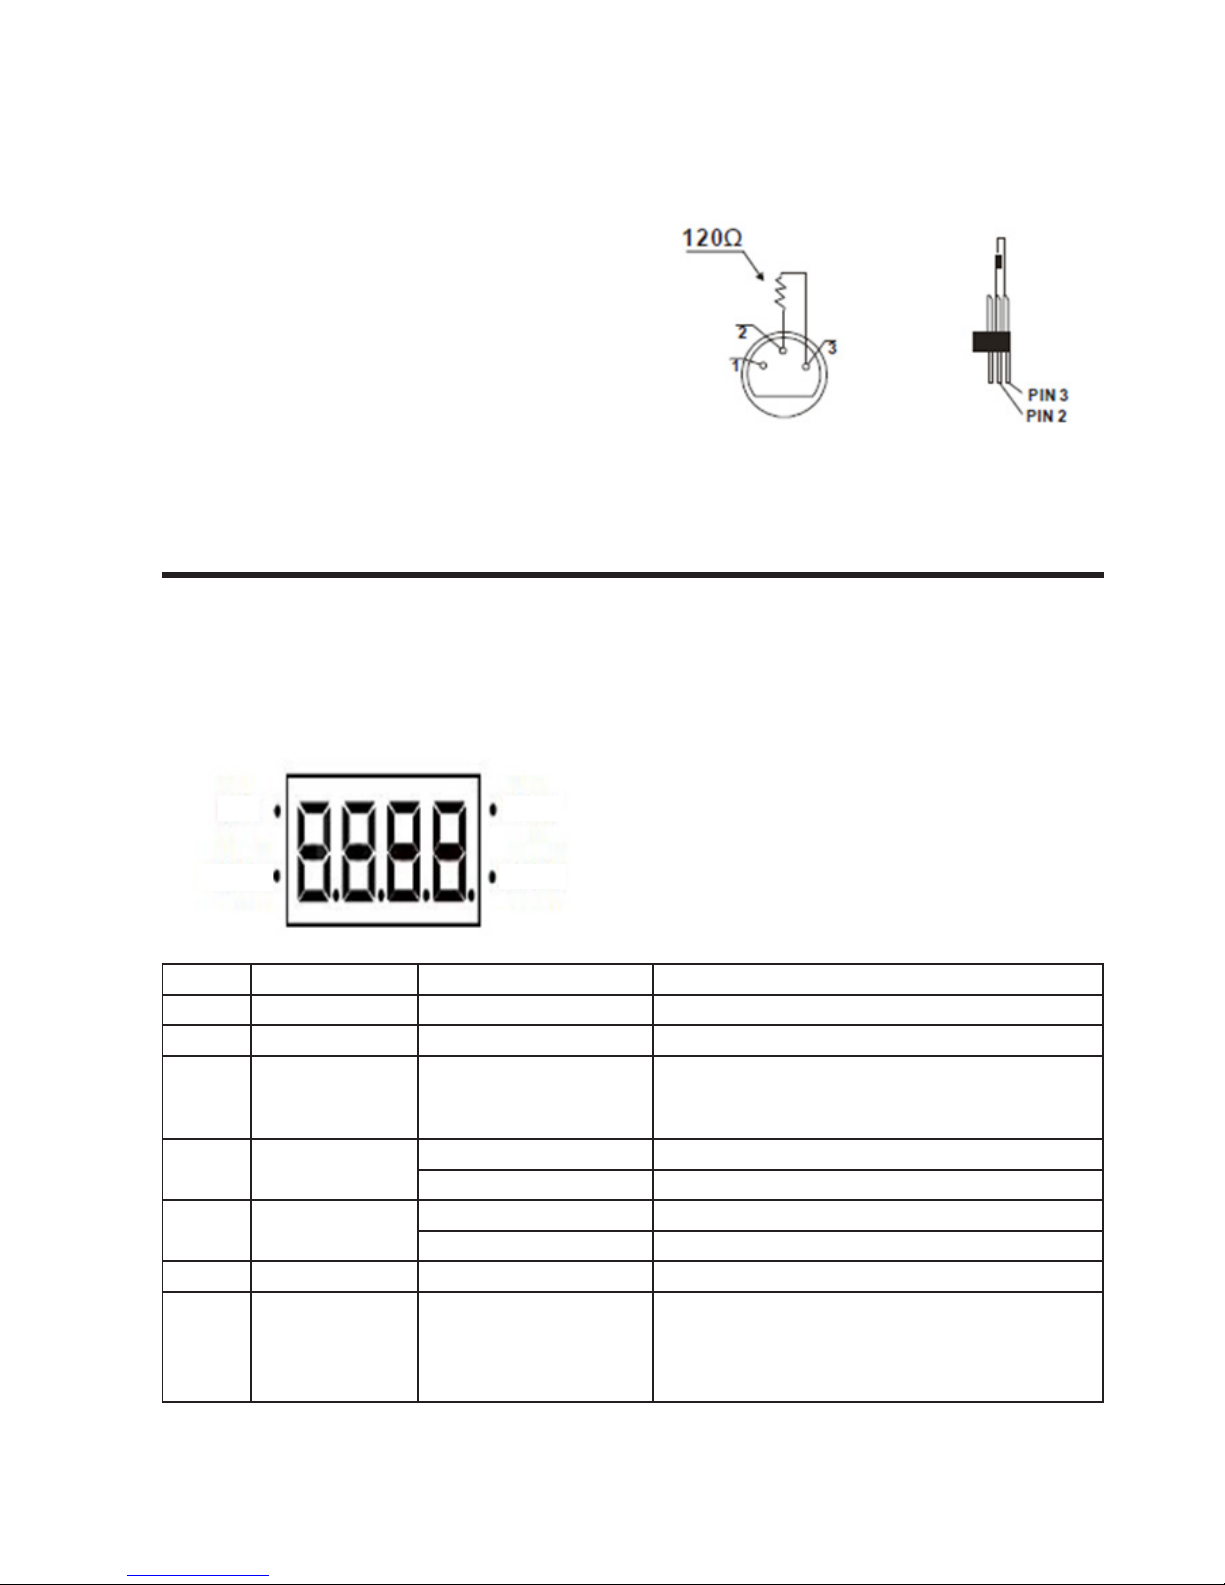
DMX-512 connection with DMX
terminator
For installation where the DMX cable has to run a
long distance or is in an electrically noisy environ-
4. MOUNTING AND INSTALLATION
DMX Output
3-PIN XLR Socket
DMX Input
3-PIN XLR Socket
COMMON
DMX +
DMX -
DMX 512 OUT
3-PIN XLR
1: GROUND
2: DATA (-)
3: DATA (+)
DMX 512 IN
3-PIN XLR
Page 6
P. 6
Tecshow Bea mpix 14 |
English version
Press “MENU” to browse the dierent function,
press “ENTER” to Next Menu(Sub-Menu) Press “UP”
or “DOWN” to choose the desire function and Press
“ENTER” to conrm. Press “MENU” to return back
last menu.
5. MENU INSTRUCTION
ment, such as in a discotheque, it is recommended
to use a DMX terminator. This helps in preventing
corruption of the digital control signal by electrical
noise. The DMX terminator is simply an XLR plug
with a 120Ω resistor connected between pins 2 and
3, which is then plugged into the output XLR socket
of the last xture in the chain. Please see illustrations.
DMX SLAVE
MASTER SOUND
No. Menu Value Function
1 Addr 1-512 DMX Address Set
2 Chnd 6ch/8ch/12ch/60ch DMX Channel select
3 SLnd
Mast
SL 1
SL 2
Master / Slave select
4 SoUn
Su 0-59 Sound Control Mode, 0-59 built-in program
Se 00-99 Sound sensitive 0-99(99 is the most Sensitive)
5 Auto
Au 0-59 Auto Mode, 0-59 Built-in program
Sp 1-9 Auto Running Speed select 1-9
6 Colo Co 1-15 Color choose
7 Manu
Red 0-255
Gree 0-255
Blue 0-255
Whit 0-255
Manual mode
Page 7

P. 7
| Tecshow Bea mpix 14
English version
DMX Channels
6 Channels
8 DISP dISP
dSIP
Display reverse
9 Ver V10 Version Number
Channel Value Function
1 0-255 Red Dimmer 0-100%
2 0-255 Green Dimmer 0-100%
3 0-255 Blue Dimmer 0-100%
4 0-255 Warm White Dimmer 0-100%
5
Color Chase
000-007 No function
008-12 Color chase 1
13 -16 Color chase 2
17-20 Color chase 3
21-24 Color chase 4
...... ......
227-247 Color chase 59
248-255 Sound controlled strobe
6 0-255 Speed control slow-fast
8 Channels
Channel Value Function
1 0-255 Dimmer 0-100%
2 0-255 Strobe
3 0-255 Red Dimmer 0-100%
4 0-255 Green Dimmer 0-100%
5 0-255 Blue Dimmer 0-100%
6 0-255 Warm White Dimmer 0-100%
7
Color Chase
000-007 No function
008-12 Color chase 1
13 -16 Color chase 2
17-20 Color chase 3
21-24 Color chase 4
...... ......
227-247 Color chase 59
Page 8

P. 8
Tecshow Bea mpix 14 |
English version
248-255 Sound controlled strobe
8 0-255 Speed control slow-fast
12 Channels
60 Channels
Channel Value Function
1 0-255 Dimmer 0-100%
2 0-255 Strobe
3 0-255 Part 1Red Dimmer 0-100%
4 0-255 Part 1 Green Dimmer 0-100%
5 0-255 Part 1 Blue Dimmer 0-100%
6 0-255 Part 1 Warm White Dimmer 0-100%
7 0-255 Part 2 Red Dimmer 0-100%
8 0-255 Part 2 Green Dimmer 0-100%
9 0-255 Part 2 Blue Dimmer 0-100%
10 0-255 Part 2 Warm White Dimmer 0-100%
11
Color Chase
000-007 No function
008-12 Color chase 1
13 -16 Color chase 2
17-20 Color chase 3
21-24 Color chase 4
...... ......
227-247 Color chase 59
248-255 Sound controlled strobe
12 0-255 Speed control slow-fast
Channel Value Function
1 0-255 Dimmer 0-100%
2 0-255 Strobe
3 0-255 Group 1 Red Dimmer 0-100%
4 0-255 Group 1 Green Dimmer 0-100%
5 0-255 Group 1 Blue Dimmer 0-100%
6 0-255 Warm White 1 Dimmer 0-100%
. . .
55 0-255 Group 14 Red Dimmer 0-100%
56 0-255 Group 14 Green Dimmer 0-100%
57 0-255 Group 14 Blue Dimmer 0-100%
Page 9

P. 9
| Tecshow Bea mpix 14
English version
58 0-255 Warm White 14 Dimmer 0-100%
59
Color Chase
000-007 No function
008-12 Color chase 1
13 -16 Color chase 2
17-20 Color chase 3
21-24 Color chase 4
...... ......
227-247 Color chase 59
248-255 Sound controlled strobe
60 0-255 Speed control slow-fast
Following are a few common problems that may
occur during operation. Here are some suggestions for easy troubleshooting:
A. The unit does not work, no light and the fax
does not work.
1. Check the connection of power and main fuse.
2. Measure the mains voltage on the main connector.
3. Check the power on LED.
B. Not responding to DMX Controller.
1. DMX LED should be on. If not, check DMX con-
nectors, cables to see if link properly.
2. If the DMX LED is on and no response to the
channel, check the address settings and DMX
polarity.
3. If you have intermittent DMX signal problems,
check the pins on connectors or on PCB of the
unit or the previous one.
4. Try to use another DMX controller.
5. Check if the DMX cables run near or run along-
side to high voltage cables that may cause damage or interference to DMX interface circuit.
C. Some units don’t respond to the easy controlle r.
1. You may have a break in the DMX cabling,
Check the LED for the response of the master/
slave mode signal.
2. Wrong DMX address in the unit, Set the proper
address.
D. No response to the sound.
1. Make sure the unit does not receive DMX signal.
2. Check microphone to see if it is good by tap-
ping the microphone.
6. TROUBLE SHOOTING
Page 10

P. 1 0
Tecshow Bea mpix 14 |
Design and product specications are subject to change without prior notice.
The following points have to be the considered
during the inspection:
1. All screws for installing the devices or parts of
the device have to be tightly connected and
must not be corroded.
2. There must not be any deformations on the
housing, color lenses, xations and installation
spots(ceiling, suspension, trussing).
3. Mechanically moved parts must not slow any
traces of wearing and must not rotate with
unbalances.
4. The electric power supply cables must not
show any damage, material fatigue or sedi-
ments.
Further instructions depending on the installation
spot and usage have to be adhered by a skilled
installer and any safety problems have to be removed.
Caution: Disconnect from mains before starting
maintenance operation.
In order to make the lights in good condition and
extend the life time. We suggest a regular cleaning
to the lights
1. Clean the inside and outside lens each week to
avoid the weakness of the lights due to accumulation of dust.
2. Clean the fan each week.
3. A detailed electric check by approved electrical
engineer each three month, make sure that the
circuit contacts are in good condition, prevent
the poor contact of circuit from overheating.
We recommend a frequent cleaning of the device.
Please use a moist, lint-free cloth. Never use alco-
hol or solvents.
There are no serviceable parts inside the device.
Please refer to the instructions under “Installation
Instructions”. Should you need any spare parts,
please order genuine parts from your local dealer.
7. MAINTENANCE AND CLEANING
English version
Page 11

P. 11
| Tecshow Bea mpix 14
BeamPix 14
Barra LED 2-en-1 con control pixel por pixel
BeamPix 14 es una barra con control pixel por pixel
equipada con 14 LEDs blanco cálido de 3W y 56
LEDs RGB SMD5050. Gracias a su innovador diseño,
el equipo logra un efecto 2-en-1 combinando sus losos y denidos haces blancos con el efecto visual
generado por sus LEDs RGB. Con un modo extendido de 60 canales DMX que permite controlar cada
LED de forma independiente, BeamPix 14 cuenta
además con 59 programas integrados, efecto estrobo y dimmer 0-100%.
Especicaciones
Fuente & Óptica
• Fuentes de luz: 14 LEDs blanco cálido de 3W
• 56 LEDs SMD5050 RGB 3-en-1
• Vida útil promedio: 50.000 horas
• Ángulo de haz: 4,5º
Información fotométrica
• Flux: 7.000 lux @ 2m (6.5 pies)
Efectos y Funciones
• Efecto 2-en-1: Haces losos y denidos + efecto
visual RGB
• Control pixel por pixel: cada LED puede ser
controlado de forma independiente
• Tecnología LED tricolor: Mezcla suave RGB sin
sombras multicolor
• Dimmer: Rango completo 0-100% general &
para todos los colores
• Efecto estrobo
• 59 programas integrados con velocidad seleccionable
Control
• Canales DMX: 6/8/12/60
• Modos de operación: DMX, audioritmico, auto-
matico y Maestro/Esclavo
Físico
• Display LED de 4-digitos
• Conectores DMX: 2 conectores XLR (XLR-3 de
entrada & salida)
• Conectores de alimentación de entrada y salida
PowerCON®
• Dimensiones: 1000x70x100 mm. / 39,4x2,75x3,9
pulg.
• Peso: 2,66 Kg. / 5,9 Lbs.
1. DESCRIPCIÓN
Versión Español
Page 12

P. 12
Tecshow Bea mpix 14 |
Versión Español
No manipule los cables. Alto Voltaje.
Riesgo de descarga eléctrica.
El equipo fue entregado en perfectas condiciones.
Procure seguir las instrucciones y advertencias de
seguridad del manual para garantizar el buen estado del equipo y su correcto funcionamiento.
La garantía no cubre daños provocados
por el uso inapropiado de este produc-
to. El fabricante y el distribuidor no
aceptarán responsabilidad por el mal uso del
equipo.
• En caso de que el equipo haya sido expuesto
a cambios de temperatura drásticos, no lo
encienda de inmediato. La condensación puede
causar daños en el equipo. Manténgalo apagado hasta que alcance la temperatura ambiente.
• El equipo cuenta con grado de protección I. Por
lo tanto, procure la conexión a tierra del equipo.
• La instalación eléctrica del equipo debe ser
realizada por un profesional certicado.
• Verique que el rango de voltaje utilizado no
sea superior ni inferior a los valores indicados
en el presente manual.
• Compruebe que el voltaje utilizado no sea
superior ni inferior a los valores indicados en el
presente manual.
• Verique que el cable de suministro eléctrico
no se encuentre cortado o dañado. Si ese fuera
el caso, contacte a su distribuidor para reemplazarlo por otro cable en óptimas condiciones.
• Desconecte el equipo del suministro eléctrico
cuando necesite limpieza o cuando no esté en
funcionamiento.
• Manipule el cable de alimentación única-
mente desde el enchufe. No tire del cable para
desconectar el enchufe.
• Durante la puesta en marcha inicial, es pro-
bable que se genere algo de humo u olor. Es
un proceso normal que no implica que esté
dañado el dispositivo. Tanto el humo como el
olor desaparecerán gradualmente.
• No proyecte la luz sobre sustancias inamables.
• No instale el equipo sobre supercies ina-
mables. Instale el equipo en ambientes con
ventilación adecuada y mantenga una dis-
tancia mínima de 50 cm con otros objetos o
supercies.
• Si el cable de alimentación se encuentra
dañado, debe ser sustituido por el fabricante
o su distribuidor para evitar riesgos.
2. INSTRUCCIONES DE SEGURIDAD
Page 13

P. 13
| Tecshow Bea mpix 14
Versión Español
• Beampix 14 es un bañador LED de pared de uso
decorativo únicamente.
• En caso de que el equipo haya sido expuesto
a cambios de temperatura drásticos, no lo
encienda de inmediato. La condensación puede
causar daños en el equipo. Manténgalo apagado hasta que alcance la temperatura ambiente.
• Evite sacudir el equipo cuando esté siendo
trasladado o se encuentre en movimiento.
• Al elegir el punto de instalación, procure que
el equipo no quede expuesto al calor, hume-
dad o polvo en exceso. No deje los cables de
alimentación desparramados por el suelo, ya
que pueden causar descargas eléctricas en las
personas.
• Asegúrese de que el lugar de instalación se en-
cuentre en óptimas condiciones de seguridad
antes de instalar el equipo.
• Emplee un cable de seguridad durante la instalación y compruebe que los tornillos y abrazaderas estén correctamente jados.
• Verique con frecuencia que el lente se encuentre en buen estado. Sustituya el lente en caso
de que se encuentre rayado o dañado para
garantizar la óptima salida de luz.
• El equipo debe ser operado por personal calicado que se encuentre familiarizado con sus
características e instrucciones de uso.
• Utilice el embalaje original si precisa trasladar
el equipo.
• Por motivos de seguridad, está prohibido
introducir modicaciones no autorizadas en el
equipo.
• La garantía no cubre aquellos daños provocados por el uso indebido del equipo. Cualquier
mal uso de la unidad puede causar cortocircuitos, descargas eléctricas, explosión de la
lámpara, etc.
3. INSTRUCCIONES DE USO
Page 14

P. 14
Tecshow Bea mpix 14 |
Versión Español
Precaución: Para mayor seguridad,
realice la instalación del equipo fuera
de las zonas de circulación de personas
o donde personal no autorizado pueda tener
acceso al equipo.
• Para garantizar una instalación segura, la es-
tructura en la que se je el equipo debe poder
soportar diez veces su peso durante una hora,
sin sufrir deformaciones.
• Utilice un accesorio de seguridad adicional,
como un cable de seguridad durante la insta-
lación.
• Evite situarse debajo del equipo para realizar su
montaje, desmontaje o mantenimiento.
• Asegúrese de mantener el equipo al menos a
1,50 metros de distancia de materiales inamables (decoración, escenografía, etc.).
• Procure utilizar el cable de seguridad provisto
con el equipo para evitar accidentes o daños en
caso de que falle la abrazadera.
Puntos de montaje
Para realizar un montaje en altura se requiere de
experiencia y conocimientos previos para calcular
los límites de peso, los materiales a emplear, las
medidas de seguridad, etc. Si no cumple con estos
requisitos, no realice la instalación por sus propios
medios. Una instalación inadecuada podría resultar en lesiones corporales graves. Asegúrese de
haber completado todo el proceso de instalación
y anclaje antes de conectar el equipo al suministro
eléctrico.
Montaje con abrazadera
Beampix 14 facilita el ensamblaje de manera única,
integrando la base del equipo y el punto de anclaje
del cable de seguridad en una unidad. Como medida de seguridad adicional, siempre utilice un cable
de seguridad adecuado. Colóquelo en la base, a
través del punto de anclaje correspondiente.
Independientemente de la opción de montaje se-
leccionada, siempre asegúrese de usar únicamente
el punto de montaje designado para el cable de
seguridad. Nunca asegure un cable de seguridad a
un asa de transporte.
Conexión DMX 512
Conecte un extremo del clave XLR provisto, a la
salida XLR-3 hembra de su controlador y el otro
extremo, a la entrada XLR-3 macho del bañador.
Reitere este paso para enlazar todas las unidades
deseadas. El cable utilizado debe ser bilar y blin-
dado con conectores XLR de entrada y salida. Para
obtener más información, reérase al siguiente
diagrama:
Terminador DMX
Cuando el cable DMX debe recorrer largas distancias o se encuentra en un ambiente con mucho ruido eléctrico (discotecas), se recomienda el uso de
4. INSTALACIÓN Y MONTAJE
Salida DMX
Conector XLR-3
hembra
Entrada DMX
Conector XLR-3
macho
COMMON
DMX +
DMX -
Salida DMX
XLR-3
1: A tierra
2: Señal negativa (-)
3: Señal positiva (+)
Entrada DMX
XLR-3
Page 15

P. 15
| Tecshow Bea mpix 14
Versión Español
Presione “MENU” para navegar por las diferentes
funciones y “ENTER” para acceder al submenú
correspondiente. Presione “UP” o “DOWN” para
seleccionar la función deseada y luego “ENTER”
para conrmar. Presione “MENU” para regresar al
menú anterior.
5. MENÚ DE FUNCIONES
un terminador DMX. El terminador ayudará a prevenir que el ruido eléctrico perjudique la señal de
control digital. Es básicamente un conector XLR con
una resistencia de 120 Ω soldado entre las clavijas 2
y 3, que luego se conecta en la salida XLR del último
equipo de la serie de enlace. Para obtener más
información, reérase al siguiente diagrama:
DMX SLAVE
MASTER SOUND
Nro. MENÚ Valor Función
1 Addr 1-512 Conguración de la dirección DMX
2 Chnd 6ch/8ch/12ch/60ch Selección del modo de canales DMX
3 SLnd
Mast
SL 1
SL 2
Modo maestro/esclavo
4 SoUn
Su 0-59 Modo audiorítmico, 0-59 programas integrados
Se 00-99 Sensibilidad de sonido: 0-99 (99 mayor sensibilidad)
5 Auto
Au 0-59 Modo automático, 0-59 programas integrados
Sp 1-9 Velocidad de ejecución automática 1-9
6 Colo Co 1-15 Selección de color
7 Manu
Red 0-255
Gree 0-255
Blue 0-255
Whit 0-255
Modo manual (rojo, verde, azul y blanco)
Page 16

P. 1 6
Tecshow Bea mpix 14 |
Versión Español
Cuadro de canales DMX
Modo 6 canales
8 DISP dISP
dSIP
Rotación de pantalla
9 Ver V10 Versión de soware
Canal Valor Función
1 0-255 Rojo: dimmer 0-100%
2 0-255 Verde: dimmer 0-100%
3 0-255 Azul: dimmer 0-100%
4 0-255 Blanco cálido: dimmer 0-100%
5 Chase de color
000-007 Sin función
008-12 Chase de color 1
13 -16 Chase de color 2
17-20 Chase de color 3
21-24 Chase de color 4
...... ......
227-247 Chase de color 59
248-255 Estrobo en modo audiorítmico
6 0-255
Control de velocidad: velocidad
creciente
Modo 8 canales
Canal Valor Función
1 0-255 Dimmer 0-100%
2 0-255 Estrobo
3 0-255 Rojo: dimmer 0-100%
4 0-255 Verde: dimmer 0-100%
5 0-255 Azul: dimmer 0-100%
6 0-255 Blanco cálido: dimmer 0-100%
7
Chase de color
000-007 Sin función
008-12 Chase de color 1
13 -16 Chase de color 2
17-20 Chase de color 3
21-24 Chase de color 4
...... ......
227-247 Chase de color 59
Page 17

P. 17
| Tecshow Bea mpix 14
Versión Español
248-255 Estrobo en modo audiorítmico
8 0-255 Control de velocidad: velocidad
creciente
Modo 12 canales
Modo 60 canales
Canal Valor Función
1 0-255 Dimmer 0-100%
2 0-255 Estrobo
3 0-255 Parte 1. Rojo: dimmer 0-100%
4 0-255 Parte 1. Verde: dimmer 0-100%
5 0-255 Parte 1. Azul: dimmer 0-100%
6 0-255 Parte 1. Blanco cálido: dimmer 0-100%
7 0-255 Parte 2. Rojo: dimmer 0-100%
8 0-255 Parte 2. Verde: dimmer 0-100%
9 0-255 Parte 2. Azul: dimmer 0-100%
10 0-255 Parte 2. Blanco cálido: dimmer 0-100%
11
Chase de color
000-007 Sin función
008-12 Chase de color 1
13 -16 Chase de color 2
17-20 Chase de color 3
21-24 Chase de color 4
...... ......
227-247 Chase de color 59
248-255 Estrobo en modo audiorítmico
12 0-255 Control de velocidad: velocidad cre-
ciente
Canal Valor Función
1 0-255 Dimmer 0-100%
2 0-255 Estrobo
3 0-255 Grupo 1. Rojo: dimmer 0-100%
4 0-255 Grupo 1. Verde: dimmer 0-100%
5 0-255 Grupo 1. Azul: dimmer 0-100%
6 0-255 Blanco cálido 1: dimmer 0-100%
. . .
55 0-255 Grupo 14. Rojo: dimmer 0-100%
56 0-255 Grupo 14. Verde: dimmer 0-100%
Page 18

P. 18
Tecshow Bea mpix 14 |
Versión Español
57 0-255 Grupo 14. Azul: dimmer 0-100%
58 0-255 Blanco cálido 14: dimmer 0-100%
59
Chase de color
000-007 Sin función
008-12 Chase de color 1
13 -16 Chase de color 2
17-20 Chase de color 3
21-24 Chase de color 4
...... ......
227-247 Chase de color 59
248-255 Estrobo en modo audiorítmico
60 0-255
Control de velocidad: velocidad
creciente
Esta guía le permitirá al usuario resolver problemas simples. En caso de surgir algún inconveniente con la unidad, siga los pasos descritos a
continuación:
A. La unidad no funciona, no hay emisión de luz
y el fax no responde.
1. Verique el estado del suministro eléctrico y
del fusible.
2. Verique que la unidad esté conectada al rango
de voltaje correcto.
3. Verique el estado de la lámpara LED.
B. El equipo no responde al controlador DMX.
1. Verique que el indicador DMX esté encendido.
De lo contrario, revise la conexión entre los
cables y los conectores DMX.
2. Si el indicador LED está encendido y no
responde al canal, verique los valores de la
dirección DMX y la polaridad DMX.
3. Si observa problemas de señal DMX recu-
rrentes, verique las clavijas de los conectores
o de la placa de circuito impreso en el equipo y
el equipo previo de la cadena.
4. Utilice otro controlador DMX.
5. Revise que los cables DMX no estén cerca de o
junto a cables de alto voltaje que pueden ocasionar interferencia en el circuito DMX.
C. Algunos equipos de la cadena no responden al
controlador DMX.
1. Es posible que haya un corte en el cableado DMX. Verique el LED para comprobar la
respuesta de la señal del modo maestro/esclavo.
2. Dirección DMX incorrecta. Ingrese una nueva
dirección DMX.
D. El equipo no responde al sonido.
1. Asegúrese de que el equipo no reciba señal
DMX.
2. Verique que funcione correctamente el
micrófono.
6. RESOLUCIÓN DE PROBLEMAS
Page 19

P. 1 9
| Tecshow Bea mpix 14
Versión Español
Algunas consideraciones a tener en cuenta:
1. Todos los tornillos del equipo o los utilizados en
la instalación deben estar bien asegurados y en
buen estado.
2. No debe haber deformaciones en la cubierta,
los lentes o el lugar de instalación (cielos rasos,
suspensiones o sistema de truss).
3. Las partes con movilidad mecánica no deben
observar daños o mal funcionamiento.
4. Los cables del suministro eléctrico no deben
estar dañados ni cortados.
En caso de precisar más instrucciones sobre la
instalación y el uso del equipo, póngase en contacto con un profesional calicado que pueda descartar cualquier problema de seguridad.
Precaución: Desconecte el equipo antes de
realizar cualquier tarea de mantenimiento.
Se recomienda la limpieza regular del equipo para
prolongar su vida útil y optimizar la salida de luz.
1. Procure limpiar el interior y exterior del lente
una vez por semana para evitar que la acumulación de polvo disminuya la intensidad de la
salida de luz.
2. Limpie el ventilador una vez por semana.
3. Un electricista certicado debe realizar un
control de las conexiones eléctricas del equipo cada tres meses para garantizar que los
circuitos se encuentren en buen estado y así
evitar los falsos contactos por recalentamiento.
Para la rutina de limpieza, utilice un paño seco
que no genere pelusa. Bajo ninguna circunstancia
emplee alcohol o solventes.
El equipo no contiene piezas que puedan ser
reparadas por el usuario. Para obtener más infor-
mación, diríjase al apartado “Instalación”. Si en
algún momento precisa repuestos, utilice piezas
originales.
7. LIMPIEZA Y MANTENIMIENTO
Observación: La información de este manual está sujeta a cambios sin previo aviso.
Page 20

P. 2 0
Tecshow Bea mpix 14 |
tecshow.amproweb.com
 Loading...