

Page 1

BEAMER 7R
USER MANUAL / MANUAL DE USUARIO
PLEASE READ THE INSTRUCTIONS CAREFULLY BEFORE USE
POR FAVOR LEA LAS INSTRUCCIÓNES ANTES DE USAR
Page 2

p. 2
Overview
Beamer 7R is a compact moving head powered by a 7R 230W
Lamp with a beam angle of 2.5º. Boost your creativity with
its 14 colors + open, CTB, CTO and rainbow eect, 17 static
gobos + open and its 8-facet rotating prism. Stay in control
of your show with Beamer 7R´s motorized focus even in the
most challenging environments.
Specications
Source & Optics
Light Source: 7R 230W discharge lamp
Color temperature: 8,000K
Lamp life: 10,000 hours
Beam angle: 2.5°
Photometric data
Luminous Flux: 87000 lux @ 10m (30 .)
Eects & Functions
Color wheel: 14 dichroic lters + open, and bidirectional rain-
bow eect
Static gobo wheel: 11 indexable gobos + 7 dierent size beam
gobos
Gobo Diameter: 10 mm.
Gobo shaking
8-facet rotating prism
Frost: Linear frost
Electrical focus
Dimmer: Full range 0-100%
Strobe: 1-13 ashes per second
Control
DMX channels: 15/16
Operational modes: DMX, Master/Slave, Manual, Auto-run &
Built-in programs
Movement
Pan: 540°
Tilt: 265°
16-bit resolution
Auto repositioning
Electrical
Input voltage range: 100–240V, 50-60Hz
Power supply: Electronic auto-ranging
Power consumption: 380W
Physical
DMX connectors: 2 XLR connectors (XLR-3 In and Out)
Power supply connectors: PowerCON® In
Backlit LCD display
Dimensions: 372x290x500 mm. / 14.6x11.4x19.7 in.
Weight: 17.2 Kg. / 37.9 Lbs.
BEAMER 7R
ENGLISH VERSION
Page 3

• All maintenance must be carried out by a qualied
electrician.
• A minimum distance of 0.5m must be maintained between
the equipment and a combustible surface.
• The product must always be operated in a well ventilated area.
• DO NOT stare directly into the light source.
• Always disconnect the power before carrying out any
maintenance.
• The earth must always be connected to the ground.
• Ensure that all parts of the equipment are kept clean and
free of dust.
IMPORTANT
Every person involved with the installation, operation
and maintenance of this device has to be qualied.
• Follow the instructions of this manual.
• Consider this manual to be part of the total product.
• Keep this manual for the entire service life of the product.
• Pass this manual on to every further owner or user of
the product
• Download the latest version of the user manual from
the Internet.
OPERATING DETERMINATIONS
• This product is only allowed to be operated with an alternating voltage of 100-240 V, 50/60 Hz.
• This device is designed for professional use, e.g. on stages, in clubs, bars, theatres etc.
• Do not shake the device. Avoid brute force when installing or operating the device.
• When choosing the installation-spot, please make
sure that the device is not exposed to extreme heat,
moisture or dust. There should not be any cables lying around. Please make sure that the unit cannot be
touched or bumped.
• When using smoke machines, make sure that the de-
For your own safety, please read this user manual careful-
ly before you initially start-up.
SAFETY WARNING
vice is never exposed to the direct smoke jet and is installed in a distance of 0.5 meters between smoke machine and device.
• The ambient temperature must always be between -15°
C and +45° C. Keep away from direct insulation (particu-
larly in cars) and heaters.
• Never use the device during thunderstorms. Over volt-
age could destroy the device. Always disconnect the device during thunderstorms.
• The device must only be installed on a non-amma-
ble surface. In order to safeguard suicient ventilation,
leave 50 cm of free space around the device.
• For overhead use (mounting height >100 cm), always
x the xture with an appropriate safety-rope. Fix the
safety-rope at the correct xation points only. The safe-
ty-rope must never be xed at the transport handles!
• Only operate the xture aer having checked that the
housing is rmly closed and all screws are tightly fastened.
• Operate the device only aer having become familiarized
with its functions. Do not permit operation by persons
not qualied for operating the device. Most damages are
the result of unprofessional operation!
• Please consider that unauthorized modications on the
device are forbidden due to safety reasons!
• Never remove the serial barcode from the device as this
would make the guarantee void.
p. 3BEAMER 7R
ENGLISH VERSION
Page 4
Set Up
• Installation
• Controlling Board
• Machine connection
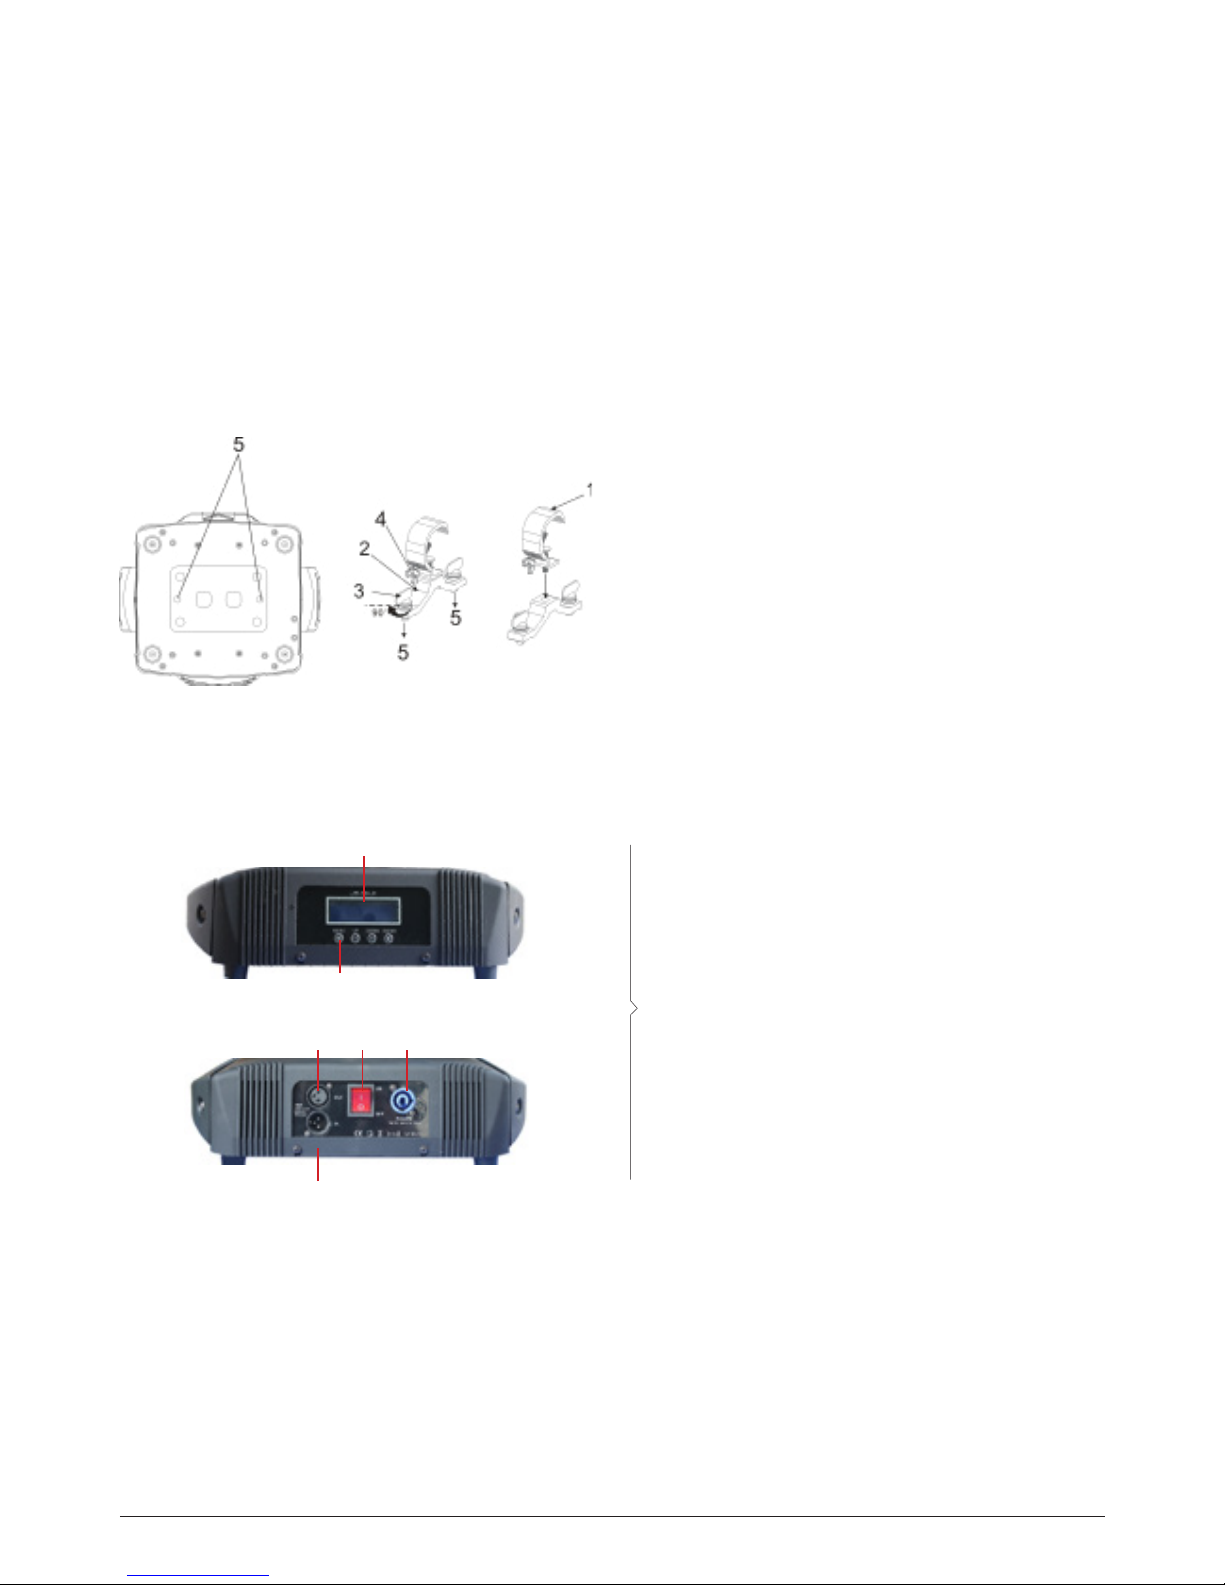
Installation
• This machine should be mounted through the screw
holes of truss. Safety wire is a must to x xture well.
Make sure truss and safety wire have strong load capaci-
ty to bear 3 times weight than xture at least.
• This machine should be installed by qualied technician.
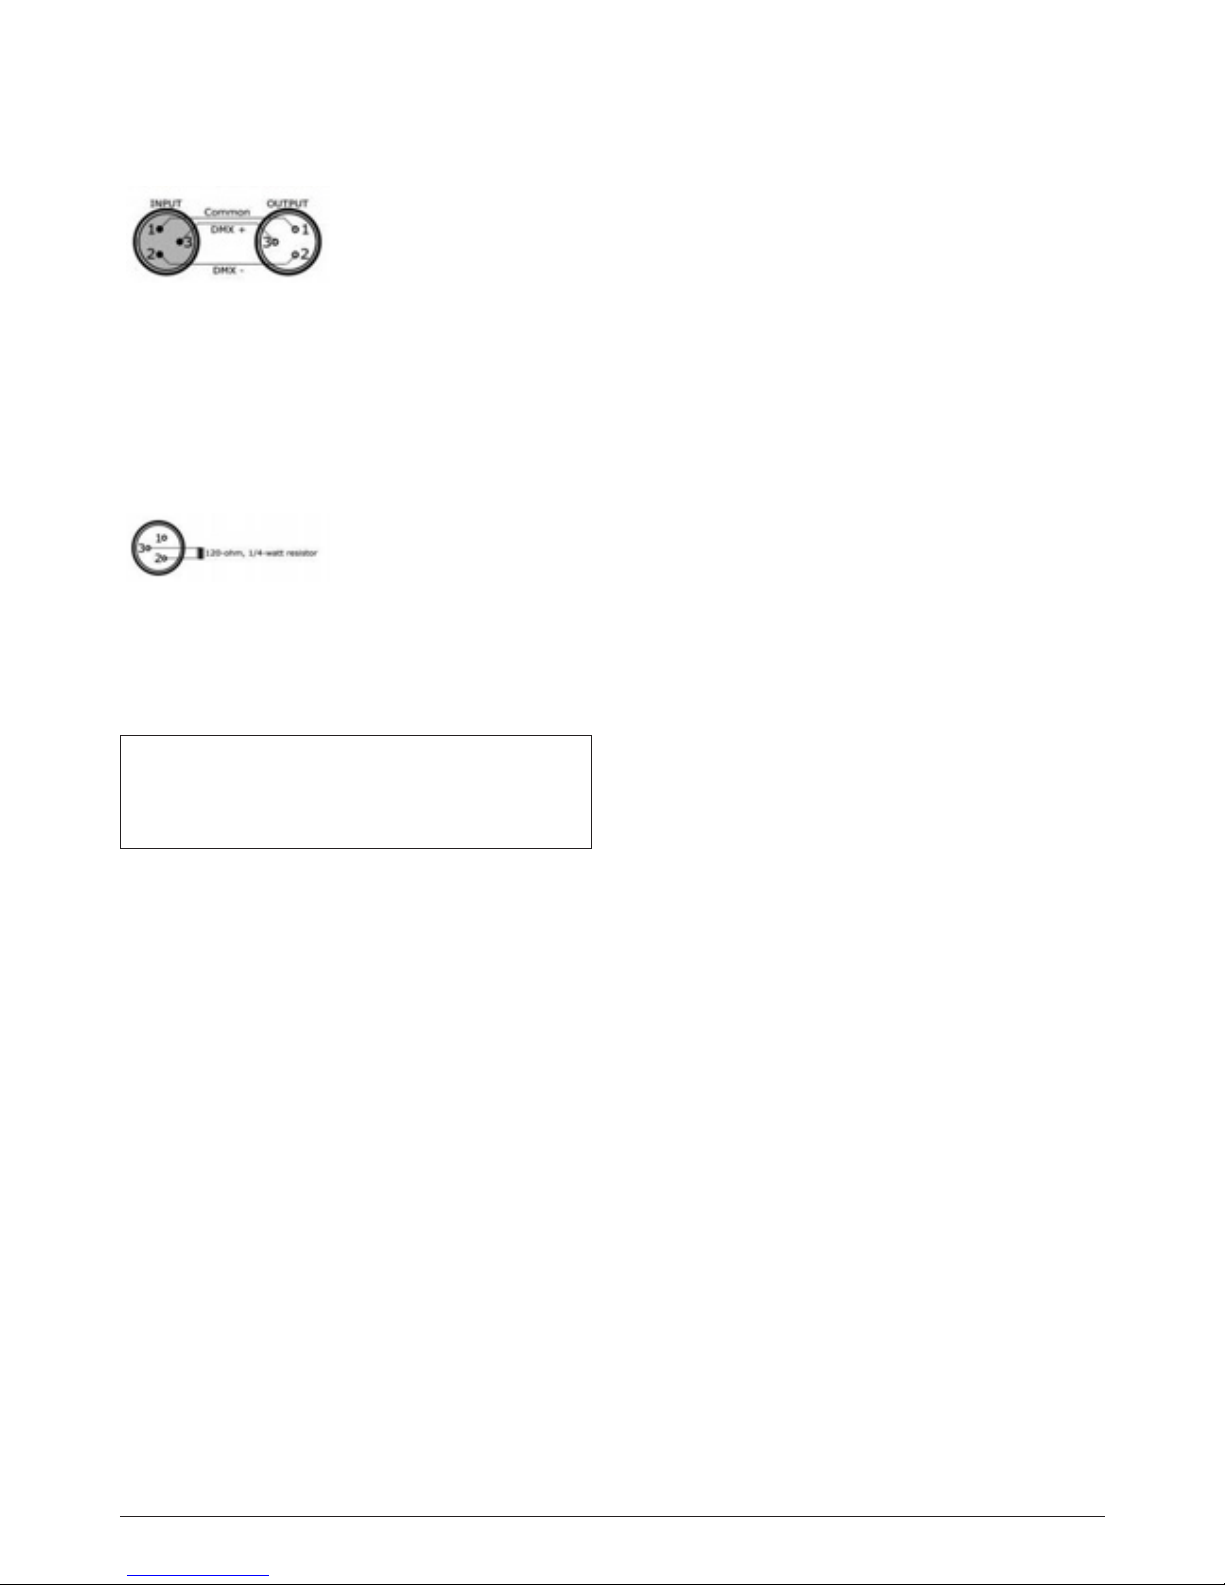
1. LCD Display.
Shows menu
2. Display Control Button.
Buttons: Menu, UP, Down, Enter
3. Power Switch
Power on and power o
4. DMX In
Connect signal cable to let DMX signal input
5. DMX Out
Connect signal cable to let DMX signal output
1
2
6
3 4 5
Controlling Board
p. 4BEAMER 7R
ENGLISH VERSION
Page 5
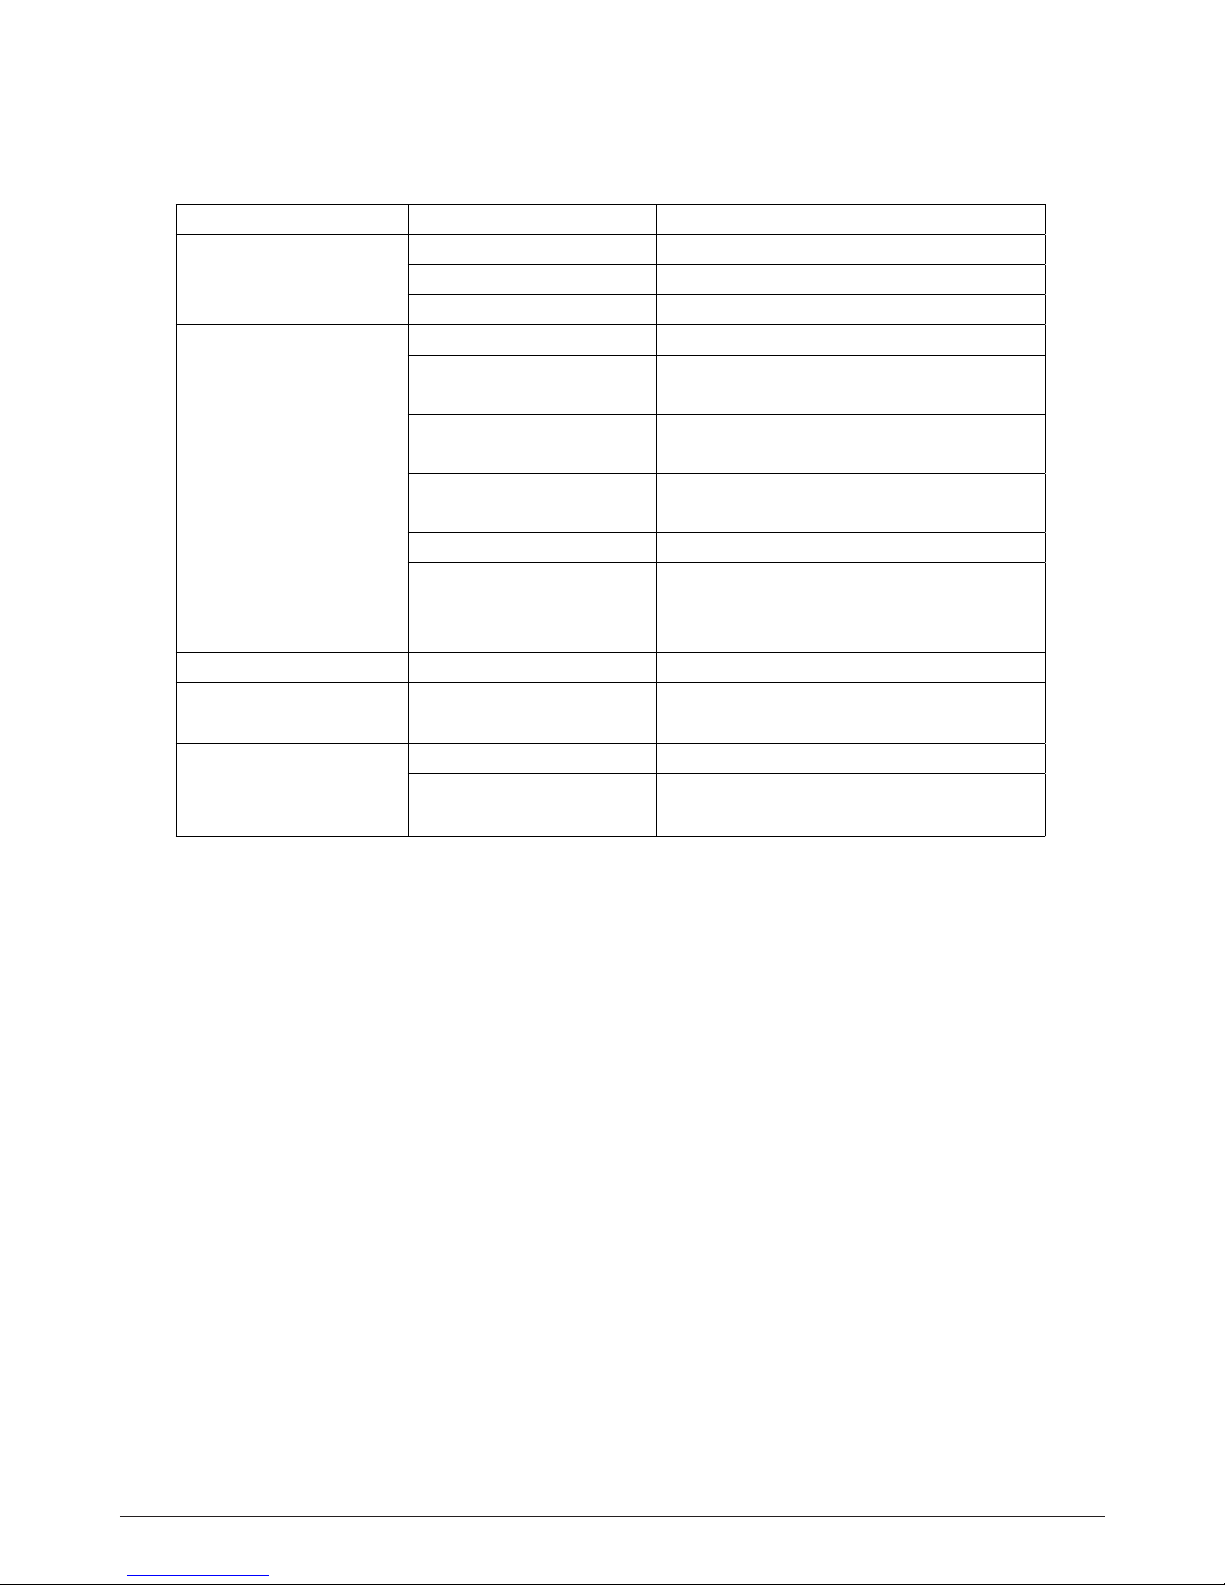
Machine Connection
Cables must have a male XLR connector on one end and a
female XLR connector on the other end.
A word on termination: DMX is a resilient communication protocol, however errors still occasionally occur. Termination reduces signal errors, and therefore best practices include use of
a terminator in all circumstances. If you are experiencing prob-
lems with erratic xture behavior, especially over long signal
cable runs, a terminator may help improve performance.
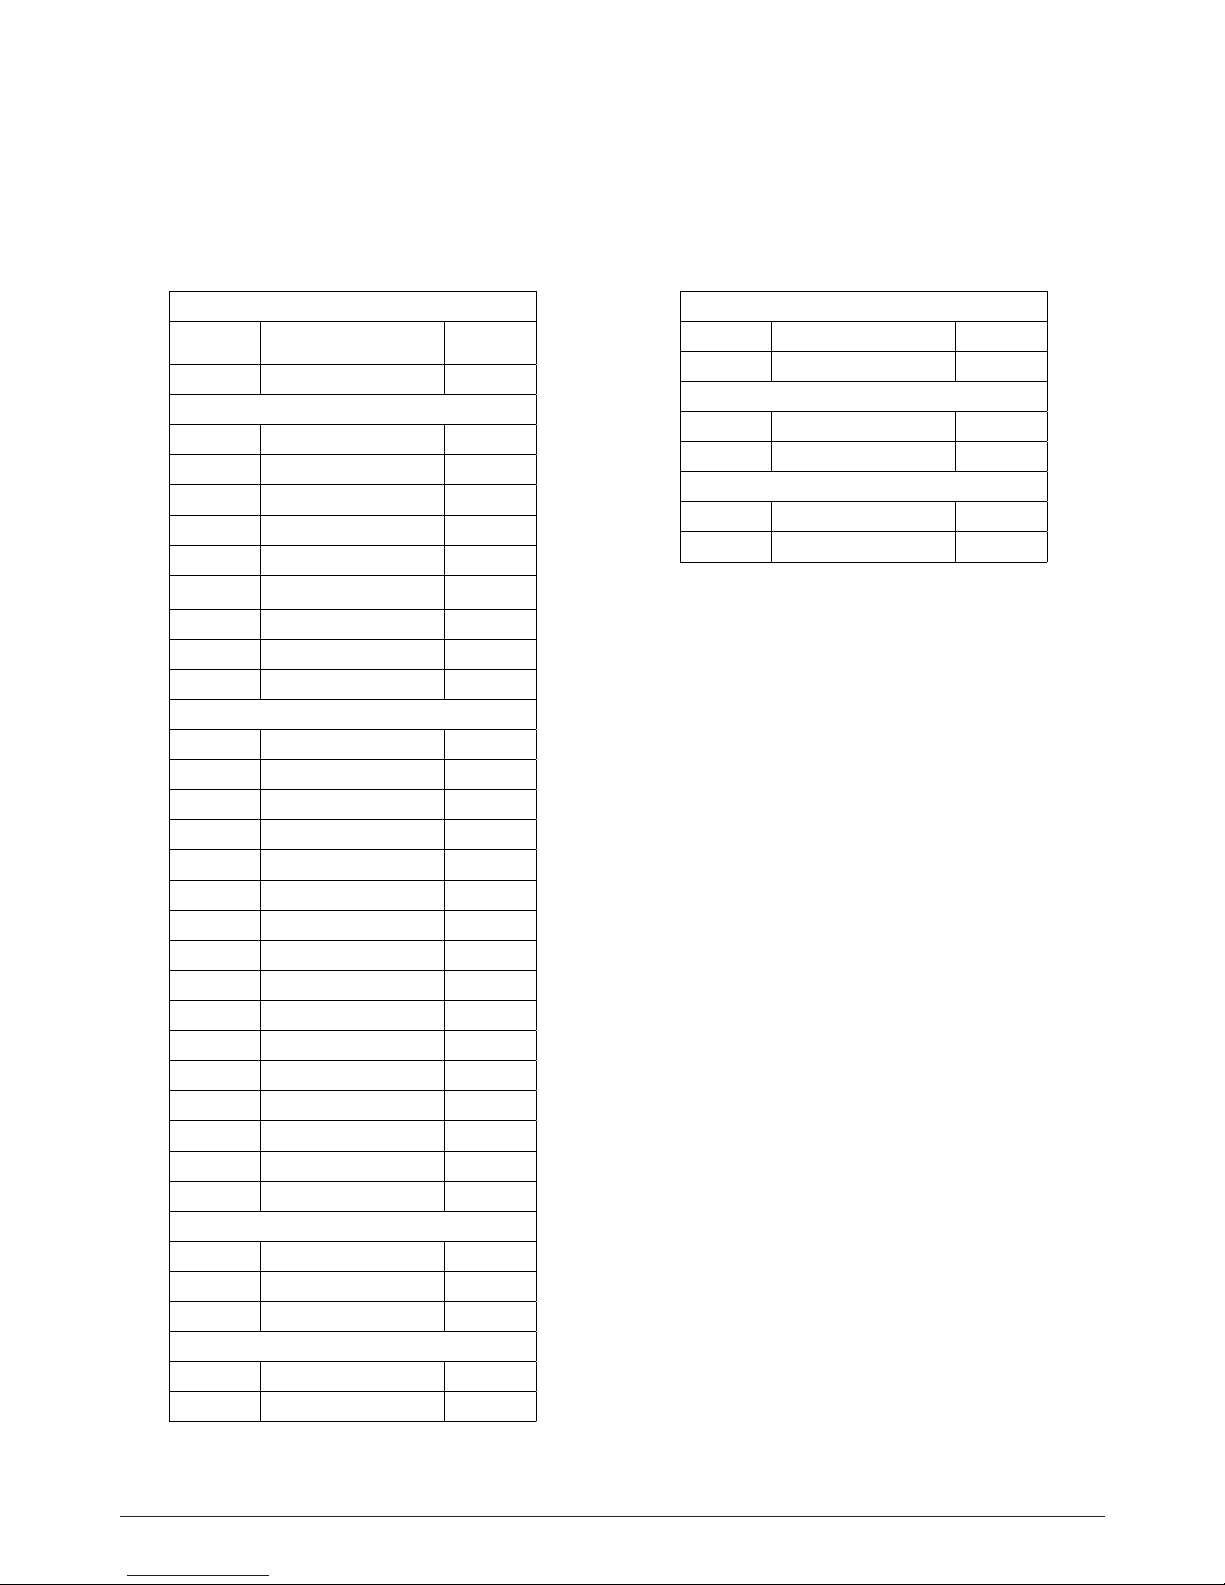
To build your own DMX Terminator: Obtain a 120-ohm, 1/4-
watt resistor, and wire it between pins 2&3 of the last xture.
They are also readily available from specialty retailers.
Complimentary signal cable can transmits signals to
20 unit xtures at most. Signal amplier is a must to
connect more xtures
p. 5BEAMER 7R
ENGLISH VERSION
Page 6
Troubleshooting
Troubleshooting
Problem Probable cause(s) Remedy
No response from xture
when power is applies
No power to xture Check power cables
Primary fuse blown Replace fuse
Secondary fuse blown Replace fuse
Fixture resets but does
not respond correctly to
controller(DMX mode oper-
ation)
Controller not connected Connect controller
Incorrect addressing of the
xtures
Check address setting on xture and controller
Bad data link connection
Inspect cables and correct poor connections and/
or broken cables.
Conict between tracking and
vector control
Eliminate scene cross-fade on controller
Data link not terminated Insert termination plug in output of last xture
Defective xture or 2 devices
transmitting on link
Bypass xtures one at a time until normal oper-
ation is regained:unplug both connectors and
connect them directly together
Colors cannot be mixed Random color mixing is on Turn o random color mixing
Fixture does not reset
correctly
Electronic or mechanical failure Contact service technician
No light, lamp cuts out
intermittently,or burns out
too quickly
Lamp missing or blown Disconnect xture and replace lamp
Fixture or lamp is too hot
Allow xture to cool. If problem persists,contact
service technician
p. 6BEAMER 7R
ENGLISH VERSION
Page 7
Reference
• Control menu
• DMX protocol
• Specication
Control Menu - Main Menu
Beam 230 Light
Welcome to use
Wait
DMX Address
Reset All
Reset Pan Tilt
Reset Gobo
Reset Color
Reset Focus
Reset Dimmer
Reset Prism
Reset Fog
Factory
Manual
CH:01 [0~255]
CH:02 [0~255]
CH:03 [0~255]
CH:04 [0~255]
CH:05 [0~255]
CH:06 [0~255]
CH:07 [0~255]
CH:08 [0~255]
CH:09 [0~255]
CH:10 [0~255]
CH:11 [0~255]
CH:12 [0~255]
CH:13 [0~255]
CH:14 [0~255]
CH:15 [0~255]
CH:16 [0~255]
Mode
DMX512
Auto Run
Slave
Lamp
On
O
Color
On
O
Tilt
Yes
No
Pan
Yes
No
p. 7BEAMER 7R
ENGLISH VERSION
Page 8
Control Menu -Setting up Menu
Remark: Each MENU level should press ENTER to save data. If
need to back to last class, press MENU; If no any operation for
30 seconds, LCD display will turn o automatically.
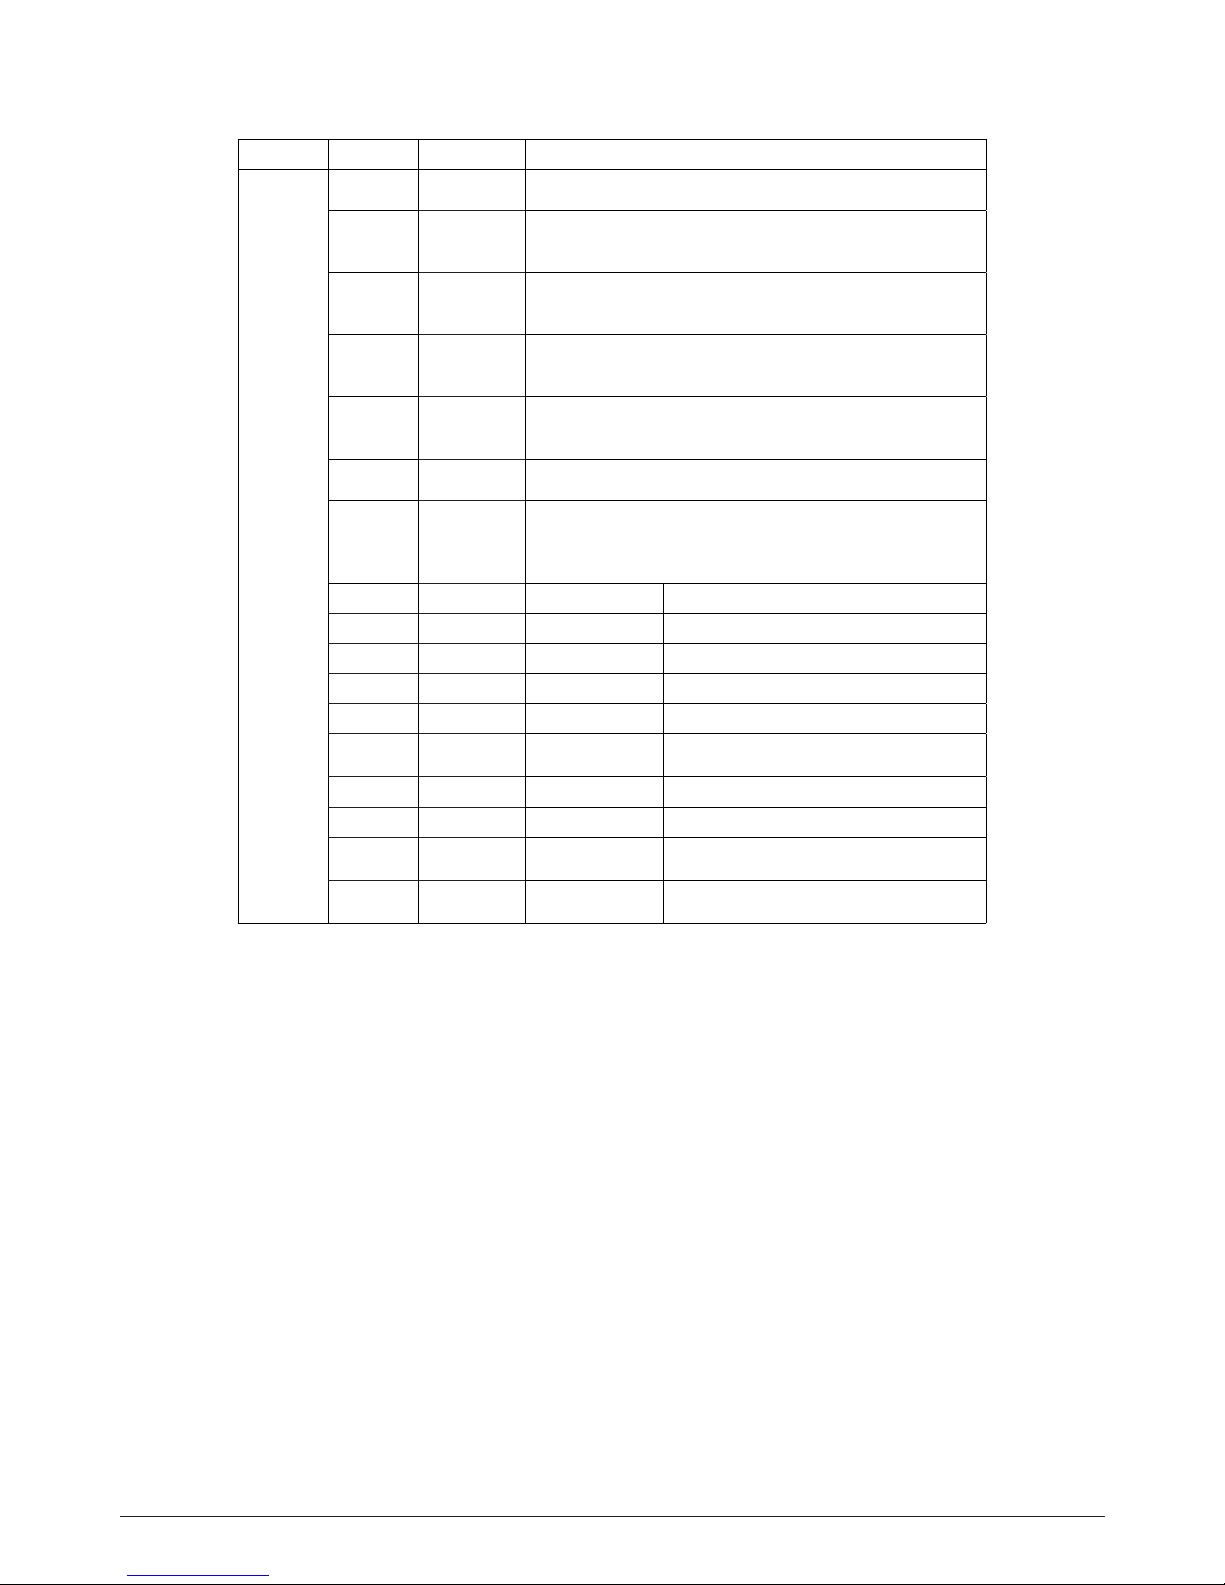
Menu Function Enter Operation
MENU
DMX To 15CH / 16CH, ENTER to save.
Pan
To YES/ NO, ENTER to save. YES stands for anticlockwise
run; NO for clockwise run
Tilt
To YES/ NO, ENTER to save. YES stands for anticlockwise
run; NO for clockwise run
Color
To YES/NO, ENTER to save. YES is color ne, NO is color
skip
Lamp To YES/NO, ENTER to save. O for lamp o, ON is lamp on.
Mode To Mode Slave: master/slave mode, ENTER to save
Manual
Choose CH1 to CH16 manually-ENTER-UP/DOWN to adjust
DMX value press ENTER to save
Press ENTER Reset ALL Press ENTER, system reset
Restore Reset Pan Tilt Press ENTER, Pan/Tilt reset
UP / DOWN Reset Gobo Press ENTER, Gobo reset
Reset Color Press ENTER, color reset
Reset Focus Press ENTER, focus reset
Reset Dimmer Press ENTER, dimmer reset
Reset Prism Press ENTER, prism reset
Reset Fog Press ENTER, for eect reset
Mode Auto run Pre-program mode, enter to save
Restore Factory Spare
p. 8BEAMER 7R
ENGLISH VERSION
Page 9

DMX Protocol
15 CHANNELS
Channel Function Eect
1 Pan scan 000-255 0°-540°
2 Tilt scan 000-255 0°-265°
3 Pan scan 16 Bit 000-255
4 Tilt scan 16 Bit 000-255
5 Pan/Tilt speed 000-255 from slow to fast
6 Dimmer 000-255 from dark to bright
7 Shutter
1-50 lamp on 51-240 strobe from slow to fast 241-255
lamp o
8 Frost 000-255 from strong to impotent
9 color 000-255 from color to color
10 Gobo 000-255 from gobo to gobo
11 Prism 0-127 non- change 128-255 8 facet prism
12 Prism rotate
0-106 clockwise rotate from slow to fast 107-180 anti-
clockwise from slow to fast 181-255 prism rotate and
shake from slow to fast
13 Focus 000-255
14 Lamp control
0-99 non- change 100-105 lamp o (keep on 3 seconds)
106-199 non- change 200-205 lamp on
(keep on 3 seconds)206-255 non- change
15 Reset 0-254 non- change 255 (keep on 3 seconds then reset)
p. 9BEAMER 7R
ENGLISH VERSION
Page 10

DMX Protocol
16 CHANNELS
Channel Function Eect
1 Color
000-255
0-0 open
6-6 open/ren
12-12 red
18-18 red/yellow
24-24 yellow
30-30 yellow/blue
36-36 blue
42-42 blue/green
48-48 green
54-54 green/orange
60-60 orange
66-66 orange/pink
72-72 pink
78-78 pink/magenta
84-84 magenta
90-90 Mag/Purple
96-96 Purple
102-102 Purple/Amber
108-108 Amber
114-114 Amber/Cyan
120-120 Cyan
126-126 Cyan/Li.gr
132-132 Light green
138-138 Li.gr/CTB 8000
144-144 CTB 8000
150-150 CTB8000 / CTC 190
156-156 CTC 190
162-162 CTC 190 / CTC 260
168-168 CTC 260
174-174 CTC 260 / OPEN
180-180 Open
186-219 Scroll clockwise fast to slow
220-255 Scroll anticlockwise slow to fast
2 Shutter
000-000 Closed
001-050 Open
051-240 strobe from slow to fast
241-255 Open
3 Dimmer 000-255 from dark to bright
p. 10BEAMER 7R
ENGLISH VERSION
Page 11

4 Gobo
000-255
0-3 open
4-7 Gobo 1
8-11 Gobo 2
12-15 Gobo 3
16-19 Gobo 4
20-23 Gobo 5
24-27 Gobo 6
28-31 Gobo 7
32-35 Gobo 8
36-39 Gobo 9
40-43 Gobo 10
44-47 Gobo 11
48-51 Gobo 12
52-55 Gobo 13
56-59 Gobo 14
60-63 Gobo 15
64-67 Gobo 16
68-71 Gobo 17
72-113 Scroll clockwise fast to slow
114-118 No Scroll
119-160 Scroll anticlockwise slow to fast
161-165 No Scroll
166-171 Gobo 1 shake
172-177 Gobo 2 shake
178-183 Gobo 3 shake
184-189 Gobo 4 shake
190-195 Gobo 5 shake
196-201 Gobo 6 shake
202-207 Gobo 7 shake
208-213 Gobo 8 shake
214-219 Gobo 9 shake
220-225 Gobo 10 shake
226-231 Gobo 11 shake
232-237 Gobo 12 shake
238-243 Gobo 13 shake
244-249 Gobo 14 shake
250-255 Gobo 15 shake
5 Prism
000-127 open
128-255 prism
6 Prism rotate
001-043 No spin
044-106 clockwise rotate from slow to fast
107-116 safe
117-180 anticlockwise from fast to slow
181-191 safe
192-255 prism rotate and shake from slow to fast
Channel Function Eect
p. 11BEAMER 7R
ENGLISH VERSION
Page 12

7 RESERVED
8 Frost eect 000-255 0%-100% Frost
9 Focus 000-255 0%-100% Focus from distant to near
10 Pan 000-255 0°-540°
11 Pan ne
12 Tilt 000-255 0°-265°
13 Tilt ne
14 RESERVED
15 Reset
000-244 safe
244-255 Reset all
16 Lamp control
0-100 safe
101-105 Lamp OFF (lamp switch o passing
through the unused range and staying 3s in Lamp
OFF levels.)
106-200 safe
201-205 Lamp ON (lamp switch on passing
through the unused range and staying 3s in Lamp
ON levels.)
Channel Function Eect
BEAMER 7R
ENGLISH VERSION
p. 12
Page 13

BEAMER 7R
VERSIÓN ESPAÑOL
p. 13
Descripción
Beamer 7R es un cabezal móvil de diseño compacto que
tiene una lámpara 7R de 230W con un ángulo de haz de 2.5º.
Explote su creatividad con sus 14 colores + abierto, CTB, CTO,
efecto de arcoiris, 17 gobos estáticos + abierto y su prisma
rotativo de 8 facetas. Gracias a su foco motorizado Beamer
7R le permite mantener un control de su show aún en los ambientes más difíciles.
Especicaciones
Fuente & Óptica
Fuente de luz: Lámpara 7R de 230W
Temperatura de color: 8,000K
Vida útil promedio: 10,000 hours
ángulo de haz: 2.5°
Información fotométrica
Flujo lumínico: 87000 lux @ 10m (30 .)
Efectos y funciones
Rueda de color: 14 ltros dicróicos y efecto arcoiris bidireccional
Rueda de gobo estática: 11 gobos indexables + 7 tamaños
diferentes
Diámetro del gobo: 10 mm.
Efecto gobo shake
Prisma rotativo de 8 caras
Frost: 0-100%8
Foco motorizado
Dimmer: Rango completo 0-100%
Estrobo: 1-13 ashes por segundo
Control
Canales DMX: 15/16
Modos de operación: DMX, Master/Slave, Manual, Auto-run &
programas integrados
Movimiento
Pan: 540°
Tilt: 265°
Resolución: 16-bit
Reposicionamiento automático
Eléctrico
Rango de voltaje de entrada: 100–240V, 50-60Hz
Alimentación: Rango automático
Consumo de potencia: 380W
Físico
Conectores DMX: 2 conectores XLR (XLR-3 de entrada & salida)
Alimentación: PowerCON® de entrada
Pantalla LCD con iluminación de fondo
Dimensiones: 372x290x500 mm. / 14.6x11.4x19.6 in.
Peso: 17.2 Kg. / 37.9 Lbs.
Page 14

Por su propia seguridad, por favor lea atentamente el
manual antes de utilizar el equipo.
ADVERTENCIA DE SEGURIDAD
• Este producto debe ser instalado por un profesional
calicado.
• Toda mantención debe ser llevada a cabo por un electr-
icista calicado.
• Una distancia mínima de 0.5m debe ser mantenida entre
el equipo y cualquier supercie combustible.
• El producto debe ser siempre operado en áreas ventiladas.
• NO mire de forma directa hacia la fuente de luz.
• Siempre desconecte el equipo antes de realizar cualqui-
er tipo de mantención.
• El neutro debe estar siempre conectado a tierra.
• Asegúrese que todas las partes del equipo se mantengan
limpias y libres de polvo.
IMPORTANTE
• Toda persona involucrada con las instalación, operación
y mantenimiento del equipamiento debe estar calica-
da para ello.
• Seguir las instrucciones de este manual.
• Considerar este manual parte del producto.
• Mantener este manual durante toda la vida útil del producto.
• Pasar el presente manual a cada uno de los futuros
dueños de la unidad.
• Descargar la última versión disponible del sitio de internet de la empresa.
DETERMINACIONES DE OPERACIÓN
• Este producto solamente puede ser operado en un voltaje de 100-240 V, 50/60 Hz.
• Este equipamiento está diseñado para uso profesional.
Por ejemplo: escenarios, clubs, bares y teatros.
• No agite el equipo. Evite la fuerza bruta al instalar o hacer funcionar el dispositivo.
• Al elegir el lugar de la instalación, por favor asegúrese de
que el dispositivo no está expuesto a calor extremo, humedad o polvo. No debe haber ningún cable por ahí. Por favor,
asegúrese de que la unidad no puede ser tocada ni golpeada.
• Al usar máquinas de humo, asegúrese de que el dispositivo no está expuesto al chorro de directo de la máquina y de que sea instalado a una distancia mínima de 0,5
metros entre la máquina de humo y el dispositivo.
• La temperatura ambiente debe estar siempre entre -15
° C y + 45 ° C. Mantener alejado del sol directo (especial-
mente en el coche) y calentadores.
• Nunca utilice este dispositivo durante tormentas eléctri-
cas. El Sobre-voltaje podría destruir el dispositivo. Siempre desconecte el aparato durante tormentas eléctricas.
• El equipo sólo se debe instalar sobre una supercie no
inamable. Con el n de salvaguardar la ventilación su-
ciente, deje 50 cm de espacio libre alrededor del aparato.
• Por instalar el equipo encima de la cabeza (altura de
montaje> 100 cm), siempre je el aparato con una cuer-
da de seguridad apropiada. Fijar la cuerda de seguridad
sólo en los puntos de jación correctos. La seguridad de
la cuerda no debe jarse en las asas de transporte.
• Opere el equipo solamente luego de haber comprobado
que el recinto del mismo está bien cerrado y con todos
los tornillos bien apretados.
• Haga funcionar el aparato sólo después de familiarizarse
con sus funciones. No permitir la utilización por parte
de personas no calicadas para operar el dispositivo. La
mayoría de los daños son el resultado de una operación
poco profesional.
• Por favor, considere que las modicaciones no autorizadas
del aparato están prohibidas por razones de seguridad.
• Nunca quite el código de barras de serie del dispositivo
ya que esto haría que la garantía pierda vigencia.
BEAMER 7R
VERSIÓN ESPAÑOL
p. 14
Page 15

Conguración
• Instalación
• Panel de control
• Conexiones
Instalación
• La unidad debe montarse utilizando los oricios para
tornillos del truss. Procure utilizar un cable de seguridad
para jar la unidad en la posición que desee. Asegúrese
de que el truss y el cable de seguridad puedan tolerar,
como mínimo, un peso equivalente a 3 veces el peso de
la unidad.
• Procure que la instalación de la unidad esté a cargo de
un técnico calicado.
1. Pantalla LCD
Permite visualizar el menú de funciones de la unidad.
2. Teclas de navegación en pantalla
Teclas: Menu, Up, Down y Enter
3. Interruptor de encendido
Utilice este interruptor para encender o apagar la unidad.
4. Entrada DMX
Conecte el cable de señal para el ingreso de la señal DMX.
5. Salida DMX
Conecte el cable de señal para la salida de la señal DMX.
1
2
6
3 4 5
Panel de control
BEAMER 7R
VERSIÓN ESPAÑOL
p. 15
Page 16

Conexiones
Los cables deben tener un conector XLR macho en un extremo y un conector XLR hembra en el otro.
Terminación: DMX es un protocolo de comunicación resiliente, por lo que pueden presentarse errores de manera esporádica. La terminación permite reducir errores en la señal.
Por eso, es recomendable utilizar un terminador en todos
los casos. Si el funcionamiento de la unidad no es adecuado,
especialmente cuando se utilizan cables de señal prolongados, el uso de un terminador puede ayudar a mejorar el rendimiento del dispositivo.
Construcción de terminador DMX. Conecte un resistor de 120
Ω y 1/4 W entre los pines 2 y 3 de la última unidad. Puede adquirir este resistor en un establecimiento especializado.
Referencias de la imagen
COMMON COMÚN
DMX - DMX DMX + DMX +
INPUT ENTRADA
OUTPUT SALIDA
Referencias de la imagen
120-ohm, ¼-watt resistor Resistor de 120 Ω y ¼ W
El cable de señal complementario transmite señales a un
máximo de 20 unidades. En caso de necesitar conectar
más unidades, utilice un amplicador de señal.
BEAMER 7R
VERSIÓN ESPAÑOL
p. 16
Page 17

Resolución de problemas
Resolución de problemas
Problema Causa probable Solución
La unidad no responde al enchufarla.
Falta de suministro eléctrico. Controle los cables de alimentación.
Fundición de fusible primario. Reemplace el fusible.
Fundición de fusible secundario. Reemplace el fusible.
La unidad se reinicia, pero no responde cor-
rectamente al controlador en modo DMX.
Falta de conexión del controlador. Conecte el controlador.
Direccionamiento incorrecto de las
unidades.
Verique la conguración de direc-
ciones en la unidad y el controlador.
Conexión de datos incorrecta.
Controle los cables y repare las
conexiones defectuosas o los cables
dañados.
Conicto entre control vectorial y pistas.
Elimine el cross-fade entre escenas en
el controlador.
Falta de terminación de la conexión
de datos.
Inserte un conector de terminación en
la salida de la última unidad.
Unidad defectuosa o 2 dispositivos con
transmisión en la misma conexión.
Omita las unidades de a una por vez
hasta que vuelvan a funcionar normal-
mente. Desenchufe ambos conectores
y conéctelos juntos de manera directa.
Falta de mezcla de colores.
Función de mezcla aleatoria de colores
activada.
Desactive la función de mezcla aleato-
ria de colores.
Reinicio incorrecto de la unidad. Falla electrónica o mecánica. Contacte a un técnico.
Falta de iluminación en las lámparas,
cortes intermitentes o apagado rápido.
Fundición de lámpara o lámpara
inexistente.
Desconecte la unidad y reemplace la
lámpara.
Sobrecalentamiento de la unidad
o lámpara.
Permita que la unidad se ventile. Si
el problema continúa, contacte a un
técnico.
BEAMER 7R
VERSIÓN ESPAÑOL
p. 17
Page 18

Referencias
Menú de control
Protocolo DMX
Especicaciones técnicas
Menú de control
Menú principal
Luz Beam 230
Welcome to use
Wait
DMX Address
Reset All
Reset Pan Tilt
Reset Gobo
Reset Color
Reset Focus
Reset Dimmer
Reset Prism
Reset Fog
Factory
Manual
CH:01 [0-255]
CH:02 [0-255]
CH:03 [0-255]
CH:04 [0-255]
CH:05 [0-255]
CH:06 [0-255]
CH:07 [0-255]
CH:08 [0-255]
CH:09 [0-255]
CH:10 [0-255]
CH:11 [0-255]
CH:12 [0-255]
CH:13 [0-255]
CH:14 [0-255]
CH:15 [0-255]
CH:16 [0-255]
Mode
DMX512
Auto Run
Slave
Lamp
On
O
Color
On
O
Tilt
Yes
No
Pan
Yes
No
BEAMER 7R
VERSIÓN ESPAÑOL
p. 18
Page 19

Menú de conguración
Menú Función Teclas Operación
MENU
DMX
Presione
ENTER
Opciones: 15CH [15 canales]/16CH [16 canales]. Presione ENTER para
guardar.
Pan
Opciones: YES [activado]/NO [desactivado]. Presione ENTER para
guardar. YES: sentido antihorario; NO: sentido horario.
Tilt UP/DOWN
Opciones: YES [activado]/NO [desactivado]. Presione ENTER para
guardar. YES: sentido antihorario; NO: sentido horario.
Color
Opciones: YES [activado]/NO [desactivado]. Presione ENTER para
guardar. YES: aplicar color;
NO: omitir color.
Lamp
Opciones: YES [activado]/NO [desactivado]. Presione ENTER para
guardar. OFF: lámpara apagada; ON: lámpara encendida.
Mode Opción: modo master/slave. Presione ENTER para guardar.
Manual
Seleccione las opciones CH1 a CH16 para conguración manual. Utilice
las teclas ENTER/UP/
DOWN para ajustar el valor DMX. Presione ENTER para guardar.
Restore
Reset ALL Presione ENTER para reinicio del sistema.
Reset Pan Tilt Presione ENTER para reinicio de pan/tilt.
Reset Gobo Presione ENTER para reinicio de gobos.
Reset Color Presione ENTER para reinicio de color.
Reset Focus Presione ENTER para reinicio de enfoque.
Reset Dimmer Presione ENTER para reinicio de dimmer.
Reset Prism Presione ENTER para reinicio de prisma.
Reset Fog Presione ENTER para reinicio de efecto de humo.
Mode Auto run Modo precongurado. Presione ENTER para guardar.
Restore Factory Regresar a la conguración de fábrica.
Aclaraciones: Para guardar los cambios realizados, presione
ENTER. Para volver al menú anterior, presione la tecla MENU.
Si no realiza ninguna acción durante 30 segundos, la pantalla
LCD se apagará en forma automática.
BEAMER 7R
VERSIÓN ESPAÑOL
p. 19
Page 20

Protocolo DMX
15 CANALES
Canal Función Efecto
1 Escaneo de pan 000-255 0°-540°
2 Escaneo de tilt 000-255 0°-265°
3 Escaneo de pan [16 bits] 000-255
4 Escaneo de tilt [16 bits] 000-255
5 Velocidad de pan/tilt 000-255 (velocidad creciente)
6 Dimmer 000-255 Oscuro-brilloso
7 Shutter
1-50 Lámpara encendida
51-240 Estrobo (velocidad creciente)
241-255 Lámpara apagada
8 Frost 000-255 Intensidad decreciente
9 Color 000-255 De color a color
10 Gobo 000-255 De gobo a gobo
11 Prisma
0-127 Sin cambio
128-255 Prisma de 8 caras
12 Rotación del prisma
0-106 Rotación en sentido horario (velocidad creciente)
107-180 Rotación en sentido antihorario (velocidad creciente)
181-255 Rotación y vibración del prisma (velocidad creciente)
13 Enfoque [0-255]
14 Control de la lámpara
0-99 Sin cambio
100-105 Lámpara apagada (luego de 3 segundos)
106-199 Sin cambio
200-205 Lámpara encendida (luego de 3 segundos)
206-255 Sin cambio
15 Reinicio
0-254 Sin cambio
255 (Reinicio luego de 3 segundos)
BEAMER 7R
VERSIÓN ESPAÑOL
p. 20
Page 21

Protocolo DMX
16 CANALES
Canal Función Efecto
1 Color
000-255
0-0 Abierto
6-6 Abierto/rojo
12-12 Rojo
18-18 Rojo/amarillo
24-24 Amarillo
30-30 Amarillo/azul
36-36 Azul
42-42 Azul/verde
48-48 Verde
54-54 Verde/naranja
60-60 Naranja
66-66 Naranja/rosa
72-72 Rosa
78-78 Rosa/magenta
84-84 Magenta
90-90 Magenta/púrpura
96-96 Púrpura
102-102 Púrpura/ámbar
108-108 Ámbar
114-114 Ámbar/cian
120-120 Cian
126-126 Cian/verde claro
132-132 Verde claro
138 -138 Verde claro/CTB 8000
144-144 CTB 8000
150-150 CTB 8000/CTC 190
156-156 CTC 190
162-162 CTC 190/CTC 260
168-168 CTC 260
174-174 CTC 260/abierto
180-180 Abierto
186-219 Desplazamiento en sentido horario (velocidad
decreciente)
220-255 Desplazamiento en sentido antihorario (velocidad
creciente)
2 Shutter
000-000 Cerrado
001-050 Abierto
051-240 Estrobo (velocidad creciente)
241-255 Abierto
3 Dimmer 000-255 Oscuro-brilloso
BEAMER 7R
VERSIÓN ESPAÑOL
p. 21
Page 22

4 Gobo
000-255
0-3 Abierto
4-7 Gobo 1
8-11 Gobo 2
12-15 Gobo 3
16-19 Gobo 4
20-23 Gobo 5
24-27 Gobo 6
28-31 Gobo 7
32-35 Gobo 8
36-39 Gobo 9
40-43 Gobo 10
44-47 Gobo 11
48-51 Gobo 12
52-55 Gobo 13
56-59 Gobo 14
60-63 Gobo 15
64-67 Gobo 16
68-71 Gobo 17
72-113 Desplazamiento en sentido horario (velocidad
decreciente)
114-118 Sin desplazamiento
119-160 Desplazamiento en sentido antihorario (velocidad
creciente)
161-165 Sin desplazamiento
166-171 Vibración de gobo 1
172-177 Vibración de gobo 2
178-183 Vibración de gobo 3
184-189 Vibración de gobo 4
190-195 Vibración de gobo 5
196-201 Vibración de gobo 6
202-207 Vibración de gobo 7
208-213 Vibración de gobo 8
214-219 Vibración de gobo 9
220-225 Vibración de gobo 10
226-231 Vibración de gobo 11
232-237 Vibración de gobo 12
238-243 Vibración de gobo 13
244-249 Vibración de gobo 14
250-255 Vibración de gobo 15
5 Prisma
000-127 Abierto
128-255 Prisma
Canal Función Efecto
BEAMER 7R
VERSIÓN ESPAÑOL
p. 22
Page 23

6 Prisma
001-043 Sin giro
044-106 Rotación en sentido horario (velocidad creciente)
107-116 Seguro
117-180 Rotación en sentido antihorario (velocidad decre-
ciente)
181-191 Seguro
192-255 Rotación y vibración del prisma (velocidad creci-
ente)
7 RESERVADO
8 Efecto frost 000-255 Frost (0 % -100 %)
9 Enfoque 000-255 Enfoque 0 % -100 % (distancia decreciente)
10 Pan 000-255 0°-540°
11 Pan no
12 Tilt 000-255 0°-265°
13 Tilt no
000-244 Seguro
244-255 Reiniciar todo
14 RESERVADO
15 Reinicio
000-244 Seguro
244-255 Reiniciar todo
16
Control de la
lámpara
0-100 Seguro
101-105 Lámpara apagada (se apaga la lámpara; pasa a
través del intervalo sin utilizar y permanece 3 segundos en
los niveles de apagado de la lámpara).
106-200 Seguro
201-205 Lámpara encendida (se enciende la lámpara; pasa
a través del intervalo sin utilizar y permanece 3 segundos
en los niveles de encendido de la lámpara).
Canal Función Efecto
BEAMER 7R
VERSIÓN ESPAÑOL
p. 23
Page 24

FOR MORE INFO ON THIS PRODUCT PLEASE CHECK WWW.TEC-SHOW.COM
PARA MAS INFORMACION SOBRE ESTE PRODUCTO VISITE WWW.TEC-SHOW.COM
 Loading...