

Page 1
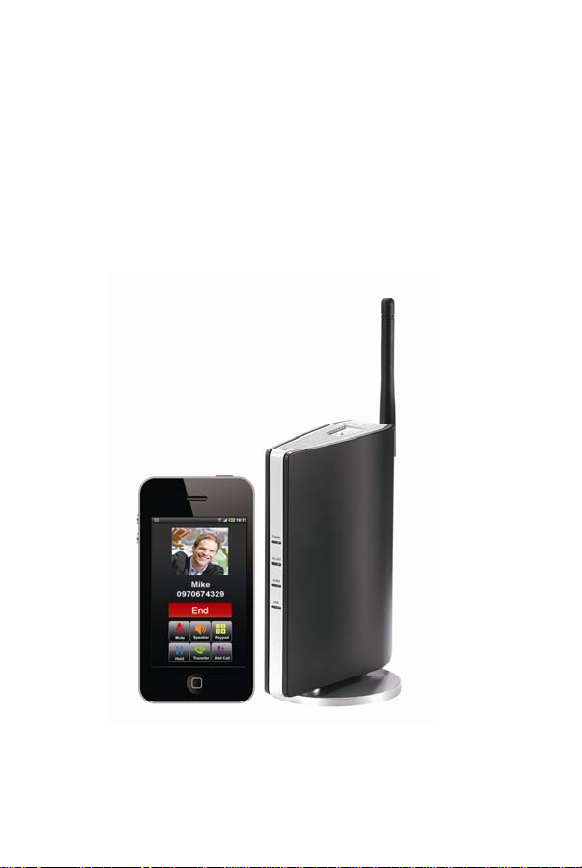
IG7200
Smart Phone Gateway
Quick Installation Guide
-1-
Page 2
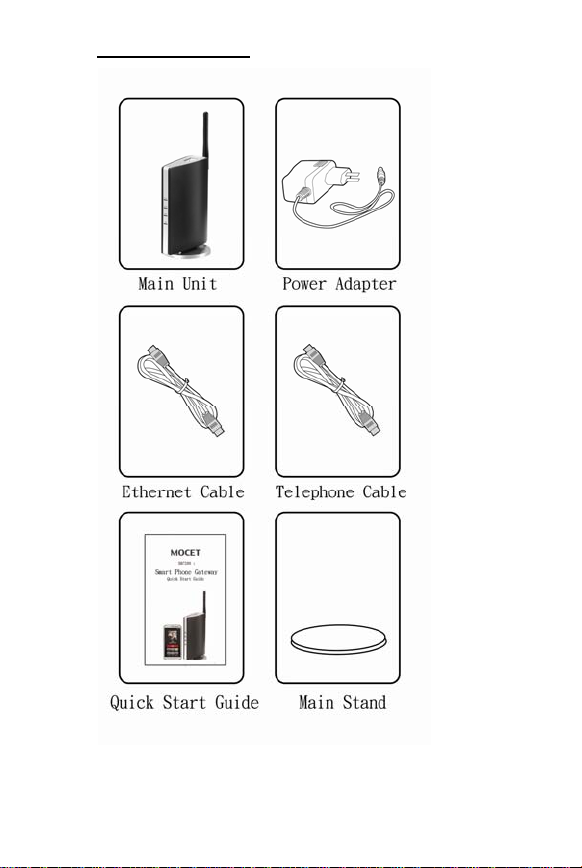
What’s in the Box
-1-
Page 3
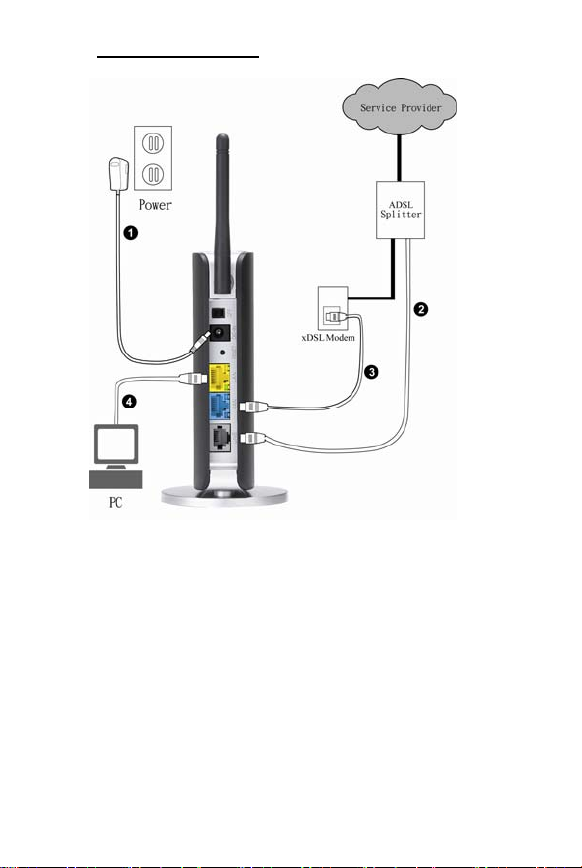
Connection Type A
LINE
MODEM
PHONE
1. Plug “Power Adaptor”, set switch to ON (IG7200 will
be ready for use after two minutes.)
2. Connect the “PHONE"port of the ADSL splitter to
the “LINE"port of IG7200.
3. Connect the “WAN" port of IG7200 to Ethernet port
of xDSL Modem.
4. Connect the “LAN" port of IG7200 to Ethernet port
of your PC if needed.
-2-
Page 4
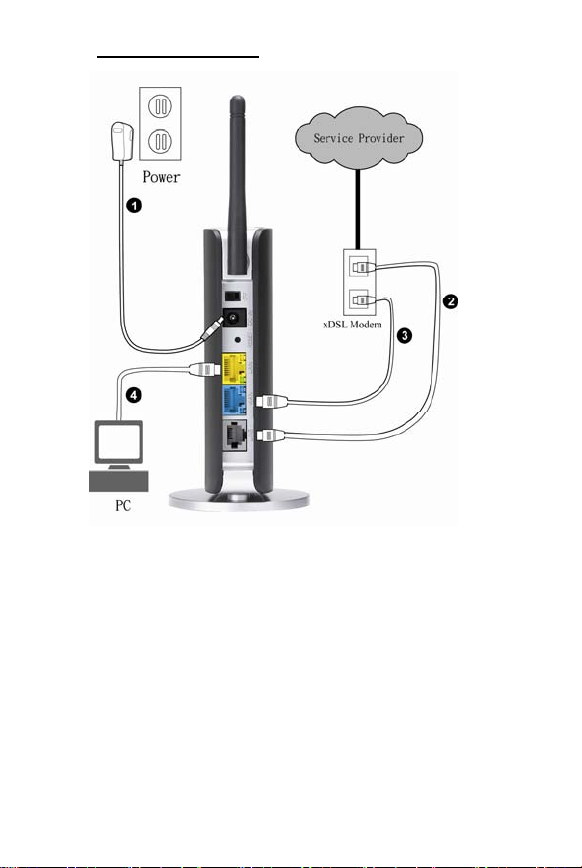
Connection Type B
DSL
PHONE
1. Plug “Power Adaptor”, set switch to ON (IG7200 will
be ready for use after two minutes.)
2. Connect the “PHONE”port of the xDSL Modem to the
“LINE”port of IG7200.
3. Connect the “WAN” port of IG7200 to Ethernet port of
xDSL Modem.
4. Connect the “LAN” port of IG7200 to Ethernet port of
your PC if needed.
-3-
Page 5
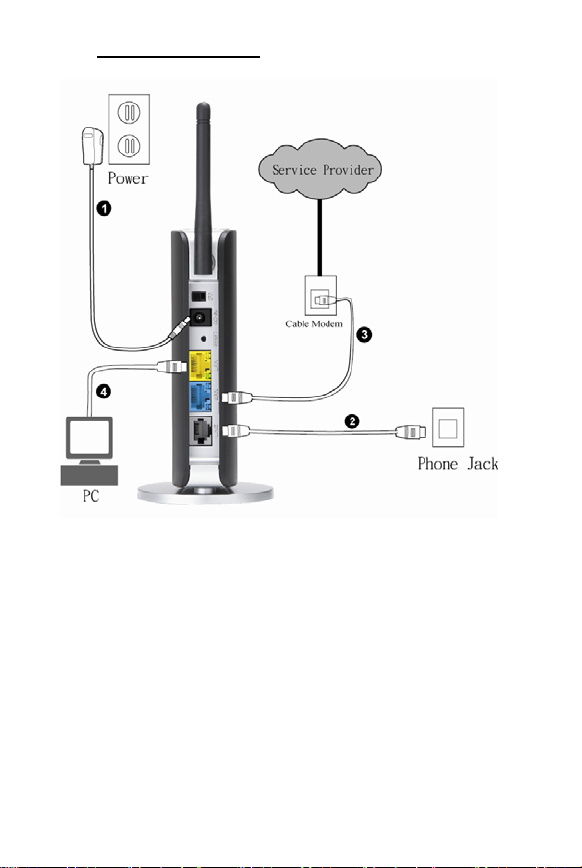
Connection Type C
1. Plug “Power Adaptor”, set switch to ON (IG7200 will
be ready for use after two minutes.)
2. Connect the wall phone jack to the “LINE” port of
IG7200.
3. Connect the “WAN” port of IG7200 to Ethernet port of
Cable Modem.
4. Connect the “LAN” port of IG7200 to Ethernet port of
your PC if needed.
Coaxial Cable
PHONE
-4-
Page 6
<For Android phone users>
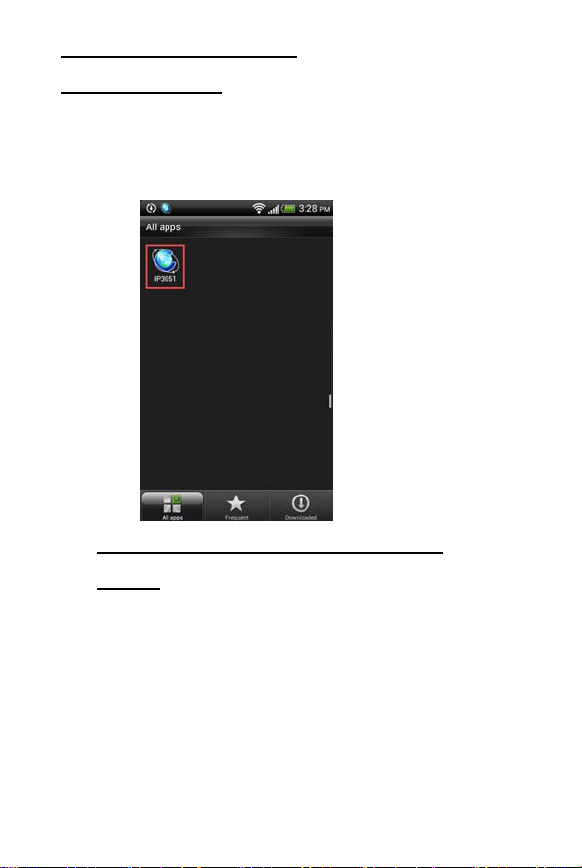
Download IP3051
Android smart phone press ”Play Store”
search ”IP3051” press ”IP3051” ”Download”
“Accept & download” “KEEP SHOPPING”
“Installing” back to home page of smart phone press
“All apps” find “IP3051” in the list. (Figure 1)
(Figure 1)
Smart phone (IP3051) auto pairing with
IG7200
Step 1: Smart phone Wi-Fi access thru. IG7200:
use smart phone and press “All apps” “Settings”
“Wireless & networks” turn on Wi-Fi press “Wi-Fi
settings” press ”7200_XXXXXX” (“XXXXXX” is the
last 6 digits of MAC address which is labeled under the
stand of IG7200.) press “Connect” Wi-Fi connection
finished.(Figure 2)
-5-
Page 7
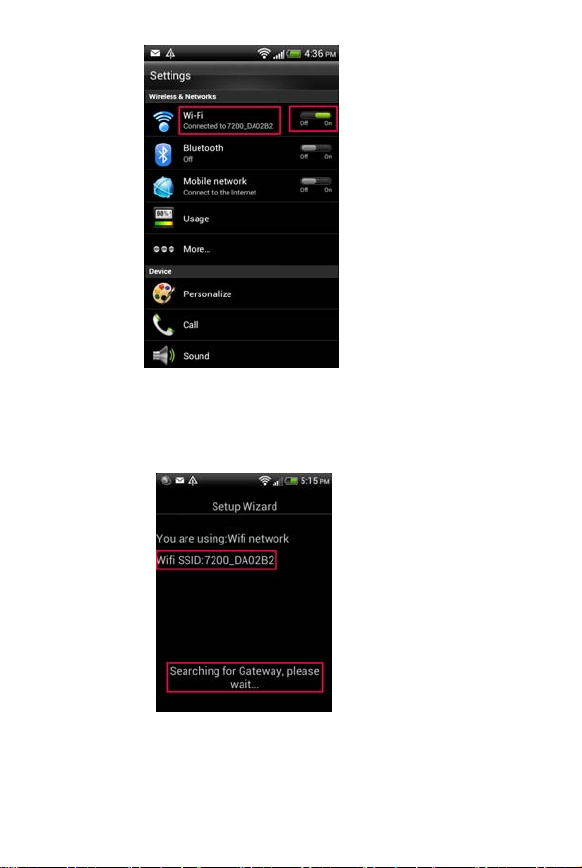
(Figure 2)
Step 2: IP3051 detect IG7200 automatically:
press “Home page” key on smart phone
press ”All apps” select “IP3051” the screen
shows ”Searching for Gateway, please wait…”.(Figure 3)
(Figure 3)
-6-
Page 8
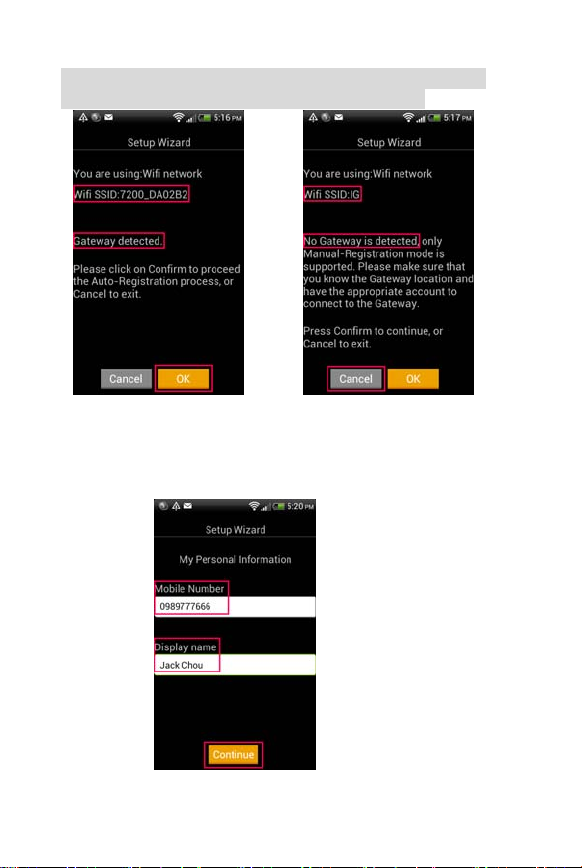
Step 3 : Screen shows ”Gateway detected” ”OK”。
(Figure 4)
(If the screen shows “No Gateway is detected.” (Figure 5)
press ”Cancel” back to step 1 to do again.)
(Figure 4) (Figure 5)
Step 4 : Key in “Mobile Number” “Display name”
(Your name) ”Continue”。(Figure 6)
-7-
(Figure 6)
Page 9
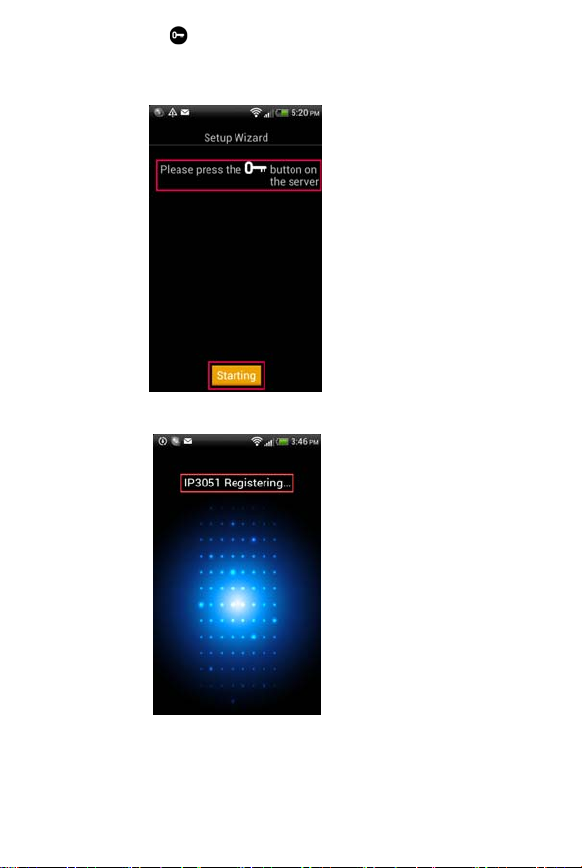
Step 5 : Press button which is on the top of IG7200
(WLAN LED will flash with red and blue at this
moment.) press “Starting” on IP3051. (Figure 7)
(Figure 7)
Step 6: Screen shows ”IP3051 Registering…”. (Figure 8)
-8-
(Figure 8)
Page 10
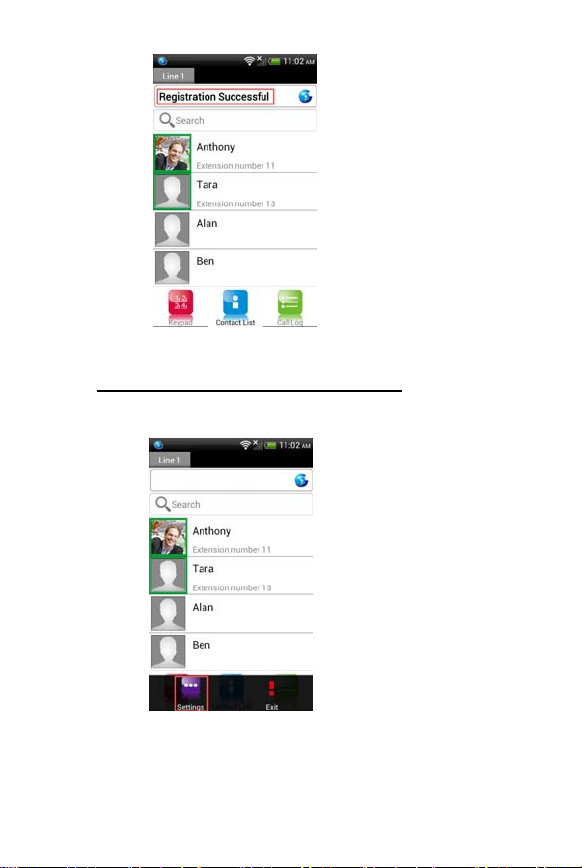
Step 7 : Registration Successful. (Figure 9)
(Figure 9)
IG7200 WAN IP Settings (Optional)
Step 1 : Press “Menu” key on smart phone during
IP3051’s screen ”Settings”. (Figure 10)
(Figure 10)
Step 2 : Press ”Gateway Settings” (Figure 11)
-9-
Page 11
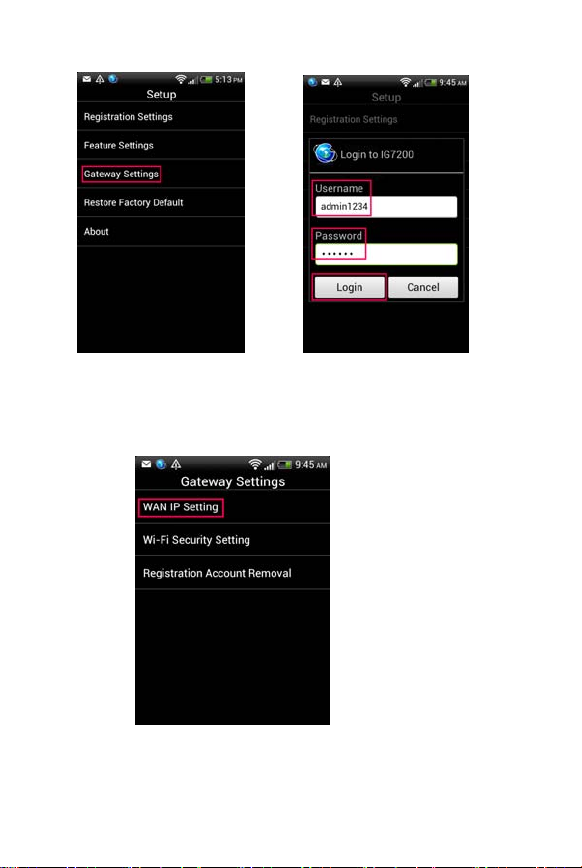
Input ”admin1234” (Username) and “123456” (Password)
press ”Login”. (Figure 12)
(Figure 11) (Figure 12)
Step 3 : Press ”WAN IP Setting”. (Figure 13)
(Figure 13)
Step 4 : Press ”Network Type”. (Figure 14)
-10-
Page 12

-11-
(Figure 14)
Page 13

Step 5 : Choose the network type for your xDSL/Cable
Modem : ”DHCP”, ”Static IP” or “PPPoE”. (Figure 15)
(If you don’t know what network type of your network is,
please check it with your ISP (Internet Service Provider).)
”Static IP” for ADSL Static IP ; “PPPoE" for ADSL
Dynamic IP;" DHCP" for Cable Modem,enter the data
as below:
a. Static IP: Input “IP Address”, “Subnet Mask”,
“Default Gateway” and “DNS 1” .
b. PPPoE: Input ”PPPoE Username” and “PPPoE
Password”.
c. DHCP:No need to input data.
(Figure 15)
Press “OK" after settings finished, IG7200 will
reboot. After 2 minutes, “Power” LED of IG7200 is
“solid on”.
-12-
Page 14

IG7200 Wi-Fi settings (Optional)
If you need to change the Wi-Fi settings or password,
please follow the steps below:
Step 1: IP3051’s screen press ”Menu” key on smart
phone ”Settings”. (Figure 16)
(Figure 16)
Step 2 : Press ”Gateway Settings” (Figure 17)
Input ”admin1234” (Username) and “123456” (Password)
press ”Login”. (Figure 18)
(Figure 17) (Figure 18)
Step 3 : Press "Wi-Fi Security Setting". (Figure 19)
-13-
Page 15

(Figure 19)
Step 4 : Press ”Type”. (Figure 20)
(Figure 20)
Step 5 : Choose one security mode (Suggest to choose
“ WPA-PSK” mode). (Figure 21)
-14-
Page 16

(Figure 21)
Step 6 : Press "Password" and key in the Wi-Fi
password. (Figure 22)
(Figure 22)
Step 7 : Press "OK",IG7200 Wi-Fi password is
changed immediately. (Remember to change the Wi-Fi
settings on smart phone to re-connect IG7200.)
Congratulations!! Setup is complete, you can use IG7200
now.
-15-
Page 17

At any time, you can check the upper left corner of the
IP3051 icon.
If the blue, device is the "successful registration"!
After finishing IG7200 installation and IP3051's
registration, you can make call thru “Keypad",
“Contact List" and “Call Log". You can make free
calls between IP3051s and receive / make call thru the
PSTN line which connected to IG7200 everywhere. No
doubt, you can save the roaming fee when you go abroad.
-16-
Page 18

**Note:** 3G phone will disable the roaming feature for
data in general, to avoid the roaming bill, please make
sure the roaming feature for data is disabled when you
go abroad. (Settings Mobile network Off),use the
local free Wi-Fi network to save the cost.
-17-
Page 19

<For iphone users>
Download IP3051
iphone press ”App Store” search ”IP3051”
press ”IP3051” ”FREE” “INSTALL APP”
“INSTALLING” back to home page of iphone find
“IP3051” in the list. (Figure 23)
(Figure 23)
iphone (IP3051) auto pairing with IG7200
Step 1: iphone Wi-Fi access thru. IG7200:
use iphone and press “Settings” “Wi-Fi” turn on
“Wi-Fi” press ”7200_XXXXXX” (“XXXXXX” is the
last 6 digits of MAC address which is labeled under the
stand of IG7200.) Wi-Fi connection finished.(Figure
24)
-18-
Page 20

(Figure 24)
Step 2: IP3051 detect IG7200 automatically:
press “Home page” key on iphone select “IP3051”
the screen shows ”Searching for Gateway, please
wait…”.(Figure 25)
(Figure 25)
-19-
Page 21

Step 3 : Screen shows ”Gateway detected” ”N ext”。(Figure
26)
(If the screen shows “No Gateway is detected.” (Figure 27)
press “Home page” key on iphone back to step 1 to do again.)
(Figure 26) (Figure 27)
Step 4 : Key in “Mobile Number” “Display name”
(Your name) ”Next”。(Figure 28)
(Figure 28)
-20-
Page 22

Step 5 : Press button which is on the top of IG7200
(WLAN LED will flash with red and blue at this
moment.) press “Start Registration” on IP3051.
(Figure 29)
(Figure 29)
Step 6: Screen shows ” Registering…”. (Figure 30)
(Figure 30)
-21-
Page 23

Step 7 : Registration Successful. (Figure 31)
(Figure 31)
IG7200 WAN IP Settings (Optional)
Step 1 : Press “Setup” button on IP3051 ” Gateway
Settings”. (Figure 32)
(Figure 32)
-22-
Page 24

Step 2 : Input ”admin1234” (Username) and “123456”
(Password) press ”Login”. (Figure 33)
(Figure 33)
Step 3 : Press ”WAN IP Setting”. (Figure 34)
-23-
(Figure 34)
Page 25

Step 4 : Press ”Network Type”. (Figure 35)
(Figure 35)
-24-
Page 26

Step 5 : Choose the network type for your xDSL/Cable
Modem : ”DHCP”, ”Static IP” or “PPPoE”. (Figure 36)
(If you don’t know what network type of your network is,
please check it with your ISP (Internet Service Provider).)
”Static IP” for ADSL Static IP ; “PPPoE" for ADSL
Dynamic IP;" DHCP" for Cable Modem,enter the data
as below:
a. Static IP: Input “IP Address”, “Subnet Mask”,
“Default Gateway” and “DNS 1” .
b. PPPoE: Input ”PPPoE Username” and “PPPoE
Password”.
c. DHCP:No need to input data.
(Figure 36)
Press “Done" after settings finished, IG7200 will
reboot. After 2 minutes, “Power” LED of IG7200 is
“solid on”.
-25-
Page 27

IG7200 Wi-Fi settings (Optional)
If you need to change the Wi-Fi settings or password,
please follow the steps below:
Step 1: Press “Setup” button on IP3051 ” Gateway
Settings”. (Figure 37)
(Figure 37)
Step 2 : Input ”admin1234” (Username) and “123456”
(Password) press ”Login”. (Figure 38)
(Figure 38)
-26-
Page 28

Step 3 : Press "Wi-Fi Security Setting". (Figure 39)
(Figure 39)
Step 4 : Press ”Type”. (Figure 40)
(Figure 40)
Step 5 : Choose one security mode (Suggest to choose
“ WPA-PSK” mode). (Figure 41)
-27-
Page 29

(Figure 41)
Step 6 : Press "Password" and key in the Wi-Fi
password. (Figure 42)
(Figure 42)
-28-
Page 30

Step 7 : Press "Done",IG7200 Wi-Fi password is
changed immediately. (Remember to change the Wi-Fi
settings on smart phone to re-connect IG7200.)
Congratulations!! Setup is complete, you can use IG7200
now.
At any time, you can check the registration icon of the
IP3051.
If the blue, device is the "successful registration"!
After finishing IG7200 installation and IP3051's
registration, you can make call thru “Keypad",
“Contact List" and “Call Log". You can make free
calls between IP3051s and receive / make call thru the
PSTN line which connected to IG7200 everywhere. No
doubt, you can save the roaming fee when you go abroad.
-29-
Page 31

**Note:** iphone will disable the roaming feature for
data in general, to avoid the roaming bill, please make
sure the roaming feature for data is disabled when you
go abroad. (Settings General Cellular Data
Roaming OFF),use the local free Wi-Fi network to
save the cost.
-30-
Page 32

<For iphone users>
Please remember to enable the following items in
iphone.
<Notifications>
iphone “Settings” “Notifications” “IP3051”
“Notification Center” “ON”
<Privacy Policy> (To avoid IP3051 stop running.)
iphone “Settings” “Privacy” “Contacts”
“IP3051” “ON”
-31-
Page 33

Federal Communication Commission Interference Statement
This device complies with Part 15 of the FCC Rules. Operation is subject to the
following two conditions: (1) This device may not cause harmful interference, and (2)
this device must accept any interference received, including int erference th at may cause
undesired operation.
This equipment has been tested and found to comply with the limits for a Class B digital
device, pursuant to Part 15 of the FCC Rules. These limits are designed to provide
reasonable protection against harmful interference in a residential installation. This
equipment generates, uses and can radiate radio frequency energy and, if not installed
and used in accordance with the instructions, may cause harmful interference to radio
communications. However, there is no guarantee that interference will not occur in a
particular installation. If this equipment does cause harmful interferen ce to radio or
television reception, which can be determined by turning the equipment off and on, the
user is encouraged to try to correct the interference by one of the following measures:
- Reorient or relocate the receiving antenna.
- Increase the separation between the equipment and receiver.
- Connect the equipment into an outlet on a circuit different from that
to which the receiver is connected.
- Consult the dealer or an experienced radio/TV technician for help.
FCC Caution: Any changes or modifications not expressly approved by the party
responsible for compliance could void the user's authority to operate this equipment.
This transmitter must not be co-located or operating in conjunction with any other
antenna or transmitter.
Radiation Exposure Statement:
This equipment complies with FCC radiation exposure limits set forth for an
uncontrolled environment. This equipment should be installed and operated with
minimum distance 20cm between the radiator & your body.
Note: The country code selection is for non-US model only and is not available to all
US model. Per FCC regulation, all WiFi product marketed in US must fixed to US
operation channels only.
Any other adaptor with non-shielded cable and without core may could cause problems
Customer Information:
This equipment complies with Part 68 of the FCC rules and the requirements adopted
by the ACTA. On the side is a label that contains, among other information, a product
identifier in the format US:D6XIS00BIG7200. If requested, this number must be
provided to the telephone company.
Applicable connector jack Universal Service Order Codes (“USOC”) for the Equipment
is RJ11C .
A plug and jack used to connect this equipment to the premises wiring and telephone
network must comply with the applicable FCC Part 68 rules and requirements adopted
by the ACTA. A compliant telephone cord and modular plug is provided with this
-32-
Page 34

product. It is designed to be connected to a compatible modular jack that is also
compliant. See installation instructions for details.
The REN is used to determine the number of devices that may be connected to a
telephone line. Excessive RENs on a telephone line may result in the devices not
ringing in response to an incoming call. In most but not all areas, the sum of RENs
should not exceed five (5.0). To be certain of the number of devices that may be
connected to a line, as determined by the total RENs, contact the local telephone
company. For products approved after July 23, 2001, the REN for this product is part of
the product identifier that has the format US: D6XIS00BIG7200. The digits represented
by 00 are the REN without a decimal point (e.g., 03 is a REN of 0.3).
If this Smart Phone Gateway causes harm to the telephone network, the telephone
company will notify you in advance that temporary discontinuance of service may be
required. But if advance notice isn't practical, the telephone company will notify the
customer as soon as possible. Also, you will be advised of your right to file a complaint
with the FCC if you believe it is necessary.
The telephone company may make changes in its facilities, equipment, operations or
procedures that could affect the operation of the equipment. If this happens the
telephone company will provide advance notice in order for you to make necessary
modifications to maintain uninterrupted service.
If trouble is experienced with this Smart Phone Gateway, for repair or warranty
information, please contact Lynx Telecom Inc – P.O. Box 2875, Stan. Champaign
Illinois 61285 U.S.A., Phone : 217-384-2230 . If the equipment is causing harm to the
telephone network, the telephone company may request that you disconnect the
equipment until the problem is resolved.
Connection to party line service is subject to state tariffs. Contact the state public utility
commission, public service commission or corporation commission for information.
If your home has specially wired alarm equipment connected to the telephone line,
ensure the installation of this equipment does not disable your alarm equipment. If you
have questions about what will disable alarm equipment, consult your telephone
company or a qualified installer.
WHEN PROGRAMMING EMERGENCY NUMBERS AND(OR) MAKING TEST
CALLS TO EMERGENCY NUMBERS:
1) Remain on the line and briefly explain to the dispatcher the reason for the call.
2) Perform such activities in the off-peak hours, such as early morning or late evenings.
-33-
Page 35

-34-
 Loading...