

Page 1
GW 6000 Administrative Guide Configuration
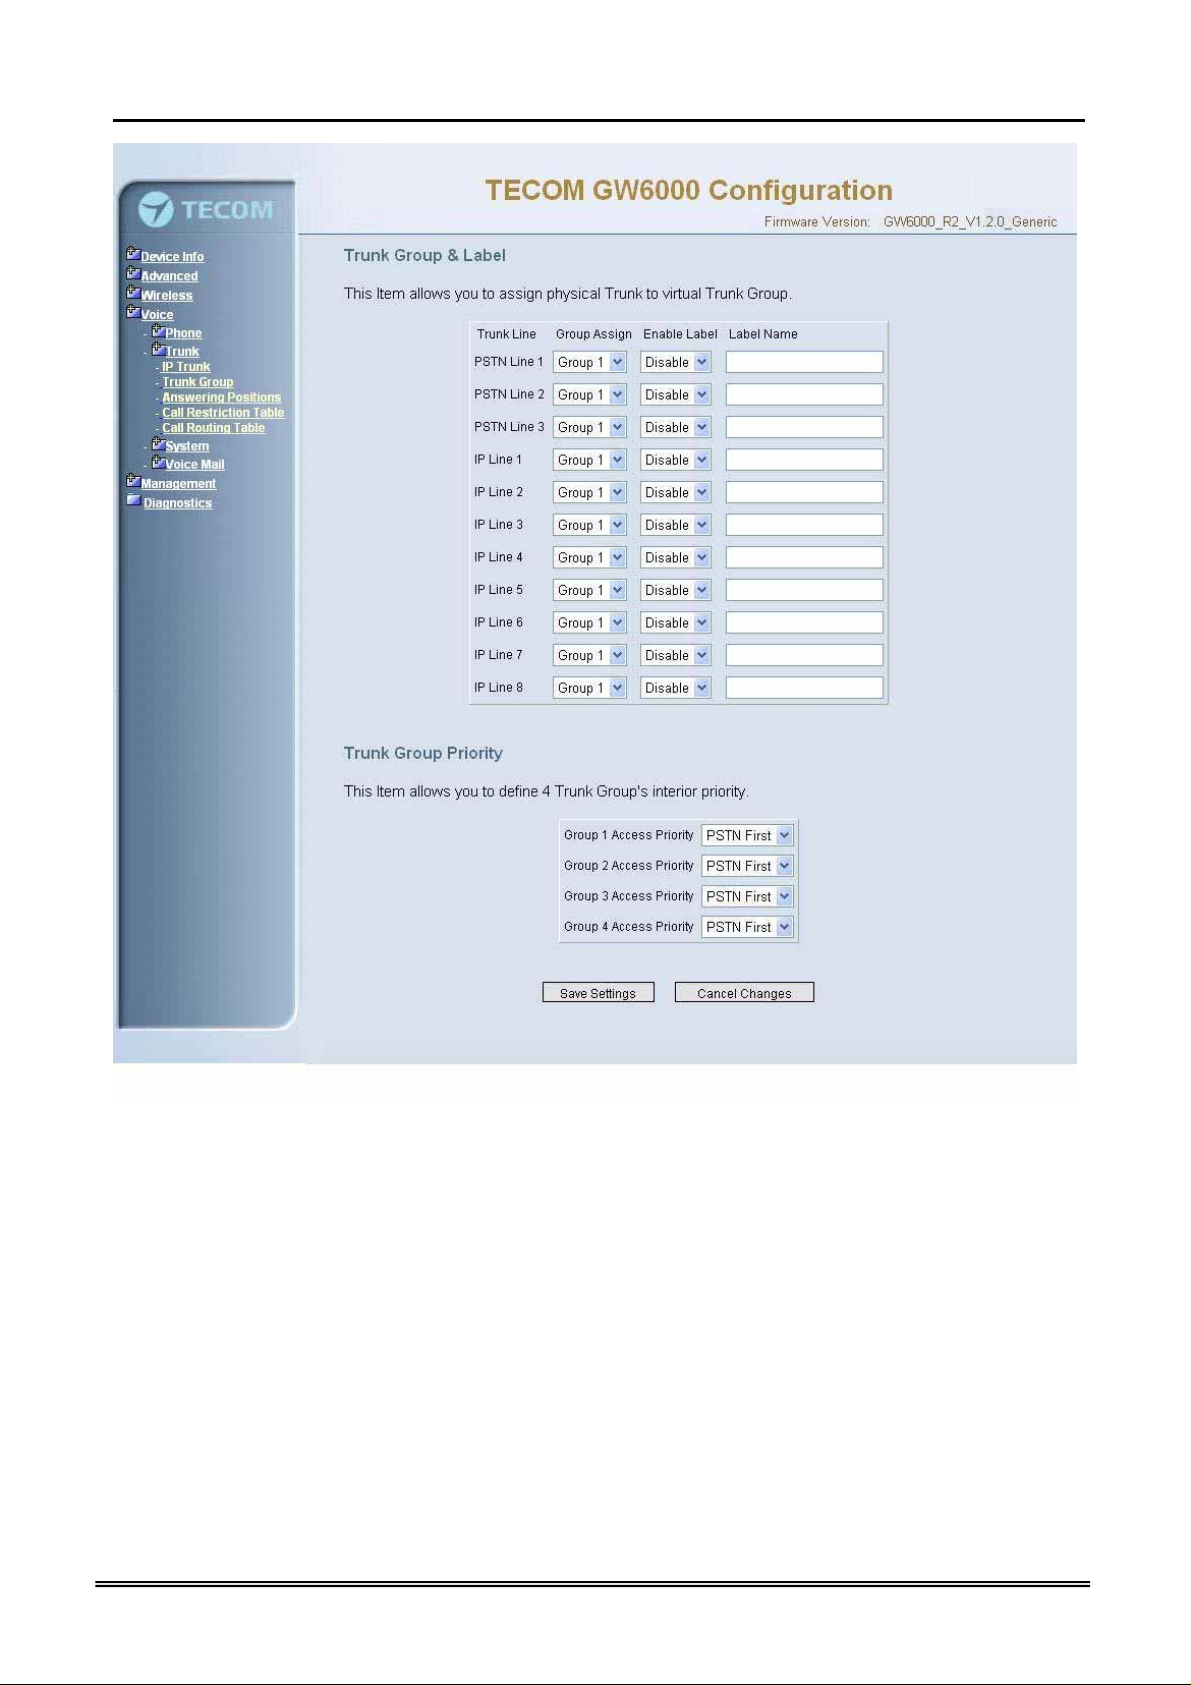
Figure 6-30. Voice – Trunk –Trunk Group
Copy Right 2006 Tecom, Co. LTD. All rights reserved Page 61 of 107
Page 2
GW 6000 Administrative Guide Configuration
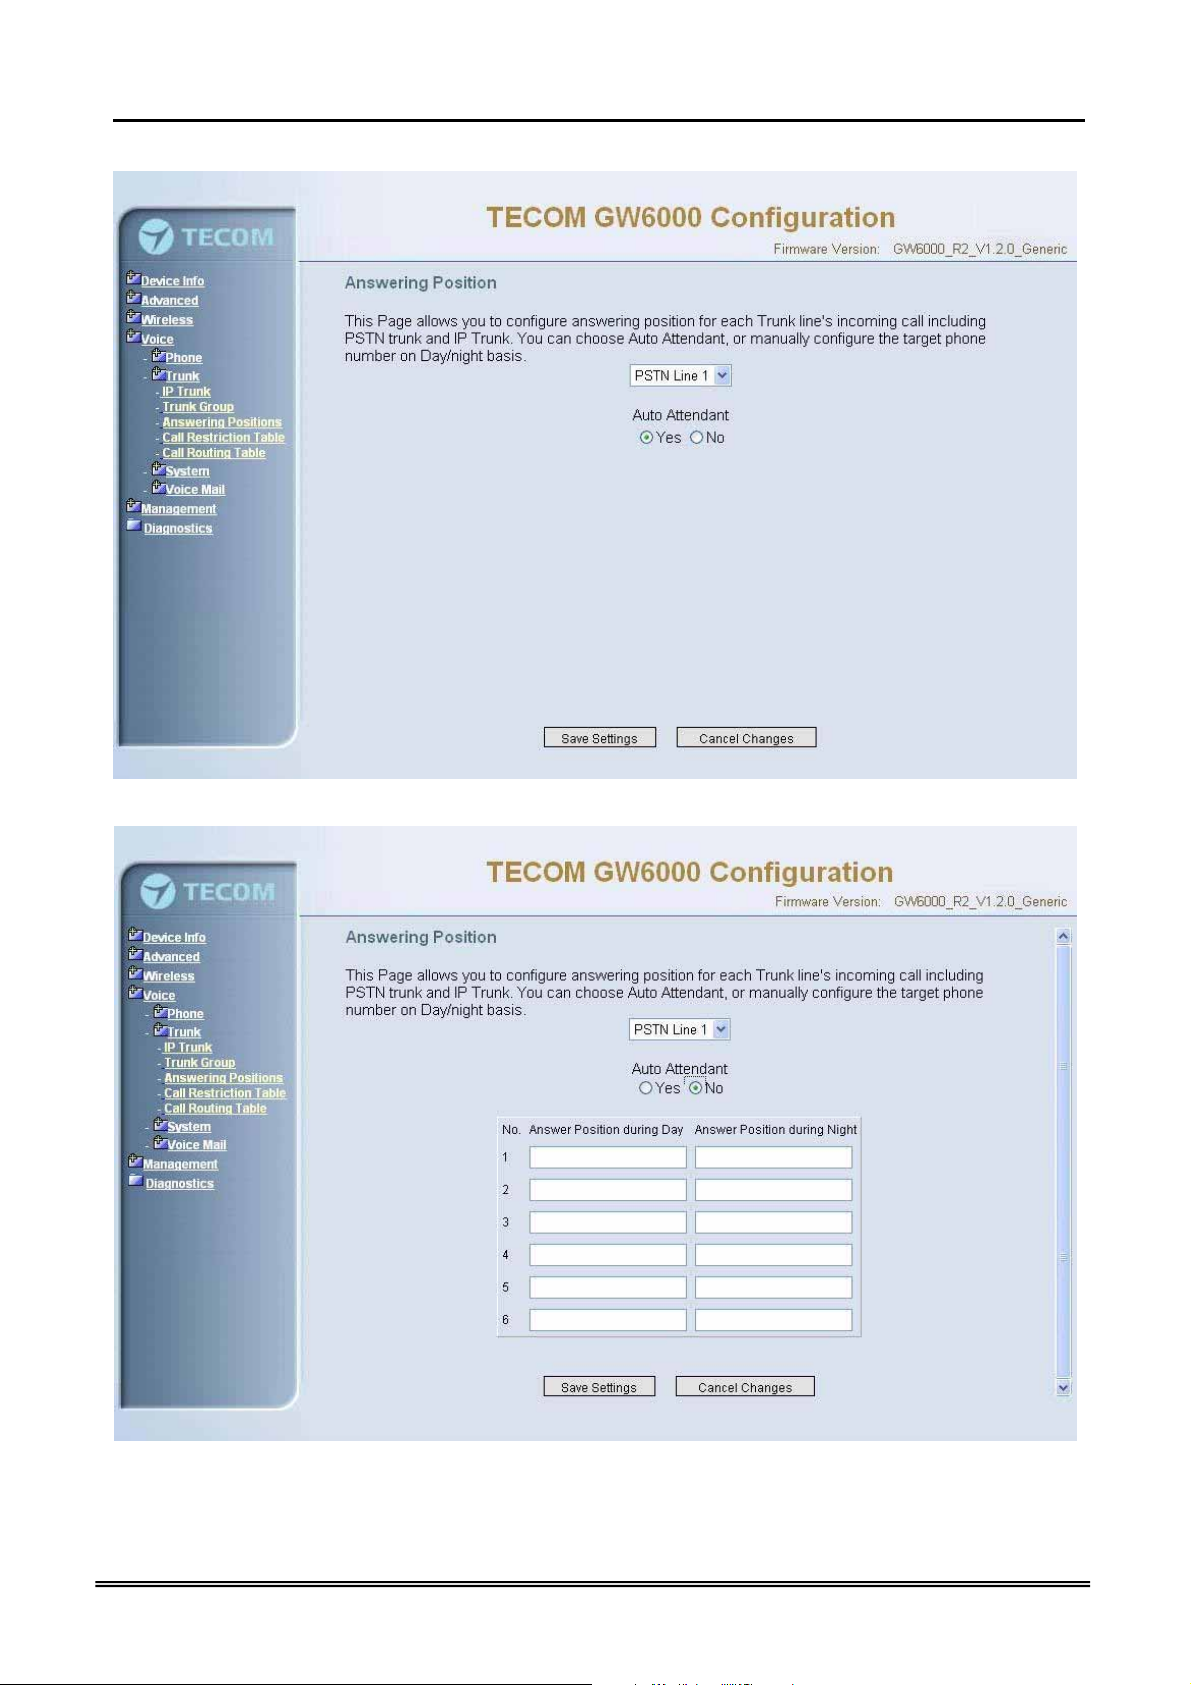
6.6.2.3 Answering Positions
Figure 6-31-1. Voice – Trunk – Answering Positions – AA(Yes)
Figure 6-31-2. Voice – Trunk – Answering Positions – AA(No)
Copy Right 2006 Tecom, Co. LTD. All rights reserved Page 62 of 107
Page 3

GW 6000 Administrative Guide Configuration
This Item allows you to configure answering position for each Trunk line including PSTN
trunk and IP Trunk. You can choose Auto Attendant, or manual configure the target
phone number on Day/night basis.
Auto Attendant: Yes/No.
Day Answering Position: 6 extension numbers maximum
Night Answering Position: 6 extension numbers maximum
If choose Auto Attendant as Yes, an idle VAA will auto-answer this incoming trunk call.
You can continue your operation by following its indicative words. Otherwise some
extension will be called and ringing. If you pick up one of them, the other extensions will
stop ringing.(Figure 6-31)
6.6.2.4 Call Restriction Table
This page allows you to configure the call restriction table. If you choice YN in "Trunk
Access" option, it means that the entry is used in both trunk access and call routing judge.
Y means that it is only valid in trunk access judge, and N is vice versa. Only the caller's
COS priority is higher than the entry's COS value, the call is allowed.
From/To
The allowed intervals are made up of a From and To entry which establish a
numeric range. For example, an entry of “From 1700” , “To 1800” would include the
following range of numbers as the leading: 1700, 1701, 1702, …1799, 1800. Each
From/To entry can be from 1 to 13 digits long and may contain any digit 0-9, or X (X
representing any digit). The :From” entry must be less than or equal to the “To”
entry.
Trunk Access
GW6000 checks the field only when a call matches the associated allowed interval.
If the field is set to “Y”, the entry is valid when the trunk is accessed previously. If
the field is set to “N”, the trunk isn’t accessed previously. The trunk will be accessed
through Call Routing Table. If he option is set to “YN”, the entry is valid no matter
the trunk is accessed or not previously.
COS
The COS setting is defined by the allowed intervals. “Y” allows an extension with
the COS or higher priority to dial the number(s) specified in that range.
Copy Right 2006 Tecom, Co. LTD. All rights reserved Page 63 of 107
Page 4

GW 6000 Administrative Guide Configuration
Figure 6-32. Voice – Trunk – Call Restriction Table
Copy Right 2006 Tecom, Co. LTD. All rights reserved Page 64 of 107
Page 5
GW 6000 Administrative Guide Configuration
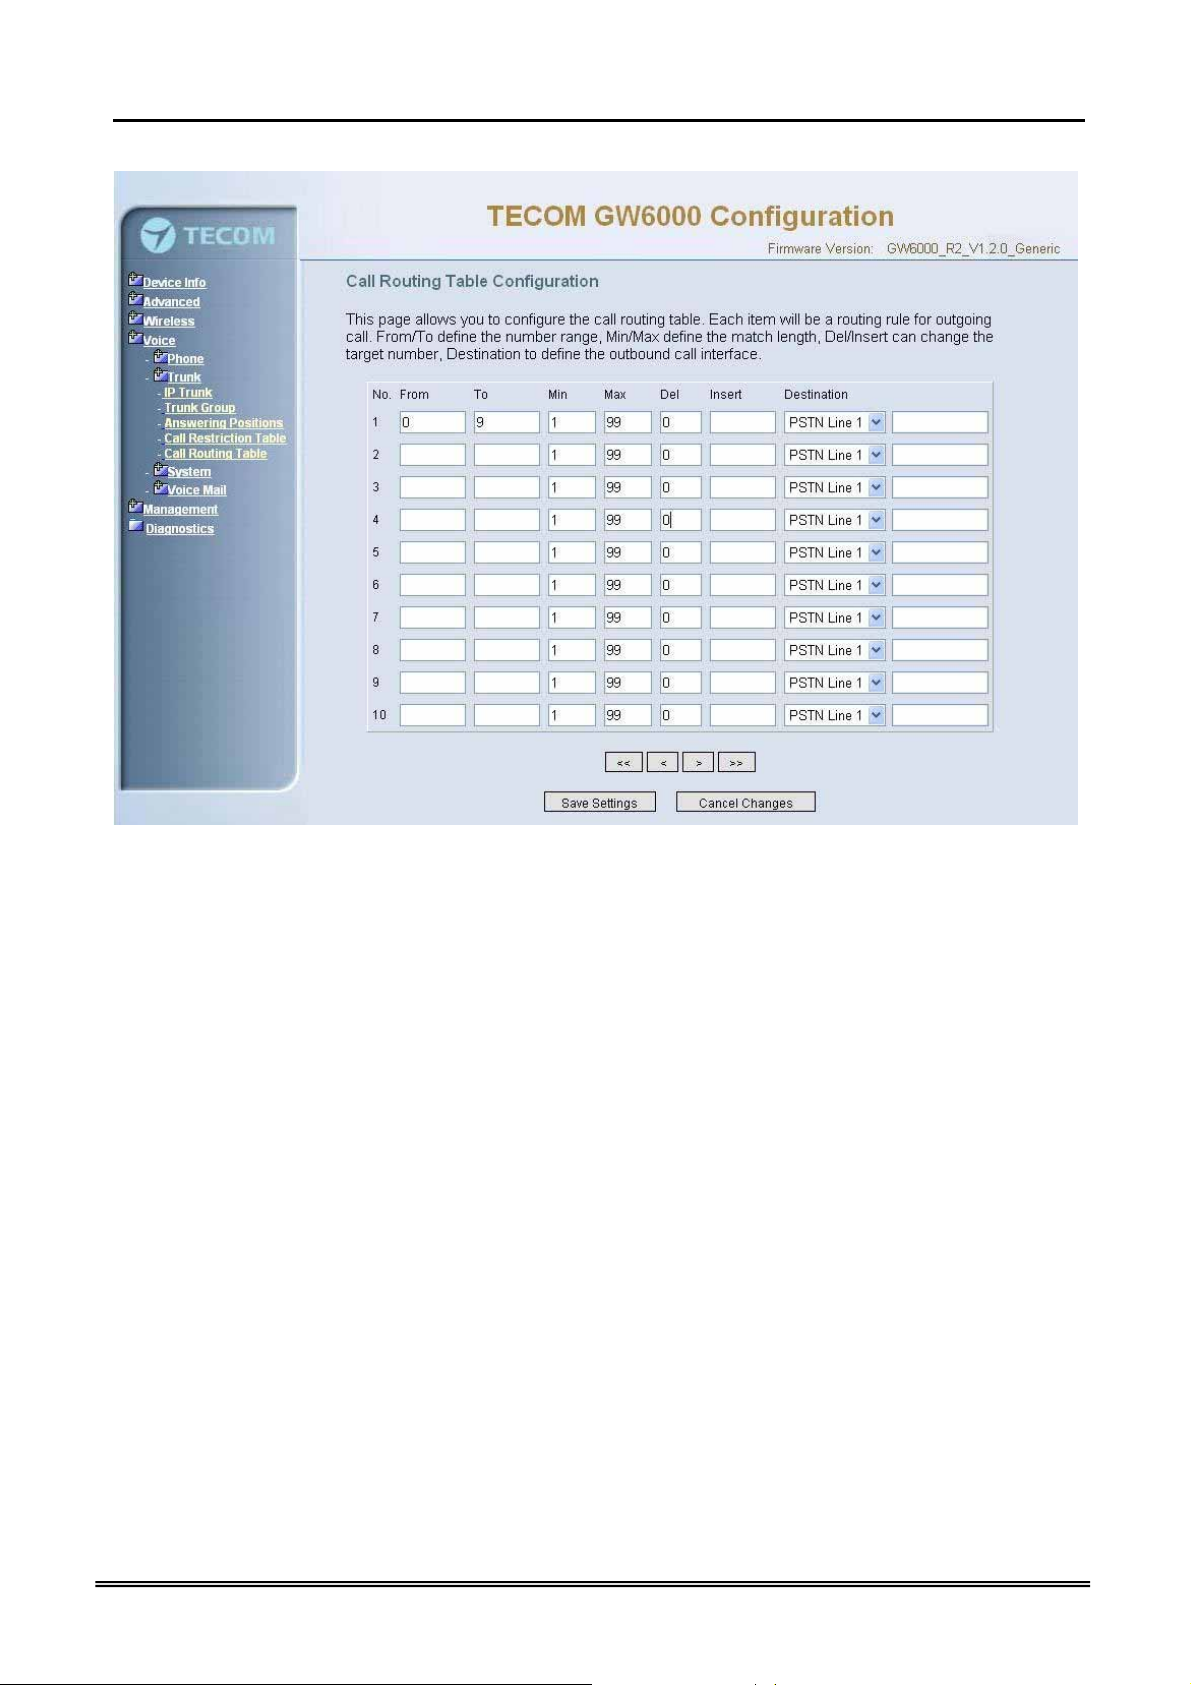
6.6.2.5 Call Routing Table
Figure 6-33. Voice – Trunk – Call Routing Table
This page allows you to configure the call routing table. Each item will be a routing rule
for outgoing call. From/To define the number range, Min/Max define the match length,
Del/Insert can change the target number, Destination to define the outbound call
interface. You can click the buttons under the table to choose pages.
In the Destination field, the drop list includes a particular option: “IG Expansion”.
When selecting “IG Expansion”, the next field is a drop list, the drop list contains the
founded IG name which is maintained by the GW6000, and you can select a suitable IG
name to route your calls (Figure 6-33).
6.6.3 System
Use the System screen to configure the System function related parameters. It is
separated into 4 parts:
z Numbering Plan
z Service Mode
z Transmission
z IG Dynamic Discovery
z IG Expansion Table
Copy Right 2006 Tecom, Co. LTD. All rights reserved Page 65 of 107
Page 6
GW 6000 Administrative Guide Configuration
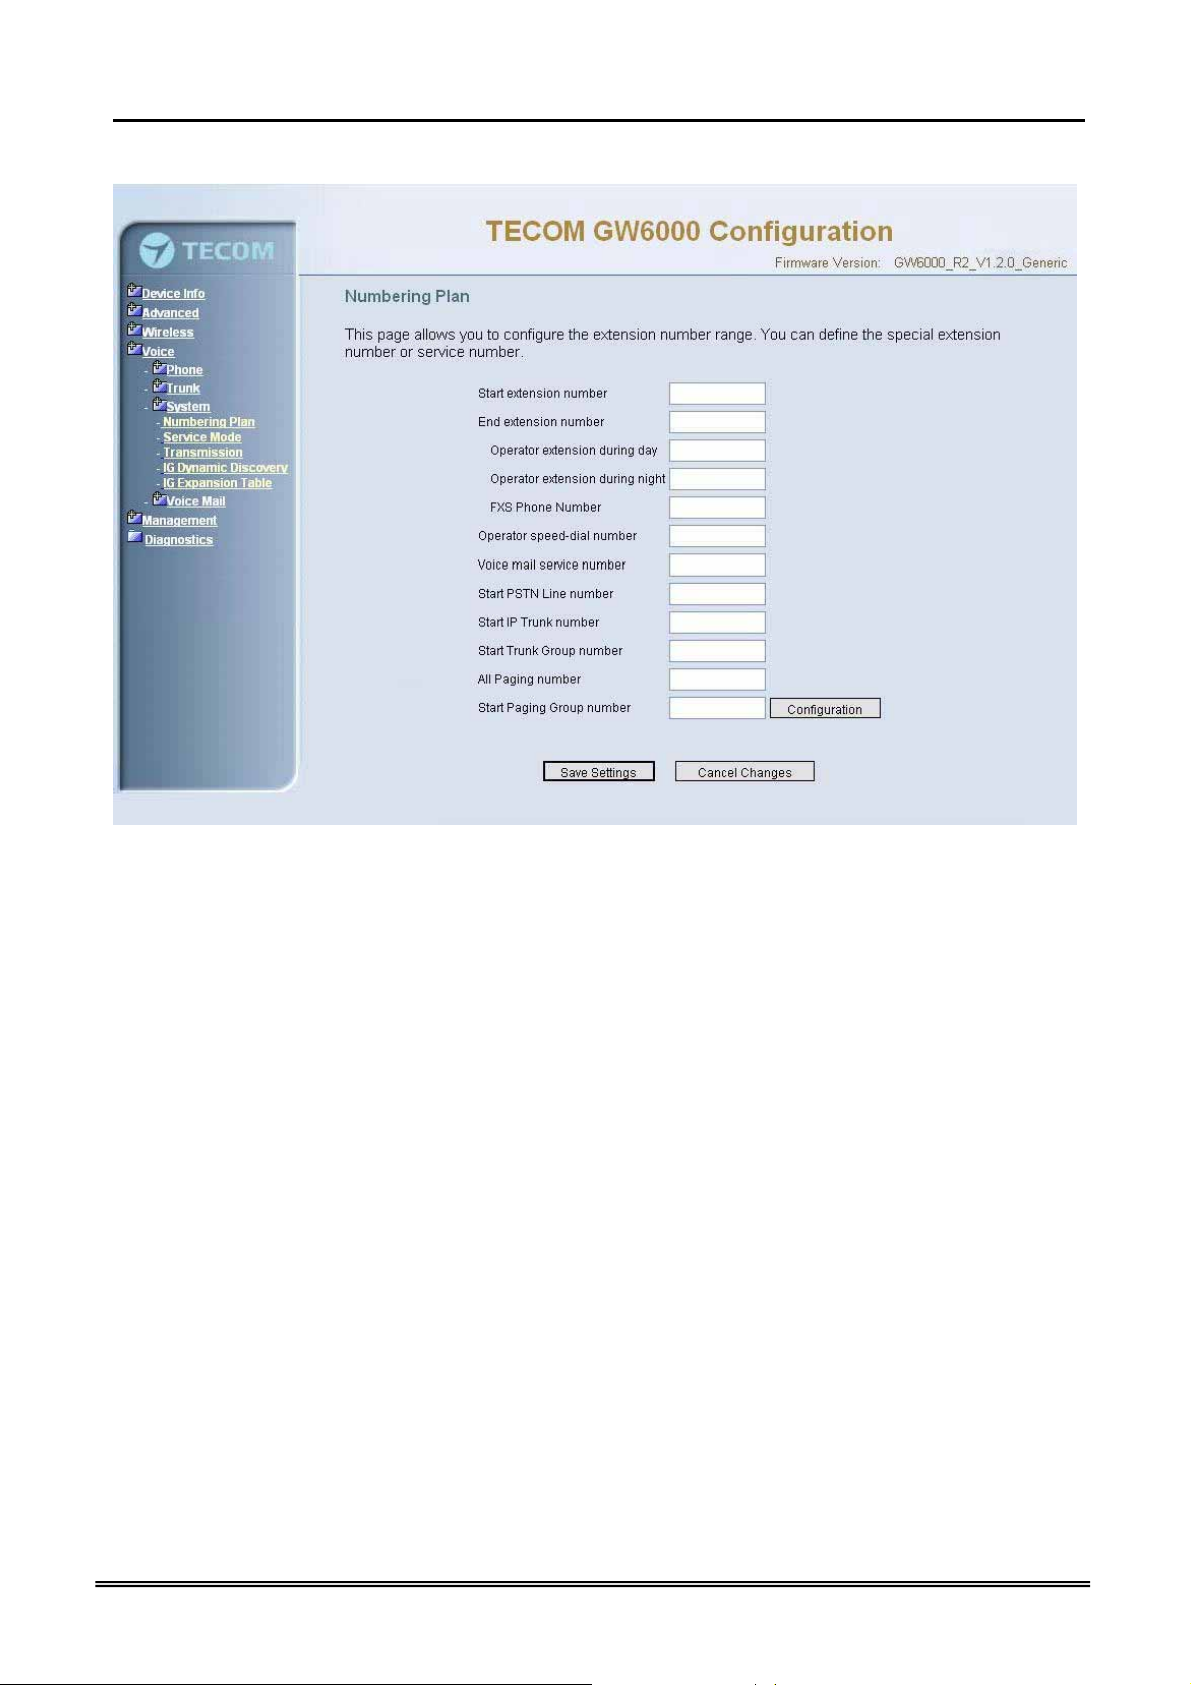
6.6.3.1 Numbering Plan
Figure 6-34. Voice – System – Numbering Plan
This page allows you to configure extension number range. You can also define some
special service numbers in the table.(Figure 6-33)
Start extension number: start phone number of system internal extension. All valid
extension number can’t be smaller than it.
End extension number: end phone number of system internal extension. All valid
extension number can’t be greater than it. If receiving an IP2007’s Plug & Play
request, IG will allocate the first unused number from this limited region.
Operator extension during day: system operator number. If dial Operator speeddial number, this extension will be called during day.
Operator extension during Night: system operator number. If dial Operator speeddial number, this extension will be called during night.
FXS Phone Number: It determines the FXS phone number.
Operator speed-dial number: If dial this number, the operator extension will be
called. Also it is limited on length 1 character.
Voice mail service number: If dial this number, internal user can enter IG’s vm
system and do some operations such as listening personal message.
Start PSTN Line number: IG provides 3 PSTN line at most. Every line has its own
internal alias number. You can dial these numbers directly to access PSTN trunks.
Start IP Trunk number: IG provide 8 IP Trunk line at most. Every line has also its
own internal alias number. You can dial these numbers directly to access IP Trunks.
Copy Right 2006 Tecom, Co. LTD. All rights reserved Page 66 of 107
Page 7
GW 6000 Administrative Guide Configuration
Start Trunk Group number: IG provides 4 trunk groups at most. If dialing trunk
group number, IG will choose the first idle line for caller automatically.
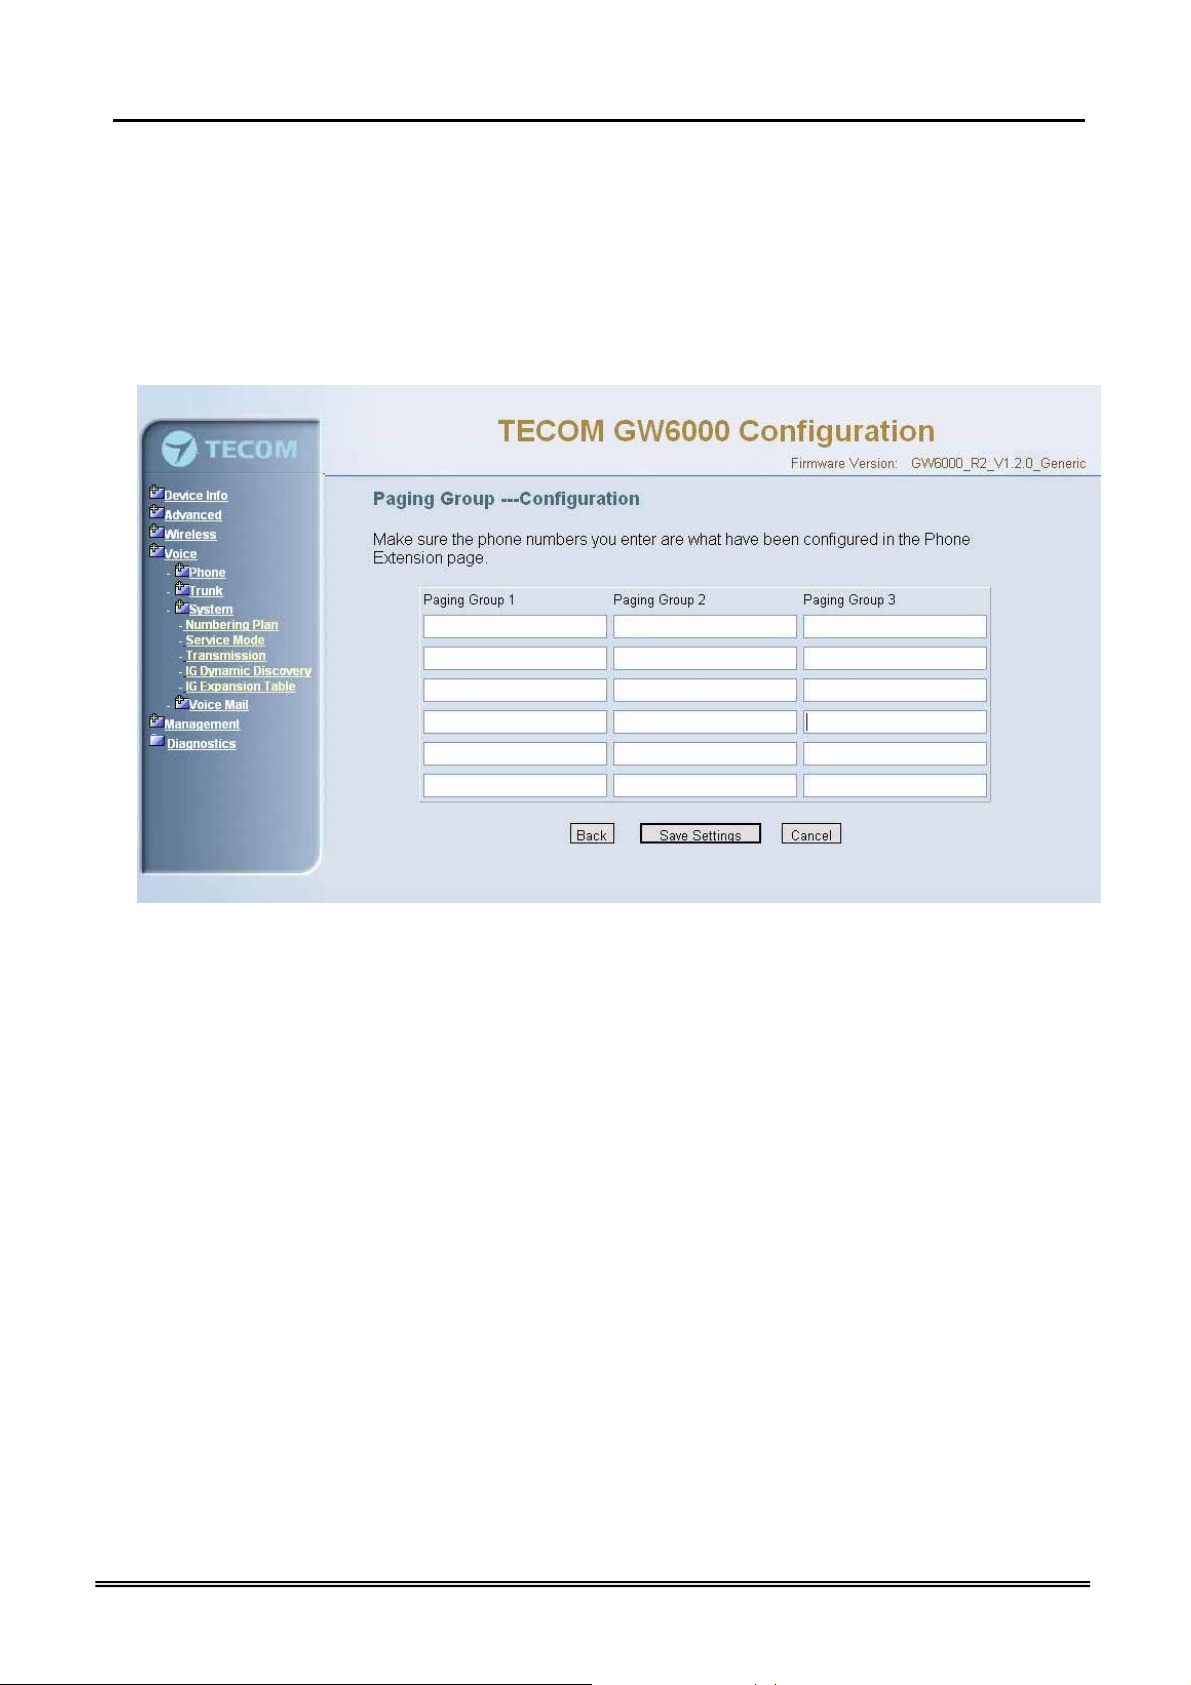
All Paging number: If dialing this number, all internal IP2007s will be paged.
Start Paging Group number: 3 paging groups are defined in IG. If dialing a Paging
Group number, the call will page to all internal IP2007s of the called paging group.
While pressing “Configuration” in “Start Paging Group number”, it shows Paging Group
Configuration screen (Figure 6-34).
Figure 6-35. Voice – System – Numbering Plan – Paging Group
6.6.3.2 Service Mode
This page allows you to configure the day/night service mode. You can also customize
the working time manually for each weekday.
If you choose Time Mode, it’s for the specified day of week. The time is entered in 24hour format. Valid entries are 00:00 to 23:59 in 1-minute increments.(Figure 6-35)
Copy Right 2006 Tecom, Co. LTD. All rights reserved Page 67 of 107
Page 8

GW 6000 Administrative Guide Configuration
Figure 6-36. Voice – System – Service Mode
6.6.3.3 Transmission
This page allows you to configure the Audio, FXS, FXO settings. Click “Save Settings”
button to save the new configuration. Click “Cancel Changes” button you can cancel the
changes. (Figure 6-36)
Copy Right 2006 Tecom, Co. LTD. All rights reserved Page 68 of 107
Page 9

GW 6000 Administrative Guide Configuration
Figure 6-37. Voice – System – Transmission
Audio: It is used to set many Audio-related options. It will be applied to the all FXS and
PSTN lines.
Country: It may be used to determine not only the Caller ID detection / transmission
method but also ring/tone cadence/frequency.
Voice Active Detection: Enable or Disable; VAD is a technique that detects the
absence of audio and conserved bandwidth by preventing the transmission of
“silence packets” over the network. Normally, this is set to On.
Packet Loss Concealment: Enable or Disable
Echo Cancellation Tail Length: Echo cancel time; 0 value disables Echo Canceller.
RTP Packet Size: 10/20/.../60 ms
Copy Right 2006 Tecom, Co. LTD. All rights reserved Page 69 of 107
Page 10

GW 6000 Administrative Guide Configuration
Codec Priority: GW6000 can support different audio Codec (G711u, G711a, G723,
G729a) but only one is active at one time. You can choose “Preferred
Codec”, ”Secondary Codec”, ”Thirdly Codec” and ”Fourth Codec” properly.
FXS: It is used to set many FXS-related options.
Fax Support: The system supports FAX/modem tone detection with G.711 mode.
Call ID Method: The system provides the ability to detect the calling party
identification provided by PSTN lines. It also transmits the calling party identification
to POTS ports. There are four choices: NONE, DTMF_BR, DTMF_AR, FSK
Input Volume Gain: value range: -20 ~ 20. If the value increased 1, the actual
analog-voice will become louder 0.5dB. Otherwise the voice will become lower 0.5dB.
Output Volume Gain: value range: -20 ~ 20.
Inter-digit Timeout: Its range is from 0 to 30 seconds.
FXO: It is used to set many central office line options.
Input Volume Gain: value range: -20 ~ 20
Output Volume Gain: value range: -20 ~ 20
Call Abandon Time: For every PSTN/FXO call, system provides the facility to
monitor the call status. If the remote party hangs up, the ongoing call must be
terminated. The PSTN line monitor is done by the loop-break signal or busy tone.
The value range is: 100/200/…/1000 ms.
Ring Recognition Time: The timer determines the minimum ring duration
recognized as a valid incoming ring on a PSTN port. Shorter ring signals are ignored.
The timer range is 200ms to 60ms in 40ms increments.
Delay Ring Time: The timer is to allow the Central Office to send ICLID before the
call is answered. Once the timer expires, the programmed extensions will ring and
the ICLID number will be sent to the ringing extensions. The timer range is 3 to 6
seconds on 0.5 second increments.
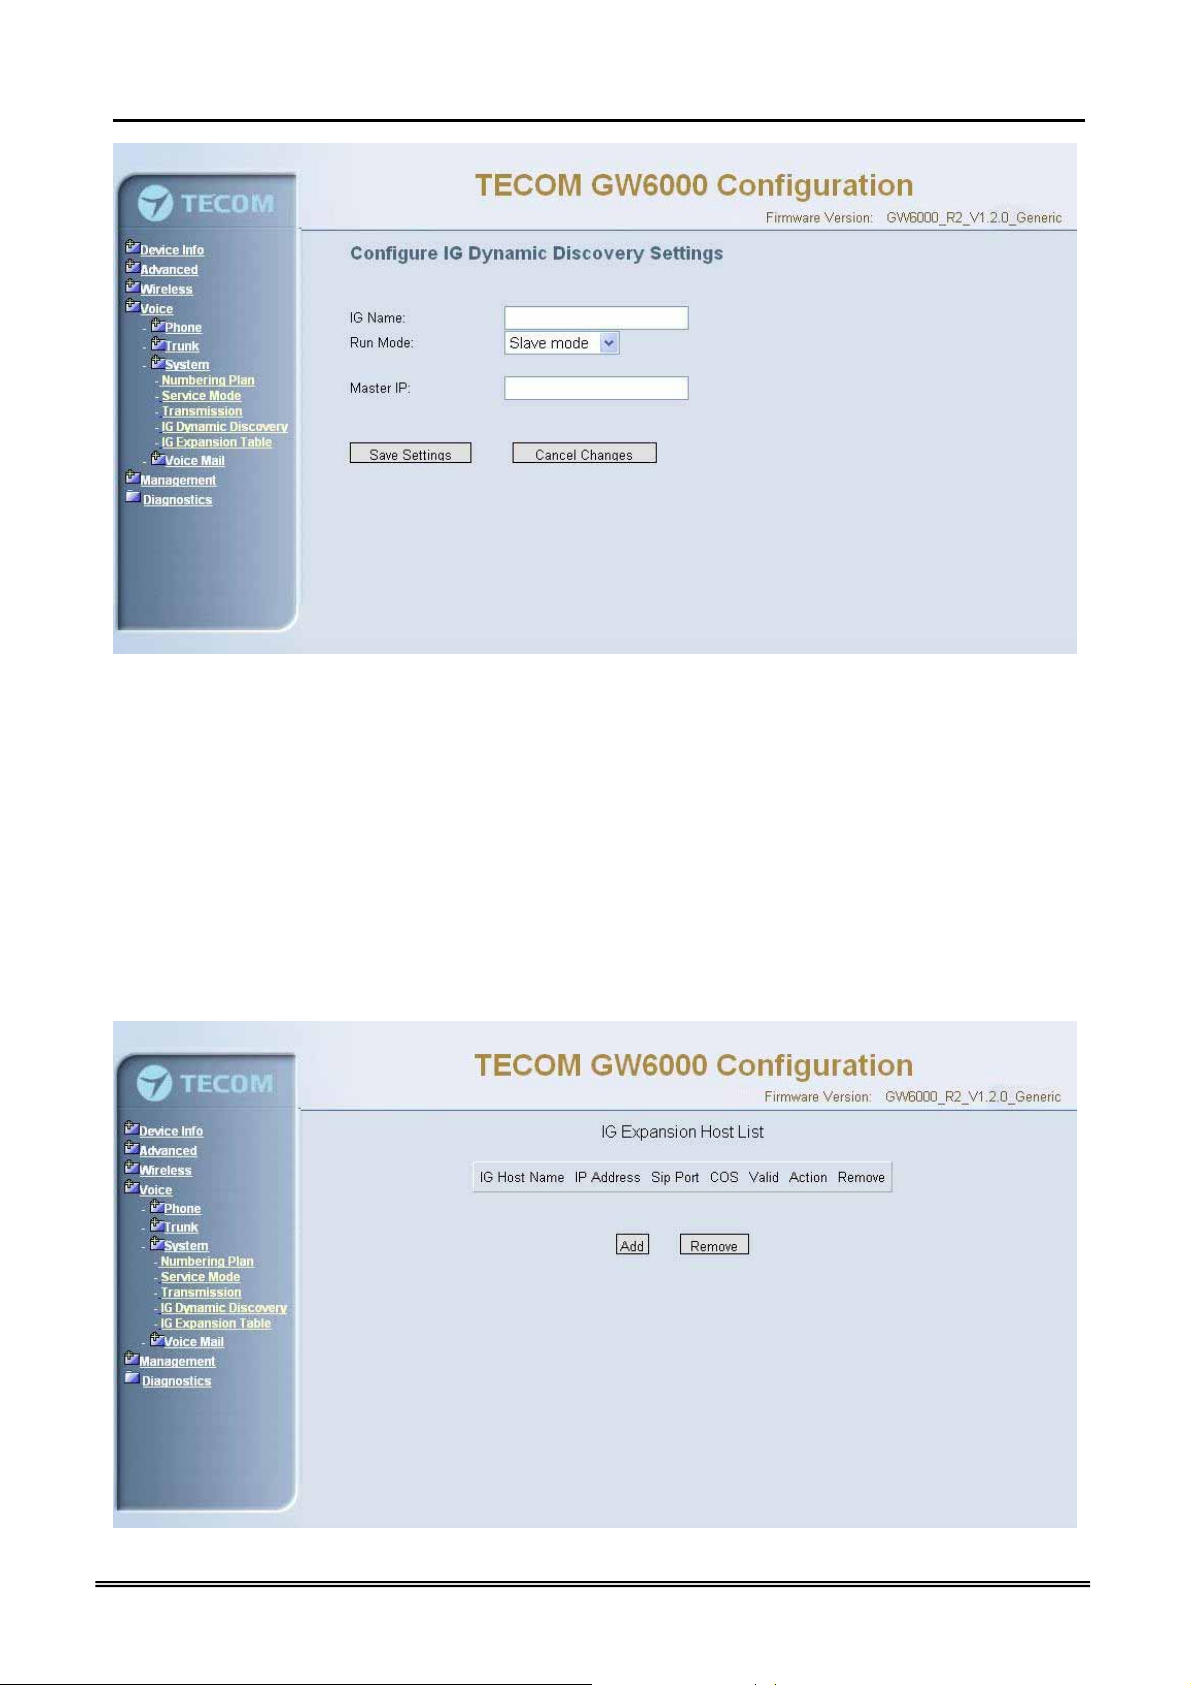
6.6.3.4 IG Dynamic Discovery
This page allows you to configure IG dynamic discovery settings.(Figure 6-37)
IG Name: The name of IG. It will be referred for the other IGs.
Run Mode: The mode that IG is running. IG can run in Master Mode or Slave Mode.
Master Mode: When IG is running in master mode, it maintains an IG list table.
When the master found that some slave IG changes its name or IP address, it will
broadcast to all of other slave IGs in this list and let them update their own IG list
table.
Slave Mode: When IG is running in slave mode, the master IG IP address should be
configured. When its name or IP address changed, it will inform the master IG. And
then the master IG will let other IG know this change.
Copy Right 2006 Tecom, Co. LTD. All rights reserved Page 70 of 107
Page 11
GW 6000 Administrative Guide Configuration
Figure 6-38-1. Voice – System – IG Dynamic Discovery
6.6.3.5 IG Expansion Table
This page shows the all cooperated IGs. It can be got through IG Dynamic Discovery. It
also allows you to add the specified IG that our calls want to be routed into.
IG Host Name: The cooperated IG’s name.
IP Address: The cooperated IG’s IP address.
Sip Port: The cooperated IG’s SIP port.
COS: The cooperated IG’s Class of Service.
Valid: If setting “N”, it rejects the direct call from the cooperated IG.
Copy Right 2006 Tecom, Co. LTD. All rights reserved Page 71 of 107
Page 12

GW 6000 Administrative Guide Configuration
Figure 6-38-2. Voice – System – IG Expansion Table
6.6.3 Voice Mail
GW6000 provides a built-in Auto Attendant and Voice Mail System. It is separated into 4
parts:
z General
z Extension
z Holiday
z Advanced
The configurable items for each part would be described in the following.
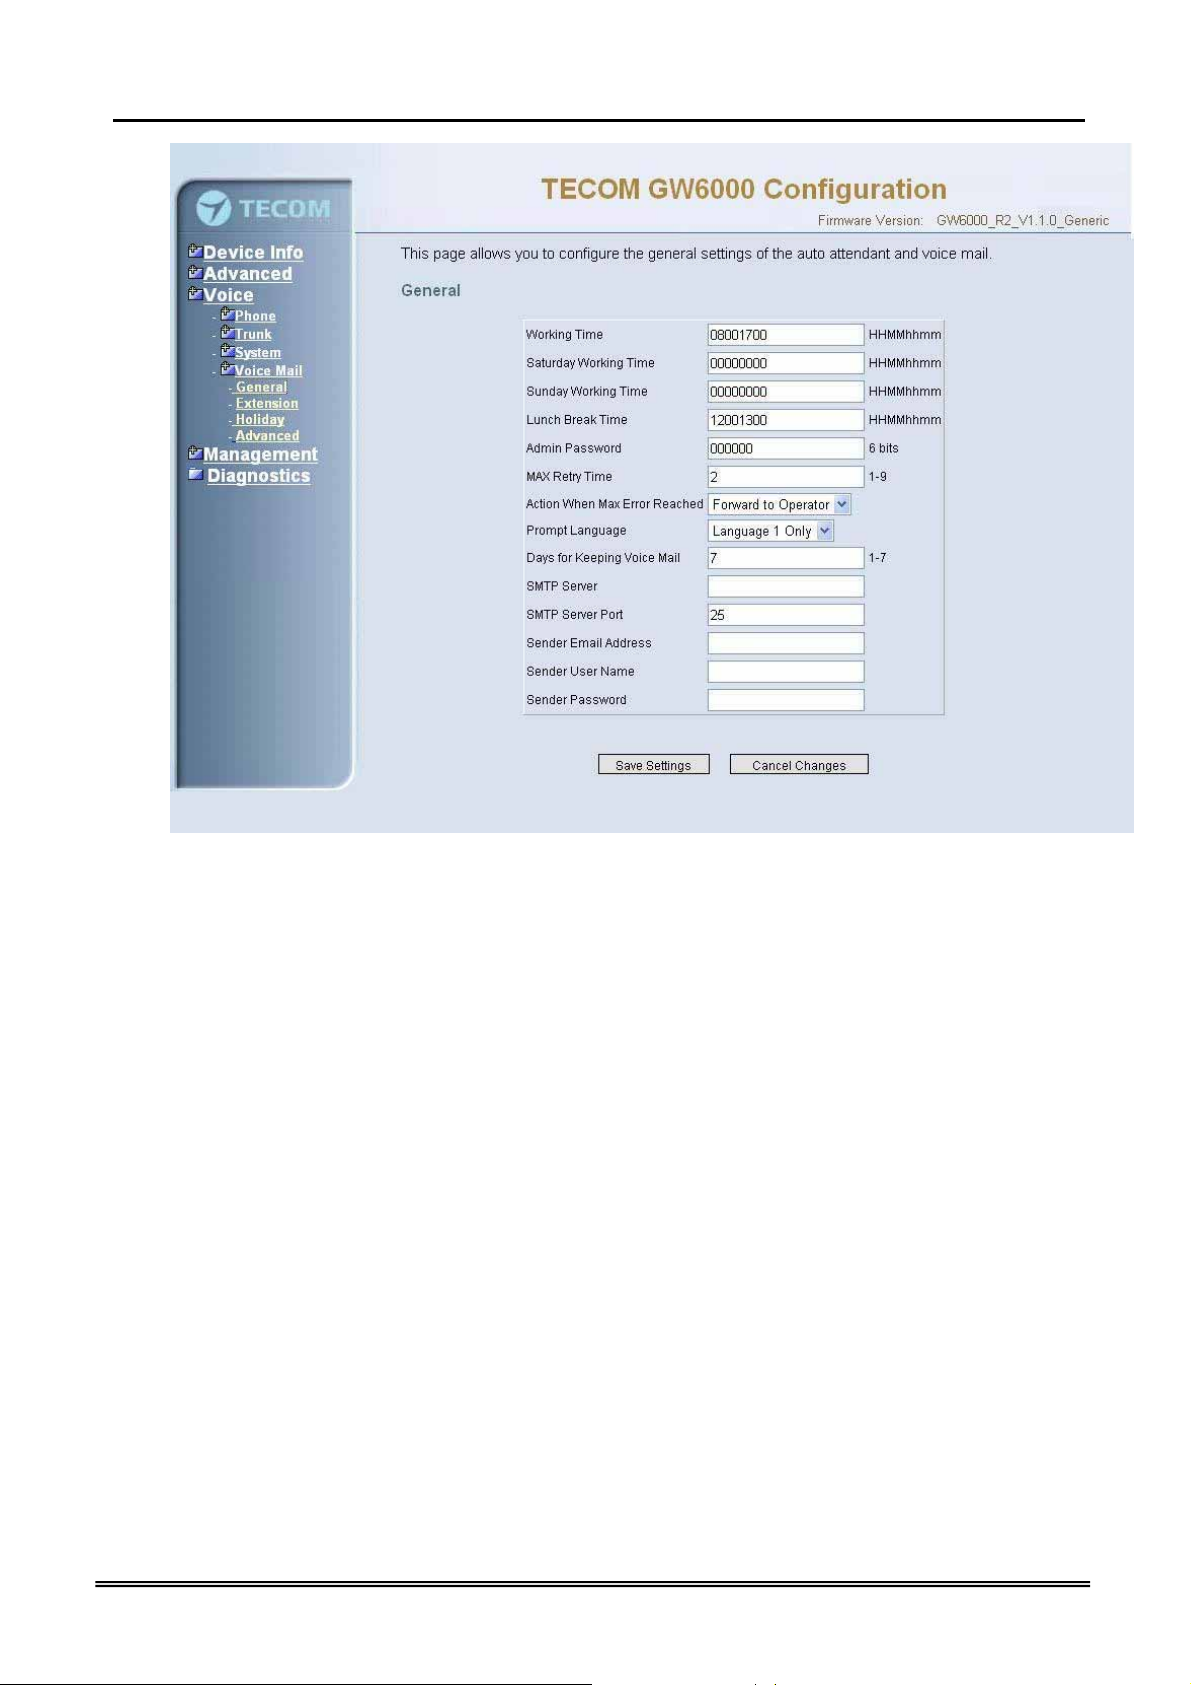
6.6.3.1 General
This page allows you to configure the general settings of the auto attendant and voice
mail. (Figure 6-38)
Working Time: Weekday working time.
Saturday Working Time: 00000000 means Saturday Holiday.
Sunday Working Time: 00000000 means Sunday Holiday.
Lunch Break Time: The time for lunch break.
Admin Password: The password of administrator
Max Retry Time: Maximum errors for extension’s length input.
Action When Max Error Reached: You can set the system “Forward to operator” or
“Disconnect” when too many error for key input.
Prompt Language: Automated Attendant language type. It provides one or two
languages to be chosen.
Days for Keeping Voice Mail: Keep days for leaving messages.
SMTP Server: SMTP Mail Server
SMTP Server Port: SMTP Mail Server port. The default is 25.
Sender Email Address: Email Address of Sender.
Sender User Name: User Name of Sender’s Email.
Sender Password: Password of Sender’s Email.
Copy Right 2006 Tecom, Co. LTD. All rights reserved Page 72 of 107
Page 13
GW 6000 Administrative Guide Configuration
Figure 6-39. Voice – Voice Mail – General
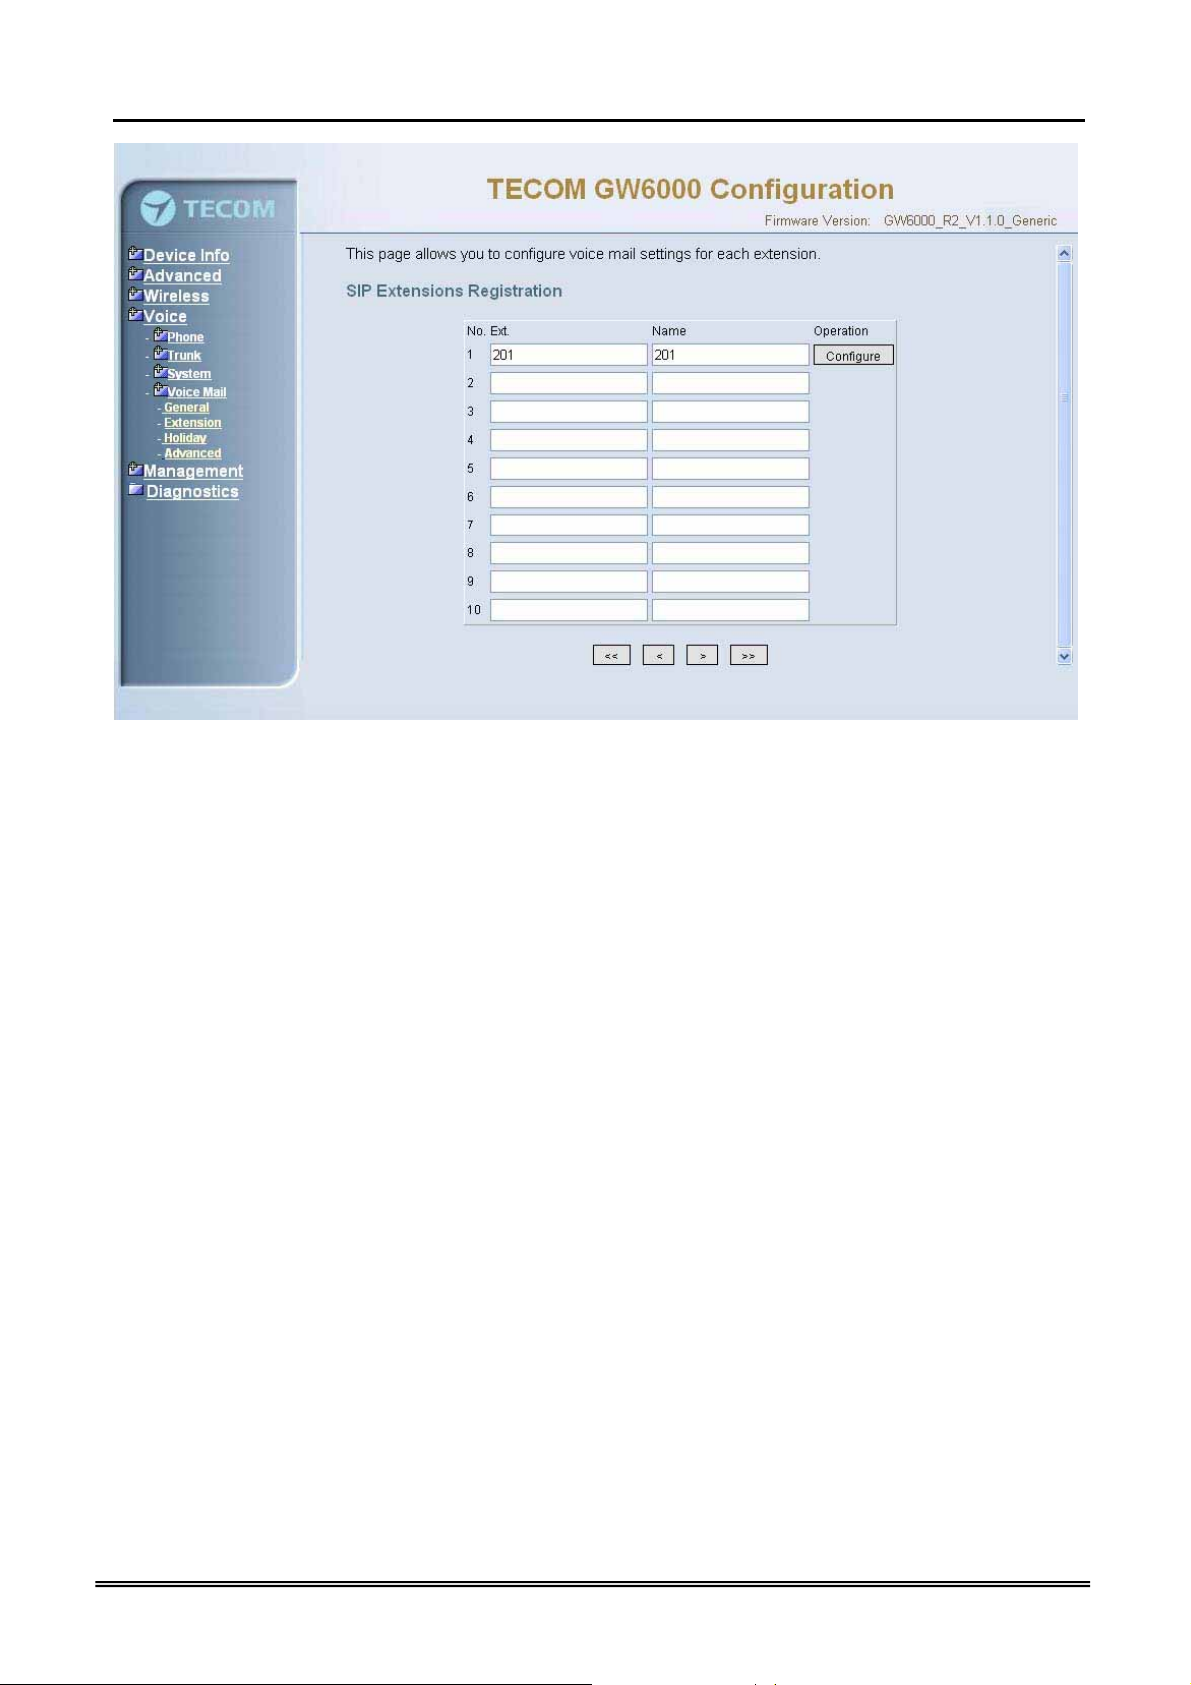
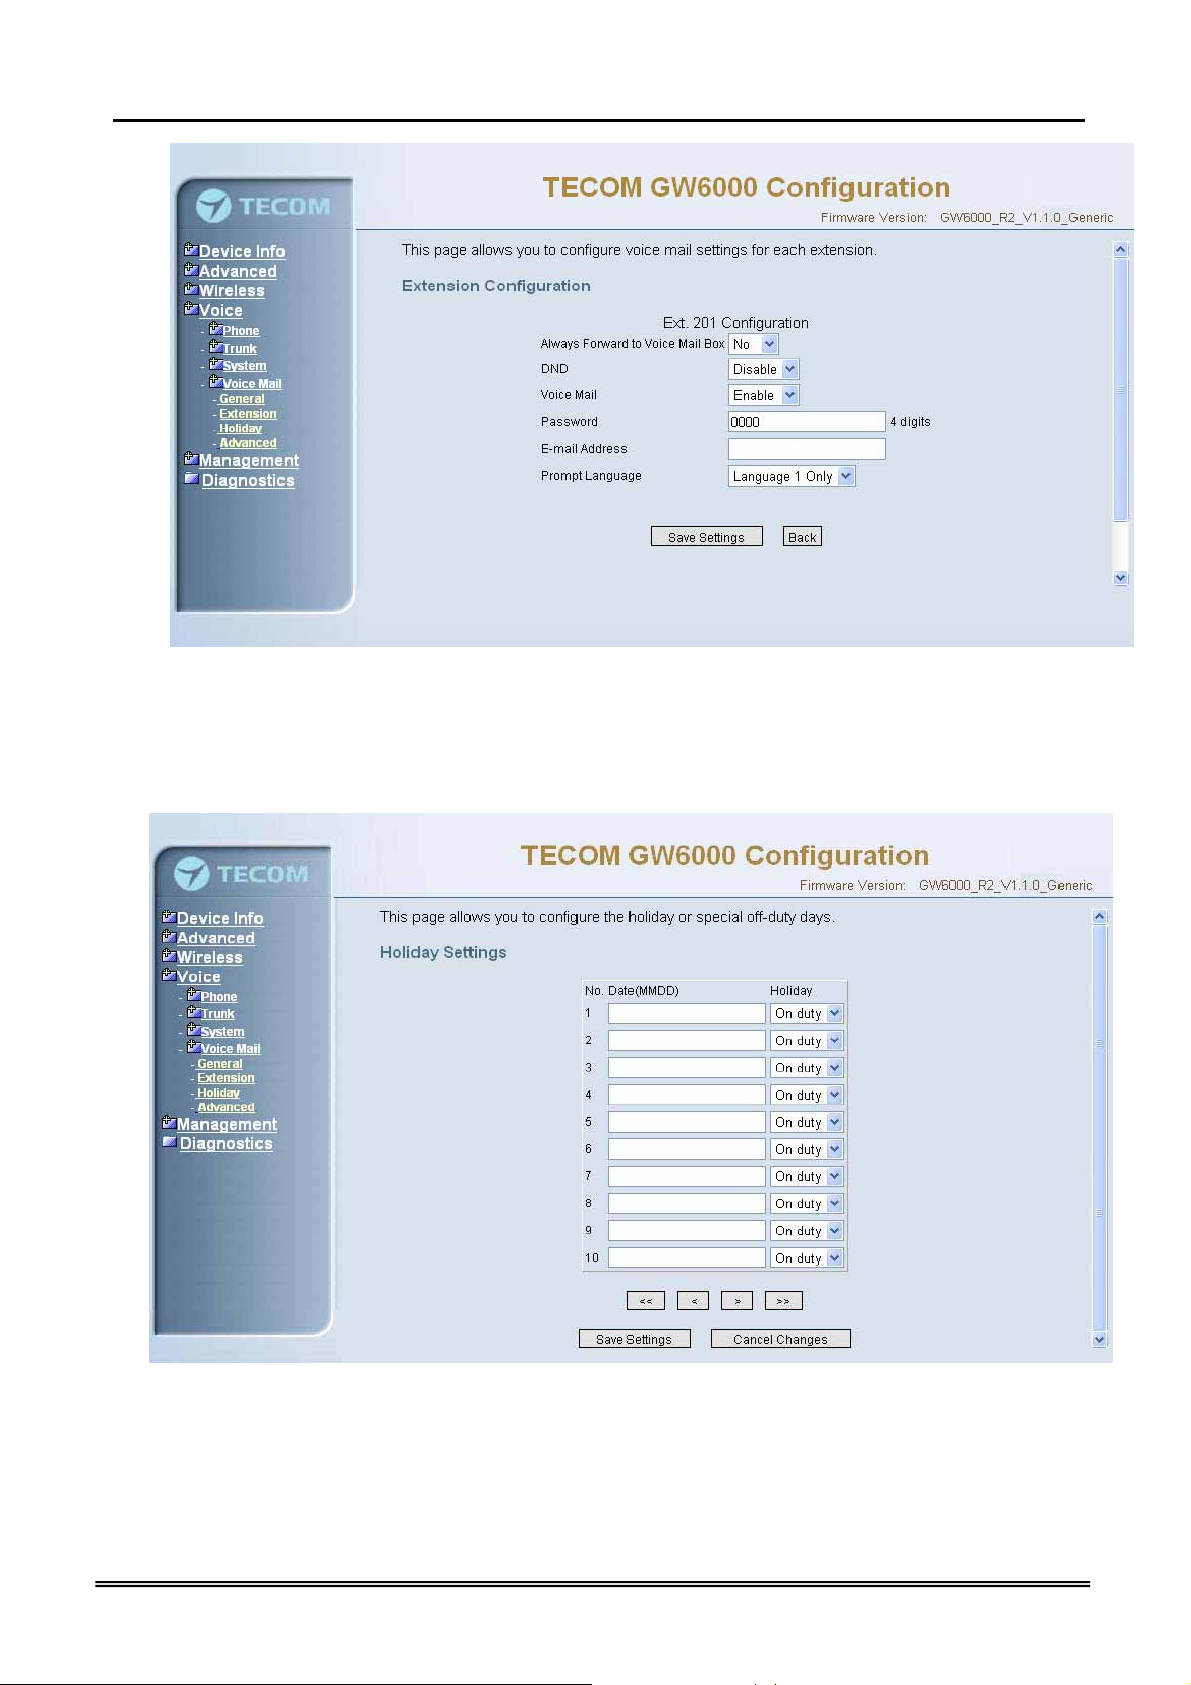
6.6.3.2 Extension
While pressing “Configure”, it shows Extension Voice Mail Configuration screen (Figure
6-39-1).
Copy Right 2006 Tecom, Co. LTD. All rights reserved Page 73 of 107
Page 14
GW 6000 Administrative Guide Configuration
Figure 6-40-1. Voice – Voice Mail – Extension
The following items will be configured in the Configuration setting (Figure 6-39-2):
Always Forward to Voice Mail Box: The extension leaves message directly only. It
can’t be used for transferred call
DND: the extension reject dialing in; 1: reject, 0:allow
Voice Mail: Enable/Disable
Password: Password of voice mail box of the extension
E-mail Address: Phone user’s E-mail Address.
Prompt Language: Provides one or two language to be chosen, Chinese and
English.
Copy Right 2006 Tecom, Co. LTD. All rights reserved Page 74 of 107
Page 15
GW 6000 Administrative Guide Configuration
Figure 6-40-2. Voice – Voice Mail – Extension – Extension Configuration
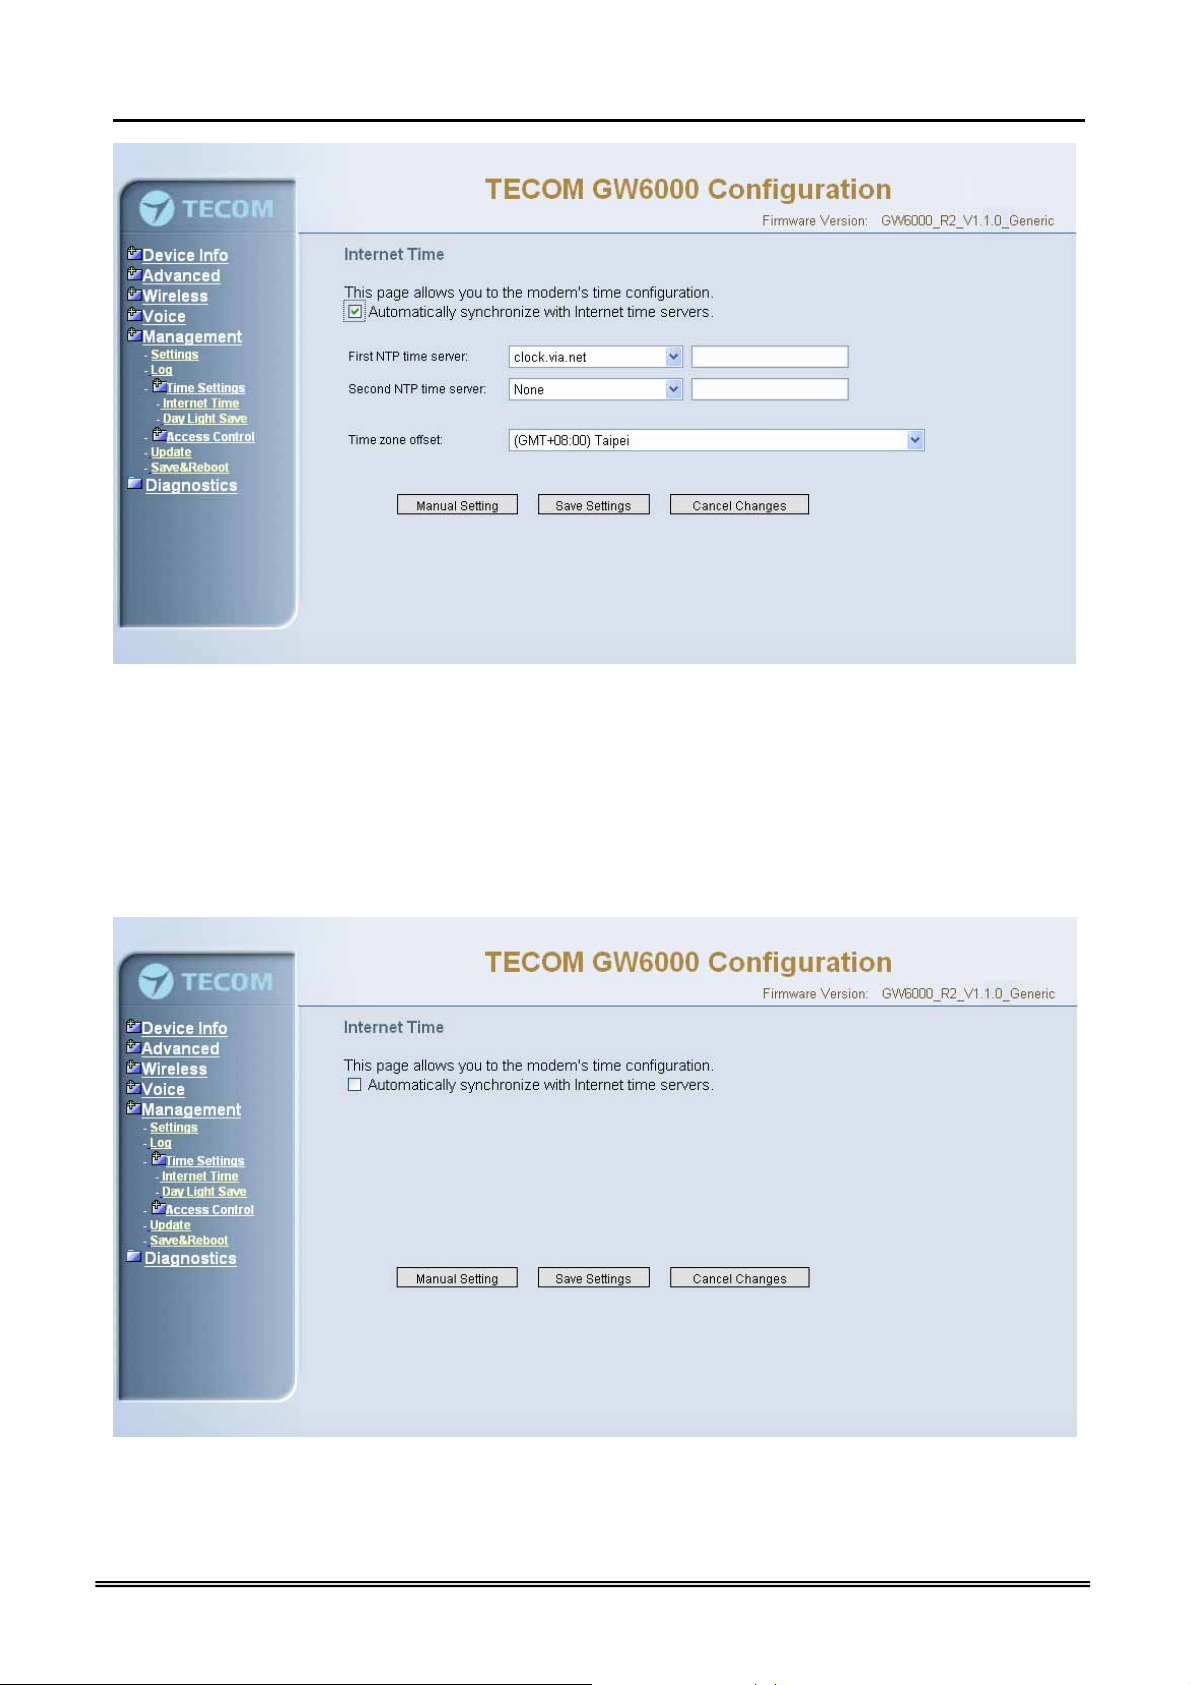
6.6.3.3 Holiday
This page allows you to configure the holiday or special off-duty days. You can click
the buttons under the table to choose pages (Figure 6-40).
Figure 6-41. Voice – Voice Mail – Holiday
6.6.3.4 Advanced
This page allows you to browse, upload or download voice files and settings via FTP.
Copy Right 2006 Tecom, Co. LTD. All rights reserved Page 75 of 107
Page 16

GW 6000 Administrative Guide Configuration
6.7 Management
The system administrator can do the following functions to manage the configurations,
events, and software update of the GW6000.
z Settings
z Log
z Time Setting
- Internet Time
- Day Light Save
z Access Control
- Services
- IP Addresses
- Password
z Update
z Save&Reboot
6.7.1 Settings
System Administrator can do the GW6000 settings backup, restore, and update here.
The settings can be saved from GW6000 to PC. The saved setting file can also be
loaded from PC to GW6000. These functions can help the system administrator to
manage large amount of GW6000s efficiently. Restore Default would set the GW6000
with the factory default configuration.(Figure 6-41)
Settings -- Backup
Click “Save Settings”, you may save your router configurations to a file on your PC.
Tools -- Restore Default Settings
Click “Restore Default Settings” to restore the factory default settings. This would be
helpful when the settings mass up.
Tools -- Update Settings
Click “Browse” to locate the setting file saved on the Local PC. Then, “Update
Settings” would apply the settings to the GW6000 according to the configuration file.
Copy Right 2006 Tecom, Co. LTD. All rights reserved Page 76 of 107
Page 17

GW 6000 Administrative Guide Configuration
Figure 6-42. Management – Settings
6.7.2 Log
This allows System Administrator to view the System Log and configure the System
Log options (Figure 6-42-1). Click "View System Log" to view the System Log. Click
"Configure System Log" to configure the System Log options (Figure 6-42-2).
When you configure the System Log options, you can see 8 levels of Log Level and
Display Level, Emergency, Alert, Critical, Error, Warning, Notice, Informational, and
Debugging. The Log Level implies that what log level is applied to GW6000 to do the
log. The Display Level would just show the users the log message that they want to
know. As a result, Display Level was just a subset of the retrieved from the total log
message which was logged according to the setting of the Log Level. If “Mode” is set to
“Remote” or “Both”, the log messages would be sent to the specified UDP port of the
specified log server. Click “Save Settings” button you can save the new configuration.
Click “Cancel Changes” button you can cancel the changes.
Copy Right 2006 Tecom, Co. LTD. All rights reserved Page 77 of 107
Page 18

GW 6000 Administrative Guide Configuration
Figure 6-43-1. Management – Log
Figure 6-43-2. Management – Log – Configure
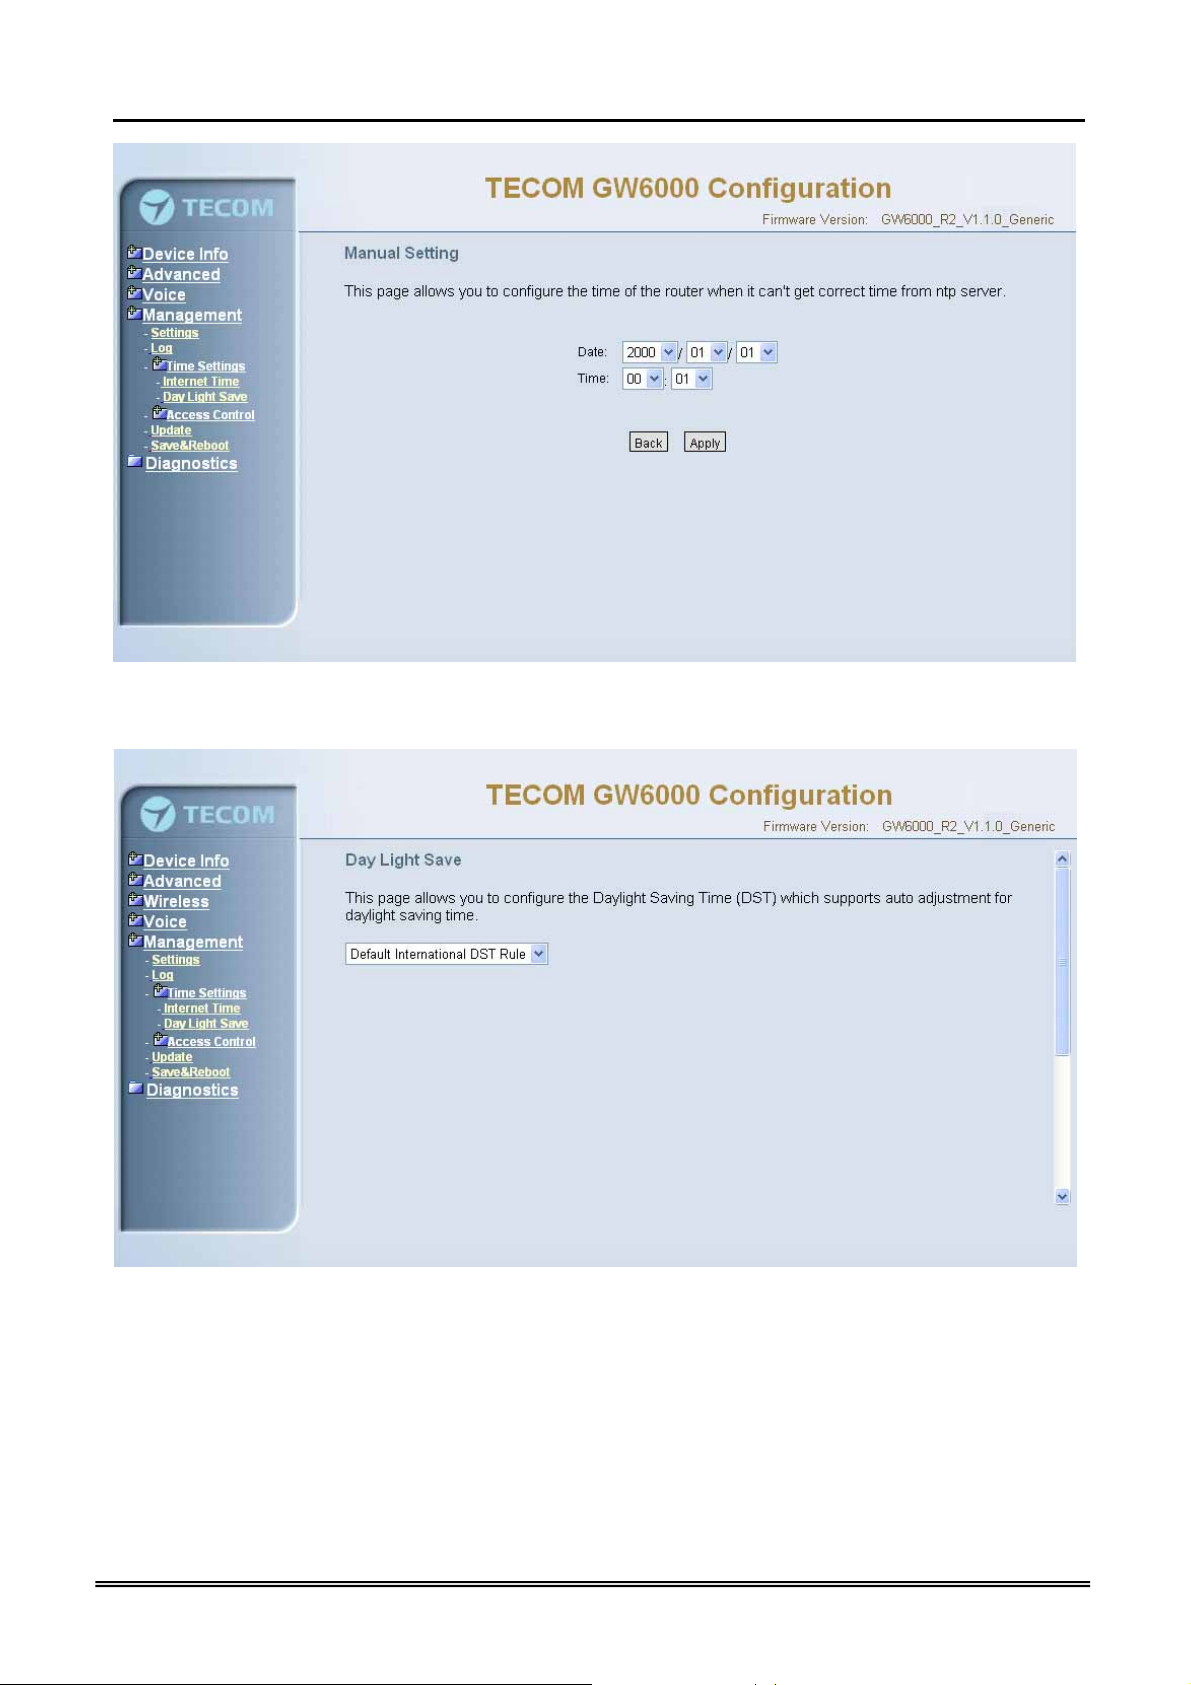
6.7.3 Internet Time
This page allows you to configure system’s time and the Daylight Saving Time.
6.7.3.1 Time Setting
Automatically synchronize with Internet time servers:
This page allows you to configure the NTP time server so the GW6000 can
synchronize its system time with NTP time server automatically (Figure 6-43-1).
Copy Right 2006 Tecom, Co. LTD. All rights reserved Page 78 of 107
Page 19
GW 6000 Administrative Guide Configuration
Figure 6-44-1. Management – Internet Time – Time Setting – NTP setting
Manual Setting: Setting GW6000’s system time manually.
If you do not want to synchronize GW6000’s system time with Internet time server, you
can configure GW6000’s system time manually. If you want to set the time manually,
Firstly you should make sure the “Automatically synchronize with Internet time servers”
checkbox do not be checked (Figure 6-43-2), and then click the “Manual Setting” button,
the Manual Setting page will be shown as figure 6-43-3. Now you can configure the
system time as you like.
Figure 6-44-2. Management – Internet Time – Time Setting
Copy Right 2006 Tecom, Co. LTD. All rights reserved Page 79 of 107
Page 20
GW 6000 Administrative Guide Configuration
Figure 6-44-3. Management – Internet Time – Time Setting – Manual Setting
6.7.3.2 Day Light Save
Figure 6-45-1. Management – Internet Time – Day Light Save
Copy Right 2006 Tecom, Co. LTD. All rights reserved Page 80 of 107
Page 21

GW 6000 Administrative Guide Configuration
Figure 6-45-2. Management – Internet Time – Day Light Save – Manual DST Rule
This page allows you to configure the Daylight Saving Time (DST) which supports
auto adjustment for daylight saving time. Click “Save Settings” button you can save
the new configuration. Click “Cancel Changes” button you can cancel the
changes.(Figure 6-44-1, Figure 6-44-2)
Default International DST Rule: Default DST Rule obey international standard rule.
Manual DST Rule: Define your own DST Rule.
Start Time of DST: the date and time to start daylight saving
If “Weekday” is 0, it means the date to start daylight saving is at exactly the given
date. If “Weekday” is not 0, the DST start on the “Weekday” on or after the given
date.
End Time of DST: the date and time to end daylight saving
If “Weekday” is 0, it means the date to end daylight saving is at exactly the given
date. If “Weekday” is not 0, the DST ends on the “Weekday” on or before the given
date.
Save Time during DST Period: the amount of hour/min/sec to add to the current
time during daylight saving period
Copy Right 2006 Tecom, Co. LTD. All rights reserved Page 81 of 107
Page 22

GW 6000 Administrative Guide Configuration
6.7.4 Access Control
This page allows you to configure Service Control List, IP Address Access Control
mode and password for user ‘admin’.(Figure 6-45)
6.7.4.1 Services
Figure 6-46. Management – Access Control – Services
Mark the Enable of the WAN and LAN for each service. HTTP, ICMP, TELNET are
supported in GW6000.
6.7.4.2 IP Addresses
Figure 6-47-1. Management – Access Control – IP Addresses
IP address Access Control mode: If enabled, GW6000 will permit access to local
management services from IP addresses contained in the Access Control list. If the
Copy Right 2006 Tecom, Co. LTD. All rights reserved Page 82 of 107
Page 23

GW 6000 Administrative Guide Configuration
Access Control mode is disabled, the system will not validate IP addresses form
incoming packets. (Figure 6-46-1, Figure 6-46-2)
Figure 6-47-2. Management – Access Control – IP Addresses – Add
6.7.4.3 Password
In this page you can define the passwords for administrator. The user Administrator
has unrestricted access to change and view configuration of your GW6000 Router.
Use the password field to enter up to 16 characters. Note: Password cannot contain a
space.(Figure 6-47)
Figure 6-48. Management – Access Control – Passwords
Copy Right 2006 Tecom, Co. LTD. All rights reserved Page 83 of 107
Page 24

GW 6000 Administrative Guide Configuration
6.7.5 Update Software
The new released software could be updated from the Local PC side or remotely.
Click the “Browse” to locate the new software image file in the PC. Then, click “Update
Software” to process the software update. You can also click “Cancel Changes” button
to cancel the location.
NOTE: The update process takes about 2 minutes to complete, and your GW6000
Router will reboot. (Figure 6-48)
6.7.6 Save & Reboot
Figure 6-49. Management – Update Software
Figure 6-50. Management – Save&Reboot
Copy Right 2006 Tecom, Co. LTD. All rights reserved Page 84 of 107
Page 25

GW 6000 Administrative Guide Configuration
Click “Save/Reboot” to reboot the GW6000. The GW6000 would automatically save
the configuration before reboot, so that modified settings would take effect after reboot.
6.8 Diagnostics
This page provide the following information to users:
z the network connection information on the net
z the status of GW6000's PSTN Line
z the status of GW6000’s IP Trunk Line
z the status of GW6000’s VAA Line
z the status of GW6000’s FXS
z the status of GW6000’s Extension phones
Click Reset button will allow you release the selected trunk line or rescue the blocked
one. (Figure 6-50)
1) Network Connection
PASS: normally connected
FAIL: connecting fail
DOWN: no connection
2) PSTN Line / IP Trunk Line / VAA / FXS
FAILED: connecting fail or registering failure
IDLE: the line is idle
N/A: the line is not available
Busy: the line is in use
3) Registered Extension Phone
LAN: registered through LAN port
WAN: registered through LAN port
Copy Right 2006 Tecom, Co. LTD. All rights reserved Page 85 of 107
Page 26

GW 6000 Administrative Guide Configuration
Figure 6-51. Diagnostics – Network
Copy Right 2006 Tecom, Co. LTD. All rights reserved Page 86 of 107
Page 27

GW 6000 Administrative Guide Appendix 1
Appendix 1: Product Summary
TCP/IP Protocols
IP Protocol (RFC 791)
ARP (RFC 826) / RARP (RFC 903)
ICMP (RFC792)
TCP (RFC 793)
UDP (RFC 768)
SNTP
DNS
HTTP
Telnet
TFTP
RTP
Static Routing
NAT with ALGs
IP Address Assignment
Static
Dynamic
Subnet Mask
PPPoE Client (RFC 2516)
Primary and Secondary DNS
DHCP Server (RFC 2131-2132)
DHCP Client (RFC 2132)
Routing
RIP v1/v2
Static routing
DHCP Server/Relay/Client
DNS Relay
NAT/NAPT
IGMP Proxy
Virtual Server
Virtual Server
Port Trigger
QoS
IP ToS function (RFC 1349)
Priority queues for upstream traffic based on ToS field.
Copy Right 2006 Tecom, Co. LTD. All rights reserved Page 87 of 107
Page 28

GW 6000 Administrative Guide Appendix 1
IP Precedence
VoIP Protocols
SIP (RFC 3261)
SDP(RFC2327) t
Real Time Protocol (RTP ; RFC 1889)
MD5 (RFC3261 HTTP) digest authentication
G.168 Echo Cancellation
Voice Cod ec: G.711, G.729a and G.723.1
Support FAX/modem tone detectio n and auto-fallback to G.711
IP Trunk
Support up to 8 IP Trunk, which can register to ITSP carrier.
SIP message, including INVITE, re-INVITE, ACK, CANCEL, OPTIONS, BYE, REGISTER, INFO,
REFER, SUSCRIBE/NOTIFY and REPLACE messages.
SIP Outbound Proxy, SIP Proxy and Registrar
Auto-Registration when power-on or period
Session Time r support
Support IP address, domain name, user name, display name for SIP URL
Digital Audio
Codec:
G.711 a-law/µ-law 64Kbps,
G.729A/B (8Kbps),
G.723.1(6.3K/5.3Kbps) ,
SIP Call Offer /Answer: Codec auto capacity exchange
Echo Cancellation: G.168 for each voice line
Silence Detection/Suppression
Comfort Noise Generation
Adaptive jitter buffer
Different frame size support (10,20,30,40, 50, and 60ms)
Packet loss concealment
Out-band (RFC2833) and In-band DTMF
Security
Password protected system management
User authentication for PPP (PAP/CHAP/MSCHAP)
Firewall
Packet Filtering
Access Control List
Wireless Security:
Support WEP (64, 128-bit) encryption
802.1x and WPA/WAP2 authentication
MAC Address-based access control
Copy Right 2006 Tecom, Co. LTD. All rights reserved Page 88 of 107
Page 29

GW 6000 Administrative Guide Appendix 1
WDS support
Configuration Management
LAN/WAN management via Telnet interface or Web-based browser interface
Firmware upgrade available by TFTP/ HTTP
Status display and event report from Web-based management
Settings Save and Restore
Reset to factory default
Radio - WLAN
Stansard : IEEE 802.1g and 802.11b
Media Access Control : CSMA/CA with ACK
Modulation : OFDM/CCK
Frequency Range (Range depends on different country)
Output Power : 15dBm (typical)
Sensitivity : -67 (54Mbps) / -83 (11Mbps) dBm (typical)
Data Rate : 54, 48, 36, 24, 18, 12, 11, 6, 5.5, 2, 1Mbps, auto-fallback
Remote Diagnostic
Syslog
Device Diagnostic, Enable remote test following:
Test the connection to your local network,
The connection to your Internet service provider,
The status of PSTN Line,
The status of IP Trunk Line,
The status of VAA Line,
The status of FXS
The registered status of SIP Phones
Physical Interfaces
One 10/100BaseT Internet port (RJ-45) for WAN interface
Four 10/100BaseT Internet port (RJ-45) for LAN interface
One Telephone interface (RJ-11)
Three PSTN Line interface
One PSTN Backup line
LED Status
LED Name Color Status Description
On Power on. POWER Blue
Off Power off.
On Wireless LAN initialization success. WIRELESS Blue
Off Wireless LAN is not present.
Off PSTN Line is idle. LINE (1-3) Blue
On PSTN Line is busy.
Off Phone is idle. TEL Blue
On Phone is busy.
ETHERNET(1-4) Blue On LAN connected.
Copy Right 2006 Tecom, Co. LTD. All rights reserved Page 89 of 107
Page 30

GW 6000 Administrative Guide Appendix 1
Off LAN network connection not present.
Flashing LAN activity present (traffic in either direction).
INTERNET Blue On WAN connected.
Power Requirement
Input : Voltage Range 90~230 VAC
Output : Linear 15V DC / 1A, 2.5mm barrel jack
Operating Environment
Temperature : 0~40
Humidity : 10 to 90%, non-condensing
0
C
Physical Specification
Dimension : 192(W) x 280(L) x 32(D) (mm)
Copy Right 2006 Tecom, Co. LTD. All rights reserved Page 90 of 107
Page 31

GW 6000 Administrative Guide Appendix 2
Appendix 2: Auto Attendant and Voicemail System
Appendix 2.1 System Voice Prompts
Appendix 2.1.1 Preset Voice Prompts
Provide two languages service for the all voice files. The all files are saved in vox folder
in PCM u-law format. The only difference of the file name in the both languages is the
first digit of the file name. It’s “1” for the first language, “2” for the second language.
File# Contents Application
10001
10002
10003
10004
10051
10097
10102
10103
10104
10106
10107
10201
10205
10206
10207
10210
10212
10221
10301
10302
10303
10304
10305
10306
10501
10502
Hello, please dial the extension number directly or press zero for the
operator
Hello, it is out of the office hours, please dial the extension number
directly or press zero for the operator
Hello, it is lunch time, please dial the extension number directly or
press zero for the operator
Hello, today is holiday, please dial the extension number directly or
press zero for the operator
Please dial the phone number, at the end, press punch(pound) key
This mailbox's capacity is used. There is no room for more
messages.
The number is incorrect, your call will be transferred to the operator
The number is incorrect
Please check your number and dial again
The number is incorrect, please dial again
The number is incorrect, Please check your number and dial again,
bye bye!
Your call is in transferring, please wait
The extension line is busy, to wait for a retry, press “*” key
The number you dialed is not available, to wait for a retry, press “*”
key
To leave a message, press “#” key
To dial another number, press zero for the operator
The number you dialed does not answer, to wait for a retry, please
press “*” key
Sorry, the number you dialed is not available, please dial another
number, or press zero for the operator
Leave your message after the beep, when finish, press pound
Your message has been recorded
To confirm recording, press one
To listening to your recording, press 2
To record your message again, press 3
To canceling your recording, press 4
When finishing, press the # (pound) key
Your message has been saved
End of messages
Thanks for your using, good bye
Please input mailbox number
Sorry, no such a mailbox number, please try again
It’s a Welcome Message. It’s played while getting
an incoming FXO/IP line call in work time.
It’s a Welcome Message. It’s played while getting
an incoming FXO/IP line call out of work time.
It’s a Welcome Message. It’s played while getting
an incoming FXO/IP line call in lunch time.
It’s a Welcome Message. It’s played while getting
an incoming FXO/IP line call in holidays.
It requests to dial a phone number.
It talks to the Caller it has no room to store the
leaving messages.
AA gets non-existed extension number input
many times. AA will transfer the call to Operator.
It’s played while the user makes an incorrect
input
It’s played before AA hangs up the call.
AA gets non-existed extension number input and
allows the caller to redial.
AA gets non-existed extension number input
many times. AA will drop the call.
It’s played before AA transfers the call to the
transferred party.
The transferred destination is busy. AA provides
some choices for the user.
The transferred destination doesn’t answer the
call in 30 seconds. AA provides some choices for
the user.
Same as 10205 or 10206, another choice.
Same as 10205 or 10206, another choice
AA gets a Direct Call Forward call.
It’s played while transferring a call to an
extension set “Reject” of dial in.
It reminds the user how to leave messages.
Finish leaving message.
It’s played after finishing leaving message.
The leaving message is recorded.
It’s played the all leaving messages.
It’s played while finishing Voicemail System
service.
It’s played first while the user gets into Voice Mail
Box through the FXO/IP trunks.
It’s played if the user dials an invalid mailbox ID..
Copy Right 2005 Tecom, Co. LTD. All rights reserved Page 91 of 107
Page 32

GW 6000 Administrative Guide Appendix 2
10503
10504
10505
10506
10507
10510
10511
10512
10514
10516
10517
10521
10522
10523
10524
10526
10527
10528
10529
10530
10531
10532
10533
10534
10537
10538
10547
10549
10550
10561
10580
10601
19001
19011
The mailbox hasn’t enabled, please dial another number
Please input your password.
The password is incorrect, please try again
The password is incorrect, please check it and try later
To listen to the message, press one
To change the password, press two
To record your personal greeting, press three
To set up leaving message directly, press four.
You have no messages
You have
?Voice message
To listen to your message, press one
To delete all your message, press two
When finish, press the pound key
To listen to this message again, press one
To delete this message, press 2
To listen to next message, press 3
To transfer this message to another mailbox, press four
When finish, press the pound key
All messages are played, there are no more messages, thanks.
You message has been transferred successfully
Transferring failed
Deleting, please wait
All messages are deleted
Please input new four digits number password
The new password you entered is
To confirm the new input, press one
To reenter, press two
To cancel and return to the previous menu, press the pound key
Your password has been changed
Your password was not changed
To listen to your greeting, press one
To record new greeting, press two
To delete the current greeting, press 3
When finish, press the pound key
You have not greeting recorded
Please record greeting after the beep. When finish, press the pound
key
Your recording is finished
Your greeting has been deleted
Deletion failed
The setting is completed
Deletion completed
Deletion failed
To set up your extension number as mailbox directly? If yes, press
one, if no, press 2. When finished, press the pound key
Sorry, the mailbox is in use
Please begin to record after the beep, when finish, press the pound
key
Please input the administrator password
To record the first language greeting, press one
To record the second language greeting, press 2
It’s played if the user dials a valid, but disabled
mailbox ID.
It requests the user to enter the password of the
mailbox.
The user dials an incorrect password. It allows
the user to try again.
The user dials incorrect password over 3 times. It
disallows the user to try again.
It’s played after entering Voice Mail Box.
No leaving message in the mailbox.
It will report how many leaving messages in the
mailbox.
It reports how many leaving messages in the
mailbox.
The user will decide how to process the leaving
messages.
It’s played after listening a message. It’s to ask
what the user would like to do next.
It’s played if it has played the all messages.
Transfer the leaving message to another mailbox
well.
Fail to transfer the leaving message to another
mailbox
Voicemail system is deleting the all leaving
messages.
All leaving message are deleted.
It reminds the user how to input the new mailbox
password.
It plays what the new input password is.
It’s to ask whether the new input password is
correct.
It’s to report the password is changed
successfully.
It fails to change the password.
It’s for recording a user’s temporally greeting.
It’s played if having no greeting message.
It reminds the user how to record the greeting
message.
It’s played after finishing recording.
It reports the greeting message is deleted
successfully.
It fails to delete the greeting message.
Finish setup.
It reports the leaving message is deleted
successfully.
It fails to delete the leaving message.
It’s for setting “Leaving Messages Directly”.
The mailbox is in use
.
It reminds the administrator how to record the
voice files.
It requests administrator to enter the mailbox
password
It’s for recording system greeting message.
Copy Right 2006 Tecom, Co. LTD. All rights reserved Page 92 of 107
Page 33

GW 6000 Administrative Guide Appendix 2
When finish, press the pound key
19012
19013
19015
19073
19200
19201
91000
91100
10870 0 zero 10871 10881 10872 2 t wo 10873 3 three
10874 4 four 10875 5 five 10876 6 six 10877 7 seven
To record the greeting for regular office hours, press one
To record the greeting for out of office hours, press two
To record the greeting for lunch time break, press three
To record the greeting for holidays, press four
When finish, press the pound key
To listen to current greeting press one
To record the greeting, press two
When finished, press the pound key
There are no recordings
The extension number that you entered is not installed on this
system
Please input five digits number voice code.
To cancel the input, please press pound key
The voice code that you entered is
For Language 1, press 1. For Language 2, press 2.
Beep
It’s to choose what kind of greeting message will
be recorded.
It’s for recording voice files.
It’s played if having no the requested voice file.
It plays if entering a wrong extension number.
It’s for entering voice file name.
It’s to play what voice file name is entered
If setting “Two Languages”, it’s played before
Welcome message.
It’s played before recording any message
10878 8 eight 10879 9 nine 10880 10 ten 10881 11 eleven
10882 12 twelve 10883 13 thirteen 10884 14 fourteen 10885 15 fifteen
10886 16 sixteen 10887 17 seventeen 10888 18 eighteen 10889 19 nineteen
10890 20 twenty 10891 30 thirty 10892 40 forty 10893 50 fifty
10894 60 sixty 10895 70 seventy 10896 80 eighty 10897 90 ninety
Appendix 2.1.2 Voice Prompts Recording
You can change Voice Prompts by two ways:
Appendix 2.1.2.1 Through IP Phone Client
a. Use IP phone which is an extension of GW6000, dial Voicemail Directory
Number (“100” at default).
b. Type in password of the extension. (“0000” at default).
c. Press "*" key right here, to enter the Administrator mode.
d. Type in Voicemail Administrator password (“000000” at default).
e. Listen to the prompt, press "1" to record the first language greeting (File
10001 – 10004). Press "2" to record the second language greeting (File
20001 – 20004).
f. Or press "3" directly, then type 5 digits file number to directly record
prompt/greeting into the respective file name.
Appendix 2.1.2.2 Through FTP Server directly
a. All prompt/greeting files are saved in vox folder in PCM u-law format. You can
record your prompt in wav format first and then convert to PCM u-law. There are
many free Audio convert software on the internet.
b. Login GW6000 embedded FTP serve:
ftp://IG IP address. (Or in IG-Web, select
“Voice” – “Voice Mail” – “Advanced”, then press “Browser Voice mail file” button.)
c. Save the new prompt to vox folder with the same file number to replace the old
prompt. (Suggest you to save all old prompts before updating the new files.)
Copy Right 2006 Tecom, Co. LTD. All rights reserved Page 93 of 107
Page 34
GW 6000 Administrative Guide Appendix 2
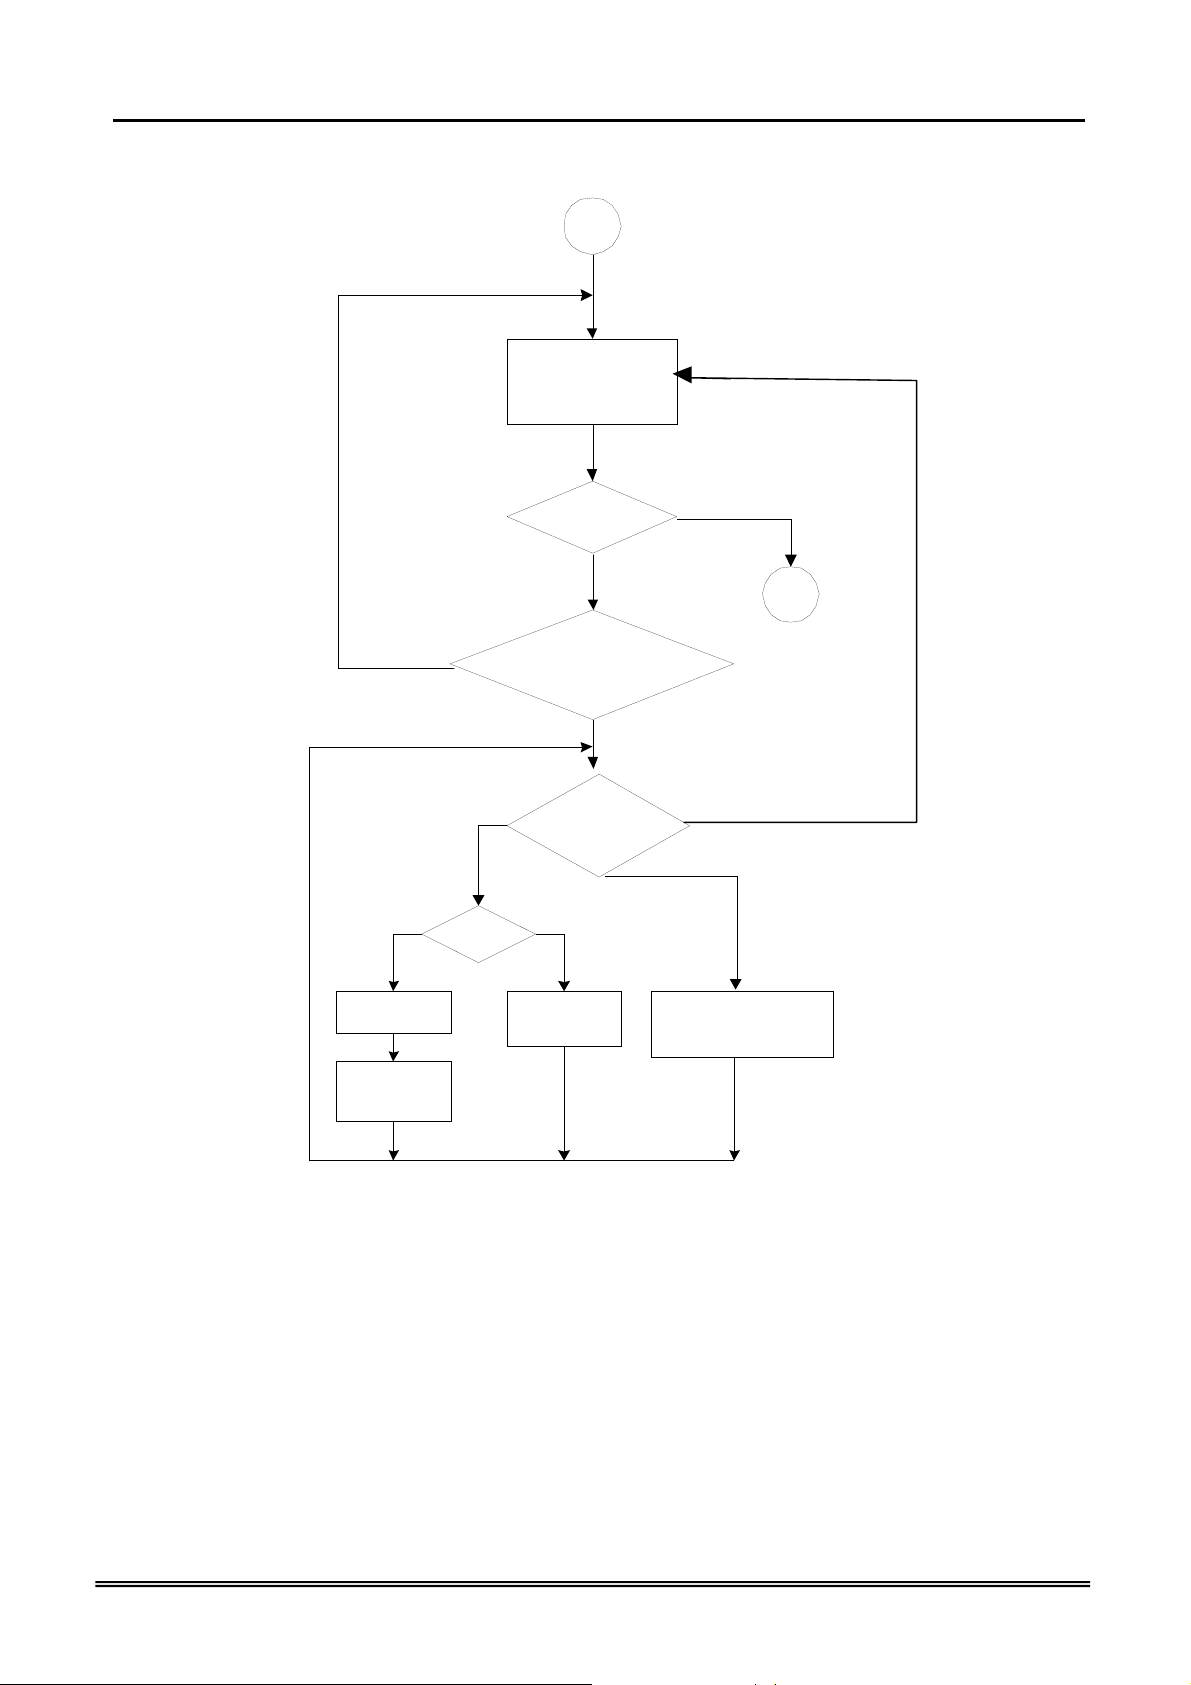
Appendix 2.2 Flowchart
Appendix 2.2.1 Automated Attendant
1
10001
Hello, please dial the
,
extension number directly or
press zero for operator
1A
Listening
Press “*"
Press “#"
Press “0"
No
1A
message?
No
Make an
Outside call?
No
Operators code?
No
Extension
Number length?
Yes
Yes
Yes
Yes
3
11
Find out
operator
number
Transfer to
Operator
10106
The number is
incorrect, please
dial again.
No
No
10102
The number is incorrect,
your call will be transfer
to the operator
Find out
operator
number
Transfer to
operator
hang up
,
r
,
,
Error Count
< 揗ax Error
Setting“Hang
Thanks for your using,
good bye.
up"?
10306
End
Yes
Yes
10201
In transferring,
please wait
No
Yes
Extension
exists?
Yes
2
,
Dial Count < 3
Yes
19073+10210
No such an extension
number. Dial other number,
Press 0 for operator
hang up
End
No
No
hang up
,
End
1A
End
Copy Right 2006 Tecom, Co. LTD. All rights reserved Page 94 of 107
Page 35

GW 6000 Administrative Guide Appendix 2
Appendix 2.2.1.1 Transfer Call to Outside
11
No
10106
The number is incorrect,
please dial again.
Error Times
=3
Yes
Hang up
End
No
10051
Please dial the
phone number, at the
end, press punch key
Transfer to
Destination
10501
please input
mailbox
number
10504
Please input your
password
Is
password
correct?
Yes
Yes
No
Yes No
10506
Incorrect
password, please
check it and try
later
Hang up
Error Times
=3
10505
Incorrect
password,
please try again
Hang up
End
End
Copy Right 2006 Tecom, Co. LTD. All rights reserved Page 95 of 107
Page 36

GW 6000 Administrative Guide Appendix 2
Appendix 2.2.2 Subscriber Voicemail Flowchart
2
Setting Reject
of Dial In
No
Busy
Original Ext?
Yes
Yes
2B
The extension line is busy, press *
for waiting; Leave message, press
Setting Busy Call
Forward
No
10205+10207+10210
# ;Dial other numbers, press zero
for operator.
No
2A
Setting Direct
Call Forward
No
Yes
2B
dialing again; Leave message, press
Setting Leaving
Message Directly
No
Transfer to
Extension.
No Answer
Original Ext?
Yes
Yes
There is no answer, press * for
# ;Dial other numbers, press zero
Setting No
Answer Call
Forward
No
10206+10207+10210
for operator.
Yes
Transfer to
Destination ext.
No
2B
Answer
or
Dial Count =3
hang up
End
1
Transfer to
original ext.
2
2
2A
0or
other Ext
1A
Copy Right 2006 Tecom, Co. LTD. All rights reserved Page 96 of 107
Page 37

GW 6000 Administrative Guide Appendix 2
Appendix 2.2.2.1 Leaving messages
2A
Has the personal
Yes
greeting been
recorded?
Playing personal
greeting
No
10301
Leave message afte r
beeping, press punch for
ending
Save messages with
date and extension
Playing the
recording
Leaving message is finished
2
10304
Your message is recorded
(Turn on MWI)
10306
Thanks for your using,
See you again
Confirmrecording, press 1
Listening record, press 2
Re-recording, press 3
Canceling recording, press 4
1
10302
10303
3
Ending, press #
4
Delete voice file of
temporary area
hang up
End
*Message will be recorded if caller drops
the call immediately after leaving message
Copy Right 2006 Tecom, Co. LTD. All rights reserved Page 97 of 107
Page 38

GW 6000 Administrative Guide Appendix 2
Appendix 2.2.3 Mailbox Administer Flowchart
3
No
10503
The mailbox hasn抰
enabled, please dial
other number
or 10502
Sorry,no such a
mailbox number
Error Times
=3
Yes
Hang up
End
3B
Changing password, press two;
No
10507
Listening message, press one;
Recording personal greeting,
press three;
Setting up leaving message
directly, press four
10501
please input
mailbox
number
Yes
10504
Please input your
password
Is
password
correct?
Yes
No
Yes No
10506
Incorrect
password, please
check it and try
later
Hang up
Error Times
=3
10505
Incorrect
password,
please try again
31
Listening message
User抯 input
1
2
32
33
3
4
34
End
*
4
#
End
Recording greeting
Changing mailbox password
Recording personal greet ing
Setting leaving message directly
Copy Right 2006 Tecom, Co. LTD. All rights reserved Page 98 of 107
Page 39

GW 6000 Administrative Guide Appendix 2
Appendix 2.2.3.1 Listening message
31
You have ( ?voice message )
Listening voice message, press 1
Deleting all message , press 2
Press # for ending
1
Playing voice message
10305
Playing is finished
1
10516
User抯 input
Listening again, press 1
Delete this message, press 2
Listening next message , press 3
Transfer this message to other
mailbox, press 4
Press # for ending
Leaving
messages?
Yes
10511+10512
10514
User抯 input
No
#
2
10528
Right, press 1. Input
again, press 2. Press
# for ending.
1
10523
Deleting, please wait
10524
All messages are
deleted
10510
No voice message
Turn off MWI
#
Point to next
message
2
10549
Deleting
succeeds
Yes
3
Please input mailbox #
More message ?
No
10517
All messages are
played, thanks.
Turn off MWI
4
10501
Transfer this
message
#
3
Turn off MWI
Copy Right 2006 Tecom, Co. LTD. All rights reserved Page 99 of 107
Page 40

GW 6000 Administrative Guide Appendix 2
Appendix 2.2.3.2 Changing Mailbox Password
32
Please input new mailbox
password, four digital numbers
2
Your inputted password is XXXX
Right, press 1
Input again, press 2
Press # for ending
10526
10527+10528
#
1
10529
Succeed changing
password
3
Copy Right 2006 Tecom, Co. LTD. All rights reserved Page 100 of 107
Page 41

GW 6000 Administrative Guide Appendix 2
2.2.3.3 Recording Personal Greeting
33
If no personal
Yes No
10532
You have not
recorded greeting
Listening greeting,press1
Recording greeting,press2
Deleting greeting,press3
Press# for ending
12
greeting
recorded?
Playing Greeting
10531
User抯 input
10533
Recording greeting
after beeping
Press # for ending
Recording
10534
Finish Recording
10549
Deleting succeeds
3
#
3
Copy Right 2006 Tecom, Co. LTD. All rights reserved Page 101 of 107
Page 42

GW 6000 Administrative Guide Appendix 2
Appendix 2.2.3.4 Setting leaving message directly
Copy Right 2006 Tecom, Co. LTD. All rights reserved Page 102 of 107
Page 43

GW 6000 Administrative Guide Appendix 2
Appendix 2.2.4 System Administrator’s Voicemail Flowchart
4
10505
Invalid password
please try again
Yes
10506
Invalid password
please check it and
try later
Hang up
End
Error Count <
“ Max Input Error”
No
19001
Input administrator
password
No
Is ppassword
Correct?
Yes
19011
Recording the first language
greeting, press 1.
Recording the second language
greeting, press 2.
Ending, press #
User抯 input
3
4A
Option 3 is for internal
use only. Hence, it will
not be playback to user
to avoid any change to
recording
#1,2
41 4A
42
Recording process voice files
Recordinggreeting for various languages
Copy Right 2006 Tecom, Co. LTD. All rights reserved Page 103 of 107
Page 44

GW 6000 Administrative Guide Appendix 2
Appendix 2.2.4.1 Recording Various Greeting
41
Recording lunching time greeting, press 3.,
4A
#
Yes No
voice file?
Playback voice file
Recording on duty greeting, press 1.,
Recording out of duty greeting, press 2.
Recording holiday greeting, press 4,
1
Is there
19012
Ending, press punch
#
User抯 input
1,2,3,4
19013
Playing, press 1,
recording press2,
ending, press#
19015
No recording
record after beeping,
others
10601
ending press punch
Input incorrect
2
10305
Playing is finished
Copy Right 2006 Tecom, Co. LTD. All rights reserved Page 104 of 107
Page 45
GW 6000 Administrative Guide Appendix 2
Appendix 2.2.4.2 Recording Process Voice Files
42
19200
Pleaseinput voice
code, five digital
number, canceling,
press#
2
Yes No
Playing voice
file
10305
Playing is
finished
Is ‘#’?
No
The voice code you input is xxxxx.
Right, press 1. Input again, press
Is there
voice file?
19201+10528
2. Press # for ending
1
19013
Playing, press one,
1
recording press two,
ending, press #
19015
No recording
Yes
4
#
2
10601
Record after beeping,
ending press punch
Copy Right 2006 Tecom, Co. LTD. All rights reserved Page 105 of 107
Page 46

GW 6000 Administrative Guide Appendix 3
Appendix 3: Feature Access Codes Assignment
The Feature Access Codes are applied in Tecom IP2007/8 Phones and FXS phone only.
It’s to activate/cancel some GW6000 user-specified functions.
These Feature Access Codes are used when the phone is at idle state.
Direct Call Forward via AA
Forward all of the calls without regard to the extension status.
To Activate
*21 + Ext No
*21 + * + (PSWD) + * + Outside Telephone Number
To Cancel
**21
Busy Call Forward via AA
Forward the calls if the extension is busy.
To Activate
*22 + Ext No
*22 + * + (PSWD) + * + Outside Telephone Number
To Cancel
**22
No Answer Call Forward via AA
Forward the calls if the extension doesn't answer the call within No Answer Time.
To Activate
*23 + Ext No + * + Time
*23 + * + (PSWD) + * + Outside Telephone Number + * + Time
To Cancel
**23
Direct Call Forward to Voice Mail Box via AA
Forward all of the calls to its own Voice Mail box.
To Activate
*24
To Cancel
**24
Do Not Disturb via AA
Extension users can enable DND to stop incoming PSTN or IP Trunk calls from ringing
at their phone.
To Activate
*4
To Cancel
**4
Copy Right 2005 Tecom, Co. LTD. All rights reserved Page 106 of 107
Page 47

GW 6000 Administrative Guide Appendix 3
COS Following
It changes the individual COS of the extension temporarily.
*55+(phone number)+(password)
Reset To Default
Selected GW6000 extension features can be returned to default setting.
To Activate
*69
To Cancel
**69
Feature Key Programming
To program the Feature Key to a PSTN, IP Trunk or Trunk Group number.
*70 + (Feature Key number, 1 – 4) + (PSTN, IP Trunk or Trunk Group number)
Phone Lock/Unlock
You can use the Lock feature to prevent unauthorized trunk calls from being made from
extension.
To Activate Phone Lock
*97 + (password)
To Cancel Phone Lock
**97 + (password)
Call Waiting
If disabled, it returns busy response while getting second call at non-idle state
To Activate
*98
To Cancel
**98
Page Allow/Deny
Block one-way paging (group and all page) over the IP phone speaker
To Activate Page Deny
*99
To Cancel Page Deny
**99
(for IP2007/8 only)
Copy Right 2006 Tecom, Co. LTD. All rights reserved Page 107 of 107
 Loading...