

Page 1

P/N MAUSER-TS1001 • REV 02 • ISS 04MAR15
TS1001 Touch Screen
Arming Station
User Manual
Page 2

Copyright
©
2015 UTC Fire & Security Australia Pty Ltd.
All rights reserved.
Trademarks
and patents
The
TS1001 Touch Screen Arming Station
name and logo are trademarks of
UTC Fire &
Security Australia Pty Ltd
.
Other trade names used in this document may
be trademarks or registered trademarks of the
manufacturers or vendors
of the respective
products.
Manufacturer
UTC Fire & Security Australia Pty Ltd t/a
Interlogix
A UTC Building & Industrial Systems company
Ground Floor, 10 Ferntree Place
Notting Hill, Victoria 3168
Australia
Agency
compliance
N4131
This product c
onforms to the standards set by
Standards Australia on behalf of the Australian
Communications and Media Authority (ACMA).
Notice!
This is a Class A product. In a
domestic environment this product may cause
radio interference in which case the user may
be
required to take adequate measures.
Contact
information
For contact information
, see
www.interlogix.com.au.
Page 3

TS1001 Touch Screen Arming Station User Manual iii
Content
Important information iv
Disclaimer iv
Limitation of liability iv
Advisory messages v
Related manuals v
Care and cleaning instructions vi
Product overview 1
User interface details 2
Front LED indications 5
Using the RAS 6
Logging in 6
Selecting a menu option 7
Entering text 8
Arming and disarming 10
Selecting areas by searching 12
Logging in to classic mode 14
Page 4

iv TS1001 Touch Screen Arming Station User Manual
Important information
Disclaimer
The customer is responsible for testing and determining the
suitability of this product for specific applications. In no event is
UTC Fire & Security Australia Pty Ltd (trading as Interlogix)
responsible or liable for any damages incurred by the buyer or
any third party arising from its use, or their inability to use the
product.
Limitation of liability
To the maximum extent permitted by applicable law, in no event
will UTCFS be liable for any lost profits or business
opportunities, loss of use, business interruption, loss of data, or
any other indirect, special, incidental, or consequential damages
under any theory of liability, whether based in contract, tort,
negligence, product liability, or otherwise. Because some
jurisdictions do not allow the exclusion or limitation of liability for
consequential or incidental damages the preceding limitation
may not apply to you. In any event the total liability of UTCFS
shall not exceed the purchase price of the product. The
foregoing limitation will apply to the maximum extent permitted
by applicable law, regardless of whether UTCFS has been
advised of the possibility of such damages and regardless of
whether any remedy fails of its essential purpose.
Installation in accordance with this manual, applicable codes,
and the instructions of the authority having jurisdiction is
mandatory.
While every precaution has been taken during the preparation of
this manual to ensure the accuracy of its contents, UTCFS
assumes no responsibility for errors or omissions.
Page 5

TS1001 Touch Screen Arming Station User Manual v
Advisory messages
Advisory messages alert you to conditions or practices that
can cause unwanted results. The advisory messages used
in this document are shown and described below.
WARNING: Warning messages advise you of hazards that
could result in injury or loss of life. They tell you which
actions to take or to avoid in order to prevent the injury or
loss of life.
Caution: Caution messages advise you of possible
equipment damage. They tell you which actions to take or
to avoid in order to prevent the damage.
Note: Note messages advise you of the possible loss of
time or effort. They describe how to avoid the loss. Notes
are also used to point out important information that you
should read.
Related manuals
This manual describes how to use the TS1001 Touch
Screen Arming Station. Refer also to the TS1001 Touch
Screen Arming Station Installation Manual for installation
details.
The Touch Screen RAS may be used on either a
Challenger10 system or a Challenger V8 system. Refer to
the appropriate Challenger manual for details about
operating the Challenger system.
Page 6

vi TS1001 Touch Screen Arming Station User Manual
Care and cleaning instructions
The touch screen display panel (Figure 1 on page 1,
item 1) is an LCD module consisting of a glass display
panel and a polarizing display surface. The polarizer
covering the display surface of the LCD module is soft and
easily scratched.
Do not use hard or sharp objects to operate the touch
screen: it is designed to be operated by touching the
display surface with your fingers (or gloved hands).
If the touch screen is dirty, breathe on it to fog the surface,
and then gently wipe the surface with a soft dry cloth.
Caution: Do not use water, ketone, or aromatic solvents to
clean the touch screen.
For dirt or marks that are not removed by a soft dry cloth,
moisten the cloth with a small amount of either isopropyl
alcohol or ethyl alcohol, and then gently wipe the surface.
WARNING: Do not use alcohol near an open flame or
other source of ignition.
Page 7
1 TS1001 Touch Screen Arming Station User Manual
Product overview
Refer to Figure 1 below for details of external features of
the TS1001 Touch Screen Arming Station, and to Figure 2
on page 3 for details displayed on the touch screen (screen
image varies).
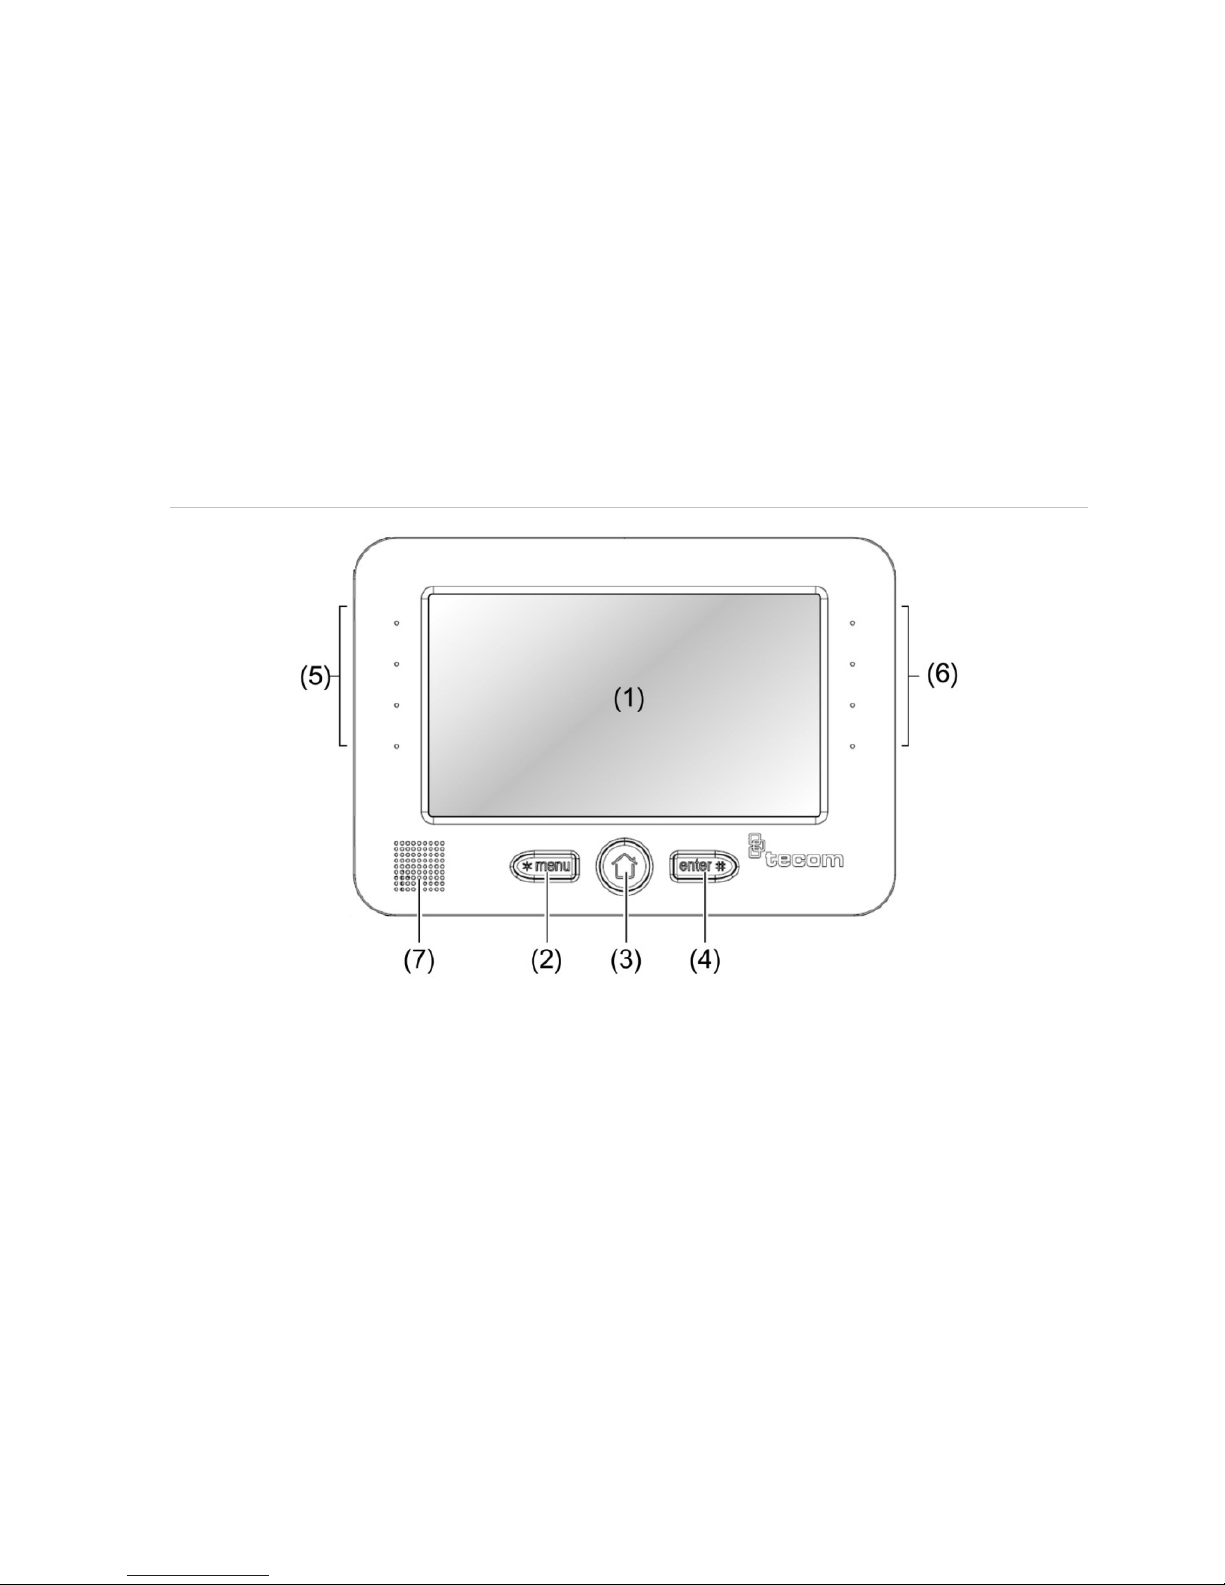
Figure 1: TS1001 Touch Screen Arming Station overview
(1) Touch screen display panel
(2)
* Menu key
(3)
Home key
(4) Enter # key
(5) First four area LEDs
(6)
Next four area LEDs
(
7) Beeper
The TS1001 Touch Screen Arming Station (Touch Screen
RAS) is used for controlling Challenger security system
alarm and access functions. Arming stations are also
known as remote arming stations or RASs.
Page 8

2 TS1001 Touch Screen Arming Station User Manual
Product features include:
• Touch screen keypad
• Beeper
• Integrated tamper switch
• Area and system status Light Emitting Diodes (LEDs)
• One open collector output is provided to drive a small
relay or LED, for example.
• One input is provided for an egress function.
User interface details
A touch screen RAS provides a graphical mode of
operating a Challenger system. In addition to the normal
graphical mode’s advanced user interface, the touch
screen also has a “classic” mode that mimics a
conventional LCD keypad.
Note: Different types of users may have levels of
permissions to use the RAS. For example, access to
“Install menu” options may be limited to installers, the
ability to arm and disarm areas may be limited to users with
“alarm” codes, and the ability to open a door may be limited
to users with “door” codes.
When idle (not in programming mode and in the absence of
alarms or faults) the touch screen resembles Figure 2 on
page 3.
Page 9

TS1001 Touch Screen Arming Station User Manual 3
Figure 2: Home screen details
(1) Arm button
(2)
Disarm button
(3)
Open button (optional)
(4) Classic button (optional)
(5) Status button
(6)
Menu button
(7) Automat
ion quick control
button (optional)
In idle state, the RAS’s Home screen (Figure 2 above) has
standard and optional graphical buttons to perform the
following functions:
• The Arm button (item 1) followed by an alarm code is
used to arm assigned areas, or to select and arm areas
(depending on alarm group programming).
• The Disarm button (item 2) followed by an alarm code is
used to disarm assigned areas, or to select and disarm
areas (depending on alarm group programming).
Page 10

4 TS1001 Touch Screen Arming Station User Manual
• The optional Open button (item 3) followed by a door
code (or an alarm code, depending on RAS
programming) is used to open the RAS’s door.
• The optional Classic button (item 4) is used to access
the login (code) prompt for mimicking a conventional
LCD keypad. When using classic mode, enter a menu
number to access a Challenger menu option.
• The Status button (item 5) displays the alarm Quick
History when the system is normal (no alarms). When
alarms are present, the display shows the inputs in
alarm.
• The Menu button (item 6) is used to access the login
(code) prompt for graphical access to Challenger menu
options.
• The optional Automation quick control button (item 7) is
a shortcut to User menu option 24-Automation Control.
Automation quick control does not require user
authentication via PIN.
When you see one of the button images later in this
manual, it means you begin at the Home screen and then
press the button.
Page 11

TS1001 Touch Screen Arming Station User Manual 5
The RAS’s physical * Menu, Home, and Enter # keys
perform the following operations:
• The * Menu key (Figure 1 on page 1, item 2) may be
used to access the login (code) prompt for graphical
access to Challenger menu options. During
programming, the * Menu key delete the last character
entered, navigates backwards through menus, or
toggles Yes/No values, as applicable.
• The Home key (Figure 1 on page 1, item 3) may be
used to quickly exit the current option and return to the
idle screen.
• The Enter # key (Figure 1 on page 1, item 4) followed
by an alarm code, is used to select and arm areas
(same as the Arm button). During programming, the
Enter # key works the same as the graphical # or 8
buttons.
Front LED indications
The area status LEDs (Figure 1 on page 1, items 5 and 6)
display the status of areas 1 to 8 (or as configured).
The LED indications are as follows:
• The LED illuminates when its corresponding area is
armed.
• The LED flashes slowly when a fault is detected, or
when an alarm occurs, in disarm.
• The LED flashes quickly when a fault is detected, or
when an alarm occurs, in arm.
Page 12

6 TS1001 Touch Screen Arming Station User Manual
Using the RAS
The following sections describe how to navigate via a
Touch Screen RAS:
• “Logging in” below
• “Selecting a menu” on page 7
• “Entering text” on page 8
• “Arming and disarming” on page 10
• “Selecting areas by searching” on page 12
• “Logging in to classic mode” on page 14
Logging in
From the Home screen, press the Menu button or the
* Menu key (Figure 1 on page 1, item 2).
Figure 3: Login screen
Page 13

TS1001 Touch Screen Arming Station User Manual 7
To login to the menu, press the buttons that correspond to
your alarm code, and then press the Enter button (or press
the Menu button). To delete the last digit entered press the
* Menu key or the Backspace button during login.
Note: The numbered buttons shown in Figure 3 on page 6
(for example) will appear in different sequences if the RAS
is programmed to scramble the keypad. The scramble
keypad option moves the numbered buttons to different
positions after every login to avoid providing visual clues to
the numbers used.
Selecting a menu option
Use the Up and Down arrows to navigate the list of options.
Touch the list item to access the option.
Figure 4: Menu screen
To access the Install menu, use the Up and Down arrows
to display 19 – Install Menu. Touch the 19 – Install Menu
list item to open the Install menu (Figure 5 on page 8).
Page 14

8 TS1001 Touch Screen Arming Station User Manual
Note: The TS1001 Touch Screen RAS displays lists of
menu items (as in Figure 4 on page 7) instead of displaying
one item at a time. The list depends on the user’s alarm
group and the RAS’s alarm group (stored in the Challenger
panel) which results in a small delay.
Figure 5: Install menu screen
Use the Enter # key or Down button to navigate down the
list of options, or use the * Menu key or Up button to
navigate up the list of options. Press the list item to access
the option.
Entering text
Text entry is used to enter things like user names, text
words, custom RAS messages, and so on.
Page 15

TS1001 Touch Screen Arming Station User Manual 9
Figure 6: Text entry screen
(1) Read mode (greyed)
(2)
Shift button
(3) Edit mode (black)
(4) Letter/numeral button
(5)
Backspace button
Uppercase and lowercase keys are selected automatically.
Use the Shift button to override the automated selection of
case.
The Clear button deletes any pre-existing characters and
exits the option.
Page 16

10 TS1001 Touch Screen Arming Station User Manual
You can’t modify existing text, but you can replace it with
new text. As soon as you begin to enter text, it replaces
any previous text.
Press the Done or Cancel buttons to exit this option.
Arming and disarming
The examples in this section are for arming. The screens
and processes for disarming are similar.
The Arm button (item 1) followed by an alarm code, is used
to arm assigned areas, or to select and arm areas
(depending on alarm group programming).
From the Home screen, press the Arm button to display the
arming login screen (Figure 7 below).
Figure 7: Arming login screen
Press the buttons that correspond to your alarm code, and
then press the Enter button (or the Arm button or the Enter
# key).
Page 17

TS1001 Touch Screen Arming Station User Manual 11
Note: The arming and disarming process varies depending
on system configuration. If the option “prompt with list of
areas” is disabled, then the areas assigned to the user are
not displayed, and assigned areas are immediately armed
or disarmed. Examples in this manual assume that area
selection is required.
The selection “All”, and any unarmed areas are listed (only
a few are displayed at a time).
Figure 8: Area selection screen
Use the Enter # key or Down button to navigate down the
list of areas, or use the * Menu key or Up button to
navigate up the list of areas.
Press either a displayed area or All to arm one area or all
areas. In the example in Figure 8 above, if you press area
4, then it’s removed from the display and the next unarmed
area is shown in the list.
Page 18

12 TS1001 Touch Screen Arming Station User Manual
Alternatively, press the Search button to search for named
areas. See “Selecting areas by searching” below for
details.
Note: The disarm screen (Figure 9 below) lists all armed
areas, plus any (armed or disarmed) areas that are in
alarm.
Figure 9: Disarm screen showing area in alarm
Selecting areas by searching
Areas are identified by a number from 1 to 99 and
(optionally) a name programmed by the installer.
When arming or disarming the system, you may want to
select a specific area instead of selecting all areas. The
Touch Screen RAS supports area search to help you
quickly find areas by name.
For example to arm an area named “Main-office”:
1. On the area selection screen (Figure 8 on page 11) click
the Search button to open the search screen.
Page 19

TS1001 Touch Screen Arming Station User Manual 13
Figure 10: Area search screen (initial screen)
2. As soon as you enter a character, the screen
automatically changes to edit mode and displays a
Search button (Figure 11 below).
Figure 11: Area search screen (edit mode)
3. Press one or more characters (for example, M) and then
press the Search button to see the area names starting
with the characters entered (Figure 12 on page 14).
Page 20

14 TS1001 Touch Screen Arming Station User Manual
Figure 12: Area selection screen (filtered)
4. Press either a displayed area or All to arm one area or
all displayed areas.
5. Alternatively, press the Search button again to define a
new search.
Logging in to classic mode
From the Home screen, press the Classic button to display
the login screen (Figure 13 below).
Figure 13: Classic mode home screen
Page 21

TS1001 Touch Screen Arming Station User Manual 15
To login to the classic menu press the * button (or press
the * Menu key) to display the login screen.
Figure 14: Classic mode login screen
Press the buttons that correspond to your alarm code, and
then press the # button (or press the Enter # key).
Figure 15: Classic mode menu screen
Page 22

16 TS1001 Touch Screen Arming Station User Manual
Classic mode works like a conventional LCD keypad: you
need to know a menu option number before you can
access the menu.
To see menu option numbers:
• Press the # button, the Down button, or press the Enter
# key, to navigate down the list of menu options.
• Press the * button, the Up button, or press the * Menu
key, to navigate up the list of menu options.
Note: Some screens have Left and Right buttons (see
Figure 15 on page 15). Use the Left and Right buttons to
move backwards and forwards between records (such as
inputs) for the same field. For example, you can enter a
name for input 1, press [ENTER] to save, and then press
the right arrow key to enter a name for input 2, and so on.
When going backwards between records you can press the
left arrow button to move immediately from the first record
to the last record.
Press the buttons that correspond to the menu option
number, and then press the # button (or press the Enter #
key) to access the menu.
Some options have additional menus, such as the Install
menu (Figure 16 on page 17).
Page 23

TS1001 Touch Screen Arming Station User Manual 17
Figure 16: Classic mode Install menu screen
Refer to the Challenger manuals for details about operating
a Challenger system and entering text via a conventional
LCD keypad.
Page 24

18 TS1001 Touch Screen Arming Station User Manual
 Loading...