

Page 1
Secure Encryption Telephone
User Manual
Please connect this Telephone directly to your telephone line (PSTN). It is recommended that this Telephone
not be used behind any PBX or local switching equipment in order to ensure optimum performance.
Page: 1/
12
Page 2
Regulatory Information (U.S.A.)
f
The Federal Communications Commission (FCC) has established rules that allow the
direct connection of this telephone to the public switched telephone network. Certain
actions must be undertaken or understood before the connection of any customer
provided equipment is completed.
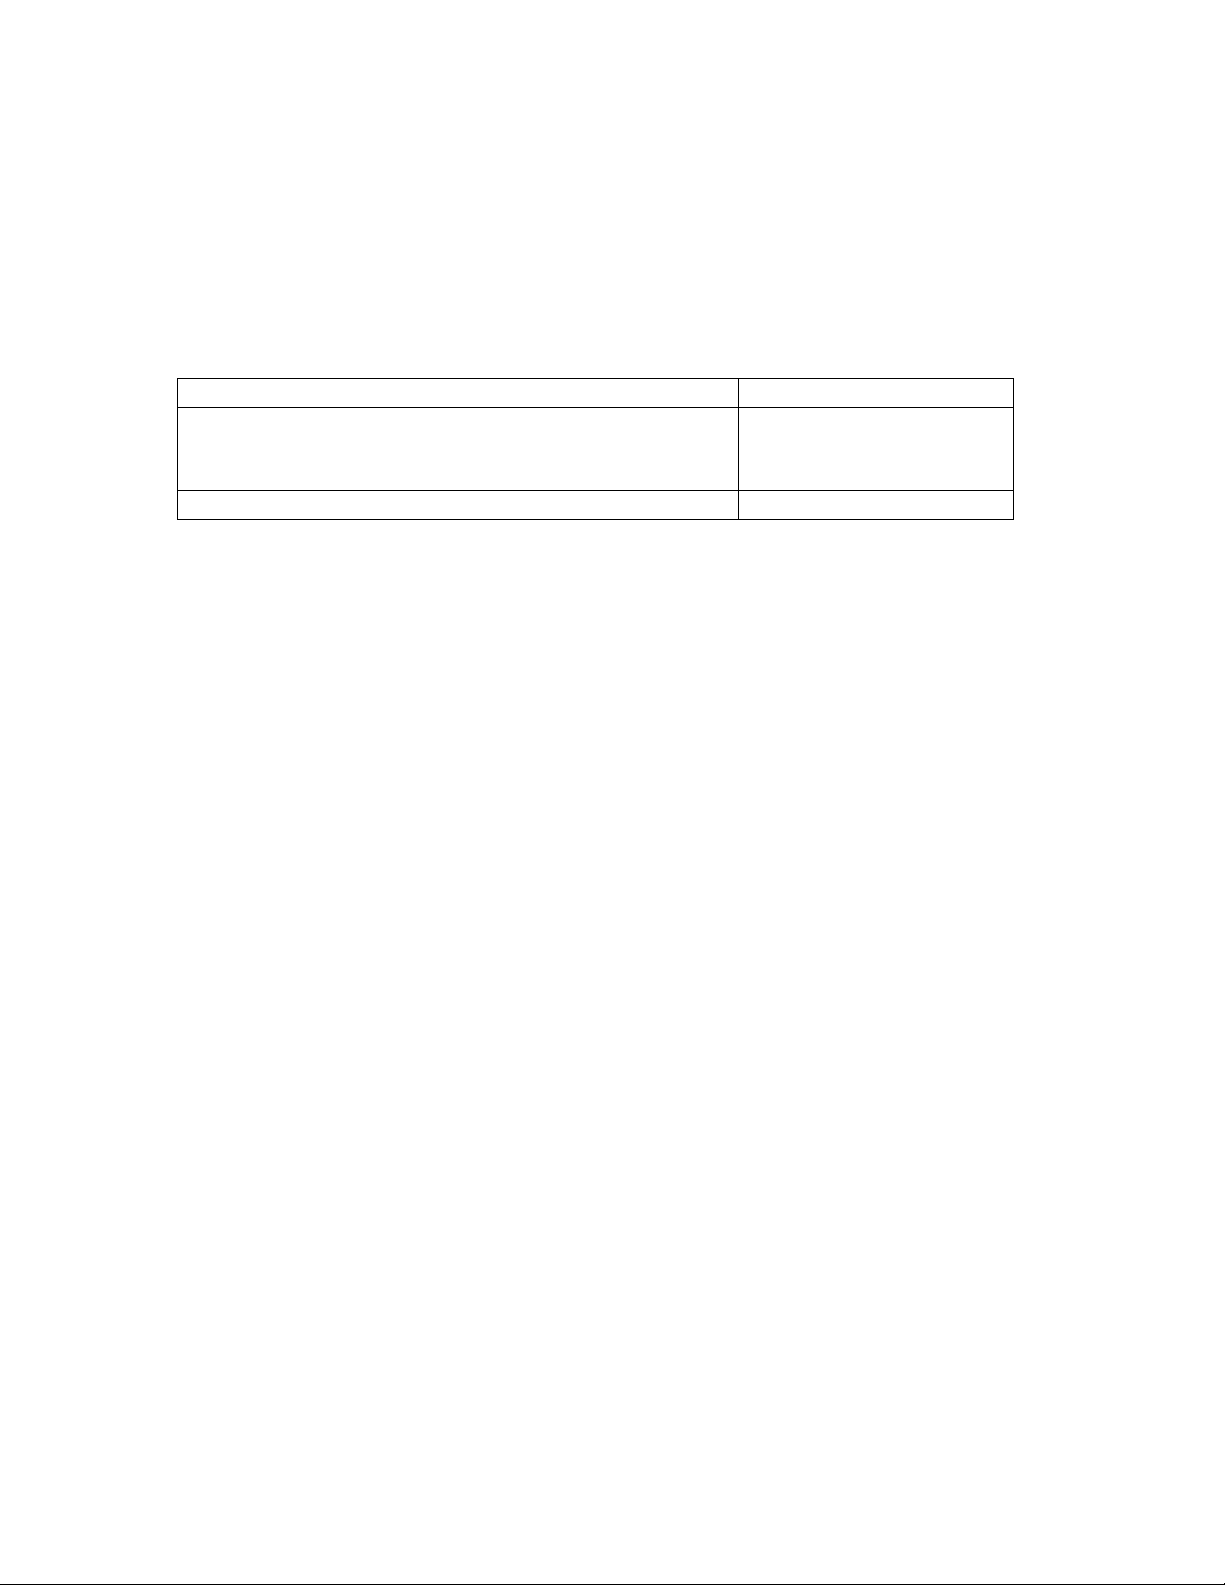
Table FCC Compliance
Complies with Part 68, FCC Rules
FCC Registration number for customer premise
equipment operation (CO Line accessed by means o
dial-access-codes or group/pooled CO line access)
Ringer Equivalence Number (REN) or service code 0.3B
D6XTE03BST-3168
UL/CSA Safety Compliance
This product has met all safety requirements and has been found to be in compliance with
the Underwriters Laboratories (UL) 1459 Standard.
Changes in Service
The local telephone company may make changes in its communications facilities or
procedures. If these changes affect the use of this product or compatibility with the public
switched telephone network, the telephone company must give a written notice to the
user to allow uninterrupted service.
Maintenance Limitations
Maintenance on this product must be performed only by the manufacturer or its
authorized agent. The user may not make any changes and/or repairs except as
specifically noted in this manual. If unauthorized alterations or repairs are made, any
remaining warranty and the software license for the phone will be voided.
Hearing Aid Compatibility
This product is Hearing Aid Compatible, as defined in Section 68.316 of Part 68 FCC
Rules and Regulations.
Notice of Compliance
This product complies with FCC Rules regarding radiation and radio frequency emissions
by class B computing devices. In accordance with FCC Standard 15 (Subpart J), the
following information must be supplied to the end user:
Page: 2/
12
Page 3
Before You Begin
k
m
Thank you for choosing the Safetalk, a state-of-art encryption phone. Safetalk is a
high-class digital communication security telephone designed to operate under triple DES,
a widely recognized international encryption standard to prevent eavesdropping. To
ensure the best performance, please read the following instructions carefully before
installing and operating the telephone.
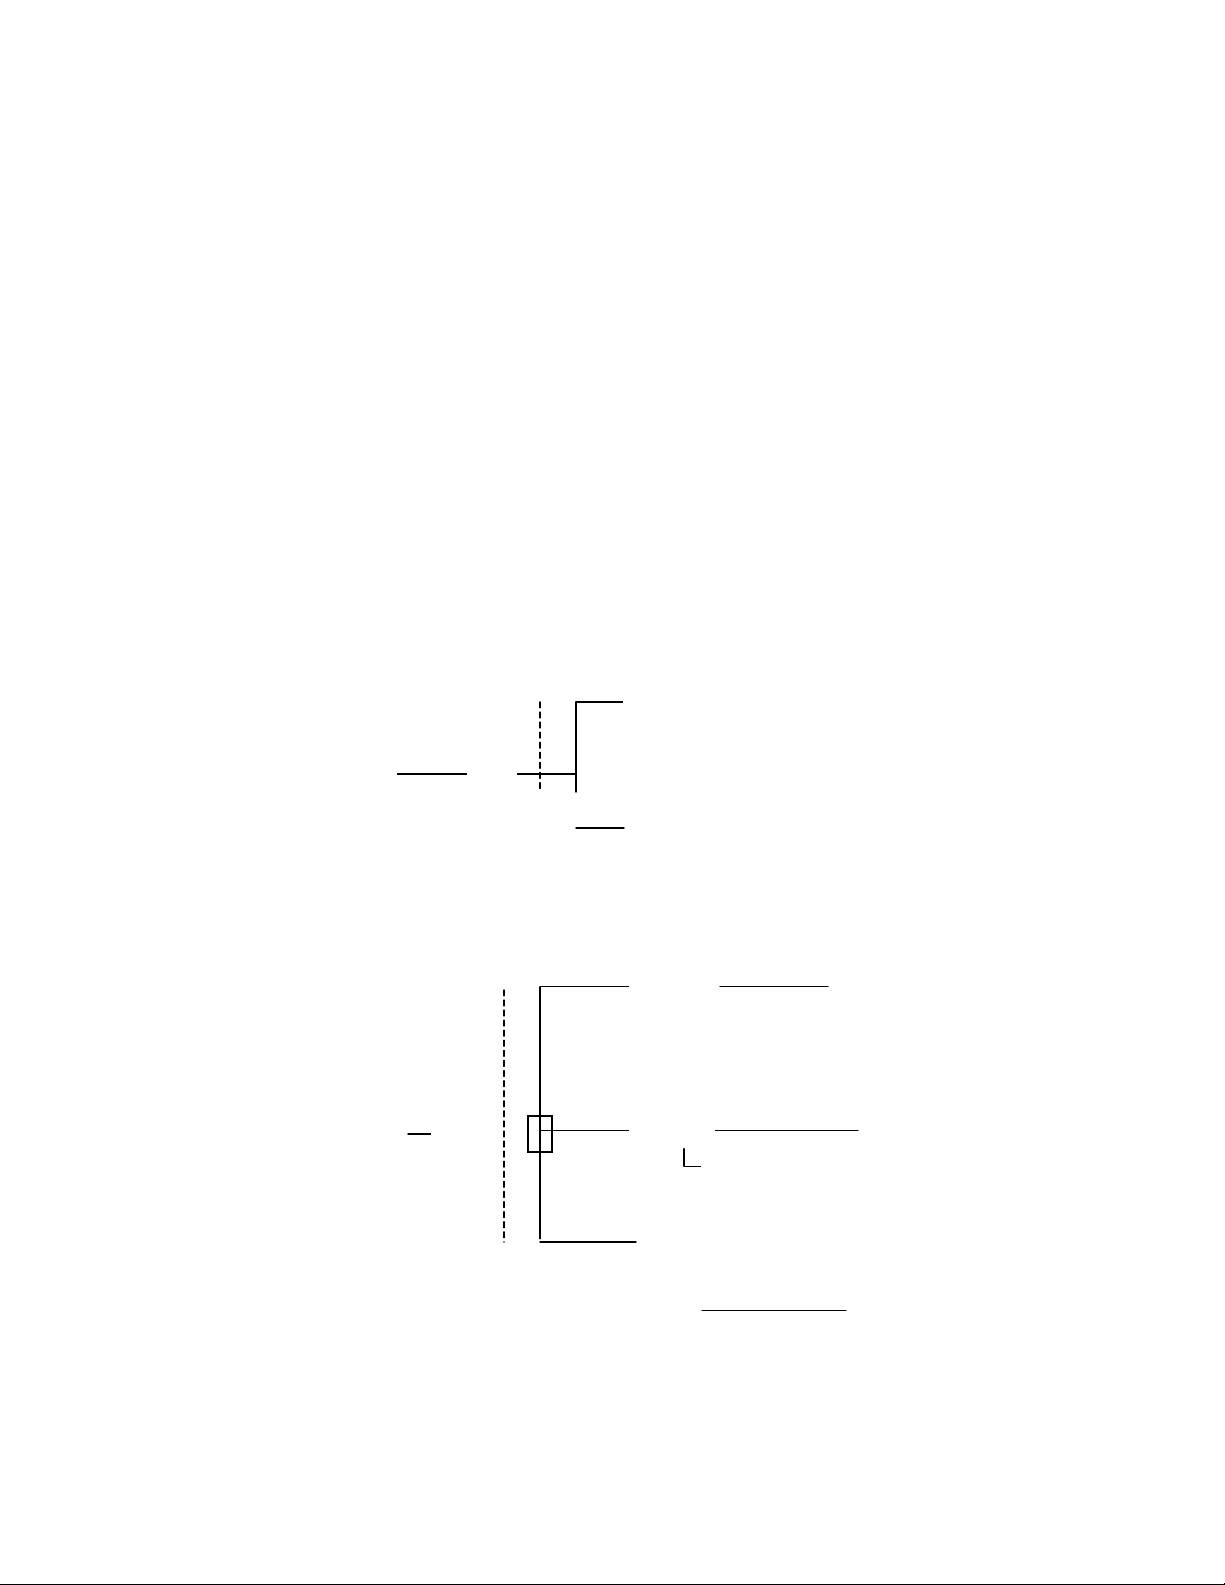
NOTE: PLEASE INSTALL “SAFETALK” DIRECTLY TO THE TELEPHONE LINE
FROM THE CENTRAL OFFICE (PSTN). DO NOT INSTALL “SAFETALK” BEHIND
ANY OTHER DEVICES.
1. CORRECT
SafeTal
PSTN Line
Extension Phone (but do not use it simultaneously)
2. WRONG
Mode
Splitter
PSTN Line
SafeTalk
SafeTalk
ADSL Modem
PBX
SafeTalk
Page: 3/
12
Page 4

※NOTE:
1. This unit utilizes Triple DES, an advanced encryption algorithm. Under
“SECURE Mode”, the voice data is compressed and encrypted. Therefore, the
user may notice that voice quality is slightly different than when under normal
“Clear Mode” calling.
2. Once SECURE mode has been invoked, the unit can not return back to CLEAR
mode during the same call. This operation is designed to insure that the user
cannot unintentionally interrupt the secure communications channel once it has
been established at both ends. Furthermore, during SECURE mode conversation,
if there is any extension line eavesdroppers or wiretaps activated during the call,
SafeTalk has special protective circuits to detect and interrupt the conversation
in order to ensure the ultimate in voice security.
3. In certain countries, the fixed line operators may route the calls by various
networks (such as VoIP networks) for long distance and/or international calling.
This may affect the key exchange process; which is enabled by SafeTalk’s
built-in algorithms. In these cases, the user may need to press the “SECURE”
button MORE THAN ONE TIME to establish SECURE connection.
Page: 4/
12
Page 5

I. Packing and Installation
1.Parts Checklist
(1) Base (2) Handset & Handset Cord
(3) Power Adapter (AC 100~240V) (4) Telephone Line Cord (RJ 11)
(5) Adjustable Stand (6) Wall-mount Attachment and screw
2. Installation Steps:
(1) Insert the handset cord into the handset and into the jack on the left side of the
telephone base.
(2) Plug one end of the RJ11 telephone line cord into the upper part of the base and the
other end into the PSTN wall jack.
(3) Plug insert the power adapter cord into the DC jack located at the back of the
telephone base and plug the power adapter into the AC electrical outlet.
(4) Select and snap on the low or high profile stand as desired for the most convenient
Page: 5/
12
Page 6

usage. For wall mounting, please use the indicated low profile stand with the enclosed
wall-mounting screw.
II. Telephone Illustration
Page: 6/
12
Page 7

III. Key Descriptions
CALL LOG/DIAL: Stores and retrieves the last 20 dialed numbers from the Call Log.
<<: Moves the cursor to the left on the LCD display.
>>: Moves the cursor to the right on the LCD display.
SPD: Allows you to store the most commonly dialed numbers.
PROGRAM: Used for selecting various programming options.
EDIT: Used to change or delete programming options/data.
OK: Confirms successful programming operations.
DELETE: Used to delete the displayed data.
END: Used to end or exit the current operation.
LOCK: In LOCK mode, keys will not function until you enter the correct password.
LOUD MIC: Enhances voice reception (transmit audio) during CLEAR mode.
▲ VOLUME▼ :
(1) Used to raise or lower the handset receive volume.
(2) Used to scroll up or down in display routines.
FLASH: Used to operate with subscribed services from the central office such as
3-party conference and call waiting.
REDIAL: Redials the last number dialed.
MUTE: Mutes the transmit audio from your phone.
SPEAKER: Used for Handsfree calling.
SECURE: Initiates the SECURE mode.
0~9, *, #: Large buttons used for dialing.
Page: 7/
12
Page 8

IV. Programming Procedures:
1. When the phone is idle, press “PROGRAM” to enter into programming mode.
The unit will ask for the password (Default password is 0000). After entering the
correct password, press “OK”. The unit will advance to the next step once the
password is confirmed.
2. Press “▲VOLUME▼” to select the program option and then press “EDIT”.
3. Enter in numbers or letters to edit and use the DELETE key to remove an entry.
4. Press “OK” to save. A long beep tone is heard and the LCD will display
“SAVED” when any programming change is done correctly.
5. Press “END” to exit the current operation. Press “END” again to exit
programming mode.
※ Notice: To protect the system data, the password is always needed when
entering into the programming mode.
V. Program Options:
1. USER NAME: This allows entering your name or greeting words that will be displayed
on the LCD during idle mode. The words will be centered automatically. If a space or
special symbols are needed, please press “1” to search.
2. PASSWORD: The default password is 0000. You can change to any 4-digit password
numbers using common dialing digits 0~9. “RETYPE” will be displayed and new
password re-entered to confirm any password change.
3. GROUP ID: To enhance the security level, you can program a Group ID. Secure links
can not be established between 2 units with different Group IDs. The default Group ID is
1234. You can change to any Group IDs from 4 to 8 digits. “RETYPE” will be needed.
Changes will be valid after retype is confirmed.
4. AUTO UNLOCK INCOMING CALL: When you press “LOCK”, the system is locked
Page: 8/
12
Page 9

and all keys will not function. You can set up the system to unlock automatically
whenever there is an incoming call. <ON> will enable the auto unlock function. If
<OFF> is set, you will need to type in the correct password each time before answering
incoming calls. The default is <OFF>.
5. LCD CONTRAST: There are 5 contrast levels (1/2/3/4/5). Press“▲VOLUME▼” to
adjust. The letters will turn from light to dark (“1” is the lightest). The default setting is
<3>.
6. RINGER TYPE:There are 4 ringer types (1/2/3/4). Press “▲VOLUME▼” to adjust.
The default setting is <1>.
7. AUTO SECURE:After you press “SECURE”, the built-in RSA algorithm will generate
keys to establish the secure link. You can choose either to let the system generate the
secure keys automatically or to manually enter random numbers as secure keys. <ON>
means that the system will generate keys automatically. (The key will be different each
time.) <OFF> means that you have to key in random numbers (within 8 digits) to initiate
the secure link. The default setting is <On>.
VI. Basic Operation:
Make a phone call: (1) When the system is not locked, (LCD shows “READY”) pick
up the handset or press “SPEAKER” to access the line and dial. Once it is connected,
please use the handset for conversation. (2) When the system is locked, (LCD shows
“LOCKED”) you must press “LOCK” and enter the correct system password in order to
unlock. Then, you can follow the steps stated in (1).
Answer an incoming call: (1) When the system is not locked or when the system is
locked but auto unlock incoming call (program option #4) is <ON>, you can pick up the
handset to answer a call. (2) When the system is locked but auto unlock incoming call is
<OFF>, you must enter the correct password and press “OK” to pick up the call.
Hang up : Return the handset to the phone cradle and the call will be disconnected. The
system will return to the previous status and settings.
Page: 9/
12
Page 10

OPERATION NOTE: THE “HANDS-FREE” OR “SPEAKER” FUNCTION IS NOT
ENABLED IN THIS VERSION OF SAFETALK FOR CLEAR OR SECURE
COMMUNICATIONS. THE HANDSET MUST BE USED FOR ALL
COMMUNICATIONS.
SECURE talk:
(1) After the call is connected, if you do not press “SECURE”, the conversation is
not under protection (clear mode). LCD shows “IN USE(CLEAR)”, and
“SECURE” LED is dark.
(2) After the call is connected, press “ SECURE’ to enter into secure link.
Note: If auto secure is <ON> (program option #7), the system will generate keys
automatically to establish the link. If auto secure is <OFF>, please enter
random numbers within 8 digits to initiate the secure link.
(3) During the secure link, LCD will show “CONNECTING” and some random
0,1, numbers. The SECURE LED will flash and you can hear connection noises
from the MODEM.
(4) When the secure link is established successfully, LCD will show “SECURED”.
The SECURE LED will be illuminated and 2 beeps can be heard to confirm the
secure mode is entered.
(5) If the secure link is not established, LCD will go back to “IN USE (CLEAR)”.
The “SECURE” will turn dark and 5 error beeps can be heard. The conversation
returns back to clear mode (not secure mode). Please make sure both parties use
the same model and that the GROUP ID setting (program option #3) is the same.
Then repeat steps (1) to (4) to try again.
(6) Upon entering secure mode, in order to ensure the security, the unit can not
return back to clear mode. You must hang up and place another call if clear mode
conversion is preferred.
During SECURE mode, the keypad is disabled. When pressing the dial pad buttons,
Page: 10/
12
Page 11

DTMF tones can still be heard. However, there is no corresponding function.
VII. Speed Dial
1. Enter/Edit:Press any SPD key, and press “EDIT” to enter new data or
modify the existing data. Press “OK” to confirm. Press “END” to exit.
2. Review: Press any SPD key to display. Use “▲VOLUME▼” to search if it
is needed.
3. Dial: Review the SPD data and make sure it is correct. Press “SPEAKER” or
lift up the handset; the unit will seize the line and dial out automatically.
4. Delete:Press any SPD key, and press “DELETE” to erase the stored data.
VIII. Call Log
The unit can store 20 sets of outgoing number automatically.
1. Press “CALL LOG/DIAL” and use “▲VOLUME▼” to search for the number you
wish to dial.
2. After confirming, you can press “SPEAKER” or lift up the handset; the unit will seize
the line and dial out automatically.
3. Press “DELETE” and the number displayed will be erased.
4. If you want to delete all the data stored, press “CALL LOG/DIAL” ( but do not use
“▲VOLUME▼” to search) and the unit will display the total number of stored data.
Press “DELETE” and confirm “YES”; all the stored numbers will be deleted.
IX. Troubleshooting Tips
1. If the unit does not function properly as a basic telephone, please ensure the handset,
linecord, and adapter are well-connected.
Page: 11/
12
Page 12

2. If the unit does not light up or no display, check the AC outlet where the power adapter
is plugged in.
3. If the unit still is not working properly, plug another standard telephone in the wall
jack and confirm proper outside line connection.
4. When the unit can not establish secure link, please check:
(1) if both parties are using the same secure phone model. Secure links can
not be established between different models. Under these circumstances, the unit
will only function as a normal telephone.
(2) if both parties press the “SECURE” key. Only one party should initiate
the secure link.
(3) if the group IDs (program option #3) are different. The secure link can be
established only when both parties have set the same group ID.
(4) if you disable the auto secure function (program option #7). you must enter
a random number (less then 8 digits) and press “OK” to generate the encryption key
manually.
(5) If all of the above conditions are excluded, please note that the line condition,
especially the noise level, will affect the secure mode operation. Sometimes
redialing or trying the call later may allow proper operation. However, if the secure
linking is always difficult, there is a possibility that some recording devices or
extension line eavesdroppers exist and, thus, will inhibit SECURE operation.
5. If incoming calls can not be answered, please check if the system is locked and
auto-unlock incoming call (program option #4) is not enabled. If so, please enter the
correct system password and press “OK” to pick up the calls.
6. If you forget the password, the unit needs to be returned to the factory in order to
re-format. All the stored data and settings will be eliminated and altered to default
values since the factory is unable to retrieve the original password. This
re-formatting may incur a service charge.
Page: 12/
12
 Loading...