

Page 1

USER’S MANUAL
FROST FREE
SIDE BY SIDE
REFRIGERATOR
Models : TSXS582WNBAM
TSXS582SNBAM
To ensure proper use of the appliance and your safety, please read the
following user manual completely before use.
Page 2
Thank you for purchasing our product and thank you for placing your
confi dence in us.
Read this manual carefully before use. Follow instructions and
keep the manual for future reference.
Follow the operating instructions and safety notices in this manual.
If any trouble arise, do not attempt to fi x it yourself. Please contact
TECO service on 1300 660 037 (8:30am - 4pm Mon~Fri AEST).
This refrigerator is designed and approved for use with fl ammable
R600a refrigerant.
The appliance is specifi cally constructed for domestic
use and is therefore suitable for the refrigeration and storage
of fresh and frozen foods and the production of ice-cubes.
The appliance has not been designed or manufactured for
professional use. TECO declines all responsibility for damage
deriving from improper use of the appliance. The refrigerator
has undergone the necessary tests on the tightness of the
refrigeration circuit and complies with the safety regulations
for electrical appliances.
All images, illustrations and photos contained in this manual are for
illustration purposes only and may differ from your appliance.
WARNING ICON
This symbol indicates information concerning your personal
safety
WARNING
CAUTION ICON
This symbol indicates information on how to avoid damaging
the appliance
CAUTION
FLAMMABLE ICON
R600a WARNING LABEL
R600a
2
Page 3

TABLE OF CONTENTS
Safety Information.....................................................
Name of Parts and Usage ........................................
Packing List ..............................................................
Transporting the Appliance & Installation .................
Operating Instructions ..............................................
Control Panel ...........................................................
Energy Saving Tips ..................................................
Maintenance ......................................... ..................
Disconnection of the Appliance ...............................
4 - 5
6 - 7
8
8 - 9
10
10 - 13
14
14 - 15
15
Troubleshooting ......................................................
Specifi cations ...........................................................
Repairs, Service & Warranty ....................................
..
SPECIAL FEATURES
◊ Frost Free
◊ Internal Lighting (Freezer & Fridge)
◊ Electronic Temp. Control
◊ Quick Freeze & Quick Cold Modes
16
17
Back
cover
◊ In-door Twist Ice Maker
◊ Double Freezer Drawers & Vegetable Crispers
◊ Non Plumbed Water Dispenser
3
Page 4
R600a Isobutane Refrigerant
Hydrocarbon refrigerants have excellent refrigerant
properties and minimal low global warming potential and
WARNING
synthetic R600a refrigerant:
Hydrocarbon refrigerants cannot be ‘retrofi tted’ to the appliance
that has not been designed and approved to use that type of
refrigerant.
Ensure that the tubing of the refrigerant circuit is not damaged
during transportation and installation.
Leaking refrigerant may cause eye injuries or could ignite.
The room for installing the appliance must be at least 1m
of refrigerant. The amount of refrigerant in the appliance can be
found on the rating plate attached to the appliance.
Risk of fi re
no ozone depletion potential.
This appliance contains a small quantity of fl ammable, non-
3
per 8g
If the refrigerant circuit should become damaged. Avoid open
fl ames and sources of ignition. Disconnect the appliance from the
mains power. Thoroughly ventilate the room in which the
WARNING
• The refrigerator is designed to operate on a single phase power
supply within a voltage range of 220~240V/50Hz.
• The refrigeration system contains refrigerant. Do not allow any
sharp objects to come in contact with the refrigerant system to
avoid damage the refrigerant circuit.
• This product is for indoor use only.
• Do not place electrical items or cooking equipment nearby.
Keep away from substances which could cause ignition and good
ventilation shall be always maintained.
• Do not place objects on top of the appliance which are magnetic,
heavy or fi lled with water.
• If the supply cord is damaged, it must be replaced by authorised
appliance is situated for several minutes.
SAFETY INFORMATION
TECO service personal, service agent or similarly qualifi ed persons
in order to avoid a hazard.
• Do not store fl ammable, explosive, volatile and highly corrosive
materials in the refrigerator. Containers with fl ammable gases or
liquids can leak at low temperature. There is a risk of explosion or fi re.
4
Page 5
• Do not splash water on the appliance. It may cause malfunction or
electric shock.
• Always switch off and unplug appliance before cleaning.
• This appliance is not intended for use by persons (including children)
with reduced physical, sensory or mental capabilities, or lack of
experience and knowledge, unless they have been given supervision or
instruction concerning use of the appliance by a person responsible for
their safety.
• WARNING: Keep ventilation openings, in the appliance enclosure or in
the built-in structure, clear of obstruction.
• WARNING: Do not use mechanical devices or other means to accelerate
the defrosting process, other than those recommended by the
manufacturer.
• WARNING: Do not damage the refrigerant circuit.
• WARNING: Do not use electrical appliances inside the food storage
compartments of the appliance.
• For appliances which use fl ammable insulation blowing gases, Please
keep the products away from the fi re or similar glowing substance before
you dispose of the refrigerator.
• This appliance is intended to be used in household and similar
applications such as:
- staff kitchen areas in shops, offi ces and other working environments;
- farm houses and by clients in hotels, motels and other residential type
environments;
- bed and breakfast type environments;
- catering and similar non-retail applications.
Safety of children
• Young children should be supervised to ensure that they do not
WARNING
• Packing (e.g. wraps, polystyrene etc.) can be dangerous
for children. There is a risk of suffocation. Keep packaging
play with the appliance.
materials away from children.
• Contact your local authorities for correct method of disposal.
Dispose of all packaging in a responsible manner in accordance
with local regulations.
Dispose of old appliances in accordance with local regulations.
Remove the doors, cut off the main cable, break or remove
spring or bolt catches if fi xed to prevent children getting trapped
or involve themselves in other dangers.
5
Page 6
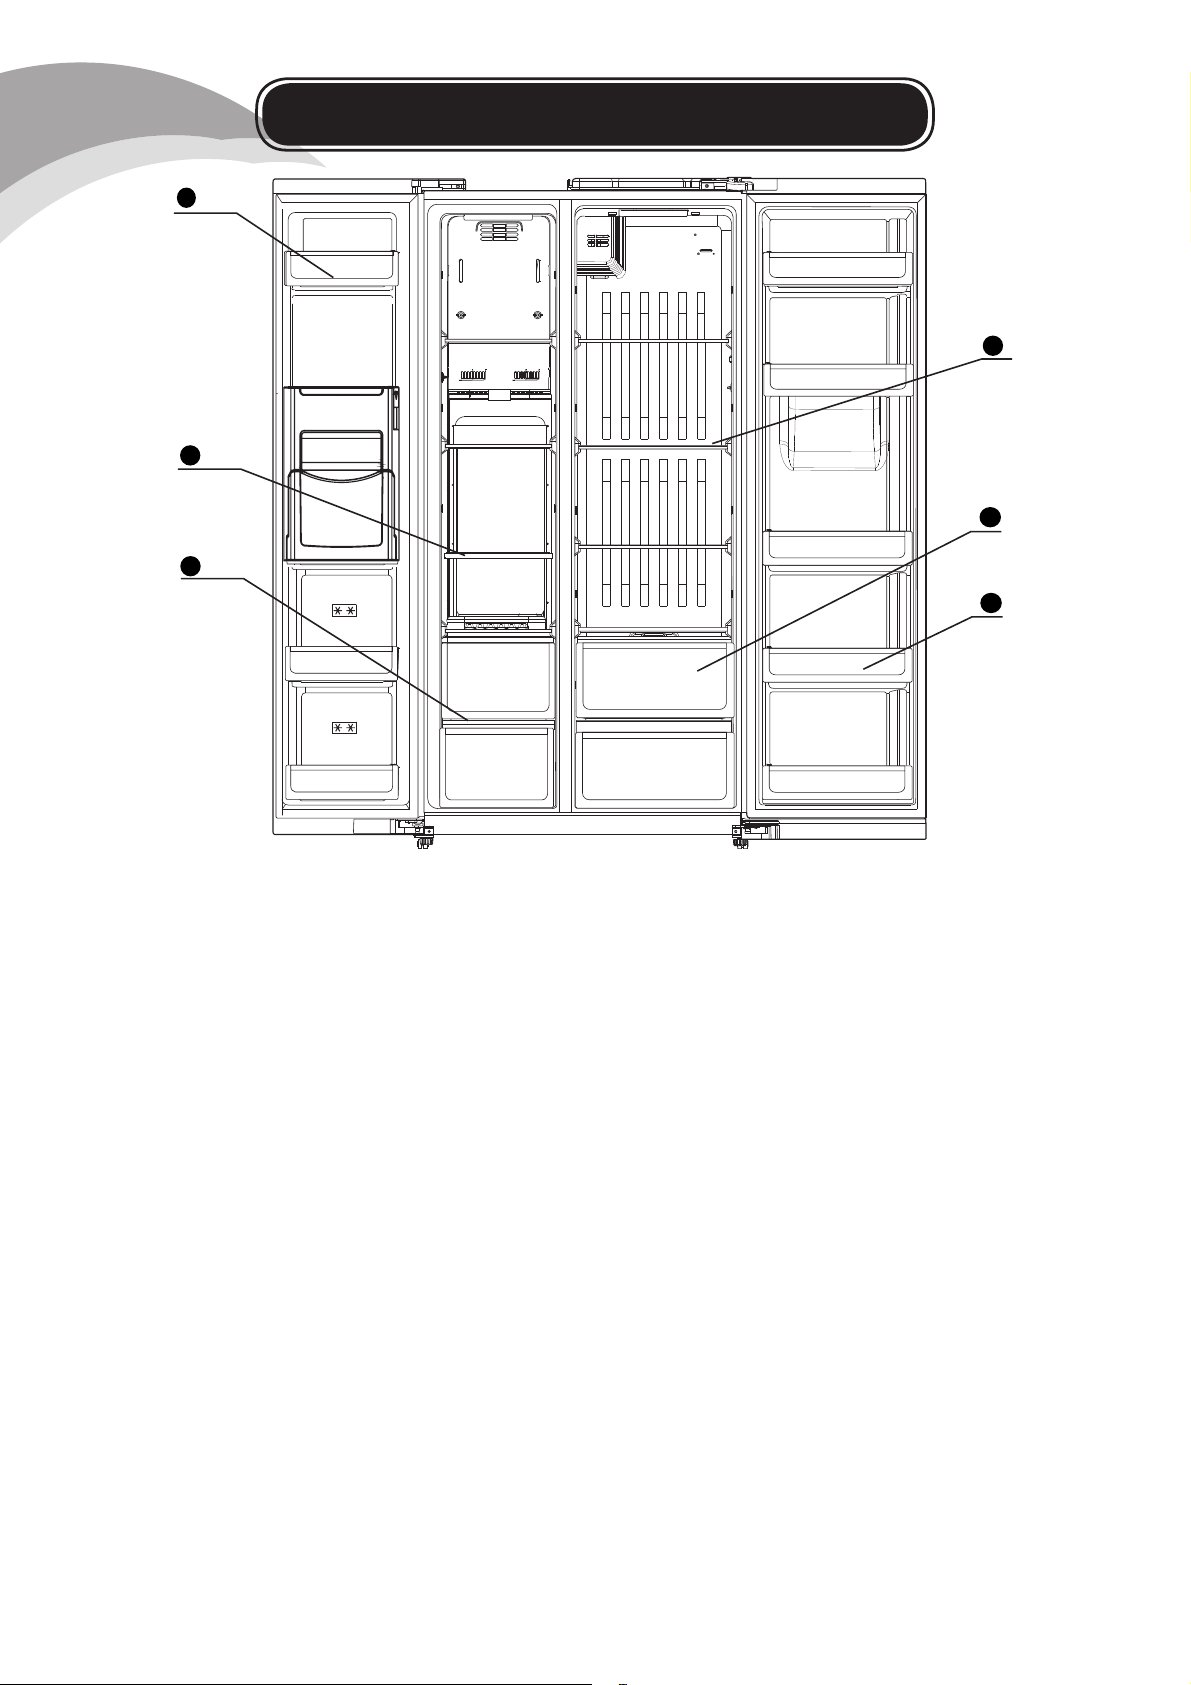
NAME OF PARTS AND USAGE
1
4
2
5
3
6
1. Freezer Door Rack 4. Refrigerator Glass Shelf
2. Freezer Glass Shelf 5. Vegetable Crisper
3. Freezer Compartment Drawer 6. Refrigerator Door Rack
The refrigerator you purchased is subject to continuous improvement,
which may not be completely consistent with the manual, however, the
functions and operating methods will not change.
If you use the refrigerator for the fi rst time, remove the adhesive tapes
from all surfaces, drawers, shelves, trays, etc.
Do not pull or push the drawers and shelves forcefully during use as this
may result in damage to the appliance.
6
Page 7

FREEZER & REFRIGERATOR
COMPARTMENTS
Freezer Compartment Refrigerator Compartment
9
7
8
1. Freezer Door Rack 4. Refrigerator Glass Shelf
2. Freezer Glass Shelf 5. Vegetable Crisper
3. Freezer Storage Drawer 6. Door Rack
9. In-door Easy Twist Ice Maker 7. Water Tank (Dispenser)
8. Large Door Rack
8
8
7
Page 8

PACKING LIST
Check the packing list that all items have been included.
Part No.
1
2
Warranty on Sheet
User’s Manual
Item
1 Copy
1 Copy
Ice Cube Measuring
3
1 Piece
Cup
4
Note: Product specifi cations are subject to change without prior notice.
Wrench
1 Piece
TRANSPORTING THE APPLIANCE &
INSTALLATION
●
The appliance must be transported only in a vertical position. The packing
must be intact during the transportation.
●
When unpacking and re-packing the appliance, please memorise the
position of each accessory of the appliance when unpacking it. When
re-packing the appliance for transportation, ensure all accessories are
secured before transportation.
●
Do not lift or pull the doors during transportation.
●
When moving the appliance, do not tilt >45 degrees
(the angle of the vertical direction). Please avoid strong
vibration and impacts that could cause damage to the
appliance.
●
The refrigerator should be located on a fi rm and fl at surface. An uneven
surface may cause excess operating noise or vibration.
(a) The noise may be increased if the fl oor is not fi rm.
(b) If the appliance is to be positioned on carpet fl ooring and heat
emitted from the appliance is a concern, place a solid sheet
under the appliance.
8
Page 9

●
Choose a location which is not exposed to sunlight, high temperature or
humid, as humidity may cause staining or damage.
●
It is recommended a clearance of at least 100mm away
300mm
from objects and walls on both sides and back. Ensure the
clearance above the appliance is not less than 300mm and
° clearance for the doors to swing open.
160
●
If the appliance is unstable, rotating either of the front two
leveling feet will raise or lower the appliance.
100mm
When adjusting the front feet, ensure the appliance leans
backwards slightly to assist in keep the door closed.
●
Remove all internal packaging before operating.
ADJUSTING THE DOOR HEIGHT
1) Identify which door requires adjustment and losen the Lower Nut (refer
to Fig. 1). Rotate the nut clockwise for two (2) full rotations using a
wrench (refer to item 4 on Page 8).
100mm
2) Rotate the Uppeer Nut (refer to Fig. 1) clockwise to raise the door or
counter-clockwise to lower the door.
3) Once both doors are level, tighten the Lower Nut to secure the height of
the door and prevent the Upper Nut from moving.
NOTE: The maximum the door can be adjusted is 5mm.
Upper Nut
Not level
Fixed Shaft
Fig. 1
Leveling Feet
Lower Nut
Left
Right
Wrench
9
Page 10

OPERATING INSTRUCTIONS
Before fi rst use, let the refrigerator stand for 2 hours before connecting the
power. Leave 4 to 5 hours after connecting power before placing fresh or
frozen food into the refrigerator.
PLACEMENT OF FOOD
●
There should always be some space between
items inside for air circulation.
●
Food should be kept in sealed packaging to
avoid becoming dry or spoilt.
●
Hot food should be cooled down before placing
into the appliance. Otherwise, the interior
temperature and power consumption will increase.
●
Reduce opening the door frequently.
This will increase the appliance effi ciency and reduce
power consumption.
Do not use any electronic equipment inside the appliance.
Do not store objects which are costly or subject to temperature
variations. e.g. medication or chemicals.
WARNING
Do not adjust shelving once food has been placed on them.
CONTROL PANEL
Controlling the temperature of the freezer and refrigerator compartment
can be set by the control panel. Refer to the descriptions below.
Buttons:
A) Adjust Freezer Temp.
B) Mode Selector
C) Adjust Refrigerator Temp.
D) Control Panel Lock/Unlock
Indicators:
1) Vacation Mode 2) Quick Freeze Mode 3) Quick Cold Mode 4)
Lock/Unlock 5) Freezer Temp. 6) Refrigerator Temp. 7) Refrigerator
Compartment Off (Vacation Mode)*
*Refer to full description on Page 11.
10
Page 11

CONTROL PANEL LOCK / UNLOCK
To lock the control panel, press and hold the Lock/Unlock button (D on
Page 10) for at least three (3) seconds. The display will indicate the
control panel is locked [ ] and all control functions are now locked.
To unlock, press and hold the Lock/Unlock button (D) for at least three (3)
seconds. The display will indicate the control panel is unlocked and button
function is restored [ ].
MODE SELECTOR
Press the Mode Selector button (B on Page 10) to cycle through the
available functions. None Vacation Mode Quick Freeze
Quick Freeze & Quick Cold Quick Cold
VACATION MODE
Refer to Mode Selector above to choose Vacation Mode. Vaction Mode
will set the freezer compartment to the minimum temp. (warmest) and the
refrigerator compartment will be set to OFF. Press the Lock/Unlock button
to confi rm. Please refer to Page 15 for tips before using Vaction Mode.
QUICK COLD MODE
The Quick Cold function will set the refriger to its maximum (coldest) temp.
After a few hours, the refrigerator will return to the set refrigerator temp.
(Refer to setting the refrigerator temp. on Page12). To set Quick Cold
mode, press the Mode Select (refer to button B on Page 10) repeatedly
until the Quick Cold indicator is displayed (refer to indicator 3 on Page 10).
To exit Quit Cold mode, press the Mode Select (button B) repeatedly until
the Quick Cold indicator is no longer displayed.
QUICK FREEZE MODE
The Quick Freeze function will set the freezer to its maximum (coldest)
temp. After a few hours, the freezer will return to the set freezer temp.
(Refer to setting the freezer temp. on Page12). To set Quick Freeze mode,
press the Mode Select (refer to button B on Page 10) repeatedly until the
Quick Freeze indicator is displayed (refer to indicator 2 on Page 10). To
exit Quit Freeze mode, press the Mode Select (button B) repeatedly until
the Quick Freeze indicator is no longer displayed.
11
Page 12

REFRIGERATOR COMPARTMENT TEMP. SETTING
The temp. of the refrigerator compartment can be set by pressing the
Adjust Refrigerator Temp. button (refer to button C on Page 10). The
refrigerator temp. indicator (indicator 6 on Page 10) will fl ash. Press the
Adjust Refrigerator Temp. button (C) repeatedly to cycle through the
o
available temp. settings (between 2
C and 8oC). NOTE: Exit all functions
(eg: Vacation Mode, Quick Cold, etc. before adjusting the temp.).
FREEZER COMPARTMENT TEMP. SETTING
The temp. of the freezer compartment can be set by pressing the Adjust
Freezer Temp. button (refer to button A on Page 10). The freezer temp.
indicator (indicator 5 on Page 10) will fl ash. Press the Adjust Freezer
Temp. button (A) repeatedly to cycle through the available temp. settings
o
(between -16
C and -24oC). NOTE: Exit all functions (eg: Vacation Mode,
Quick Freeze, etc. before adjusting the temp.).
IN-DOOR ICE MAKING
To make ice cubes, fi ll the in-door twist ice maker tray using the supplied
measuring cup (refer to item 3 on Page 8) with clean drinking water. Be
careful when opening / closing the door until the water in the tray is frozen.
To remove the cubes from the tray, gently press the button down. It can
be located on the right side of the Easy Twist Ice Maker (refer to item 9 on
Page 7), inverting the tray. The cubes will fall into the container below. The
container can be emptied into the larger ice cube storage compartment
below.
WATER DISPENSER
●
Only clean drinking water should be used in the water tank. It is strongly
recommended NOT to use anything other than water in the tank (eg:
carbonated soft drinks, milk, juice, etc.).
●
Do not fi ll the water tank past the maximum point as indicated.
●
If the dispenser is not fl owing as expected, check the water tank is
securely in place and fl ush against the door. Ensure all piping is correctly
in place.
●
Drain the water tank completely before removing from the refrigerator.
●
Do not remove any of the dispenser plumbing in the refrigerator door.
●
Clean the water tank before fi rst use and when the dispenser has not
been used for a long time (after draining completely).
●
It is recommended to clean the water tank every three (3) to six (6) months.
●
Be careful when opening and closing the door of the water dispenser and
water tank to avoid spilling water.
12
Page 13

Fill
r
wate
tank
here
Wire Rack
R
emove to Fill
ate r tank cover
W
ate rr tank
W
Water
Dispenser
To fi ll the water tank, remove the water tank cover.
Fill the water tank with clean drinking water.
USING THE WATER DISPENSER
Using a drinking cup or glass, position it under the
dispenser nosil and push it up against the water
dispenser lever (refer to image on right). Water will begin
FILLING THE WATER TANK
to fl ow from the dispenser into the cup or glass.
PUSH
Once the desired amount of water has been reached,
simply move the cup or glass away from the dispenser
lever and the water will stop fl owing automatically as the
lever returns to its original position.
WATER TANK & DISPENSER MAINTENANCE
Every three (3) to six (6) months, follow the steps below to maintain the
water tank and dispenser. NOTE: If detergent is used to clean any part
of the dispenser or water tank, fl ush the system fi ve (5) or six (6) times
by fi lling the water tank and empty through the dispenser to remove any
residue that could remain before use.
1) Completely empty the water tank.
2) Remove the water tank by gently pulling forward
o
slightly then lifting away at a 45
angle (refer to image
on right). Be careful when disconnecting from the
dispenser valve.
3) Clean the water tank and wipe the dispenser valve.
4) Allow the water tank and dispenser valve to dry.
5) Replace the water tank by sliding downward into place
and gently push back into place. Ensure the water tank is aligned with
the dispenser valve and is fl ush against the refrigerator door.
6) Flush the water dispenser fi ve (5) or six (6) times by fi lling and empty
the water tank through the dispenser before use.
13
Page 14

ENERGY SAVING TIPS
Adjust the temperature control to a setting that is acceptable for the
storage of the food. This will reduce the power consumption.
Only open the door when required and ensure all doors are closed
securely. Frequently opening or doors left open will increase power
consumption.
To maintain good air circulation, keep the shelves and crisper of the
refrigerator as supplied, and do not block air outlets.
MAINTENANCE
The appliance should be maintained and cleaned frequently. For your
safety, unplug the appliance from the mains power source before
performing any maintenance.
1.Interior and exterior maintenance
Clean the interior of the appliance with clean water and wipe it dry
with a piece of dry cloth.
Cleansers such as soap powder, abrasive cleaning powder, alkali
cleansers, chemical cloth, thinners, alcohol, acid petroleum products
and hot water should not be used to clean the refrigerator as they
may damage the painted cover and plastics.
2. Smearing can age the interior plastic components, so remove it as soon
as possible.
3. Wipe the door gasket clean, it is easy to damage the door gaskets if
polluted by stains, e.g. oil, sauce, etc.
4. The replacement of interior light
The interior lights use LED bulbs and can not be replaced. If the lights
stop working, please contact TECO service or an authorised TECO
service agent. (Refer to the Back Page for details).
5. Please check the points below after maintenance:
1) Is there any damage or loss of the power lead?
2) Can the power plug be inserted into the power socket correctly?
3) Is the power plug and/or lead heating up?
14
Page 15

CRISPERS & DRAWERS
Please be careful when handling and removing cripers and drawers.
Gently pull and lift to remove, clean and replace each of the refrigerator
and freezer items.
GLASS SHELVES & DOOR RACKS
To remove glass shelves for cleaning, pull the shelf out as far as possible
and then lift slightly. The shelf should lift away easily.
Clean the shelf completely, allow to dry before replacing.
To remove the door racks, grasp the rack with both hands and gently lift.
Once removed, clean and allow to dry before replacing.
DISCONNECTION OF THE APPLIANCE
If a power failure occurs, even in summer, the refrigerator could store food
normally for some time.
1, Power failure
During a power failure, do not put additional food in the appliance and
reduce opening the door frequently.
Place several ice cubes into a container if power failure is anticipated
beforehand, and place it in the top of the fridge.
2, Power failure during vacation
Before departure of a short vacation, remove any items that could spoil
if a power failure occurs. Ensure the door is closed fi rmly.
If going on a long vacation, remove all items, clean and wipe dry the
internal of the appliance, prior to disconnecting the power and leave the
door open.
3, Storage of appliance
If the refrigerator will be stopped for a long period of time (storage),
remove all items, clean and wipe dry the internal of the appliance,
unplug the appliance from the power outlet. The door should be kept
open in order to prevent unpleasant odours.
Unplugging the appliance from the power outlet, please
leave at least 5 minutes before reconnection.
15
Page 16

TROUBLESHOOTING
The following cases are not malfunctions:
1. Moisture may form as condensation on the outside of the appliance
during humid conditions. To remove excess moisture, wipe clean.
2. The fl ow of refrigerant through the pipeline coil could cause gurgling,
similar to water boiling. This is the normal function of the appliance.
3. It is normal that the sides of the appliance will get warm as a result of
the refrigeration system operation.
4. The appliance operation could cause electrical interference to electrical
equipment.
SYMPTOM: The refrigerator/freezer does not work.
SUGGESTION: It may not be connected to the power supply (plug, power
failure or blown fuse) and switched on. Check that the temp. setting is not
set to the minimum (warmest) setting.
SYMPTOM: The refrigerator does not work effi ciently as expected.
SUGGESTION: It may be caused by heavy frost, warm temperature
setting, frequently opening the door or low voltage.
SYMPTOM: The refrigerator makes an unusual noise.
SUGGESTION: It may be caused by an unbalanced appliance or unstable
surface, bottles are incorrectly placed and rattling, vibration from an object
on top of, behind or beside the appliance.
SYMPTOM: The compressor keeps working for a long period.
SUGGESTION: The environment temperature may be too high. The doors
may be opened frequently or they are left open. The temperature setting
may increase the working time of the compressor. Large amounts of warm
food recently placed in the appliance may also cause this symptom.
SYMPTOM: Unpleasant odours.
SUGGESTION: Interior may need cleaning. Some foods produce strong
odours, some containers can also cause odours. Food should be packed
tightly before being placed inside the appliance. Check if any food has
spoilt in the appliance.
SYMPTOM: Heavy frost occurs in the freezer compartment.
SUGGESTION: Make sure the door is correctly closed and the seal is not
obstructed.
SYMPTOM: Refrigerator or Freezer temperature is too cold.
SUGGESTION: Check the control panel and the temp. settings.
16
Page 17

SPECIFICATIONS
TSXS582WNBAM
Model Number
TSXS582SNBAM
Climate Class
Classication of
Installation and Use
Rated Total
Gross Volume (L)
Rated Total
Storage Volume (L)
Voltage
Frequency
Noise Level
Fridge
Freezer
Fridge
Freezer
V
Hz
dB
T
Group 5S
Indoor Use Only
347
235
342
183
230
50
47
Refrigerant Type
Ambient Operating
o
C
R600a
43
Temperature
Dimensions (mm)
Height
Width
Depth
IP Rating
Net Weight
Note: Product specifi cations are subject to change without prior notice.
For full specifi cation information, please refer to the rating plate attached
to the appliance.
Kg
1788
895
745
IPX0
109
17
Page 18

NOTES :
______________________________________________________
______________________________________________________
______________________________________________________
______________________________________________________
______________________________________________________
______________________________________________________
______________________________________________________
______________________________________________________
______________________________________________________
______________________________________________________
______________________________________________________
______________________________________________________
______________________________________________________
______________________________________________________
______________________________________________________
______________________________________________________
______________________________________________________
18
Page 19

Did you know?
TECO Australia’s product range also includes:
Top Load Clothes Washers
Front Load Clothes Washers
Twin Tub Clothes Washers
Auto Sensing Condenser and Vented Clothes Dryers
Refrigerators
Chest and Vertical Freezers
Bar Fridges
Dehumidifi ers
Televisions
Air Curtains and Air Conditioners
Visit www.teco.com.au for our full range.
19
Page 20

REPAIRS, SERVICE & WARRANTY
It is hazardous for anyone installing, removing, altering, repairing,
servicing, testing or certifying the gas system of a gas device (i.e.
charging, discharging or breaking into the refrigeration system that uses
hydrocarbon refrigerants).
Only an Authorised Service Person can carry out servicing or repairs to
this appliance. In Queensland the authorised person must hold a Gas
Work Authorisation for hydrocarbon refrigerants, before carrying out
servicing or repairs which involve the removal of covers.
Individuals will need to hold appropriate refrigeration/air conditioning
competencies and also training in hydrocarbon refrigerants. This type of
authorisation is provided to individuals only.
IF SERVICE IS REQUIRED:
If you have a problem, and the problem persists after you have made the
checks mentioned in this manual, contact:
TECO Australia’s Service on 1300 660 037 (8:30am-4pm Mon~Fri AEST)
Service Email had.service@teco.com.au Spare Parts had.parts@teco.com.au
For warranty details please visit www.teco.com.au
Complete and retain the following information:
Name of retailer: _________________________________
Date of purchase: ________________________________
Model No. : _____________________________________
Serial No. : _____________________________________
MFG code: _____________________________________
Please retain proof of purchase for warranty claims.
HBG-v3
www.teco.com.au
 Loading...