

Page 1

TDW15WCG/ TDW15SCG
15 plac e settings
Alt function
Page 2

Fo r detai led operating meth od read the cor responding con tent on the instruction manual.
Switch on the appliance Open the door, press the On/Off button to switch on the appliance.
Compartment A:
For each wash cycle.
Fill the detergent dispenser
Compartment B:
For programs with pre-wash only.
(Follow the user instructions)
C
B
A
Check the rinse aid level
Load the baskets
Select a programme
Running the dishwasher
Changing the programme
Add forgotten dishes in the
dishwasher.
Mechanical indicator C.
Electronic LED Indicator also on Control Panel.
Scrape off any large particles food. Soften remnants of burnt food in pans,
then load the baskets. Refer to the dishwasher loading instructions.
Press the Programme Button until the selected programme lights up.
( See the section entitled “Operation instruction”
Turn on the water tap , close the door. The machine will start working after about 10 seconds.
1. A running cycle can only be modified if it has been running for a short time. Otherwise the detergent
may have already been released and the water already drained. If this is the case, the detergent
dispenser must be refilled.
2. Open the door and
to cancel the running program.
3.Select a new programme.
4.Close the door,the machine will restart after about 10 seconds.
1.Open the door a little to stop the dishwasher.
2.After the spray arms stop working, you can open the door completely.
3.Add the forgotten dishes.
4.Close the door, the dishwasher will start running again after 10 seconds.
press the Programme Button for more than 3 seconds
Open th e door c ar efully.
Hot steam may escap e
when the door i s open ed!
If the appliance is switched
off during a wash cycle.
Switch off the appliance
Turn off the water tap,
unload the baskets
If the appliance is switched off during a wash cycle, when switched
on again, please re-select the washing cycle and operate the dishwasher
according to the original Power-on state.
When the working cycle has finished, the buzzer of the
dishwasher will sound 8 seconds, then stop.
Turn off the appliance using the On/Off Button.
Warning: wait a few minutes (about 15 minutes) before unloading the dishwasher to avoid handling
the dishes and utensils while they are still hot and more susceptible to breakage.
They will also dry better. Unload the appliance, starting from the lower basket.
Page 3
Dear Cu st omer,
This ap pliance is intended to be used in hous ehold
and similar applications suc h as:
-sta ff kitc hen areas in shops, offices and other
workin g environments ;
-farm houses;
-by cli en ts in hotels, motels and oth er re si dential
type en vironments;
-bed and breakfast type environ me nt s.
Plea se carefully read this manua l bef ore using the
dishwash er, it will help you to use and maintain the
dishwash er properly.
ep it as a re fer in the later days .
Ke
Pass it on to an y sub sequent owne r of the ap plianc e.
Cont ro l Panel. ............... .... ............. .. .. ..............2
Dish wash er Fe atures...... ...... ............... ...... ... ...2
A. Rins e Aid Dispenser........ ................. .. ..3..... .. .
B. Deterg ent ................ ....... ...... .. .............4.... .. ..
Atte ntion before or after loading the Dis hwas her
Basket s..... .................................. ...... .............6
The Method Loading Normal Dishware
.....................6
This ma nu al co ntains secti ons on safety Instructions,
Operat in g Instructions, Installation Inst ru ctions an d
Tro ubleshooting Tips, etc.
To review the section on troubleshoo ting Tips
will help you to solve some common pro blems
by yo urse lf .
yo u can no t solve the problems by yo ur se lf ,
If
plea se ask for the help of profession al technicians .
10
Wash Cycle Table....................................................10
Turning on the Appliance.. .....................................10
Change the Programme...........................................11
Forget to Add Dish ..................................................11
At the End of the Wash Cycle..................................12
13
Filtering System........................................................13
Caring for the Dishwasher........................................14
15
Positioning the Appliance...................................... ..15
About Power Connection.........................................15
Aqua Stop Hose / Water Connection........ ..............16
Start of Dishwasher..................................................17
18
Before calling for service...........................................18
Error codes.............. .................................... ..........20
Technical information...............................................20
Th
e manuf actu rer, follow in g a policy of constant
develo pmen t and upd at ing of the product, may
make modi fi ca tions with out giving prior notice.
Page 4
When using your dishwasher, follow the precautions listed below:
This appliance must be grounded. In the event of a
malfunction or breakdown, grounding will reduce
the risk of anelectric shock by providing a path of
least resistance of electric current. This appliance
is equipped with a cord having an equipmentgrounding conductor and a grounding plug.
The plug must be plugged into an appropriate outlet
that is installed and grounded in accordance with
all local codes and ordinances.
Do not abuse, sit on, or stand on the door or dish
rack of the dishwasher.
Do not touch the heating element during or
immediately after use.
(This instruction is only applicable to machines
with a visual heating element.)
Do not operate your dishwasher unless all
enclosure panels are properly in place. Open
the door very carefully if the dishwasher is
operating, there is a risk of water squirting out.
Do not place any heavy objects the
door when it is open. The appliance could tip
forward.
When lo ad ing items to be washed:
1) Loca te sh arp ite ms so that they are not likel y
to da ma ge the door seal;
2 Warn ing: Knives and other utens ils with
)
shar p poi nts must be loaded in the basket
wi th th eir points down or placed in a
hori zontal position.
When us in g your dishwasher, you should
prev en t plastic items from coming in to co ntac t
with th e hea ting element.(This inst ru ct io n is only
applic able to machines with a visu al heating
elemen t. )
Chec k tha t the detergent comparme nt is em pty
afte r com pletion of the wash cycle.
Do not wash plastic items unless they are marked
dishwasher safe or the equivalent. For plastic items
n
ot so marked, check the manufacturer's
recommendations.
Use only det er gent and rinse additiv es
design ed for an automatic dishwas her.
Neve r use so ap , laundry detergent , or han d
wash in g detergent in your dishwas he r. Kee p
these pro ducts out of the reach of child re n.
on or stand on
Improper connection of the equipment-grounding
conductor can result in the risk of an electric shock.
Check with a qualified electrician or service
representative if you are in doubt whether the
appliance is properly grounded. Do not modify the
plug provided with the appliance; If it does not fit
the outlet. Have a proper outlet installed by a
qualified electrician.
Keep children away from detergent and rinse aid, keep
child away from the open door of the dishwasher,
ren
there could still be some detergent left inside.
This appliance is not intended for use by persons
(including children with reduced physical, sensory or
mental capabilities, or lack of experience and
knowledge ,unless they have been given supervision
or instruction concerning use of the appliance by a
person responsible for their safety.
Children should be supervised to ensure that they do
not play with the appliance.
The dishwasher must always be connected to
the water system using new hose sets.
Dish wa sher detergent s are stro ngly alkaline, they
can be extre mely dangerous if swal lo wed. Avo id
contac t with skin and eyes and keep chil dren away
from the dishwas her whe n the door is open.
The door sho ul d not be left open,
since thi s cou ld increase the risk of tr ip ping.
If th e supply cord is damaged, it mu st be replaced
by the manufacturer or its ser vi ce agent or a
simi la rly qualified per so n in order to avoid a
hazard .
If the app lian ce is installed on a car pe t floor,
take ca re th at the openings in its base are no t obs tructed.
Remove the door to the washing compartment when
removing an old dishwasher from service or discarding it.
Plea se di sp ose of packing materials properly.
Use the dishwasher only for its intended function.
During in stallation, the power supp ly must not
be exce ss ively or dangerously ben t or fla ttened.
Do not tamper with controls.
The appli ance is to be connect ed to th e wat er
ma ins usi ng new hose sets and that old ho se -s ets
should not be reused.
The max im um number of pla ce settings to be
wash ed is 15 .
The max im um permissible inlet wat er pressure is
1M pa.
The min im um pe rmissible inlet wat er pr es sure is
0.04 Mp a.
)
Page 5
To get the best pe rforman ce f rom your dishwasher, read all operating inst ructions
be fore u sing it for the first t ime.
1 2
1 2
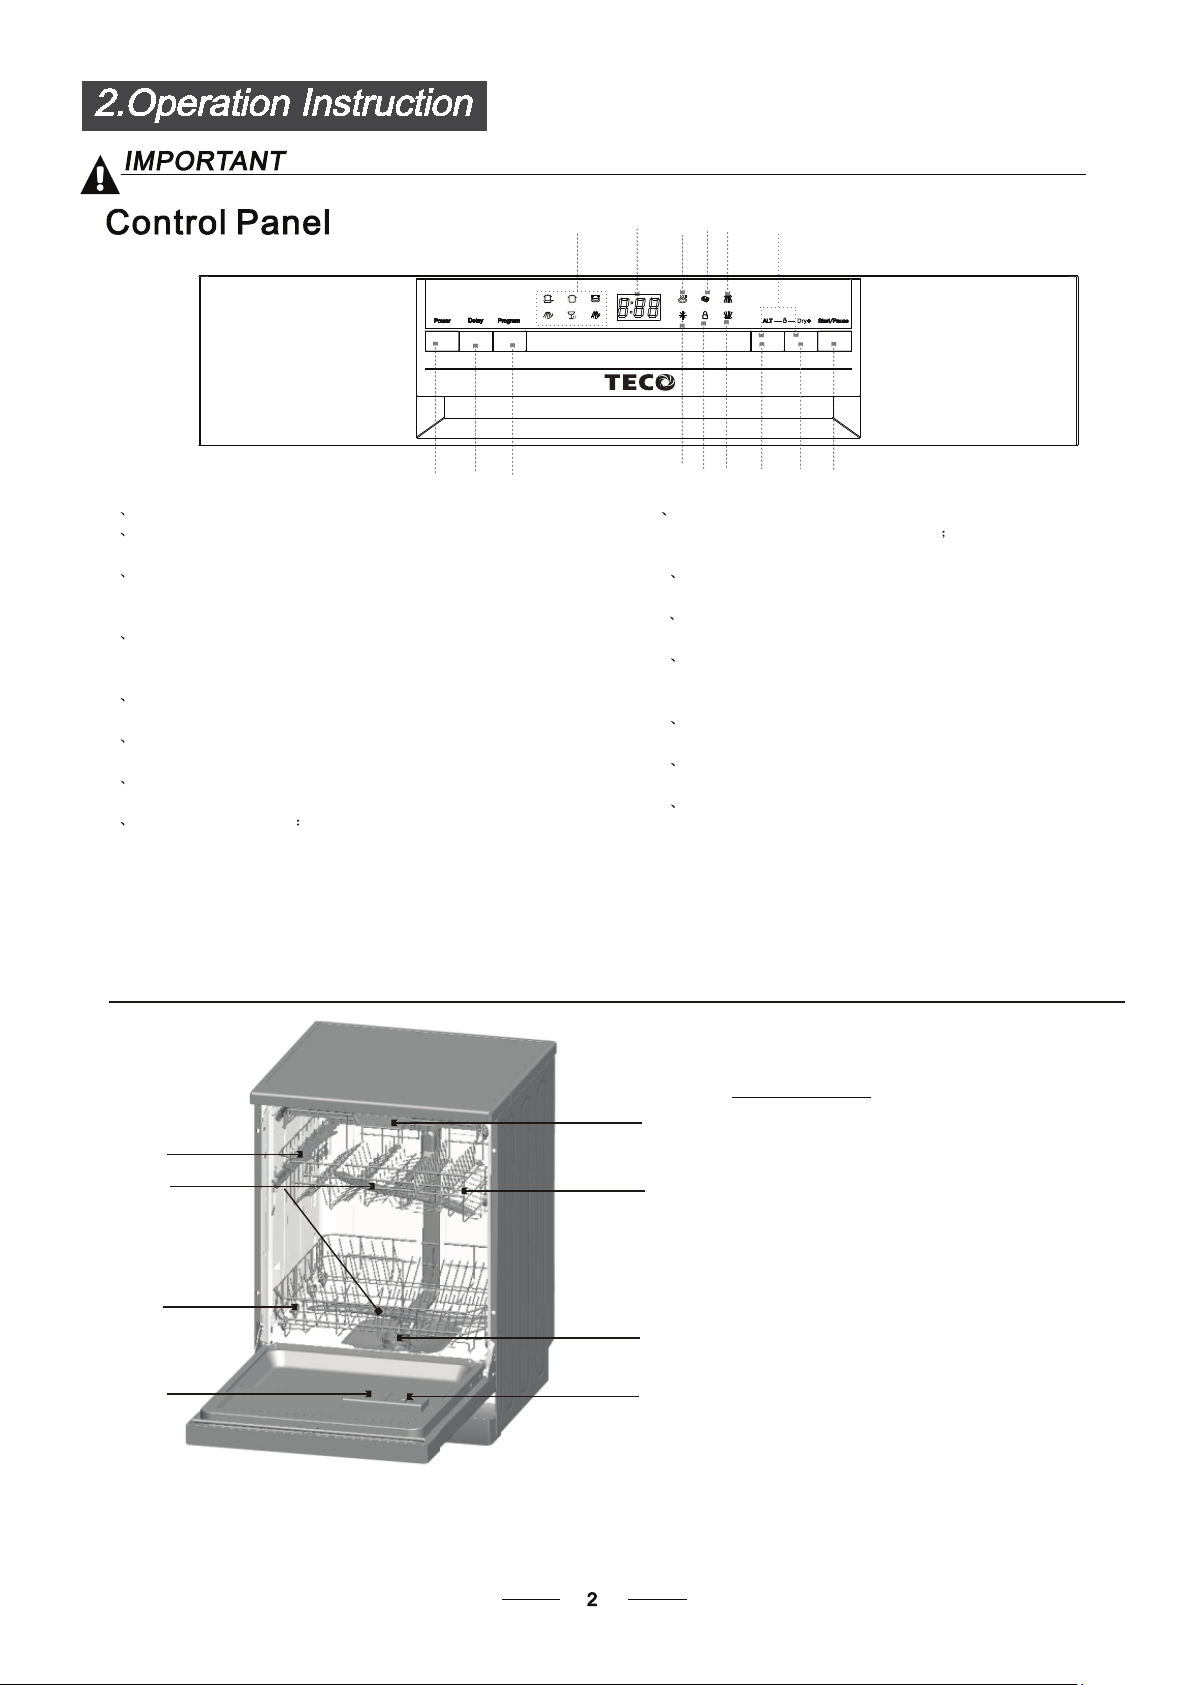
1 Power switch: To turn on/off the power supply.
2 Delay button: The START DELAY will allow you to delay the
start time of any cycle automatically up to 24hours.
3 Program button : Press the key to scroll through the wash
program. The corresponding programme light will be ON to
indicate which WASH PROGRAM has been selected.
4 ALT button : Press this button you can choose the
additional function "3 IN 1" ,washing of upper layer or washing
lower layer and the corresponding light flashes.
5 Extra Dry : Press this button you can choose or cancel the
Extra Dry function.
6 Start \Pause button: The appliance will start or pause the expected
washing cycle.
7 Child lock button: Press DRY & ALT together for at least 3 sec.
could be locked and any button can not be used.
8 Program indicator light When you select a washing programme ,
3
the corresponding light will display.
8 9
15
3
3
of
11
10
12
9 Dry+ indicator: An increased temperature during the final rinse
stage will improve the drying process The indicator will be
available when the Dry+ button is selected.
10 Rinse aid refill indicator: The indicator lights up when dispenser
needs to be refilled.
11 3 in 1 indicator: The indicator light
function is selected.
Child lock :
12 indicator The "Child Lock" will be activated
you press the Child lock buttons for 3 seconds, and the 3 in 1.
"Child lock"indicator lights up after flashing 6 times.
13 Washing light of upper layer: To come on when the upper
layer is selected.
14 light of lower layer: To come on when the lower
Washing
layer is selected.
15 Digital display: To display the running time remain, malfunction
codes and delay time.
13
14
7
Dry+
4
4
6
5
s up when the a
when
Dishwasher Features
8
2
3
5
Front View
7
1
4
6
1 Upper Basket
2 Spray Arms
3 Lower Basket
4 Filters
5 Detergent Dispenser
6 Rinse Aid Dispenser
7 Cutlery Tray
8 Cup Holder
Page 6

Befo re using your di shwasher for the first time:
A. Rins e aid dispe ns er
B. Detergent
Rinse Aid Dispenser
Th e rinse aid is rele ased during the final rinse to prevent water fr om forming dr opl ets on you r dishes, whi ch can
le av e spots and stre aks. It also impro ves dryi ng by al lowing water to roll off the dishe s. Your dishwas he r is
de si gned to use liqu id rinse ai ds. The ri nse aid dispe nser is located inside the door ne xt to the deterg ent dispense r.
To fi ll the dispen ser, open the cap and pour the rinse aid in to th e dis penser until the level ind icator tur ns comp le tely
bl ac k. Th e volume of the rinse aid cont ainer is ab out 110m l.
Function of Rinse Aid
Rins e aid is automat ically added du ring the last ri nse, ensur ing tho ro ugh ri ns ing, and spot an d streak free dr yi ng.
Attention!
Only use branded rin se ai d for dishw asher. Never fil l the rinse ai d dis penser with any other subs tances
(e.g . Dishwasher cl eaning age nt , liquid dete rg ent). This would dam age the appli an ce.
When to Refill the Rinse Aid Dispenser
If ther e is no rinse-aid warni ng light in the cont ro l panel, you can judg e the amount of rinse- ai d by the color of th e
opti cal level indic at or "C" loc at ed nex t to the cap. Whe n the rinse-aid co ntainer is full , the whole indicator will be
dark .A s the rinse-aid di minishes, th e size of th e dar k dot decreases . You shou ld never le t the rinse ai d get below
1 / 4 ful l.
As th e rinse aid dimini shes, the size of the black dot
on th e rinse aid leve l indicator cha nges, as illu st rated below.
Full
3 / 4 ful l
1 / 2 ful l
1 / 4 ful l - Should ref ill to eliminat e spotting
Empt y
RINSE AID DISPENSER
To open th e dispense r, turn the cap to the "open" (left ) arrow and lift it out.
1
Pour the rinse aid into th e dispenser, being caref ul no t to overfi ll .
2
Re place the cap by inser ti ng it aligned with " open" arrow and tu rning it to th e closed (right) arrow.
3
Be ca re ful not to ove rf ill the dispens er, because th is could ca us e over sudsing. Wi pe away any spil ls
wi th a damp clot h. Don't forget to re place the cap be fore you cl ose the dishw asher door.
At tention!
Cl ea n up any rinse ai d spilt during filling with an absorbent clo th to avoid exce ss fo aming
du ring the next wash .
Page 7

Adjusting Rinse Aid Dispenser
The rins e ai d di sp en ser has si x or four settings. Al wa ys start wit h the dispenser
set on "4". If spo ts a nd poor drying are a pr ob lem, increase the amo un t of rinse
6
5
4
3
2
1
Increase the dose if there are drops of wate r or lime spo ts o n th e dishes after washing.
Re du ce it if there are sticky whitis h st ai ns on yo ur dishes or a blu ish film on glassw are or
knif e blades.
Detergents w ith its ch emic al ingredient s are necess ar y to remove dirt, crus h di rt a nd tr ansport it out of the d ishw as h er.
Mo st o f the co mmercial quality detergen ts a re su itable for this purpose.
aid dispense d by r em ov ing the dispenser lid and r otatin g the dial to "5". If th e
dishes still are n ot d ry ing pr operly or are showi ng spo ts , ad just the dial to the next
higher lev el until you r dish es are spot-free. The re commended setting is "4 ".
(Facto ry v alue i s "4 ". ) Please check the supplied model and individual adjustment
methods as they may differ from your model.
Detergents
There are 3 so rt s of d etergents
1.Wit h ph os ph ate and with chlorine
2.Wit h phosph at e and wi thout chlorine
3.Wit hout p hosphate and without chlorine
Normal ly new pul verised detergent i s with ou t ph osphate. Thus the water softener fu nc tion of
phosph at e is not given. In this case w e reco mm end to fill salt in the salt containe r even when
the hardne ss of water is only 6 dH. If detergents witho ut ph osphate are used in the cas e of h ar d wa te r
ofte n wh it e spot s appear on dishes and glasse s. In this case please add more de tergen t to reach
bett er r es ul ts. Detergents without chlo ri ne do only bleach a little. Str ong an d colo ured spo ts w ill not
be remov ed compl etely. In t his case please choose a program wi th a higher tempera ture.
°
Concentrated Detergent
Base d on t he ir c hemical composition, dete rg en ts can be split in two basic type s:
conven tion al, alkaline detergen ts w it h caustic components
low al kali ne concentrated detergent s with natural enzymes
The use of normal washin g pr ograms in combination with conc en trated detergents
redu ces poll ution and is good for your di shes ; th ese wash programs are specifi ca ll y matched
to the dir t- di ss olving properties of th e en zy me s of the concentrated d eter ge nt. For this reason
norm al wash programs in wh ic h conc entrated detergen ts a re us ed can achieve the same
“ ”
resu lts th at c an otherwise only be achiev ed u sing intensive progra ms .
Use of "3 in 1" Detergent Tablets
General Advice
1. Before using these products you should first check that the water hard-ness in your supply is
compatible with the use of these products as the detergent manufacturers instructions (on the
product packaging).
2. These products should be strictly used according to the detergent manufacturers instructions.
3. If you encounter problems when using "3 in 1" products for the first time then please contact the
detergent manufacturers care line (the telephone number is given on the product packaging).
These products are detergents with integrated and combined detergent/rinse aid functions.
Before using these products you should first check that the water hardness in your supply is
compatible with the use of these products as per the detergent manufacturers (on the product
packaging).
To select "3in1" function:
1. close the door and select the 3in1 washing cycle by pressing the "ALT" button until the "3in1"
indicator blinks.
2. The 3in1 washing cycle will be available after pressing the start/pause button , and the"3in1"
indicator lights.
To cancel "3in1" function:
To cancel 3in1 washing cycle by pressing the "ALT" button or follow the "Change the programme"
instructions.
If you decide to switch to the use of a standard detergent system we advise that you:
1. Refill the rinse aid compartments.
2. Switch the water hardness setting to the highest possible position and run for three normal cycles
without load.
3. Readjust the water hardness setting again according to the conditions for your region (For more
information please refer to your instruction manual).
Note: Drying outcome may vary depending on 3 in 1 product used.
“ ”
“ ”
Page 8

Amount of Detergent to Use
If the lid is cl os ed : press release button. The lid will sprin g ope n.
lway s add the detergent just before sta rt ing each wash cycle.
A
Only use bra nd ed detergent an d rin se aid for dishwashe r.
Dish wa sher detergent is corros ive! Take care to keep it out of re ach of chi ld ren.
Proper Us e of Det ergent
Use only det er gent specificall y mad e for the use in dishwas he rs . Keep your detergent fre sh an d dry.
Don' t put powdered deterge nt in to th e dispenser until you're re ad y to wash dishes.
A
F
ill in Detergent
Fill th e det er gent dispenser with de tergent.
The marki ng indicates the dosing lev els , as
illust ra ted on the right:
The pla ce fo r mai n wash cycle deterge nt .
A
The pla ce fo r pre -w as h cycle detergent.
B
Plea se ob se rve the manufactu re rs dosing and storag e
Reco mm endations as stated on the deter ge nt packaging.
Clos e the lid and press until it locks in plac e.
If the dishe s are heavily soiled, pla ce an additional
dete rg ent dose in the pre-wash deterge nt chamber. This deterg en t will take effect during the pre-wash pha se .
B
T
he info rm atio n about the amount of dete rg en t for the single prog ra mm e please refer to the Was h
Cycle Ta ble on the page 8.
The deter ge nt amount could be adju sted according to the soi li ng level and the specific hardne ss of water.
Plea se ob se rve the manufactu re r's recommendation s on the de tergent packaging.
Page 9

5 Loading the Dishwasher Baskets
Loading the baskets according to (*AS/NZS 2007.1) for best performance of the dishwasher,
Features and appearance of baskets and Cutlery tray may vary from your model.
Attention before or after Loading the Dishwasher Baskets
1. Scrape off any large amounts of leftover food. It is not necessary to rinse the dishes under
running water. Place objects in the dishwasher in the following way:
A. Items such as cups, glasses, pots/pans, etc. are stood upside down.
B. Curve items, or those with recesses, should be at a slant so that water can run off.
C. They are stacked securely and can not tip over.
D. They do not prevent the spray arms from rotating while washing takes place.
2. Very small items should not be washed in the dishwasher as they could easily fall out of the
Baskets.
3. The upper and lower baskets can not be pull out in
the same time when the dishwasher is Loading, or it
May lead to dumping.
Removing the Dishes
To prevent water dripping from the upper basket into the lower basket, we recommend that you
empty the Lower basket first and then the upper basket.
Loading the Upper Basket
Upper Basket
The upper basket is designed to
hold more delicate and lighter
A
14
dishware such as glasses, coffee
and tea cup and saucers, as well
as plates, small bowls and
shallow pans (as long as
IN
they are not too dirty).
Position the dishes and
cookware so that they
Do not get moved by
the Spray of water.
B
15
A
13
A
11
A
15
C
A
A
A
10
A
6
B
5
1
14
B
9
B
14
C
B
1
B
8
5
4
B
1
Upper basket
Type
A
B
C
Item
Cup
Glass
Saucer
Adjusting the Upper Basket
Height adjustment mechanism on the upper basket of your machine is designed to let you adjust
the height of the upper basket up or down as needed. The upper basket of is set to a lower
position in factory settings. In order to raise the upper basket, hold the upper basket from both
sides and pull it upwards. In order to lower it, hold it from both sides and lift it again.
NOTE: Ensure both sides of the upper basket adjustment mechanism are in the same position
when lifting or lowering the basket and ensure basket is secured firmly before use.
6
Page 10

pper position
U
Lower position
Loading the Lower Basket
We recommend that you place large items which are most difficult to clean in to the lower basket:
pots, pans, lids, serving dishes and bowls, as shown in the figure below.
It is preferable to place serving dishes and lids on the side of the baskets in order to avoid blocking
the rotation of the top spray arm.
Pots, serving bowls, etc. must always be placed top down.
Deep pots should be slanted to allow water to flow out.
The bottom basket features fold down tine rows so that larger or more pots and pans can be loaded.
Lower Basket
I
NOTE: Oversized dishes may
not be suitable for this appliance
as they may obstruct the spray
arms and cause damage to the
appliance or dishes. Please
check spray arms are not
obstructed before starting each
wash.
This appliance has been tested
to meet Australian Standards for
crockery items and plates
AS/NZS 2007.1
15
Lower basket
Type
G
H
15
G
15
H
I
Item
Soup plate
Dinner plate
Dessert plate
Upper/Lower basket Folding racks
Folding racks consisting of three/two parts in the upper/lower basket of your machine are designed in
order to let you place big items easier as pots, pans, etc. If requested, each part can be folded
separately, or all of them can be folded and larger can be obtained. You can use folding racks by
rasing then upwards, or by folding.
Upper Basket
1
2
For optional
1
Lower Basket
2
7
Page 11

Cutlery tray
Arrange the cutlery in the tray as shown. Cutlery should be placed to ensure that water
runs off freely.
Cutle ry t ray
1 1
4 4
Type
1
Dessert s poons
2
3
Item
Tea spoon s
Soup spoo ns
3 3
5 5
2 2
For washing in the dishwasher the following cutlery/dishes
Are not suitable
Cutlery with wooden, horn china or
mother-of-pearl handles
Plastic items that are not heat resistant
Older cutlery with glued parts that is not
temperature resistant
Bonded cutlery items or dishes
Pewter or cooper items
Lead crystal glass
Steel items subject to rusting
Wooden platters
Items made from synthetic fibre
4
5
1 2
WARNING!
Do not let any item extend through bottom
Forks
Knive s
4
3
5
Are of limited suitability
Some types of glasses can become
dull after a large number of washes
Silver and aluminium parts have a
tendency to discolour during washing
Glazed patterns may fade if machine
washed frequently
NOTE:
new dishes please make sure that they are suitable for dishwashers.
Do not put in items that are dirty of cigarette ash, candle wax, lacquer or paint. If you buy
8
Page 12

Please do not overload your dishwasher. There is only space for 15 standard dishes. Do not
NOTE:
use dish that is not suitable for dishwashers. This is important for good results and for reasonable
energy consumption.
Loading Cutlery and Dishes
Before loading the dishes, you should:
Remove large left-over
Soften remnants of burnt food in pans
When Loading the Dishes and Cutlery, Please Note:
Dishes and cutlery must not impede the rotation of the spray arms.
Load hollow items such as cups, glasses, pans etc. with the opening downwards so that water cannot
collect in the container or a deep base.
Dishes and items of cutlery must not lie inside one another, or cover each other
To avoid damage to glasses, they must not be touched
Load large items which are most difficult to clean into the lower basket
The upper basket is designed to hold more delicate and lighter dishware such as glasses, coffee and
tea cups
Attention!
Long bladed knives stored in an upright position are a potential hazard!
Long and/or sharp items of cutlery such as carving knives must be positioned horizontally in the upper
basket
Damage to Glassware and other Dishes
Possible causes:
Type of glass or manufacturing process. Chemical composition of detergent.
Water temperature and duration of dishwasher programme.
Suggested remedy:
Use glassware or porcelain dishes that have been marked dishwasher-proof by the manufacturer.
Use a mild detergent that is described as kind of dishes. If necessary, seek further information from
detergent manufacturers.
Select a programme with a low temperature.
To prevent damage, take glass and cutlery out of the dishwasher as soon as possible after the
programme has ended.
At the End of the Wash
When the working cycle has finished, the buzzer of dishwasher will ring for 6 times, then stop. Turn
off the appliance using the "Power" button, shut off the water supply and open the door of the
dishwasher. Wait a few minutes before unloading the dishwasher to avoid handling the dishes and
utensils while they are still hot and more susceptible to breakage. They will also dry better.
9
Page 13

6. Starting a Washing Programme
Wash cycle table
Program
Intensive
Heavy
Normal
(AS/NZS 2007.1)
Rinse
Rapid
Soak
Cycle Selection
Information
For the heaviest soiled loads,
such as pots, pans, casserole
dishes and dishes that have
been sitting with dried food
on them for a while.
For heavy soiled loads,
such as pots, plates, glasses
and lightly soiled pans.
standard daily cycle.
For normally soiled loads,
such as pots, plates, glasses
and lightly soiled pans.
Standard daily cycle
For dishes that need to be
rinsed and dried only
A shorter wash for lightly
soiled loads that do not
need drying.
To rinse dishes that you
plan to wash later that day
Description
of Cycle
Pre-wash(40 )
Main wash(55 )
Rinse 1
Rinse 2
Hot rinse(65 )
Drying
Main wash(60 )
Rinse 1
Rinse 2
Hot rinse(65 )
Drying
Pre-wash
Main wash(44 )
Rinse
Hot rinse(45 )
Drying
Pre-wash
Hot rinse(70 )
Drying
Main wash(40 )
Hot rinse(50 )
Pre-wash
Detergent
Pre/main
5/29g
(or 3in1)
5/29g
(or 3in1)
5/29g
(or 3in1)
20g
Running
Time
(min)
167
142
165
60
47
7
Energy
(kWh)
1.35
1.25
0.66
0.86
0.60
0.06
Water
(L)
16.0
12.5
12.2
8.0
8.0
4.0
AS/NZS 2007.1:This programme is the test cycle. The information for comparability test
in accordance with AS/NZS.2007.1, as follows:
- Capacity: 15 settings
- Position of Upper basket: Low position
- Rinse aid setting:5(or 4 for four setting dispenser)
We recommend you open the door slightly 5 0 mm to assist in drying of the dishes
NOTE:
after every wash.
Turning on the Appliance
Starting a wash cycle...
Draw out the lower and upper basket, load the dishes and
1. push them back. It is recommended to load the lower basket first, then the upper one (see the
section entitled "Loading the Dishwasher"). Pour in the detergent.
2. Insert the plug into the socket. The power supply is 230V AC 50 Hz.
Make sure that the water supply is turned on to full pressure. Close the door, press the "Power"
button, press the " program " button to select a desired "Wash cycle". (See the section entitled
"Wash Cycle Table".) .
10
Page 14

NOTE: A click could be heard when the door is closed perfectly.
When the washing is over, you can shut off the switch by pressing "Power" button.
Change the Programme.
Premise: A cycle that is underway can only be modified if it has only been running for a short time.
Otherwise, the detergent may have already been released, and the appliance may have already
drained the wash water. If this is the case, the detergent dispenser must be refilled (see the section
entitled " Fill in the Detergent " ).
Press the "Power" button and turn on it again. Press the "program” button to choose the expected
cycle setting (see the section entitled "Starting a wash cycle. . . " ).
NOTE: If you open the door when the washing cycle underway, the appliance will pause and emit
warning signals, the display appears E1. When you close the door, the machine will keep on working
after 10 seconds.
The 6 programme lights show the state of the dishwasher :
a) One of the programme lights on --> cycle running
b) One of the programme lights bliking--> pause
NOTE: If all the lights begin to glimmer, that indicates the machine is out of order, please turn off the
main power and water supply before calling a service.
Forget to Add Dish
A forgotten dish can be added any time before the detergent cup opens.
1Press the Start/Pause button, Open the door a little to stop the wash program.
2 After the spray arms stop working, you can open the door completely.
3 Add forgotten dishes.
4 Close the door, press the Start/Pause button and the dishwasher will work after ten seconds.
WARNING!
It is dangerous to open the door when washing, because the hot water may scald you. Switch Off
the Dishwasher
The digital display appears "---" and the buzzer rings 6 times, only in this case the programme
has ended.
1.Switch off the dishwasher by pressing the "Power" button.
2.Turn off the water tap!
Open the door carefully. Hot steam may escape when the door is opened!
Hot dishes are sensitive to knocks. The dishes should therefore be allowed to cool down around
15 minutes before removing from the appliance.
Open the dishwasher's door, leave it ajar and wait a few minutes before removing the dishes. In
this way they will be cooler and the drying will be improved.
Unloading the dishwasher
It is normal that the dishwasher is wet inside.
Empty the lower basket first and then the upper one. This will avoid water dripping from the upper
basket onto the dishes in the lower one.
11
Page 15

When the w or king cycle has finished, the buz ze r of the dishwasher will sound for 8 s ec onds, then stop. Turn off
the appliance u sing the ON /OFF button, shut off the water supply and ope n the door of the dishwasher.
Wai t for a few minutes before unloading the dish wa sher t o avoid handling the dishes and uten sils while they
are stil l ho t and more susceptible to breakage. They will also dr y be tter.
Switch Off the Dishwasher
The progra m ligh t is on but is not blinking, only in this c ase th e pr ogramme has ended.
1.Switc h off the di shwash er by pressing the ON/OFF b utton.
2.Tu rn off t he wat er tap!
Open the door carefully.
Hot di shes a re sensitive to knocks. The dishes should th erefore be allowed to cool down aro und 15 m inutes
befo re rem oving from the appliance.
Open the dis hw asher's door, leave it ajar and wait a f ew minut es before removing the dish es. In t hi s way they
will be cooler a nd the drying will be improved.
Unloading the dishwasher
It is no rmal t hat the dishwasher is wet inside.
Empt y th e lo wer basket first and then the upper one. This will a void w ater dripping from the upper Basket onto
the dish es in th e lower one.
Was h th e arms in soapy and warm wate r and us e a so ft brush to
clean th e je ts . Replace them after rinsing th em t ho roughl y.
When following this procedure from step1 to step 3, the filter system will be removed;
when following it from Step 3 to Step 1, the filter system will be installed.
It is da nger ou s to open t he door when washing, be ca use the hot water may scald you.
12
Page 16

The filter p re vent s larger r em nant s of f ood or o ther objects from getting inside the pump.
The residues may b lock t he filter, in this case they must be removed.
The filter system cons is ts of a coar se filter,a flat (Main filter)
And a mi cr ofil ter(Fine filter).
1
2
and easily become trapped in the course fi lt er
caught by the filter, gently squeez e the tap on the top of this
evomeroTniardeht
3
2
1
3
Main filter
Food and soil particles tr apped in t his filt er are pulver iz ed by a
special jet on the lower spr ay a rm and w as hed down to drain.
Coarse filter
Larger ite ms , such as piec es of bones or glass, that could block
the item s
er and lift out.
filt
Fine filter
This filter holds soil and food resi dues in th e su mp area and
prevents it from being on the dishes during wash cycle.redeposited
Filter assembly
The filter e fficiently
For best per fo rm ance and r esults , th e filter must be cleaned regularly. this reason, it is a good idea to
remo ve t he lar ger food par ti cles t rapped in t he filter after each wash cycle by rinsing the semicircular filter and
cup under running water. To remove the filter devic e, pull the cup h andle in the upward direction.
remove s food particl es f ro m the wash water, allowing it to be recycled during the cycle.
For
The dishwa sh er m ust neve r be used without the filters.
Impr oper r eplace ment of the filter may reduce the perfo rm an ce level of the appliance
and damage dishes and utensils.
Step 1 contrarotate the
Coarse filter ,and then lift it up;
Step 2 lift the Flat filter up
1 2
NOTE: If operate from step 1 to step 2, the filter system will be removed; while operate from step 2
to step 1, the filter system will be installed.
13
Page 17

Remarks:
- Inspe
ct the fil ters for blocking afte r eve ry time the dishwash er has been used.
- By unscr ew ing the coarse filte r, you ca n remove the filter system. Remove an y foo d remnants and
clean the fi lter s under running wa ter.
The entire filter assembly should be cleaned once a week.
Cleaning the Filter
To cl ean the co arse filter and the fin e fil te r, use a cleaning brush. Re as se mble the filter part s as sho wn in the figures
on the pre vi ou s page and reinsert the enti re assembly in the dishwa sh er, positioning it in its seat and pres sing downwards .
When cleani ng the filters, don't knock on them. Other wise, the filters co uld be
contorted and the performance of the dis hwasher c ould be dec reased.
The con tr ol panel can be cleaned by usin g a lightly dampened cl oth.
After cle an ing, make sure to dry it th or ou ghly.
For the exterior, use a good appliance po lish wax.
Neve r use sh ar p objects, scouring pa ds or harsh cleaners on any part of the di sh washer.
Cleaning The Door
To cl ea
To av oid penetration of water into the doo r loc k and electrical com po nents, do not
use a sp ra y cleaner of any kind.
Neve r u
and ele ctrical components .
Abrasi ve agents or some pap er to wels should no t be used because of the ri sk of
scratc hing or leaving spot s on the stainl es s steel surface.
n the edge around the door, you shoul d use on ly a soft warm, damp cloth.
se a spr ay clea ner to clean the door panel as it may da ma ge the door lock
Protect Against Freezing
please ta ke frost protection meas ur es on the dishwasher in wint er. Ev er y fter wa shin g cycles,
please oper ate as follows
1.Cut off the electr ic al po wer to the dishwashe r.
2.Turn off the water supply and disco nnect the water inlet pip e fro m the wa ter valve.
3.Drain th e wat er from the inlet pipe and wa te r valve. (Use a pan to gather the wat er)
4.Rec on ne ct the water inlet pi pe to the wat er valve.
5.Rem ov e the filter at the bottom of the tub an d use a sponge to soak up water in the sump .
:
If your dishwasher canno t w ork because of the ic e,
please co ntact profession al service persons.
time a
Cleaning the Spray Arms
It is ne
ce ssary to clean the spray arms reg ul arly for hard
water che micals will clog the spray arm jets and bearings.
To remo ve th e upper spray arm, hold the nut, rota te th e arm
clockw ise to remove it.
To remo ve th e lower spray arm, pull out the sp ray arm upward.
Was h the arms in soapy and warm wat er and use a soft brush to
clean the je ts. Replace them after rinsin g them thoroughly.
14
Page 18

After Every Wash
r every wa sh , turn off th e water supply to the
Afte
applia nc e and leave the door sli ghtl y open so that
mo istu re an d odours are not trappe d insid e.
Remove the Plug
Before cl ea ning or performin g mai ntenance, always
remo ve th e plug from the socket.
No Solvents or Abrasive Cleaning
To cl ean the exterior and rubb er pa rts of the dishwas her,
do not use solv ents or abrasive cle aning products .
Only use a cloth with warm soapy wat er.
To remo ve spots or stains from the sur fa ce of the
inte ri or, use a cloth dampened with water and a little
vinega r, or a cleaning product ma de specifica ll y for
dishwash ers.
tion the app li an ce in the desired loc atio n. The back sho uld res t aga inst the wall behind it, and th e sides,
Posi
along the ad ja cent cabinets or walls . The dish wa sh er is equipped with water su pp ly and drain hoses that can
be posi ti on ed either to the right or the left si de s to facilitate proper installa ti on .
When not in Use for a Long Time
recommend that you run a was h cyc le with the
It is
dishwasher empty and the n rem ove the plug from the
sock et, turn off the water suppl y and le ave the door of
the app liance sligh tl y open. Th is wi ll help the door
seals to last longer and pre ve nt odours from forming
within the applia nc e.
Moving the Appliance
If the app lian ce must be moved, try to keep it in the
ve rt ical po sition. If absolutely necessary, it can be
positi oned on its back.
Seals
One of the fa ctor s that cause odours to form in the
dishwash er is food that remains trap pe d in the seals.
Period ic cleaning with a damp sp on ge will prevent this
from oc curring.
the app lian ce is positioned for le velling, the height of the dis hw asher
Once
ma y be alte re d via adjustment of the screwi ng le vel of the feet. In any cas e,
the app li ance should not be inclined more th an 2 .
For pe
DO NOT
DO NOT
CONNECTION FROM THE POWER CORD.
se look at the rati ng la bel to kn ow the rating voltage and co nn ect the di sh washer to the appropri at e pow er supply.
Plea
Use the requir ed fu se 10 amp, time delay fuse or ci rc uit breaker recommended and provi de separate circuit serving
only this applia nc e.
rsonal safety:
USE AN EXTENSION CORD OR AN ADAPTER PLUG WITH THIS APPLIANCE.
, UNDER ANY CIRCUMSTANCES, CUT OR REMOVE THE EARTHING
Ensu re th e voltage and freq uenc y of the po we r being used correspon ds to
those on the ra ting plate. Only insert the pl ug into an electrica l soc ket which is earthed
prop er ly. If th e ele ctrical socket to which the appl iance must be connecte d is not
appr op riate for the plug , replace the socke t, rather than using a adapt or or the likes as
they co uld cau se overheati ng and burns .
This appliance must be earthed. In the event of a malfunction or breakdown, earthing will reduce the risk of
electric shock by providing a path of least resistance for the electric current. This appliance is equipped with a
cord having an equipment-earthing conductor and an earthing plug. The plug must be plugged into an
appropriate outlet that is installed and earthed in accordance with all local standards and requirements.
15
Page 19

Improper connection of the equipment earthing conductor can result in the risk of an
electric shock.
Check with a qualified electrician or service representative if you are in doubt whether the
appliance is properly earthed.
Do not modify the plug provided with the appliance. If the plug does not fit properly to the
outlet, please have a qualified electrician to install a proper outlet.
Aqua Stop Hose
Please clo se the hydr an t after using .
for personal safety:
DO NOT USE AN EXTENSION CORD OR AN ADAPTER PLUG WITH THIS APPLIANCE.
DO NOT, UNDER ANY CIRCUMSTANCES, CUT OR REMOVE THE
CONNECTION
Co nnect the cold water supply hose to a threaded 3/4(i nch) connector and make sure
th at it is fastened tightly in pl ace.
If t he water pipes are new or have no t been used for an extended period of time, let the
wa ter run to make sure that the water is clear. This preca ution is needed to avoid the
risk of the water inlet to be blocked and damage the appliance.
FROM THE POWER CORD.
EARTHING
Insert the d rain hose into a drain pipe with a minimum diame ter of 40mm, or let it run into the sin k, m akin g sure to
avoid be ndin g or c ri mping it. The to p of the hose must be less than 1000mm.
min120mm
min 4 0mm
max1100mm
min500mm
16
Page 20

How to Drain Excess Water From Hoses
If the sink is 1000mm higher from the floor, th e ex ce ss water in hoses cannot be drained directly
into the sink. It will be necessary to drain e xc es s wa ter from hoses into a bowl or suitable
container th at is held outs ide an
d lower than the sink.
Water Outlet
Connect the water drain hose. The drain hose must be corre ctly fitted to avoid water leaks.
Ensu re that th e wate r drain hose is not kinked or squashed.
Extension Hose
If you needadrain hose extension, ma ke s ur e to use a similar drain hose.
It must be n o longer than 4 met re s; otherwise the cleaning effect of the dishwasher could be reduced.
Available from any good plumbing supplier.
Syphon Connection
Insert the d rain hose into a drain pipe with a minimum diameter of 40mm, or let it run into the sink, making sure t o
avoid bending or crim ping i t. The top of the hose mus t be less than 1000mm.
The following things should be checked before starting the dishwasher.
1 The dishwasher is level and fixed properly.
2 The inlet valve is open.
3 There is no leakage at the connections of the conducts.
4 The wires are tightly connected.
5 The power is switched on.
6 The inlet and drain hoses are not knotted and kinked.
7 All packing and printing materials should be ta ken out of the dishwasher.
After installation, please make sure to keep this manual.
The content of this manual is very helpful to the users.
17
Page 21

Fuse blown, or the home
circuit breaker has been
triggered.
Power supply is not
turned on
Error code:E1;
Water pressure is low
Replace fuse or reset circuit breaker. Remove any other
appliances sharing the same circuit with the dishwasher
Make sure the dishwasher is turned on and the door is
closed securely.
Make sure the power cord is properly plugged into the
wall socket.
Check that the water supply is connected properly and
the water is turned on.
Water not pumped
from dishwasher
Door of dishwasher
not properly closed.
Kink in drain hose
Filter clogged
Kitchen sink clogged
Improper detergent
Spilled rinse-aid
Detergent with
colourant was used
Hard water minerals
Make sure to close the door properly and latch it.
Check drain hose.
Check the filter
(see section titled )" Cleaning The Filter "
Check the kitchen sink to make sure it is draining well.
If the problem is the kitchen sink not draining ,you may
need a plumber rather than a serviceman for dishwashers.
Use only the special dishwasher detergent to avoid suds.
If this occurs, open the dishwasher and let suds evaporate.
Add 4 litres of cold water to the tub. Close and latch the
dishwasher, then select any cycle. Dishwasher will drain
out the water at the first step.
has stopped and check if the suds have disappeared.
Repeat if necessary.
Always wipe up rinse-aid spills immediately.
Make sure that the detergent is the one without
colourant.
To clean the interior, use a damp sponge with
dishwasher detergent and wear rubber gloves.
Never use any other cleaner than dishwasher
detergent for the risk of foaming or suds.
Open the door after the draining
The affected items are
not corrosion resistant.
A sp ay arm is
r
knocking against
an item in a basket
Items of crockery
are loose in the
wash cabinet
This may be caused
by on-site installation
or the cross-section of
the piping.
18
The items should be corrosion resistant.
Interrupt the programme, and rearrange the items
which are obstructing the sp ay arm.r
Interrupt the programme,
and rearrange the it
This has no influence on the dishwasher function.
if in doubt, contact a suitably qualified plumber.
ems of crockery.
Page 22

The dishes were not
loaded correctly.
See notes in " Loading the Dishwasher Baskets ".
The programme was
not powerful enough.
Not enough detergent
was dispensed.
Items are blocking
the path of sp ay arms.r
The filter combination
in the base of wash
cabinet is not clean or
is not correctly fitted.
This may cause
the sp ay arm jets
r
to get blocked.
Combination of soft
water and too much
detergent.
Aluminum utensils
have rubbed against
dishes.
Dishes block
detergent cups.
Improper loading
Too little rinse-aid
Select a more intensive programme.
See" Wash Cycle Table ."
Use more detergent, or change your detergent.
Rearrange the items so that the sp ay can rotate freely.r
Clean and/or fit the filter combination correctly.
Clean the sp ay arm jets. See "Cleaning the Spray
Arms".
Use less detergent if you have soft water and select
a shorter cycle to wash the glassware and to get
them clean.
Use a mild abrasive cleaner to eliminate those marks.
Re-loading the dishes properly.
Load the dishwasher as suggested in the directions.
Increase the amount of rinse-aid/refill the rinse-aid
dispenser.
r
Dishes are removed
too soon
Wrong program
has been selected
Use of cutlery with
a low-quality coating
Do not empty your dishwasher immediately after
washing. Open the door slightly so that the steam can
escape. Begin unloading the dishwasher only once
the dishes are barely warm to the touch. Empty the low
basket first. This prevents water form dropping off
dishes in the upper basket.
In short program the washing temperature is lower.
This also lowers cleaning performance. Choose
a program with a long washing time.
Water drainage is more difficult with these items.
Cutlery or dishes of this type are not suitabl
washing in the dishwasher.
e for
19
Page 23

When some malfunctions happen, the appliance will display error codes to warn you.
Codes
E1
E2
E3
E4
E5
E6
E7
E8
Meanings
Door open
Water inlet
Water drainage
Temperature sensor
Overflow/leakage
Water leakage
Heating element
Water diversion system
If over ow occurs, turn o the main water supply before calling service.
If there is water in the base pan because of an over ll or small leak,
the water should be removed before restarting the dishwasher.
Possible Causes
The door is opened when the
dishwasher is operating
Water inlet malfunction
Water drainage malfunction
Temperature sensor malfunction
Overflow occurs/Water leakage occurs
Water leakage occurs
Abnormal heating
Water diversion system malfunction
WDH
Voltage connected load:
Water pressure:
Power supply:
Capacity:
600mm 600mm 845mm
See rating label
0.04--1.0MPa
see rating label
15 Place settings
20
Page 24

Did you know?
TECO Australia’s product range also includes:
Top Load Clothes Washers
Front Load Clothes Washers
Twin Tub Clothes Washers
Auto Sensing Condenser and Vented Clothes Dryers
Refrigerators
Chest and Vertical Freezers
Bar Fridges
Dehumidifi ers
Televisions
Air Curtains and Air Conditioners
Visit www.teco.com.au for our full range.
Page 25

REPAIRS, SERVICE & WARRANTY
It is hazardous for anyone installing, removing, altering, repairing, servicing, or
testing.
Only an Authorised Service Person can carry out servicing or repairs to this
appliance.
IF SERVICE IS REQUIRED
If you have a problem, and the problem persists after you have made the
checks mentioned in this manual, contact:
TECO Australia Service Department on 1300 660 037
(9am to 4pm AEST Mon to Fri) Email: had.service@teco.com.au
For warranty details please visit www.teco.com.au
Complete and retain the following information:
Name of retailer: _________________________________
Date of purchase: ________________________________
Model No. : _____________________________________
Serial No. : _____________________________________
MFG code: _____________________________________
Please retain proof of purchase for warranty claims.
GBG-v6
www.teco.com.au
 Loading...