

Page 1

230V 1Ø 0.5 - 3HP
N3 INVERTER SERIES
Operating Manual
0.4 - 2.2kW
230V 3Ø 0.5 - 40HP
0.4 – 30kW
460V 3Ø 1 - 75HP
0.75 – 55kW
Revision: 2.03.05
Page 2

N3 Drive Operations Manual
Table of Contents
1.0 Introduction ..................................................................................................................................... 1
2.0 Product Inspection ......................................................................................................................... 2
2.1 Nameplate Layout ...................................................................................................................... 2
3.0 Operating Precautions ................................................................................................................... 3
3.1 Before Power up ......................................................................................................................... 3
3.2 During Power up ......................................................................................................................... 4
3.3 Before Operation ........................................................................................................................ 4
3.4 During Operation ........................................................................................................................ 5
4.0 Environment and Installation ........................................................................................................ 6
4.1 Inverter Mounting ........................................................................................................................ 6
Fig.4.1.1 Panel and Enclosure Placement ..................................................................................... 6
Fig 4.1.2 Din Rail Mounting Clearances ......................................................................................... 7
5.0 General Wiring Diagram (1 - 2 HP) ................................................................................................ 8
6.0 General Wiring Diagram (3 - 75 HP) .............................................................................................. 9
7.0 Power Terminals Designations and Ratings (Terminal Block TM1) ........................................ 10
7.1 Power Terminal Configuration TM1 .......................................................................................... 10
7.2 Power Terminal Block TM1 Electrical Ratings and Tightening Torques .................................. 11
8.0 Inverter Wiring .............................................................................................................................. 11
8.1 Input / Output Power Wiring Connections (Terminal TM1) ...................................................... 11
8.2 Input / Output Power Wiring Noise Suppression ...................................................................... 11
Fig. 8.2 Input / Output Power Wiring Noise Suppression ............................................................. 11
8.3 Motor Cable Length .................................................................................................................. 12
8.4 Cable Length vs Carrier Frequency ......................................................................................... 12
8.5 Inverter Grounding .................................................................................................................... 12
8.6 Input Power Wiring and Installation Recommendations with Examples .................................. 13
Fig. 8.6 Input Power Wiring and Installation Examples ................................................................ 13
9.0 Input / Output Power Section Block Diagram ............................................................................ 14
Fig. 9.0 Power Input / Output Block Diagrams ............................................................................. 14
10.0 Control Terminals (Terminal Block TM2) ................................................................................. 15
10.1 Control Terminal Designations (Terminal Block TM2) .......................................................... 15
10.2 Control Terminal Layout and Control Switches ..................................................................... 16
Fig. 10.2.1 Control Terminal TM2 Layout ................................................................................ 16
Fig. 10.2.2 Control Terminal TM2 Layout (Prior to Version 1.3) ............................................. 16
10.3 Control Terminal Wiring and Connections (Terminal TM2) .................................................. 16
11.0 Peripheral Power Devices .......................................................................................................... 17
12.0 Input Fuse Types and Ratings ........................................................................................... 18 - 19
13.0 Applicable specifications for circuit breakers and magnetic contactors ............................. 19
14.0 Reactor Input / Output Specifications ...................................................................................... 20
15.0 Braking Unit and Braking Resistor Selections ........................................................................ 21
16.0 EMC Filters .................................................................................................................................. 22
17.0 Keypad Key Functions and Navigation .................................................................................... 23
17.1 N3 Keypad ............................................................................................................................. 23
17.2 Keypad LED Functions .......................................................................................................... 23
17.3 Key Functions ........................................................................................................................ 24
17.4 Keypad Navigation ................................................................................................................ 25
17.4.1 Basic Keypad Control ................................................................................................. 25
17.4.2 Local / Remote Function.............................................................................................. 25
17.4.3 Setting Parameters b (Basic) and A (Advanced) ........................................................ 26
18.0 Control Mode Selection ............................................................................................................. 27
Cont.
Table of Contents
Page 3

N3 Drive Operations Manual
19.0 b (Basic) and A (Advanced)parameters defined .................................................................... 28
19.1 b (Basic) Parameter Summary ....................................................................................... 28 - 29
19.2 b (Basic) Parameter Details ........................................................................................... 30 - 33
19.3 A (Advanced) Parameter Summary ............................................................................... 34 - 46
19.4 A (Advanced) Parameter Details .................................................................................... 47 - 81
20.0 Option Modules and Cables ...................................................................................................... 82
Fig. 20.1 Remote Keypad .............................................................................................................. 82
Fig. 20.2 Remote Keypad Mounting Dimensions .......................................................................... 83
Fig. 20.3 RS485 Interface P/N SIF-485 ......................................................................................... 83
Fig. 20.4 RS232 Interface P/N SIF-232 ......................................................................................... 84
Fig. 20.5 Copy Module P/N SIF-MP .............................................................................................. 84
21.0 Error Display Codes ................................................................................................................... 85
21.1 Unresettable / Unrecoverable Errors ..................................................................................... 85
21.2 Automatically and Manually Recoverable Errors............................................................ 85 - 86
21.3 Manually Recoverable Errors Only (no auto-restart) ............................................................. 87
21.4 Set –up Configuration and Interface Errors .................................................................... 86 - 88
21.5 Keypad Errors ................................................................................................................. 88 - 89
22.0 Troubleshooting ......................................................................................................................... 89
22.1 General troubleshooting ........................................................................................................ 90
Flow Charts: ........................................................................................................................... 91 - 97
Fig. 22.1 Fault display troubleshooting ................................................................................. 91 - 92
Fig. 22.2 OC and OL fault troubleshooting .................................................................................. 93
Fig. 22.3 OV and LV fault troubleshooting .................................................................................. 94
Fig. 22.4 Motor will not run .......................................................................................................... 95
Fig. 22.5 Motor overheating ......................................................................................................... 96
Fig. 22.6 Instability ....................................................................................................................... 96
23.0 Routine periodic inspection ...................................................................................................... 97
Appendix A – Specifications ............................................................................................................. A1
AA.1 General Specifications ................................................................................................. A1 – A2
AA.2 Product (Model) Specifications .................................................................................... A3 – A4
Appendix B - Motor Internal Data List .............................................................................................. B1
Appendix C - N3 Envelope Dimensions and Weight Table vs Model No. .................................... C1
Appendix D –N3 Cover Removal Procedure for Various Frame Sizes ................................. D1 – D2
AD.1 Frame sizes 1 & 2 ................................................................................................................ D1
AD.2 Frame size 3 ........................................................................................................................ D1
AD.3 Frame size 4 ........................................................................................................................ D2
AD.4 Frames sizes 5 & 6 ............................................................................................................. D2
Appendix E- EMC Filter Dimensions ....................................................................................... E1 – E3
AE.1 FS Type ................................................................................................................................ E1
AE.2 KMF Type ............................................................................................................................. E2
AE.3 JUN Type .............................................................................................................................. E3
Appendix F- Inverter Parameter Setting List ................................................................................... F1
Appendix G- Version 1.3 Changes .......................................................................................... G1 – G2
Table of Contents Cont.
Page 4

N3 Drive Operations Manual
!
!
DANGER
Do not touch any circuit boards or components while the charge indicator is still on
after power is turned off. Wait until the charge indicator lamp is completely
extinguished. NOTE: The charge indicator lamp is located under the digital
operator
Do not connect or disconnect any wiring while power is present.
Do not test parts and signals on the circuit boards during the inverter operation.
Do not disassemble the inverter and modify any internal wires, circuits, or parts.
Ensure that the ground terminal of the inverter is bonded properly to earth ground.
For 200V class, ground to <100 Ω. For 400v class, ground to <10Ω.
!
CAUTION
Do not perform high voltage dielectric tests on any inverter parts, as damage to
these parts may can result.
Do not connect the AC input power supply to the motor terminals T1 (U), T2 (V),
and T3 (W) of the inverter.
Do not touch any circuit board without proper precautions as the CMOS ICs on the
inverter’s control board can be damaged due to static electricity.
1.0 Introduction
The N3 Inverter series is state of the art design using the latest control and power technologies. It is designed to
operate and control 3Ø induction motors in the hp range of 0.5 to 75 hp and voltage class of 230 or 460VAC. The
inverter can operate in the open loop vector, variable torque, or V/F mode; settable via programming. There are two
sets of parameters: b Basic, and A Advanced, allowing for flexible control in many different applications. The
membrane keypad in combination with a 3 digit 7 segment display allows for ease of programming and monitoring.
An optional communications module can be used for control and parameter setting using the MODBUS RTU protocol.
The N3 has been designed with easy access to the input power, output motor, and control terminals.
Before proceeding with the set-up and installation please take time to review this manual to ensure proper operation
and above all else, personnel safety. Should there be any problem in using the product that cannot be resolved with
the information provided in the manual, please contact your nearest TECO distributor or sales representative for
assistance.
SAFETY FIRST!
The inverter is an electrical product. For your safety, there are symbols “Danger” and “Caution” in this manual as a
reminder to pay attention to safety instructions on handling, installing, operating, and troubleshooting the inverter. Be
sure to follow the instructions for maximum safety.
DANGER - Indicates a potential hazard that could cause death
or serious personal Injury.
! CAUTION - Indicates that the inverter or the mechanical system
might be damaged.
Introduction & Safety 1
Page 5

N3 Drive Operations Manual
Input
Specification
Output
Specification
Model and
Motor Rating
CAUTION
Enclosure Type and Rating
: xxxxxxxxxxxx
: xxHP/xxkW
: AC x phase 50/60 Hz
: xxx-xxxV (+10%,-15%)
: xx.x A
: AC 3 phases 0-400 Hz
: 0 – xxxV
: xx.x A
Model
Motor Rating
INPUT
VOLTAGE
Amps
OUTPUT
VOLTAGE
Amps
2.0 Product Inspection
TECO’s inverters have all passed a functional factory test before delivery. Please check the following when you
receive and unpack the inverter:
Check for any damages that may have occured during transportation or handling. If there is damage, do not
apply power, and contact a TECO sales representative.
Check that the model and capacity of the inverter are the same as those specified in your purchase order. The
following describes the nameplate information.
NOTES:
2.1 Nameplate Layout
Product inspection & Nameplate Layout 2
Page 6

N3 Drive Operations Manual
!
CAUTION
The input voltage must comply with the inverter’s specified input voltage.(See
product nameplate)
!
CAUTION
To avoid the front cover from disengaging or other physical damage, do not
carry the inverter by its cover. Support the unit by its heat sink when
transporting. Improper handling can damage the inverter or injure personnel,
and should be avoided.
To avoid the risk of fire, do not install the inverter on or near flammable
objects. Install on nonflammable objects such as metal surfaces.
If several inverters are placed in the same control panel, provide adequate
ventilation to keep the temperature below 40°C (104°F) to avoid overheating
or fire.
When removing or installing the digital operator, turn off the power first, and
then follow the instructions in this manual to avoid operator error or loss of
display caused by faulty connections.
Warning
This product is sold subject to IEC 61800-3. In a domestic environment this
product may cause radio interference in which case the user may be required to
apply corrective measures.
!
CAUTION
To ensure the safety of peripheral devices, it is strongly recommended to install a
fast acting fuse on the power input side of the inverter. The specifications for fast
acting fuses are covered in Section 12.0.
!
DANGER
Make sure the applied voltage input connections are correct, L1 (L), L2, and
L3 (N) are power-input terminals and must not be connected to T1, T2, and T3.
Otherwise, inverter damage can result.
3.0 Operating Precautions
3.1 Before Power Up
Operating Precautions; Before Power UP 3
Page 7

N3 Drive Operations Manual
!
DANGER
Do not connect or disconnect any wiring on the inverter as bodily harm and /
or damage to the equipment may result.
When momentary power loss is greater than 2 seconds (the higher the HP
rating, the longer the time), the inverter can not sustain power to the control
circuit. Therefore, when power is restored, the operation of the inverter is
based on the setup of b000 / A015 and the condition of the external switches.
This is considered to be a restart.
When restarting, the operation of the inverter is based on the setup of
b000 and A015 and the condition of external switch (FWD / REV button).
NOTE: the start operation is not affected by parameters
A013/A014/A018/A019.
1. When b000=0000, the inverter will not run after restart.
2. When b000=0001 and the external (FWD / REV) switch is off, the
inverter will not run after restart.
3. When b000=0001, the external switch (FWD / REV button) is on, and
A015=0000, the inverter will run automatically after restart. In this case
after loss of power, turn off the external (FWD/REV) switch to avoid
damage to the equipment and injury to personnel after sudden
restoration of power.
For further information, please refer to the description and warnings of
parameter A015 covered in the advanced parameter section.
When the momentary power loss is less than 2 seconds, the inverter still has
enough storage power to support the control the circuit. Therefore, when
power is restored, the inverter will automatically restart depending on the setup
of A013 / A014.
!
CAUTION
Below situations are normal:
1. The inverter display will flash the AC input voltage for 1 second after power is applied.
2. After power is off, the inverter display will flash "LV" for 1 second when the inverter
is at Stop status and the inverter display will flash "LV-C" for 1 second when the
inverter is at Run status.
!
DANGER
Make sure only qualified personnel familiar with AC drives and having a full
understanding on parameter settings allowed to operate the equipment.
3.2 During Power up
3.3 Before Operation
Operating Precautions; During Power UP & Before Operation 4
Page 8

N3 Drive Operations Manual
!
DANGER
Do not connect or disconnect the motor during operation. The overcurrent circuit
will cause the inverter to trip or damage the equipment may result.
!
DANGER
Do not remove any protective covers as lethal voltages are present inside
the inverter.
The motor will restart automatically after stop when the auto-restart function is
on. In this case, use extreme caution while working near the motor or driven
equipment.
Note: The stop function is different from the emergency stop switch, which
must be set first to be effective.
!
CAUTION
Do not touch heat-generating components such as heat sinks and braking
resistors.
The inverter can operate the motor from low speed to high speed. Verify that
the allowable speed range of the associated machinery will tolerate this range.
Note the settings related to the `minimum braking resistor value.
Do not check signals on circuit boards while the inverter is operating.
!
CAUTION
After power is removed from the inverter, allow 5 minutes before disassembling or
checking any components or disconnecting wiring. The charge indicator lamp
which is located under the digital operator should not be illuminated.
3.4 During Operation
Operating Precautions; During Operation 5
Page 9

N3 Drive Operations Manual
PANEL
Correct
Fan
Fan
Enclosure
Enclosure
PANEL
Incorrect
Correct
Incorrect
N3
N3
N3
N3
N3
N3
Panel Mounting
Enclosure Mounting
Ambient Temperature: 14 -104 oF (-10oC - +40oC),
Without Cover: 14-122 oF (-10oC - +50oC)
Relative Humidity: 95% non-condensing
Altitude : < 3,281 ft. (1000m)
Avoid exposure to rain or moisture.
Avoid direct sunlight.
Avoid oil mist and salinity.
Avoid corrosive liquid and gas.
Avoid dust, lint fibers, and small metal
filings.
Keep away from radioactive and
flammable materials.
Avoid electromagnetic interference (soldering machines, power machines).
Avoid vibration (stamping, punching machines etc.). Add a vibration-proof pad if the
situation cannot be avoided.
If several inverters are placed in the same control panel, provide a heat removal means
to maintain ambient temperatures below 40oC.
4.0 Environment and Installation
The environment will directly affect the proper operation and the life span of the inverter. To ensure that the inverter
will give maximum service life, please comply with the following environmental conditions:
4.1 Inverter Mounting
When mounting and installing one or more inverters on a panel or in an enclosure, ensure that the placements and
clearances are correct. (see Fig.’s 4.1.1 and 4.1.2). Also make sure that the inverter(s) are mounted vertically to
maximize air flow to the heatsink. To further increase airflow, the dust cover on the inverter(s) may be removed,
provided that the environment is free from contaminants.
Fig. 4.1.1 Panel and Enclosure Placements
Cont.
Environment & Installation; Inverter Mounting 6
Page 10

N3 Drive Operations Manual
N3
FRONT
2.0 in
2.0 in
4.8 in
4.8 in
2.0 in
N3
Fig. 4.1.2 Mounting Clearances
NOTES:
Environment & Installation; Inverter Mounting Cont. 7
Page 11

N3 Drive Operations Manual
T1(U)
T2(V)
T3(W)
L1(R)
L2(S)
L3(T)
RUN / STOP
S1
S2
S3
S4
S5
3 Ø
INDUCTION MOTOR
MULTIFUNCTION
DIGITAL INPUTS
(See parameters A050 – A057)
+10V
AIN / S7
COM
(0V)
E
E
R1A
R1B
R1C
R2A
R2C
N3
INVERTER
SHIELD
SHIELD
N3 General Wiring Diagram
1 - 2 HP and (3-75 HP prior to Version 1.3)
0 - 10 VDC
ANALOG
OUTPUT
(See parameters
A103 & A104)
MULTIFUNCTION RELAY
OUTPUTS
Dry contacts rated
(250 VAC / 30 VDC @ 2A)
(See parameters A105 & A106)
+24V
COM
RUN / STOP or REV / FWD
For SOURCE mode connect
to +24V and set SW1 to the
PNP position.
For SINK mode connect to
COM and set SW1 to the NPN
position. (Factory Default)
+FM
COM
S6 / AI2
(0V)
(0V)
SW1
NPN
PNP
SW3
I
V
SW2
BR
DC Choke
Braking
Resistor
P1
Braking
Resistor
P
_
B1/P
B2
DC Power
Supply
_
DC Power Supply
or
External Braking Unit
+
230V: 0.5 – 10 HP
460V: 1 – 15 HP
230V: 15 – 20 HP
460V: 20 HP
230V: 25 – 40 HP
460V: 25 – 75 HP
NOTE GROUND CONNECTION
RESISTANCE TO BE 230V CLASS: ≤100Ω
460V CLASS: ≤10Ω
PE
E
E
Ground Terminal
Designation
TERMINAL DESIGNATIONS FOR
POWER DEVICE INPUTS FOR
VARIOUS HORSEPOWER.
(See Sec. 7.0 for further details)
CON 1
CON 2
OPTION CARD
CONNECTOR
TM2
TM2
(See Sec. 10.0 for further details)
S5 can be configured for pulse
input. ( A054 = 0019) (See
also parameter A098)
The AIN / S7 input terminal can be
configured as an Analog input:
SW2 = V (0-10VDC) or *(2 - 10VDC)
SW2 = I (0 - 20 mA) or *(4 - 20 mA)
*(See Note)
AIN/S7 can also be configured as a
digital input .
Example – An external pot is
connected to the AIN terminal as
shown providing 0 - 10 VDC input
2K
L1(R)
L2(S)
L3(T)
Magnetic
Contactor
MCCB
AC
Reactor
Fast Acting
Fuses
PE
PE
S6 / AI2 can be configured as a digital
or analog input.
SW3 = V (0-10VDC) or (2 - 10VDC)
SW3 = I (0 - 20 mA) or (4 - 20 mA)
(See parameters *A049, (A050 – A056),
A097 & A154)
*A049 – Version 1.3 or later)
*Note: For versions prior to 1.3, to set AIN (2-10V) or
(4-20mA), parameters A92-A96 were used. For
versions 1.3 or higher it can be set directly with
parameter A154. Also see parameters A050 - A056.
AC Input Voltage
5.0 General Wiring Diagram 1 - 2 HP
N3 General Wiring Diagram.( All HP’s prior to Ver.1.3) 8
Page 12

N3 Drive Operations Manual
T1(U)
T2(V)
T3(W)
L1(R)
L2(S)
L3(T)
RUN / STOP
S1
S2
S3
S4
S5
3 Ø
INDUCTION MOTOR
MULTIFUNCTION
DIGITAL INPUTS
(See parameters A050 – A057)
AI2
AIN / S7
E
E
R1A
R1B
R1C
R2A
R2C
N3
INVERTER
SHIELD
SHIELD
N3 General Wiring Diagram
3 – 40 HP at 230V and 3 – 75 HP at 460V (Version 1.3 or later)
0 - 10 VDC
ANALOG
OUTPUT
(See parameters
A103 & A104)
MULTIFUNCTION RELAY
OUTPUTS
Dry contacts rated
(250 VAC / 30 VDC @ 2A)
(See parameters A105 & A106)
+24V
24G
RUN / STOP or REV / FWD
For SOURCE mode connect
to +24V and set SW1 to the
PNP position.
For SINK mode connect to
COM and set SW1 to the NPN
position. (Factory Default)
+FM
AGND
S6
SW1
NPN
PNP
SW3
I
V
SW2
Braking
Resistor
_
B1/P
B2
DC Power
Supply
_
DC Power Supply
or
External Braking Unit
+
230V: 25 – 40 HP
460V: 25 – 75 HP
230V: 15 – 20 HP
460V: 20 HP
NOTE GROUND CONNECTION
RESISTANCE TO BE 230V CLASS: ≤100Ω
460V CLASS: ≤10Ω
E
E
Ground Terminal
Designation
TERMINAL DESIGNATIONS FOR
POWER DEVICE INPUTS FOR
VARIOUS HORSEPOWER.
(See Sec. 7.0 for further details)
CON 1
CON 2
OPTION CARD
CONNECTOR
TM2
TM2
(See Sec. 10.0 for further details)
S5 can be configured for pulse
input. ( A054 = 0019) (See
also parameter A098)
The AIN / S7 input terminal
can be configured as an
Analog input:
SW2 = V (0 -10VDC)
SW2 = I (0 - 20mA)
AIN / S7 can also be
configured as a digital input.
(see parameters A056, (A092
– A096) & A154)
Example – An external pot is
connected to the AIN terminal as
shown providing 0 - 10 VDC input
2K
L1(R)
L2(S)
L3(T)
Magnetic
Contactor
MCCB
AC
Reactor
Fast Acting
Fuses
AGND
3 – 40 HP at 230V
&
3 – 75 HP at 460V
AC Input Voltage
AI2 Analog input input terminal:
SW3 = V (0 -10VDC) or (0 - 20mA)
SW3 = I (2-10VDC) or (4-20 mA)
(Ver. 1.3 or later)
(See parameters A049, A097, (A050
– A056) & A154)
6.0 General Wiring Diagram 3 – 75 HP*
*. For 3 - 75HP prior to Version 1.3. please refer to Wiring Diagram 5.0
N3 General Wiring Diagram (3-75 HP Ver.1.3 or later) 9
Page 13

N3 Drive Operations Manual
R/L1 S/L2 T/L3
B1/P
_
B2
UT1 VT2
WT3
Power Dynamic To Motor
230V 3Ø: 15 – 20 HP
460V 3Ø: 20 HP
R/L1 S/L2
T/L3
_
UT1
VT2
WT3
+
230V 3Ø : 25 - 40 HP
460V 3Ø : 25 - 75 HP
Fig.7.1 Power Terminal Configuration TM1
Terminal Connections
R/L1 – S/L2 – T/L3
U/T1 – V/T2 – W/T3
B1/P – B2
B1/P –
_
Terminal Connections
–
_
+
External DC Supply
Or External Braking
Unit.
230V 1Ø: 0.5 – 1 HP
Terminal Connections
(L) – (N)
L1 – L2 – L3
T1 – T2 – T3
P1 – BR
P1 – P *
PE
A)
C)
D)
TM1
TM1
TM1
Do Not remove the
Factory Installed
Jumper between
Terminals P – P1
unless a DC reactor
is being installed.
CAUTION
230V 3Ø: 0.5 – 2 HP
460V 3Ø: 1 – 2 HP
230V 1Ø: 0.5 – 1 HP
3Ø Motor Output
Braking Resistor Connection
DC Reactor Connections
Earth Ground
3Ø Input Power
3Ø Motor Output
Braking Resistor
External DC Supply
R/L1 – S/L2 – T/L3
U/T1 – V/T2 – W/T3
3Ø Input Power
3Ø Motor Output
L1(L)
L2
L3(N)
T1
T2
T3
PEPE
BRP
P1
(L) – (N)
L1 – L2 – L3
T1 – T2 – T3
P1 – BR
P1 – P *
230V 3Ø: 3 – 10 HP
460V 3Ø: 3 – 15 HP
230V 1Ø: 2 – 3 HP
3Ø Motor Output
Braking Resistor Connection
DC Reactor Connections
Terminal Connections
L1 L2 L3(N)
P1
BR
T1 T2
T3
Power Dynamic To Motor
P
TM1
230V 1Ø: 2 – 3 HP
B)
Do Not remove the Factory Installed Jumper between
Terminals P – P1 unless a DC reactor is being installed.
CAUTION
!
!
*
*
7.0 Power Terminals Designations and Ratings (Terminal Block TM1)
Depending on inverter ratings, the power terminals (TM1) can have one of three configurations. These are shown as
A), B), C) and D) in Fig. 7.1. Section 7.2 covers the electrical ratings and tightening torques of the terminals.
Do Not over tighten terminal screws. (See Sec. 7.2)
Use the proper wire size for terminal connections.
Use proper termination techniques.
7.1 Power Terminal Configuration TM1
Power Terminal Designations & Ratings (TM1) 10
Page 14

N3 Drive Operations Manual
Horsepower
Phase
Ø
Power source
Volts
Amps
Tightening Torque
Lb-ft / KG-M
Lb-in / KG-CM
0.5 & 1
1
200-240V
600
15A
0.59 / 0.08
7.10 / 8.20
2 3 1& 2
3
380-480V
3, 5, 7.5, 10 &15
3
200-240V
40A
1.5 / 0.21
18.00 / 20.28
2 & 3
1
3, 5, 7.5, 10 &15
3
380-480V
15,20, & 25
3
200-240V
80A
1.84 / 0.3
22.1 / 30
20,25, & 30
3
380-480V
60A
30
3
200-240V
100A
4.42 / 0.66
53.1 / 66
40 & 50
3
380-480V
40
3
200-240V
150A
60 & 75
3
380-480V
Inverter Input
Voltage
Horsepower
240 V
0.5,1, & 2
3 & 5
7.5 & 10
X
15, 20, &
25
30
40
480 V
1, 2, 3, & 5
7 & 10
15
20 , 25 & 30
X
40 & 50
60 & 75
*AWG / mm2
#14 / 2.0
#12 / 3.5
#10 / 5.5
#6 / 14
#4 / 22
#2 / 30
#1 /50
N3
IM
MCCB
Power
Source
Noise
Filter
Grounded
Metal Conduit
Noise
Filter
Grounded Metal
Enclosure
Signal Cable
11.8 in. / 30 cm
(Separate signal wiring from power leads
by a minimum of 30 cm / 11.8 in..)
7.2 Power Terminal Block TM1 Electrical Ratings and Tightening Torques
Table7.1 Electrical Ratings and Tightening Torques
8.0 Inverter Wiring
8.1 Input / Output Power Wiring Connections (Terminal TM1)
Table 8.1 Input / Output Power Wire Size vs Horsepower
* Wire size shown is based on maximum terminal size. Please consult the NEC or local
codes for the proper size to be used.
Use only copper wires. Proper diameter wire should be based on ratings at +105°C.
The minimum voltage rating of wiring is: 300V for 230VAC and 600V for 460VAC.
For safety reasons do not use under sized wiring.
8.2 Input / Output Power Wiring Noise Suppression
Electrical noise or EMI can be generated from the input power lines and or the output power leads to the motor.
This can interfere with the function of surrounding equipment as well as the inverter’s own control wiring. Fig. 8.2
shows an example of filters and shielding schemes to help minimize any radiated EMI.
Fig. 8.2 Input / Output Power Wiring Noise Suppression
Cont.
Power Terminal Designations & Ratings (TM1) Cont. & Inverter Wiring 11
Page 15

N3 Drive Operations Manual
Cable length between the
inverter and motor
ft / m
< 75 / 22.9
< 150/45.7
< 300 / 91.4
> 300 / 91.4
Recommended carrier
frequency allowed
<=16KHz
<=12KHz
<=8KHz
<= 5KHz
Setting of parameter
A044
<=16
<=12
<=8
<=5
N3 N3
N3
N3 N3 N3
a) Correct
b) Correct
N3 N3 N3
c) Incorrect
Loop
8.3 Motor Cable Length
The length of the cables between the motor and inverter can cause a significant phase to phase voltage
reduction at the motor due to the voltage drop across the cables. To calculate this reduction, apply the following
formula:
Phase-to-phase voltage drop (V) = 3 ×resistance of wire (Ω/km) × length of line m) × current×10-3.
(km=3280 x feet) (m=3.28 x feet )
8.4 Cable Length vs Carrier Frequency
The allowable setting of the PWM carrier frequency is also determined by motor cable length and on is specified
in the following table.
Table 8.2 Cable Length vs Carrier Frequency
8.5 Inverter Grounding
The proper grounding scheme for one or more inverters is very important to ensure personnel safety as well as
equipment performance. The following will discuss the proper grounding procedures.
The grounding resistance for the 230V class; <100, the 460V class; <10.
The ground wire size (AWG) is per electrical code.
Do Not share a ground with any other equipment with high current loads such as welding machines, presses,
etc. Connect the inverter to its own dedicated ground.
Do Not make a loop when several inverters share a common ground point (See Fig. 8.5c).
Fig. 8.5 Inverter Grounding
Inverter Wiring; Input Power Wiring 12
Page 16

N3 Drive Operations Manual
N3
IM
MCCB
Power
Source
N3
IM
MCCB
Power
Source
General
Noise
Filter
Machine
N3
IM
MCCB
Power
Source
Machine
General
Noise
Filter
N3
IM
MCCB
Power
Source
Special
Noise
Filter
Machine
N3
MCCB
Power
Source
Machine
IM
Isolation
Transformer
a) Dedicated Power Source
b) Special Noise Filter
c) Isolation Transformer
d) General Noise Filter
CORRECT
INCORRECT
or
8.6 Input Power Wiring and Installation Recommendations with Examples
Fig. 8.6 shows input power installation recommendations with correct and incorrect examples.
When possible the inverter should be connected to a dedicated input power source. (Fig. 8.6 a)
When the inverter is sharing a power source with other equipment, either install a special input noise filter,
(Fig. 8.6b) or an isolation transformer, (Fig. 8.6c) to isolate other loads.
Using a general purpose noise filter may not give sufficient results as shown in (Fig. 8.6d) below.
Fig. 8.6 Input Power Wiring and Installation Examples
Inverter Wiring; Input Power Wiring 13
Page 17

N3 Drive Operations Manual
Control
Circuit
Cooling Fan
+
_
L1(L)
L2
L3 (N)
T1
T2
T3
DC /DC
Converter
PE
Control
Circuit
Cooling Fan
C.M. Choke
R/L1
S/L2
T/L3
U/T1
V/T2
W/T3
DC /DC
Converter
E
Control
Circuit
Cooling Fan
C.M. Choke
DC /DC
Converter
+24VDC
+
_
E
+
_
R/L1
S/L2
T/L3
U/T1
V/T2
W/T3
B) 230V: 25 HP and 440v : 25 – 30 HP
C) 230V: 30 - 40 HP and 440v : 40 – 75 HP
A) 230V 1Ø: 0.5 – 3 HP, 230V 3Ø: 0.5 – 10 HP and 460V 3Ø: 1 - 15 HP
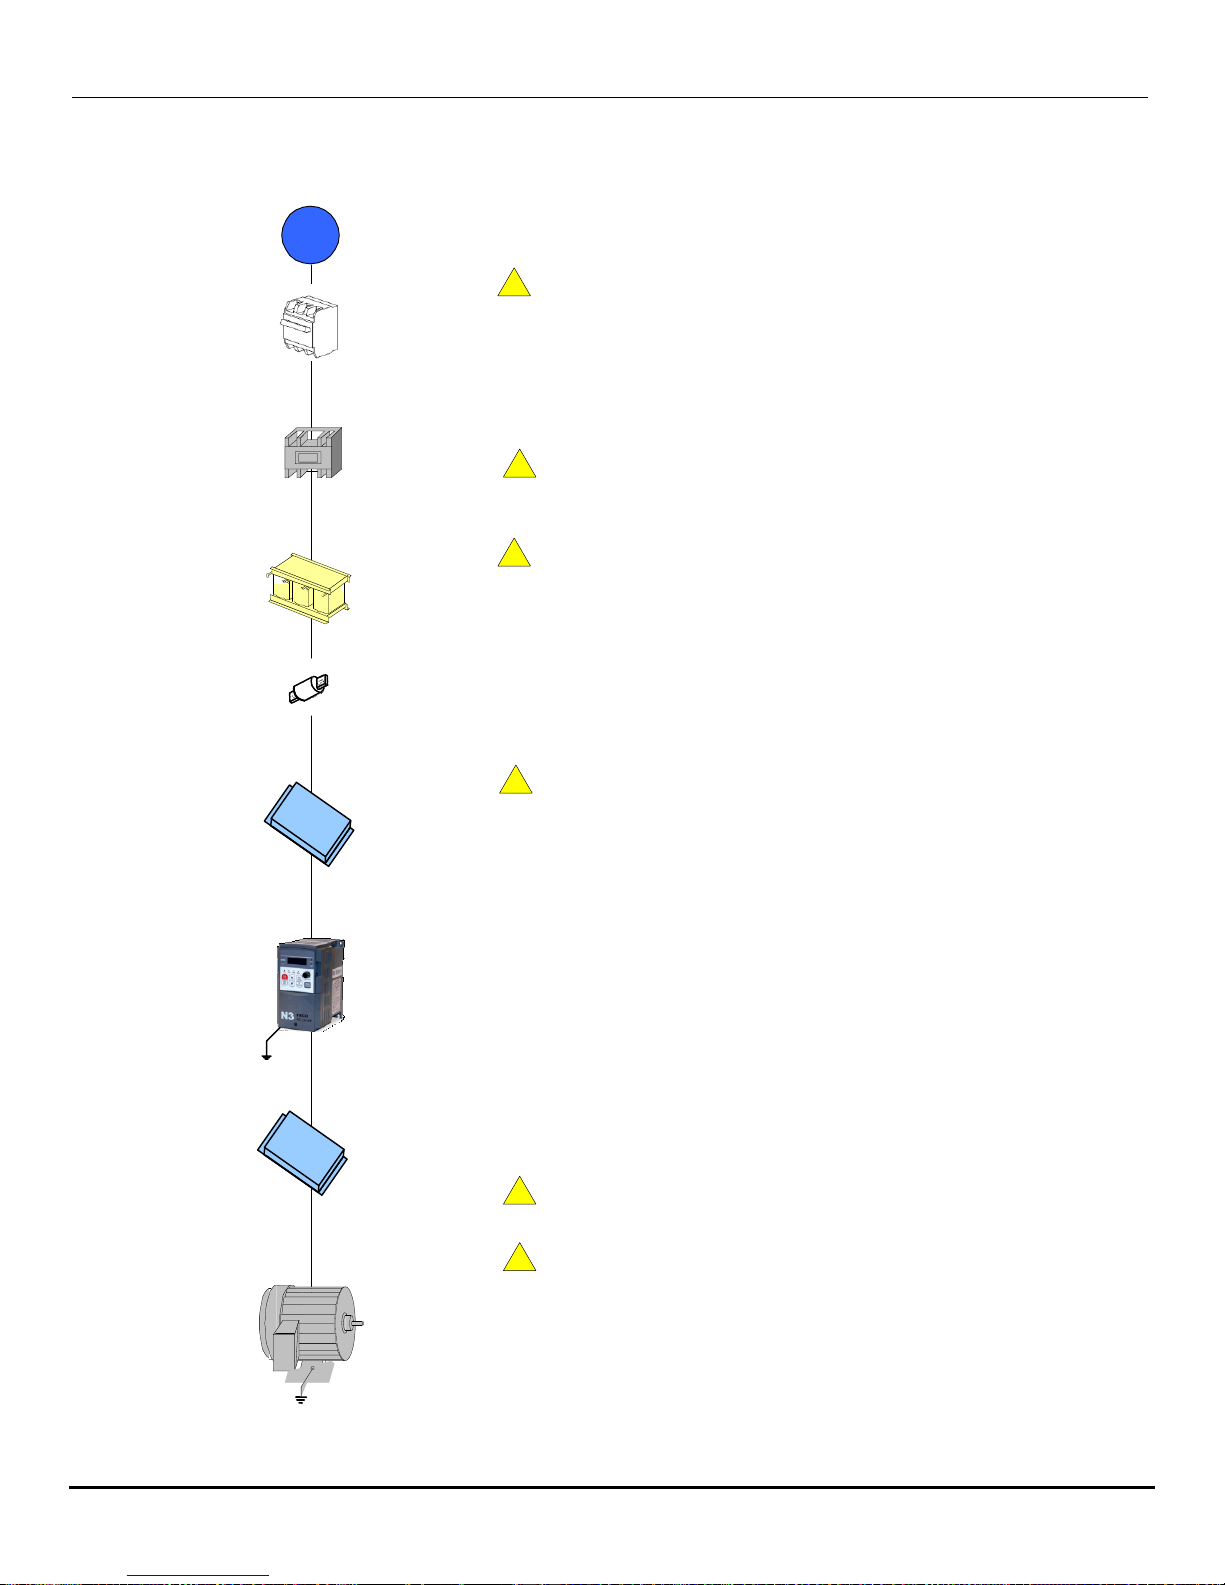
9.0 Input / Output Power Section Block Diagram
The following Fig. 9.0 A), B) and C) show the basic configuration of the power sections for the range of horsepower
and input voltages. This is shown for reference only and is not a detailed depiction.
Fig. 9.0 Power Input / Output Block Diagrams
Input / Output Power Section Block Diagram 14
Page 18

N3 Drive Operations Manual
Terminal
Description
R2A
Multifunctional output relay (Form A - N.O.)
Contact rating:
(250VAC or 30VDC @ 1A)
Contact function:
(refer to parameters A105 & A106)
R2B
R1C
Common contact
Multifunctional output relay
(Form C)
R1B
Normal close contact
R1A
Normal open contact
10V
Frequency knob (VR) power source terminal. 10 mA max. (Do not use for other functions)
AIN / S7
Analog signal input terminal (0 -10Vdc / 4 - 20mA), or multifunction input terminals S7
(H level:>8V, L level:<2V, PNP only) (refer to parameter A056 description)
AI2
Analog signal input (0 - 10V / 0 – 20 mA) 0r 2 – 10V / 4 – 20 mA) 3 - 75 HP: (For Ver. 1.3
or later only)
24V
Common for digital inputs, S1-S5 (S6, S7) in PNP (Source) input. (SW1 is set to PNP input)
50 mA max. (Do not use for other functions)
COM
0.5 - 2 HP & (3 – 75HP prior to Ver. 1.3): Common for analog input /output signals and for
digital S1 - S5 inputs in NPN (Sink) input. (SW1 set to NPN input)
*24G
Common for digital S1 – S6 inputs in NPN (Sink) input. ( SW1set to NPN input)
*AGND
Common for analog inputs AIN & AI2 and analog output FM+
FM+
Multifunction analog output signal, 0-10VDC @ 2mA max. (refer to parameter A103
description)
S1
Multifunction digital input terminals(refer to parameters A050 - A054 description)
S2
S3
S4
S5
Multifunction digital input terminal (Same as S1 – S4) or can be used as a pulse train input
to control output frequency. (refer to parameter A054=0019 description). Input pulse level
19.2V min. to 24.7V max.
S6 / AI2
0.5 - 2 HP& (3 – 75HP prior to Ver. 1.3): Multifunction input terminal (digital terminal high
level:>8V, Low level:<2V, PNP only) or analog input terminal AI2 (0 -10Vdc / 4 - 20mA).
( refer to A055 description)
10.0 Control Terminals (Terminal Block TM2)
The following table shows the control terminal designations for terminal block TM2. Refer to the parameter section of
this manual and to General Wiring Diagrams 5.0 and 6.0 for further explanation of the functions and connections.
Table 10.1 Control Terminal Designations (Terminal Block TM2)
* 3 - 75 HP: (For Ver. 1.3 or later only, see Appendix G for further details)
Cont.
Control Terminals (TM2); Terminal Layout & Wiring 15
Page 19

N3 Drive Operations Manual
R2B
R2A
S6
S5 S4 S3 S2 S1
R1AR1B
R1C
AIN
10V
24V
FM+
COM
0.5 – 10 HP (230V) 1 – 15 HP (460V)
SW2
R2B
R2A
S6
S5 S4 S3 S2 S1
R1AR1B
R1C
AIN
10V 24V
FM+
COM
COM COM
15 – 40 HP (230V) 20 – 75 HP (460V)
R2B
R2A
S6
S5 S4 S3 S2 S1
R1AR1B
R1C
AIN
10V
24V
FM+
COM
0.5 – 2 HP (230V) 1 – 2 HP (460V)
Fig. 10.2.2 Control Terminal TM2 Layout (Prior to Version 1.3)
Fig. 10.2.1 Control Terminal TM2 Layout
R2B
R2A
S6
S5 S4 S3 S2 S1
R1AR1B
R1C
AIN
10V
AGND
24V
FM+
AI2
24G
SW1 - Sets the input digital terminals S1-S7 for Sink (NPN) or Source (PNP) logic.
SW2 - Sets the analog input terminal AIN for voltage (V) or current (I).
SW3 – Sets the analog input terminal AI2 (Ver. 1.3 or later) or the multifunctional terminal S6/AI2 (prior to Ver.1.3) for voltage (V) or current (I).
Please refer to General Wiring Diagrams 5.0 and 6.0 for further information.
SW1
NPN
PNP
SW3
I
V
SW2
Control Switches
Control Board
3 – 40 HP (230V) 3 – 75 HP (460V)
R2B
R2A
S6
S5 S4 S3 S2 S1
R1AR1B
R1C
AI2
10V
AIN
24V
FM+
AGND
24G
Version 1.4 and above
Version 1.3
Shield
Twisted Pair
Wrap with insulating Tape
Ground Shield at Inverter
end
ONLY
DO NOT
Ground Shield at
this end
10.2 Control Terminal Layout (Terminal Block TM2) and Control Switches
10.3 Control Terminal Wiring and Connections (Terminal TM2)
Control wiring is connected to terminal TM2. Select the proper wire and rating in accordance with the following:
Use copper wire only. The proper wire diameter should be based on ratings at +105°C.
AWG #18 is recommended.
To minimize EMI (electromagnetic interference), route control cables at least 12 in. from any power cables.
Do not run control wiring in the same conduit with power and motor wiring.
Depending on signal levels, shielded - twisted pair wiring is recommended as shown in the Fig. below.
For nominal values of input / output signals, follow the requirements of class 2 wiring
Control Cable, Shielded Twisted Pair
Control Terminals (TM2); Terminal Layout & Wiring Cont. 16
Page 20
N3 Drive Operations Manual
~
~
~
Power Supply
M
C
C
B
Molded
Circuit
Breaker
Magnetic
Contactor
AC
Reactor
Fast
Acting
Fuse
Input Noise
Filter
N3
Inverter
Ground
Induction
Motor
Ground
Output Noise
Filter
Power supply:
!
Make sure the correct voltage is applied to avoid damaging the
inverter.
Molded-case circuit breaker (MCCB) or fused disconnect:
A molded-case circuit breaker or fused disconnect must be installed
between the AC source and the inverter that conforms to the rated
voltage and current of the inverter to control the power and protect the
inverter.
!
Do not use the circuit breaker as the run/stop switch for the
inverter.
Ground fault detector / breaker:
!
Install a ground fault breaker to prevent problems caused by
current leakage and to protect personnel. Select current range up to
200mA, and action time up to 0.1 second to prevent high frequency
failure.
Magnetic contactor:
Normal operations do not need a magnetic contactor. When
performing functions such as external control and auto restart after
power failure, or when using a brake controller, install a magnetic
contactor.
!
Do not use the magnetic contactor as the run/stop switch for
the inverter.
AC line reactor for power quality:
When inverters are supplied by a high capacity (above 600KVA)
power source, an AC reactor can be connected to improve the power
factor.
Install Fast Acting Fuse:
To protect peripheral equipment, install fast acting fuses in
accordance with the specifications in Sec.12.0.
Input and output noise filter:
A filter must be installed when there are inductive loads affecting the
inverter.
Inverter:
Output terminals T1, T2, and T3 are connected to U, V, and W
terminals of the motor. If the motor runs in reverse while the inverter
is set to run forward, swap any two terminals connections for T1, T2,
and T3.
!
To avoid damaging the inverter, do not connect the output
terminals T1, T2, and T3 to AC input power.
!
Connect the ground terminal properly. (230V series: Rg <100;
460V series: Rg <10.)
11.0 Peripheral Power Devices
The following describes some of the precautions that should be followed when selecting peripheral power devices.
Peripheral Power Devices 17
Page 21
N3 Drive Operations Manual
220V class (1Ø)
N3-2
HP
KW
KVA
100% CONT
Output AMPS
(A)
Max.RK5
FUSE Rating(A)
Max. CC or T
FUSE
Rating(A)
P5-CS
0.5
0.4
1.2
3.1
10
20
01-CS
1
0.75
1.7
4.5
15
30
02-CS
2
1.5
2.9
7.5
20
40
03-CS
3
2.2
4.0
10.5
25
50
220V class (3 Ø)
N3-2
HP
KW
KVA
100% CONT
Output AMPS
(A)
Max.RK5
FUSE Rating(A)
Max. CC or T
FUSE
Rating(A)
P5-C
0.5
0.4
1.2
3.1 8 10
01-C
1
0.75
1.7
4.5
12
15
02-C
2
1.5
2.9
7.5
15
20
03-C
3
2.2
4.0
10.5
20
30
05-C
5
3.7
6.7
17.5
30
50
07-C
7.5
5.5
9.9
26
50
60
10-C
10
7.5
13.3
35
60
70
15-N1
15
11.0
20.6
48
80
100
20-N1
20
15.0
27.4
64
100
125
25-N1
25
18.5
34.0
80
125
150
30-N1
30
22.0
41.0
96
160
200
40-N1
40
30.0
54.0
130
200
250
12.0 Input Fuse Types and Ratings
Inverter input fuses are provided to disconnect the inverter from input power in the event of a component failure in the
inverter’s power circuitry. The inverter’s electronic protection circuitry is designed to clear inverter output short circuits
and ground faults without blowing the inverter input fuses. The table on the next page shows the N3 input fuse ratings.
To protect the inverter most effectively, use fuse types RK5 or CC/T with a current-limit function.
Table 12.1A (1Ø) Input Fuse Types and Ratings
Table 12.1B (3 Ø) Input Fuse Types and Ratings
NOTES:
Cont.
Input Fuse Types & Ratings 18
Page 22

N3 Drive Operations Manual
440V class (3 Ø)
N3-4
HP
KW
KVA
100% CONT
Output AMPS
(A)
Max.RK5
FUSE Rating(A)
Max. CC or T
FUSE
Rating(A)
01-C
1
0.75
1.7
2.3 6 10
02-C
2
1.5
2.9
3.8
10
15
03-C
3
2.2
4.0
5.2
10
20
05-C
5
3.7
6.7
8.8
20
30
07-C
7.5
5.5
9.9
13
25
35
10-C
10
7.5
13.3
17.5
30
50
15-C
15
11.0
20.6
25
50
60
20-N1
20
15.0
27.4
32
60
70
25-N1
25
18.5
34.0
40
70
80
30-N1
30
22.0
41.0
48
80
100
40-N1
40
30.0
54.0
64
100
125
50-N1
50
37.0
68.0
80
125
150
60-N1
60
45.0
82.0
96
150
200
75-N1
75
55.0
110.0
128
200
250
!
CAUTION
TECO bears no responsibility for failures caused by the following conditions:
(1) A molded-case circuit breaker is not installed, or an improper or overrated
breaker is used between the power source and the inverter.
(2) A magnetic contactor, a phase capacitor, or a surge suppressor between the
inverter and the motor.
N3 model
N3-2XX - Y
P5-CS
01-CS
02-CS
03-CS
05-C
07-C
10-C
15-N1
20-N1
25-N1
30-N1
40-N1
Molded-case
circuit breaker
made by TECO
TO-50E
10A
TO-50E
20A
TO-50E
30A
TO-50E
30A
TO-50E
30A
TO-50E
50A
TO-100S
60A
TO-100S
100A
TO-100S
100A
TO-225S
150A
TO-225S
175A
TO-225S
175A
Magnetic
contactor (MC)
made by TECO
CU-11
CU-16
CU-18
CU-27
CU-50
CU-65
CU-80
CN-100
CN-125
N3 model
N3-4XX - Y
01-C/02-C/03-C/05-C
07-C
10-C
15-C
20-N1
25-N1
30-N1
40-N1
50-N1
60-N1
75-N1
Molded-case circuit
breaker made by
TECO
TO-50E
15A
TO-50E
20A
TO-50E
30A
TO-50E
50A
TO-100S
50A
TO-100S
75A
TO-100S
100A
TO-100S
100A
TO-125S
125A
TO-225S
175A
TO-225S
175A
Magnetic contactor
(MC) made by TECO
CU-11
CU-16
CU-18
CU-27
CU-38
CU-50
CU-50
CU-65
CU-80
CN-100
CN-125
Table 12.1C (3 Ø) Input Fuse Types and Ratings
NOTE: Fuse ratings are based on 250V fuses for 230V inverters and 600v for 460V inverters.
13.0 Applicable Specifications for Circuit Breakers and Magnetic Contactors
The following tables show the specifications for molded case circuit breakers and magnetic contactors vs N3 models.
Table 13.1A (230V)
Table 13.1B (460V)
Input Fuse Types & Ratings Cont., Circuit Breakers & Magnetic Contactors 19
Page 23

N3 Drive Operations Manual
N3 Model
(240V)
AC inductance at
AC input side
N3 Model
(460V)
AC inductance at
AC input side
Current
(A)
Inductance
(mH)
Current (A)
Inductance
(mH)
2P5
5.0
2.1
401
2.5
8.4
201
5.0
2.1
402
5.0
4.2
202
10.0
1.1
403
7.5
3.6
203
15.0
0.71
405
10.0
2.2
205
20.0
0.53
407
15.0
1.42
207
30.0
0.35
410
20.0
1.06
210
40.0
0.265
415
30.0
0.7
215
60.0
0.18
420
40.0
0.53
220
80.0
0.13
425
50.0
0.42
225
90.0
0.12
430
60.0
0.36
230
120.0
0.09
440
80.0
0.26
240
160.0
0.07
450
90.0
0.24
460
120.0
0.18
475
150.0
0.15
N3 Model
AC inductance at input side
Current (A)
Inductance
(mH)
(240V)
2P5
3.1
5.65
201
4.5
3.89
202
7.5
2.33
203
10.5
1.67
205
17.5
1.00
207
26
0.67
210
35
0.50
(460V)
401
2.3
15.22
402
3.8
9.21
403
5.2
6.73
405
8.8
3.98
407
13
2.69
410
17.5
2.00
415
25
1.40
14.0 Reactor Input / Output Specifications
The specifications for the input (AC Power side) and output (DC to Motor side) reactors are as shown in the following
tables.
Table 14.1 Input Reactor Specifications
Table 14.2 Output Reactor Specifications
Input & Output Reactor Specifications 20
Page 24

N3 Drive Operations Manual
N3
Inverter
Model
Braking Unit
Braking Resistor
per braking unit
Suitable Motor
Capacity
Braking resistor
Specification
Braking
Resistor Duty
Cycle (%)
Braking
torque
(%)
Resistor dimension
(L x W x H) mm
(inches)
Model
Qty
Type
(HP)
(KW)
(W)
(Ω)
2P5
- - JNBR-150W200
0.5
0.4
150
200
10
238
251*28*60
(9.88*1.10*2.36)
201
- - JNBR-150W200
1
0.75
150
200
10
119
251*28*60
(9.88*1.10*2.36)
202
- - JNBR-150W100
2
1.5
150
100
10
119
251*28*60
(9.88*1.10*2.36)
203
- - JNBR-260W70
3
2.2
260
70
10
115
274*34*78
(10.79*1.34*3.07)
205
- - JNBR-390W40
5
3.7
390
40
10
119
395*34*78
(10.79*1.34*3.07)
207
- - JNBR-520W30
7.5
5.5
520
30
10
108
400*40*100
(15.7*1.57*3.94)
210
- - JNBR-780W20
10
7.5
780
20
10
119
400*40*100
(15.7*1.57*3.94)
215
-
-
JNBR-2R4KW13R6
15
11
2400
13.6
10
117
535*50*110 (Qty 2)
(21.1*1.96*4.33)
220
- - JNBR-3KW10
20
15
3000
10
10
119
615*50*110 (Qty 2)
225
JNTBU-230
1
JNBR-4R8KW8
25
18.5
4800 8 10
119
535*50*110 (Qty 4)
(21.1*1.96*4.33)
230
JNTBU-230
1
JNBR-4R8KW6R8
30
22
4800
6.8
10
117
535*50*110 (Qty 4)
(21.1*1.96*4.33)
240
JNTBU-230
2
JNBR-3KW10
40
30
3000
10
10
119
615*50*110 (Qty 2)
(24.21*1.96*4.33)
401
- - JNBR-150W750
1
0.75
150
750
10
126
251*28*60
(9.88*1.10*2.36)
402
- - JNBR-150W400
2
1.5
150
400
10
119
251*28*60
(9.88*1.10*2.36)
403
-
-
JNBR-260W250-
3
2.2
260
250
10
126
274*34*78
(10.79*1.34*3.07)
405
-
-
JNBR-400W150-
5
3.7
400
150
10
126
395*34*78
(10.79*1.34*3.07)
407
-
-
JNBR-600W130-
7.5
5.5
600
130
10
102
470*50*100
(15.7*1.57*3.94)
410
- - JNBR-800W100
10
7.5
800
100
10
99
535*50*110
(24.21*1.96*4.33)
415
-
-
JNBR-1R6KW50
15
11
1600
50
10
126
615*50*110
(24.21*1.96*4.33)
420
-
-
JNBR-1R5KW40
20
15
1500
40
10
119
615*50*110
(24.21*1.96*4.33)
425
JNTBU-430
1
JNBR-4R8KW32
25
18.5
4800
32
10
119
535*50*110 (Qty 4)
(21.1*1.96*4.33)
430
JNTBU-430
1
JNBR-4R8KW27R2
30
22
4800
27.2
10
117
535*50*110 (Qty 4)
(21.1*1.96*4.33)
440
JNTBU-430
1
JNBR-6KW20
40
30
6000
20
10
119
615*50*110 (Qty 4)
(24.21*1.96*4.33)
450
JNVPHV-0060
1*5
JNBR-9R6KW16
50
37
9600
16
10
119
535*50*110 (Qty 8)
(21.1*1.96*4.33)
460
JNVPHV-0060
1*5
JNBR-9R6KW13R6
60
45
9600
13.6
10
117
535*50*110 (Qty 8)
(21.1*1.96*4.33)
475
JNTBU-430
2
JNBR-6KW20
75
55
6000
20
10
126
615*50*110 (Qty 4)
(24.21*1.96*4.33)
15.0 Braking Unit and Braking Resistor Selections
Formula for brake resistor: W= ( Vpnb * Vpnb ) * ED% / R
1. W: braking resistor power (Watts)
2. Vpnb: braking voltage (220V=380VDC, 440V=760VDC)
3. ED%: braking effective period
4. R: braking resistor rated ohms
5. Alternative selection choice: 450: (JNTBU-430 + JNBR-4R8KW32) 2, 460: (JNTBU-430 + JNBR-4R8KW27R2) 2
Above 25HP, please add Braking Transistor Units: 200V JNTBU-230, 400V JNTBU-430, and 400V JUVPHV-0060
For more detailed information, please contact TECO.
When installing a braking unit and resistor, ensure that there is adequate clearance and ventilation.
Braking Unit & Braking Resistor Selections 21
Page 25

N3 Drive Operations Manual
Inverter Model
Rating
(INPUT)
Filter Model
Second Environment
First Environment
Restricted Distribution
First Environment
Unrestricted Distribution
N3
2P5-CS
1 170 -264V
--
Built in
FS 6146-11-07
201-CS
1 170-264V
--
Built in
FS 6146-11-07
202-CS
1 170-264V
--
Built in
FS 6146-27-07
203-CS
1 170 -264V
--
Built in
FS 6146-27-07
2P5-CS
1 170 -264V
--
FS 6146-11-07
--
201-CS
1 170-264V
--
FS 6146-11-07
--
202-CS
1 170-264V
--
FS 6146-27-07
--
203-CS
1 170 -264V
--
FS 6146-27-07
--
2P5-C
3 170 -264V
--
FS 6147-8.9-07
--
201-C
3 170 -264V
--
FS 6147-8.9-07
--
202-C
3 170 -264V
--
FS 6147-8.9-07
--
203-C
3 170 - 264V
--
FS 6147-19-07
--
205-C
3 170 - 264V
--
FS 6147-19-07
--
207-C
3 170 - 264V
--
FS 6147-39-07
--
210-C
3 170 -264V
--
FS 6147-39-07
--
401-C
3 323 -528 V
--
Built in
FS 6149-4.6-07
402-C
3 323 -528 V
--
Built in
FS 6149-4.6-07
403-C
3 323 -528 V
--
Built in
FS 6149-10-07
405-C
3 323 -528 V
--
Built in
FS 6149-10-07
407-C
3 323 -528 V
--
Built in
FS 6149-28-07
410-C
3 323 -528 V
--
Built in
FS 6149-28-07
415-C
3 323 -528 V
--
Built in
FS 6149-28-07
401-C
3 323 -528 V
--
FS 6149-4.6-07
--
402-C
3 323 -528 V
--
FS 6149-4.6-07
--
403-C
3 323 -528 V
--
FS 6149-10-07
--
405-C
3 323 -528 V
--
FS 6149-10-07
--
407-C
3 323 -528 V
--
FS 6149-28-07
--
410-C
3 323 -528 V
--
FS 6149-28-07
--
415-C
3 323 -528 V
--
FS 6149-28-07
--
420-N1
3 323 -528 V
JUNF34048S-MA
--
--
425-N1
3 323 -528 V
KMF370A
--
--
430-N1
3 323 -528 V
KMF370A
--
--
440-N1
3 323 -528 V
KMF3100A
--
--
450-N1
3 323 -528 V
KMF3100A
--
--
460-N1
3 323 -528 V
KMF3150A
--
--
475-N1
3 323 -528 V
KMF3180A
--
--
16.0 EMC Filters
The inverters use PWM (Pulse Width Modulation) in the output power section which results in rapid on / off switching
of the solid state power devices (IGTB transistors). Because of this, unwanted EMI (Electromagnetic Interference) and
RFI (Radio Frequency Interference) is produced which may affect other equipment. The use of EMC filters listed in
the following table is used to control this interference within limits set forth by the following standards.
EMC Standard 89/336/EEC
EMI Radio Standard – EMS Immunity Standard
EN 61800-3 1996/A11 : 2000 First Environmental Unrestricted Distribution (Class B)
EN 61800-3 1996/A11 : 2000 First Environmental Restricted Distribution
Note: Please refer to Appendix D for dimensional information for the various type EMC filters.
EMC Filters 22
Page 26
N3 Drive Operations Manual
Output frequency
control potentiometer
(when selected)
4 digit 7 segment
LED display
Membrane keys
LED indicators
LED indicators
LED
STATUS
DESCRIPTION
SEQ (Sequence
OFF
Run Command Source is from the keypad (b000=0000)
(factory default)
ON
Run Command Source is from external terminal (b000=0001),
or RS485 communication control (b000=2)
FRQ (Frequency)
OFF
Frequency Command Source is from the keypad
(b004=0000) (factory default)
ON
Frequency Command Source is from potentiometer on
keypad (b004=1), external analog signal (b004=0002), up /
down frequency control using MFIT (S1-S6) (b004=0003) or
RS485 communication control (b004=0004)
*FWD (Forward)
ON
Drive is running in the forward direction
Flashing
Drive is in the stop mode
REV (Reverse)
ON
Drive is running in the reverse direction
Flashing
Drive is in the stop mode
FUN (Function)
ON
Entering A or b parameters
*Hz/RPM
ON
Display is showing output frequency
VOLT
ON
Display is showing motor voltage (b014=0001), DC bus
voltage (B015=0001) or PID feedback voltage (b016=0001)
AMPS
ON
Display is showing motor current (b013=0001)
17.0 Keypad Key Functions and Navigation
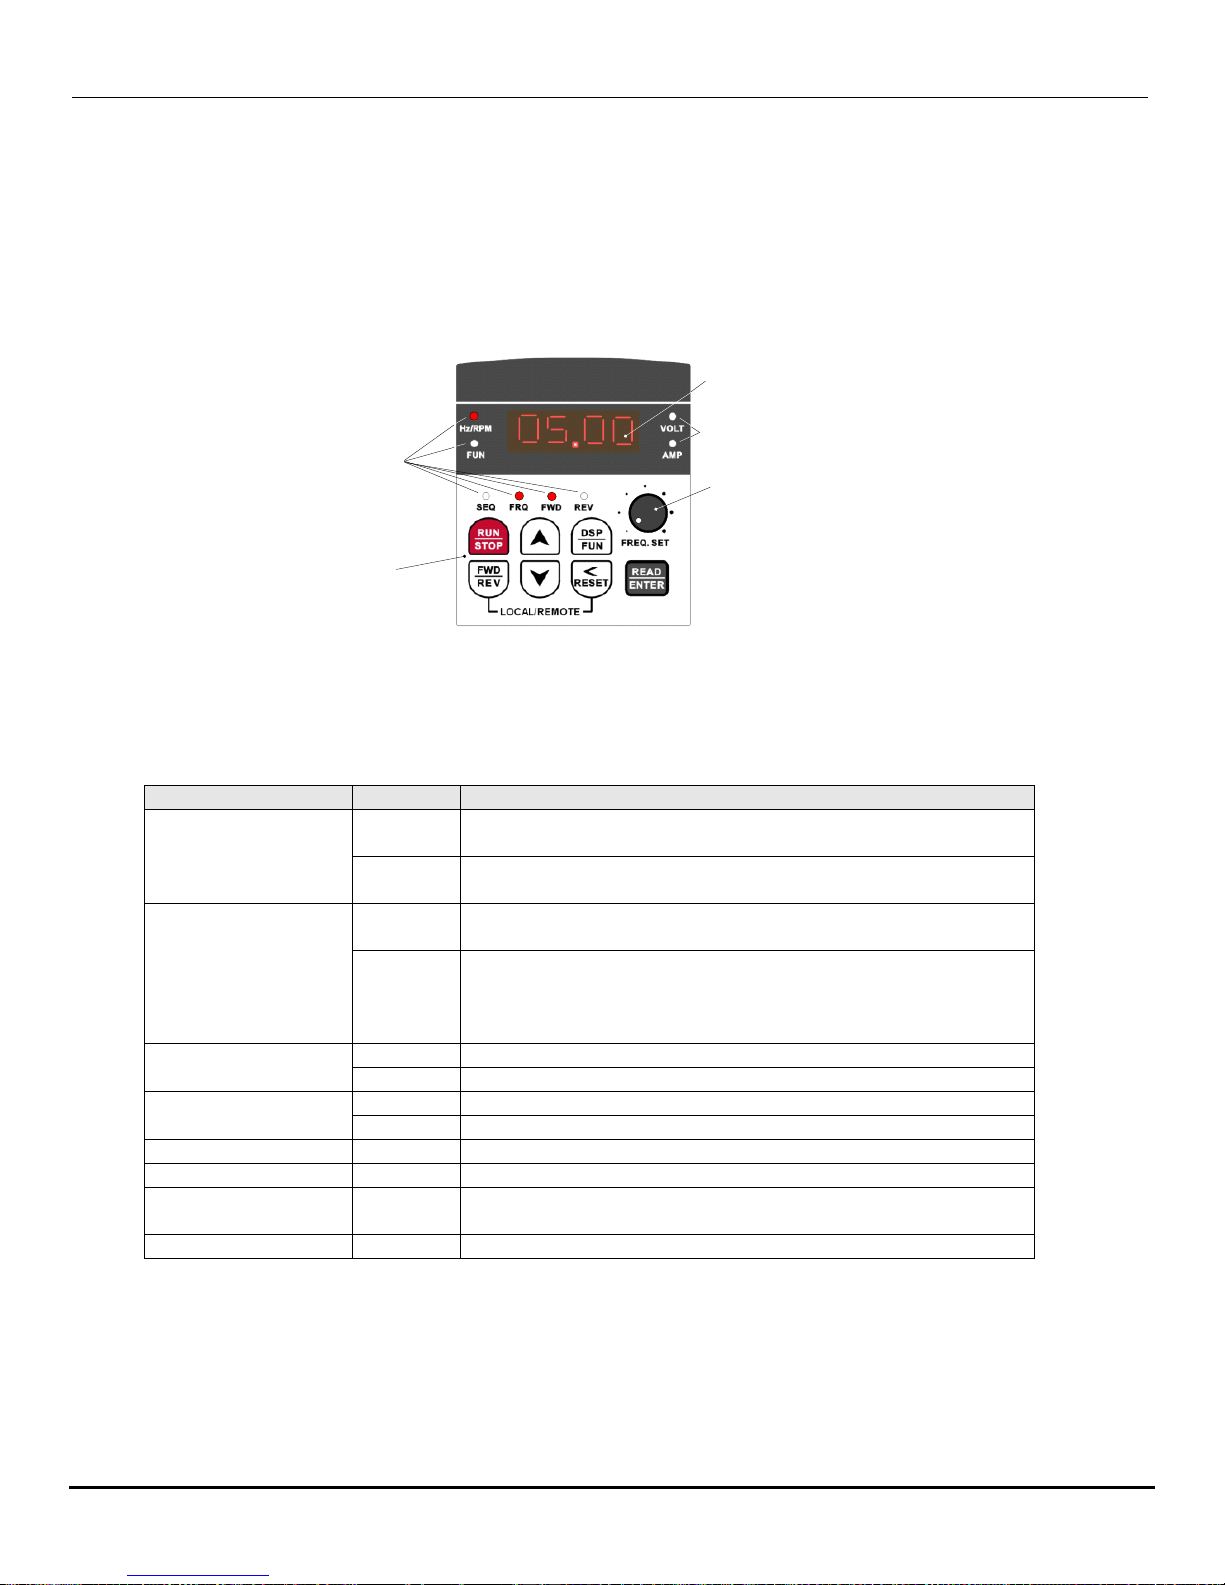
The N3 keypad, provides all the necessary functions to allow full control of the N3 inverter. The keypad has
membrane type keys and a 7 - segment 4 - digit LED display. Also located on the keypad is a potentiometer that can
be used to control inverter output frequency when selected as the control source. A remote keypad is available as an
option, and is covered more in detail in the Option Modules Sec. 20.0.
17.1 N3 Keypad
Fig. 17.1 N3 Keypad
17.2 Keypad LED Functions
Table 17.1
*Note – On initial powerup (factory default), the only LEDs that are on are Hz/RPM and FWD.
Keypad Functions & Navigation; Key Functions 23
Page 27

N3 Drive Operations Manual
UP / DOWN
· Sets the inverter output frequency when using the keypad mode.
· Sets the value of the 4 display digits to set the *A and b parameters.
* Access to the A parameters must be enabled. (see Sec. 17.4.3)
RUN / STOP
· Controls the output of the inverter when selected in the keypad mode. It is an on /
off toggle function.
DISPLAY / FUNCTION
· Toggles the display between the inverter output selected value (Hz etc.) and the *A
and b parameter lists. Also when AMPS and or VOLTS are selected for display, the
key will sequence through to display Hz/RPM, A and b parameter lists, AMPS or
VOLTS.
READ / ENTER
· Used to READ and /or save (ENTER) *A and b parameters.
STOP
RUN
FUN
DSP
FWD
REV
FWD / REV
· Controls the direction of the motor ( inverter output) when selected in the keypad
mode. It is an on / off toggle function.
· Used in conjunction with the RESET / SCROLL key to toggle between Local and
Remote operation.
RESET
RESET / SCROLL
· Resets the inverter after a fault
· Scrolls through the position of the 4 display digits to set the *A and b parameters.
· Used in conjunction with the FWD / REV key to toggle between Local and Remote
operation.
READ
ENTER
!
CAUTION
Do not use any sharp or potentially damaging objects to operate the keypad.
17.3 Key Functions
The keys are multifunctional, providing for both control of the inverter when keypad mode is selected (default) and
access in setting various parameters. The key functions are as follows.
Table 17.2
NOTES:
Keypad Functions & Navigation; Key Functions 24
Page 28
N3 Drive Operations Manual
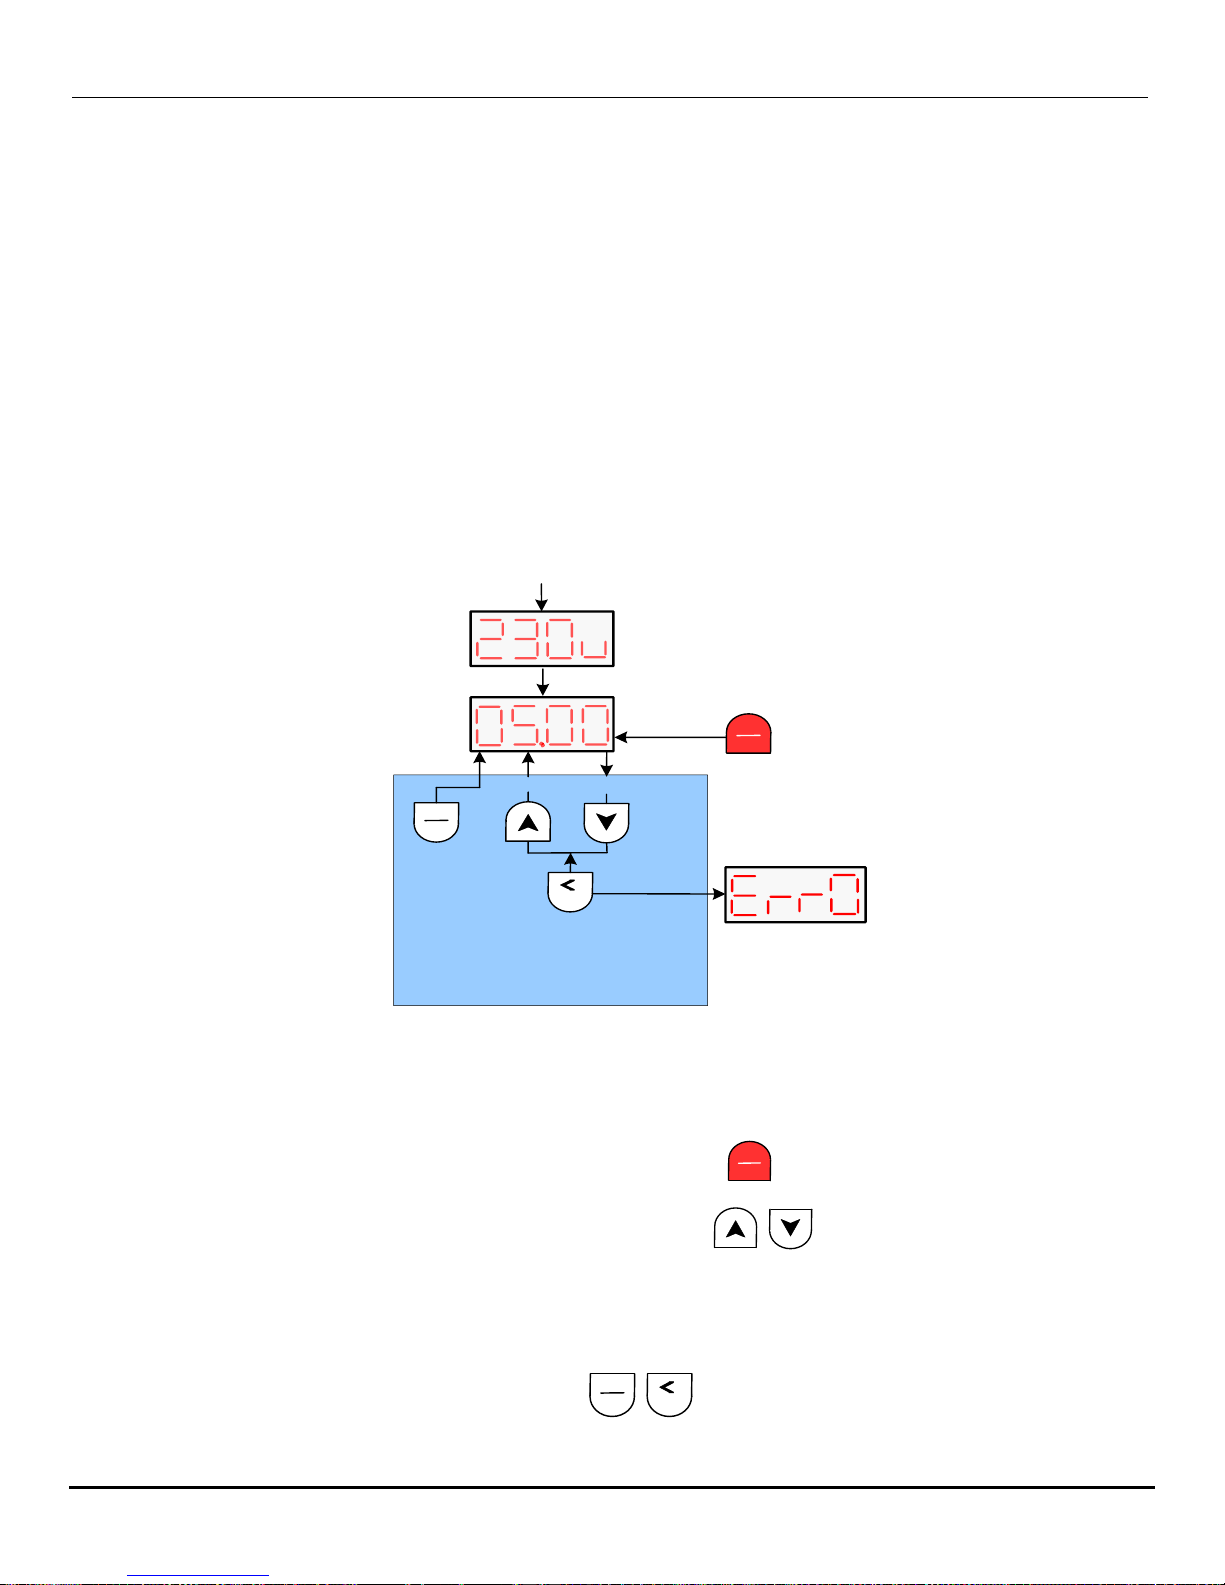
Initial Power-up
Input Voltage
(Vac)
Display
flashing
Initial output
frequency
(Hz)
Display flashing
in STOP mode
Display steady
in RUN mode
Fig. 17.2 Basic Keypad Control
Approx. 2 sec.
Reset after
Fault clear
STOP
RUN
Up
Down
RESET
Select digit position
Select digit value
Output frequency control
0 – 50/60 Hz in 0.01Hz increments
FWD
REV
STOP
RUN
STOP
Local / Remote Function
In Local mode:
· The RUN command is controlled by the RUN / STOP key.
· FREQUENCY command
If b004 = 0000: The UP/DOWN keys control the output frequency.
If b004 = 0001: The front panel potentiometer controls the output frequency.
FWD
REV
RESET
In Remote mode:
· The RUN command is controlled via the function set by (b000)
· The frequency command is set by the function set by (b004)
To toggle between Local / Remote press the keys simultaneously.
17.4 Keypad Navigation
When attempting to control and set various parameters for the inverter it would be useful for the user to become
familiar with keypad navigation and to go through a few function changes before making the final settings.
17.4.1 Basic Keypad Control (Factory Default, b000=0000 & b004=0000)
In its basic form as received from the factory, the inverter output is controlled from the keypad. Please refer to the A
and b parameter list (Sec. 19.0) to view the factory default settings for the various parameters. When the inverter is
powered up, the display will be flashing and momentarily show the inverter input voltage. The flashing display will
then switch to a minimum output frequency of 05.00Hz, the FWD LED will be flashing and the Hz/RPM LED will be on.
By pressing the STOP / RUN key the output is active (RUN) and the display is on solid as is the FWD LED. Using the
< / RESET key to select the digit position and the UP/DOWN keys to select the digit value, the output frequency
may then be set from 00.0 to 50.0/60.0Hz with minimum increments of 00.1Hz. The FWD/REV key may be toggled to
set the output direction. Both the output frequency and the output direction can be set when the inverter is in the RUN
or STOP mode. When the RUN/STOP key is toggled to STOP, the set frequency is displayed and the display is again
flashing. The < / RESET key also functions to initiate a RESET after a Fault is cleared.
17.4.2 Local / Remote Function
Keypad Functions & Navigation; Basic Keypad Control 25
Page 29

N3 Drive Operations Manual
RESET
Scroll from
b000 to b016
b parameters
displayed
Scroll to function
or code value
Display flashes
Then returns to
parameter selected
Parameter
function or value
saved
Toggles display between the set output
frequency (main display) and b or A
parameters (
when A is activated
)
To enter the A parameters, select
b011 and then 0001
Returns to b menu
Fig. 17.3 Setting b (Basic) and A (Advanced) Parameters
FUN
DSP
READ
ENTER
READ
ENTER
Up
Down
RESET
Select digit position
Select digit value
Scroll from
A000 to A181
Scroll to function
or code value
Display flashes
Then returns to
parameter selected
Parameter
function or value
saved
READ
ENTER
READ
ENTER
Up
Down
RESET
Select digit position
Select digit value
Returns to A menu
Select Leftmost digitSelect A
A parameters
displayed
FUN
DSP
Press at any time to
return to the main
display
READ
ENTER
Display flashes
Then returns to
parameter selected
17.4.3 Setting Parameters b(Basic) and A(Advanced)
The accessing and setting of parameter groups b and A will be discussed next.
Important ! The A (Advanced) parameters are not directly accessible and must be enabled by setting
parameter b011=0001.
Setting b (Basic) parameters
The basic parameters b can be accessed in two ways; the keypad or through the MODBUS protocol using an
optional communications module. Here only keypad access will be described. Before proceeding, refer to the b and
A parameter list (Sec. 19.0) and note that some parameters must be changed with the inverter in the STOP mode
while others can be changed in either the RUN or STOP mode. Also changing certain parameters may also affect
other functions and should be considered before making those changes.
To enter the b parameters, press the DSP/ FUN key; the display should show b000. Using the
> / RESET key to select the digit position and the Λ / V keys to select the value, enter the parameter to be set and
then press the READ / ENTER key to save; the display should momentarily flash End and return to the parameter
selected.
Setting A (Advanced) parameters
As previously mentioned, the A parameters are not directly accessible and must be enabled. To do this, select
parameter b011 and then Code = 0001 (Enable). Press the READ / ENTER key to save; the display should be
showing b011. Using the > / RESET key scroll to b000 position and then press the Λ key; A000 will be displayed.
Using the same procedure in setting the b parameters scroll to the desired A parameter and select the code or
function to be set and then press the READ / ENTER key to save. After all parameter changes have been made,
press the DSP/FUN key to return the main display show the output frequency.
Keypad Functions & Navigation; Setting b & A Parameters 26
Page 30

N3 Drive Operations Manual
Control Mode
Variable Torque
A000=1
Vector Control
Parameters to be Set:
A001 Motor rated voltage
A002 Motor rated current
A003 Motor HP
A004 Motor rated speed
A005 Motor rated frequency
A007 AC line input voltage
Perform auto tuning : A006=1
Parameters that can be Set:
B009 V/f Pattern
A129 Torque boost
A130 Motor no load current
A131 Motor rated slip
A132 Max. output frequency
A133 Max. output voltage
A134 Medium output frequency
A135 Medium output voltage
A136 Min. output frequency
A137 Min. output voltage
Suitable motor current A002
(OL1 reference)
General Vector
A000=0
V/f Control
A000=2
(Factory Default)
END
Select Control Mode
18.0 Control Mode Selection
The N3 inverter series has three control modes:
1. General Vector Control.
2. VT (Variable torque) Vector Control (Special for Fans and Pumps).
3. V/f Control (Factory default).
The user can select one of these control modes by following the flow chart below and setting the parameters as
shown. When vector control is selected the motor HP must match the inverter rating.
The V/f control mode should be used when the following conditions apply.
(1) Using one inverter to drive several motors simultaneously.
· In this case the rated inverter output current must equal or exceed the sum total of all of the motors
(2) The motors’ nameplate information is unknown or the motor ratings are not standard.
(3) The specifications of the inverter and motor differ by more than 1 HP.
In V/f control, A001 - A005 max. & min. values are determined by the TECO standard motor specification limit.
When parameter A000 = 2 (V/f control), the keypad will display ‘Err2’ if Auto tuning is performed.
connected.
· The correct V/f pattern must be set by parameters A132 – A137.
· In this case the inverter will set the motor characteristics in accordance with a standard TECO motor.
Control Mode Selection 27
Page 31

N3 Drive Operations Manual
Parameter
No.
LCD Display
Description
Range/Code
Factory
Setting
Remarks
b000
Run Source
Run Command
Source Selection
0000: Keypad
0001: External Run/Stop Control
0002: Communication
0000
b001
MFIT Run
Mode
Run/StopForward/Reverse
Operation Mode
with External
Terminals
0000: Forward/Stop-Reverse/Stop
0001: Run/Stop-Forward/Reverse
0002: 3-Wire Control Mode Run/Stop
0000
b002
Reverse
Oper
Reverse Prohibit
operation
0000: Enable Reverse Command
0001: Disable Reverse Command
0000
b003
Stopping
Method
Stopping Method
Selection
0000: Deceleration-to- Stop with
DC Injection Braking (Rapid
Stop)
0001: Coast to a Stop
0000
19.0 b (Basic) and A (Advanced) parameters defined.
The N3 inverter has two programmable function parameter categories; A (Advanced) and b (Basic) which are
described in detail in this section. It is important to note that while the parameters are set individually, they are
interactive with other parameters and must be considered when adjusting the value. It would be prudent on the users’
part to consider all parameters that are to be changed for a particular application before setting the individual values.
Note that the Advanced parameters are designated with an uppercase A, where the Basic parameters are designated
with a lowercase b. This is the result when a 7-segment LED display is used and is not intended to show priority.
b (Basic)
These parameters consist of the more basic parameters that most users need to consider. Examples of basic settings
are acceleration and deceleration rates (b007 and b008), run command and frequency sources (b000 and b004), and
optional current and voltage displays (b013 - b015). One important b parameter, (b011) allows the user to select
whether to allow access to A advanced parameters. As mentioned in the keypad navigation section, in order to
access and change the A parameters, b011 must be enabled.
A (Advanced)
In general the A parameters allow the inverter to be tailored to specific applications in order to achieve more precise
or specialized control. Examples are PID control, Auto-run mode, RS485 communication set-up, vector control mode
etc. In addition, all analog and digital input and output configurations plus motor parameters are entered in the A
parameters.
The tables below will summarize the b and A parameters, and then they will be individually discussed in detail.
Note: Some of the A parameters that are referenced in the Remarks column to note 9 are only available in
Versions 1.3 or later. (See Appendix G)
19.1 b (Basic) Parameter Summary
Cont.
b (Basic) & A (Advanced) Parameters defined; b000 – b003 28
Page 32

N3 Drive Operations Manual
Parameter
No.
LCD Display
Description
Range/Code
Factory
Setting
Remarks
b004
Frequency
Source
Frequency
Command Source
Selection
0000: Keypad
0001: Potentiometer on Keypad
0002: External Analog Signal Input
or Remote Potentiometer
0003: Up/Down Frequency Control
Using MFIT (S1 - S6)
0004: Communication setting
frequency
0005: Pulse Follower
0000
b005
Freq Upper
Limit
Frequency Upper
Limit (Hz)
0.01 - 400.00
50.00/
60.00
2
b006
Freq Lower
Limit
Frequency Lower
Limit (Hz)
0.00 - 400.00
0.00
b007
Accel Time 1
Acceleration Time
# 1 (Seconds)
0.1 – 3600.0
10.0
1
b008
Decel Time 1
Deceleration Time
# 1 (Seconds)
0.1 – 3600.0
10.0
1
b009
V/F Selection
Volts/Hz
Patterns(Password
protected
0 - 18
9
2 & 3
b010
Password
Parameter
Lock(except B010)
0000: Disable
0001: Enable
0000 b011
Advanced
Display
Advanced Display
0000: Disable
0001: Enable
0000
b012
Select
Language
Language
Selection
0000: English
0001: German
0002: French
0003: Italian
0004: Spanish
0000
Only for
LCD
Keypad
(option)
b013
Mtr Current
Motor Current
Display Selection
0000: Disable Motor Current
Display
0001: Enable Motor Current Display
0000
1
b014
Mtr Voltage
Motor Voltage
Display Selection
0000: Disable Motor Voltage
Display
0001: Enable Motor Voltage Display
0000
1
b015
Bus Voltage
DC Bus Voltage
Display Selection
0000: Disable Bus Voltage Display
0001: Enable Bus Voltage Display
0000
1
b016
PID
Fdbk(S6)Disp
PID Feedback
Display Selection
0000: Disable PID Feedback
Display
0001: Enable PID Feedback
Display
0000
1
Notes:
1 - Can be modified during run.
2 - Related to factory settings in North America or overseas
3 - Only available in V/F mode. Please refer to Fig. 19.27 for V/F Patterns.
Factory Setting 9 is for 60Hz General Use Application.
Cont.
b (Basic) & A (Advanced) Parameters defined; b004 – b016 29
Page 33

N3 Drive Operations Manual
b000
b
Run Command Source Selection
0000: Keypad
0001: External terminal control
0002: Communication control
b001
Operation modes for external
terminals
0000: Forward/stop - reverse/stop
0001: Run/stop - forward/reverse
0002: 3-wire control mode - run/stop
S1 (Run)
S2 (Stop)
S3 (Forward / Reverse)
+24V
(Common)
(2) PNP Input Signal
S1 (Run)
S2 (Stop)
S3 (Forward / Reverse)
COM (Common)
(1) NPN Input Signal
Parameter b001 = 0002, control method works as follows:
S1 (Run)
S2 (Forward / Reverse)
+24V
(Common)
(2) PNP Input Signal
b000 = 0002 (3- Wire Run / Stop)
b000 = 0001 (Run / Stop – Forward / Reverse)
S1 (Run)
S2 (Forward / Reverse)
COM (Common)
(1) NPN Input Signal
Parameter b001= = 0001, control method works as follows:
b000 = 0000 (Forward / Stop – Reverse / Stop)
S1 (Forward / Stop)
S2 (Reverse / Stop)
+24V
(Common)
(2) PNP Input Signal
S1 (Forward / Stop)
S2 (Reverse / Stop)
COM (Common)
(1) NPN Input Signal
Parameter b001 = 0000, control method works as follows:
19.2 b (Basic) Parameter Details
1.) b000 = 0000: The inverter is controlled by the keypad.
2.) b000 = 0001: The inverter is controlled by the external terminals. The Stop key will function as an emergency stop
function. (Refer to parameter A010 description).
Note: For the safety of personnel and equipment, when b000 = 0001, please refer to parameter group A013, A014,
A019 and A018 for a detailed description.
3.) b000 = 0002: The inverter is RS485 communication controlled.
1.) When operation command b000 = 0001 (external terminal), b001 is valid.
2.) When operation command b000 = 0001 (external terminal), the stop button is available for emergency stop.
(Refer to A010 for detailed description).
3.) When both forward and reverse commands are ON, this will result in a stopped mode.
Fig. 19.1
Notes: 1 - In 3 wire control mode, terminal S1, S2 and S3 are not controlled by A050, A051 and A052.
2 - When b002 = 0001 reverse is prohibited. (See b002)
Cont.
b (Basic) Parameter Details; b001 Cont., b002 – b004 30
Page 34

N3 Drive Operations Manual
S1
S2
S3
Terminals
b001 = 2
Three wire mode
b001 = 0
Run/Stop/Reverse
b001 = 1
Run/Reverse/Stop
b001 (Control Method Sequences)
b002
Disable Reverse Command
0000: Enable Reverse Command
0001: Disable Reverse Command
b003
Stopping Method
0000: Controlled Deceleration-to- Stop with
DC injection Braking (Rapid Stop)
0001: Free run stop (Coast stop)
b004
Frequency Command Source
Selection
0000: Keypad
0001: Potentiometer on Keypad
0002: External Analog Signal Input or Remote
Potentiometer
0003: Up/Down Frequency Control Using
MFIT (S1 - S6)
0004: RS485 Communication
0005: Pulse input (S5) setting frequency
(Ver2.3)
Fig. 19.2
b002 = 0001: The reverse command is invalid.
1.) b003 = 0000: The inverter will decelerate to 0Hz within the configured deceleration time after
receiving a stop command.
2.) b003 = 0001:The inverter will stop after receiving a stop command. The motor will coast to stop.
1.) Please refer to the description of parameter group A050 - A056 (multifunction input terminals) for the Up/Down
terminal function.
2.) The priority in reading frequency is Jog, preset speed, ▲▼ on keypad, Up / Down or communication control.
Cont.
b (Basic) Parameter Details; b001 Cont., b002 – b004 31
Page 35

N3 Drive Operations Manual
b005
Frequency Upper limit
0.01 - 400.00 (Hz)
b006
Frequency Lower limit
0.01 - 400.00 (Hz)
b011
Advanced Display
0000: Disable
0001: Enable
b013
Motor Current Display Selection
0000: Disable Motor Current Display
0001: Enable Motor Current Display
b014
Motor Voltage Display Selection
0000: Disable Motor Voltage Display
0001: Enable Motor Voltage Display
b010
Parameter Lock (except b010)
0000: Disable
0001: Enable
b012
Language Selection
0000: English
0001: German
0002: French
0003: Italian
0004: Spanish
b005 (Frequency upper limit)
b006 (Frequency lower limit)
Frequency command
Output frequency
(see note below)
b005 & b006 (Frequency Reference Limits)
Fig. 19.3
Note: When b006 = 0 Hz and the frequency command is 0 Hz, the inverter will stop at 0 speed. When b006 > 0 Hz
and the frequency command ≤ b006, the frequency output will be the b006 preset value.
b009 is the parameter for the V/f pattern selection (0 – 18) and will be covered extensively in the A (advanced)
parameter section. (A129 ~ 137 and Fig. 19.27)
b010 = 0000: Disable parameter lock.
b010 = 0001: Enable parameter lock.
Note: Message “LOC” will be displayed if an attempt is made to program when enabled.
b011 = 0000: Disable advanced display.
b011 = 0001: Enable access to advanced functions (A000 - A181).
Note: The b012 function is only available for products with an LCD keypad (option). The function is not valid for
the LED keypad.
Cont.
b (Basic) Parameter Details; b005 – b014 32
Page 36

N3 Drive Operations Manual
b015
DC Bus Voltage Display
Selection
0000: Disable Bus Voltage Display
0001: Enable Bus Voltage Display
b016
PID Feedback Display
0000: Disabled
0001: Enable
1.) The keypad displays the PID feedback value when:
· A140=0001 (PID is enabled)
· Parameter A049 = 0020 (Terminal AI2 is PID analog feedback).
· b016=0001 (Displays AI2 as PID analog feedback *value 0 -100)
*If the feedback signal is 0 – 10V the display value = (AI2 / 10V) x100
*If the feedback signal is 0 – 20mA the display value =(AI2 / 20mA) x100
2.) Press the DSP key to toggle between the output frequency and PID feedback value.
3.) The inverter displays XXXF when in Run mode, and XXXr when stopped.
NOTES:
b (Basic) Parameter Details; b015 – b016 33
Page 37

N3 Drive Operations Manual
Parameter
No.
LCD Display
Description
Range/Code
Factory
Setting
Remarks
A000
Control Mode
Control Mode
0000: Vector (Constant Torque)
0001: Vector (Variable Torque)
0002: Volts/Hz
0002
A001
Motor Rated
Volt
Motor Rated Voltage
(Vac)
Refer to Appendix B Table for default values
5
A002
Motor Rated
Amps
Motor Rated Current
(Amp)
5
A003
Motor Rated
HP
Motor Rated Power
(HP)
5
A004
Motor Rated
RPM
Motor Rated Speed
(RPM)
5
A005
Motor Rated
Hz
Motor Rated
Frequency (Hz)
5
A006
Auto Tuning
Motor Parameter
Auto Tuning
0000: Disabled
0001: Enabled
0000 A007
AC Input Volt
AC Line Input
Voltage (Vac)
230V SERIES: 170.0 - 264.0
460V SERIES: 323.0 - 528.0
230V
460V
A008
A009
Reserved
Reserved
A010
Keypad Stop
Keypad Stop Button
(In External
Run/Stop Mode)
0000: Stop Button Enabled
0001: Stop Button Disabled
0000
A011
Keypad
Up/Down
Keypad Frequency
Setting with
Up/Down Keys in
Run Mode
0000: ‘Enter’ must be pressed after
frequency change with
Up/Down Keys on keypad.
0001: Frequency will be changed
directly when Up/Down Keys
are pressed.
0000
A012
Starting
Method
Starting Method
Selection
0000: Normal Start
0001: Enable Speed Search
0000
A013
PwrL Selection
Momentary Power
Loss and Restart
0000: Momentary power loss and
restart disable
0001: Momentary power loss and
restart enable
0002: Momentary power loss and
restart enable while CPU is
still powered up.
0000
A014
PwrL Ridethru
T
Momentary Power
Loss Ride-Thru
Time (Seconds)
0.0 - 2.0
0.5
A015
Dir Start Sel
Direct Run After
Power-Up
0000: Enable Direct run after
power- up
0001: Disable Direct run after
power-up
0001
A016
Dir Start Delay
Delay-ON Timer
(Seconds)
0.0 - 300.0
0.0 A017
Auto Restart
Auto Restart Method
0000: Enable Speed Search
0001: Normal Start
0000
19.3 A (Advanced) Parameter Summary
Cont.
A (Advanced) Parameter Summary; A000 – A017 34
Page 38

N3 Drive Operations Manual
Parameter
No.
LCD Display
Description
Range/Code
Factory
Setting
Remarks
A018
Auto Restart
Sel
Number of Auto
Restart Attempts
0 - 10 0
A019
Auto Restart
Delay
Auto Restart Delay
Time (Seconds)
0.0 - 800.0
0.0
A020
Reset Mode
Sel
Reset Mode Setting
0000: Enable Reset Only when Run
Command is Off
0001: Enable Reset when Run
Command is On or Off
0000
A021
A022
Reserved
Reserved
A023
S-Curve 1
S-Curve Acc/Dec #1
(Seconds)
0.0 - 4.0
0.2 A024
S-Curve 2
S-Curve Acc/Dec #2
(Seconds)
0.0 - 4.0
0.2
A025
Accel Time 2
Acceleration Time
# 2 (MFIT)*
(Seconds)
0.1 – 3600.0
10.0
1
A026
Decel Time 2
Deceleration Time
# 2 (MFIT)*
(Seconds)
0.1 – 3600.0
10.0
1
A027
Jog Acc Time
Jog Acceleration
Time (MFIT)*
(Seconds)
0.1 - 25.5
0.5
1
A028
Jog Dec Time
Jog Deceleration
Time (MFIT)*
(Seconds)
0.1 - 25.5
0.5
1
A029
DC Inj Freq
DC Injection Braking
Start Frequency
(Hz)
0.1 - 10.0
1.5
A030
DC Inj Level
DC Injection Braking
Level (%)
0.0 – 10.0% (Level 100% by based
on Motor Rate Voltage A001)
5.0 A031
DC Inj Time
DC Injection Braking
Time (Seconds)
0.0 - 25.5
0.5 A032
Skip Freq 1
Skip Frequency # 1
(Hz)
0.00 - 400.00
0.0
1
A033
Skip Freq 2
Skip Frequency # 2
(Hz)
0.00 - 400.00
0.0
1
A034
Skip Freq 3
Skip Frequency #
3 (Hz)
0.00 - 400.00
0.0
1
A035
Skip
Bandwidth
Skip Frequency
Bandwidth (± Hz)
0.00 - 30.00
0.0
1
A036
A037
A038
(Reserved)
Reserved
A039
Parameter
Lock
Parameter Lock
0000: Enable all Functions
0001: A059 – A068 cannot be
changed
0002: All Functions Except A059 –
A068 cannot be changed
0003: Disable All Functions
0000
* MFIT refers to Multi-Function Terminal Inputs.
Cont.
A (Advanced) Parameter Summary; A018 – A039 35
Page 39

N3 Drive Operations Manual
Parameter
No.
LCD Display
Description
Range/Code
Factory
Setting
Remarks
A040
Parameter
Copy
Copy Unit
0000: Disable
0001: Inverter to Copy Unit
0002: Copy Unit to Inverter
0003: Verify Copy Operation
0000
A041
Fan Control
Fan Control
0000: Auto (Depend on drive
temperature.)
0001: Operate while in RUN mode
0002: Always Running
0003: Always Stopped
0000
A042
Energy Save
Mode
Energy Saving
Mode
0000: Disabled
0001: Controlled by MFIT≠ at Set
Frequency
0000
6
A043
Energy Save
Gain
Energy Saving Gain
(%)
0 - 100
80
6
A044
Carrier Freq
Carrier Frequency
(kHz)
4 - 16
10
A045
Display Units
Custom Units (Line
Speed) Display
Mode
0000: Drive Output Frequency is
Displayed
0001: Line Speed is Displayed as an
Integer (xxxx)
0002: Line Speed is Displayed with
One Decimal Place (xxx.x)
0003: Line Speed is Displayed with
Two Decimal Places (xx.xx)
0004: Line Speed is Displayed with
Three Decimal Places (x.xxx)
0000
1
A046
Display Scaling
Custom Units (Line
Speed) Value
0 - 9999
1800
1
A047
A048
(Reserved)
A049
(AI2 Function)
AI2 Function Set
20 / 21 / 22
20
7
Cont.
NOTES:
A (Advanced) Parameter Summary; A040 – A049 36
Page 40

N3 Drive Operations Manual
Parameter
No.
LCD Display
Description
Range/Code
Factory
Setting
Remarks
A050
S1 Terminal
Sel
Multifunction Input
Term. S1
0000: Forward/Stop Command
0001: Reverse/Stop Command
0002: Frequency Command 2
(A062)
0003: Frequency Command 3
(A063)
0004: Frequency Command 4
(A065)
0005: Jog
0006: Acc/Dec # 2
0007: Emergency Stop A Contact
0008: Base Block A Contact
0009: Speed Search
0010: Energy Saving
0011: Control Signal Selection
0012: Communication Selection
0013: Acc/Dec Disabled
0014: Up Command
0015: Down Command
0016: Master/Auxiliary Speed
0017: PID Function Disabled
0018: Reset
0019: Pulse Input terminal
( terminal S5 )
0020: PID feedback signal AI2
( terminal *AI2)
0021: AI2 Bias signal 1 input
( terminal *AI2)
0022: AI2 Bias signal 2 input
( terminal *AI2)
0023: Analog input (terminal AIN)
0024: Multi-Sequence Control
0000
*7
A051
S2 Terminal
Sel
Multifunction Input
Term. S2
0001
A052
S3 Terminal
Sel
Multifunction Input
Term. S3
0002
A053
S4 Terminal
Sel
Multifunction Input
Term. S4
0003
A054
S5 Terminal
Sel
Multifunction Input
Term. S5
0004
A055
S6 Terminal
Sel
Multifunction Input
Term. S6
0018
A056
AIN Term Sel
Multifunction Input
Term. AIN
0023
*0025: Emergency Stop B Contact
(NC)
*0026: Base Block B Contact (NC)
A057
Term Scan
Time
Multifunction Input
Term. S1 - S6
Signal Verification
Scan Time
(mSec X 4 )
1 – 100 (4-400msec)
5(20ms)
Cont.
NOTES:
A (Advanced) Parameter Summary; A050 – A057 37
Page 41

N3 Drive Operations Manual
Parameter
No.
LCD Display
Description
Range/Code
Factory
Setting
Remarks
A058
Up/Dn Stop
Mode
Stop Mode Using
Up/Down
0000: When the terminals are
Programmed for Up/Down
Frequency Control, the Set
Frequency will remain when
the Drive stops. When the
Drive stops, Up/Down Function
Disabled.
0001: Up/Down is used. The preset
frequency is reset to 0 Hz as
the inverter stops.
0002: When the terminals are
Programmed for Up/Down
Frequency Control, the Set
Frequency will remain when
the Drive stops. When the
Drive stops, Up/Down
Function is Enabled.
0000
A059
Jog Freq
Jog Frequency
(Hz)
0.00 - 400.00
2.00
1
A060
Up/Down Step
Fnct
Up/Down Step
Function (Hz)
0.00 – 5.00
0.00 A061
Freq command
1
Frequency
Command 1 (Hz)
0.00 - 400.00
5.00
1
A062
Freq command
2
Frequency
Command 2 (Hz)
0.00 - 400.00
5.00
1
A063
Freq command
3
Frequency
Command 3 (Hz)
0.00 - 400.00
10.00
1
A064
Freq command
4
Frequency
Command 4 (Hz)
0.00 - 400.00
20.00
1
A065
Freq command
5
Frequency
Command 5 (Hz)
0.00 - 400.00
30.00
1
A066
Freq command
6
Frequency
Command 6 (Hz)
0.00 - 400.00
40.00
1
A067
Freq command
7
Frequency
Command 7 (Hz)
0.00 - 400.00
50.00
1
A068
Freq command
8
Frequency
Command 8 (Hz)
0.00 - 400.00
60.00
A069
A070
Reserved
Reserved
A071
Auto_ Run Sel
1
Auto_ Run Mode
Operation
Selection 1
(0-3600 sec)
0000
A072
Auto_ Run Sel
2
Auto_Run Mode
Operation
Selection 2
A073
Auto_ Run Sel
3
Auto_Run Mode
Operation
Selection 3
A074
Auto_ Run Sel
4
Auto_Run Mode
Operation
Selection 4
Cont.
A (Advanced) Parameter Summary; A058 – A074 38
Page 42

N3 Drive Operations Manual
Parameter
No.
LCD Display
Description
Range/Code
Factory
Setting
Remarks
A075
Auto_ Run Sel
5
Auto_Run Mode
Operation
Selection 5
A076
Auto_ Run Sel
6
Auto_Run Mode
Operation
Selection 6
(0-3600 sec)
0000
A077
Auto_ Run Sel
7
Auto_Run Mode
Operation
Selection 7
A078
Auto_ Run Sel
8)
Auto_Run Mode
Operation
Selection 8
A079
A080
(Reserved)
Reserved
A081
Auto _ Run
Stop 1
Auto_ Run Stop 1
0000: STOP
0001: Forward
0002: Reverse
0000
A082
Auto _ Run
Stop 2
Auto_ Run Stop 2
A083
Auto _ Run
Stop 3
Auto_ Run Stop 3
A084
Auto _ Run
Stop 4
Auto_ Run Stop 4
A085
Auto _ Run
Stop 5
Auto_ Run Stop 5
A086
Auto _ Run
Stop 6
Auto_ Run Stop 6
A087
Auto _ Run
Stop 7
Auto_ Run Stop 7
A088
Auto _ Run
Stop 8
Auto_ Run Stop 8
A089
A090
(Reserved)
Reserved
Cont.
NOTES:
A (Advanced) Parameter Summary; A075 – A090 39
Page 43

N3 Drive Operations Manual
Parameter
No.
LCD Display
Description
Range/Code
Factory
Setting
Remarks
A091
Auto Run
Invalid
Operation Mode
Selection During
Auto Run
0000: Auto Run mode not effective
0001: Auto Run mode for cycle.
(continue running from the
unfinished step if restarting)
0002: Auto Run mode performed
periodically (continue running
from the unfinished step if
restarting)
0003: Auto Run mode for cycle, then
hold the speed of final step to
run. (continue running from the
unfinished step if restarting)
0004: Auto Run mode for cycle.
(starting a new cycle if
restarting)
0005: Auto Run mode be performed
periodically (starting a new cycle
if restarting)
0006: Auto Run mode for one single
cycle, then hold the speed of
final step to run. (starting a
New cycle if restarting)
0000
A092
AIN Gain
AIN Gain (%)
0 - 200
100
1
A093
AIN Offset
AIN Bias (%)
0 - 100
0
1
A094
AIN Bias
AIN Bias
Selection
0000: Positive
0001: Negative
0000
1
A095
AIN Slope
AIN Slope
0000: Positive
0001: Negative
0000
1
A096
AIN Scan Time
AIN Signal
Verification Scan
Time (AIN, AI2)
(mSec x 2)
1 - 100
50
A097
AI2 Gain
AI2 Gain
(%)*(AI2)
0 - 200
100
1& *7
A098
Pulse Inp.
Mult.
Encoder Impulse
Ratio
0.001 - 9.999
1.000
A099
Ref. Source2
Select the source
of auxiliary
frequency
command
0 - 4 0
A100
A102
Reserved
Reserved
A103
AO Mode Sel
Analog Output
Voltage Mode
(0 - 10 VDC,
Term.
FM+)
0000: Output Run Frequency
0001: Input Frequency Setting
0002: Output Voltage
0003: DC Voltage
0004: Output Current
0005: PID Feedback
0000
1
A104
AO Gain
Analog Output
Gain
(%)
0 - 200
100
1
Cont.
A (Advanced) Parameter Summary; A091 – A104 40
Page 44

N3 Drive Operations Manual
Parameter
No.
LCD Display
Description
Range/Code
Factory
Setting
Remarks
A105
Relay R1 Sel
Output Relay R1
Operation Mode
0000: Run
0001: Frequency Reached (Frequency
Command) (Set Frequency
± A108)
0002: Set Frequency (A107 ± A108)
0003: Frequency Threshold Level
(> A107) - Frequency Reached
0004: Frequency Threshold Level
(< A107) - Frequency Reached
0005: Over torque Threshold Level
0006: Fault
0007: Auto Restart
0008: Momentary AC Power Loss
0009: Emergency Stop Mode
0010: Coast-to-Stop Mode
0011: Motor Overload Protection
0012: Drive Overload Protection
0013: PID Feedback Signal Loss
0014: Power on
0015: Under torque Threshold Level
0006
A106
Relay R2 Sel
Output Relay R2
Operation Mode
0000
A107
Freq Agree
Frequency Reached
(Hz) (Refer to
A105: 0001)
0.00 - 400.00
0.00
1
A108
Freq Agree
width
Frequency Reached
Bandwidth (± Hz)
0.00 - 30.00
2.00
1
A109
A110
Reserved
Reserved
A111
Trip Prevent –
ACC
Trip Prevention
Selection During
Acceleration
0000: Enable Trip Prevention
During Acceleration
0001: Disable Trip Prevention
During Acceleration
0000
A112
Trip ACC Level
Trip Prevention
Level During
Acceleration (%)
50 – 300 (Level 100% based on Motor
HP setting A003)
200
A113
Trip Prevent -
DEC
Trip Prevention
Selection During
Deceleration
0000: Enable Trip Prevention
During Deceleration
0001: Disable Trip Prevention
During Deceleration
0000
A114
Trip DEC Level
Trip Prevention
Level During
Deceleration (%)
50 – 300 (Level 100% based on Motor
HP setting A003)
200
A115
Trip Prevent -
RUN
Trip Prevention
Selection in Run
Mode
0000: Enable Trip Prevention in
Run Mode
0001: Disable Trip Prevention in
Run Mode
0000
A116
Trip Run Level
Trip Prevention
Level In Run
Mode (%)
50 - 300 (Level 100% based on Motor
HP setting A003)
200
A117
Dec Trip Time
Trip Prevention
Deceleration Time
Selection in Run
Mode
0000: Trip Prevention Deceleration
Time Set by B008
0001: Trip Prevention Deceleration
Time Set by A118
0000
Cont
A (Advanced) Parameter Summary; A105 – A117 41
Page 45

N3 Drive Operations Manual
Parameter
No.
LCD Display
Description
Range/Code
Factory
Setting
Remarks
A118
Dec Trip Time
Deceleration Time
In Trip Prevention
Mode (Seconds)
0.1 – 3600.0
3.0
A119
Motor OL1 Sel
Electronic Motor
Overload
Protection
Operation Mode
0000: Enable Electronic Motor
Overload Protection
0001: Disable Electronic Motor
Overload Protection
0000
A120
Motor Type
Motor type
Selection
0000: Electronic Motor Overload
Protection Set for Non-Inverter
Duty Motors
0001: Electronic Motor Overload
Protection Set for Inverter Duty
Motors
0000
A121
Motor OL1
Curve
Motor Overload
Protection Curve
Selection
0000: Curve A (OL =103 %) (150 %
for 1 Minute)
0001: Curve B (OL = 113 %) (123 %
for 1 Minute)
0000
A122
Motor OL1
Operat
Operation After
Overload
Protection
is Activated
0000: Coast-to-Stop After Overload
Protection is Activated
0001: Drive Will Not Trip when
Overload Protection is Activated
(OL1)
0000
A123
Torq Det Sel
Over/Under torque
Detection
Selection
0000: Disable Over/Under torque
Operation
0001: Enable Over/Under torque
Operation Only if at Set
Frequency
0002: Enable Over/Under torque
Operation while the Drive is in
Run Mode
0000
A124
Torq Det Res
Operation After
Over/Under torque
Detection is
Activated
0000: Drive will Continue to Operate
After Over-torque is Activated
0001: Coast-to-Stop After Over Torque is Activated
0000
A125
Torq Hi Level
Over-torque
Threshold Level
(%)
30 – 200 (Level 100% based by
Motor HP A003)
150
A126
Torq Hi Delay
Over-torque
Activation Delay
Time (Seconds)
0.0 - 25.0
0.1
A127
Torq Lo Level
Under-torque
Threshold Level
(%)
30-200 (Level 100% based by Motor
HP A003)
0 A128
Torq Reserv
Time
Under-torque
Activation Delay
Time (Seconds)
0.0 – 25.0
0.1 A129
Torque Boost
Volts/Hz Curve
Modification
(Torque Boost) (%)
0 – 50.0
0.0
1 & 6
A130
Motor noLoad
Amp
Motor No Load
Current (Amps
AC)
-----
0
5 & 6
.
Cont.
A (Advanced) Parameter Summary; A118 – A130 42
Page 46

N3 Drive Operations Manual
Parameter
No.
LCD Display
Description
Range/Code
Factory
Setting
Remarks
A131
Motor rated Slip
Motor Slip
Compensation (%)
0.0 – 100.0
0.0
1 & 6
A132
Max frequency
Maximum
Frequency (Hz)
0.20 - 400.00
50.00/
60.00
4 & 6
A133
Max Voltage
Maximum
Frequency
Voltage
Ratio (%)
0.0 - 100.0 (l 100% based on AC
Input Volt A007)
100.0
6
A134
Mid frequency
Mid Frequency
(Hz)
0.10 - 400.00
25.00/
30.00
4 & 6
A135
Mid Voltage
Mid Frequency
Voltage Ratio (%)
0.0 - 100.0 (100% based on AC
Input Volt A007)
50.0
6
A136
Min frequency
Minimum
Frequency (Hz)
0.10 - 400.00
0.50/ 0.60
6
A137
Min Voltage
Minimum
Frequency
Voltage Ratio (%)
0.0 - 100.0 (100% based on AC
Input Volt A007)
1.0 6 A138
A139
(Reserved)
Reserved
A140
PID Mode Sel
Mode Selection
0000: Disabled
0001: Bias D Control
0002: Feedback D Control
0003: Bias D Reversed
Characteristics Control
0004: Feedback D Reversed
Characteristics Control
0005: Frequency Command + Bias
D Control
0006: Frequency Command +
Feedback D Control
0007: Frequency Command + Bias
D Reversed Characteristics
Control
0008: Frequency Command +
Feedback D Reversed
Characteristics Control
0000
A141
Feedback Gain
Feedback Gain
0.00 - 10.00
1.00
1
A142
PID Gain
Proportional Gain
0.0 - 10.0
1.0
1
A143
PID I Time
Integration Time
(Seconds)
0.0 - 100.0
10.0
1
A144
PID D Time
Differentiation
Time
(Seconds)
0.00 - 10.00
0.00
1
A145
PID Offset
PID Offset
0000: Positive
0001: Negative
0000
1
A146
PID Offset Adj
PID Offset Adjust
(%)
0 - 109
0 1 A147
Output Filter T
Output Lag Filter
Time (Seconds)
0.0 - 2.5
0.0
1
Cont
A (Advanced) Parameter Summary; A131 – A147 43
Page 47

N3 Drive Operations Manual
Parameter
No.
LCD Display
Description
Range/Code
Factory
Setting
Remarks
A148
Fdbk Sel
Feedback Loss
Detection Mode
0000: Disabled
0001: Enabled - Drive Continues to
Operate After Feedback Loss
0002: Enabled - Drive "STOPS"
After Feedback Loss
0000
A149
Fdbk Lvl
Feedback Loss
Detection Level
(%)
0 - 100 0
A150
Fdbk Loss Time
Feedback Loss
Detection delay
Time (Seconds)
0.0 - 25.5
1.0
A151
PID I Limit
Integration Limit
Value (%)
0 - 109
100
1
A152
I Time value Sel
Integration Value
Resets to Zero
when Feedback
Signal equals the
set point
0000: Disabled
0001:1 Second
0030:30 Seconds
0000
A153
I Error Margin
Allowable
integration
Error Margin
(Units)
(1 Unit = 1/8192)
0 - 100 0
A154
AIN AI2 Source
AIN or AI2 Source
signal
0000: AIN = 0 -10V or 0 - 20mA
AI2 = 0 -10V or 0 - 20mA
0001: AIN = 0 -10V or 0 - 20mA
AI2 = 2 -10V or 4 - 20 mA
0002: AIN = 2 -10V or 4 - 20 mA
AI2 = 0 -10V or 0 - 20mA
0003: AIN = 2 -10V or 4 - 20 mA
AI2 = 2 -10V or 4 - 20 mA
0000
7
A155
Sleep Level
Sleep Function
Operation Level
0.00 - 400.00
0.0
A156
Sleep Delay
Time
Sleep Function
Delay Time
0.0 - 25.5
0.0
Cont.
NOTES:
A (Advanced) Parameter Summary; A148 – A156 44
Page 48

N3 Drive Operations Manual
Parameter
No.
LCD Display
Description
Range/Code
Factory
Setting
Remarks
A157
Unit : NONE
Engineering Unit
(only for PID
Feedback used
for LCD type)
0000 : NONE
0001 : FPM (feet per minute)
0002 : CFM (cubic feet per minute)
0003 : PSI (pounds per square inch)
0004 : GPH (gallons per hour)
0005 : GPM (gallons per minute)
0006 : in
0007 : ft
0008 : /s (units per second)
0009 : /m (units per minute)
0010 : /h (units per hour)
0011 :Deg F
0012 : inW (inches in water column)
0013 : HP
0014 : m/s (meters per second)
0015 : MPM (meters per minute)
0016 : CMM (cubic meters per
minute)
0017 : W
0018 : kW
0019 : m
0020 : Deg C
0021 : %
0022 : rpm
0000
A158
PID Fdbk Dsp
Max
PID Feedback
Display Unit Max
0-9999
1000
Only for LCD
keypad
A159
PID Fdbk Dsp
Min
PID Feedback
Display Unit Min
0-9999
0
Only for LCD
keypad
A160
Reserved
Reserved
A161
Comm Error
Operation Sel
Communications
time-out
operation
selection
0000: Deceleration to stop.
(b008: Deceleration time 1)
0001: Coast to stop.
0002: Deceleration to stop.
(A026: Deceleration time 2)
0003: Continue operating.
0000
7
A162
Comm Error
detection time.
Communications
time-out
detection
time.
00.0 - 25.5 Sec.
00.00
7
A163
Se Comm Adr
Assigned
Communication
Station Number
1 - 254
1
2
Cont.
A (Advanced) Parameter Summary; A157 – A163 45
Page 49

N3 Drive Operations Manual
Parameter
No.
LCD Display
Description
Range/Code
Factory
Setting
Remarks
A164
Se Baud Rate
Baud Rate Setting
(bps)
0000: 4800
0001: 9600
0002: 19200
0003: 38400
0003
2
A165
Comm Stop Bit
Stop Bit Selection
0000:1 Stop Bit
0001: 2 Stop Bits
0000
2
A166
Comm Parity
Sel
Parity Selection
0000: Without Parity
0001: With Even Parity
0002: With Odd Parity
0000
2
A167
Comm Data
Format
Data Format
Selection
0000: 8-Bits Data
0001: 7-Bits Data
0000
2
A168
Stator Resistor
Stator Resistance
(Ohms)
Refer to Appendix B Table for default values
5
A169
Rotor Resistor
Rotor Resistance
(Ohms)
5
A170
Equi
Inductance
Equivalent
Inductance (mH)
5
A171
Magnet
Current
Magnetizing
Current
(Amps AC)
5
A172
Ferrite Loss
Ferrite Loss
Conductance (gm)
5
A173
A174
Reserved
Reserved
A175
Drive Model
Drive Horsepower
Code
-----
3
A176
Software
Version
Software Version
-----
-----
3
A177
Fault Log
Fault Jog (Last 3
Faults)
-----
-----
3
A178
Elapsed Hours
Accumulated
Operation Time
(Hours)
0 - 9999
-----
3
A179
Elapsed
Hr*10000
Accumulated
Operation Time
(Hours X 10000)
0 - 27
-----
3
A180
Elapsed Time
Sel
Accumulated
Operation Time
Mode
0000: Time Under Power
0001: Run Time
0000
A181
Reset
Parameter
Reset Drive to
Factory Settings
1110: Reset for 50 Hz Motor
Operation
1111: Reset for 60 Hz Motor
Operation
0000
4
Notes: 1 - Can be modified during run.
2 - Cannot be modified while communication is active.
3 - Value does not get set back to factory default after a factory reset. (See parameter A181)
4 - Related to factory setting in North America or overseas.
5 - The factory default value can be changed manually, or is changed automatically if required by
auto-tuning.
6 - Only available in V/F mode.
7 - Valid only for Versions 1.3 and higher. (For further information see Appendix G)
A (Advanced) Parameter Details; A164 – A181 46
Page 50

N3 Drive Operations Manual
A000
Control Mode
0000: Vector mode (Vector CT Mode)
0001: Vector mode (VT Mode)
0002: V/F mode
A001
A002
A003
A004
A005
Motor Rated Voltage(Vac)
Motor Rated Current (A)
Motor Rated Power (kW)
Motor Rated Speed (RPM)
(A004 X100 = Motor Rated
Speed)
Motor Rated Frequency (Hz)
Vac
Amps
Killowatts
RPM
Hz
A006
Motor Parameter Auto Tuning
0000: Disabled
0001: Enabled
!
Caution
1. The motor parameter auto tuning is stationary auto tuning. During motor auto tuning, the motor
does not rotate, and the keypad displays “-AT-”.
2. During motor parameter auto tuning, the input signal in the control circuit is invalid.
3. Before motor parameter auto tuning, confirm that the motor is stopped.
4. The motor parameter auto tuning is only available for vector control modes (A000 = 0000 or
A000 = 0001).
A007
AC Line Input Voltage (Volts)
230V Series : 170.0 - 264.0 Vac
460V Series : 323.0 - 528.0 Vac
A010
Keypad Stop Button
0000: Stop Button Enable
0001: Stop Button Disable
A011
Keypad Operation with Up/Down
Keys in Run Mode
0000: ‘Enter’ must be pressed after frequency
changes with the Up/Down Keys
on keypad to save selection.
0001: Frequency will be changed directly
when Up/Down Keys are Pressed
19.4 A (Advanced) Parameter Details
Select the appropriate vector control mode or V/F mode in accordance with the load characteristics.
1.) Vector (Vector CT mode) is best suited to control rapidly-changed torque loads.
2.) Vector (VT mode) is suitable for Fan and Pump loads. The magnetizing current of the motor
will vary with the torque, which will reduce the average current and save energy.
3.) If V/F mode is selected, set parameters, b009 and A129 - A137 in accordance with the load
characteristics.
1.) Whenever the vector mode is selected, the motor nameplate data must be input to
parameters A001 – A005.
2.) The Auto tuning is performed by setting A006=0001. The detected internal data will
automatically be written to parameters A168 to A172 when the display shows “End”.
Ex. If the motor rated speed is 1700 rpm, set A004 to 17.0
To accurately represent the voltage level of the inverter, input the actual measured line voltage.
When A010 = 0000, the STOP key is available on the keypad to activate a stop regardless of the drive Run source
as per parameter b000.
A (Advanced) Parameter Details; A001 – A011 47
Page 51

N3 Drive Operations Manual
A012
Starting Method Selection
0000: Normal Start
0001: Enable Speed Search
A013
Momentary Power Loss and
Restart
0000: Momentary Power Loss and
Restart Disable
0001: Momentary Power Loss and Restart is
Enabled
0002: Momentary Power Loss and
Restart Enable while CPU is Operating.
A014
Momentary Power Loss Ride-
Thru Time(seconds)
0.0 - 2.0 sec.
A015
Direct run after power up
0000: Enable Direct Run After Power Up
0001: Disable Direct Run After Power Up
!
Danger
1.) A015 = 0000: If the inverter is set to external terminal control (b000 = 0001), the inverter will autostart if the run switch is ON when power is applied. It is recommended that the run switch be turned
to OFF to avoid injury to personnel or equipment when power is applied.
2.) A015 = 0001: If the inverter is set external terminal control (b000 = 0001), the inverter will not
auto-start if the run switch is ON when power is applied and the display will flash ‘STP1’. In
this case it is necessary to disconnect power and turn the run switch OFF and then restart.
A016
Delay-ON Timer (seconds)
0 - 300.0 sec.
A017
Auto restart method
0000: Enable Speed Search
0001: Normal Start
A018
Number of Auto restart Attempts
0 - 10 times
A019
Auto restart Delay Time (seconds)
0 - 800.0 sec.
1.) A012 = 0000: At start, the inverter accelerates from 0 to the target frequency in the set time.
2.) A012 = 0001: At start, the inverter accelerates to the target the frequency from the detected speed of the motor.
1.) If the input voltage drops below the under voltage threshold level, the motor inverter will coast to stop. If the
input voltage recovers within the A014 preset time, the motor will spin start from the trip frequency, or the inverter
will trip with ‘LV-C’ being displayed.
2.) The allowable power loss time differs with ratings of the various models. The range is from 1 to 2 seconds.
3.) A013 = 0000: If power is lost, the inverter will not start.
4.) A013 = 0001: If the power loss time is less than the value of A014 the inverter will Spin Start in 0.5 second
when the power is re-supplied, and the number of restart times is unlimited.
5.) A013 = 0002: if the power is lost but is reapplied before the inverter loses control power, the inverter will restart
according to the settings of b000, and A017 and the status of the external switch.
Note: If b000=0001, A017=0000 and A013=0001 or 0002 and power is lost for an extended time, disconnect the
power to the drive to avoid injury to personnel and equipment when power is re-applied.
On power up with A015 = 0000, the inverter will perform auto restart after the delay time selected by A016.
1.) A017 = 0000: The inverter will detect motor speed and accelerate to the set frequency.
2.) A017 = 0001: The inverter will accelerate from stop (zero speed) to set frequency.
1.) A018 = 0: The inverter will not auto restart after fault trip.
Cont.
A (Advanced) Parameter Details; A012 – A019 48
Page 52

N3 Drive Operations Manual
A020
Error reset mode setting
0000: Enable Reset Only when Run Command is
Off
0001: Enable Reset when Run Command is On
or Off
b007
Acceleration Time #1 (seconds)
0.1 – 3600.0 sec.
b008
Deceleration Time #1 (seconds)
0.1 – 3600.0 sec.
A023
S Curve of First Acceleration
Stage (seconds)
0.0 – 4.0 sec.
A024
S Curve of Second Acceleration
Stage (seconds)
0.0 – 4.0 sec.
A025
Acceleration Time #2 (seconds)
0.1 – 3600.0 sec.
A026
Deceleration Time #2 (seconds)
0.1 – 3600.0 sec. for Emergency Stop reference
A027
Jog Acceleration Time(seconds)
0.1 – 25.5 sec.
A028
Jog Deceleration Time (seconds)
0.1 – 25.5 sec.
Acceleration time = b007 (or A025) x
Preset
frequency
Deceleration time = b008 (or A026) x
Preset
frequency
A005
A005
Function
Preset value
Acc/ Dec time 1
(b007 / b008)
Acc/ Dec time 2
(A025 / A026)
JOG Acc/Dec time
(A027 / A028)
b004 determines the
output frequency
source
b004 determines the
output frequency
source
A059 determines the Jog
frequency
A050 - A056 = 0005
Jog command
Off
Off
On
A050 - A056 = 0006
Acc/Dec time 2
Off
On
Off
2.) A018>0 and A019 = 0: The inverter will conduct a spin start 0.5 seconds after fault trip. The
motor will run to the frequency at the trip point and then to set frequency at the selected
acceleration and deceleration times.
3.) A018>0 and A019>0: the output will be stopped for a period which is determined by
parameter A019 after a trip fault. Then, the inverter will spin start to the preset frequency.
4.) If the inverter is set to braking mode, it will not perform a restart after a trip fault.
A020 = 0000: If the inverter trips on a fault turn the Run switch OFF to perform a reset, or restarting will not occur
unless power is cycled.
1.) Formula for calculating acceleration and deceleration time: The denominator is based on the rated frequency
of the motor (A005).
2.) When A050 – A056 = 0006 (the second acceleration and deceleration time), the first acceleration /
deceleration / S curve or the second acceleration / deceleration / S curve will be set by the external input
terminal.
3.) When A050 – A056 = 0005 (Jog), Jog run is controlled by external terminals. The acceleration and
deceleration action will be at Jog acceleration and deceleration times.
4.) When the external terminals select A050 – A056 to = 0005 (Jog) and 0006 (acceleration and deceleration
time the resulting control of the accelerating and decelerating times are prioritized as follows.
5.) When the S curve time (A023 / A024) is set to 0 sec., the acceleration and deceleration ramps are linear.
6.) When S curve time (A023 / A024) is greater than 0 sec., the acceleration and deceleration action is as
shown in Fig.19.4.).
7.) Regardless of the stall prevention period, the actual acceleration and deceleration time = preset
acceleration / deceleration time + S curve time. For example: acceleration time = b008 + A023.
Cont.
A (Advanced) Parameter Details; A019 Cont., A020 – A028 49
Page 53

N3 Drive Operations Manual
Time
Output Frequency
S Curve characteristics
S Curve time
A029
A030
A031
DC Injection Brake Start
Frequency (Hz)
DC Injection Brake Level (%)
DC Injection Brake Time
(seconds)
0.1 – 10.0 Hz
0.0 – 10.0 %
0.0 – 25.5 sec.
A031
A029
Hz
t
DC Injection braking example
A032
A033
A034
Skip Frequency #1 (Hz)
Skip Frequency #2 (Hz)
Skip Frequency #3 (Hz)
0.00 – 400.00 Hz
A035
Skip Frequency Bandwidth
(± Hz)
0.00 – 30.00 ± Hz
A32 A33 A34
A35
A35
A35
Output
Frequency
t
10Hz
20Hz
30Hz
+2Hz = 8 – 12 Hz
+2Hz = 18 – 22 Hz
+2Hz = 28 – 32 Hz
A035
A034
A035
A036
Skip
frequency
8.) During the acceleration and deceleration process, there may be a residual error in Acceleration and deceleration
toggling. If you need to toggle the acceleration and deceleration time during the acceleration / deceleration
process, set the S curve time (A023 / A024) = 0 sec.
Fig. 19.4
A031 and A029 is the active time and start frequency respectively of DC braking as shown below.
Fig. 19.5
Example: A032 = 10.0Hz, A033 = 20.0 Hz,
A034 = 30.0 Hz and A035 to 2.0Hz
Fig. 19.6
A (Advanced) Parameter Details; A028 Cont. – A029 – A035 50
Page 54

N3 Drive Operations Manual
039
Parameter lock function
0000: Enable all Functions
0001: A059 - A068 cannot be changed
0002: All Functions Except A059 - A068
cannot be changed
0003: Disable All Functions
A040
Parameter Copy
0001: Inverter to Copy Unit
0002: Copy Unit to Inverter
0003: Verify
A041
Fan Run Control
0000: Auto (Depends on temperature)
0001: Operate while in RUN Mode
0002: Always Running
0003: Always Stopped
A042
Energy Saving Mode Operation
(Note a.)
0000: Disabled
0001: Controlled by MFIT at Set Frequency
A043
Energy Saving Operation Gain
(%)
0 – 100 % (Note b.)
1.) A040 = 0000: The Inverter copy operation is not in the copy mode.
2.) A040 = 0001: Copy the inverter parameters to keypad module.
3.) A040 = 0002: Copy the keypad module parameters to inverter.
4.) A040 = 0003: Compares the parameters in the inverter to the parameters in the keypad module.
Note: If there is a mismatch, error message “EPr2” will be displayed.
Note: The copy function is only available for the models with same ratings.
1.) A041 = 0000: The fan runs when the inverter temperature rises above a set level.
2.) A041 = 0001: The fan runs while the inverter is running.
3.) A041 = 0002: The fan is continuously running regardless of the status of the inverter.
4.) A041 = 0003: The fan is always stopped regardless of the status of the inverter.
Note: The function is disabled at and above 15HP for the 230V class and above 20HP for the 460V class,
for these models, the fan will run continuously after power up.
1.) With fans, pumps or other high inertia loads, starting torques are typically high. When set speed is reached
the torque demand becomes less, consequently the output voltage can be lowered to save energy by setting
parameter A042 = 00001.
2.) Setting A050 - A056 = 10 (Multifunction input terminal) enables energy saving.
3.) If the multifunction terminal is set to =10 (energy saving control terminal), and A042 = 0001, the output voltage
will gradually decline to the original voltage x A043 (0-100%) when the terminal is ON. When the terminal
is OFF the output voltage will rise to original voltage.
Note: a. Energy saving mode is only available in the V/F mode. (A000 = 0002)
b. The declining and rising speeds of voltage for energy saving are the same as those for Speed Search.
A (Advanced) Parameter Details; A039 – A043 51
Page 55

N3 Drive Operations Manual
A044
Carrier Frequency (KHz)
2 – 16 KHz
A045
Custom Units (Line Speed)
Display Mode
0000: Drive Output Frequency is Displayed
0001: Line Speed is Displayed as an Integer
(xxxx)
0002: Line Speed is Displayed with One Decimal
Place (xxx.x)
0003: Line Speed is Displayed with Two Decimal
Places (xx.xx)
0004: Line Speed is Displayed with Three
Decimal Places (x.xxx)
A046
Custom Units (Line Speed) Value
0 – 9999
A049
AI2 Function: Analog Input
0020: PID Feedback Signal AI2 (Terminal AI2)
0021: AI2 Bias Signal 1 Input (Terminal AI2)
0022: AI2 Bias Signal 2 Input (Terminal AI2)
A044
Carrier
Frequency
A044
Carrier
Frequency
A044
Carrier
Frequency
A044
Carrier
Frequency
2
2KHz
6
6KHz
10
10KHz
14
14KHz
3
3KHz
7
7KHz
11
11KHz
15
15KHz
4
4KHz
8
8KHz
12
12KHz
16
16KHz
5
5KHz
9
9KHz
13
13KHz
Note: Increasing the carrier frequency will generally result in lower audible noise from the motor. However,
increased carrier frequencies can potentially cause electrical interference on other equipment operating
in proximity to the N3 inverter.
1.) The preset frequency is displayed when the inverter is stopped when the operation line speed is displayed
when the inverter is running.
2.) The maximum preset line value of A046 is equal to the rated frequency of the motor (A005). For example,
if the maximum line speed is set at 1800 RPM, the line speed is equal to 900 RPM when output is 30Hz
with a motor base frequency of 60Hz.
Note: Parameter 049 is only available in Versions 1.3 or later. Please refer to pages 52 and 55 for
details on parameter selections
NOTES:
A (Advanced) Parameter Details; A044 – A049 52
Page 56

N3 Drive Operations Manual
A050
to
A056
Multifunction input terminals
(TM2 S1-S6/AIN/ *AI2)
A054
A049
Note: The functions 0019 A049
to 0024 are assigned to A049
the specific parameters A056
shown. A050
0000: Forward/Stop Command
0001: Reverse/Stop Command
0002: Frequency Command 2 (A062)
0003: Frequency Command 3 (A063)
0004: Frequency Command 4 (A064)
0005: Jog
0006: Acc/Dec time # 2
0007: Emergency Stop Contact A
0008: Base Block Contact A
0009: Speed Search Stop
0010: Energy Saving
0011: Control Signal Selection
0012: Communication Control Signal Selection
0013: Acc/Dec Disabled
0014: Up Command
0015: Down Command
0016: Master/Auxiliary Speed
0017: PID Function Disabled
0018: Reset
0019: Pulse Input Terminal (Terminal S5)
0020: PID Feedback Signal AI2 (Terminal *AI2)
0021: AI2 Bias Signal 1 Input (Terminal *AI2)
0022: AI2 Bias Signal 2 Input (Terminal *AI2)
0023: Analog Input (Terminal AIN)
0024: Multi-Sequence Control
*0025: Emergency Stop Contact B
*0026: Base Block Contact B
*Note: only available in Versions 1.3 or later (See Appendix F for further details).
Digital inputs S1 to S6 and analog input AIN on terminal block (TM2) are multifunction input terminals.
A050 - A056 Function Description: Any function may be assigned to parameters A050 – A056 with the
exception of functions 0019, 0020, 0021, 0022, 0023 and 0024 which
are assigned to specific parameters as shown above.
1. 0000: (Forward / Stop Command). If forward command is ON, the inverter runs in the forward direction, and
stops when the command is OFF. The A050 factory default is forward.
0001: (Reverse / Stop Command) If reverse command is ON, the inverter runs in the reverse direction,
and stops when the command is OFF. The A051 factory default is reverse.
2. 0002, 0003, 0004: (Frequency Command 2/3/4 at A062/A063/A065). When External multifunction input
terminals are ON, the inverter operates at the preset speed, for the time that the input is ON. The
corresponding frequency output vs. the terminal input states is shown in the table on the next page.
3. 0005: (Jog). When Jog operation is selected, the inverter operates at the Jog acceleration and deceleration
times. The corresponding jog frequency parameter is shown in the table on the next page. The priority
of frequency is: Jog Speed→Preset Speed→Keypad frequency or external frequency signal.
Cont.
A (Advanced) Parameter Details; A050 – A056 53
Page 57

N3 Drive Operations Manual
Multifunction
terminal 3
Preset value=04
Multifunction
terminal 2
Preset value =03
Multifunction
terminal 1
Preset value =02
Jog Command
terminal
Preset value =05
Output
frequency
preset value
0 0 0
0
A061 X X X 1
A059
0 0 1
0
A062
0 1 0
0
A063
0 1 1
0
A064
1 0 0
0
A065 1 0 1 0
A066 1 1 0 0
A067 1 1 1 0
A068
1 = ON, 0 = OFF, & X = Don’t Care
4. 0006: (Toggle acceleration and deceleration time). This input selects the acceleration 1 / deceleration 1 /
S curve 1 or acceleration 2 / deceleration 2 / S curve 2.
5. 0007 or 0025: (External Emergency Stop Contact A or B). When the external emergency stop contact is
closed, the inverter will decelerate to stop via the time set by A026 (Deceleration time 2) and the display
will flash E.S when the emergency stop signal is received regardless of the b003 (Stopping method)
setting. To restart the drive after the external emergency stop contact is opened, press the run key on the
keypad or toggle the run input contact. The inverter will restart from the start frequency. If the emergency
signal is cleared before the inverter stops completely, the inverter still carries out the emergency stop.
The multifunction output relays, A105 (Relay output 1) and/or A106 (Relay output 2), will activate with an
emergency stop if A105 and/or /A106 = 9: (Rapid stop mode). Contact A is normally open, and activates
emergency stop when energized. Contact B is normally closed and emergency stop activates when de energized.
6. 0008 or 0026: (Base Block Contact A or B) The inverter output voltage immediately goes to 0, and the motor
does a coast stop. Contact A is normally open and base block activates when energized. Contact B is
normally closed and base block activates when de- energized.
7. 0009: (Speed Search Start) When starting, the inverter detects the present speed of the motor, then
accelerates from that speed to preset speed.
8. 0010: (Energy-saving operation) With Fans, Pumps, or other high inertial loads, starting torques are typically
higher while at set speed, the torque demand is less. Consequently the output voltage to is reduced to
save energy. When the input in ON the output voltage will gradually decline as set speed is reached.
When OFF, the output voltage will gradually increase to the original voltage.
Note: The acceleration and deceleration rate during the energy saving operation is the same as that of
Speed Search.
9. 0011: (Control signal selection)
OFF: The setting of b000 (Run source) and b001 (MFIT) determines the operating mode.
ON: The keypad controls the operating mode.
Note: The toggling of 0011 is allowed while the drive is running, however when doing this, please use
caution around the operating equipment.
10. 0012: (Communication signal selection)
OFF: RS485 communication, from a PC or PLC can control the inverter operation and allow
modification to the parameters. The keypad and external control terminals TM2 are not functional
in this mode. Furthermore, the keypad can only display the voltage, current and frequency and the
parameters are read - only. The Emergency top is still valid.
Cont.
A (Advanced) Parameter Details; A050 – A056 Cont. 54
Page 58

N3 Drive Operations Manual
Operating
Signal
Disable
Acc./ Dec.
Output Frequency
ON: The inverter is controlled by the keypad regardless of the settings of b000 (Run source) and b004
(Frequency source). The RS485 communication can still read and write the inverter parameters.
11. 0013: (Disable acceleration and deceleration) When ON, acceleration and deceleration is disabled until the
input is turned OFF. The function is illustrated below.
12. 0014 and 0015: (Up / Down Function)
Actual Acc /Dec time is based on the following settings:
Cont.
Fig. 19.7
(1) To use the Up / Down function set b004 = 3. The other frequency signals are not valid.
(2) When A058 = 0000 and A060 = 0000, the inverter accelerates to the preset value of A061, and then
maintains a constant speed. When the inverter receives either the Up or Down command, it will accelerate
or decelerate until the command is released. The inverter runs at the speed setting at the time of release.
When the inverter receives a stop command, the inverter will either ramp or free - run to stop as determined
by the setting of b003. The frequency at the stop time will be stored in A061. The Up / Down key is invalid
when the inverter is stopped. The preset parameters are modified through the keypad.
(3) When A058 = 0001, the inverter will operate from 0Hz when the Run command is ON. The Up / Down
and stop command action is the same as above. The next operation will start at 0 Hz.
(4) The Up /Down signals are invalid if pressed simultaneously.
(5) When a Run command is given, the inverter will accelerate to the preset frequency set by A061 and
maintain that speed. If the step frequency A060 is set to a given value (≠0), and the Up or Down terminal
is turned ON for less than 2 seconds, the set frequency will accelerate or decelerate to a new value equal
to A061± A060 which will become the new set frequency. Each time the Up or Down terminal is turned
ON for less than 2 seconds the set frequency will change by the value of A060 (See fig. on next page).
If the Up / Down signal is maintained over 2 seconds, or if A060 = 0, the frequency will continuously
accelerate or decelerate toward the frequency limits until the signal is released.
The Up / Down functional range is subject to the set frequency upper and lower frequency limits, b005
and b006.
A (Advanced) Parameter Details; A050 – A056 Cont. 55
Page 59

N3 Drive Operations Manual
Output Frequency
Operation
Up
Down
A061
Up / Down key sequencing
Time
0
10
Hz
V
AIN + AI2
Upper
Frequency
Limit b005
0
10
Hz
V
AIN + AI2 -5V
Upper
Frequency
Limit b005
5
A049 = 0021
A049 = 0022
(The value is 0 when
AIN + (AI2-5V) < 0)
A49 Bias Signal Characteristics
Fig. 19.8
13. 0016: (Auxiliary speed toggle)
OFF: The frequency is set by the potentiometer (Master Speed) on the keypad.
ON: The frequency is set by the AUX. input signal terminal (Auxiliary Speed) on TM2.
b004 = 0001: If one of the parameters in group A050 - A056 is set to 16 and the multifunction terminal is
OFF, the frequency is set by the potentiometer on the keypad. When the multifunction terminal is ON, the
frequency is set by the analog signal (auxiliary speed) on terminal block (TM2).
b004 = 0002: If one of the parameters in group A050 - A056 is set to 16 and the multifunction terminal is
OFF, the frequency is set by the analog signal on terminal block (TM2). When the input is ON, the
frequency is set by the potentiometer on the keypad.
14. 0017: (PID Function Disable) When the PID Function Disable is ON, the PID function, A140 is disabled.
15. 0018: (Reset Command) The Reset command performs the same function as the Reset Key on the keypad.
When the command is OFF, the inverter does not respond. The factory default of A055 is the Reset
command.
16. 0024: (Multi-Sequence Control) The Multi-Sequence control is set to 0024 to become the input terminal for
the Auto – Run mode.
17. A054 = 0019: (Pulse Input Terminal) The multifunction terminal S5 when A054 is set to 0019 and becomes
the input terminal for encoder signals.
18. A049 = 0020: (PID Feedback Input Terminal) The multifunctional terminal AI2 becomes the PID feedback
input terminal and can be set to 0 – 10V (0 – 20 mA) or 2 – 10V (4 – 20 mA) set by parameter 140.
= 0021: (Bias Signal 1) and = 0022: (Bias Signal 2) The Bias signals provide a means of setting an
offset for the Keypad potentiometer or AIN analog input. Only 0-10V (0-20mA) or 2-10V (4-20mA) is
available.
Note: Parameter A049 is only available in Versions 1.3 or later (See Appendix F for further details).
Fig. 19.9 Cont.
A (Advanced) Parameter Details; A050 – A056 Cont. & A057 – A068 56
Page 60

N3 Drive Operations Manual
A057
Multifunction terminals S1 - S6
and AIN signal scan times
(4mSec )
1 - 100 times
A058
Stop Mode Using Up/Down
frequency is maintained when the inverter
stops, and the UP/Down is unavailable.
0001: When Up/Down is used, the preset
frequency is reset to 0 Hz when the
Inverter stops.
frequency is Maintained when the inverter
stops, and the UP/Down is available.
A059
&
A061 –
A068
Jog and Preset (MFIT) Speed
Setting on Keypad
Set Jog and preset speed by
Keypad
19. A056 = 0023: (Analog input AIN) The multifunction analog terminal AIN = 0023, controlling the output
frequency.
20. A050 = 0024: (Multi-Sequence Control) The Multi-Sequence control is set to 0024 to become the input
terminal for the Auto – Run mode.
1.) This function is used to minimize the electrical noise on the digital and analog inputs by sampling the input signal
every 4 mSec. x 1-100 ( 4 to 400 mSec. user selected). If the signal value is the same for the interval time selected
it is treated as a valid value. If the signal changes during the interval time it is treated as noise.
2.) The minimum scan period is 4mS while the maximum is 400mS.
3.) The user can set the scan time interval depending on the noise environment. In general, the noise can be
minimized by increasing scan time interval, however the response to valid signal changes will be slower.
Note: If input AIN is digital, an input voltage level above 8V is treated as ON, and below 2V as OFF.
1.) A058 = 0000: Upon receiving a Run command the inverter will accelerate to the speed set in parameter A061.
When the Up / Down command is activated the inverter begins to accelerate / decelerate and the inverter will
hold that speed when the Up / Down command removed. When a Stop command is given, the inverter will ramp
stop or stop as determined by the b003. It will store the frequency value at the time when the Stop signal is
activated. The Up / Down function is unavailable when the inverter is stopped. The keypad is available to modify
the preset frequency (A061). If A058 = 0002, the UP/Down function is available When the inverter stops.
2.) A058 = 0001: When the Run terminal is energized, the inverter accelerates from 0 Hz, and the Up / Down function
is same as above. When a Stop command is given, the inverter will ramp stop or stop (determined by b003) to
0 Hz. The next Run command will start from 0 Hz.
1.) A050 – 056 = 0002 - 0004 (preset speed 1 - 3)
ON: the inverter operates at preset speeds 1 – 8 based on the corresponding frequency output vs. the
terminal input states is shown in the table.
2.) A050 – 056 = 0005 (Jog)
ON: the inverter operates in Jog acceleration time / Jog decelerate time / ON
Cont.
A (Advanced) Parameter Details; A050 – A056 Cont. & A057 – A068 57
Page 61

N3 Drive Operations Manual
Function
Code No.
LCD
Display
Description
Range/Code
Factory Setting
A059
(Jog Freq)
Jog Frequency (Hz)
0.00 - 400.00
2.00
A061
(Freq Command 1)
Frequency Command 1 (Hz)
0.00 - 400.00
5.00
A062
(Freq Command 2)
Frequency Command 2 (Hz)
0.00 - 400.00
5.00
A063
(Freq Command 3)
Frequency Command 3 (Hz)
0.00 - 400.00
10.00
A064
(Freq Command 4)
Frequency Command 4 (Hz)
0.00 - 400.00
20.00
A065
(Freq Command 5)
Frequency Command 5 (Hz)
0.00 - 400.00
30.00
A066
(Freq Command 6)
Frequency Command 6 (Hz)
0.00 - 400.00
40.00
A067
(Freq Command 7)
Frequency Command 7 (Hz)
0.00 - 400.00
50.00
A068
(Freq Command 8)
Frequency Command 8 (Hz)
0.00 - 400.00
60.00
Multifunction
terminal 3
Preset value=04
Multifunction
terminal 2
Preset value=03
Multifunction
terminal 1
Preset value=02
Jog Command
terminal
Preset value=05
Output
frequency
preset value
0 0 0
0
A061
x x x
1
A059
0 0 1
0
A062
0 1 0
0
A063 0 1 1 0
A064 1 0 0 0
A065 1 0 1 0
A066
1 1 0
0
A067
1 1 1
0
A068
A060
Step of Up/Down Function (Hz)
0.00 – 5.00 Hz
ON
ON
OFF
OFF
UP
DOWN
Output Frequency
Up / Down Profile Example A060=0.00
b005 Upper
frequency limit
b006 Lower
frequency limit
Reaches Upper
frequency limit
Priority in reading the frequency: Jog > Preset speed > Keypad frequency or external frequency signal
1.) A060 = 0.00: When the Up terminal is ON, the frequency continuously increases while the Down terminal is
ON, the frequency continuously decreases until the upper and lower frequency limits are reached.
(See fig. below)
Fig. 19.10
Cont.
A (Advanced) Parameter Details; A057 – A068 Cont. & A060 58
Page 62

N3 Drive Operations Manual
ON
ON
OFF
OFF
UP
DOWN
Output Frequency
Up / Down profile example A060=0.01
b005 Upper
frequency limit
b006 Lower
frequency limit
2
Sec.
Ramp
2
Sec.
Ramp
A061
Auto_Run Mode Frequency
Command
1
0 – 400 Hz
A062
2
A063
3
A064
4
A065
5
A066
6
A067
7
A068
8
A071
Auto_Run Mode Operation
Selection
1
0 –3600 Sec.
A072
2
A073
3
A074
4
A075
5
A076
6
A077
7
A078
8
2.) A060 = 0.01 to 5.00: When the Up / Down terminal is ON, the output frequency steps at the incremental
frequency set by A060. If Up / Down signal is ON for more than 2 seconds, the output frequency will ramp
continuously toward the frequency limits until it is turned OFF. (See fig. below)
Fig. 19.11
Cont
A (Advanced) Parameter Details; A060 Cont. & A061 – A078 59
Page 63

N3 Drive Operations Manual
A081
Auto_Run Stop
1
0000: Stop
0001: Forward
0002: Reverse
A082
2
A083
3
A084
4
A085
5
A086
6
A087
7
A088
8
A091
Operation Mode Selection During
Auto Run
0001: Auto Run mode for one cycle. (continue
running from the
0002: Auto Run mode is performed
periodically (continue running from
the unfinished step if restarting)
0003: Auto Run mode for one cycle,
then hold the speed of final
step to run. (continue
running from the unfinished
step if restarting)
0004: Auto Run mode for one cycle.
(starting a new cycle if restarting)
0005: Auto Run mode is performed
periodically (starting a new cycle if
restarting)
0006: Auto Run mode for one single cycle,
then hold the speed of final step to
run. (starting a new cycle if
restarting)
Cmd / Sel
Freq Cmd. Hz
Oper Sel. Sec.
Fwd / Rev / Stop
1
A061 = 15
A071 = 20
A081 = Fwd.
2
A062 = 30
A072 = 25
A082 = Fwd.
3
A063 = 50
A073 = 30
A083 = Fwd.
4
A064 = 20
A074 = 40
A084 = Rev.
5 - 8
A065 – A068 = 0
A075 – A078 = 0
A085 – A088 = 0
1.) A091 = 0000 – 0006: Selects the mode of operation in Auto_Run.
2.) In the Auto_Run mode:
A061 - A068: Selects the run frequency
A071 - A078: Selects the time of the run frequency
A081 - A088: Selects the direction (Fwd / Rev) of the output or the Stop mode.
3.) In the Auto_Run mode the acceleration / deceleration follow the settings of b007 / b008.
4.) In the auto_Run mode, the multi-step frequency commands 02 - 04 are ineffective.
5.) Some examples of the Auto_Run mode are as follows:
(A) Single Cycle Running - (A091= 0001and 0004)
In this example, the inverter will run for a single full cycle based upon the specified settings in the table and then stop.
Cont.
A (Advanced) Parameter Details; A081 – A091 60
Page 64

N3 Drive Operations Manual
Hz
t
20s 25s 30s
40s
(A071)
(A072)
(A073) (A074)
(A064)
20Hz
15Hz
30Hz
50Hz
(A063)
(A062)
(A061)
Single Cycle Auto Run Example
Hz
20s 25s 30s
40s
(A071)
(A072)
(A073) (A074)
(A064)
20Hz
15Hz
30Hz
50Hz
(A063)
(A062)
(A061)
Periodic Cycle Auto Run Example
20s
25s 30s
40s
(A071)
(A072)
(A073) (A074)
(A064)
(A063)
(A062)
(A061)
t
Hz
20s 25s 30s
40s
(A071)
(A072)
(A073)
(A074)
(A064)
15Hz
30Hz
50Hz
(A063)
(A062)
(A061)
Single Cycle Auto Run Example; Final step hold
20Hz
Fig. 19.12
(B) Periodic Running - (A091=0002 and 0005)
In this example the inverter will repeat the same cycle periodically.
Fig. 19.13
(C) Single Cycle (A091 = 0003 and 0006)
In this example the speed of final the step will be held to run.
The settings are the same as the 2 prior examples except A084 which is changed to =1 (Fwd).
Fig. 19.14
A (Advanced) Parameter Details; A091 Cont. 61
Cont.
Page 65

N3 Drive Operations Manual
Run
Command
Output Frequency
Run Run
Stop
Continue running
from unfinished step
t
Run
Command
Output Frequency
Run Run
Stop
Begin a new cycle
t
A091 = 0001 - 0003 A091 = 0004- 0006
Auto Run Cycle with Interrupt
A092
AIN Gain (%)
0 - 200
A093
AIN Bias (%)
0 - 100
A094
AIN Bias Selection
0000: positive
0001: negative
A095
AIN Slope
0000: positive
0001: negative
A096
AIN & AI2 signal verification
Scan Time
1 – 100 x (4 mSec.)
A097
AI2 Gain (%)
0 - 200
(D) A091 = 0001 - 0003: If the inverter stops and re-starts, it will continue running from the unfinished step,
according to the setting of A091.
= 0004 - 0006: If the inverter stops and re-starts, it will begin a new cycle and continue running according
to the setting of A091.
Fig. 19.15
1.) A094 = 0000: (AIN Bias selection positive) 0V (0mA) corresponds to the lower frequency limit, and 10V (20mA)
corresponds to the upper frequency limit.
2.) A094 = 0001: (AIN Bias selection negative) 10V (20mA) corresponds to the lower frequency limit, and 0V (0mA)
corresponds to the upper frequency limit.
3.) AI2 / S6 (PID feedback signal)
When A154 = 0000 (0 – 10 V / 0 – 20mA):
Output frequency (SW2 set to I) = I x (b005) / 20; when I ≥ 0
Output frequency (SW2 set to V) = V x (b005) / 10; when VI ≥ 0
When A154 = 0001 (2 – 10 V / 4 – 20 mA):
Output frequency (SW2 set to I) = (I-4 )x (b005)/16; when I ≥ 4 (Output frequency =0; when I<4)
Output frequency (SW2=V) = (V-2) x (b005)/8; when V ≥ 2 (Output frequency =0; when V<2)
Cont.
A (Advanced) Parameter Details; A091 Cont. & A092 – A097 62
Page 66

N3 Drive Operations Manual
Hz
V
60
30
0
0
5
10
(0mA)
(20mA)
100%
050%
000%
Bias
Upper frequency limit
(b005 = 60.0)
Fig. a
Hz
V
60
30
0
0
5
10
(0mA)
(20mA)
100%
050%
000%
Bias
Upper frequency limit
(b005 = 60.0)
Fig. b
A
B
C
D
A92 A93 A94 A95 A97
A 100% 050% 000 000 100%
B 100% 000% 000 000 100%
a. setting
A92 A93 A94 A95 A97
C 100% 050% 000 001 100%
D 100% 000% 000 001 100%
b. setting
Hz
V
60
30
0
2
10
(4mA)
(20mA)
- 100%
- 050%
- 000%
Bias
Upper frequency limit
(b005 = 60.0)
Fig. c
E
A92 A93 A94 A95 A97
E 100% 020% 001 000 100%
c. setting
V
60
30
0
5
10
(20mA)
- 100%
- 050%
- 000%
Bias
Upper frequency limit
(b005 = 60.0)
Fig. d
F
Hz
A92 A93 A94 A95 A97
F 100% 020% 001 001 100%
d. setting
NOTE: Refer to the example tables and figures below for additional information
Fig. 19.16
Fig. 19.17
4.)The inverter reads the average value of the A/D signals once per (A096×4ms). Set the scan intervals to
minimize the environmental noise by increasing the value of A096. However, increasing the scan time will result
in a decreased the response time.
A (Advanced) Parameter Details; A092 – A097 Cont. 63
Page 67

N3 Drive Operations Manual
098
Pulse input frequency ratio
0.001 – 9.999
A099
Select the source of auxiliary
frequency command
0: 061 (frequency command 1)
1: VR speed control on keypad
2: AIN analog input on TM2
3: UP/Down input on TM2
4: Serial communication
A103
Analog Output Voltage Mode
0001: Frequency Setting
0002: Output voltage
0003: DC Voltage
0004: Output current
0005: PID Feedback
A104
Analog Output Gain
A103 Setting
A
B
Comments
0000
f
b005 (f max.)
FM+ 0 – 10 V corresponds to output frequency
0001
FM+ 0 – 10 V corresponds to set frequency
0002
V
Vector A001 or
V/f A107 x A133
1. When A000 = 0 or 1 (vector), FM+ 0 – 10 V
corresponds to 0 – motor rated voltage.
2. When A000 = 2 (V/f), FM+ 0 – 10 V corresponds
to 0 – AC line input voltage (A007) x max. output
frequency voltage ratio % (A133).
0003
V
500 V or 1000V
200 V class: FM+ 0 – 10 V corresponds to 0 – 500 VDC
400 V class: FM+ 0 – 10 V corresponds to 0 – 1000 VDC
0004
I
Rated current
FM+ 0 – 10 V corresponds to rated current.
Ex. The rated current of 201 is 4.5 A. FM+ 0 -10 V
corresponds to 0 – 4.5 A.
0005
%
100 % feedback
value
1. When A140 ≠ 0 , FM+ 0 – 10 V corresponds to
0 – 100% feedback value.
2. When A140 = 0 , FM+ 0 – 10 V corresponds to
0 – 10V or 0 – 20mA on terminal S6/AI2.
When the frequency source parameter b004 is = 0005 (pulse follower), the actual command frequency will be
determined by the pulse input signal frequency and parameter A098. The inverter command frequency = (input pulse
frequency) x A098 (times ratio)
Example: when the input pulse frequency is = 1KHz (1000), and A098 is set at 1.50, the inverter frequency
command is 1000 x 1.5 = 1500 / 100 = 15.00HZ. The frequency accuracy of S5 is by base of 100, 1K (1000)
present 10.00 HZ.
When frequency source command is set as b004 = 0005 (pulse input), and if A050 – A056 (multi-functional input
terminals) is set to = 16 (Master / Auxiliary Speed), when the input is off, the command frequency is the pulse input.
When the terminal is on the frequency command source is controlled by the setting of A099.
1.) The multifunction analog output range is 0 -10VDC. The selected output units is determined by A103
(Analog output voltage mode); (see following table and fig.). A104 (Analog output gain) is used to calibrate the
output signal for use with an external voltmeter or other peripheral equipment.
2.) The analog output of the PID Feedback value (the input voltage or current to AI2) is output to terminal
FM+. (set by parameter b016). The output value corresponds to the PID feedback input signal 0 -10V
(0 - 20 mA) or 2 -10V (4 - 20mA).
Cont.
A (Advanced) Parameter Details; A098 – A103 Cont. 64
Page 68

N3 Drive Operations Manual
10V
B
A
Parameter A103 vs FM+ Output
V (FM+)
0
A105
Relay 1 (R1C,R1B,R1A terminals
on TM2)
0000: Run
0001: Frequency Reached (Target Frequency)
(Frequency Reference ± A108)
0002: Set Frequency (A107 ± A108)
0003: Frequency Threshold Level (> A107) –
Frequency Reached
0004: Frequency Threshold Level (< A107) –
Frequency Reached
0005: Over-torque Threshold Level
0006: Fault
0007: Auto-restart
0008: Momentary AC Power Loss
0009: Emergency Stop Mode
0010: Coast-to-Stop Mode
0011: Motor Overload Protection
0012: Drive Overload Protection
0013: PID Feedback Signal Break
0014: Power On
0015: Under-torque Threshold Level
A106
Relay 2 (R2C,R2A terminals on
TM2)
A107
Output Frequency Detection
Level
0 –400 Hz
A108
Frequency Reached Bandwidth
0 –30 Hz
Fig. 19.18
Cont.
(Advanced) Parameter Details; A103 Cont. & A105 – A108 65
Page 69

N3 Drive Operations Manual
Run
Command
(b000)
RUN
STOP
Frequency
Reference
(b004)
Inverter Output
Frequency
Relay Output
Signal
If Inverter is
Stopped the
Relay will not
Operate
Target frequency
detection range
(A108)
A105 / A106 = 01 Frequency Reached ( Frequency Reference ± A108)
Target frequency
detection range (A108)
Frequency
Reference
(b004)
Run
Command
(b000)
RUN
STOP
Inverter Output
Frequency
Relay Output
Signal
Set frequency
detection range (A108)
If Inverter is Stopped or has
no Reference Frequency
the Relay will not Operate
Output Freq.
Detection Level
(A107)
Set frequency
detection range
(A108)
A105 / A106 = 02 Set Frequency Reached (Set Frequency ± A108)
Freq. Reference
(b004)
Output Freq.
Detection Level
(A107)
Output Frequency Detection Function FOUT = A107 ± A108
Operation Conditions:
A. I Output Frequency – Frequency Reference (b004) I < Frequency Threshold Level (A108)
B. I Output Frequency – Detection Level (A107) I < Frequency Threshold Level (A108)
The following Fig.’s show some examples of the functions of output relays R1 (A105) and R2 A106)
Fig. 19.19
Fig. 19.20
Cont.
(Advanced) Parameter Details; A105 – A108 Cont. 66
Page 70

N3 Drive Operations Manual
Run
Command
(b000)
RUN
STOP
Inverter Output
Frequency
Relay Output
Signal
A105 / A106 = 03 Frequency Threshold Level (Set Frequency > A107)
Output Freq.
Detection Level
(A107)
Output Freq.
Detection Level
(A107)
Run
Command
(b000)
RUN
STOP
Inverter Output
Frequency
Relay Output
Signal
Note: The Relay Output is always active when the inverter is stopped
Output Freq.
Detection Level
(A107)
Output Freq.
Detection Level
(A107)
A105 / A106 = 03 Frequency Threshold Level (Set Frequency < A107)
Fig. 19.21
Fig. 19.22
Cont.
(Advanced) Parameter Details; A105 – A108 Cont. 67
Page 71

N3 Drive Operations Manual
Output Current
Over Torque
Output
(A105/A106 = 05)
A105 / A106 = 05 Over Torque Detection
(A126)
Over Torque
Activation Delay
Time (0 – 25 sec.)
(A125)
Over Torque
Detection Level
(100 – 200 %)
A111
Trip Prevention Selection
During Acceleration
0000: Enable Trip Prevention During
Acceleration
0001: Disable Trip Prevention During
Acceleration
A112
Trip Prevention Level During
Acceleration
50% - 300% (based by Motor HP A003)
A113
Trip Prevention Selection
During Deceleration
0000: Enable Trip Prevention During
Deceleration
0001: Disable Trip Prevention During
Deceleration
A114
Trip Prevention Level During
Deceleration
50% - 300% (based by Motor HP A003)
A115
Trip Prevention Selection in
Run Mode
0000: Enable Trip Prevention in Run Mode
0001: Disable Trip Prevention in Run Mode
A116
Trip Prevention Level in Run
Mode
50% - 300% (based by Motor HP A003)
A117
Trip Prevention Deceleration
Time Selection in Run Mode
0000: Trip Prevention Deceleration Time Set by
b008
0001: Trip Prevention Deceleration Time Set by
A118
A118
Deceleration Time in Trip
Prevention Mode (sec.)
0.1 - 3600.0 Sec.
Fig. 19.23
1.) If the acceleration time is set too short, the inverter will delay the acceleration time in order to prevent an over
current trip “OC-AS”.
2.) If the deceleration time is set too short, the inverter will delay the deceleration time in order to prevent an over
voltage of DC BUS trip ‘OC-C’.
3.) Some mechanical equipment such as presses, or a mechanical failure such as seizing due to insufficient
lubrication, varying loads, etc. will cause the inverter to trip. When the operating torque of the inverter exceeds
the setting of A116, the inverter will lower the output frequency at the deceleration time set by A117, and then
return to normal operating frequency after the torque level stabilizes.
Cont.
(Advanced) Parameter Details; A105 – A108 Cont. & A111 - A118 68
Page 72

N3 Drive Operations Manual
5.0
1.0
103
113 123
150
A
B
Thermal overload Curves A and B
Time (Min.)
Current (%)
A119
Electronic Motor Overload
Protection Operation Mode
0000: Enable Electronic Motor Overload
Protection
0001: Disable Electronic Motor Overload
Protection
A120
Motor Type Selection
0000: Electronic Motor Overload Protection Set
for Non-Inverter Duty Motor
for Inverter Duty Motor
A121
Motor Overload Protection
Curve Selection
0000: Constant Torque (OL=103%)(150%,
1 minute)
0001: Variable Torque (OL=113%)(123%,
1 minute)
A122
Operation After Overload
Protection is Activated
0000: Coast-to-Stop After Overload Protection
Is activated
0001: Drive Will not Trip when Overload
Protection is Activated (OL1)
Description of the thermal overload function:
1.) A121 = 0000: Protects the general mechanical load. If the load is less than 103% of rated current, the motor
continues to run. If the load is larger than 150% of rated current, the motor will run for 1 minute.
(See curve A).
= 0001: Protects HVAC loads (fans, pumps etc.): If the load is less than 113% of rated current, the motor
continues to run. If the load is larger than 123% of rated current, the motor will run for 1 minute.
(See curve B)
2.) If A121 = 0000 and the motor is operating at or below a certain frequency (speed) the thermal overload action
will revert from curve A to curve B.
3.) A120 = 0000: Set A005 as the rated frequency of the motor.
A122 = 0000: When the thermal overload function activates, the inverter will coast to stop and the display will
flash “OL1”. To clear the fault press the “Reset” key on the keypad or activate the external reset
to continue to run.
= 0001: the inverter continues to run when the thermal overload activates and the display flashes “OL1”
until the current declines to 103% or 113 % determined by A121.
Fig. 19.24
Cont.
(Advanced) Parameter Details; A119 – A122 69
Page 73

N3 Drive Operations Manual
Rated Current
(%)
Rated Frequency
(%)
Rated Current
(%)
Rated Frequency
(%)
Rated Current
(%)
Rated Frequency
(%)
103
63
30
100
A Non-Inverter duty motor OL1 protection curve
OL = 103% Start , 150% / 1 Min.
A
Rated Current
(%)
Rated Frequency
(%)
113
63
30
100
B Non-Inverter duty motor OL1 protection curve
OL = 113% Start , 123% / 1 Min.
B
0.13
30
100
C Inverter duty motor OL1 protection curve
OL = 103% Start , 150% / 1 Min.
C
103
113
30
100
D Inverter duty motor OL1 protection curve
OL = 113% Start , 123% / 1 Min.
D
Electronic overload OL1 protection for inverter and non-inverter duty motors (current / frequency)
A123
Over/Under Torque Detection
Selection
0000: Disable Over/Under Torque Operation.
0001: Enable Over/Under Torque Operation Only
if at Set Frequency.
0002: Enable Over/Under Torque Operation
while the Drive is in Run Mode.
A124
Motor Type Selection
0000: Drive will Continue to Operate After
Over/Under Torque is Activated.
0001: Coast-to-Stop After Over/Under Torque is
Activated.
A125
Over Torque Threshold Level (%)
100 - 200%
A126
Over Torque Activation Delay
Time (Sec.)
0.0 - 25.0 Sec.
A127
Under torque Threshold Level
(%)
0 – 100 %
A128
Under torque activation Delay
Time (Sec.)
0.0 - 25.0 Sec.
Fig. 19.25
1.) Over torque is defined as when the output torque exceeds the setting of parameter A125 (Over torque threshold %)
for a time exceeding the setting of parameter A126 (Over torque activation delay Sec.).
Over Torque:
A124 = 0000: When there is over torque, the inverter will continue to run and flashes “OL3” until the output
torque decreases to less than the A125 set value.
= 0001: When there is over torque, the inverter coasts to stop and flashes “OL3”. After the fault clears,
the “Reset” key on the keypad or external reset must be activated to restart the drive.
Note: When parameters A105 and / or A106 (Multifunction output terminal) = 05, the relay
Output(s) will be activated on over torque.
2.) Under torque is defined as when the output torque is less than the setting of parameter A127 (Under torque
threshold level %) for a time exceeding the setting of parameter A128 (Under torque activation delay Sec.).
Cont.
(Advanced) Parameter Details; A122 Cont.; 123 - 128 70
Page 74

N3 Drive Operations Manual
A129
Torque boost gain (V/F pattern
modulation)%
0.0 – 30.0 %
A130
Motor no load current(Amps AC)
------
A131
Motor rated slip
compensation(%)
0.0 - 100 %
A132
Max output frequency(Hz)
0.20 – 400.0 Hz
A133
Max output frequency voltage
ratio(%)
0.0 – 100.0 %
A134
Medium frequency(Hz)
0.10 – 400.0 Hz
A135
Medium output frequency
Voltage ratio (%)
0.0 – 100.0 %
A136
Min output frequency(Hz)
0.10 – 400.0 Hz
A137
Min output frequency voltage
ratio (%)
0.0 – 100.0 %
Custom V/f setting
A133
(Vmax.)
A136
A135
(Vmid.)
A137
(Vmin.)
A134
A132
Hz
V %
400 Hz
(max.)
0.10 Hz
(min.)Hz(mid.)
Under Torque:
A124 = 0000: When there is under torque, the inverter will continue to run and flashes “OL4” until the output
torque increases to more than the A127 set value.
= 0001: When there is under torque, the inverter coasts to stop and flashes “OL4”. After the fault clears,
the “Reset” key on the keypad or external reset must be activated to restart the drive.
Note: When parameters A105 and / or A106 (Multifunction output terminal) =15, the relay
Output(s) will be activated on under torque.
3.) Over / Under torque functions are disabled when parameter A123 = 0000 and will only be active when parameter
A123 = 0001 or 0002.
V/f pattern selection (0 – 18): The following fig’s show the various V/f patterns using the parameter settings as
specified.
1.) When b009 = 0018, the V/F pattern can be customized in accordance with the parameters A132 – A137 as
shown in the fig. below.
Cont.
Fig. 19.26
(Advanced) Parameter Details; A123 – A128 Cont. & A129 – A137 71
Page 75

N3 Drive Operations Manual
Purpose
b009
V/f pattern
Purpose
b009
V/f pattern
50 Hz Systems
50
Hz
General use
00
60 Hz Systems
60
Hz
60 Hz Systems
General use
09
High start torque
01
High start torque
10
02
11
03
12
Decreasing torque
04
Decreasing torque
13
05
14
Constant torque
06
Constant torque
15
07
16
08
17
V (%)
100
B
C
1.5 3.0 60 400 Hz
V (%)
100
B
C
1.3 25 50 400 Hz
V (%)
100
B
C
1.5 30 60 400 Hz
V (%)
1.5 2.5 50 400 Hz
100
B
C
V %)
1.3 2.5 50 400 Hz
V (%)
1.5 3.0 60 400 Hz
100
B
C
100
B
C
V (%)
100
B
C
0.6 30 60 400 Hz
V (%)
0.5 25 50 400 Hz
100
B
C
2.) b009 = 00 – 17 V/f Pattern (Refer to Table )
Fig. 19.27 Pre-configured V/f Patterns Set by Parameter b009
(Advanced) Parameter Details; A129 – A137 Cont. 72
Page 76

N3 Drive Operations Manual
B
C
100%
Voltage
A129
1
2.5/3.0
50/60
Hz
A129 Torque Boost Gain
Slip frequency boost =
Output Current - (A130)
× (A131)
Note : A002 = motor rated current
(A002) - (A130)
A130 = motor no load current
A131 approximate value =
(Motor synchronization speed – Rated speed) / Motor synchronization speed
Marked on the motor nameplate
b009
B
C
50 Hz
60 Hz
00
0 9
7.5%
4.5%
01
10
10%
7%
02
11
11%
8.5% / 8%
03
12
12%
9.5% / 9%
04
*
17.5%
4%
05
*
25%
5%
*
13
20.5%
7%
*
14
28.5%
8%
06
15
45.0%
1.0%
07
16
55.0%
1.0%
08
17
65.0%
1.0%
Motor synchronization speed
(RPM)=
120
× Motor rated frequency (50Hz or 60Hz)
Motor Poles
3.) Parameter b009 (00 – 17) sets the V/f pattern. The value of the output voltage is set as a percentage of
maximum by the values of B and C at the frequencies shown. The starting torque can be increased by
parameter A129 (torque boost gain) as shown in the fig. below.
Fig. 19.28
Note: When A129=0 the torque boost function is invalid.
4.) In an induction motor, there is slip due to the load torque resulting in a decrease in motor RPM.
To compensate for the speed change it is necessary to boost the output voltage. Parameter
A131 (motor rated slip compensation) is used to accomplish this function and is calculated as
per the following equation.
(Advanced) Parameter Details; A129 – A137 Cont. 73
Cont.
Page 77

N3 Drive Operations Manual
Example: 4 Poles,60Hz induction motor synchronization speed
=
120
× 60 = 1800 RPM
4
A140
PID Operation Selection
0000: PID disable
0001: PID enable (Deviation is D-controlled)
0002: PID Feedback D-controlled
0003: PID D Reverse characteristic controlled
0004: PID Feedback D characteristic controlled
0005: PID, Frequency command + D controlled
0006: PID, Frequency command + Feedback D
controlled
0007: PID, Frequency Command + D reverse
Characteristic controlled.
0008: PID, Frequency Command + Feedback D
reverse Characteristic controlled.
A141
Feedback Calibration Gain
0.00 – 10.00
A142
Proportion Gain
0.00 – 10.00
A143
Integral Time (sec.)
0.0 – 100.0 Sec.
A144
Differential Time (sec.)
0.00 – 10.00 Sec.
Note: Motor no load current (A130) differs with the inverter HP capacities (see parameter A175) and should be set to
actual values. (Refer to A002 note)
Please refer to the PID Block Diagram on next page, Fig 19.29.
A140 = 0001: D is the deviation of the process error signal in unit time (A144 differential time).
= 0002: D is the deviation of the feedback in unit time (A144 differential time).
= 0003: D is the deviation of the process error signal in the unit time (A144 differential time). If the deviation is
positive, the output frequency decreases and vice versa.
= 0004: D is the deviation of feedback in unit time (A144 differential time). When the deviation is positive, the
output frequency decreases, and vice versa.
= 0005: D is equal to the deviation of the process error signal in unit time (A144 differential time) +Frequency
command.
= 0006: D is equal to the deviation of feedback in unit time + Frequency command.
= 0007: D is equal to the deviation of the process error signal in unit time +Frequency command. If the
deviation is positive, the output frequency decreases, and vice versa.
= 0008: D is equal to the deviation of feedback in unit time + Frequency command. When Deviation is positive,
the frequency decreases, and vice versa.
A141 is the calibration gain. Deviation = (set point – feedback signal) × A141
A142: Proportion gain for P control
A143: Integration time for I control
A144: Differential time for D control
Cont.
(Advanced) Parameter Details; A129 – A137 Cont. & A140 – A144 74
Page 78

N3 Drive Operations Manual
A145
PID Offset
0000: Positive Direction
0001: Negative Direction
A146
PID Offset Adjust (%)
-109% - +109 %
A147
Output Lag Filter Time (sec.)
0.0 - 2.5 Sec.
A148
Feedback Loss Detection Mode
0000: Disable
0001: Enable – Drive Continues to Operate After
Feedback Loss.
0002: Enable – Drive “STOPS” After Feedback
Loss.
P
I
D
Offset
+/-
A147
PID Delay
Sleep
Mode
PID
Output
A155/A156
Sleep Mode
A145/A146
Deviation
A140=2,4,6,8
Feedback D
-1
+
-
b004
Frequency
Command
(PID Command)
Gain
A140=2,4,6,8
Feedback D
D
Signal
A049
(AI2)=20
PID
Feedback
A154
Feedback
Signal
A141
Feedback
Gain
A140
D gain
+
+
A140=1,3,5,7
Deviation D
A143
Integral Time
A142
Proportion Gain
A140=
3,4,7,8
Reverse
characteristic
+
+
+
A140=1,2,5,6
Forward
characteristic
A144
Ditterential Time
A151
Integral
limit
I
limit
I
reset
+
A140=1,2,3,4
PID Output=PID
PID
Limit
PID Limit
Up=b005
Down=b006
A152
Integral
reset to 0
A140=1,3,5,7
Deviation D
A140=5,6,7,8
PID Output = PID +
Frequency Command
PID block diagram
A145 / A146: PID the calculated result pluses A146 (the sign of A146 is determined by A145).
A147: Update time for output frequency.
Note: The PID function is available for controlling the output flow, external fan flow and temperature (See fig. below).
Fig. 19.29
1.) To enable PID control, set parameter A049 = 0020 (PID Feedback signal AI2 on TM2).
2.) The set point is the b004 input frequency.
3.) There are two ways to display the PID feedback signal: one is using the keypad display
(b016 = 0001: enable PID feedback display), and the other is using analog output FM+
(A103 = 0005 PID feedback).
A148 = 0: Disable.
A148 = 1: Detect, continue running, and display ‘PDER’.
A148 = 2: Detect, stop, and display ‘PDER’.
(Advanced) Parameter Details; A145 – A148 75
Page 79

N3 Drive Operations Manual
A149
Feedback Loss Detection
Mode (%)
0 – 100 %
A150
Feedback Loss Detection
Delay Time (sec.)
0.0 -25.5 Sec.
A151
Integrator Limit Value (%)
0 – 109 %
A152
Integrator Reset to 0 when
Feedback Signal Equals the
set point
0000: Disable
0001: 1 Sec.
0030: 30 Sec.
A153
Allowable Integration Error
Margin (Unit Value) (1 Unit =
1/8192)
0 - 100
A154
AIN and AI2 Signal Type
0000: AIN = 0 - 10V or 0-20mA,
AI2 =0 - 10V or 0-20mA
0001: AIN = 0 - 10V or 0-20mA,
AI2 =2 - 10V or 4-20mA
0002: AIN = 2 - 10V or 4-20mA,
AI2 =0 - 10V or 0-20mA
0002: AIN = 2 - 10V or 4-20mA,
AI2 =2 - 10V or 4-20mA
A155
Sleep Function Operation Level
(Hz)
0.00 – 400.00 Hz
A156
Sleep Function Delay Time (sec.)
0.0 – 25.5 Sec.
A149: Sets the percentage level for the feedback signal loss detection. The Error in percent = (Set point –
feedback value). When the error is larger than the loss level setting, the feedback signal is considered lost.
A150: Sets the minimum time window to consider the feedback signal lost.
A151: Sets the integral limit percentage to prevent the PID from saturating.
A152 = 0: As the PID feedback value reaches the set point, the integrator will not be reset to 0.
A152 = 0001 or 0030: As the PID feedback value reaches the set point, the integrator will be reset to 0 in the time
selected and inverter stops. The inverter will run again when the feedback value differs from the set point value.
A153= 0 - 100% unit value: After the integrator resets to 0 the error margin will restart.
Note: The signal type V or I is set via switches SW2 and SW3 on the control board.
A155: Sets the sleep threshold frequency.
A156: Sets the time for sleep delay.
1.) When the PID output frequency is less than the sleep threshold frequency A155 exceeding the time of sleep
delay set by A156, the inverter will decelerate to 0 and enter PID sleep mode. When the PID output frequency
is greater than the sleep threshold frequency A155 the inverter will reactivate and enter the PID wake mode.
The time diagram is shown in the first fig, on the next page.
2.) Parameters A140 = 1(PID enable), A049 = 20(PID feedback enable), b004 = PID setting frequency source
(target value) are set as shown in first fig, on the next page
Cont.
(Advanced) Parameter Details; A149 – A156 76
Page 80

N3 Drive Operations Manual
0V
(4mA)
10V
(20mA)
Engineering
Unit Value
Input voltage
(Input current)
PID feedback
dsp. Min (A159)
PID feedback
dsp. Max (A158)
*A157
Engineering
Units
0000: None
0001: FPM (feet per minute)
0002: CFM (cubic feet per minute)
0003: PSI (pounds per square
inch)
0004: GPH (gallons per hour)
0005: GPM (gallons per minute)
0006: in
0007: ft
0008: /s (units per second)
0009: /m (units per minute)
0010: /h (units per hour)
0011: °F
0012: inW (inches in water
column)
0013: HP
0014: m/s (meters per second)
0015: MPM (meters per minute)
0016: CMM (cubic meters
per minute)
0017: W
0018: kW
0019: m
0020: °C
0021: %
0022: rpm
0021: %
*A158
PID Feedback Display Unit Max.
0 - 9999
*A159
PID Feedback Display Unit Min.
0 - 9999
Inverter sleep condition
(0 Hz output)
Wake Point
A155
Sleep Level
Internal RUN command
External RUN command
A156
Sleep
Delay
Inverter output frequency
PID output frequency
Sleep Level Hz (Set by A155)
Wake point based
on PID output
Sleep point based
on output
frequency
PID Sleep / Wake Mode
Fig. 19.30
A158 and A159: Allow the selected engineering units to be scaled. (See Fig. 19.31 below)
* Can only be used with LCD display.
Fig. 19.31
(Advanced) Parameter Details; A155 – A156 Cont. & A157 – A159 77
Page 81

N3 Drive Operations Manual
Master
Slave
(N3 response)
T1 T2 T3
T3>A162
Master resends data
to Auto Reset
RY Output
A161 = 0000,
0001, 0002
A161 = 0003
A161 = 0000,
0001, 0002
A161 = 0003
A161 = 0000,
0002
A161 = 0001
A161 = 0003
0000 Dec from b008
0002 Dec from A026
0000
0002
If b008< A026
0001 free run
0001 continue to run
Display
Reset
COt
Display shows
“COt” until reset
Frequency Output
Parameter A161 Communications Time - out
A161
Communication time-out
Operation selection.
0000: Deceleration to stop (b008: Deceleration
time 1).
0001: Free run to stop.
0002: Deceleration to stop (A026: Deceleration
time 2).
0003: Continue operating.
A162
Communication time-out
Detection time.
00.0 – 25.5 Sec.
A161: Selects the time-out operation. (See diagram below)
1.) Reset method:
a. Push the “Reset” button directly.
b. Receive Modbus data from Master.
2.) After communication time-out, the motor decelerates to stop (A161 = 0000, 0001, 0002). The motor does not run
after reset. The inverter must send the run command to restart.
3.) The setting of parameter A161 cannot be modified during communication.
A162: Selects the time-out detection time.
1.) Communication time-out detection is enabled or disabled by parameter A162 and does not affect the
Run / Frequency command.
3.) The setting of parameter A162 cannot be modified during communication.
Fig. 19.32
(Advanced) Parameter Details; A161 – A162 78
Page 82

N3 Drive Operations Manual
A163
RS485 Communication Station
Drop Number
1 - 254
A164
Baud Rate setting (bps)
0000: 4800
0001: 9600
0002: 19200
0003: 38400
A165
Stop Bit Selection
0000: 1 stop bit
0001: 2 stop bit
A166
Parity Selection
0000: no parity
0001 even parity
0002: odd parity
A167
Data Format Selection
0000: 8 bit data
0001: 7 bit data
A168
Stator Resistance(Ohms)
------
A169
Rotator Resistance(Ohms)
------
A170
Equivalent Inductance(mH)
------
A171
Magnetized Current(Amps AC)
------
A172
Ferrite Loss Conduction (gm)
------
A163: Assigns a node number to a specific inverter when networking multiple inverters using RS485 protocol.
1.) RS485 Communication:
A. 1 to 1 control: A host controller controls one inverter, set A163 = 001 to 254.
B. 1 to multiple inverter control: A host controller can control up to a maximum of 32 inverters. Use parameter
A163 to set the communication address (001 - 254). When the communication address = 000, the inverter
is controlled by serial communication regardless of the A163 setting.
2.) RS-232communication: (an RS232 interface is required)
1 to 1 control: A host controller controls one inverter, set A163 = 1 to 254.
Notes:
a. The baud rate A164 and the communications format A165, A166 and A167 of the host controller must match
that of the inverter.
b. The inverter will validate the modified parameters after the parameters are modified by the host controller.
c. For the communication protocol, refer to the N3 MODBUS communication protocol
manual.
d. Parameters A163 – A167 cannot be changed via the communication module.
1.) Parameters A168 – A172 are automatically set (factory default) with the HP code A175.
(Refer to Appendix B)
2.) If A000 is set to = 0 or 1(vector control mode), on power up, set A006 =1 (auto-tuning). The motor operates with
the inverter to perform auto tuning. Once the motor stops, auto tuning is completed and the inverter will write the
internal parameters of the motor to A168 - A172. A006 will automatically be reset to 0 and the display will read
END.
Note: Do not perform auto-tuning with the mechanical load connected to the motor.
3.) Auto tuning must be carried out whenever the motor is changed. If the internal parameters are known,
they can be input directly to A168 - A172.
4.) Parameters A168 – A172 are only effective in when A000 = 0 or 1 (vector control mode).
5.) Only perform the auto tune when the inverter and motor are not connected.
(Advanced) Parameter Details; A163 – A172 79
Page 83

N3 Drive Operations Manual
A180
Description
0
Count the accumulated time when power is applied.
1
Count the accumulated time when the Inverter is operating.
A175
Drive Horsepower Code
See table below
A175
Inverter Model
A175
Inverter Model
2P5
N3-
2P5-SC/SCF/C
401
N3-
401-C/CF
201
201-SC/SCF/C
402
402-C/CF
202
202-SC/SCF/C
403
403-C/CF
203
203-SC/SCF/C
405
405-C/CF
205
205-C
407
407-C/CF
207
207-C
410
410-C/CF
210
210-C
415
415-C/CF
215
215-N1
420
420-N1
220
220-N1
425
425-N1
225
225-N1
430
430-N1
230
230-N1
440
440-N1
240
240-N1
450
450-N1
460
460-N1
475
475-N1
A176
Software Version
XXXXXXX
A177
Fault Log (Latest 3 times)
X.XXXX
A178
Accumulated Operation Time 1
(Hours)
0 – 9999 Hours
A179
Accumulated Operation Time 2
(Hours X 10000)
0 – 27 (Hours X 10000)
A180
Accumulated Operation Time
Mode
0000: Power on time
0001: Operation time
1.) When the inverter trips on a new fault, the fault that is stored in 1.xxxx will be transferred to 2.xxxx, and the
fault stored in 2.xxxx will be transferred to 3.xxxx. The current fault will then be stored in 1.xxxx. So the most
recent fault will always be stored in 1.xxxx and the oldest in 3.xxxx.
2.) When pressing ‘ENTER’ at A177, the most recent fault 1.xxxx will be displayed first. Pressing ▲ will display
2.xxx→3.xxx→1.xxx. Pressing ▼ will display 2.xxx→1.xxx→3.xxx.
4.) To clear the fault log, press ‘ENTER’ at A177 and the reset key at the same time. The fault log content will
change to 1.---,2.---,3.---.
1.) When the operating time accumulated in A178 reaches 9999, and the next hour expires, A179 will be set to = 01
(10000 hours) and A178 will be reset to 0000.
2.) A180: Mode of accumulated time selection:
(Advanced) Parameter Details; A175 – A180 80
Page 84

N3 Drive Operations Manual
A181
Reset to the factory setting
1110: Reset to the 50Hz factory setting
1111: Reset to the 60Hz factory setting
A181: Is set to 1110 when the inverter is used with motors rated at 50Hz.
A181: Is set to 1111 when the inverter is used with motors rated at60Hz.
Note:
Motor parameters (A168 - A172) will be modified when in V/F control mode after a factory reset is performed.
Motor parameters (A168 - A172) will not be modified when in vector control mode after a factory reset is performed.
After a reset to factory setting, the Axxx parameters will become inaccessible. Parameter b011 must then be set to
0001 to enable access to the A parameters.
NOTES:
(Advanced) Parameter Details; A181 81
Page 85

N3 Drive Operations Manual
!
CAUTION
When installing option modules, make sure that power has been removed from the
inverter and that the charge indicator is extinguished before proceeding.
Option Part Number
Description
*Keypad Remote Cable
Kit
FIG.
No.
Part Number
Length
Ft./ M
N3 – LED – W
Remote LED Keypad
SW305P
1.6 / 0.5
20.1.1
&
20.1.2
SW3001
3.3 / 1.0
*Select the desired cable length from table
SW3002
6.6 / 2.0
N3 – LCD – W
Remote LCD Keypad
SW3003
9.8 / 3.0
SW3005
16.4 / 5.0
SIF - 485
RS485 Interface
x
20.1.3
SIF - 232
RS232 Interface
x
20.1.4
SIF - MP
Copy Module
x
20.1.5
PDA Link
SIF - 232
RS232 Interface
x
20.1.6
1 – N3 Inverter (Frame 1 shown for reference)
2 – LED or LCD Keypad (Refer to Fig. 20.1.2 for mounting dimensions)
3 – Connecting cable (See table for cable kit number and length)
Fig. 20.1 Remote Keypad (LED or LCD)
20.0 Option Modules and Cables
The following Option Modules are available for the N3 Inverter series. They are easily installed and are inserted into
connector CON2 by removing the front cover.
Remove the front cover in accordance with the model being used (See Appendix D) . After the option module has
been installed, replace the cover before powering-up the inverter. Do not operate the inverter with the cover
removed.
20.1 Option Module Part Numbers
Cont.
Option Modules and Cables 82
Page 86

N3 Drive Operations Manual
C
L
0.75 /19
0.75 /19
2.52 /64
3.23 /82
1.82 /46
1.43 /36.2
3.0 /76.2
M3 x P0.5
(Qty 2)
Cable
Connector
(see table)
0.56 /15
0.16 /4
1.16 /29.5
(LED Keypad only)
Potentiometer
(LED Keypad Only)
Fig. 20.2 Remote N3 LED / LCD Keypad Mounting Dimensions
Note : Dimensions are given in (in ./ mm)
C
L
N3 Inverter
Series
SIF-485
M
1Ø / 3Ø
Input Voltage
A
B
Red
Black
+24V
COM
RS485
+
-
Fig. 20.3 RS485 Interface P/N SIF-485
CON2
NOTE: Use isolated RS232 / RS485
converter connections between PC
and option card to avoid equipment
damage.
GND
Cont.
Option Modules and Cables Cont. 83
Page 87

N3 Drive Operations Manual
N3 Inverter
Series
SIF-232
M
1Ø / 3Ø
Input Voltage
RS232
Fig. 20.4 RS232 Interface P/N SIF-232
CON2
NOTE: Use isolated RS232 / RS485
converter connections between PC
and option card to avoid equipment
damage.
N3 Inverter
Series
SIF-MP
M
1Ø / 3Ø
Input Voltage
Fig. 20.5 Copy Module P/N SIF-MP
CON2
NOTES:
Option Modules and Cables Cont. 84
Page 88

N3 Drive Operations Manual
Display
Code
Fault
Cause
Remedy
CPF
Program
problem
External noise interference.
(EMI)
Connect a parallel RC
suppressor across the coil of the
magnetic contactor that is
causing the interference.
EPR
EEPROM
problem
Faulty EEPROM
Replace EEPROM
*-OV-
Overvoltage
while stopped
Voltage detection circuit
Malfunction.
Repair or replace unit.
*-LV-
Undervoltage
while stopped
1. Input voltage too low.
2. Power resistor or fuse
burned out.
3. Detection circuit
malfunctions.
1. Verify that the input voltage is
correct.
2. Replace the power resistor or
fuse.
3. Repair or replace the inverter.
*-OH-
The inverter
overheats
while stopped
1. Detection circuit
malfunction.
2. Ambient temperature too
high or poor ventilation.
1. Replace or return the inverter.
2. Improve ventilation conditions.
CTER
Current
transducer
detection error
Current transducer or
circuit error.
Repair or replace unit.
Display
Code
Fault
Cause
Remedy
OC-S
Overcurrent at
start
1. Motor winding and frame
short circuit.
2. Motor and ground short
circuit..
3. Power module is damaged.
1.Inspect the motor.
2. Inspect the wiring.
3. Replace the power module.
21.0 Error Display Codes
The following tables describe the error codes that are displayed under fault conditions. They are broken down into five
categories:
· Unresettable / Unrecoverable errors
· Errors recoverable both manually and automatically
· Manually recoverable errors Only (no auto-restart)
· Set-up configuration and interface errors
· Keypad errors
Some of the faults can be reset manually via the Reset key, or by an external reset command. Certain faults can
also be reset by setting parameter A018 (Enable Auto Restart). Other faults are not resettable. In this case, the
inverter may need total replacement or a part replaced.
21.1 Unresettable / Unrecoverable Errors
*The Fault relay contact does not operate with these error indications.
21.2 Automatically and Manually Recoverable Errors
Cont.
Error Display Codes 85
Page 89

N3 Drive Operations Manual
OC-D
Overcurrent at
deceleration
The preset deceleration time is
too short.
Set a longer deceleration time.
(Parameter b0008)
OC-A
Overcurrent at
acceleration
1. Acceleration time is set too
short.
2. The capacity of the
motor exceeds the capacity
of the inverter.
3. Short circuit between the
motor winding and the
frame.
4. Short circuit between
motor wiring and ground.
5. IGBT module is damaged.
1. Set a longer acceleration time.
(Parameter b0007)
2. Replace inverter with the same
or greater capacity as that of
the motor.
3. Check the motor.
4. Check the wiring.
5. Replace the IGBT module.
OC-C
Overcurrent during
run
1. Transient load change.
2. Transient power change.
1 .Increase the capacity of the
inverter.
2. Repeat parameter auto
tuning. (A006 = 1)
3. Reduce stator resistance
(A168) if the above actions are
ineffective.
OV-C
Overvoltage
during operation/
deceleration
1. Deceleration time setting too
short or excessive load
inertia.
2. Input voltage varies widely.
(fluctuates)
1. Set a longer deceleration time.
2. Add a braking resistor or
braking unit.
3. Add a reactor to the input line
side.
4. Increase inverter capacity.
Err4
Illegal interrupt
of CPU
Outside noise interference.
Return unit if this is a frequent
occurrence.
OVSP
Over speed during
operation
1. Motor load excessive or
inverter capacity too small.
2. Motor parameter error.
(vector mode)
3. The gain is excessive in
vector mode.
4.Current detection circuit
fault.
1. Increase acceleration /
deceleration time..
(Parameters b007 / b008)
2. Check and correct motor
parameter.
3.Change stator Resistance
gain and Rotor resistance
gain. ( Parameters A168 /
A169), (suggest
Incremental decrease of
50-100)
4. Return unit.
Cont.
Error Display Codes Cont. 86
Page 90

N3 Drive Operations Manual
Display
Fault
Cause
Remedy
OC
Over-current during
stop
1. OC detection circuit
malfunction.
2. Bad connection for CT signal
cable.
Send the inverter back for repair.
OL1
Motor overload
1. Motor under-sized.
2. Improper settings
for Parameters A002
and A119-A122.
1. Increase motor capacity.
2. Set A002, A119 - A122
accordingly.
OL2
Inverter overload
Excessive Load.
Increase the inverter capacity.
OL3
Over torque
1. Excessive Load.
2. Improper settings of
parameters A125 and A126
1. Increase the inverter capacity.
2. Set A125 and A126 accordingly.
LVC
Undervoltage
during operation
1. Input voltage too low.
2. Input voltage varies widely.
(fluctuates)
3. Main Circuit Relay error.
1. Improve input voltage quality
or increase the value of
parameter A014.
2. Set a longer acceleration time.
(Parameter b0007 )
3. Add a line reactor to the input side.
4. Send the inverter back for repair.
OH-C
Heat-sink
temperature
too high during
operation
1. Excessive load.
2. Ambient temperature too
high or poor ventilation.
1. Check the load.
2. Increase inverter capacity.
3. Improve ventilation
conditions.
Display
Fault
Description
STPO
Zero speed stop
Set frequency <0.1Hz Increase set frequency
STP1
Fail to direct start
on power up
1. If the inverter is set for external terminal control mode (b000=1), and
direct start on power up is disabled (A017 = 0001), the inverter cannot
be started and will flash STP1 when the run switch is ON and power is
applied. (Refer to descriptions of A017).
2. Set A017 = 0001 for direct start.
21.3 Manually Recoverable Errors Only (no auto-restart)
21.4 Setup Configuration and Interface Errors
Cont.
Error Display Codes Cont. 87
Page 91

N3 Drive Operations Manual
STP2
Keypad
emergency stop
1. If the inverter is set to external control mode (b000 = 0001), and the
Stop key is pressed (A010 = 0000), the inverter will stop based on the
setting of B003 and STP2 will flash. Turn the run switch to OFF and
then ON again to restart the inverter.
2. If the inverter is in communication mode and the Stop key is pressed
(A010 = 0000), the inverter will stop based on the setting of b003 and
STP2 will flash. The PLC or PC must send a Stop command then a
Run command to the inverter for it to be restarted.
3. The Stop key cannot perform an emergency stop when
A010 = 0001.
E.S.
External
emergency stop
The inverter will decelerate to stop and flashes E.S., when there
is an external emergency stop signal via the Control input terminals.
(See parameters A050-A056).
b.b..
External
base block
The inverter stops immediately (motor coasts to stop) and then
flashes b.b., when external base block is input through the multifunctional input terminal. (See parameters A050 - A056).
ATER
Auto-tuning faults
1. Motor data error resulting in auto-tuning failure.
2. Stopping the inverter during Auto-tuning before completion.
PDER
PID feedback
signal loss
PID feedback signal circuit error detection.
Display
Error
Cause
Remedy
LOC
Parameter and
frequency
reverse
modifications
locked out
1. Attempt to modify frequency
parameter while A039 > 0000.
2. Attempt to reverse while
b002 = 0001.
1. Set A039 = 0000.
2. Set b002 = 0000.
Err1
Keypad
operation error
1. Attempt to press ▲ or ▼keys
when b004 > 0 or in speed
operation.
2. Attempt to modify parameters, which
can not be modified during Run.
(see parameter list)
1. The ▲ or▼ is available
for modifying the
parameter only when
b004=0.
2. Modify the parameters
only in stop mode.
Err2
Parameter setting
error
1. The setting of b006 is within ranges
of parameters A032 ± A035 or A033
± A035 or A034 ± A035.
2. b005 ≤ b006.
3. Setting error while performing Auto
tuning. (e.g. b000 ≠ 0, b004 ≠ 0 )
1. Modify A032-A034 or A035.
2. b005 > b006.
3. Set b000 = 0, b004 = 0
during
Auto tuning.
Err5
Modification of
parameter is
not allowed
during
communication
2. Modify parameters A164 -167
during communication.
1. Issue enable command
before / while
Communicating.
2. Set parameters 164-167
before communicating.
21.5 Keypad Errors
Cont.
Error Display Codes Cont. 88
Page 92

N3 Drive Operations Manual
Err6
Communication
failure
1. Faulty / incorrect wiring.
2. Incorrect settings of communication
parameters.
3. Check-sum error
4. Incorrect communication
verification.
1. Check hardware and
wiring.
2. Check parameters A161 –
A164.
Err7
Incorrect
parameter
settings
1. Attempt to change A175.
2. Voltage and current detection circuits
are malfunctioning.
Reset inverter or contact
technical support.
EPr1
Parameter set
error, Copy unit
failed
1. Can not connect with Copy unit.
2. Copy unit failure.
3. The HP rating on Copy unit and the
inverter are different.
1. Modify parameter A040.
2. Change copy unit.
3. The HP rating need to be
the same.
EPr2
Parameters do
not match
Copy the parameter to the inverter
to verify the parameters do not match.
1. The voltage and HP rating
of the Copy unit is different
than the inverter.
2. Change copy unit.
!
DANGER
Use extreme caution when troubleshooting as lethal voltages are present.
NOTES:
22.0 Troubleshooting
The following troubleshooting section includes both general troubleshooting and flow chart guidance. The flowcharts
include:
Fig. 22.1.1 Fault Display Troubleshooting
Fig. 22.1.2 OC and OL Fault Troubleshooting
Fig. 22.1.3. OV and LV Fault Troubleshooting
Fig. 22.1.4 Motor Will Not Run
Fig. 22.1.5 Motor Overheating
Fig. 22.1.6 Motor Instability
Cont.
Error Display Codes Cont. & Troubleshooting 89
Page 93

N3 Drive Operations Manual
Fault
Status
Check That:
Remedy
Motor will
not run
there is power applied to terminals L1(L), L2,
and L3(N) (L1(L) and L3(N) for single phase
units)
· Apply power
· Turn power OFF and then ON again.
· Make sure the input voltage is correct.
· Make sure the power input terminal screws
are firmly secure.
the Charge indicator is lit.
there is voltage on output terminals T1, T2, and
T3 to the motor.
Turn the power OFF and then ON again.
there is not an overload causing the motor to stall
Reduce the load so the motor will run.
there are not any inverter wiring problems.
there is a forward or reverse run command.
there is a Run command.
· Make sure that the analog frequency input
signal wiring is correct.
· Make sure that the signal input voltage
value is correct.
the operational mode is correct.
Operate the inverter through the digital
keypad.
Motor runs
in wrong
direction
the wiring for output terminals T1, T2, and T3 is
correct.
The wiring must match the U, V, and W
terminals of the motor.
the wiring for the forward and reverse signals is
correct.
Correct wiring if necessary.
Motor
speed can
not be
regulated
the signal wiring for the analog input frequency is
correct.
Correct wiring if necessary.
the setting of operation mode is correct..
Check the operation mode on the keypad.
the load on the motor is not too excessive.
Reduce the load.
Motor
speed too
high or too
low
the specifications for the motor (poles,
voltage etc…) are correct.
Confirm the motor specifications.
the gear ratio is correct.
Confirm the gear ratio.
the setting of the maximum output frequency
is correct.
Confirm the maximum output frequency.
Motor
speed
varies
erratically
the load is too excessive.
Reduce the load.
the load does not vary excessively.
· Minimize the variation of the load.
· Increase capacities of the inverter and the
motor.
the input power is not erratic or there is a phase
loss occurring.
· Add an AC reactor at the power input side if
using single-phase power.
· Check wiring if using three-phase power.
22.1 General Troubleshooting
Troubleshooting; General 90
Page 94

N3 Drive Operations Manual
Replace *DM
N3 fault
Is fault known ?
Check damaged parts
Yes
Replace fuse
Symtoms other than damaged
parts or blown fuses
No
No
Yes
fault signal ?
No
Any symtoms of
damaged parts ?
Is the main circuit DM
intact ?
Yes
No
Yes
Is the fuse blown ?
Yes
No
No
Is the main circuit
IGBT intact ?
Replace *IGBT
No
Check according to fault
messages
Yes
Visually check controller and
driver boards
Yes
Any visual abnormalties ? Replace defective boards
No
Yes
Apply power
Are the displays and indicators
working properly ?
Any fault displays ?
Yes
Is the charge indicator
on?
Replace pre-charge resistor
No
Check terminals and wiring
No
Yes
No
Is the +5 V control
voltage correct?
Replace the driver board
No
Yes
Replace control board and
digital operator
Yes
What is the fault ?
Yes
Check the 3 fault values with
the key
Is the error eliminated after the
board is replaced?
Yes
Perform a detailed check of
the inverter.
No
No
Continue to next page
Fig. 22.1 Fault Display Toubleshooting
Is the DC bus voltage
correct?
* IGBT – Insulated gate bipolar transistor
* DM – Power diode module
Cont.
Troubleshooting Flow Chart; Fault Display 91
Page 95

N3 Drive Operations Manual
N3 fault
Replace control board
No
Set up frequency command
Check inverter parameters
Is the frequency displayed on the
digital operator ?
No
Yes
Connect the motor and run
Any fault displays ?
Yes
The inverter is faulty.
Perform a detailed check.
No
Yes
Inverter is functioning normally
No
Fig. 22.1 Fault Display Troubleshooting Cont.
Initialize parameters
Specify operation control mode
Continue from previous page
Fwd or Rev LED
flashing ?
Replace control board
Yes
Is there motor output voltage at
terminals U, V & W ?
Replace control board
No
Yes
Does the control board
function normally after
replacement ?
Yes
Are the output currents of each
phase balanced ?
No
Troubleshooting Flow Chart; Fault Display Cont. 92
Page 96

N3 Drive Operations Manual
N3 OC and OL errors
Replace IGBT modules
No
Apply power
No
Yes
Is the Fwd LED on ?
Yes
The inverter is faulty.
Perform a detailed check.
Yes
Inverter is functioning normally
No
Fig. 22.2 OC and OL Error Troubleshooting
Are the IGTB modules
functioning ?
Replace control board
Yes
Is there motor output voltage at
terminals U, V & W ?
Input frequency command
No
Yes
Does the inverter function
normally after replacement
?
Yes
Any faults displayed ?
Are there any visual
abnormalties ?
Replace faulty parts
Are there any
abnormal indications ?
Input operational command
Yes
Are the current
detectors ok ?
Replace current controller
Yes
No
No
Replace control board
Is the output frequency displayed
on the digital operator ?
Yes
Replace control board
No
No
Replace control board
Connect the motor and run
Yes
Are the current
detectors ok ?
No
Troubleshooting Flow Chart; OC & OL Error 93
Page 97

N3 Drive Operations Manual
N3 OV and LV errors
Replace fuse
No
Apply power
No
Yes
Is the Fwd LED on ?
Yes
The inverter is faulty.
Perform a detailed check.
Yes
Inverter is functioning normally
No
Fig. 22.3 OV and LV Error Troubleshooting
Is the main circuit fuse
ok ?
Replace control board
Yes
Is there motor output voltage at
terminals U, V & W ?
Input frequency command
No
Yes
Does the inverter function
normally after replacement
?
Yes
Any faults displayed ?
Are there any visual
abnormalties ?
Replace faulty parts
Are there any
abnormal indications ?
Input operational command
Yes
No
Replace control board
Is the output frequency displayed
on the digital operator ?
Yes
Replace control board
No
No
Replace control board
Connect the motor and run
Yes
Are the current
detectors ok ?
No
No
Troubleshooting Flow Chart; OV & LV Error 94
Page 98

N3 Drive Operations Manual
is MCCB
On ?
is MCCB
tripped ?
Wiring short circuit
No
Yes
Are voltages
Between power terminals
correct ?
Is the charge indicator
LED on ?
Input voltage or wiring is
incorrect
No
N3 fault
No
Is the the run command
on ?
No
Turn on the run command
Is there output voltage
to the U,V, and W
terminals ?
N3 fault
No
Are the output
voltages between
U,V, and W terminals
the same?
No
N3 fault
Motor faulty or wiring
is bad
Motor will not run
Yes
Yes
Yes
Yes
Yes (Note 2)
NOTES:
1 - The voltage between input terminals should be within 10%
of the nominal value.
2 - The voltage deviation should be within ± 3% of the value
without the motor.
Yes (Note 1)
Fig. 22.4 Motor Will Not Run
Troubleshooting Flow Chart; Motor Will Not Run 95
Page 99

N3 Drive Operations Manual
Replace motor with one of
proper duty rating
No
Yes
Correct connection
Does it happen during
acceleration ?
Increase the accel / decel
time
No
Are the output
voltages between
U,V, and W terminals
the same?
No
N3 fault
Motor overheats
Yes
Yes (Within ± 3% of the rated output voltage)
Fig. 22.6 Motor Instability
Is the load or current
exceeding the the inverter
rating ?
Reduce the load or increase
the inverter and / or the motor.
Yes
Is the the motor
running at low speed
for an extended time ?
No
Yes (Within ± 3% of the nominal value)
Is there output voltage
to the U,V, and W
terminals ?
N3 fault
Is there anything
obstructing motor
cooling ?
Yes
Remove obstruction.
Faulty connection
between N3 and motor
Yes
No
No
Is acceleration time
correct ?
No
Reduce the load or increase
the inverter and / or the motor.
Yes
Is the load fluctuating?
Reduce the load fluctuation or
add a flywheel.
Yes
Is there any
mechanical vibration
or gear backlash ?
No
Yes
Inspect mechanical system
and correct
N3 fault
Minimal
Fig. 22.5 Motor Overheating
Troubleshooting Flow Chart; Motor Overheats & Motor Instability 96
Page 100

N3 Drive Operations Manual
Items
Details
Check
Methods
Criteria
Action
Daily
Yearly
Ambient
conditions
around the
drive
Confirm that the
temperature and
humidity is within
specification
x
Measure with
thermometer
and hygrometer
Temperature:
-10 – 40oC
(14-120℉)
Humidity:
Below 95% RH
Improve the
ambient or
relocate the
drive.
Are there
flammable or
corrosive materials
in the vicinity?
x Visual check
Keep area clear
Installation and
grounding of
the inverter
Any excessive vibration
from the machine ?
x
Visual, hearing
check
No vibration
Secure hardware
Is the ground
bonding resistance
correct?
x
Measure the
resistance
with a multitester
200V series: below
100Ω
400V series: below
10Ω
C grounding
Input power
voltage
Is the voltage correct?
x
Measure the
voltage with a
multi-tester
Voltage must
conform with the
specifications
Correct input
voltage
External
terminals and
internal
mounting
screws of the
inverter
Are secure parts
loose?
x
Visually check &
Check with a
screwdriver
Secure terminals
and no rust present
Secure or return
for repair
Is the terminal base
damaged?
x
Visual rust stains
present?
x
Internal wiring
of the inverter
Any unusual bends or
breaks?
x
Visual check
No abnormalities
Replace or return
for repair
Any damage of the
wire insulation?
x Heat sink
Excessive dust or
debris
x Visual check
Clean surfaces
Clean up debris
or dust
Printed circuit
boards &
power
modules
Excessive dust or
debris.
x
Visual check
Clean surfaces with
no discoloration.
Clean or replace
the circuit board
or power
modules
Discolored,
overheated, or
burned parts
x
Cooling fan
Unusual vibration
and/or noise
x
Visual or
hearing check
Clean surfaces
Replace the
cooling fan
Excessive dust or
debris
x Visual check
Clean fan
Capacitor
Any unusual odor or
leakage
x Visual check
No abnormalities
Replace
capacitor or
inverter
!
DANGER
To prevent injury to personnel and damage to the equipment, wait 5 minutes after
the “charge indicator” extinguishes before touching any parts.
23.0 Routine periodic inspection
To ensure safe and secure operations, check and maintain the inverter and motor at regular intervals, the table below
lists the suggested items to be checked on a periodic basis.
Routine Periodic Inspection 97
 Loading...