

Page 1

ELECTRIC COOKER
GARDA EC1
Operating Instructions
Before operating this cooker,
please read these instructions carefully
Page 2

2
Introduction Installation
CONTENTS
– Introduction page 2
– Installation ” 2-3-4
– Features and
Technical Data ” 5
– How to use the hotplates ” 6-7
– How to use the oven
and grill ” 8-9
– Temperature recipe guide ” 10
– Care and maintenance ” 11
– After sales service ” 12
INTRODUCTION
Congratulations on your purchase of this
TECNOLEC electric cooker which has
been carefully designed and produced to
give you many years of satisfactory use.
Before using this appliance it is essential
that the following instructions are carefully read and fully understood. We would
emphasize that the installation section
must be fully complied with for both your
safety and to ensure that you obtain the
maximum benefits from your appliance.
Warning: This appliance
must be earthed.
INSTALLATION
We strongly recommend that this cooker
be installed by a qualified electrician.
Use minimum 4 mm
2
cable.
POWER CONNECTION
The power supply to the cooker must be
via a suitable double pole isolating
switch.
Do not attempt to use a 13 Amp
plug and socket.
All electrical wiring must be in
compliance with the appropriate IEE and
local electricity board regulations and
carried out by a qualified electrician.
VOLTAGE
230 Volts AC - 50 Hz
Maximum rated current : 7000 W
Page 3
3
Fig. 1
C
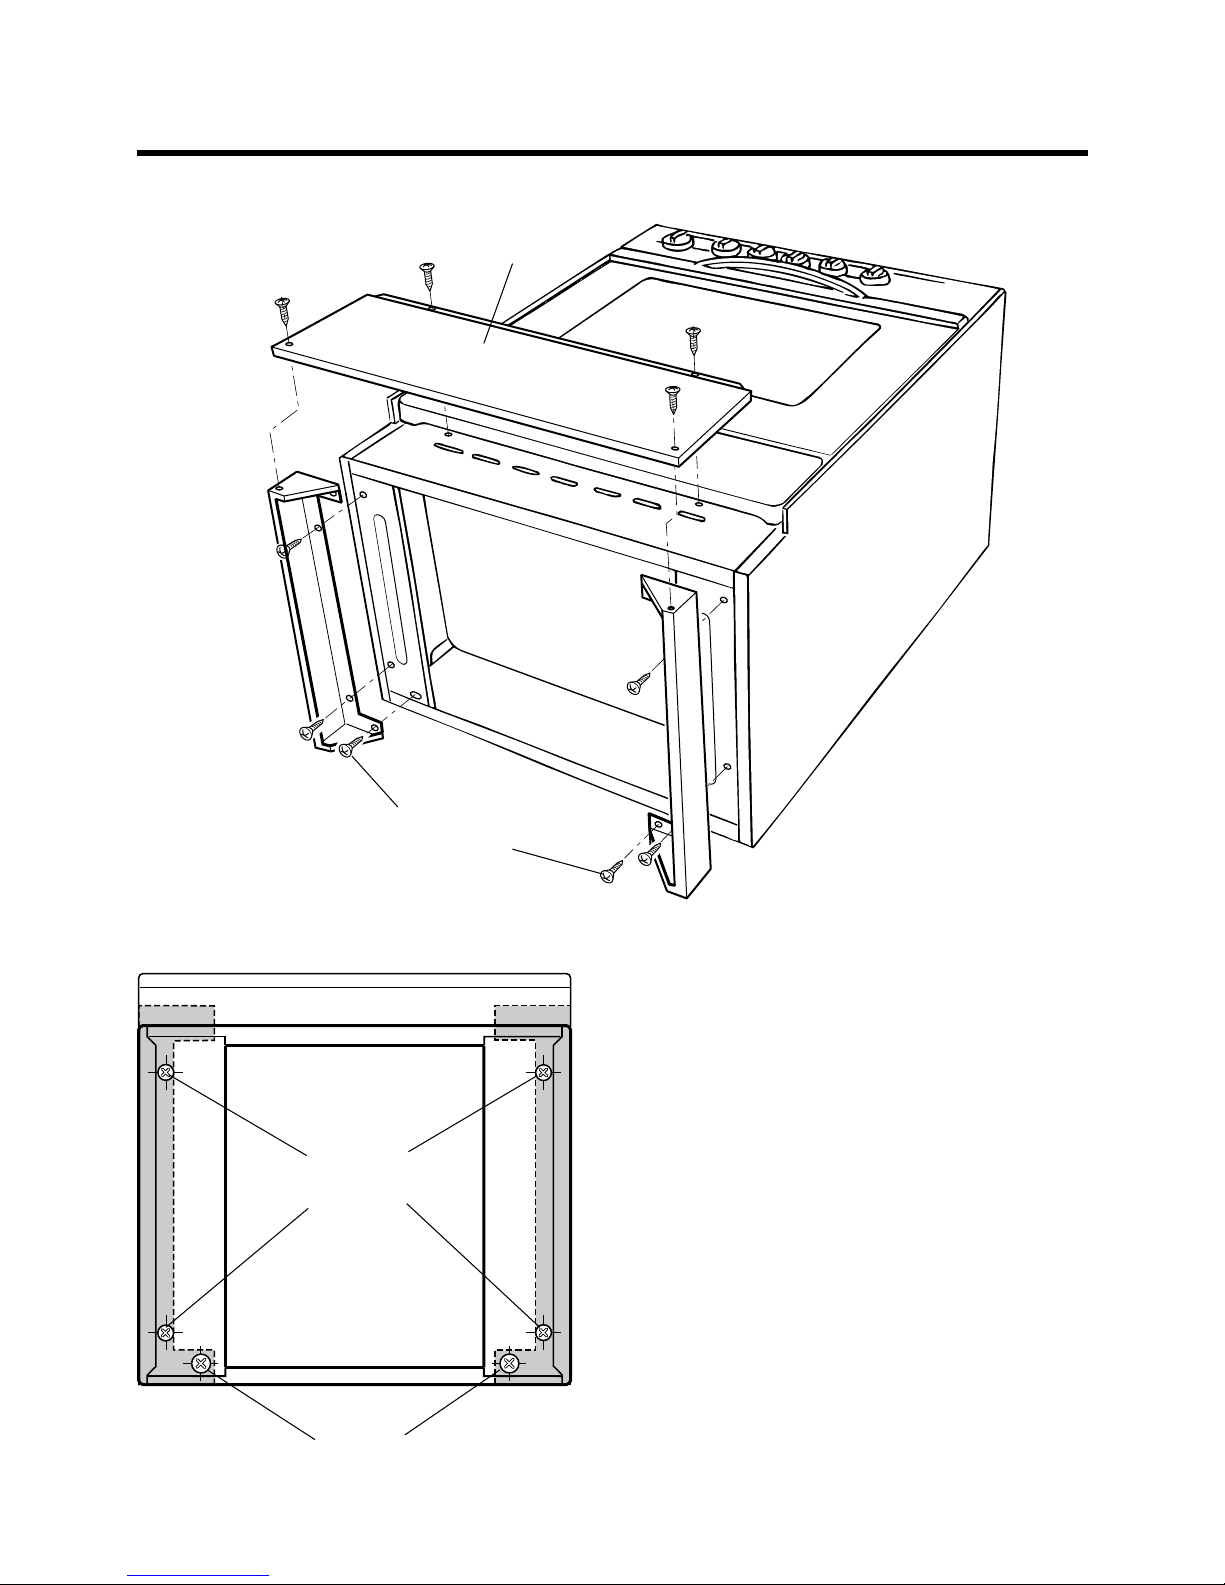
Installation
FITTING THE PLINTH
The plinth consist of three panels:
two side pieces and the front panel.
1. Remove the lid.
2. Place the cooker on its back.
3. Remove drawer.
4. Fit the front panel to the cooker
using the screws provided
(fig. 1).
5 . Fit the front panel to the side
panels using the screws provided
(fig. 1). The correct positioning of
the side panels is shown in fig. 2.
6. Fit the 2 side pieces to the base
of the cooker with the screws
provided (fig. 1).
Fig. 2
White
screws
14Px13,5
Black
screws
7Px9,5
White
screws
14Px13,5
Page 4
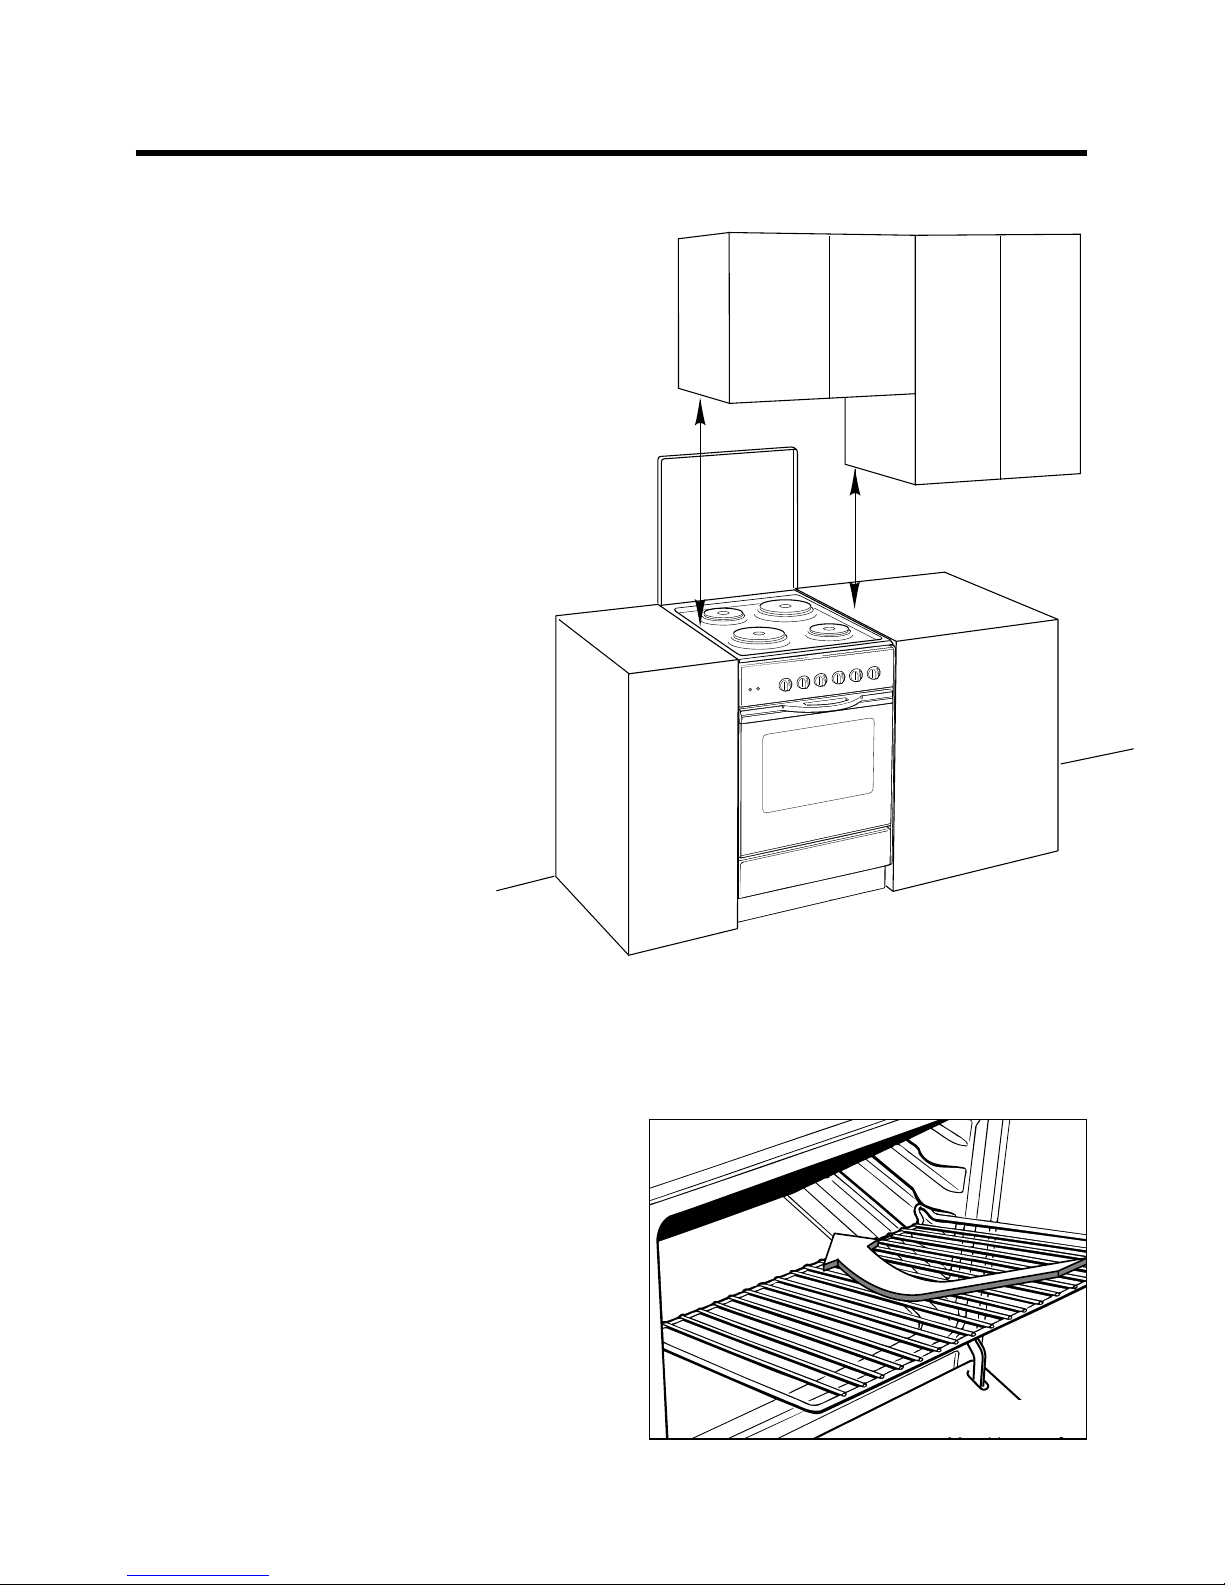
4
Installation
LOCATION
The cooker has type “X” overheating protection so that it can be
installed to a cabinet (fig. 3).
It is advisable that the kitchen furniture near the sides of the
cooker is made of heat resistant
material, minimum 75 °C.
FITTING UP OF OVEN SHELVES
The oven shelves are provided with a
security block to prevent accidental
extraction.
They must be inserted operating as per
bottom figure 4.
To pull them out operate in the inverse
order.
400 mm
15.7"
650 mm
25.5"
Fig. 4
Fig. 3
Page 5

5
Features and Technical Data
900 mm - 35.43"
500 mm
19.7"
500 mm
19.7"
G
A
R
D
A
°
C
PLINTH
ELECTRICAL PLATES (Fig. 5)
1. 180 mm diameter (normal)
1500 W
2. 145 mm diameter (normal)
1000 W
3. 180 mm diameter (normal)
1500 W
4. 145 mm diameter (normal)
1000 W
OVEN
– Oven rating - 2000 W
– Grill rating - 1900 W
– Usable oven volume:
49 dm
3
CONTROL PANEL (Fig. 5)
5. Front right plate (4)
control knob
6. Rear right plate (3)
control knob
7. Rear left plate (2)
control knob
8. Front left plate (1)
control knob
9. Oven switch control knob
10. Oven thermostat control
knob
11. Hotplates control lamp
12. Oven temperature control
lamp
2134
Fig. 5
11128765910
Page 6

6
How to use the Hotplates
0
6
5
4
3
2
1
The hob is made of steel coated with a
vitreous enamel to provide a durable and
attractive surface. There are four solid
plates clamped to the surface of the hob.
All have a fixed stainless steel ring which
may turn yellow after the plate is first
used this is normal.
ELECTRIC PLATES:
The higher the number set on the control
knob, the higher the temperature that will
be maintained on the plate.
Each plate has seven working positions
marked on the control knob (Fig. 6):
- Position
0 Off
- Positions
1 - 6 Operating number
(indicator light on)
Fig. 6
REMEMBER:
Solid plates maintain heat for up to five
minutes after switching off, so when boiling or frying, turn down the power setting
after reaching operating temperature.
BOILING AND SIMMERING:
Boiling and simmering can be carried out
on any of the four plates.
FRYING:
Generally frying is carried out on the larger plates. It is important not to leave
frying unattended even for a short while.
Do not use a chip-pan more than one
third full of fat or oil.
Page 7

7
Fig. 7
Right
Wrong
Pan wrong shape
Wrong
Pan too small
Wrong
Do not dry cloths
on plates
Wrong
Pan too large
Wrong
Pan wrong shape
How to use the Hotplates
DONT’S:
Pans with a ridged or recessed base
must not be used.
Likewise do not use an asbestos or wire
mat or anything else under the pan.
Never leave a plate switched on for long
periods when not covered with a pan.
Do not lower the lid until the hotplates
have cooled.
Do not use the cooker with the lid down
as a working surface.
CHOICE OF PANS:
It is uneconomical to use pans smaller
than the plate that has been selected.
The plate is made of cast-iron and is
heated uniformly over the whole surface,
therefore any part of the plate not covered by the pan is wasting energy.
Whilst almost any type of pan can be
used, those with curved or distorted
bases will waste energy.
We therefore recommend pans with flat
bases particularly those with machine
ground bases. Always dry the base of
the pan before placing on the plate.
Page 8

8
How to use the Oven and Grill
0
50
75
100
125
150
175
200
225
250
Fig. 8 Fig. 9
OVEN
Attention: The oven door becomes
very hot during operation.
Keep children away.
The oven has two heating elements, one
at the base of the oven, and one at the
top. Hot air rises, so the top of the oven
is always the hottest.
The temperature in the middle of the
oven is maintained at the temperature
set by the control knob, and is slightly
hotter above, slightly cooler below.
Always pre-heat a conventional oven
before use.
The oven indicator light will go out when
the required temperature is reached.
Do not open the oven door during
cooking unless absolutely necessary.
Function selector Temperature selector
Page 9

9
How to use the Oven and Grill
FUNCTION SELECTOR (Fig. 8)
Cook or grill by turning the control knob
FUNCTION until the indicator on it is in
line with the symbol.
Conventional Oven - It is
advisable to preheat the oven
until the set temperature has
been reached ie: when the
indicator light above the
function selector goes off.
During cooking, do not open
the door unless it is absolutely
necessary.
Use in conjunction with the
temperature selector.
Always grill with the door
closed. Set the function
selector to the grill position and
the temperature selector to the
desired temperature.
The temperature can be varied
depending on the food being
cooked.
Before using the grill, pre-heat
for about five minutes. Position
the grill pan on the highest
shelf position and keep
checking as it could easily
burn.
To avoid possible smoking
during grilling it is advisable to
add a little water to the grill
pan.
TEMPERATURE SELECTOR (Fig. 9)
The light on the left of the control panel
will illuminate when the oven is switched
on and turns off when the oven reaches
the correct temperature.
The light will cycle on and off during
cooking in line with the oven
temperature.
The grill pan comes with a
detachable handle which
should always be used when
removing the grill pan from the
oven.
Note: It is recommended that you do not
grill for longer than 30 minutes at any
one time.
Page 10

10
Temperature Recipe Guide
OVEN COOKING TEMPERATURES
APPROX.
MARK
HEAT OF TYPE OF DISH TO COOK
TEMPERATURE OVEN
125°C
4
Very cool Meringue,
(257°F) oven slow cooking foods.
135°C - 140°C
4-5
Cool or Milk puddings, very rich fruit
(275°F - 285°F) slow oven cakes, eg., Christmas.
150°C
5
Cool or Stews, casseroles, braising,
(300°F) slow oven rich fruit cakes, eg., Dundee.
160°C - 170°C
5-6
Warm oven Biscuits, Low temperature roasting,
(320°F - 338°F) rich plain cakes eg., Madeira cake.
180°C
6
Moderate Plain cakes, eg., Victoria
(356°F) oven sandwich, meat pies.
190°C
6-7
Fairly hot Small cakes, savoury flans,
(374°F) oven fish.
200°C
7
Hot oven Plain cakes and buns, swiss rolls,
(392°F) fruit pies. High temp. roasting
220°C
8
Moderately Bread and bread rolls etc., scones,
(428°F) hot oven flaky and rough puff pastry,
yorkshire pudding
230°C
8-9
Very hot Sausage rolls, mince pies, puff
(446°F) oven pastry
250°C
9
Very hot Browning ready cooked dishes
(482°F) oven
Page 11

11
Care and Maintenance
THE HOB:
Spillage on the hob can usually be
removed by a damp soapy cloth. More
obstinate stains can be removed by
rubbing gently with a soapy scouring pad
or mild household cleaner.
Avoid scratching or scraping the surface.
Always wipe the plates after use with a
damp cloth and switch on momentarily to
dry the plate.
Occasionally wipe a trace of cooking oil
over the plate to maintain its
appearance.
SPILLAGE:
Any spillage should be dealt with as
soon as possible to prevent it becoming
baked on.
REMOVING THE LID:
Simply open the lid so that it is in the
upright position. Lift upwards until the
hinges are clear of the hinge brackets.
Replace in reverse.
THE OVEN:
The oven interior and the chromium
plated shelves and runners can be
cleaned by a damp soapy cloth.
Obstinate stains can be removed with
scouring pads and a gentle, nonabrasive, liquid cleaner.
Provided the oven is wiped over
immediately after roasting, only the
minimum of cleaning should be
necessary.
REMOVING THE DOOR:
To facilitate oven cleaning, it is possible
to remove the door.
Hinge “A” have two removable clips “B”
which can be connected to parts “C” of
the hinges when the door is completely
open in order to lock this in position.
Following this, the door can be lifted
upwards and removed. Do this, lever on
the sides of the door near the hinges.
To remount the door, first insert the
hinges in their grooves. Now close the
door. Do not forget to remove the two
movable clips “B” used to link to the
two hinges.
Always switch the cooker off at the
mains isolating switch before cleaning
or touching any electrical part.
DOOR GLASS:
The glass of the oven door can be
cleaned with a soft, warm, soapy cloth,
then wiped clean with cold water and
polished with a soft clean cloth.
Do not use scouring pads or anything
abrasive on the oven door glass.
NOTE:
Any cleaners such as spray or stick
cleaners which are used on enamel must
have the VEDC (Vitreous Enamel
Development Council) seal of approval
and the manufacturers instructions must
be followed.
A
B
C
Fig. 10
Page 12

Code 110540.1
Ed. 7
Descriptions and illustrations in this booklet are given as simply indicative. The manufacturer reserves
the right, considering the characteristics of the models described here, at any time and without notice, to make eventual necessary modifications for their construction or for commercial needs.
The static noise interference of this appliance conforms to the EEC
87/308 Norms.
If the cooker is malfunctioning and service is required.
Turn off the mains supply and contact your nearest COMET Service Centre.
After Sales Service
 Loading...