

Page 1
OWNER’S MANUAL
If you do not have prior experience
with a metal detector, we strongly
recommend that you:
1) Adjust the Sensitivity
to a low setting in the
event of false signals.
Always begin use at a
reduced sensitivity level;
increase sensitivity only after you have
become familiar with the detector.
2) Do not use indoors. This detector is for
outdoor use only. Many household
appliances emit electromagnetic energy,
which can interfere with the detector. If
conducting an indoor demonstration, turn
the sensitivity down and keep the search coil
away from appliances such as computers,
televisions and microwave ovens. If
your detector beeps erratically, turn
off appliances and lights.
Also keep the search coil away
from objects containing metal,
such as floors and walls.
3) Use a 9-volt ALKALINE battery
only.
Do not use Heavy Duty Batteries.
Page 2

TABLE OF CONTENTS
Terminology . . . . . . . . . . . . . . . . . . . . . . . . . . . . . . . . . . . . . . . . . . . .3
Assembly . . . . . . . . . . . . . . . . . . . . . . . . . . . . . . . . . . . . . . . . . . . .4-5
Batteries . . . . . . . . . . . . . . . . . . . . . . . . . . . . . . . . . . . . . . . . . . . . . . .6
Quick-Start Demo . . . . . . . . . . . . . . . . . . . . . . . . . . . . . . . . . . . . . . .8
Basic Of Metal Detecting . . . . . . . . . . . . . . . . . . . . . . . . . . . . . . . .8-9
Ground Minerals . . . . . . . . . . . . . . . . . . . . . . . . . . . . . . . . . . . .8
Trash . . . . . . . . . . . . . . . . . . . . . . . . . . . . . . . . . . . . . . . . . . . .8
Identifying Buried Objects . . . . . . . . . . . . . . . . . . . . . . . . . . . .8
Size and Depth of Buried Objects . . . . . . . . . . . . . . . . . . . . . .9
EMI . . . . . . . . . . . . . . . . . . . . . . . . . . . . . . . . . . . . . . . . . . . . . .9
How To Work The Controls . . . . . . . . . . . . . . . . . . . . . . . . . . . . . . .10
MENU Selections
Disc Level . . . . . . . . . . . . . . . . . . . . . . . . . . . . . . . . . . . . . . . .11
Notch . . . . . . . . . . . . . . . . . . . . . . . . . . . . . . . . . . . . . . . . . . .11
Sensitivity . . . . . . . . . . . . . . . . . . . . . . . . . . . . . . . . . . . . . . . .12
Volume . . . . . . . . . . . . . . . . . . . . . . . . . . . . . . . . . . . . . . . . . .12
Target Identification . . . . . . . . . . . . . . . . . . . . . . . . . . . . . . . . . . . . .13
Depth And Target Display . . . . . . . . . . . . . . . . . . . . . . . . . . . . . . . .14
In The Field Techniques . . . . . . . . . . . . . . . . . . . . . . . . . . . . . . .15-17
Headphones . . . . . . . . . . . . . . . . . . . . . . . . . . . . . . . . . . . . . . . . . . .18
Trouble Shooting . . . . . . . . . . . . . . . . . . . . . . . . . . . . . . . . . . . . . . .19
Code of Ethics . . . . . . . . . . . . . . . . . . . . . . . . . . . . . . . . . .Back Cover
Warranty . . . . . . . . . . . . . . . . . . . . . . . . . . . . . . . . . . . . . .Back Cover
2
Page 3

TERMINOLOGYHEADPHONE JACK
The following terms are used throughout the manual, and are standard
terminology among detectorists.
ELIMINATION
Reference to a metal being "eliminated" means that the detector will not
emit a tone, nor light up an indicator, when a specified object passes
through the coil’s detection field.
DISCRIMINATION
When the detector emits different tones for different types of metals, and
when the detector "eliminates" certain metals, we refer to this as the
detector "discriminating" among different types of metals.
Discrimination is an important feature of professional metal detectors.
Discrimination allows the user to ignore trash and otherwise undesirable
objects.
RELIC
A relic is an object of interest by reason of its age or its association with
the past. Many relics are made of iron, but can also be made of bronze
or precious metals.
IRON
Iron is a common, low-grade metal that is an undesirable target in certain
metal detecting applications. Examples of undesirable iron objects are
old cans, pipes, bolts, and nails.
Sometimes, the desired target is made of iron. Property markers, for
instance, contain iron. Valuable relics can also be composed of iron;
cannon balls, old armaments, and parts of old structures and vehicles
can also be composed of iron.
FERROUS
Metals which are made of, or contain, iron.
PINPOINTING
Pinpointing is the process of finding the exact location of a buried object.
Long-buried metals can appear exactly like the surrounding soil, and can
therefore be very hard to isolate from the soil.
PULL-TABS
Discarded pull-tabs from beverage containers are the most
bothersome trash items for treasure hunters. They come in many
different shapes and sizes. Pull-tabs can be eliminated from
detection, but some other valuable objects can have a magnetic
signature similar to pull-tabs, and will also be eliminated when
discriminating out pull-tabs.
GROUND BALANCE
Ground Balancing is the ability of the detector to ignore, or "see through,"
the earth’s naturally occurring minerals, and only sound a tone when a
metal object is detected. This Detector incorporates proprietary circuitry
to eliminate false signals from severe ground conditions
3
Page 4
ASSEMBLY
Loc
kin
g
Col
lar
Loc
kin
g
Col
lar
S-R
od
Vel
cro
Str
ap
Vel
cro
Str
ap
Knurled
Kno
b
Bolt
Sea
rch
Coi
l
Hand-grip
Sea
rch
Coil Cable
Low
er
Stem
Upp
er
Stem
Cable
Plug
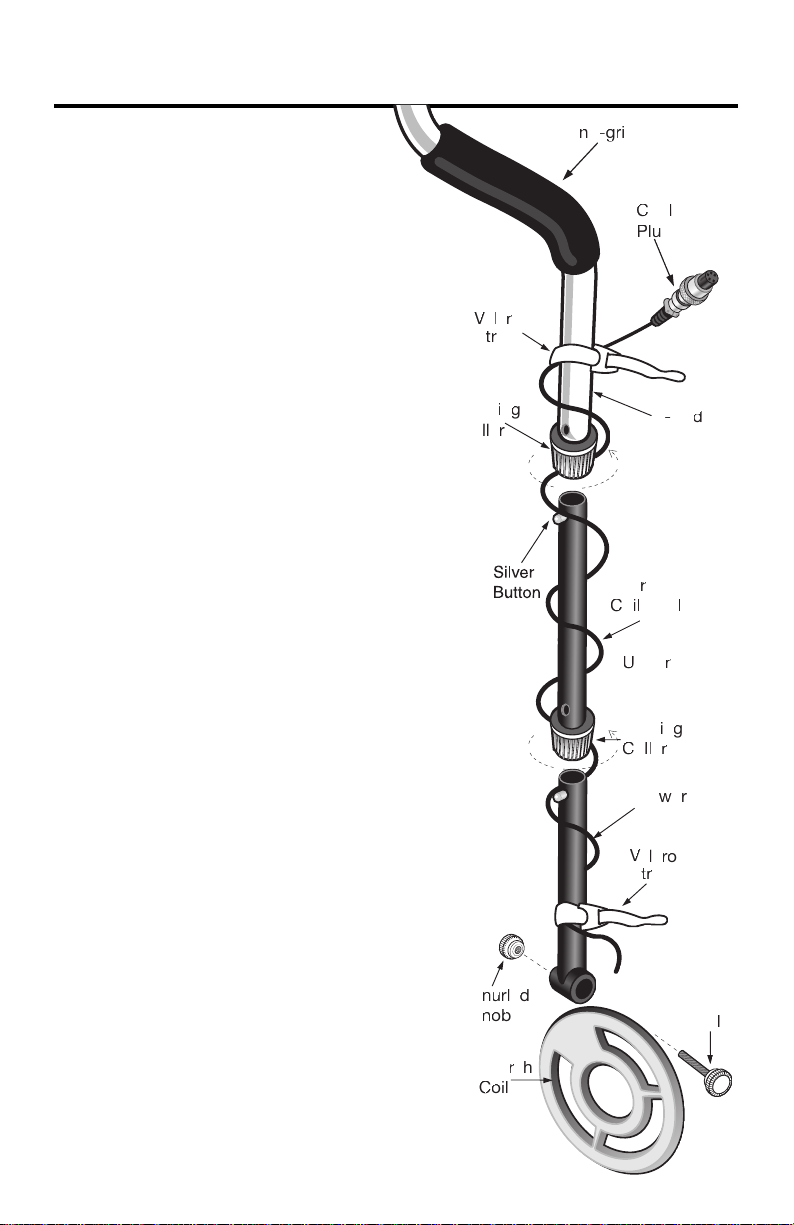
Assembly is easy and
requires no tools.
1 Loosen both Locking Collars by
●
rotating 100% counterclockwise.
2 Insert the Upper Stem into the S-Rod and click
●
Silver Button into hole.
3 Position the Lower Stem with the Silver
●
Button toward the back. Using the Bolt
and Knurled Knob, attach the Search
Coil to the Lower Stem.
4 Press the button on the upper end of the
●
Lower Stem and slide the Lower Stem in to the
Upper Stem.
a comfortable upright posture, with your arm
relaxed at your side, and the search coil
parallel to the ground in front of you.
Adjust the stem to a length that lets you maintain
5 Wind the cable securely around the stems.
●
6 Insert the plug into the matching connector on
●
the back of the detector body. Do not twist the
cable or plug. Be sure that the key-way and
pins line up correctly. Turn knurled cap nut
only . T ighten knurled cap nut by hand to secure
cable connection to housing.
7 Tighten both Locking Collars.
●
8 Secure the cable with the 2 velcro straps
●
provided, one on the Lower Stem close to the
coil, one on the Upper Stem, close to the
housing.
Caution: Do not force the plug in. Excess
force will cause damage. To
4
disconnect the cable, pull on the
plug.
Do not pull on the cable.
Page 5
ASSEMBLY
Hand-grip
Nut
Screw
1/8” H
eadphone Jack
1/4” H
eadphone Jack
Search
Coil
Cable
Cable
Plug
Sea
rch
Co
il
S-Rod
armrest
Velcro
Strap
Lower
Stem
Upper
Stem
Velcro
Str
ap
Knu
rle
d
Kno
b
Locking
Collar
Battery
Compartment
(back sid
e)
Loc
kin
g
Col
lar
Optional Arm Strap
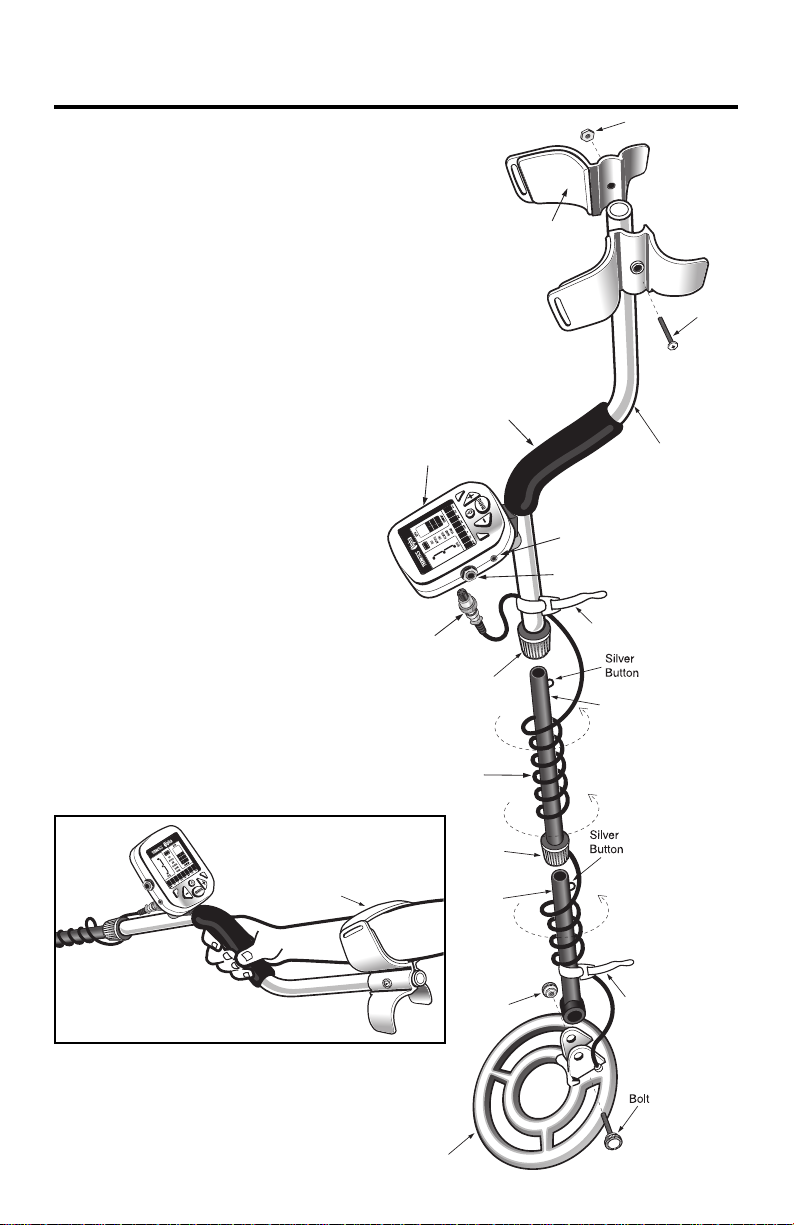
Adjusting the Arm Rest
The arm rest may be moved
forward or backwards by removing
the single screw and nut, and then
repositioning the 2-piece arm rest.
Users with shorter arms may find
the arm rest more comfortable in
the forward position. In order to
move the arm rest backwards, the
plastic plug must be removed from
the aluminum tube.
Arm Rest Strap (not included)
Some users prefer to use a strap
when swinging the detector
vigorously, in order to hold the
detector secure against the arm.
The strap may be purchased as an
optional accessory.
The detector can also be used
without the strap with no
compromise to detector balance
and stability under most
conditions.
5
Page 6

BATTERIES IN THE FIELD TECHNIQUES
The detector requires a single 9-volt ALKALINE battery (battery not
included).
Do not use ordinary zinc carbon batteries.
Rechargeable batteries can also be used.
If you wish to use rechargeable batteries, we recommend using a
Nickel Metal Hydride rechargeable battery.
The battery compartment is located on the back side of the housing.
Slide the battery door to the side and remove it to expose the battery
compartment.
BATTERY LIFE
Expect 20 to 25 hours of life from a 9-volt alkaline battery.
Rechargeable batteries provide about 8 hours of usage per charge.
SPEAKER VOLUME AND BATTERY CHARGE
You may notice the speaker volume drop while one battery segment is
illuminated.
With one segment flashing, low speaker volume will be very apparent.
BATTERY INDICATOR
The 3-segment battery indicator has 4 stages of indication.
These indications are accurate for a 9-volt alkaline battery.
Segments Illuminated Battery Voltage
3 -segments more than 8.3 volts
2 -segments more than 7.0 volts
1 -segment more than 6.2 volts
1 -segment flashing less than 6.2 volts
After the battery indicator begins flashing, expect the detector to shut off within
10 minutes.
A rechargeable battery will usually illuminate all segments throughout most of
its useful charge. But as soon as it drains to the 2-segment level, it will then
discharge very rapidly.
6
Page 7
QUICK-START DEMONSTRATION
I. Supplies Needed
• a Nail • a Zinc Penny (dated after 1982)
• a Nickel • a Quarter
II. Position the Detector
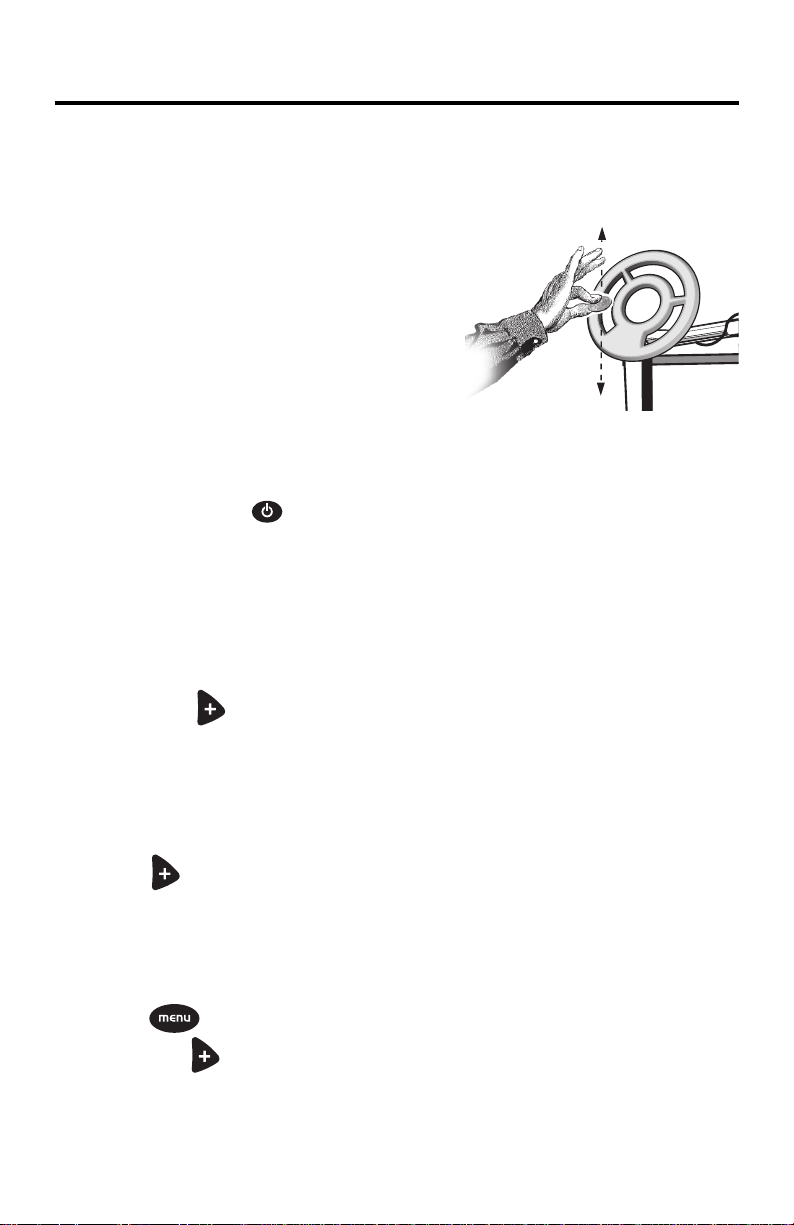
a. Place the detector on a table, with the
search coil hanging over the edge.
Or better, have a friend hold the
detector, with the search coil off the
ground.
b. Keep the search coil away from walls,
floors, and metal objects.
c. Remove watches, rings, and jewelry.
d. Turn off lights or appliances, whose electromagnetic emissions may
cause interference.
e. Pivot the search coil back.
III. Power Up. Press .
IV. Wave each object over the search coil.
a. Notice a different tone for each object:
Low Tone: Medium Tone: High Tone:
Nail Zinc Penny, Nickel Quarter
b. Motion is required.
Objects must be in motion over the search coil to be detected.
V. Then press .
a. The word “IRON” disappears from the display
VI. Wave the nail over the search coil.
a. The nail will not be detected
b. The nail has been “discriminated out.”
VII. Press four more times.
a. The words FOIL, 5¢, ALUM, and ZINC disappear.
VIII. Wave the nickel
a. The nickel will not be detected.
IX. Press to toggle down to NOTCH.
Then press 3 times
a. 5¢ reappears on the display
X. Wave the Nickel.
a. The nickel is now again detected.
b. The nickel has been “notched in.”
7
Page 8

THE BASICS OF METAL DETECTING
A hobby metal detector is intended for locating buried metal objects. When
searching for metals, underground or on the surface, you have the following
challenges and objectives:
1. Ignoring signals caused by ground minerals.
2. Ignoring signals caused by metal objects that you do not want to find,
like pull-tabs.
3. Identifying a buried metal object before you dig it up.
4. Estimating the size and depth of objects, to facilitate digging them up.
5. Eliminating the effects of electromagnetic interference from other
electronic devices.
Your ALPHA metal detector is designed with these things in mind.
1. Ground Minerals
All soils contain minerals. Signals from ground minerals can interfere with the
signals from metal objects you want to find. All soils differ, and can differ
greatly, in the type and amount of ground minerals present. The detector
incorporates an automated ground-balancing feature which will eliminate
false signals from most types of soils.
There is no user adjustment. If you experience false signals from severe
ground conditions, such as highly mineralized soil found in many gold
prospecting locations, or red-clay soils, reduce sensitivity.
2. Trash
If searching for coins, which will induce higher tone sounds, you want to
ignore items like aluminum foil, nails, and pull-tabs. These undesirable
items induce lower tones. You can listen to the sounds of all objects
detected, and decide on what you want to dig up. Or you can eliminate
unwanted metals from detection by using the DISCRIMINATION feature.
3. Identifying Buried Objects
Different objects induce different tones (high, medium, low) and are classified
on the display screen in different categories from left to right.
8
Page 9

THE BASICS
continued
4. Size and Depth of Buried Objects
The relative depth of an object is displayed at the left of the display as a 1
digit number, 0 to 9 inches. The size of an object can be determined using
sweep techniques described later in the manual.
5. Electromagnetic Interference (EMI)
The search coil produces a magnetic field and then detects changes in that
magnetic field caused by the presence of metal objects. This magnetic field
that the detector creates is also susceptible to the electromagnetic energy
produced by other electronic devices. Power lines, microwave ovens,
lighting fixtures, TVs, computers, motors, etc…. all produce EMI which can
interfere with the detector and cause it to beep when no metal is present,
and sometimes to beep erratically.
The SENSITIVITY control lets you reduce the strength of this magnetic
field, and therefore lessen its susceptibility to EMI. You may want to operate
at maximum strength, but the presence of EMI may make this impossible,
so if you experience erratic behavior or “false” signals,
sensitivity.
reduce the
9
Page 10
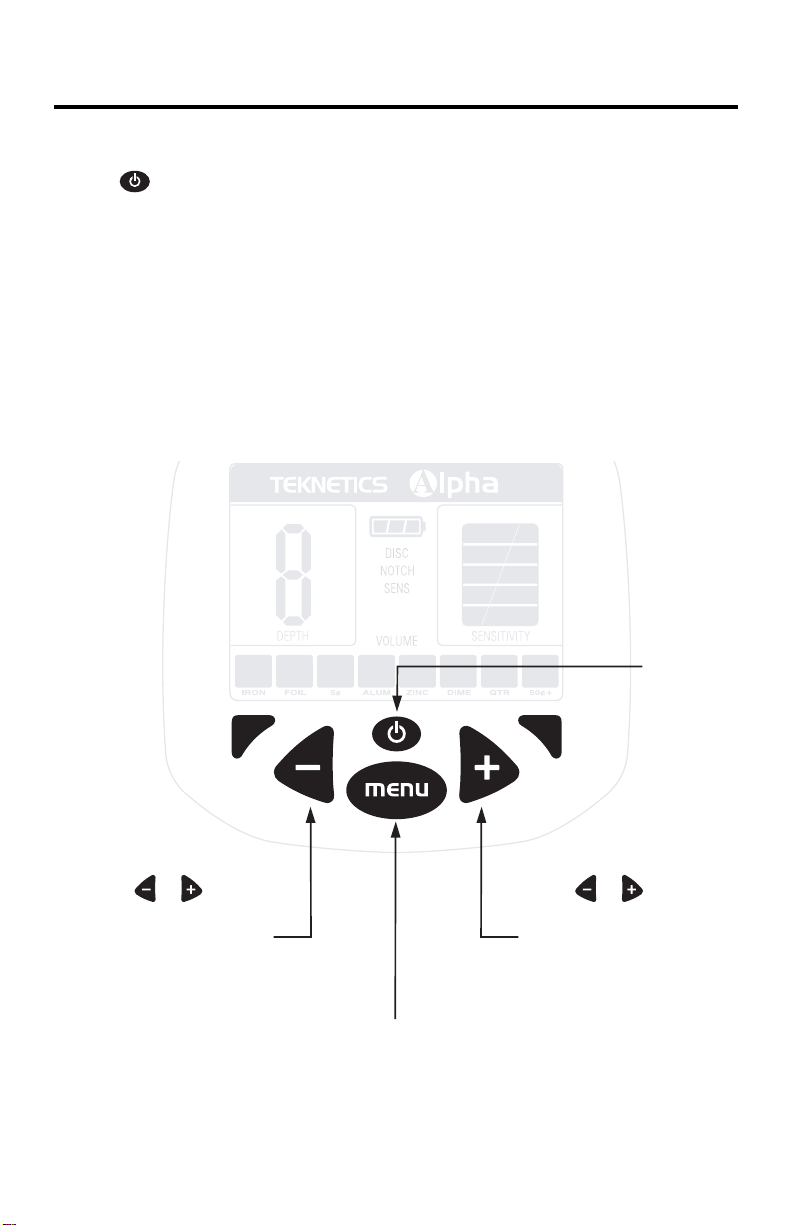
OPERATION and CONTROLS
Press MENU button
to select the
menu item you
want to adjust.
POWER
ON/OFF
Press or Buttons
to CHANGE THE SETTING
of the active menu item.
The active menu item is
the Highlited line on the
left side of the display.
Press or Buttons
to CHANGE THE SETTING
of the active menu item.
The active menu item is
the Highlited line on the
left side of the display.
HOW TO WORK THE CONTROLS
POWERING UP
Press
• The detector always starts up with the DISCRIMINATION feature active.
Motion is required to detect metal.
• Sensitivity is at 70% of maximum
• All target categories are illuminated, meaning that all metal objects will
be detected.
10
Page 11
OPERATION and CONTROLS
MENU SELECTIONS
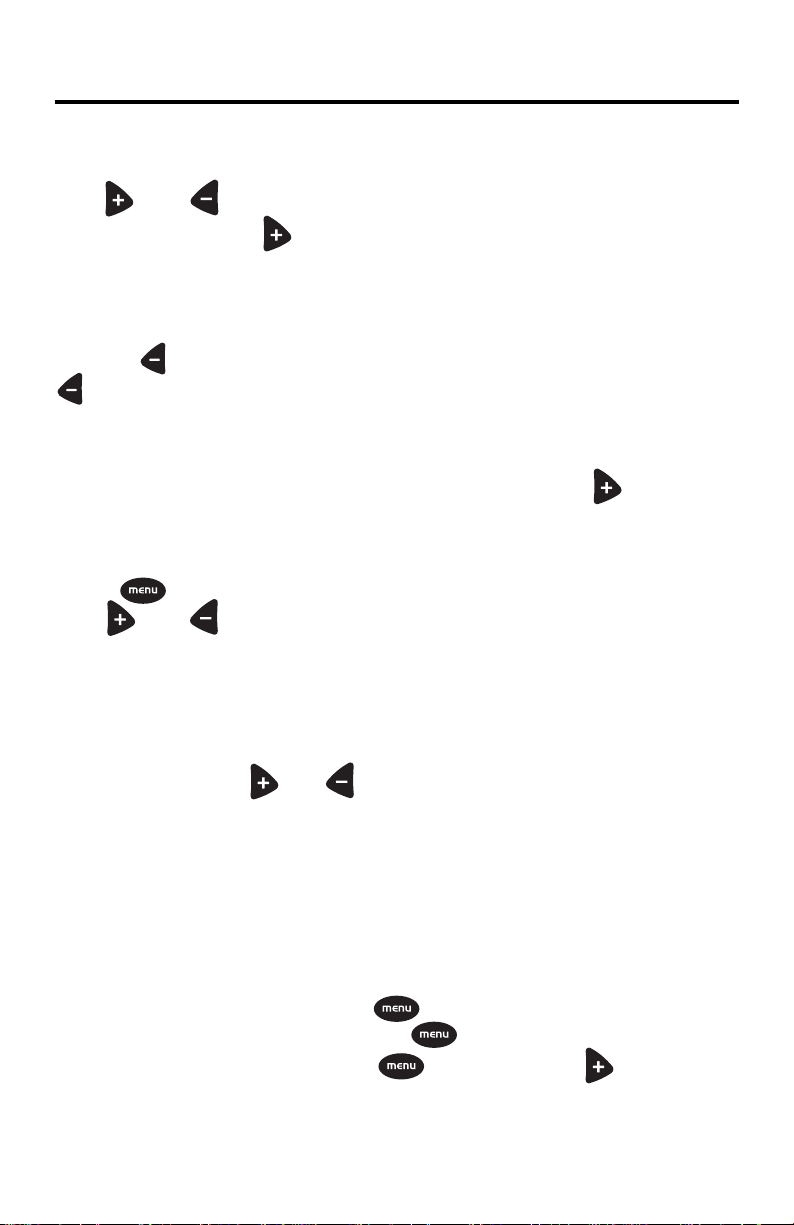
1. DISC
Use and to increase or decrease DISCRIMINATION level.
Each time you press , a target category is eliminated from detection.
Elimination occurs from left to right. When a category description (for example
“IRON”) disappears from the display, then targets classified in that category
will not be detected.
Pressing reverses the discrimination process. With each press of
, a category description will reappear, indicating that targets
classified in that category will again be detected.
Discrimination is a cumulative elimination system. Targets can be eliminated
from left to right on the scale, with each additional press of , resulting in
more objects being eliminated from detection.
2. NOTCH
Press until “NOTCH” is illuminated on the display.
Use and to notch target categories IN or OUT while the NOTCH line
is highlighted.
Whereas the discrimination feature eliminates all categories sequentially from
detection, the NOTCH control allows you to selectively include or exclude
target categories from detection.
With each press of or , the notched category moves across the
display screen. As you move the position of the notched category, you are
changing the detection status of the selected category.
• If a target category was previously eliminated (word not visible) then
notching that category will return it to detection.
• If a target category was previously retained (word is visible) then
notching that category will remove it from detection.
Only one target category at a time can be selected for notching. To notch
multiple categories in or out, press again while NOTCH is
highlighted. Each subsequent press of allows you to set an additional
notch. Each time you press , followed by , the notch
program will begin by changing the status of the IRON segment.
At any time, the display screen indicates the current category notches or
discrimination settings. Any category whose description is not visible will not
be detected.
11
Page 12
OPERATION and CONTROLS
menu
cont.
NOTCH
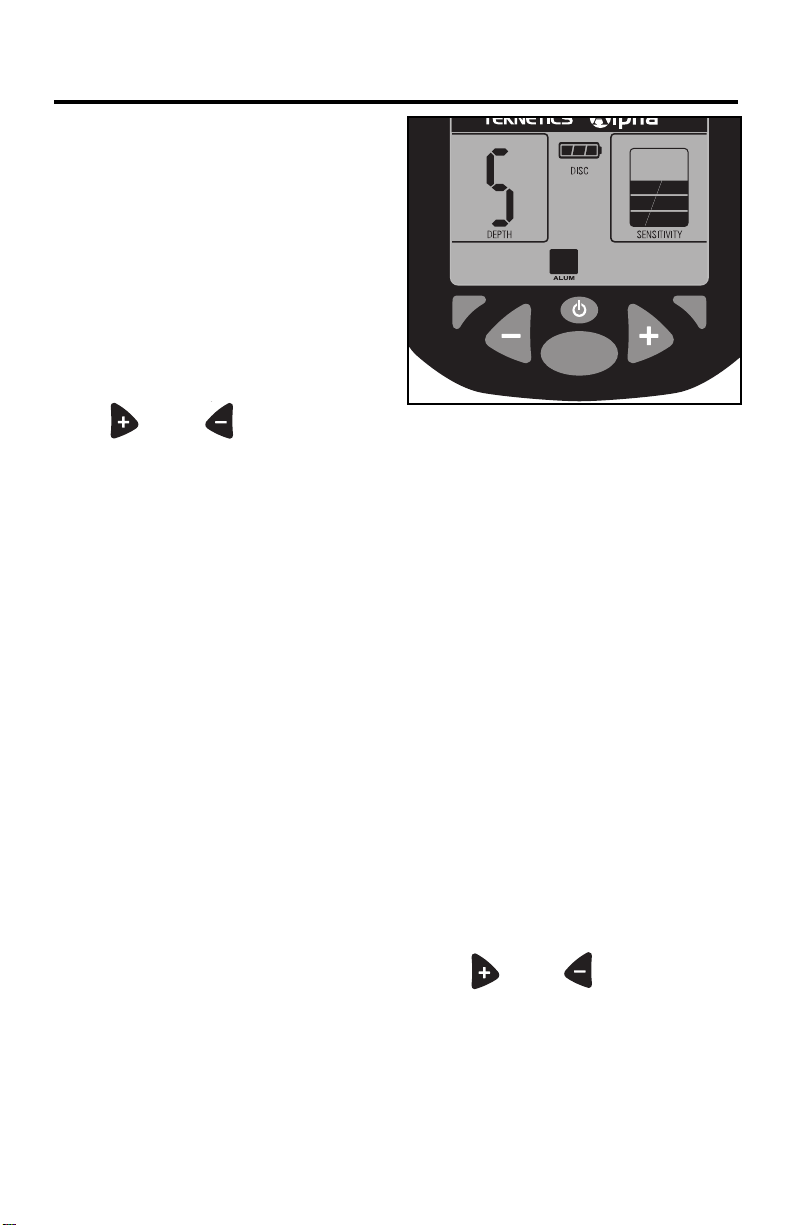
For example, the following settings tell
us that:
continued
• The nickel, dime, quarter, and
50¢+ categories will be
detected.
• All other categories of targets
(iron, foil, alum, and zinc) will
not be detected.
3. SENSITIVITY
Use and to increase or
decrease sensitivity while the SENS line is highlighted.
Maximum sensitivity is indicated by 5 bars.
Minimum sensitivity is indicated by 1 bar.
If the detector beeps erratically or beeps when there are no metal objects
being detected,
The search coil produces a magnetic field and then detects changes in that
magnetic field caused by the presence of metal objects. This magnetic field that the
detector creates is also susceptible to the electromagnetic energy produced by
other electronic devices. Power lines, microwave ovens, lighting fixtures, TVs,
computers, motors, etc…. all produce EMI which can interfere with the detector and
cause it to beep when no metal is present, and sometimes to beep erratically.
reduce the sensitivity.
HOW DEEP WILL IT GO?
The Alpha Metal Detector will detect a coin-sized object, like a quarter, to a
distance of about 9” from the search coil. Large metal objects can be detected
to a depth of several feet. Detectability is directly related to the size of the metal
object -- the larger the object, the deeper it can be detected.
Accuracy of target identification is also related to distance from the coil.
Beyond a distance of 8”, the accuracy of target identification begins to
diminish.
4. VOLUME
While the VOLUME line is highlighted, use and to change the
speaker volume.
The default volume setting is 9. Maximum is 9.
Minimum is 0 (volume off). At levels 1, 2 and 3, high tones will be inaudible or
barely audible.
The speaker volume will diminish as battery voltage drops. For maximum
speaker volume, use 1 or 2 tones, as the low and bass tones generate the
loudest sounds.
12
Page 13
TARGET IDENTIFICATION
Targets are identified both audibly and visually as follows:
1. Different pitch tones for different types of metals
2. An illuminated icon within the target category best describing it.
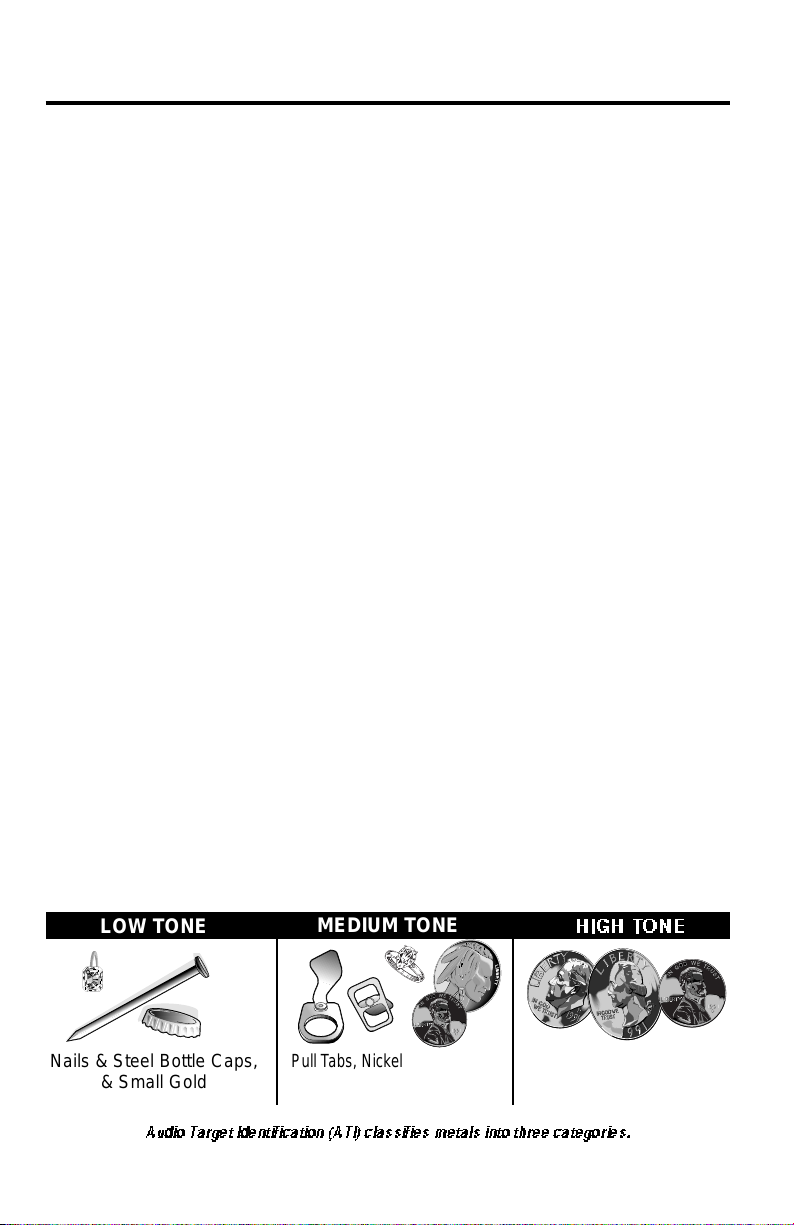
AUDIO TARGET IDENTIFICATION:
Tones identify targets as follows:
LOW TONE
Ferrous objects, such as iron and steel, like nails and tin cans.
Smallest-sized gold objects and steel bottle caps
MEDIUM TONE
Newer pennies (post-1982 are minted from zinc)
Larger gold pieces, small brass objects, and most bottle screw caps.
Foil, pull-tabs, nickels and most recent-vintage non-US coins.
HIGH TONE
Silver and copper coins, large brass objects
Older pennies (pre-1982 were minted from copper)
Dimes, quarters, half-dollars, silver dollars
Susan B. Anthony and Sacajawea dollar coins
Flattened aluminum cans (with a stronger signal than a coin)
LOW TONE
Nails & Steel Bottle Caps,
& Small Gold
Audio Target Identification (ATI) classifies metals into three categories.
MEDIUM TONE
Pull Tabs, Nickels, Smaller &
Larger Gold, Zinc Pennies
(Post 1982), Many screw caps
HIGH TONE
Copper, Silver & Brass
Copper Pennies (Pre 1982)
13
Page 14

DEPTH AND TARGET DISPLAY
READING THE DISPLAY
The Liquid Crystal Display (LCD) shows the
PROBABLE identification of the targeted
metal, as well as the PROBABLE depth of the
target.
The detector will register a consistent target
identification, upon each sweep of the coil,
when a buried target has been located and
identified. If, upon repeated passes over the
same spot, the target identification reads
inconsistently, the target is probably a trash
item, or oxidized metal. With practice, you will
learn to unearth only the repeatable signals.
The segment identifications are highly
accurate, when detecting the objects
described on the label. However, if an object
registers in a given category for an unknown
buried object, you could be detecting a
metallic object other than the object described
on the label, but with the same metallic
signature. Also, the greater the distance
between the target and the coil, the less
accurate the target identification.
GOLD TARGETS Gold objects will register
on the left side of the LCD scale.
Gold flakes will register under iron.
Small gold items will register under foil
or 5¢.
Medium-sized gold items will
register between 5¢ and Alum.
Large gold items will register under
Zinc.
SILVER TARGETS: Silver objects will
register to the right of the scale, under Dime,
Qts. or 50¢+.
IRON: All but the very largest iron objects will
register on the far-left side of the scale. This
could indicate a worthless item such as a nail,
or a more valuable historic iron relic.
can, will register here. Many gold rings will also
register here.
PT: Older pull tabs, which always detached
completely from the can, register here. Many
medium size gold ring also register here.
ZINC: Newer US pennies (post-1982), and
Canadian $1 and $2 coins register here. Many
non-US coins of recent vintage will also
register here.
DIME:Dimes and older copper pennies (pre-
1982) register here.
50¢+ Qts: Quarters register here, Silver
Dollars, Half-Dollars and very large iron
objects, like a sewer lid, will register here.
Caution:
references. Many other types of metal can fall
under any one of these categories. While the
detector will eliminate or indicate the presence
of most common trash items, it is impossible
to accurately classify ALL buried objects.
DEPTH INDICATOR:
accurate for coin-sized objects. It indicates
the depth of the target, in inches.
Large and irregularly-shaped objects will yield
less reliable depth readings
When passing over an object, the indicators
will light up and stay illuminated for three
seconds. If the depth indication varies with
each sweep, try sweeping at different angles;
there may be more than one target present.
With practice, you will learn the difference
between accurate readings, multiple targets,
and highly erratic readings which evidence
trash or irregularly shaped objects.
The target indications are visual
The Depth Indicator is
FOIL: Aluminum foil, such as a gum
wrapper, will register as foil. A small
broken piece of pull tab may also register
here.
NICKEL: Most newer pull-tabs from beverage
cans, the type intended to stay attached to the
14
Page 15
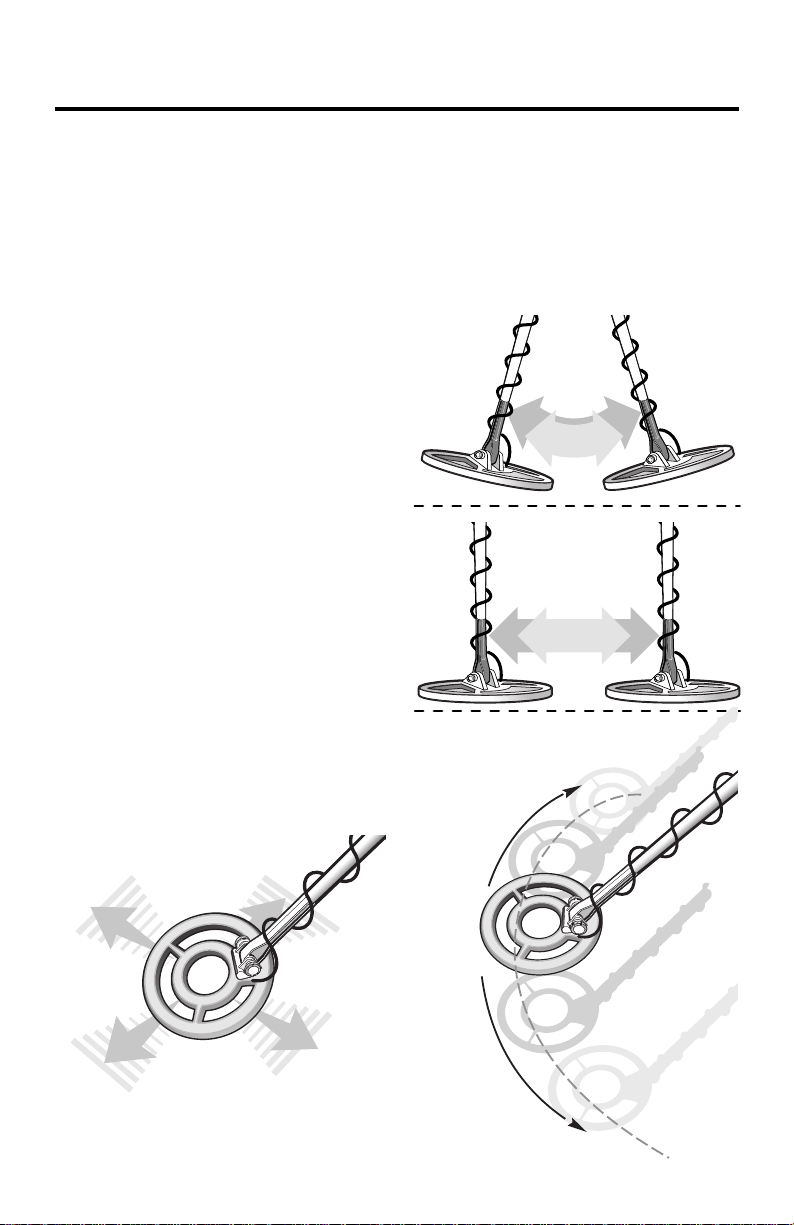
PINPOINTING
COIL MOVEMENT
Accurate pinpointing takes practice
and is best accomplished by “Xing” the target area.
1. Once a buried target is indicated
by a good tone response,
continue sweeping the coil over
the target in a narrowing sideto-side pattern.
2. Take visual note of the place on
the ground where the “beep”
sounds.
3. Stop the coil directly over this
spot on the ground.
4. Now move the coil straight forward and straight back towards
you a couple of times.
5. Again make visual note of the
spot on the ground at which the
“beep” sounds.
6. If needed, “X” the target at
different angles to “zero in” on the
exact spot on the ground at which
the “beep” sounds.
When swinging the coil, be careful
to keep it level with the ground
about one inch from the surface.
Never swing the coil like a pendulum.
WRONG
CORRECT
When pinpointing a target, try drawing an “X”,
as illustrated, over where the tone is induced.
15
Page 16
IN THE FIELD TECHNIQUES
Hand-grip
Nut
Screw
Headphone Jack
1/4” Headphone Jack
Search
Coil
Cable
Cable
Plug
Sea
rch
Co
il
S-Rod
armrest
Velcro
Strap
Lower
Stem
Velcro
Strap
Locking
Collar
Battery
Compartment
(back sid
e)
Optional Arm Strap
(continued)
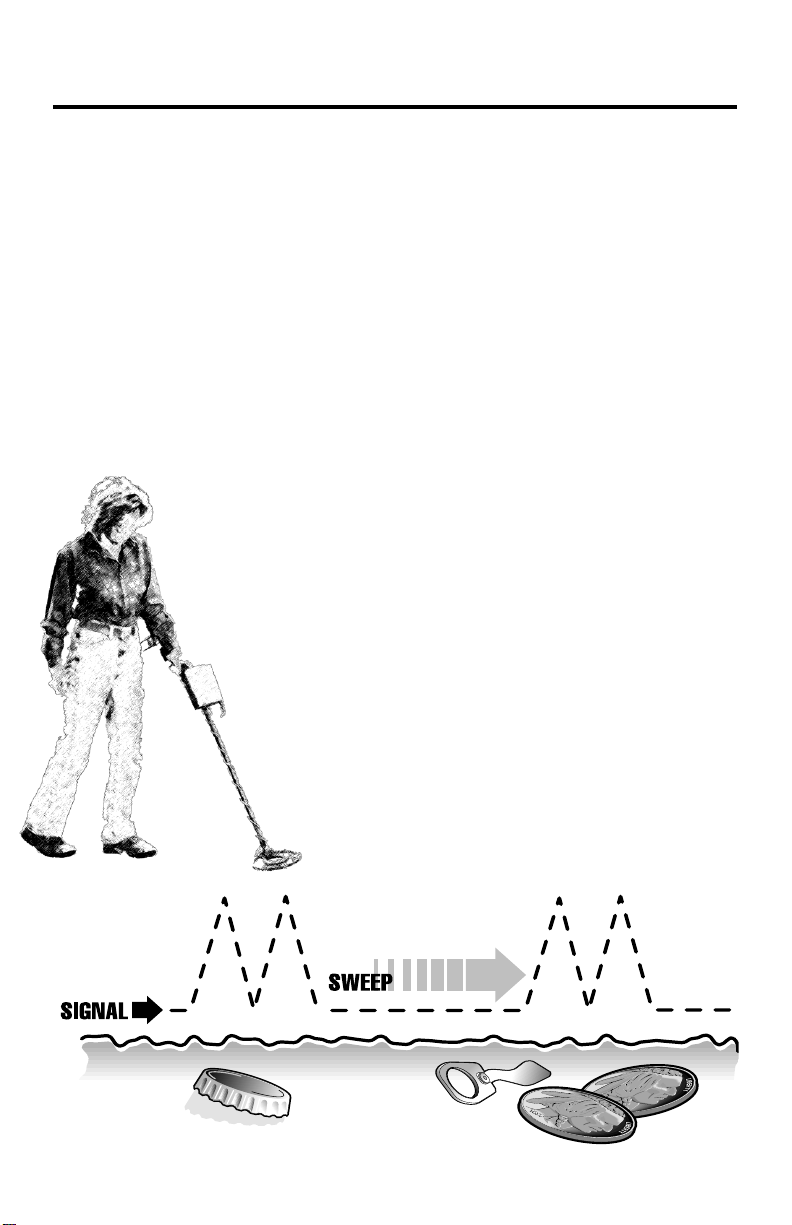
Swing the search coil slowly,
overlapping each sweep as you
move forward. It is important to
sweep the coil at a consistent
speed over the ground as you
search. After identifying a target,
your sweep technique can help in
identifying both the location and
the nature of the target. If you
encounter a weak signal, try
moving the coil in short, rapid
sweeps over the target
zone; such a short rapid
sweep may provide a
more consistent
target identification.
Most worthwhile
objects will
respond with
a repeatable
tone. If the
signal
does
not repeat after sweeping the coil
directly over the suspected target
a few times, it is more than likely
trash metal.
Crossing the target zone with
multiple intersecting sweeps at
multiple angles is another way to
verify the repeatability of the
signal, and the potential of the
buried target. To use this method,
walk around the target area in a
circle, sweeping the coil across
the target repeatedly, every 30 to
40 degrees of the circle, about ten
different angles as you walk
completely around the target. If a
high-tone target completely
disappears from detection at a
given angle, chances are that you
are detecting oxidized ferrous
metals, rather than a silver or
copper object. If the tone
changes at different angles, you
may have encountered multiple
objects. If you are new to the
WHAT
READS
LIKE THIS
16
…MAY
ACTUALLY
BE THIS
Page 17
IN THE FIELD TECHNIQUES
(continued)
hobby, you may want to dig all
targets at first. With practice in
the field, you will learn to better
discern the nature of buried
objects by the nature of the
detector’s response.
You may encounter some false
signals as you proceed. False
signals occur when the detector
beeps, but no metal target is
present. False signals can be
induced by electromagnetic
interference, oxidation, or highly
mineralized ground soils. If the
detector beeps once, but does
not repeat the signal with several
additional sweeps over the same
spot, there is probably no target
present.
find in some areas. The trashiest
areas have been frequented by
the most people, and frequently
hold the most promise for finding
the most lost valuables.
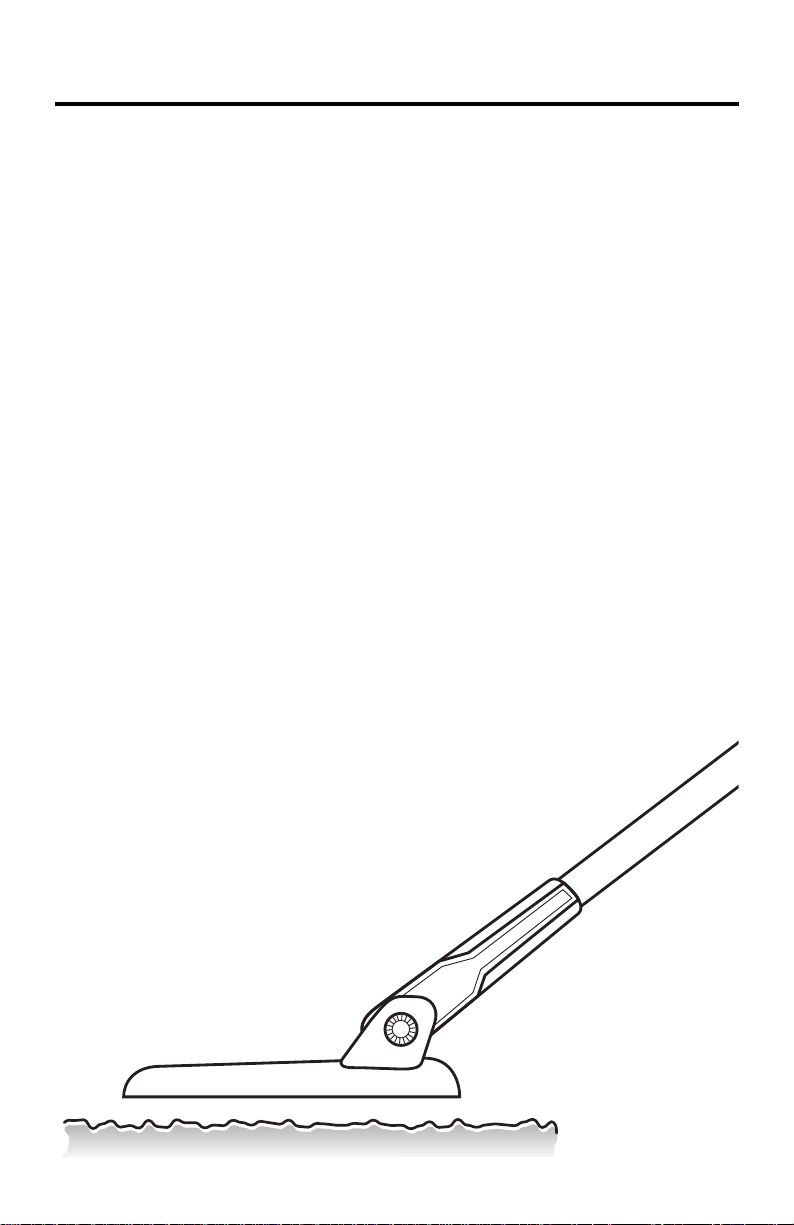
Also maintain the search coil
positioned just above the surface
of the ground, without making
contact with the ground. Making
contact with the ground can
cause false signals.
When searching very trashy
ground, it is best to scan small
areas with slow, short sweeps.
You will be surprised just how
much trash metal and foil you will
17
Page 18
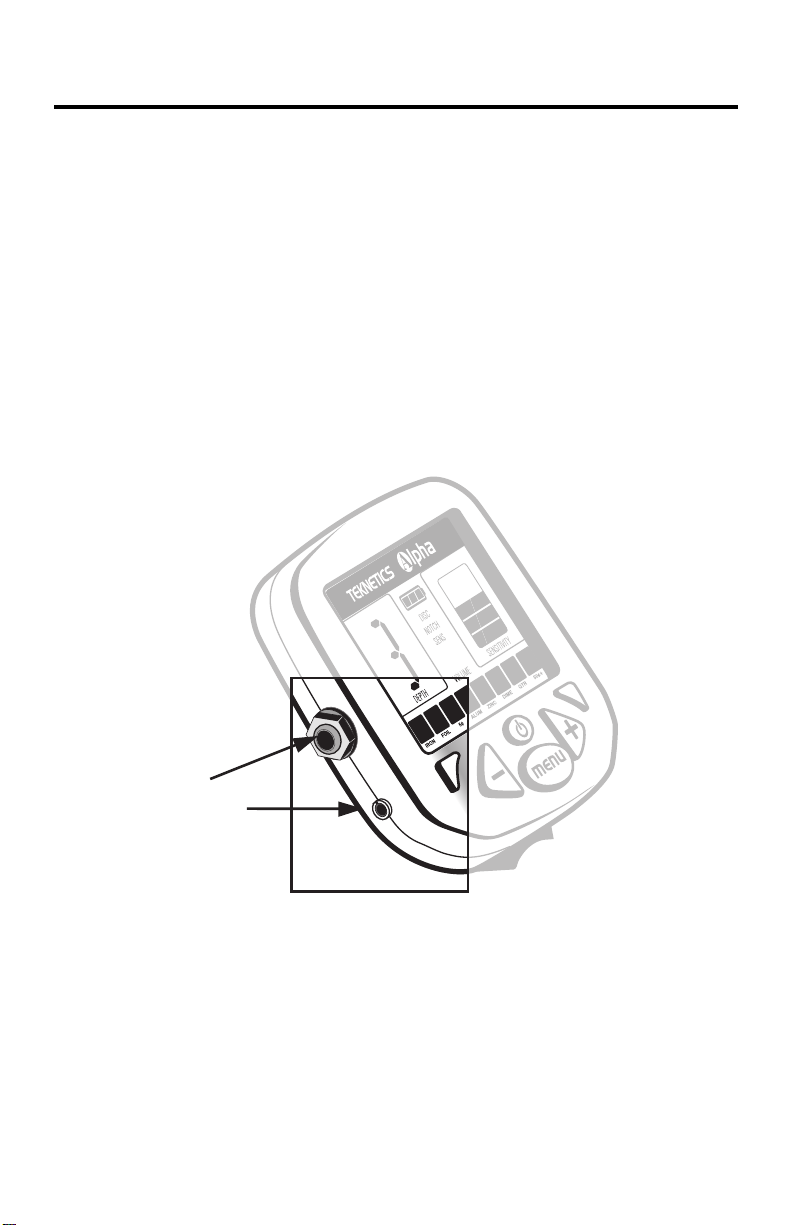
The detector has a 1/8” & 1/4” headphone jack on the left side of the
Headphone
Jacks
housing.
Optional Headphones come standard with a 1/8” stereo plug (the 1/4”
adapter is not required).
When the headphone jack is connected, speaker audio is disabled. Using
a detector with headphones facilitates detection of the weakest signals
and also extends the battery life.
This device is to be used with interconnecting cables/headphone cables shorter
than three meters.
18
Page 19

TROUBLE SHOOTING
TROUBLE SHOOTING GUIDE
SYMPTOM CAUSE SOLUTION
Detector chatters • Using detector • Use detector
or beeps erratically indoors outdoors only
• Using detector near • Move away
power lines
• Using 2 detectors in • Keep 2 detectors
close proximity at least 20’ apart
from power lines
• Environmental •
electromagnetic until erratic
interference signals cease
Constant low tone •
or
constant repeating
tones
LCD does not lock • Multiple targets •
on to one target ID present at different angles
or detector emits • Highly oxidized • Only dig up
multiple tones target repeatable signals
No power, no • Dead battery • Replace battery
sounds
Discharged battery
• Wrong type of • Use only 9V
battery
• Sensitivity set • Reduce sensitivity
too high
• Cord not connected
securely •
Reduce sensitivity
• Replace battery
alkaline battery
or rechargeable
Move coil slowly
Check connections
19
Page 20

TREASURE HUNTER’S CODE OF ETHICS:
• Always check Federal, State, County and local laws before searching.
• Respect private property and do not enter private property without the owner’s permission.
• Take care to refill all holes and try not to leave any damage.
• Remove and dispose of any and all trash and litter found.
• Appreciate and protect our inheritance of natural resources, wildlife and private property.
• Act as an ambassador for the hobby, use thoughtfulness, consideration and courtesy at all
times.
• Never destroy historical or archaeological treasures.
• All treasure hunters may be judged by the example you set; always conduct yourself with
courtesy and consideration of others
5-YEAR LIMITED WARRANTY
The Alpha metal detector is warranted against defects in materials and workmanship under normal use for five years from the date of purchase to the original owner.
Damage due to neglect, accidental damage, or misuse of this product is not covered under this warranty. Decisions regarding abuse or misuse of the detector are
made solely at the discretion of the manufacturer.
Proof of Purchase is required to make a claim under this warranty.
Liability under this Warranty is limited to replacing or repairing, at our option, the
metal detector returned, shipping cost prepaid to First Texas Products. Shipping cost
to First Texas Products is the responsibility of the consumer.
To return your detector for service, please first contact First Texas for a Return
Authorization (RA) Number. Reference the RAnumber on your package and return
the detector within 15 days of calling to:
First Texas Products L.L.C.
1465-H Henry Brennan Dr.
El Paso, TX 79936
Phone: 915-225-0333
NOTE TO FOREIGN COUNTRY CUSTOMERS
This warranty may vary in other countries, check with your distributor for details.
Factory warranty follows the channel of distribution.
Warranty does not cover shipping costs.
Copyright©2009 by First Texas Products, L.L.C.
All rights reserved, including the right to reproduce this book, or parts thereof, in any form,
except for the inclusion of brief quotations in a review.
Published by First Texas Products, L.LC..
Warranty coverage does not include the cost of transporting the detector
back to an owner who is located outside of the United States of America.
All rights reserved, including the right to reproduce this book, or parts thereof, in any form.
MALPHA 1465-H Henry Brennan • El Paso, TX 79936 • (915) 225-0333 042309
Copyright© 2009
 Loading...