

6G-SDI EXTENDER OVER FIBER
500734
500734-SM10
500734-SM40
500734-SM80
Installation & Operation Manual
94-000843-A
SE-000843-A

© MuxLab Inc. 6G-SDI Extender Over FIBER
Page 2
Copyright Notice:
Copyright © 2016 MuxLab Inc. All rights reserved.
Printed in Canada. No part of this publication may be reproduced,
stored in a retrieval system, or transmitted in any form or by any
means, electronic, mechanical, photocopying, recording or
otherwise without prior written permission of the author.
Trademarks:
MuxLab Broadcast is a registered trademark of MuxLab Inc.

© MuxLab Inc. 6G-SDI Extender Over FIBER
Page 3
Table of Contents
1. Overview .........................................................................4
1.1. Description .............................................................. 4
1.2. Features ................................................................... 7
2. Technical Specifications ................................................9
3. Installation Procedure .................................................11
3.1. Parts List ............................................................... 11
3.2. Product Overview ................................................. 12
3.3. Physical Installation .............................................. 14
3.4. Installation & Power-up Procedure ....................... 18
3.5. Supported Video Modes ........................................ 20
3.6. SDI Input Connections .......................................... 21
3.7. SDI Output Connections ....................................... 21
4. Firmware Upgrade Procedure ....................................22
4.1. Firmware Upgrade Procedure ............................... 22
4.2. USB Driver Setup ................................................. 25
5. Unit Control and Status...............................................28
6. Troubleshooting ...........................................................29
7. Appendix .......................................................................31
A. ASCII Command Set............................................. 31
8. Product Warranty Policy ............................................37

© MuxLab Inc. 6G-SDI Extender Over FIBER
Page 4
1.
1.1.
Overview
Description
The 6G-SDI Extender over Fiber Optic with Return Channel is a
unique solution from MuxLab for extending SDI cameras or other
SDI sources up to 4K resolutions at 30Hz to a distance of up to
1300ft (400m) using OM4 multi-mode fiber (model 500734),
33,000ft (10km) using single-mode fiber (model 500734-SM10),
132,000ft (40km) using single-mode fiber (model 500734-SM40),
and 264,000ft (80km) using single-mode fiber (model 500734SM80).
The product supports multichannel transmission, and can
simultaneously transmit up to 9Gbps of data throughput over the
fiber link, and allows for versatile combinations of sources,
including 6G-SDI, 3G-SDI and HD-SDI. The unit supports
simultaneous transmission of mixed signals such as one 6G-SDI
signal + one 3G-SDI, or three 3G-SDI signals, or two 3G-SDI
signals + two HD-SDI signals, and many other combinations up to
9Gbps. The device supports one input and one output SDI port,
plus three directional SDI ports that can be individually configured
as input or output, or set to automatic direction detection. This
flexibility allows for up to four source ports and one return
channel, or up to one source port and four return channels, or
anything in between. The SDI return channel may be used for AV
monitoring and talk-back, while the RS232 pass-through supports
return of tally light, camera control unit (CCU) and control of end
devices.

© MuxLab Inc. 6G-SDI Extender Over FIBER
Page 5
Figure 1 System Connectivity Overview

© MuxLab Inc. 6G-SDI Extender Over FIBER
Page 6
Typical Applications:
Video (cinema) production
Studio broadcasting production
Studio to Studio
Mobile video (broadcasting vehicle)
News coverage and live events
Post production

© MuxLab Inc. 6G-SDI Extender Over FIBER
Page 7
1.2.
Features
Up to 1300ft (400m) via multimode OM4 fiber and
up to 264,000ft (80km) via singlemode fiber.
Supports multichannel transmission, and can
simultaneously transmit up to 9Gbps of data traffic
on the fiber link.
Accepts mixed signal transmission of up to one 6G-
SDI signal + one 3G-SDI signal, three 3G-SDI
signals, or two 3G-SDI signals + two HD-SDI
signals, and many other combinations up to 9Gbps,
and in any direction, including the return channels.
Supports one input and one output SDI port, plus
three configurable directional SDI ports that can be
individually configured as input or output, or set to
automation direction detection.
Supports up to four source ports and one return
channel, or up to one source port and four return
channels, or any combination in between. The SDI
return channel may be used for AV monitoring and
talk-back.
Supports RS232 pass-through for remote control,
and as a return channel for tally light and for a
camera control unit (CCU).
Maximum resolution supported: 4096x2160 @
24/25Hz, 3840x2160 @ 30Hz.
Supported SMPTE Standards: SMPTE-292M, SMPTE-
296M, SMPTE-372M, SMPTE-424M, SMPTE-425M.

© MuxLab Inc. 6G-SDI Extender Over FIBER
Page 8
Supports all 6G channel configurations (1, 2 or 4
BNC).
Automatic SDI Link recognition and configuration.
USB interface may be used for setting the three
directional SDI ports to a fixed direction, or to set
them to automatic direction detection mode. The
USB port is also used for diagnostics, and
upgrading the unit firmware.
Supports a standard 10G SFP+ module for the
optical fiber interface.
Supports an aluminum casting enclosure for
ruggedized use.
Multiple ¼”-20 threads for Camera mounting or
equipment attachment.

© MuxLab Inc. 6G-SDI Extender Over FIBER
Page 9
2.
Specifications
Environment
HD/3G/6G-SDI Digital Signal Transmission
Enclosures
Measurements
Tx: 110mm (4.3”) x 110mm (4.3”) x 32mm (1.25”)
Rx: 110mm (4.3”) x 110mm (4.3”) x 32mm (1.25”)
Color
Black
Control
Serial Terminal Emulation with USB Interface
Distance
Model 500734: Up to 985ft (300m) via OM3
multimode fiber and 1300ft (400m) via OM4
multimode fiber.
Model 500734-SM10: Up to 33,000ft (10km) via
singlemode fiber.
Model 500734-SM40: Up to 132,000ft (40km) via
singlemode fiber.
Model 500734-SM80: Up to 264,000ft (80km) via
singlemode fiber.
Compliance
FCC, CE, RoHS
Power
12VDC, 1.25Amp
External Power Supply with US, UK & Euro blades
Technical Specifications
Table 1 Specifications

© MuxLab Inc. 6G-SDI Extender Over FIBER
Page 10
Transmitter Connectivity
Front Side
1x BNC SDI Input Connector (0.8V pp, 75 ohms)
1x BNC SDI Output Connector (0.8V pp, 75 ohms)
3x BNC SDI Directional Connectors (0.8V pp, 75 ohms)
Rear Side
1x SFP+ Module Connector
1x Terminal Block for RS232 Interface
Lower Side
1x Power Connector (12VDC, 1.25Amp)
Top Face
1x Mini USB for Firmware Updates, plus Control & Status
Receiver Connectivity
Front Side
1x BNC SDI Input Connector (0.8V pp, 75 ohms)
1x BNC SDI Output Connector (0.8V pp, 75 ohms)
3x BNC SDI Directional Connectors (0.8V pp, 75 ohms)
Rear Side
1x SFP+ Module Connector
1x Terminal Block for RS232 Interface
Lower Side
1x Power Connector (12VDC, 1.25Amp)
Top Face
1x Mini USB for Firmware Updates, plus Control & Status
Table 2 Transmitter Connectivity
Table 3 Receiver Connectivity

© MuxLab Inc. 6G-SDI Extender Over FIBER
Page 11
3.
3.1.
Installation Procedure
Parts List
The 6G-SDI Extender over FIBER Kit with Return
Channel (500734, 500734-SM10, 500734-SM40 &
500734-SM80) come with the following parts:
1x Transmitter Unit (Tx)
1x Receiver Unit (Rx)
2x 12VDC Wall-mount Power Supply
US, UK & Euro Blades for the Wall-mount Power
Supply
2x 10G SFP+ modules with LC connectors

© MuxLab Inc. 6G-SDI Extender Over FIBER
Page 12
3.2.
3.2.1.
LED Indicator
is established
Power
LED Indicator
Mini-USB Port
Upgrade
Flashing LED
link
SFP+ module
Figure 2 Front View of Transmitter
POWER
connector
SERIAL port
6G/3G/HD-SDI Input
6G/3G/HD-SDI Output
3G/HD-SDI In / Out
3G/HD-SDI In / Out
3G/HD-SDI In / Out
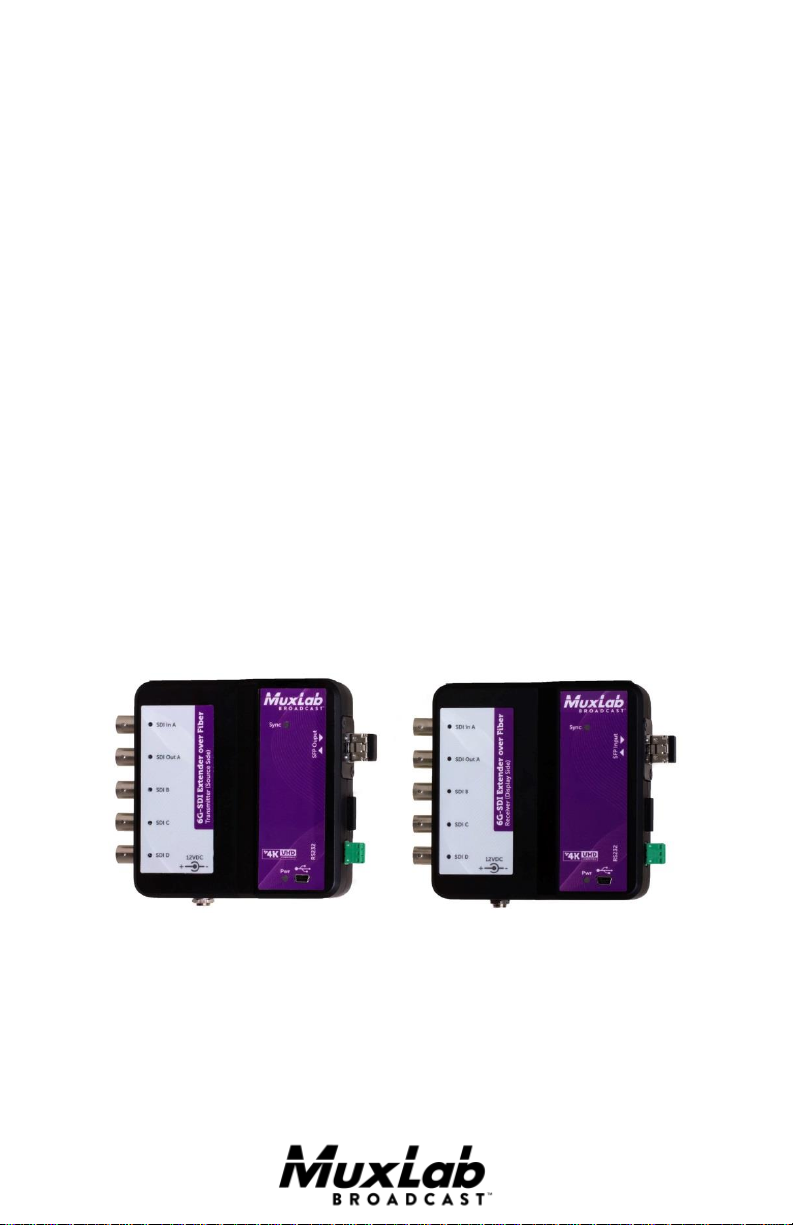
Product Overview
Transmitter
The external connections and light indicators of the
transmitter unit are detailed in Figure 2. Please
familiarize yourself with them before installing the unit.
When SDI Link
Indicator
When
information
Is passing
through the
Firmware

© MuxLab Inc. 6G-SDI Extender Over FIBER
Page 13
3.2.2.
LED Indicator
is established
Power
LED Indicator
Mini-USB Port
Firmware Upgrade
& Unit Control
Flashing LED
link
SFP+ module
6G/3G/HD-SDI Output
3G/HD-SDI In / Out
Figure 3 Front View of Receiver
POWER
connector
SERIAL port
3G/HD-SDI In / Out
3G/HD-SDI In / Out
6G/3G/HD-SDI Input
Receiver
The external connections and light indicators of the
receiver unit are detailed in Figure 3. Please familiarize
yourself with them before installing the unit.
When SDI Link
Indicator
When
information
Is passing
through the

© MuxLab Inc. 6G-SDI Extender Over FIBER
Page 14
3.3.
Port A Input, see table 4
Port A Output, see table 4
Port C In/Out, see table 4
SOURCE INPUT (Camera, Etc)
Must use 6G/3G/HD 75Ω graded coax cable
In accordance with the SDI Throughput needed.
Port D In/Out, see table 4
Important: Always Use SDI A, then B, etc… as first
connections for any SDI transmission speed, see table 4.
Connection to FIBER
(Duplex Connection)
Connection to FIBER
(Duplex Connection)
Important: Keep the Receiver outputs and signals in the
same order and speed as the Transmitter, see table 4.
DESTINATION OUTPUT (Recorder, Monitor, Ect.)
Must use 6G/3G/HD 75Ω graded coax cable
In accordance with the SDI Throughput needed.
12VDC Power Input
Duplex Connection:
Port B In/Out, see table 4
Port A Input, see table 4
Port A Output, see table 4
Port B In/Out, see table 4
Port C In/Out, see table 4
Port D In/Out, see table 4
12VDC Power Input
Figure 4 Physical Installation
Physical Installation

© MuxLab Inc. 6G-SDI Extender Over FIBER
Page 15
Case
Port A
Signal
1
6G-SDI
2
3G-SDI
3
HD-SDI
Figure 5 Input / Output Combinations
Figure 5 highlights one example of the port direction combinations
that are possible, but other combinations are also possible.
Table 4 below shows the combination of signals that can be
transmitted/received over the fiber link, based on the Figure 5
example, and based on the number of ports used for
transmission/reception in a given direction. The total bandwidth
available is 9Gbps, so varying combinations of
transmission/reception rates totaling 9Gbps are possible.
Table 4a For 1 port used (Port A)

© MuxLab Inc. 6G-SDI Extender Over FIBER
Page 16
Case
Port A
Signal
Port B
Signal
1
6G-SDI
3G-SDI
2
6G-SDI
HD-SDI
3
3G-SDI
3G-SDI
4
3G-SDI
HD-SDI
5
HD-SDI
HD-SDI
Case
Port A
Signal
Port B
Signal
Port C
Signal
1
6G-SDI
HD-SDI
HD-SDI
2
3G-SDI
3G-SDI
3G-SDI
3
3G-SDI
3G-SDI
HD-SDI
4
3G-SDI
HD-SDI
HD-SDI
5
HD-SDI
HD-SDI
HD-SDI
Case
Port A
Signal
Port B
Signal
Port C
Signal
Port D
Signal
1
3G-SDI
3G-SDI
HD-SDI
HD-SDI
2
3G-SDI
HD-SDI
HD-SDI
HD-SDI
3
HD-SDI
HD-SDI
HD-SDI
HD-SDI
Table 4b For 2 ports used (Ports A & B)
Table 4c For 3 ports used (Ports A, B & C)
Table 4d For 4 ports used (Ports A, B, C & D)

© MuxLab Inc. 6G-SDI Extender Over FIBER
Page 17
Simplex Connection:
If transmission is only required in one direction, this device can be
connected with a single fiber in a simplex arrangement as indicated
in the following steps.
1. While looking at the unit from the top, connect the single
fiber cable to the Transmitter right most LC connector as
shown below.
2. While looking at the unit from the top, connect the opposite
end of the fiber cable to the Receiver left most LC
connector as shown below.
Figure 6 Connecting the Fiber Cable
3. The unused LC connector on both the Transmitter and
Receiver must be protected from dust. This can easily be
accomplished by cutting the protective rubber plug in half
and inserting the plug into the unused LC connectors.
Figure 7 Plug Unused Fiber Port
Important note: The serial port is not available when only using a
single fiber cable in a simplex arrangement.

© MuxLab Inc. 6G-SDI Extender Over FIBER
Page 18
3.4.
Installation & Power-up Procedure
In order to install the product, please follow the steps
below:
1. First, install the Transmitter near the SDI signal
source equipment and Return Channel sink
(destination) equipment. Attach the unit via the
mounting holes or by other appropriate means.
2. Transmitter: Follow the procedure in section 5 (Unit
Control and Status) to individually configure Ports
B, C & D of the Transmitter as either Inputs,
Outputs, or as Auto-detect (to automatically detect
the transmission direction). Note that Auto-detect is
the default setting.
3. Install the Receiver near the SDI signal sink
(destination) equipment and Return Channel source
equipment. Attach the unit via the mounting holes or
by other appropriate means.
4. Receiver: Follow the procedure in section 5 (Unit
Control and Status) to individually configure Ports
B, C & D of the Receiver as either Inputs, Outputs,
or as Auto-detect (to automatically detect the
transmission direction). Note that Auto-detect is the
default setting. Make sure that a given Transmitter
Port set as an Input is set as an Output on the
Receiver, and vice versa.
5. Connect the necessary number of SDI Compatible
75Ω Coax cables in order to carry the video/audio
signal. Connect the source equipment to the
Transmitter ports configured as SDI Inputs, and
connect the Return Channel sink (destination)
equipment to the Transmitter ports configured as

© MuxLab Inc. 6G-SDI Extender Over FIBER
Page 19
SDI Outputs. Always start by connecting the first
cable to the BNC A, then B and so on.
6. Once the Transmitter is installed and connected with
the SDI coax cables, then connect and run the fiber
optic cable from the Transmitter to the Receiver unit,
using either multimode or singlemode fiber
depending on the 6G-SDI Extender model being
installed. Respect the distance specification listed on
Table 1.
7. After hooking up the fiber optic cable to the SFP+
port on the Receiver, proceed to connect the SDI
coax cables from the Receiver to the destination
device (e.g.: Recorder, Monitor, Mixer, Capture
card, etc.). Connect the sink (destination) equipment
to the Receiver ports configured as SDI Outputs, and
connect the Return Channel source equipment to the
Transmitter ports configured as SDI Inputs.
8. Once all the cabling is installed, next plug the
12VDC wall-mount power supplies to both the
Transmitter and Receiver.
9. Each unit will power up and auto-initialize.
10. Next the fiber link will sync, and the link indicator
on each unit will blink after the negotiation process
has successfully completed.
11. If the source is generating a video signal at the
Transmitter end, then the Receiver will output the
same signal which can be terminated on a Recorder,
Monitor, Mixer, Capture card, etc.

© MuxLab Inc. 6G-SDI Extender Over FIBER
Page 20
3.5.
Resolution 10Bit 4:2:0 12Bit 4:2:0
10Bit 4:2:2 12Bit 4:2:2
12Bit 4:4:4
10Bit 4:4:4:4
2160p @ 30/29.97Hz
2160p @ 25Hz
2160p @ 24/23.98Hz
6Gbit/s
Single Link 6G
Dual Link 3G
1080p @ 60/59.94Hz
1080p @ 50Hz
3Gbit/s
Single Link 3G
Dual link 1.5G (HD)
6Gbits/s
Single Link 6G
Dual Link 3G
1080i @ 60/59.94Hz
1080i @ 50Hz
1080p @ 30/29.97Hz
1080p @ 25Hz
1080p @ 24/23.98Hz
1.5Gbit/s
Single Link 1.5G
(HD)
3Gbit/s
Single Link 3G
Dual Link 1.5G (HD)
720p @ 60/59.94Hz
720p @ 50Hz
720p @ 30/29.97Hz
720p @ 25Hz
720p @ 24/23.98Hz
1.5Gbit/s
Single Link 1.5G
(HD)
3Gbit/s
Single Link 3G
3D: 1080p @ 60/59.94Hz
3D: 1080p @ 50Hz
6Gbit/s
Single Link 6G
Dual Link 3G
3D: 1080i @ 60/59.94Hz
3D: 1080i @ 50Hz
3D: 1080p @ 30/29.97Hz
3D: 1080p @ 25Hz
3D: 1080p @ 24/23.98Hz
3Gbit/s
Single Link 3G
Dual Link 1.5G (HD)
6Gbit/s
Single Link 6G
Dual Link 3G
3D: 720p @ 60/59.94Hz
3D: 720p @ 50Hz
3D: 720p @ 30/29.97Hz
3D: 720p @ 25Hz
3D: 720p @ 24/23.98Hz
3Gbit/s
Single Link 3G
Dual Link 1.5G (HD)
6Gbit/s
Single Link 6G
Dual Link 3G
Table 4 Supported Video Mode Matrix
Supported Video Modes

© MuxLab Inc. 6G-SDI Extender Over FIBER
Page 21
3.6.
SDI, Input BNC Connector (Transmitter)
Input
Modes
SDI A
SDI B
SDI C
SDI D
One SDI
Signal
Link A
---
---
---
Two SDI
Signals
Link A
Link B
---
---
Three SDI
Signals
Link A
Link B
Link C
---
Four SDI
Signals
Link A
Link B
Link C
Link D
3.7.
SDI, Output BNC Connector (Receiver)
Input
Modes
SDI A
SDI B
SDI C
SDI D
One SDI
Signal
Link A
---
---
---
Two SDI
Signals
Link A
Link B
---
---
Three SDI
Signals
Link A
Link B
Link C
---
Four SDI
Signals
Link A
Link B
Link C
Link D
SDI Input Connections
Table 5 SDI Input Connections Matrix
SDI Output Connections
Table 6 SDI Output Connection Matrix

© MuxLab Inc. 6G-SDI Extender Over FIBER
Page 22
4.
4.1.
Firmware Upgrade
Procedure
Firmware Upgrade Procedure
1. Make sure the PC USB device driver has been
installed (see section 4.2 for more details)
2. Download the latest version of the appropriate
firmware upgrade from the MuxLab website.
3. Unzip the firmware upgrade executable in a
directory of your choice.
4. Connect the mini-USB cable to the unit and to
the PC.
5. When the device driver has recognized your
device to be upgraded you can double click on
the upgrade application to execute it.

© MuxLab Inc. 6G-SDI Extender Over FIBER
Page 23
You are about to upload the firmware version x.x.x
Detecting COM port and Baud Rate..................OK
COM PORT Number : 3
Baud rate : 115200
Checking product .......... RX OK
Muxlab 6G SDI EXT 500732 RX/TX
>>
Preparing to Upload Programmable Logic ............ OK
Sending Programmable Logic data ................... 100% OK
Preparing to Upload Firmware ...................... OK
Sending data ...................................... 100% OK
Please wait while the unit is rebooting ........... 100%
Press any key to exit
6. The output should look like the below:

© MuxLab Inc. 6G-SDI Extender Over FIBER
Page 24
7. The behavior of the Transmitter and Receiver
unit should be as outlined below during upgrade.
The device uses the SDI LEDs to indicate the
actual status.
SDI A/B/C/D Blinking: Download phase.
Clear memory space and write new
image.
SDI A Blinking: Erasing previous
programmable logic memory
SDI B Blinking: Copying programmable
logic from secondary memory to primary
memory.
SDI C Blinking: Copying firmware from
secondary memory to primary memory.
8. Once the process is completed, the upgraded
firmware will automatically start and the SDI
A/B/C/D LEDs will cycle.

© MuxLab Inc. 6G-SDI Extender Over FIBER
Page 25
4.2.
USB Driver Setup
When interfacing a MuxLab device with the USB port
on Windows XP, Windows 7, Windows 8 or Windows
10 operating systems, a driver setup file will be required.
For Linux and Mac OS X operating systems, no driver is
necessary.
To install the USB serial driver, download the SC000032-A (or later version) USB to serial driver file
from the MuxLab website and save it to the local hard
drive. NOTE: If the downloaded file is compressed, it
will need to be uncompressed before it may be utilized.
Plug the USB cable between the MuxLab device and the
PC, and power up the device. The Found New
Hardware wizard will open (see Figure 8). Select
Locate and install driver software (recommended).
Figure 8 Found New Hardware Wizard

© MuxLab Inc. 6G-SDI Extender Over FIBER
Page 26
A new dialog box will open (see Figure 9). Select
Browse my computer for driver software (advanced).
Figure 9 Found New Hardware Dialog Box
Another dialog box will open (see Figure 10). Click
Browse and locate the SC-000032-A USB to serial
driver file downloaded earlier. Once found, click Next.
Figure 10 Browsing for Unknown Device

© MuxLab Inc. 6G-SDI Extender Over FIBER
Page 27
A security window will appear, indicating that the driver
software is unsigned (see Figure 11). Select Install this
driver software anyway.
Figure 11 Windows Security
A window will appear instructing that the software for
the driver has been successfully installed (see Figure
12). Click Close.
Figure 12 Successful Installation Dialog Box

© MuxLab Inc. 6G-SDI Extender Over FIBER
Page 28
5.
Unit Control and Status
USB Control & Status
Commands from an ASCII terminal (e.g. PUTTY) may
be sent directly to the device via a USB connection
(serial connection emulation). Maintenance can be
performed with a terminal emulator, such as the one
available under windows with the ASCII Command set
described in the Appendix of this manual.

© MuxLab Inc. 6G-SDI Extender Over FIBER
Page 29
6.
PROBLEM
POSSIBLE SOLUTIONS
No Power @
Transmitter
or Receiver
Verify the power adapter and connectors
4K
Misaligned
Quadrant
Wrong order in the SDI Links either at the receiver or transmitter.
Check for cable inversion. (reboot the system when ordered properly)
No Link
Check the fiber for damage, check if the fiber connectors are clean
Verify that you have not exceeded the maximum length.
Troubleshooting
The following table describes some of the problem symptoms, the
probable causes and possible solutions. If the information below
does not solve the problem, the technical support contact
information can be found at the end of this section.

© MuxLab Inc. 6G-SDI Extender Over FIBER
Page 30
If the above Troubleshooting does not resolve the problem, contact
your nearest MuxLab dealer or MuxLab Technical Support at 877689-5228 (toll free in North America) or (+1) 514-905-0588
(International), please have the following information ready:
Unit model number.
Cabling layout. Please include the model of SDI source and
receiver, cable length and type (e.g.: Fiber and Coax at both
ends).
Description of problem.
List of tests performed.

© MuxLab Inc. 6G-SDI Extender Over FIBER
Page 31
7.
Appendix
A. ASCII Command Set
Ensure that the terminal emulation program parameters
are set to the following:
BAUD Rate: 115200
Data bits: 8
Stop bits: 1
Parity: None
Flow control: None
It should be noted that commands are case sensitive and
arguments must be separated by a single space.
Commands must be entered as outlined here-in and end
with a carriage return:

© MuxLab Inc. 6G-SDI Extender Over FIBER
Page 32
Serial/USB Port Commands
1. HELP Command
help
Description: Display all command lists available
Response: List all available commands
help –c <command>
Description: Help for a specific command
Response: List the specifics of the demanded command
2. RESET Command
reset –f
Description: Reset the unit and restore the default factory settings
Response: “ok”

© MuxLab Inc. 6G-SDI Extender Over FIBER
Page 33
3. STATUS Command
status
Description: Report current operation condition
Response:
“Master firmware version: x.x.x
User variable Version : 2
FPGA Version : RX 1.000 4
Status
SDI MODE : 3G SDI on 1 channel
SDI ratio : 0
SDI ref. : 148.5 MHz
SDI freq. : 148.505 MHz
HDMI freq.: 148.504 MHz

© MuxLab Inc. 6G-SDI Extender Over FIBER
Page 34
4. VERSION Command
version
Description: Report firmware version of the microcontroller
Response: “Master firmware version: x.x.x”

© MuxLab Inc. 6G-SDI Extender Over FIBER
Page 35
5. Bit Error Rate Command
ber
Description: Report bit error rate during transmission
Response:
6. SDI Port Direction Command
Sdi –r n (n for number of return channels)
Description: Determine the number of return channels, where n ={0 to
4}, 0=Auto Direction Detection, or 1, 2, 3, or 4 Return Channels.
Response: n SDI Return Channels

© MuxLab Inc. 6G-SDI Extender Over FIBER
Page 36

© MuxLab Inc. 6G-SDI Extender Over FIBER
Page 37
8.
Product Warranty Policy
Items Under Warranty - Company Policy
MuxLab guarantees its products to be free of defects in manufacturing and workmanship for the
warranty period from the date of purchase. If this product fails to give satisfactory performance
during this warranty period, MuxLab will either repair or replace this product at no additional
charge, except as set forth below. Repair and replacement parts will be furnished on an exchange
basis and will be either reconditioned or new. All replaced parts and products become the property
of MuxLab. This limited warranty does not include repair services for damage to the product
resulting from accident, disaster, misuse, abuse, or unauthorized modifications or normal decay of
battery driven devices. Batteries, if included with the product, are not covered under this warranty.
Limited warranty service can be obtained by delivering the product during the warranty period to the
authorized MuxLab dealer from whom you purchased the product, or by sending it to MuxLab.
MuxLab will not accept any such product for repair without a Return Material Authorization number
(RMA#) issued by its Customer Service Department and a proof of purchase date. If this product is
delivered to MuxLab by mail, you agree to assume risk of loss or damage in transit, to prepay
shipping charges to the warranty service location, and to use the original shipping container or
equivalent.
THE ABOVE LIMITED WARRANTY IS THE ONLY WARRANTY COVERING YOUR
MUXLAB PRODUCT. THERE ARE NO OTHER WARRANTIES, EXPRESSED OR IMPLIED,
INCLUDING WARRANTIES OF MERCHANTABILITY OR FITNESS FOR A PARTICULAR
PURPOSE. SOME STATES DO NOT ALLOW LIMITATIONS ON IMPLIED WARRANTIES,
SO THE ABOVE LIMITATION MAY NOT APPLY TO YOU.
IF THIS PRODUCT IS NOT IN GOOD WORKING ORDER, YOUR SOLE REMEDY SHALL BE
REPAIR OR REPLACEMENT AS PROVIDED FOR ABOVE. IN NO EVENT SHALL MUXLAB
BE LIABLE TO YOU FOR ANY DAMAGES, INCLUDING ANY LOSS OF PROFITS, LOST
SAVINGS, OR OTHER INCIDENTAL OR CONSEQUENTIAL DAMAGES ARISING OUT OF
THE USE OF OR INABILITY TO USE THIS PRODUCT, EVEN IF MUXLAB OR AN
AUTHORIZED MUXLAB DEALER HAS BEEN ADVISED OF THE POSSIBILITY OF SUCH
DAMAGES; NOR WILL MUXLAB BE LIABLE FOR ANY CLAIM BY ANY OTHER PARTY.
SOME STATES DO NOT ALLOW THE EXCLUSION OR LIMITATION OF INCIDENTAL OR
CONSEQUENTIAL DAMAGES FOR CONSUMER PRODUCTS, SO THE ABOVE
LIMITATIONS OR EXCLUSIONS MAY NOT APPLY TO YOU. THIS WARRANTY GIVES
YOU SPECIFIC LEGAL RIGHTS. YOU MAY ALSO HAVE OTHER RIGHTS WHICH MAY
VARY FROM STATE TO STATE.

© MuxLab Inc. 6G-SDI Extender Over FIBER
Page 38
Warranty Periods
Any product found to be defective within three (3) months of invoice, including one (1) month shelf
life, may be returned for replacement by a new unit or a satisfactory repair within one (1) month of
receiving any returned product. The customer must provide MuxLab with the serial number and
proof of purchase of the defective unit being returned. All RMA’s issued are subject to inspection by
MuxLab, and will be returned to customer if not properly packaged – units must be returned in
original container or equivalent. MuxLab will not accept any such product for repair without an
authorization from its Technical Support department and without an RMA# issued by MuxLab
Customer Service department. For a credit & replace RMA, the customer will be liable to pay
replacement invoice if defective products are not returned.
For Product more than six months old, including shelf life. The defective unit must be returned
prepaid to MuxLab and then the unit will be repaired or if repair is not possible, replaced by an
equivalent unit and returned to the customer within one (1) month of receiving any returned product.
There is no charge for repair (parts and labor) during the full warranty period.
Items Defective and not under Warranty
For products which are no longer under warranty the policy is repair and return. An amount of 25%
of the products published list price at the time of purchase will be charged. Customer must issue a
purchase order to cover the cost of repair.
Each unit will be returned to the customer within one (1) month from receipt of the unit by MuxLab.
The defective unit must be returned prepaid to MuxLab. The repaired unit will be returned to the
customer FOB MuxLab. The repaired unit includes a 90 day warranty.

© MuxLab Inc. 6G-SDI Extender Over FIBER
Page 39

© MuxLab Inc. 6G-SDI Extender Over FIBER
Page 40
MuxLab Inc.
8495 Dalton Road
Mount Royal, Quebec
Canada H4T 1V5
Tel.: +1 (514) 905-0588 Fax: +1 (514) 905-0589
Toll Free (North America): 877 689-5228
URL: www.muxlab.com
E-mail: videoease@muxlab.com
 Loading...