

Page 1

TITAN 600 User Guide
Page 2

Contents
Basic Knowledge ................................................................................................... 3
1.1 Brief Introduction .......................................................................................... 3
1.2 General Considerations ................................................................................. 3
1.3 Battery Precautions ....................................................................................... 3
1.4 Charge Mobile Phone ................................................................................... 4
1.5 Charger Precautions ...................................................................................... 4
1.6 Cleaning and Maintenance ........................................................................... 5
Introduction .......................................................................................................... 5
2.1 Icons .............................................................................................................. 5
2.2 Phone Layout .............................................................................................. 6
Setting up your phone ........................................................................................... 7
2.3 Insert and Remove SIM Card ........................................................................ 7
2.4 Power On/Off ................................................................................................ 7
2.5 Unlock SIM Card ............................................................................................ 8
2.6 Unlock Screen................................................................................................ 8
Basic Functions ..................................................................................................... 9
3.1 Dial ................................................................................................................... 9
3.2 Contacts ......................................................................................................... 11
3.3 Messages ........................................................................................................ 12
3.4 File Management ........................................................................................... 13
3.5 Camera ........................................................................................................... 14
3.6 Images ............................................................................................................ 15
3.7 Video Player ................................................................................................... 16
3.8 Music Player ................................................................................................... 17
3.9 FM Radio ........................................................................................................ 18
3.10 Recorder ....................................................................................................... 18
3.12 Calendar ....................................................................................................... 20
3.13 Calculator ..................................................................................................... 21
3.14 Notepad........................................................................................................ 22
3.15 Flashlight ...................................................................................................... 22
3.16 E-mail ........................................................................................................... 23
3.18 Searching ...................................................................................................... 25
3.19 Download ..................................................................................................... 27
3.20 Map .............................................................................................................. 27
3.21 Barometric Altimeter ................................................................................... 28
3.22 Backlog ......................................................................................................... 29
3.23 Compass ....................................................................................................... 29
3.24 Play Service .................................................................................................. 30
Page 3

2
Settings ............................................................................................................... 33
4.1 SIM Management ........................................................................................... 34
4.2 WIFI ................................................................................................................ 34
4.3 Bluetooth ....................................................................................................... 35
4.4 Mobile Network ............................................................................................. 36
4.5 Flight Mode .................................................................................................... 36
4.6 Scenes Mode .................................................................................................. 36
4.7 Display ............................................................................................................ 37
4.8 Storage ........................................................................................................... 37
4.9 Application ..................................................................................................... 37
4.10 Security ........................................................................................................ 38
4.11 Language and Input Method ........................................................................ 39
4.12 Backup and Reset ......................................................................................... 39
4.13 Date and Time .............................................................................................. 39
4.14 Schedule Power On/Off ................................................................................ 40
4.15 Auxiliary Function ........................................................................................ 40
4.16 Developer Options ....................................................................................... 41
4.17 About Phone ................................................................................................ 41
Common Problems & Solutions ............................................................................ 41
Page 4

3
Basic Knowledge
1.1 Brief Introduction
Thank you for purchasing this digital mobile phone. This instruction manual is
designed to guide you through the functions and features.
In addition to common call functions and records, this phone also provides you a
variety of useful features and services.
Some of the services and functions described in this manual depend on the network
and reservation service. Therefore, on occasions the menu items in the phone may
not be available. Various menus and functions of the phone may have different
shortcut numbers.
Our company reserves the right to modify the contents of this manual without prior
notice.
1.2 General Considerations
Your phone can only use our designated batteries and chargers. Using other products
may cause battery leakage, overheating, explosion and fire.
Do not put the battery, mobile phone or charger in any high-pressure equipment, i.e
microwave oven. This may cause circuit damage, fire and other accidents.
On airplanes, in hospitals and other places, prohibit the use of mobile phones. Please
turn off it phone.
Do not use the mobile phone near weak signal or high-precision electronic
equipment. Radio wave interference may cause incorrect operation of the electronic
equipment and other problems.
Do not disassemble or modify the phone otherwise it will cause damage, leakage and
circuit faults to the phone.
Avoid the mobile phone being too close to magnetic objects such as magnetic cards.
Mobile phone radiation waves may clear floppy disks, saving cards, credit card
information etc.
1.3 Battery Precautions
The use of mobile phone battery life is limited. Frequent charging of the battery will
overtime shorten the battery life span. Once the battery is no longer chargeable, you
Page 5

4
should replace with a new specified battery.
Do not throw old batteries in the general household waste. There is a clear local
regulation [WEEE] for battery disposal, please follow their instructions required to
do.
Do not throw the battery into fire, otherwise it will cause the battery to ignite and
explode. When installing batteries, do not apply pressure to force. This will cause the
battery to leak, overheat, explode and catch fire.
If the battery fluid reaches too close to the eye, do not rub your eyes. Rinse with
fresh water and then immediately visit a doctor/hospital/clinic. This could cause
blindness.
Do not disassemble or modify the battery, otherwise it will lead to battery leakage,
overheating, explosion and fire.
Do not use or leave the battery beside a fire or heater or hot place, otherwise it will
lead to battery leakage, overheating, explosion or fire.
Do not wet the battery; otherwise it will cause the battery to overheat, smoke and
corrode. Do not use or leave the battery in direct sunlight or near a hot car,
otherwise it will result in fluid leakage and overheating may degrade performance
and shorten the service life.
Do not charge for more than 24 hour continuously.
1.4 Charge Mobile Phone
Once the phone is connected to the charger, the mobile phone battery indicator
will appear on the screen. The charging indicator will appear on screen and
the battery will commence charging. When the on-screen battery indicator shows full
and is no longer flashing, this indicates that the charging has been completed. After
the charging is complete, disconnect the AC power outlet which connects the phone
and charger.
1.5 Charger Precautions
Please use 220V AC. If you use any other voltage, this may cause leakage, fire or
damage to the phone and charger. Please do not use the charger if the power cord is
damaged, otherwise it will lead to a fire and electric shock.
Please clean the dust on the power socket.
Please keep water away from the charger to avoid overheating, leakage and
malfunction caused by water spills. If the charger comes into contact with water or
other liquids, immediately unplug the power from the outlet down to prevent
overheating, fire, electric shock and malfunction of the charger.
Do not disassemble or modify the charger, otherwise it could lead to personal injury,
electric shock, fire and damage to the charger.
Page 6

5
Please do not use the charger in the bathroom where there may be high humidity.
This could cause electric shocks, fire and damage of the charger.
1.6 Cleaning and Maintenance
When cleansing the mobile phone, battery and charger, ensure this is done with
waterproof conditions. Do not use in the bathroom where there may high humidity
to avoid being wet. It is best to use a soft, dry cloth to clean the phone, battery and
charger. Do not use alcohol, thinner or benzene solution to wipe the phone.
Introduction
2.1 Icons
In the standby interface there may appear small ICONS, details are as follows
Icons
Instructions
Time Display
Alarm clock has been set and activated
Show battery level
Vertical bars indicate the signal strength of the
GSM network signal.
Indicates music playing
Receives new message
Missed Call
Meeting Mode
Flight Mode
Mute Mode
Activate USB
Access Restricted
Page 7

6
2.2 Phone Layout
Keys
Instructions
Call Key
Press this key to enter the call record interface and dial out.
End Key
Press this key to hang up in the call interface; Other interface,
press the key to close screen, then bright screen.
Menu Key
In any mode, press this key to display the current menu
options.
Return Key
Return to the previous menu.
Home Key
Pressing this key directly reverts back to the standby interface.
Long press to open the recent task.
Power Key
Long press this key to turn off/on. Short press this key to lock
the phone.
USB Jack
Headset and USB Jack
Camera Key
Press this button to enter the camera viewfinder interface, then
to take photos.
SOS Key
Long press to dial emergency number and send a message for
Page 8

7
help.
Volume Key
Ongoing call and audio play interface, press the two side keys to
adjust the volume.
Camera
Camera
Flashlight
Camera flashlight, open the flashlight program can be used as a
flashlight lighting.
Loudspeaker
Loudspeaker
Setting up your phone
2.3 Insert and Remove SIM Card
Turn off the phone. Then remove the battery and other external power supplies.
When you need to take out the SIM card, please turn it off, take out the battery, then
remove the SIM card from SIM card holder.
2.4 Power On/Off
Long press the power key to turn on the phone.
To turn off the phone long press the power key again. The following message box
should appear =select "Off”.
Press the power key to switch off the phone. You can also choose to reboot the
phone, select the flight mode, mute mode, vibration mode and standard mode.
Page 9

8
2.5 Unlock SIM Card
In order to prevent illegal use, SIM cards using PIN1 (Personal Identification Number)
have code encrypt protection. Each time the phone is switched on, you must enter
the PIN1 code so that you can unlock the SIM card and then send or receive calls.
Press the ON / OFF key to boot the phone; enter PIN1 code, press to clear
the error input, press to confirm
If you enter the wrong PIN1 code in several times, SIM card will be locked. In this
instance please contact your SIM card network operator.
2.6 Unlock Screen
In order to prevent unauthorized use, you can lock your phone screen. Every time
you light up the screen you must draw your unlock pattern so that you can unlock
the phone.
Users can clear the unlock pattern (see "Security Settings"), in this case, the phone
cannot prevent unauthorized use.
Page 10

9
Basic Functions
3.1 Dial
Click to enter the dial-up interface. Click the digits on the screen to dial a
number. If you need to change the phone number, please click back to delete
characters then dial the number. Press the Menu key to reveal menu options, as
shown, you can choose to send SMS, added to the "Contacts" or the Settings, etc.
You can also touch at the top of screen to enter the call records interface
to dial out. Or click at the top of the screen to enter the contact interface
to dial out. By clicking directly in the standby interface, this can also select
contacts to dial out.
Page 11

10
After the call is connected as shown:
Click to open the dial pad.
Click to open the speaker, amplified voice calls.
Click to mute, do not send local voice.
Click to keep current call held.
Click to select the relevant contact or to make a new call.
Click to end the current call
Page 12

11
Interface as shown when a call comes in, tap and drag to answer the
phone, drag to reject a call, drag to send SMS.
3.2 Contacts
You can directly open the "Contacts" on the main screen or open it in "Dial" app.
Enter the contact interface as shown, click on a contact to view the contact
information stored, click on to call the contact, click on to send SMS
to the contact. Press the Menu key to modify, share and delete the contact
In the contact interface, click on to quickly search contacts; click on to
add a new contact. You can choose to save the newly added contacts to the phone or
Page 13

12
the SIM card and save the contact name, phone, email, address and other
information, as shown:
In the contact interface, click the menu button to pop up the following menu options.
You can, according to your needs, delete, import, export and share contacts and
other operations.
3.3 Messages
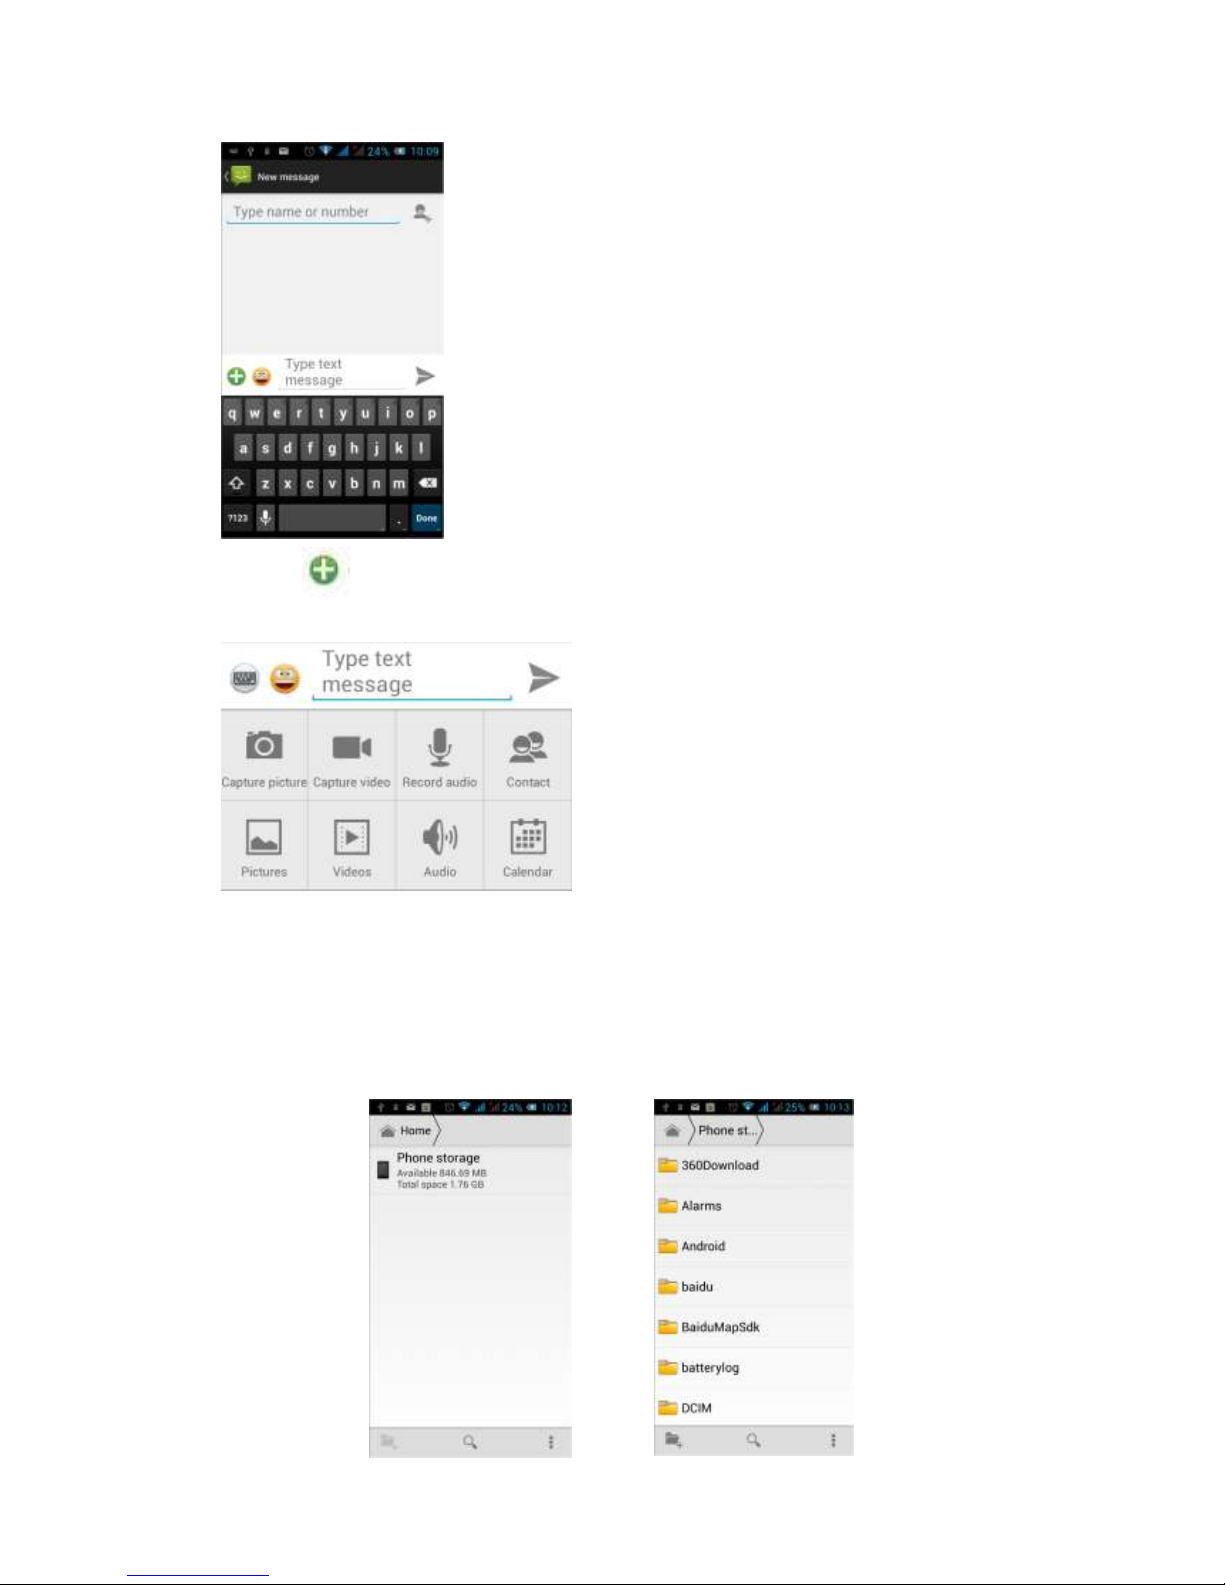
Click on the home screen to enter the message interface. Click to enter
the written message interface. In the "input names and numbers" area, input the
number, or click on the contact icon, select a number from your contacts here. In the
"input the text message" area to edit message content. Touch to send a
message after completion.
Page 14
13
Clicking on the screen can insert images, video, audio and other files. SMS will
be automatically converted into MMS.
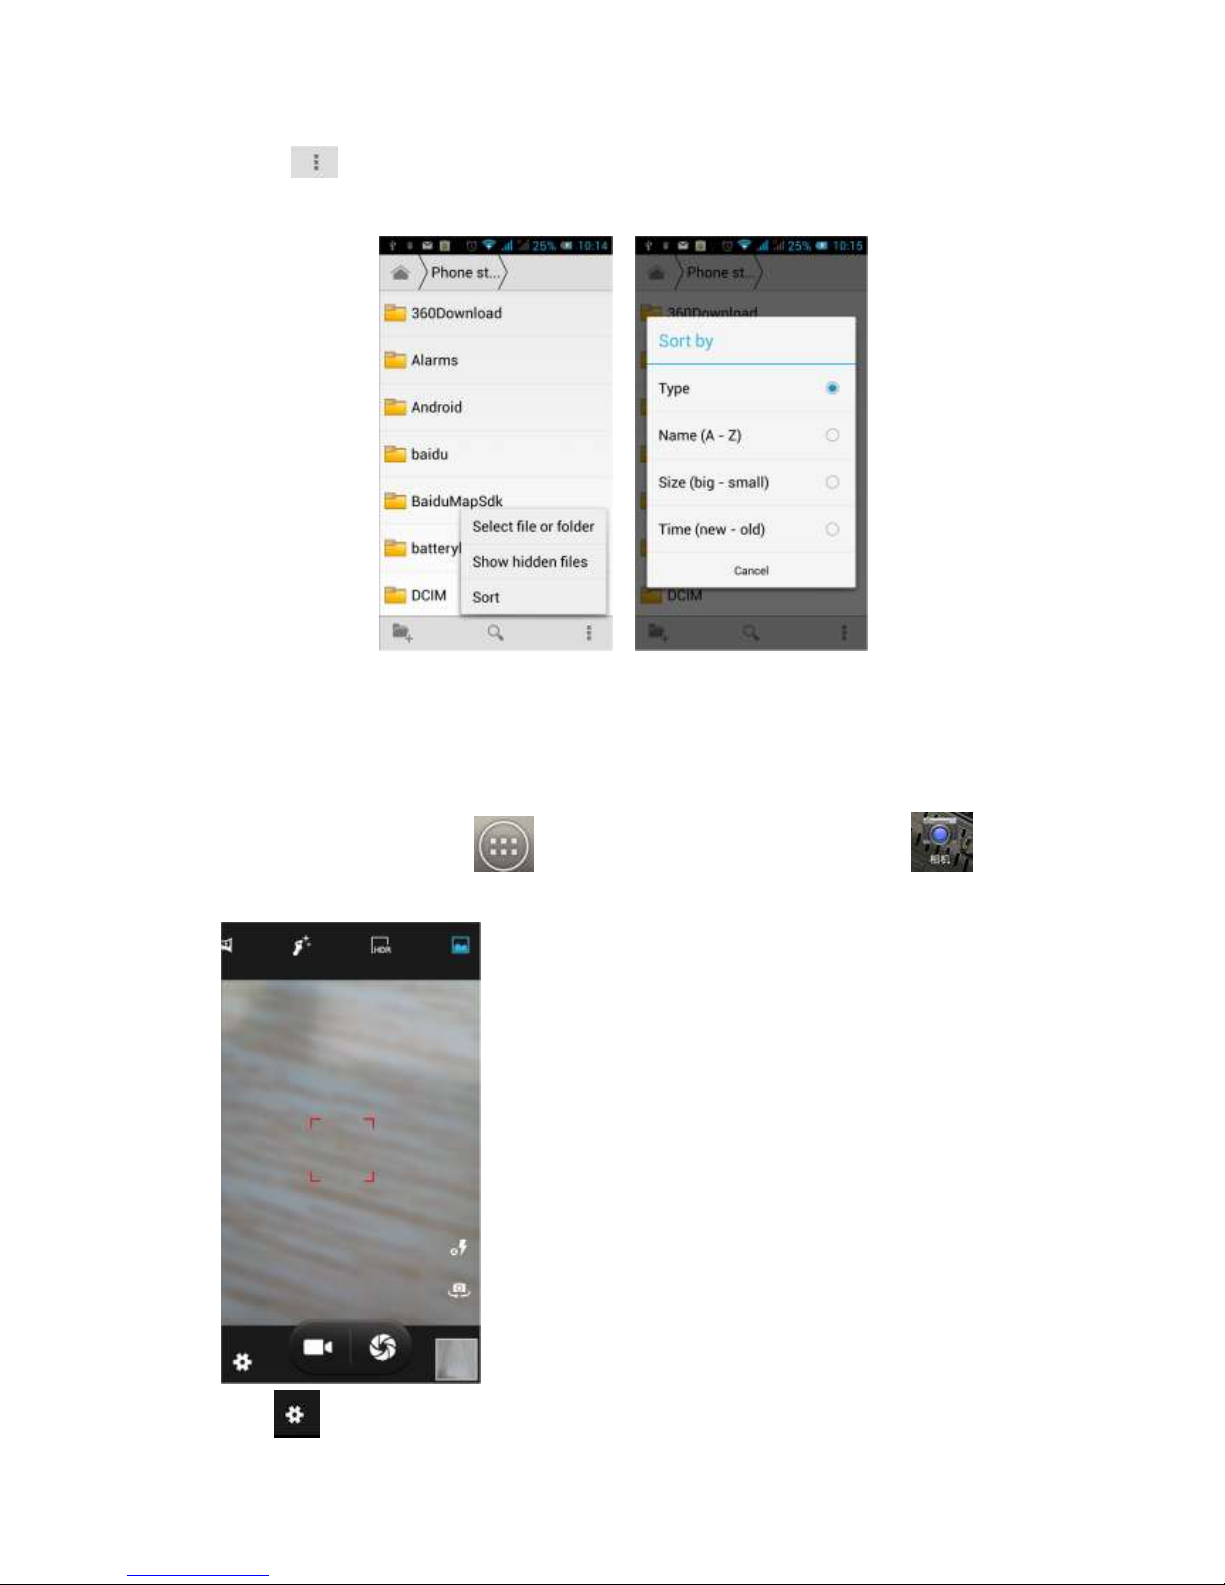
3.4 File Management
You can view and manage the files which can be stored locally on the phone or SD
card. You can copy the files, paste, rename, delete, share and other operations.
Page 15
14
Clicking , you can select one or more files or folders to share, copy, delete, cut,
rename and other operations. You can also reorder folders by name, size or date.
3.5 Camera
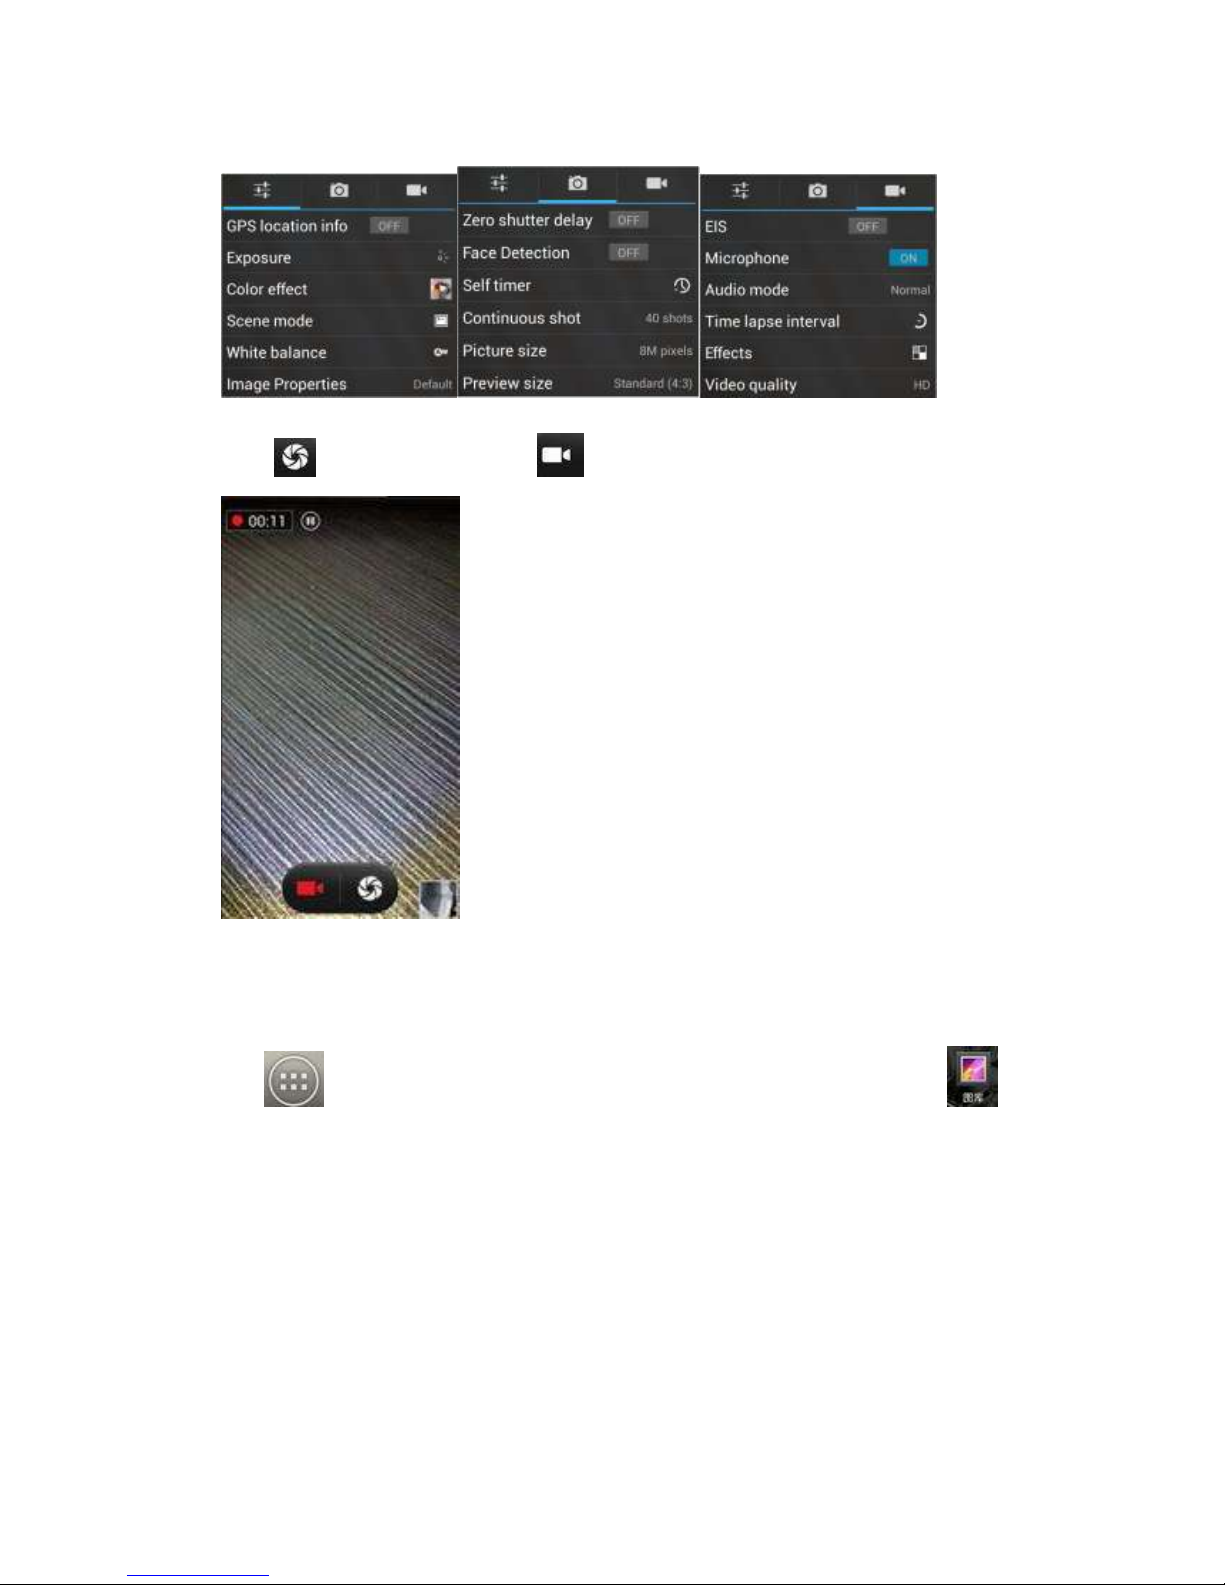
On the main screen, tap to enter the application menu. Click to
enter the camera viewfinder screen.
Click to enter the camera setting mode. You can, according to your needs,
Page 16
15
configure camera exposure, effects, shooting and other settings. As shown:
Click to take a picture, click to convert video interface, as shown:
3.6 Images
Tap on the main screen to enter the application menu, and then click .
You can view all the pictures and video files that saved in the mobile phone and SD
card, press menu key to browse images, delete and grouping operation, etc.
Page 17
16
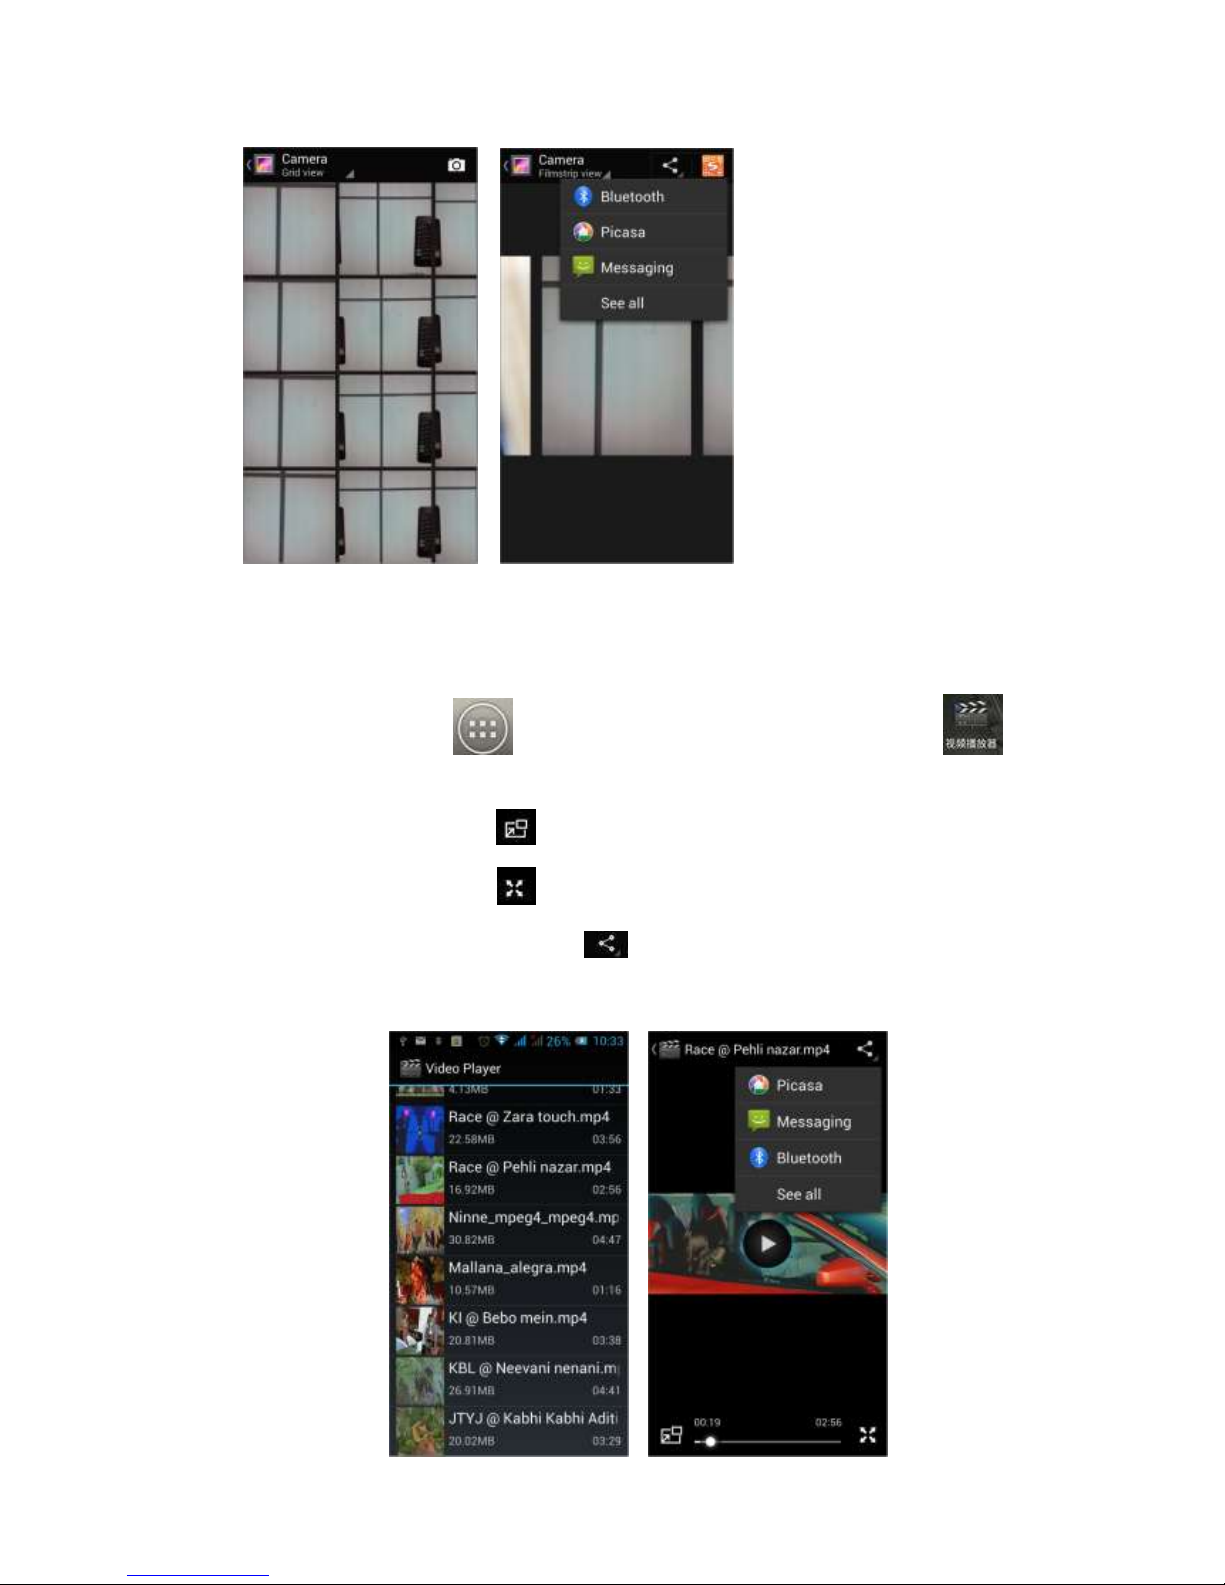
3.7 Video Player
On the main screen, tap to enter the application menu and then click
to enter the video list. Click on the menu key to delete, sort, and other operations.
Select a video to play, click to play the video into a small window, support
background play mode. Click to full-screen playback. Click time progress bar to
forward and reverse operation. Click to send video to message, Bluetooth,
E-mail to share.
Page 18
17
3.8 Music Player
On the main screen, tap to enter the application menu and then click
to enter the music player.
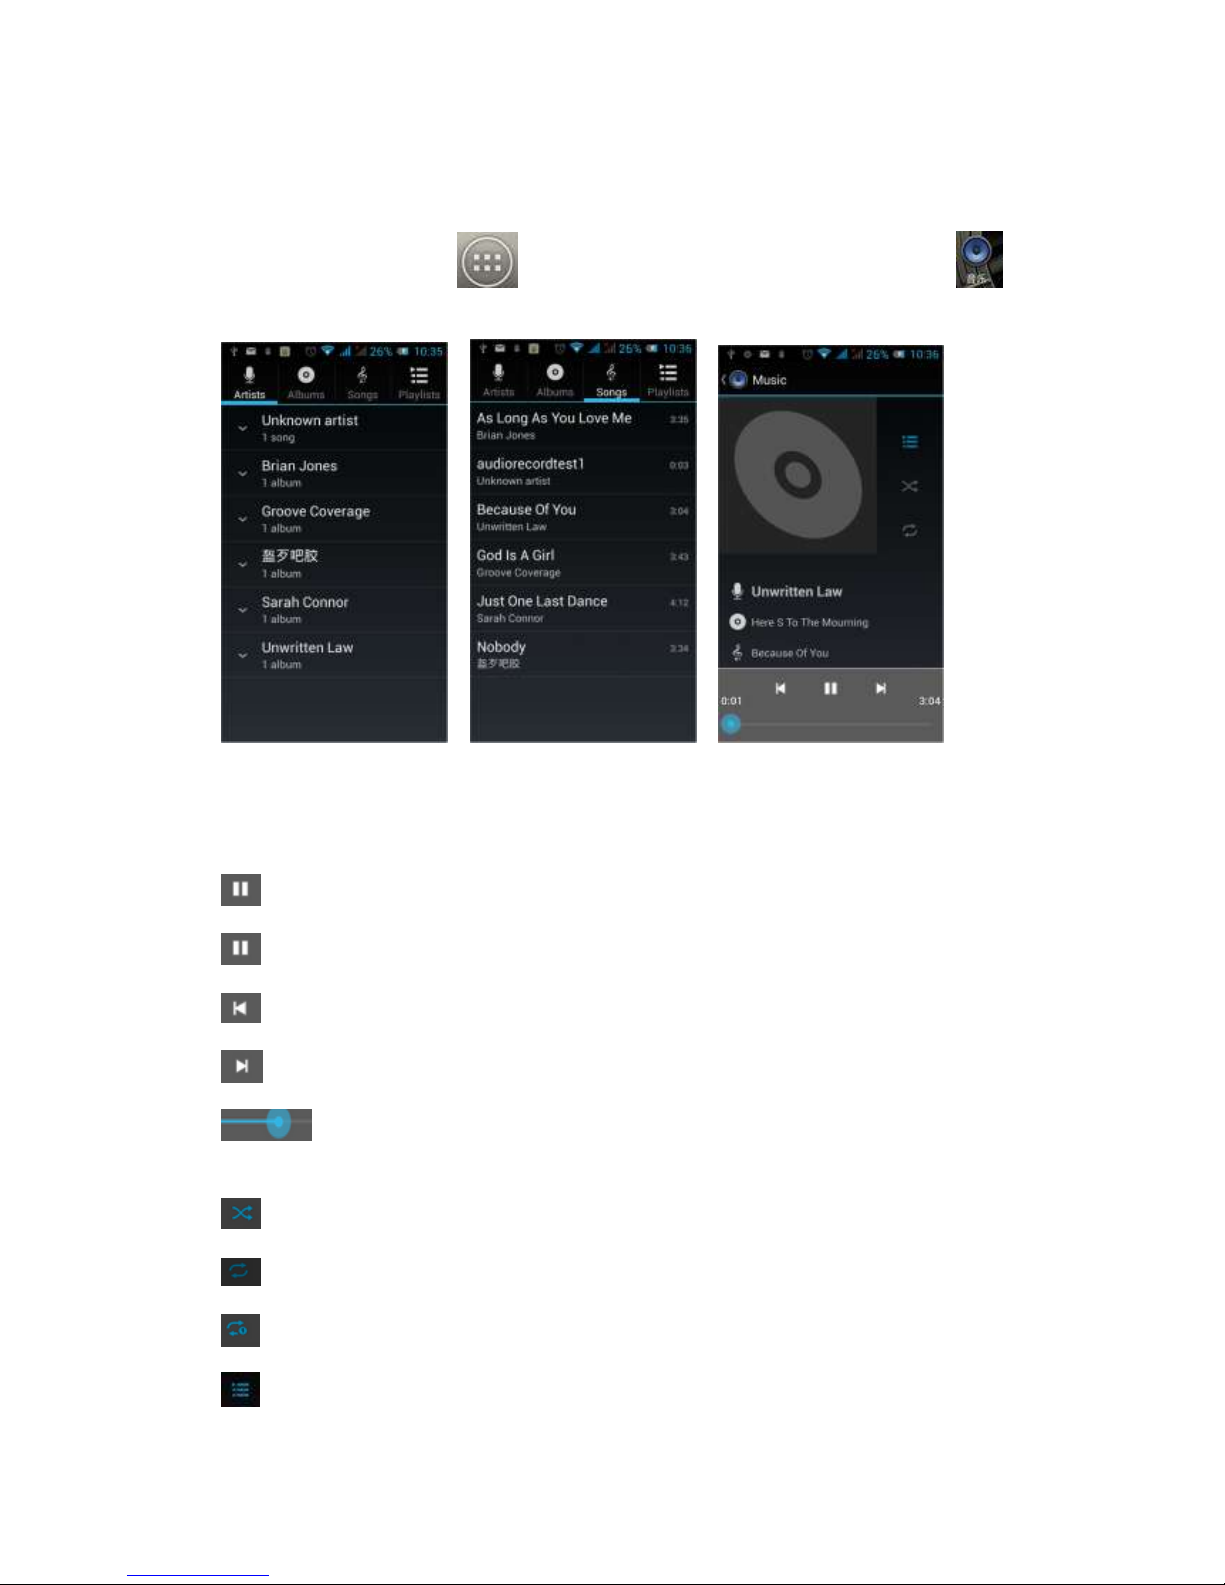
At the top of the screen all audio files are classified via the artist, album, songs and
playlists ICONS respectively. You can choose your favorite arrangement to find the
songs that you want to listen to. Choose to play a song:
Indicates pause/play song.
indicates continue playing.
indicates switch to last song, long press to rewind.
indicates switch to next song, long press to forward.
indicates the progress of the song playback (time display), sliding around
the scroll bar to jump to any position in the song.
indicates on/off the shuffle.
indicates on/off repeat all songs.
indicates repeat current song.
indicates back to song list.
Page 19
18
3.9 FM Radio
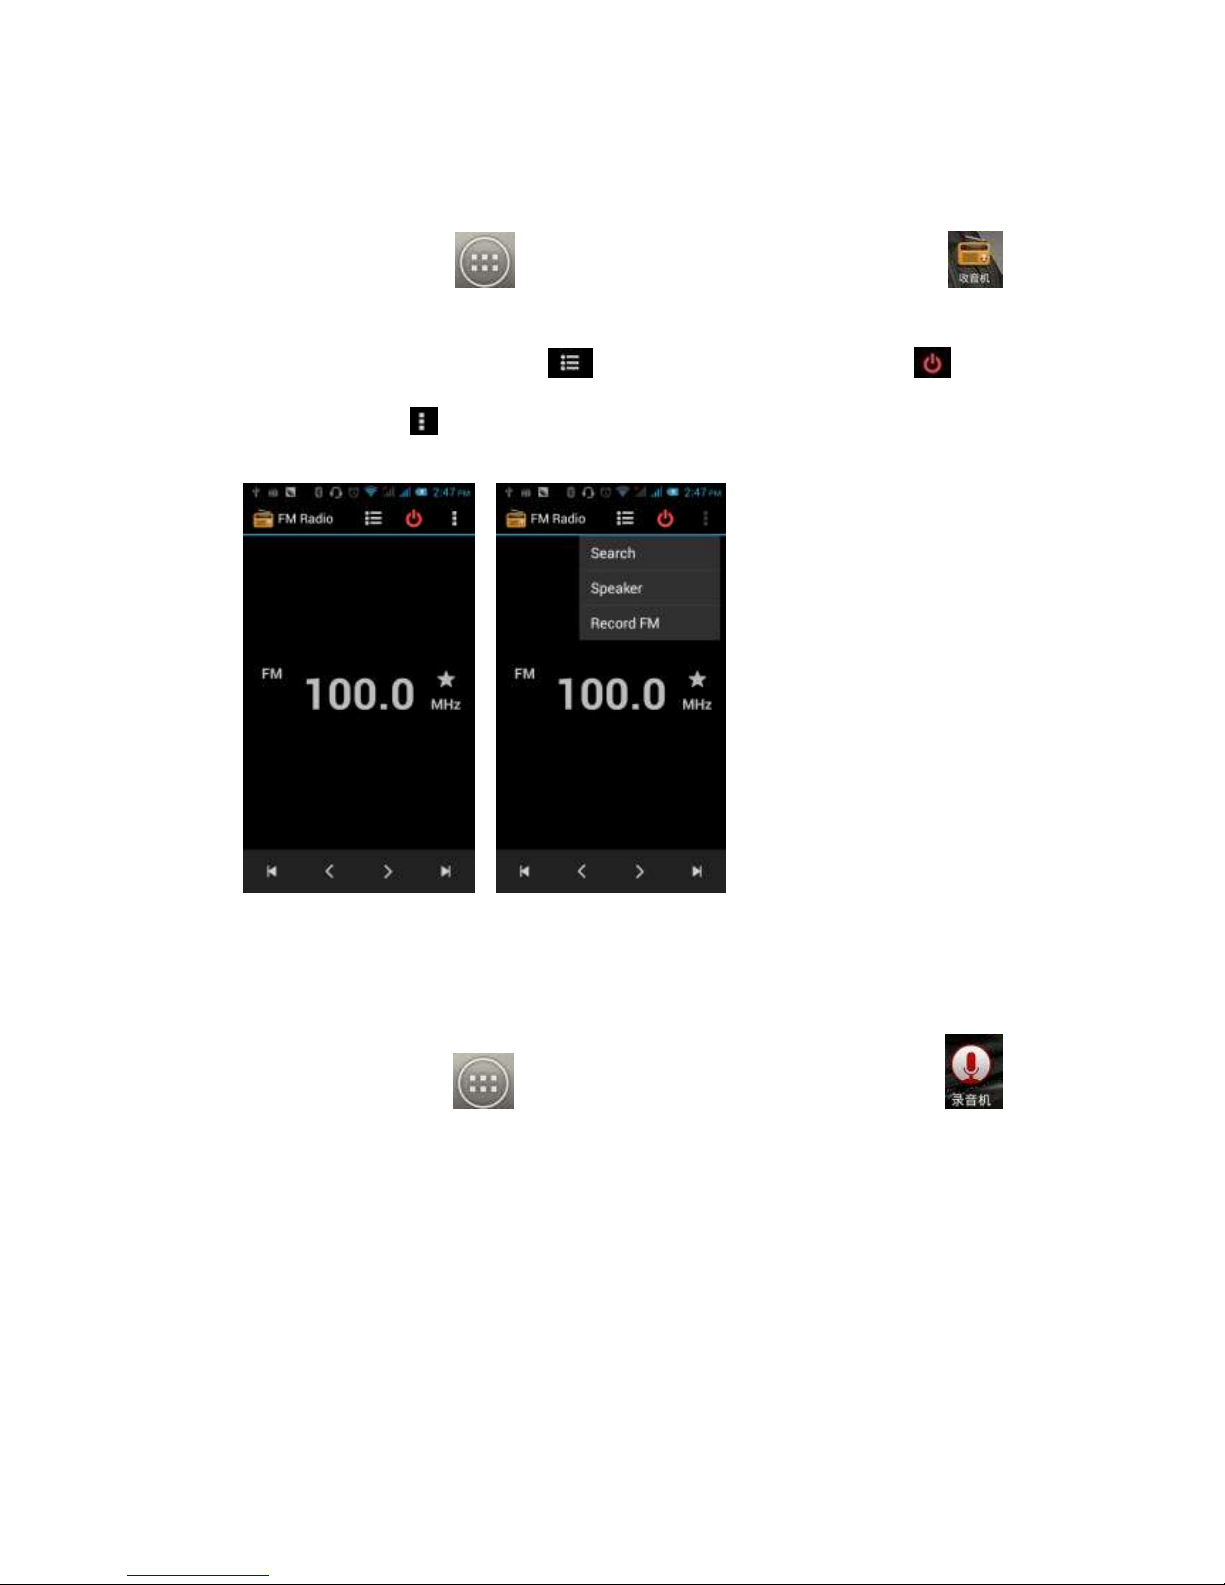
On the main screen, tap to enter the application menu and then click
to enter the radio. Once in the radio you need to plug in the headset cable and then
you can search for a channel. Click to enter the channel list; clicking Stop
/ Play Radio; clicking , you can search for it, FM recording and other operations, as
shown:
3.10 Recorder
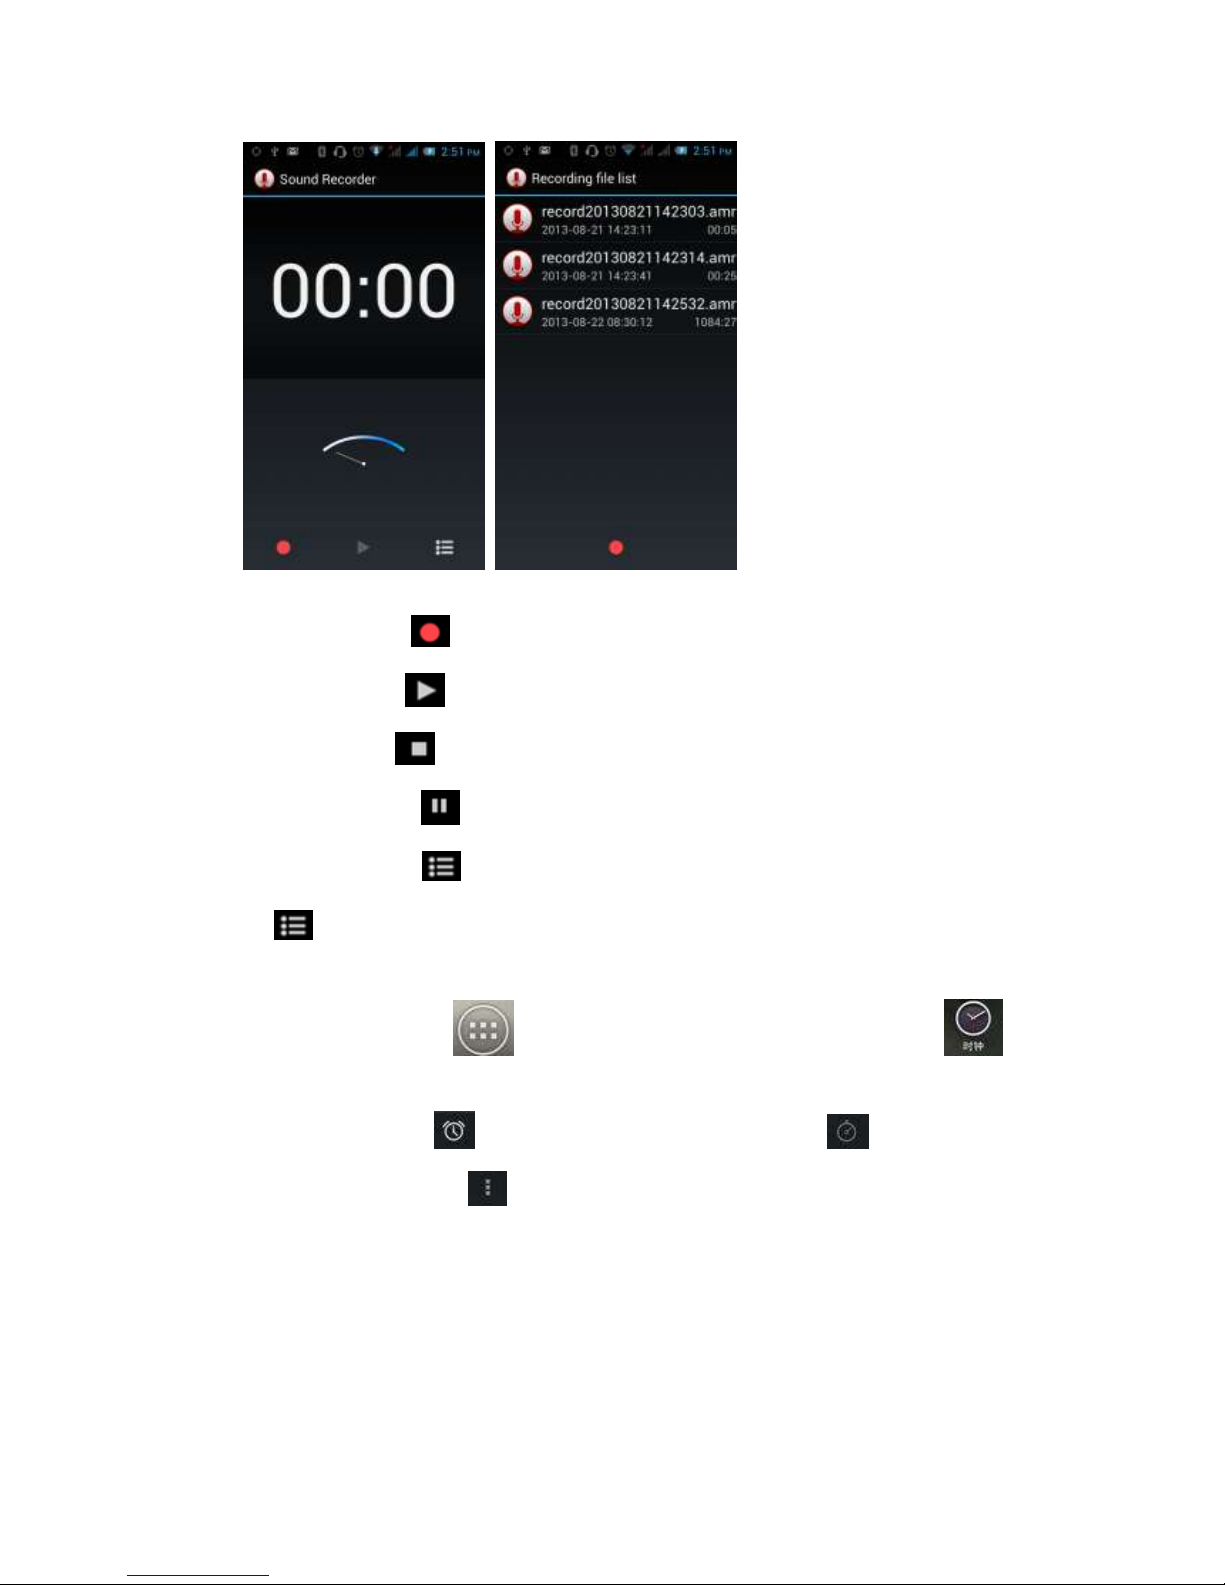
On the main screen, tap to enter the menu application and then click
to enter the radio. You can record audio files.
Page 20
19
Start recording: Tap
Play recording: Tap
End recoding: Tap
Pause recording: Tap
List of recording: Tap
Click to view the recording or playback recording.
3.11 Clock
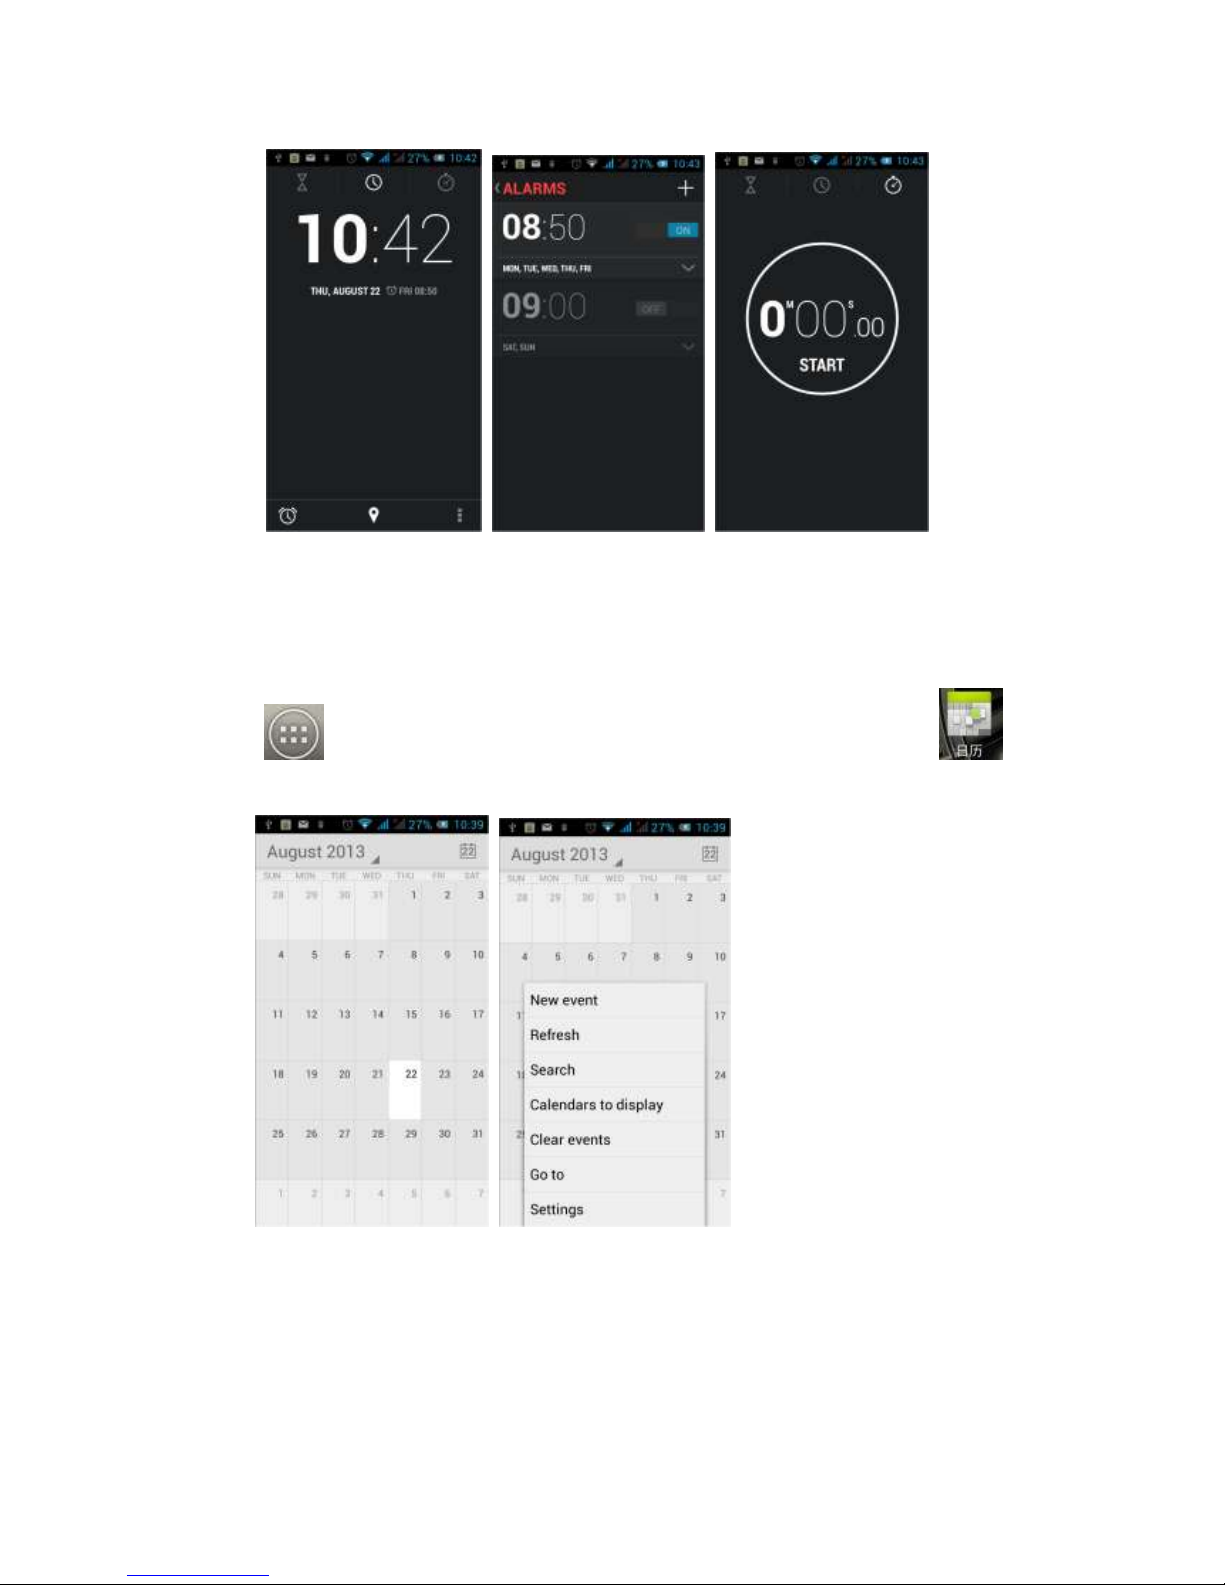
On the main screen, tap to enter the application menu and then click
to enter the clock. You can see the settings, date and time, week and alarm in the
clock interface. Click to view and set the alarm; click to open the
stopwatch function. Click to select night mode, set menu and set the alarm,
etc.
Page 21
20
3.12 Calendar
Tap on the main screen to enter the application menu and then click
to access the calendar.
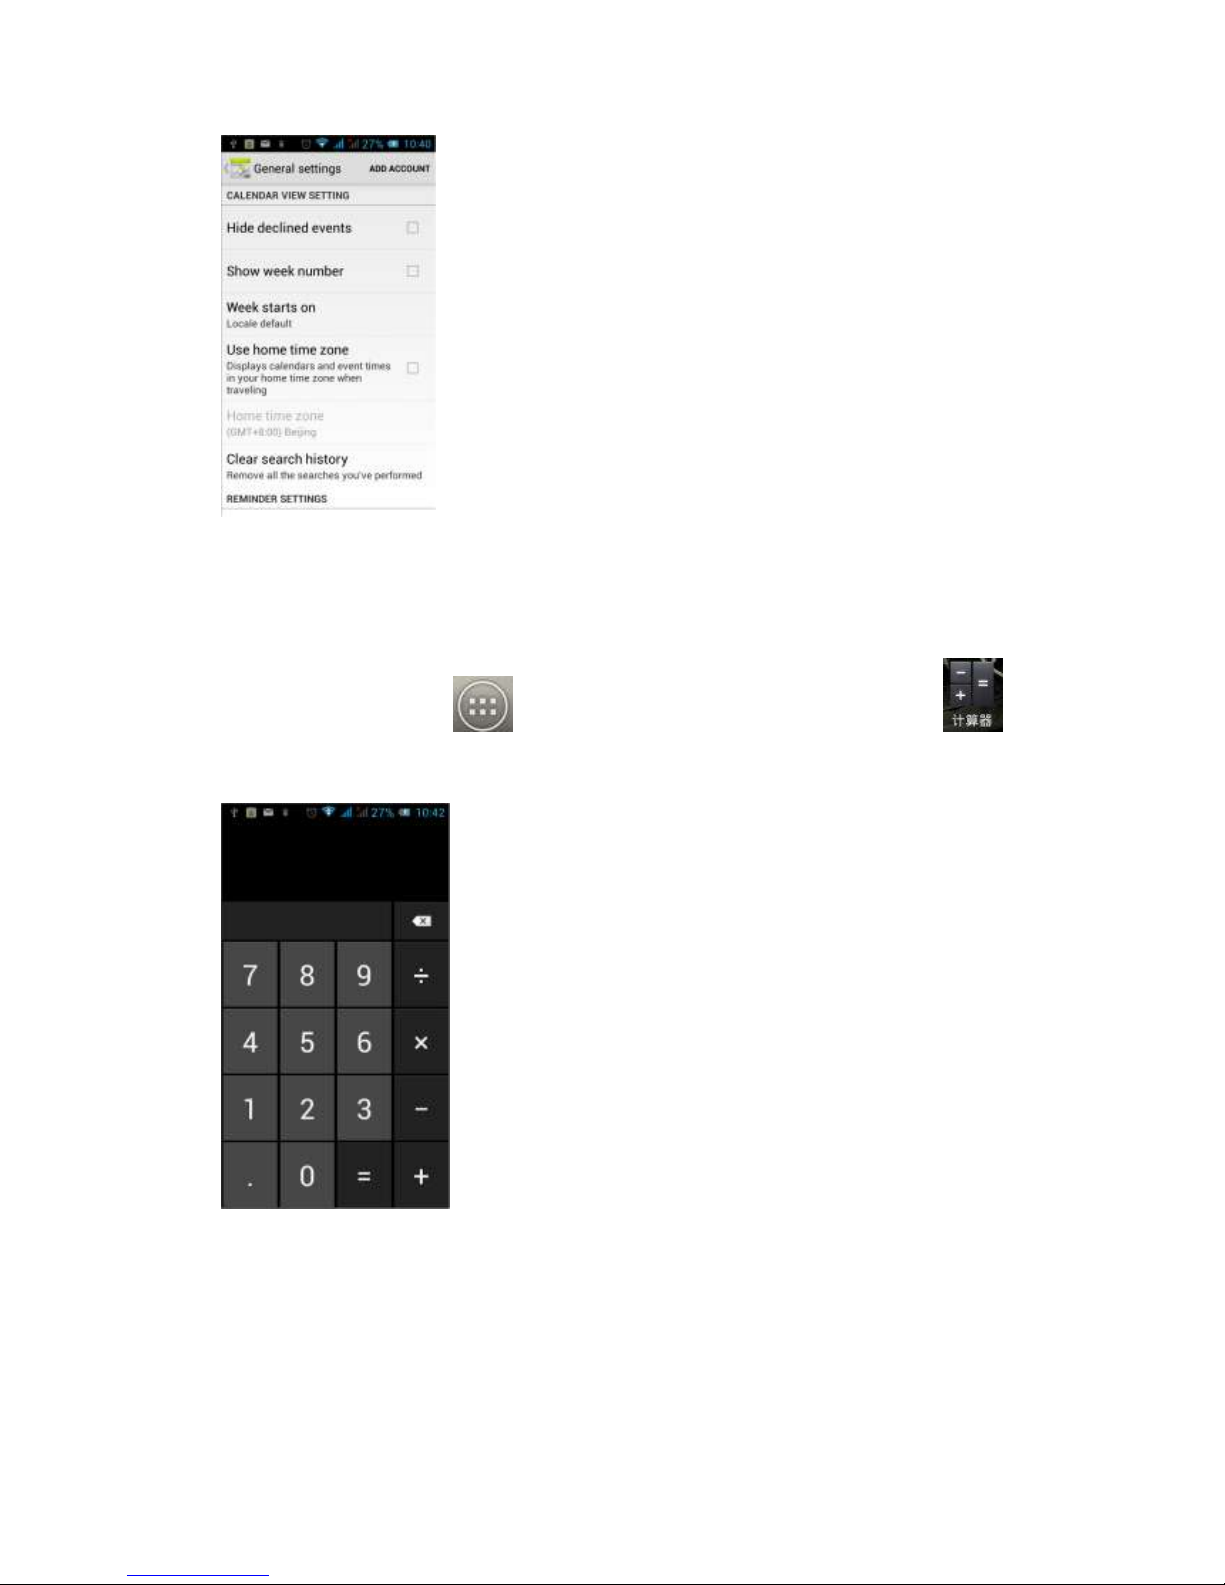
In the calendar interface, slide up and down to view the previous month and next
month's calendar. Also you can click the menu key to refresh the new activity, search,
set, and other related operations. You can set the calendar view and reminders.
Figure:
Page 22
21
3.13 Calculator
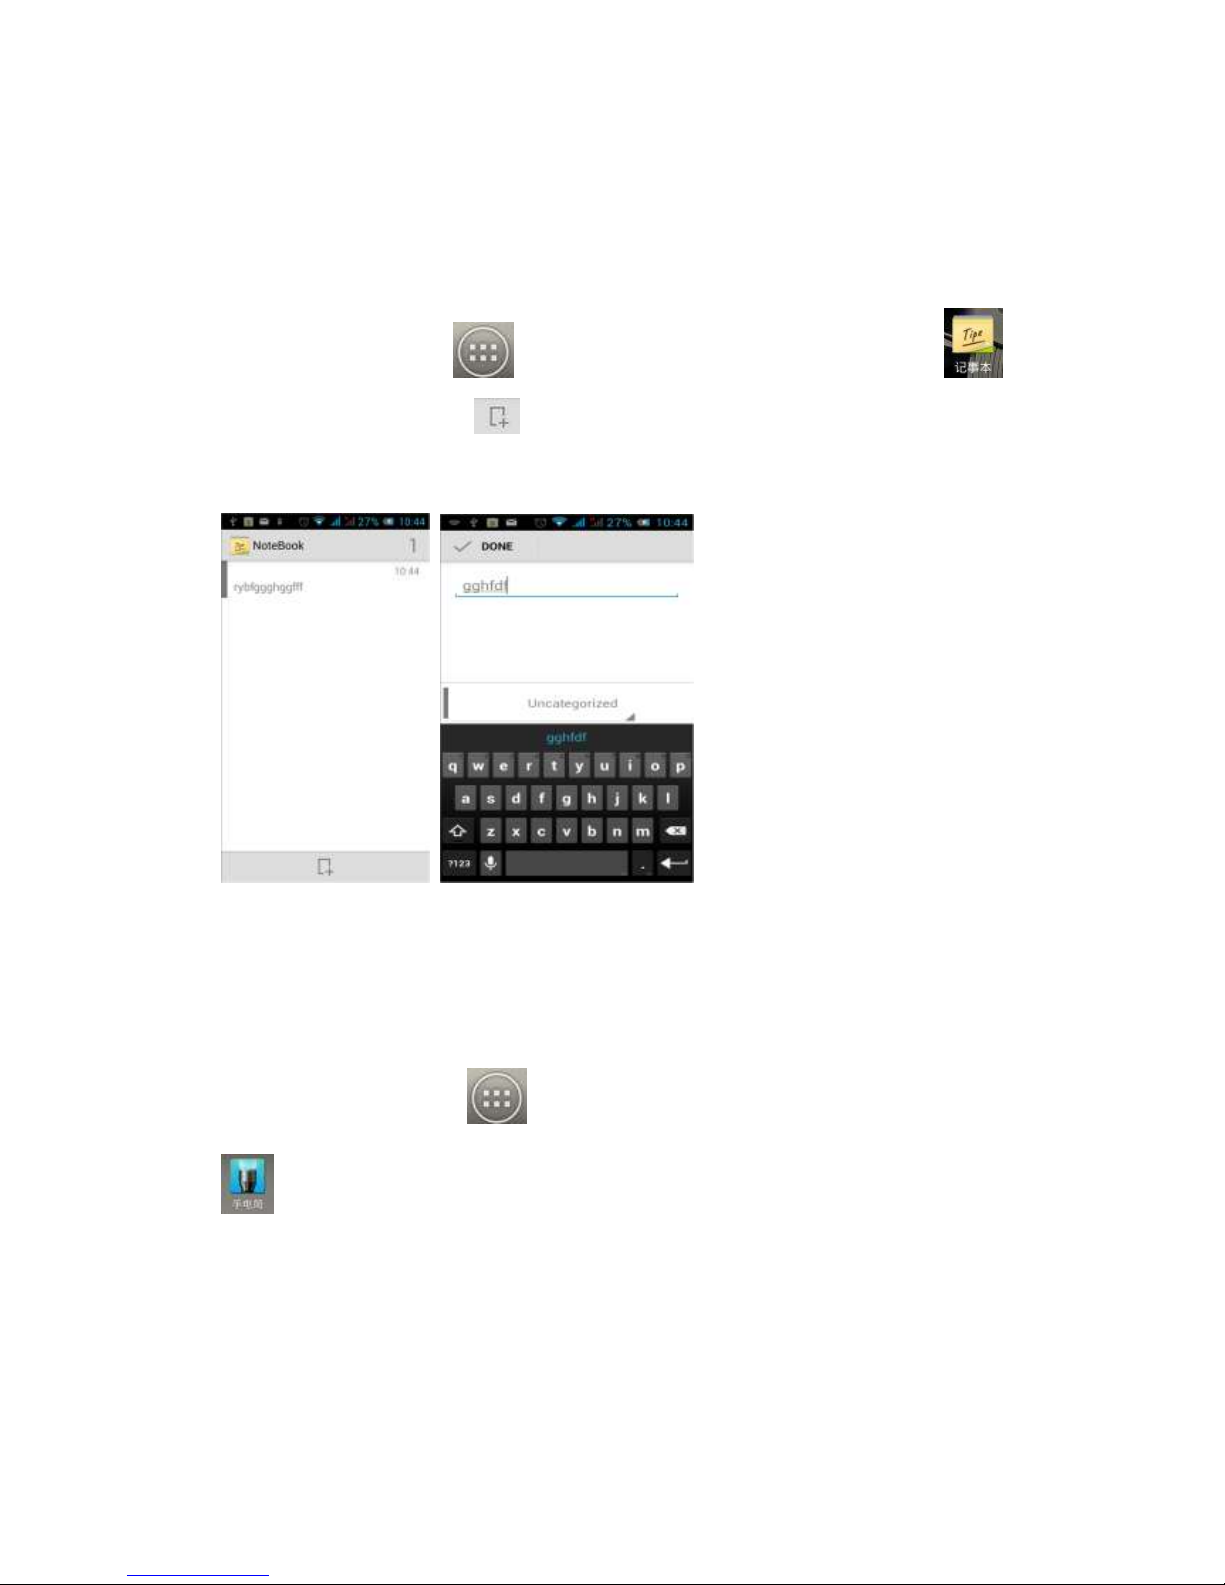
On the main screen, tap to enter the application menu and then click
to access the calculator. Your phone provides you a calculator with the four basic
functions, allowing you to perform simple arithmetic.
Page 23
22
3.14 Notepad
On the main screen, tap to enter the application menu and then click
to enter Notepad. Click on to add a new Notepad. Click the "Unclassified" area
to classify the new added Notepad, mainly divided into work items, personal matters,
family matters and learning issues.
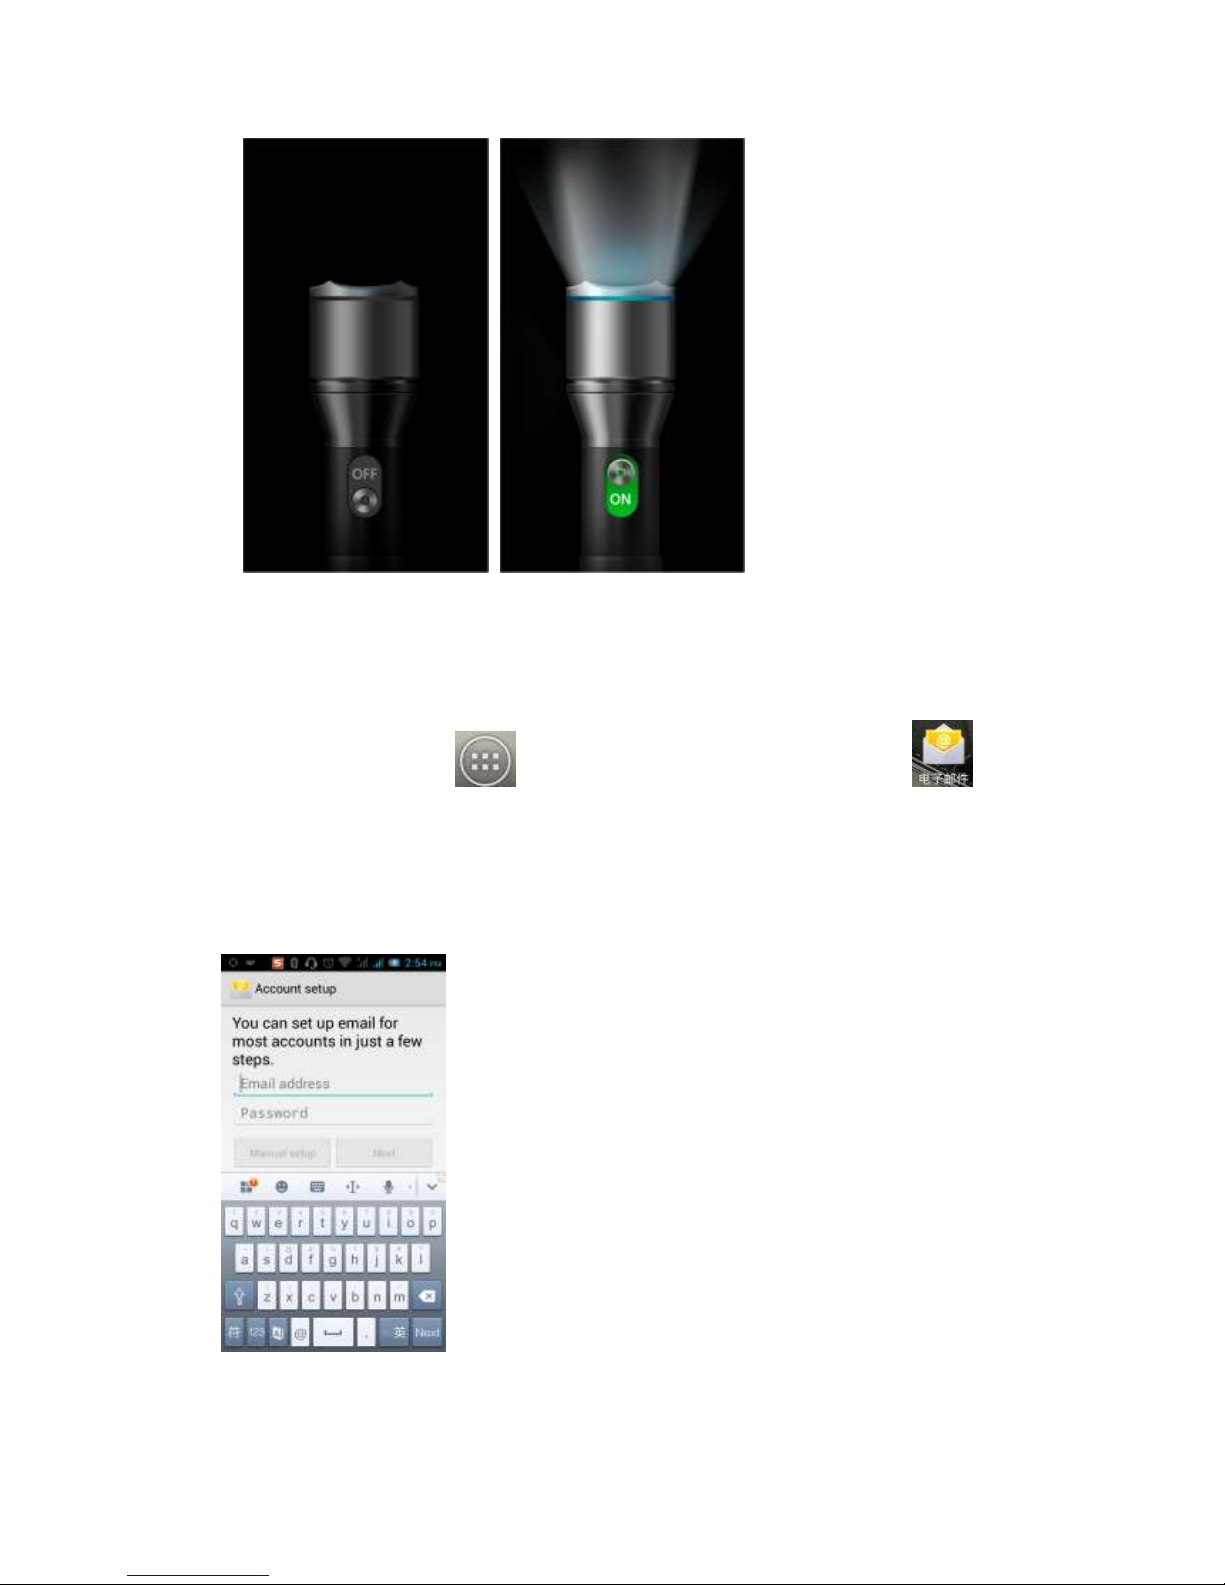
3.15 Flashlight
On the main screen, tap to enter the application menu and then click on
to enter the flashlight. Click "off" to close flashlight, click "on" to turn on the
flashlight.
Page 24
23
3.16 E-mail
On the main screen, tap into the application menu and then click to
enter the e-mail. You can send email messages to anyone with an email address.
Enter the program and set up my account. Then you can click on your email account
as it has been built into the account. To start, edit, create account or delete
operations can all be sent or received like a computer. The program requires network
support.
3.17 Browser
Page 25
24
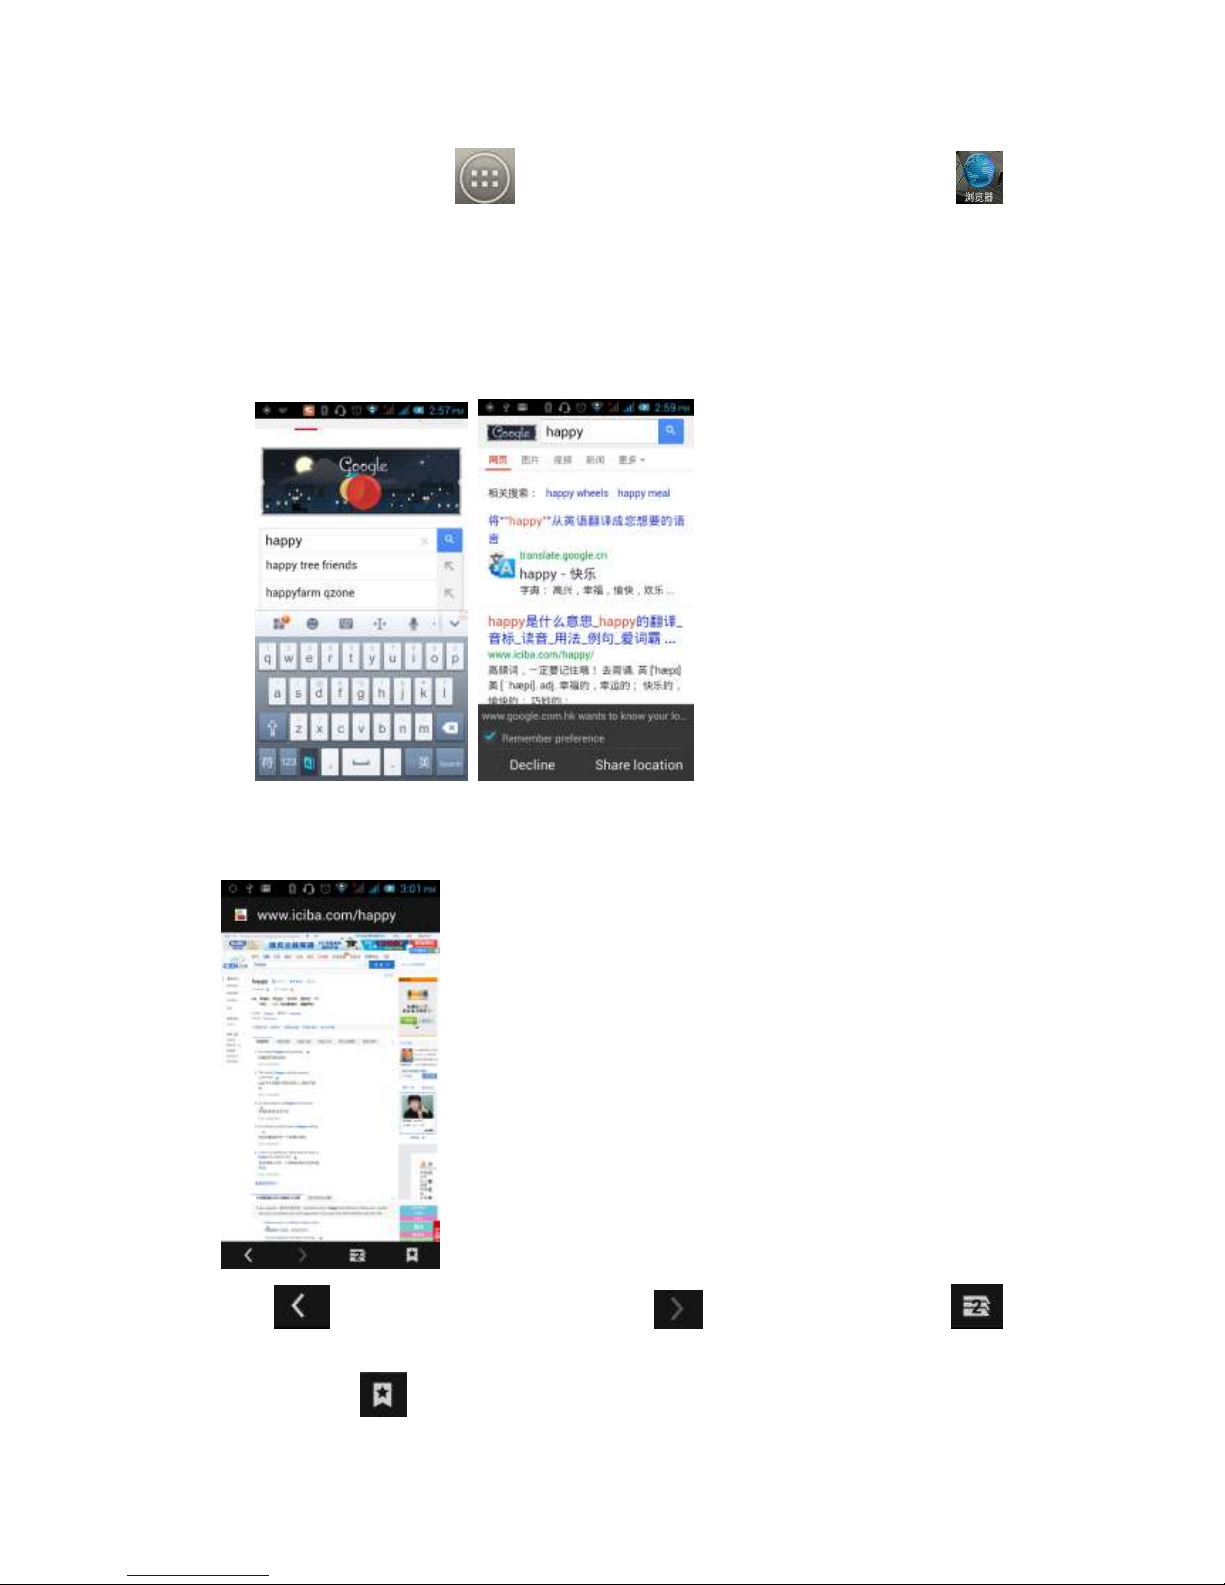
On the main screen, tap to enter the application menu, and then click
to enter the browser. The support of the network (WI-FI or GPRS) into Web browser
lets you surf the Web on your phone and view Web pages. You can create a
bookmark on your phone and sync bookmarks with your computer. Directly from the
main screen to quickly access your favorite sites.
In the search box, enter the content you want to find. Click the Search icon to enter
the relevant pages:
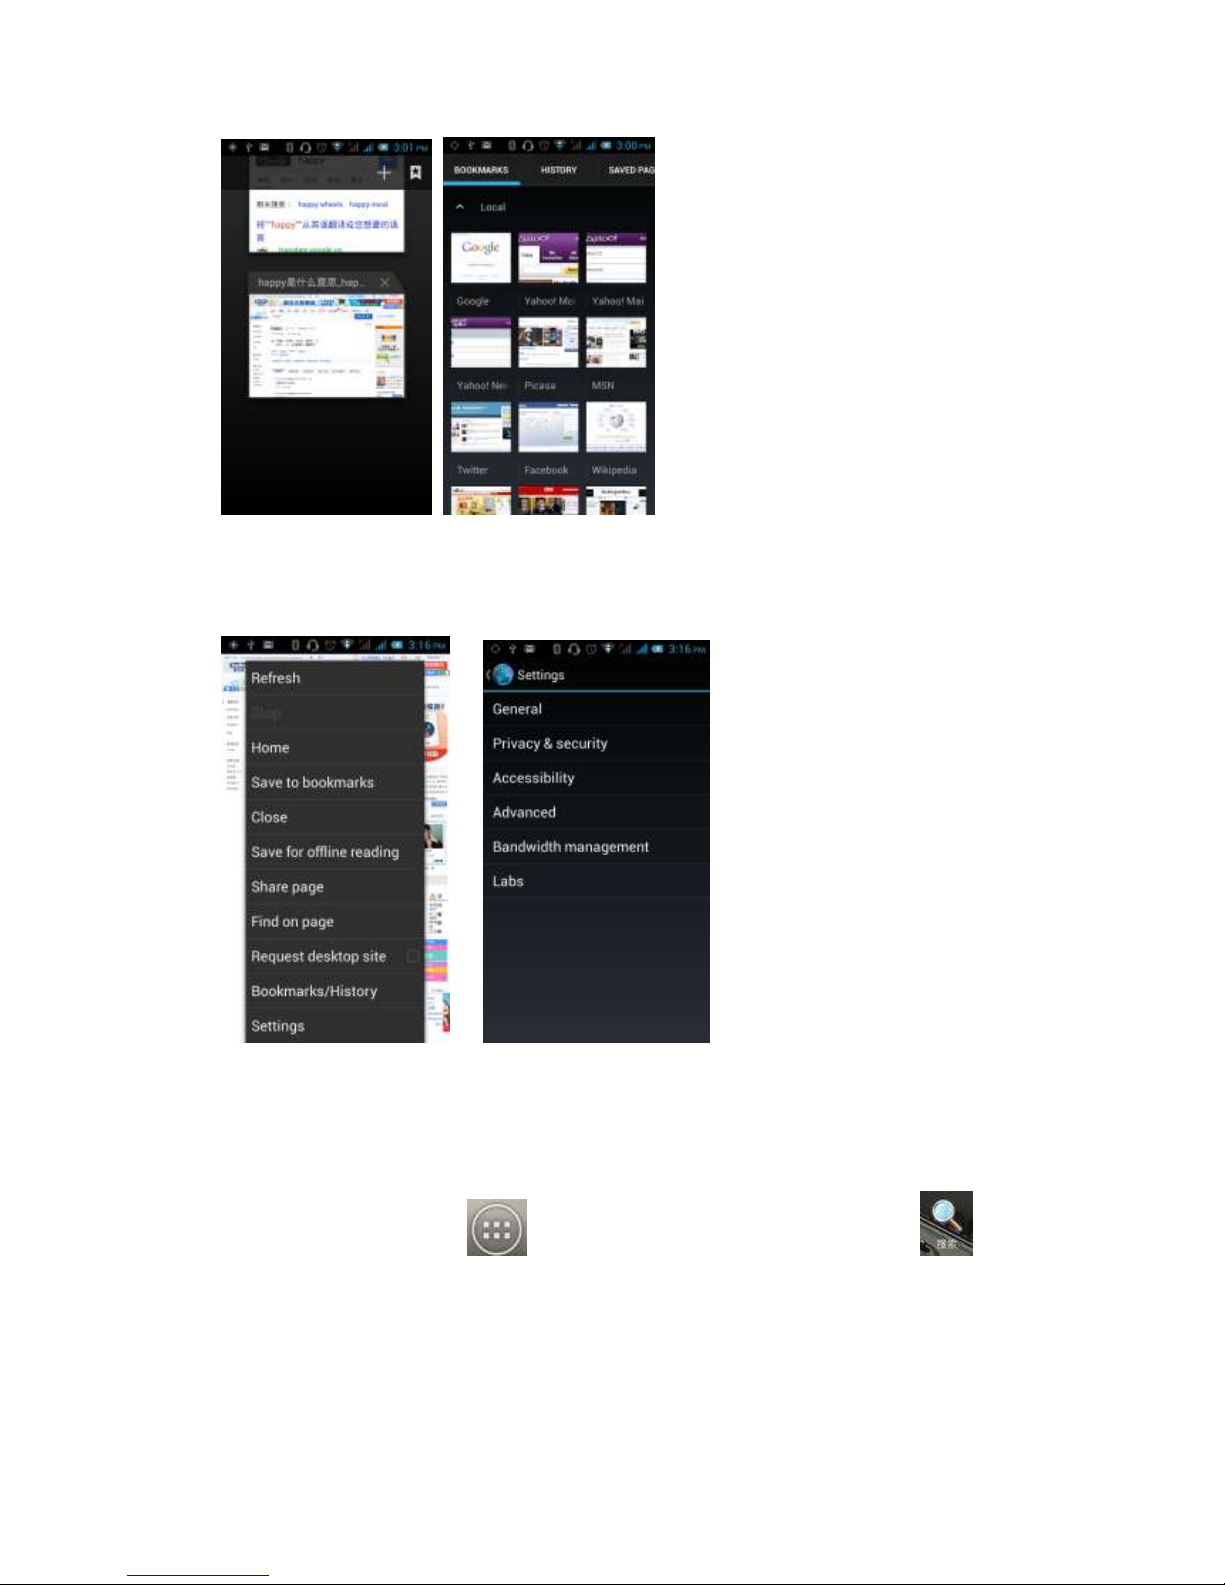
Touch the screen, the screen display URL above, display the menu below:
Click to go to the previous page; Click to enter next page; Click
to view the pages you have open, you can slide up and down, and select a page to
enter; clicking , you can view your bookmarks, history, and saved web page.
Page 26
25
Click on the menu key on the main page, you can refresh, close, save to bookmark,
share web pages, settings, etc.
3.18 Searching
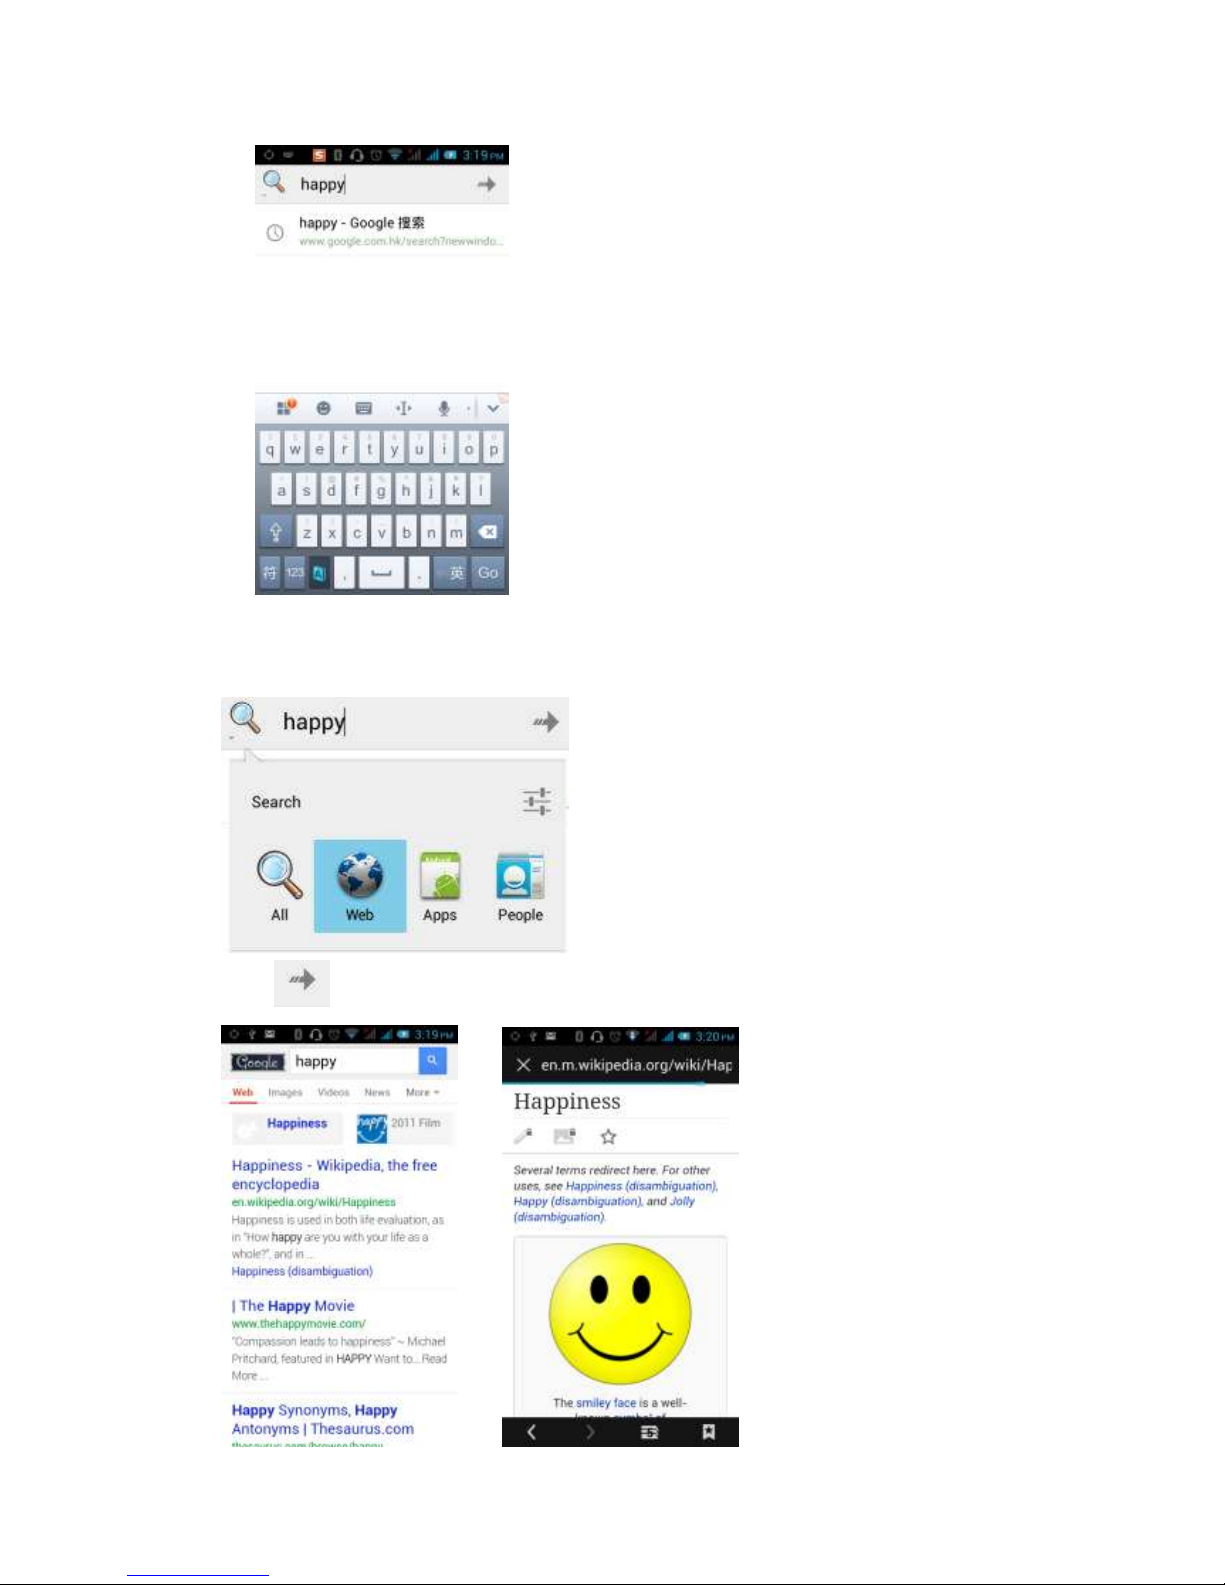
On the main screen, tap to enter the application and then click to
enter the search interface:
Page 27
26
Enter the content you want to search click the Searching key, select the type of
search you want such as web pages, contacts, etc:
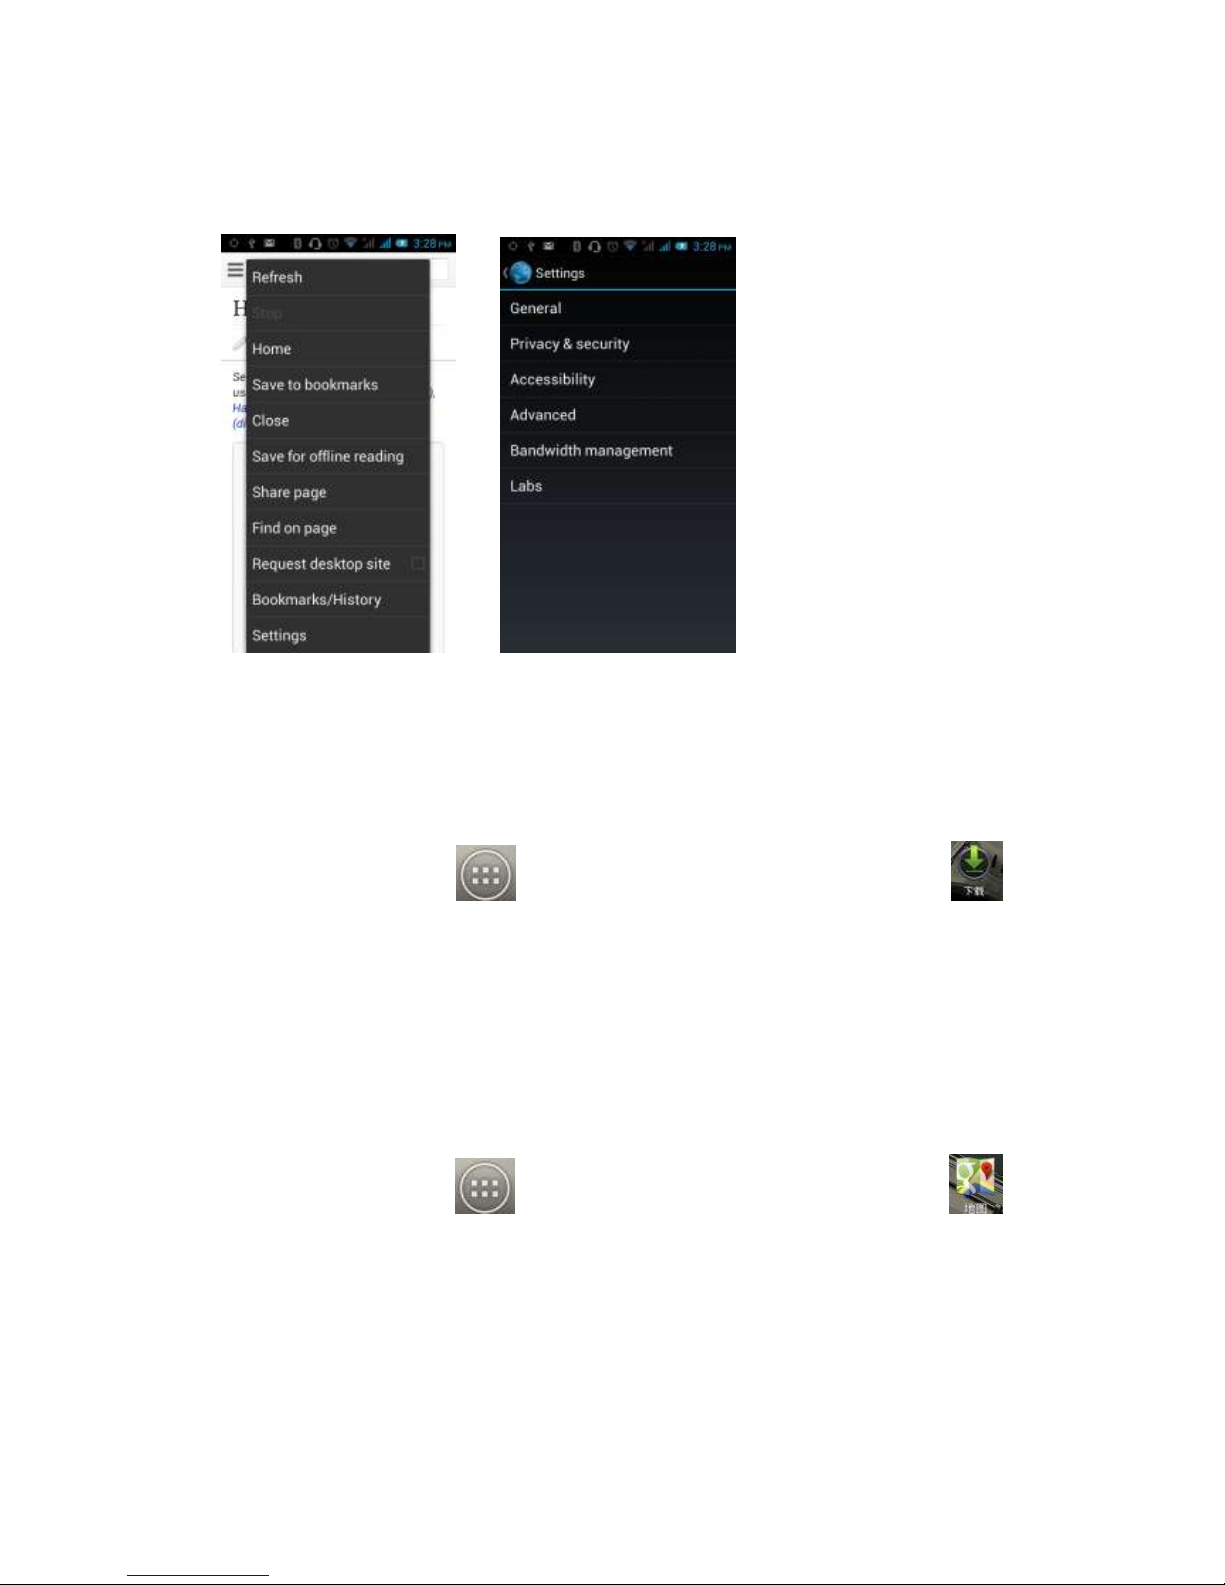
Click to enter the search results:
Page 28
27
You can refresh, close, save to bookmark, share web pages, settings, etc by clicking
on the menu key on the main page..
3.19 Download
On the main screen, tap to enter the application menu and then click
to enter the download interface. You can view the content which have been
downloaded or being downloaded. On download content interface, press the Menu
key can be sorted by size or time of operation.
3.20 Map
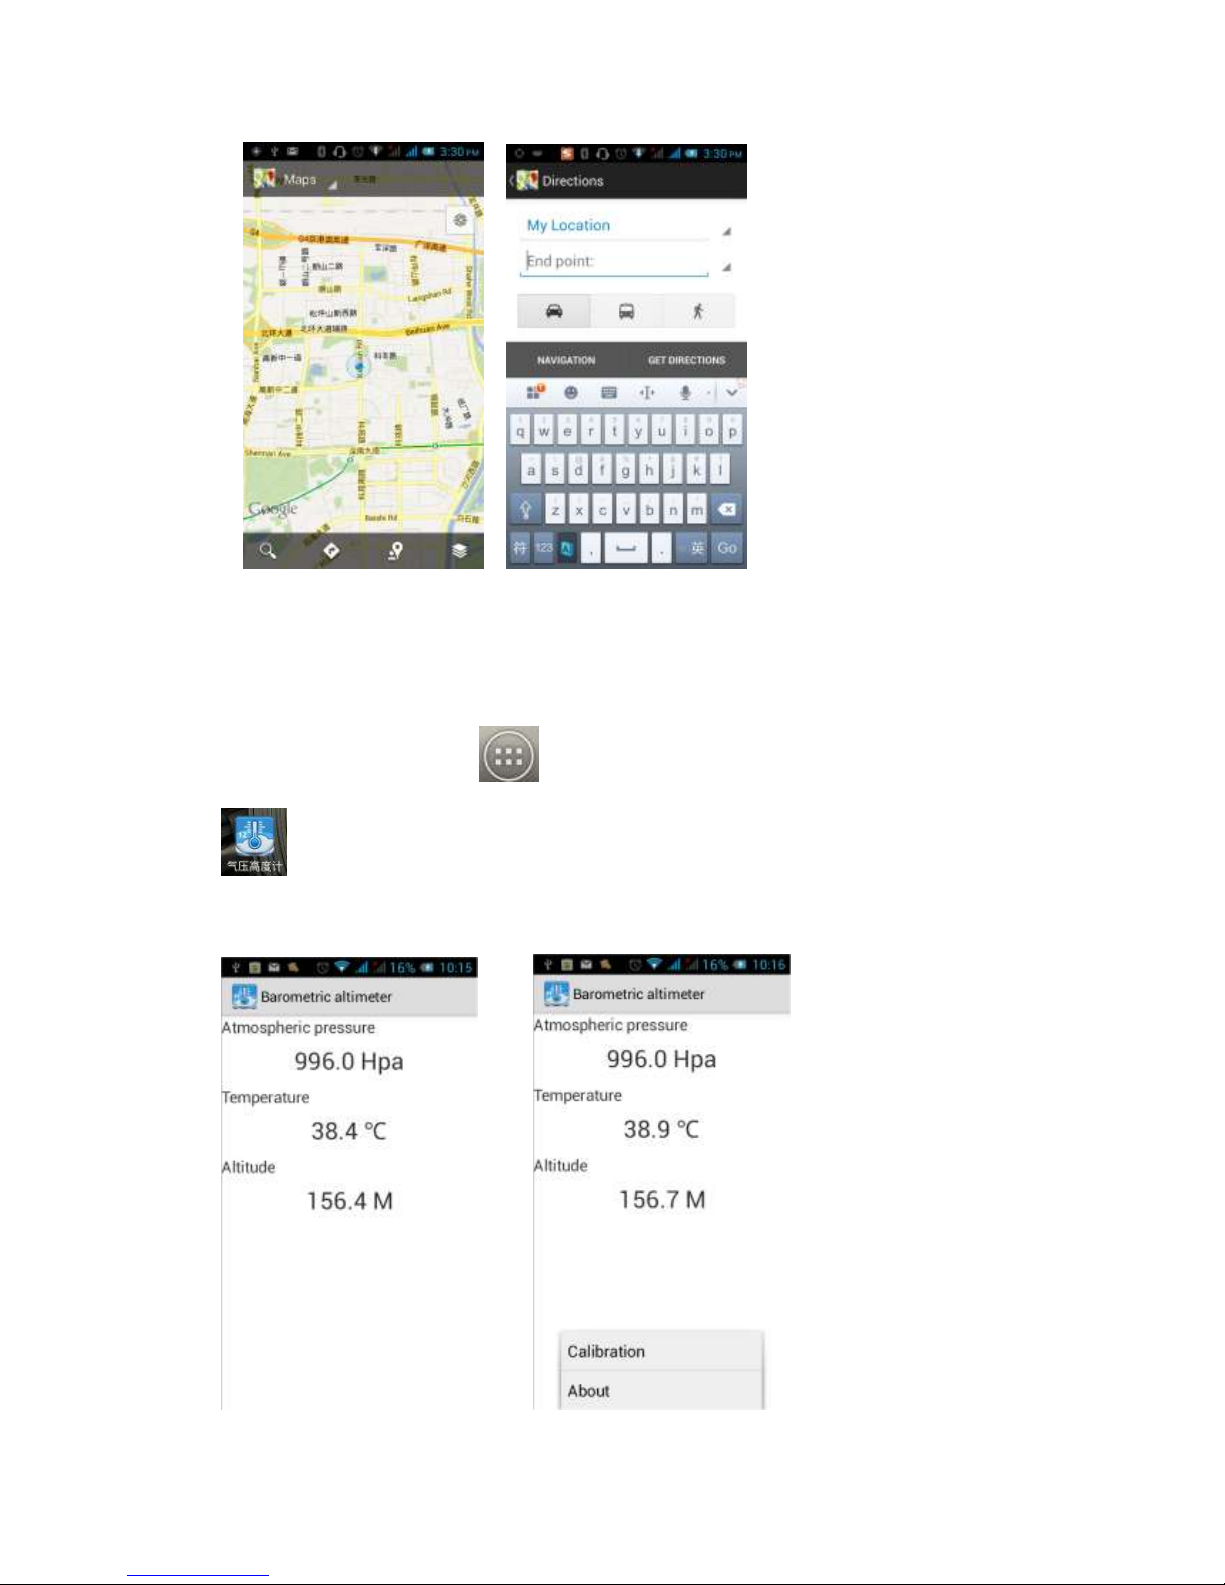
On the main screen, tap to enter the application menu and then click
to enter the map interface. You can click on the Search icon key under the screen to
enter the destination you're looking for, search, or click the line icon under the
screen, enter the start and the end to query bus transit.
Page 29
28
3.21 Barometric Altimeter
On the main screen, tap to enter the application menu and then click
to enter the barometric altimeter. You can view the pressure, temperature
(temperature inside the phone) and altitude of your location. You can be calibrated
according to the local barometric pressure, and view the software features.
Page 30
29
3.22 Backlog
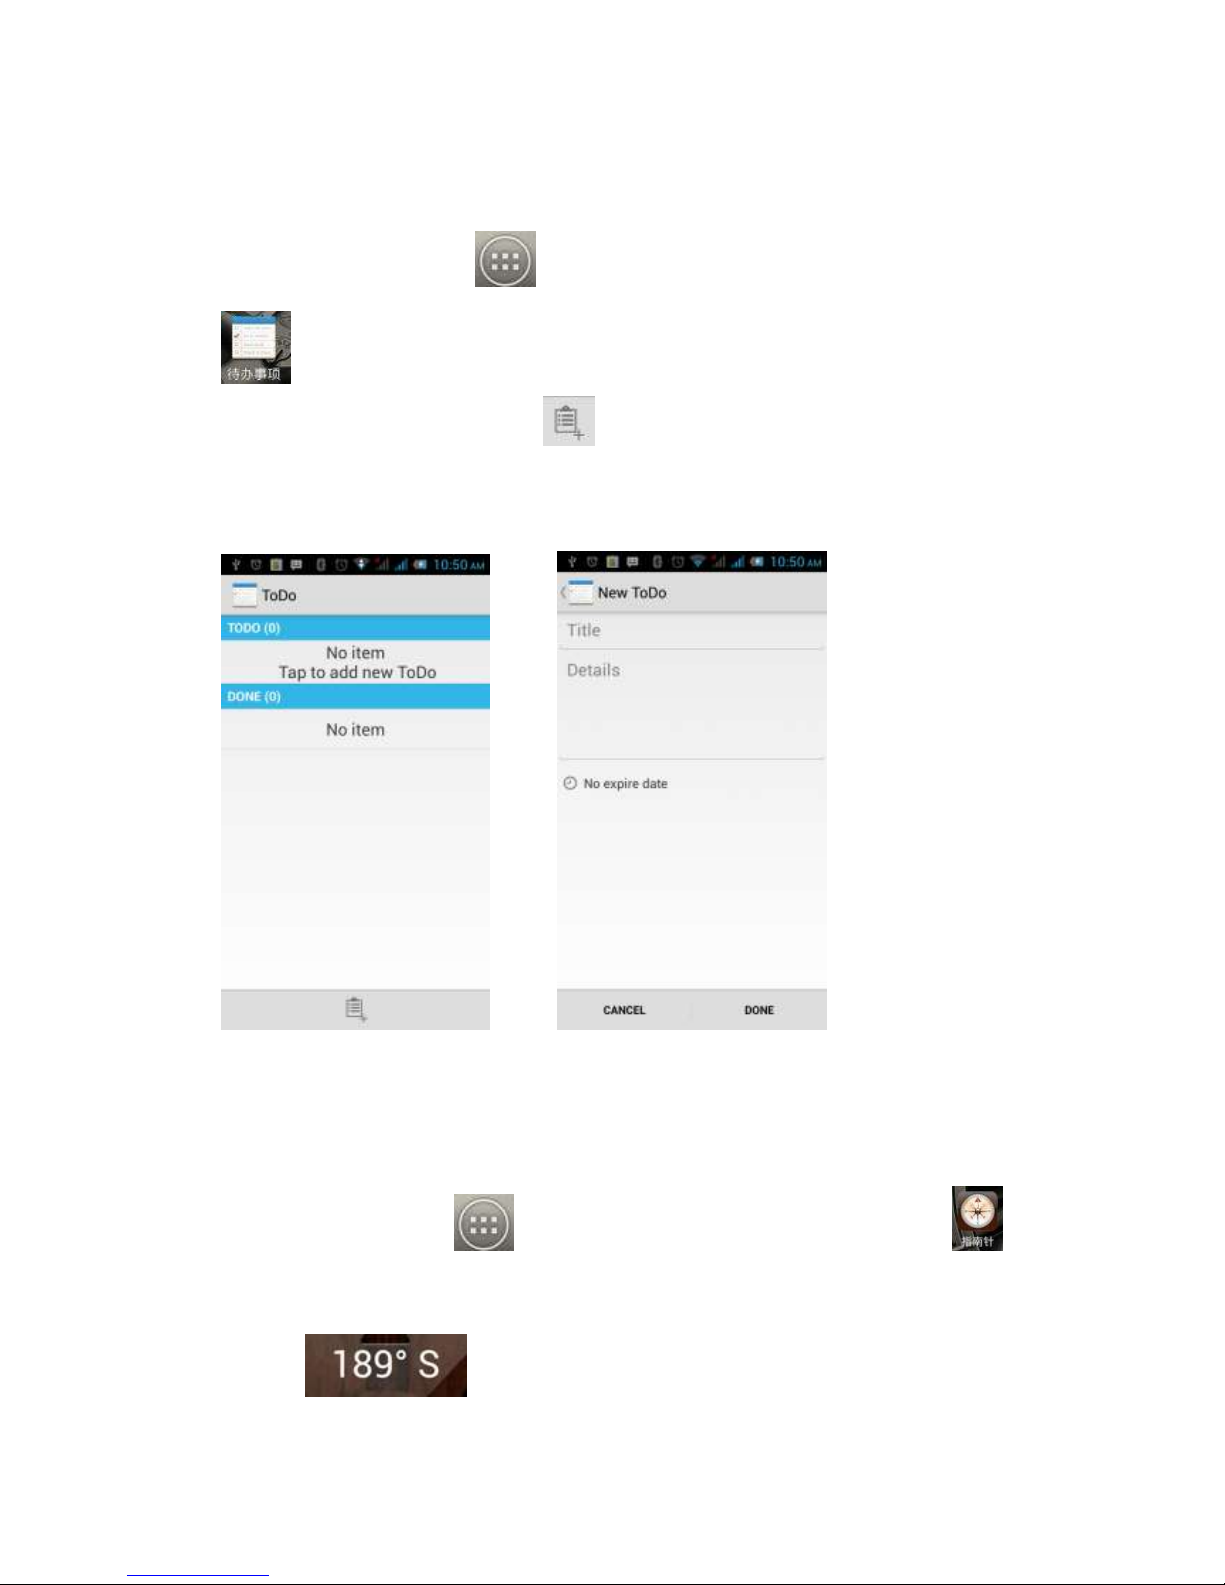
On the main screen tap to enter the application menu and then click
to enter the backlog. In the backlog interface you can view the ‘to do’ items
and completed items, or click on bottom of the screen to add items. When
adding an item interface you can enter a title and a description. You can also set the
deadline for your needs.
3.23 Compass
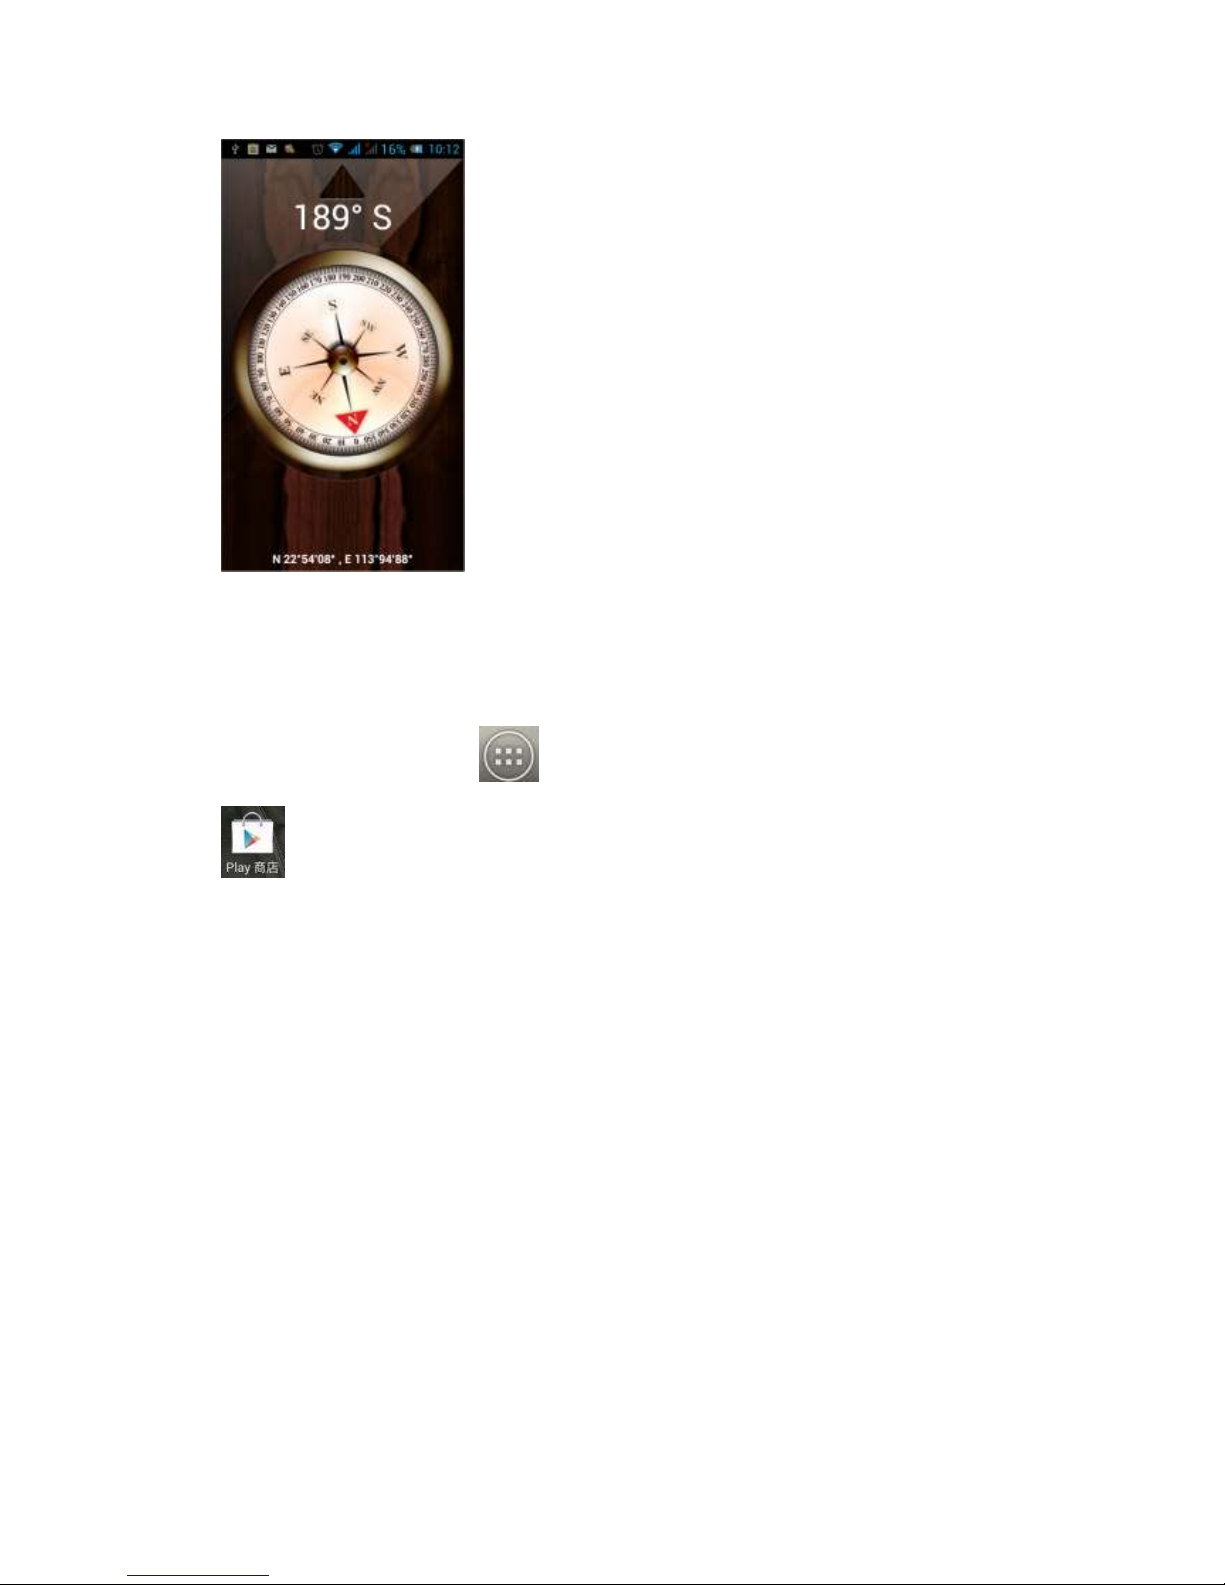
On the main screen, tap to enter the application menu, and then click
to enter the compass interface. The compass icon on the middle of the screen will
change the orientation of the phone. An icon appears above the corresponding angle,
such as: , as shown:
Page 31
30
3.24 Play Service
On the main screen, tap to enter the application menu and then click
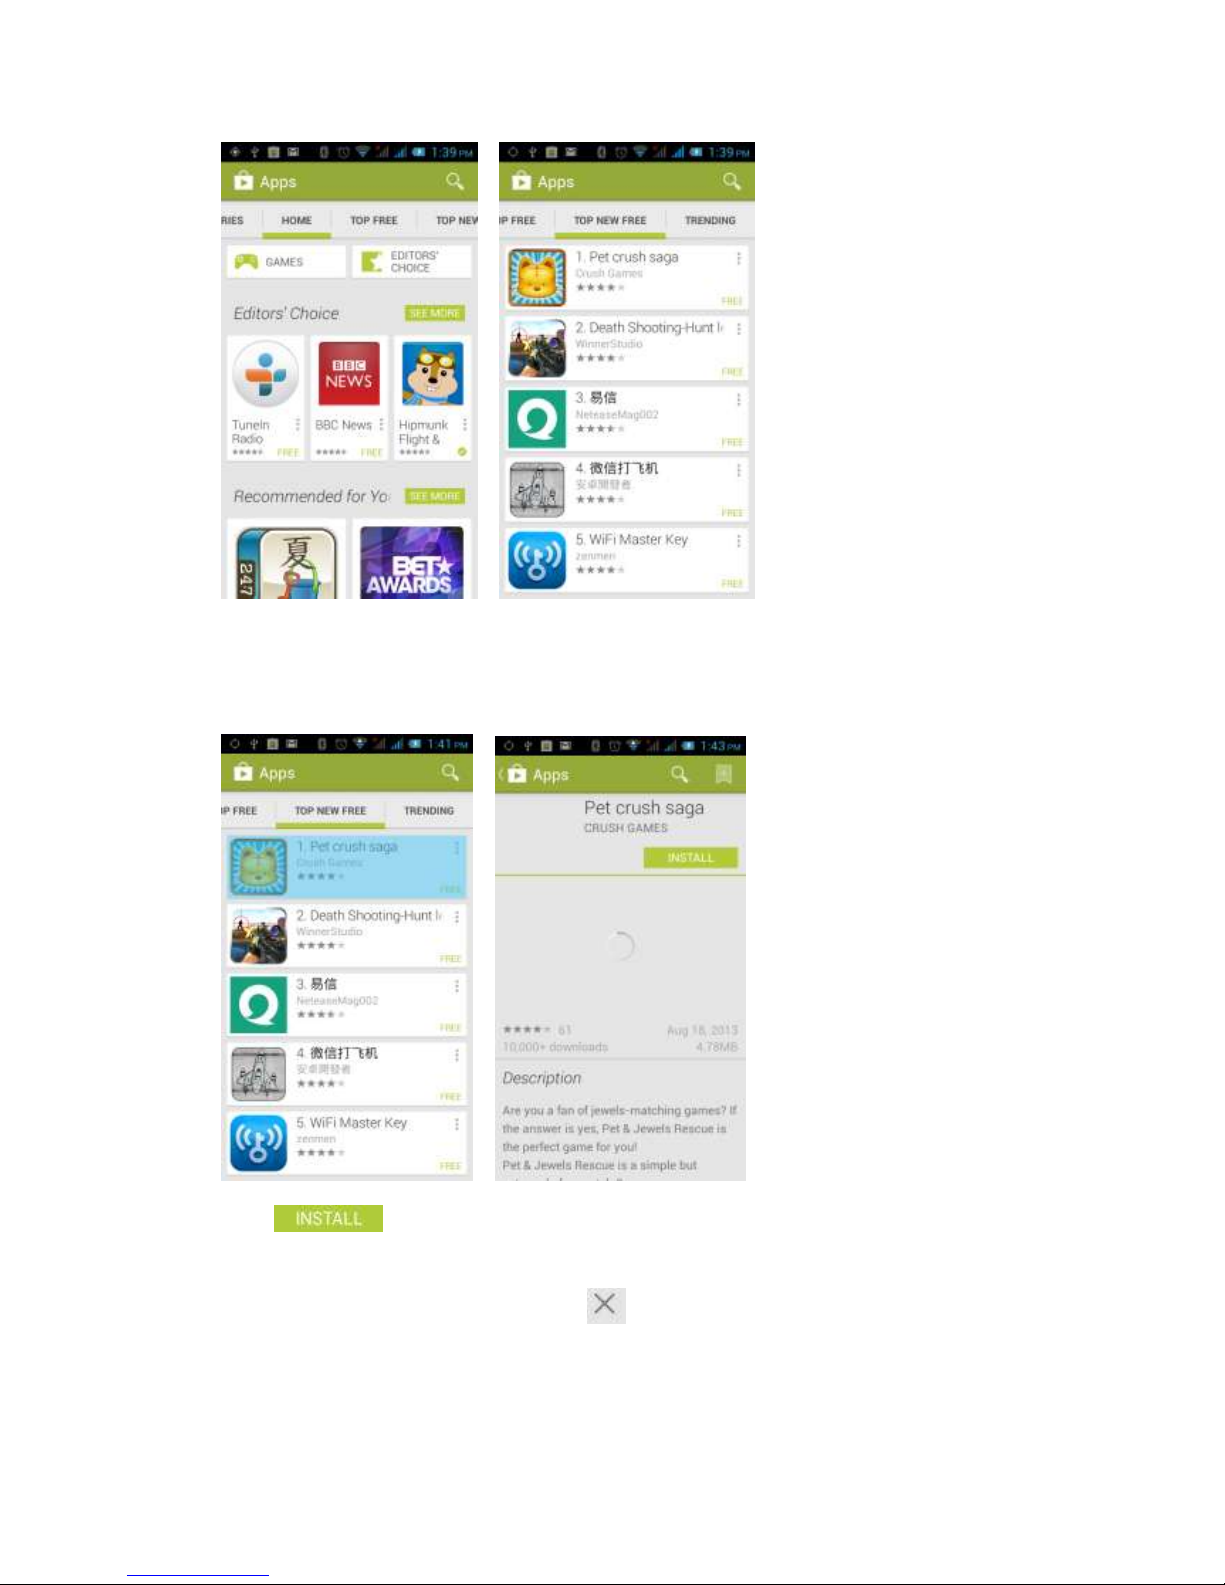
to enter the Play Store. When you first enter the Play Store, you will need to
create a new account. Follow the prompts to complete the creation process. When
you use the account to enter the Play Store home page, you can see a range of
mobile phone software. You can choose according to your needs and install it to your
phone. You can slide the screen to the category, Top Free, Top Free new products,
fastest rising to find the popular software.
Page 32
31
In the Play Store screen, click an icon on your favorite software, enter the installation
interface:
Click to install the selected software, application permissions in the
popup choose to accept, the phone automatically starts to download the software, if
you want to cancel the download, click next to the download progress bar.
Page 33
32
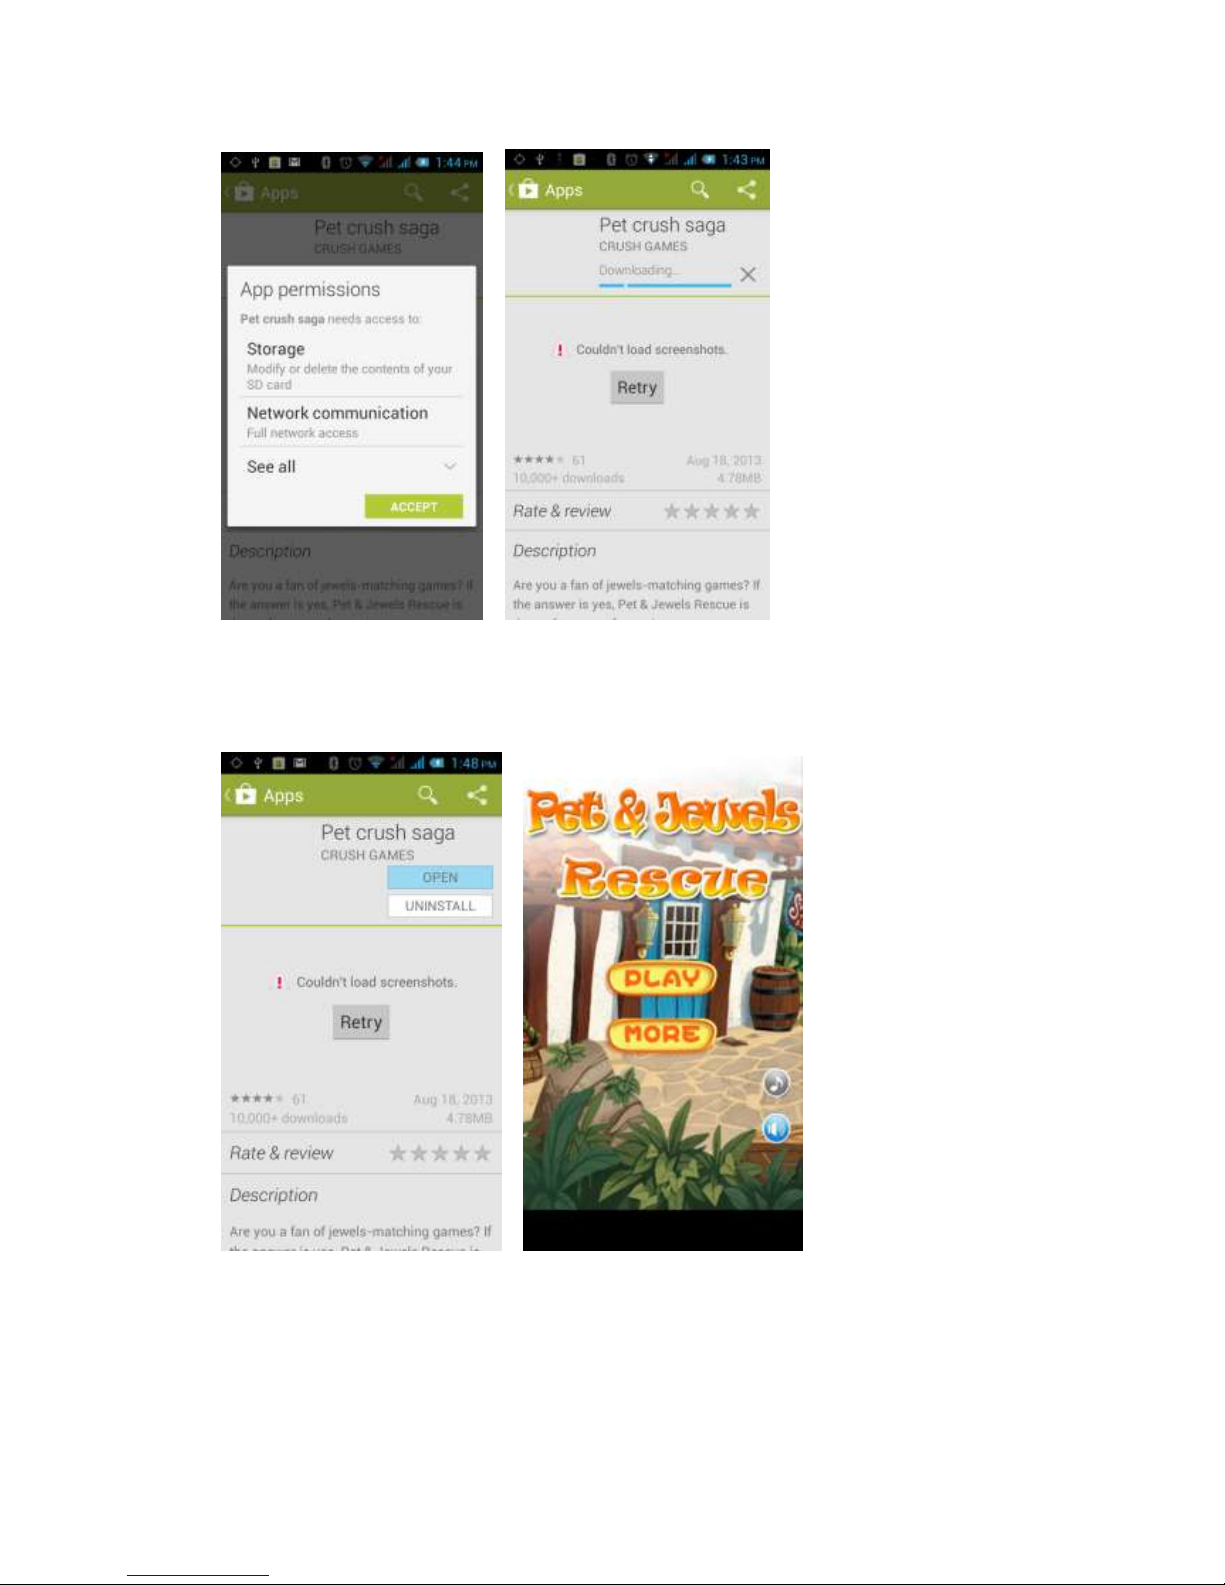
After the download is complete, click Open, you can start to apply your newly
downloaded software:
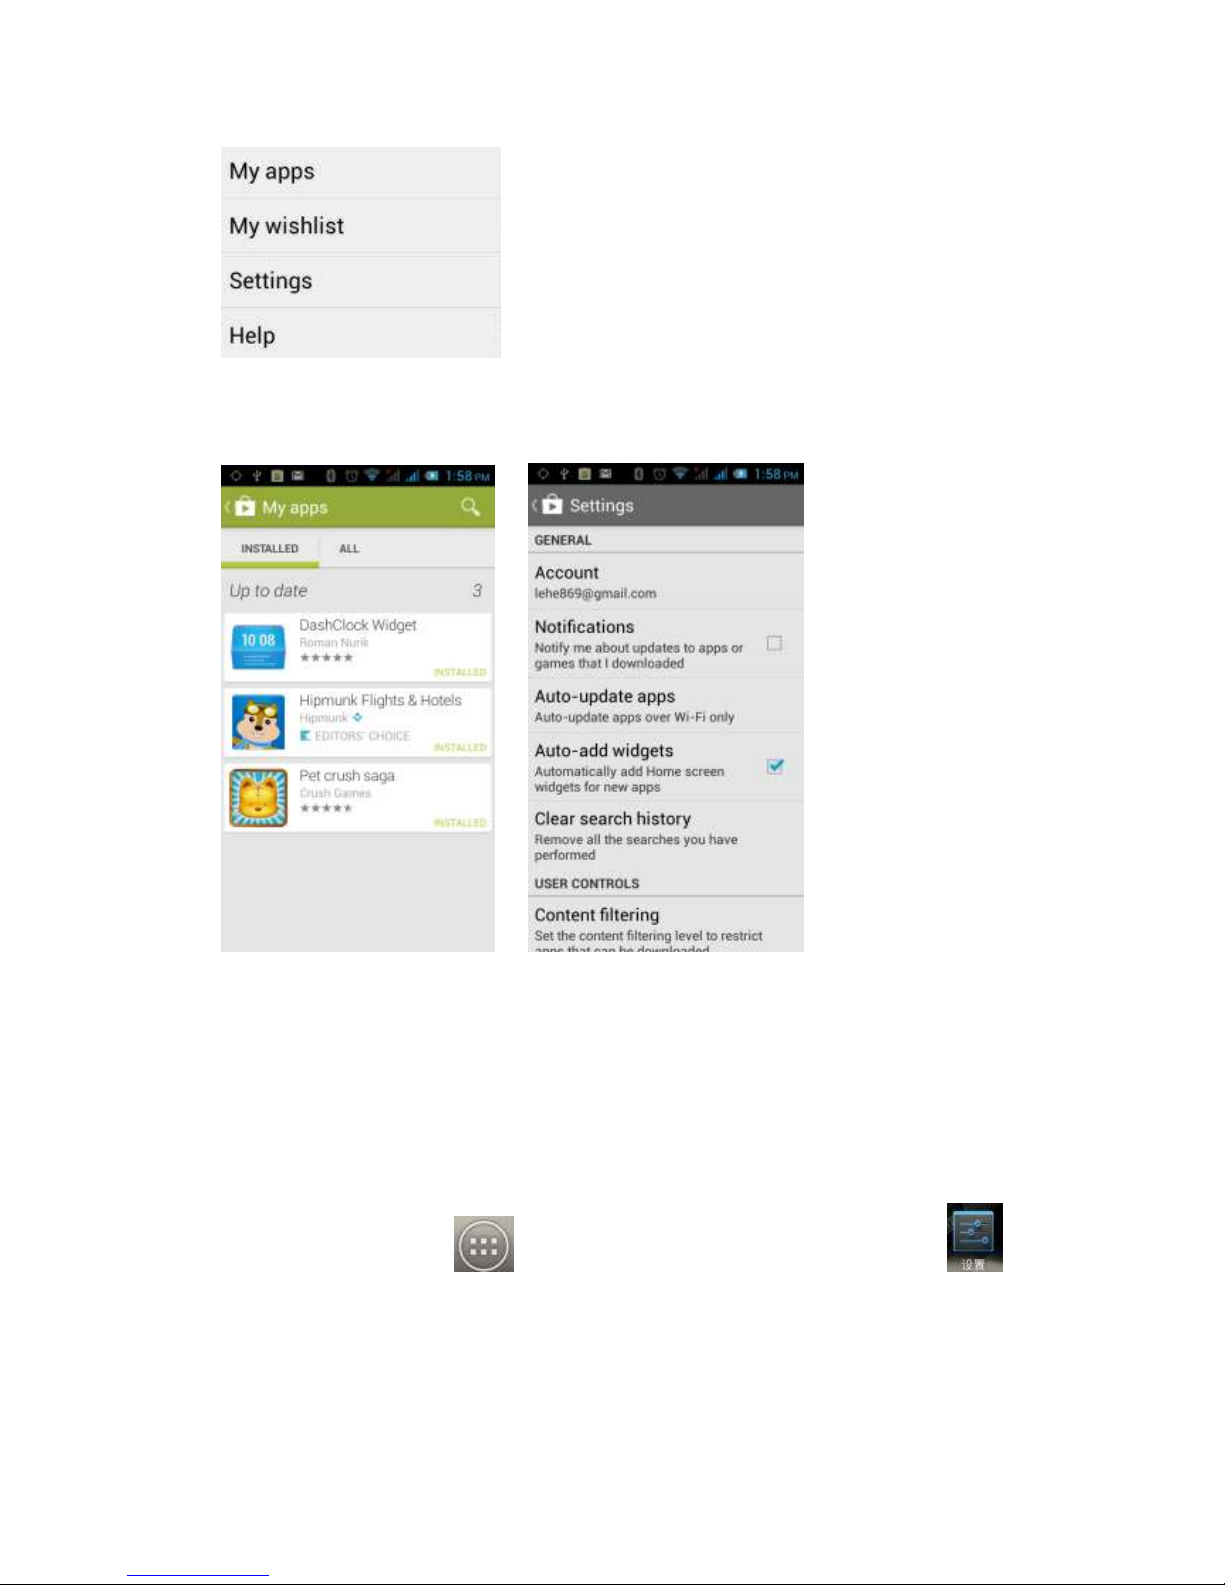
In the Play Store homepage, click the menu key to bring up the following menu:
Page 34
33
Select "My Application", to view your "Installed application" and "All Applications",
you can also reset accounts, notifications, auto-updating applications, password, etc.
Other Google services, such as: Gmail, Google set, Google Talk, will need to apply for
Google account, after landing Google services in order to properly use Google related
services.
Settings
On the main screen, tap to enter the application menu and then click
to enter the settings to your personalize your phone.
Page 35
34
4.1 SIM Management
Set the SIM card for voice calls, video calls, messages, data connections and other
settings.
4.2 WIFI
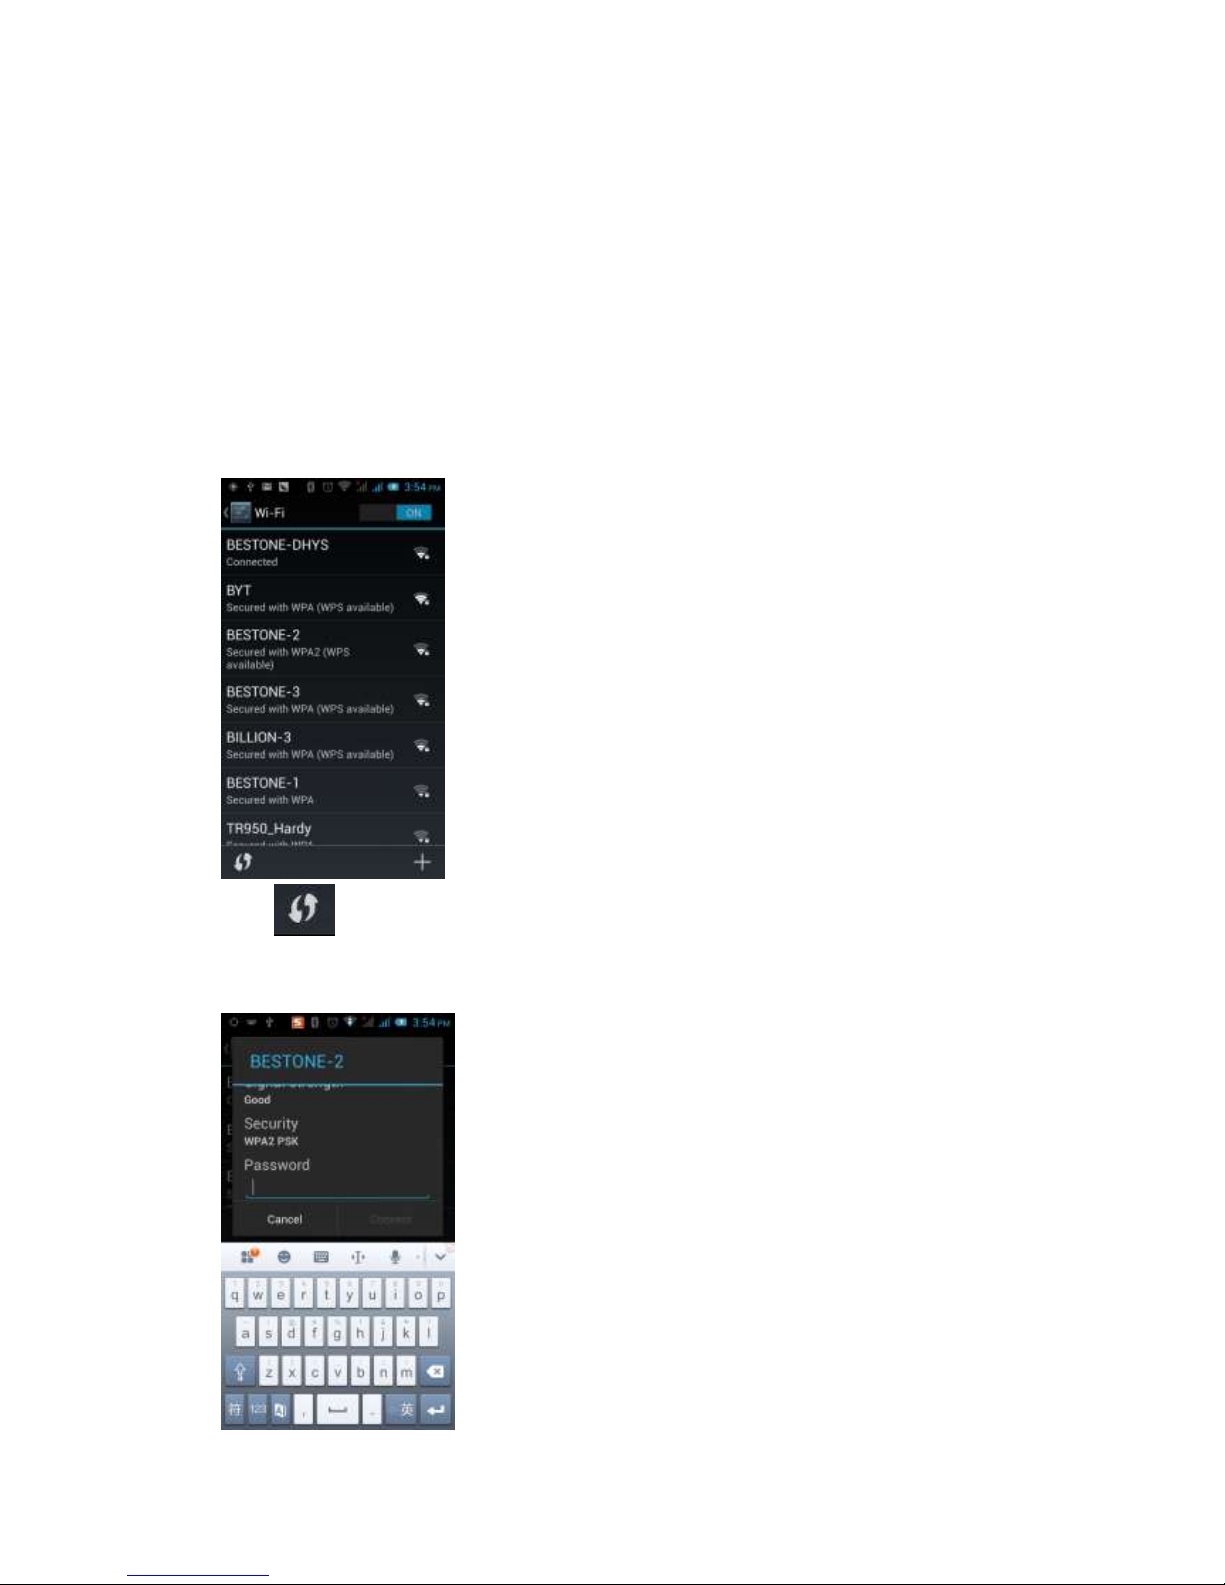
Click WIFI to enter the WIFI interface. Click the "Open" icon on the top right of the
screen, your phone will automatically search for wireless networks within range.
Click to refresh the network list. You can click on your wireless network and
enter the password in the input area. At this stage click "Connect". The connection is
completed when the screen displays "Connected".
Page 36
35
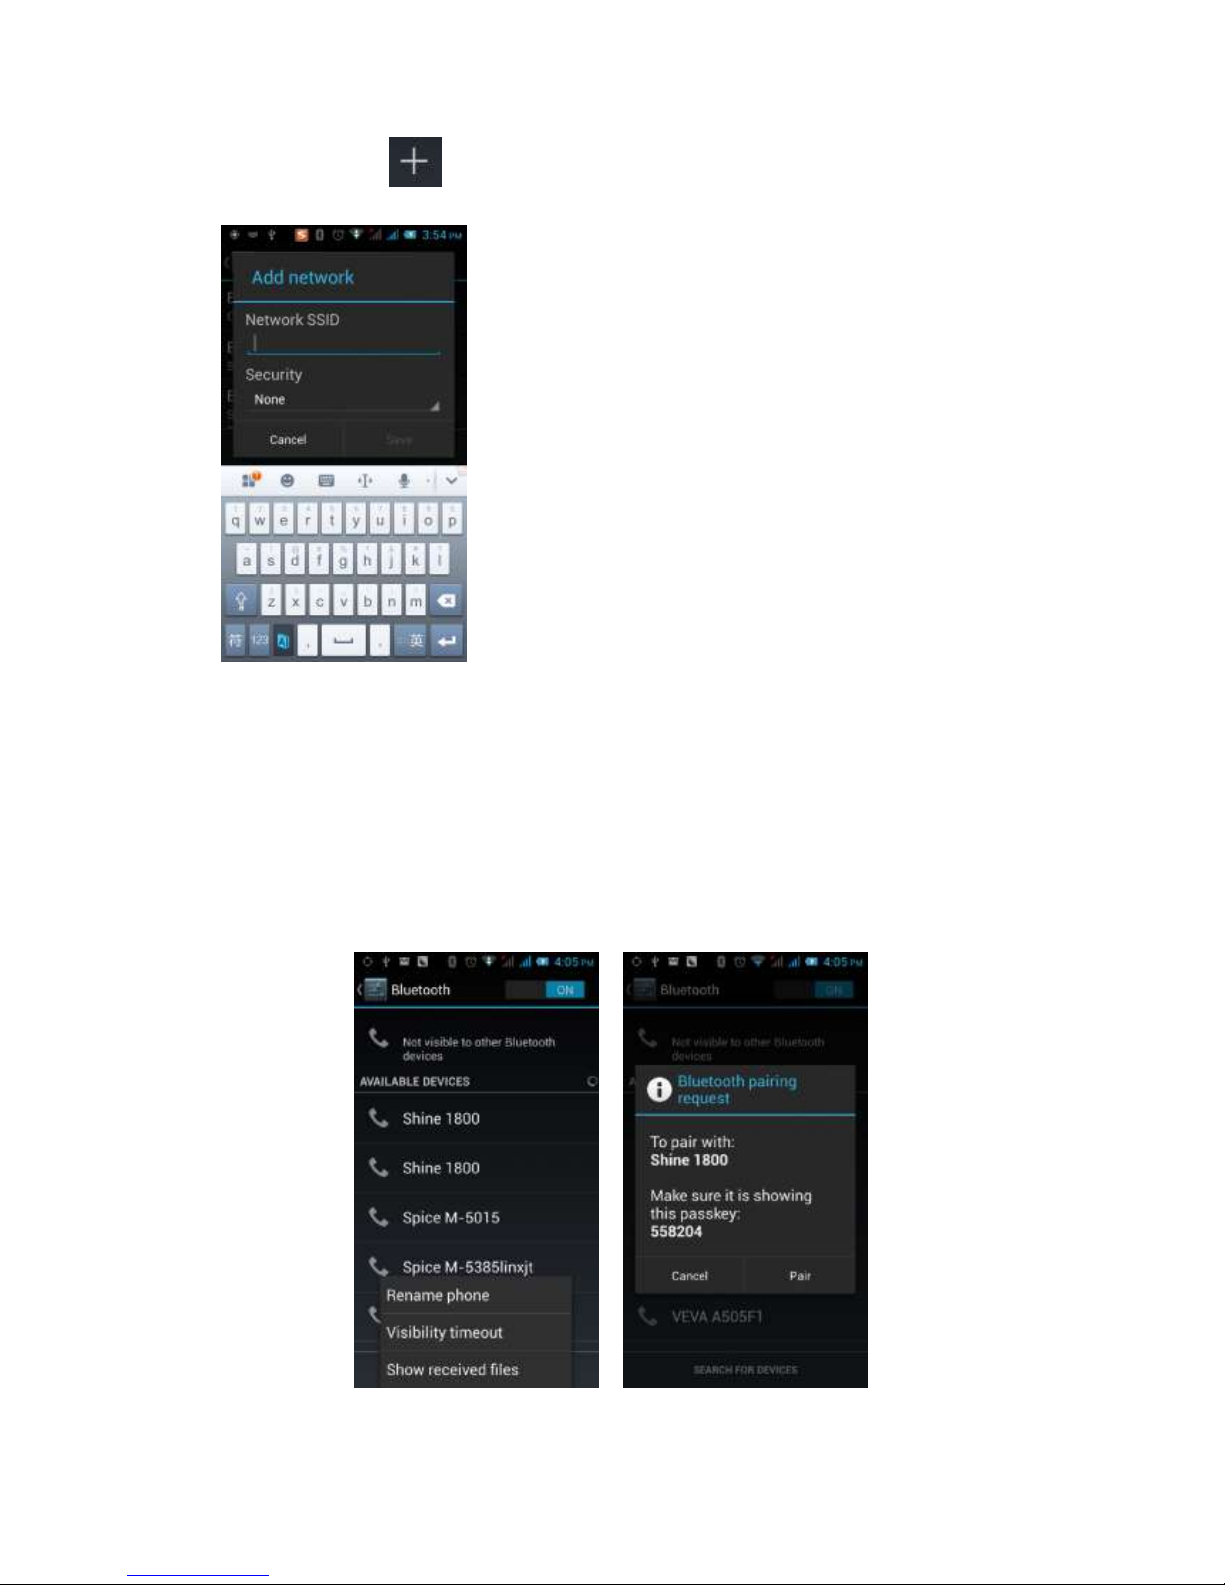
You can also click on the screen in the lower right corner add a network:
4.3 Bluetooth
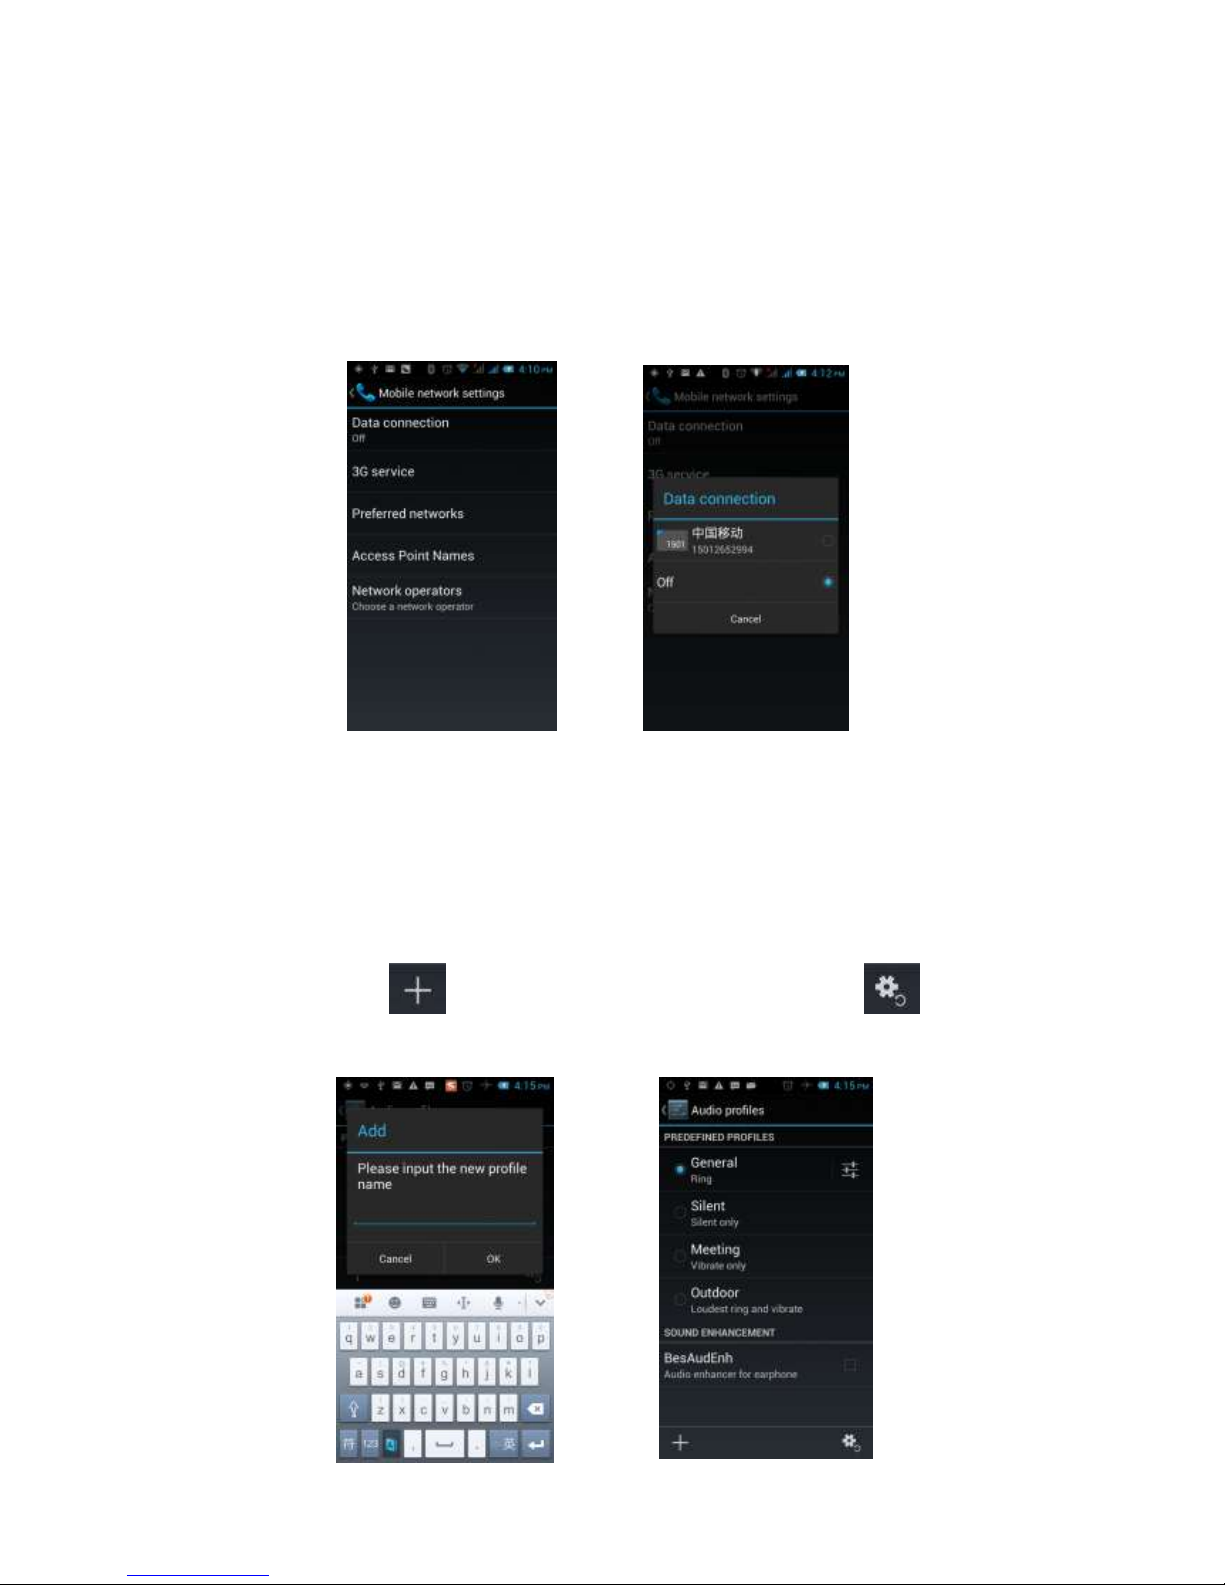
To activate Bluetooth, the phone will automatically search for Bluetooth devices seen
locally. You can click on any device with which to pair another device.
Page 37
36
4.4 Mobile Network
In this menu you can turn the data connection on or off enabling 3G services,
Network operators and other options:
4.5 Flight Mode
When selected, it will disable all wireless connections, calls and messages will not
available.
4.6 Scenes Mode
The following modes can be set up on the phone: Standard, Mute, Meeting, Outdoor;
You can also click on the left corner to add a new mode. Click on the
lower right corner to return to the default settings.
Page 38
37
4.7 Display
Open to personalize the phone brightness, scene, wallpaper, themes and
automatically rotate the screen, etc.
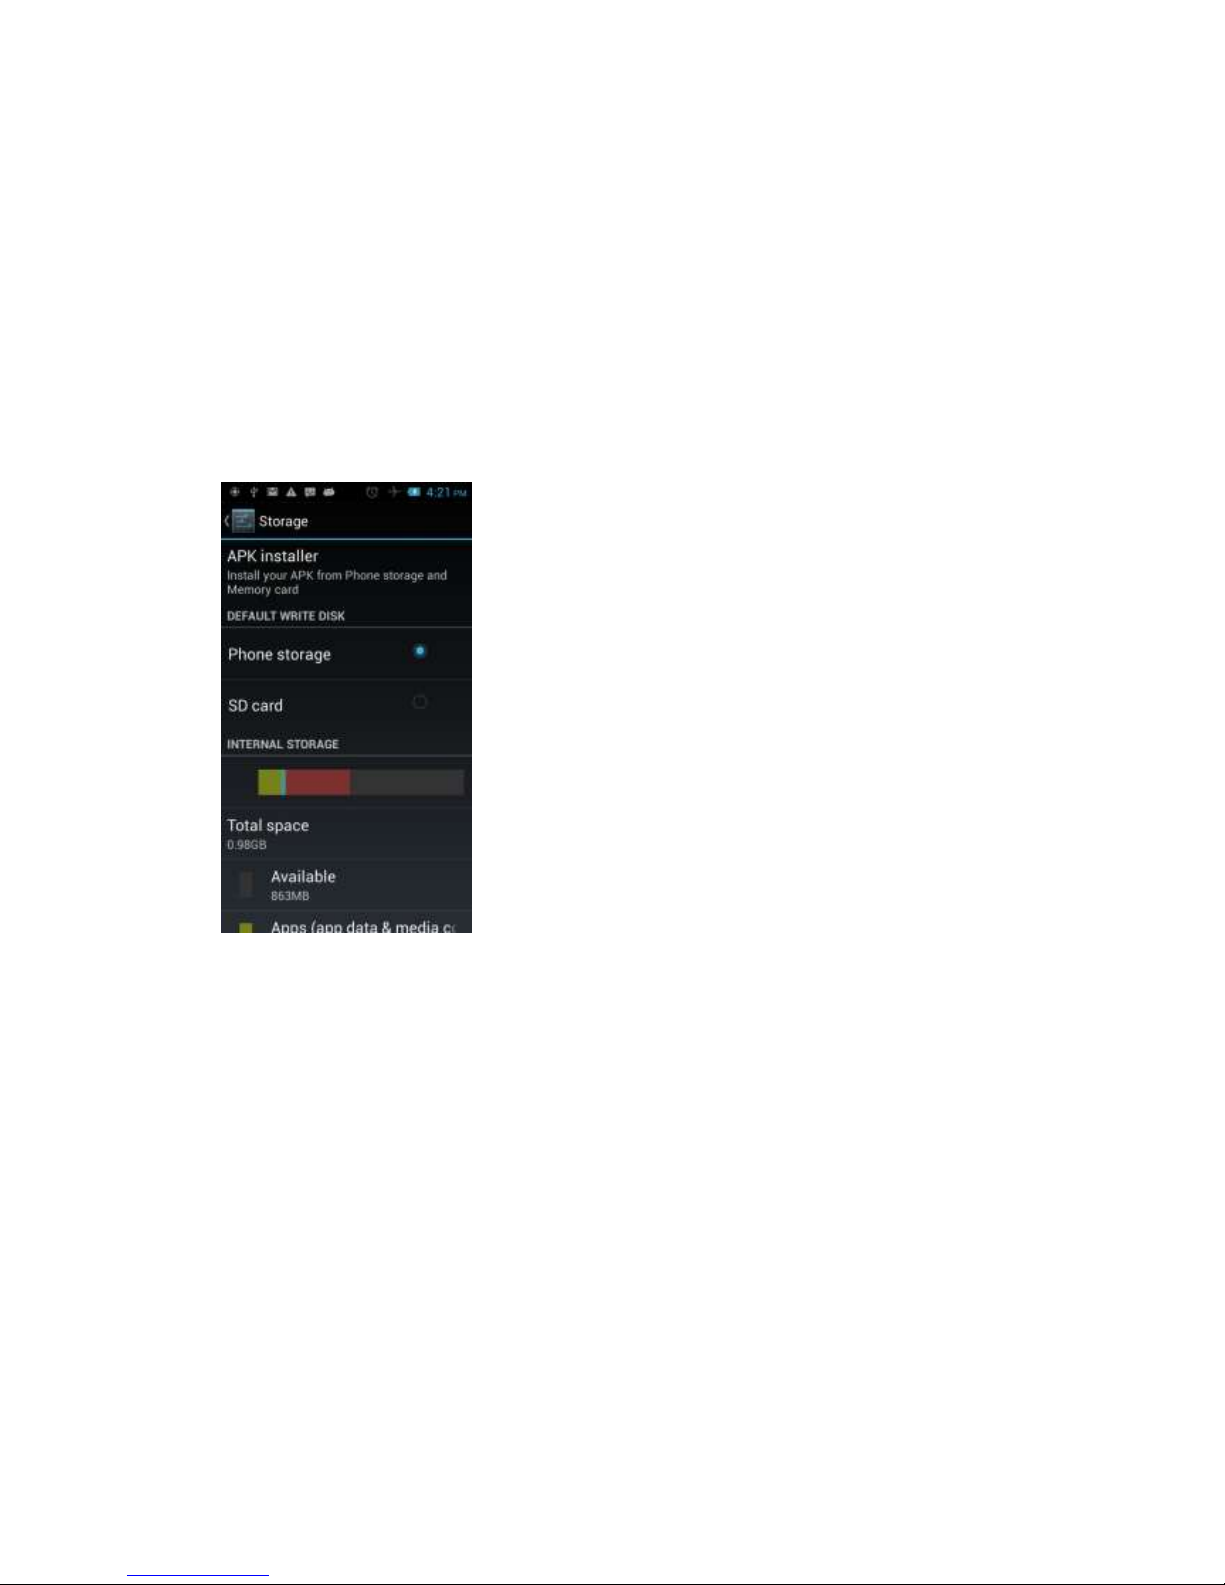
4.8 Storage
You can view the phone and SD card’s total capacity and free space. You can choose
the preferred installation location and format the phone memory.
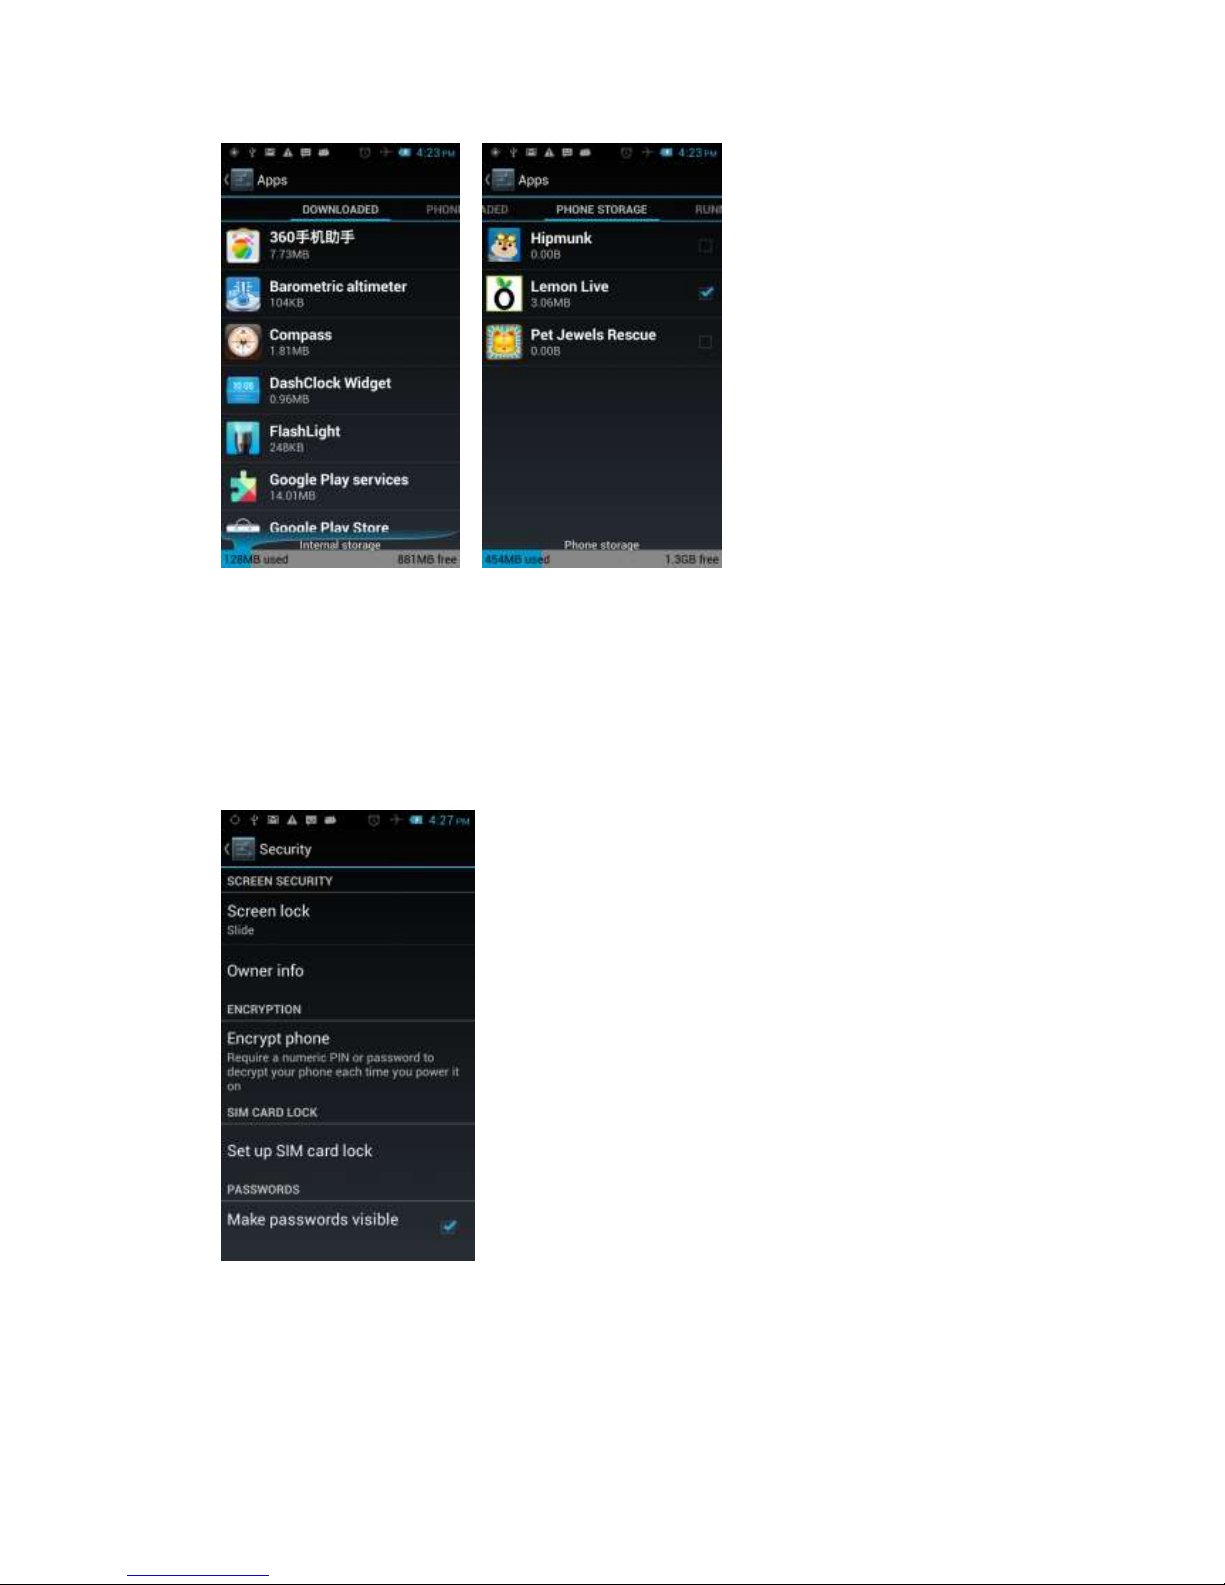
4.9 Application
You can view the phone has downloaded applications, phone storage applications,
running applications and all applications. You can click on the menu key to reorder
these programs by size.
Page 39
38
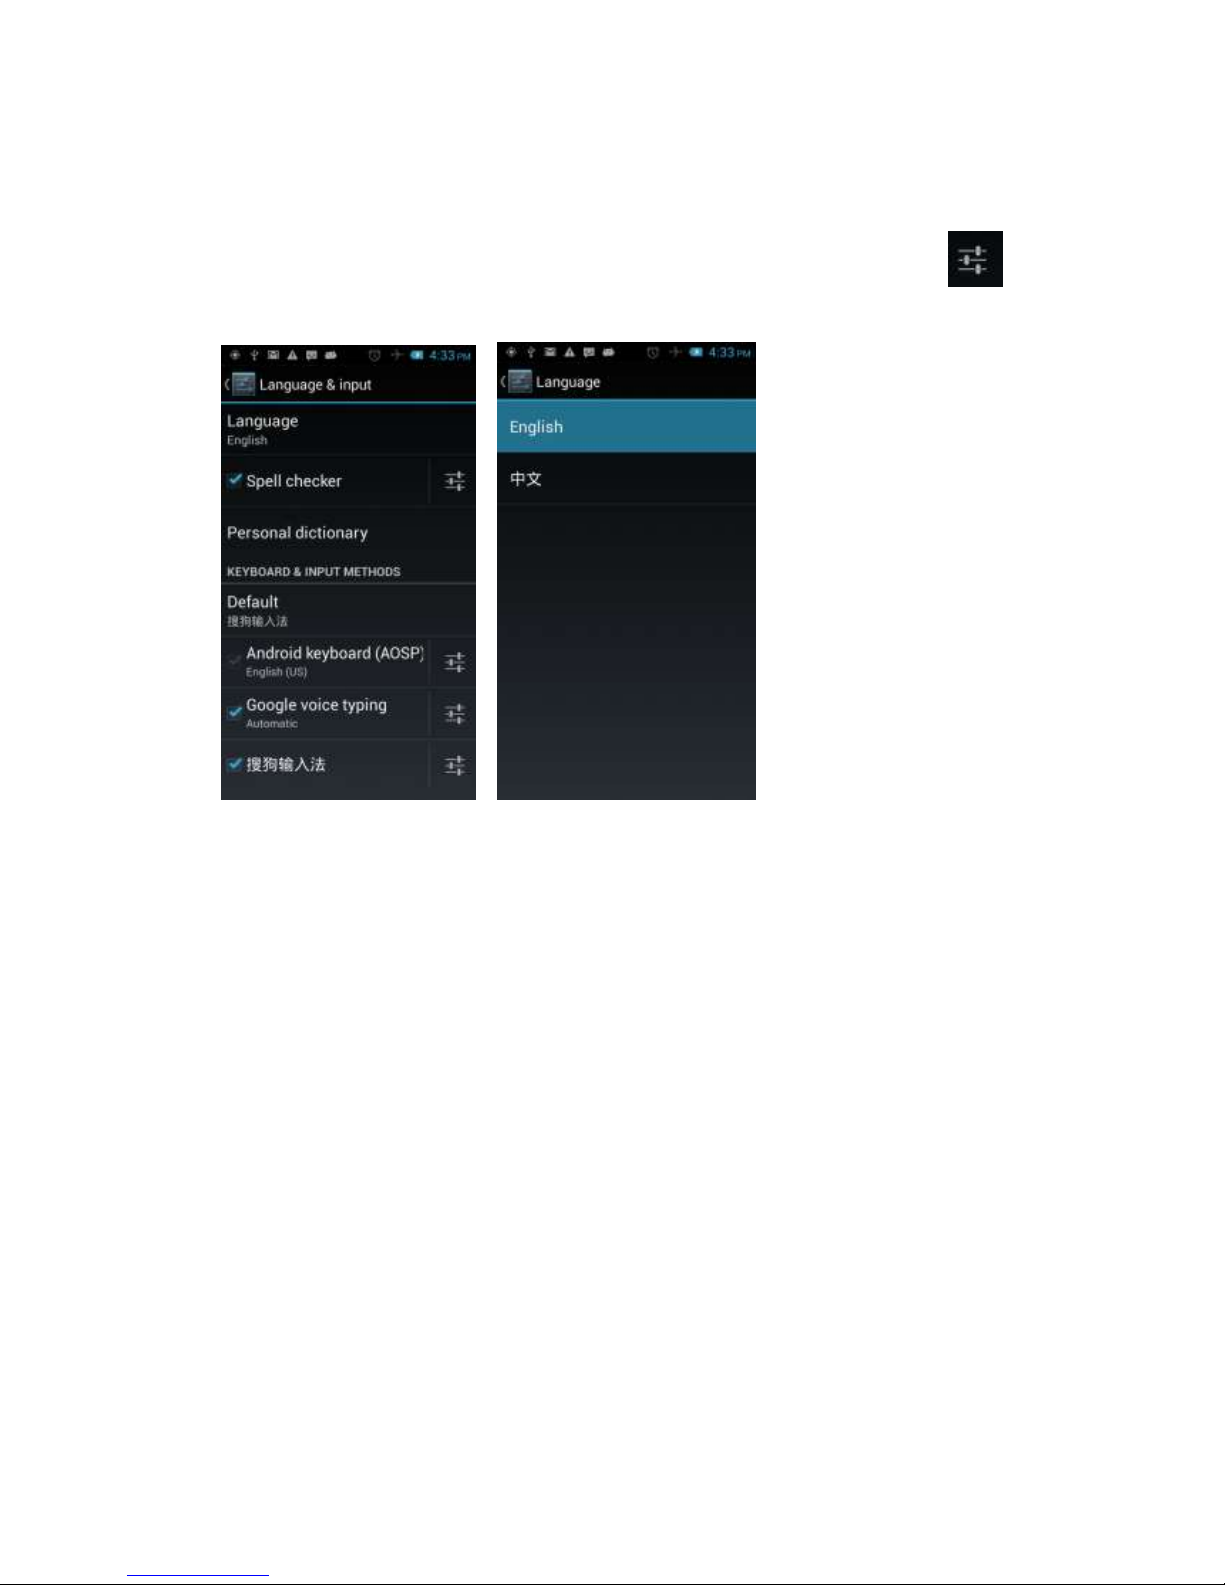
4.10 Security
Set the screen security, SIM card lock, password, device management, credential
storage and other settings:
Page 40
39
4.11 Language and Input Method
You can choose your preferred language and input method. You can also click
for the input method for the relevant settings:
4.12 Backup and Reset
You can backup your data, automatically restore, restore the factory settings and
operations. Restore factory settings will delete all personal data on your phone.
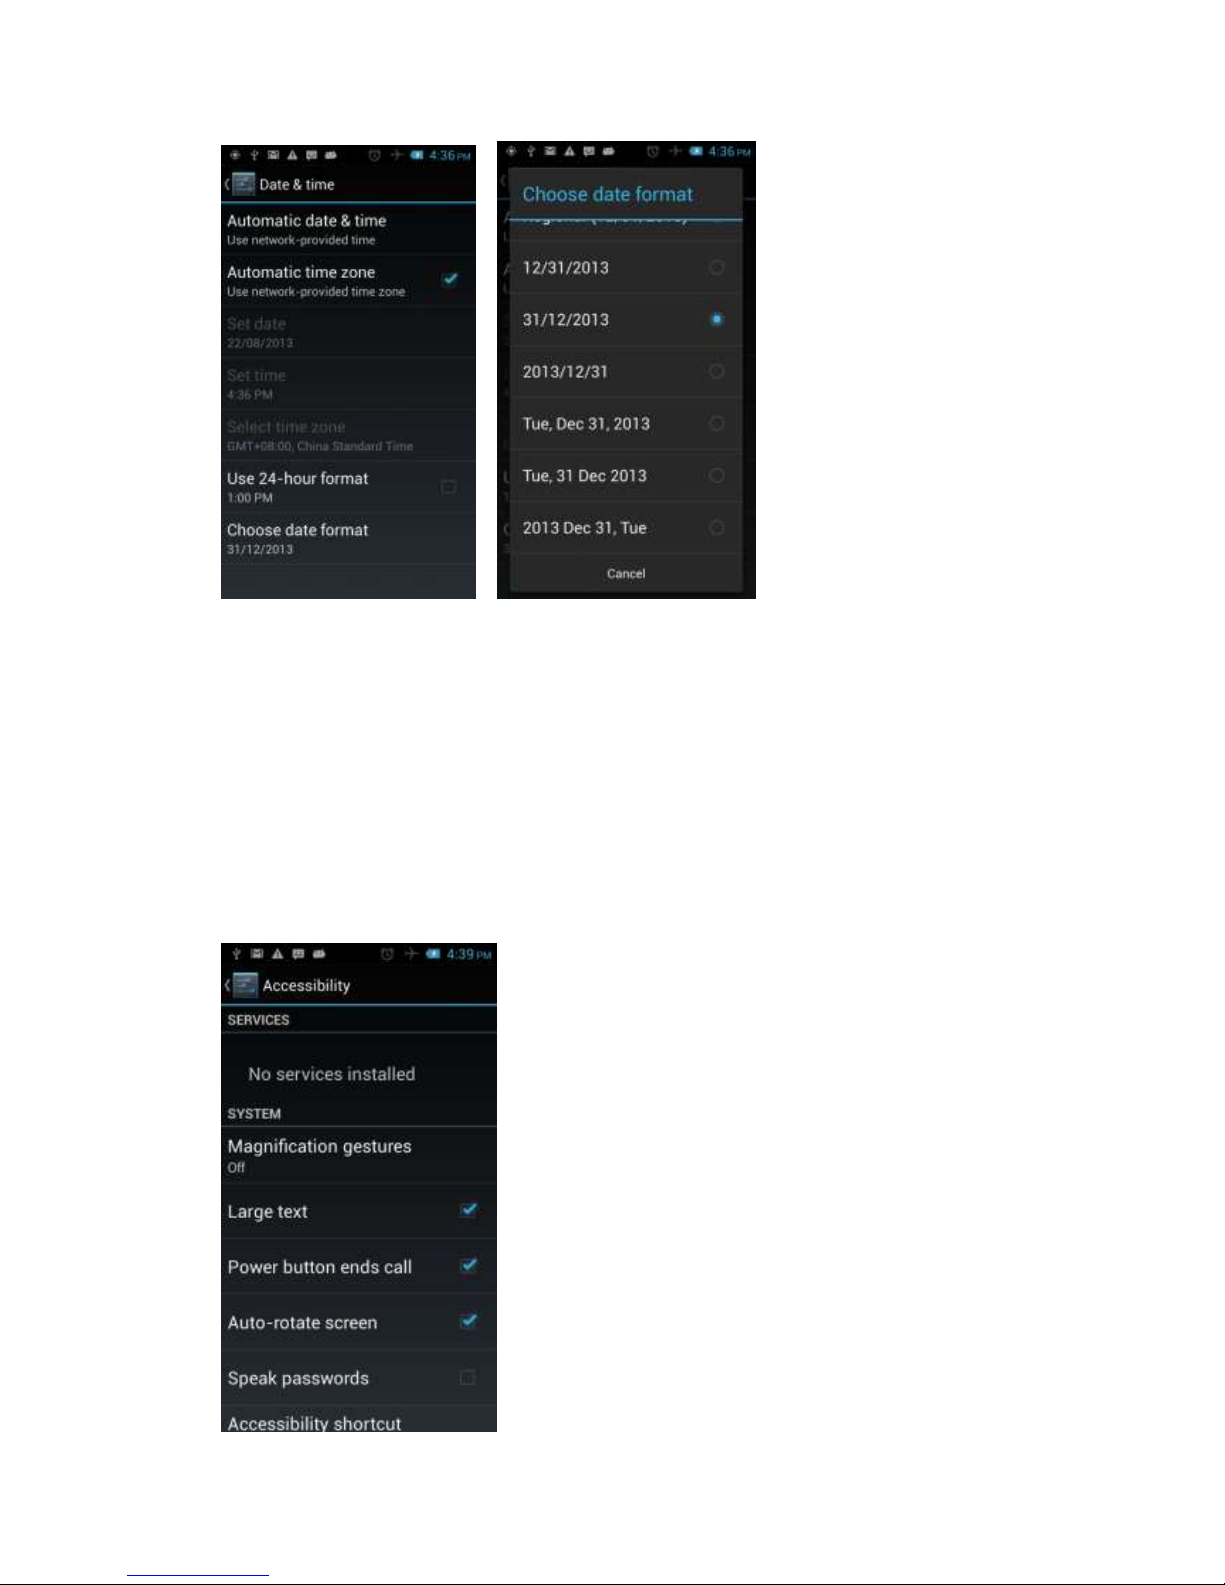
4.13 Date and Time
You can choose to automatically determine the date and time, and automatically
determines the time zone, use the 24-hour format, and select the date format and
other operations:
Page 41
40
4.14 Schedule Power On/Off
Set the time to automatically turn on or off the phone.
4.15 Auxiliary Function
To set fast boot, auto-rotate screen, large font, press the "Power" key to end the call
and other functions:
Page 42

41
4.16 Developer Options
You can set a desktop backup password, unlock screen, the SD card, read and write
protection, USB debugging and other different applications.
4.17 About Phone
View phone's current signal, power, service status, the phone's software and
hardware information.
Common Problems & Solutions
If an exception occurs while using your phone, please refer to the following table to
troubleshoot.
Common
problems
The causes
The solutions
Poor signal
Using the mobile phone in poor
reception area, such as nearby
buildings or basement, the radio
waves cannot effectively
communicate;
Try to avoid
Using the mobile phone in a call
dense period, such as commute
time, line congestion caused by
the inability of the calls.
Try to avoid
Associated with the launch of the
base station network built near
and far
Can ask Internet service
providers provides service
area map
Echo or noise
Poor network trunk is a regional
problem
Hang up and redial, trunk
lines may replace good one.
Some regional bad line
Standby time
shorter
Standby time is related to the
network system setting
Turn off the mobile phone in
the poor reception area.
The battery needs to replaced,
please replace new battery.
Please replace new battery.
Page 43

42
The phone will continue to search
base station, it will use a lot of
battery power, causing the
standby time to become shorter.
Please move to strong signal
place or turn off the phone.
Unable to boot
The battery power is exhausted.
Check the battery power or
charge it.
SIM card error
SIM card is damaged
Contact your network service
supplier.
SIM card not installed
Make sure SIM Card has been
installed.
SIM card metal surface have dirt
Use clean cloth to brush the
SIM card metal contact point
unable to
connect the
network
SIM card is invalid
Contact your network service
supplier.
Beyond the GSM or 3G network
service area.
Ask your network service
supplier the service area.
The signal is weak
Please move to the strong
signal place to retry
Calls unable to
call
set up the call barring function
cancel the call barring
function
set up the fixed dial function
cancel the fixed dial function.
PIN error
input incorrect PIN Code in three
times
contact your network service
supplier.
Unable to
charge
Battery or charger damaged
need to replace new battery
or charger
Charge in lower than -10℃ or
higher than 55℃ environment
change the charging
environment
Bad contact
check whether the plug
connection well
Unable to add
phonebook
record
Phonebook memory is full
delete some part of
phonebook record.
unable to set up
some function
Network provider does not
support this feature, or you did
not apply for this function
contact your network
provider.
 Loading...