

Page 1

TeckNet Backlit X701
Professional Gaming Keyboard
Page 2
Welcome
Thank you for purchasing this TeckNet X701 gaming keyboard and
mouse combo. To ensure optimum performance and safety, please read
these instructions carefully before operating the product. It is strongly
recommended you keep this manual for future reference.
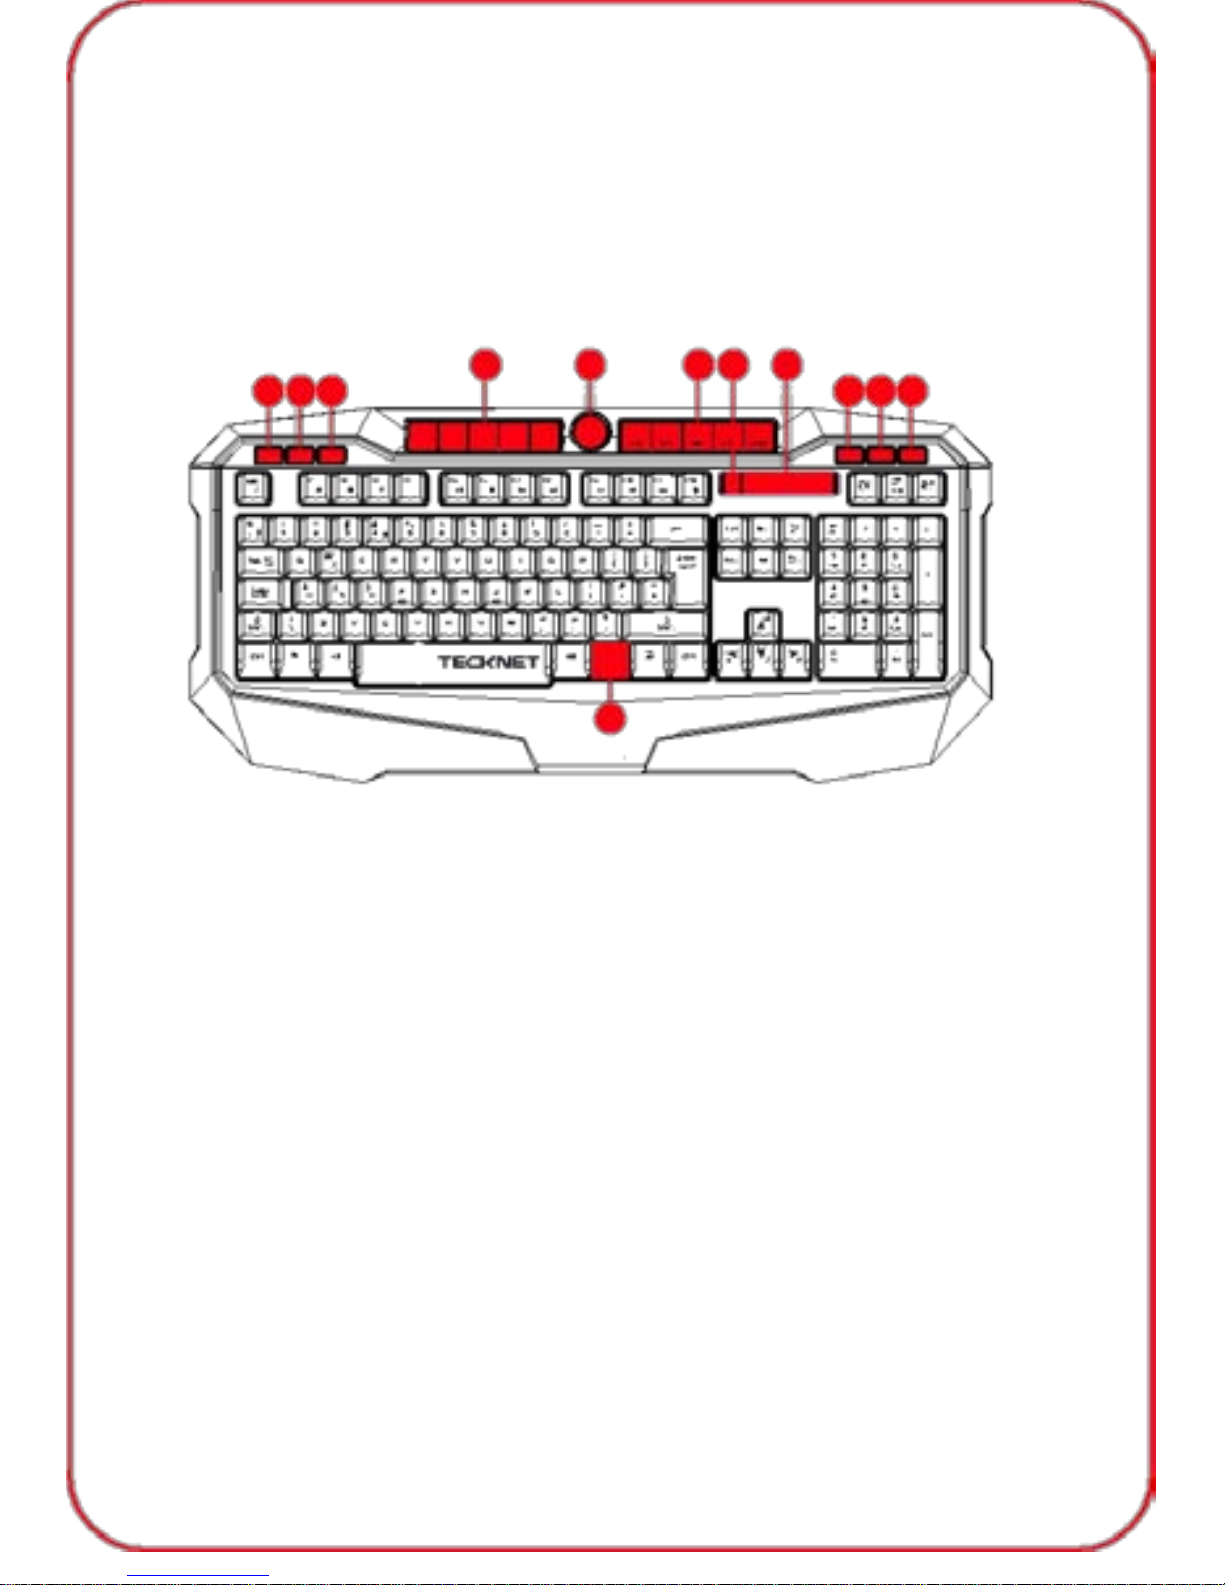
Product Layout:
1
2 3 5 4
5
7 8 9 10
11
6
1. Mr Key
2. Game Lock Key
3.
Backlight Switch Button
4.
Backlight Adjustment Knob
5.
Custom Function Key
6.
FN Key
7.
Mr Indicator
8.
Indicator
9.
Media Play Key
10. Mute Key
11. Power on/off Key
Package Contents
1 x TeckNet Backlit Gaming Keyboard
1 x TeckNet M268 Gaming Mouse
1 x User Manual
1 x Warranty Card
01
Page 3

TeckNet X701 Backlit Gaming Keyboard Features and
Specifications:
1. Three colours of backlight ( blue, red, purple) with adjustable brightness.
2. Adjustable “breathing” light.
3. Special 19 key for anti-collision.
4. 10 user-defined keys.
5. Game lock key.
6. Multimedia functions with quick internet access.
7. Water resistant.
8. Direction key changeable.
9. Both keyboard and mouse use USB 2.0 interface, plug & play, no
driver required.
10. Adjustable, three speed levels.
11. It is compatible with Windows OS (Windows 98, 2000, XP,
Vista, WIN7, WIN8).
12. USB Cable length: 1.5 metres.
13. Operating voltage: +5VDC±10%
14. Operating current: <350mA
15. Keystroke force: 55±1 0g
16. Key life: 3 million keystrokes.
TeckNet M268 Gaming Mouse Features and Specifications
Note: This mouse is not programmable and no driver is needed.
1. 6D optical gam ing mouse with precise sensor.
2. Plug & Play.
3. Unique desig n.
4. Inner 40g additional fine-tunin g weights for specialised gam i n g.
5. 1000/1600/2000 DPI shift, the default setting is 1000DPI.
6. Enhanced refresh rate.
7. Durable & comfortable scroll wheel design.
8. Fibre knit cable with magnetic ring and gold USB port.
9. Compatible with Windows OS (Windows 98, 2000, XP, Vista,
WIN7, WIN8).
10. Working voltage: 5.0V DC.
11. Current rating: 100mA Max.
12. Fram e rat e: 40 00 frames/s e c .
13. Key life cycle: more than 3,000,000 clicks.
14. Dimension: 126 x 70 x 39mm (LxWxH).
15. Weight: 150g.
02
Page 4

TeckNet M268 Gaming Mouse DPI switch
The mouse supports 1000DPI, 1600DPI and 2000DPI. To change
the setting, press the DPI button.
The defa ul t s etti ng is 1000DPI .
Press the DPI button on the top of the mouse once to change from
1000DPI to 1600DPI, the blue light will increase in brightness.
Press the DPI button again to change from 1600DPI to 2000DPI, the
blue light will further increase in brightness.
TeckNet X701 Gaming Keyboard functions:
19 specia l non-c onflicting keys
19 keys: Q, W, E, A, S, D, Z, X, C, V, SPACE, CTRL(Strg i n DE versi on) ,
Shift( in DE versi on) , CTRL(Strg in DE versi on) , Alt, up, down, l eft and
right can be used simultaneously wit hout conflicting.
3 adjustable keyboard speeds
FN+Q keys allow adjustment of the repeat rate of the keys in
Characters Per Second (CPS), similar to changing the DPI of
the mouse. Three levels are available, 20, 30 and 60CPS.
Pressing the FN + Q keys will change the speed to 20 CPS and the
Game Key LED will flash once. Pressing again will change to
30CPS and the LED will flash twice. Press again to change to
60CPS an d t he LED wil l fl ash three tim es. P r ess ing agai n wil l
change back to the default setting.
User-defined key settings
10 keys, M1-M10 are c ustom isable keys. Game payer s can arbitraril y
assign the shortcut key features accor ding to thei r own needs.
03
Page 5

Customising the keys
Using M1 as an example:
1. Press and hold the MR key then press the M1 key and then
release both keys. The yellow LED on the “Mr” key will flash.
2. Enter the custom key features that y ou want (such as: Z , D, R, T, H etc).
3. Press the “Mr” key again to save your choice of functions. After
successfully saving the custom function, the yellow LED on the “Mr”
key will fla sh 5 times.
4. Follow the same procedure for customisation of the other M1-M10 keys.
5. Each user-defined key (M1-M10) is capable of being customised with
a function consisting of up to 40 different characters (letters, numbers
and other arbitrary symbols).
6. Note: Character “€”, press Ctrl+Alt+4(only available in UK version).
Changing the user-defined keys:
1. Press and hold the MR key then press the M1 key and then
release both keys. The yellow LED on the “Mr” key will flash.
2. Select the new functions you want (such as: Z, D, R, T, H etc).
3. After selection, press the “Mr” key again to save the function and
the yellow LED on the “Mr” key will flash 5 times to indicate that
the new function has been saved.
4. Follow the same procedure to change user-defined functions for
the other M1-M10 keys.
Clear a user-defined function key
To clear a single user-defined function key (eg M1) press the “Mr”+“M1”
and the yellow LED on the “Mr” key will start flashing. Press “M1” and
then pres s “Mr” to save the change. The yellow “Mr” LED will stop
flashing, indicating that the function of the M1 key has been deleted and
there is no longer any user defined function. Follow the same procedure
to clear user-defined functions for the other M1-M10 keys.
Clear all user-defined functions
To clear all user -define function keys, simultaneously press
“FN+Del”("FN + Entf" for DE version). The backlight will flash and the
yellow “Mr” LED will illumin ate. When the yellow “Mr” LED goes out, all
the user-defined functions are cleared.
04
Page 6

Backlight on/off switch
The backlight key is on the left side of the keyboard indicated by a
light bulb symb ol .
Press once to turn the backlight on, pressing it again
will turn the
backlight off.. When the backlight switch is on, press FN+ (scroll
lock) to change backlight color(3 colors : red, purple, blue).
Note: key is for US and UK version, it would shou “Rollen” in
DE version.
9 levels of backlight brightness
There are 9 adjustable levels of backl ight brightness. Turn the dial
clockwi se to incr ease the br ightness, turning the dial anti cl oc k wise wil l
decre ase th e br ightnes s.
3 backlight “breathing” colours
Switch on backl ight , then pres s FN+F1 2 to ac ti v e br ea thi n g f unc t i o n,
the keyboard will enter the “breathing” mode. The backlight will
automatically cycle through the 3 colours(red, purple, blue). To turn off
the “breathing” mode, simply pressing FN +F12 again to turn off the
“breathing” mode. The backlight will flash twice to indicate that the
“breathing” mode has been successfully turned off.
3 levels of backlight “breathing” rate
Switch on backlight , then press FN+F12 to active breathing function, Press
FN+ to inc r ease the rate of the LED backlight “breathing”. The rate of
backlight “breathing” c an be adjusted to suit your mood or game. There are
three lev els, the default breathing speed being 10MS.
Press FN+ once to incr ease th e rate to 20MS (F N + in D E vers ion). Pr ess
FN+
again to increase the rate to 30MS (FN+ i n D E Version)
Game Lock Win key
The Game Lock Win key conv eniently lets the player av oid ac ci dentally pressing
the Win key (which r eturns the screen back to the desktop) dur ing gameplay.
After pr essing t he Game Lock key, the red LED will ill umi nate to indicate that t he
Win key has been loc k ed and cannot be used. Press the Game Lock Win k ey
again and the red LE D will t urn off indicating t hat t he Win key i s unl oc k ed and
the computer is ready for normal use.
05
Page 7

Exchangeable direction keys
Press the FN+W key combination allows you to use W, S, A, D keys
to switch the direction keys ↑, ↓, ←, →. The default setting is the
standard keyboard.
Quick access to the Internet and multimedia functions
Pressing the FN + F1-F10 key allows you to quickly access the I nternet and
multim edia functions. Pr ess and hold t he FN key whilst pressing any of the
F1-F10 keys allows you to access the desir ed function.
IMPORTANT SAFETY INSTRU CTION S-CAREFULLY FOLLOW
THESE INSTRUCTIONS.
1.SAVE THESE INSTRUCT IONS - This sheet contains important safety
and operating instructions.
2.Before using the product, read all instructions and caution markings on
the product, acc essori es and device using our pro duc t .
3.Thi s appli anc e is not intended for use by persons (including c hildr en) with
reduced physical, sensory or m ental capabilities, or lack of experienc e and
knowledge, unl es s they have been given supervi si on or instructi on c onc er ning
use of the appliance by a person responsible for their safety.
4.Children should be supervised to ensure that they do not play with
the appl iance.
5.Keep the product away from fire or explosion may occur.
6.For indoor use onl y. Do not expose to r ain, water, excess moistur e or snow. 7.Do
not place product in or near inflammabl e, explosive or hazardous object. 8.Do not
place in or near water, rain, excess moistur e or extr eme heat.
9.Do not operate product with damaged cord or plug.
10.Do not operate product if it has been damaged in any way.
11.Do not disassemble the product. Disassembly may result in a risk of
safety hazards.
12.Do not throw or shake the product
13.To reduce the risk of electric shock, unplug the product from the
power supply when not in use or switch off the power supply
06
Page 8

Limited 18-Month Warr anty:
What this warranty covers.
Shenzhen Unchain Technology Co., LTD. (Manuf ac turer: “Unchain” ) warrants
to the original purchaser of t his Tec k Net produc t that the product shal l be free
of defect s i n design, assembly, materi al, or workmanship.
What the period of coverage is.
Unchain warrants the TeckNet product for 18 Months.
Wha t will we do to correct problems?
Unchain will repair or replace, at its option, any defective product free
of charge (except for shipping charges for the product).
What is not covered by this warranty?
All above warranties are null and void if the TeckNet product is not
provid ed t o U nch ai n for i ns p ect ion upon Unchain’s request at the sole
expense of the purchaser, or if Unchain determines that the TeckNet
product has been improperly installed, altered in any way, or tampered
with. The TeckNet Product Warranty does not protect against acts of God
such as flood, earthquake, lightning, war, vandalism, theft, normal-use
wear and tear, erosion, depletion, obsolescence, abuse, damage due to
low voltage disturbances (i.e. brownouts or sags), non-authorized
program, or system equipment modification or alteration.
How to claim the warranty
Please contact retailers or visit TeckNet website www.tecknet.co.uk for
more information
Disclaimer
Every e f for t has be en mad e to ensure that the in form ati on an d pr ocedur es
in this guide are accurate and complete, no liability can be accepted for
any errors or omissions and we reserve the right to make any changes
without further notice to any products mentioned herein.
Warranty
We warrant that products purchased from authorised distributors will
meet the applicable product specifications and be free from all defects in
design, assembly, materials and workmanship. Please contact retailers
or visit our website for more information.
06
 Loading...