

Page 1
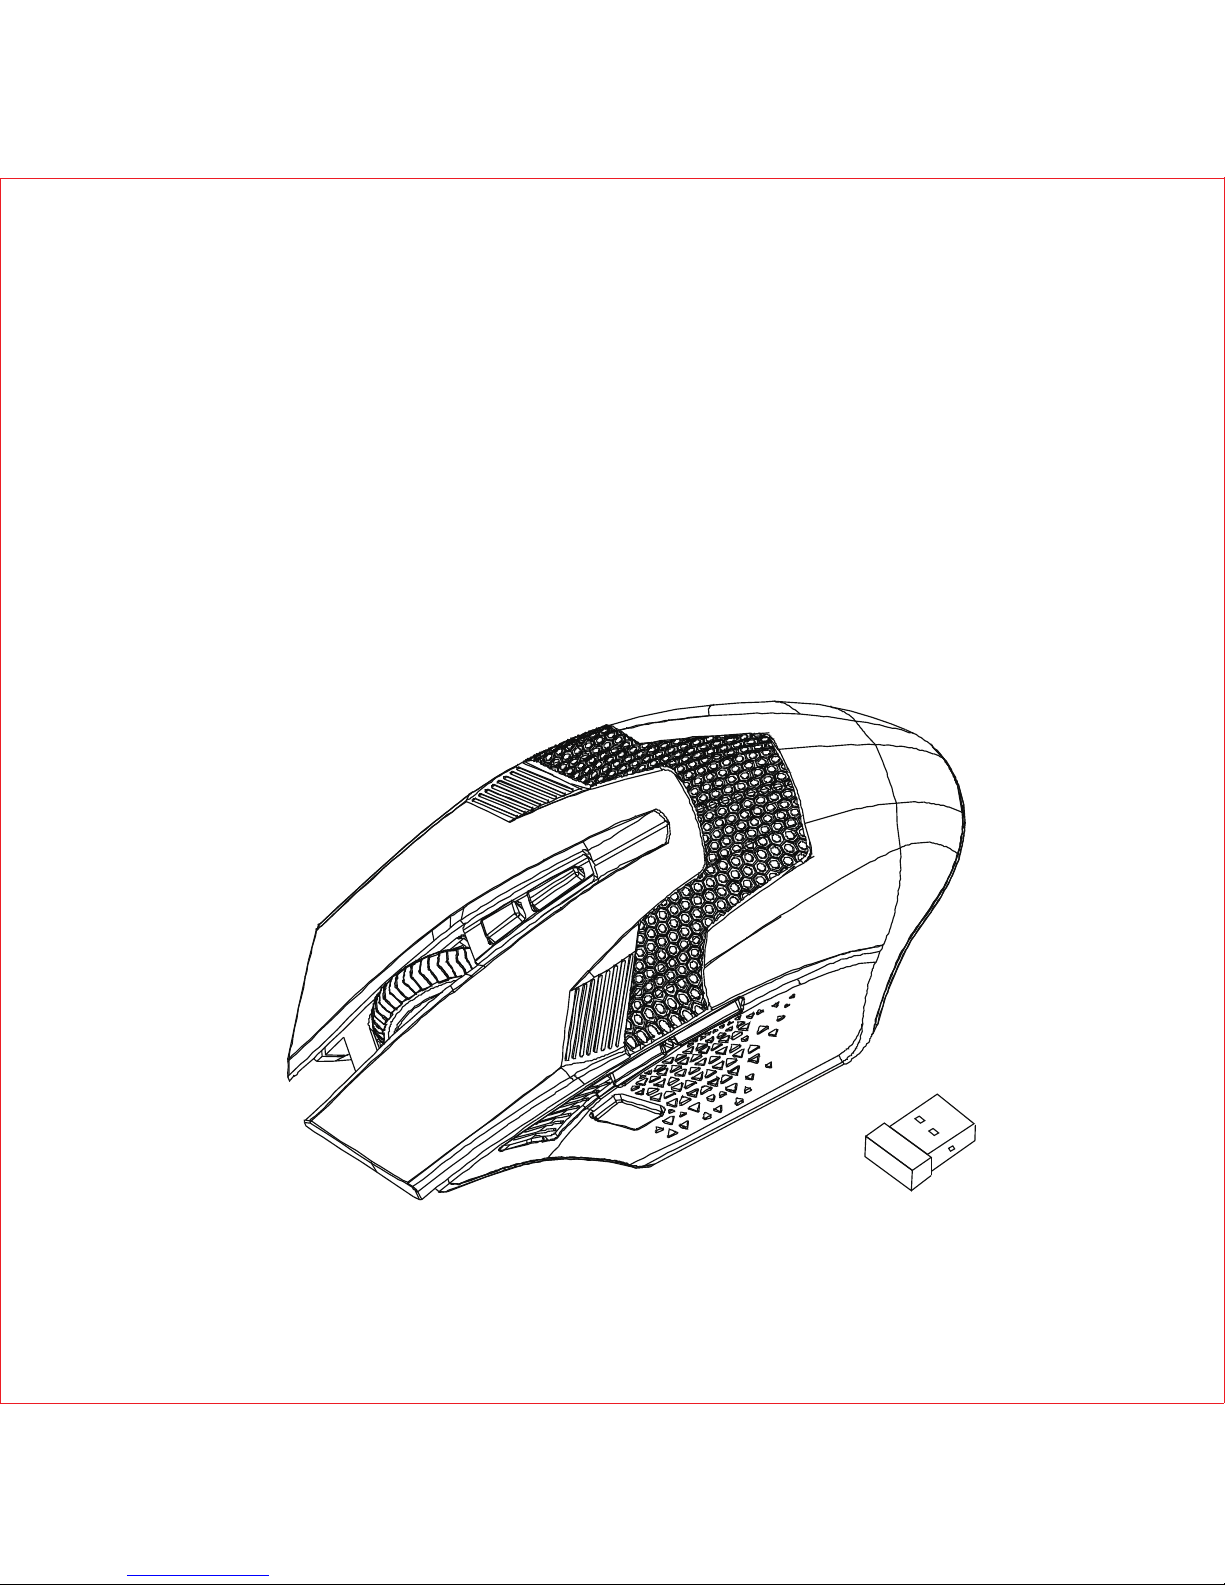
TeckNet WM389 Wireless Gaming Mouse
Welcome Guide
Page 2
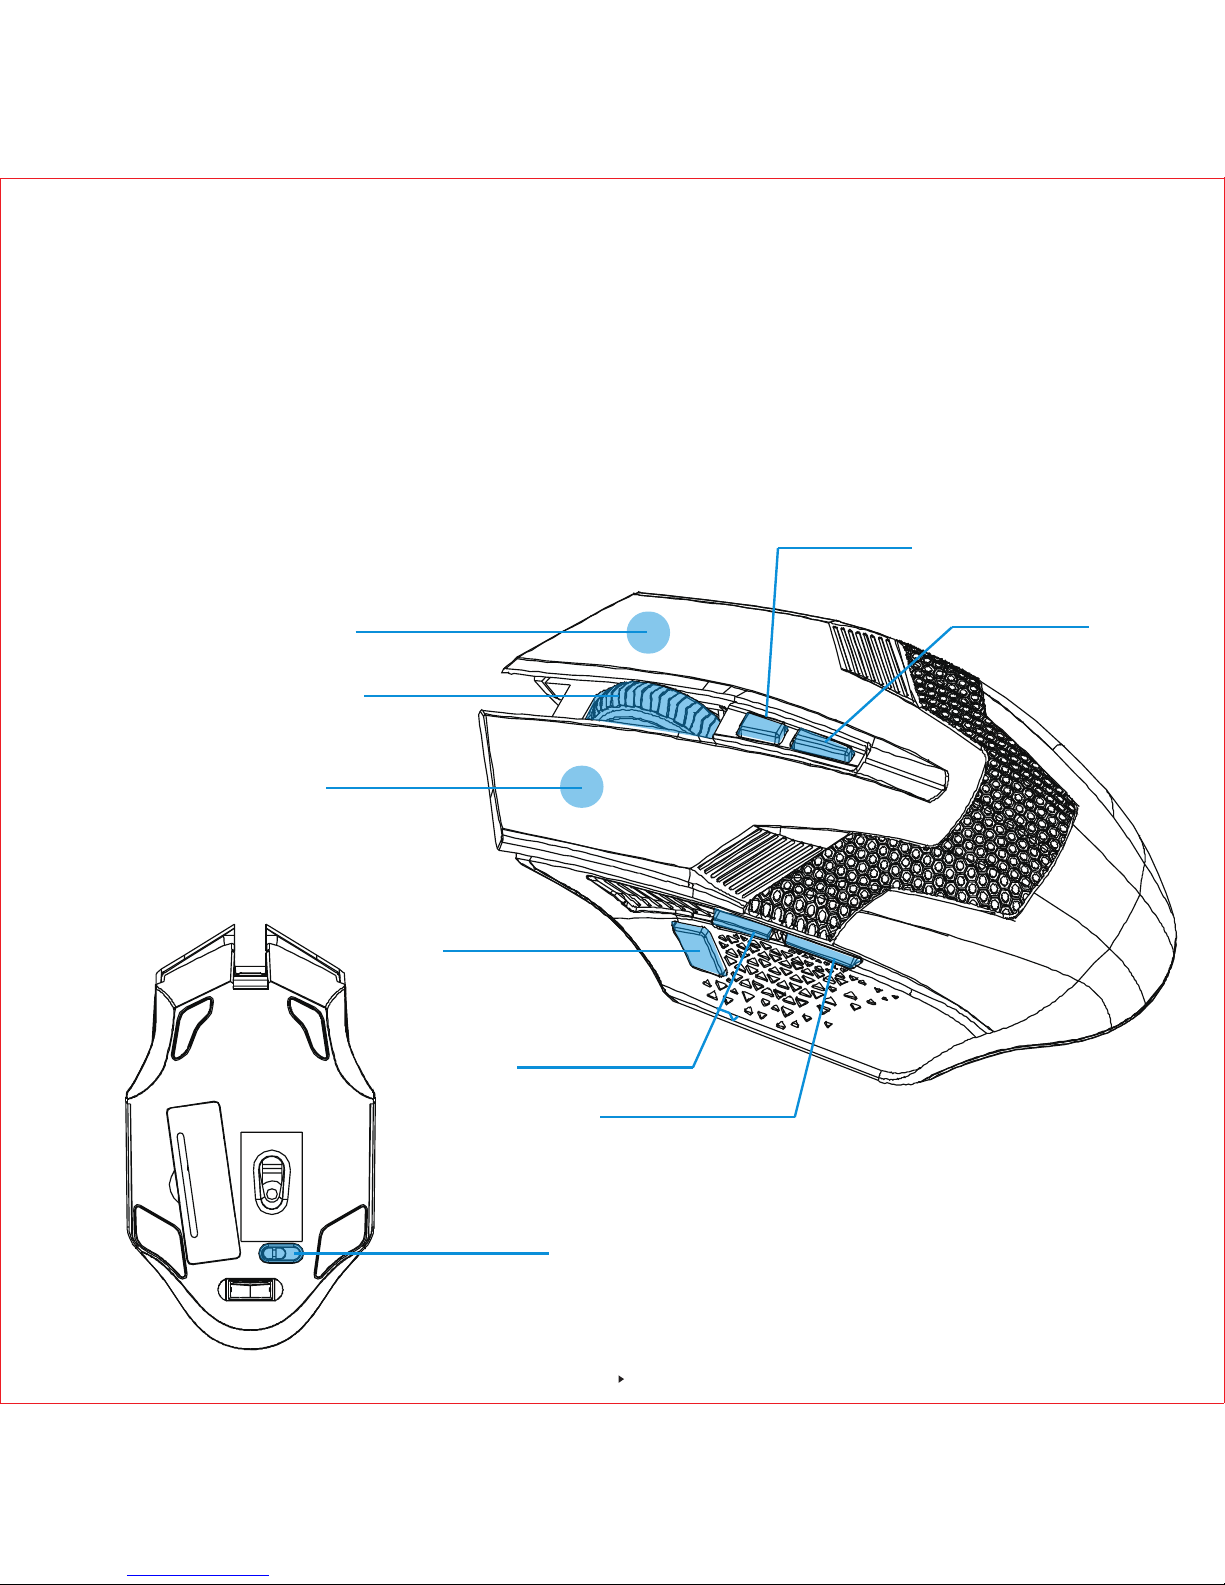
Product Layout
Welcome
Thank you for purchasing this TeckNet product. To ensure optimum performance and safety,
please read these instructions carefully before operating the product. It is strongly recommended
you keep the manual for future reference.
Left Click Button
Right Click Button
Scroll Whee
Fire Button
Froward Button
Backward Button
DPI - Button
DPI +Button
Power Switch
1
Page 3

Technical Specifications
Button Count: 8buttons
Operating Frequency: 2.4GHz
Resolution: 800/1200(default)/1600/2400/3200/4800DPI
Receiver Interface: USB version1.1
Operating Voltage: 1.5V
Operating Current: ≤15mA
Dimensions: 126 x 70 x 39mm
Weight: 81g
Button life : 50 million times
Package Contents
1 x WM389 Cordless Mouse
1 x USB Nano Receiver
1 x User Manual
1 x Warranty Card
System Requirements
To use this mouse, your computer must meet the following hardware requirements and run one
of the operating systems listed below.
Hardware
• PC with a Pentium processor or equivalent AMD processors
• USB 2.0
Operation System
Windows XP/VISTA/Windows7/Windows8/WIN10
Note: The scroll wheel only works under the operating systems listed above. If you use the mouse
under a different operating system, the mouse may either not work or lose its enhanced features.
Instructions
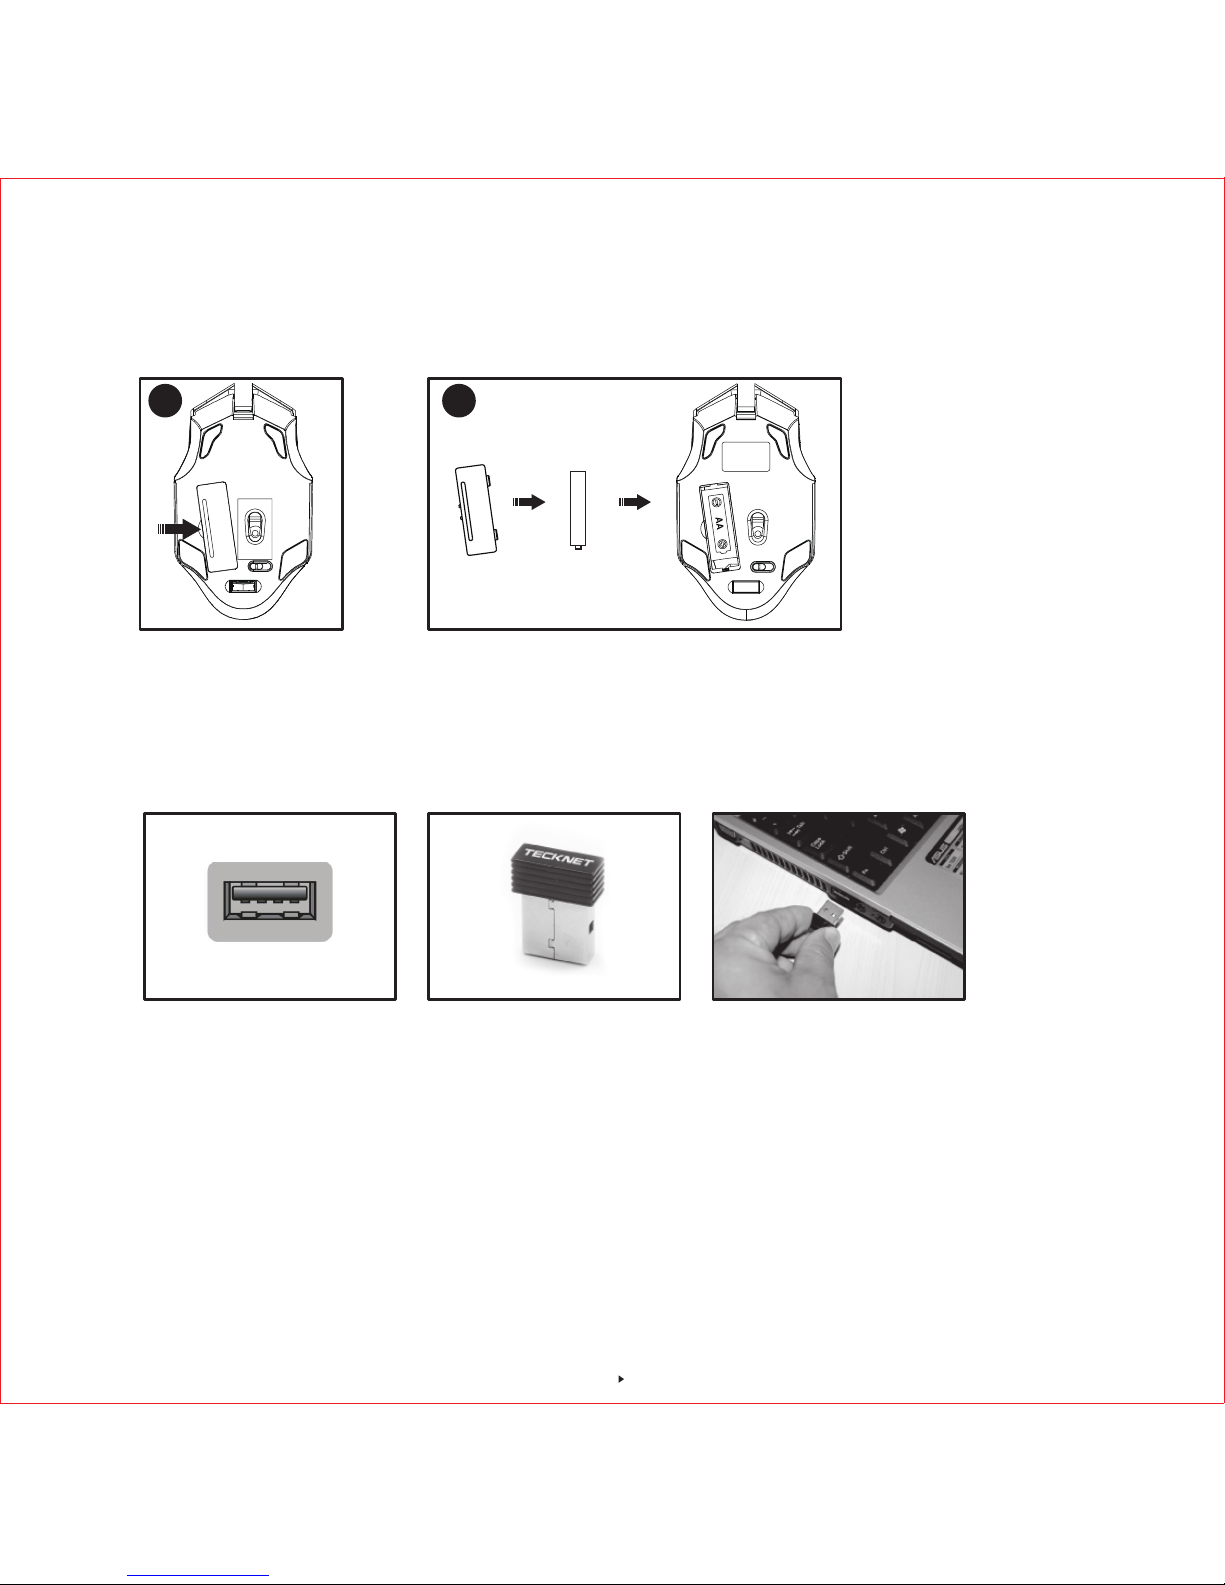
Battery Installation
The WM389 optical mouse uses one AA batteries (not included).
1. Open the battery cover. Insert the batteries into the compartment, ensuring they correspond
with the polarity markings.
2. Close the battery cover. Switch on the WM389 by adjusting the power switch underneath the
mouse. Switch to the left, LED indicator would turn off, switch to the right, LED indicator would
turn on. The blue LED of the power indicator at the top of the mouse will flash.
2
Page 4
Note: Make sure that the polarity of the batteries is correct. The positive (+) and negative (-)
ends of each battery must match the positive (+) and negative (-) markings in the battery
housing.
Note: The receiver can be removed and stored next to the battery compartment while not in use.
DPI Switch
The mouse supports 6 levels DPI:800/1200/1600/2400/3200/4800. To switch to either setting,
press the "DPI +" button on the top of the mouse once to upgrade the DPI, LED light would flash
for appropriate times, when DPI reaches 4800, press "DPI +" button, LED would not flash. Click
the "DPI -" button on the top of the mouse once to downgrade the DPI, LED light would flash for
appropriate times. When DPI reaches 800, press DPI- button, LED would not flash
Receiver Connection
Remove the USB Nano receiver and plug it into a free USB port in your computer. Turn on the
mouse. The Plug & Play function of your system will detect a new device has been connected
and install it automatically.
AA
2
1
USB Port Nano receiver
3
Page 5
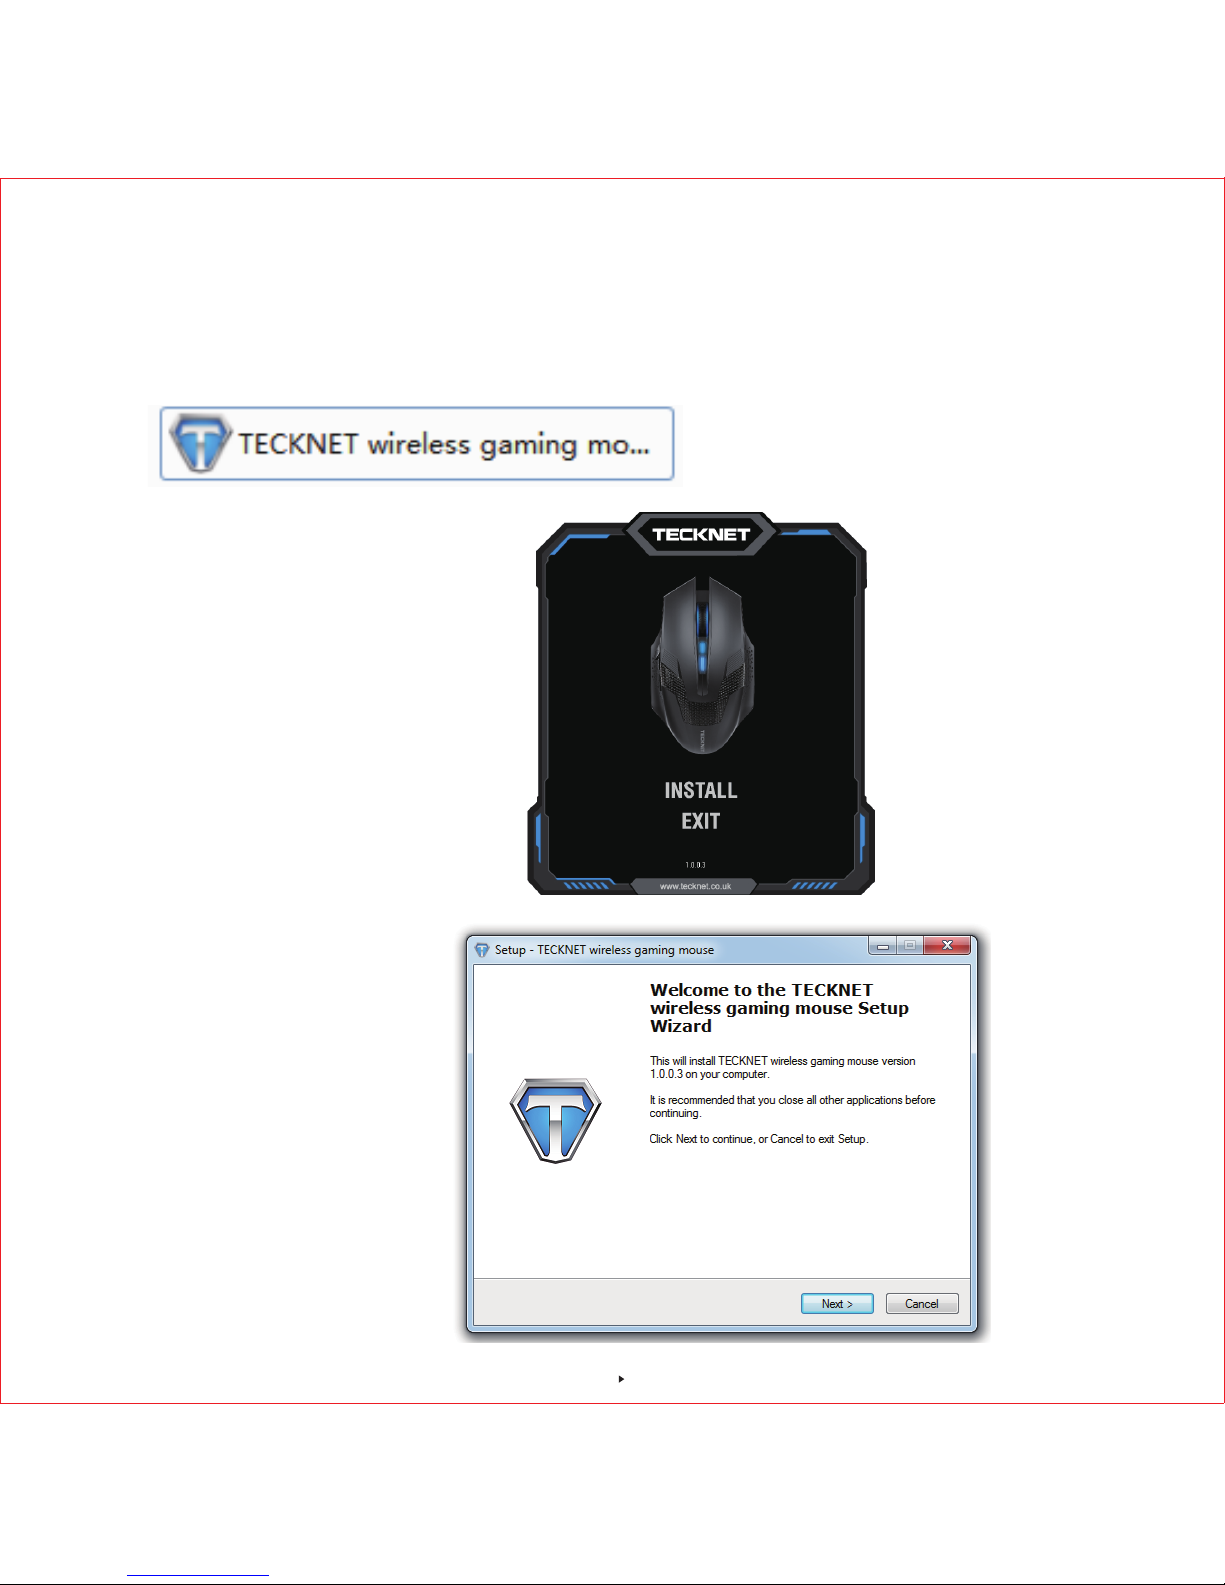
Software Instructions
Installation:
1. Load the disc into CD Rom and double click the software icon.
2. Click "Install" to start installation.
3. Click "Next" then click "Install".
4
Page 6
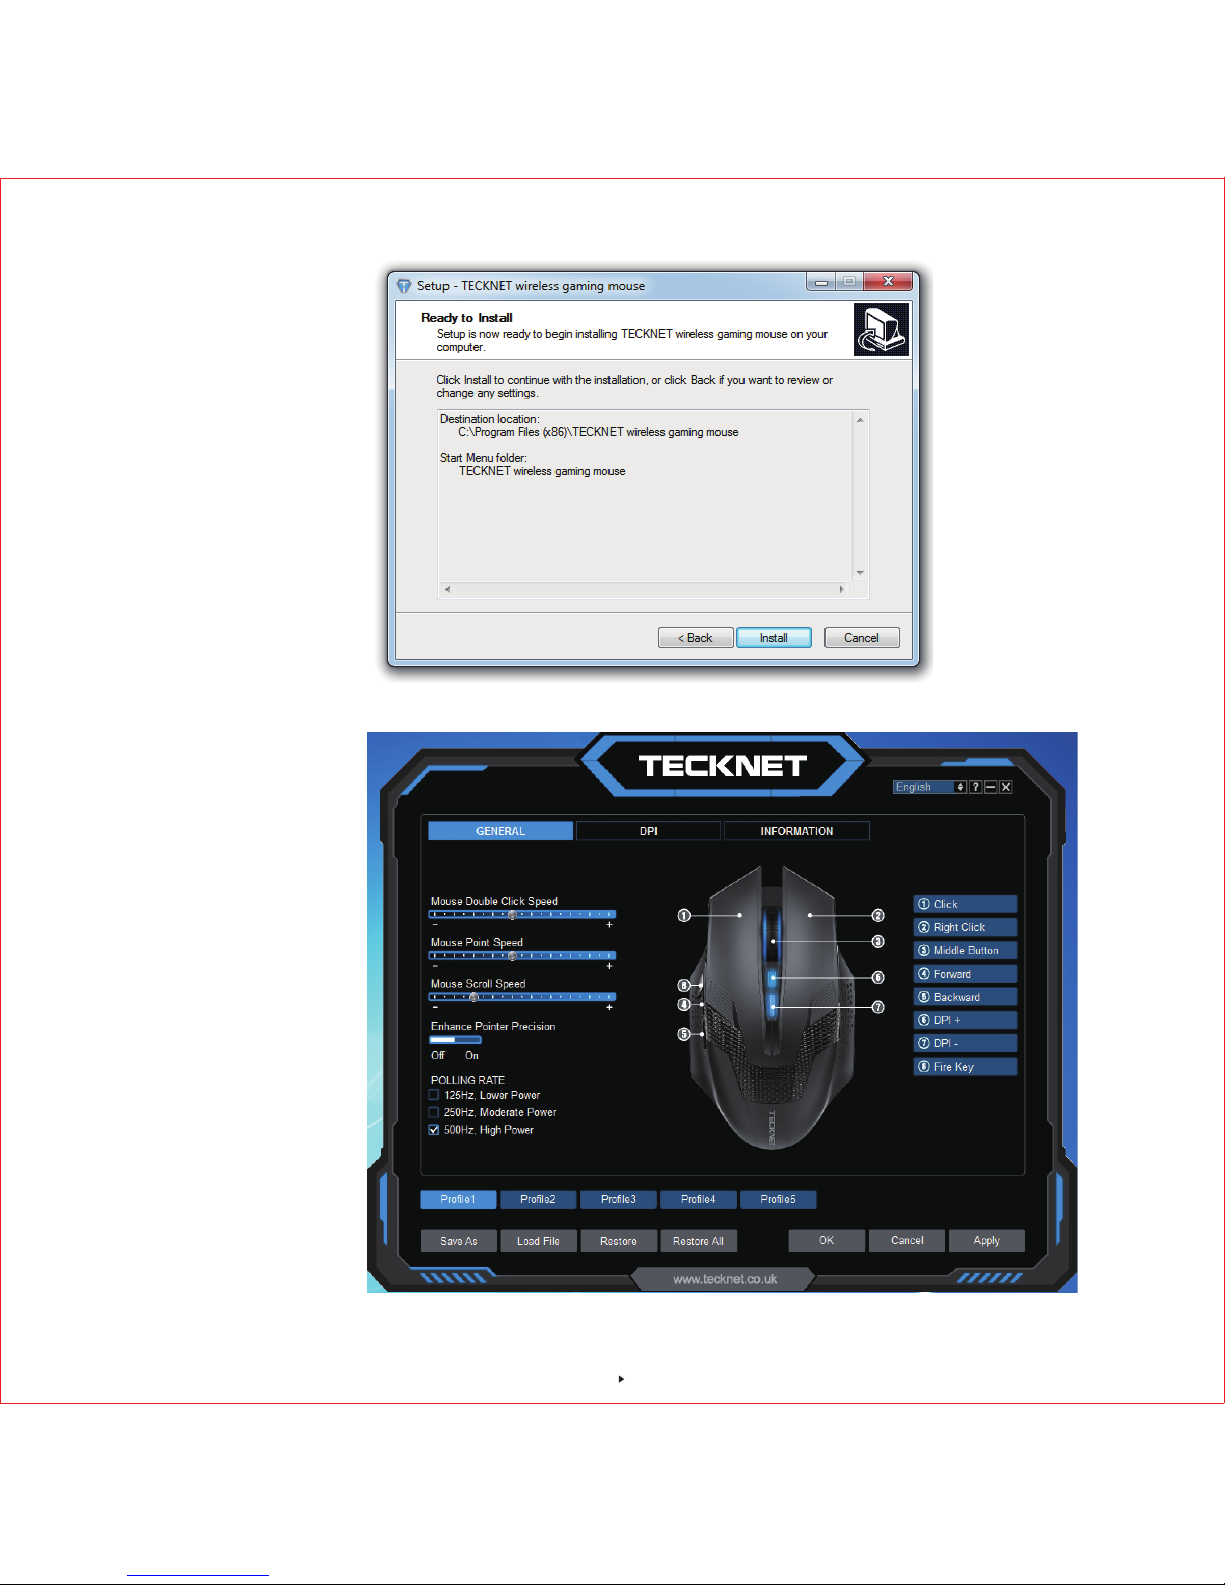
4. Double click software icon once installation is completed. The main interface will show as below.
5
Page 7

User instruction:
The main interface is divided into three parts: General Setting, DPI Setting, Version Information
Button Setting:
User-defined support as below
Mouse: Left Click Button,Right Click Button,Scroll Wheel,Froward Button,Backward Button,DPI
+Button,DPI - Button,Fire Button
Edit: Copy, Cut, New, Open, Paste, Print, Redo, Save, Select All, Undo, CTRL, ALT, SHIFT, WIN.
Multimedia: Media player, Prev Track, Next Track, Play/Pause, Stop, Mute, Volume+, Volume -.
Windows: My computer, Mail, HOME, WWW Search, Close windows, Search Maximized,
Minimized, File, Show Desktop, Run.
Parameter: Double Click Speed, Mouse Point Speed, Mouse Scroll Speed, Polling Rate, Enhance
Pointer Precision,Return rate
Examples
Macro Setting
1. If you would like to set up for “Right Button”, click it first and a drop-down menu will show up,
then click the "macro manager" a pop-up window will show up as below.
6
Page 8

2.Click "NEW " and input "TEST1", press "enter key" to an end
3.click"Start Record" to set up the macro. For example, input 1,2,3,4,5,6,7,8,9.
then click "Stop Record" to complete. Click "OK" , "APPLY" to save the setting before exiting the
software.
7
Page 9

Mouse setting
If you would like to set up for “Right Button”, click it first and a drop-down menu will show up as
below. Then choose the setting you need, click "Apply" then click "OK" to save the setting before
exiting the software.
Edit setting
If you would like to set up for “Right Button”, click it first and a drop-down menu will show up,
select "Edit", a new drop-down menu shown as below, then you can select the action needed,
click "Apply" then click "OK" to save the setting before exiting the software.
8
Page 10

Multimedia setting
If you would like to set up for “Right Button”, click it first and a drop-down menu will show up,
select "Multimedia", a new drop-down menu shown as below, then you can select the action
needed, click "Apply" then click "OK" to save the setting before exiting the software.
Windows setting
If you would like to set up for “Right Button”, click it first and a drop-down menu will show up, select
"Windows", a new drop-down menu shown as below, then you can select the action needed, click
"Apply" then click "OK" to save the setting before exiting the software.
9
Page 11

Parameter Setting
You can adjust the speed of "Double Click Speed", "Mouse Point Speed", "Mouse Scroll
Speed", "Polling Rate"
DPI Setting
there are 6 levels of DPI, you can define each level based on your requirement, then choosing
the DPI you need , click "apply" will be ok.
10
Page 12

Profile Setting:
TeckNet WM389 supports 5 profiles. You should define each profile first, click "Apply", then click
"OK" to save the profile.
Export Profile:
1. You can export the profile after saving a profile, click "Save As".
2. A pop-up window will show up, you can select a captioned folder to keep the profile, then click
"Save".
11
Page 13

Load File:
You can load the saved profile into the software. Simply click "Load File", a pop-up window will
show up as below, select the folder with saved profile, then select the captioned profile, click
"Open" to load.
12-Month Battery Life
You can load the saved profile into the software. Simply click "Load File", a pop-up window will
show up as below, select the folder with saved profile, then select the captioned profile, click
"Open" to load.
Restore: Click "Restore", the captioned profile setting will return the default setting.
Restore All: Click "Restore All", all the profile setting will return the default setting.
Low Power Indicator
The mouse is equipped with low power indicator. When the
battery power gets low during the period of use, the indicator
under the scroll wheel will flash to remind you replace the
battery.
Note: We recommend you use AA alkaline dry cell battery.
Low Power Indicator
12
Page 14

Reconnection
There is a connection code for this mouse. High temperatures, electro-magnetic fields or
vibration may influence the code signal and the mouse may need to be reconnected.
1. Ensure the battery voltage is correct; if the voltage is low, replace the batteries.
2. Press the middle key(scroll wheel) to reconnect.
3.Unplug the Nano receiver and plug in the USB port again.
Intelligent Power Saving (IPS)
The mouse is equipped with Intelligent Power Saving (IPS) function.
• When the USB Nano receiver is disconnected or the PC is switched off, the mouse will
automatically switch off to conserve power.
• If the mouse is not used for 5 seconds, it will automatically drop to the first level of IPS. To
wake the mouse, click any button.
• If the mouse is not operated for 9 minutes, it will automatically drop to the second level of
IPS -- sleep mode. To wake the mouse, click any button.
Attention
1. To maximize battery life, it is recommended to use the mouse on a white or light color
surface. As the mouse might not work smoothly on some special surfaces, such as smooth,
dark or black, reflecting or 3D mouse pad surfaces.
2. If not operated for 8 minutes, the mouse will enter auto-sleep mode. Press any key or scroll
wheel to activate the mouse again.
3. Do not use the mouse on a glass or mirrored surface, as these surface will cause the mouse
temporarily fail to work.
4. Avoid using the mouse on a metal surface, such as iron, aluminum or copper which will
shield the radio frequency transmission, slow down the mouse presenter’s response time or
cause temporarily fail to work.
5. If your PC has a metal case that contains aluminum or magnesium, use the mouse by the
side of the PC. The display panel may interfere with the radio frequency if you use the
mouse directly in front of the PC.
13
Page 15

IMPORTANT SAFETY INSTRUCTIONS-CAREFULLY
FOLLOW THESE INSTRUCTIONS.
1.SAVE THESE INSTRUCTIONS - This sheet contains
important safety and operating instructions.
2.Before using the product, read all instructions and
caution markings on the product, accessories and device
using our product.
3.This appliance is not intended for use by persons
(including children) with reduced physical, sensory or
mental capabilities, or lack of experience and knowledge,
unless they have been given supervision or instruction
concerning use of the appliance by a person responsible
for their safety.
4.Children should be supervised to ensure that they do
not play with the appliance.
5.Keep the product away from fire or explosion may
occur.
6.For indoor use only. Do not expose to rain, water,
excess moisture or snow.
14
Page 16

15
7.Do not place product in or near inflammable, explosive
or hazardous object.
8.Do not place in or near water, rain, excess moisture or
extreme heat.
9.Do not operate product with damaged cord or plug.
10.Do not operate product if it has been damaged in any
way.
11.Do not disassemble the product. Disassembly may
result in a risk of safety hazards.
12.Do not throw or shake the product.
13.To reduce the risk of electric shock, unplug the product
from the power supply when not in use or switch off the
power supply.
Page 17

Limited 18-Month Warranty:
What this warranty covers.
Shenzhen Unichain Technology Co., LTD. (Manufacturer: “Unichain”) warrants to the
original purchaser of this TeckNet product that the product shall be free of defects in
design, assembly, material, or workmanship.
What the period of coverage is.
Unichain warrants the TeckNet product for 18 Months.
What will we do to correct problems?
Unichain will repair or replace, at its option, any defective product free of charge
(except for shipping charges for the product).
What is not covered by this warranty?
All above warranties are null and void if the TeckNet product is not provided to
Unichain for inspection upon Unichain’s request at the sole expense of the purchaser,
or if Unichain determines that the TeckNet product has been improperly installed,
altered in any way, or tampered with. The TeckNet Product Warranty does not protect
against acts of God such as flood, earthquake, lightning, war, vandalism, theft,
normal-use wear and tear, erosion, depletion, obsolescence, abuse, damage due to
low voltage disturbances (i.e. brownouts or sags), non-authorized program, or system
equipment modification or alteration.
How to claim the warranty?
Please contact retailers or visit TeckNet website www.tecknet.co.uk for more
information.
16
Page 18

E-mail: support@tecknet.co.uk
Website www.tecknet.co.uk
Warranty
We warrant that products purchased from authorized distributors will meet the
applicable product specifications and be free from all defects in design, assembly,
materials and workmanship. Please contact retailers or visit our website
(www.tecknet.co.uk) for more information.
Disclaimer
Every effort has been made to ensure that the information and procedures in this
guide are accurate and complete, no liability can be accepted for any errors or
omissions and we reserve the right to make any changes without further notice to any
products mentioned herein.
17
 Loading...