

Page 1

TeckNet iEP900
Tri-proof Power Bank
Tri-proof Power Bank
Page 2
TECKNET iEP900 Tri-proof Power Bank
User Manual
1
Welcome
Thank you for choosing this TeckNet product. To ensure optimum
performance and safety, please read these instructions carefully before
operating this product. It is strongly recommended you keep the manual
for future reference.
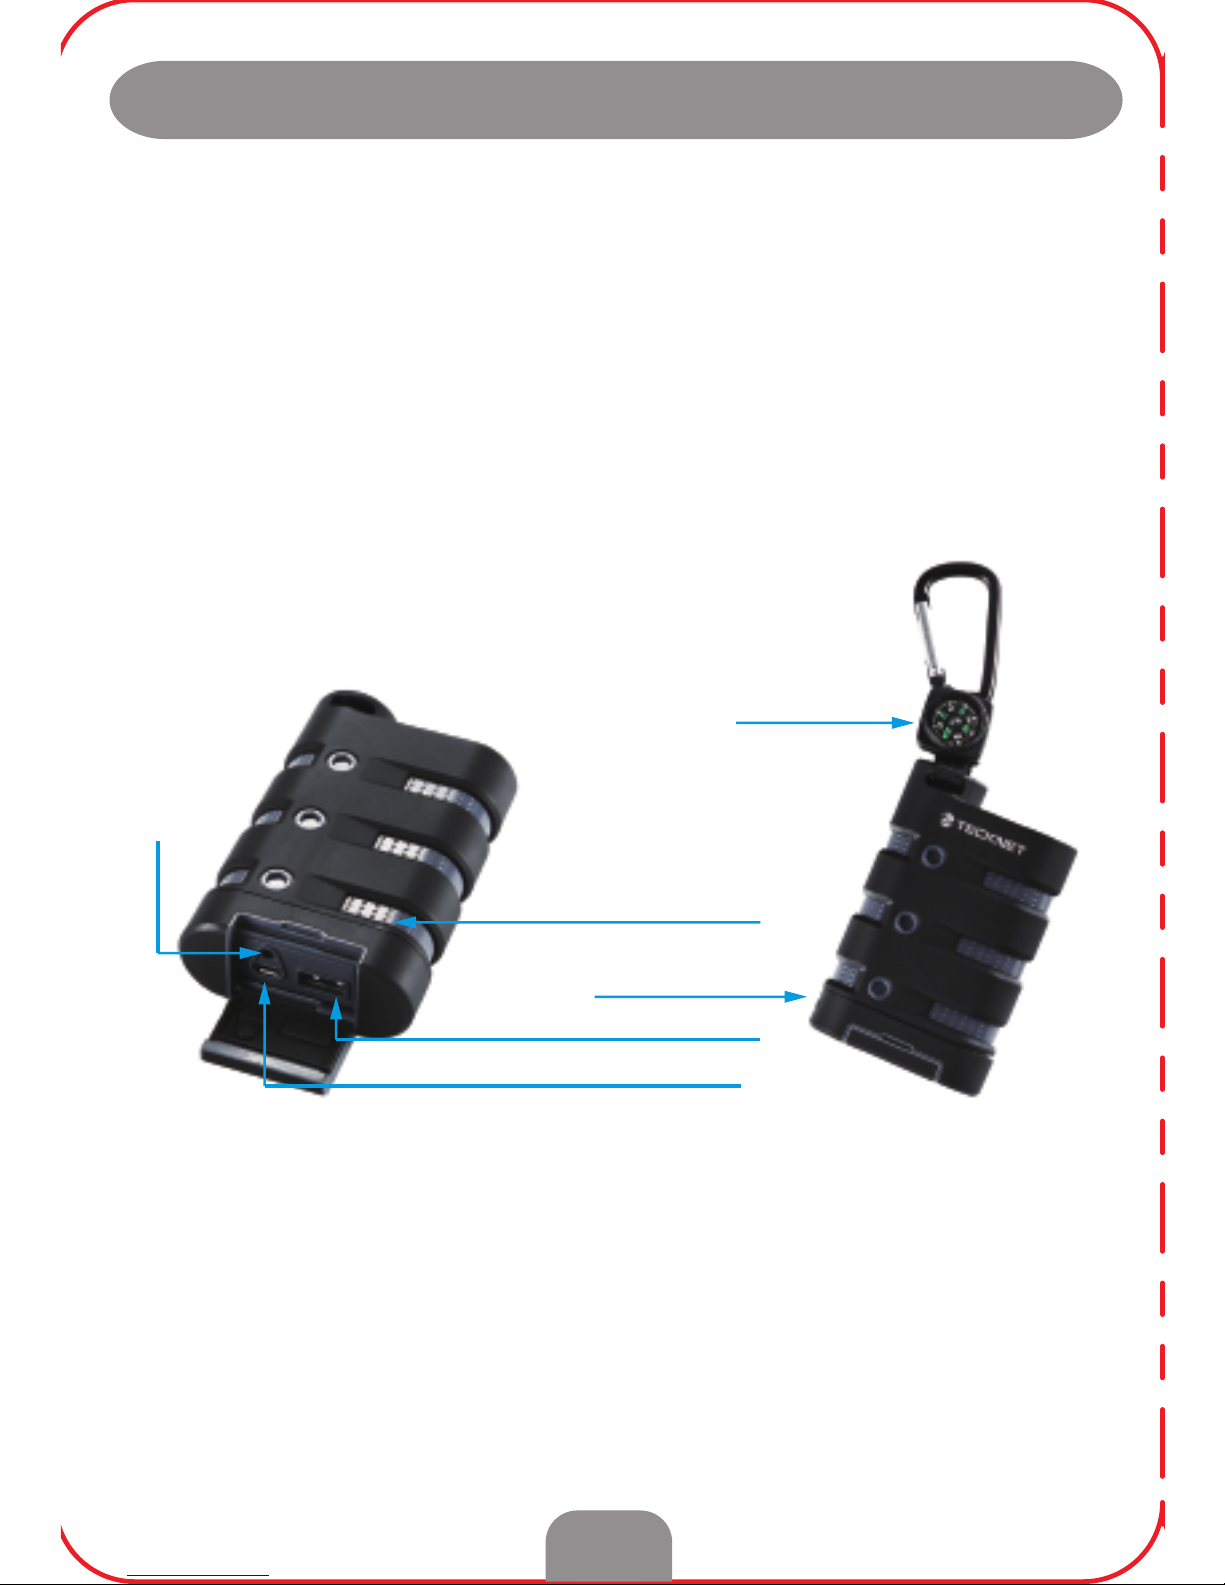
Description
1. LED Power Indicator 2. Switch Button
3. USB Output DC 5V 2.1A 4. Micro USB Input Port 5V 2A
5. LED Torch 6. Compass
Product Layout
Compass
LED Power Indicator
Switch Button
USB Output DC 5V 2.1A
LED Torch
Micro USB Input Port 5V 2A
Page 3

Technical Specifications
Product Name: TeckNet iEP900 Power Bank
Battery Type: Li-Ion battery
Capacity: 9000mAH
Input: 5V/2A
Output: 5V/2.1A
LED Indicator: 4
Recharges: >300 Cycles
Dimensions: 101x 64 x 27mm
Weight: 220g
Package Contents
TeckNet iEP900 Power Bank x1
USB cable x1
Carabiner x1
Compass x1
User Manual x1
Compatibility
Apple iPad, iPhone & iPod, Mobile Phones, and all other digital devices
requiring USB charging current from 1A~ 2.1A.
Features
1. All-weather: provides waterproof, dustproof, and shockproof, offering
you reliability and stability. Tough, rugged body with Ingress
Protection Rating of IP67
2. Built-in flashlight.
3. Large 9000mAh capacity, comes with a carabiner, making it super
portable.
4. Max 2.1A output, can charge almost any smart device at top speed;
DC 5V 2.0A input, saving up to 50% of the charging time.
5. The output port is universal and compatible with almost any smart
device with an input of DC 5V.
2
Page 4
Using The iEP900 Power Bank
Charging the Power Bank
You can use the provided "USB to Micro USB cable" to charge the
iEP900 Power Bank from a USB power source. While the iEP900 Power
Bank is being charged, the white LED indicators will flash. When the
Power Bank is fully charged all LED indicators will light up and the
Power Bank will stop charging. Disconnect the Power Bank from the
power source and it is now ready for use. The charging process usually
takes around 7-8 hours via a 5V, 1.5A power source.
Recharging Your Devices
1. Using your original USB data cable or our standard cable, connect
the USB cable to the Power Bank USB Output.
2. Connect the other end of the cable to the device you want to
recharge.
3. To turn on the Power Bank, open the bottom cover and press the
power-on button. The LED Power Indicator will illuminate for 2-3
seconds showing the charger is on.
4. The Power Bank will automatically turn off after 30-35 seconds if it is
not connected to any device.
Battery Capacity Indicator & LED Light Switch Button
Press the power button to check remaining power
Power Status
3
LED Light( ● ON ○ OFF) Capacity
○○○○ <20% LED Flashes
●○○○ 20-40% Power
●●○○ 40-60% Power
●●●○ 60-80% Power
●●●● 80-100% Power
“○” LED indicator off
“●” LED indicator light on
Page 5

Caution!
1. Please fully charge the Power Bank before its first use.
2. Please make sure you use the standard cables with appropriate
specification. Failure to do so may lead to damage of the Power
Bank.
3. Please check the voltage of your device is 5V before charging.
4. Do not expose the Power Bank to excessive heat or flammable
places.
5. Do not keep the Power Bank in a car. Strong light and high
temperatures will lead to product damage.
6. Keep the Power Bank away from children.
7. Do not put any item into the Power Bank USB input/output ports
to avoid any short circuit or damage.
8. Please completely charge every 4 months to prolong the Power
Bank lifespan.
Disclaimer
Every effort has been made to ensure that the information and
procedures in this guide are accurate and complete, no liability can
be accepted for any errors or omissions and we reserve the right to
make any changes without further notice to any products mentioned
herein.
Warranty
We warrant that products purchased from authorised distributors will
meet the applicable product specifications and be free from all
defects in design, assembly, materials and workmanship. Please
contact TeckNet retailers, or visit our website for more information
about the product.
4
Page 6

DE
TeckNet iEP900 Tri-Beweis Power Bank
Benutzerhandbuch
Willkommen
Vielen Dank für den Kauf dieses Produktes! Um Ihnen die optimale
Leistung und Sicherheit sicherstellen zu können, bitte lesen Sie die
Anweisungen sorgfältig vor der Verwendung. Sie sollten dieses
Handbuch von dem Produkt aufbewahren, damit es bei Bedarf immer
griffbereit ist.
Description
(1) LED-Anzeige (2) Schalter/Druckknopf
(3) USB-Ausgang DC 5V 2.1A (4) Micro USB-Eingang
(5) LED Taschenlampe (6)Kompass
Product Layout
Kompass
LED-Anzeige
Schalter/Druckknopf
USB-Ausgang DC 5V 2.1A
LED
Taschenlampe
Micro USB-Eingang 5V 2A
Page 7

DE
Technische Spezifikationen
Artikel: TeckNet iEP900 Power Bank
Akku: Li-Ionen-Akku
Kapazität: 9000mAh
Eingang: 5V/2A
Ausgang: 5.0V/2.1A
LED-Anzeige: 4
Ladezyklen: >300 Zyklen
Bemaßung: 101 x 64 x 27mm
Gewicht: 220g
Lieferumfang
TeckNet iEP900 Power Bank x1
USB Kabel x1
Karabiner x1
Kompass x1
Benutzerhandbuch x1
Kompatibilität
iPad, Mobil Telefone, iPhone, iPod und alle anderen digitalen Geräte
die einen USB Ladestrom von 1A~2.1A benötigen.
Ausstattung
1. Wetterfest: wasserdicht, staubdicht und stoßfest, bietet ihnen
Zuverlässigkeit und Stabilität. Robuste, stabile Hülle mit einem
Wassereinbruchschutz von IP67.
2. Eingebaute Taschenlampe.
3. Große 9000mAh Kapazität, ausgestattet mit einem Karabiner, der es
super tragbar macht.
4. Max 2.1A Ausgang, ermöglicht das Laden von fast allen smart
Geräten bei Höchstgeschwindigkeit; DC 5V 2.0A Eingang, spart bis
zu 50% der Ladezeit.
5. Der Ausgang ist universal und kompatibel mit fast allen Smart
Geräten mit einem DC 5V Eingang.
Page 8

DE
Anwendung Ihrer iEP900 Power Bank
Die Power Bank aufladen
Mit Hilfe des sich im Lieferumfang befindenden USB/Micro-USB-Kabels
kann die iEP900 Power Bank aus einer USB-Stromversorgung
aufgeladen werden. Bei der Aufladung der iEP900 Power Bank werden
die weißen LED-Anzeigen blinken. Sobald die Power Bank vollgeladen
ist, leuchten alle LEDs und die Power Bank hört auf zu laden. Trennen
Sie die Power Bank vom netz und sie ist nun zur Nutzung bereit. Für
gewöhnlich dauert der Ladevorgang etwa 7-8 stunden mit einem 5V,
1.5A Stromanschluss.
Ihre Geräte aufladen
1. Verwenden Sie Ihr Original USB Daten Kabel oder unser Standard
Kabel, verbinden Sie das USB Kabel mit dem USB-Ausgang der
Power Bank.
2. Verbinden Sie das andere ende des Kabels mit dem Gerät das Sie
Laden möchten.
3. Um die Power Bank anzuschalten, öffnen Sie die untere Abdeckung
und betätigen Sie den Schalter. Nachdem der Druckknopf gedrückt
wurde leuchtet die LED-Anzeige etwa 2 bis 3 Sekunden um zu
zeigen dass das Ladegerät an ist.
4. Die Power Bank schaltet sich nach 30-35 Sekunden automatisch aus
wenn es mit keinem Gerät verbunden ist.
Anzeige der Akkukapazität und Druckknopf des LED Lichtes
Drücken Sie den An Schalter um die verbleibende Lebensdauer des
Akkus zu überprüfen.
Akku Status
LED Anzeige (● AN ○ AUS) Kapazität
○○○○ <20% LED Blinkt
●○○○ 20-40% Power
●●○○ 40-60% Power
●●●○ 60-80% Power
●●●● 80-100% Power
“○” LED-Anzeige “aus”
“●” LED-Anzeige “an”
Page 9

DE
Warnung!
1. Bitte Laden Sie die Power Bank vollständig auf vor dem ersten
Einsatz.
2. Bitte stellen Sie sicher dass Sie Standard kable mit den
entsprechenden Spezifikationen verwenden. Nichteinhaltung kann
zur Beschädigung der Power Bank führen.
3. Bitte überprüfen Sie das ihr gerät eine Spannung von 5V benötigt
vor Sie es Laden.
4. Setzen Sie dieses Produkt keiner exzessiven Hitze oder Flamen
aus.
5. Bewahren Sie die Power Bank nicht im Auto auf. Starke Licht- und
Temperatureiwirkung können zu Produktschäden führen.
6. Halten Sie die Power Bank von Kindern fern.
7. Stecken Sie keine Gegenstände in die USB Eingänge/Ausgänge
der Power Bank um Kurzschlüsse und Schäden zu vermeiden.
8. Bitte Laden Sie die Power Bank alle vier Monate vollständig auf
um die Lebensdauer zu erhöhen.
Haftungsausschluss
Die Inhalte und Anleitungen in diesem Benutzerhandbuch wurden
mit größtmöglicher Sorgfalt erstellt, es kann keine Verbindlichkeit
aufgrund von fehlerhafter Bedienung geltend gemacht werden und
wir reservieren das Recht Änderungen vorzunehmen ohne weitere
Ankündigung zu den hier beschriebenen Produkten.
Garantie
Wir Garantieren das dieses Produkt von einem anerkannten Händler
die entsprechenden Produktspezifikationen erfüllt und frei von allen
defekten bezüglich Design, Material und Verarbeitung ist. Bitte
kontaktieren Sie einen TECKNET Händler oder besuchen Sie
unsere Webseite für mehr Informationen über dieses Produkt.
Page 10

FR
iEP900 TeckNet Tri-preuve Etanche
Mode d’Emploi
Bienvenue
Merci de choisir ce produit TeckNet. Pour assurer une performance et
une sécurité optimale, veuillez lire ces consignes attentivement avant
d’utiliser ce produit. Il est fortement recommandé que vous gardiez ce
manuel pour des références ultérieures.
Description
1. Voyant d’Alimentation LED 2. Interrupteur
3. Sortie USB 5V DC 2,1A 4. Port d’Entrée Micro USB 5V 2A
5. Torche LED 6. Boussole
Disposition du Produit
Boussole
Voyant d’Alimentation LED
Interrupteur
Sortie USB 5V DC 2,1A
Torche LED
Port d’Entrée Micro USB 5V 2A
Page 11

FR
Spécifications Techniques
Nom du Produit : Tri-preuve Chargeur iEP900 TeckNet
Type de Batterie : Batterie Li-Ion
Capacité : 9000mAH
Entrée : 5V/2A
Sortie : 5V/2,1A
Voyants LED : 4
Recharges : >300 Cycles
Dimensions : 101 x 64 x 27mm
Poids : 220g
Contenue de l’emballage
Chargeur iEP900 TeckNet x1
Câble USB x1
Dragonne x1
Bousole x1
Mode d’Emploi x1
Compatibilité
iPad, iPhone & iPod Apple, Téléphones Mobiles, et tous les autres
appareils numériques nécessitant un courant de chargement par USB
de 1A~ 2.1A.
Caractéristiques
1. Tous climats : étanchéité, anti-poussière et antichoc assurés, vous
offrant stabilité et fiabilité. Résistant, boitier avec Indice de Protection
IP67.
2. Projecteur intégré.
3. Large capacité 9000mAh, venant avec une dragonne, le rendant
super portable.
4. Sortie maximale de 2,1A, peut charger la plupart des appareils
intelligents à pleine vitesse, entrée de 5V DC 2,0A, économisant
jusqu’à 50% du temps de charge.
5. La sortie est un port universel et compatible avec la plupart des
appareils intelligents avec une entrée 5V DC.
Page 12

FR
Utiliser le Chargeur iEP900
Charger le Chargeur
Vous pouvez utiliser le “câble USB à Micro USB” fournis pour charger le
Chargeur iEP900 depuis une source d’alimentation USB. Pendant que
le Chargeur iEP900 est en train d’être chargé, les voyants LED
clignotent. Lorsque le Chargeur est complètement chargé, les voyants
LED s’allumeront et le Chargeur s’arrêtera de charger. Débranchez le
Chargeur de la source d’alimentation et il est maintenant prêt à l’usage.
Le processus de chargement prend généralement environ 7 à 8 heures
avec une source d’alimentation de 5V 1,5A.
Recharger Vos Appareils
1. Utilisez votre câble de données USB original ou un câble standard,
branches le câble USB à la Sortie USB du Chargeur.
2. Branchez l’autre extrémité du câble à l’appareil que vous souhaitez
recharger.
3. Allumez le Chargeur, ouvrez le couvercle du bas et appuyez sur le
bouton d’alimentation. Le voyant LED d’alimentation s’allumera
pendant 2 à 3 secondes indiquant que le chargeur est allumé.
4. Le Chargeur s’éteindra automatiquement après 30 à 35 secondes s’il
n’est pas connecté à un autre appareil.
Voyant de Capacité de Batterie & Bouton Lumière LED
Appuyez sur le bouton d’alimentation pour vérifier la puissance restante.
Statut de Puissance
Voyant LED (● ALLUME ○ ETEINT) Capacité
○○○○ <20% LED clignotante
●○○○ 20-40% de Puissance
●●○○ 40-60% de Puissance
●●●○ 60-80% de Puissance
●●●● 80-100% de Puissance
“○” voyant LED “éteint”
“●” voyant LED “allumé”
Page 13

FR
Attention !
1. Veuillez charger complètement le Chargeur avant le premier usage.
2. Veuillez vous assurer que vous utilisez les câbles standards avec
les spécifications appropriées. Le contraire pourrait endommager le
Chargeur.
3. Veuillez vérifier la tension de votre appareil pour qu’elle soit de 5V
avant de charger.
4. Ne pas exposer le Chargeur à une chaleur excessive ou à un
endroit inflammable.
5. Ne pas garder le Chargeur dans une voiture. Les lumières fortes et
les hautes températures conduiront à des dommages au produit.
6. Gardez le Chargeur éloigné des enfants.
7. Ne pas mettre d’objet dans les ports d’entrée/sortie USB du
Chargeur pour éviter les court-circuits ou dommages.
8. Veuillez charger complètement tous les 4 mois pour prolonger la
durée de vie du Chargeur.
Clause de Non Responsabilité
Tout a été mis en œuvre pour s’assurer que les informations et les
procédures contenues dans ce guide sont exactes et complètes,
aucune responsabilité ne saurait être acceptée en cas d’erreur ou
d’omission et nous nous réservons le droit d’effectuer des
modifications sans préavis sur les produits mentionnés dans le
présent document.
Garantie
Nous vous garantissons que le produit des distributeurs agréés
seront conformes aux spécifications de produits applicables et
seront exempt de défaut en conception, assemblage, matériaux et
fabrication. Veuillez contacter les détaillants TeckNet ou visiter notre
site www.tecknetonline.co.uk pour plus d’information à propos du
produit.
Page 14

Disclaimer
Every effort has been made to ensure that the information and
procedures in this guide are accurate and complete, no liability can
be accepted for any errors or omissions and we reserve the right to
make any changes without further notice to any products mentioned
herein.
Warranty
We warrant that products purchased from authorized distributors
will meet the applicable product specifications and be free from all
defects in design, assembly, materials and workmanship. Please
contact TeckNet retailers, or visit our website for more information
about the product.
TECKNET iEP900 Power Bank
www.tecknet.co.uk
 Loading...