

Page 1

C018 1080P Web Camera
Us er Manual
Page 2

C018 1080P Web Camera
English
Deutsch
Français
01-08
09-16
17-24
Page 3
K ey F eatures :
High Resolution HD Digital Camera CMOS Sensor
* Maximum video size:1920*1080(2M pixels)
* Maximum snapshot image size: 4000*3000(12M pixels
snapshot)
* Video mode: MJPG and YUY2
* Hi-speed USB 2.0(recommended)
* Transmission rate: 1920*1080up to 30fps under MJPG
mode
* Signal-noise ratio: greater than 48dB
* Dynamic range: greater than 72dB
* Image focus: 3cm to infinity
* Non-compression image processor
* AWB (Automatic White Balance)
* Manual focus function
* High-precision glass element lens
* Built-in mic
rophone
* Photo frame/special effect/face tracking and zoom
function
S ys tem R equirements :
* Windows 2003/XP/Vista/WIN7/WIN 8/ MAC OS(No
driver installation required)
* 1 GHz Intel® Core™2 Duo or above
* 200 MB hard drive space
* One free USB 2.0 port
For F ull H D1080p video r ec ording:
* 3.0 GHz Intel® Core™2 Duo
* 2 GB RAM
* 1920 x1080 HD screen resolution
*
1
TeckNet C018 1080P Web Camera User Manual
Page 4
Driver I NS TAL L ATION ( IF N E E DE D)
Notice: Please make sure the webcam is plugged into the USB port before installation.
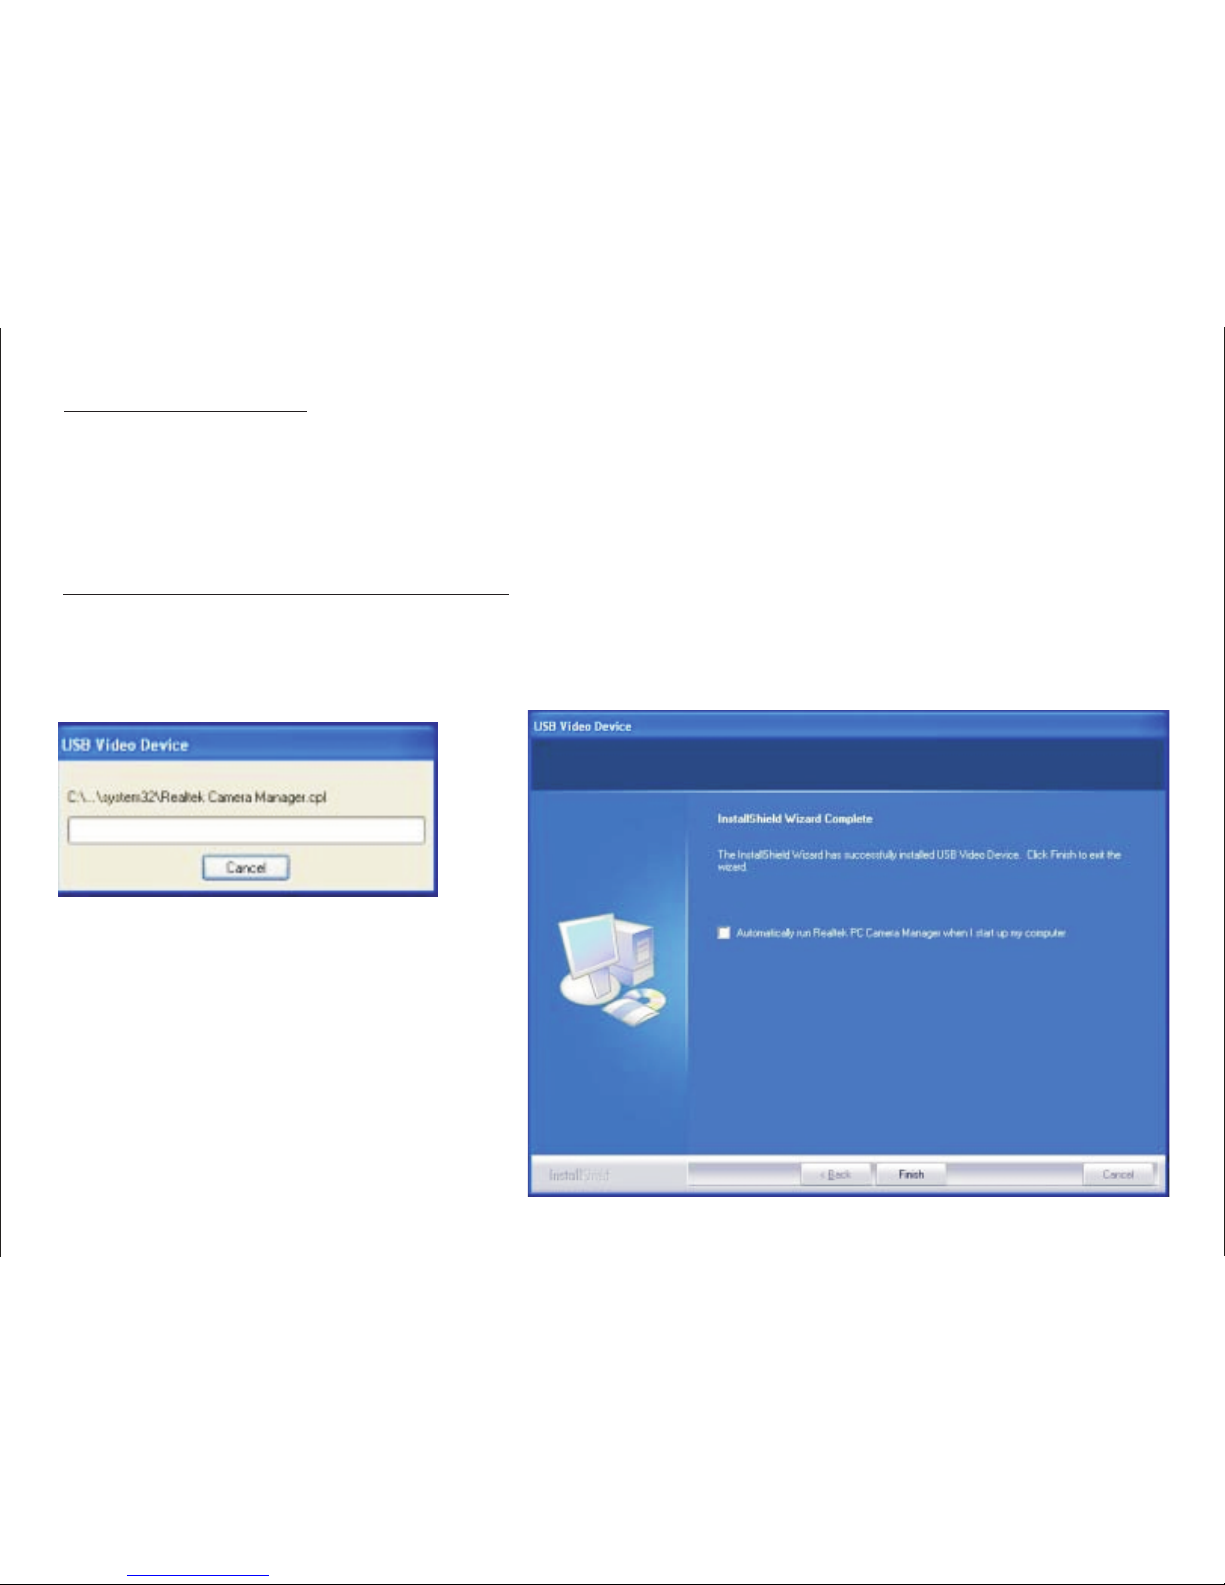
1. Insert Driver/Application Disc into CD-ROM drive,install the driver by double clicking Setup and
the system will automatically run necessary files and display windows as following:
Pac kage C ontents :
Your new Webcam will ship with the following items.
* 1 ×TeckNet C018 1080P Webcam
* 1 ×Driver CD
* 1 ×User Manual
2
Page 5
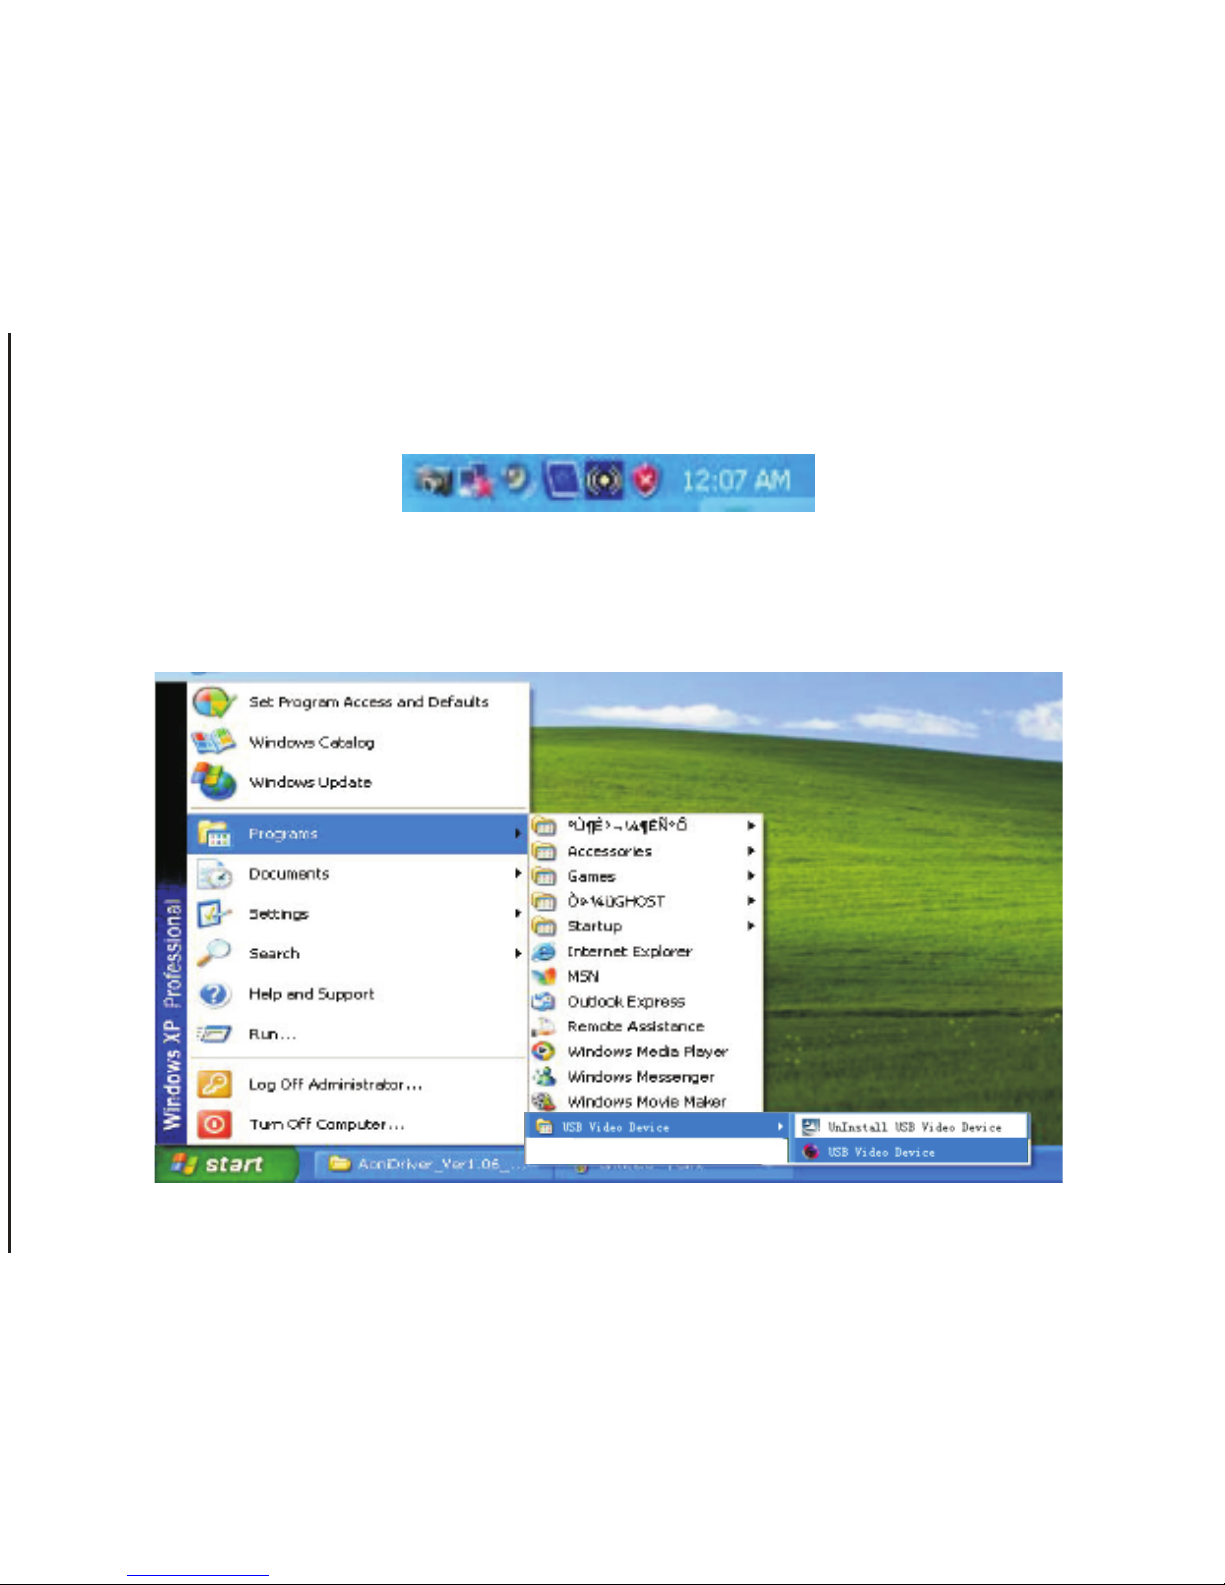
2. Click “Automatically run Realtek camera manager when you start up the computer”, the camera icon will
appear in the Taskbar.
3.Start your webcam by selecting the USB Video Device application from Start menu as shown below.
3
Page 6
How to U S E U S B V ideo D evic e?
How to preview the picture?
Right Click the Webcam Icon in the Taskbar, and choose “Show Main Panel“. Left click the preview window in
the upper left corner, then you can see it.
How to take a picture?
Select “Photograph” icon and choose your favourable image size. Click “save” and choose a disk or folder for
your pictures, and then click “snapshot”.
4
Page 7
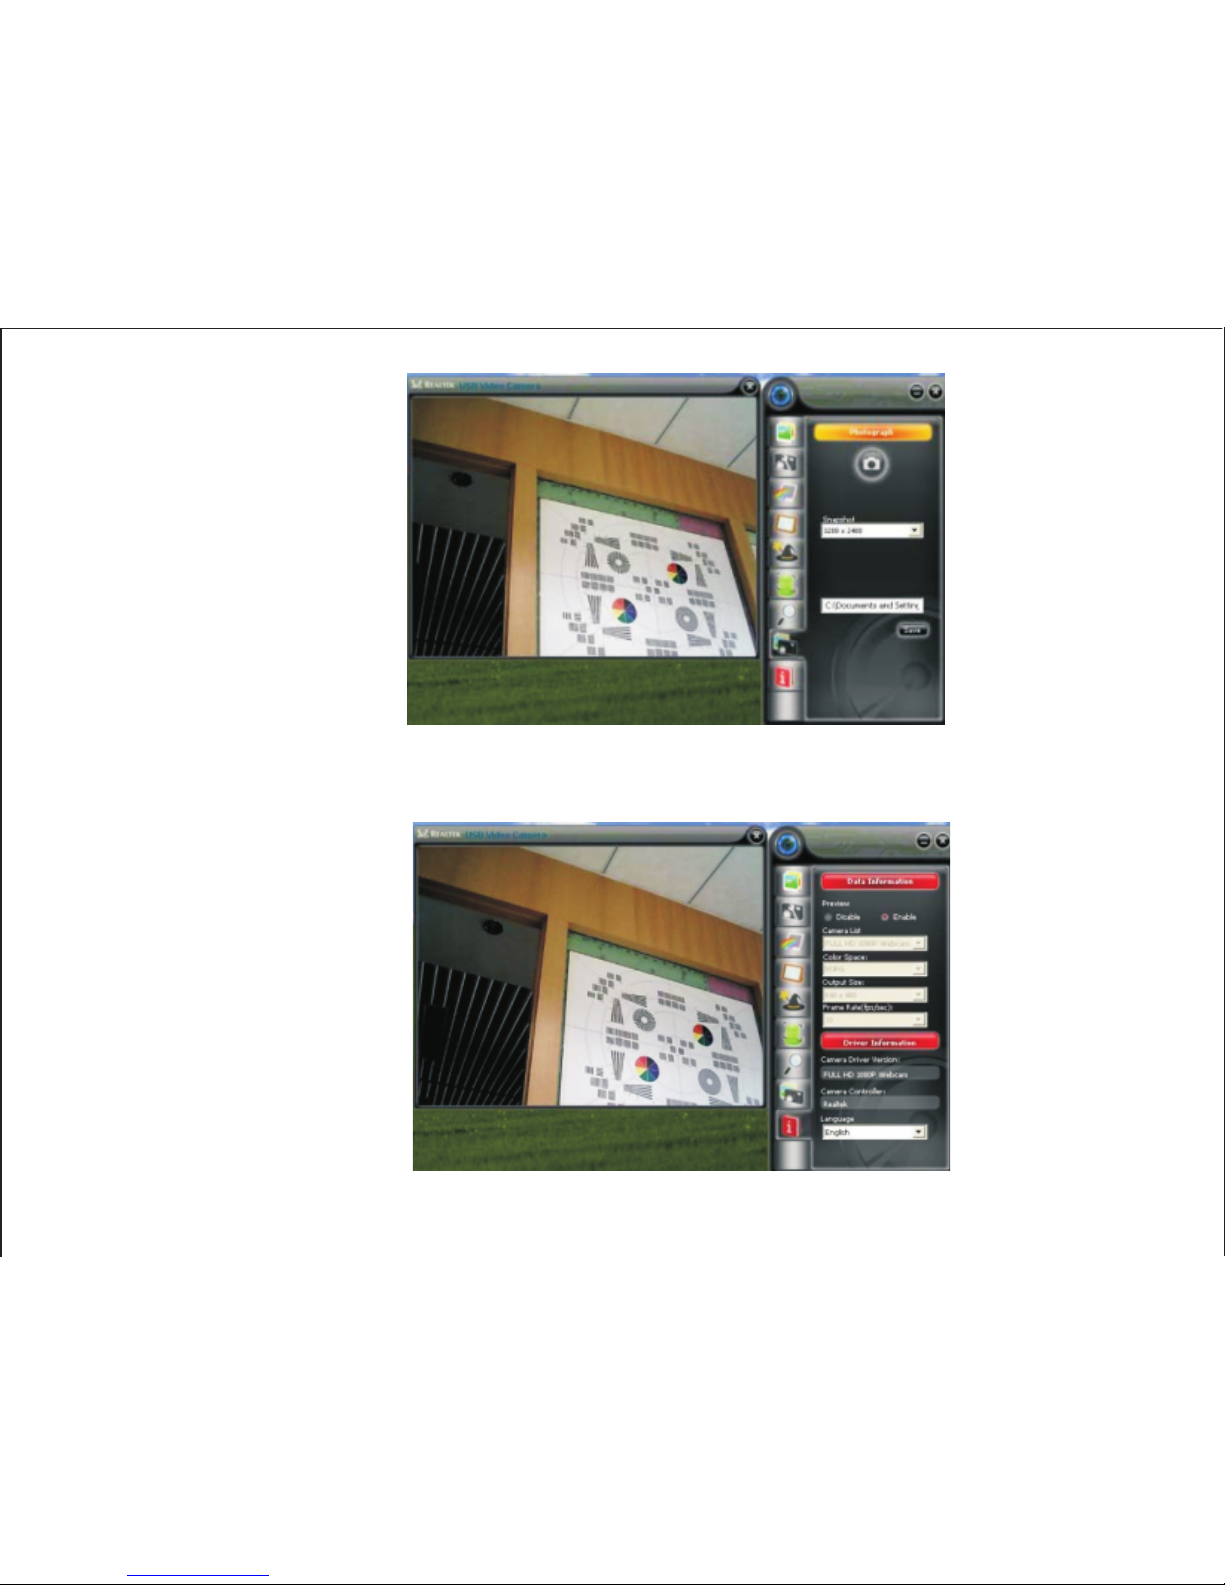
How to adjust the resolution?
Enter“Data Information”and choose “disable”, you can adjust the resolution of preview window. The window
size will keep VGA size.
Note: H igh r es olution r educ es p icture s peed(fps ).
5
Page 8
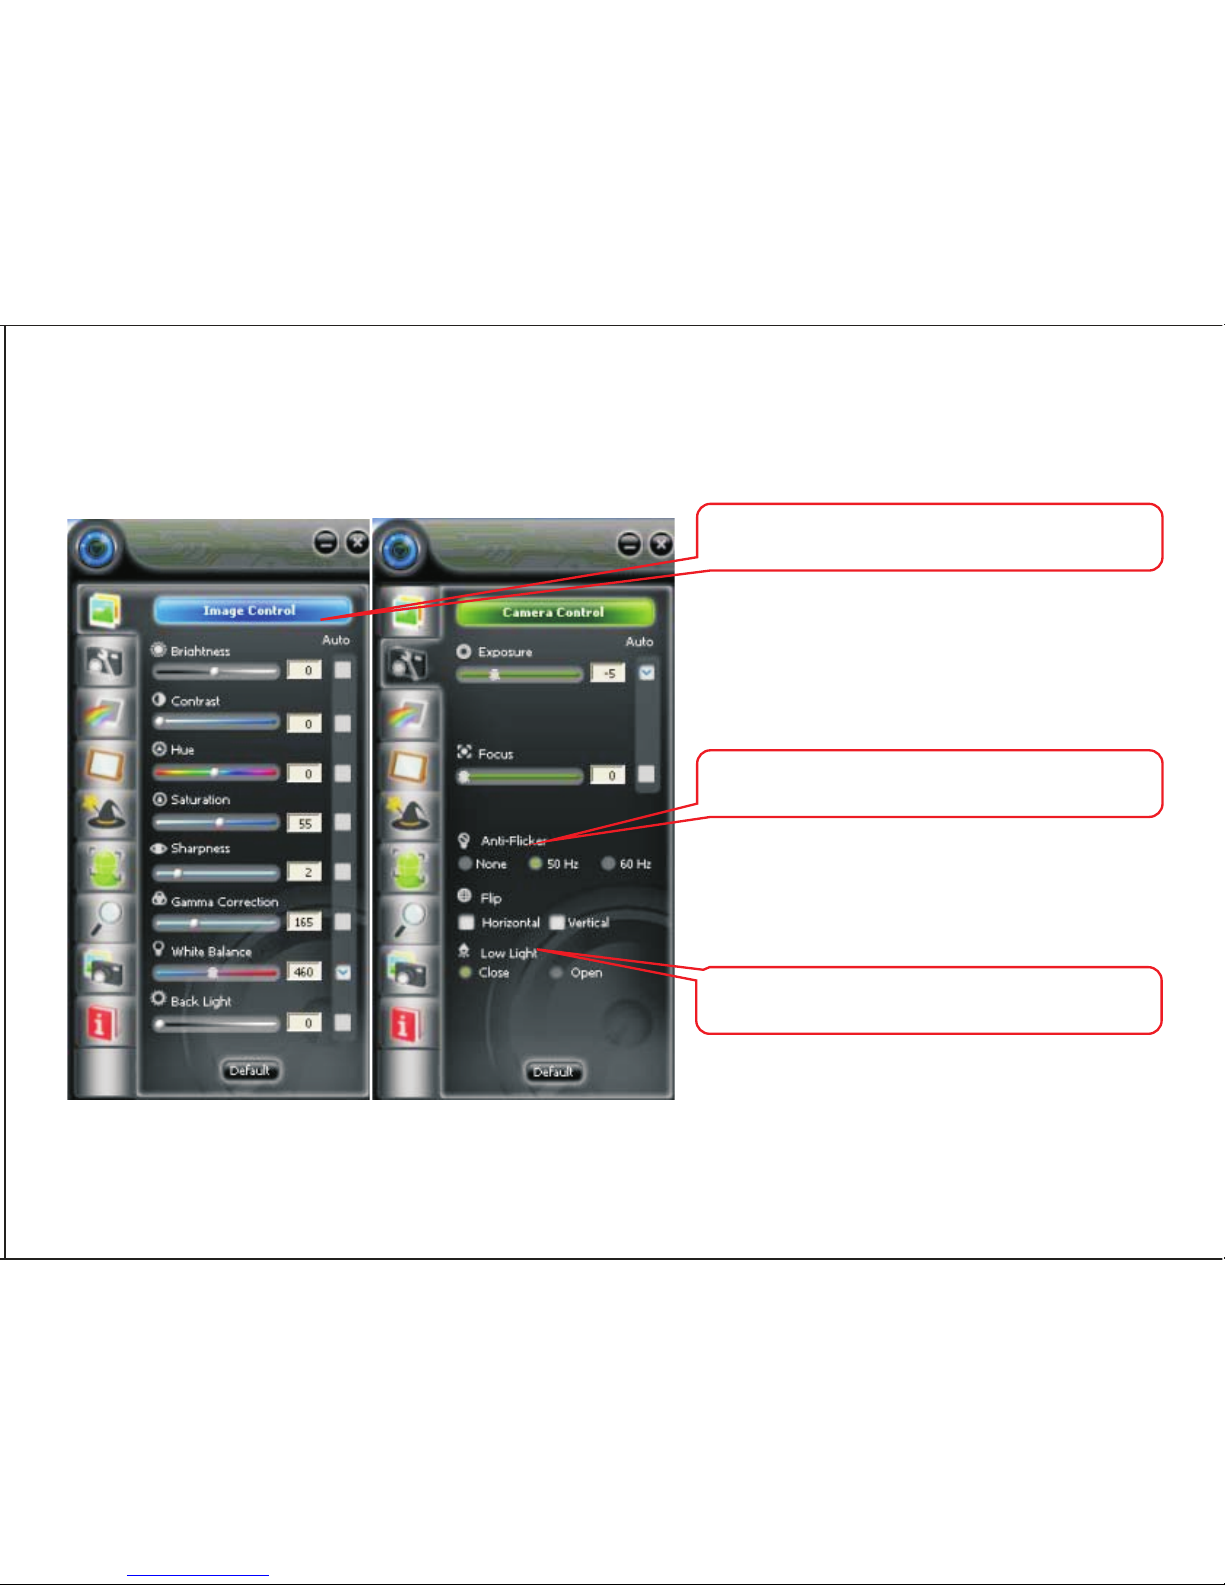
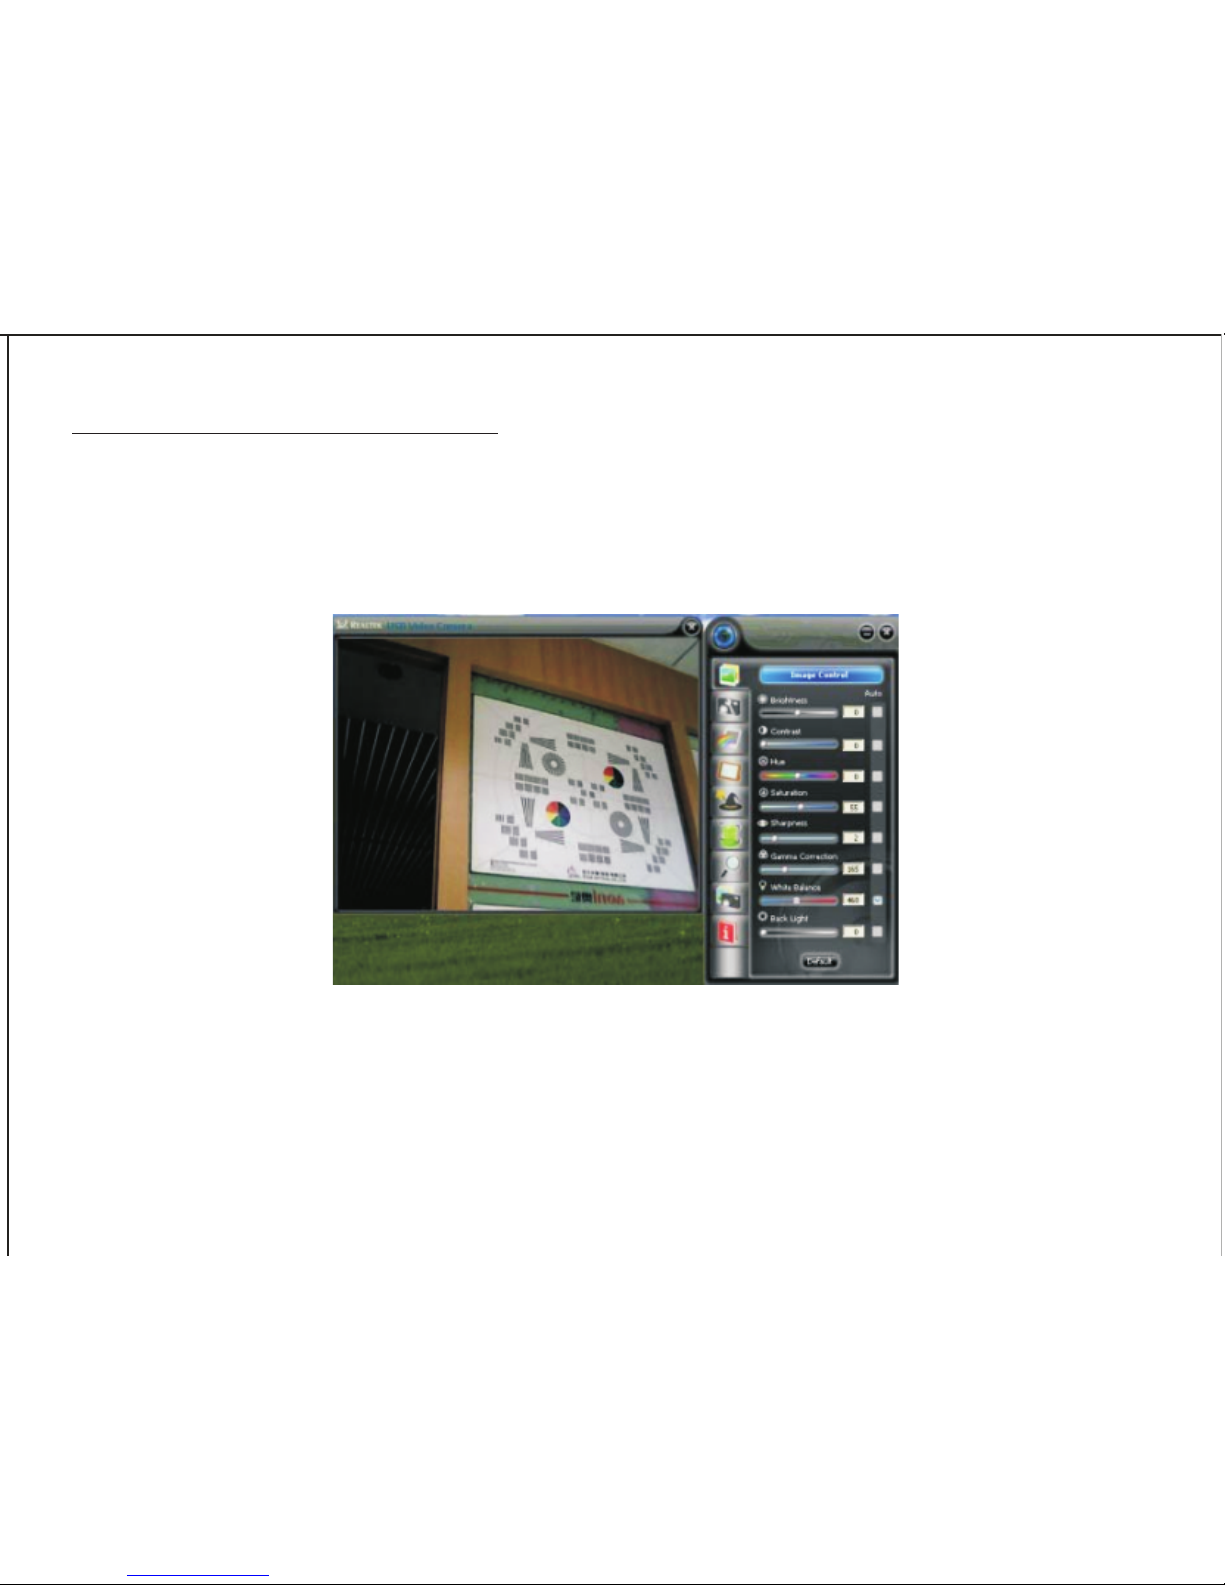
How to use settings and advanced setting?
Click “Image Control”then“Camera Control”, you can adjust the quality of the picture and other settings.
At the following panels you can set image style, photo frame,filter effect, face track and
digital zoom for your video and pictures.
Adjust the parameter to your favourite setting
It's very important to set the frequency the
same as your local power supply
Click it under low-light surrounding
6
Page 9
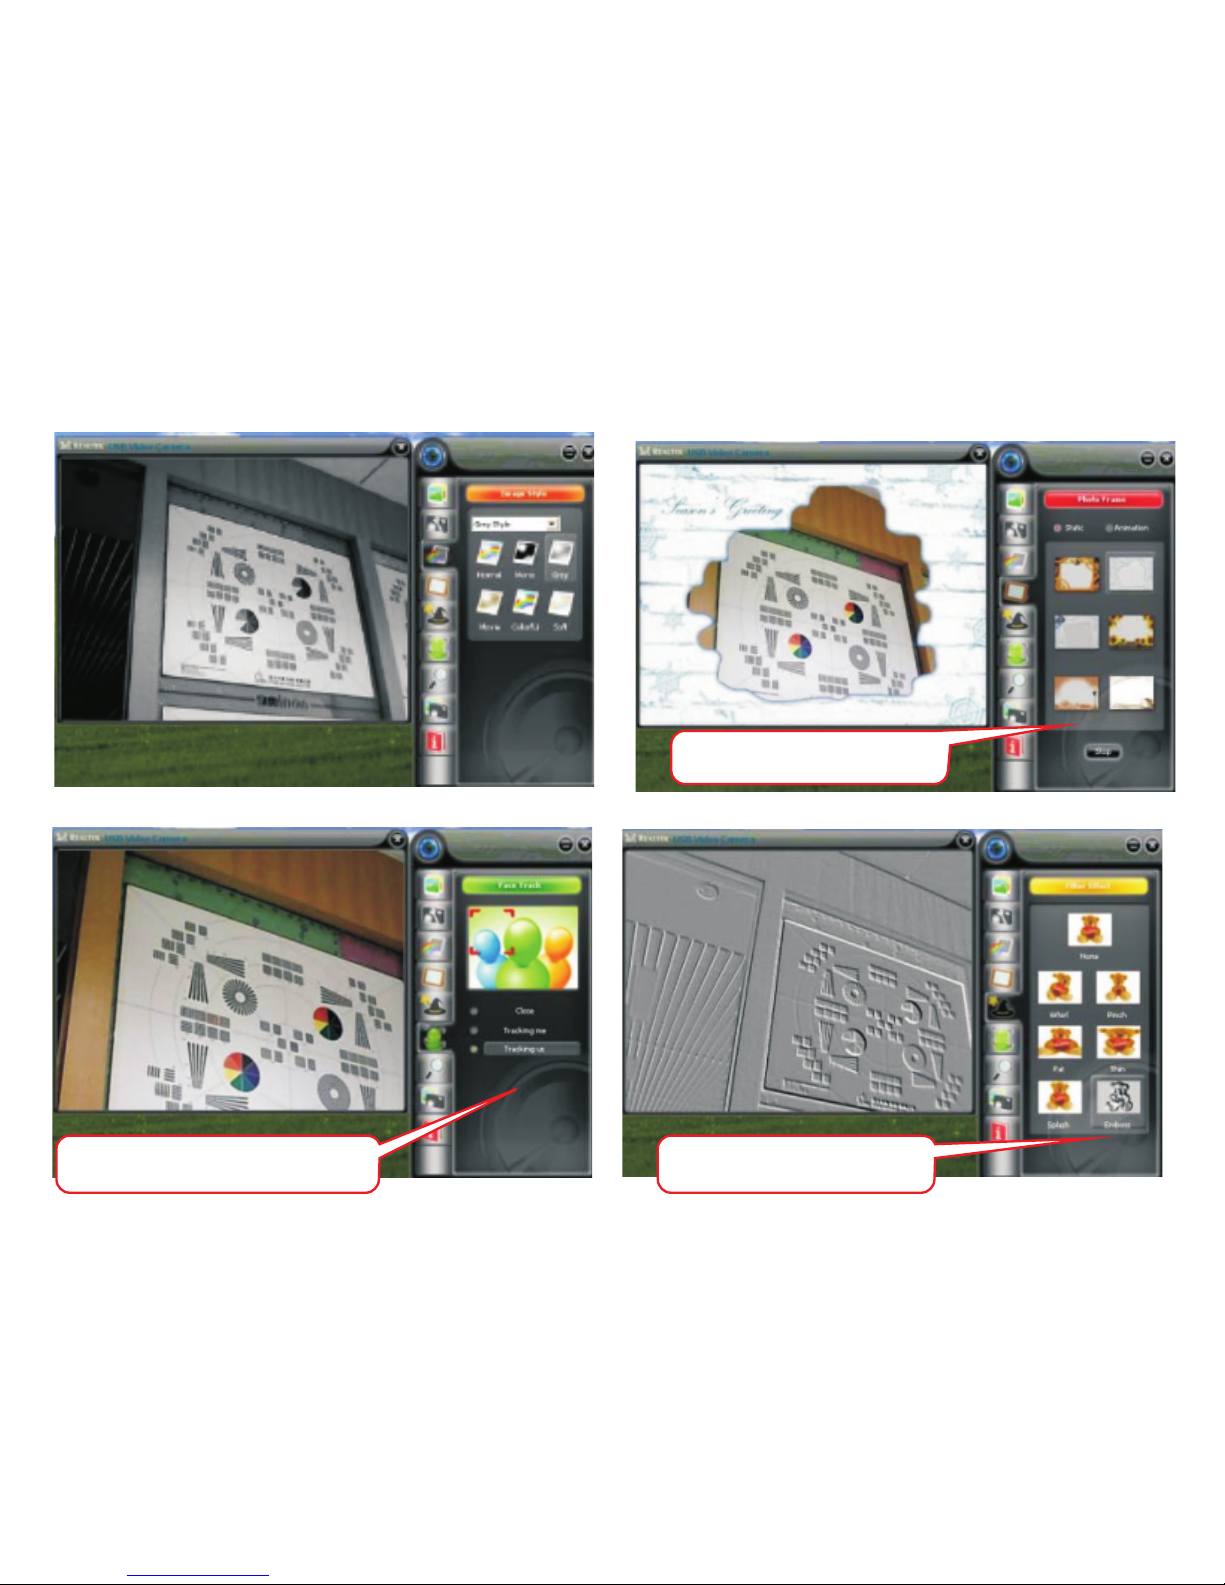
Effects setting field
Photo frame setting field
In this area, users can achieve
face tracking function
7
Page 10

C autions
If the webcam get too hot after long working,we suggest you stop it for a period of time.
* Avoid touching the lens with hand, sharp or coarse objects; use clean and soft cloth for cleaning.
* Do not use it in hot, cold, dusty or humid environment.
* Avoid falling as much as possible; severe falling may cause damages to the lens, malfunction or
scratches to the surface.
Dis claimer
Every effort has been made to ensure that the information and procedures in this guide are accurate
and complete, no liability can be accepted for any errors or omissions and we reserve the right to
make any cha
nges without further notice to any products mentioned herein.
Warranty
We warrant that products purchased from authorized distributors will meet the applicable product
specifications and be free from all defects in design, assembly, materials and workmanship. Please
contact TeckNet retailers, or visit our website for more information about the product.
Tec hnic al S upport and R eturn Merc handis e for S ervic e
Please access Technical Support and Return on the web for help.
www.tecknetonline.co.uk
In this area, users can
achieve zoom function
8
Page 11

Hauptmerkmale:
Hohe Auflösung HD Digitalkamera CMOS-Sensor
* Maximale Videogröße: 1920 * 1080 (2 Mio. Pixel)
* Maximale Bildgröße Snapshot: 4000 * 3000 (12 Mio.
Pixel Snapshot)
* Video-Modus: MJPG und YUY2
* Hi-Speed USB 2.0 (empfohlen)
* Übertragungsrate: 1920 * 1080 bis zu 30 Bilder pro
Sek. im MJPG-Modus
* Signal-Rausch-Verhältnis: mehr als 48dB
* Dynamikbereich: größer als 72dB
* Bild-Fokus: 3cm bis unendlich
* Non-Kompression Bildprozessor
* AWB (Automatischer Weißabgleich)
* Manuelle Fokusfunktion
* Hochpräzisionslinse mit Glaselement
* Eingebautes Mikrofon
* Fotorahmen/Spezialeffekt/Gesichtsverfolgung und
Zoomfunktion
S ys temanforderungen:
* Windows 2003/XP/Vista/WIN7/WIN 8/ MAC OS
(Keine Treiberinstallation erforderlich)
* 1 GHz Intel® Core™2 Duo oder mehr
* 200 MB freier Festplattenspeicher
* Ein freier USB 2.0 Anschluss
Für K OMP LE TT E H D1080p V ideoaufnahme:
* 3.0 GHz Intel® Core™2 Duo
* 2 GB RAM
* 1920 x1080 HD Bildschirmauflösung
*
9
TeckNet C018 1080P Web-Kamera Benutzerhandbuch
Wichtiger Hinweis: Bitte lesen Sie diese Anleitung sorgfltig durch.
Alle Markennamen und Warenzeichen sind das Eigentum ihrer jeweiligen Eigentümer.
Page 12

Inhalt:
Ihre neue Webcam wird mit dem folgenden Zubehör ausgeliefert:
* 1 × TeckNet C018 1080P Webcam
* 1 × Treiber CD
* 1 × Benutzerhandbuch
Tr eiberins tallation ( FA L LS E R F O R DE R L IC H)
Hinweis: Bitte stellen Sie sicher, dass die Webcam mit dem USB-Anschluss verbunden ist, bevor Sie die
Installation ausführen.
1. Legen Sie die Treiber/Applikations-CD in das CD-ROM-Laufwerk ein. Installieren Sie den Treiber, indem
Sie auf Setup doppelklicken. Das System wird automatisch die notwendigen Dateien ausführen und
folgende Fenster auf dem Bildschirm anzeigen:
10
Page 13

2. Setzen Sie das Häckchen bei “Automatisch Realtek Kameramanager ausführen beim Systemstart”, das
Kamerasymbol wird in der Taskleiste angezeigt werden.
3.Starten Sie die Webcam, indem Sie die USB Videogerät- Anwendung im Startmenü auswählen, wie unten
angezeigt .
11
Page 14

Zur B enutzung d es U S B V ideogerts
Wie erzeugt man die Vorschau eines Bildes?
Klicken Sie in der Taskleiste mit der rechten Maustaste auf das Symbol der Webcam , und wählen Sie „Zeige
Hauptbedienfeld“, ein Linksklick auf das Vorschaufenster in der oberen linken Ecke und es wird angezeigt.
Wie nimmt man ein Foto auf?
Wählen Sie das “Fotografie”-Symbol und wählen Sie ihre favorisierte Bildgröße aus. Klicken Sie auf
“speichern” und wählen Sie einen Datenträger oder Ordner f r Ihre Bilder, dann klicken Sie auf “Snapshot”.ü
12
Page 15

Wie kann die Auflösung eingestellt werden?
Geben Sie die “Dateninformationen ” ein und wählen Sie “deaktivieren”. Sie können nun die Auflösung für das
Vorschaufenster einstellen. Die Fenstergröße wird die VGA-Größe beibehalten.
Hinweis : E ine h ohe Aufls ung r eduziert die B ildwiederholrate ( B ild pro S ekunde).
13
Page 16

Wie nimmt man Änderungen der Einstellungen und der Erweiterten Einstellungen vor?
Klicken Sie auf “Bildkontrolle” dann auf “Kamerakontrolle”. Sie können nun die Qualität des Bildes einstellen
neben weiteren Einstellungen.
Passen Sie die Parameter für die
beliebtesten Einstellungen an
Es ist sehr wichtig, die Frequenz an die
ihrer lokalen Einstellungen anzupassen
Schalten Sie es ein in Umgebungen mit
wenig Restlicht
Mit den folgenden Bedienflächen können Sie Bildstil, Fotorahmen, Filtereffekte, Gesichtserkennung
und digitalen Z
oom für ihre Videos und Bilder auswählen.
14
Page 17

Einstellungsfeld für
Fotorahmen
Einstellungsfeld für Effekte
In diesem Bereich können
Benutzer die Gesichtverfolgung
einstellen
15
Page 18

Warnung
Falls die Webcam nach langer Benutzung zu heiß wird, empfehlen wir Ihnen den Betrieb für eine gewisse Zeit
zu unterbrechen.
* Vermeiden Sie das Objektiv mit der Hand, scharfen oder groben Gegenständen zu berühren. Verwenden
Sie für die Reinigung ein sauberes und weiches Tuch.
* Keine Verwendung in heißer, kalter, staubiger oder feuchter Umgebung.
* Vermeiden Sie Erschütterungen, wo möglich. Heftige Stürze können zu Schäden am Objektiv,
Fehlfunktionen und Kratzern führen.
Haftungs aus ss chlus s
Es wurde alles unternommen, um sicherzustellen, dass die Informationen und Verfahren in diesem Handbuch
richtig und vollständig sind. Es kann keine Haftung für etwaige Fehler oder Auslassungen übernommen
werden und wir behalten uns das Recht vor, Änderungen ohne vorherige Ankündigung zu irgendwelchen
Produkten, die hier erwähnt werden, vorzunehmen.
G arantie
Wir garantieren, dass Produkte, die von autorisierten Händlern gekauft werden, den geltenden
Produktspezifikationen entsprechen und frei von allen Mängeln in Design, Montage, Material und
Verarbeitung sind. Bitte kontakti
eren Sie einen TeckNet Einzelhändler oder besuchen Sie unsere Website für
weitere Informationen über das Produkt.
Tec hnis cher K undendiens t und R eperaturs ervic e
Sie erreichen den Technischen Kundendienst und Reperaturservice unter:
www.tecknetonline.co.uk
16
In diesem Bereich können
Benutzer die Zoomfunktion
einstellen
Page 19

Note Importante : Veuillez lire ce manuel avec attention.
Tous les noms de marques et marques déposées sont la propriété de leur propriétaire respectif.
Fonc tionnalités P rinc ipales :
*
* Résolution vidéo maximale : 1920*1080(2M pixels)
* Résolution photo maximale : 4000*3000
(capture en 12M pixels)
* Mode Vidéo : MJPG et YUY2
* USB 2.0 Hi-speed (recommandé)
* Vitesse de transmission : 1920*1080 jusqu'à 30ips en
mode MJPG
* Rapport signal/bruit : supérieur à 48dB
* Dynamique : supérieure à 72dB
* Mise au point Image : 3cm à l'infini
* Processeur d'image sans compression
* AWB (Balance des Blancs Automatique)
* Fonction de mise au point manuelle
* Eléments de l'obj
ectif en verre de haute précision
* Microphone intégré
* Fonctions cadre photo / effets spéciaux / suivi de
visage et zoom
C onfiguration R equis e :
* Windows 2003/XP/Vista/WIN7/WIN 8/ MAC OS
(Pas d'installation de pilote nécessaire)
* 1 GHz Intel® Core™2 Duo ou supérieur
* 200 Mo d'espace disque
* Un port USB 2.0 libre
Pour l 'enregis trement vidéo e n F ull H D1080p:
* 3.0 GHz Intel® Core™2 Duo
* 2 Go RAM
* Ecran HD de résolution 1920 x1080
Caméra Numérique Haute Résolution HD à Capteur CMOS
17
TeckNet C018 1080P Web Caméra manuel d'instruction
Page 20

C ontenu d e l'emballage:
Votre nouvelle Webcam est envoyée avec les éléments suivants.
* 1 × Webcam TeckNet C018 1080P
* 1 ×CD de pilote
* 1 ×Manuel d'Utilisation
Ins tallation d u p ilote ( S I NE C E S S A IR E )
Remarque: Veuillez-vous assurer que la webcam est connectée à un port USB avant l'installation.
1. Insérer le Disque Pilote/Application dans le lecteur de CD-ROM, installer le pilote en double cliquant sur
Installation et le système exécutera automatiquement les programmes nécessaires et affichera les
fenêtres comme suit :
Page 21

2. Cliquer sur “Lancer automatiquement le gestionnaire de caméra Realtek au démarrage de l'ordinateur ”,
l'icône de la caméra va apparaître dans la barre des tâches.
3. Démarrer votre webcam en sélectionnant l'application Périphérique Vidéo USB dans le menu Démarrer
comme illustré ci-dessous.
19
Page 22

C omment prendre u ne p hoto?
Sélectionner l'icône “Photographie” et choisir la taille d'image préférée. Cliquer sur “Enregistrer” et choisissez
un disque ou un dossier pour vos images, puis cliquer sur “photo”.
C omment utilis er l e P ériphérique V idéo US B ?
Comment prévisualiser les images ?
Faire un clic droit sur l'Icône de la Webcam dans la barre des tâches, et choisir “Afficher le Panneau Principal
“. Cliquer sur la fenêtre de prévisualisation dans le coin supérieur gauche, alors vous pourrez la voir.
20
Page 23

Note: L a haute r és olution r éduit la v ites s e des i mages ( ips ).
Comment régler la résolution?
Entrer dans “Information Données” et choisir “inactif”, vous pouvez régler la résolution de la fenêtre de
prévisualisation. La taille de la fenêtre restera en VGA.
21
Page 24

Comment utiliser les réglages et réglages avancés ?
Cliquer sur “Contrôle de l'Image” puis sur “Contrôle de la Caméra”, vous pouvez ajuster la qualité de l'image
et d'autres réglages.
Sur les panneaux suivants vous pouvez régler le style l'image, le cadre photo, les effets
de filtre, le suivi de visage et le zoom numérique pour vos vidéos et photos.
Ajuster les paramètres à votre réglage favori
Cliquer ici en environnement sombre
Il est très important de régler cette fréquence
comme celle de votre alimentation secteur
22
Page 25

Champ de réglage du
cadre photo
Champ de réglage des effets
Dans cette zone, les utilisateurs
peuvent activer la fonction de
suivi de visage
23
Page 26

Préc autions
Si la Webcam devient trop chaude après une longue utilisation, nous vous suggérons de l'arrêter pendant un
certain temps.
* Eviter de toucher l'objectif avec la main ou des objets pointus ou rugueux ; utiliser un chiffon propre et
doux pour le nettoyage.
* Ne pas utiliser dans un environnement humide, poussiéreux, froid ou chaud.
* Eviter les chutes autant que possible ; de lourdes chutes peuvent entraîner des dommages à l'objectif, des
dysfonctionnements ou des rayures de la surface.
L imitation de r es pons abilité
Tous les efforts on été faits pour s'assurer que les informations et les procédures de ce guide sont fiables et
complètes, aucune responsabilité ne pourra être engagée pour quelque erreur ou oubli et nous nous réservons
le droit d'apporter des modifications sans préavis à tous les produits mentionnés ici.
G arantie
Nous garantissons que les produits achetés via les distributeurs agréés satisferont les exigences de produit et
seront exempts de défaut de conception, d'assemblage, matériel et de fabrication. Veuillez contacter les
revendeurs de TeckNet, ou vous rendre notre site web pour plus d'inf
ormation sur le produit.
S ervic e de S upport Technique e t R etour de P roduit
Pour obtenir de l'aide, veuillez accéder au Support technique et Retour sur le web.
www.tecknetonline.co.uk
Dans cette zone, les
utilisateurs peuvent activer
la fonction zoom
24
Page 27

TeckNet
PO BOX 122
Liverpool
L9 7 WQ
www.tecknetonline.co.uk
 Loading...