

Page 1
3"/"24"
"
"
User Manual
Thank"you"for"purchasing"TECJET"printers."Hope"you"have"a"good"operating"experience."
"
In"order"to"safely"and"correctly"use"printers,"please"read"this"manual"carefully"and"operate"as"it"
informs."If"not,"it"may"cause"so me"bad"damages."
"
All"Rights"Reserved"by"printers."
"
"
Contents"
1 Safety"Instructions".................................................................................................................."3"
1.1 Power"
1.2 Printing"Cautions"
1.3 Installing"Environment"
1.4 Ink"Placement"
"
2 Installation"Requirements ........................................................................................................ 4"
2.1-2.7"Body"installations"
2.8 Operating"Panel"
2.9 Media"In st alla t ion "
2.10 Distance"between"Printhead"and"Media"
2.11 Ink"Installation"
2.12 Single"Printhead"Installation"and"Connecting"
2.13 Ink"Color"Order"
2.14 Carriage"Board"and"Cable"Connecting"
"
3 About"Printing"Operation… ................................................................................................... 13"
3.1 Start"to"Use"
3.2 How"to"Calibrate"
3.3 Set"Calibration"IP"Address"
3.4 How"to"Use"Calibration"Software"
"
4 How"to"Install"Software ....................................................................................................... 19"
4.1 Step"One:"Decompress"the"Software"
4.2 Step"Two:"Select"Installation"Fo lder"
4.3 Step"Three:""
4.4 Step"Four:"Select"”Restart"later”"and"Press”Close”"
4.5 Step"Five:"
Page 2

3"/"24"
"
"
"
"
4.6 Step"Six:"
4.7"Step"Seven:"
4.8"Step"Eight:"
4.9"Step"Nine:"Choose"Custom"Printer"
4.10"Step"Ten:""Select"the"Color"Curve"
4.11"Step"Eleven:"Set"As"Default"Printer"
5 Common"Questions"and"Answers ........................................................................................ 23"
Page 3

3"/"24"
"
"
1."Safety"Instructions"
"
1.1 Power"
1) Requirements:"50Hz,"220V,"AC"(±10%),"the"printing"power"consumption"is"120W,"
Maximum"machi n e"power"cons u mp t i o n" is"1920W," p r e -heating"300W,"post-hea ting"
300w,"outside"heating"1200W."In"different"countries"and"regions,"it"may"use"110V"or"
220V"AC."
2) All"devices"should"be"connected"to"a"properly"grounded"outlet,"please"avoid"socket"with"
photocopiers"or"air"conditioning"system."
3) Avoid"using"wall"switches"or"automatic"timers"controlled"outlet."
4) Keep"your"computer"system"away"from"potential"sources"of"EMI,"such"as"speakers"or"
cordless"telephone."
5) Do"not"use"the"damaged"or"worn"Power"cable."
6) If"please"use"the"attached"power"cable,"make"sure"that"insert"the"extra"total"amps"of"power"
line"devices."Use"an"earth"wire"to"be"safe."
7) Do"not"try"to"fix"the"printer"yourselves."Any"problems"please"consult"the"senior"technician"
first."
8) All"the"cables"are"not"allowed"to"be"pulled"out"when"the"power"is"on,"or"will"cause"the"
damages"of"the"main"board."
"
"
1.2 Printing"Cautions"
1) When"turn"on"the"printer,"do"not"move"the"print"head,"or"the"printer"may"be"
damaged."
2) Always"use"the"power"switch"to"turn"off"the"printing,"but"when"the"button"is"
pressed,"the"power"supply"will"be"cut"off."Before"the"power"is"cut"off,"do"not"
unplug"the"printerʹs"plug"or"cable."
3) Before"moving"the"printer,"ensure"that"the"print"head"in"the"initial"position,"and"
fixed."
4) Do"not"attempt"to"remove"the"dryer"or"electric"control"cabinet."
5) Do"not"remove"any"other"closed"or"open"cover"or"plugs."
6) Do"not"insert"any"objects"in"the"slot"of"the"printer."
7) Do"not"touch"the"printer"drying"systemʹs"interior"cover."Even"after"power"is"
disconnected"interior"surface"may"still"be"very"hot."
8) When"contact"material"drying"channel,"special"care"should"be"taken."
9) Keep"clothes"and"all"parts"of"the"body"away"from"the"moving"parts"of"the"
printer."
10) Do"not"wear"necklaces,"bracelets"and"other"hanging"articles."
11) Be"careful"and"not"to"let"your"sleeve"or"glove"is"entangled"by"moving"parts"of"the"
printer."
12) During"printing,"do"not"touch"the"gears"or"the"reel."
"
1.3 Installing"Environment"
To"keep"Tecjet"printers"keep"smooth"operation"in"a"long"time,"Tecjet"printers"should"be"kept"in"
Page 4

3"/"24"
"
"
the"place"where"air"flows"well,"room"is"big"enough "w ith"sm o oth "floo r,"and "the"tem p era ture"
should"be"better"between"18-26℃."
"
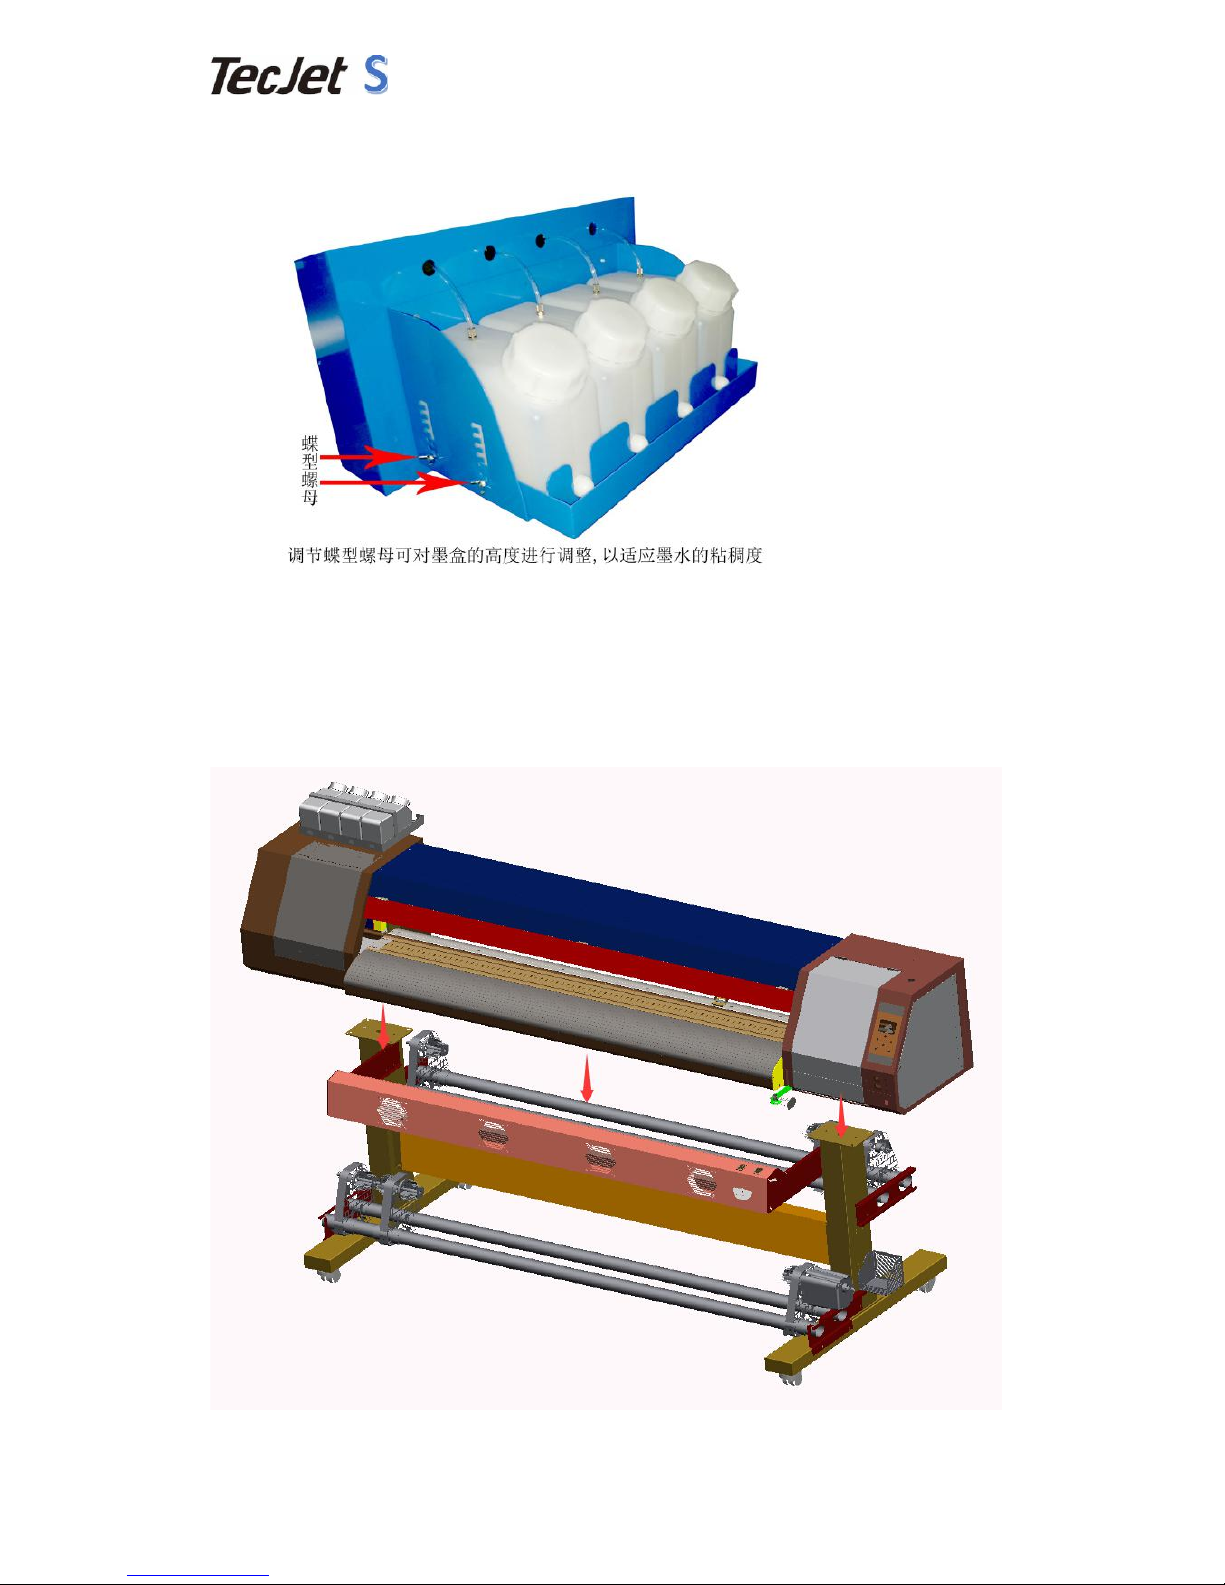
1.4 Ink"PlacementKeep"the"ink"bottles"out"of"the"childrenʹs"reach,"don't"let"the"
kid"drink"or"touch"ink"bottles."
1) If"the"ink"sticks"to"skin,"clean"with"soap"and"water;"if"ink"splashes"in"eyes,"
immediately"flush"with"water."
2) Do"not"shake"ink"bottles,"which"will"cause"the"ink"leaking."
3) After"using"the"ink"bottles"for"a"certain"period"(usually"three"months),"
immediately"removed"for"thorough"cleaning"and"drying;"pay"attention"to"
cleaning"when"replaced"a"new"ink"bottle"to"ensure"print"quality."
4) Dispose"the"waste"ink"according"to"relevant"local"laws."
"
"
"
"
"
"
"
"
"
"
"
"
"
"
"
"
"
"
"
"
"
"
"
"
"
"
"
"
"
"
"
"
"
"
"
"
"
Page 5
3"/"24"
"
"
"
2 Installation"Requirements"
"
After"open"the"wooden"package,"please"install"Tecjet"printer"as"below."
"
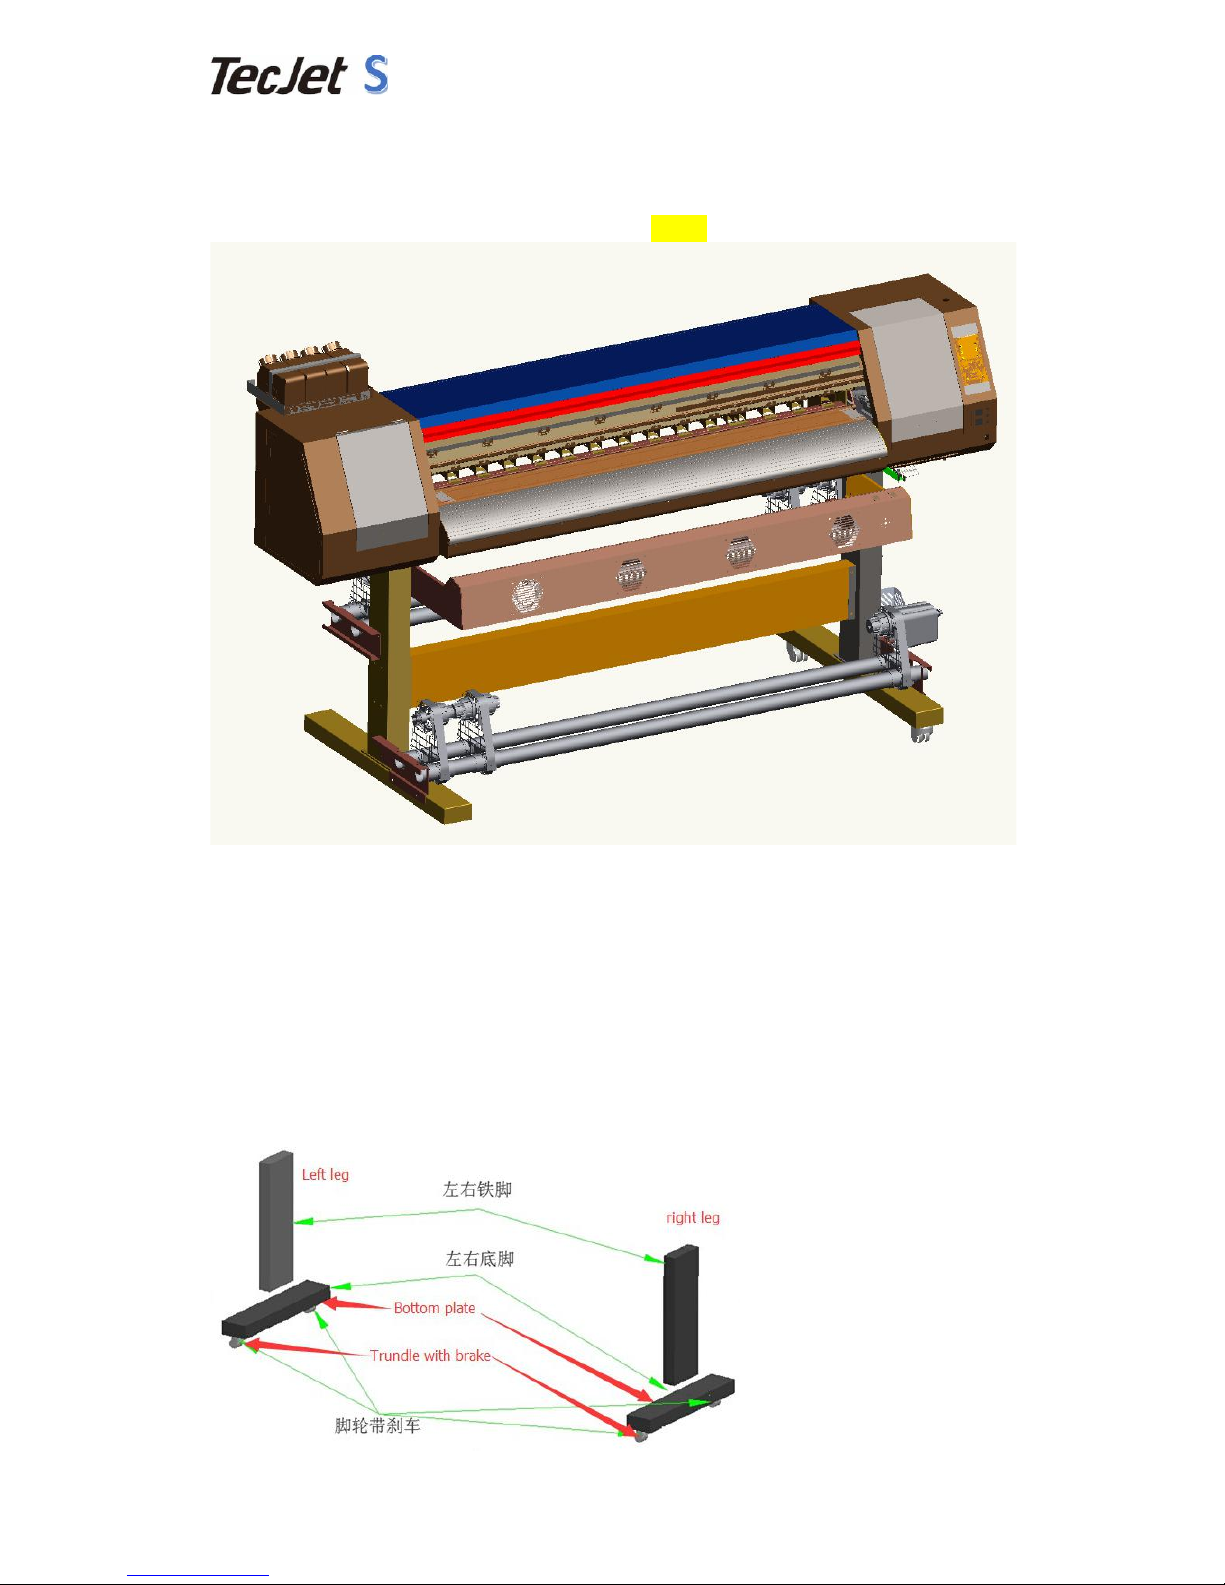
Name"of"parts:
(1)Main"body(2)Feeding"system(3)Drying"system(4)Steel"leg"
(5)Horizontal"bar(6)Up"Fixing"plate(7)Fan"Fixing"Plate""""""""""""""""""""""""""""""""""
(8)Tube"Fixing"Plate(9)Legs(10)Take"up"system"
"
Leg"installation"
Install"the"legs"as"image"shows."Fasten"legs"with"8-M6X20"bolt."Leg"brakes"should"be"
installed"under"its"legs"and"fastened"by"16-"M6X20"Bolt."
Page 6
3"/"24"
"
"
"
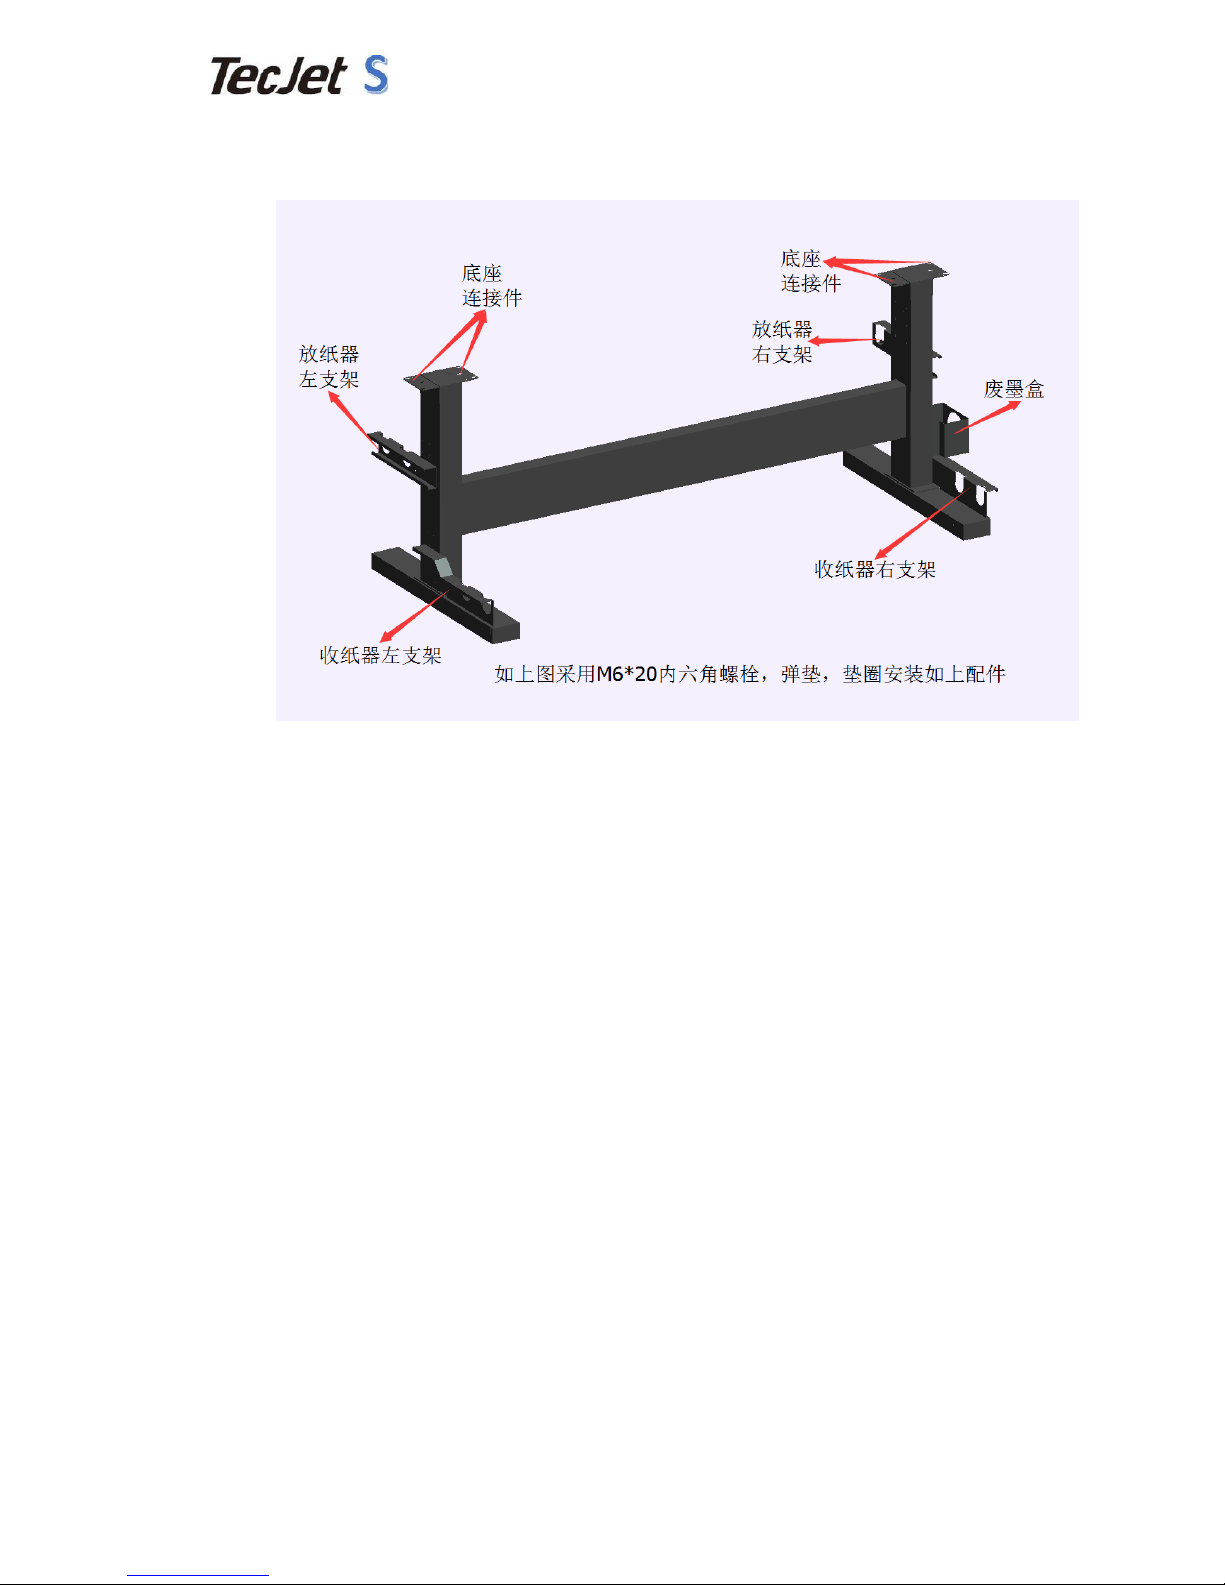
2.1 Install"and"fasten"the"horizontal"bar"with"12-"M6X20"and"Install"the"
Tube"Fixing"Plate"with"16-"M6X20"as"the"image"below.
"
"
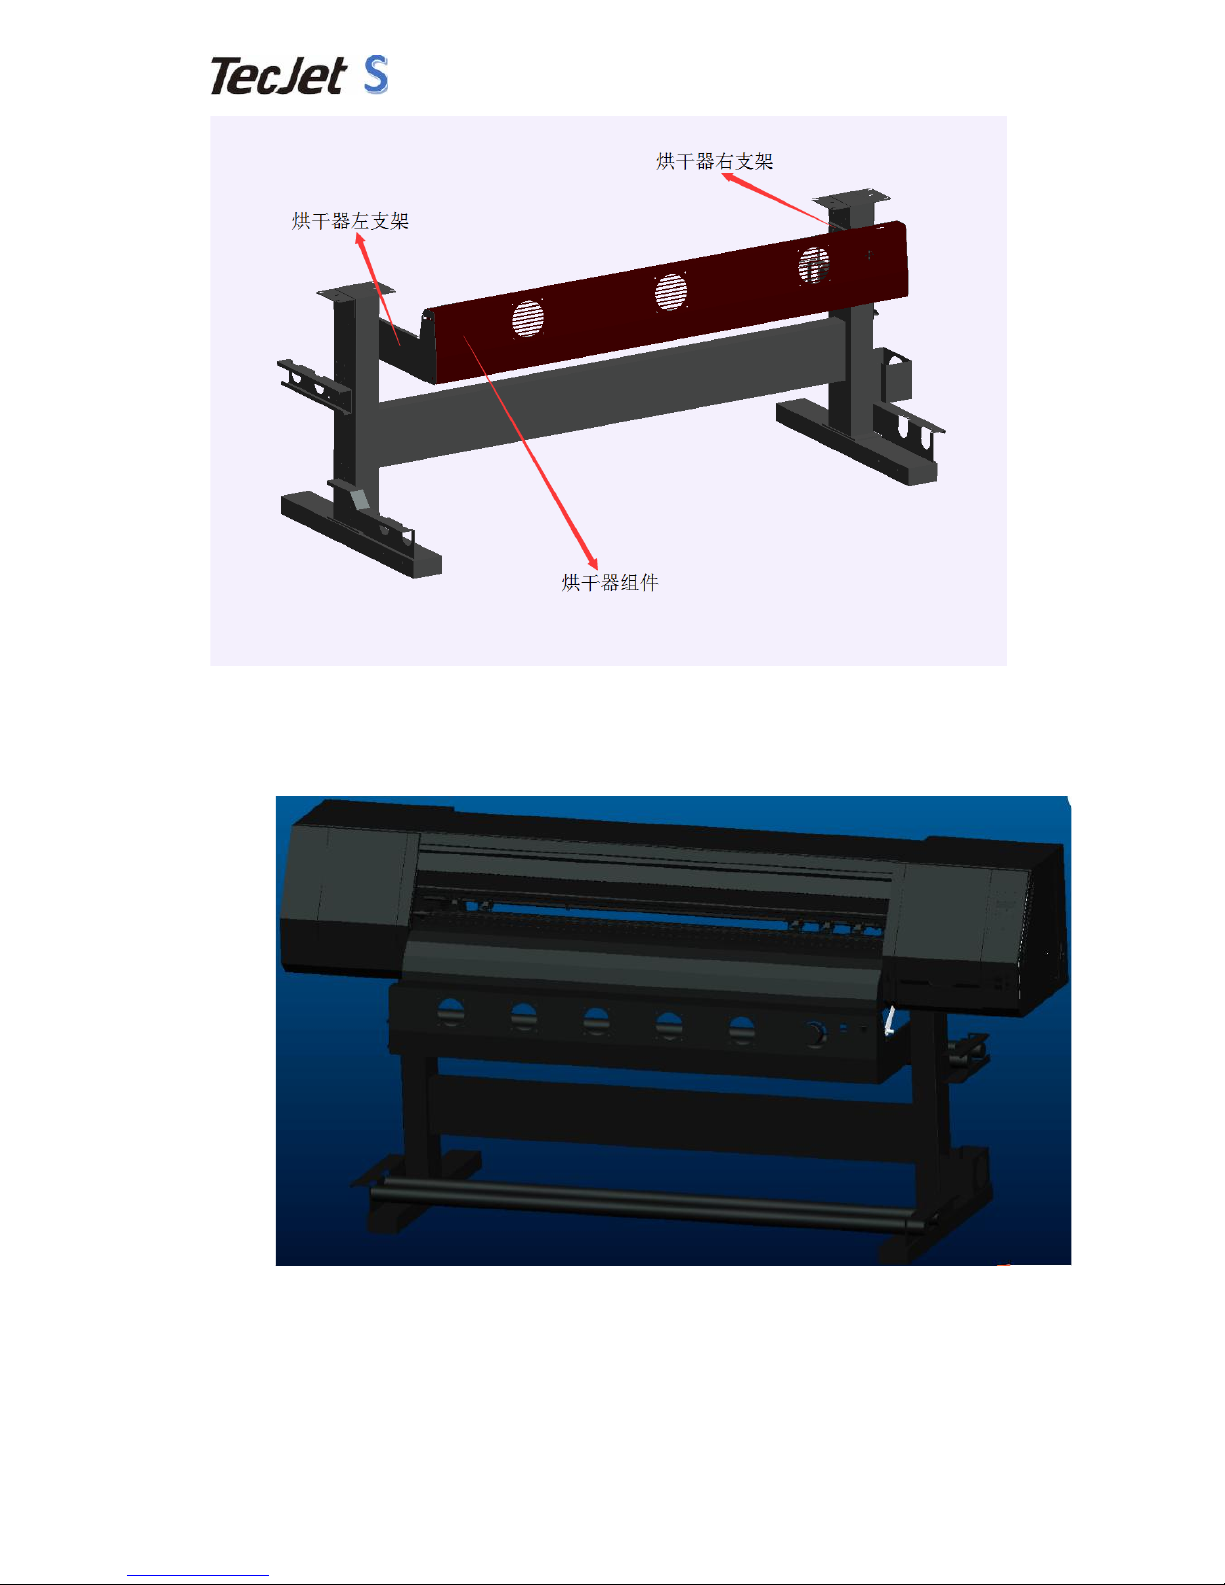
2.2 Install"the"Fan"Fixing"Plate"and"Steel"Legs"with"8-M6X20"bolts."
After"fastening"them,"fasten"the"Up"Fixing"Plates"of"Main"body"and"Steel"
Legs"with"12-M6X20"bolts."Install"dry"fans"on"the"fixing"plate"with"4-
M6X15"bolts(Black"Plastic"Cover).
Page 7
4"/"24"
"
"
"
"
"
"
2.3 Install"and"fastened"the"Steel"Tubes"with"8-M4X25(Black"Plastic"Cover)"on"
the"Tube"Fixing"Plate."
"
Page 8
5"/"24"
"
"
"
"
2.4 Install"the"first"Ink"Cartridge"as"the"image"shows."
"
"
2.5 Install"the"Feeding"System"and"Take"Up"System"on"the"Steel"Tubes"with"4-
M6X15"bolts(Black"Plastic"Cover)"and"put"on"the"Main"body"frame"as"image"
shows"and"fix"it"with"8-M6X20"bolts."
"
"
2.6 Operating"Panel
Page 9

6"/"24"
"
"
"
"
1) Press"right"or"left"button"to"control"the"carriage"movement."Press"right"long,"
carriage"moves"to"right;"press"left"long,"carriage"moves"to"left."Release"button,"
carriage"stops."
2) Press"Up"and"down"to"make"forward"or"back"after"entering"the"menu."Control"
media"to"feed"or"not."
3) Return:"Back"or"cancel"what"you"do."
4) Enter:"Confirm"your"order."
5) When"printers"go"on"standby,"press"right"to"enter"cleaning"menu."
2.7 Media"Installation"
Scroll"media"is"better."Keep"media"direct"and"keep"media"parallel"with"platform."
Media"should"be"smooth"and"complete."
Before"install"media,"lift"up"the"pressing"handle."After"installing"media,"you"need"to"
lift"down"the"pressing"handle."
Page 10
7"/"24"
"
"
"
"
2.8 Distance"between"Printhead"and"Media"
Printhead"base"can"be"adjusted"according"to"Media"thickness."The"best"distance"
between"printhead"and"media"is"1.5mm,"not"more"than"2mm."Media"should"be"
smooth."Adjust"the"M4X8"bolts"as"image"shows,"the"distance"will"be"changed"
accordingly.(Example"at"DX5"Head)"
"
2.9 Ink"Installation"
1) Keep"ink"out"of"the"reach"of"Children."If"it"enters"your"eyes"or"splash"on"your"
clothes,"please"flush"with"plenty"of"water."
2) Clean"ink"tube"with"our"clean"flush."
3) The"temperature"of"ink"should"be"better"kept"between"18℃—28℃."
4) After"open"the"inks,"it"should"not"be"kept"for"a"long"time."Please"use"it"ASAP."
5) Don’t"shake"the"ink"bottles."Don’t"pollute"environment"by"throwing"ink,"ink"
bottle"at"your"will."
6) Add"ink"as"image"below"shows."Connect"ink"tube"as"the"image"shows.
M4X8 Bolt
Page 11

8"/"24"
"
"
"
"
"
"
Attention:"Ink"bottle"cap"cannot"be"too"tight"so"that"there’s"no"air"left."
2.10 XP600&DX5&DX 7&5113"Single"Printhead"Installation"and"
Connecting.
Page 12

9"/"24"
"
"
"
"
" "
"
DX5-1"
DX5-2"
"
""""""""""""" "
"
""""""""""""""""""""""""DX7-1""""""""""""""""""""""""""""""""""""""""""""""""""""""""""""""""""DX7-2"
"
""""""""""" "
"
"""""""""""""""""""""XP600-1"""""""""""""""""""""""""""""""""""""""""""""""""""""""""""""""""XP600-2"
"
Page 13

10"/"
"
"
""""""""""" "
"
""""""""""""""""""""""5113-1""""""""""""""""""""""""""""""""""""""""""""""""""""""""""""""""""5113-2"
"
Cables"should"be"connected"as"images"below."(IMPORTANT!!!)"
For"DX5"printhead,"connection"should"be"as"below:"
"
"
For"DX7"printhead,"connection"should"be"as"below:"
"
For"XP600"printhead,"connection"should"be"as"below:"
Page 14

11"/"
"
"
"
For"5113"printhead,"connection"should"be"as"below:"
"
"
2.11 Ink"Color"Order"
For"DX5"printhead,"it’s"the"order"as"below."
"
"
For"DX7"printhead,"it’s"the"order"as"below."
"
For"XP600"printhead,"it’s"the"order"as"below"
Page 15

12"/"
"
"
"
"
For"5113"printhead,"it’s"the"order"as"below"
"
Page 16

11"/"24"
"
"
"
"
2.12 Carriage"Board"and"Cable"Connecting"
For"DX5"printhead,"it"should"be"connected"as"below."
"
"
For"DX7"printhead,"it"should"be"connected"as"below."
"
"
For"XP600"printhead,"it"should"be"connected"as"below."
"
Page 17

11"/"24"
"
"
"
"
For"5113"printhead,"it"should"be"connected"as"below."
"
Page 18

11"/"24"
"
"
"
"
3. About"Printing"Operation"
"
3.1 Start"to"Use"
(1)Press"the"power"button"like"the"image"below."
(2)Close"the"printer"by"press"the"power"button"to"“O”"situation."
3.2 How"to"Calibrate"
1)"How"to"set"the"IP"of"your"computer(Here"run"at"Windows10"Enterprise"64-bit"
System)"
Please"check"the"cable"and"machine"make"sure"the"machine"is"power"on"and"
network"cable"connected"with"the"machine"and"computer"successfully."
Step"one:Find"Wifi"Icon"at"the"right"down"corner"of"the"desktop"and"press"it."
"
Step"two:Find”Network"Settings”"and"press"it.
开关
Page 19

16"/"24"
"
"
"
"
Step"three:"Go"down"by"the"mouse"and"find"“Network"and"Sharing"Center”"and"press"it."
"
"
"
Step"four:"Find"“Local"Connection”"icon"and"press"it."
"
Step"five:Find"“Properties”"and"press"it."
Page 20

17"/"24"
"
"
"
Step"six:Find"“Internet4"(TCP/IPv4)”"and"press"the"“Properties”."
"
Step"seven:Select"the"“Use"the"following"IP"address”"and"at"IP"address"enter"“196"12"0"188”"and"
press"ok."
"
Step"eight:After"that"there"is"an"attention"windows"will"come"out,just"press"ok."
"
Step"nine:The"Subnet"Mask"will"default"to"”255"255"255"0”automatically"and"press"ok"and"finished."
Page 21

18"/"24"
"
"
"
"
3.3 Set"Calibration"IP"Address"
Step"one:Set"the"Calibration"IP"address"as"below."
"
Step"two:Press"the"“Connect”"and"see"if"the"IP"succeed."
"
3.4 How"to"Use"Calibration"Software"
1) Vertical"Calibration,"adjusting"printhead"
Open"the"calibration"software,"after"connecting"the"printer,"press"“More”"first"and"then"press"“Vert."
test”"
Page 22

19"/"24"
"
"
"
"
"
Adjust"printhead"according"to"printing"image."The"result"should"be"as"below."
"
2) Two-way"Calibration"
Page 23

20"/"24"
"
"
"
"
Press"“Hidi.Align”"and"do"two-way"calibration"and"print"images
:
And"see"which"line"is"the"best"and"enter"its"number.For"example,"if"number"3"is"the"
best,"then"enter"30+3=33."
3) Feeding"calibration"
"
"
Page 24

21"/"24"
"
"
"
"
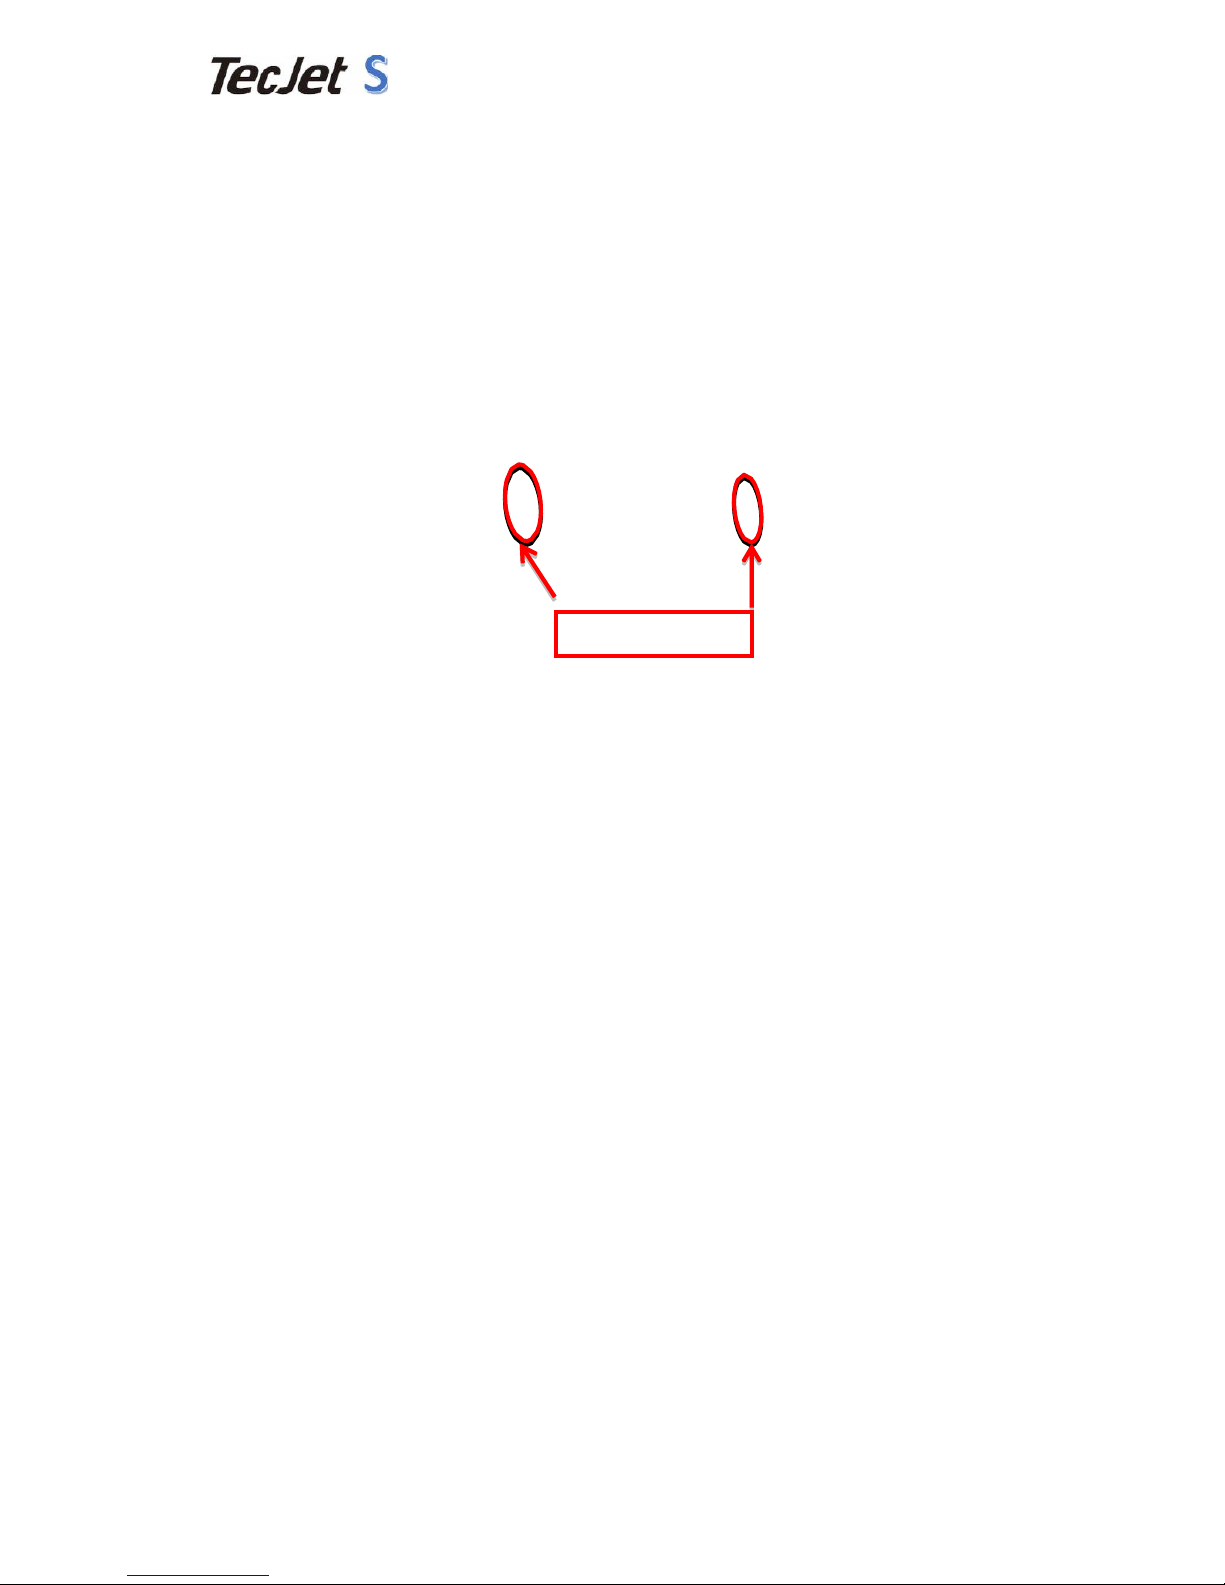
Image"01"
Press"the"“Step"Align”"and"do"the"Feeding"calibration"and"print"the"image."
"
"
"
"
"
"
"
"
Measure"the"distance"of"two"arrows"and"accurate"to"MM."Put"the"“Distance"number”"
into"image"01.And"press"calculate"and"then"press"save."
"
4) Print"setting"
Page 25

22"/"24"
"
"
"
Print"setting"should"be"as"the"image"up."
5) Advanced"setting"
Press"“Entry"advanced"Setup”"and"enter"Password"16753."
"
"
1) Voltage"adjust"should"choose"512,"it’s"default."
2) If"ink"emerge"light"or"spitting,"you"can"use"higher"voltage."If"ink"didn’t"continue,"
and"two"much"ink,"please"use"lower"voltage."The"standard"value"is"512,"and"the"
range"of"value"is"460-580."
3) Color"order"(KCMYCM)"can"be"changed"as"per"your"need."
Page 26

23"/"24"
"
"
"
6) Calibration"values"import"and"export"
Click"“more…”in"maintenance"area"and"you"will"see"the"following"image."
"
After"calibrate"all"values,"please"save"them"in"your"computer."If"you"need"to"change"
carriage"board,"you"should"import"the"files"you"saved"in"this"step.
Page 27

24"/"24"
"
"
7) Control"panel"
8) Carriage"connection"instruction"
Mainboard
Page 28

25"/"24"
"
"
"
"
USB"
"
Internet"
access"
"
"
Feeding"
servo"1"
"
Feeding"
servo"2"
Connect"
carriage"
board"
"
"
"
"
Power"
(3)
Wiper"
motor"
"
"
"
UV"lamp"and" sensors(4)
Ink"
pump"
"
"
"
"
"
"
"
"
"
."
Connect" Led"
panel"
Wipe"sensors(5)
4. How"to"Install"Software
Page 29

26"/"24"
"
"
"
4.1 Install"Maintop"Software"
Step"One:Decompress"the"software"and"open"the"folder"and"double"click"“INSTALL”"to"install"the"
software."
"
"
"
"
4.2 Step"Two:"Select"Installation"Folder"and"press"“OK”."
"
4.3 Step"Three:"After"depressing,"there"is"a"windows"come"out"“MainTop"RIP"Port""
Monitor"installation"is"failed!”"and"press"ok."
"
Page 30

27"/"24"
"
"
Page 31

28"/"24"
"
"
"
4.4 Step"Four:"Select"“Restart"later”"and"press"“Close”."
"
4.5 Step"Five:"Press"“Close”"on"the"READ"MEE."
"
4.6 Step"Six:Select"“MainTop"Print"Manager”"and"“MainTop”"and"Send"to"“Desktop"
creat"shortcut”."
Page 32

29"/"24"
"
"
"
"
4.7 Step"Seven:Open"the"“MainTop”"shortcut"on"the"Desktop,"then"press"“File”"and"
select"“Printer"Setup”"open"it."
Page 33

21"/"24"
"
"
"
4.8 Step"Eight:Select"the"“Microsoft"XPS"Document"Writer,Ne00”"and"press"“Install”."
"
4.9 Step"Nine:Press"“Custom”."
"
4.10 Step"Ten:Copy"the"Color"Curve“DYMK_DYE_SY_XP600_20170423”"from"our"CD"
disk"to"Desktop,"and"select"the"“easyjet”(File"inside"that"folder)"and"press"
Open.(The"Color"Curves"is"different"of"Epson"DX5,DX7,XP600,5113"printhead)."
"
"
Page 34

21"/"24"
"
"
"
4.11 Step"Eleven:Press"“Set"As"Default"Printer”"and"press"OK"then"finish."
"
Page 35

21"/"24"
"
"
"
"
5. Common"Questions"and"Answers"
"
"
Number"
Common"questions"
Question"analysis"
Answer"and"solutions"
"
"
"
"
"
"
1"
"
"
"
"
"
After"power"on,"
printer"has"no"action,"
carriage"doesn’t"move"
a)"Check"power"outlet,"cable"and"
power"box"and"see"if"they"are"in"
good"condition."
Check"parts"related"to"power"and"see"if"
there’s"24V"power"output."
b)"Main"board"fused"
Change"fuse"
c)"Led"lamp"in"carriage"board"
does"not"work;"main"board"or"
carriage"board"broken."
Cables"of"26P"need"to"be"connected"
tightly;"Voltage"from"main"board"
abnormal,"then"change"main"board"or"
carriage"board."
d)Carriage"board"servo"driver"
abnormal"
Check"connecting"between"servo"driver"
and"main"board;"change"a"new"servo"
driver."
"
"
2"
"
Carriage"board"moves"
and"can’t"back"ink"
station."
a)"Wrong"signal"from"raster"slip"
Check"raster"slip"and"encoder"
b)"Carriage"moves"left"only"
Cables"of"26P"don’t"connect"well;"change"
new"carriage"board"or"main"board;"
motors"connecting"not"well"or"change"
new"motors."
"
3"
Carriage"board"backs"
ink" station" normally,"
but"hit"the"right"bar."
Original"sensor"broken"
Check"sensor"connecting"
"
"
"
"
4"
"
"
No"ink"from"any"
channel"when"testing"
printhead"
a)"42V"input"abnormal"
Check"if"there’s"42v"voltage"from"power"
box"and"see"if"42v"fuse"in"main"board"has"
been"fused"
b)"printhead"cables"connecting"
Check"printhead"cable"connecting"well"or"
not"
c)"abnormal"carriage"board"or"
printhead"plate"
Change"carriage"board"or"printhead"plate"
"
"
5"
"
Some"channels"no"ink"
output"or"ink"output"
abnormally"
a)"carriage"board"or"printhead"
plate"abnormal"
Change"carriage"board"and"printhead"
plate"
b)"cables"connected"with"
printhead"
Check"the"printhead"cables"
"
6"
Ink"sucking" motor,"
wiper"and"fans"are"
abnormal"
a)"Ink"pump"and"solenoid"valve"
abnormal"
Check"cables,"ink"pump,"solenoid"valve"
and"fans"
b)"main"board"is"broken"
Change"new"main"board"
"
7"
Abnormal"media"
feeding"
a)"motor"connecting"and"motors"
Check"cables"and"feeding"motors"
b)"drive"plate"and"main"board"
Change"new"circuit"board"
"
8"
After"turning"on,"
computer"shows"not"
connecting"or"it"can’t"
a)"printer"IP"and"computer"IP"is"
different"
Set"the"IP"address"again"
b)"internet"cables"can’t"work"
Change"new"internet"cables"
Page 36

21"/"24"
"
"
"
print"
c)"cables"connecting"main"board"
and"carriage"board"are"not"
connected"well"
Check"cables"connecting"
9"
Printing"is"not"finished"
but" data" transmission"
ends"
a)"carriage"board"is"broken"
Change"new"carriage"board"
b)"there"is"not"enough"space"to"
install"maintop"
Clean"installation"disk"or"change"another"
disk"so"that"the"space"is"big"enough"
10"
Empty"or"overlapping"
printing"
a)"feeding"adjustment"is"not"good"
Make"feeding"adjustment"again;"change"
different"media"to"adjust"
b)"media"situation"different"from"
feeding"calibration"and"printing"
Adjust"media"feeding"in"system"and"make"
media"feed"well"
11"
Image"printing"size"is"
too"long"or"short"
a)"calibration"values"are"not"
correct"
Calibrate"feeding"again"or"change"values"
in"maintop"
12"
Bad"resolution"and"ink"
spitting"
a)"distance"between"head"and"
media"is"too"high("normal"
1.8-2.2mm)"
Adjust"the"distance"
b)"lower"than"42V"
Check"42V"power"and"see"if"it’s"OK"
c)"vertical"calibration"and"
two-way"calibration"is"not"good"
Make"vertical"and"two-way"calibration"
again"
d)"carriage"moves"too"fast"
Change"printing"speed"
e)"abnormal"head"drive"plate"
Change"a"new"head"drive"plate"
13"
No"ink"out"when"
printing"
a)"affected"by"interior"
temperature"and"humidity"
Keep"temperature"normal"
b)"bad"ink"quality"
Change"good"quality"ink"
c)"Ink"supply"system"is"not"good"
Keep"ink"supply"pressure"normal"and"no"
air"leakage"in"ink"tubes"and"connecting"
parts"
d)"carriage"moves"too"fast"
Change"printing"speed"
e)"head"drive"plate"is"of"problems"
Change"new"head"drive"plate"
14"
Color"cast"
a)"check"ink"and"head"situation"of"
ink"out"
Ink"is"not"matched"with "maintop"profile"or"
head"block"
b)"less"than"42V"
Check"42V"power"
c)"abnormal"head"drive"plate"
Change"new"head"drive"plate"
15"
Error"reports"from"
carriage"and" print"
ends"
a)"26P"cables"connecting"not"
good"
Connect"them"again"
b)"servo"motor"reports"errors"
Check"servo"motor"connecting"
c)"error"reports"from"raster"slip"
Check"raster"slip"position"and"situation."
Connecting"between"raster"slip"and"
circuit"plate"is"not"good."Check"Encoder"
"
 Loading...