

Page 1
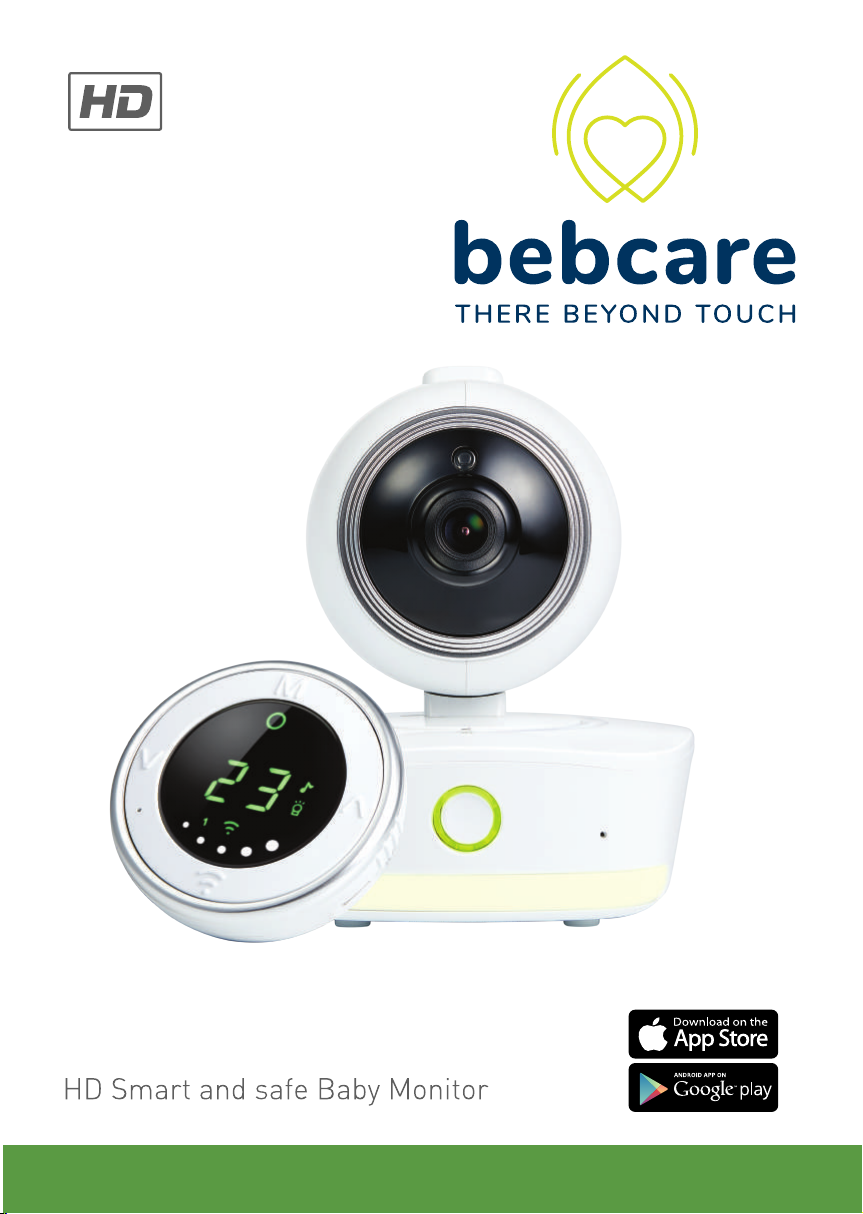
BEBCARE iQ
Page 2

INDEX
Features of Bebcare iQ…………………………………………………..........… 3
Warning……………………………………………………………………….…… 4
Control Layout and Icons………………………………………………………... 4
Icon Screen……………………………………………………………………….. 5
Power Supply……………………………………………………………………… 6
Pairing the camera to parent unit and movement sensor mat……………..… 8
Operation
Camera……………………………………………………………………….....… 10
Parent unit……………………………………………………………………….… 12
Movement sensor mat……………………………………………………………. 18
Changing the operation mode of camera……………………………………… 21
Precautions……………………………………………………………………...... 23
Standard accessories included in packaging…………………………….....… 24
Trouble Shooting guide……………………………………………………......… 25
Declaration of Conformity…………………………………………………..…… 27
Specification…………………………………………………………………….… 28
FCC Warning……………….….....…………………………………………….… 29
2
Page 3

Thank you for purchasing our Bebcare iQ digital WiFi baby monitor. Your
unit has been manufactured and checked under the strictest possible quality
control to ensure that each monitor leaves the factory in perfect condition. In the
unlikely event you find any defects or have any problem, please contact our
dealer or service center.
Please read this manual carefully to obtain maximum performance and
extended service life from the unit.
Features
-1080p high definition true colour video
-Night vision with IR LED
-Lens with 100° field of view
-Ultra green clean wireless transmission
-Horizontal 330° Vertical 110° lens movement by motorized mount
-IEEE802.11 b/g/n WiFi specifications
-Capable to view baby anywhere through smart phone or tablet PC
-Ultra compact parent unit
-Immediate baby sound alert without latency
-Baby’s room temperature indication with Hi/Lo alarm
-Night light and lullaby function
-Talk back function
-Possible to set to zero radiation under standby mode
-Expandable up to two cameras
-Optional movement sensor mat to monitor baby’s breathing
3
Page 4
WARNING
The Bebcare iQ should not be regarded as a medical device. Premature
babies or those considered to be at risk should be under the supervision of
your doctor or health personnel.
Direct supervision of your baby at a regular interval by a responsible
adult is strongly recommended in addition to using this baby monitor.
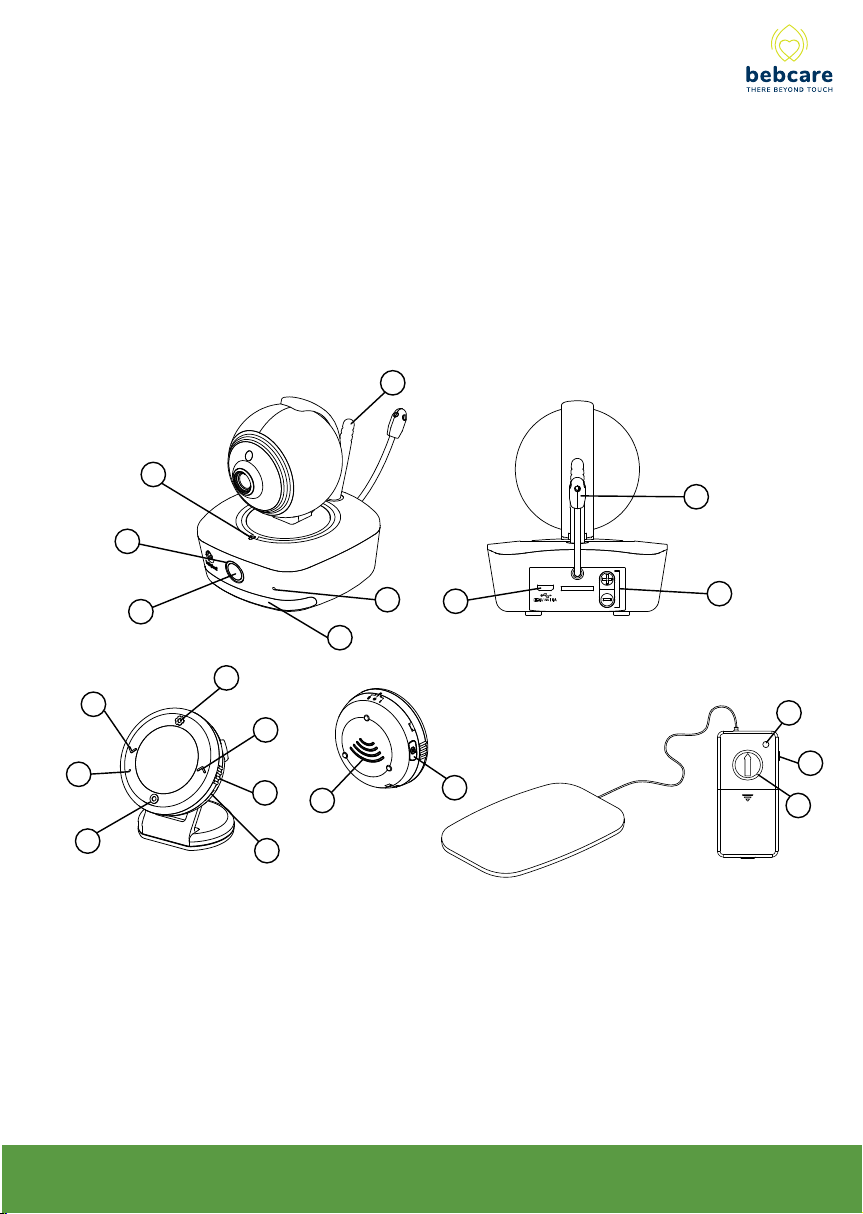
CONTROL LAYOUT and ICONS
7
3
9
2
1
12
13
14
1. Power button
2. Power indicator
Green - On
Pulsating green
-Ultra safe mode
3. Wi indicator
Blue - WiFi on
Flashing Red
- Connecting to router
4. Mic
5. Night light
6. USB port
5
10
15
16
18
17
7. Antenna
8. Volume up/
down button
9. Temperature sensor
10. Setting button
Long press to enter
setting mode /Short
press to show settings
[ Normal mode ]
To conrm
[ Setting mode]
4
6
11
11. Talk button
12. Volume down
[Normal mode]
To select
[ Setting mode]
13. Mic
14. Wi on/o or
Ultra-green mode selection
15. Volme up [ Normal mode ]
To Select [Setting mode ]
8
19
21
20
16. Side ring to turn on/o/vibration
17. USB port
18. Speaker
19. Movement indicator
20. Movement sensitivity Knob
21. Alarm hold button
4
Page 5
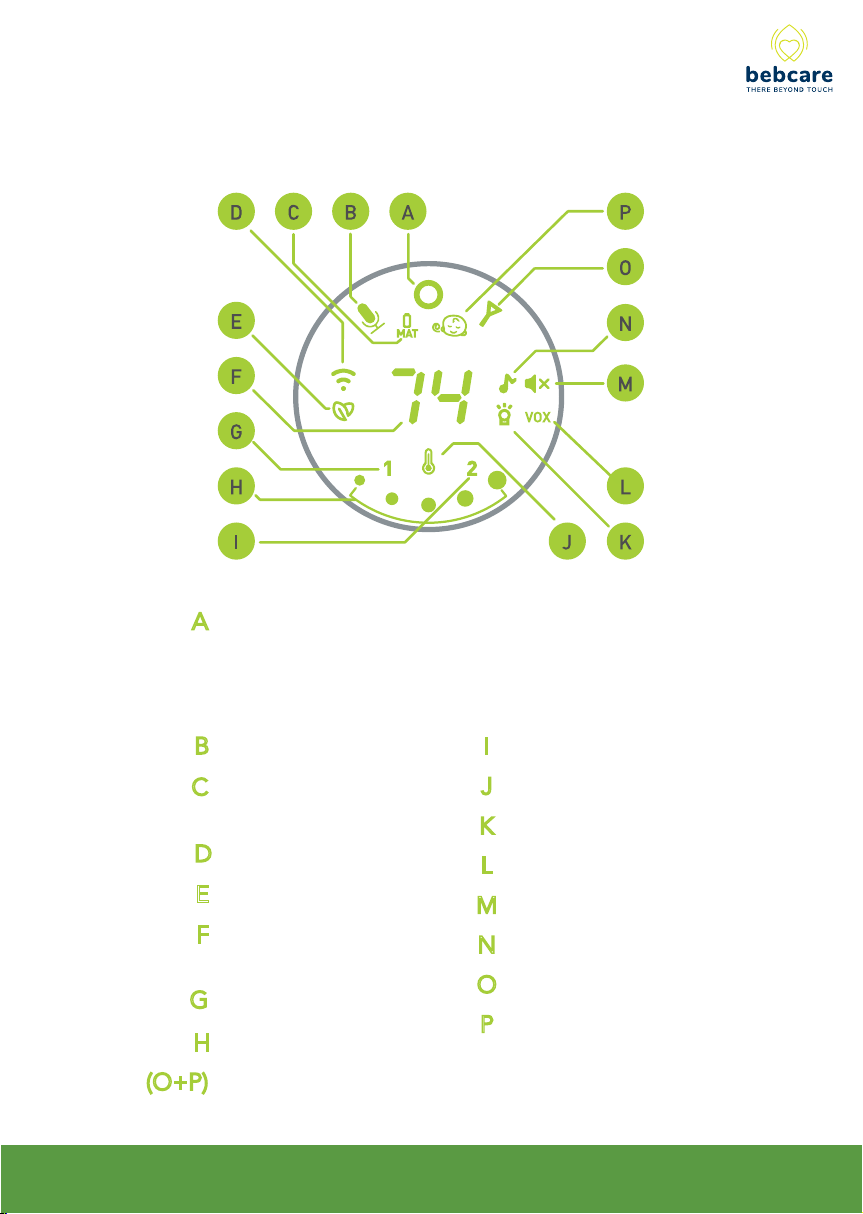
ICON SCREEN
A
Power Indicator
Green - On
Flashing Green - Battery low
Red - Under Charging
C
G
H
(O+P)
Mic sensitivity
B
Movement sensor
mat battery low
WiFi on
D
Ultra safe mode on
E
Baby’s room
F
Carmera 2
I
J
Temperature alarm on
K
Night light on
L
Night light VOX
M
Speaker mute
N
Lullaby on
temperature
O
Out-of-range/Talk back
Camera 1
P
Baby breathing alert
Sound level meter
Movement sensor mat out of range
5
Page 6
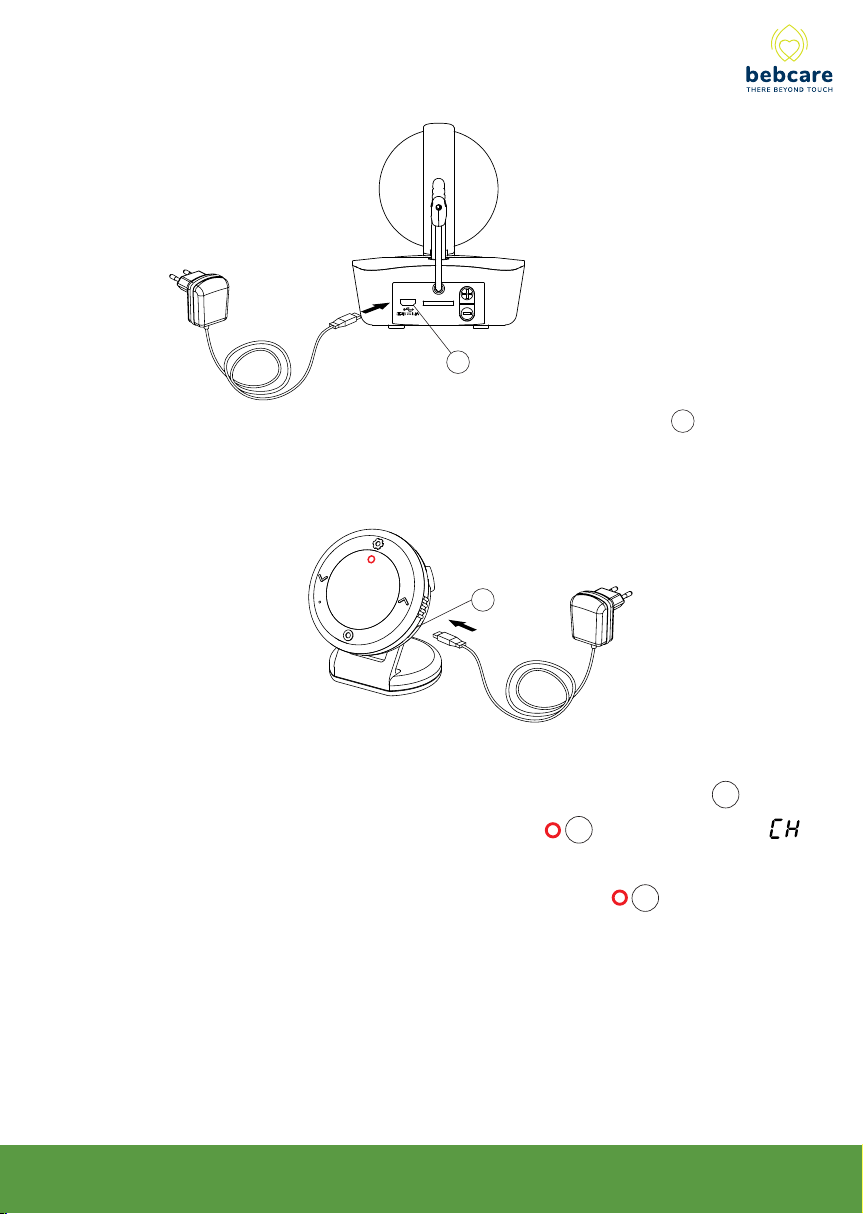
POWER SUPPLY
(A) Camera
6
Insert the output plug of supplied 5V 1.5A AC adapter to USB port 6 .
(B)Parent Unit (PU)
Parent Unit FCC ID:OD9BC70PU
17
A Li polymer battery is already incorporated in the unit. To charge up the battery,
connect the output plug of supplied 5V 600mA AC adapter to USB port 17 . With
the unit being switched off, the power indicator icon A will light up red and
will show up on icon screen fo 5 sec. Once the battery is fully charged up
(normally it takes around 4 hours), the power indicator icon A will go off or
turn steady green (if unit is switched on). Now the unit is ready for operation.
Either you can disconnect the AC adapter or keep connecting will cause no
damage to the battery. In the latter case, when the battery is being consumed
and voltage falls to a certain level, the AC adapter will automatically start
charging up the battery again.
6
Page 7
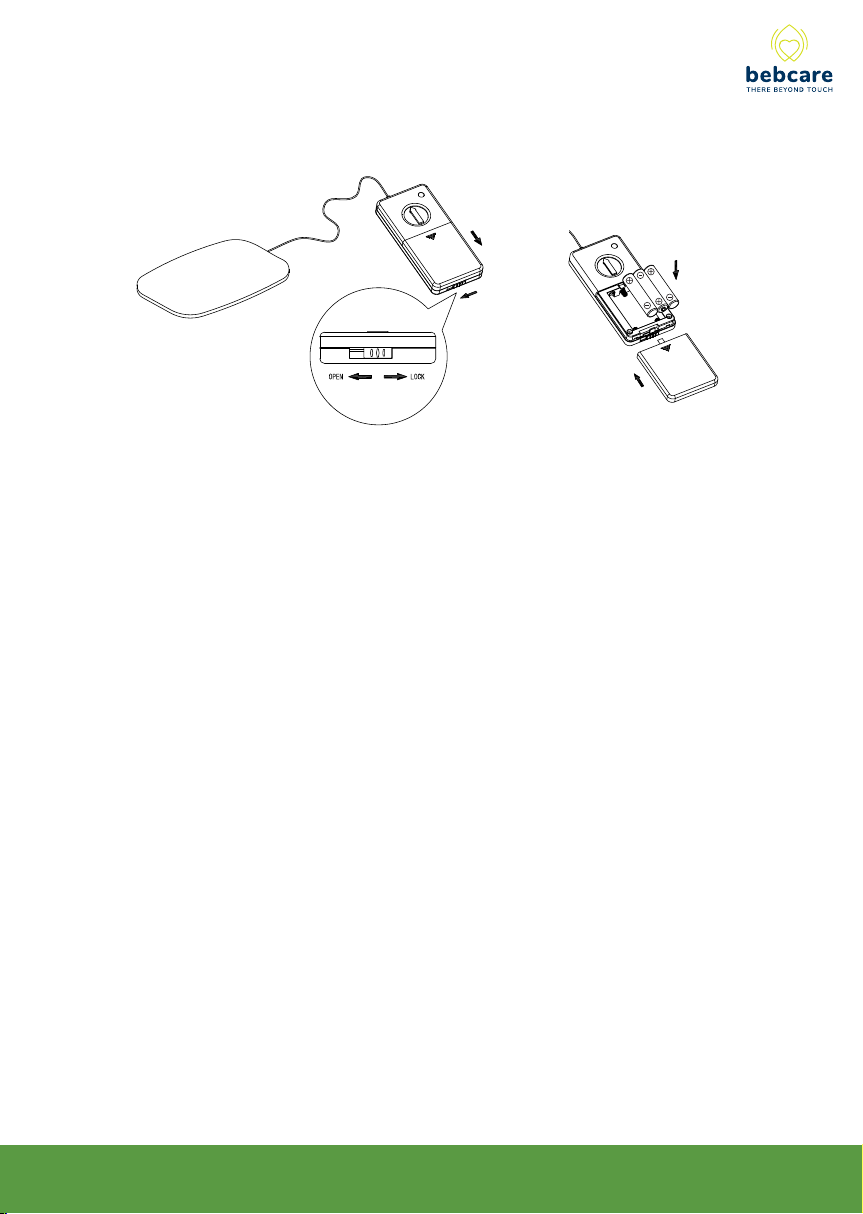
(C)Movement Senor Mat (optionally purchased)
FCC ID:OD9BSM1
Set the lock lever to open position, slide open the battery door in direction as
shown. Install 3 pcs AA (UM-2) alkaline batteries, observe correct polarities.
Slide back battery door and set the lever back to lock position. The battery life
can last for around 60 days when using battery such as Duracell.
7
Page 8

PAIRING
This process is the match the PU with camera and movement sensor mat
so that they can communicate with each other while no other devices (even
baby monitor of identical model) can interfere with you or receiving your signal.
The PU and camera are already paired when they are shipped out from
factory. However, it is necessary to perform pairing again when an extra
camera is added to work with PU.
1. Press and hold the button 10 of PU.
2. Rotate the side ring 16 to switch on unit, then release button 10
after hearing a beep. The icon screen will show a “1” and a “ ”
flashing.
3. Press and hold the volume down – button 8 on one of the camera
while switching on the unit by long press of power button 1 until the
night light 5 starts flashing. This indicates the camera has entered
pairing mode.
N.B. Be sure not to set two cameras into pairing mode at the
same time.
4. Short press button 10 on PU, two beep sound will be heard which
indicates pairing become successful. The night light 5 will go off while
the “ ” will stop flashing. This camera is assigned as camera no.1.
5. Now repeat step 3 on the other camera after switch off camera 1.
6. Short press button 15 on PU and the icon screen will show a “2” and
a “ ” flashing.
7. Short press button 10, two beep sound will be heard. The night light
5 on this camera will go off while the “ ” will stop flashing. This
camera is assigned as camera no. 2.
8
Page 9

8. Switch off all units and switch on again, the baby monitor is ready for
operation.
9. The pairing between camera and movement sensor mat should be
performed after the successful pairing between camera and PU or
otherwise the system will not operate properly.
10. Press and hold the volume up + button 8 on camera while
switching on the unit by long press of power button 1 until the power
indicator 2 starts flashing.
11. While holding down the alarm hold button 21 , switch on the
movement sensor mat by turning the knob 20 clockwise, two beep
sound will be heard in camera, indicating pairing is successful.
12. The mat is now ready for operation, probably you will hear the
breathing alarm in PU (if the baby breathing alert function is set to ON)
after 20 sec in case nothing is placed on the mat. Slight tap the mat
few times and the alarm will stop, this show the system is working
properly.
N.B. When it is no longer necessary to monitor the baby’s
breathing as he grows older, the movement sensor mat is
required to unpair from camera to avoid unnecessary alarms. To
achieve this perform pairing process between camera and PU by
repeating above steps 1- 8 but leave out steps 10 -11.
9
Page 10
OPERATION
Camera
1. Follow the quick start guide to download the Bebcare iQ app and
connect the camera to your home router.
2. Make sure to switch on the WiFi of camera using the button 14 on
PU with D being shown on icon screen ( camera WiFi is default to
be ON when shipped out from factory). Follow the steps as shown in
the app.
3. Use the app to view the image as captured by camera lens.
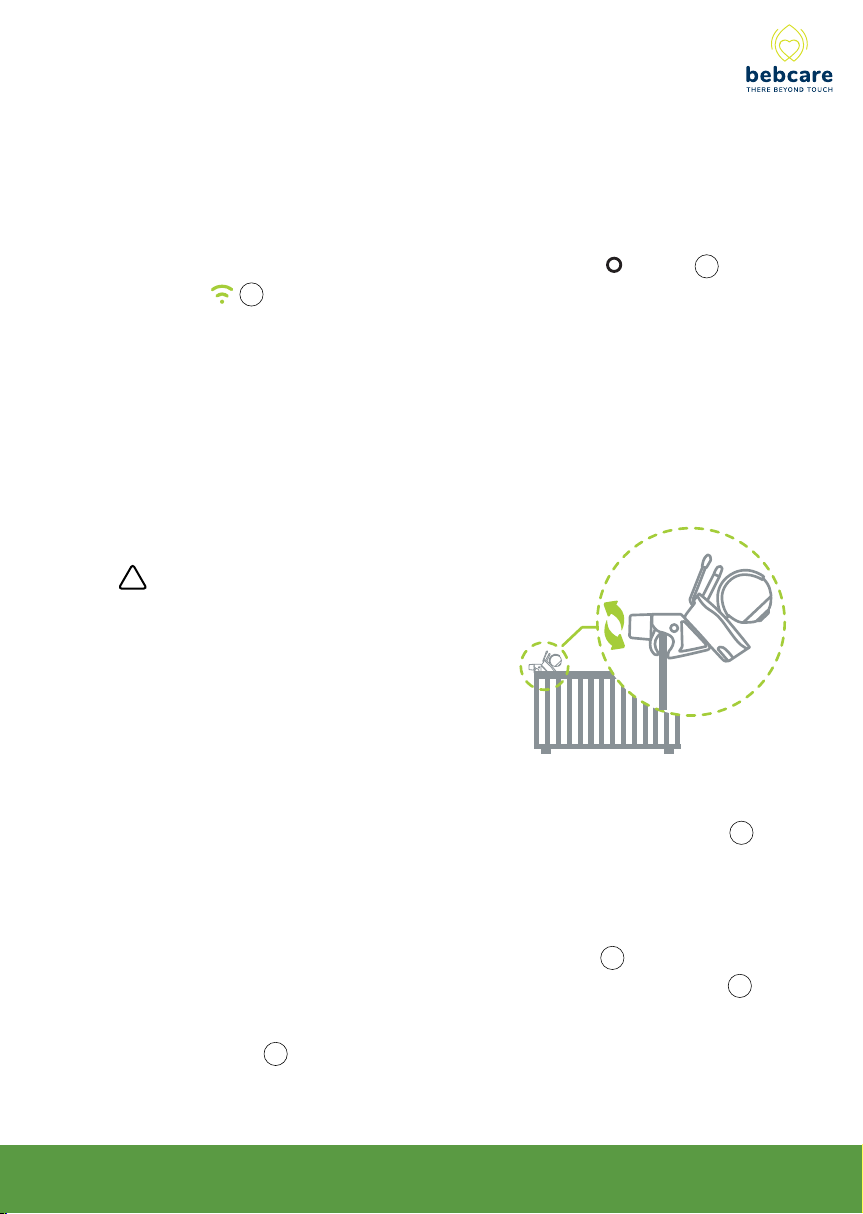
4. Place the camera onto a stable location out of reach of baby
(preferably 1m away). When baby is newly born, you may secure the
camera onto the crib handrail using the optional crib mount as shown.
Make sure the AC adapter cord is fastened firmly to avoid
strangulation accident.
WARNING: When baby grows older
!
and able to move around in the crib, it is
strongly recommended ot remove
camera from the crib handrail to avoid
risk of cord strangulation. Place the
camera further away beyond the reach of
baby.
5. Adjust the microphone sensitivity (set on PU side) such that the camera
will be triggered to transmit baby’s voice whenever the microphone 4
picks up a sound at your desirable loudness level. Note this sensitivity
is independent from the sound alert sensitivity set in the app that will
activate a push notification.
6. Once the camera is switched on, the power indicator 2 will light up
green. When it is set to ultra safe mode from PU side, the indicator 2
will show pulsating green.
7. The night light 5 can be set to OFF, ON or VOX (on when detecting
sound) using the PU or app.
10
Page 11

8. This camera is incorporated with lullaby function which can be
remotely turned on or off using PU or app. Parents can select from 6
different factory preset song/sound. The volume of music can be
adjusted using the up/down button 8 which also control the parents’
talk back volume.
9. When there is sufficient light intensity, the app will show a colourful
image. Once the environment getting dark, the IR LED in camera will
automatically turn on to illuminate the surroundings and the app will
show a black white image.
10. When parents prefer not to view baby on app, they can switch off the
WiFi connection using the mode button 14 on PU or further set it
to Ultra safe mode . Under such circumstances, there is zero
radiation under standby mode and besides, the camera cannot be
hacked by other people.
11. The WiFi indicator 3 function as follow:
Steady blue – WiFi is ON
Flashing red – Camera is under connection to home router
Off – WiFi is OFF
11
Page 12
Parent unit
1. Rotate the side ring 16 clockwise or anti-clockwise to switch on the unit
(Clockwise – unit on with vibration/Anti-clockwise – unit on only).
2. The icon screen will show up for around 20 sec and if there is no sound
from baby, the icons (except the power indicator icon ) will go off to
save battery power.
3. Normally, the power indicator icon A will show green and when battery
becomes low, it will start flashing green. Once the unit is under charge,
this indicator will show red.
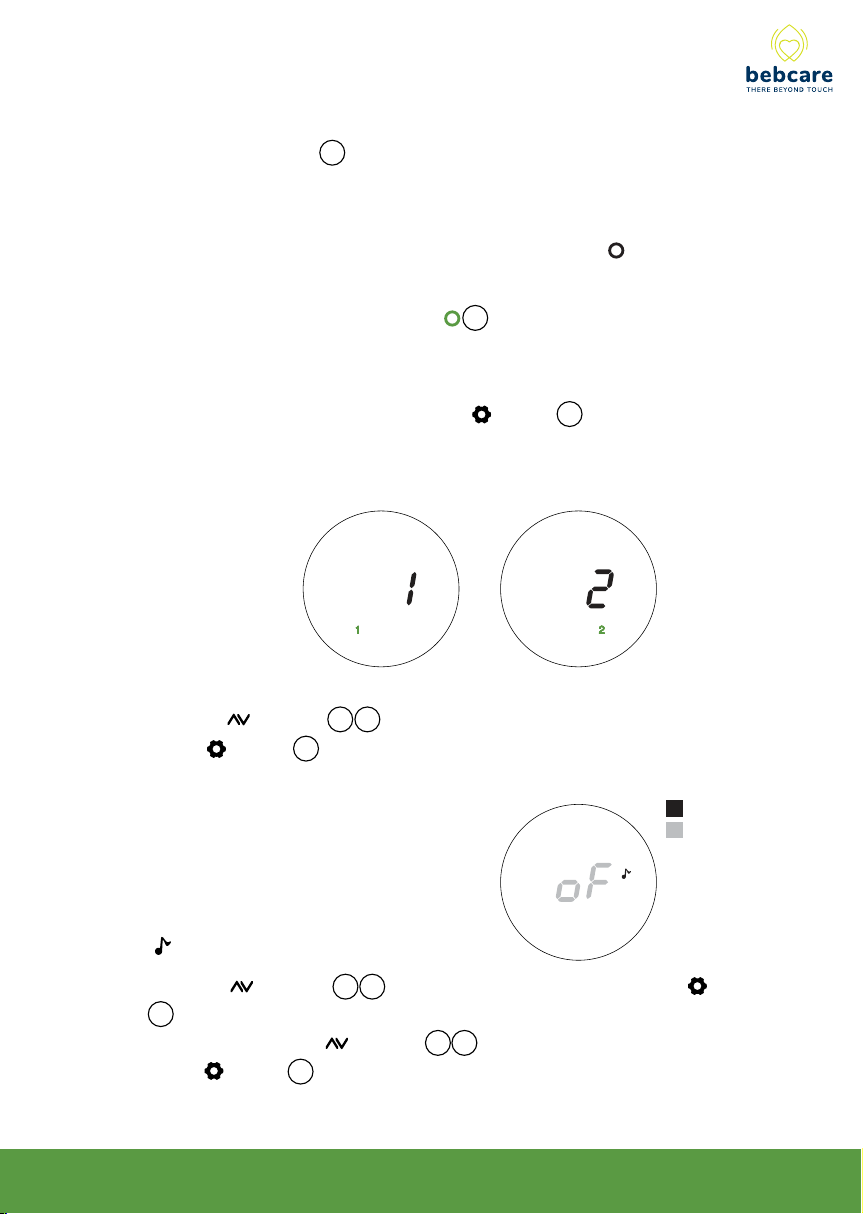
4. To enter setting mode, long press the button 10 for 2 sec. The icon
screen will show either following :
(a) When the PU is paired to two cameras
or
Use the buttons 12 15 to select between the camera to be set,
press button 10 to confirm.
(b) When the PU is paired to only one camera
steady
ashing
Lullaby playing
Use the buttons 12 15 to select between ON/OFF, press button
10 to confirm. Once ON is selected, the song number will show flashing
on icon screen, use buttons 12 15 to select the preferred music,
press button 10 to confirm.
12
Page 13
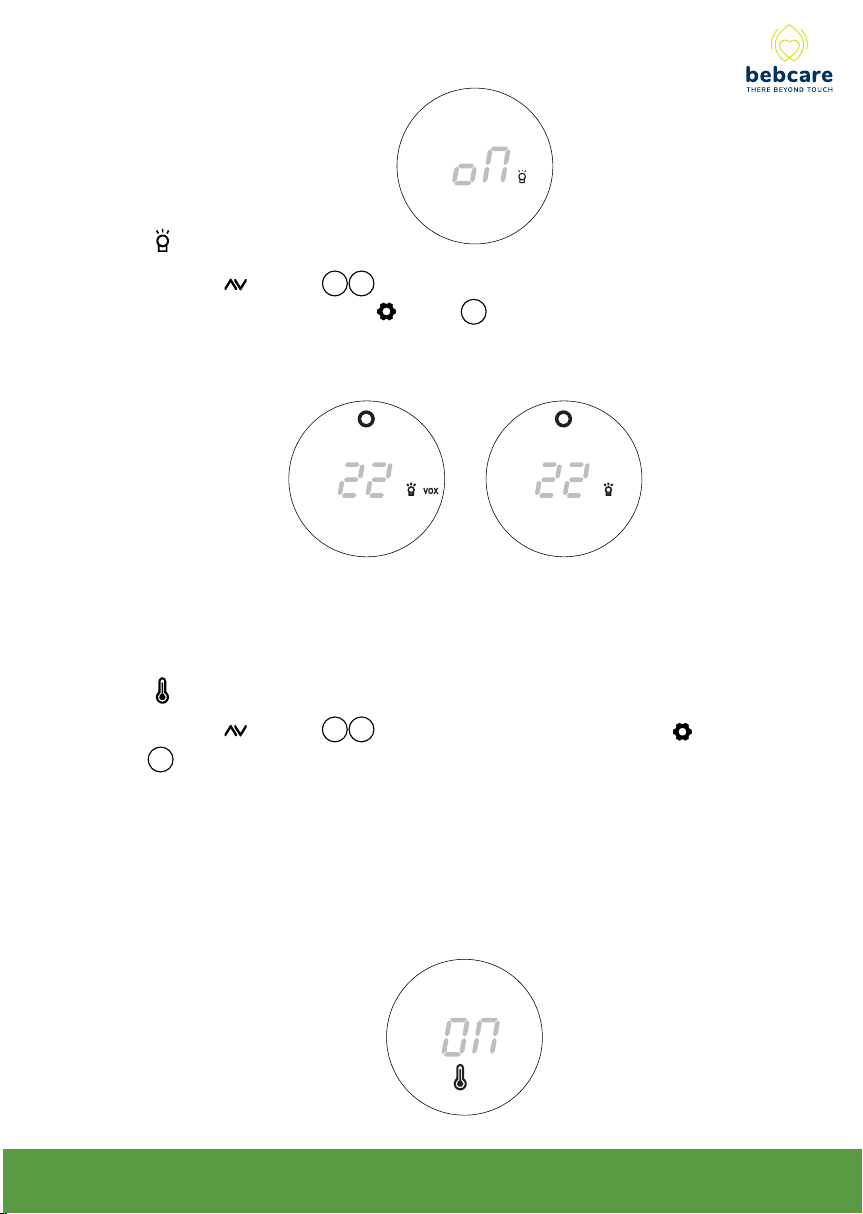
Night light
Use the buttons 12 15 to select between OFF, ON or VOX (on when
detecting a sound). Press button 10 to confirm.
Once ON or VOX is selected. The screen will show following:
or
N.B. The lullaby playing and night light status in PU and app will
synchronize with each other when the setting is changed in either
side.
Temperature alarm
Use the buttons 12 15 to select between ON/OFF, press button
10 to confirm.
ON - PU will provide an alarm once the baby’s foom temperature exceed
the high an low limit as specified in the app, at the same time, the
temperature reading will flash in icon screen.
OFF - no alarm will be provided
13
Page 14
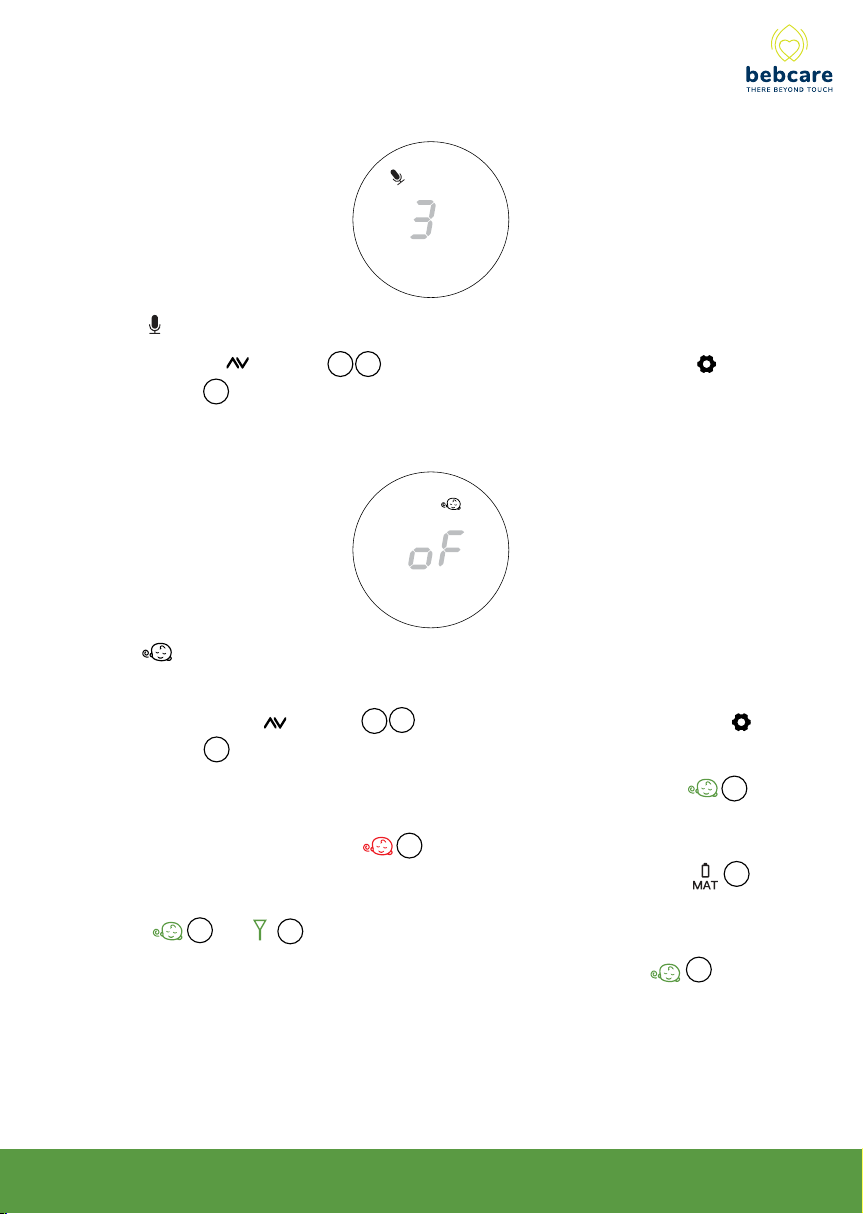
Camera microphone sensitivity
Use the buttons 12 15 to select between level 1 to 5, press
button 10 to confirm. Higher level means the microphone is more
sensitive to baby’s voice.
Breathing alert
This feature is useful when the camera is paired to a movement sensor
mat. Use the buttons 12 15 to select between ON or OFF, press
button 10 to confirm.
ON – The PU will monitor the breathing movement of baby and P will
show up on icon screen. In case there is no movement for over 20 sec, it
will provide an alarm and P starts flashing to alert parents. Moreover,
the PU will provide an alarm in case sensor mat battery is low ( C
show flashing on icon screen) or sensor mat is out of range from camera
( P and O show flashing on icon screen).
OFF – The PU will stop monitoring the movement of baby ( P will not
show up on icon screen). Under such mode, the PU also will not provide
an alarm in case the sensor mat battery level is low or the sensor mat is
out of range from camera.
14
Page 15
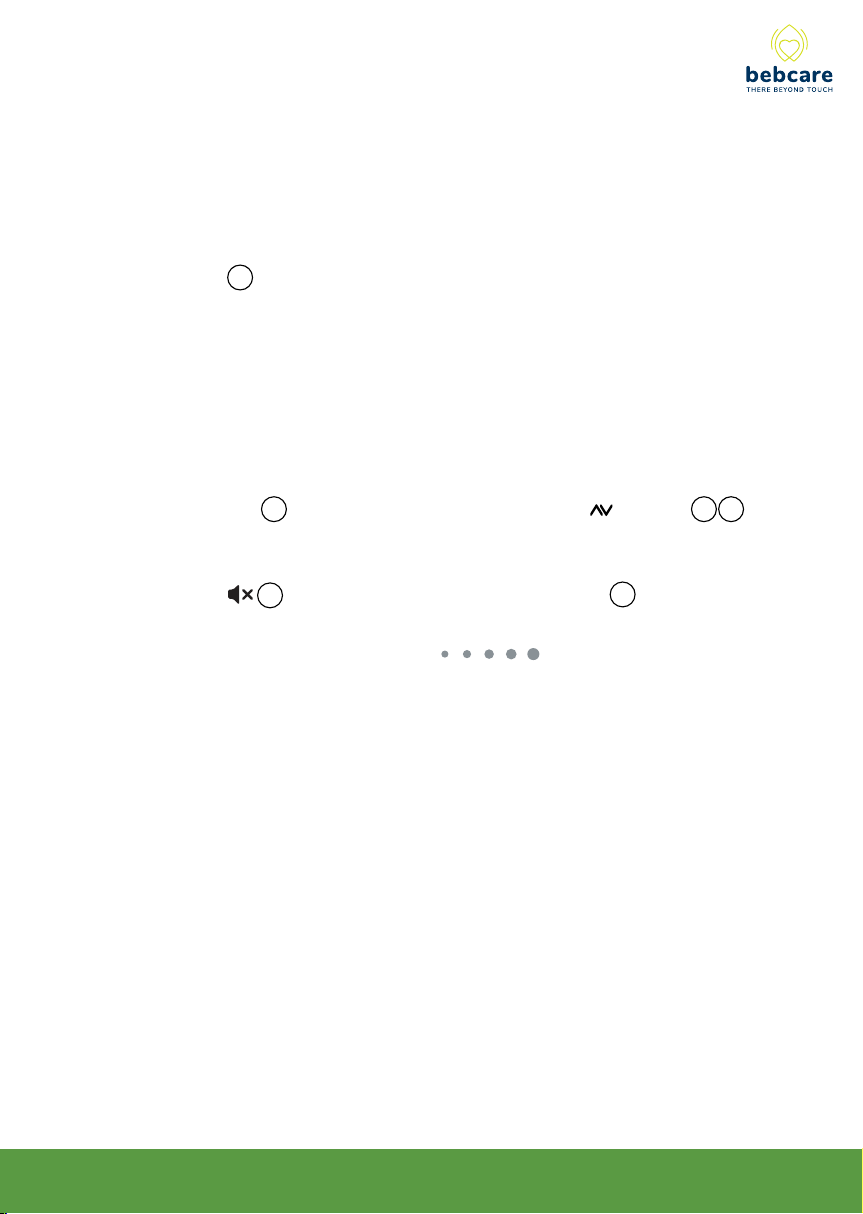
5. Place the PU at a reasonable distance away from camera to avoid
feedback. Too close a distance will create a screeching sound at the
speaker 18 .
6. Once the PU receives a signal, the icon screen will light up and
depending the signal is coming from which camera, the corresponding
camera no. will show up together with other information (room
temperature, WiFi mode or ultra safe mode, etc.) of that camera.
N.B. In case the PU is paired to only one camera, the icon screen
will not show the camera no.
7. The speaker 18 volume can be adjusted using the buttons 12 15.The
temperature reading also change correspondingly during adjustment to
show the level ( 1 to 5) being selected. When the level is set to minimum
and the M show up on icon screen, the speaker 18 is totally muted.
Under such circumstances, parent can still monitor the activity of baby by
looking at the sound level meter.
N.B. When the camera is under pan / tilt movement, the speaker
volume will be automatically turned down to minimize the humming
noise created by electric motor.
15
Page 16

8. If the PU is paired to work with two cameras, camera 1 always has top
priority. This means while the unit is listening to signal from camera 2, in
case camera 1 starts transmitting, PU will immediately switch listening to
camera 1 until it stops to transmit, then PU will switch back to listen to
camera 2 .
9. To avoid parent missing the attendance to camera 2, while PU is listening
to signal from camera 1, in case camera 2 starts to transmit, “2” will show
flashing on icon screen to alert parent. If parent prefers to listen to
camera 2, he can short press button 10 and PU switches listening to
camera 2 while “1” go flashing (if camera 1 still transmitting). Further
press of button 10 will switch back to camera 1 again. Under such
arrangement, the parent is able to monitor both babies.
10. Under standby mode, the PU will alternately scan between the two
cameras for activities. When either one of the camera starts to transmit,
the PU will immediately listen to that camera and the icon screen will
only show information from it until the signal goes off.
11. When the PU is set to ON with vibration, whenever a baby’s voice is
detected, the vibrator starts functioning. This feature is useful when the
parent is working under noisy environment (eg. vacuum cleaning). To
save battery power, it is recommended not to use the vibrating alert
frequently.
12. Once the PU is beyond the communication range of camera for over 30
sec, an out of range alarm will be heard together with O flashing on
icon screen. Besides, the temperature reading will show - - . The alarm
will only go off when the PU falls back within the communication range of
camera.
N.B. This alarm will also be heard in case the camera is switched
off, or its power is cut off.
!
WARNING : no out of range alarm will be provided in case the
camera is set to operate with Ultra safe mode .
16
Page 17
13. In case the temperature alarm is set to ON, whenever the baby’s room
temperature falls outside the range as prescribed by the high and low
temperature limits set in the app, an alarm will be heard and
temperature reading starts flashing on icon screen.
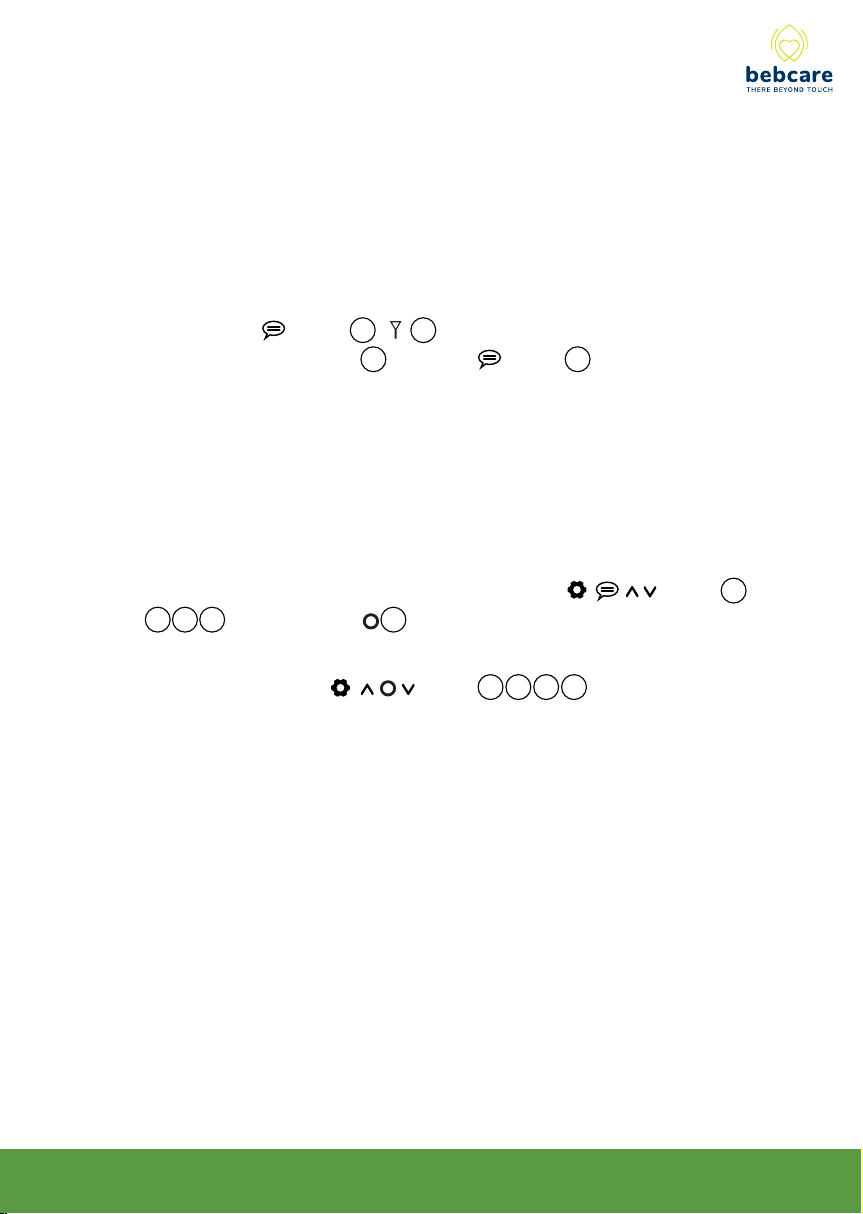
14. It is possible for parent to talk back to baby to soothe his emotion. Press
and hold the button 11, O show up on icon screen. Speak
towards the microphone 13 . Release button 11 after finish
speaking. It is worth noted that the parent can talk back anytime they
prefer, but it would not be able to hear the baby’s voice during talk back.
15. The various alarm is designed to have following priority :
Out of range alarm > Breathing alert > Temperature alarm > Battery low
alarm
Only one kind of alarm can be heard at any time to avoid confusion. An
alarm can be muted by short press of anyone of button 10
11 12 15 but NOT button 14. However, the alarm icon will keep
showing on icon screen until the condition is rectified.
16. Each time any of the button 10 12 14 15 is pressed, a beep
tone will be heard to validate your entry.
17
Page 18
Movement Sensor Mat
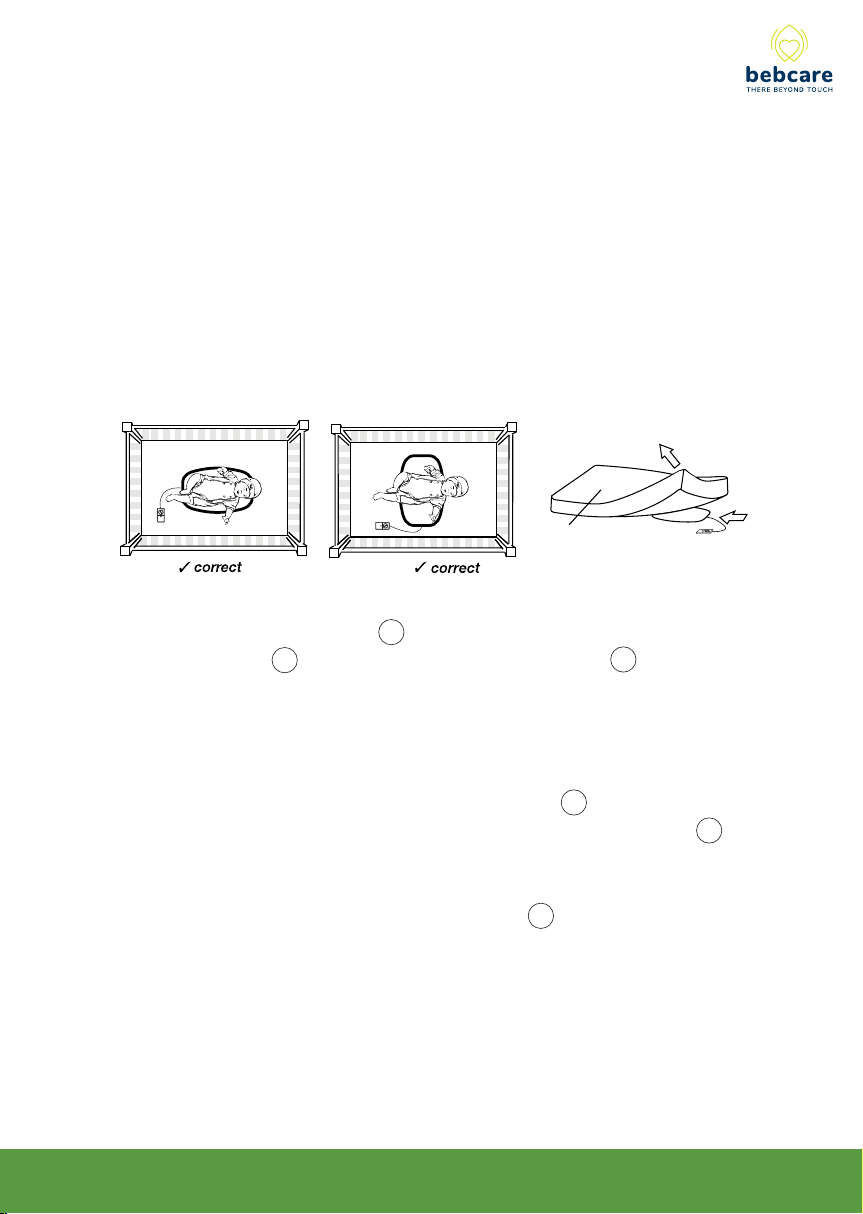
1.Place the movement sensor mat underneath the mattress,
lengthwise direction and directly under where your baby sleeps. For
optimum performance, there should be no bedclothes tucked
between the sensor mat and the mattress. Besides, if the mattress
support is too soft (such as box spring or underpadding), a hard
board is required to be placed underneath the mat to provide a firm
surface for it. The size of the board should be larger than the sensor
mat.
Mattress
2. With the baby placed in crib, switch on sensor mat by turning the
movement sensitivity knob 20 in clockwise direction. Adjust the
position of knob 20 such that the movement indicator 19 will blink
in pace with the breathing movement of baby.
Slip the control box underneath the mattress to keep out of reach of
baby and place it as far away from the sensor mat as possible.
According to the change in weight as baby grows, it may be
necessary to adjust the sensitivity setting of knob 20 again. In case
the sensitivity setting is not appropriate, the movement indicator 19
will always stay ON or OFF and false alarm may occur.
N.B. Before attempting to adjust the knob 20 , wait for at least
15 -20 min until the baby has settled down or fallen asleep.
18
Page 19
3. For environment with continuous vibration from the floor, the sensor
mat may has false detection and delay or prevent the alarm from
sounding. Under such circumstance, move the crib to the corner of
the room or near a solid supporting wall. Moreover, keep the crib
away from strong draft and air current.
4. Besure the camera and sensor mat is within the same room or apart
from each other not more than a distance of 10m, otherwise they may
lost connection with each other and breathing movement of baby
cannot be monitored.
5. When baby needs to be taken out from crib for feeding or other
purpose, to avoid false alarm on PU,short press the alarm hold
buttom 21 . This button can be pressed before or after taking out the
baby, but such action must be preformed within 20 sec, or otherwise
the alarm would still sound. To stop alarm in PU, short press alarm
hold button 21 again. Upon placing back the baby into crib, the
sensor mat will automatically resume to monitor the movemnent of
baby after 20 sec.
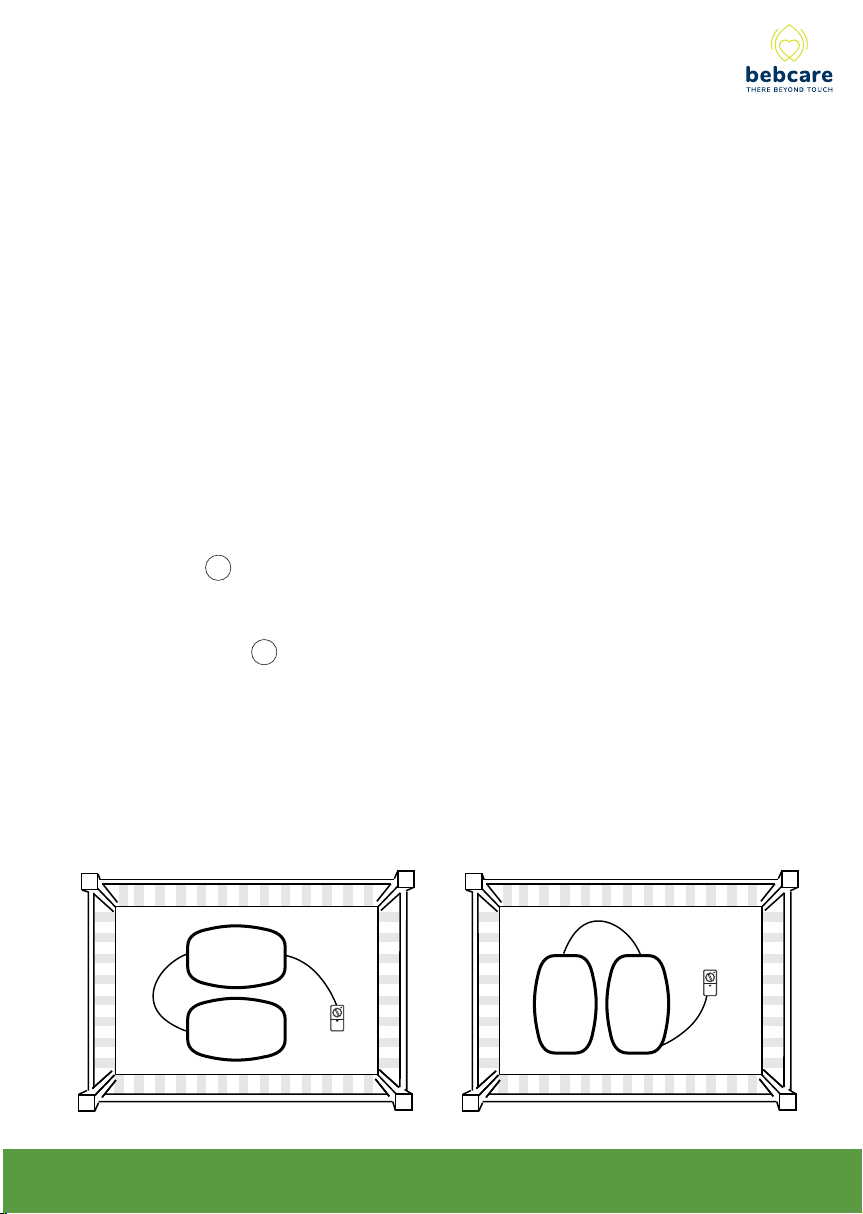
6. When the baby’s movement increases as he grows older, he may
move away from the sensor mat and cause false alarm. Additional
movement sensor mat can be connected to increase the coverage.
BSM-1
BSM-2
19
or
BSM-2
BSM-1
Page 20

N.B. In case there are two cameras operating in the system,
besure each camera and its corresponding sensor mat are far
away from each other and placed in separate rooms to avoid
interfering each other and creating false alarm.
20
Page 21
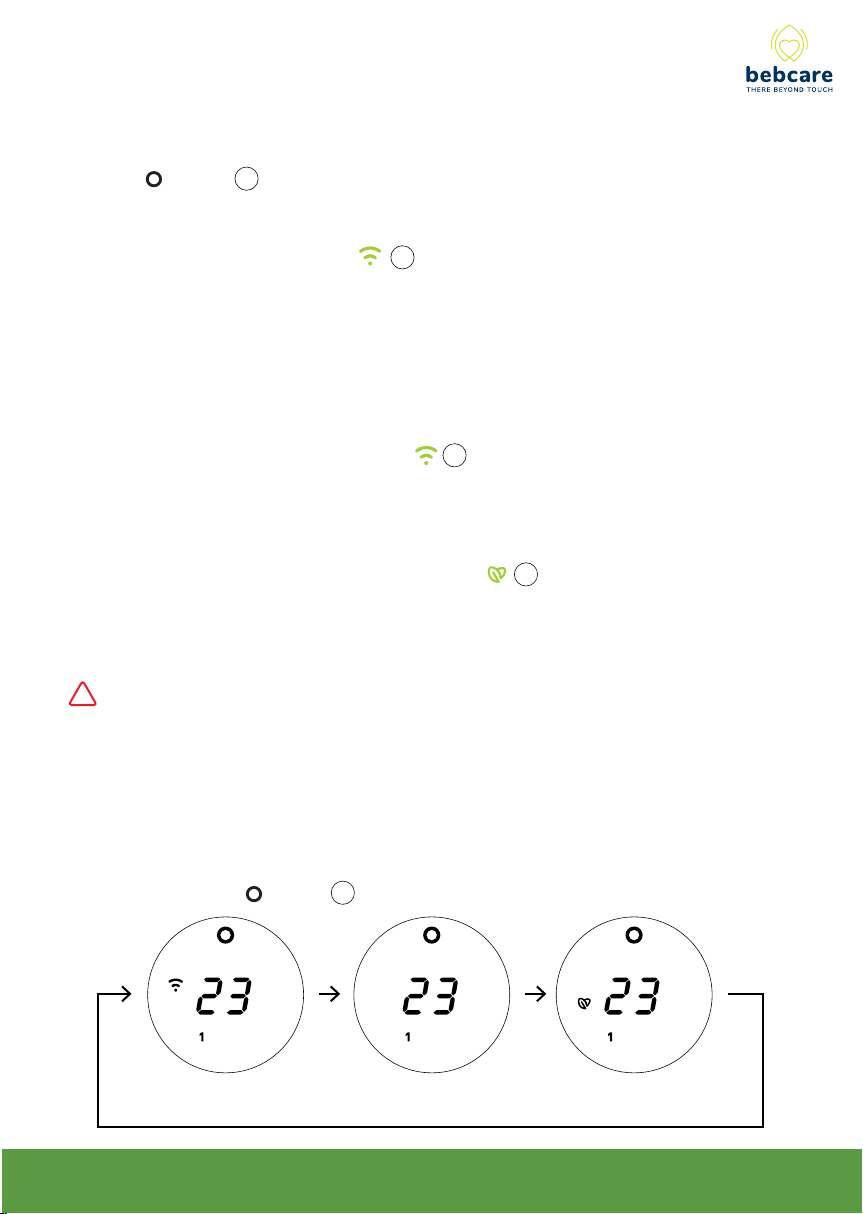
CHANGING THE OPERATION MODE OF CAMERA
Use the button 14 on PU to change the different operation mode of camera :
WiFi ON mode – the WiFi circuitry is switched on and parent can see baby’s
image in app. D is shown in icon screen of PU.
WiFi OFF mode – the WiFi circuitry is switched off and parent unable to see baby
in app.
Under such mode, there is less radiation from camera and no
risk of being hacked. D goes off in icon screen of PU.
Ultra Safe mode – not only WiFi is switched off, there is completely zero radiation
from camera under standby. E is shown in icon screen of PU.
WARNING : Parents need to be sure they are located at a position that can
!
well receive the audio signal from camera before changing to Ultra Safe
mode, since there will not be any out of range alarm under such mode to alert
parent they are outside the operating range of camera.
Each short press of button 14 will change the mode in following manner :
21
Page 22

N.B. When changing from WiFi OFF to WiFi ON mode, the WiFi indicator 3
on camera as well as D on PU icon screen will show flashing. It will take
around 20 - 30 sec for camera to be successfully connected to your home
router. Once the WiFi indicator 3 and D light up steady, the connection
is done and parents are able to view baby in app.
22
Page 23

PRECAUTIONS
-Use only the supplied AC adapters, use of other adapters may cause
damage to the baby monitor.
-When not using the monitor for a long period of time, remove all batteries
from movement sensor mat to avoid damage due to battery leakage.
-Disconnect the AC adapter from the wall outlet when the monitor is not to
be operated.
-Do not open the cabinet, no serviceable parts inside.
-The
Bebcare iQ
should not be exposed to dripping, splashing and that no
objects filled with liquids, such as vases shall be placed on it.
-Batteries (battery pack or batteries installed) shall not be exposed to
excessive heat such as sunshine, fire or the like.
23
Page 24
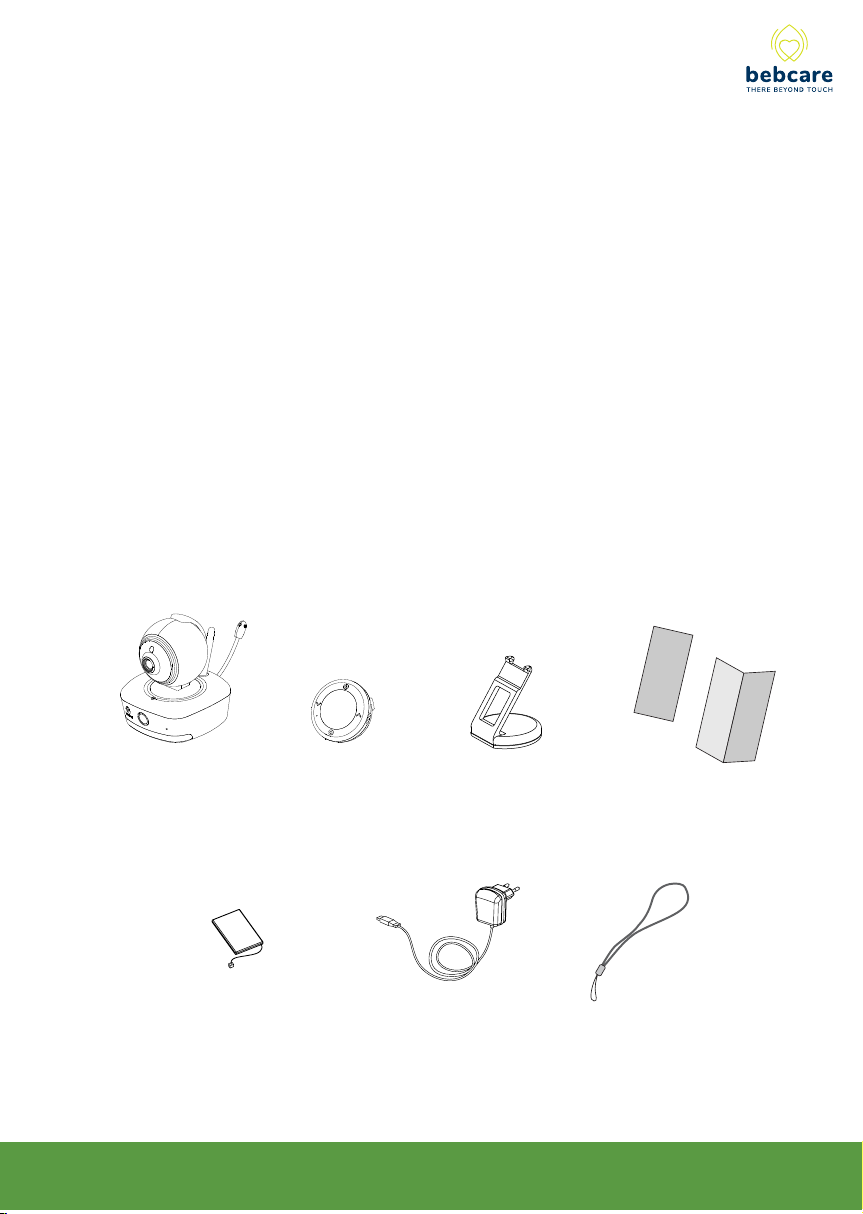
STANDARD ACCESSORIES
a. Camera
b. Parent unit with belt clip
c. Stand for PU
d. Instruction manual
e. 3.7V Li polymer rechargeable battery pack (installed in PU)
f. 5V AC adapters x 2
g. Lanyard x 1
a. b. c. d.
e. g.f.
24
Page 25

TROUBLE SHOOTING GUIDE
Problem
Unable to see baby's
image in app
Image of baby is not
smooth but always
freezed
Parent unit unable to
receive audio from
camera
Audio always
transmitting
Possible Causes
- Camera WiFi is off
- Password is incorrect
- Home router is down
- Camera is not connected to
router
- Your home internet has
network bandwidth of less than
8 Mbps
- Camera operating system is
crashed
- Your phone is connected to a
router probably with firewall
- Too many devices using same
router as your camera
- Your internet bandwidth is not
enough to support HD image
- Mic sensitivity is too low
- Distance between camera &
PU exceeds the operationg
range and ultra safe mode is
ON
- Mic sensitivity is too high
Solution
- Switch on WiFi using button 14
on PU
- Input correct password in app
- Swith off home router and reboot
after 1 min
- Perform set up process again “start
with pairing to add camera”
- Change to another ISP that has
bandwidth over 20 Mbps
- Switch off and then swith on camera
again
- Change connecting to another router
or use 4G cellular network to view
baby
- Disconnect some other devices from
your router
- Change to view baby with lower
resolution(e.g. instead of 1080p HD
smooth, SD or 720p )
- Adjust mic sensitivity higher using
PU
- Move the camera and PU closer
together
- Adjust mic sensitivity lower using PU
Out-of-range alarm
always on
Temperature alarm
always on
Icon always show
flashing and alarm
heard
- Pairing is not successful
- Camera power is cut off
- Distance between camera &
PU exceeds the operationg
range
- The high and low temperaturelimit is set too close to the
current reading in app
- Baby is not in the crib
- Sensitivity of sensor mat is not
properly set
- Baby’s breathing is abnormal
25
- Perform pairing again
- Check if camera is switched on
- Move the camera and PU closer
together
- Set the high and low emperature
limit around 5˚C difference from
current reading
- Short press hold buttom 21 on
sensor mat control box
- Adjust sensitivity using movement
sensitivity knob 20 such that the
movement indicator 19 blink in
pace with baby’s breathing
- Take immediate care of baby and
consult doctor
Page 26
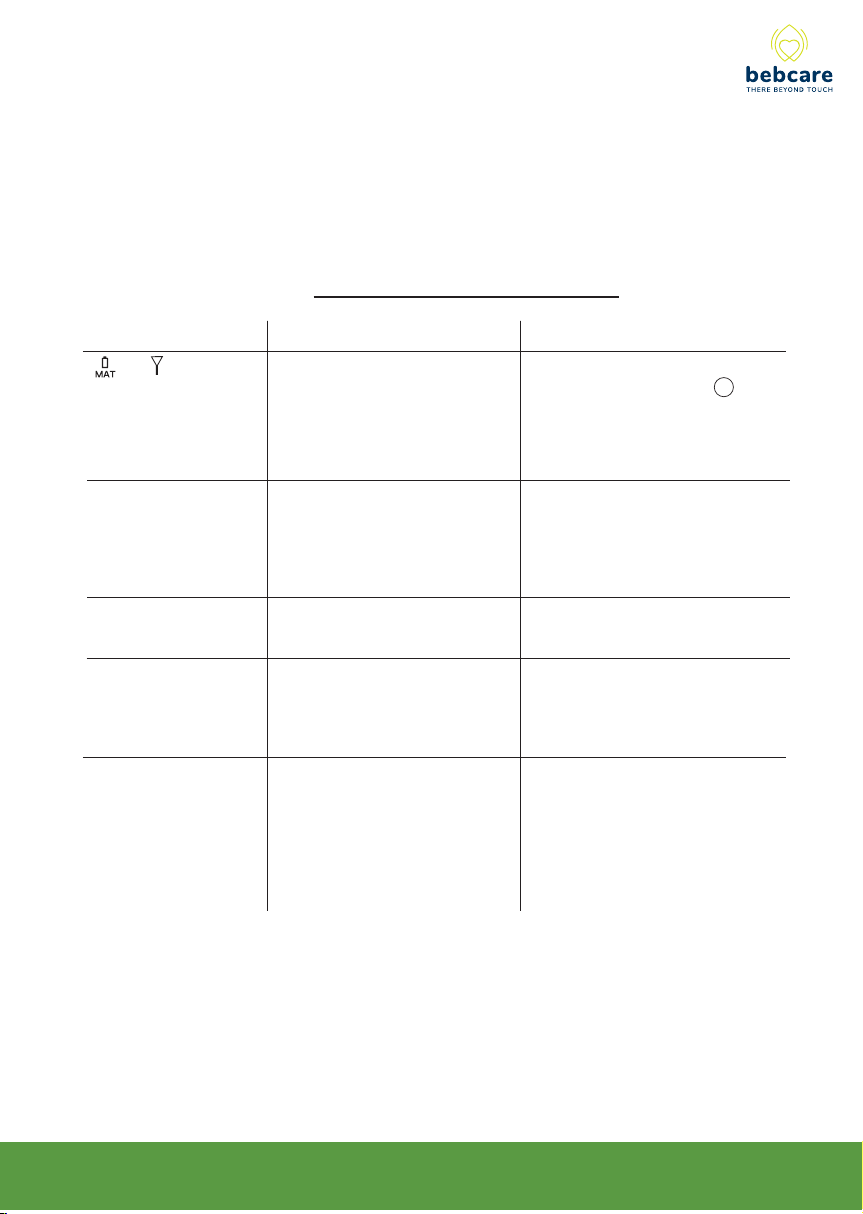
TROUBLE SHOOTING GUIDE
Problem
and always
show flashing
PU always showing low
battery alert
Battery life is short
Too short
communication
range
Camera & PU cannot
communication with
each other
Possible Causes
- Sensor mat is off
- Battery of sensor mat is
running down
- Distance between BU and mat
exceed 10m
- Battery has run down
- Battery pack is damaged
- Vibration alert is swiched on
- Many steel structures between
Camera and PU
- Pairing is lost
Solution
- Switch on sensor mat using
movement senitivity knob 20
- Replace with new battery
- Move BU closer to sensor mat
- Recharge battery using AC adapter
- Consult your dealer to change new
battery
- Switch off vibration alert(PU)
- Re-locate camera or PU
- Perform pairing process again
26
Page 27

DECLARATION OF CONFORMITY
27
Page 28

SPECIFICATION
Camera
1080P High Definition Full HD true colour video
IEEE 802.11 b/g/n WiFi specifications
Lens with 100° view angle
330° pan and 110° tilt movement angle
5V 1.5A DC power supply
Parent unit
30 hours of battery standby time (fully charged condition)
3.7V 800mAh Li battery installed
5V 600mA DC power supply
This equipment complies with FCC radiation exposure limits set forth for an
uncontrolled environment. This equipment should be installed and operated with
minimum distance 20cm between the radiator& your body.
This transmitter must not be co-located or operating in conjunction with any other antenna or
transmitter.
28
Page 29

FCC W arning:
Any Changes or modifications not expressly approved by the party responsible for compliance
could void the user’s authority to operate the equipment.
This device complies with part 15 of the FCC Rules. Operation is subject to the following
two conditions: (1) This device may not cause harmful interference, and (2) this device
must accept any interference received, including interference that may cause undesired
operation.
FCC Radiation Exposure Statement:
This equipment complies with FCC radiation exposure limits set forth for an
uncontrolled environment. This equipment should be inst alled and operated with
minimum distance 20cm between the radiator& your body.
This transmitter must not be co-located or operating in conjunction with any other antenna
or transmitter.
Note: This equipment has been tested and found to comply with the limits for a Class B digital
device, pursuant to part 15 of the FCC Rules. These limits are designed to provide reaso nable
protection against harmful interference in a residential installation. This equipment generates
uses and can radiate radio frequency energy and, if not installed and used in accordance with
the instructions, may cause harmful interference to radio communications. However, there is
no guarantee that interference will not occur in a particular installation. If this equipment does
cause harmful interference to radio or television reception, which can be determined by turning
the equipment off and on, the user is encouraged to try to correct the interference by one or
more of the following measures:
—Reorient or relocate the receiving antenna.
—Increase the separation between the equipment and receiver.
—Connect the equipment into an outlet on a circuit different from that to which the receiver is
connected.
—Consult the dealer or an experienced radio/TV technician for help.
29
 Loading...