


User Manual
TVIF1900
Water
Proof
TV
www.tech visio n.co.uk

Index
Sp ecification
Ac cesso ry
.. ..... ............ ............ ..... ............ ......01
In stallatio n Instr uctions.. ................ ......... ......02-04
Sp eaker Installat ion Guide...... ......... ......... ....... ....05
Ca bling........ ..... ..... ..... ............. ..... ..... ............. ..06
Re mote Co ntrol...... ................ ......... ..............07 -09
MENU Adjust Settings...... ......... ................ .......10 -11
DV B-T func tion..... ......... ................ ......... ......12-23
FM Rad io Player. ....... ......... ......... ................ ........2 4
Bl uetooth. ........ ..... ........ ..... ........ ........ ..... ........ ..25
Ca ble Schem atic..... ......... ....... ......... ......... ..........26
Tr ouble Shoot ing............. ......... ......... ....... ......... .27
Ge neral Prec autions.. ......... ......... ....... ......... ........2 8
.. ..... ..... ............ ..... ..... ..... ............ ..... ..29
29
Accessory
1. Wa terproof remo te control
2. Wa ll plugs x 8 and Scre ws x 8
3. User manua l
4. Adaptor
5. Extentio n Ca ble
6. Ceiling Sp ea kers

01
Specification
IT EM S pe cification
Screen size
Display Resolution
Brightness(Typ.)
Viewing Angle(Typ.)
Video source
Speaker
Power input
Weight
Dimension
Certification
Contrast Ratio(Typ.)
18.5 inch
1366(H)x768(V)
400(cd/m )
1000
Top=80 Bottom=80
Left=80 Right=80
Video input x1(NTSC/PAL/SECAM)
Analog TV
DVB-T
FM Radio Play
Buletooth
5w
DC 12V__5A
5.2kg 100g
475(L)x397(H)x44(D) mm
CE Ip67
2
28
General Precautions
1. Do not add any pa rt s or use any acce ssories not pro vided
from the manu fa cturer.
2. Temperature . (S torage 0~50 , Operating 0~6 0) degrees C.
3. Please repl ac e the remote ba ttery immedia tely when it ru ns
out. The li fe of battery is on e year.(appr ox)
4. The TV is wat erproof rated I P67. This i s fully water proof,
however, we wo ul d not suggest s ubmerging in wa ter.
5. Clean the uni t wi th a soft damp cl oth. Do not use abr asive
substance s or m aterials th at could scratc h the glass pan el .
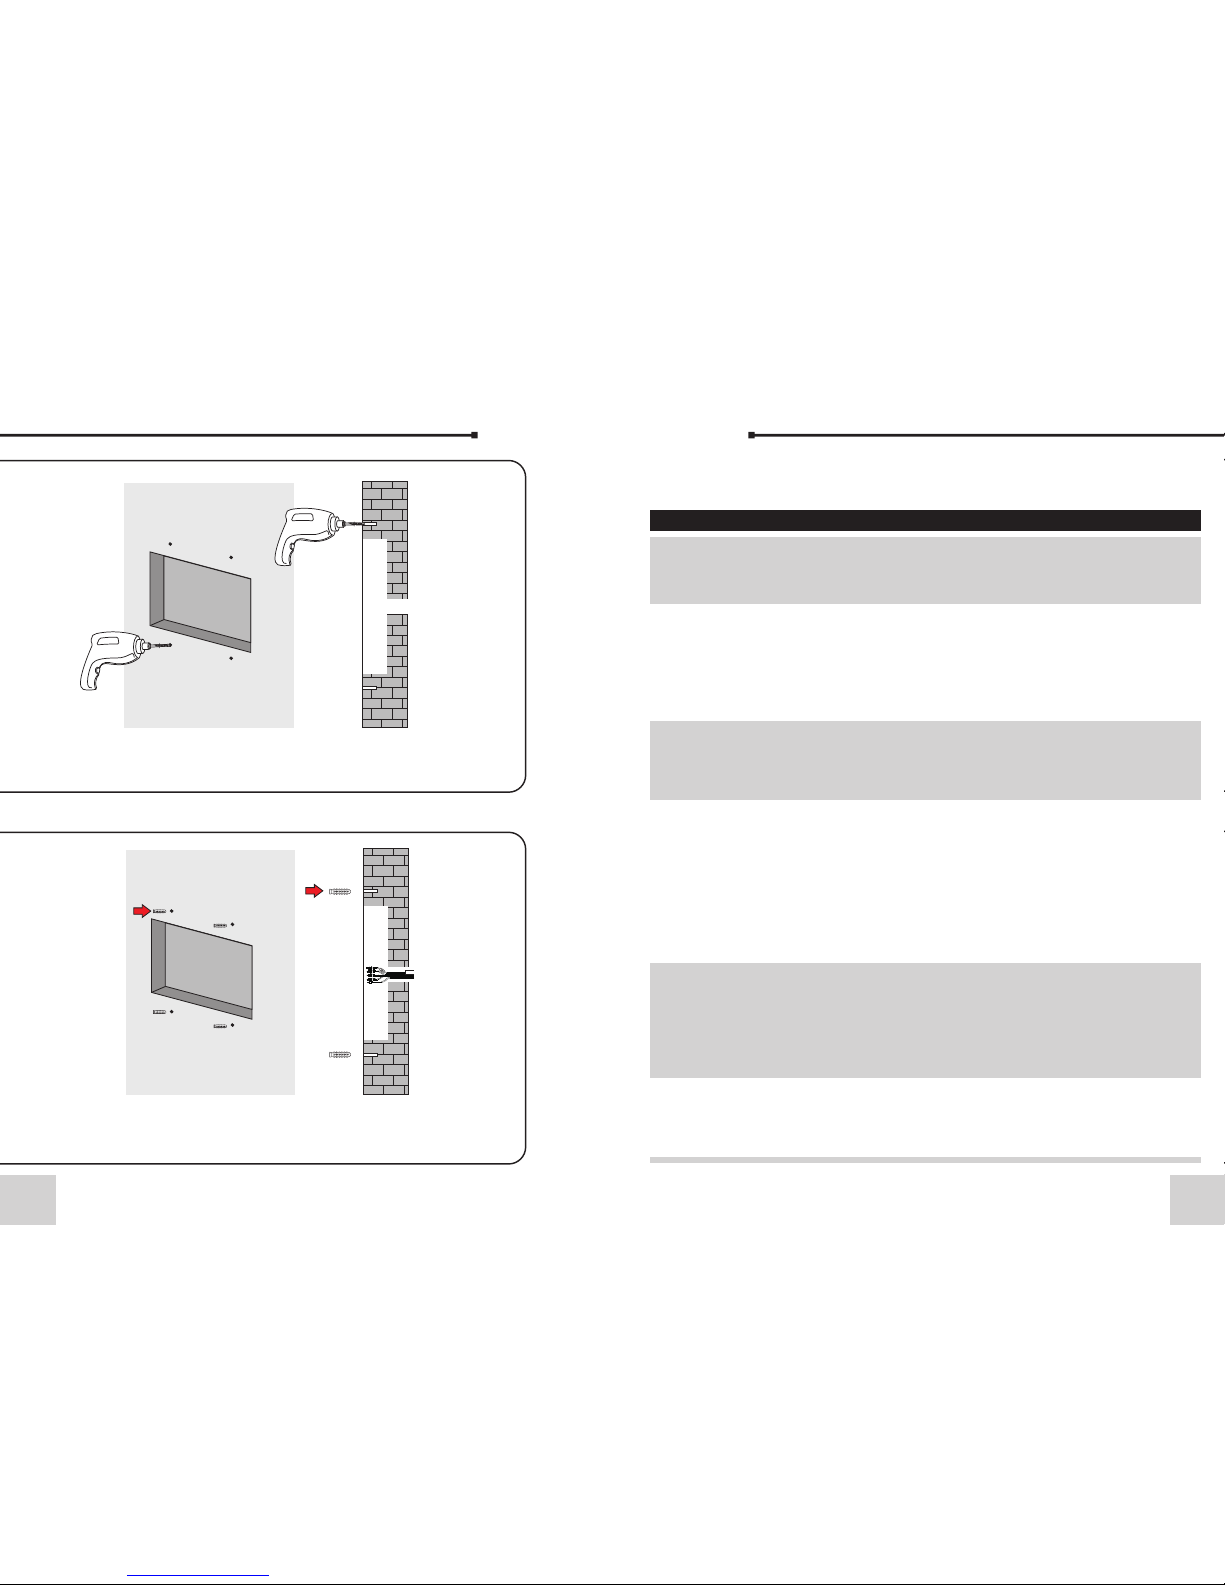
Installation Instructions
02 27
STEP 1
Cut a hol e in the wall in o rder to hous e the back of th e units
and dri ll fixing no tes.
STEP 2
Plug th e screw hole s and feed the r equired le ads to the bac k
of the un it.
Trouble Shooting
Check tha t all cab les are securely f asten ed, that yo u have co nnected
to an aeria l feed or c hosen AV sourc e and tha t the unit is s witch ed on.
General P roble m Sugge stion & Imp rovem ent
No Sign al
When fi rst switch ed on this war ning will di splay.
Only wh en you have tu ned the TV in will th e TV
work.
The TV will au tomatica lly switch o ff if t here is no
sourc e connecte d and it recei ves no instr uctions
from th e operator.
eg; If wa tching a vid eo, press pl ay on the vide o
short ly after tur ning on the TV or it wi ll switch off.
This is n ot a fault of th e TV. For all rece ption
probl ems a qualif ied aerial i nstaller s hould b e
consu lted.
Ensur e that the vid eo signal ca ble is corre ctly
conne cted to moni tor and sour ce.
The sys tem suppor ts three inp ut signals . Check
the Mon itor displ ay is in the rig ht input sig nal.
Check i nput sourc es (e.g. VCR , etc.) func tion
norma lly.
1. Ensu re that the vi deo signal c able is corr ectly
conne cted to Moni tor and sour ce.
2. Chec k the audio si gnal is conn ected with
“Audi o in” switch c orrectly.
3. Chec k audio cont rol is MUTE OF F.
Check i f the audio si gnal cable i s correctl y
conne cted to the Ri ght-audi o-In and Lef t-audioIn.
TV swit ches off
I canno t tune into
all cha nnels
No Video Dis play
No Audio O utput
Right -Left-Au dio-
Outpu t Error

T
OP
STEP 3
Conne ct up the lead s from the bac k of the unit.
STEP 4
Apply a b ead of silic one to the bac k of the unit an d
screw t he unit into p lace.
TO
P
0326
Cable Schematic
4.5m
Speak er ca ble
Speak er
AV
VIDEO
4m
TV CA BLE
3.5m
50cm
DC-j ack
Power e xte nsion
AC- Adapt or
HDM I CABLE
POW ER CABL E
SPE AKER OU T
AUD IO OUT

STEP 5
Fix the d ecorativ e screw hole c overs
T
OP
TOP
Please check the direction
04 25
Main M enu
Digi tal TV
FM Rad io Play er
Blue tooth
Game s
Vers ion
Blue tooth
Bule tooth I nit OK!
RED: P lay/P ause
YELL OW: NEX T
GREE N: PREV
BLUE : STOP
Bluetooth
Bluetooth in MEDIA MENU
Main Menu
In Main Menu, pre ss UP /DO WN ke y to ch oos e
Bluetooth opt ion a nd th en Pr ess ” OK” k ey
once to enter Blu eto oth .
Bluetoo th
Open your bluet oot h opt ion f rom t he Mo bil e
phone/ Mp3/ Mp4 ... , and y ou ca n fin d the
“Bathroom TV”.
Line th Bathroo m TV and you can enjoy the
music.
Press the RED/ GR EEN / YELLOW/ BLUE, you
can Play/ Pause / PRE V/ NE XT/ S TOP th e
music.
If you can’t stop M usi c, ma ybe y our b ule too th
option no STO P fun cti on.

05
Speaker Installation Guide
(1) Cut o ut a recess fo r the speake r of
144x115mm .
(3) Fee d Cables fro m TV.
(2) Che ck cables ar e correctl y
conne cted.
(4) Pus h back wire cl ips and slid e
speak er into plac e.
(5) Fin ished.
24
FM Radio Player
FM Radio Player in MEDIA MENU
Main M enu
Digi tal TV
FM Rad io Play er
Blue tooth
Game s
Vers ion
FM Rad io Play er
FM Ini t Succe ss!
RED: Au to Scan
Main Menu
In Main Menu, pre ss UP /DO WN ke y to ch oos e
FM Radio Player o pti on an d the n Pre ss ”O K”
key once to enter F M Rad io Pl aye r.
FM Radio Pl ayer
When into the FM Ra dio P lay er. th e sys tem
will Auto Scan, an d you c an pr ess “ RED ” to
auto scan again .
Press channel U P/D OWN t o cho ose c han nel .

06
Cabling
Mai ns plug
Mai ns sock et
240 V mains s upply
Iso latio n
pul l switc h
Please no te: All elec trica l install ation s hould be ca rried o ut by a ful ly
qualifi ed Elec trician and all fi re and sa fety regu latio ns should b e obeye d.
The TV requ ires a 13amp sock et
outlet conn ec ted to a 240V mai ns
supply via a re ad ily accessi ble
isolation s wi tch mounted i n close
proximity t o th e unit. Both th e
socket and pu ll s witch must
conform to th e la test safety
specifica ti on and be prote cted via
and RCCD devi ce o r similar. This
socket must b e fi tted in a dry are a
away from any m oi sture.
The cabling a nd a daptor plug
supplied wi th t his TV must n ot be
cut, shorte ne d, lengthen ed, etc.
as this could p ot entially da mage
the unit.
TV Aerial :
Take a 75Ω feed fro m yo ur present te levision aeri al or distrib ut ion
system and co nn ect this to the C OAX connectio n at the back of th e
unit. The s ignal level fed t o the set must be a t least 60dB/1m illivolt
or the pictur e ma y be noisy. A TV Dist ri bution Ampli fier may be
required if y ou a re in an area of we ak signal or if oth er television s
are already b ei ng fed from the s ame aerial. If in d oubt, consu lt a
qualified a er ial technic ian.
Cleaning:
To clean the fron t sc reen use only a s oft damp cloth. U nder no
circumsta nc es are abrasi ve cleaners to be u sed. Failur e to
observe thi s wa rning will in validate your g uarantee.
23
Electronic programs guide(EPG)
1
2
3
4
5 6
7
8
(1) You c an pr ess k ey “E PG” o n the r emo te
control to ente r int o the E PG pa ge to k now
more about the pr ogr ams t o be pl aye d. As
shown in the figu re be low :
Enter into EPG me nu de fau lt en ter D ail y Mod e,
menu under this m ode c ont ain 7 p art s, As
shown in the figu re ab ove :
[1].Tab 1 shows the Ti tle .
[2].Tab 2 shows tim e and d ate l ist .
[3].Tab 3 shows par tic ula r dat e lis t.
[4].Tab 4 shows pro gra m lis t, pr ess
“UP/DOWN” to sw itc h bet wee n pro gra ms.
[5].Tab 5 shows the t ime r ang e and p rog ram
information , pre ss “F.R & F.F ” cir cul arl y to
choose to brows e the t ime r ang e and p rog ram
information o n bas is of d ays o f eve ry we ek.
[6].Tab 6 shows the d eta ile d pro gra m
information i n Tab 5 .
[7].Tab 7 shows hin t inf orm ati on fo r key s,
correspondi ng to t he fo ur co lor s on th e rem ote
controller: r epl ace w ith c olo rs RE D, GR EEN ,
YELLOW, BLUE.
[8].Press “LE FT/ RIG HT” t o swi tch b etw een Tab
4 and Tab 5.
(2)Press “GRE EN” k ey to e nte r int o Weekly
Mode to display t he pr ogr ams a nd pr ogr am
information i n different time ranges of the
current progr am li st wi thi n one w eek .
[1].Press F.R & F.F k ey to s wit ch be twe en
Sunday ---Sat urd ay in Tab 3.
[2].Press UP/ DOW N key t o mov e upw ard a nd
downward to swi tch b etw een t he di fferent
programs in Tab 5 .
[3].Press LEF T/R IGH T key to choose to view
the program inf orm ati on in d ifferent time
ranges in Tab 6.
(3)When the cur sor s top s on Tab 5 in Figure 3.6
Tab 6 in Figure 3.7, pr ess t he “Y ELL OW” k ey to
choose the deta ile d inf orm ati on co rre spo ndi ng
to the current pr ogr am.
(4)When the cur sor s top s in Tab 5 of Figure 3.6
and Tab 6 of Figure 3 .7, p res s the “ BLU E” ke y
to enter Wake up Tim er me nu to b ook p rog ram s
Press “EXIT” to exit f rom E PG.
1
3
2
4
5
6
7

07
Remote Control
POWER
LCD mon itor power b utton (On/ Off ).
Mute
Mute se tting.
MEDIA MENU
Switc hing MEDIA ME NU.
DISPL AY
Switc hing the cur rent infor mation sou rces.
SLEEP
Power O N/OFF time b utton.
INPUT
Switc hing the inp ut source.
MENU
Used to a ccess menu o ptions for p icture qua lity
adjus tment, cha nnel scan, a nd return to o riginal
facto ry setting s.
EXIT
To return t o previous s tatus or exi t.
lift/ up/ down/ rig ht
move th e left/up/ down/rig ht item in the m enu.
OK
Selec t an item or con firms a choi ce. List wil l enter
the cha nnel manag er.
PMODE
Pictu re mode hot ke y.
SMODE
Sound m ode hot key.
VOLUM E
Incre ase / decrea se volume.
CHANN EL
chang e channels s equentia lly up or down i n
viewi ng mode.
22
Factory use onl y.
Version
Avail able Ga mes
Box Man
There are six fun cti on se lec tio n men us on t he
left of the inter fac e for u ser :
New Game: Resta rt ga me.
Reset: reset ma p.
Continue: Con tin ue ga me.
Level: Displa y gam e lev el.
Help: offer h elp i nformation.
Exit Game: exit g ame .
Tetris
There are five fu nct ion s ele cti on me nu on t he
left of the inter fac e for u ser :
Start Game: Start Ga me.
Setting: set ga me sp eed a nd di fficulty
Help: provide g ame i nfo rma tio n.
Score List: sco re li st.
Exit Game: exit the ga me.
Hit Rat
There are five fu nct ion s ele cti on me nu on t he
left of the inter fac e for u ser :
New Game: Resta rt Ga me.
Speed: Set Game S pee d, Pr ess L EFT /RI GHT
key to set.
Score List: sco re li st;
Help: help info rma tio n.
Exit Game: exit the ga me.
Games

EPG
Elect ronic Prog ram Guide( DTV only).
LANG( language )
Selec t the screen O SD languag e.
TV/RA DIO
Switc hes bet ween TV and RA DIO ((D TV only).
SIZE
Selec t the 4:3 or 16: 9.
Numbe r Keys(0~9 )
For dir ect entry of c hannel num ber or input o f
alpha numeric ch aracters S ystem Info rmation.
RETUR N
Goes ba ck to the prev iously vie wed channe l.
INFO
Displ ays inform ation on vie wed channe l (DTV on ly) .
FAV
Selec t the favori te or all TV channe ls(DTV onl y).
FAV+
chang e channels s equentia lly up in view ing
mode( DTV only).
FAV-
chang e channels s equentia lly down in vi ewing
mode( DTV only).
RED/G REEN/YEL LOW/BLUE
MEDIA mo de Special .
08 21
Wak eup Timer
If you want to set ch ann el pl ayi ng at c ert ain
time or giving so me hi nt in for mat ion s uch a s
Birthday. You ca n set v ia Wa keu p Time r men u,
as shown in Figur e 4.3 2
In Wa keu p Time r men u, yo u can s et Tim er No :
set Wake up ev ent n umb er, th e sys tem c an
support at most 8 e ven ts, Ti mer M ode : set t ime
mode, Wa keu p Mod e: se t wak eup m ode ,
Wak eup M ess ag: s et wa keu p mes sag e,
Wak eup C han nel : set w ake up ch ann el na me ,
Wak eup D ate : set w ake up da te, O n Time : set
wakeup time, Du rat ion : set d ura tio n.
Parenta l Lock
You ca n rev ise s yst em Pa ssw ord , you c an vi a
menu ( MENU>Dig ita l TV>Configuration >
Parental Lock ) to en ter P are nta l Loc k men u.
(1)Press the 0- 9 num ber k ey on t he re mot e
controller to i npu t old P ass wor d, th e sys tem
defaults Pass wor d as“ 000 0“.
(2)If the passw ord i s inp ut co rre ctl y, the cursor
can move onto Inp ut Ne w Pas swo rd op tio n,
press0-9 numb er ke y on th e rem ote c ont rol ler
to input new 4-di git P ass wor d;
(3)The cursor m ove C onf irm N ew Pa ssw ord
option, press 0 -9 nu mbe r key p res s on th e
remote contro lle r to in put n ew 4- dig it
Password; if it i s con fir med t he ne w pas swo rd
is diffe ren t fro m the new Password input, the
system will hin t to in put n ew pa ssw ord a gai n,
until they are co nsi ste nt. Af ter t he pa ssw ord i s
set successfu lly, the system will hint the
success and sav e the s ett ing , and t he ne w
password will c ome i nto e ffect.
Softwar e Upgra de
For factory use o nly.

0920
Replace battery
1. Open the b atter y cap
Tur n around the batte ry cap to t he open mar k, and ta ke the ba ttery out
from the ba se (See f igure 1)
2. Replac e batte ry
Ensure th e anode ( Positive) and ca thode ( Negativ e) be put i n the correct
side. Not e: Do not l ose the waterpro of rubb er seal.
3. Close th e batte ry cap
Tur n around the batte ry cap to t he close ma rk (See f igure 3)
Dimensi on
175 (L) ×52 ( W)×10(H)
Weigh t 70g ± 5g
System Se tup
System Setup me nu ca n pro vid e con ven ien t
system setup, y ou ca n via m enu ( M ENU >Digital TV- >Co nfiguration -> System Setu p)
enter System Se tup m enu
EQ se tting
To set ou tput so und eff ect , can b e set a s Standar d,
Cla ssic, R ock, Ja zz, POP
Surround
To set stage effe ct, c an be set as OFF, Concert,
Church, Passi ve, L ive
Area
To set scanning are a and , cho ose a rea t o
download pres et ch ann el se tti ngs , Ger man y/
England/ Ital y/ Fr anc e/ Sp ain /
Holland/Tai wan /Ch ina /No rwa y/S wed en/Finlan
d supported, de pen din g on di fferent versio n.
Tim e
Via m enu ( MEN U>D igital TV>C onf igu rat ion>
Tim e)
You ca n set Ti mer M ode i n Time p age : Time r
Mode: set time mo de, D ate : set d ate , Time : set
time, GMT Off set : set G MT Offset, Summer
Tim e: se t sum mer t ime .
In Time menu, ther e are t wo ti me mo des , one i s
Auto setting: r evi se vi a set tin g GMT
Off set ,Su mme r Time options;the other is
Manual settin g: re vis e via s ett ing D ate ,Tim e
options. When t he cu rso r mov es on to Tim er
Mode option, Pr ess L EFT /RI GHT key to
choose time mod e.

10
MENU Adjust Settings
PICTURE MODE
USER
BRIGHTNESS
50
CONTRAST
50
SATURATION
50
5
50
ADJUST EXIT
MENU
SOUND
FUNCTION
PICTURE
PICTURE
Pictu re mode can be s et as
Stand ard / Vivid / Soft / Op timal /
user.
USER mo de can be set th e
Brigh tness / Cont rast / Satur ation /
Sharp ness.
COLOR TE MP: c an be set t he
Stand ard / Warm / C ool / User.
SOUND MODE
BALANCE
50
TREBLE
50
BASS
0
AVL
SOUND
FUNCTION
PICTURE
Press MEN U to ente r the set up modes.
ress EXIT to go
Press " "
button to m ove it to t he posi tion. pre ss OK key t o confirm .
p
SOUND
Sound m ode can be set a s Standard
/ Music / M ovie / Speec h / User.
User mo de can be set th e bass /
trebl e / balance.
AVL: on / off.
EQ: 100 / 3 00 / 1K / 3K / 8K.
Surro und: on / off.
SHARPNESS
HUE
COLOR TEMP
STAN DARD
USER
OFF
EQ
SURROUND
ON
TV
TV
MOVE
ADJUST EXIT
MENU
MOVE
100 3 00 1K 3K 8K
SOUND\EQ
100 1 00 100 10 0 100
SOUND
FUNCTION
MAIN MENU
PICTURE
TV
ADJUST BACK
MENU
MOVE
MAIN MENU
MAIN MENU
19
TV
TV setup provid es co nve nie nt TV input mode,
you can via menu ( ME NU- >Di git al TV>Configurat ion - > TV) enter TV set
Display Mode
TV mode can chang e the m ode o f the o upu t
video, you can ad jus t TV mode, can be set as
Auto, PAL , NTS C.
Aspect Ratio
Vid eo ou tpu t mod e can change the mode of
video ouput, yo u can a dju st TV mode, can be
set as 16: 9 / 4: 3.
Vid eo Ou tpu t
Vid eo Ou tpu t mod e can change the mode of
video output, y ou ca n adj ust TV mode, can be
set as CVBS, RGB, P-YU V, P-RG B, S- Vid eo
Brightness
If the brightne ss is n ot pr ope r dur ing w atc hin g,
you can adjust th e cur ren t bri ght nes s to be a
proper one, can b e set a s: 0%, 10%, 20%,
30%, 40%, 50%, 60%, 70%, 80%, 90%
or100.
Contrast
You ca n set s yst em co ntr ast v ia Co ntr ast
option, can be se t as: 0%, 10%, 20%, 30%,
40%, 50%, 60%, 70%, 80%, 90% o r 100 .
HUE
Adjust the syst em hu e, ca n be se t as: - 6, -5 , -4,
-3, - 2, -1, 0, 1, 2, 3, 4, 5 or 6.
Saturation
Adjust system s atu rat ion , can b e set a s: 0- 12.

11
SETUP
Langu age: selec t your langu age.
OSD Dur ation: Set t he OSD
disap pear time.
Aspec t Ratio:
displ ay formats .
TT Lang uage: sele ct your TT
langu age.
Reset : reset the pi cture para meters
of scre en.
selec t 16:9 / 4:3 / full
LANGUAGE
OSD DURATION
10 SECONDS
FULL
SOUND
PICTURE
FUNCTION
TV
ADJUST EXIT
MENU
MOVE
MAIN MENU
ENGLISH
ASPECT RATIO
RESET
WEST
TT LANGUAGE
SOUND
PICTURE
FUNCTION
TV
ADJUST EXIT
MENU
MOVE
MAIN MENU
001
615.25 MHz
PAL
CHAN NEL
AREA
AUTO S EARCH
MANU . SEARC H
SOUND
PICTURE
FUNCTION
TV
BACK
MENU
MAIN MENU
CHAN NEL 001 (XX X.XX MH z)
TV \ AUTO SEARCH
10%
FINE T UNE
COLO R SYSTE M
SOUN D SYSTE M
ENGL AND
DK
CANCEL
TV
Chann el: select t he channel .
AREA: s elect your a rea.
Auto Se arch: Auto- search the TV
chann els. Right c ursor butt on search
TV chan nels.
Manua l SEARCH: ma nual-sea rch the
TV chan nels.
Fine Tune: Pr ess the ◄ ► butt ons
adjus t the freque ncy.
Color s ystem: Sel ect the PAL/
SECAM / AUTO .
Sound s ystem: Sel ect the DK/ BG /
L/ AUTO.
SKIP: I f selected , skip
the sel ected chan nel number w hen
use CH+ /CH- selec t channel. S elect
ON mean s skip; sele ct OFF means n o
skip.
For An alogu e TV & SK Y
18
(4)To delete all Ca rri ers a nd de let e all TV and
Radio channel , pre ss UP /DO WN ke y to mo ve
the cursor to AL L Carriers option, Press OK
key, then t he sy ste m will hint with “Delete all
Carriers?”d ial ogu e box , pre ss LE FT/ RIG HT
key to choose”Yes ” or “N o”, p res s OK ke y to
confirm .
Configuration
OSD
Configurati on pr ovi des i ndi vid ual ize d sys tem
setup functio n, yo u can c onf igu re th e sys tem
according to yo ur ow n hob by an d dem and . You
can enter Confi gur ati on me nu vi a the
menu(MENU>D igi ta TV>Configuration)
(1)OSD Langua ge op tio n: The system has the
user interfac e sup por tin g a cou ple o f
languages, yo u can s et la ngu age v ia OS D
Language opti on:
[a] Move the curs or on to OS D Lan gua ge op tio n
, Press RIGHT key to e nter OSD Language
List.
[2] Press LEFT/DOW N key c hoo se la ngu age ;
[3] Press OK key to conf irm s yst em in ter fac e
language sele cti on, t hen t he se tti ng is
eff ect ive , and t hen the interface language
turns into the cu rre ntl y cho sen l ang uag e, th e
cursor can move o nto O SD La ngu age o pti on on
the left.
(2)1st Au dio L ang uag e opt ion : Pre ss RI GHT
key to enter the cu rre ntl y sup por ted Au dio
Language list , in th e Audi o Lan gua ge li st,
press UP/DOWN k ey to c hoo se la ngu age ,
press OK key to con fir m.
(3)2nd Au dio L ang uag e opt ion : Pre ss RI GHT
key to enter the cu rre ntl y sup por ted Au dio
Language list , in th e Audi o Lan gua ge li st,
press UP/DOWN k ey to c hoo se la ngu age ,
press OK key to con fir m.
(4)Press OK key t o con fir m the e dit ing a cti on
in OSD menu, the sy ste m wil l hin t wit h “Up dat e
succeeds” and t hen r etu rn to t he pr evi ous
menu .

12
DVB-T function
17
Main MENU(MEDIA MENU)
Main Menu
In Main Menu, pre ss UP /DO WN ke y to ch oos e
Digital TV op tio n and then Press ”OK” key
once to enter Dig ita l TV menu.
Install ation
There are three k ind s of In sta lla tio n mod e as
follow:
(1)Area Searc h: se arc hin g pro gra ms by s can
aera.
(2)Manual Sea rch
(3)Auto Searc h
You ca n ent er in to pa ram ete r “in sta lla tio n
page” via input p ass wor d dig ita ls( def aul t
password is “00 00” ), As sh own i n the f igu re
below:
Installation
Press t he button, i nto the Main M enu
(3)Press the re d key Z OOM o f the r emo te
controller to e nte r Add Ch ann el me nu.
Under Add Channe l men u, th ere a re 6
parameters fo r add ing o ne ch ann el as f oll ows :
[1] Ar ea Na me: F or Are a Nam e, pr ess t he
RIGHT ke y of th e rem ote controller to enter the
Area Name list on t he ri ght , the n pre ss
UP/DOWN key to ch oos e are a nam e, pr ess O K
key to confirm.
[2] Carrier: Pr ess L EFT /RI GHT key to choose.
[3] Channel Nam e: Pr ess L EFT /RI GHT key to
enter Rename Ch ann el pa ge.
[4] Au dio P ID, V ide o PID , PCR P ID, P res s 0-9
number key to rev ise v alu es;
[5] Press OK key to conf irm t he ad din g, th e
system will hin t wit h “Up dat e suc cee ds” a nd
return to Edit Ch ann el me nu;
(6).Press EXI T key to return to Edit Channel
page.
4.Press the yel low 3 D key o f the r emo te
controller to e nte r Ren ame C han nel m enu .
The operation f or th is me nu is a s tha t of fo r
Add Channel pag e.
Delete All
If you do not like on e or so me ch ann els , you
can delete it/t hem i n Cha nne l Org ani zer
menu, but, if you d o not l ike a ll TV or Radio,
you can enter Del ete Al l men u to ch oos e to
delete all TV, RADI O, Ca rri ers .
(1)Under Chan nel M ana ger m enu , pre ss
UP/DOWN key to ch oos e Del ete Al l opt ion ,
press OK key agai n, th en th e sys tem w ill h int
with the dialog ue bo x of in put tin g pas swo rd
which is defaul ted a s “00 00” , inp ut th e pro per
password via th e 0-9 num ber k ey of t he
remote contro lle r, the n ent er De let e All me nu.
(2)To delete all TV ch annels, press UP/DOWN
key to move the cur sor t o ALL TV Ch ann els
option, press O K key, then the system will hint
with ”Delete al l TV Channels?”dialogu e box .
Press LEFT/RI GHT key to choose “Yes ” or
“No”, press OK ke y to co nfi rm ,
(3)To delete all RA DIO c han nel , pre ss
UP/DOWN key mov e the c urs or to AL L Radi o
Channels opti on, pre ss OK k ey, then the
system will hin t wit h ”De let e all R adi o
Channels?”d ial ogu e box , p res s LEF T/R IGH T
key to choose “Yes” o r “No ”,p res s OK ke y to
confirm.

16 13
Channel S earch
Area search is a ki nd of i nte lli gen t and
convenient mo de of p rog ram s sea rch ing ,
which covers pr ogr ams o f all f ren que nt po int s
of target count rie s or re gio ns. As s how n in th e
figure below:
(1)You ca n mov e the c urs or to “ are a sea rch ”
via press “UP/D OWN ” key u nde r “in sta lla tio n
menu”,then pr ess “ ent er” t o ent er in to ar ea
searching pag e.
(2) Af ter e nte rin g int o are a sea rch p age ,
system will sca n all p rog ram s one b y one
under frequen cy po int s of cu rre nt co unt rie s or
regions selec ted a uto mat ica lly.
(3)During sca nni ng, p res s “EX IT” k ey to s top
and exit scanni ng.
(4)If any progr am is d ete cte d and t he sc ann ing
process is fini she d, sy ste m wil l exi t the
scanning page a nd sa ve th e pro gra m, at t he
same time retur n to th e “in sta lla tio n men u” an d
to play them in vpp w ind ow au tom ati cal ly.
Manual Se arch
(1)You ca n mov e the c urs or to “ are a sea rch ”
via press “UP/D OWN ” key u nde r “in sta lla tio n
menu”,then pr ess “ OK” t o ent er in to ar ea
searching pag e.
(2)Prior manu al sc an, y ou ne ed to c onf igu re
relevant para met ers i ncl udi ng:
[a] Freq(KHz) : the d efa ult f req uen cy is
474000KHz,y ou ca n inp ut re lev ant d igi tal t o
modify it.;
[b]BandWidt h: th e def aul t val ue of b and wid th
is 64MHz. while y ou ca n set i t to
6MHz,7MHz,8 MHz .
(3)Press “OK” k ey af ter c onf igu rat ion o f
parameters to s tar t man ual s can .
(4)If any progr am is d ete cte d and t he sc ann ing
process is fini she d, sy ste m wil l exi t the
scanning page a nd sa ve th e pro gra m, at t he
same time retur n to th e “in sta lla tio n men u” an d
to play them in vpp w ind ow au tom ati cal ly.
(4)Press UP/D OWN k ey ch oos e Type , Press
LEFT/RIGHT key t o set Sorting Parameters.
(5)After sort ing i s set , to re ali ze ch ann el
sorting, pres s OK ke y, then the system will hint
with the dialog ue bo x“A re yo u sur e?”
To choose “Yes”t o con fir m, yo u can s ee th e
programs in the p rog ram l ist ; to to c hoo se
“No”to cancel , you c an re tur n to Ch ann el
Sorting page;
(6)Press RETU RN ke y to ex it Ch ann el So rti ng
page.
Channel G roupi ng
Group channel s acc ord ing t o Mov ies , Spo rt,
Music, Kids, Fa shi on et c.
(1)You ca n ent er th e pag e As sho wn in t he
figure via “MEN U>D igi ta TV> Channel
Manager> Chan nel G rou pin g”:
(2)It will pop up a nd di alo gue b ox pr omp tin g
that“Channe l not a vai lab le” whe n the re ar e no
programs in dat aba se to e nte r int o, an d it wi ll
not enter into ch ann el gr oup ing p age .
(3)Press UP/D OWN k ey to c hoo se th e lin e
where the chann el to b e gro upe d is in , the n
press the numbe r key s 1-8 o n the r emo te
controller to s et di fferent channel groupi ng.
(4)After chan nel i s edi ted , whe n EXI T key is
pressed to exit t he me nu, i f act ual c han nel
editing actio n exi sts , the s yst em wi ll ca rry o ut
channel group ing r ene wal , wit h the h int
of“Update suc cee ds”
Edit Chan nel
Have such opera tio ns as Ad d, De lte a nd
Rename to chann els .
(1)You ca n ent er th e pag e as sh own i n the
figure below vi a “ME NU- >Di git a TV-> Channel
Manager -> Edit C han nel ”:
(2)It will pop up a nd di alo gue b ox pr omp tin g
that “No Carrie rs” w hen t her e are n o pro gra ms
in database to en ter i nto , and i t wil l not e nte r
into ADD-Edit Ch ann el pa ge.

14 15
Auto Sear ch
You ca n sea rch t he pr ogr ams o f any c han nel .
(1)You ca n mov e the c urs or to “ are a sea rch ”
via press “UP/D OWN ” key u nde r “in sta lla tio n
menu”,then pr ess “ OK” t o ent er in to ar ea
searching pag e.
(2)Prior to aut o sea rch ing , you n eed t o
configure rel eva nt pa ram ete rs in clu din g:
[a] Start Freq (KHz) : the d efa ult f req uen cy is
474000 KHz. You can i npu t rel eva nt di git als t o
modify it;
[b] End Freq (KHz ): th e def aul t fre que ncy i s
474000 KHz. You can i npu t rel eva nt di git als t o
modify it;
[c] Band Width: the de fau lt va lue o f ban dwi dth
is 64MHz.whil e you c an se t it to 6 MHz , 7MH z,
and 8MHz.
3. Press “OK” key a fte r con fig ura tio n of
parameters to s tar t man ual s can .
4. If any program i s det ect ed an d the s can nin g
process is fini she d, sy ste m wil l exi t the
scanning page a nd sa ve th e pro gra m, at t he
same time retur n to th e “in sta lla tio n men u”
and to play them in v pp wi ndo w aut oma tic all y.
Channel Manager
Channel O rgani zer
Channel organ ize r pag e inc lud es fa vor ite
channels, cha nne l del eti ng, m ovi ng, l ock ing
and rename.
(1) You c an en ter t he pa ge as s how n in th e
figure below vi a “ME NU> Dig ita l TV> Channel
Manager> Chan nel O rga niz er”
(2)It will pop up a nd di alo gue b ox pr omp tin g
that“Channe l not a vai lab le” whe n the re ar e no
channels in dat aba se to e nte r int o, an d it wi ll
not enter into ch ann el or gan ize r pag e.
(3)Channel Or gan ize r men u inc lud es: F avo rit e
Channel, Dele te Ch ann el, S kip C han nel , Loc k
Channel. Pres s UP/ DOW N key t o cho ose t he
line where Favo rit e Cha nne l is, t hen p res s the
4-color key on th e rem ote c ont rol ler : pre ss th e
red ZOOM key to set and ca nce l Fav ori te
Channel, the gr een A- B key t o set o r can cel
Delete Channe l, th e yel low 3 D key t o set o r
cancel Skip Cha nne l, th e blu e ANGL E key t o
set or cancel Loc k Cha nne l; Aft er se tti ng,
correspondi ng fi gur e wil l app ear.
(4)To rename chan nel , p res s UP/ DOW N key
to choose the lin e whe re th e cha nne l to be
renamed is, pre ss LE FT/ RIG HT key to enter
the page to renam e the c han nel .
(5)After prog ram e dit ing , to ed it th e pro gra m,
press ENTER key ; to se t or ca nce l Loc k
Program, the sy ste m wil l hin t to in put “ 000 0”;
to set Delete Pro gra m, th e sys tem w ill h int t o
choose dialog ue bo x“D o you w ant t o del ete t he
selected item s?” , Pre ss LE FT/ RIG HT key to
choose, choos e ”Yes” to de let e the p rog ram
chosen, “No”t o can cel .
(5)Press RETU RN ke y to ex it Ch ann el
Organizer pag e.
Channel S ortin g
The channels sh all b e lis ted a cco rdi ng to
certain seque nce s o tha t the u ser c an ea sil y
find them.
(1)you can ente r the p age As s how n in th e
figure below vi a “ME NU> Dig ita TV> Channel
Manager > Chann el So rti ng” :
(2)It will pop up a nd di alo gue b ox pr omp tin g
that“Channe l not a vai lab le” whe n the re ar e no
programs in dat aba se to e nte r int o, an d it wi ll
not enter into ch ann el so rti ng pa ge.
(3)Before sor tin g, th e typ e of so rti ng sh all b e
set, includin g the f oll owi ng it ems :
[a].First Option : cho ose t he pr ogr ams t o be
sorted via the se lec tio n are a.
[b].Second Op tio n: Pr ess F TA(free of charge),
Scramble(en cry pte d), AL L Free and E ncr yte d
Channels.
[c].Third Opt ion : Acco rdi ng to a lph abe tic o rde r
A-Z, or Z-A.
 Loading...