

Page 1
2.4GHz Digital Wireless
7” LCD Surveillance Kit
User Manual
QC-3762
Page 2

Page 3
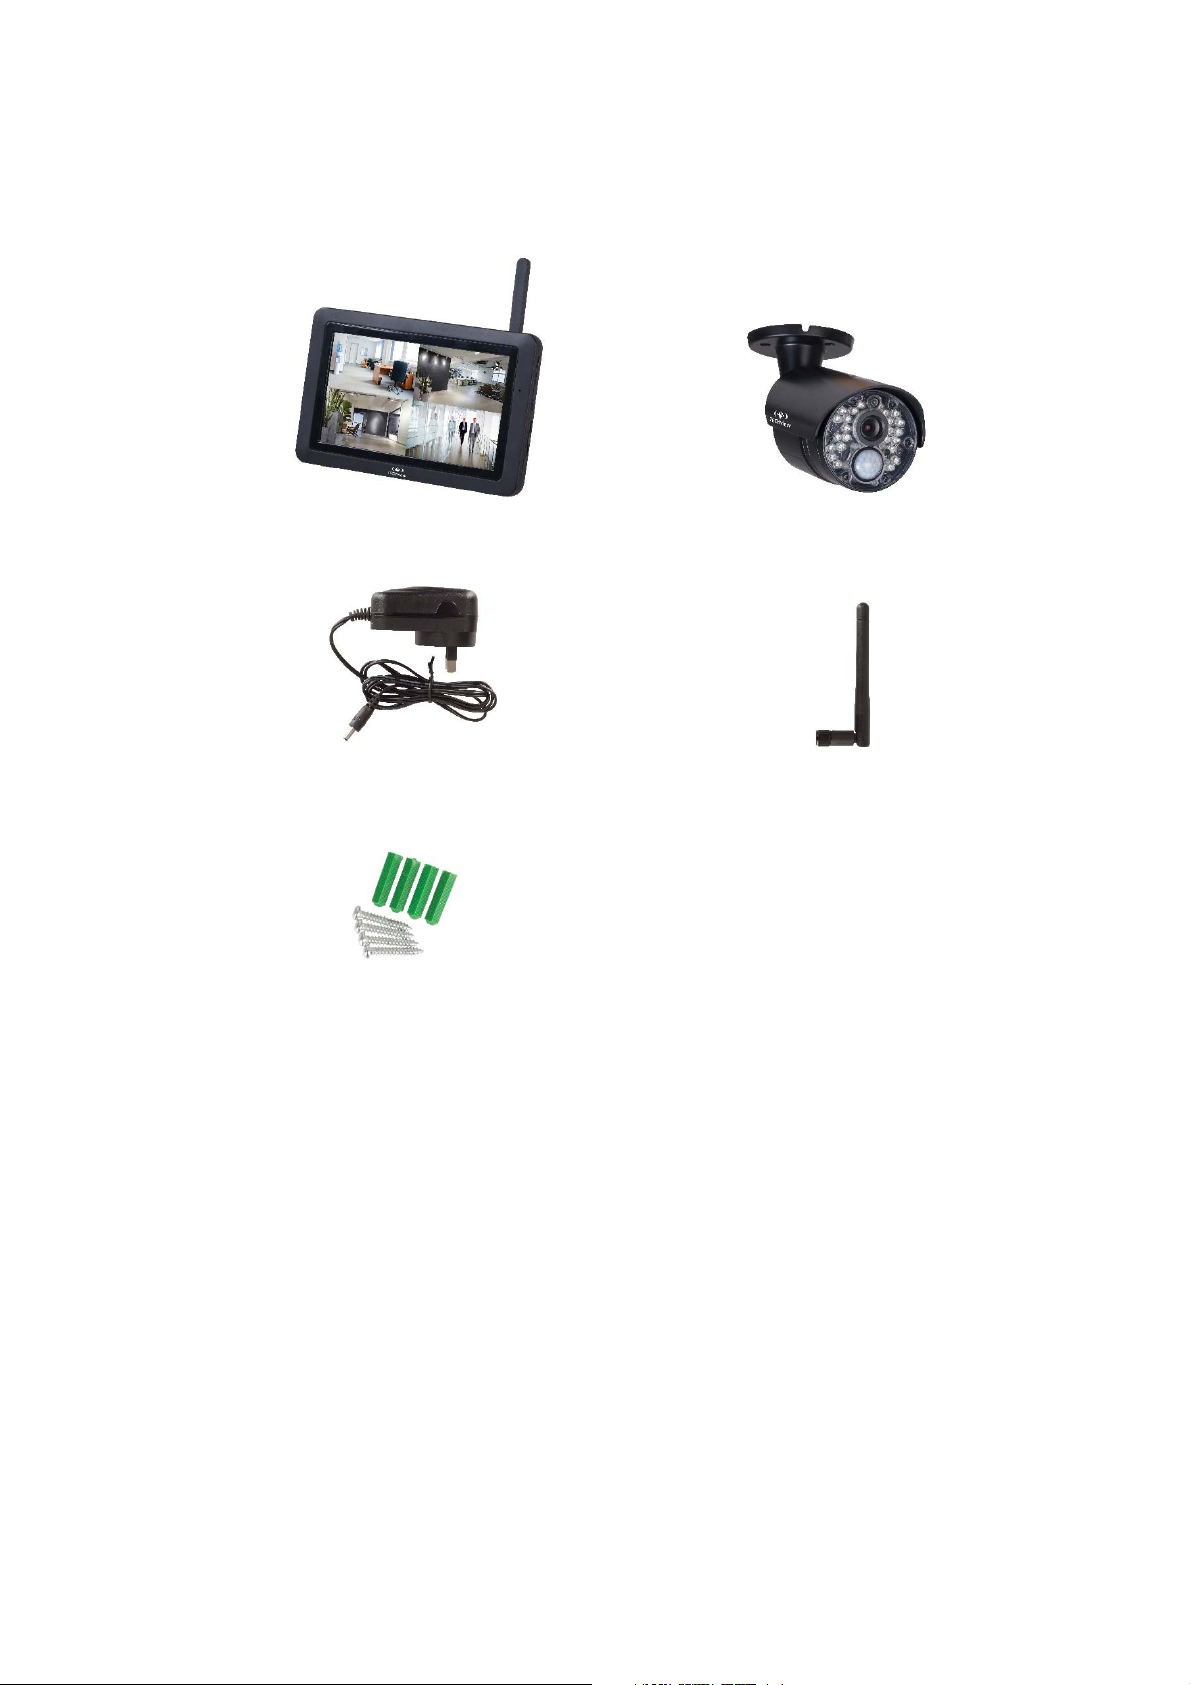
Box Contents:
1 x 7” LCD Monitor 1 x Wireless Camera
2 x Mains Power Adaptors 1 x Camera Antenna
1 x Mounting Hardware
Page 4
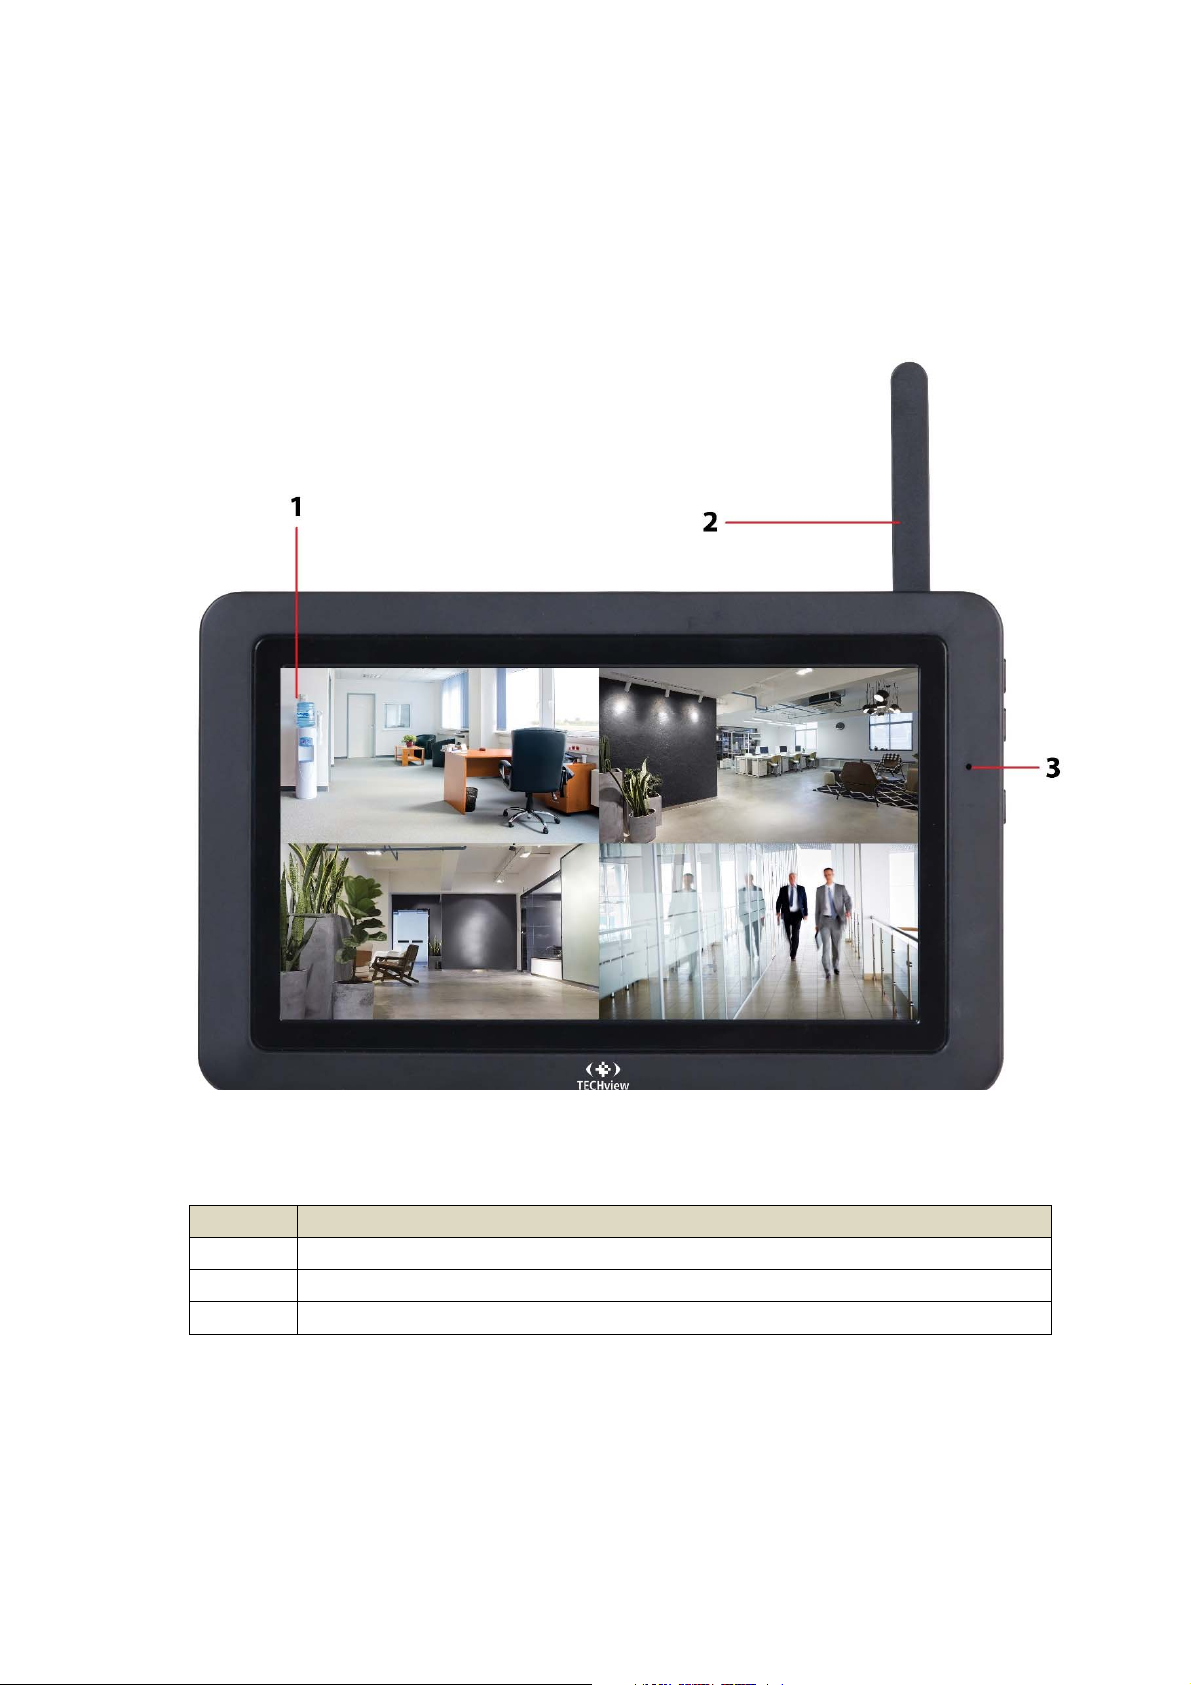
Product Diagram:
7” LCD Monitor:
No. Description
1 7” LCD Touch Screen
2 Wireless Antenna
3 Microphone
Page 5
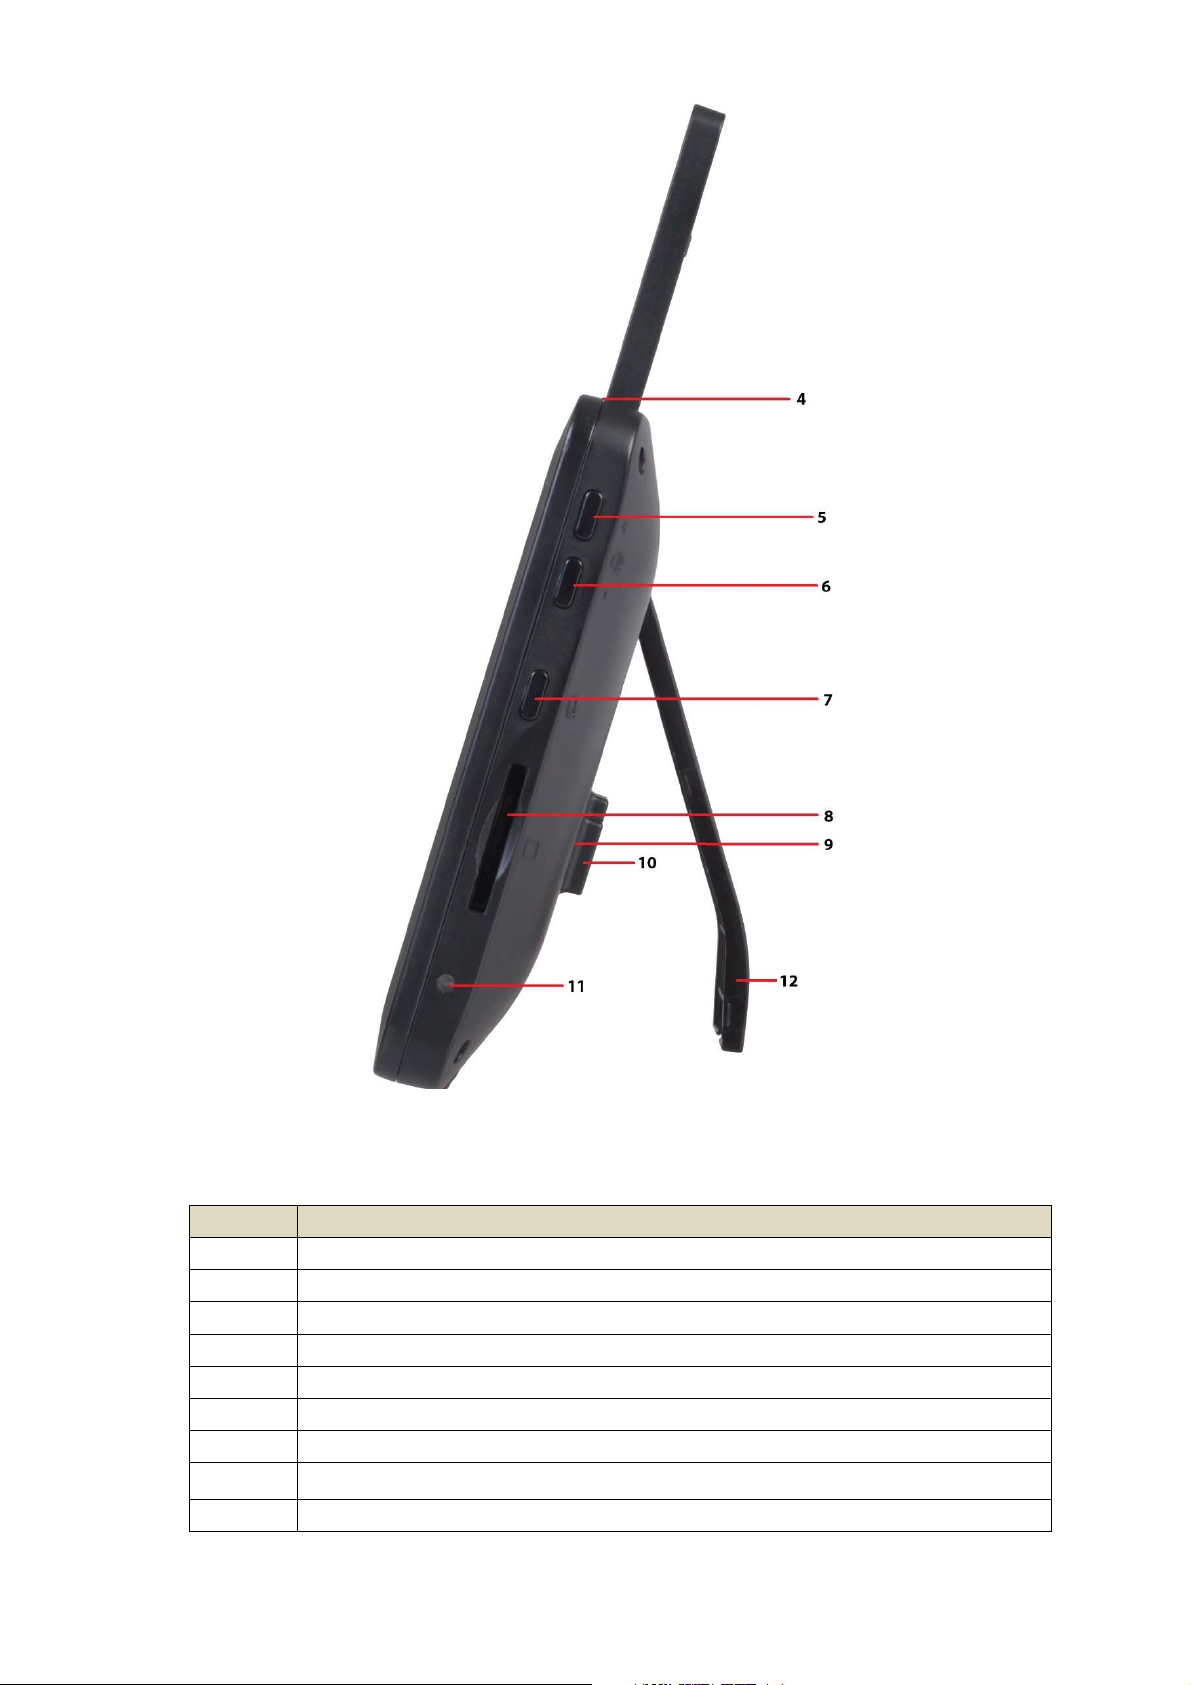
No. Description
4 Power/Scan Button
5 Volume Up
6 Volume Down
7 Talk Button
8 SD Card Slot
9 Speaker
10 Power Socket
11 LED Status Indicator
12 Folding Stand
Page 6
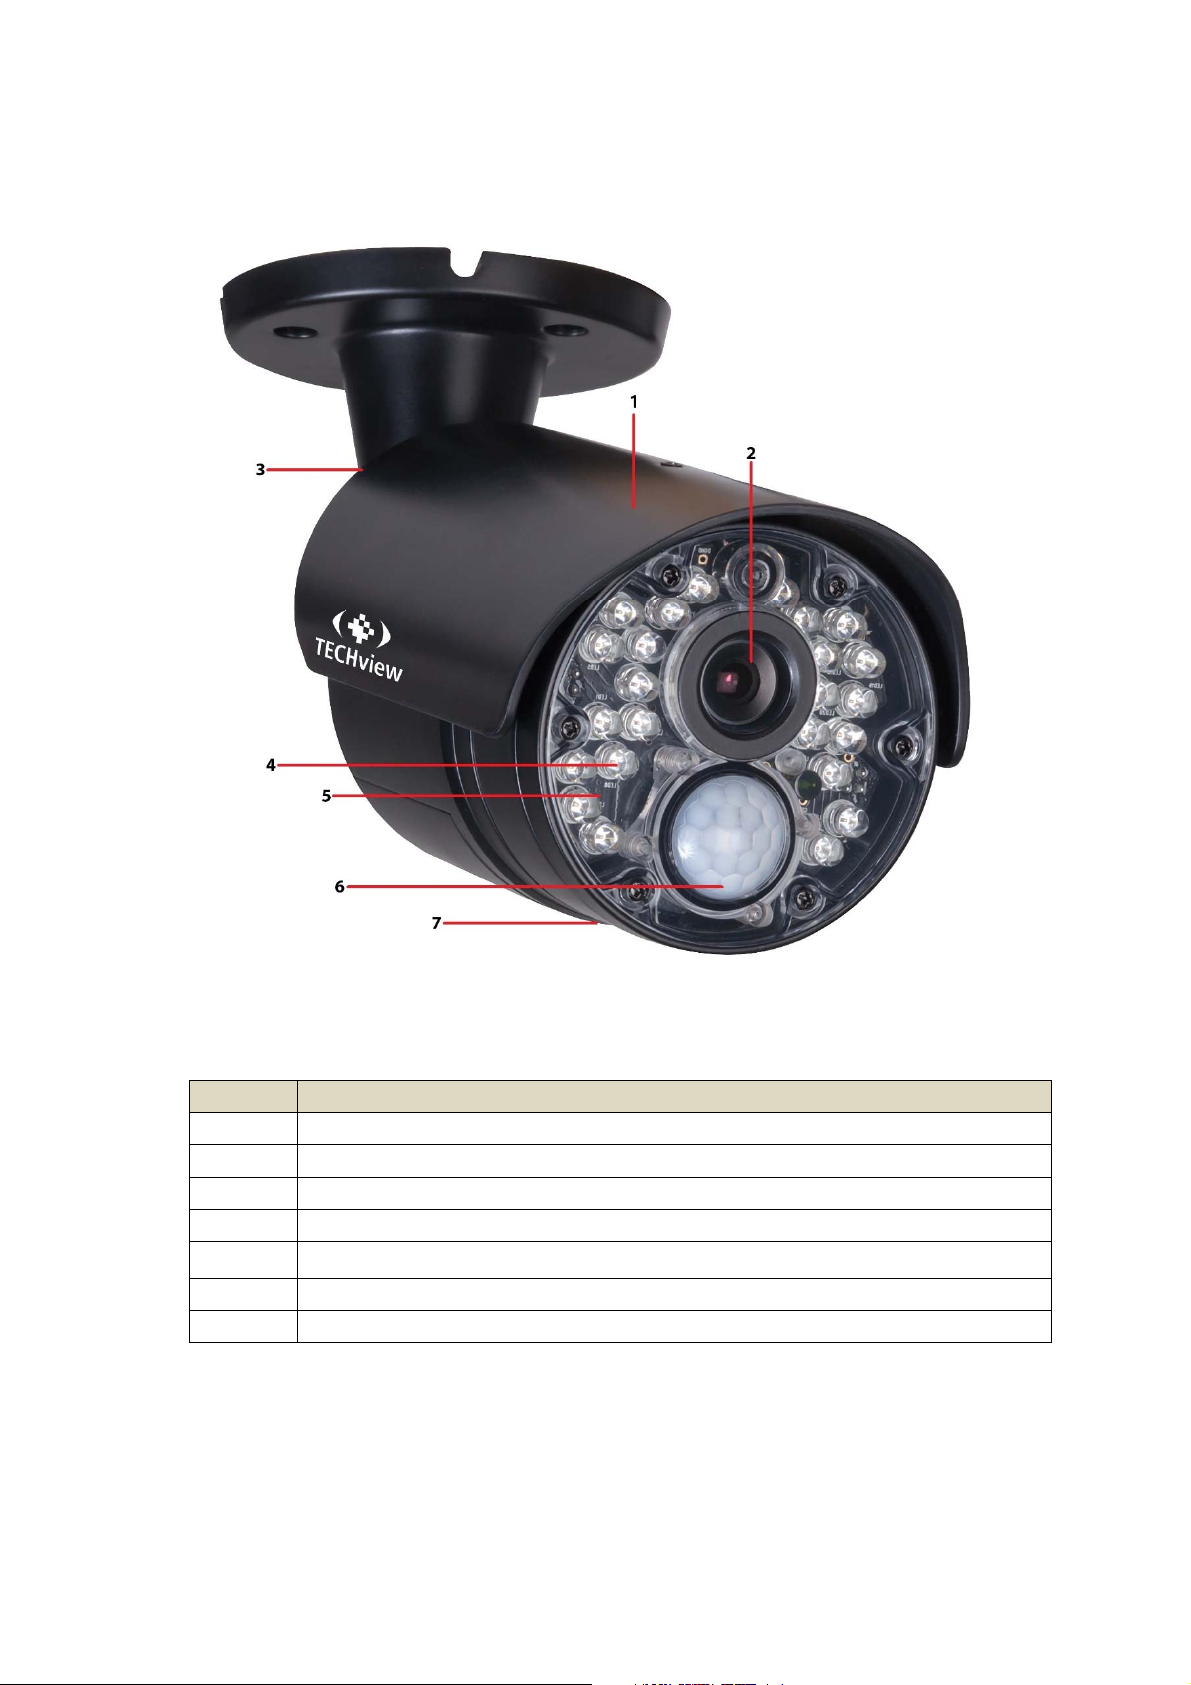
Wireless Camera:
No. Description
1 Weather Shield
2 Camera Lens
3 Wireless Antenna
4 IR LEDs
5 Microphone
6 Motion Detector (PIR)
7 Speaker
Page 7

Installation & Setup:
Monitor:
1. Pull out the folding stand to position the monitor securely.
2. Position the antenna located at the top of the monitor to an upright position.
3. Connect the 5VDC,2A mains power adaptor to a 240VAC standard power outlet, and
the DC plug in to the power socket of the monitor.
4. Press and hold the power/scan button located on the top of the monitor for 3-4
seconds for the unit to power up.
5. The monitor will display the TECHview startup screen for a few seconds and will
transition to live view.
Please Note: The screen will remain dark until the cameras are powered up.
Camera:
1. Position the camera securely in place, it is best to have the monitor located near the
camera temporarily so you can see the exact position of the camera.
2. Once you have camera in the correct position, mark the location of the screw holes.
3. An extra hole may need to be placed for the power cable to run depending on your
installation.
4. Fix the included screws and anchors to attach the camera to the wall or ceiling.
5. Attach the wireless antenna to the rear antenna socket and screw in tightly.
6. Connect the 9VDC, 600mA mains power adaptor to a 240VAC standard power
outlet, and the DC plug in to the power socket of the camera.
7. Once the camera and monitor are powered on, the unit now should be displaying
the camera footage.
Please Note: Please install the camera in an undercover area if place outside as the unit
is weatherproof only.
Page 8
Operation:
Viewing Modes:
The live view area displays the live video stream from the cameras, each camera will display
its own section of the quad view or can be viewed individually. There are 4 viewing modes
That can be displayed as shown below:
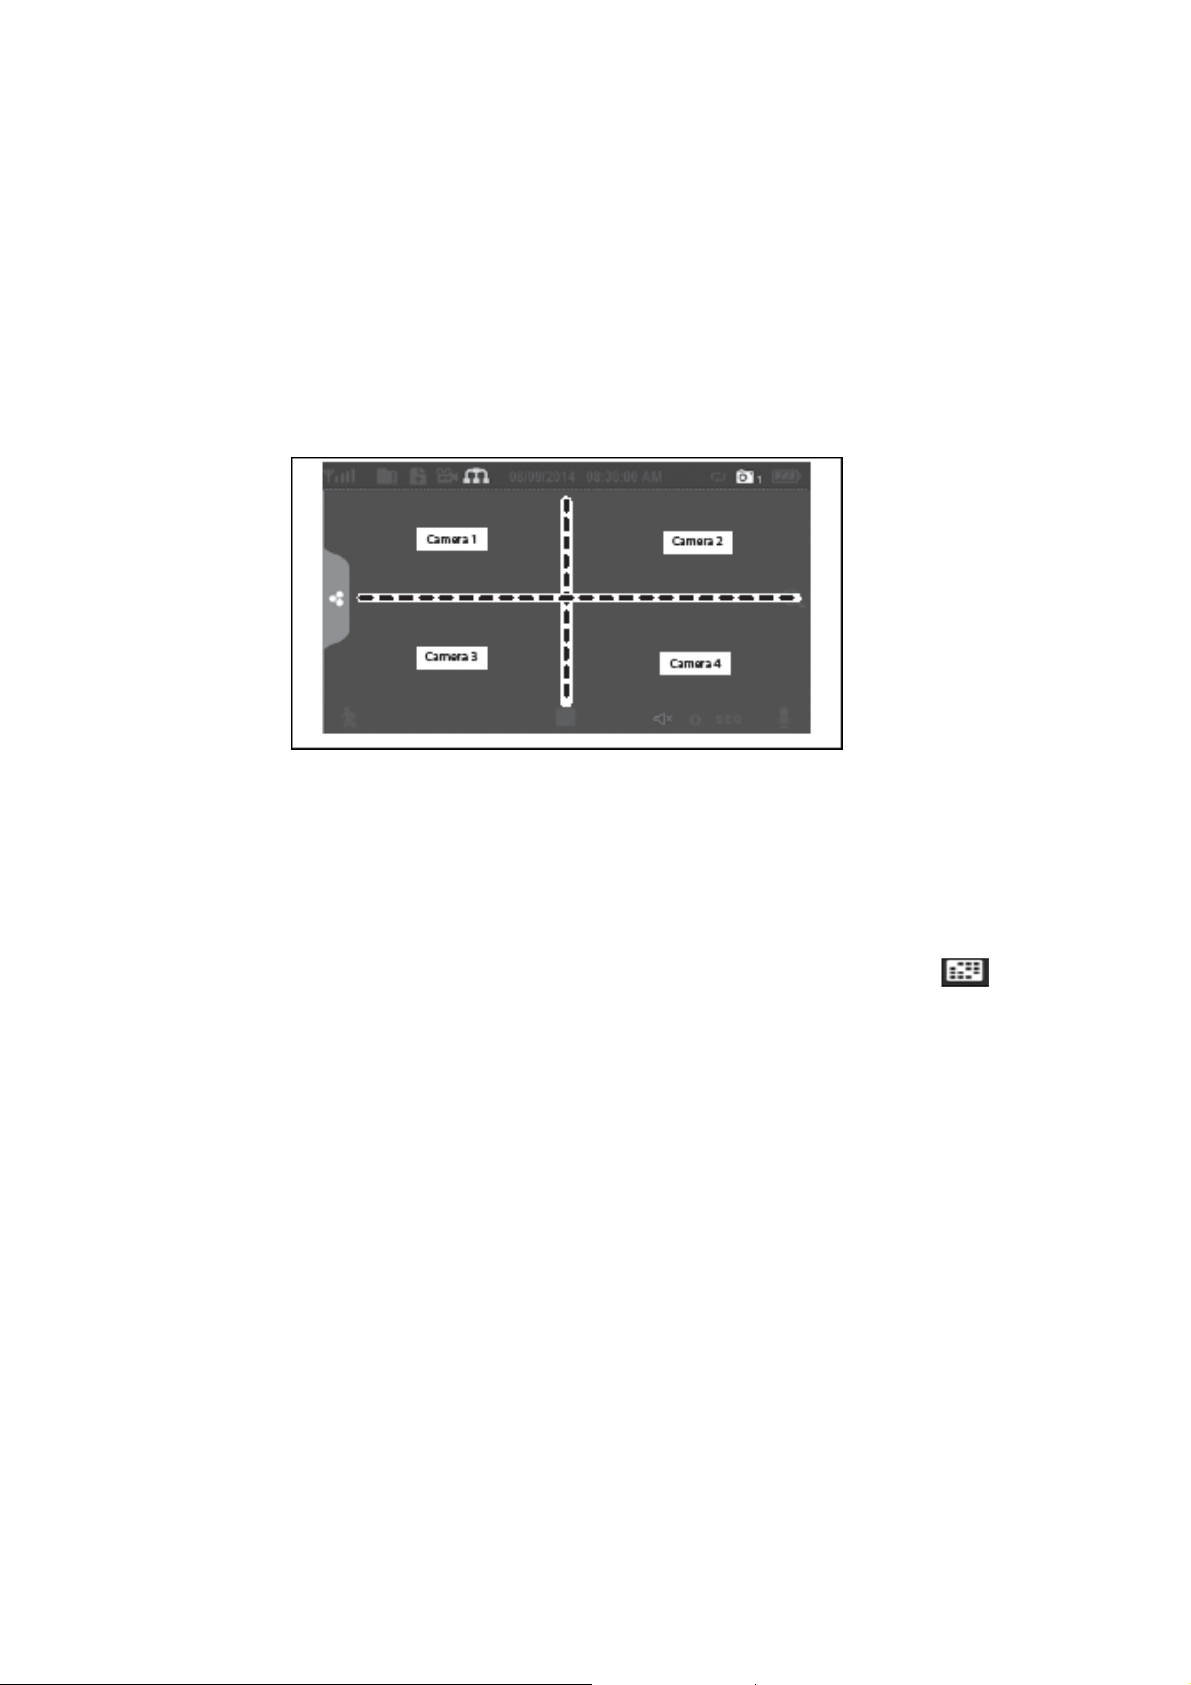
Quad View: This splits the screen’s image area into 4 quadrants and displays the active
camera in each quadrant. Press the center of the individual quadrant to enter single
viewing mode.
Single View: This mode displays one camera at a time on full screen. Press the
button to change between the channels. Tap the center of the image to return to
quad viewing mode
Scan Mode: The monitor’s screen and speakers will remain off until a camera detects
motion. The camera will then display at full screen (sound and video on) until there
has been no motion for 15 seconds. After that, the monitor screen will turn off again.
Press and release the power/scan button to turn scan mode on.
Auto Sequence: Displays each channel automatically in sequence in full screen
display. The system defaults to auto sequence mode when scan mode is turned off.
Press the SEQ button to turn auto sequence mode off and return to quad viewing
mode.
Page 9
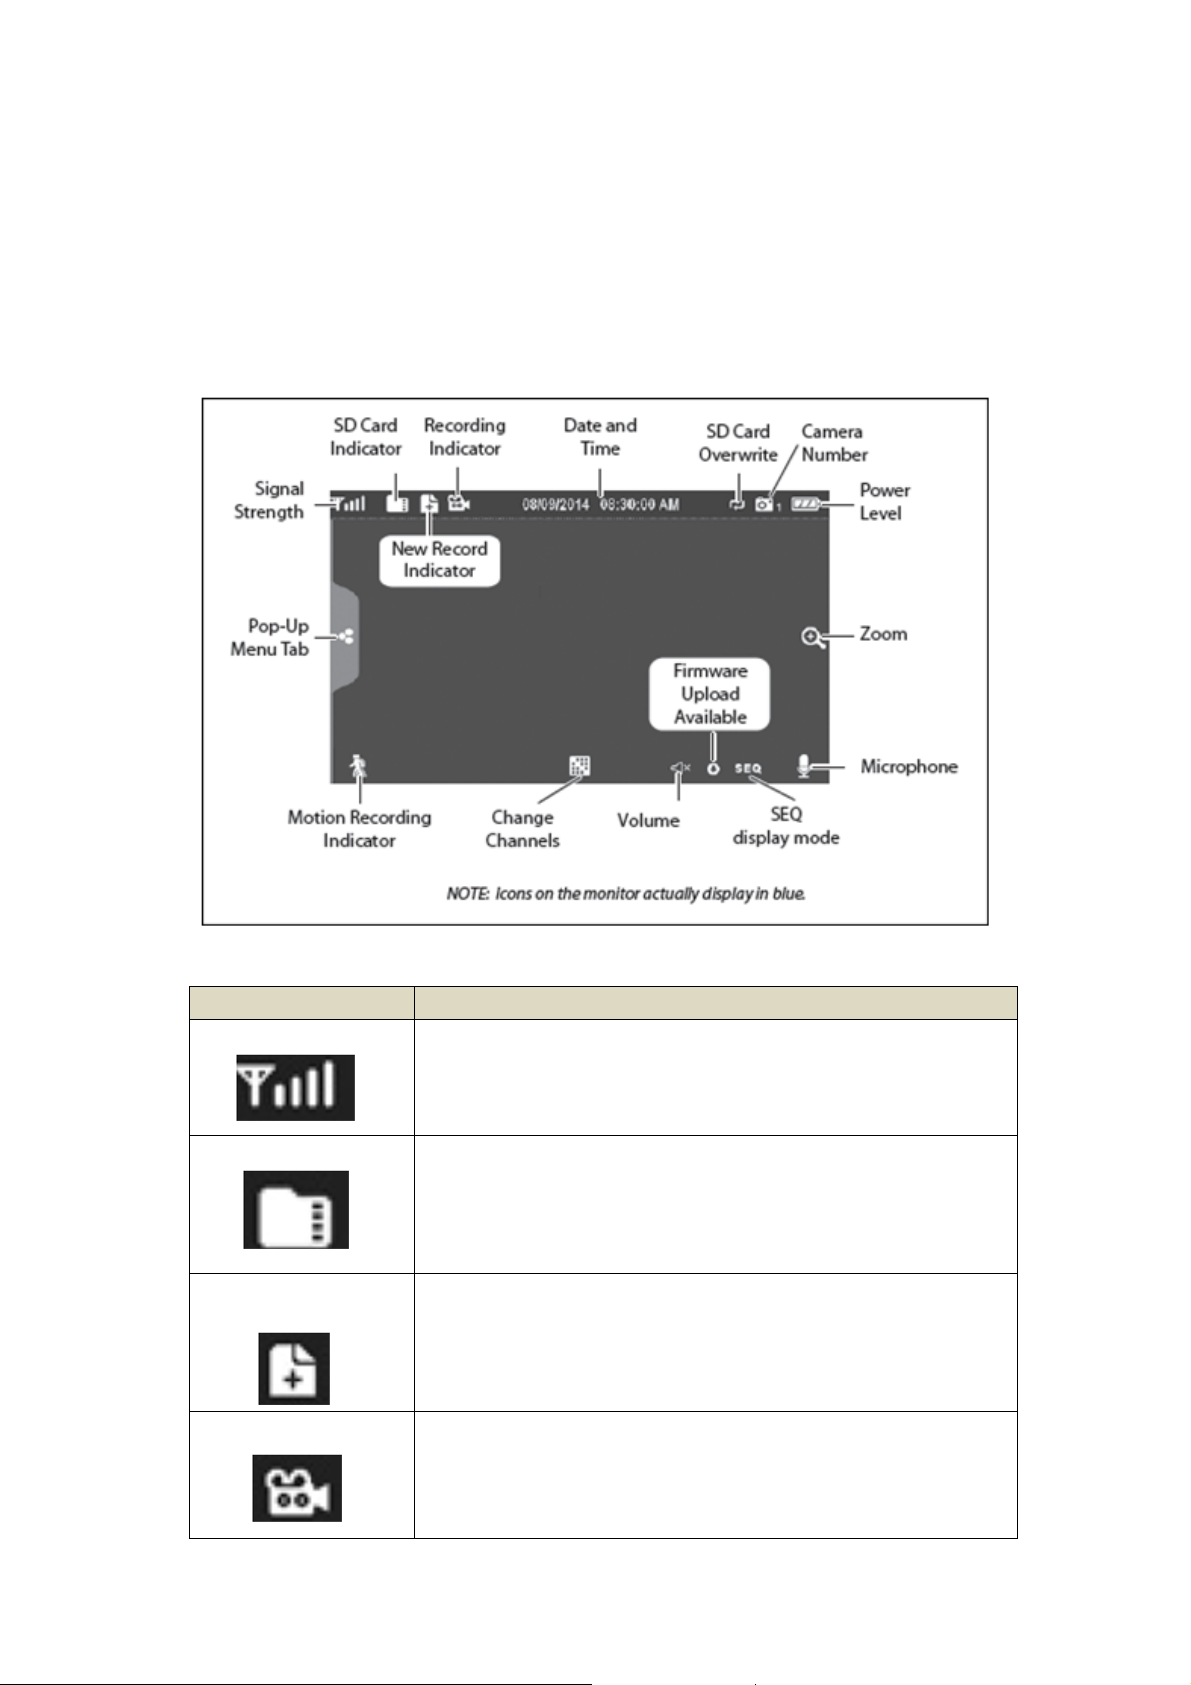
Live Screen Diagram:
Different icons are displayed on the monitor screen depending on what is going on with
your cameras. This image shown below is an example of what could be on your screen (the
video image is removed to make it easier to see the icons). Please see the icons and
descriptions listed below:
Icon Description
Signal Indicator
Shows how strong the camera's signal is. Signal ranges from 4
bars down to 0 bars (out of range).
SD Card
New Recording
Indicator
Recording Indicator
This graphic displays if an SD card is inserted into the monitor.
If the icon is blue, recording space is available.
If the icon is red, the SD card is full.
Tap this icon to view recorded files.
New recordings have been saved on the SD card.
When this icon flashes red, it indicates that recording is in
progress.
Page 10

Time Stamp Current date/time is displayed in day/month/year,
second/minute/hour format.
SD Card Overwrite
Displays if the SD card is allowed to overwrite files when it is
full.
Channel Indicator
Battery Indicator Indicates the LCD monitor's battery life:
Zoom Indicator When you tap this icon on the screen, the monitor breaks the
Volume Indicator
Talk Back Indicator
Displays the current channel number you are currently viewing.
If viewing multiple cameras at once, the camera indicator will
appear above each video display.
Flashing Red - Low battery
Green - Full battery
Flashing Green - Charging
screen image into 5 areas. Tap the area you want to see
zoomed in. That area displays in 2X size. Tap the icon again to
exit zoom mode.
Indicates the current audio volume. You must be in single
channel viewing mode to change volume. Tap + or - to raise or
lower the volume. will display when the volume is off
(muted).
Displays when the TALK button is pressed. Press and hold the
TALK button on the side of the monitor to talk back through
the camera. Release the TALK button to wait for a reply.
Sequence Indicator
Change Channel
Motion Recording
Indicator
Pop Up Menu Tab
Displays when the monitor is in auto sequence mode; it will
change channels automatically.
Press this icon to manually change channels.
Indicates motion detection status.
Blue - Automatic recording OFF.
Red - Automatic recording ON.
Press to access the pop up menu system.
Page 11

Pop Up Menu Tab:
This pop up menu tab will display settings for playback recorded files, set alarms, change
the brightness and general settings. To enter this menu, press the pop up menu tab as
shown below:
Playback:
You can manage recorded files within this screen. You can see what recorded files you have,
play or delete them.
Press the playback icon which is as shown below:
1.
Days that are highlighted have recorded files. Press the day you want to review and a list
2.
of recordings for that day will be displayed as shown below.
Page 12

Press the recorded file you want and it will start playing, with a bar across the bottom of
3.
the screen for control.
When the file is finished playing, the monitor will display the recorded file list again.
4.
Press the recycle icon to delete the recorded file.
5.
Alarm:
When the motion sensor is triggered, the camera will begin to record. The monitor will sound
with an alarm tone. This screen lets you determine how loud the alarm will be.
Press the alarm icon which is as shown below:
1.
Press + or – to increase or decrease the alarm volume. Press the pop up menu tab to
return to the previous menu.
Page 13

Brightness:
This allows you to set each camera’s brightness level.
Press the brightness icon which is as shown below:
1.
Press + or – to increase or decrease the monitor’s screen brightness. Press the pop
2.
up menu tab to return to the previous menu.
General Settings:
The general settings tab will display camera setup, recording setup, system settings,
motion detection settings, network setup and firmware upgrade which is shown
below:
Please Note: This model does not support network function.
Page 14

Main Screen Sub-Screen Description
This system comes with cameras already paired.
Use Pairing to assign these cameras to different
channels or to pair additional new cameras to the
monitor.
Set the length of time the camera records once
motion sensitivity triggers the camera to record.
The options are 15 seconds (Default), 30 seconds, or
1 minute.
Set up a schedule for pre-determined recording
times and lengths.
Camera Setup
Recording
Setup
Paring
ON/OFF Makes the cameras visible to the monitor.
Resolution Adjusts the video quality of each camera.
Duration
Scheduled
Recording
System Settings
Motion
Detection
Settings
Firmware
Upgrade
File Overwrite
Date & Time
Time Zone
Language
Default Settings Restores the system to default settings.
Format SD Card Reformats the SD card and deletes all existing data.
Information
A single screen lets you set motion detection sensitivity for each
camera.
It also lets you determine which viewing areas for each camera should
be masked from motion detection.
Let’s you select to upgrade your firmware if neccesary (from SD card).
Overwrites the oldest recorded data on the SD card
once the card is full.
•Time Setting: Set the current time (including
daylight savings Time).
•Time Zone: Set the time zone for your system.
•Set the time zone for your system.
•Enable/Disable Daylight Savings Time.
Changes languages setting for the monitor (English,
French or Spanish)
Displays the current firmware information for the
monitor and each camera.
Page 15

Camera Setup:
This allows you to pair existing or additional cameras, turn the cameras on or off and adjust
the resolution as shown below:
Pairing:
Your camera is already pre-paired to the monitor on channel 1. When you add a new camera
to your system, you have to “pair” the camera and monitor to each other so they can
communicate. You can also use pairing to change one camera to a different channel if
required.
Please Note: If the camera is already assigned to the selected channel, pairing on the same
channel will overwrite the current camera with the new one.
Please only pair one camera at a time otherwise the cameras may interfere if multiple is
pairing at once.
Press the pairing button on the camera setup screen.
1.
Select the channel number you want to pair the camera to.
2.
A message will be displayed with instructions to press the pair button on the camera.
3.
Press and release the pair button located at the rear of the camera. A 30-second
countdown will begin.
Please Note: You must press the pair button on the camera during the 30-second
countdown otherwise the camera will not pair with the monitor
The system will display live video 3 seconds after the camera has successfully paired.
4.
Page 16

On/Off:
When you add a camera to your system, pair up the camera with the monitor and the system
will automatically turn it on.
1. Press the switch bar under the camera you want to turn on or off.
2. The switch bar indicator will turn green when the camera is on. It will be greyed out
when the camera is off.
Please Note: Although the camera is turned off, it is still powered on. The monitor will
not receive video signals from that camera.
3. Press the left arrow to return to the previous menu.
Resolution:
You can adjust the resolution between high and a low frame rate for each camera.
Please Note: When you only have 2 cameras paired it will record at 25fps however if you have
4 cameras then it will record and display at 15fps.
1. Press the high or low option to set the frame rate for each camera.
2. Press the left arrow to return to the previous menu.
Page 17

Recording Setup:
This allows you to set the length of time the system will automatically record when the
motion trigger records, schedule a set time for recording for set up file overwrite.
Duration:
You can set how long the camera keeps recording after motion detection is triggered. The
options are 15 seconds (Default), 30 seconds, or 1 minute.
Press which duration you wish to set which is either 15, 30 seconds or 1 minute.
1.
2. Press the left arrow to return to the previous menu.
Scheduled Recording:
This feature lets you set up a block of time for a camera to record on a weekly schedule. You
can set up multiple cameras to record at the same time and the recording times can overlap
between cameras.
Please Note: Total recording time is limited to the space available on the SD card. If you set
the SD card to delete the oldest files when it is full, the system continues recording;
otherwise, recording stops until space is available.
Page 18

1. Press the scheduled recording icon and the overview will display as shown
below:
Press the modify button in the lower right corner to display the schduled recording
2.
setup screen.
Select the camera you wish to setup scheduled recording for, if you want more than one
3.
camera to record at the same time then select multiple cameras.
Set the recording start time.
4.
Press the AM/PM block to toggle between them.
Press the hour and number boxes separately and tap the up and down arrows to
set the time in HH:MM format.
Press the save button, the system will return to the scheduled recording overview
5.
screen with the recording period indicated.
Press the modify button again to set up another recording session to schedule.
6.
Please Note: Scheduled recordings are broken up into 10 minute file sizes. For example,
if you record a 25 minute event, you will have two 10 minute recordings plus one 5
minute recording.
File Overwrite:
This feature lets you set the system to automatically overwrite the oldest files once the SD
card is full. This will allow you to continue recording. If you do not allow overwrite then the
recording will stop once the SD card is full.
Press the file overwrite button to access this function. Press either yes or no to
1.
activate this function.
Page 19

Press the left arrow to return to the previous menu.
2.
System Settings:
You can use these settings to change the date, time, time zone, language, reset to default,
format memory card and information as shown below:
Date & Time:
Press the date & time icon to access the date & time menu.
1.
Press the up or down arrow to set the month, day, and date.
2.
Page 20

3. Press the up or down arrow to set the time.
Press the AM/PM block to toggle between them.
Press the up or down arrows to set the correct hour and minute.
Press the left arrow to return to the previous menu.
4.
Time Zone:
Time Zone allows you to set the time zone your monitor is in. Your system will know that
your request refers to the time zone the monitor is in. The default is GMT + 10 (NSW, ACT); if
you are in a different state in Australia or New Zealand then please change the time zone
accordingly.
Press the time zone button to access the setting as shown below:
1.
Scroll up and down to find your camera’s time zone and then select it.
2.
Press the next option to turn daylight savings time on or off.
3.
Press the left arrow to return to the previous menu.
4.
Language:
Press the language button to set the language on your system. The default is English
however you have the option to also set to Spanish or French.
Page 21

1. Select the language you want your system to use.
2. Press the left arrow to return to the previous menu and will automatically change
over to the selected language.
Please Note: Restart is not neccsesary once you change the language.
Default Reset Settings:
Press the default settings button to reset to original factory default settings.
1.
Select yes to restore to original factory default settings.
2.
Press ok to confirm resetting the unit.
3.
Format SD Card:
Formatting the SD card erases all the data stored on the card. (Default is set to No)
Press the button to reformat your SD card.
1.
Press yes to format your SD card.
2.
Please Note: All your existing files will be deleted if you select yes.
Press yes to confirm that you want to format the SD card.
3.
Page 22

A progress bar will be displayed on the screen. After formatting is complete format ok
4.
message will display.
Information:
This screen lists the firmware information of the monitor and all cameras paired to it.
Press the information button to display this screen.
1.
Press the left arrow to return to the previous menu.
2.
Motion Detection:
You are able to control how sensitive the motion detection is triggered and mask off any
areas for the camera to ignore. For example, you may have trees located in your image that
would set off the motion detection if there is wind so you are able to block them out.
Page 23

Sensitivity:
This option allows you to set the camera’s motion detection sensitivity levels to high, low, or
off.
Press the sensitivity button to access the following menu:
1.
Press high, low, or off to set sensitivity.
2.
3. Press the left arrow to return to the previous menu.
Mask Area:
Use this option to mask off any parts of the viewing area you don’t want to be included for
motion detection.
Press the mask area button to display which blocks you would like superimposed
1.
over the image.
Select the squares that cover the areas of the image you do not want affected by motion
2.
detection.
When you are finished, press the left arrow to return to the previous menu.
3.
Page 24

Upgrade From SD Card:
Press the upgrade from SD card button to upgrade the firmware.
1.
To upgrade the firmware through the SD card, select yes on the confirmation screen.
2.
A progress screen will be displayed.
3.
When the update is complete, the monitor displays Firmware Upgrade Successful and
4.
automatically reboots.
Please Note: It is not required to update the firmware from default unless deemed
necessary.
Page 25

Recording Live Video (Monitor):
On the live viewing screen, press the red viewing icon for the camera to begin
1.
recording.
The icon will blink and turn blue while recording.
2.
Press it again to stop recording. The icon stops blinking and will turn red.
3.
Please Note: You can record from all cameras at the same time.
Play Back Recorded Video:
There are two ways to access recorded video files. You can either tap the SD card icon
on the live screen or you can tap the playback pop up menu. Either way, the
following screen displays:
Select the highlighted day containing the recording you want to view or on a specific
1.
camera to only view that camera’s recordings. The recording file list screen displays
those recordings.
Please Note: If you select on a day that is not highlighted, there will be no action taken
at all.
Press the recording you want to view and it will begin playing. The control icons will be
2.
displayed across the bottom of the screen.
Page 26

3. Select any area of the screen that does not have control icons to bring up the playback
progress bar. Press any area again to close it. While playback progress is visible, you can
fast forward/ rewind by dragging the playback bar forwards or backwards.
Please Note: On the playback progress bar, tap the double arrow to skip forward or
backwards about 10 seconds. Press the arrow and bar to skip to the next or previous
video.
When the playback ends, press the left arrow to return to the previous menu.
4.
Live View Functions:
Please see the list of basic functions listed below:
Live View Functions: Action
1. Press the blue icon on the monitor screen.
Manually Start/Stop Recording
Video
Set Up automatic Recording
Schedule
Delete Recording schedule
Watch Recorded video
Delete Recorded Videos
The icon turns red and flashes, indicating that
recording has started.
2. Press the icon again to stop recording, the icon will
then turn blue.
1.From the general settings/recording setup,
press the icon.
2. The scheduled recording Overview screen will
display
3. Press modify to view the recording setup screen.
1. From General Settings/Recording Setup, Press the
icon.
The scheduled recording overview screen will display.
2. Select the day you want to modify and press modify
to view the recording schedule for that day.
3. Select the camera(s) whose schedule you want to
delete. Enter the schedule (or part of a schedule) you
want to delete and press delete.
1. From the main screen, press the pop out menu tab
and then press the icon , the recording file list
displays the recorded files.
2. Press the day you want to view, and then tap the file.
3. The video will begin playing
1. From the Recorded File List, press the icon.
2. Press yes to confirm deletion.
Change Channels
1. Press the icon.
2. The next channel will displays
Page 27

Troubleshooting:
If… Try…
·Make sure the camera is connected to power.
The camera's signal status icon
shows no bars
·Make sure that the camera's antenna is attached and
the monitor's antenna is extended.
·Make sure the camera is paired to the correct channel.
·Re-pair the camera and monitor.
The camera won't pair with the
monitor
·Make sure the camera is connected to power.
·Press and release the pairing button quickly. Do not
press and hold the pairing button.
Safety Instructions:
Do not open the monitor or camera for any reason.
Do not expose the camera outdoors, it is a weatherproof camera however it is
recommended to be placed undercover otherwise it may damage the camera.
Avoid pointing the camera in direct sunlight.
Specifications:
Monitor:
LCD: 7” Touch Screen
Frequency: 2.4GHz Digital
Wireless Range: Up to 100m
Resolution: 800 x 480 (VGA)
Video Compression: MPEG-4
Recording Format: ASF
Storage: Up to 128GB SD
Battery: 3.7V, 2000mAh Li-Ion
Battery Time: Up to 2.5hrs
Power: 5VDC, 2A
Dimensions: 196(L) x 123(H) x 20(D)mm
Camera:
Image Sensor: ¼” Colour CMOS
Resolution: 640 x 480 (VGA)
Frame Rate: 25fps (Up to 2 x Cameras)
15fps (Up to 4 x Cameras)
Lens: 3.6mm
Viewing Angle: 66°
Page 28

Night Vision: 24 x IR LEDs
IP Rating: IP65
Power: 9VDC, 600mA
Dimensions: 191(L) x 69(Dia)mm
Recording
Time:
SD Card
Capacity:
QVGA (15fps) VGA (25fps)
Min Max Min Max
1G 2.8 Hrs 10.7 Hrs 2.6 Hrs 10.5 Hrs
2GB 5.6 Hrs 21.4 Hrs 5.2 Hrs 21 Hrs
4GB 11.3 Hrs 42.8 Hrs 10.3 Hrs 42 Hrs
8GB 22.6 Hrs 85.6 Hrs 20.7 Hrs 83.9 Hrs
16GB 45.2 Hrs 171.3 Hrs 41.4 Hrs 167.8 Hrs
32GB 90.3 Hrs 342.6 Hrs 82.8 Hrs 335.6 Hrs
64GB 180.6 Hrs 685.1 Hrs 165.6 Hrs 671.2 Hrs
128GB 361.2 Hrs 1370.2 Hrs 331.2 Hrs 1342.4 Hrs
File Size:
QVGA (15fps) VGA (25fps)
Time: Min Max Min Max
1 Min 1.45Mb 5.5Mb 1.48Mb 6Mb
10 Mins 14.5Mb 55Mb 14.8Mb 60Mb
30 Mins 43.4Mb 165Mb 44.4Mb 180Mb
60 Mins 86.8Mb 330Mb 88.8Mb 360Mb
Distributed by:
TechBrands by Electus Distribution Pty. Ltd.
320 Victoria Rd, Rydalmere
NSW 2116 Australia
Ph: 1300 738 555
Int’l: +61 2 8832 3200
Fax: 1300 738 500
www.techbrands.com
 Loading...