

Page 1
VIEW
R'8 MAN
Page 2
TableofCOntents
ImportantSafetyInfomtation..........................................................................................................................2
Ove_iew Of YourNew PDP............................................................................................................................7
Co_ But_l ..............................................................................................................................................7
ControlButtonKeyFunction.......................................................................................................................7
ConnectthgTo ExternalEquipment...........................................................................................................8
RS-232CConfiguralJons.............................................................................................................................9
Accessories.......................................................................................................................................................11
FeaturesOf TheRemoteControl....................................................................................................................12
LoadingTheBatteries.................................................................................................................................13
ReceptionRangeOfRemoteControl........................................................................................................13
MonitorInstallation...........................................................................................................................................14
WallMount(optional)Installation................................................................................................................14
TableStand(optional)Installa_on..............................................................................................................15
SpeakerInstallation.....................................................................................................................................17
OptionalExtras..................................................................................................................................................21
Watching"rv.......................................................................................................................................................22
TowatchTV (Whenthe Interfaceboardisinstalled)................................................................................22
WatchingVCR....................................................................................................................................................23
TowatchVCR (Whenthe Interfaceboardisinstalled).............................................................................23
WatchingDVD(Intedace)..................................................................................................................................24
Howtoconnect(WhentheInterfaceboardisinstalled)............................................................................24
Howto use(Whenthe Interfaceboardisinstalled)...................................................................................24
Watching DVD(Progressive)...........................................................................................................................25
ConnectingThe PC........................................................................;..................................................................26
CompatibleDisplayMonitorSpecification...................................................................................................27
OSDStructure....................................................................................................................................................28
Picture('rv&VIDEO)..........................................................................................................................................29
Picture(PC)........................................................................................................................................................31
Sound('rV&VlDEO+PC)...................................................................................................................................33
MISC(TV&VlDEO+PC)......................................................................................................................................34
Tim e ..................................................................................................................................................................... 35
TVSET-UP..........................................................................................................................................................36
PIP(PC)...............................................................................................................................................................37
HotKeyFunctionBy RemoteControl...........................................................................................................38
Specification......................................................................................................................................................41
Troubleshooting................................................................................................................................................43
UnitedStatesRetailWarrantyCard...............................................................................................................44
................................................................................................................................................................................................................................................ 3
OWNER'SMANUAL _ 1
Page 3
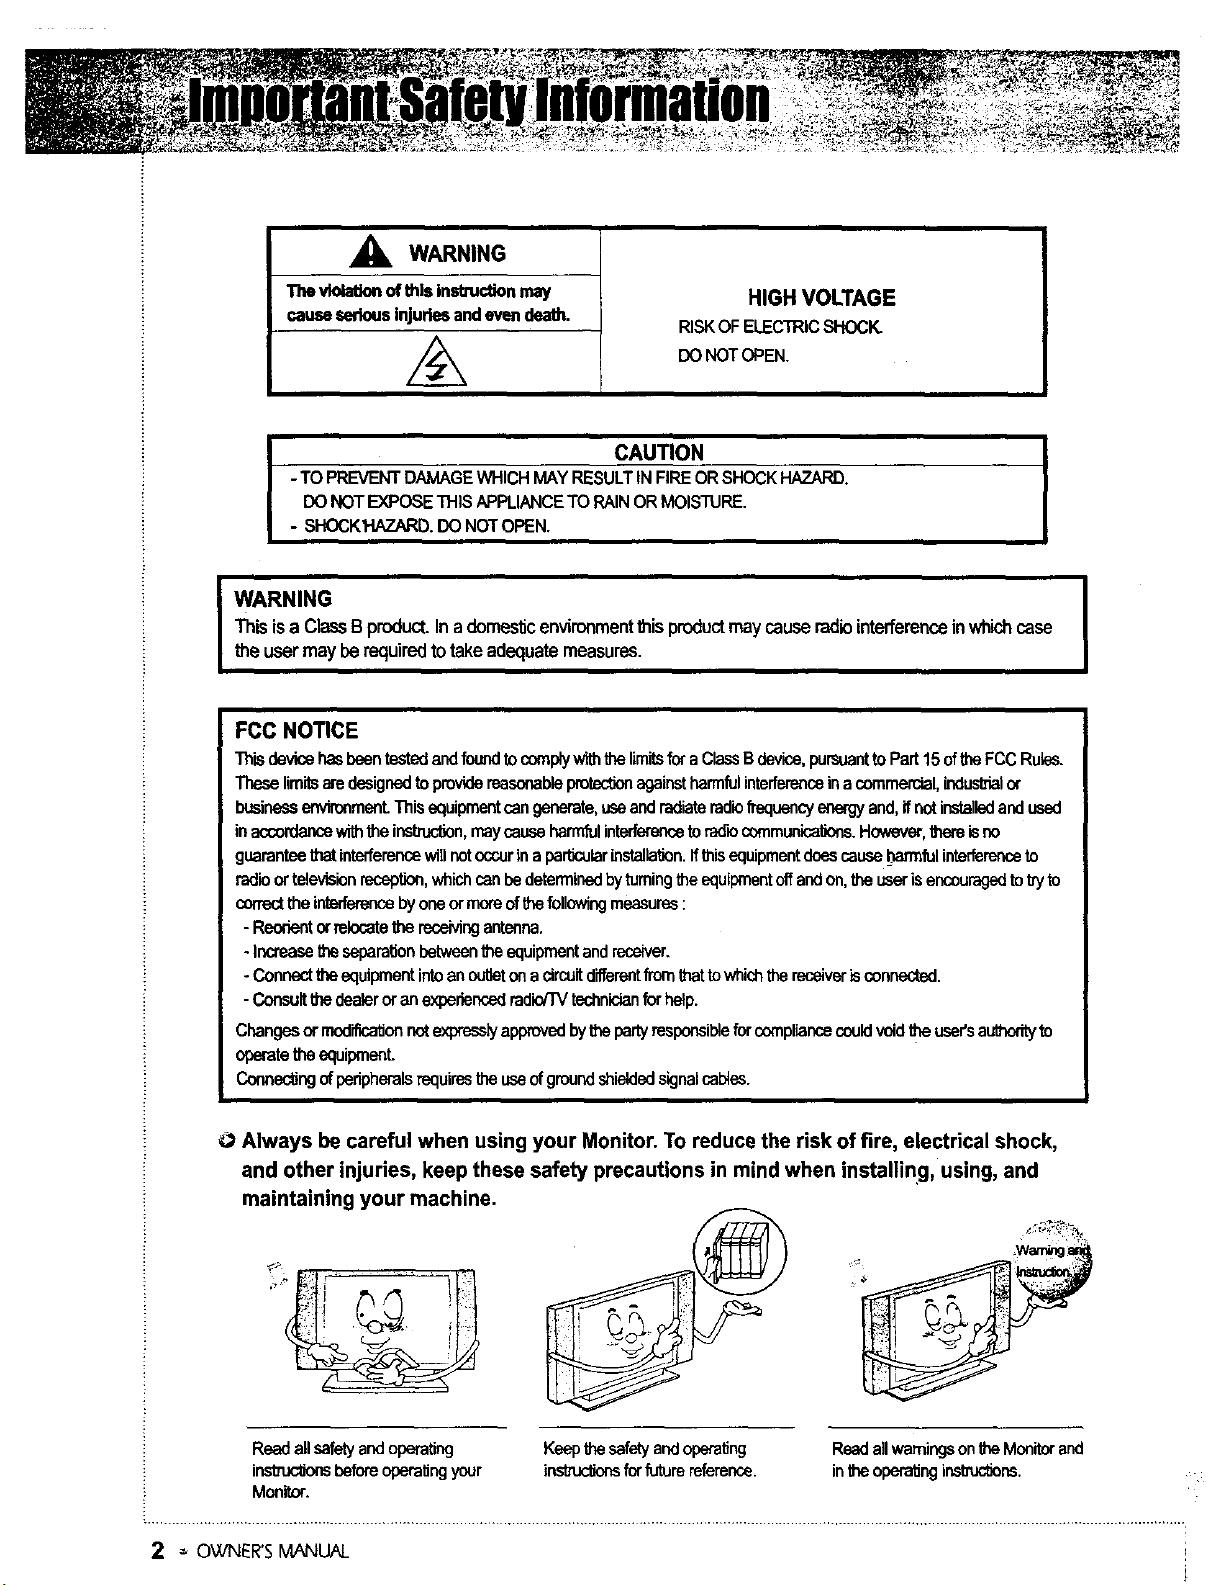
_k, WARNING
The violationof this ins'o'uctionmay
causeserious injuriesandevendeath.
RISKOF ELECTRICSHOCK.
DO NOTOPEN.
HIGH VOLTAGE
- TOPREVENTDAMAGEWHICHMAYRESULTINFIREORSHOCKHAZARD.
DONOTEt_3_:_3,SETHISAPPLIANCETORAINORMOISTURE,
I CAUTION
- SHOCKHAZARD.DONOTOPEN.
Thisisa ClassBproduct. Ina domesticenvironmentthisproductmaycauseradiointerferenceinwhichcase
I ARNING
theusermayberequiredtotakeadequatemeasures.
FCC NOTICE
Thiadevioe hasbeentested andfound tocomplywith the lirfft,s for a ClassB devioe,pursua_ _ P_ 15 of_ FCCRu_.
limitsare designedto providereasonableprotectionagainstharmfulinterferenceina commercial,industrial(x
businessenvironment.This equipmentcangenerate,use andradiateradiofrequencyenergyand,ifnotinstalledandused
in accordancewiththe instruction,maycauseharmfulinterferenceto radtocomrnonioa_ons.However,there isno
guaranteethatinte_erence vAllnotoccur in a particularinstallalJon,ifthisequipmentdoescause harmfulintederenceto
radioortelevisionreception,whichcan bedeterminedbyturning theequipmentoffand on,the useris encouragedto_ to
correctthe interferenceby one or more ofthefolk_ing measures:
-Reorientor rekx:ate_hereceivingantenna.
-Increasethe separalJonbetweenthe equipmentand_r.
-Connect theequipment intoan outleton acircuitdifferentfrom thatto whichthe receiverisconnected.
-Consultthedealeroranexperiencedradio/TVtechnicianforhelp.
Changesormodificationnotexpresslyapprovedbythepartyresponsibleforcompliancecouldvoidtheusersaufi'x:_ to
operatethe equipmenL
Connectingof peripheralsrequirestheuseof groundshieldedsignalsal_es.
0
Always be careful when using your Monitor. To reduce the risk of fire, electrical shock,
and other injuries, keep these safety precautions in mind when installing, using, and
maintaining your machine,
Readallsafetyandoperating
i_ beforeoperaUngyour
Monitor.
2 o OWNER'SMANUAL
Keepthesafetyandoperating
inslnJc_or_forfuturereference.
ReadallwarningsontheMonitorand
intheopera_ngi_ns.
Page 4
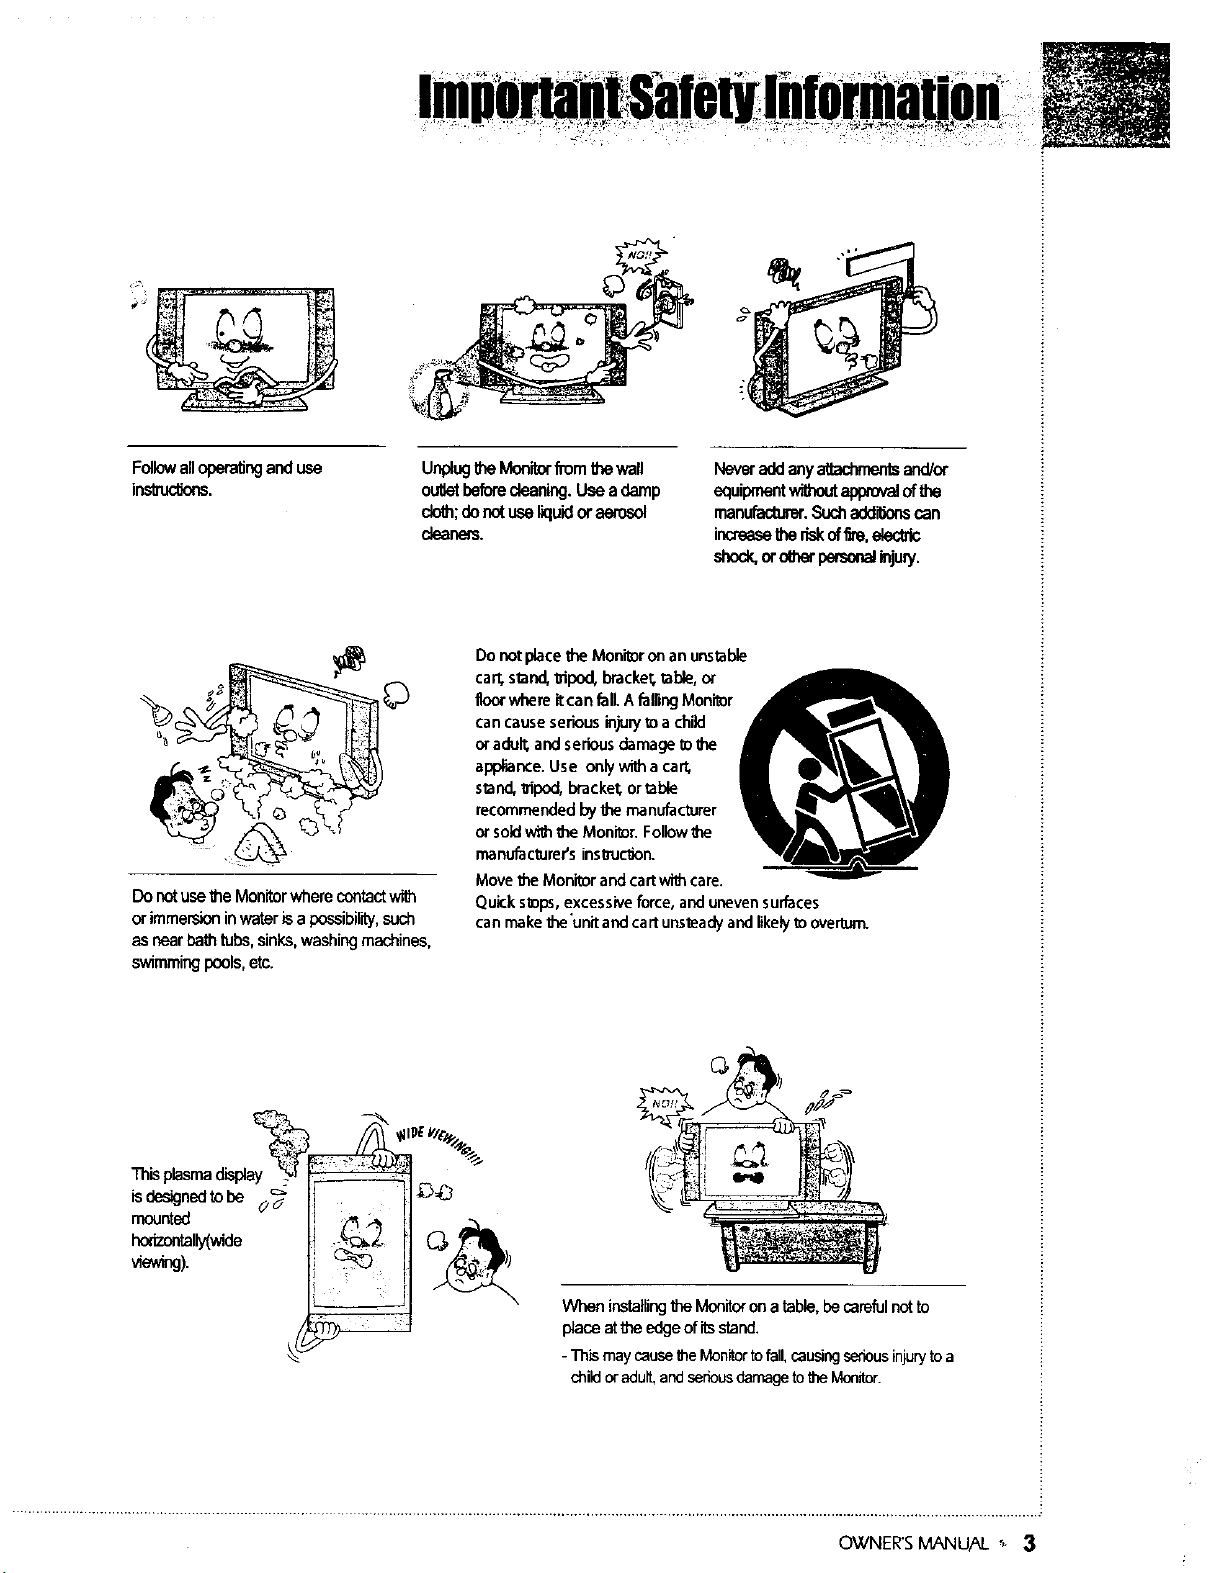
Followalloperatinganduse
ins'e'uctJor_.
©
DonotusetheMonitorwherecontactwith
orimmersioninwateris a possibility,such
as nearbathtubs,sinks,washingmachines,
swimmingpools,etc.
UnplugtheMonitorfrom tt,,ewag
ougetbeforecleardng.Usea damp
cloth;do notuse_uid orae{osol
cleaners.
Neveraddanyattachmentsand/or
equipmentwithoutappmv_ofthe
manufacturer.Suchadditionscan
increasethedskoffire,etectdc
st,,o_oroe_"person_mju_.
Do not place file Moni_r on an unstable
cart, stand, _ipod, bracket, table, or
floor where itcan falLA falling Monitor
can cause serious injuly _) a child
or adult, and serious damage _othe
appliance. Use only witha cart,
stand, _ipod, bracket, or table
recommended by the manufacturer
or so]d wi_ the Monitor. Follow the
manufacturer's instJuctJon.
Move _e Monitor and cart witfi care.
Quick s_ops,excessive force, and uneven surfaces
can make the'unit and ca rtunsteady and likely_ overturn.
Thisplasmad_
is d_ign_i to be 0_"
mounted
hodzon_l_de
viewing).
%
installing_ Monitorona table,becarefulnotto
plaoeat_ edgeof itsstand.
- ThismaycausetheMonitortofall,causingseneusinjurytoa
childoradult,andseriousdamageto theMonitor.
OVCNER'S MANUAL _,- 3
Page 5
ACI0_-I_V AC_00-240V llP-._.40{_ TYP'E)
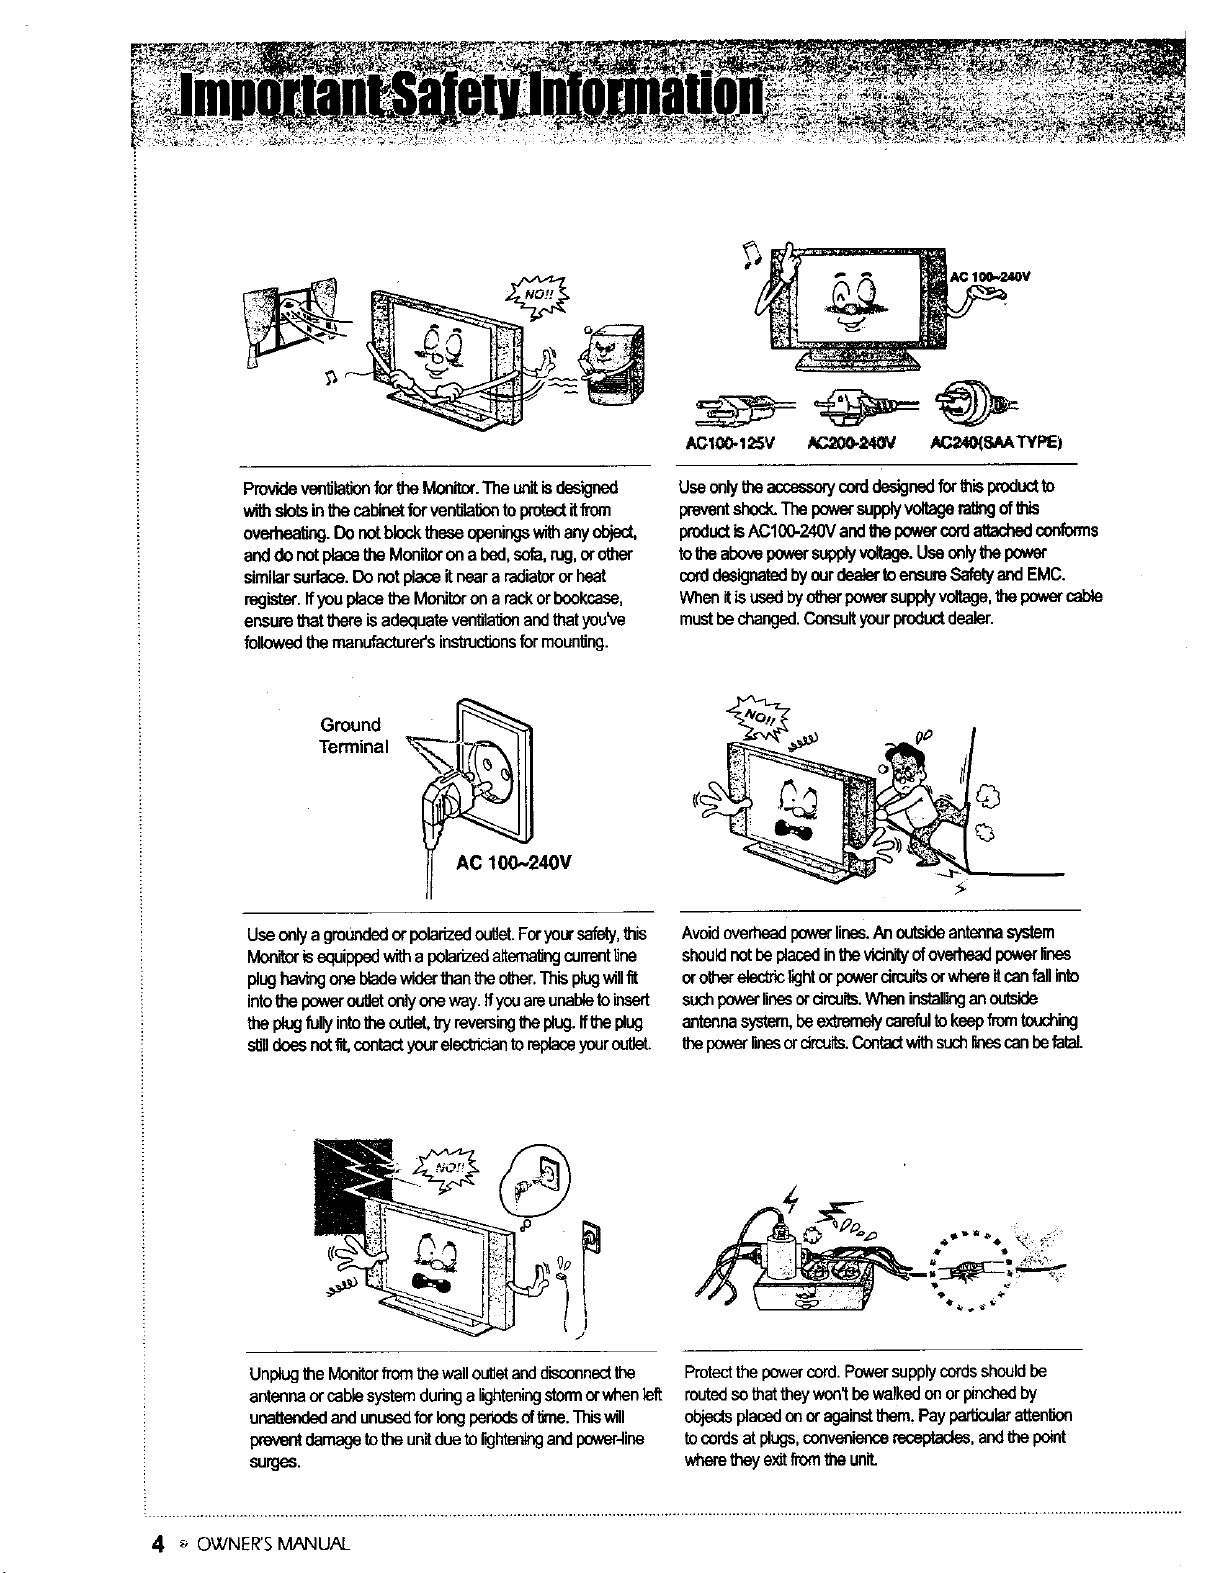
ProvidevenUlationfor the Monitor.The unitisdesigned
wi_ slotsinthecabinetfor ventilationtoprotectitfrom
ovsd_sa_g. Do notblock theseopeningswithanyobject,
anddo notplacotheMonitoron a bed,sofa,rug,orother
similarsurface.Donotplaceitneara radiatororheat
register,if youplacethe Monitoron a rackorbookcase,
ensurettlat8"_oreisadequateventilationandthatyou've
followedthemanufacturer'sinstnJctJonsformoun_ng.
Terminal
Ground __
AC 100,,,240V
Useonlyagroundedor polarizedo_at. Foryoursafety,this
Monitorisequippedwitha polarizedalternatingcun'entijne
plug hav%ngonebladewidor61anthe othor.Thisplugwillfit
intothepoworoutletonlyoneway.ifyouareunsbletoinsort
the plugfullyinfotheou_ ky revemingtheplug.Ifthe plug
s_lldoesnat_, conta_ yourelectridanto _ yourou_L
Useonlytheaccesson/corddesignsdfor_ispreductto
preventshock.Thepowersupplyvoltagera_ ofthis
FoductisAC100-240VandthepowercordattachedcoNorms
totheabovepowerstJPplyvoltage.Useonlythepower
co_'ddesignatedbyourdealertoensureSafetyandEMC.
Whenit isusedbyatherpowersupplyvoltage,thei:x_,orcable
mustbechanged. Consultyourproductdealer.
Avoidoverheadpowerlines.An outsideantennasystem
shouldnotbe placedinthevidnityofoverheadpoweHinss
or otherelectric_ht or powercircuitsorwhereitcanfall into
suchpowerlinesor drcuits.Wheninstaflinganoutside
antennasystem,beex_nely carefulto keepfromfouching
thepowerrtnesordrcoits.Contactwithsuchr_nescanbefatal
Unplugthe Monitorfromtf',ewallo_et andd=sconnectthe
antennaor cablesystemduringa lighteningstormorwhen left
unattendedandunusedfor longbenodsoftime.Thiswill
ix'everf{damagetotheunitduetor,:j andpower-line
surges.
4 _ OWNER'S MANUAL
Protectthepower cord.Powersupplycordsshouldbe
routedso thattheywon_bewalkedon or pinchedby
objectsplacedonor againstthem. Payparticularattenf_on
tocordsatplugs,conveniencereceptacles,andthe point
whereif_eyexitfromthe unit.
Page 6
_, _ _ _:i_ _ •
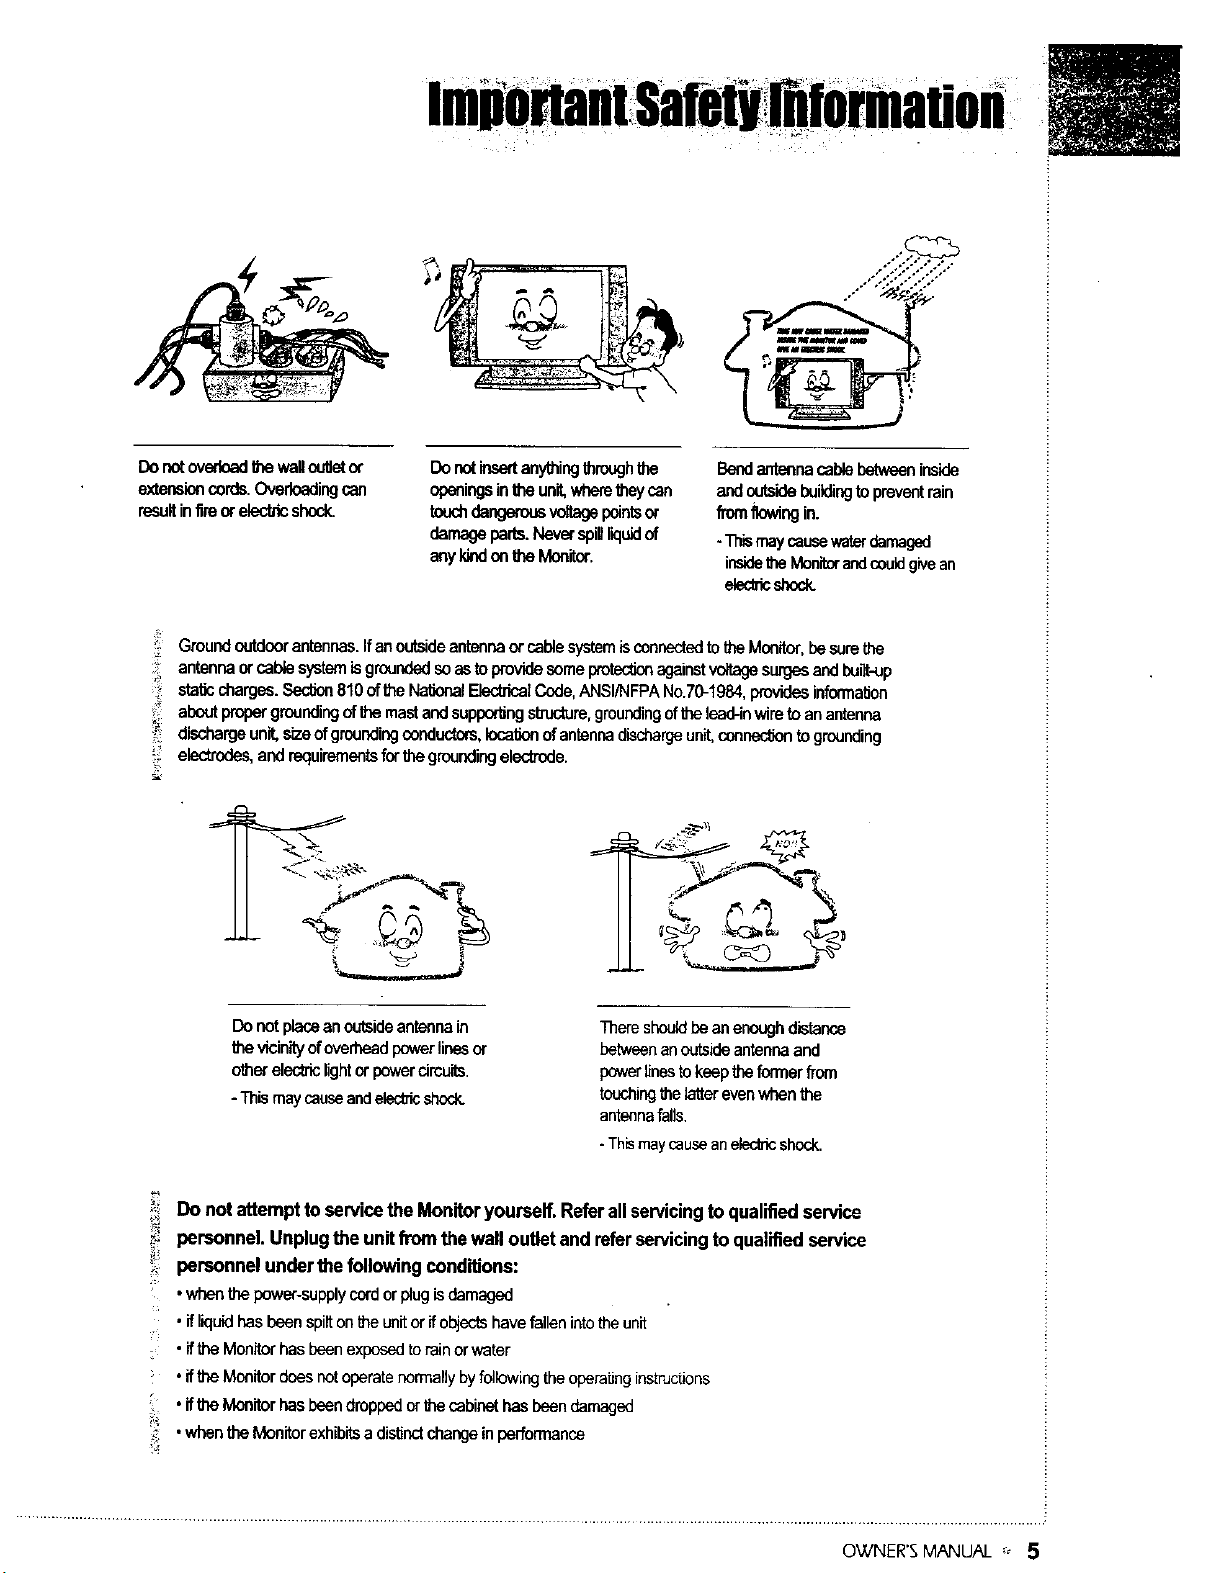
Do notoverte,_dI_lewalioutl_ _
extensioncordsOverloadingcan
resultinfire orelectdcshock
GroundoutdoorantennasIf anoutsideantennaorcablesystemisconnectedtotheMonitor,besorethe
÷
antennaorcablesystemisgroundedsoasto providesomeprotectionagainstvoltagesurgesand_-up
staticcharges_ 810 of tile NationalElectricalCode,ANSI/NFPANo 70 1984,providesinforrnallon
: aboutpropergroundingof the mastandsuppertingsttuctere,groundingoftheInad-inwirato anantenna
dischargeunit sizeof groundingoenductem,locationofantennadischargeunit,con_ to grounding
electrodes,and requirementsforthegroundingelectrode
Donotinsertanythingthroughthe
openingsinthe unit,wheretheycan
teuchdangerousvoitagepointsor
damageparts.Neverspillliquidof
anykindonthe Moniter
Bendantennacablebetweeninside
andoutsidebuik:lingto preventrain
from ltewingin
. Thismaycaueewaterdamaged
insidetheMonitorandcouklgivean
_ shock
I!
Donotplaceanoutsideantennain
thevicinityof overheadpowerlinesor
o_or electriclightor powercircuits
Thismaycauseandelesbicshock.
Thereshouldbean enoughdistance
betweenanoutsideantennaand
powerlinestokeeptheformerfrom
touching_e latterevenwhenthe
antennafalls.
-Thismaycauseanelecbicshock.
Do not attempt to service the Monitor yourself. Refer all servicing to qualified service
personnel. Unplug the unit from the wall outlet and refer servicing to qualified service
personnel under the following conditions:
•whenthepewer-supplycordorpingisdamaged
• if liquidhas been spillonth,e unitor ifobjectshavefallen intothe unit
• iftha Monitorhas beenexposedto rainor water
•if the Monitor does notoperatenormallyby folldwingthe operatinginstructions
•if the Monitor has beendropped orthe cabinethas beendamaged
•when the Monitor exhibitsa distinctchangein performance
OWNER'S MANUAL ', 5
Page 7
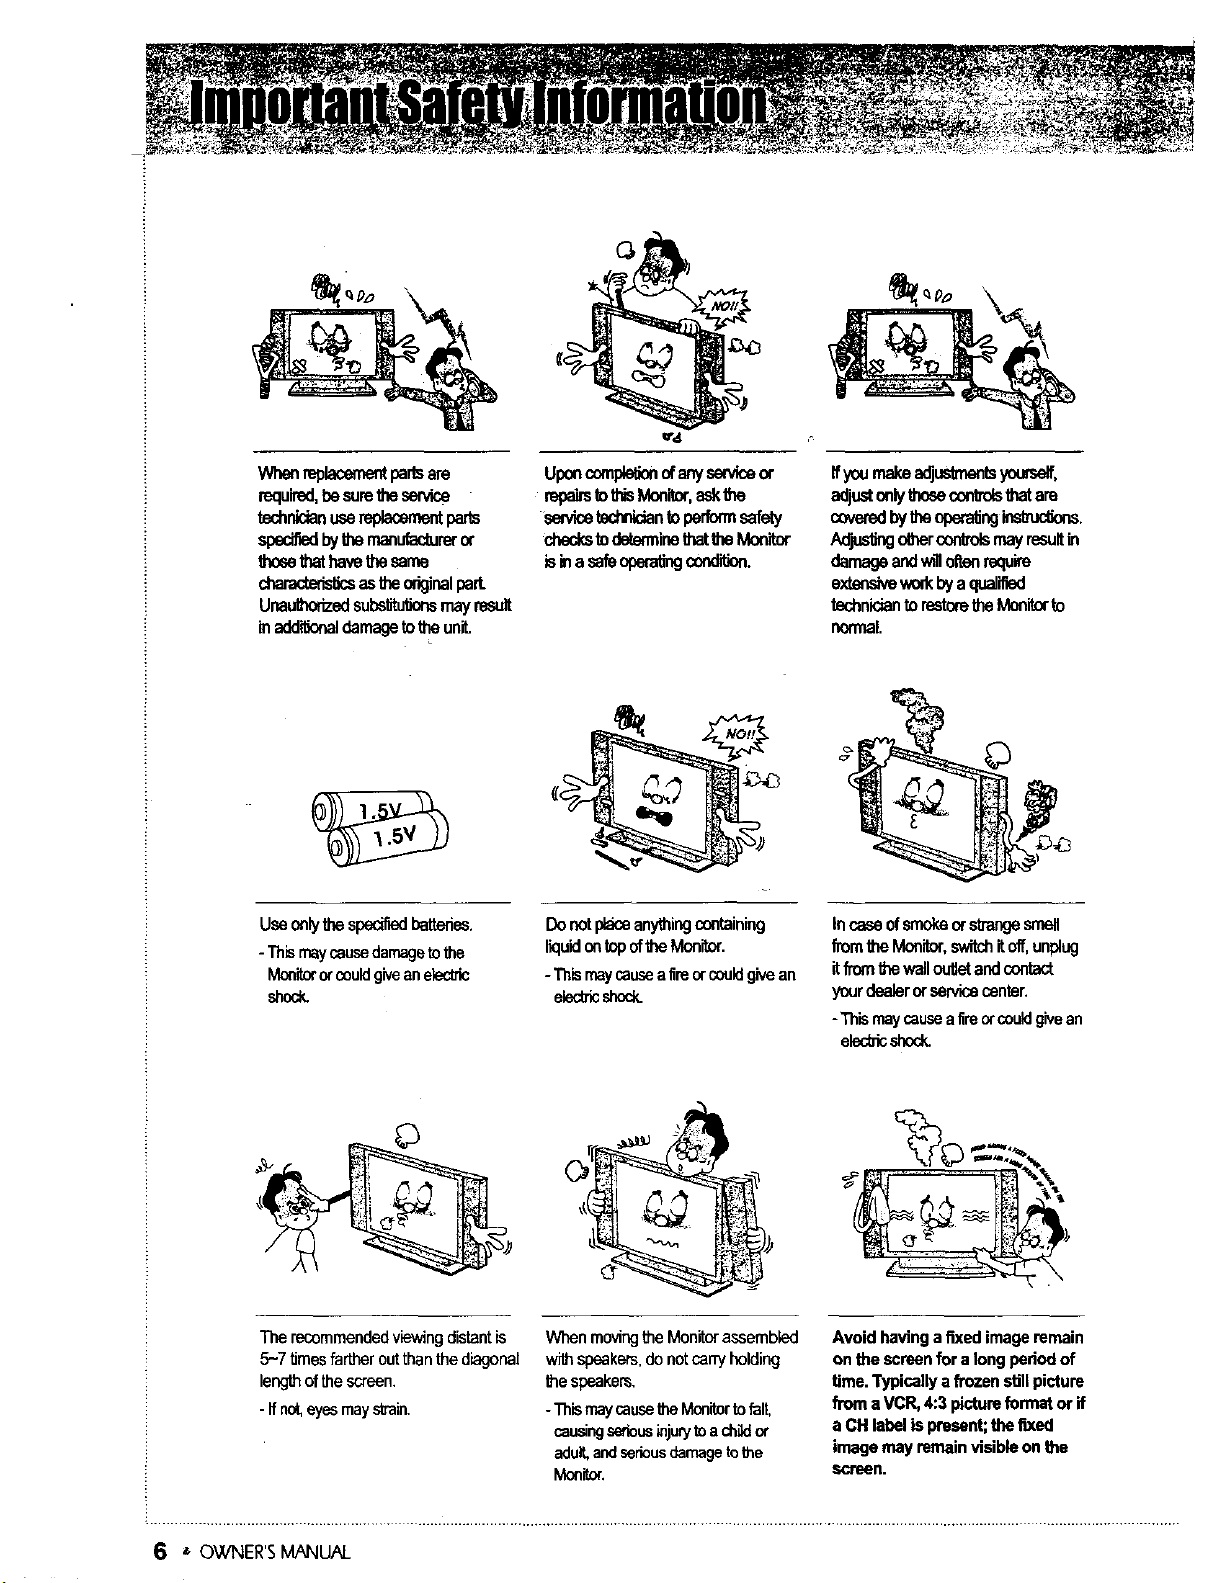
Whenreplacementpartsare
required,besumtheservice
technidanusereplacementparts
specifiedbythernanufactureror
thosethathavethesame
_ astheor_nalpart.
Unau_ed subsbtu_onsmayresult
inaddit_naldamagetotheunit.
Uponcomple_onofeJ'_yse_ceor
mpa_b U'JsMonr_,askthe
semitelachnlclantoperformsefe_y
checkstodelarmbe_'_attheMonitor
isinasafeoperatingcondition.
_fyoumake_usVnentsyo_s_f,
aCjustonlythoseconsolsthatam
coveredbytheopera,rig_fzucUons.
Adjusl_ othercontrolsmayresultin
G_e ar_w__tenn_re
extensivewod_bya quaJifled
technidanto restoretheMonitorto
normal
Useonly_,,especifiedbatteries.
-Tn_smaycausedamagetothe
Monitororcouldgiveanelectric
shoc_
"i'herecommendedviewingdistantis
5-7 timesfarther outthanthe dragonal
lengthofthe screen.
- if not,eyesmays_ain,
Donotplaceanythingcontaining
I_luidontopof_e Monitor.
-Thisrnaycausea timorcouldgivean
electricshock.
WhenmovingtheMonitorassembled
with speakers,do notcam] holding
the speakers,
-"l_ismaycausefi'_eMonitortofair,
causingsedousinjur_toa chador
adult,andseriousdamagetot_e
Monitor.
IncaseofsmokeorstTangesmell
fromtheMonitor,switchitoff,unplug
itfroml_ewallcutletandcontact
yourdealerorservicecenter.
-Thismaycausea tim_ couldgivean
elecb_shod_
Avoid havinga fixedimageremain
onthe screenfor a longperiodof
time.Typicallya frozen_11picture
front aVCR,4:3 pictureformat or if
a CHlabel is present;thefixed
imagemay remainvisible on the
_¢R=en.
6 • OWNER'SMANUAL
Page 8
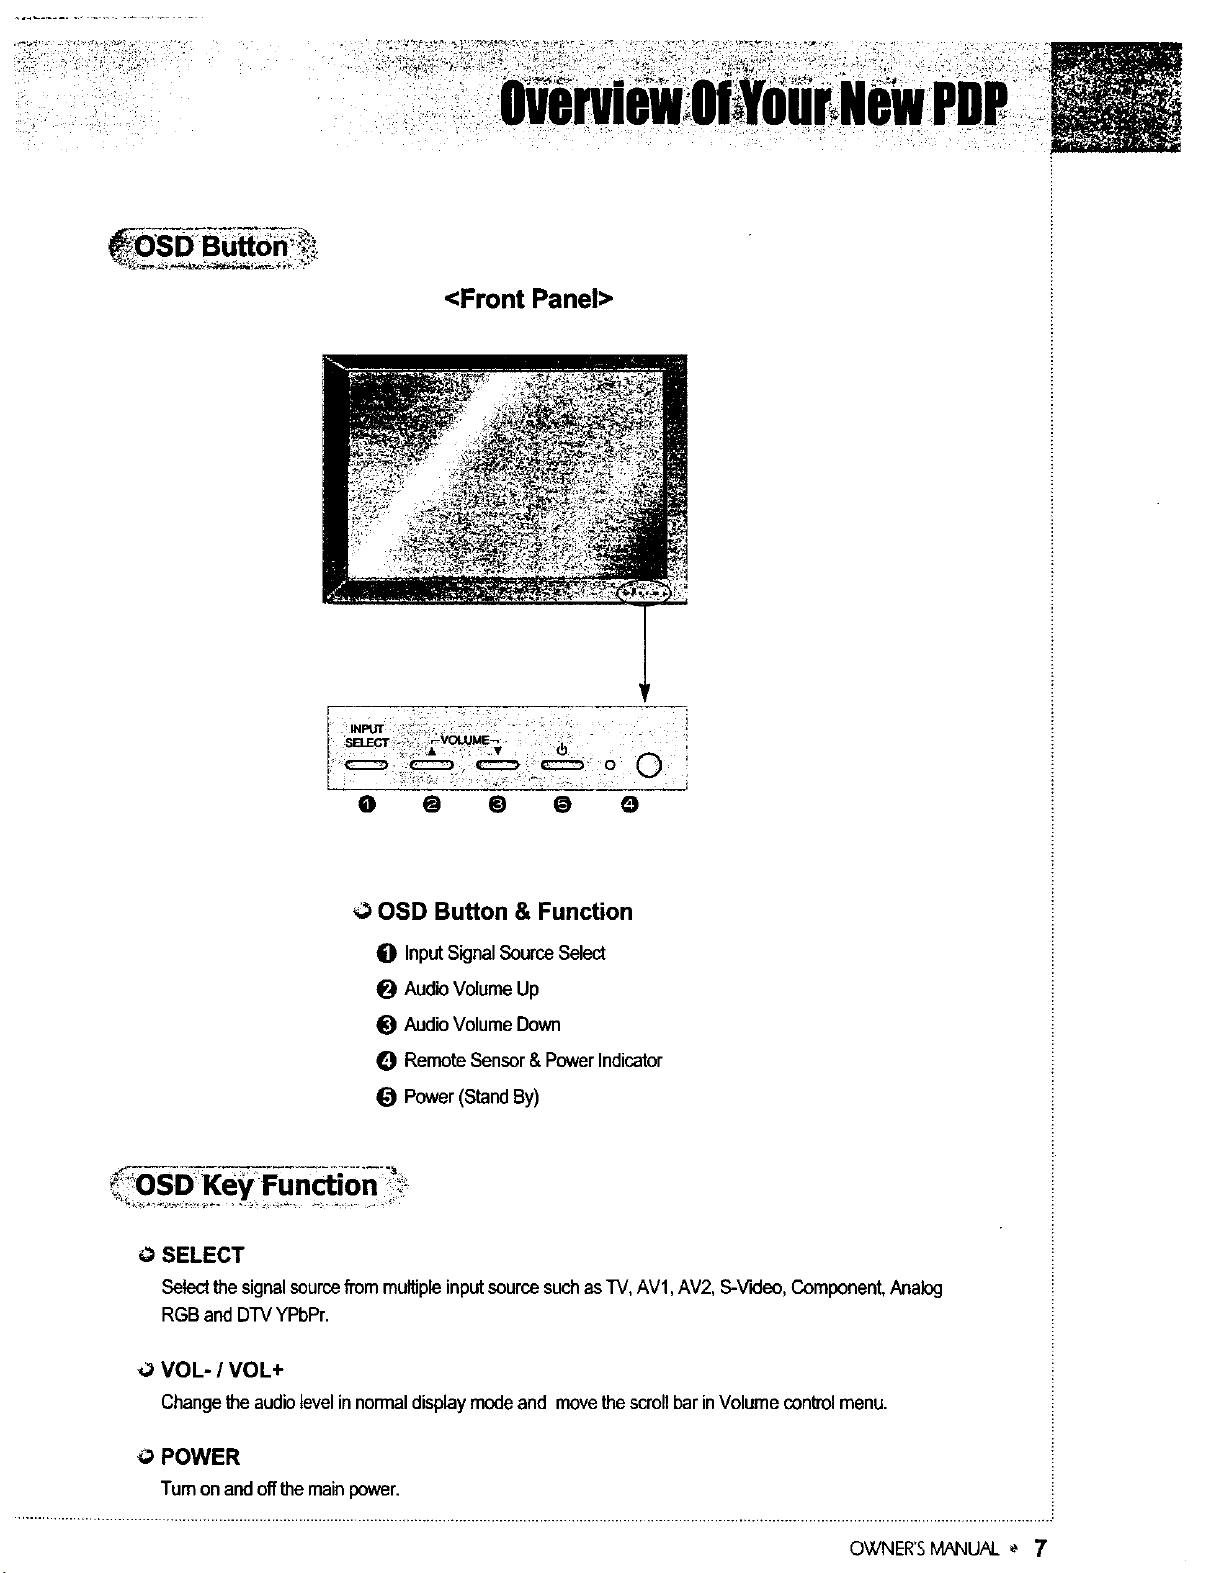
<Front Panel>
0 @ @ @ 0
00SD Button & Function
O InputSignalSourceSelect
O Audio VolumeUp
_l Audio VolumeDown
0 Remote Sensor&PowerIndicator
O Power(StandBy)
0 SELECT
Selectthesignalsourcefrom multipleinputsourcesuchasTV, AV1,AV2, S-V'_eo,Component,Analog
RGBand DTVYPbPr.
,O MOL- / MOL+
Changethe audiolevel innormaldisplaymodeand movethescrollbar inVolume controlmenu.
O POWER
Turnonand off themainpower.
OWNER'SMANUALe 7
Page 9

Back panel of the Monitor
/
0 RS-232C INPUT CONTROL TERMINAL
Controlthemonitor'sfunctionsextemallybyexternalequipment.ConnectstothecomputerRS-232Coutput
terminal.-
/
',_ DVI INPUT(Optional)
ConnectDVIComputer Source(DigitalSignal)here.Contactyourdealerforbuyingoptionalitem.
O AUDIO INPUT TERMINAL
Connecttotheaudiooutputterminalof a VCR, DVDorsimilarsourceofdevice,
8 _ OWNER'SMANUAL
Page 10
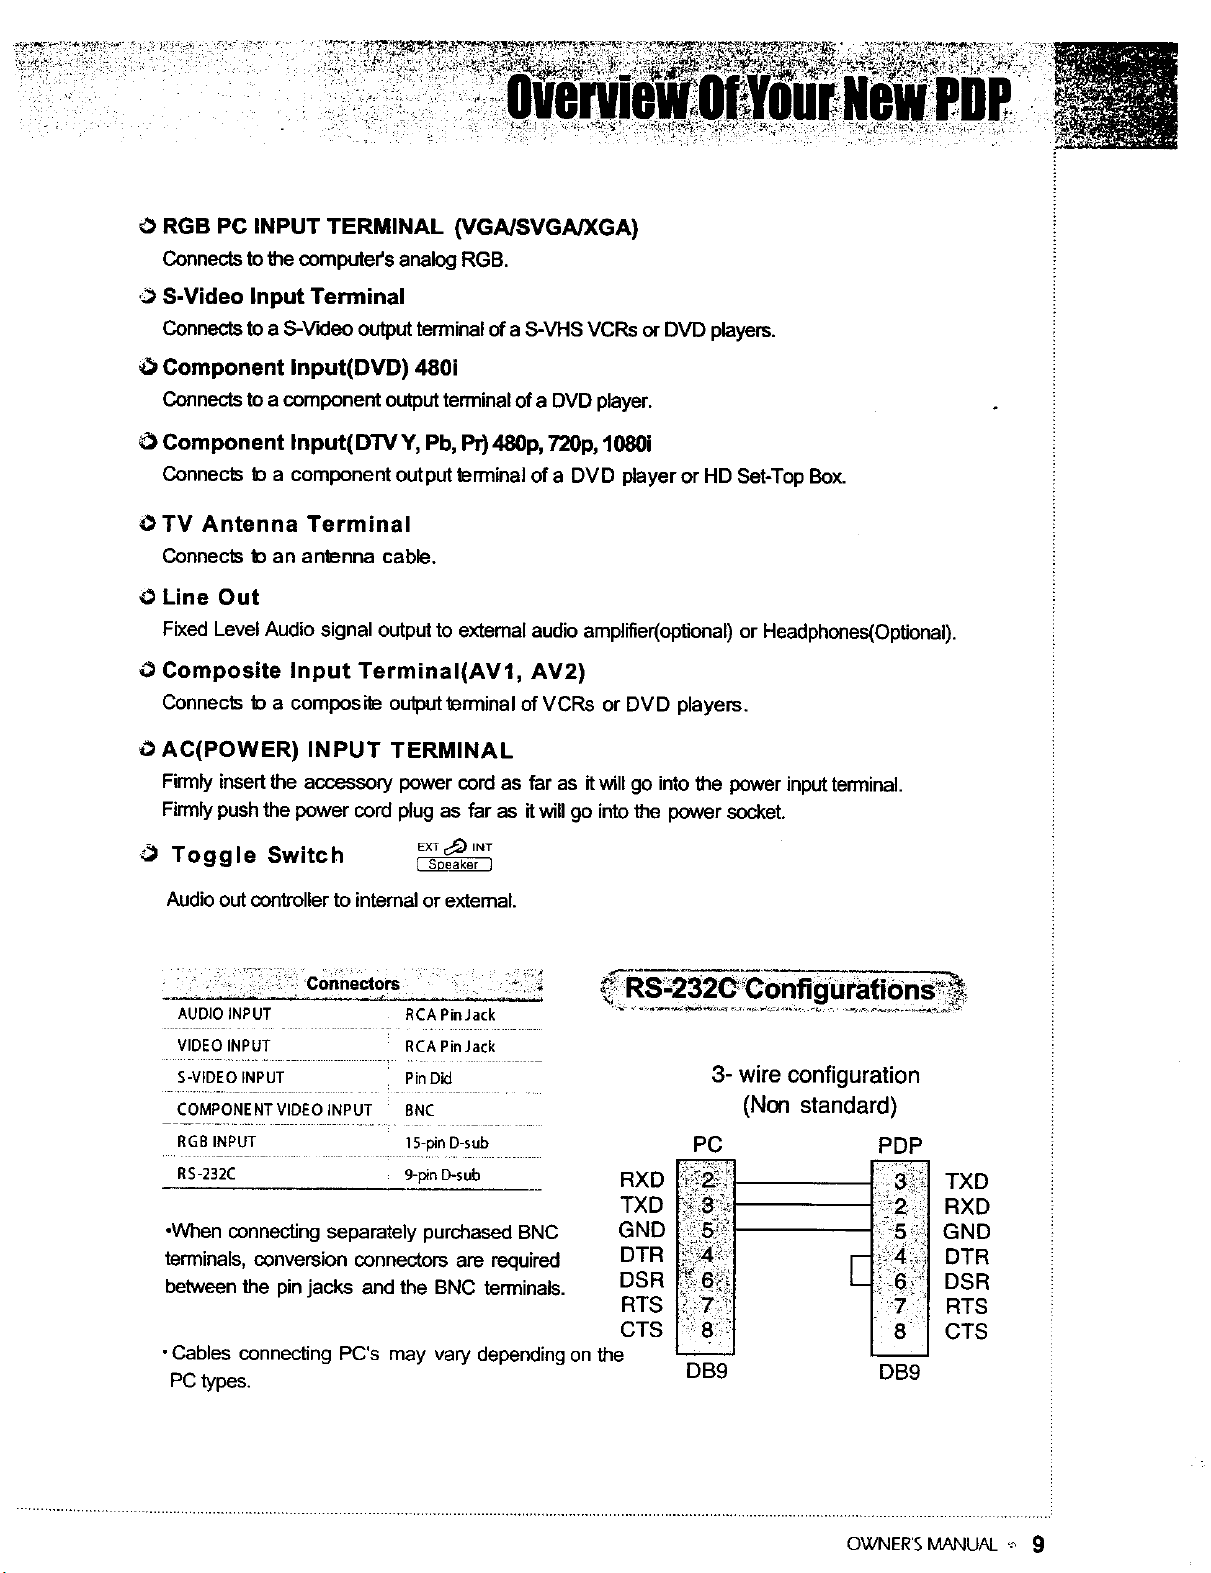
O RGB PC INPUT TERMINAL (VGA/SVGA/XGA)
Connectstothe computer's analog RGB.
.3>S-Video Input Terminal
Connectstoa S-V_leo output terminalofa S-VHS VCRs or DVD players.
O Component Input(DVD) 480i
Connectstoa component outputterminalofa DVD player.
O Component Input(DTV Y, Pb, Pr)480p, 720p, 1080i
Connects to a component output terminal of a DVD player or HD Set-Top Box.
OTV Antenna Terminal
Connects to an antenna cable.
Line Out
Fixed Level Audio signal outputto external audio amplifier(optional)or Headphones(OpUonal).
O Composite Input Terminal(AV1, AV2)
Connects t_ a composite outputterminal of VCRs or DVD players.
O AC(POWER) INPUT TERMINAL
Firmlyinsertthe accessory power cord as far as itwill go intothe power inputterminal.
Firmlypushthe power cord plugas far as it will go intothe power socket.
Toggle Switch
EXT _ INT
Audio out controller to intemal or extemal.
AUDIO INPUT RCA Pin Jack
VIDEO INPUT RCA PinJack
S-VIDEO INPUT Pin Did
COMPONENT VIDEO INPUT BNC
RGB INPUT 15-pin D-sub
RS-232C 9-pin D-sub
•When connecting separately purchased BNC
terminals, conversion connectors are required
between the pin jacks and the BNC terminals.
• Cables connecting PC's may vary depending on the
PC types.
.
wireconfiguration
(Non standard)
PC PDP
RXD _ _
TXD _ 3_
GND '. 5 _':
DTR _-_z__.
DSR _ 6_i E
RTS ....
CTS 8
DB9 DB9
TXD
RXD
GND
DTR
DSR
RTS
CTS
OWNER'SMANUAL ;'. 9
Page 11
0
z
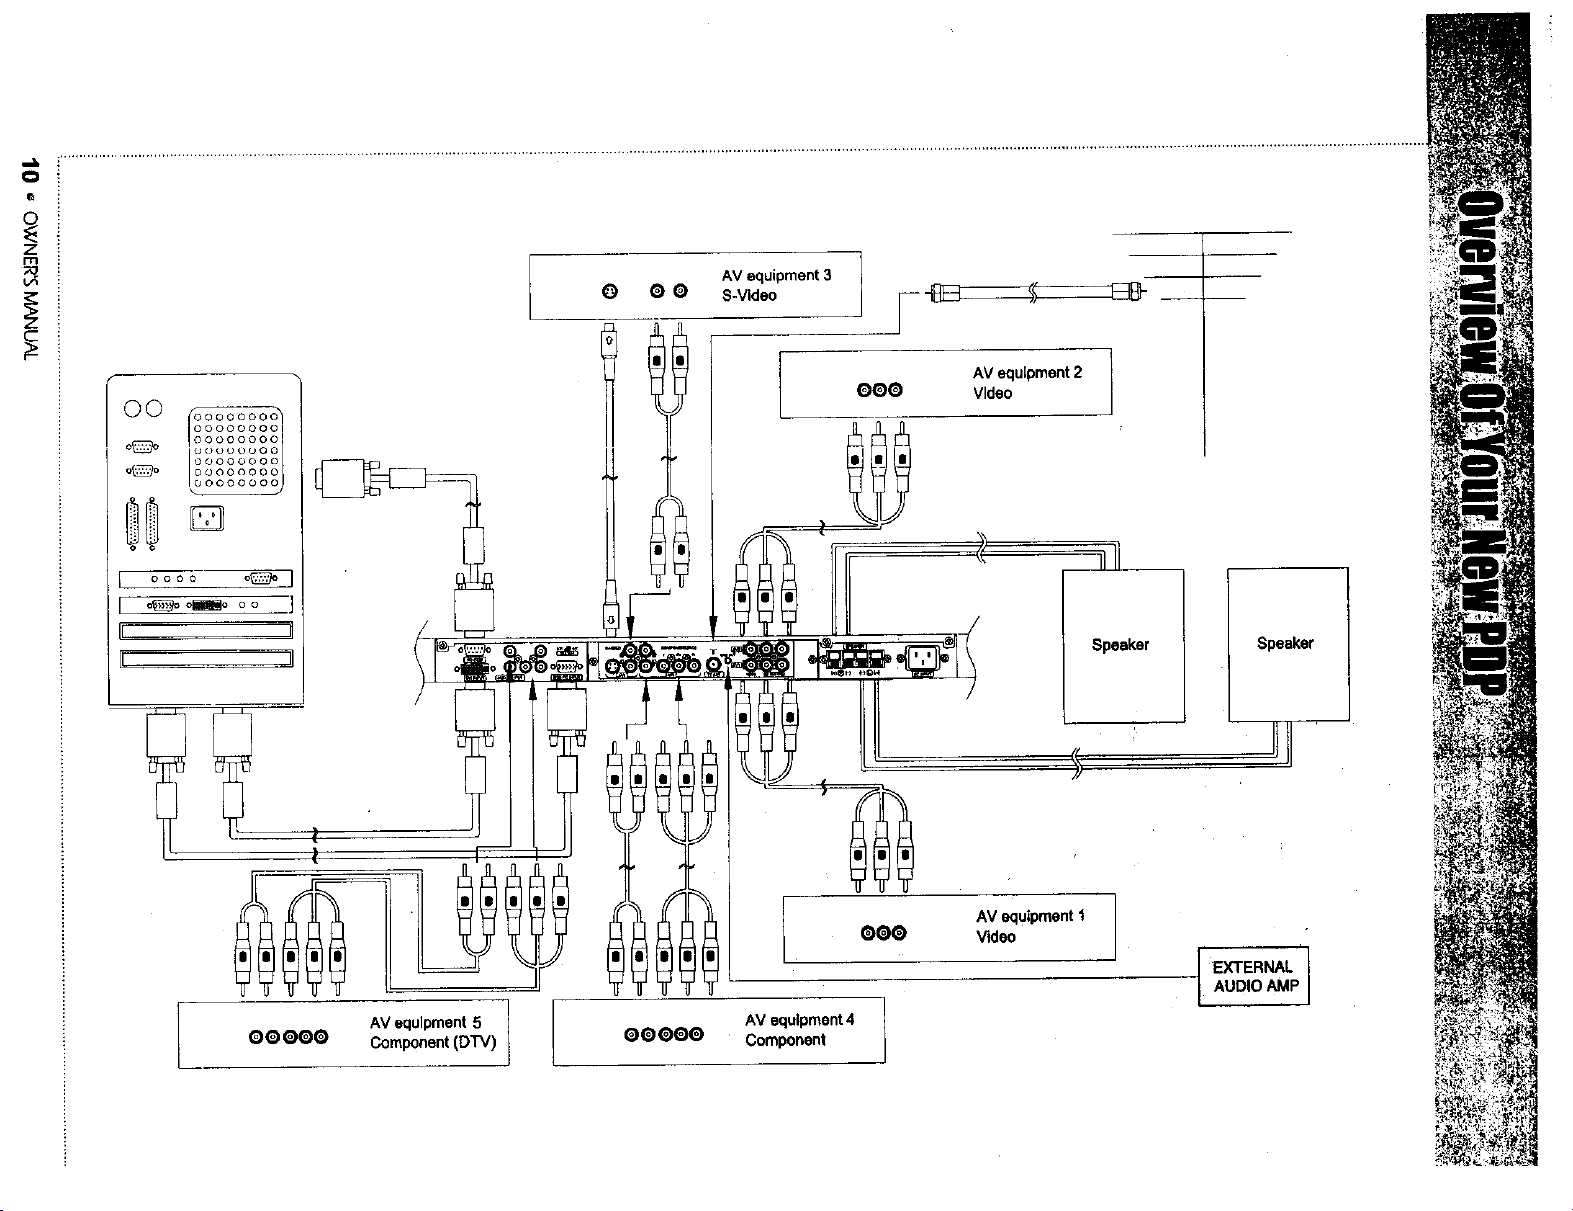
O O S-Video
AV equipment 3
O0 _oo0ooo_
o_ Ot) O00000
o_ ©_000000
O000000C
000000001
00000000
II II
OOO Video
AV equipment 2
Speaker Speaker
O0 OOQ Component (DTV)
AMequipment 5
EXTERNAL
AUDIO AMP
AV equipment 4
00000 Component
Page 12
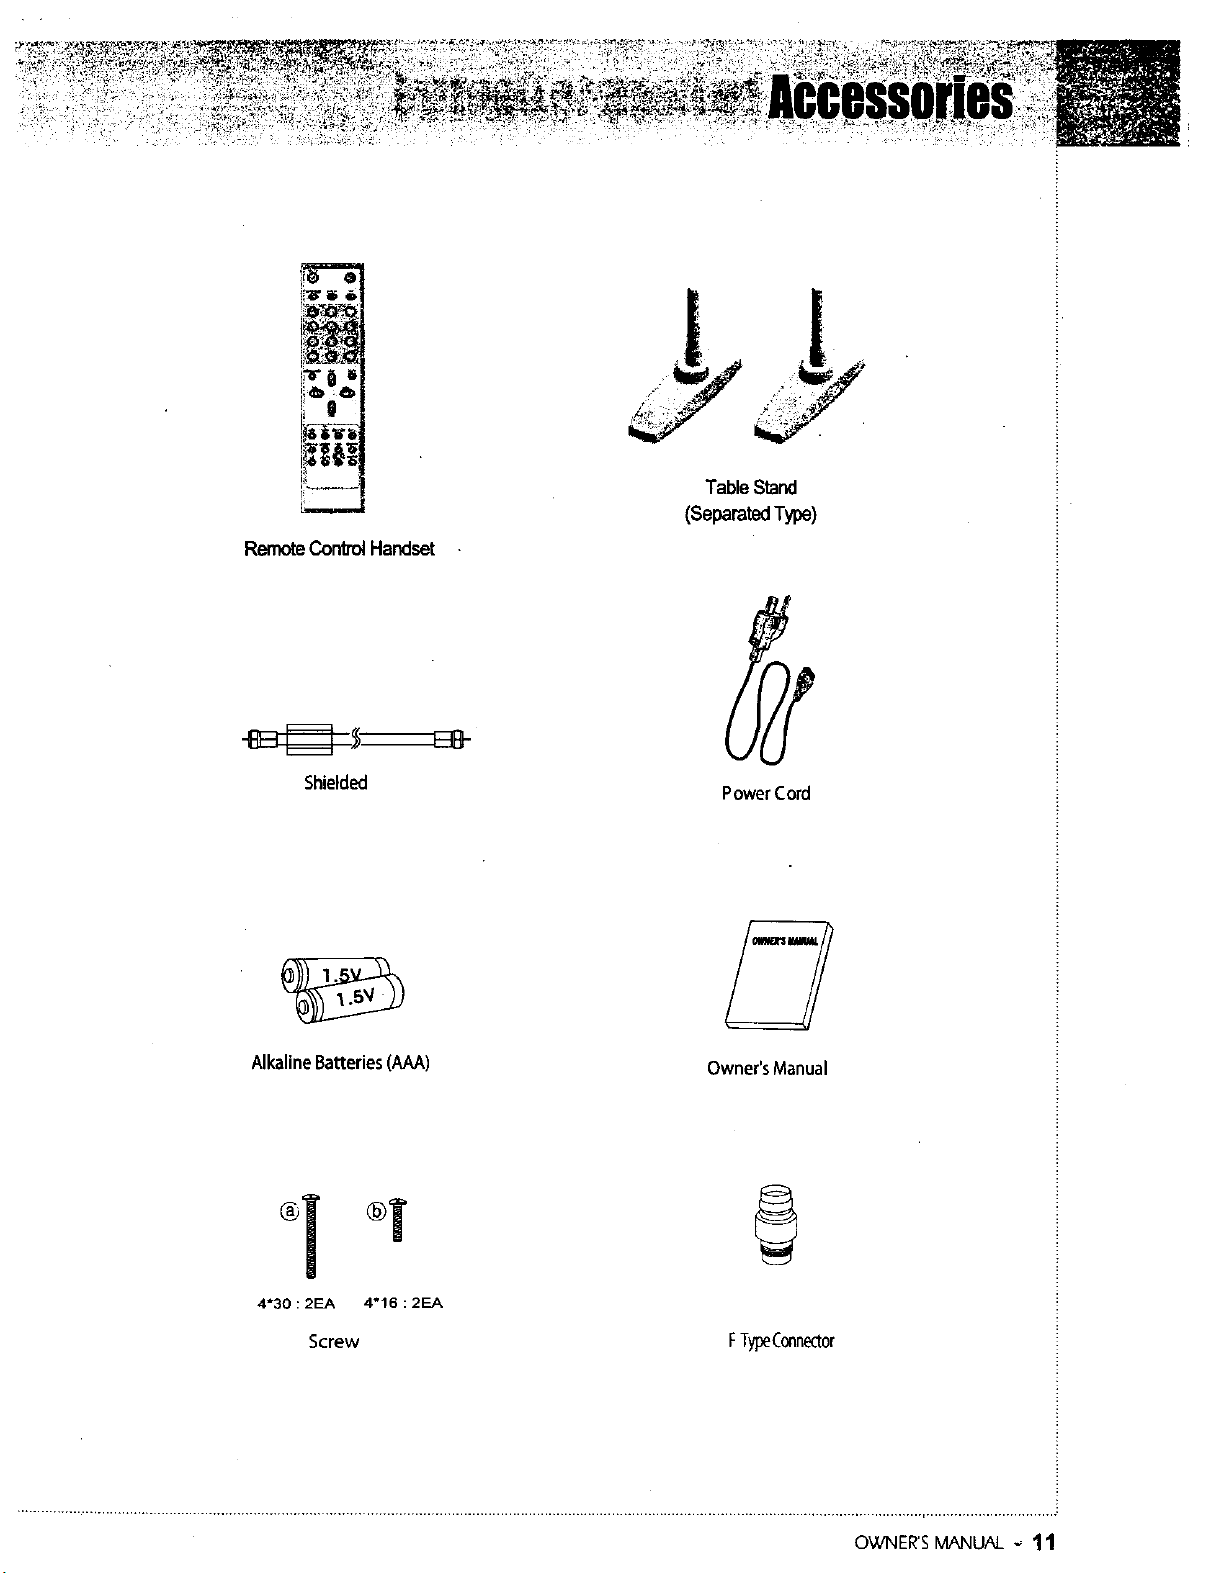
RemoteControlHandset
TableStand
(SeparatedType)
Shielded
AlkalineBatteries(AAA)
4*30 : 2EA 4"16 : 2EA
Owner'sManual
Screw FTy_Connector
PowerCord
OWNER'SMANUAL-- 11
Page 13
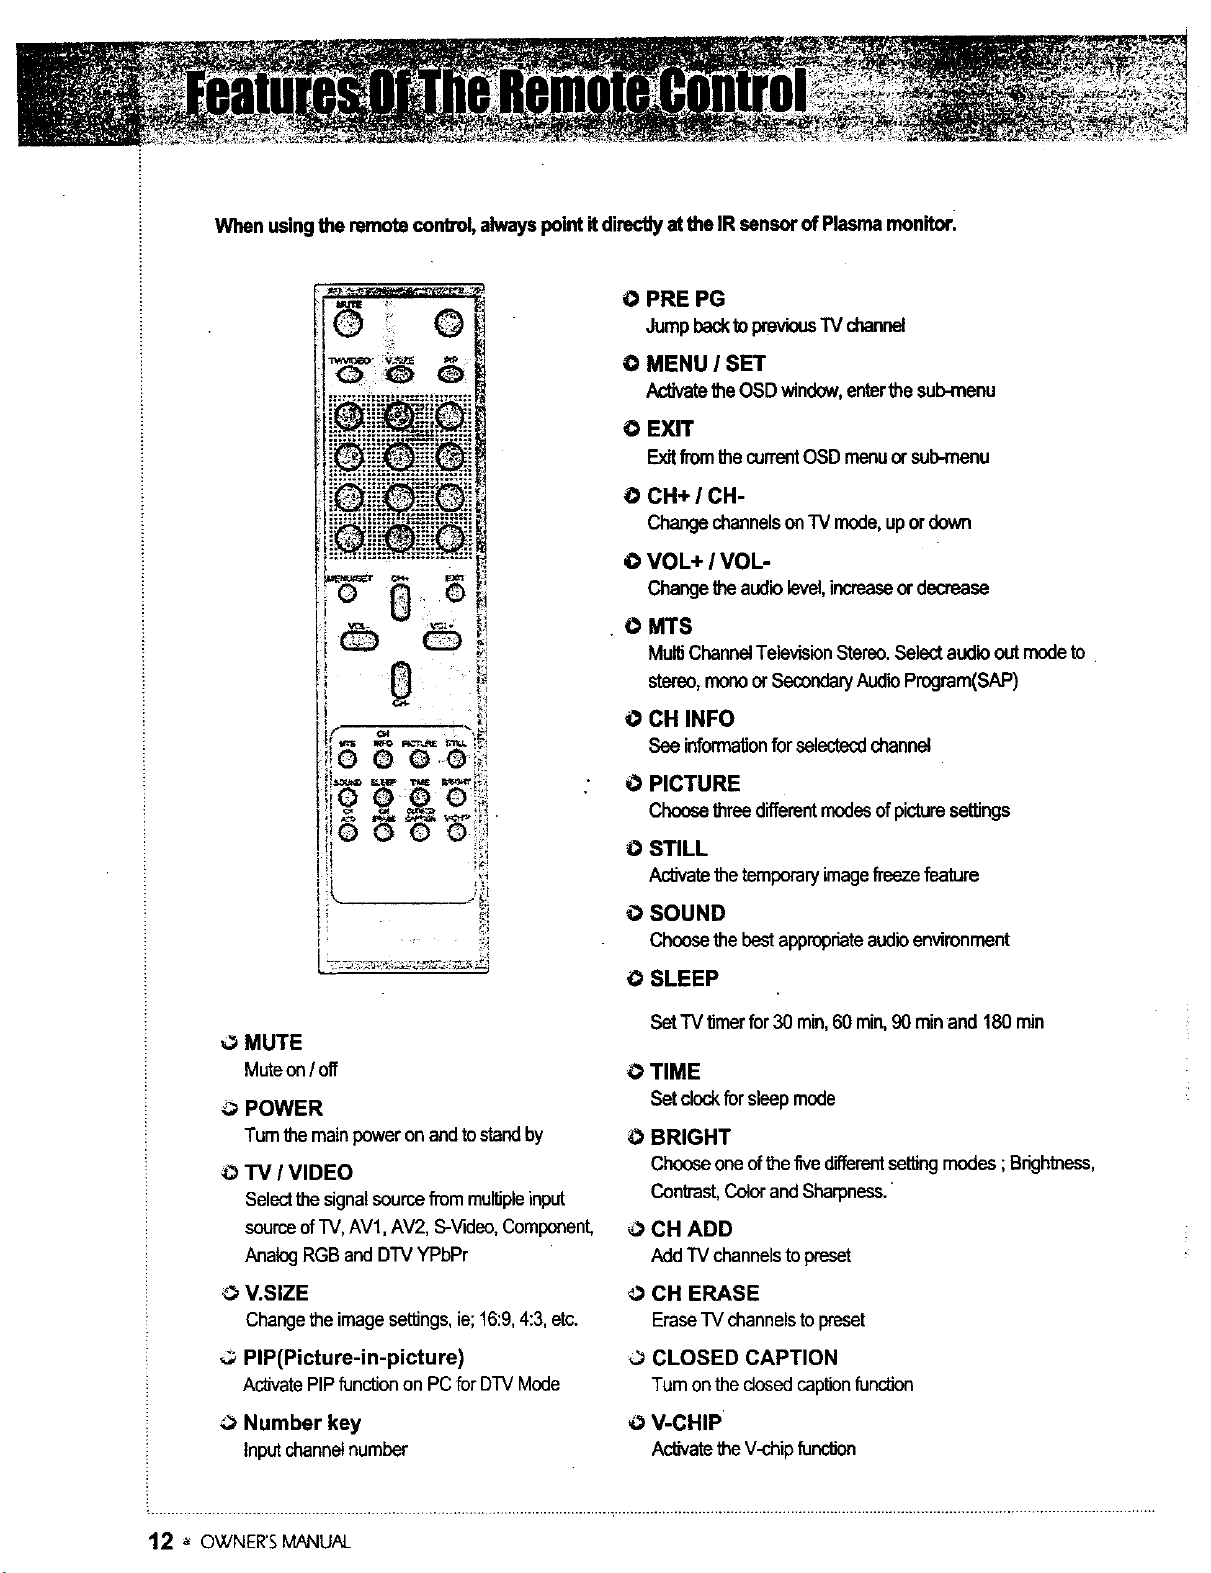
When usingthe remote control,alwayspointitdirecUyat the IR sensor of Plasmamonitor.
O PRE PG
JumpbacktopreviousTV channel
O MENU I SET
Ac_ate theOSD wind<_v,enterthesub-menu
O EXIT
ExitfromthecurrentOSDmenuorsob-menu
O CH+ / CH-
ChangechannelsonTV mode,upor down
O VOL÷ I VOL-
Changetheaudiolevel,increaseordecrease
• O MTS
MultiChannelTelevisionStereo.Selectaudiooutmodeto
stereo,monoor SecondaryAudioProgram(SAP)
O CH INFO
See informationforselectecdchannel
O PICTURE
ChoosethreedifferentmodesofpicturesetiJngs
0 MUTE
Muteon/off
0 POWER
Tumthemain poweronandtostandby
0 TV / VIDEO
Selectthe signalsourcefrom multipleinput
sourceof TV,AV1,AV2, S-Video,Component,
AnalogRGBand DTVYPbPr
0 V.SIZE
Changetheimagesettings,ie;16:9,4:3,etc.
-,3 PIP(Picture-in-picture)
ActivatePIPfunctionon PCfor DTVMode
0 Number key
Inputchannelnumber
O STILL
ActivatethetemporaryimagefreezefeabJre
O SOUND
Choosethebestapprop_te audioenvironment
O SLEEP
SetTV timerfor30 rain,60rain,90min and 180rain
@TIME
Set_ forsleepmode
0 BRIGHT
ChooseoneofthefivedifferentsetlJngmodes;Brightness,
Contrast,Colorand Sharpness."
0 CH ADD
Add TVchannelstopreset
CH ERASE
EraseTV channelstopreset
O CLOSED CAPTION
Tum on the closedcaptionfunction
0 V-CHIP
ActivatetheV-chipfunction
12 " OWNER'S MANUAL
Page 14

_ _ ._ _ _ _• _i'_i_!!_:!'i'"" •
j i'_ •
FeaturesOfTheRemotecon_ol
_ Pressonthecoverandslide
inthediredionof _e arrow.
,5
_-2i LoadtwoAAAbattedes, taking _ Close thecoveruntJlitdicks.
"_' carethatff_e+ and- endsface
tothecorrectdirection.
, _,__;_i_4 ,
Left Right
5re(Front)
I
O_VNER'SMANUAL -_13
Page 15
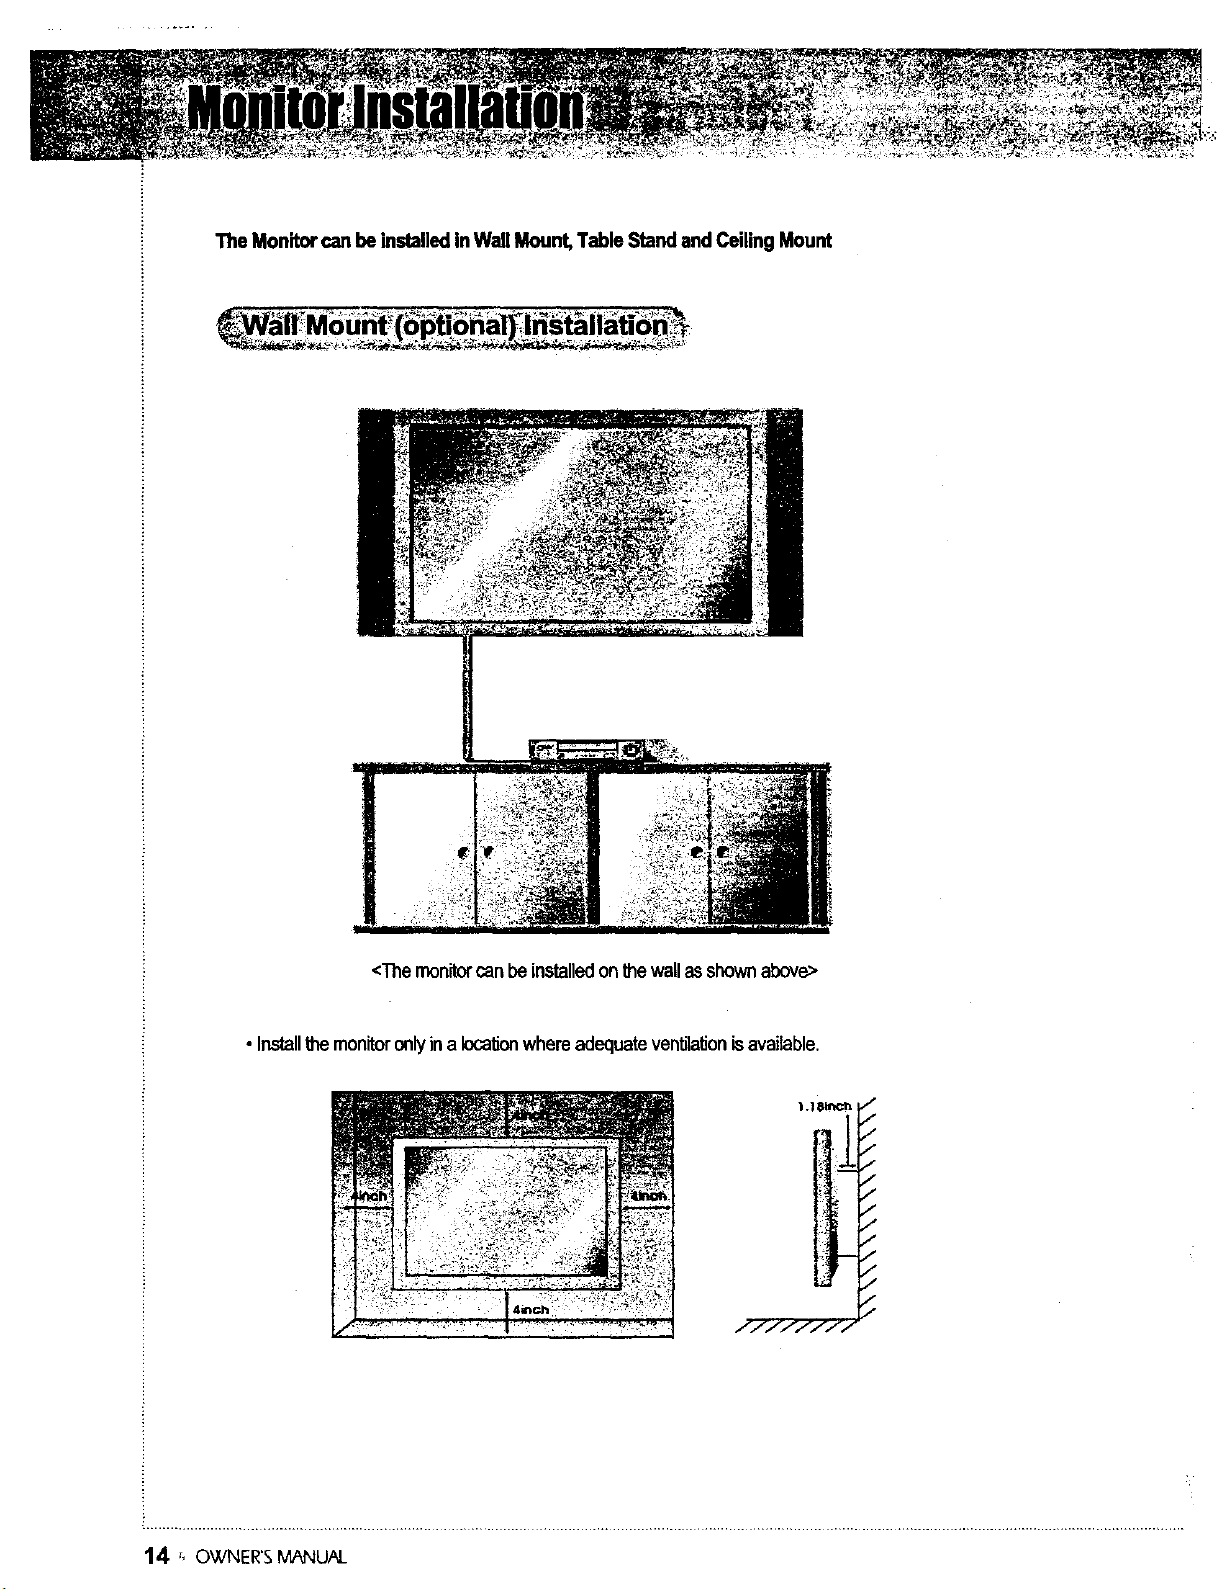
The Monitorcan be installedinWall Mount, Table Standand CeilingMount
<Themonitorcan beinstalledon thewallasshownabove>
• Installthe monitoronlyina locationwhereadequateventilationis available.
1.I 81_ch ! ,"
J'"
/
f
J
/
/
1
/
/
14 _,OWNER'SMANU,N_
Page 16

Table Stand (optional) Installatidfdfdfon
Monitorinstallation
<TheMonitorcanbe installedon a deskas shownabove.>
•TableStand requiresminimumallowableclearancesforadequateventilation.
I ,T81P,ch
I
OWNER'SMANUAL 15
Page 17

0 Installation
42"
(_ insert Table Stand into
Plasma Monitor
®-Screw(4x 30) Down
(_ (_- Screw(4 x 16) Down
I _ ,%J I
,.r__ :: _ !_1
Table Stand
(United Type - optional)
Screws
l J[
)::'°1
STAND HOLE
50" _ Screws _-]
(1_Insert Table Stand into I®1_)_ I
Plasma Monitor / I 2-8X18 J
_)-Screw(4 x 30) Down
(_ _)-Screw(8X 18) Down J 2-4X30 |
STAND HOLE
TableStand
(United Type - optional)
_t nsert _l
16 • OWNER'SMANUAL
Table Stand
Table Stand
(Separated Type)
Table Stand
_l nsert _I
Table Stand
(Separated Type)
Page 18

0 42" External Speaker (Optional) Installation
MiditorinstallaHod
• Matchthe colorofeachconnectiononthespeakerandmonitor
_aution
• Turn off monitor power before making any connecUons.
Place the speakersin _ posilk)nyou want. Install the speakerwires on the monitor and speaker. Be sure to connectthe
p_sitjve _+_wire t_the _+_input and _._enegative _ wiret_ the _-_inpu_C_nnect _eftm_nitOrinpu_t_ le_ speakerat1ddght
mon#erinputto rightspeaker. Any extraspeaker wire length remaining can be bunched into the wireho/dersprovided.
(Cau_on: Onceinsta/led,the speakerwire holderslock intoposition and can'tbe removed.)
OWNER'SM.N_UAL • 17
Page 19

0 Extemal Speaker Accessories
_w _a_(Mour_spea_tornon_ 8-4x 16LongScrews(Attachmetalplatestospeakers)
8-4x8 Sho_tScrews(AUachrnetalptatestornonitor) 2.SpeakerWires
18 _ OWNER'SMANUAL
Page 20

0 50" Speaker (Optional) Installation
\\ Supporter
\
f . ; .
• //
Hanger
• Matchthecolorofeachconnectiononthe speakerandmonitor.
•Atwaysliftthemonitoritself(not_ speakers)whenhandlingormoving_ monitorafterspeakershavebeeninstalled.
Asserr_ U_ern_nit_rt_speakerusingU-jesupp_tterhangerandb_it_Assh_wnab_veA_assemb_eb`;eaandb _f
supporterhangertothemonitorusingU*_ebo#(M4x8).Assemblethec,dandeto thespeakerusing#)e
boit(4x16),ffPieboltsaretightenedtoo much,theproductcouldbedamaged.
OWNER'S M,_U,N- • 19
Page 21

0 Connecting Speakers to the Monitor using the speaker wires provided
_Besurem_ni_ p_weristumed_ beto_ ma_dnganyconnenti_ns_P_acethespeaketsin _e _ y_uwant._ _
_peaker_res on them_nit_randspeaker_Besureto_nnect _e p_sitive"+"w#et_P_e"+__ _ _ _ _"_re
totse"-"inp_ Coonectle# monitorinputtoleftspeakerandrightmor_r inputtodght_ _ _ _w _m
lengthremainingcanbebunchedintothei_reholdemprovided.(Caution:Onceinstalled,_e speakerv_reholderslock
intopositionand can'tberemoved.)
0 Accessories
2 - SupporterHanger 6 - 4X16Screws(Attach 8 - M4X8Screws(Attach
(Mount speakers to Supporter Hanger to Supporter Hanger to
Monitor) speakers) monitor)
20 '_OWNER'S/vIANUAL
2-Speaker Wires
2 - Speaker Wire Holders
(forme speakerwires)
Page 22

Table Stand
(PedestalUnited)
,_" ;;?2
ExtemalSpeakers
FixedWall
MountBracket
CeilingMountBracket
OWNER'SMANUAL ,_21
Page 23

DVI INPUT is optional
_ ConnecttheAntennaor CATVsignalseurceto TV input.Press1VNIDEO buttononthe Remote
Controland selectTVon OSD.
, Use CH+,CH- buttonor numericbuttonto changeTV channelforselection.
_You canwatch thepreviouschannelbypressingPRE CH.buttonontheRemoteControl.
(_. AJso,you can tunetocableserviceprovidedchannelsusingthe cablebox.Forfurtherinformation
LJ;,_
regardingcableTV service,contactcableTV serviceprovider(s).
22 = OWNER'SMANUAL
Page 24

When connecting_ Plasma Monitorwith external equipment, matchthe colors of connecting ports
(VkJeo- yellow,Audio(L) - white, Audio(R ) - red).
If you have a mono VCR, connectthe audio cable from the VCR to the AUDIO(L/MONO) inputof
the Rasma Monitor.
If you connecta S-VIDEO VCR to the S-VIDEO input, the picture qualitywill be improved,
comparedtoconnecting aregular VCR to the Vkteo input.
Avoid stiffmode on the screen for a long peltodof time.
i.
Audio(R)
k Audio(R)_
Audio(L),_
<Toavoidpic_Jrenoise(interference),leavean adequatedistance(over3m)betweentheVCRand monitor.>
_ PressTV/Video buttonon theRemoteControlandselectVideoSources.(Whenconnectingwith
S-Video,selectthe S-V',:Ieo.)
_ Insertavideo tapeintotheVCRandpressthe PLAY
•No Signal
bl
"NoSignal"ondisl_aywilldisappearafter5 minutes,then#',eTVwillgoin to SleepMode(dark),
OWNER'SMANUAL• 23
Page 25

ConnectDVDvideoinputstoY,Pb,Prof COMPONENT(4800(DVDINPUT)andaudioinputstoAudiosockets
ofAV INPUT.
DVI INPUT isoptional
Audio(L}
k::HoWito the]_'d reinstallS;)_,
,_._ Tum on the DVDplayer.
_2;_ PressTV/ Video buttononthe remotecontrolofthemonitorto selectComponent
Component Input ports
Youcanget better Ncture quality ifyou connect DVDplayerwithcamponent inputports as below.
Monitor
ComponentportsofIhe
: Y ", _i"_!
V'v_eooutputports _ _. _: B-¥ _o',
of DVD player _<_ :;'_i"I _ ;_='J
24 " OWNER'S MANUAL
Page 26

O DVDIHDTV Watching through RGB Input for Progressive(480p, 720p, 10801)
mode(YPbPr)
k
Audio(R) -'mid _:,_
_,=<1"---- Pr
"-
DVliNPUTL _
isoptional _a,:I
Aud_o(L)---_;;i_ Pb
_:_; TurnontheDVDplayeror SettopBox.
_:;_ PressTV / Videobuttonon the remotecontroltoselect
m,;
DTVY, Pb,Pr
SOURCECHANGE
: S-VIDEO
AV2
COMI_ONENT
ANALOG RGB
p]VYPbPr
Notice
• NormalDVDsourceis basedon480i,whichshouldbeconnected_roughn_'malYPbProfComponentsignal
• Connect normal 480i, DVD source, throughnom',al YPbPr of Component signal only.
• No Signal
"No Signal" on display will disappearafter 5 minutes, then the .....
TV will go th to Sleep Mede (dark). _,.,_=
OWNER'S MANUAL _ 25
Page 27

Youcanenjoy vividpictureand sound with connectinga PCwiththe Monitor.
i Audio(R)
Analog RGB PC Signal/ D-'I'V
O Connecting a PC to the PDP
• Connecta PC (15pin)cablebetweentheV_leoOutputjack onthePC andtheRGB(480p,720p,1018i)in
(15pD-SUB)onthePDP.
0 Pin Configuration
• 15PinSignalCable
(basedon matepin)
_> DVI Cable (optional)
• Toseethe PC throughDVI,Select
"DigitalRGB"inyourOSD.
ANALOGRGB
D_GITALRGB i
DTVYPI::,PT
2 , Green(G)
3 Blue (B)
4 Grounding
5 Grounding(DDC)
6 Red(R)Grounding
7 Green(G)Grounding
8 ............ Blue(B)Grounding.....
9 : Reserved
I0 SyncGrounding
12 Data(DDC)
14 ..... VedJcalsycc.
15 Clock(DDC)
26 * OWNER'SMANUAL
Page 28

640x350 _.........................................
640x400
640x480 ........................
800x600 46.875 75.00
832x624 49.725 74.55
852x480 31.468 60.05
1024x768 56.476 ; 70.06
1280x1024 64.000 60.00
1366x768 48.387 60.00
31.468 _ 70.0_
37.861 ! 85.08
31.469 i 70.08
37.927
31.469
35.000
37.861
37.500
43269
45.913 !
53.011 F
64.062 i
35.156 56.25
37.879 60.31
48.077 72.18
53.674 85.06
56.000 90.00
64.016 100.00
48.363 60.00
60.023 75.02
i
85.03
59.94
66.66
72.8O
75.00
85.00
90.03
100.04
120.00
•Synchronizationinputform:separate
•852x480: 42"NativeResolulJon
_ta/ P_arity_ Posi_e(+)
VerticalPolarityisNegative(-)
• 1366x768: 50"NativeResolution
HorizorrtaJPolarityisPosiUve(+)
Ver_I Po_i_ _ Negave(-)
OWNER'S MANUAL _ 27
Page 29

_,OSD (OnScTeenDisplay)allowsuser to _ or adjustvariousfeaturesandsettingsinaccordancewithhis/her
!preferences.
,Pressthe MENU/ SETbuttononthe Remote Conb'olto see theOSD.
0 e.g.) OSD menu on the video background
r, _s ? -
1
!
; AVC On
_'J_'a".... _ ;u}
_ME
:;; SLEEP Off
TIME Press SET I
..... . I
- |
' ]
PIP °SET _ :Oo'_o_.,_T
L -- UDIO SOURCE MAIN
t! _ pppoSTON .... -" '_- '
|_ _:;_; i MODE AIR ;
_ AUTO CHANNEL Press SET
!
}i _t [ MI'S AUTO
28 _:'OWNER'S MANUAL
Page 30

Adjust Brightness,Contrast,Color, Hue,
Sharpness,Temperatureand Recallon OSD
menu.
_ PressMENU/SETbuttontoacth,ateOSD.
_ PressMENU/SETbuttonagainto get into
PICTUREmainmenu.
O BRIGHTNESS
Controlthebrightnessof display
byusingleftanddghtbutton.
Dark•
0 CONTRAST
Cont_olthecontrastof display.
Distinct•
O COLOR
Controlthecolorsaturationofdisplay.
Decrease• _Increase
• Saturaf_onmeens,the _ tonein accordancewiththedifferenceofcolorconcentrationunder_1 color
•Bnght
• Vague
HUE
Con_olthe colorappearance
from neutraltored,greenorblue.
• Huedefinesa differenceof co_r towardGreenor Redcolordirection.
Red•
:i!i¸ ."[
• Green
OWNER'SMANUAL ,_ 29
Page 31

O SHARPNESS
Confrolthe sh_pnessofimageedge.
Lesss_4 •S_
O TEMPERATURE
Selectthecolortemperatureofscreen
imagefromWarm, CoolandNormal.
Warm< • Cold
O RECALL
GointoPICTUREMenu,andselectRecallthen"presssetfor allresets.
_Warning
, Scmenlmage_ :Donotdsp/ayas_llimage(suchasona videogameorwhenix:o/dngupa FC lo _ _) _
theptasmamonitorpanelformorethan2 h_rs asitcancausescreenknagereter_n. Thisimageretentionisalso/mown
as"screenbum".Toavoidsuchimagere_, refertopage30and31of _s manualtoreduce#le_ _ _
andcontrastof _hisscreenwhendisplayingastillirnage,
30 e OWNER'SMANUAL
Page 32

Adjust Brightness,Contrast,Temperatureand
Geometry on OSD menu.
_ PressMENU/SETbuttontoactivateOSD.
PressMENU/SETbuttonagaintogetinto
PICTUREmainmenu.
0 BRIGHTNESS
Controlthebrightnsssof display.
O CONTRAST
Controlthecon_astofdisplay.
O TEMPERATURE
Selectthecolortemperatureofscreen
imagefromWarm,CoolandNormal.
TemDerature control by User
Valuefor Red,GreenandBlue canbeadjustedwhen
you chooseUsermodeusing• • key.
Dark•
Dis_nct<
Warm •
Bright
%
• Vague
• Cold
PICTURE oS__up!_o_ I
BRIGHTNESS _-_ -= 5a I
=,_- _TJvlP=r_*,IURE User
_,_-_, GREEN
'l GEOMETRY Press SE3" i
OWNER'SMANUAL_ 31
Page 33

© GEOMETRY
PressMENU/SETbutton,youcanseethe
pk:tumbelow.Movewhereyouwanttoadjust.
<ohAnalogRGB mode>
H-POSITION
Centeringdisplayimage.
AltarselectingPositionmenu,
youcanmovetheimageusing
VOL q+ buttons.
V-pOSITION
Centeringdisplayimage.
Al'IerselectingPos_enmenu,
youcanmovetheimageusing
VOL-/+ buttons.
41
4
PHASE
Finetuningofdisplayaccuracy
onthescreen.Onlyavailablewhen
youarein PC/HDinputmode.
Mismatch Match
H-SIZE
Adjustthe horizontalsizeofdisplay.
Onlyavailablewhenyouarein PC/lID
inputmode.
Mismatch Match
AUTO ADJUST
Automaticallyadjustpicturepositionandeliminateanyimageshaking.
• AUTOADJUSTisonly availableonAnalog RGB mode.
32 _ OWNER'SMANUAL
Page 34

Adjustthe Volume, Balance,SoundModeand
AVC on OSD menu.
PressMENUISETbuttontoac_vateOSD.
UseDOWN buttonto gotoSOUNDmainmenu.
_ PressMENU/SETbuttonagaintogetintoSOUNDmain menu.
O VOLUME
Controltheamountofvolumeofsound.Ranges I _
from 0to 100
O BALANCE
Controltheleftand rightsoundbalance.
,l) SOUND MODE
The soundmodefeatureallowsyou tochoose
thebestappropriateaudioenvironment.
O SOUND MODE - EQUALIZER
Youcanadjustthe qualityofthesoundto suit
yourtasteonUsermode
>-I
0 Volume
Balance
,_ _,. _-_--- -.---_o
Ag8.... b_.....
_,
EQUALIZER
100
>]
I
O AVC (Auto Volume Control)
AVCfeatureconb'olsthevolumelevelbetweentwodifferentchannelsautomatically.
OWNER'SMANUAL, 33
Page 35

Image scaling,OSD display.
0 VIDEO SiZE(Aspect Ratio)
YoucanchangethescalingsizeofvideoonMISCmainmenuandVIDEOSIZEsubmenuorby pressing
V.SIZEbuttonon RemoteControl.
Fill Screen
Fillthescreenregardlessofincomingaspectratio
Fit to Aspect
Fitthescreenwiththesameaspectratioassignalsource
Letter Box
Expandletterbox contentstofullscreen.Butyouwillnotifythedisplayqualityworsethanodginalmodedue
to theloss resolutioncausedbyimage expansion.(useonlywithletterboxcontents)
TV mode_
Zooming morelikea classicalTV size,whichisover-scanned.
OSD SHEET
Selectthebackgroundpatternof OSD. "Opaque"and"Translucent"can beselected."Opaque"settheOSD
backgroundassolid color."Translucent"sattheOSD backgroundashalf transparent.
ChangestheTransparencyof
backgroundcolorof OSDwindow.
Opaque
O OSD POSITION
SelectOSDpositionamong ninepresetpositions
Translucent
_ OWNER'SMANUAL
Page 36

_ SLEEP Off
TIME
O SLEEP : 30 min > 60 rain > 90 min > 180 min
Selectyourdesirableset_ngtimetoturnofftheTV
automatically.30 min,60min,90rain,180minand"Off"can
beselected.TheUmerwillstarttocountdownjusta_eryou
select.
0 TIME SET
selectthemodefromOff,Everydayand
Onceby usingUpandDownbutton.
j_
•: " i
i='_:"_-
SLEEP
r
TIME
OWNER'SMANUAL• 35
Page 37

O MODE
Selact=Air"or'Cabla'..IfyourTVset iscennectedtoanantenne,selact"AIR',IfyouTV setiscon_ _ _e
CABLETV, select"CABLE"
O AUTO CHANNEL
Ifyouselect"AUTOCHANNEL',TV setwillautomaticallyscanavailablechannelsandaddtopermanent
channellist.
Ifyouwanttoexitautochannelscan,press"Exit"keyontheRemoteControl.
O FINE TUNE
Youcanmanuallyadjustthe tuningprecisionbyusingthis func_on.
MTS
Selecttheaudiomadeonthe TVfor"AUTO',"STEREO',=MONO=,"L1"and1_2"can beselected.If
youselect"AUTO',theTV setwill selectstereomodeifthechannelbroadcastinstereomode,monomode
othePMse.Ifyouwanttosetsoundmodeas =MONO',thesetwillsoundsasrnenomodeevenifthechannel
broadcastswi_ stereomode.Ifthe channelisbroadcastinginbilingualmodeandIfyouwanttolistento
secondarylanguage,youshouldselect "L2=.TheTV setwillsoundswithdefaultlanguageotherwise.
36 = OWNER'SMANUAL
Page 38

PIP works in Analog RGB, Digital RGB,
and DTV Y,Pb,Pr mode.
O PiP (Picture in Picture) ON/OFF
Press the MENU/,SET button
Select ON/OFF the PDP mode.
You can choose ON/OFF
mode using VOL-_ keys.
PIP SOURCE
Select the PIP video source. _ :
After selecting videosource menu, _-_
Press the MENU/SET button I _ '
you can change the source using
VOL4+ kegs.
(TV>AV1 >AV2>SVIDEO>COMPONENT) •
:PIP ON/OFF PIP Off
PIP SOURCE TV
PIP POS_ION _'t_l_,_t;_i_'l
i
I
O AUDIO SOURCE
Press the MENU/SET button
Select the audio source. When you select 'PIP' mode, you will hear PIP audio source.
When you select 'Main' mode, you will hear Analog RGB audio source,
you can change the source using VOL-/+ keys.
O PIP POSITION
Press _heMENU/SET button
Select PIP positionamong nine preset posi_ons.
¸
•PIPfunctiongetsdisabledwhenVCR,DVDorPCisinplay
OWNER'SMANUAL _ 37
Page 39

_ _,_--_ ! O MUTE
_ ; Toturnoiltba,_,_1
..... =i- 0 "IV I VIDEO
___: Selectthesignalsourcefrommul_pleinput
_.::÷__ -L._ _ sourceofl'V,AVl,AV2,S-VkJee,Co_
_._,_... _,_>_?_ AnalogRGB andDTVYPbPr.(480p,720p,
loBoiinput)
J © PIP
-- ActNatePIPfuncUononAnalogRGBMode_ DTV
il :
)( ,
Fa_
_3;
U
O V.SIZE
Char_ett_eimagesizese_ng, _e;16:9,4:3,
etc.
_DI00
Pressthisbuttonfirstforcablechannelsover
lOO
0 PRE CH
Gobacktoprevious"IV channel
O STILL
FreezeframefiJnc_on,pressonceagainfor
reset
0 PICTURE
The Picturemndefeatureallowsyoutochoose
threedifferentmodesofpicturesettings
iv
38 _ OWNER'S MANUAL
GAI"4 lS
L1
FiJ Sm_
AM 11;07
O CH INFO
YOUcansee informationregardingthe
channelthatyousetect
MTS
ChangesoundseUJng,ie;L1,L2,Mono,etc.
Page 40

O MenulSet
Ac0vatetheOSDwindow,enterthe sub-menu.
O CH+lCH-
ChangetheTVchanneloTV mndeupor
down.
O EXIT
Exitfrom_e currentOSDmenuorsub-menu.
O VOL+NOL-
Change_,eaudiolevel,increaseordecrease
andusedfor OSDnavigation.
O SOUND
Thesoundmodefeetureallowsyouto
choosethebestappropriateaudio
environment,ie,Stereo,Mono,ASP
,=,,_, 0 TIME
Setthedockforsleepmode
0 BRIGHT
Press"Bdght"buttonrepeatedlytodirectly
chooseoneof five differentsettingmodes;
BriglYmess,Contrast,ColorandSharpness
bypushes
O Referto next page
O CLOSED CAPTION
PushClosedCaptionbuttontoactivatedosed
captionmenu.Use arrowcontrolkeysto
access2 channelsofClosedCaptionsand2
channelsofText.
t i Manually _ CH ERASE
i ErasetheTVchannelpreset
Manually _ OH ADD
Add theTVchannelpreset
OWNER'SMANUAL• 39
Page 41

0 V-CHIP
PushV-Chip buttonto activateV-Chipfuncltonmenu.Input4digitpassword(factory
defaultpassword: 0000)Andfollow thedirections.
INPUT PASSWORD
oooo
O MPAA RATING
Selecttheblocklevel.
youcanchangethe 'SHOW','BLOCK'
byusingVOLUME(<•) keys.
BLOCK CONTENT
(TVGUIDELINE • CONTENT)
You canchangethe 'SHOW','BLOCK"
by usingVOLUME(<_,)keys.
O TV GUIDELINE
Selectthe"iVguideline.
youcanchangethe 'SHOW','BLOCK"
byusingVOLUME(<_) keys,
PASSWORD CHANGE
Youcanchangethepassword.
(4 characters)
40 = OWNER'S _M,NU,_I_
Page 42

42-inch ¢Eagonalscreen
Variable4:3 / 16:9 image aspectralios(4 modes) Variable 4:3 imageaspectra_os(4 modes)
16:9 Panoramic mode 16:9 Panoramic mode
852x 480 physicalpixeb 1366 x 768 physicalp_eb _
800:1 con_ast mlio 590:.1conl_astra_o
Brighlness:630cd/m_ Brigh_ess:560cd_
PC monitursupportup_ 1280x 102460hz PC moni_rsupportup_ 1280x 102460hz
181-ChannelCable-Ready TV tuner (NTSC) 181-Channel Cable-Ready TV tuner (NTSC)
Advanced mu_window viewing: Achraneedmu_vvindowviewing:
Pic_re-ln picture(PIp) withfour selectablewindow ;osil_ons picture-lnp icture(PIP)withfour selectablewindow posit_ons
en pC mode on PC mode
Multipleinputcompaltble Mullipleinputcompa_l:_e
Advanced Mol_on6_gltalpcocessor Advanced Motiondigitalprocessor
Molion-Adap_veDei_edace Processor Moi_n-Adap_veDeinterlaceProcessor
Dig_l prog'essire linescaring Dig_l progressive_ scaring
3:2 Pul-Down for FHmScanConversion 3:2 PulkDownfor Film Scan Conversion
Digital 3D combfilter (NTSC) Digital 3D comb filter(NTSC)
pAUSECAMTV/CATVTOnerModule(Market S pecific) PAUSECAMTV/CATVTunerModule(Market Specific)
ClosedCaptiondecoding (NTSC) CiosedCaptiondecoding(NTSC)
Favoritechannelprogramming Favoritechannelprogramming
ChannelIockN-chip (NTSC) Channellock/V-chip(NTSQ
50-inch cliagonalscreen
IntndacedComponentinputwith480iand InterlacedComponentinputwi_ 480iand
ProgressiveComponentinput with480D,720p, 1080i ProgressiveComponentinputwith 480p,7209,1080i
Automaticfiequencydetection Automaticfrequency detection
Selectablecolortemp•se_ngs:Wann,Cool,User Selectabiecolortemp.settings:Warm,Cool,User
MLscellaneous Miscellaneous
Buiit-inaudio amplifierandtv_ 7W speaken_ / Optional Built-inaudioamplh%randtwo7W speakers/ Optional
Selectablefixeqivariebleaudioout_£ I Optional Selectabtefixed/variable audio output/ Optional
Quietfanles_opemtio_ Quiet fanle_soperation
Inputphaseclockadjusbnent Inputphaseckx:k adjusb_ent
Frontpanel lock(via RS-232) Frontpanellock (viaRS-232)
OWNER'S MANUAL '_ 41
Page 43

Compos_:RCA.pinx1,Scartt!,pex1
ComponentvideosignahYR_x 1
S-video:MiniDIN4.-pinx 1
RGBinput:D-sub15-pinx 1(480p,720p,1080i)
Audioinput:RCA-pinType(L/R)x4:Fulsupportsepamb3d
audioinl_t f_€each "¢deo _
Speakeroutput:CinchCormType(L/R)x 1(4inchoonnectocs
I Composite:RCA-pinx1,Scarttypex I
t
I Compon_video_g_ : YPbPrxI
i S-video:MiniDIN4-pinx 1
i RG8 input:D-sub15-p_x I(480p,720p,I080i)
Audb input:RCA-pinType(L!R)x4:Fulsupportseparated
r audioinp_ foreachVideoinput
i
Speakeroutput:CinchCormType(IJR)xI(4inchconnectors
type) type)
Audiomode:Stereo Audiomode: Stereo
_ Pods:RS-232D-sub9-pinx1 _ Pods:RS-232D-sub9-pinx 1
DVIinput: DVICable/ Op_onal DVIinput:DVICable/ Optional
Accessories _ _,: , : _ : ;_. Aco_ssodes
Fullfunctionremoteconlml Fullfunctionremoteconlto!
Tablestand/ Op6onal
Side.mountSpeakers/ Ol:_onal S_e-mount Speake'_ / OpUonal
1050x635X87 {Mainonly) 1210x733x88(Mainonly)
1250x635x87 (Wil:hstand,wiOlout_ 1450x733x88(W'_ stand,withoutSpeaker)
1050x708x299(Wifflstandandspeaker) 1450x802x299(W'_Istandandspeaker)
Tablestand/ Opt_lal
Weight:
40kg(Mainonly)
47kg(Withstand,withoutSpeake_
49.7kg(W'_ standandSpeak_ 61kg(WdhstandandSpeaker)
WorkingEnvironment " " WorkingEnvironment
Power:AC 110-'240V.50i60Hz Power:AC110--240V50i60Hz
PowerConsumpSon: 380Watts PowerConsumptbn:380Watts
Temperatu_ Temperature
Oper'a_on: 0'_.,,35°c(32_°F) Ope_ :0°c-.35"c(32'T--,,90"F)
Storage:-15%_o0"c(5T--140"F) Storage:-15=c--60°c(5_-140 "F)
Humidity Humidity
Operation: 20--70°_ OpsralJon:20-70%
Storage: 20-80% Storage: 20-80%
Pressure Pressure
Operation:800"-1114hPa Operation:800-1114hPa
Storage: 600-1114hPa Storage: 600-,1114hPa
52kg(Mainonly)
57kg(W'_hstand,withoutSpeaker)
42 _' OWNER'SMANUAL
Page 44

Beforeyou call a servicetechnician,pleasescanthis listof problemsandpossiblesok_,ons. It maysave
you timeand money.
Nopidgin&Nosound Ched_whe_"_theMonRoristurnedon.
Powercordinseri_intowallou_
Pluga_'_nerprodud_spo_r cordintothewallouUetwhere
theMonit_spow_cordwaspluggedin.
PictureOK&Nosound PresstheVOLUME(1_)button.
Check_ audioinputsignal.
Theremoteox,tmldoesnlwork ChecktoseeifthereisanyobjectbetweenthePtasma
Displayandtheremoteconbolcausu_gobsb'ucUon.
Checktoseeif_'_ebatteriesambstalledwith_'_ec_rect
pdart_es.
Noorpoorcolororpoorpicture SelectColorinthePictureandpressVOLUME(_) button.
Keepa certaindistancebetweentheMonitorandtheVCR.
Activateanyfunc_o_torestorethebdghl_essoftJ_epicture.
Checktoseethatboththemonitorandthesourceare
pluggedinandturnedon.
Theimage_stoolightortoodark AcFjusttheBrighl_essorContrastse_ngs.
Theimageistoolargeortoosmall AdjusttheSizese_ngs.
Nooutputfromoneofthespeakers AdjustBalanceintheSoundMenu.
Strangesoundfrom_e Monitor TypicalsoundduetonormalMonitoroperation,Monitorisnot
faulty.
OWNER'S MANUAL e
Page 45

iDisplay.TV Corp. ('l-echview_brand)
Limited 1 Year Warranty
iDisplay.'l'V Corp.(Techview_brand) hereby warrants, subject to the conditions herein stated in the
paragraphs below, that should this product become defective by reason of improper workmanship or
matadal defect during the specified warranty period, iDisplay.'rv Corp.('rechview_brand), at its option,
will repair (on-site service will be provided where available) or refund the same, effacting all necessary
parts replacements, without charge for either parts or labor.
Warranty Period:
iDisplay.TV Corp.(Techview_brand), warrants that from the date of purchase, this product will be free
from defects in material for a period of one (1) year and a period of (1) year on labor, iDisplay.'rv
Corp.(Tachview_brand)., at its option, will repair (on-site service will be provided where available) or
refund this product found to be defective during the warranty period, if the product is no longer
available, iDisplay.'fV Corp.(Techview_brand), may refund your purchase, with original proof of
purchase.
Conditions:
This warranty is valid for the original retail purchaser from the date of initial retail purchase and is not
transferable. Keep the original sales receipt. Proof of purchase is required to obtain warranty service
and/or refund, iDisplay.TV Corp.(Techview_brand), dealers, service centers, or retail stores selling
iDisplay.TV Corp.('rechview_brand), products do not have the right to alter, modify or in any way change
the terms and conditions of this warranty.
This warranty does not cover normal wear of parts or damage resulting from any of the following:
Negligent use or misuse of the product; Improper voltage or current; Use contrary to the operating
instructions; Deviation from instructions regarding storage and transportation; Disassembly; Repair or
alteration by anyone other than iDisplay.TY Corp. or a iDisplay.TV Corp.(-I-echview_brand), authorized
service center. Further, the warranty does not cover Acts of God, such as fire, flood, hurricanes and
tornadoes.
iDisplay.TV Corp.(Techview_brand) shall not be liable for any incidental or consequential damages
caused by the breach of any express or implied warranty. Except to the extent prohibited by applicable
law, any implied warranty of merchantability or fitness for a particular purpose is limited in duration to the
duration of the above warranty. Some states, provinces or jurisdictions do not allow the exclusion or
limitation of incidental or consequential damages or limitations on how long an implied warranty lasts, so
the above limitations or exclusion may not apply to you. This warranty gives you specific legal rights,
and you may also have other rights that vary from state to state or province to province.
How to Obtain Warranty Service
You must contact iDisplay.TM Corp.(Techview_brand), Customer Service/Technical Support at our toll-
free number 1-666-334-8324 (TECH) or by service@idisplay.tv.
A Customer Service/Technical Support representative will attempt to resolve warranty issues over the
phone. If telephone resolution is not possible, the Customer Service/Technical Support representative
will require your assistance in performing routine diagnostic procedures.
iDisplay.'rv Corp.(Techview_bra nd)
Quality Control Department/
Customer Service Department
5690 Stewart Ave.
Fremont, CA 94538
U.S.A.
ITEM # 70109
= OWNER'S MANUAL
Page 46

!_i¸_,_!i_____i!ii_!iii__i_._i7¸i'ii
f
ii,
OWNER'S MANUAL ,_ 45
Page 47

• OWNER'SMANUAL
Page 48

Page 49

Memo
l
48., OWNER'S MANUAL
iim
J
Page 50

TEfiHViEI
 Loading...