

Page 1

Raptor X11R6.1 for AIX
Installation Manual
Publication #65-0205-01 Rev F September 23, 2004
Copyright 2004 Tech Source Inc.
442 S. North Lake Blvd.
Altamonte Springs, FL 32701
(407) 262-7100
Page 2

Addendum Information
Date Released September 23, 2004
Changes made to:
REVISION
NUMBER
A
B
C
D
E
F
The Tech Source logo, Tech Source and Tech Source Raptor are
trademarks of Tech Source, Inc. X Window System is a trademark
and product of X.org.
All other products or services mentioned in this document are
identified by the trademarks or service marks of their respective
companies or organizations. Tech Source, Inc. disclaims any
responsibility for any references to those trademarks herein.
CHANGES
Initial Release
Adding Stars Support
Minor updates
Name of card changed from STARS
2K to Raptor 2000. Deleted the DB
chapter (not required anymore).
Other minor enhancements including
MOX info.
Support for Raptor 2000-AIX Cards
Support for T-Class Cards & AIX 5
DATE
10-23-96
07-01-98
07-10-98
03-28-00
07-18-02
09-23-04
Page 3

All rights reserved. No part of this work may be reproduced in any
form or by any means without prior written permission of the
copyright owner.
RESTRICTED RIGHTS LEGEND: Use, duplication, or disclosure by
the U.S. Government is subject to restrictions of FAR 52.22714(g)(2)(6/87) and FAR 52.227-19 (6/87); or DFAR 252.2277015(b)(6/95) and DFAR 227.7202-3(a).
The product described in this manual may be protected by one or
more U.S. patents, foreign patents, and/or pending patent
applications.
PREFACE
This publication documents the Tech Source Raptor X11R6.1 for
AIX Installation for use with the Tech Source, Inc. Raptor 2000 and
2100T cards. This manual is intended for users who incorporate
the Tech Source Raptor cards into IBM RS/6000 workstations
running AIX operating systems.
This is a guide to the installation of the Raptor software. All
systems vary to a degree. Knowledge of the features of your
system and an understanding of UNIX shell scripts are helpful
during the installation process.
WARRANTY
The Raptor cards are warranted for one (1) year from date of
shipment. During the warranty period, Tech Source, Inc. will, at its
discretion, repair or replace a defective component at its expense.
Page 4

Freight charges associated with the repair or replacement of
components under warranty are to be shared by Tech Source, Inc.
and the customer. All customers, domestic and international, shall
bear the freight charges for the product return. Tech Source, Inc.
shall bear the outbound freight charges up to $13.00 (USD) per
returned product, whether domestic or international. Any additional
freight charge shall be the responsibility of the customer. We
suggest that you contact your dealer first with any questions you
may have about the product. Unlimited technical support (via
telephone/facsimile/email) is provided for one (1) year from date of
shipment. The installation of any Tech Source, Inc.
hardware/software product is the sole responsibility of the customer.
Tech Source, Inc. offers a continuing hardware/software support
program that provides telephone consultation and any required
hardware repair after the expiration of the warranty period. This is a
billable annual maintenance contract. Contact Tech Source, Inc. for
the available maintenance plans.
Customers will be charged an hourly rate plus materials ($300.00
USD minimum) for repairs and/or maintenance performed by Tech
Source, Inc. that are not covered by a Tech Source, Inc. warranty or
maintenance contract.
DOCUMENTATION IS PROVIDED “AS IS” AND ALL EXPRESSED
OR IMPLIED CONDITIONS, REPRESENTATIONS AND
WARRANTIES, INCLUDING ANY IMPLIED WARRANTY OF
MERCHANTABILITY, FITNESS FOR A PARTICULAR PURPOSE
OR NON-INFRINGEMENT, ARE DISCLAIMED, EXCEPT TO THE
EXTENT THAT SUCH DISCLAIMERS ARE HELD TO BE
LEGALLY INVALID.
Page 5

TABLE OF CONTENTS
INTRODUCTION 1-1
1.1 Overview 1-1
1.2 MOX Extension Support 1-2
1.3 Conventions 1-2
HARDWARE INSTALLATION 2-1
2.1 Hardware Configurations Supported 2-1
2.2 Installation Instructions 2-1
2.3 Installation of the Raptor 2500 FPS 2-2
2.4 Installation of the Raptor 2100 FPS 2-4
SOFTWARE INSTALLATION 3-1
3.1 Requirements 3-1
3.2 CD-ROM Installation 3-1
3.3 Configuring the Raptor as LFT Display 3-3
3.4 Supported Resolutions 3-4
3.4.1
3.4.2 Raptor 1100T 3-4
3.4.3 Raptor 2500T 3-4
INVOKING X11R6.1 4-1
4.1 Overview 4-1
4.2 xinit 4-1
4.3 Setting Bit-Depth and Resolution 4-3
Raptor 2000-24M, Raptor 2000-24M AIX, Raptor 2100T 3-4
4.3.1. Setting Bit-Depth 4-3
4.3.1.1 Setting Bit-Depth on Raptor 2000 4-3
4.3.1.2 Setting Bit-Depth on T-Class Cards 4.4
4.3.1.2.1 STARSMODE Variable 4.4
4.3.1.2.2 Config File 4.5
4.3.2 Setting the Resolution 4-6
4.4 Enabling MOX Extension During X11R6.1 Server Startup 4-7
Page 6

TABLE OF CONTENTS
4.5 xdm 4-7
4.5.1 MOX Mode Using xdm 4-8
4.6 Common Desktop Environment (CDE) 4-9
4.6.1 MOX Mode Using CDE 4-9
UNINSTALLING RAPTOR X11R6.1 FOR AIX 5-1
5.1 Uninstall Using SMIT 5-1
TECHNICAL ASSISTANCE 6-1
6.1 Who to Call For Help 6-1
6.2 Email Address 6-1
6.3 Website 6-2
APPENDIX A A-1
A.1 Raptor 2100T Specifications A-1
A.2 Raptor 2500T Specifications A-2
A.3 Raptor 2000-12M Specifications A-3
A.4 Raptor 2000-24M Specifications A-4
A.5 Raptor 2000-24M AIX Specifications A-5
A.6 Raptor 1100T Specifications A-6
Page 7

Chapter 1
INTRODUCTION
1.1 Overview
This manual describes the installation for Raptor X11R6.1 for AIX.
This software supports the following cards:
• Raptor 2000-24M
• Raptor 2000-12M
• Raptor 2000-24M AIX
• Raptor 1100T
• Raptor 2100T
• Raptor 2500T
In this manual, the cards will be collectively referred to as “Raptor”.
The Raptor 2000-12M, 2000-24M and Raptor 2000-24M AIX will be
referred to as Raptor 2000. The Raptor 1100T, Raptor 2100T and
Raptor 2500T will be referred to as Raptor T-Class. Knowledge of
the AIX operating system and the SMIT installation tool will be
useful during this installation. The AIX versions currently supported
are AIX 4.3.3, AIX 5.1 and AIX 5.2.
From this point forward, Tech Source, Inc. will be referred to as
Tech Source or TSI.
The software is provided on a CD-ROM and consists of the
following:
• Tech Source Raptor device-drivers for AIX
• X11R6.1 binary distribution (clients, libraries, fonts, etc.)
• X11R6.1 server for Tech Source Raptor cards
• MOX (Multiple Overlay eXtension) Client libraries, include files
and examples
1-1
Page 8

Raptor X11R6.1 for AIX Installation Manual
Note: Before installing this software, you must uninstall any
previous versions of the software.
1.2 MOX Extension Support
Tech Source supports an X-server extension called MOX (Multiple
Overlay eXtension) on the Raptor graphics cards. The underlying
software (available as a server extension and a client library)
needed for MOX support has been included as a part of this Raptor
X11R6.1 for AIX software product. Enabling of this extension
during the X-server startup is described in Section 4.4.
1.3 Conventions
This manual will follow certain conventions throughout.
Whenever a variable name, command name, directory, or filename
is used in a paragraph they will appear in a mono-spaced font.
At times the reader will be instructed to enter commands at a
prompt. In this case a transcript of a sample session will be
provided where a prompt similar to one the reader might see will be
followed by the commands the reader is to enter. The entire
transcript will be in a mono-spaced font with the prompt in a
normal weight and the user's entries in bold.
The prompt used in a transcript varies depending on the
circumstances. The following are some common prompts and
when they are used:
prompt# used when the user is required to have root
privileges
prompt% used when the user is not required to have root
privileges
ok prompt displayed when the user is in Boot PROM
mode
1-2
Page 9

Chapter 2
HARDWARE INSTALLATION
2.1 Hardware Configurations Supported
The software has been tested on and currently supports IBM
RS/6000 systems (with PCI slots), running in single and multiscreen configurations. The RS/6000 systems currently tested on
Raptor 2000 cards are:
• 43P
• 44P
• IntelliStation Power 275
The RS/6000 systems currently tested on Raptor T-Class cards are:
• 44P
• IntelliStation Power 275
This chapter discusses the installation of Raptor cards in one of
these machines. Please contact Tech Source if you have
installation issues on a different machine.
2.2 Installation Instructions
The Raptor card installation is simple and consists of a few easy
steps. These installation instructions presume that you are familiar
with the AIX operating system.
2-1
Page 10

Raptor X11R6.1 for AIX Installation Manual
NOTE: Remember which cables go to which connectors. You may
want to label the cables and connectors before disconnecting them.
Step 1: Shutdown the system and turn the power OFF,
remove the system’s cover, find an available PCI
Local Bus slot, and remove the bracket and screw.
Ground yourself by touching the metal part on the
case.
Step 2: Install the Raptor card firmly into the PCI Local
Bus slot. Take care to press it evenly and snugly
into the slot. Once you are certain the card is
installed properly in the slot, secure it with the
bracket screw.
Step 3: Secure the system’s cover, attach any previously
removed cables, and connect the video cable to
your monitor.
The Raptor card is now installed and the system is ready for
software installation. Refer to Chapter 3 for installing the Raptor
X11R6.1 for AIX software. Sections 2.3 and 2.4 describe the cable
connections for the Raptor FPS configurations.
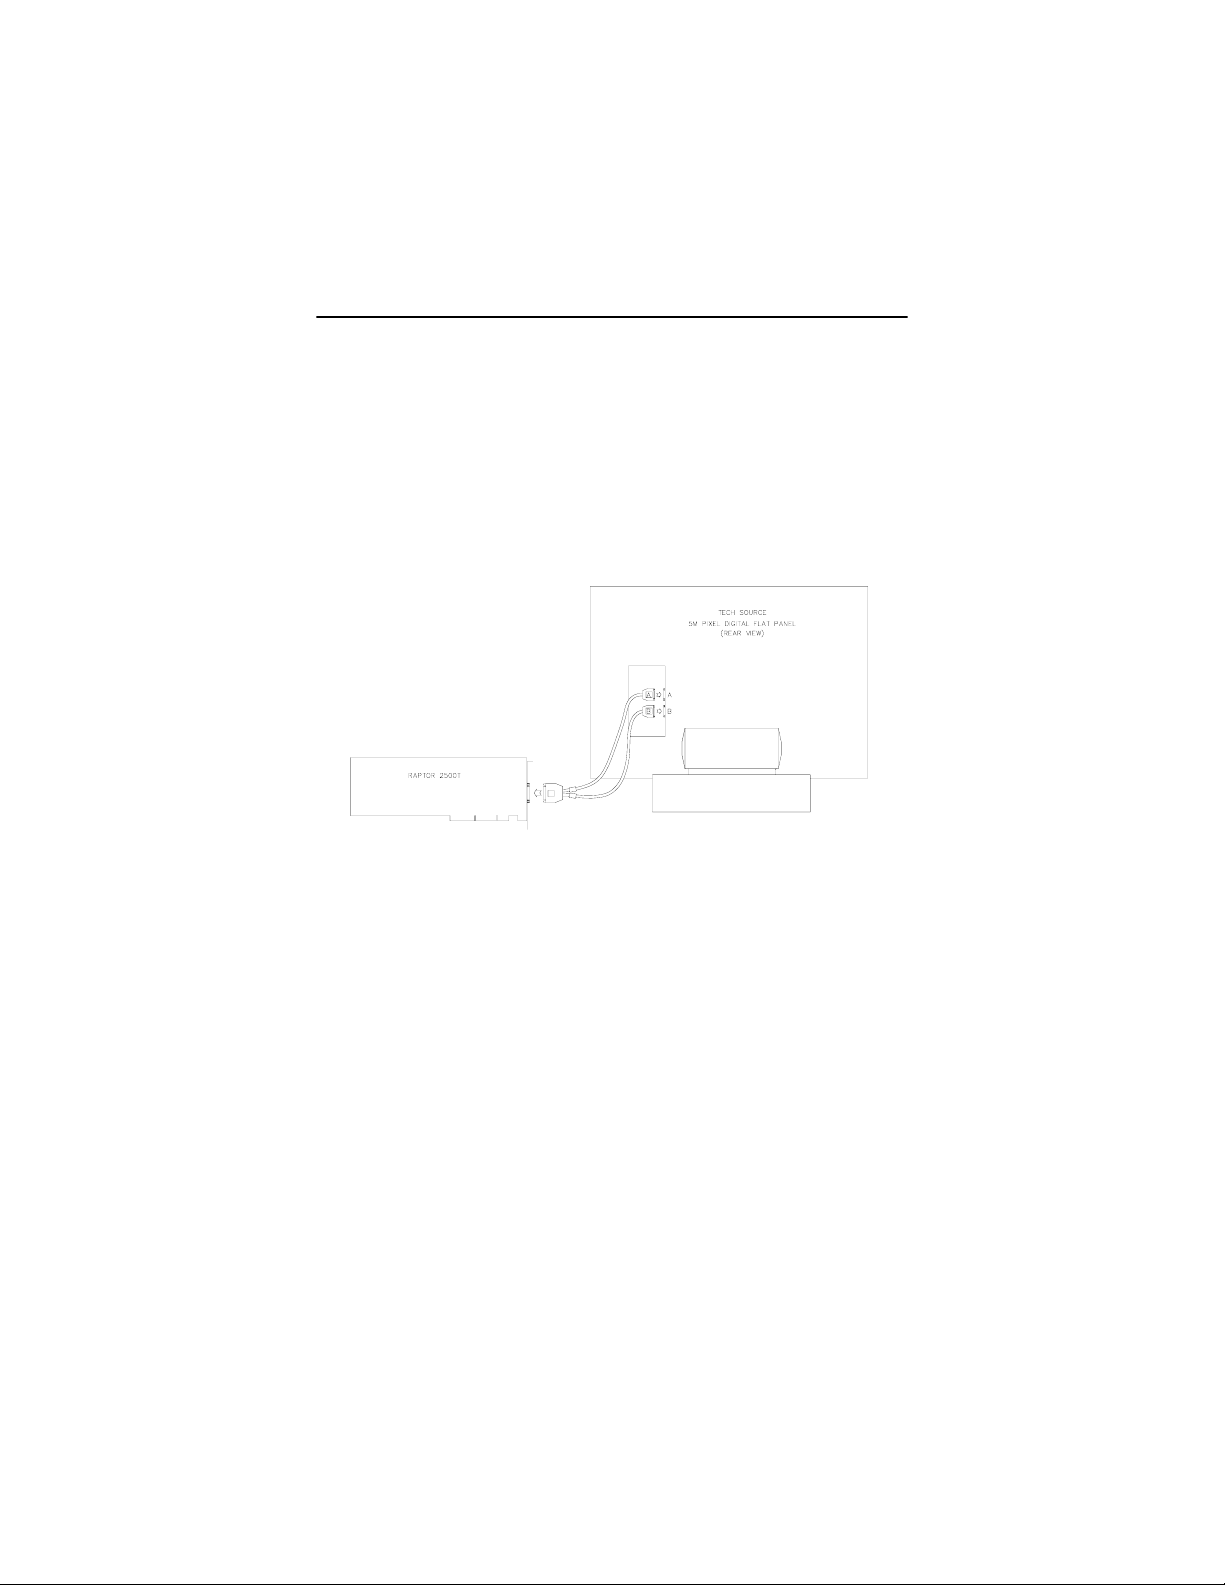
2.3 Installation of the Raptor 2500 FPS
The Raptor 2500 FPS Digital Flat Panel subsystem is comprised of
the Raptor 2500T graphics card (configured for 2560x2048
resolution), the Tech Source 2500 FPS digital flat panel, along with
associated cables and software. The Raptor 2500T graphics card
is connected to the Tech Source 2500 FPS digital flat panel using a
cable as shown in Figure 2-1.
2-2
Page 11
Raptor X11R6.1 for Solaris Installation Manual
The Raptor 2500T card has one connector on the front bracket.
One side of the provided cable has the LFH60 connector that
connects to the graphics card. The cable splits into two with
MDR26 connectors on the opposite end. These two connectors
marked A & B get connected to the appropriately marked
connectors on the back of the digital flat panel. They are shown in
Figure 2-1.
Figure 2-1 – 2500 FPS Digital Flat Panel Subsystem
2-3
Page 12
Raptor X11R6.1 for AIX Installation Manual
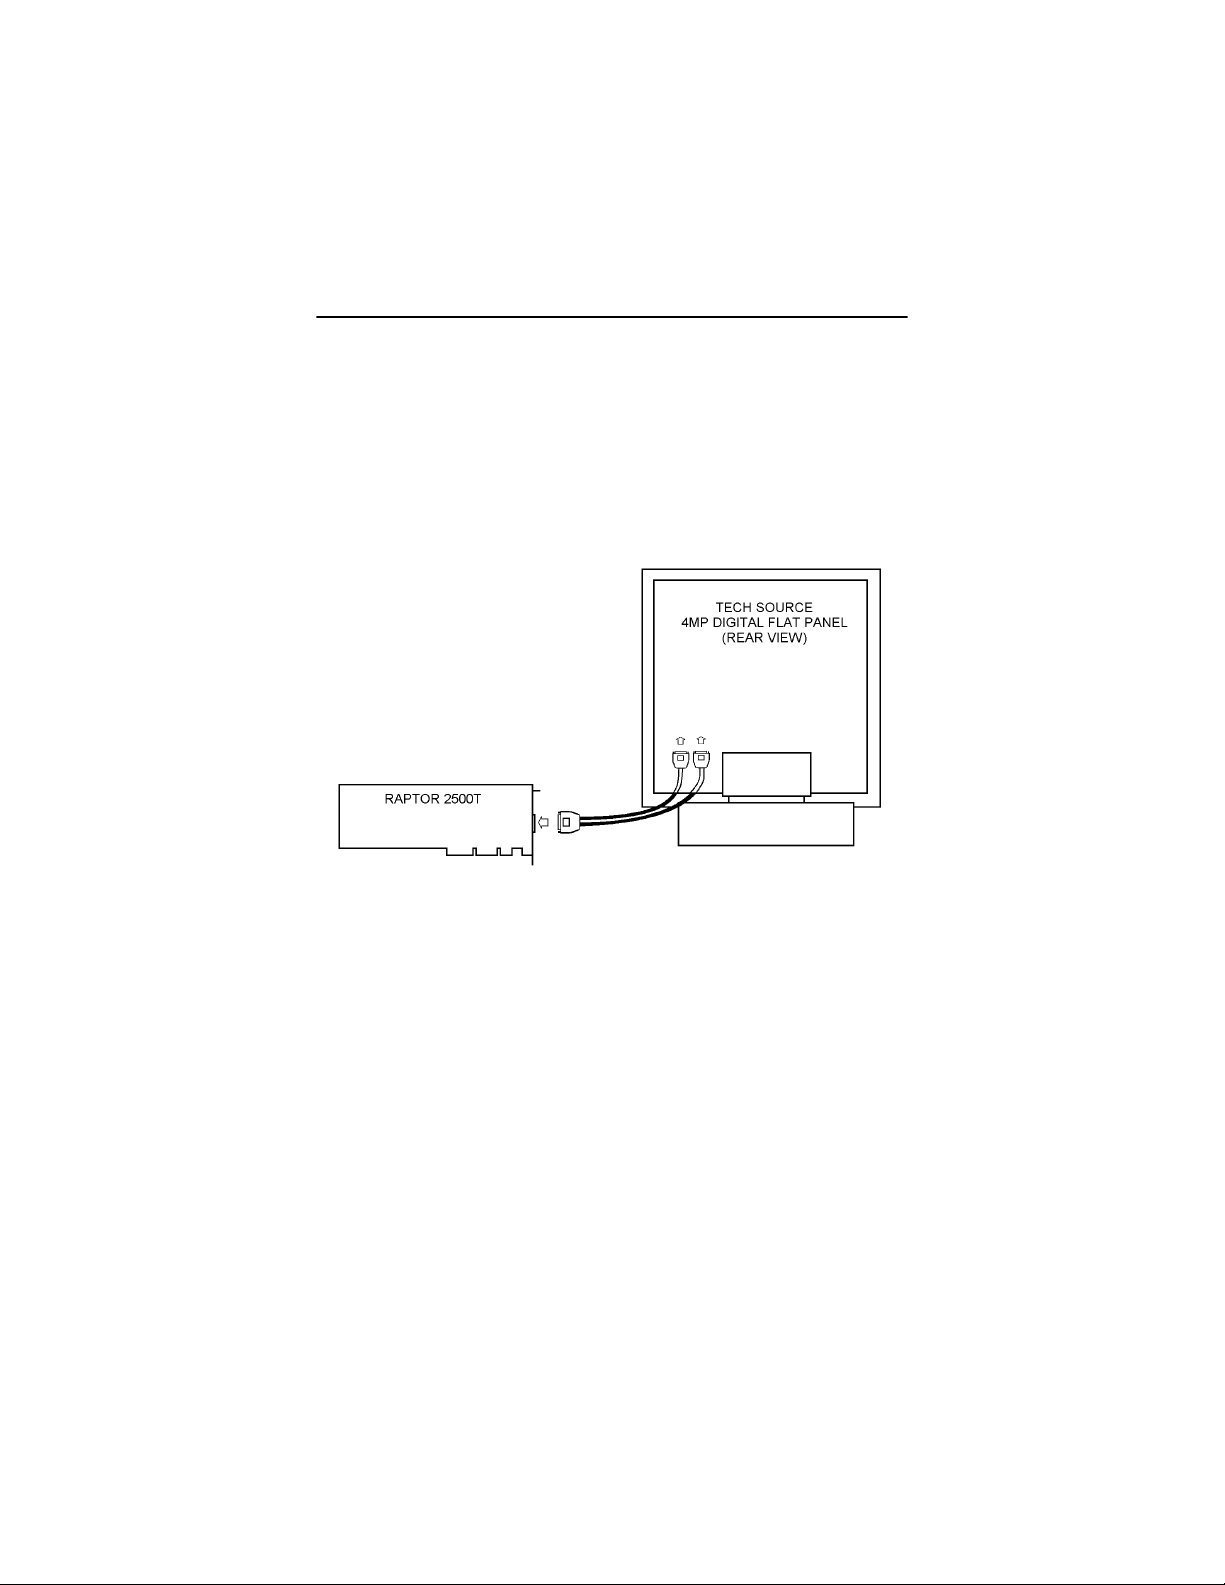
2.4 Installation of the Raptor 2100 FPS
The Raptor 2100 FPS is comprised of the Raptor 2500T graphics
card (configured for 2048x2048 resolution) and the Tech Source
2100 FPS digital flat panel, along with associated cables and
software. The subsystem is connected together as shown in Figure
2-2.
A B
Figure 2-2 – 2100 FPS Digital Flat Panel Subsystem
The Raptor 2500T card has one connector on the front bracket.
One side of the provided cable has the LFH60 connector that
connects to the graphics card. The cable splits into two with
MDR26 connectors on the opposite end. These two connectors
marked A & B get connected to the appropriately marked
connectors on the back of the digital flat panel. They are shown in
Figure 2-2. On some models of the digital flat panel, the
connectors may be recessed. In this instance, please remove the
back panel, plug the cables into the two marked connectors and
restore the back panel.
2-4
Page 13

Chapter 3
SOFTWARE INSTALLATION
3.1 Requirements
The following are prerequisites for installing Raptor X11R6.1 for AIX
Software:
• The system is running AIX 4.3.3, AIX 5.1, AIX 5.2
• Any previous version of TSI software has already been
uninstalled. (Please refer to the manual that accompanied that
software for the appropriate uninstall procedure).
• 41MB of disk space is available in /usr.
One or more of the cards listed in Section 1.1 is presently installed
in the workstation.
3.2 CD-ROM Installation
Installation of Raptor software can be done through SMIT. The
following are the step-by-step instructions for installing Raptor
X11R6.1 for AIX software from CD-ROM:
1. Install a Raptor card in the computer as described in
Chapter 2.
2. Login as root on the target install machine.
3. Uninstall any previous version of TSI software in
accordance with the instructions supplied with that
software.
The installation may fail if previous TSI software already
exists on the system.
3-1
Page 14

4. Insert the CD-ROM labeled “Raptor X11R6.1 for AIX" into
the CD-ROM drive.
5. Mount the CD-ROM drive. To do this using SMIT, perform
the following steps:
• Select System Storage Management | File
• In the File System Name box, select /dev/cd0
• In the Directory to Mount box, select /cdrom
• In the Type of File System box, select cdrfs
• In the Mount as READ-ONLY file system box,
6. Install the software. To do this using SMIT, perform the
following steps:
• Select Software Installation and Maintenance |
• Install Software
• In the Input Device/Directory for Software box,
For 43P and 44P machines:
• /cdrom/power3
For IntelliStation Power 275:
• /cdrom/power4
• In the Software to Install box, make sure it says
Raptor X11R6.1 for AIX Installation Manual
Systems | Mount a File System
(or the location of your CD-ROM device)
select yes.
Install and Update Software
select the appropriate directory below based on
the type of the system you use:
“_all_latest”.
3-2
Page 15

Chapter 3 – Software Installation
After installing the drivers, reboot the machine. Turn on the
machine and the AIX should now recognize the Raptor correctly.
You can verify this by entering the following command:
prompt% lsdisp
If a Raptor 2100T card is present in the system, this command
should return an entry like:
DEV_NAME SLOT BUS ADPT_NAME DESCRIPTION
======== ==== === ========= ===========
rap2kt0 02 pci Raptor2kt
Graphics
Adapter
Note: The Raptor cards are identified by the operating system as
follows:
Raptor 2100T rap2kt#
Raptor 2000-12M rap2kl#
Raptor 2000-24M rap2k#
Raptor 2000-24M AIX rap2ki#
Raptor 1100T rap1kt#
Raptor 2500T (5MP) raptfp5#
Raptor 2500T (4MP) raptfp4#
Where # is an instance number assigned by the operating system.
3.3 Configuring the Raptor as LFT Display
In order to use the Raptor card as the LFT display, use the chdisp
command to change the current display device to the Raptor
device.
For Raptor 2100T, type the following:
prompt% chdisp [-d|-p] rap2kt0
3-3
Page 16

Note: Use “-d” for temporary change of display until the next
reboot, or “-p” to make a permanent change of display
If the Raptor card is the only graphics device in the system, it will
automatically be configured as the default LFT (console) device.
Raptor X11R6.1 for AIX Installation Manual
3.4 Supported Resolutions
3.4.1 Raptor 2000-12M, Raptor 2000-24M, Raptor
2000-24M AIX, Raptor 2100T
The resolution for Raptor 2000-12M, Raptor 2000-24M, Raptor
2000-24M AIX and Raptor 2100T is fixed at 2048x2048.
3.4.2 Raptor 1100T
The Raptor 1100T card is capable of supporting multiple resolutions
and is software configurable. See Section 4.3.2 for details.
3.4.3 Raptor 2500T
The resolution for Raptor 2500T card and Raptor 2500 FPS Digital
Flat Panel subsystem is set as 2560x2048.
The resolution for Raptor 2500T card and Raptor 2100 FPS Digital
Flat Panel subsystem is set as 2048x2048.
3-4
Page 17

Chapter 4
INVOKING X11R6.1
4.1 Overview
There are several ways to invoke X11R6.1 on your system:
• xinit
• xdm
• Common desktop Environment (CDE)
• All of the above with MOX extension enabled
Important: For all these methods, there are some environment
variables that must be set. These can be set in your .cshrc file.
prompt% setenv X11R6HOME /usr/X11R6.1
prompt% setenv LD_LIBRARY_PATH \
prompt% set path=($X11R6HOME/bin $path)
The Xtsi server is provided in the $X11R6HOME/bin directory.
The examples used in this chapter refer to the device rap2kt0.
Your actual device name will vary according to the Raptor card type
and the instance number.
4.2 xinit
The xinit program can be directly used to start the X Window
System server. The xinit format is as follows:
xinit [[client] options] [ -- [server]
[display] options ]
$X11R6HOME/lib
4-1
Page 18

Raptor X11R6.1 for AIX Installation Manual
If no specific client program is given on the command line, xinit
will look for a file in the user's home directory called .xinitrc to
run as a shell script to start up client programs. If no such file
exists, xinit will use the following as a default:
xterm -geometry +1+1 -n login -display :0
If no specific server program is given on the command line, xinit
will look for a file in the user's home directory called .xserverrc
to run as a shell script to start up the server. If no such file exists,
xinit will use the following as a default:
X :0
Note that this assumes that there is a program named X in the
current search path. The X11R6.1 server in this software is called
Xtsi and is in the directory $X11R6HOME/bin. A symbolic link
has been made from X to Xtsi.
To startup the server using xinit, type:
prompt% xinit -- $X11R6HOME/bin/Xtsi -P11
You may add any other command line arguments to the end of the
line. For additional information on xinit, refer to the xinit man
page.
The X server can run in multi-screen mode. The example below
shows how to start on Raptor 2100T and Raptor 1100T:
prompt% xinit -- $X11R6HOME/bin/Xtsi –P11 rap2kt0
NOTE: The Raptor 2000 and Raptor 200-12M cards cannot be
used in multi-screen configurations.
rap2kt0
–P12 rap1kt0
4-2
Page 19

Chapter 4 - Invoking X11R6.1
4.3 Setting Bit-Depth and Resolution
4.3.1 Setting Bit-Depth
Raptor cards support various bit-depths and overlay configurations.
This section describes the required settings for these
configurations. The default bit-depth for all Raptor cards is 8-bit.
4.3.1.1 Setting Bit-Depth on Raptor 2000
The Raptor 2000 supports 8-bit, mox16 and mox24 modes (see
Table 1.)
Mode/Bit-Depth Description of Mode
8-bit 8-bit PseudoColor visual
mox16 mox mode w/16 planes
mox24 mox mode w/24 planes
Table 1
An explanation of the different MOX modes can be found in Section
4.4.
To start X Windows with a specific depth on a Raptor 2000 card,
the environment variable STARSMODE needs to be set. For
example to start X Windows in 8-bit only mode set the STARSMODE
environment variable to +8 before starting up the X server.
prompt% setenv STARSMODE +8
Other bit-depths can be selected in a similar manner.
4-3
Page 20

Raptor X11R6.1 for AIX Installation Manual
4.3.1.2 Setting Bit-Depth on T-Class Cards
The bit-depth of Raptor 1100T, Raptor 2100T and Raptor 2500T
can be set to 8-bit only, 8+24-bit, 24-bit, mox16, mox24 or mox32
(see Table 2.)
Mode/Bit-Depth Description of Mode
8-bit 8-bit PseudoColor visual
8+24 mode One 8-bit visual + One 24-bit visual
(simultaneous)
24-bit 24-bit TrueColor visual only
mox16 mox mode w/16 planes
mox24 mox mode w/24 planes
mox32 mox mode w/32 planes
Table 2
An explanation of different MOX modes can be found in Section
4.4.
There are two ways to set bit-depth on Raptor 1100T, Raptor 2100T
and Raptor 2500T:
• By setting the environment variable
• By editing the config file /etc/X11/TSIScreenConfig
4.3.1.2.1 STARSMODE Variable
The bit-depth of the Raptor T-Class card can be set using the
STARSMODE environment variable. This variable should be set
before starting up the X server.
For example, set the bit-depth of the Raptor T-Class card to 8+24
prompt% setenv STARSMODE +8+24
To set the bit-depth of the Raptor T-Class card to mox16
prompt% setenv STARSMODE +mox16
STARSMODE
4-4
Page 21

Chapter 4 - Invoking X11R6.1
Other bit-depths can be selected in a similar manner.
NOTE: In the case when both methods to set bit-depth are used,
the STARSMODE variable takes precedence over the settings in the
TSIScreenConfig file.
4.3.1.2.2 Config File
The depth and resolution of the Raptor T-Class card can be set
using the /usr/X11R6.1/etc/TSIScreenConfig file. Each
row in the file corresponds to a specific Raptor T-Class card that is
identified by its device name. The fields in each row are separated
by spaces. In the sample config file shown below the bit-depth of
the Raptor 1100T (rap1kt0) card is set to 8+24. The cached
pixmap field is used for debugging purposes only and should
always be set to 1. The other fields are discussed in 4.3.2.
# device Depth Resolution Sync Cached Resfile
pixmap
rap1kt0 8+24 DEFAULT 1 1 trzresinfo
The default visual in 8+24-bit mode is PseudoColor. In order to set
the default visual in the 8+24-bit mode to TrueColor, the X Server
should be started with command line option cc set to 4. The
example below shows how to set the default visual to TrueColor for
the card rap2kt0.
#xinit -- $X11R6HOME/bin/Xtsi –Pll rap2kt0 –cc 4
NOTE: This method of setting the default visual has an effect only
in the 8+24-bit mode.
4-5
Page 22

Raptor X11R6.1 for AIX Installation Manual
4.3.2 Setting the Resolution
The resolution of the Raptor 2000 and Raptor 2100T cards is fixed
at 2048x2048. The Raptor 2500T is configured in hardware to
support either 2048x2048 or 2560x2048 resolutions. Therefore,
depending on your flat panel subsystem, it will support the
appropriate resolution. For example, Raptor 2500 FPS supports
2560x2048 and Raptor 2100 FPS supports 2048x2048. The Raptor
1100T supports multiple resolutions.
The resolution of the Raptor 1100T card can be changed by editing
the config file the /usr/X11R6.1/etc/TSIScreenConfi g . By
default, the resolution of this card is set to 1280x1024x60. Each
row in the config file corresponds to a Raptor card that is
identified by its device name. The fields in each row are separated
by spaces. The resfile field specifies the file that contains a list
of available resolutions and the corresponding timing numbers.
Normally, this file is called trzresinfo and is located in
/usr/X11R6.1/etc. The cached pixmap field is used for
debugging purposes only and should always be set to 1.
The resolution field should contain the name of a resolution from the
resfile. The sync field can be used to specify a sync flag. If it is
set to 1, the sync flag will default to the value specified in the
resfile. An explanation of the various sync flags can be found in
the trzresinfo file.
# device Depth Resolution Sync Cached Resfile
pixmap
rap1kt0 8+24
1600x1200x60 1 1 trzresinfo
4-6
Page 23

Chapter 4 - Invoking X11R6.1
4.4 Enabling MOX Extension During
X11R6.1 Server Startup
By default, the X11R6.1 server starts in an 8-bit mode. However,
on Raptor cards you may start the X11R6.1 server with MOX
extension enabled. (Details of the MOX Extension to X Server are
in separate technical white paper documentation.)
These MOX modes apply to all Raptor cards:
mox16 MOX, 8-bit Normal, 13-bit Group, 5-bit Absolute
mox24 MOX, 8-bit Normal, 21-bit Group, 13-bit Absolute
The Raptor 1100T, Raptor 2100T and Raptor 2500T can support
the following additional MOX mode.
mox32 MOX, 8-bit Normal, 29-bit Group, 21-bit Absolute
To enable MOX on a Raptor card, set the bit-depth to one of the
MOX modes. Please refer to Section 4.3.1 for details.
4.5 xdm
The X Display Manager (xdm) program is used for running multiple
users on the same host machine. xdm provides services similar to
those provided by init, getty and login on character terminals
prompting for login name and password, authenticating the user,
and running a session. It provides a login window for each user or
selected users.
Several files that are required to start xdm are provided in the
directory $X11R6HOME/lib/X11/xdm. The configuration file
xdm-config contains references to the other files and is used to
specify other configuration parameters of xdm. The Xservers file
specifies the users (displays) that must get a login window.
4-7
Page 24

Raptor X11R6.1 for AIX Installation Manual
The Xservers file will have individual lines to represent the Xserver startup on each of the display device on which an xdm login
screen is desired. Each startup line in Xservers file should be
modified to look like the following to enable the Raptor device
based xdm login screen:
:0 Local local-uid@console root \
/usr/X11R6.1/bin/Xtsi :0 –P11 rap2kt0
You may also add any other command line arguments to the end of
the line. For more information on xdm refer to the xdm man pages.
4.5.1 MOX Mode Using xdm
In order to enable MOX under xdm you must make use of the
StartWin script installed in /usr/X11R6.1/etc. The
Xservers file should be modified as follows:
:0 local /usr/X11R6.1/bin/StartWin:0
Additional command line options can be appended at the end of
this line. The following example StartWin script will start up the
X Server in mox24 mode.
#!/bin/sh
STARSMODE=+mox24
export STARSMODE
pass=“/usr/X11R6.1/bin/Xtsi”$*
exec $pass
NOTE: By default, the StartWin script starts up the X Server in
mox24 mode. It can be edited in order to support other MOX
modes.
4-8
Page 25

Chapter 4 - Invoking X11R6.1
4.6 Common Desktop Environment (CDE)
Common Desktop Environment (CDE) is available with AIX and is
independent of the Raptor software. In order to use CDE, you need
to configure only /usr/dt/config/Xservers file. The example
below shows how to modify Xservers file to start CDE on Raptor
2100T.
:0 local /usr/x11R6.1/bin/Xtsi –Pll rap2kt0 :0
CDE can be started by typing:
prompt# /usr/dt/bin/dtlogin
4.6.1 MOX Mode Using CDE
In order to enable MOX when using CDE, you must make use of
the StartWin script installed in /usr/X11R6.1/etc. The
Xservers file should be modified as follows:
:0 local /usr/X11R6.1/bin/StartWin:0
Additional command line options can be appended at the end of
this line. The following example StartWin script will start up the
X Server in mox24 mode.
#!/bin/sh
STARSMODE=+mox24
export STARSMODE
pass=“/usr/X11R6.1/bin/Xtsi”$*
exec $pass
NOTE: By default, the StartWin script starts up the X Server in
mox24 mode. It can be edited in order to support other MOX
modes.
4-9
Page 26

Raptor X11R6.1 for AIX Installation Manual
This page intentionally left blank.
4-10
Page 27

Chapter 5
UNINSTALLING RAPTOR
X11R6.1 FOR AIX
5.1 Uninstall Using SMIT
To uninstall Raptor X11R6.1 for AIX using SMIT, perform the
following steps:
• Select Software Installation and Maintenance |
Maintain Installed Software | Remove Software Products
• In the Software Name box, select the installed Raptor
software products.
• Click the button to complete the uninstallation.
The following are installed Raptor packages:
• raptor.srv
• raptor.x11r61
• raptor.xmox
• devices.pci.27122000.rte
• devices.pci.27122000.msg.en_US.rte
• devices.pci.27120400.msg.en_US.rte
• devices.pci.27120400.rte
• devices.pci.27120500.rte
• devices.pci.27120500.msg.en_US.rte
• devices.pci.27120f00.msg.en_US.rte
• devices.pci.27120f00.rte
• devices.pci.27122700.msg.en_US.rte
• devices.pci.27122700.rte
• devices.pci.27126700.msge.en_US.rte
• devices.pci.27126700.rte
• devices.pci.27121d00.msge.en_US.rte
• devices.pci.27121d00.rte
5-1
Page 28

Raptor X11R6.1 for AIX Installation Manual
Note: Be sure that the Preview Only option is set to no prior to
uninstalling, or else the uninstallation will not actually occur.
5-2
Page 29

Chapter 6
r
TECHNICAL ASSISTANCE
6.1 Who to Call for Help
If you need help, please call our Technical Support Team at
(800) 330-8301, or directly at (407) 262-7100 between the hours
of 9:30am - 5:30pm EST Monday through Friday.
Please have the software part number, version, and serial
number for your Raptor card(s) available when contacting Tech
Source in order to expedite support. Please make a note of this
information in the area below:
DETAILS OF YOUR CARD(S):
P/N: _________________________________
Model Name: ___________________________
Serial Number(s): ____________________
NOTE: Technical Assistance will be available only fo
products under standard or extended warranty.
6.2 Email Address
Our email address is hotline@techsource.com.
International customers should use email or our fax line at (407)
339-2554.
6-1
Page 30

Raptor X11R6.1 for AIX Installation Manual
6.3 Website
Detailed product information and Frequently Asked Questions
(FAQs), are available on our website located at:
http://www.techsource.com
6-2
Page 31

Appendix A
CARD SPECIFICATIONS
A.1 Raptor 2100T Specifications
Frame Buffer: 64MB SGRAM
MOX Hardware: Tech Source MOX ASIC; 32 layer
Priority Management,
Hardware Cursor: Up to 3 cursors
Color Lookup
Table(s) 2048 main, 512 auxiliary entries
PCI Interface: 33/66 MHz, 32/64-bit
Universal Signaling
Video Interface: Red, Green, Blue, at RS-343
(50 ohm)
Video Sync: Separate sync at TTL levels,
(75 ohm)
Video Connector: DB-5W5
Temperature 10
Rating: -10
Humidity Rating: 5 to 90% (non-condensing)
Power Rating: +5 @ 5 Amps
Dimensions: 312mm x 107mm (12.28” x 4.2”)
2 blending layers
0
to 500C operating
0
to 700C non-operating
A-1
Page 32
Raptor X11R6.1 for AIX Installation Manual
A.2 Raptor 2500T Specifications
Frame Buffer: 64MB SGRAM
MOX Hardware: Tech Source MOX ASIC; 32 layer
Priority Management,
Hardware Cursor: Up to 3 cursors
Color Lookup Primary color map with 2048
Tables: entries and two auxiliary color
PCI Interface: 33/66 MHz, 32/64-bit
Universal Signaling
Video Connector: One Low Force Helix 60-pin
(LFH60) connector
[all digital interface]
Temperature 10
Rating: -10
Humidity Rating: 5 to 90% (non-condensing)
Power Rating: +5V @ 5 Amps
Dimensions: 312mm x 107mm (12.28” x 4.2”)
2 blending layers
maps with 256 entries each
0
to 500C operating
0
to 700C non-operating
A-2
Page 33

Appendix A – Card Specifications
A.3 Raptor 2000-12M Specifications
Frame Buffer: 8-bit single or double buffered;
12 Megabytes VRAM
MOX Hardware: Tech Source MOX ASIC; 24 layer
Priority Management
Hardware Cursor: 3 color, 64 x 64 bitmap
Color Lookup
Table(s): 1024 entries
PCI Interface: 33 MHz, 32-bit
Video Interface: Red, Green, Blue, at RS-343
(50 ohms)
Video Sync: Separate sync at TTL levels
(75 ohms)
Video Connector: DB-5W5
Temperature 10
Rating: -10
Humidity Rating: 5 to 90% (non-condensing)
Power Rating: +5V @ 4 Amps; +12V @ 100mA
Dimensions: 312mm x 107mm (12.28” x 4.2”)
0
to 500C operating
0
to 700C non-operating
A-3
Page 34

Raptor X11R6.1 for AIX Installation Manual
A.4 Raptor 2000-24M Specification
Frame Buffer: 8-bit single or double buffered;
24 Megabytes VRAM
MOX Hardware: Tech Source MOX ASIC; 24 layer
Priority Management
Hardware Cursor: 3 color, 64 x 64 bitmap
Color Lookup
Table(s): 1024 entries
Drawing Processor: Number 9 Imagine 128; Series 2
PCI Interface: 33 MHz, 32-bit
Video Interface: Red, Green, Blue, at RS-343
(50 ohms)
Video Sync: Separate sync at TTL levels
(75 ohms)
Video Connector: DB-5W5
Temperature 10
Rating: -10
Humidity Rating: 5 to 90% (non-condensing)
Power Rating: +5V @ 4 Amps; +12V @ 100mA
Dimensions: 312mm x 107mm (12,28” x 4.2”)
0
to 500C operating
0
to 700C non-operating
A-4
Page 35

Appendix A – Card Specifications
A.5 Raptor 2000–24M AIX Specifications
Frame Buffer: 8-bit single or double buffered;
24 Megabytes VRAM
MOX Hardware: Tech Source MOX ASIC; 24 layer
Priority Management
Hardware Cursor: 3 color, 64 x 64 bitmap
Color Lookup
Table(s): 1024 entries
Drawing Processor: Number 9 Imagine 128; Series 2
PCI Interface: 33 MHz, 32-bit
Video Interface: Red, Green, Blue, at RS-343
(50 ohms)
Video Sync: Separate sync at TTL levels
(75 ohms)
Video Connector: DB-5W5
Temperature 10
Rating: -10
Humidity Rating: 5 to 90% (non-condensing)
Power Rating: +5V @ 4 Amps; +12V @ 100mA
Dimensions: 312mm x 107mm (12,28” x 4.2”)
0
to 500C operating
0
to 700C non-operating
A-5
Page 36

Raptor X11R6.1 for AIX Installation Manual
A.6 Raptor 1100T Specifications
Frame Buffer: 32MB SGRAM
MOX Hardware: Tech Source MOX ASIC; 32 layer
Priority Management,
Hardware Cursor: Up to 3 cursors.
Color Lookup Primary color map with 2048
Tables: entries and two auxiliary color
PCI Interface: 33/66 MHz, 32/64-bit
Universal Signaling
Video Interface: Red, Green, Blue, at RS-343A
(75 ohm)
Video Sync: Separate or composite syncs at
Video Connector: DB-13W3
Temperature 10
Rating: -10
Humidity Rating: 5 to 90% (non-condensing)
Power Rating: +5V @ 5 Amps
Dimensions: 312mm x 107mm (12.28” x 4.2”)
2 blending layers
maps with 256 entries each
TTL levels, (75 ohm)
0
to 500C operating
0
to 700C non-operating
A-6
Page 37

Notes
Page 38

Notes
Page 39

Notes
Page 40

Publication # 65-0205-01
 Loading...