

Page 1

Morae 3.0
Recorder Help File PDF
By TechSmith Corporation
Page 2

TechSmith License Agreement
TechSmith Corporation provides this manual "as is", makes no
representations or warranties with respect to its contents or use, and
specifically disclaims any expressed or implied warranties of
merchantability or fitness for any particular purpose. TechSmith
Corporation reserves the right to make changes to the content of this
manual, at any time, without obligation to notify any person or entity of
such changes.
The software described in this document is furnished under a license
agreement. The software may be used, copied, or transferred only in accordance with the terms and
conditions of the License Agreement. It is against the law to copy the software on any medium except as
specifically allowed under the terms and conditions of the license agreement.
No part of this manual may be reproduced or transmitted in any form or by any means, electronic or
mechanical, including photocopying,
recording, or information storage and retrieval systems, or any other means, now known or hereafter
becomes known, for any purpose
other than the purchaser’s personal use, without the express prior written
permission of TechSmith Corporation.
Copyright © 1990-2008 TechSmith Corporation.
All Rights Reserved. Printed in the United States of America.
Trademarks
TechSmith, SnagIt, Camtasia, Camtasia Studio and Morae are U.S., EU and Japanese registered
trademarks owned by TechSmith Corporation. EnSharpen, DubIt, TSCC,
Enterprise Wide, and Newsmonger are also registered marks owned by TechSmith Corporation Uservue,
Screencast.com, and Rich Recoding Technology are also marks owned by TechSmith Corporation. The
absence of a name/mark or logo in this paragraph/notice does not constitute a waiver of any and all
intellectual property rights that TechSmith Corporation has established in any of its product, feature or
service names/marks or logos.
All other registered trademarks and trademarks are the property of their
respective companies. All rights reserved.
Page 3

Welcome to Morae
Morae Recorder
Help PDF
Page 1
www.techsmith.com
Morae is the premier software for deeply understanding customer experiences…and sharing those insights
clearly and powerfully. From usability testing to focus groups and beyond, Morae helps you transform designs
and marketing to make things people love.
Want to test your design? Morae makes it easy to pinpoint usability problems in software applications,
websites, prototypes, or mobile devices. Install Morae on a laptop to test at a conference or in the field!
The software captures every nuance of your testing session. See the look on a participant’s face, hear the
frustration in her voice, and discover hidden problems in your product or site. Search across recordings,
automatically calculate and graph standard metrics, and more.
Doing market research? Use Morae with up to two video cameras to record a focus group or in-depth
interview. Type notes and flag important moments as you go—all your observations are indexed to the digital
video on your hard drive, eliminating hours of tedious work.
When it’s time to present your findings, simply drag and drop video clips to produce a highlight reel. Export
charts, screenshots, and videos in standard formats…or send them directly to Microsoft Office with a click!
Work faster, more flexibly, and deliver stronger results with Morae.
Morae consists of three applications – Morae Recorder, Morae Observer and Morae Manager. These three
applications work together to record, observe, log, analyze and share a user’s experience.
See also:
• Morae Overview
• System Requirements
•
Welcome to Morae Observer
•
Get Started with Morae Observer
•
Customize Observer for Your Session
Log a Session
•
•
Tips and Reference Information
Morae Overview
Morae is the premier software for deeply understanding customer experiences…and sharing those insights
clearly and powerfully. From usability testing to focus groups and beyond, Morae helps you transform designs
and marketing to make things people love.
Morae reduces the amount of work needed, not only at setup, but also during the data logging, analysis,
reporting and presentation stages.
Based on TechSmith’s patented Rich Recording Technology (RRT), Morae is a complete solution that records
the computer screen and camera video and also automatically creates a synchronized index of events
occurring behind the scenes in applications and in the operating system. You can search screen and video
recordings for specific events that occurred — like when a user viewed a Web page, clicked a link, pressed a
certain key, opened a dialog box or viewed specific text. You can easily perform in-depth analysis, log tasks,
create reports and quickly create video presentations to share.
See also Quick Overview of Morae Applications.
Page 4

Morae Recorder
Help PDF
Page 2
www.techsmith.com
Page 5
Quick Overview of Morae Applications
Morae Recorder
Help PDF
Page 3
www.techsmith.com
Morae includes three applications: Morae Recorder, Morae Observer, and Morae Manager. These
components work together to provide an easy-to-use, total recording system based on TechSmith’s patented
Rich Recording Technology (RRT).
Record – Morae Recorder
Utilizing RRT, Morae Recorder creates a complete chronicle of the events that occur behind the scenes in
applications and the operating system, as well as the onscreen and keyboard activity of the user. These data
streams are recorded in sync with video of the user (through a web camera or other camera device) and
audio of the user (through a microphone). Because Recorder runs silently in the background, it never disturbs
the user. Recorder captures only the input streams you specify during configuration. Recorder saves the
recording in a file format you can open in Morae Manager for analysis.
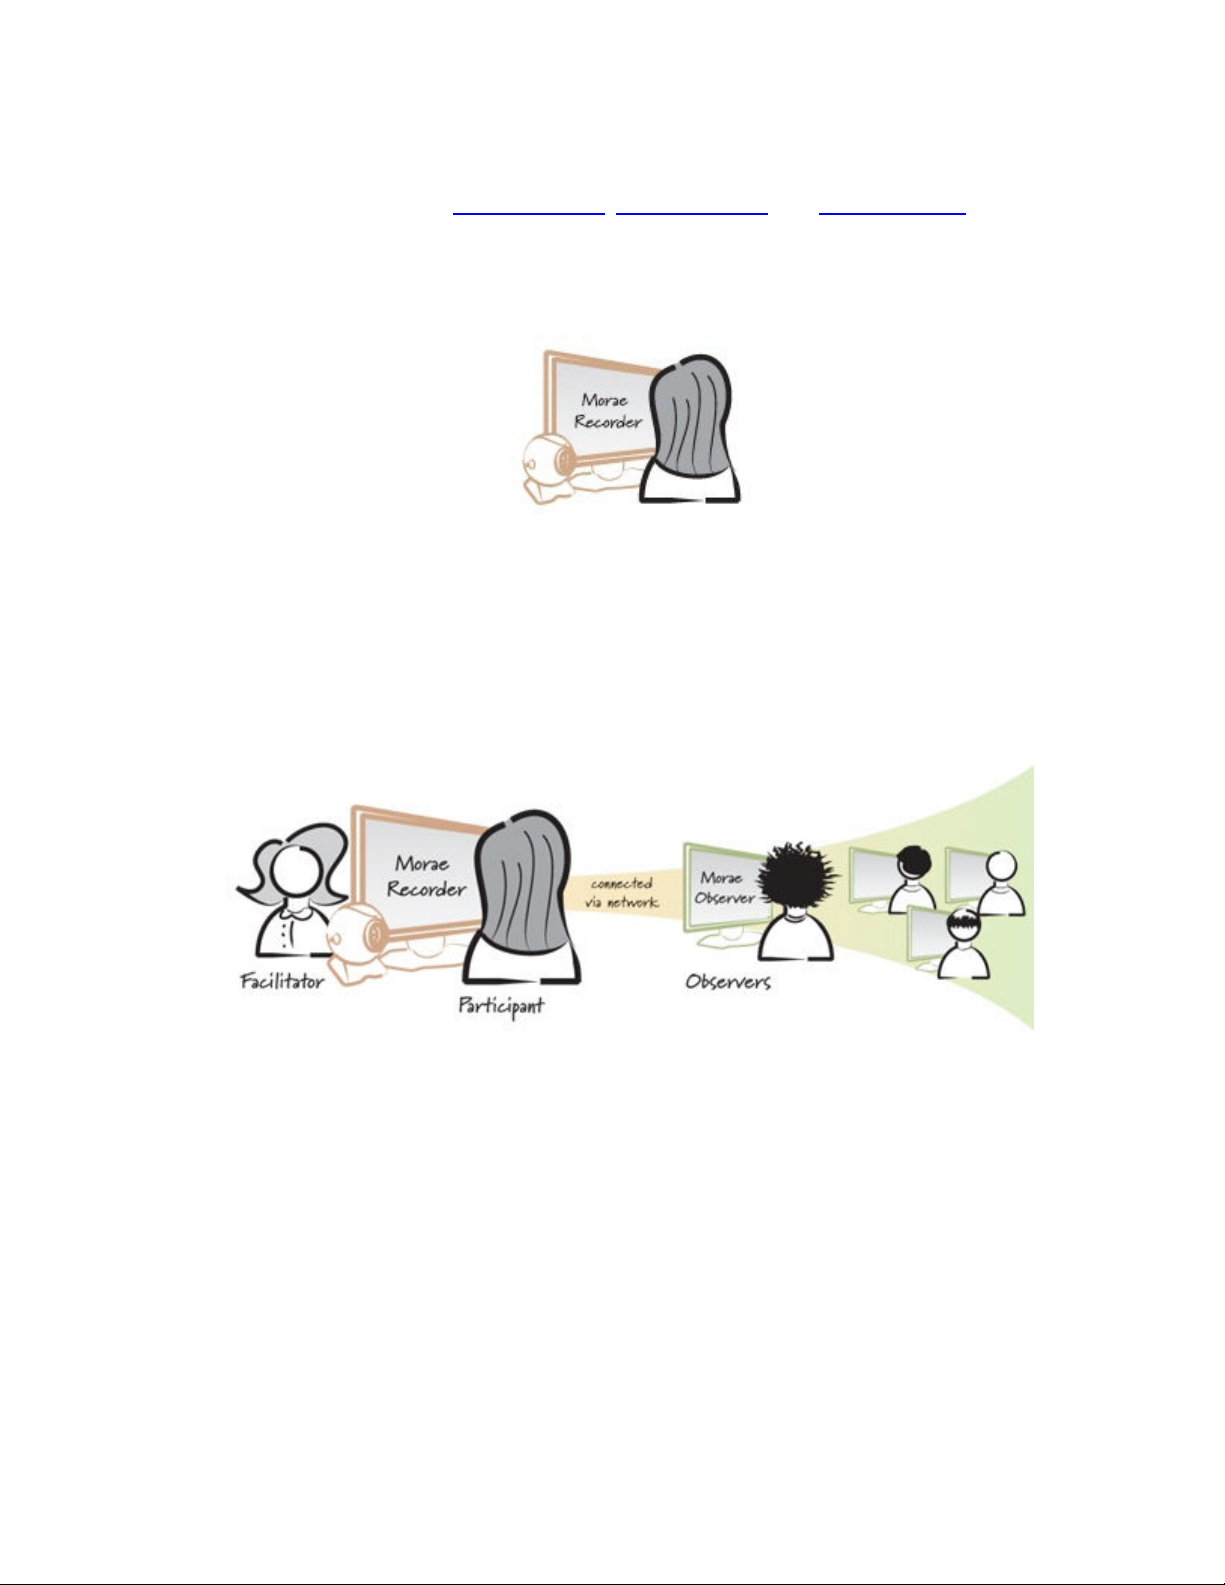
Observe and Log – Morae Observer
Morae Observer provides support for one or multiple computers to connect over a network to a computer
running Recorder. This flexibility allows your entire usability team to observe the screen and camera video
and hear the audio of the user, streaming from the Recorder source computer. Anyone logged into an
Observer computer can add markers during recording complete with text notes. Tasks are logged by one
Observer designated as the task logger. Observer automatically saves and indexes the markers and tasks
with the accompanying video and audio streams. The camera video, screen video and audio streams can be
saved locally in a WMV file for immediate playback. Utilizing multiple Observers, usability teams can conduct
collaborative user experience testing.
Page 6
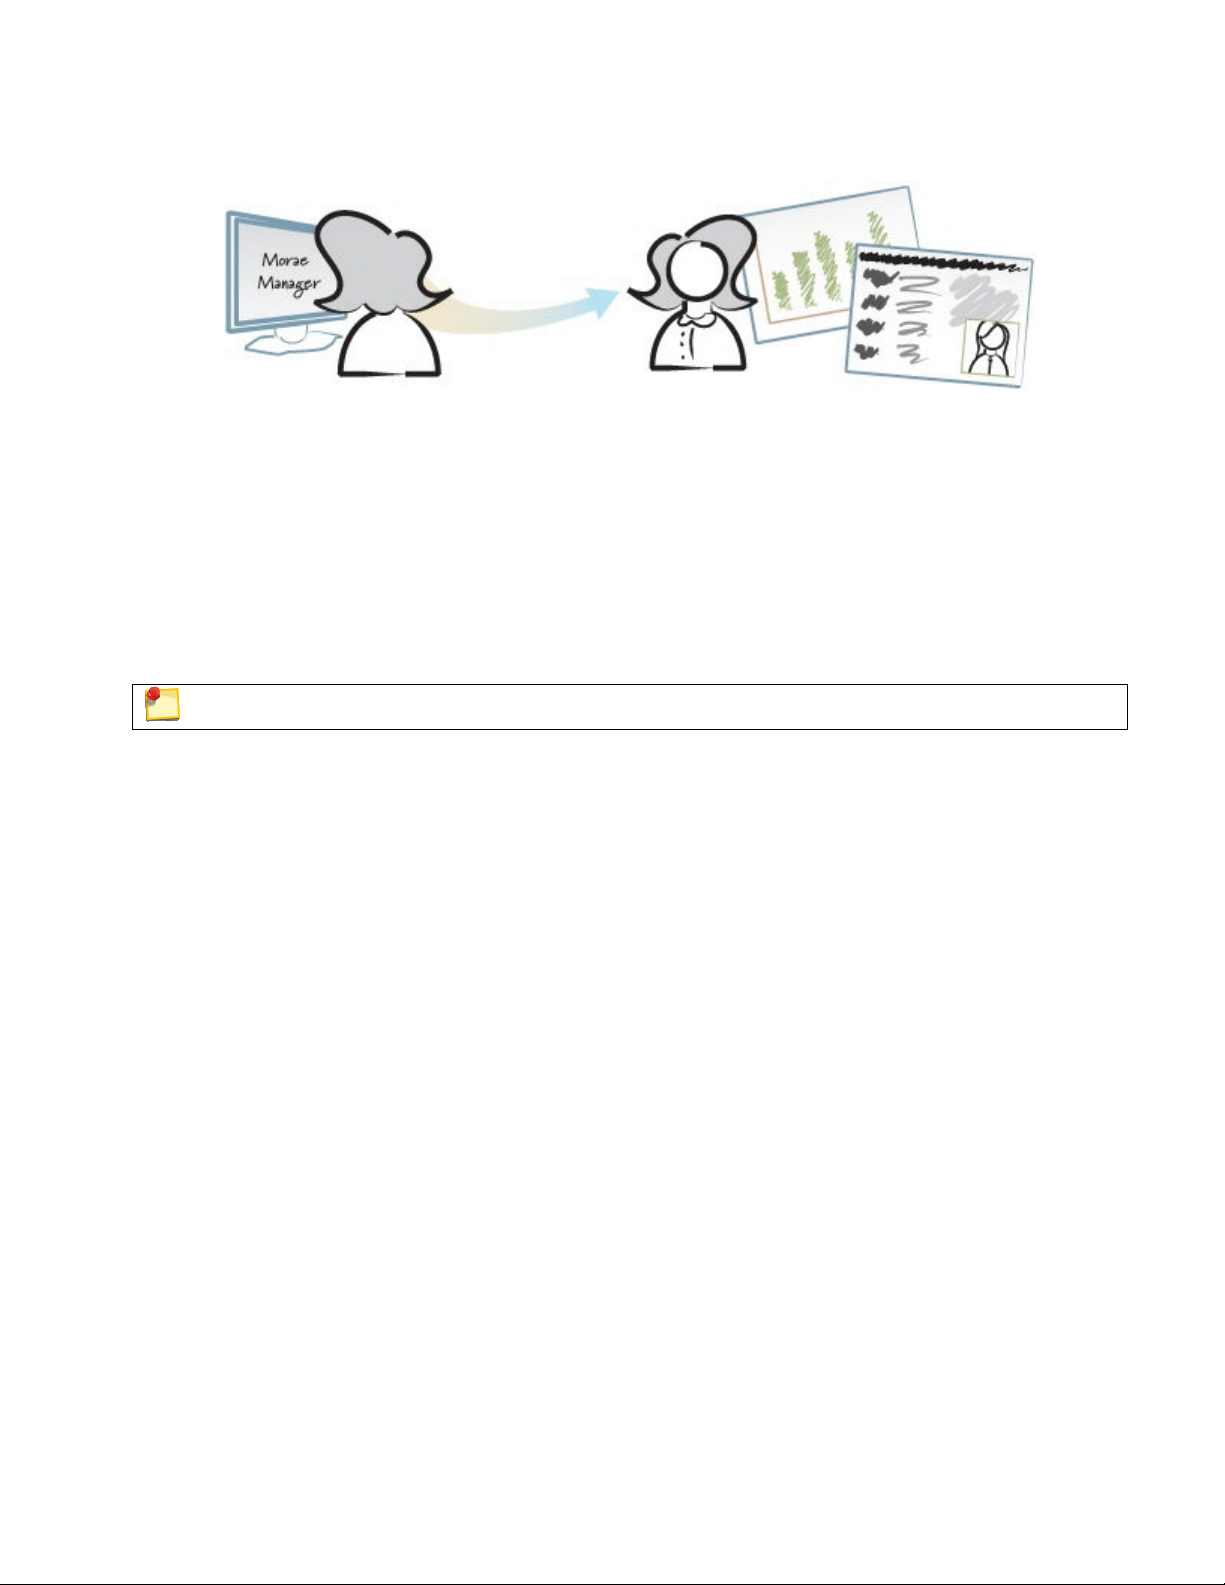
Analyze, Graph, and Share – Morae Manager
Morae Recorder
Help PDF
Page 4
www.techsmith.com
Within Morae Manager, you can start new projects and edit existing projects, configure Recorder settings,
open and analyze recordings, create graphs of your analysis and metrics and create a presentation video.
Rich Recording Technology automatically indexes the screen and video recordings collected by Recorder,
allowing you to easily search through recordings in Morae Manager.
You can isolate tasks, important points in the video, add text notes, annotate with audio and quickly create
video highlights to share. You can display the screen video with the video of the user as a picture-in-picture
image.
System Requirements
These are the same for all three Morae components on desktops and laptops.
Minimum
• Windows XP or Vista
• 2.0 GHz Pentium M, 3.0 GHz Pentium 4, or equivalent processor
• 1 GB RAM or more
• Dedicated video card with at least 64MB of dedicated video memory
• PCI Express graphics
• DirectX version 9.0 or later
• Windows-compatible sound card, microphone, and speakers
• Approximately 10-15 MB disk space per minute for recording and highlight video creation
• Networked computer with 10 Mbps (Required for Observer)
Recommended
• Windows XP or Vista
• 2.0 GHz Core 2 Duo or equivalent processor
• 2 GB RAM or more
• Dedicated video card with at least 128MB of dedicated video memory
• PCI Express x16 graphics
• DirectX version 9.0c or later
• Windows-compatible sound card, microphone, and speakers
• Approximately 10-15 MB disk space per minute for recording and highlight video creation
• Networked computer with 100 Mbps or higher (Required for Observer)
Page 7
Getting Help with Morae
Morae Recorder
Help PDF
Page 5
www.techsmith.com
Several resources are available to help when you run into questions or problems with Morae.
Morae Help Files
Each of the Morae components has its own Help File. Recorder, Observer, and Manager’s Help files contain
detailed information describing how to use Morae. Access the Help files through the Help menu or Help
buttons found in the user interface.
To open a help topic for the screen or area you are currently using,, press <F1> on your keyboard.
Morae Learning Center
For additional help, videos, and tutorials see the Morae Learning Center.
TechSmith Technical Support
We provide help with Morae installation-related issues at no cost. If you experience problems installing Morae,
search our Knowledge Base. If you don’t find your answer there, use the Contact Support tab in the
Knowledge Base to send your question to TechSmith Technical Support.
TechSmith Web Site
Additional support resources are available online at TechSmith’s Web site.
Balloon Tips and Tip Dialogs
Morae provides balloon tips (in Manager only) and tip dialogs (in Manager and Recorder). Both types of tips
contain helpful information and recommendations related to the task you are trying to complete.
Balloon tips appear only the first couple of times you complete a particular task and then they automatically
stop appearing. To reset the balloon tips, choose Help > Reset Balloon Tips.
Tip dialogs always appear unless you disable one or more of the dialogs manually. To disable all of the tip
dialogs:
• Recorder – Choose Record > Machine Settings > Preferences tab and remove the checkmark from
the Show all tips option.
• Manager – Choose File > Preferences and remove the checkmark from the Show all tips option.
You can disable an individual tip dialog by removing the checkmark from the Show tip again option in the
lower left-hand corner of the dialog box.
Page 8

Welcome to Morae Recorder
Morae Recorder
Help PDF
Page 6
www.techsmith.com
Install Morae Recorder on a computer to record a participant’s experience, including audio comments, screen
video, and/or camera video.
When recording the computer screen, Recorder also captures all system activity, including mouse clicks, web
page changes, and other application information. Recorder automatically synchronizes the video and the data,
creating a complete digital record of the user experience.
When recording from camera(s) only, you can log the session with Recorder. For more information on logging
on the computer running Recorder, see
See also:
• How to Use Morae Recorder
• Get to Know the Recorder Interface
•
Study Configurations
• Recording Details
• Study Details
• Video and Audio Sources
• Recorder Preferences
Log a Session.
Rich Recording Technology
Using Rich Recording Technology (RRT), Recorder creates a complete chronicle of the events that occur
behind the scenes in applications and the operating system, as well as the onscreen and keyboard activity of
the user. This data is recorded in sync with video and audio of the user.
After importing recordings into Morae Manager, you can search the recording files for the items captured with
RRT.
See also
How Rich Recording Technology (RRT) Works.
Page 9

Get to Know the Recorder Interface
Morae Recorder
Help PDF
Page 7
www.techsmith.com
Use the following figure to become familiar with the main parts of the Recorder interface. To get started
recording a session, see How to Use Morae Recorder.
Recorder Toolbar
Quickly access common Recorder functions. For more information, see Recorder
Toolbar.
Record Button
Click to start a recording. Recorder provides flexible options to start Recorder
depending on your equipment and participant set up. For more information, see
Recording Start Settings and Recording Stop Settings.
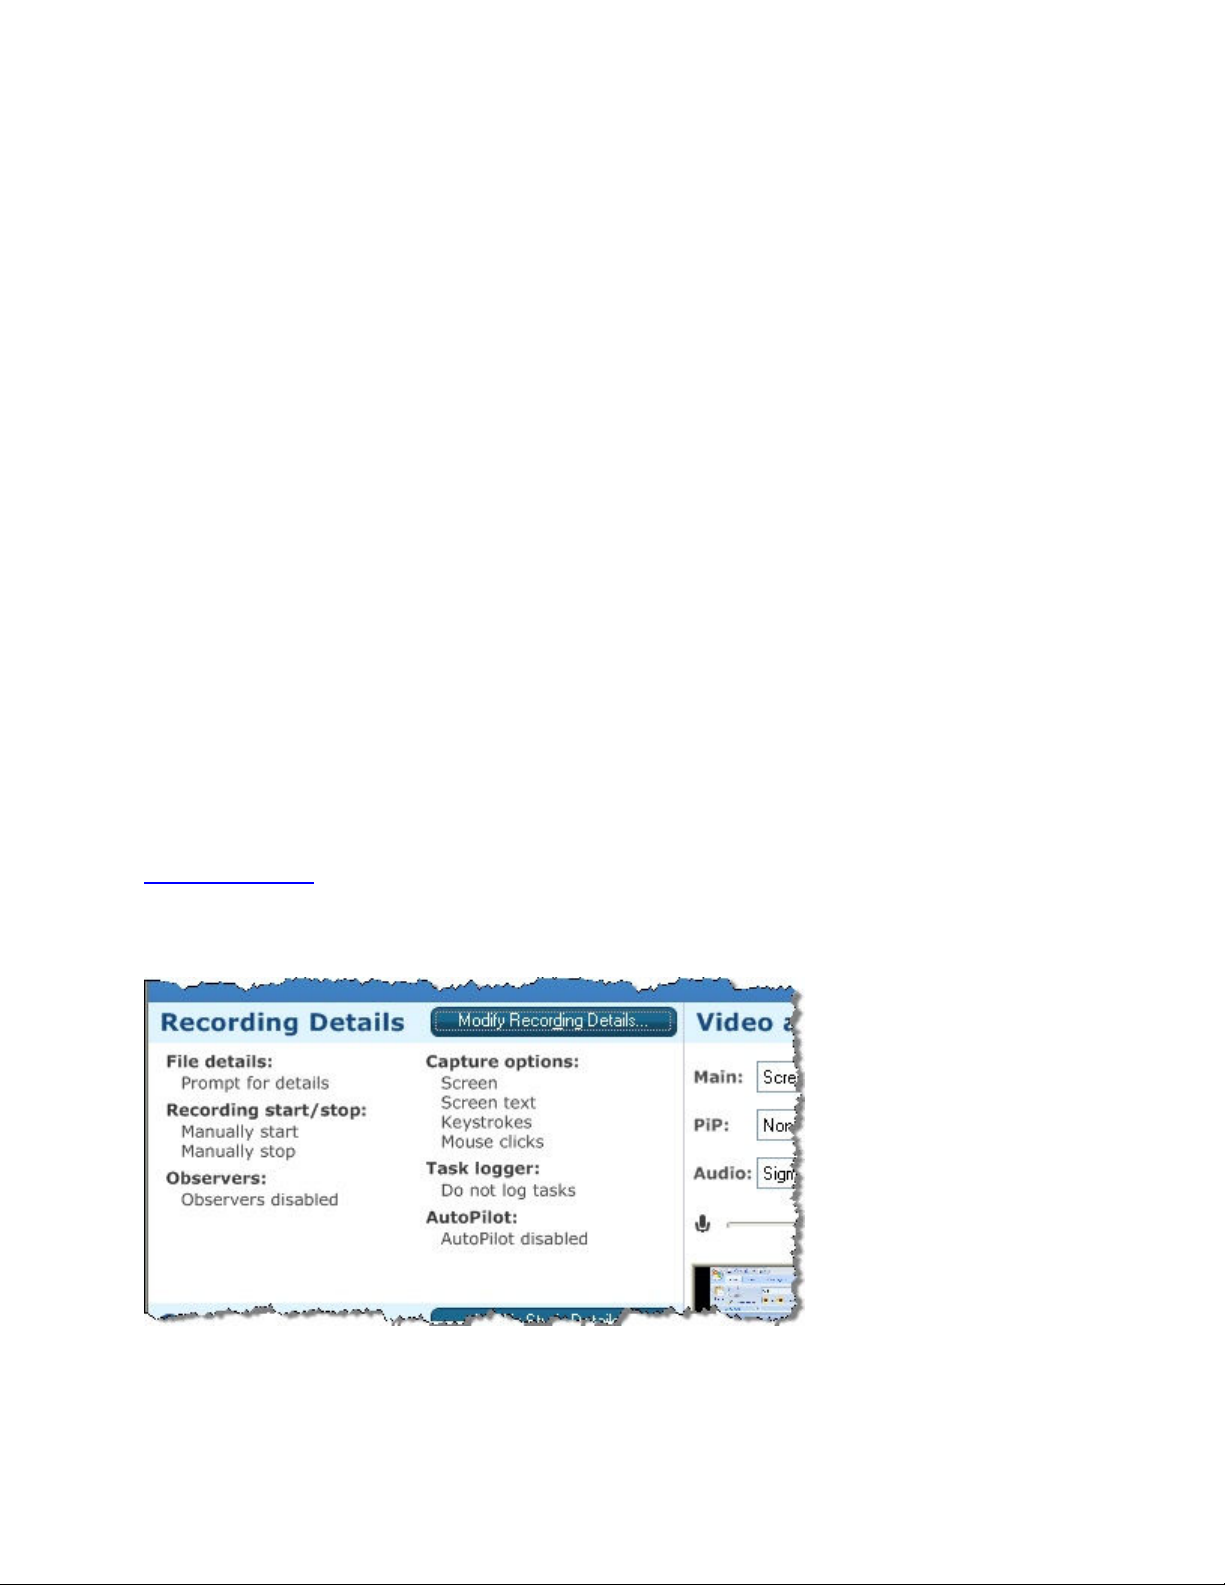
Recording Details
Preview the selected Recording Details. Click Modify Recording Details to define
how to record sessions. For more information, see
Define Recording Details.
Page 10
Video and Audio Sources
Morae Recorder
Help PDF
Page 8
www.techsmith.com
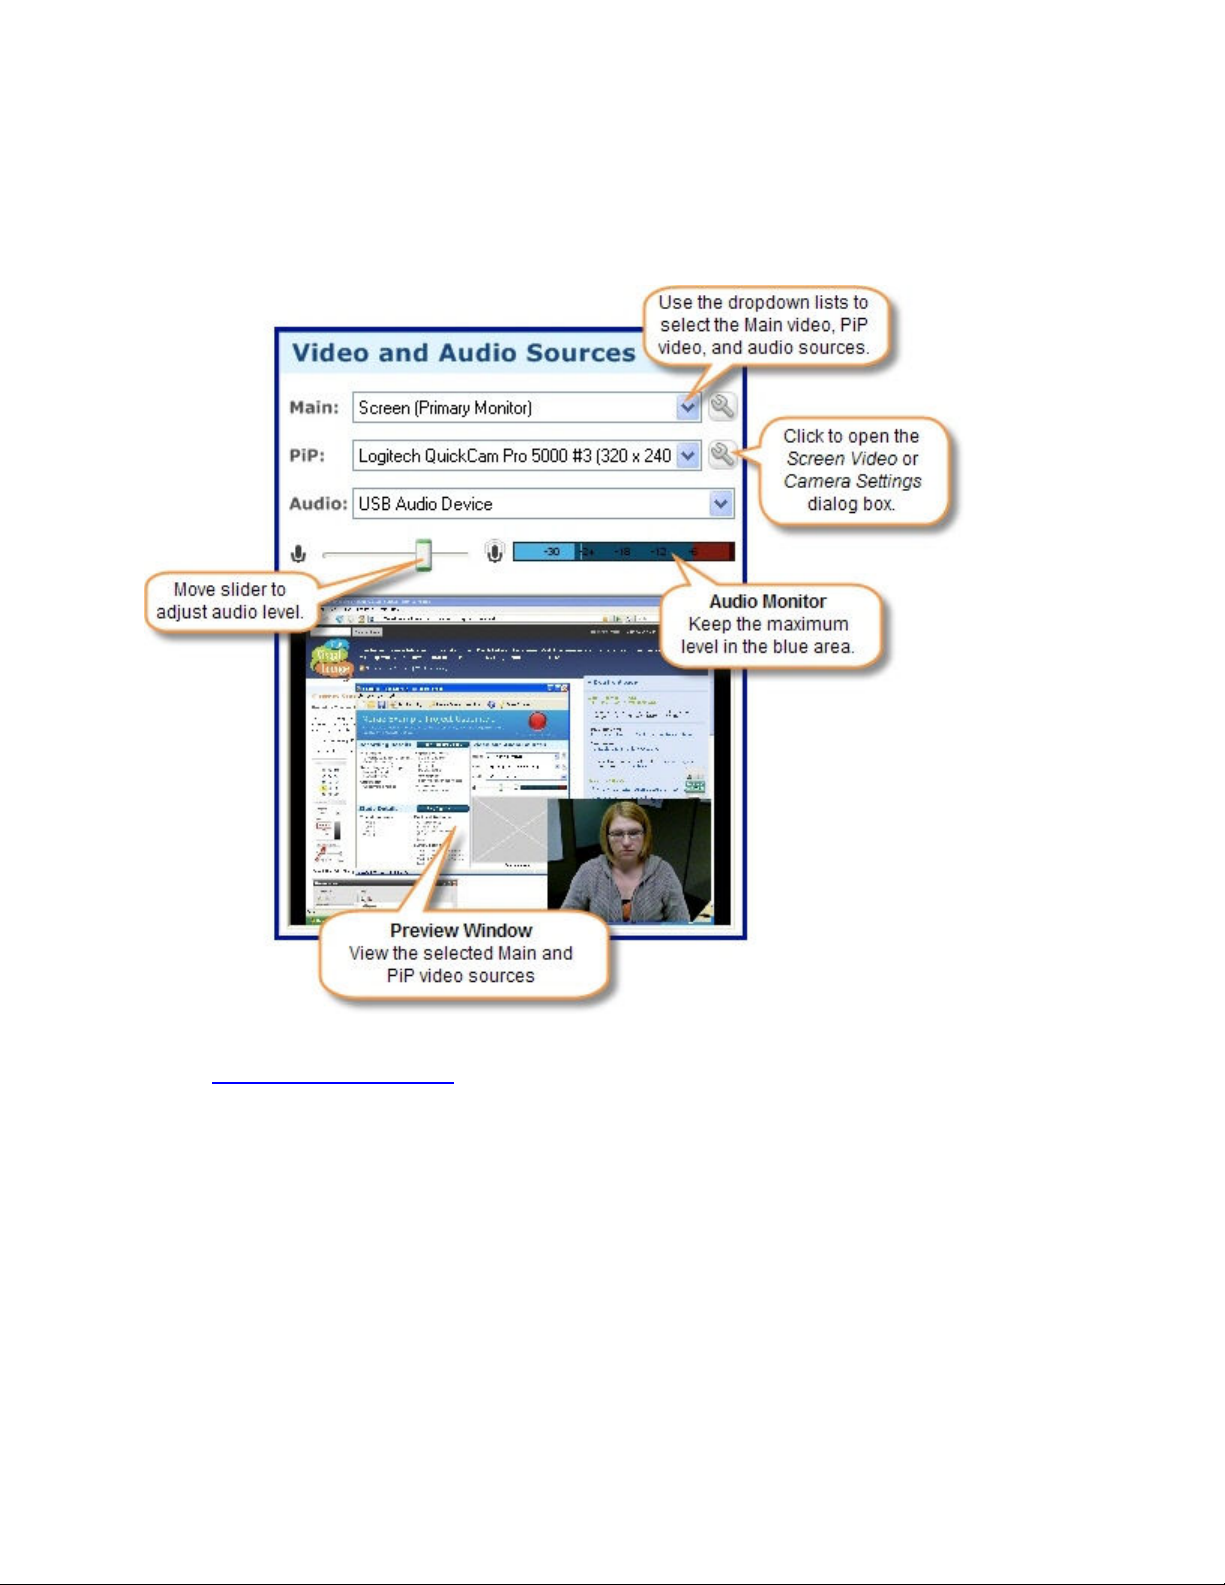
View and select the sources for the main video, Picture-in-Picture (PiP) video, and
audio. For more information, see
Video and Audio Sources.
Audio Monitor
View and adjust the audio level. For more information, see Adjust Audio Level.
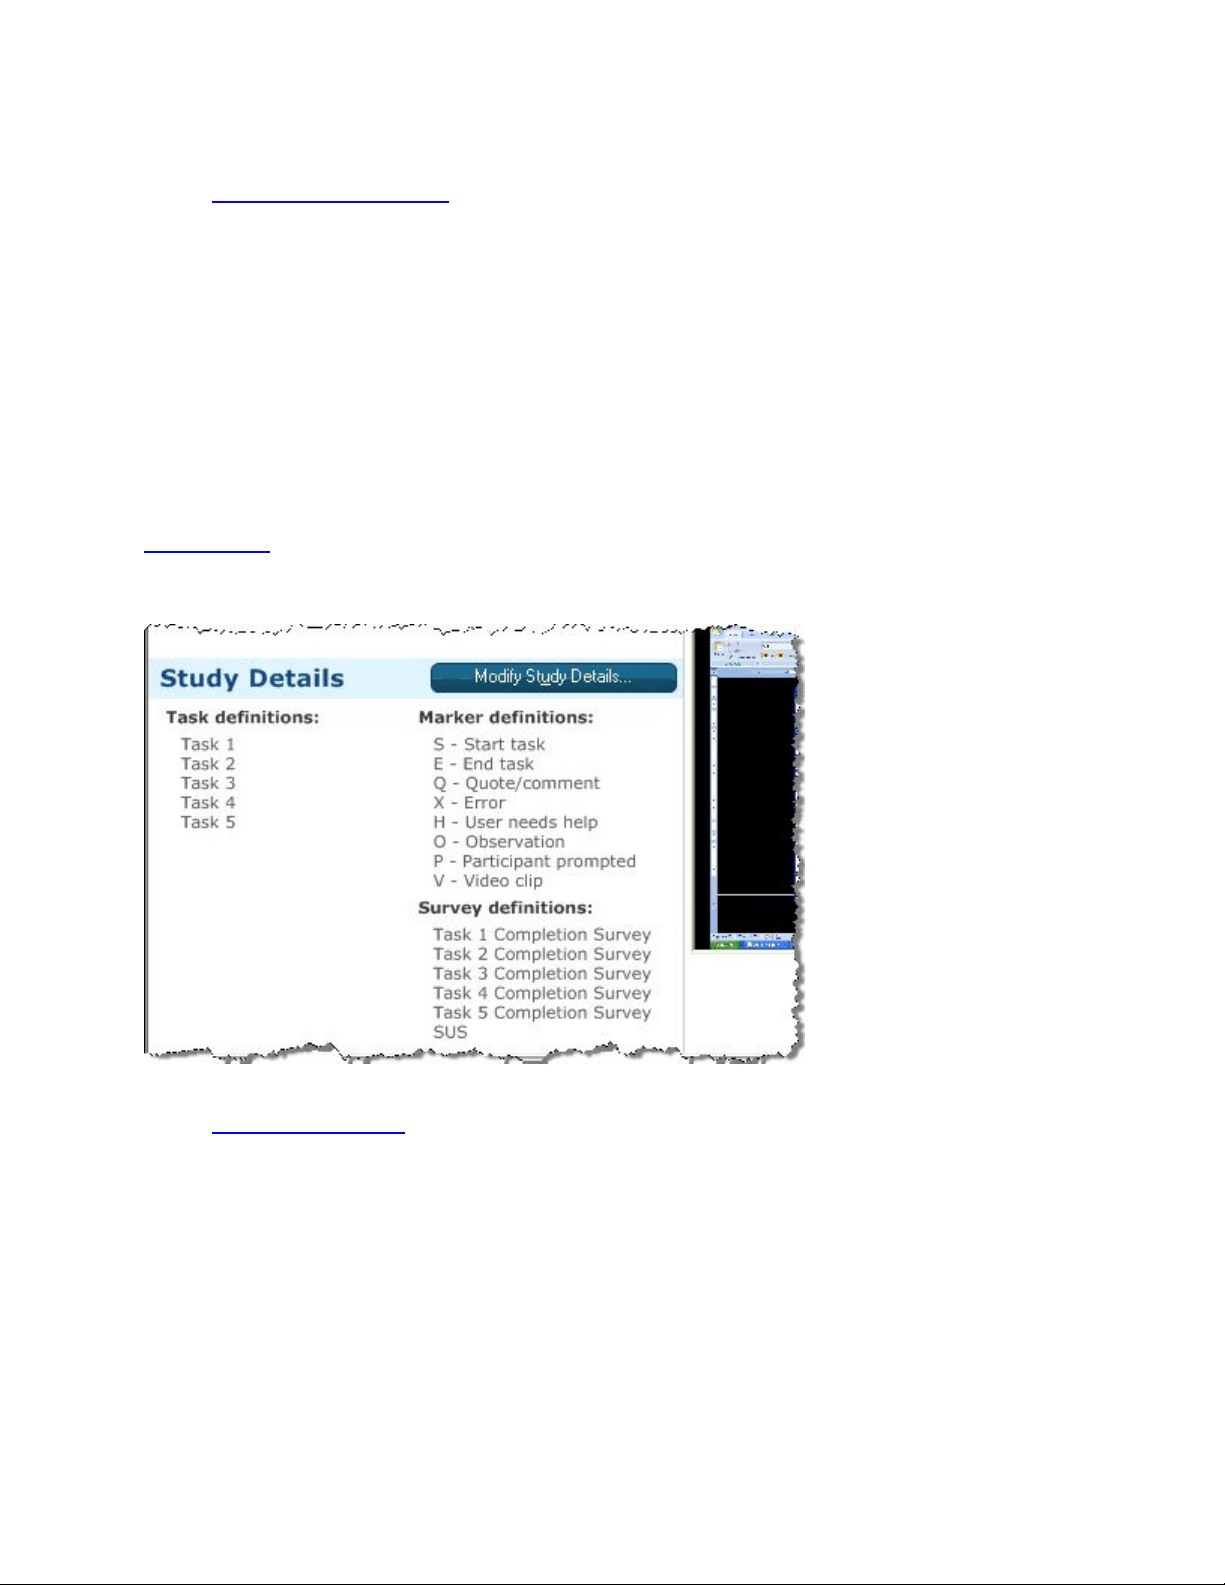
Study Details
Study Details define the study including the study name, session instructions, tasks,
markers, and surveys. For more information, see
Define Study Details.
Preview Window
View the selected main and PiP video sources.
For more information on the different parts of the Recorder interface, see the following:
• Welcome to Morae Recorder Dialog Box
• Recorder Toolbar
• Recording Details
• Study Details
• Video and Audio Sources
Page 11

Welcome to Morae Recorder Dialog Box
Morae Recorder
Help PDF
Page 9
www.techsmith.com
File > New Study Configuration
The Welcome to Morae Recorder dialog box allows you to create or open a configuration.
See also:
• Get to Know the Recorder Interface
• Recorder Toolbar
• Create a Test Recording
• Recording Details
• Study Details
• Video and Audio Sources
• Recorder Preferences
• How to Use Morae Recorder
Page 12

Recorder Toolbar
Morae Recorder
Help PDF
Page 10
www.techsmith.com
RECORDER TOOLBAR
BUTTON DESCRIPTION
See also:
• Get to Know the Recorder Interface
• Welcome to Morae Recorder Dialog Box
• Create a Test Recording
• Recording Details
• Study Details
• Video and Audio Sources
• Recorder Preferences
• How to Use Morae Recorder
Creates a new study configuration file. For more information, see
Study Configurations.
Opens a previously saved study configuration file.
Saves the current study configuration in a file.
Creates a 15 second test recording, allowing you to preview the audio
and video to be captured.
For more information, see Create a Test Recording.
Opens the Batch Process Recordings dialog box. For more information
see
Batch Process Recording Files.
Opens the Morae help system.
Opens the Morae Learning Center web site in your default browser.
Create a Test Recording
Recorder’s Test Recording option recording includes all of the data streams for the Capture Options defined
in the study configuration. A message appears describing any problems with the current configuration so you
can correct them prior to beginning an actual recording session.
When the 15-second test recording is complete, the screen video, camera video , Picture in Picture (PIP),
and/or audio streams immediately play back. The test playback confirms if Recorder is accurately capturing
the video and audio. This test also silently checks the other configuration settings chosen.
A Test Recording does not confirm Recorder Start and Stop Option settings..
If you are satisfied with the test recording and have not received any error messages, you can proceed to
record with those settings.
Page 13
To Run a Test Recording
Morae Recorder
Help PDF
Page 11
www.techsmith.com
1. Click the Test Recording button in the Recorder toolbar.
2. A dialog box appears asking if you want to continue with the test recording. Click Yes.
3. The Recorder UI minimizes to a tray icon. The test recording begins immediately and proceeds for 15
seconds.
4. The Recording in progress message appears in the Camera Preview pane and the status bar
confirms a recording is being made.
5. During the test recording, create some sound and activity for Recorder to capture (i.e., speak into the
microphone and actively interact with the computer).
6. At the end of the 15 seconds, the test video plays back and includes the screen video, camera video
PIP and audio from the temporary test file.
When the playback is complete, the window closes automatically. The test recording is not saved for
later viewing.
See also:
• Get to Know the Recorder Interface
• Welcome to Morae Recorder Dialog Box
• Recorder Toolbar
• Recording Details
• Study Details
• Video and Audio Sources
• Recorder Preferences
• How to Use Morae Recorder
Recording Details
Recording Details define how to record a session. These settings can vary for recordings within a study.
When you save a study configuration, Recording Details are saved in the study configuration but you can
change them for individual recordings, as needed. For example, if you need to run one session without
capturing screen text, you can change that setting in Recording Details.
Page 14
See also:
Morae Recorder
Help PDF
Page 12
www.techsmith.com
Define Recording Details
•
• Get to Know the Recorder Interface
• Welcome to Morae Recorder Dialog Box
• Recorder Toolbar
• Create a Test Recording
• Study Details
• Video and Audio Sources
• Recorder Preferences
• How to Use Morae Recorder
Study Details
Study Details define the study information, including study name, tasks, markers, and surveys.
When you save a study configuration, Study Details are saved in the study configuration and must be the
same for all recordings in a study.
See also:
Define Study Details
•
• Get to Know the Recorder Interface
• Welcome to Morae Recorder Dialog Box
• Recorder Toolbar
• Create a Test Recording
• Recording Details
• Video and Audio Sources
• Recorder Preferences
• How to Use Morae Recorder
Page 15
Video and Audio Sources
Morae Recorder
Help PDF
Page 13
www.techsmith.com
Video and Audio Sources show the selected video and audio sources. There is also an audio monitor and
video preview to help you set up your session.
Video and Audio Sources are affected by the hardware connected to the computer when Recorder is opened.
See also:
Video and Audio Sources
•
• Get to Know the Recorder Interface
• Welcome to Morae Recorder Dialog Box
• Recorder Toolbar
• Create a Test Recording
• Study Details
• Video and Audio Sources
• Recorder Preferences
• How to Use Morae Recorder
Page 16
Recorder Preferences
Morae Recorder
Help PDF
Page 14
www.techsmith.com
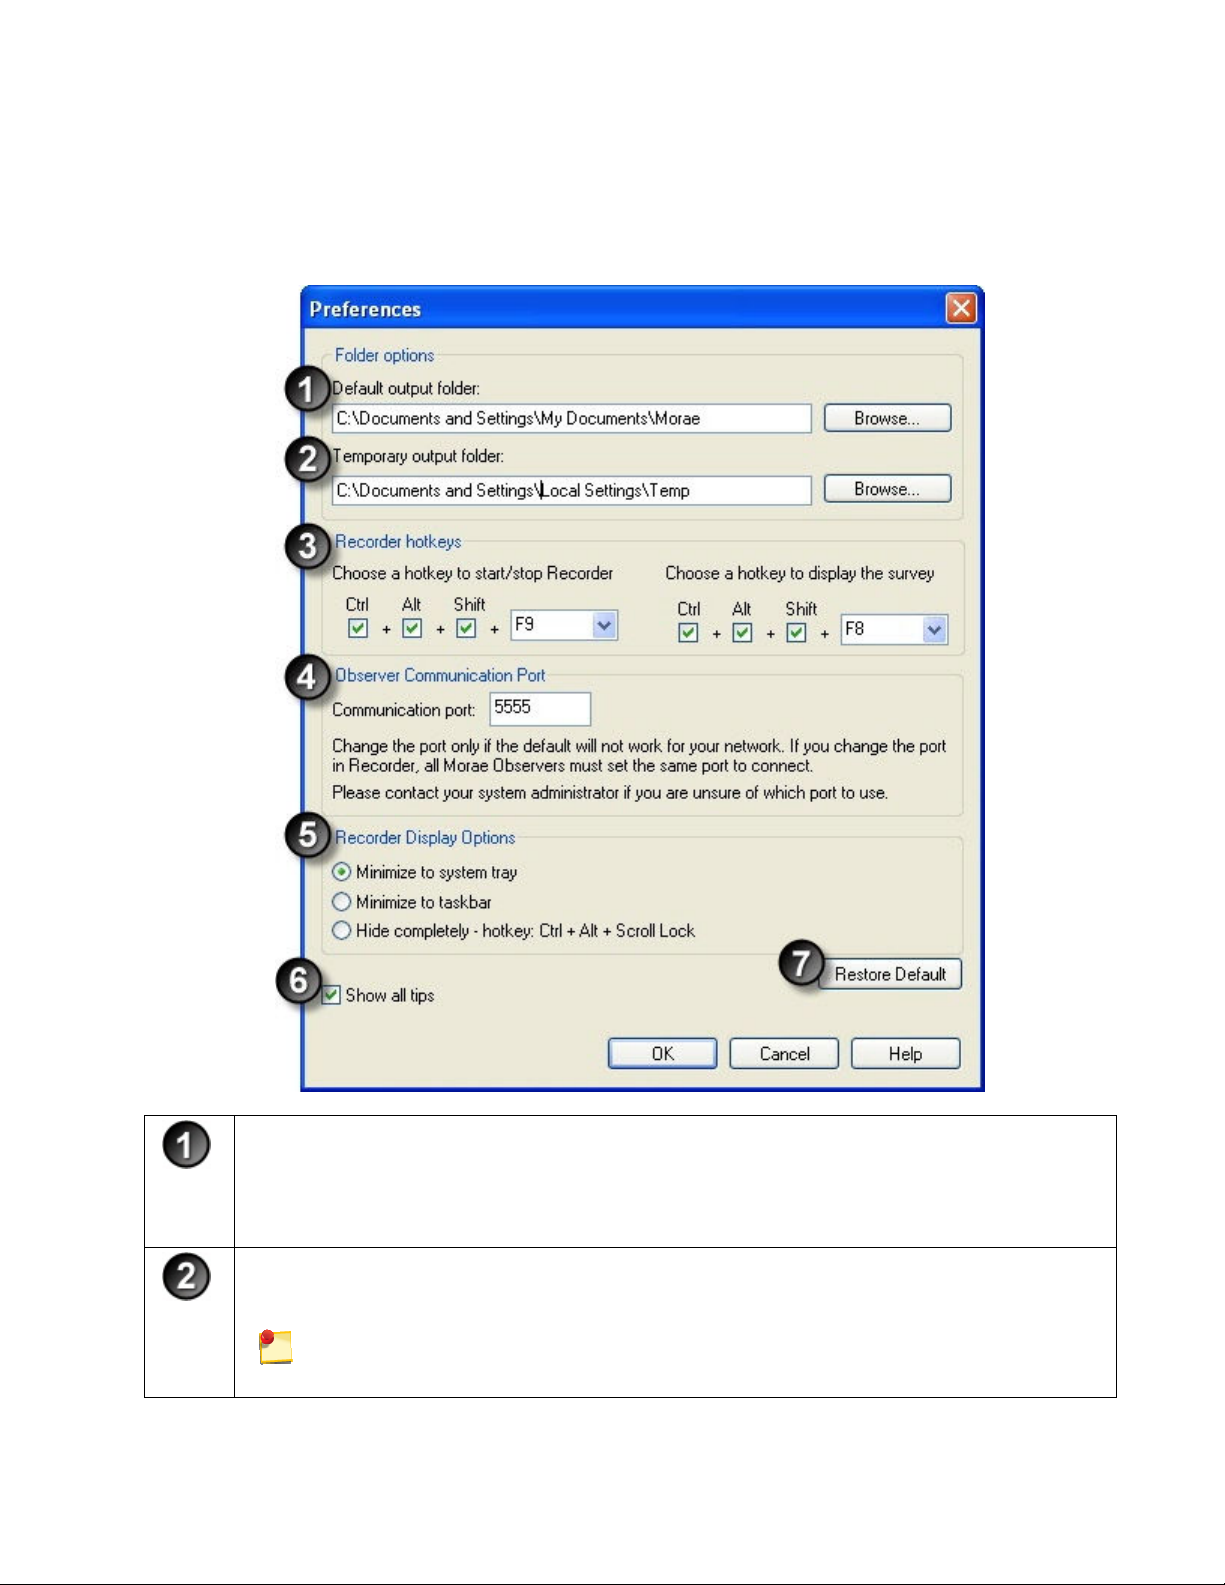
The Preferences dialog box in Recorder contains settings for Recorder preferences. These settings are
“global,” and apply to every recording. In Preferences dialog box, designate the following options.
Use the following figure to become familiar with the Recorder Preference options.
Default output folder
Defines where to store recording files. This is a global setting for Recorder, all recording files
are saved in this folder.
By default, the folder is C:\\...My Documents\Morae folder on the Recorder source computer
system.
Temporary output folder
Defines the folder that temporarily holds Recorder output during recording. The temporary files
are automatically deleted when the output file is written.
We recommend using a local drive for temporary file storage. Choosing a temporary
directory located on a network drive may cause performance problems.
Page 17
Recorder hotkeys
Morae Recorder
Help PDF
Page 15
www.techsmith.com
Defines the hotkey combination to start and stop Recorder and to deliver a survey to
participants from the keyboard
• Start/stop Recorder hotkey: Choose any combination of Ctrl, Alt, Shift and any of the
keys available in the dropdown menu to create a custom hotkey to start and stop Recorder.
The default hotkey combination is <Ctrl + Alt + Shift + F9>.
• Display survey hotkey: Choose any combination of Ctrl, Alt, Shift and any of the keys
available in the dropdown menu to create a custom hotkey to deliver a survey to
participants.
The default hotkey combination is <Ctrl + Alt + Shift + F8>.
The F12 key cannot be selected alone as a hotkey.
Observer Communication Port
Allows you to change your communication port if the default (5555) is not available in your
network.
The port defined for Observers must match the port defined here. If not, they will not be
able to connect.
Recorder Display Options
Morae provides several display options for Recorder during a session.
• Minimize to System Tray appears as a tray icon when a recording begins. Right-click on
the tray icon to access a menu of Recorder control options (Start, Stop, Show Recorder and
Exit Recorder). To make Recorder visible again, double-click on the tray icon
• Minimize to Taskbar Recorder appears on the Windows taskbar while recording.
• Hide completely: Recorder is completely hidden. To show Recorder again, use the hotkey
combination <Ctrl + Alt + Scroll Lock>.
.
Show all tips
Enables the general program tip dialogs that appear throughout Recorder.
Restore Default
Restores the Default and Temporary output folders and Performance options to their default
settings.
See also:
• Get to Know the Recorder Interface
• Welcome to Morae Recorder Dialog Box
• Recorder Toolbar
• Create a Test Recording
• Recording Details
• Study Details
• Video and Audio Sources
• How to Use Morae Recorder
Page 18

How to Use Morae Recorder
Morae Recorder
Help PDF
Page 16
www.techsmith.com
Use Morae Recorder to set up study configurations and record sessions.
The general process of using Recorder is:
1. Create or open a study configuration.
A study configuration defines a group of related recordings. Recordings in a study share the same
Study Details including tasks, markers, and surveys.
2. Verify
3.
4. Record session.
5. If you are recording from camera(s) only, you can
6.
7.
See also:
• Study Configurations
•
Define Study Details
•
Define Recording Details
Video and Audio Sources
•
•
Log a Session
Recording Details.
Start recording.
log the session on the computer running Recorder.
Stop recording.
Process and save recordings.
Page 19
Study Configurations
Morae Recorder
Help PDF
Page 17
www.techsmith.com
The ideas of the study and the study configuration are important to understand when working with Morae.
For information on working with study configurations, see Template Study Configurations, Create a Study
Configuration, and Modify a Study Configuration.
What Is a Study?
A study involves recording, observing, and logging multiple user research sessions, analyzing the results, and
sharing the results with stakeholders.
In Morae, recordings in a study share a common study configuration file (.mrcfg), which includes the Study
Details: tasks, markers, and surveys.
Because the recordings in a study use the same configuration, you can compare and analyze the recordings
in Manager. For example, when all the sessions use the same tasks, you can compare the time it took to
complete a task across multiple participants. You can search for tasks, markers, events, and more across all
recordings in a study.
To make sure that all recordings have the same Study Details, define and save a study configuration prior to
recording any sessions.
If you need to combine recordings with different configurations into a single study, you can merge the
recordings in Manager. You can also choose to have more than one study in a single Manager project
file. See the Morae Manager Help for more information.
What is a Study Configuration?
A study configuration file (.mrcfg) defines study-specific information including Study Details and Recording
Details.
Only recordings with the same study configuration can be searched and graphed together in Morae
Manager.
Study Details must be the same for all recordings in a study and include:
• Study name, description, and instructions
• Tasks definitions and instructions
• Marker definitions and instructions
• Survey definitions and associations
Recording Details do not have to be the same for all recordings in a study and include:
• File saving and processing options
• Video sources
• What data to capture
• Who logs tasks
• How to start and end recordings
Page 20

Template Study Configurations
Morae Recorder
Help PDF
Page 18
www.techsmith.com
Recorder includes template study configurations to help you define Study Details and Recording Details for
different kinds of studies. Templates contain sample tasks, markers, and surveys, along with Recording
Details pre-configured for different types of user research.
TEMPLATE
STUDY
CONFIGURATION DESCRIPTION
Default study
configuration
Focus Groups Record focus groups or in depth interviews. Use up to two cameras and log notes
Hardware or Mobile
Device
Paper Prototype Record low fidelity prototypes that can’t be displayed on a computer. Point the
Software or Web
Usability Test
Unmoderated
Usability Test
See also:
• Create a Study Configuration
• Modify a Study Configuration
Contains only basic task and marker settings. Records the screen and a PiP
video of the participant.
on the computer running Morae Recorder.
Test hardware device (cell phone, handheld, etc.) Point the primary camera at the
hardware device, and the PiP camera at the participant.
primary camera at the paper prototype, and the PiP camera at the participant.
Use for a moderated usability test of a Web site or software. Records the screen
and a PiP video of the participant.
Use to conduct unmoderated tests. The participant interacts with onscreen study
and task instructions, and tasks are automatically logged using AutoPilot.
Create a Study Configuration
1. Open Recorder. The Welcome to Morae Recorder dialog box opens.
2. Select Create a new study configuration based on.
3. Select a template study configuration from the dropdown list.
4. Click OK. The template study configuration opens in Recorder.
5. Click Modify Study Details to open the Study Details dialog box.
Page 21
6. In the Study Details dialog box, define the study details and click OK.
Morae Recorder
Help PDF
Page 19
www.techsmith.com
7. Click Modify Recording Details to open the Recording Details dialog box.
8. In the Recording Details dialog box,
9. Choose File > Save Study Configuration to save the study configuration.
See also:
• Template Study Configurations
• Modify a Study Configuration
define the recording details and click OK.
Modify a Study Configuration
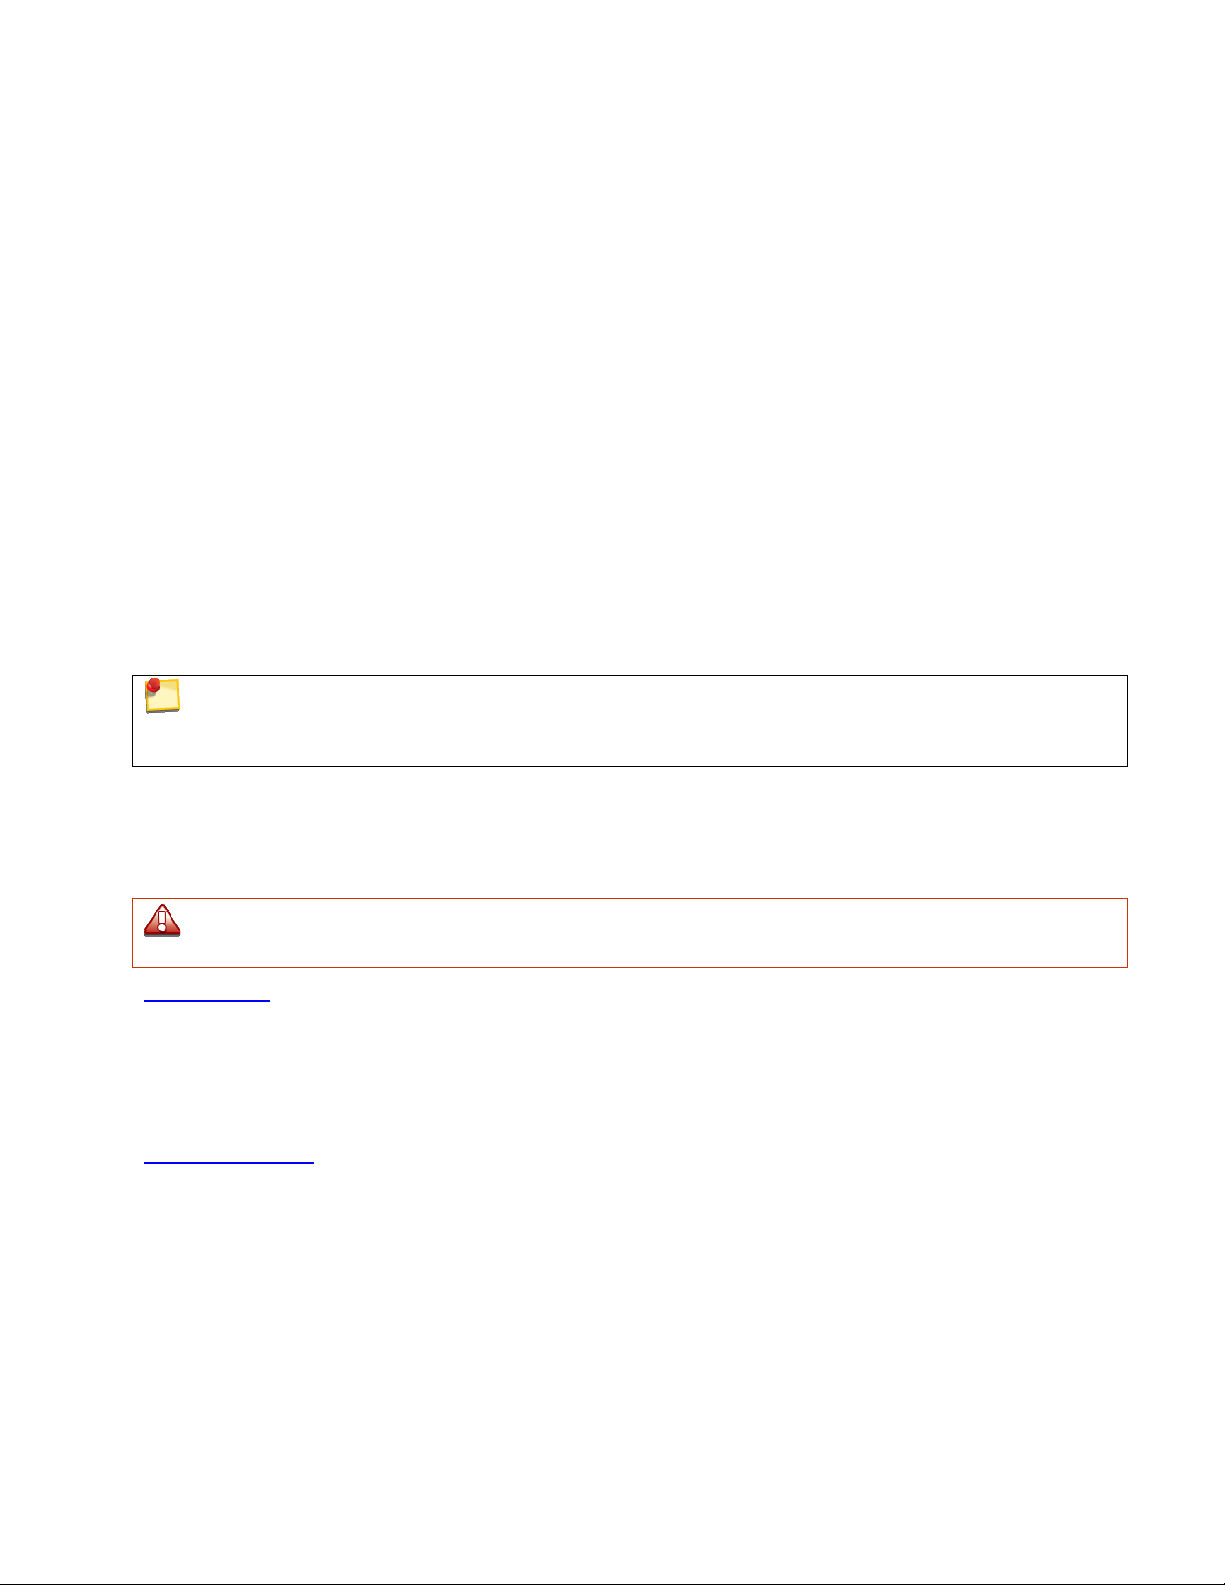
1. Open Recorder. The Welcome to Morae Recorder dialog box opens.
2. Select Open a saved study configuration.
3. Select a recently used file from the dropdown list or click Browse to locate a file on your computer.
4. Click OK. The study configuration opens in Recorder.
5. Click Modify Study Details to open the Study Details dialog box.
6. In the Study Details dialog box, define the study details and click OK.
If you modify study details, new recordings will not automatically match recordings previously
made using this study configuration. You can merge these recordings later into a single study in
Manager. For more information, see the Morae Manager Help.
7. Click Modify Recording Details to open the Recording Details dialog box.
8. In the Recording Details dialog box, define the recording details and click OK.
9. Choose File > Save Study Configuration to save the study configuration.
See also:
• Template Study Configurations
• Create a Study Configuration
Page 22
Define Recording Details
Morae Recorder
Help PDF
Page 20
www.techsmith.com
Recorder > Modify Recording Details button
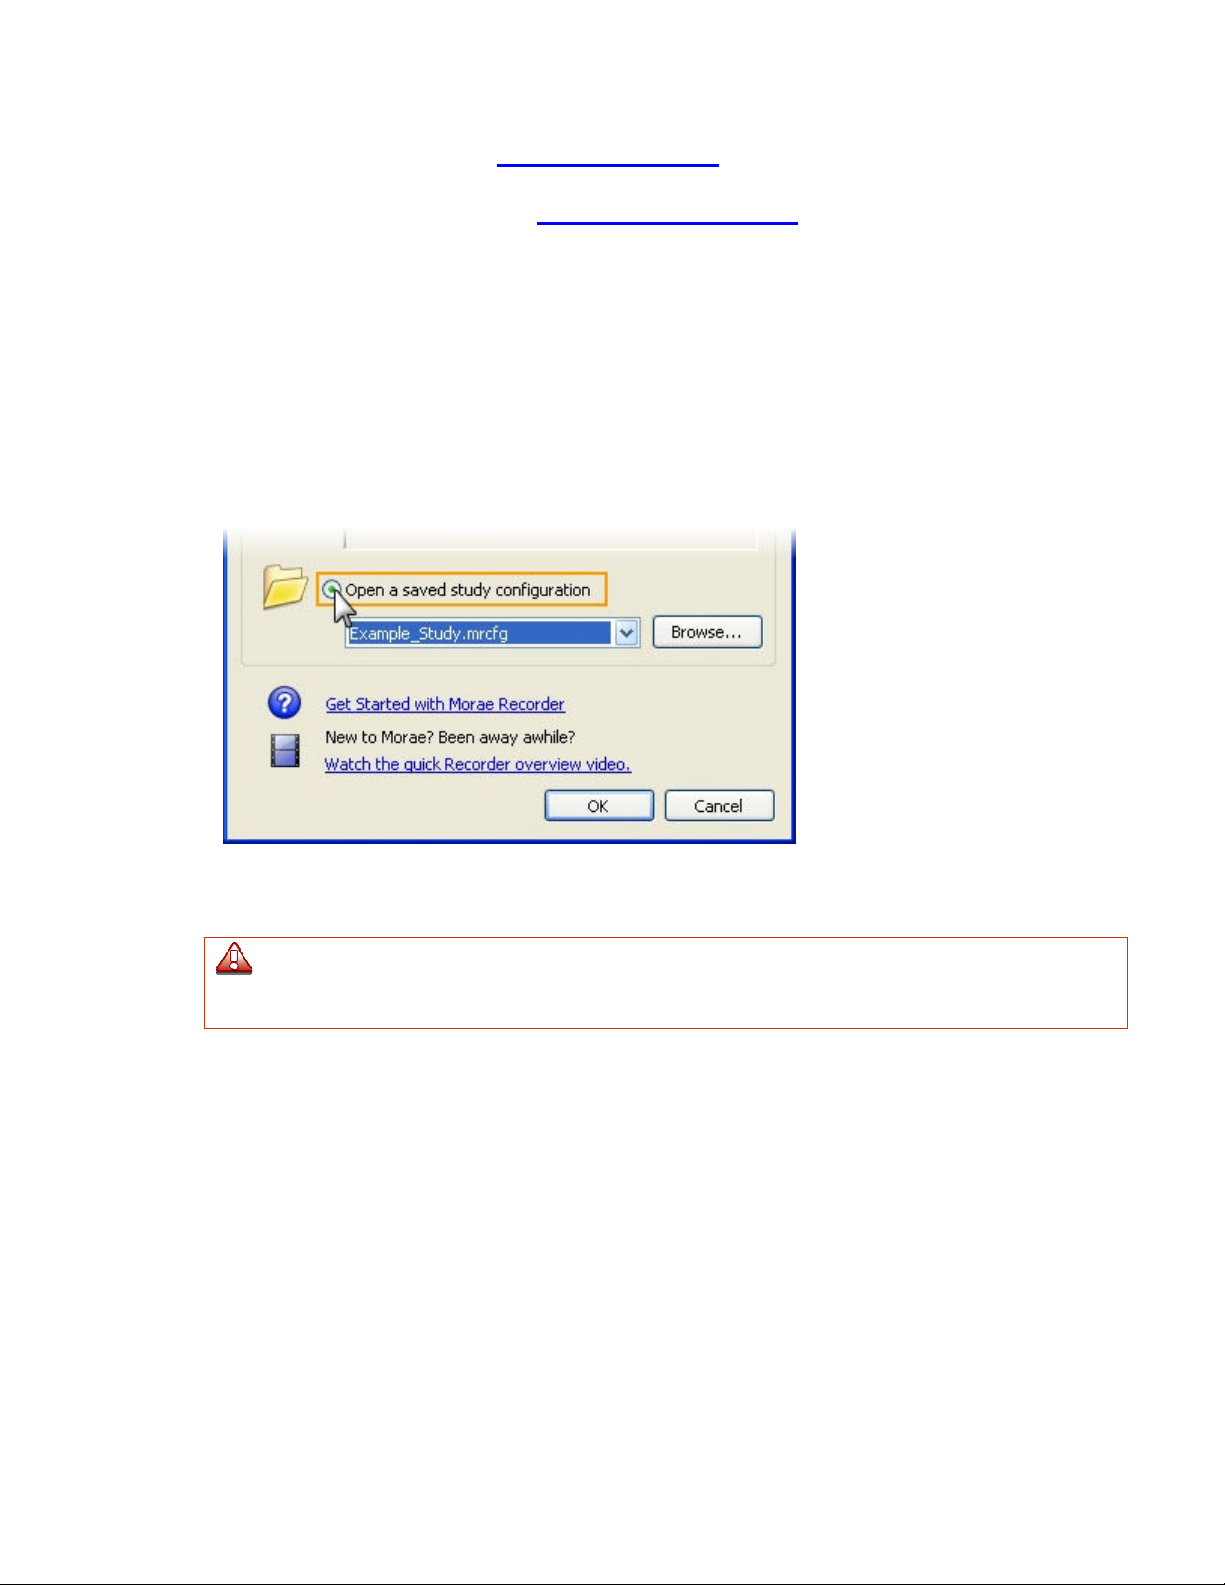
Recording Details define how to record a session with Morae. In the Recording Details dialog box, define the
following:
• File Details
• Capture Options
• AutoPilot Settings
• Task Logger Settings
• Recording Start Settings
• Recorder Stop Settings
• Observer Settings
Recording Details apply to a specific test environment or participant set up. Recording Details do not
have to be the same for all recordings in a study.
Page 23
File Details
Morae Recorder
Help PDF
Page 21
www.techsmith.com
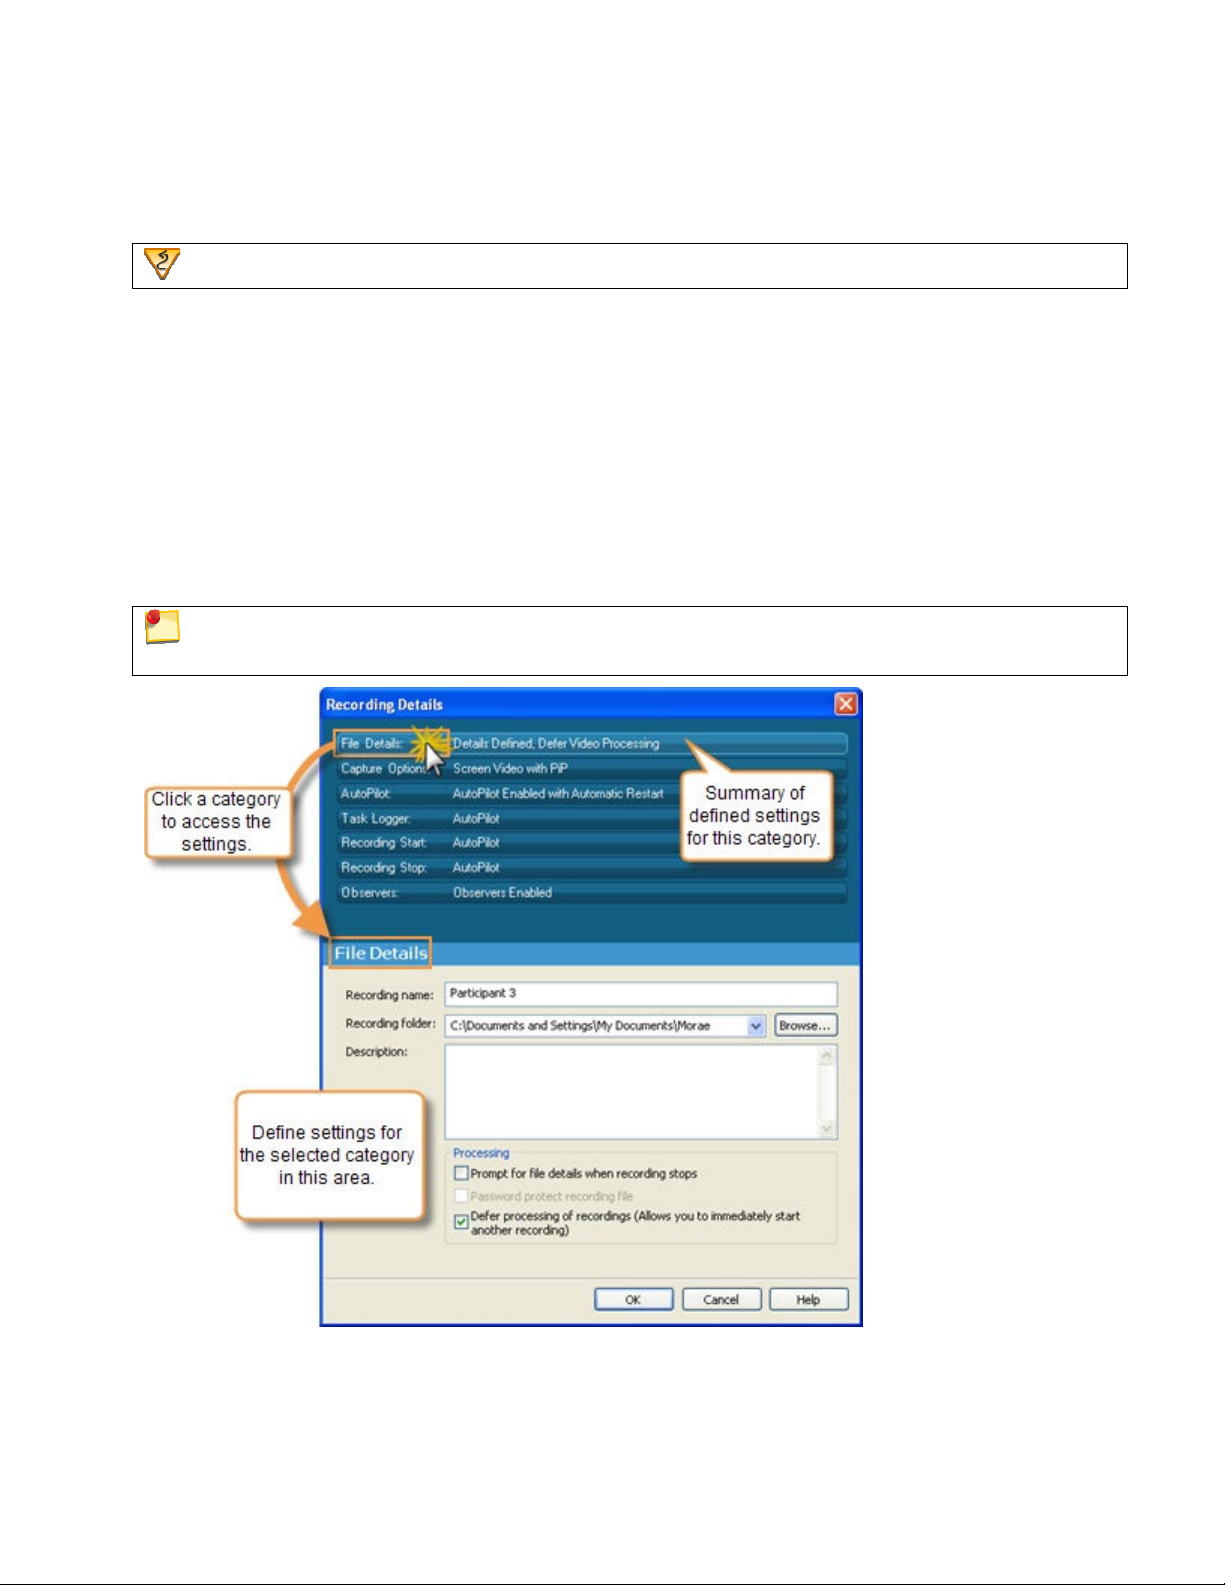
Recorder > Modify Recording Details button > File Details
The fields in the Recording File Details settings of the Recording Details dialog box define the recording
name, folder, and description, along with the file processing options.
See also:
• Capture Options
• AutoPilot Settings
• Task Logger Settings
• Recording Start Settings
• Recorder Stop Settings
• Observer Settings
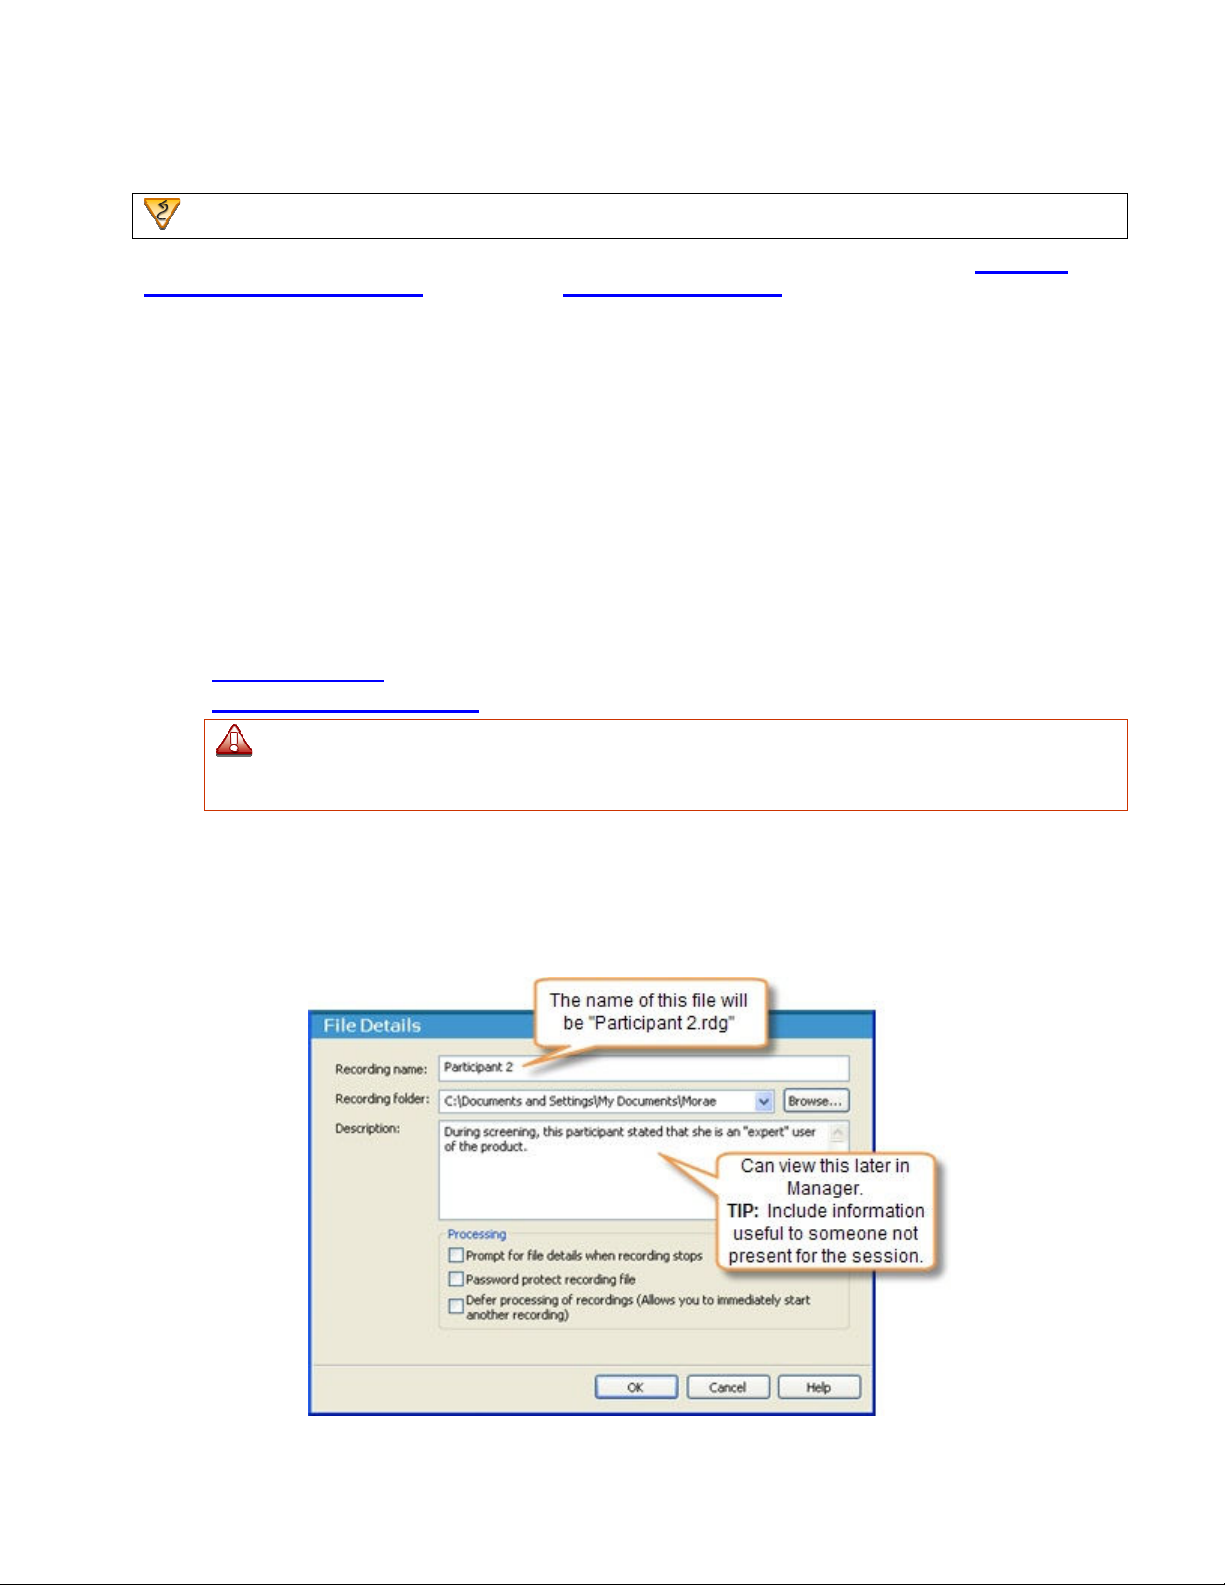
Recording Name, Recording Folder, and Description
Each recording (.rdg) needs a unique name. Define the file name, location and description for a recording in
one of the following ways:
•
Before you record in the File Details settings.
•
After you create a recording, if you use the Prompt for details when recording stops option.
You cannot save a recording without a name. You can lose the data from a recording if the test
participant, or anyone else, closes the dialog prompting for these details after the recording
stops.
For information on the processing options, see Processing.
Define File Details before Recording
If you choose to define the File Details before you record, put information in these fields to name the
recording file, define the folder to save the recording, and describe details about the recording (optional.)
Page 24

Define File Details after Recording
Morae Recorder
Help PDF
Page 22
www.techsmith.com
the recording is finished, the Recording File Details dialog box appears.
Put information in these fields to name the recording file, define the folder to save the recording, and describe
details about the recording (optional.) You can also choose processing options in this dialog box.
Processing
Choose one of these options for processing recordings:
• Prompt for File Details When Recording Stops
• Password Protect Recording Files
• Defer Processing of Recordings (You can start the next recording immediately.)
See also: Recording Name, Recording Folder, and Description.
Page 25
Prompt for File Details When Recording Stops
Morae Recorder
Help PDF
Page 23
www.techsmith.com
You cannot save a recording without a name. You can lose the data from a recording if the test
participant, or anyone else, closes the dialog prompting for these details after the recording stops.
Enable the Prompt for file details when recording stops checkbox if you do not want to define the file name,
folder, and description prior to recording. At the end of recording, Recorder prompts you to Define File
Details after Recording.
See also:
• Password Protect Recording Files
• Defer Processing of Recordings
Password Protect Recording Files
Enable the Password protect recording file checkbox to “lock” the recording files if your recordings include
sensitive material.
You can define the password before the recording starts or after it ends.
Remember your password. After you assign a password, you cannot open the recording in Manager
without the password. TechSmith cannot retrieve your password or open the recording file, if you forget
your password.
Password Protect a Recording File before Recording
If you know that you want to password protect a recording before the session occurs, you can set a password
before you start recording.
1. Enable the Password protect recording file checkbox and click OK.
2. When the recording starts, Recorder prompts you to select and verify a password,
Password Protect a Recording File after Recording
If you are not sure if you need to password protect a recording before the session occurs, you can set
Recorder to prompt you at the end of a recording.
1. Enable the Prompt for details when recording stops checkbox and click OK.
2. When the recording stops and the Recording File Details dialog box opens, enable the Password
protect recording file checkbox.
3. The Enter Recording File Password dialog box opens and prompts you to enter and confirm a
password.
Passwords are case sensitive and can include letters, numbers and symbols in any combination. There
is no maximum length for passwords.
See also:
• Prompt for File Details When Recording Stops
• Defer Processing of Recordings
Page 26
Defer Processing of Recordings
Morae Recorder
Help PDF
Page 24
www.techsmith.com
If you defer the final processing, your date is not at an increased risk of being lost or damaged if a crash
occurs. Recorded data is written to disk immediately during recording whether you choose to defer final
processing or not. Final processing involves compressing the files into an archive.
By default, Recorder writes out and verifies each recording (.rdg) file immediately after a recording is
completed. Depending on the length and content of the recording, this processing can take some time.
Enable the Defer processing of recordings checkbox to defer recording processing, which allows you to start
another recording immediately and save recordings in the Batch Processing Queue to later process several
recordings at one time.
Use the Defer processing of recordings option with the Automatically restart Recorder option to
automatically run repeated recordings or conduct several recordings without waiting for file processing in
between.
See also:
• Prompt for File Details When Recording Stops
• Password Protect Recording Files
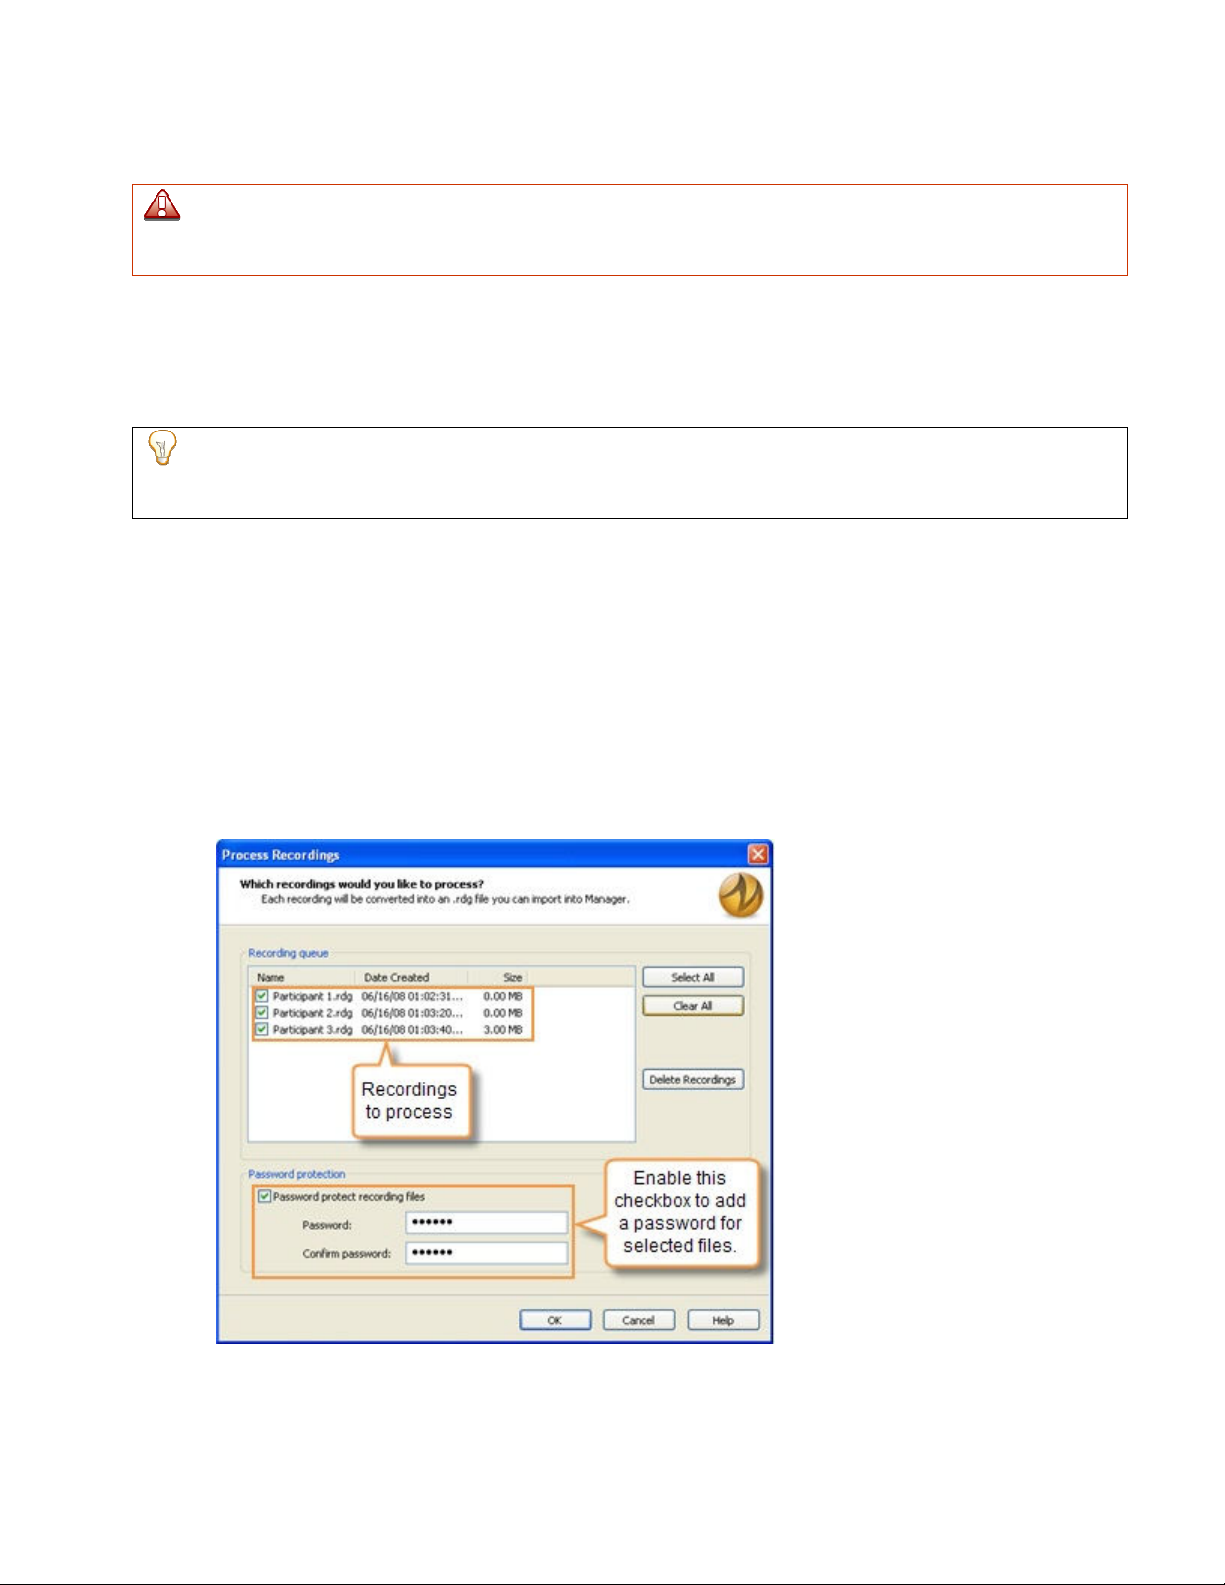
Batch Process Recording Files
When you complete a series of recordings and are ready to process them:
1. Click Process Deferred Recordings or File > Process Deferred Recordings. The Batch Process
Recordings dialog appears.
2. Select the recording files to process in Recording queue.
The recording files that you do not select remain in the list.
3. Click OK to process the selected recordings.
When processing is complete, the Batch Processing Results dialog appears. This dialog gives summary
information about each recording file, including whether it was successfully processed and where it is saved.
Page 27

Capture Options
Morae Recorder
Help PDF
Page 25
www.techsmith.com
Recorder > Modify Recording Details button > Capture Options
In Capture Options, define the main video source, Picture-in-Picture option, mouse video effects, and
the data to capture during recording.
The fields in the Capture Options of the Recording Details dialog box define the data you want Recorder to
include in the recording. Use this data later in Manager for analysis and graphs.
See also:
• File Details
• AutoPilot Settings
• Task Logger Settings
• Recording Start Settings
• Recorder Stop Settings
• Observer Settings
Main Video Source and Picture-in-Picture
Define if you are recording the computer screen or camera video as the main video source for your recording
and if you want to include a Picture-in-Picture (PiP) video.
These options are also available on the main interface in
video source or PiP options in the Recording Details dialog box, options selected in Video and Audio Sources
update automatically.
See also:
• Mouse Video Effects
• Data
Video and Audio Sources. If you change the main
Page 28
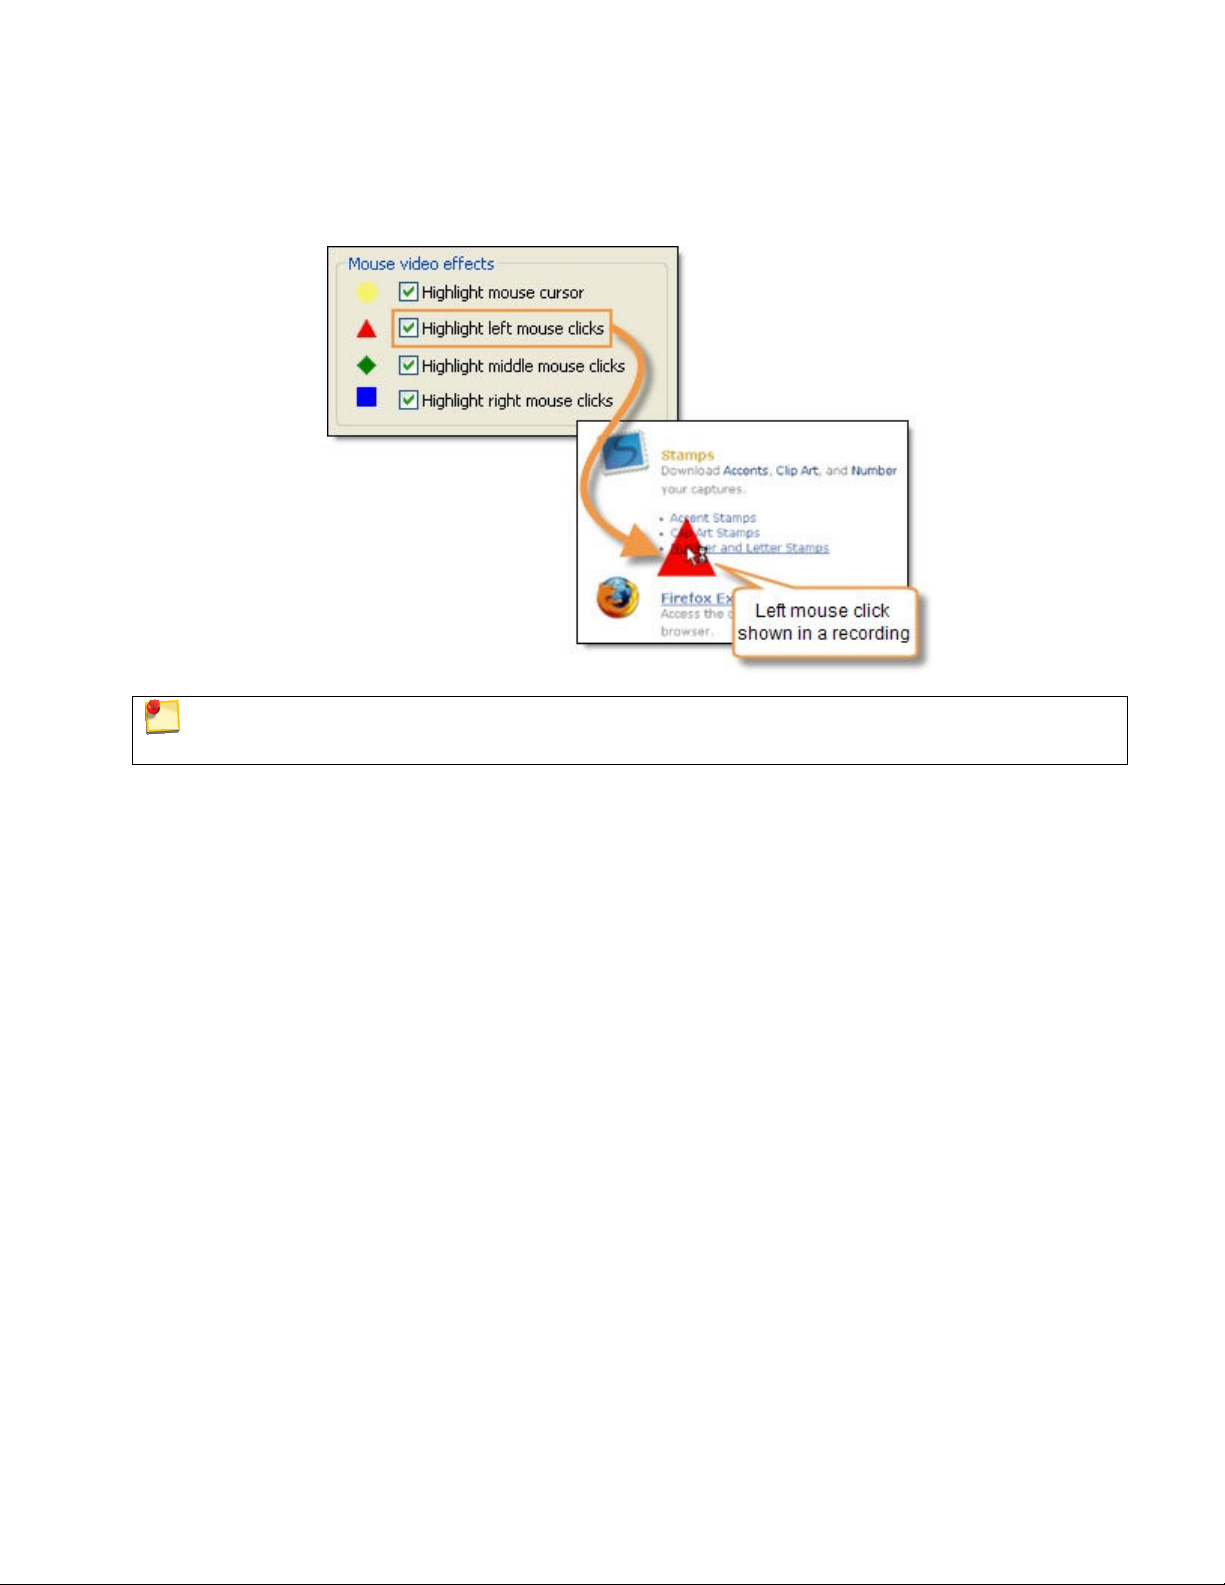
Mouse Video Effects
Morae Recorder
Help PDF
Page 26
www.techsmith.com
Define which, if any, mouse video effects to include in the recordings. Mouse video effects help clarify mouse
when you analyze recordings in Manager.
The mouse video effects do not appear on the participant’s screen or in the Observer during recording.
The effects appear when you import the recording in Manager.
See also:
• Main Video Source and Picture-in-Picture
• Data
Data
Define which kinds of data you record. Choose to capture or exclude:
• Mouse clicks
• Keystrokes
• Screen text
By default, Recorder captures all of this data. If you are dealing with sensitive or proprietary information, you
may need to exclude some data from capture. For example, if the test deals with user names and passwords,
you can choose to exclude keystrokes. By excluding keystrokes, the recording will not capture the password.
See also:
• Main Video Source and Picture-in-Picture
• Mouse Video Effects
Page 29
AutoPilot Settings
Morae Recorder
Help PDF
Page 27
www.techsmith.com
Recorder > Modify Recording Details button > AutoPilot
The checkboxes in the AutoPilot Settings of the Recording Details dialog box define if and how you want to
use AutoPilot.
See also:
AutoPilot
•
• File Details
• Capture Options
• Task Logger Settings
• Recording Start Settings
• Recorder Stop Settings
• Observer Settings
Page 30
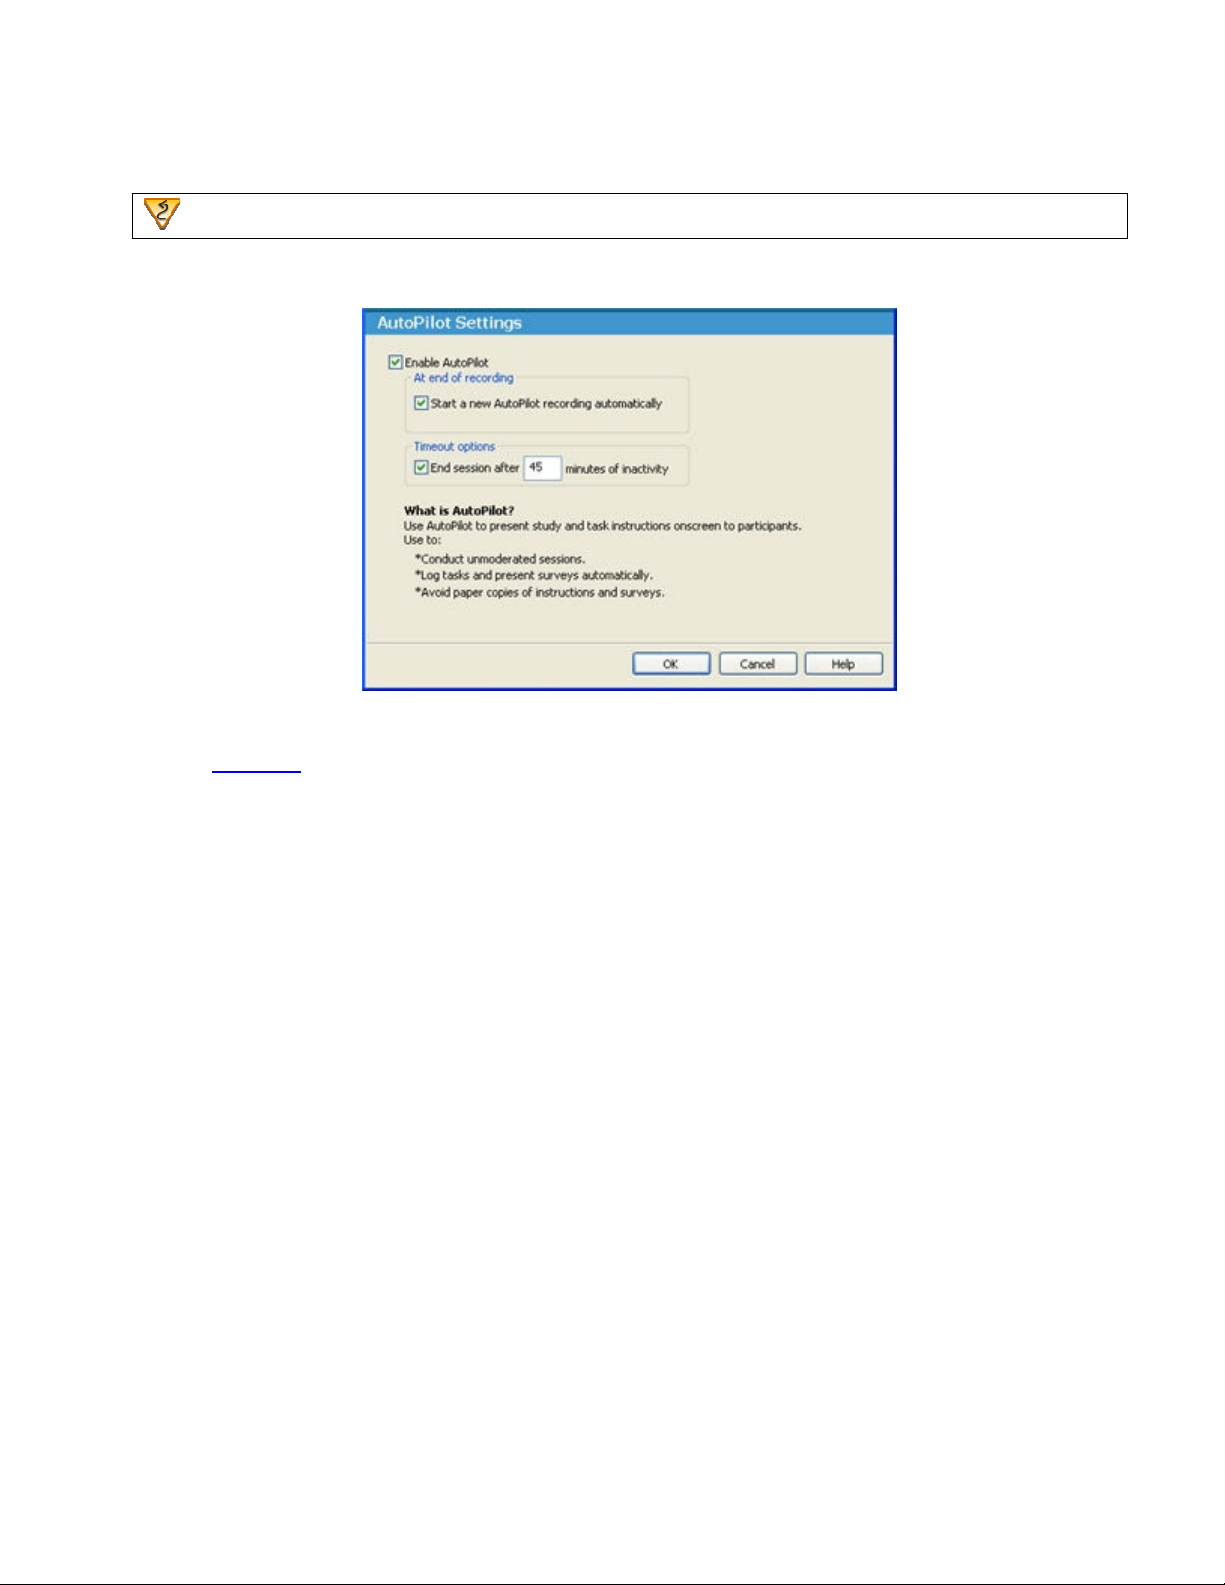
Enable AutoPilot
Morae Recorder
Help PDF
Page 28
www.techsmith.com
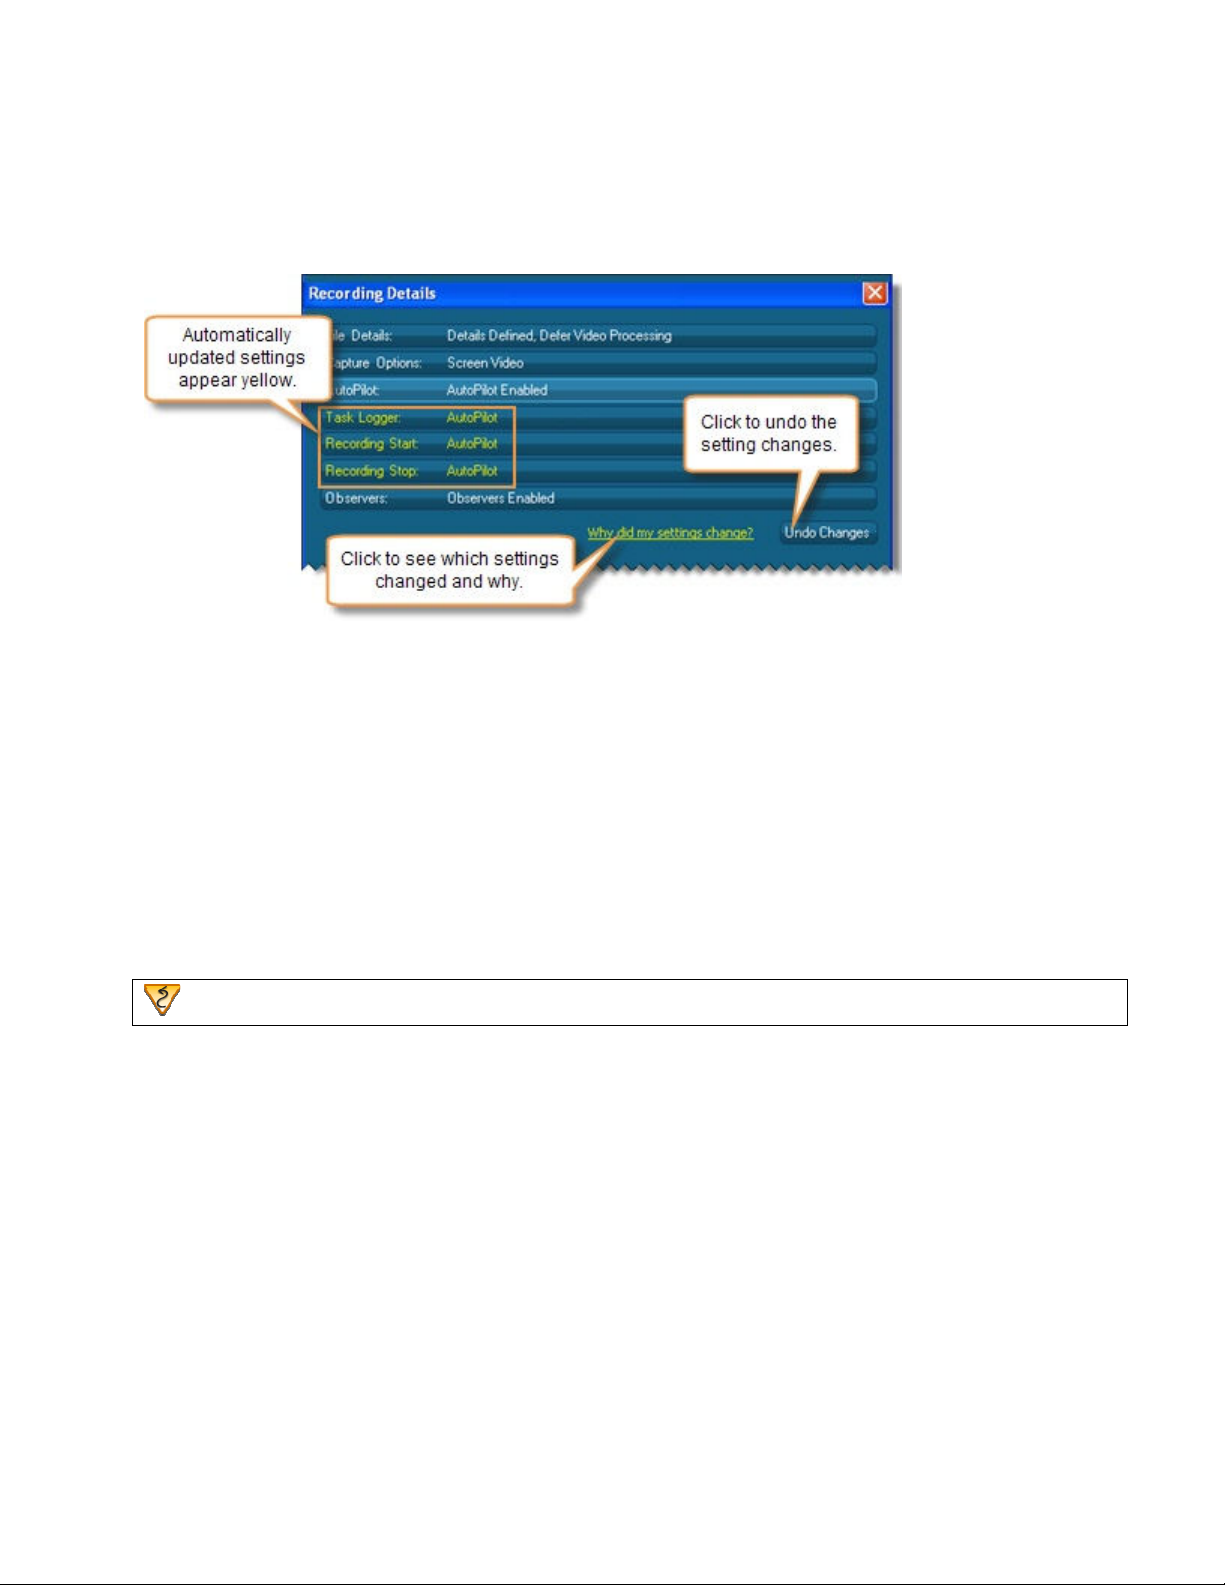
Enable this checkbox to turn on AutoPilot.
When you choose to use AutoPilot, the Task Logger, Recording Start, and Recording Stop change to
AutoPilot to provide the recommended configuration.
At End of Recording
Enable the Start a new AutoPilot recording automatically checkbox to set up AutoPilot for a new recording
as soon as one recording ends.
Timeout Options
If you use AutoPilot to run an unmoderated test, someone may not finish a session. Enable the checkbox and
enter the amount of time you want AutoPilot to wait until ending the session.
Task Logger Settings
Recorder > Modify Recording Details button > Task Logger
The task logger is the one observer can log tasks for each recording. Only the task logger can mark the start
and end of tasks.
See also:
• Who Should Be The Task Logger?
• Designate the Task Logger
• File Details
• Capture Options
• AutoPilot Settings
• Recording Start Settings
• Recorder Stop Settings
• Observer Settings
Page 31

Who Should Be The Task Logger?
Morae Recorder
Help PDF
Page 29
www.techsmith.com
When defining the task logger, choose one of the following options.
• First Observer connected
Use this option if you only have one Observer or everyone connecting to the session could log tasks.
If the task logger disconnects Observer from the session, intentionally or not, the next Observer who
connects automatically becomes the task logger.
• Designated Observer
Use this option if you know exactly who you want to log the tasks.
If the designated task logger disconnects Observer from the session, whether intentionally or not, no
one else can log tasks. If the task logger re-connects, he or she can again log tasks. See Designate
the Task Logger.
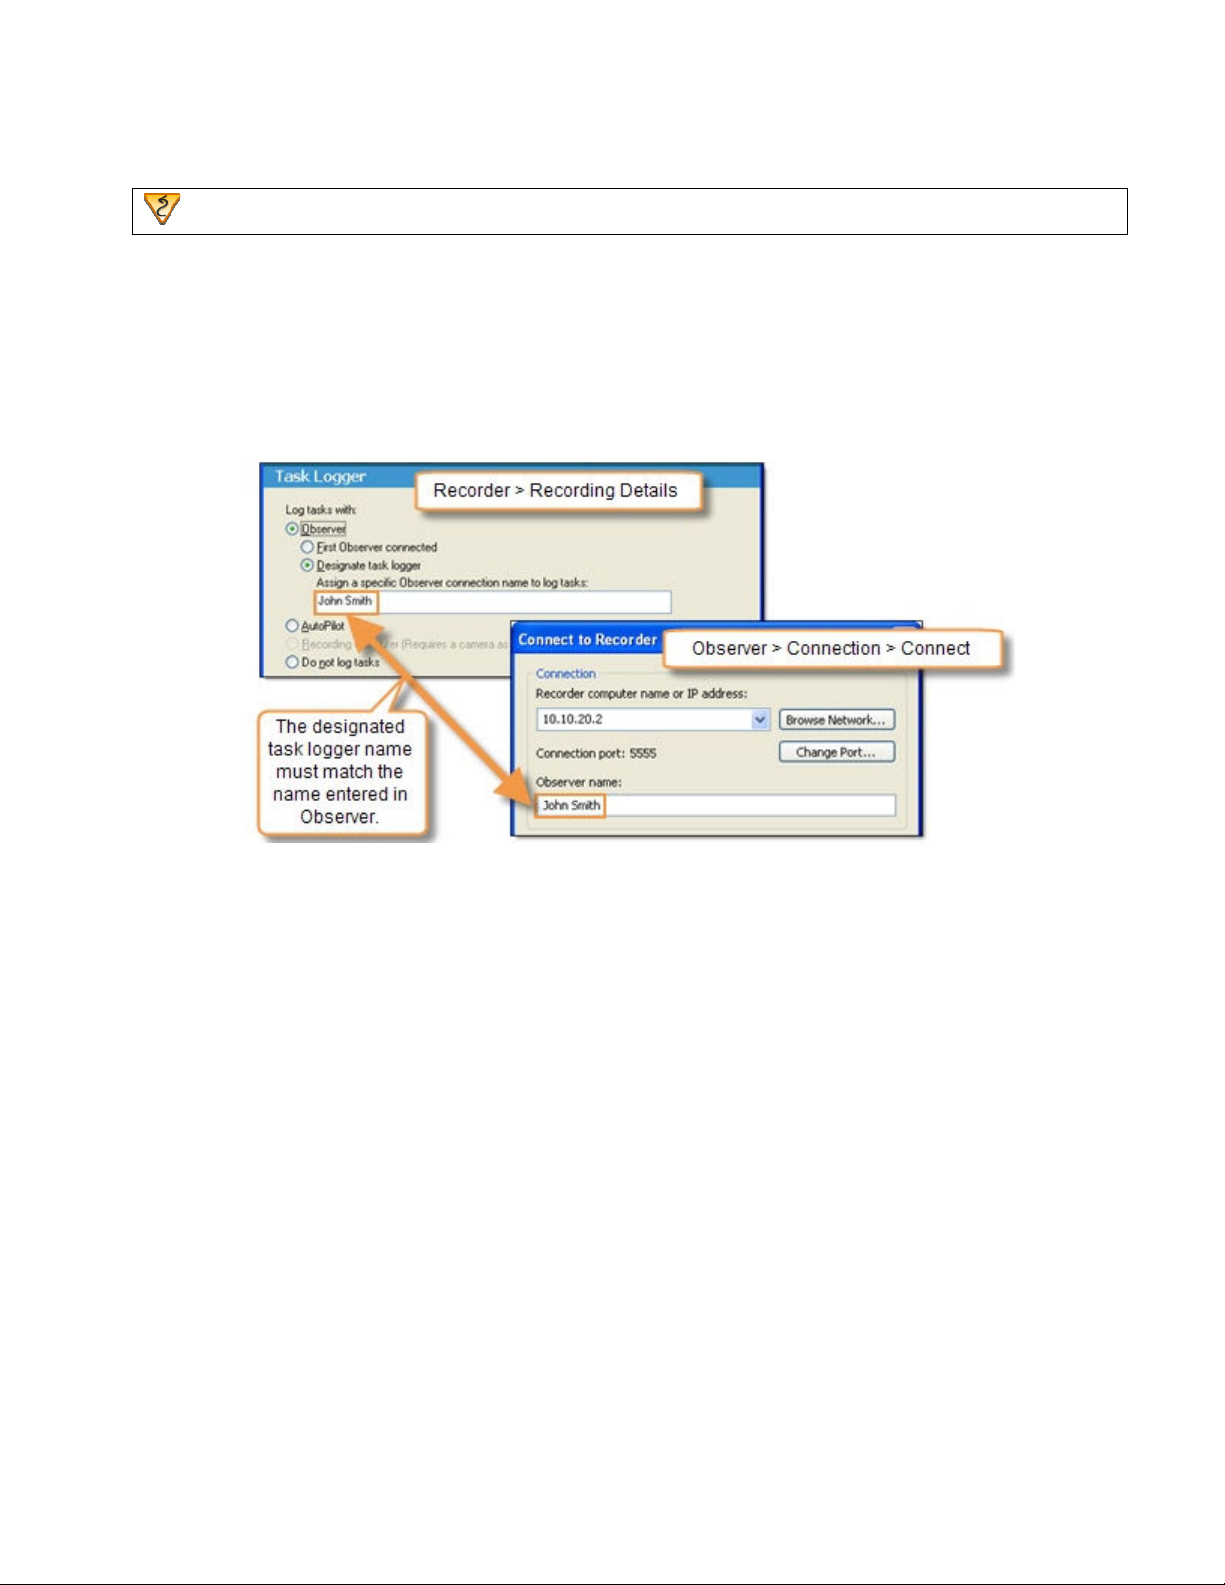
The task logger name must match the name entered in Observer. For example, if you enter
only a first name in the Recoding Details and the Observer enters a first and last name, they will
not be designated as task logger.
• AutoPilot
Use this option with AutoPilot. As the participant clicks Start Task and End Task in AutoPilot, it logs
the corresponding markers in the recording.
When you enable AutoPilot, the Recording Details update to set AutoPilot to log tasks.
• Recording computer
Use this option if you record camera as the Main video source. This setting allows you to log on the
same computer you are recording on. You do not need to have any Observers connected to log a
camera video-based session.
See also:
• Task Logger Settings
• Designate the Task Logger
Page 32
Designate the Task Logger
Morae Recorder
Help PDF
Page 30
www.techsmith.com
Recorder > Modify Recording Details button > Task Logger
To designate a specific task logger by name:
1. Enable the Observer checkbox.
2. Select Designate the task logger.
3. Enter the name of the task logger.
4. Click OK.
When the task logger connects to Recorder, the Observer name must match the name designated in
Recorder.
See also:
• Task Logger Settings
• Who Should Be The Task Logger?
Page 33
Recording Start Settings
Morae Recorder
Help PDF
Page 31
www.techsmith.com
Recorder > Modify Recording Details button > Recording Start
Recorder provides flexible options to start Recorder depending on your equipment and participant set up.
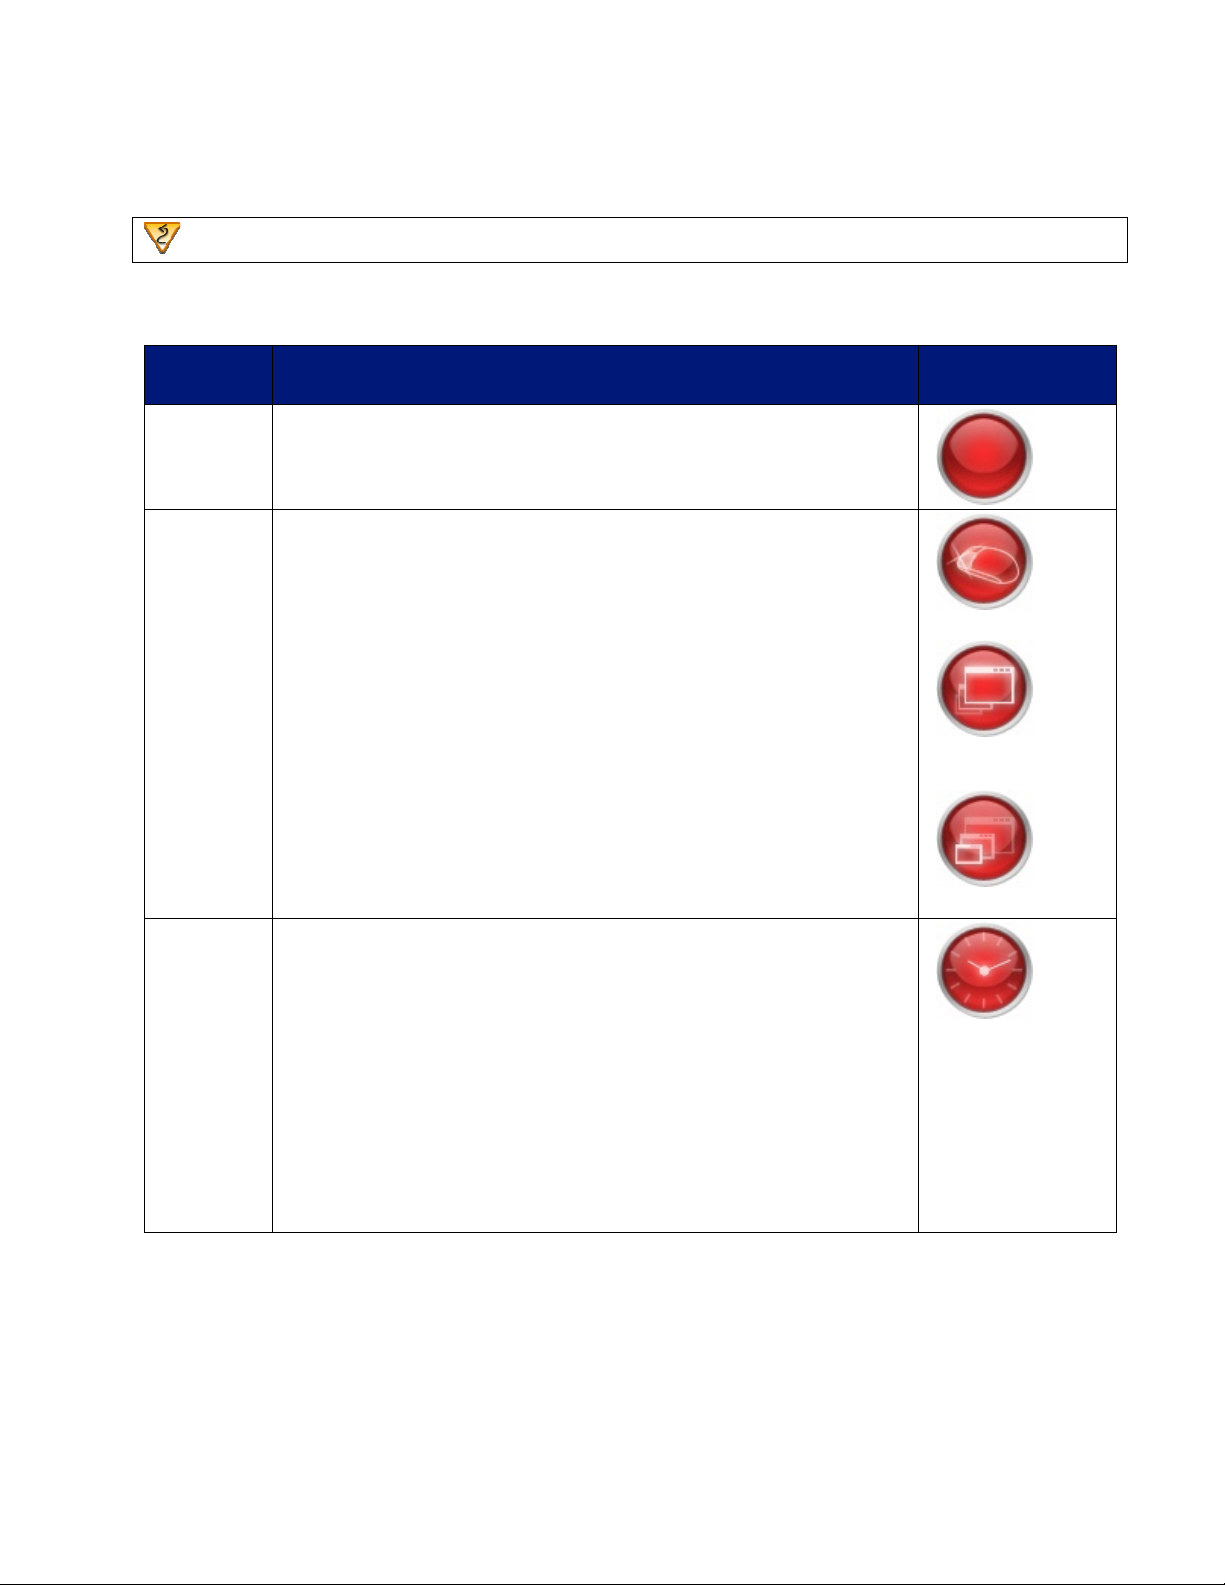
The following table describes the available options to start a recording.
START
OPTION DESCRIPTION
Manually
Based on
an event
At a
specific
Date/Time
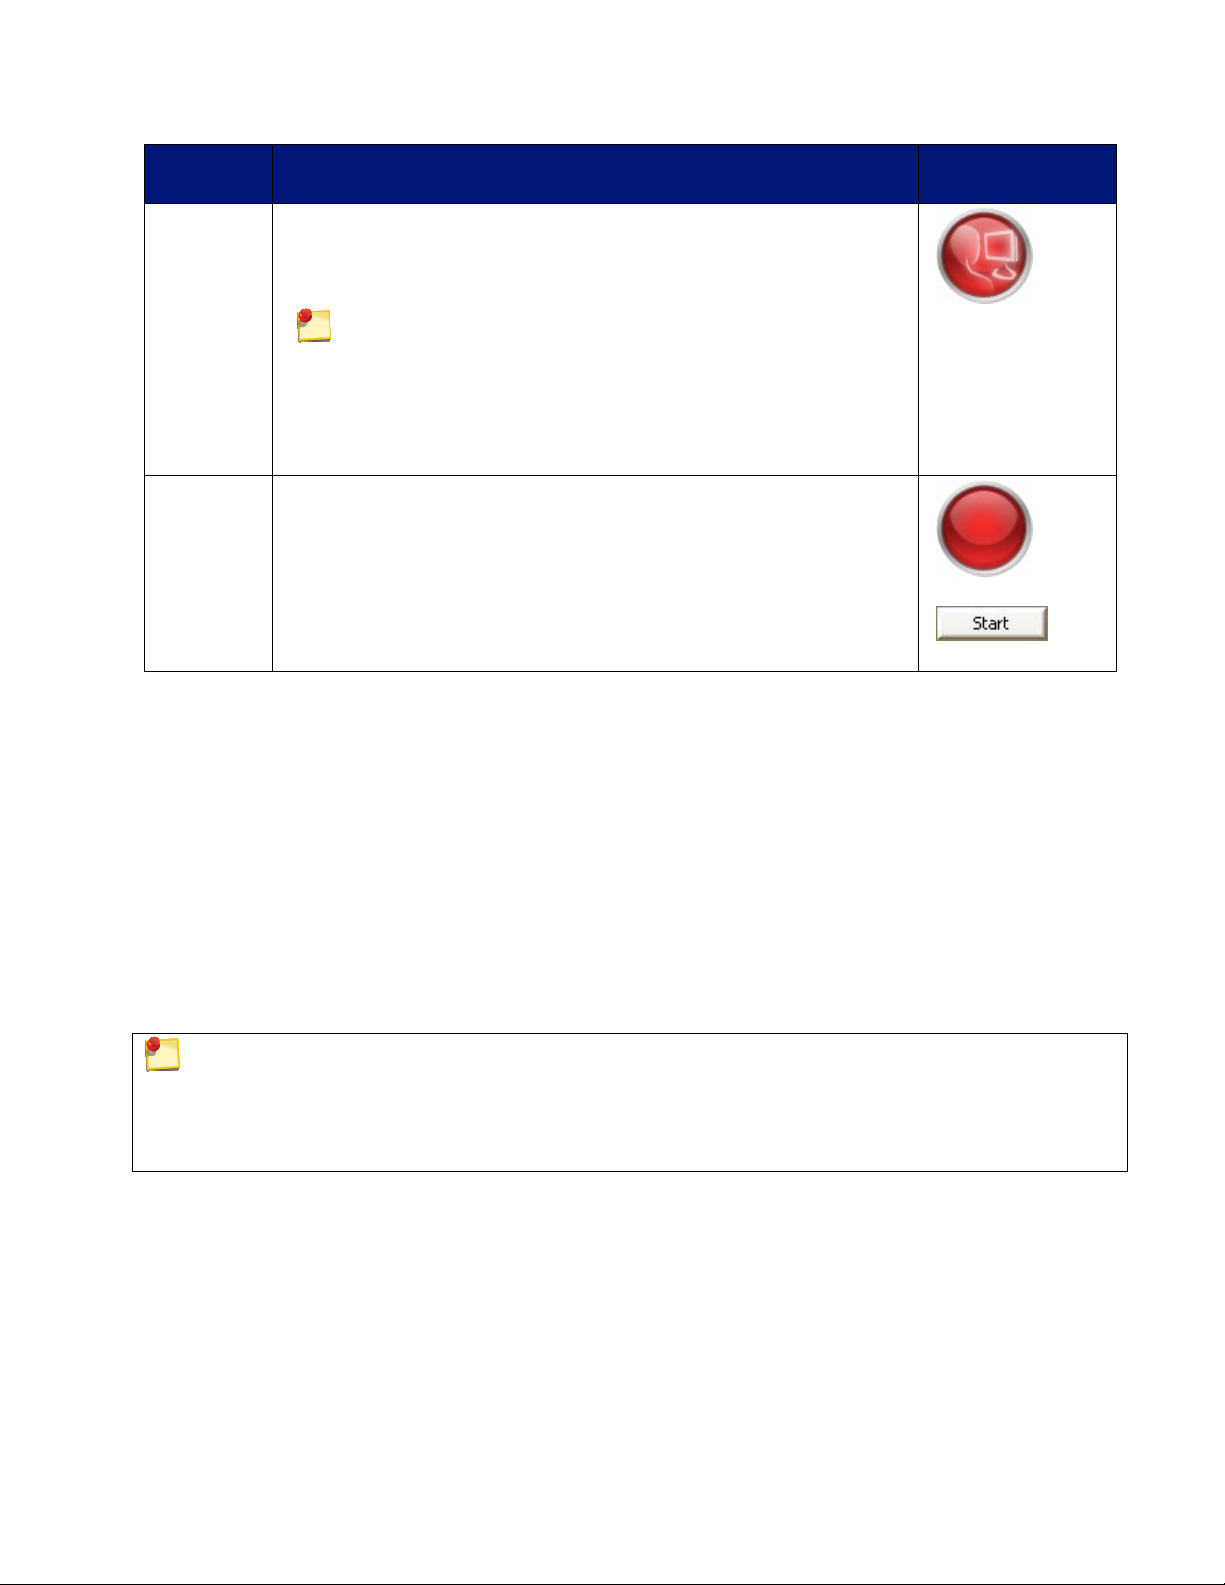
Recording starts when you click the Start button or use the hotkey
combination <Ctrl + Alt + Shift + F9>.
Recording starts when a certain event occurs. Choose one of the
event types from the dropdown menu:
• Mouse Click –Recording starts at the click of the mouse.
• Application Launch – Recording starts when the specified
application launches, for example when the participant launches
Internet Explorer.
• Application Exit – Recording starts when the participant exits a
specified application.
• In an application - Click the Browse button to find the
application’s executable name (for example IEXPLORE.EXE).
Recording starts at a particular date and time. Leave the box next to
the Date field unchecked if you want the recording to start at that
time on any date.
• Recorder must be running at the time the recording is set to
begin.
• A time-based start only occurs one time. After the recording is
complete, you must click Start again to set Recorder to wait for
the next time-based start.
• A time-based start can be set up to 49 days in advance of the
recording.
• If the time has already passed for today, the recording starts at
the specified time tomorrow.
START
BUTTON
Mouse click
Application
Launch
Application Exit
Page 34
START
Morae Recorder
Help PDF
Page 32
www.techsmith.com
OPTION DESCRIPTION
START
BUTTON
Using
Observer
Recording starts when an Observer clicks Start the recording
button on Observer’s toolbar.
Click the Start button in Recorder to wait for the start signal from
Observer.
If you leave the Observer name field blank, any Observer can
start Recorder.
You need to return to the Recorder computer between recordings to
click Start. To avoid this additional interaction with Recorder, see
Automatically Restart Recorder.
AutoPilot
See also:
• File Details
• Capture Options
• AutoPilot Settings
• Task Logger Settings
• Recorder Stop Settings
• Observer Settings
Click the Start button to launch the AutoPilot interface.
Recording starts when the participant clicks Start after reading the
study instructions in AutoPilot.
Recorder Start
AutoPilot Start
Automatically Restart Recorder
Enable the Automatically restart Recorder checkbox to automatically restart Recorder after each recording,
using the same recording settings.
The Automatically restart Recorder option does not work if you use the following Start and Stop options:
- Manual start
- Time based start with a date specified
- Time based stop with a date specified
- Event based start on a mouse click
To automatically restart Recorder:
1. In Recorder, click the Modify Recorder Details button. The Recording Details dialog box appears.
2. Click Recording Start and select the Recorder Start Setting.
3. Enable the Automatically restart Recorder checkbox.
4. Click File Details.
Page 35

5. Disable the Prompt for details when recording stops checkbox.
Morae Recorder
Help PDF
Page 33
www.techsmith.com
This prevents the Recording file details dialog from appearing after each recording.
6. Enable the Defer processing of recordings checkbox.
This places the recording files in a queue for later processing.
When you are finished with a series of automated recordings, go back to Recorder and batch process the
recording files (File > Process Deferred Recordings). For more information, see Batch Process Recording
Files .
Recorder sequentially numbers the recording files by adding a number to the file name entered in the
Recording Folder field.
For example, if you entered “Test” in the Recording name field, the recording names are “test.rdg”, “test-
0001.rdg” and “test-0002.rdg”, etc.
Recorder Stop Settings
Recorder > Modify Recording Details button > Recording Stop
Morae provides several options to choose how and when recordings stop. Stop recordings manually or use
one of the automated stop options.
The following table describes the available options to stop a recording.
STOP
RECORDER
OPTION DESCRIPTION
STOP
BUTTON
Manually Recording stops when you click the Stop button, use the hotkey
combination <Ctrl + Alt + Shift + F9>, or right-click the tray icon and
choose Stop from the menu.
You can always stop Recorder manually, even if you selected
another stop option.
Based on an
event
Recording stops when a certain event occurs. Choose one of the
event types from the dropdown menu:
• Application Launch – Recording stops when the specified
application launches, for example when the participant launches
Internet Explorer.
• Application Exit – Recording stops when the participant exits a
specified application.
• In an application - Click the Browse button to find the
application’s executable name (for example IEXPLORE.EXE).
Application
Launch
Application
Exit
Page 36
STOP
Morae Recorder
Help PDF
Page 34
www.techsmith.com
RECORDER
OPTION DESCRIPTION
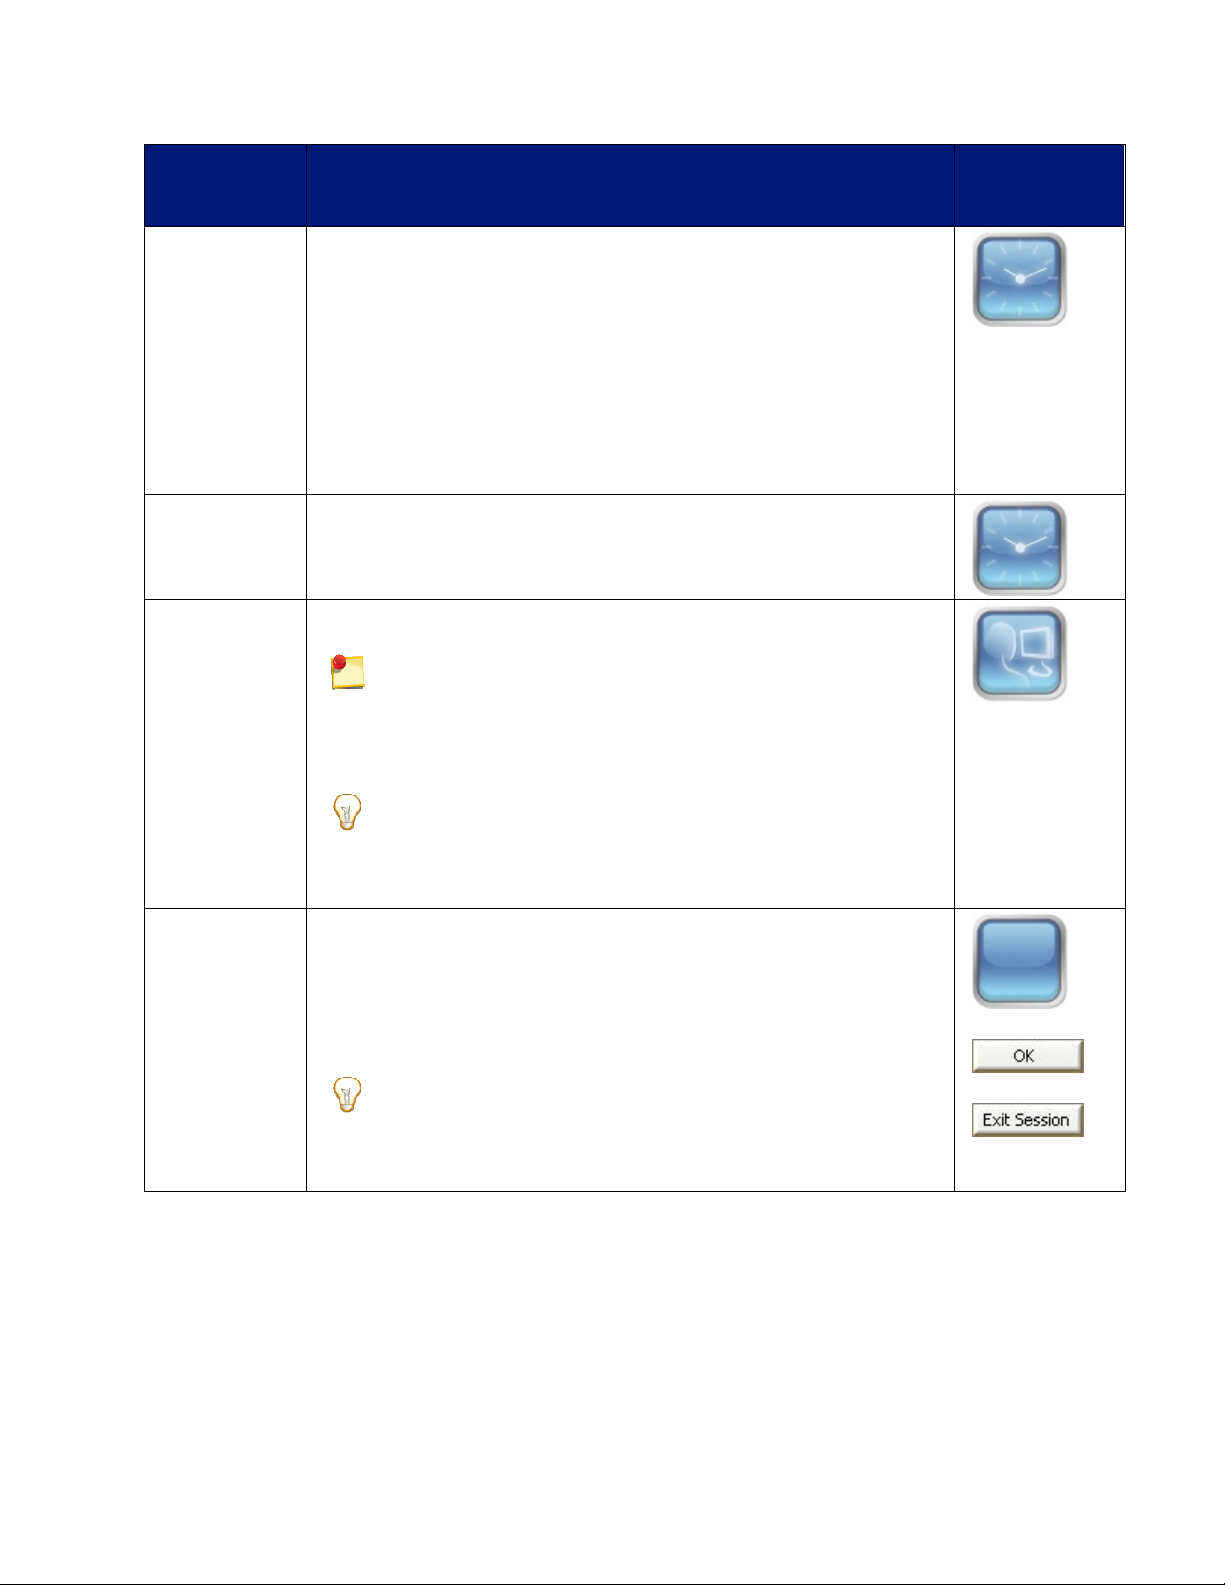
Time based Recording stops at a particular date and time.
• Leave the date field disabled to stop the recording at the
specified time today.
• If this time has already passed for today, the recording stops at
the specified time tomorrow.
• A time-based stop only occurs one time. After that recording is
complete, you must click the Start button again to set Recorder
to wait for the next time-based start.
• A time-based stop can be set up to 49 days in advance of the
recording.
After Recording stops after number of hours entered. The dropdown list
only shows durations up to 2.0 hours, you can type in up to 1176
hours (49 days).
STOP
BUTTON
Using
Observer
Recording stops when an Observer clicks Stop the recording
button on Observer’s toolbar.
If you leave the Observer name field blank, any Observer can
stop Recorder.
You need to return to the Recorder computer between recordings to
click Start. To avoid this additional interaction with Recorder, see
Automatically Restart Recorder.
If you automatically restart, you click Start in Recorder once
and then the Observer user who has control of Recorder can
start and stop recordings repeatedly, without returning to the
Recorder computer.
AutoPilot Recording ends when:
• You click Stop in Recorder.
• A participant clicks OK in AutoPilot after completing the session
tasks and surveys.
• A participant clicks Exit Session in AutoPilot to leave a session
at any time.
Enable the Start a new AutoPilot recording automatically
checkbox to set up AutoPilot for a new recording as soon as
one recording ends. See AutoPilot Settings.
Recorder stop
AutoPilot stop
Leave
AutoPilot
See also:
• File Details
• Capture Options
• AutoPilot Settings
• Task Logger Settings
• Recording Start Settings
• Observer Settings
Page 37

Observer Settings
Morae Recorder
Help PDF
Page 35
www.techsmith.com
Recorder > Modify Recording Details > Observers
With Morae, you can allow one or multiple computers to connect over a network to a computer running
Recorder. All observers can view the recording and log markers during a session. This flexibility allows your
entire team to observe the screen and camera video and hear the audio of the user, streaming from the
Recorder computer.
To allow Observers to connect to Recorder:
1. Enable the Allow Observer checkbox.
2. Enter the amount of time Recorder waits for pending (unfinished) tasks and markers before ending
the recording. By default, Recorder waits 60 seconds.
3. Click OK.
See also:
• File Details
• Capture Options
• AutoPilot Settings
• Task Logger Settings
• Recording Start Settings
• Recorder Stop Settings
Page 38
Define Study Details
Morae Recorder
Help PDF
Page 36
www.techsmith.com
Recorder > Modify Study Details
Study Details define the study including the study name, session instructions, tasks, markers, and surveys. In
the Study Details dialog box, define the following:
•
Study name, description, and instructions
Tasks definitions and instructions
•
•
Marker definitions and instructions
•
Survey definitions and associations
The study-specific information defined in the Study Details dialog box should be the same for all recordings in
a study.
If you modify study details, new recordings will not automatically match recordings previously made
using this study configuration. You can merge these recordings later into a single study in Manager. For
more information, see the Morae Manager Help.
See also:
• To Define a Task
• To Define a Marker
• Create a Survey Using Custom Questions
• Create a Survey Using System Usability Scale Questions
Page 39
Define the Study Description
Morae Recorder
Help PDF
Page 37
www.techsmith.com
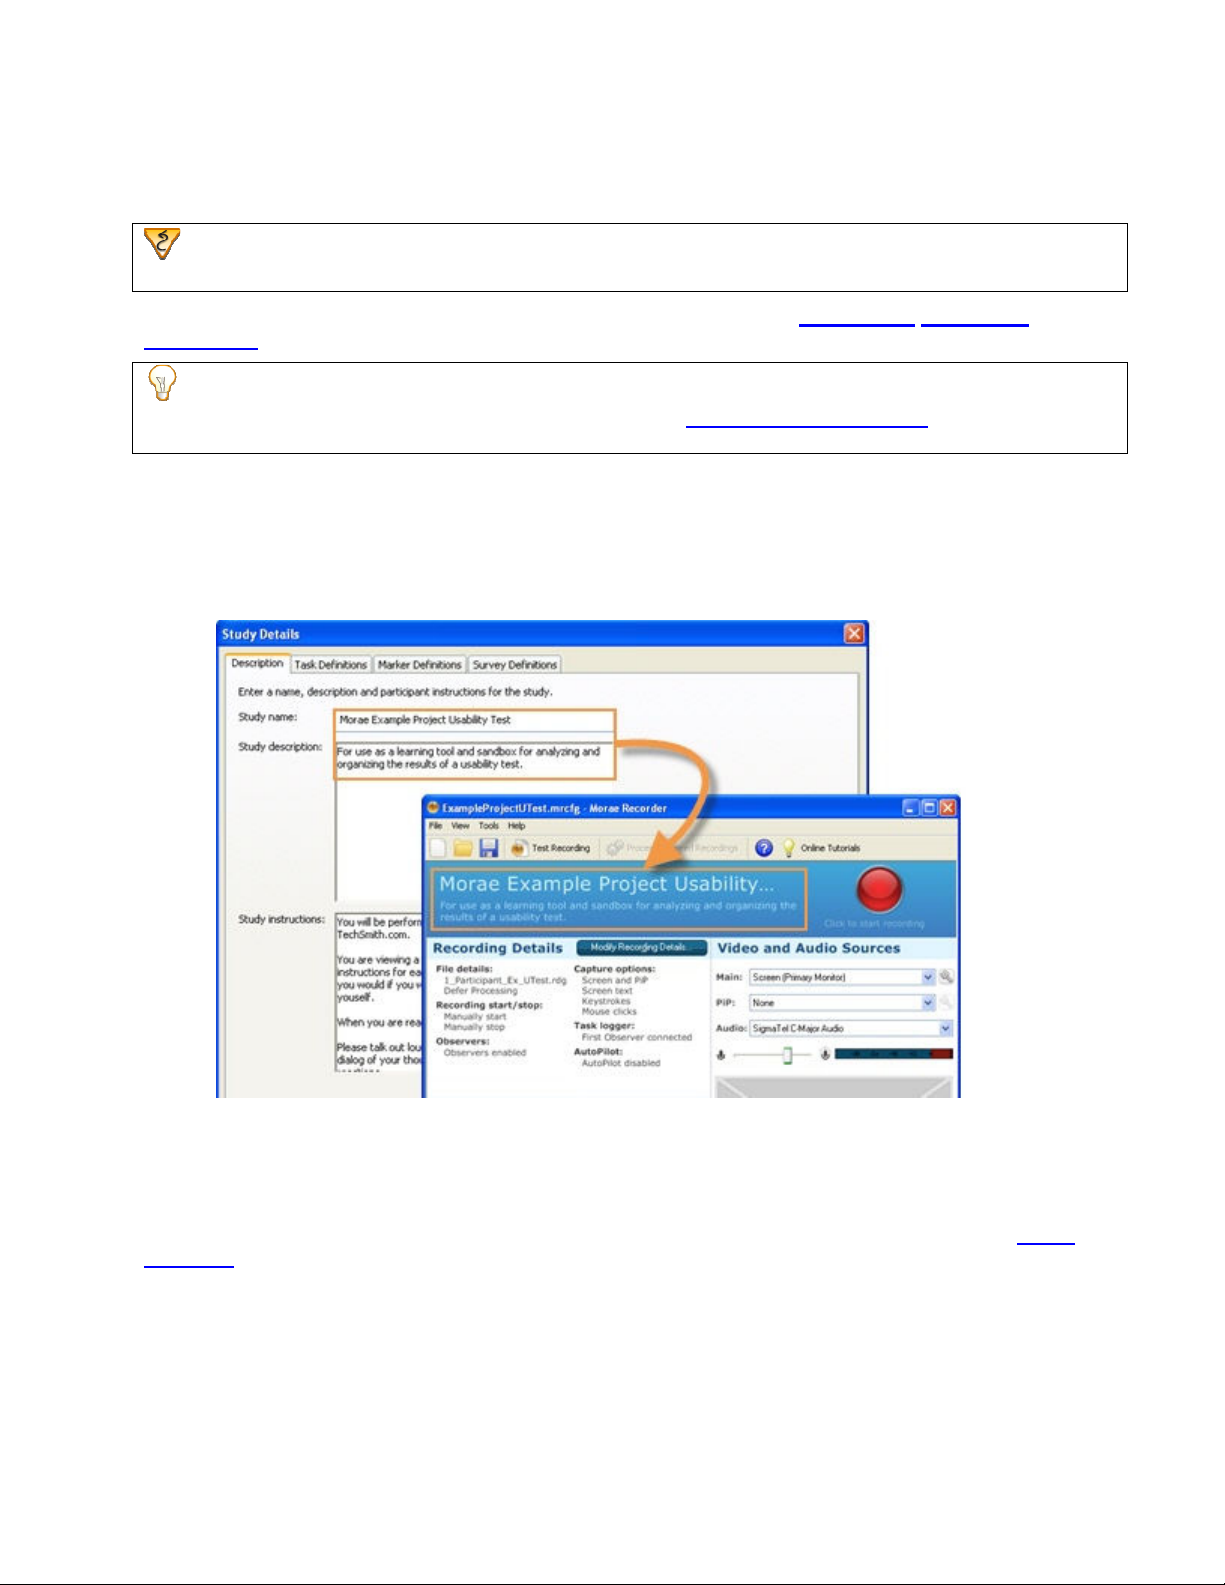
Recorder main interface > Modify Study Details > Description tab File > New or Open > Study
Configuration > Modify Study Details > Description tab
The fields in the Description tab of the Study Details dialog box define the study name, description, and
instructions.
You can open the configuration in the Morae Add-In for Microsoft Office Word and drop the study details
into a Word file to create handouts for participants. See Create Session Handouts for more
information.
Study Name and Study Description
The name and description appear in Recorder and are available when you import recordings into Manager.
Put information in these fields to describe why and when you would want to use this configuration. It will help
you to choose the correct study configuration for a session.
Study Instructions
The study name and instructions appear on the computer running AutoPilot. They are presented to the
participant before they begin a session. You can also pull these instructions into Microsoft Word to create
handouts if you are not using AutoPilot to run your session.
Put information in this field to describe the scenario or any special instructions for the participant.
See also:
• Define the Study Tasks
• Define the Study Markers
• Define the Study Surveys
Page 40
Define the Study Tasks
Morae Recorder
Help PDF
Page 38
www.techsmith.com
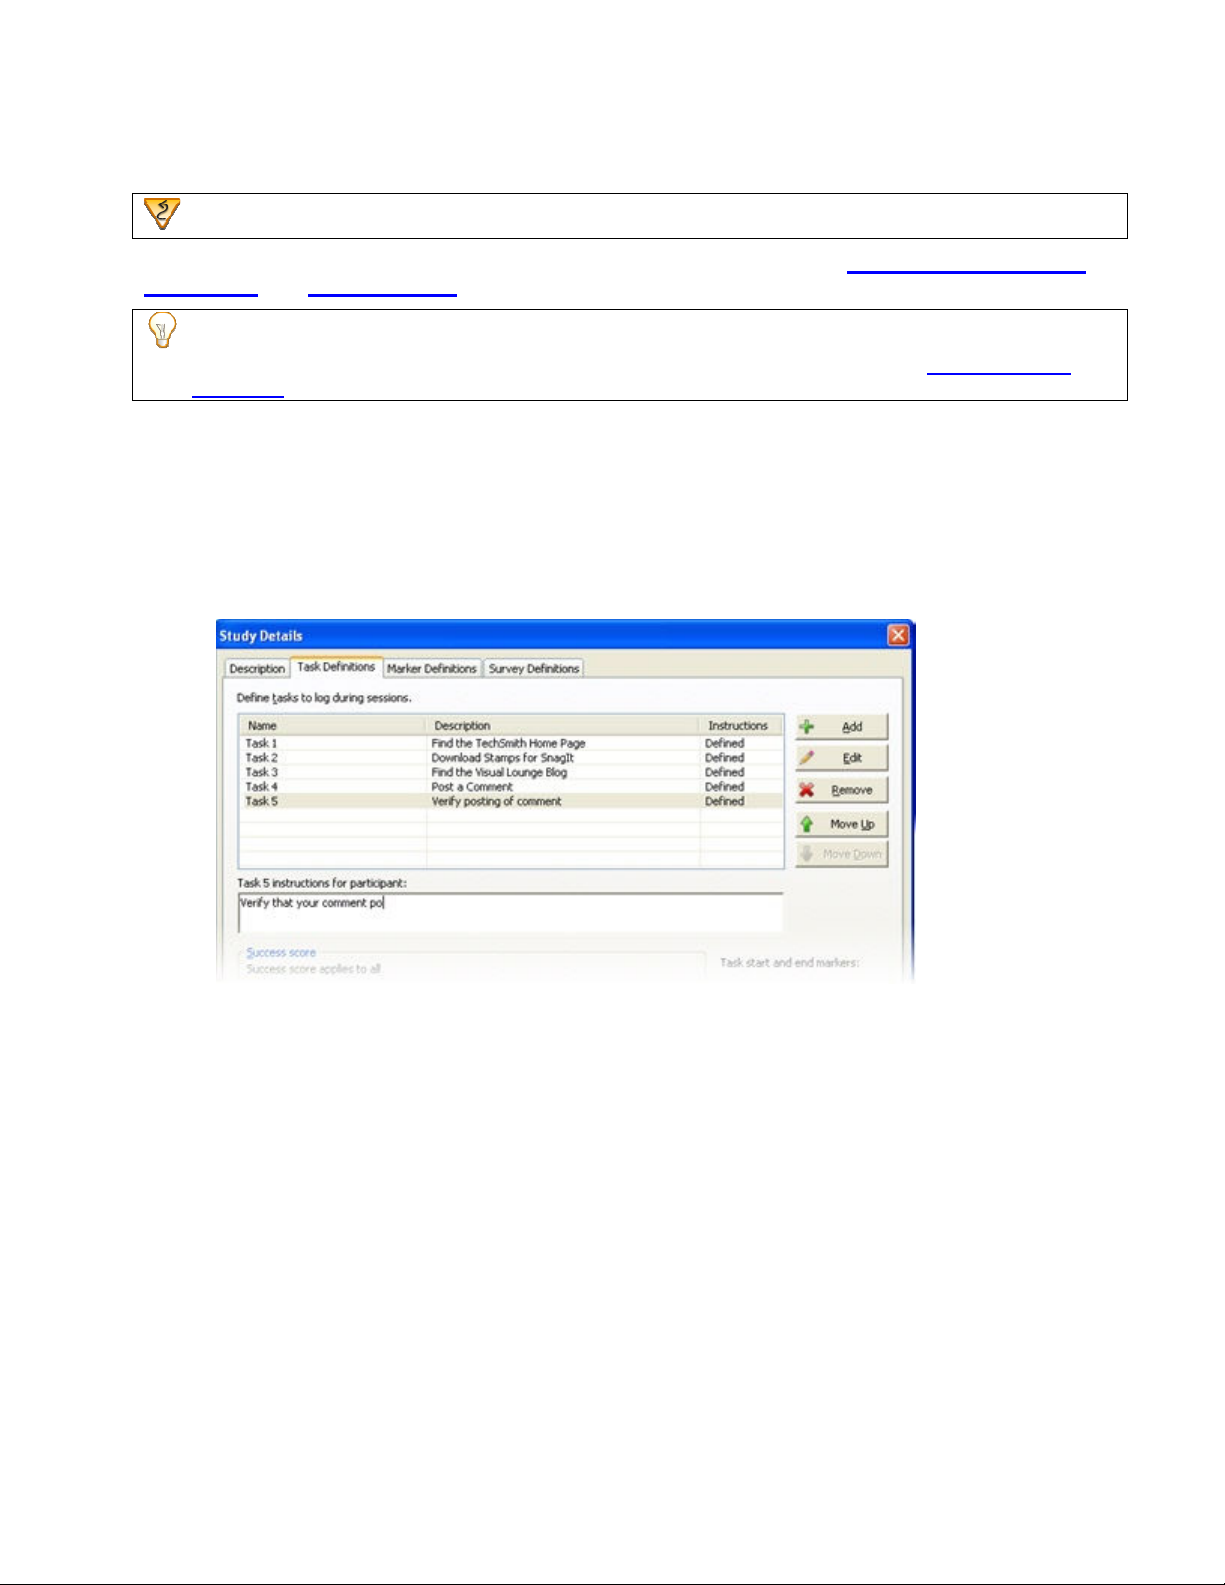
Recorder > Modify Study Details > Task Definitions tab
The fields in the Task Definitions tab of the Study Details dialog box define the task names, descriptions,
instructions, and success scores.
You can open the configuration in the Morae Add-In for Microsoft Office Word and drop the task
definitions and instructions into a Word file to create handouts for participants. See Create Session
Handouts for more information.
For information on working with tasks and success definitions in the Task Definitions tab, see Modify Task
and Success Score
To Define a Task
1. Click Add to create a new task.
2. Enter a name and description for the task.
3. Enter participant instructions for the task.
Definitions.
See also:
• Define the Study Description
• Define the Study Markers
• Define the Study Surveys
Page 41

Task Name and Description
Morae Recorder
Help PDF
Page 39
www.techsmith.com
The task name and description appear when observing a session. If you are the task logger, once you enter a
Start task marker, you choose the task from a dropdown list.
Put information in these fields to give the task logger enough information to quickly select the correct choice
when entering a Start task marker.
After importing recordings into Manager, tasks become the basis for graphs created in Manager. You are also
able to search across recordings for events or markers that occur during a given task.
See also:
• Task Instructions
• Success Score
• Modify Task and Success Score Definitions
Task Instructions
Task instructions appear on the computer running AutoPilot. The task instructions are presented to the
participant to guide them through a session.
• After reading a task, the participant clicks Start Task, which automatically logs a Start task marker.
• After completing the task, the participant clicks End Task, which automatically logs an End task
marker.
• While working on a task, the participant can show or hide the instructions as needed.
You can also pull these instructions into Microsoft Word to create handouts if you are not using AutoPilot to
run your session.
Put information in this field to describe the task for the participant.
See also:
• Task Name and Description
• Success Score
• Modify Task and Success Score Definitions
Success Score
Success scores apply to all the tasks in a study. If you are the task logger, once you enter an End task marker,
you choose the score from a dropdown list.
You can use the default completion rate scores or create your own scale.
After importing recordings into Manager, you can quickly create a task score graph to automatically calculate
and visually display the completion rate. Completion rate is a standard metric used to analyze usability tests.
See also:
• Task Name and Description
• Task Instructions
• Modify Task and Success Score Definitions
Page 42

Modify Task and Success Score Definitions
Morae Recorder
Help PDF
Page 40
www.techsmith.com
Once you save a study configuration, adding or modifying anything on this tab changes your study
configuration. You will need to merge recordings if you want them in the same study in Manager. See
the Morae Manager Help.
In the Task Definitions tab, use the following icons to modify the tasks and success scores.
BUTTON USE
Click Add to create a new task or success definition.
You can also click in an empty row to add a new task or success
definition.
Select a task or success definition and click Edit to modify the task
name and description or success definition.
You can also double-click in a field to edit it.
Select a task or success definition and click Remove to delete a task or
success definition.
You can also select a row and press Delete to remove a task or
success definition.
Select a task and click Move Up to move a task up in the list.
If your tasks are numbered, moving the task does not change the
number.
Select a task and click Move Down to move a task down in the list.
If your tasks are numbered, moving the task does not change the
number.
See also:
• Task Name and Description
• Task Instructions
• Success Score
Page 43

Define the Study Markers
Morae Recorder
Help PDF
Page 41
www.techsmith.com
Recorder > Modify Study Details > Marker Definitions tab
The fields in the Marker Definitions tab of the Study Details dialog box define the marker colors, types,
definitions, and scores.
Markers allow you to flag important points in a recording including errors, quotes, and the start and end of
tasks. For example, you can create markers for
• Participant actions
• Participant comments and questions
• Observations about how the participant performs a task
• Interesting comments or actions to include in a highlight video
You can open the configuration in the Morae Add-In for Microsoft Office Word and drop the marker
definitions into a Word file to use to prior to a session. For example, you may want share the markers
with observers prior to the session to give them an idea what to watch for. See Create Session
Handouts for more information.
For information on working with markers and score definitions in the Marker Definitions tab, see Modify
Marker and Marker Score Definitions
To Define a Marker
1. Click Add to create a new marker.
2. Select a color and type (letter) and add a description to define the marker. Observers can use <Ctrl+
[letter]> as a keyboard shortcut to log tasks in Observer, where [letter] is the letter assigned in the
Type column.
.
See also:
• Define the Study Description
• Define the Study Tasks
• Define the Study Surveys
Page 44

Marker Color, Type, and Definition
•
Morae Recorder
Help PDF
Page 42
www.techsmith.com
The marker color, type, and definition appear when observing a session. People observing with Morae
Observer can enter markers and add notes to these markers during the recording.
By adding markers and notes during a session, you can save time analyzing and automatically create graphs
after importing the recordings into Morae Manager. If you cannot add markers and notes during a session,
you can do so in Manager.
Color distinguishes the markers on the
Manager Timeline.
• Type is a letter that is used in
combination with CTRL as a keyboard
shortcut for entering a marker in
Observer.
• Definition explains to observers what
each marker should be used to flag
during a session.
You cannot edit Start task and End task marker definitions; they are required for logging tasks. You can
change the color or letter (type).
See also:
• Marker Scores
• Modify Marker and Marker Score Definitions
Marker Scores
Marker scores apply to all markers in a study. After entering a marker, observers can include a score. For
example, if you use marker scores for errors, analysis would determine the average severity of the errors.
You can use the default marker scores or create your own scale.
After importing recordings into Manager, you can create marker score graphs to automatically calculate and
visually display the marker severity rate.
See also:
• Marker Color, Type, and Definition
• Modify Marker and Marker Score Definitions
Page 45

Modify Marker and Marker Score Definitions
Add
Edit
Remove
Move Up
Move Down
Morae Recorder
Help PDF
Page 43
www.techsmith.com
Once you save a study configuration, adding or modifying anything on this tab changes your study
configuration. You will need to merge recordings if you want them in the same study in Manager. See
the Morae Manager Help.
In the Marker Definitions tab, use the following icons to modify the markers and score scores.
BUTTON USE
Click
You can also click in an empty row to add a new marker or marker score
definition.
to create a new marker or marker score definition.
Select a marker or marker score definition and click
marker color, type, and description or marker score definition.
You can also double-click in a field to edit it.
Select a marker or marker score definition and click
marker or marker score definition.
You can also select a row and press Delete to remove a marker or
marker score definition.
Select a marker and click
Select a marker and click
See also:
• Marker Color, Type, and Definition
• Marker Scores
to modify the
to delete a
to move a marker up in the list.
to move a marker down in the list.
Page 46

Define the Study Surveys
Morae Recorder
Help PDF
Page 44
www.techsmith.com
Recorder > Modify Study Details > Survey Definitions tab
Survey Definitions tab of the Study Details dialog box lists the surveys available in a study and associates
a survey with a point in the session, such as the end of the task.
You can either Create a Survey Using Custom Questions or Create a Survey Using System Usability
Scale Questions.
Morae includes the ability to deliver multiple surveys during a session. The participant answers are captured
and saved with the recording file. When you import the recordings into Manager, you can review, adjust,
analyze, and graph survey responses.
You can open the configuration in the Morae Add-In for Microsoft Office Word and drop surveys into a
Word file to create handouts for participants. See Create Session Handouts for more information.
See also:
• Define the Study Description
• Define the Study Tasks
• Define the Study Markers
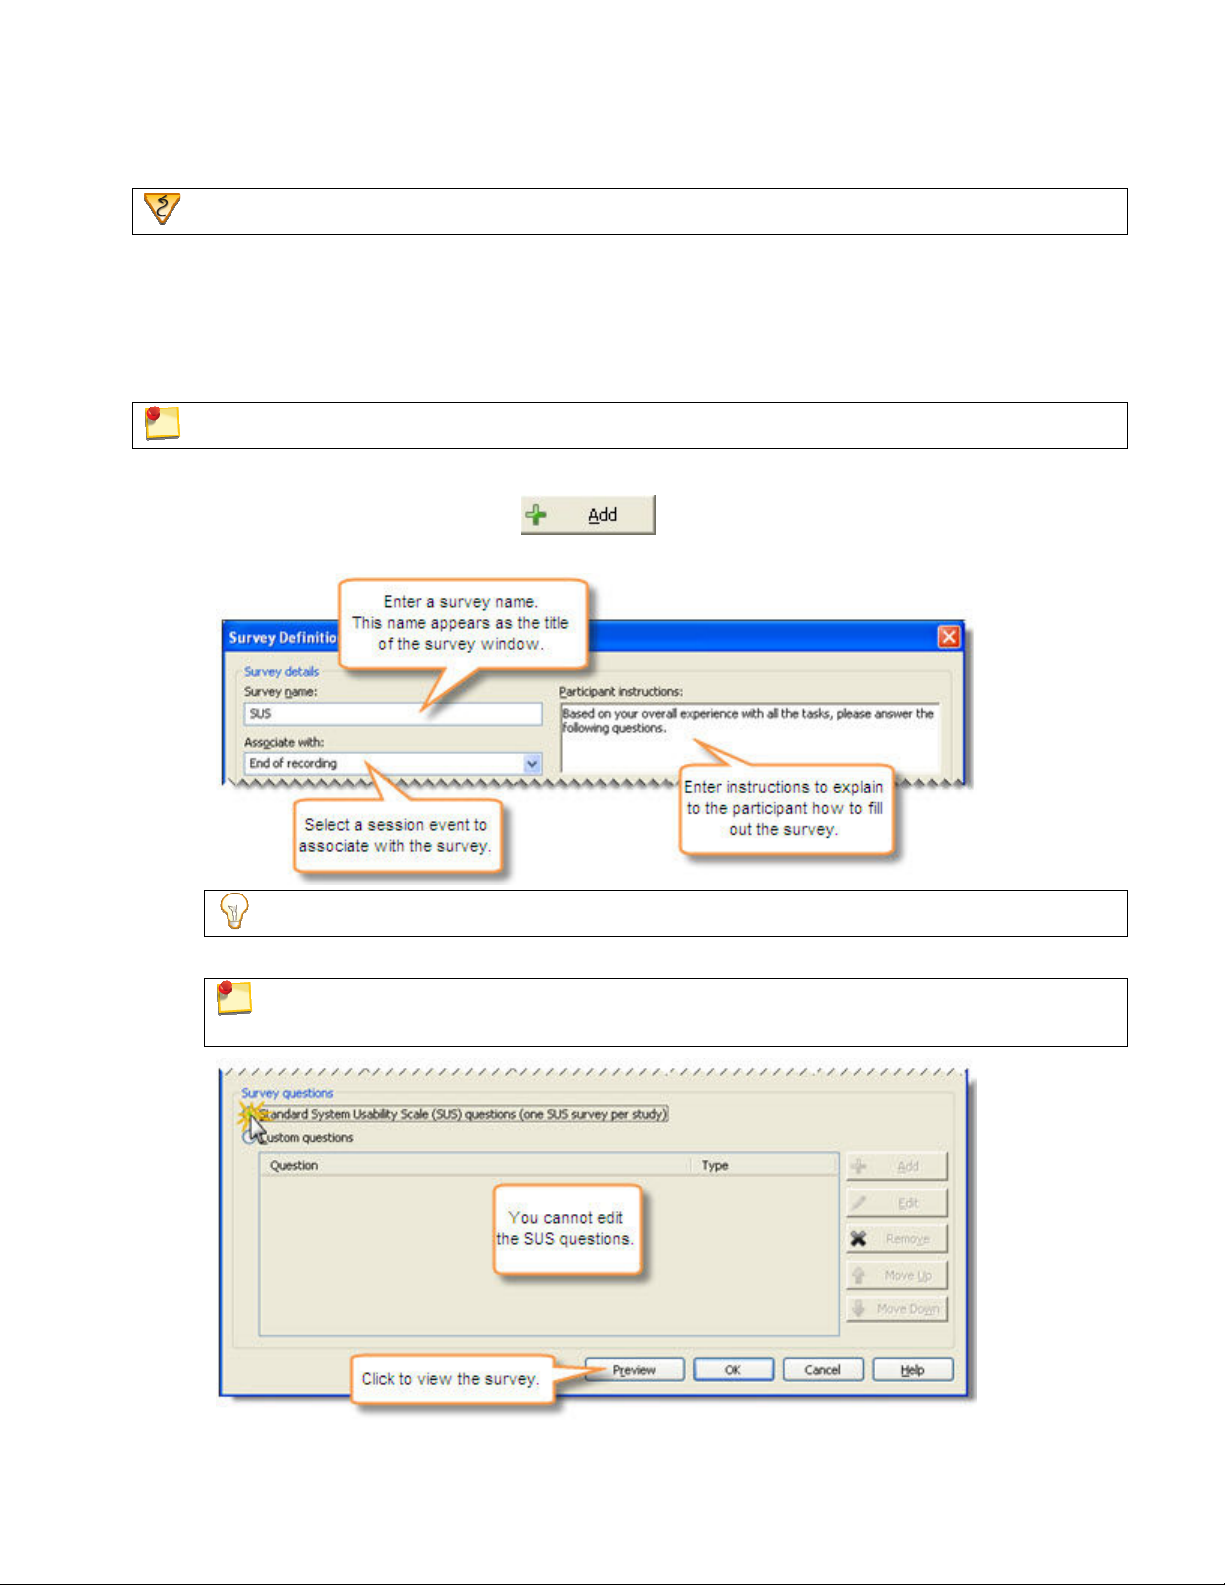
Survey Name
The survey name appears as the title of a survey dialog box and identifies a survey in the study configuration.
You can only edit the name of an existing survey in the Survey Definition tab. To create a new survey,
click the Add button. For information on how to create a new survey, see Create a Survey Using
Custom Questions and Create a Survey Using System Usability Scale Questions.
Page 47

Survey Association
Morae Recorder
Help PDF
Page 45
www.techsmith.com
Choose to associate surveys with session events. Session events include the beginning and end of the
recording, as well as the end of each defined task.
By associating a survey with a session event, it is “linked” to that event.
• AutoPilot automatically displays surveys when the associated session event occurs.
• Observer readies the survey associated with the current session event. Click Send Survey to display
the survey.
Page 48

Create a Survey Using Custom Questions
Morae Recorder
Help PDF
Page 46
www.techsmith.com
Recorder > Modify Study Details > Survey Definitions tab > Add
To create a new survey:
1. In the Survey Definitions tab, click Add. The Survey Definition dialog box opens.
2. Enter the Survey Details.
You can modify survey names and associations in the Survey Definitions tab.
3. Select Custom Questions.
For information on creating a survey using the SUS questions, see Create a Survey Using
System Usability Scale Questions.
4. Define questions for the survey. For more on adding questions and the available types, see Survey
Question Types.
5. When you finish adding questions, click OK to close the Survey Definition dialog box.
See also:
• Create a Survey Using System Usability Scale Questions
• Survey Question Types
Page 49
Create a Survey Using System Usability Scale Questions
Morae Recorder
Help PDF
Page 47
www.techsmith.com
Recorder main interface > Modify Study Details > Survey Definitions tab > Add
The System Usability Scale (SUS) is freely available for use in usability assessment and is used for a variety
of research projects; the only prerequisite for its use is that any published report must acknowledge the
source of the measure.
Acknowledgements
SUS was developed as part of the usability engineering program in integrated office systems
development at Digital Equipment Co Ltd., Reading, United Kingdom.
Morae only allows you to use the SUS questions once in a study. You cannot modify the SUS questions.
To create a survey using the SUS questions:
1. In the Survey Definitions tab, click . The Survey Definition dialog box opens.
2. Enter the Survey Details.
You can modify survey names and associations in the Survey Definitions tab.
3. Select Standard System Usability Scale (SUS) questions (one SUS survey per study).
For information on creating a survey using custom questions, see Create a Survey Using
Custom Questions.
Page 50
4. Click OK to close the Survey Definition dialog box.
Morae Recorder
Help PDF
Page 48
www.techsmith.com
See also:
• Create a Survey Using Custom Questions
• Survey Question Types
Survey Question Types
Recorder > Modify Study Details > Survey Definitions tab > Survey Definition > Add
Create custom questions or use the System Usability Scale (SUS) questions to populate your surveys.
You can use the SUS questions only once in a study.
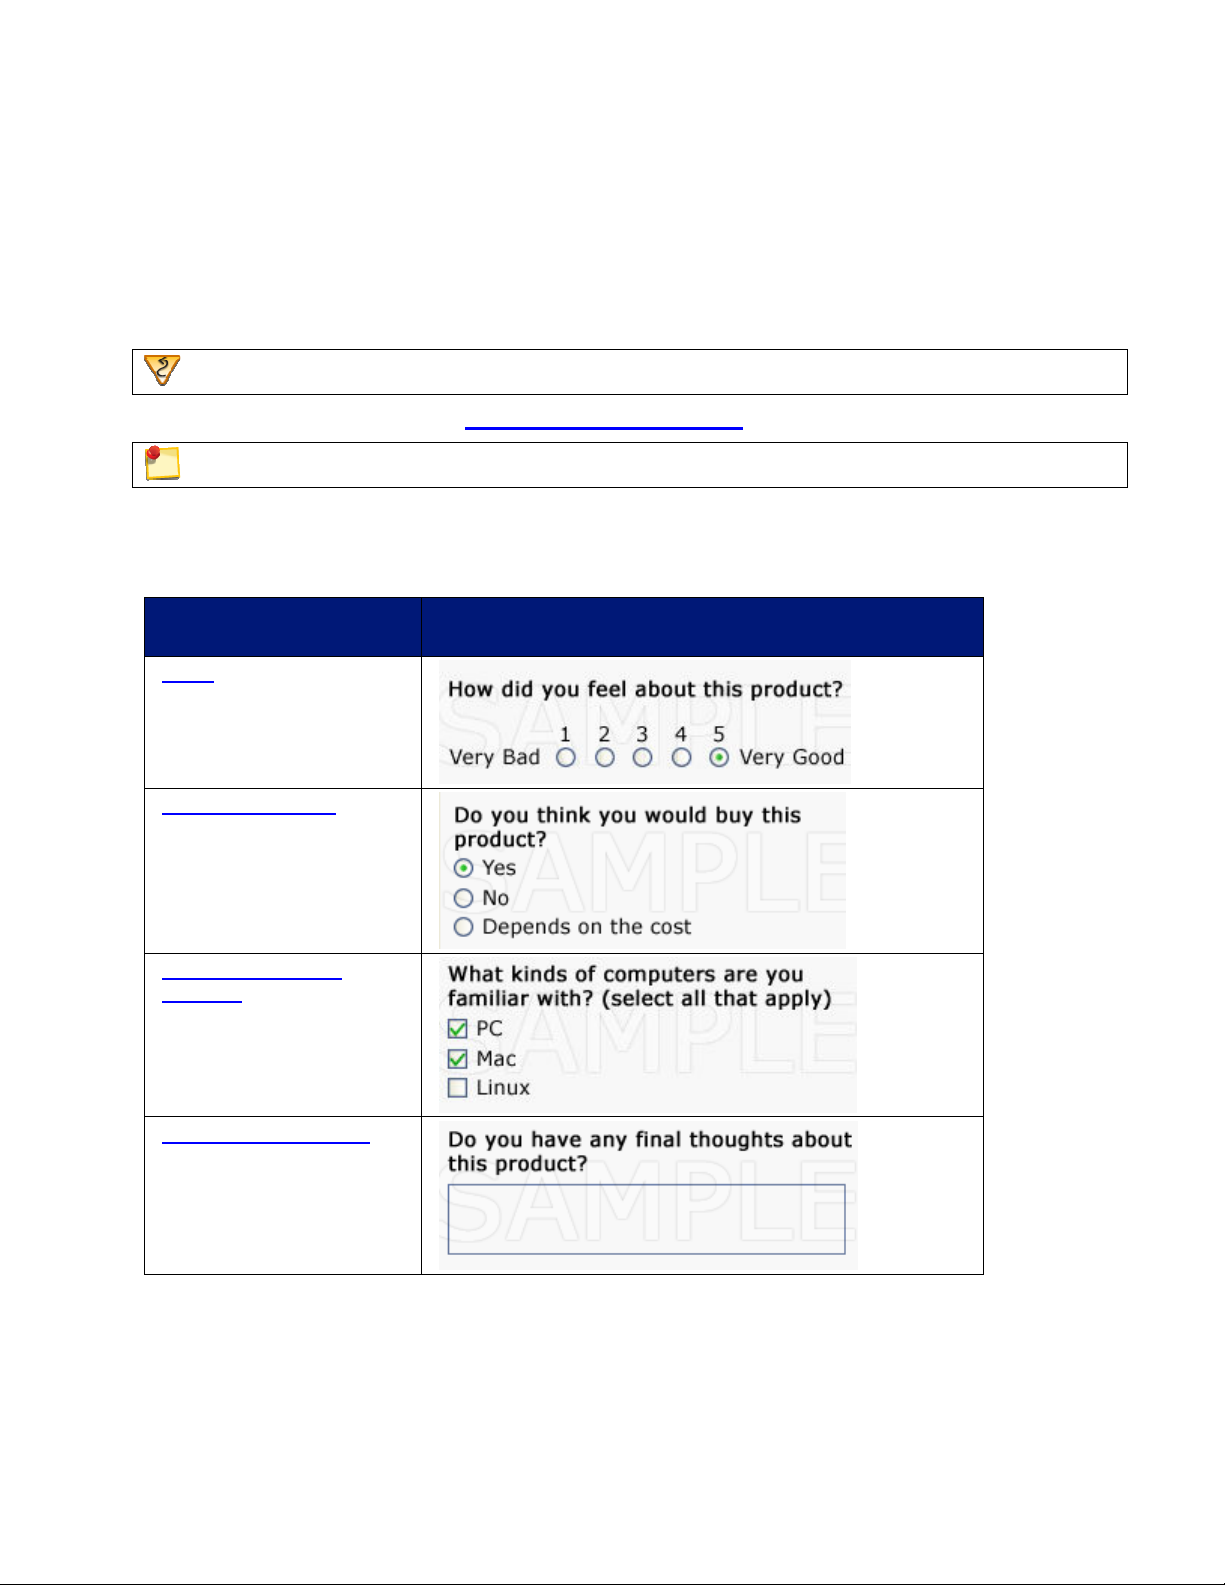
Custom Question Types
You can create various types of questions including
CUSTOM SURVEY
QUESTION TYPE EXAMPLE
Scale
Select one answer
Select one or more
answers
Freeform only answer
See also:
• Create a Survey Using Custom Questions
• Create a Survey Using System Usability Scale Questions
Page 51
Scale Question
Morae Recorder
Help PDF
Page 49
www.techsmith.com
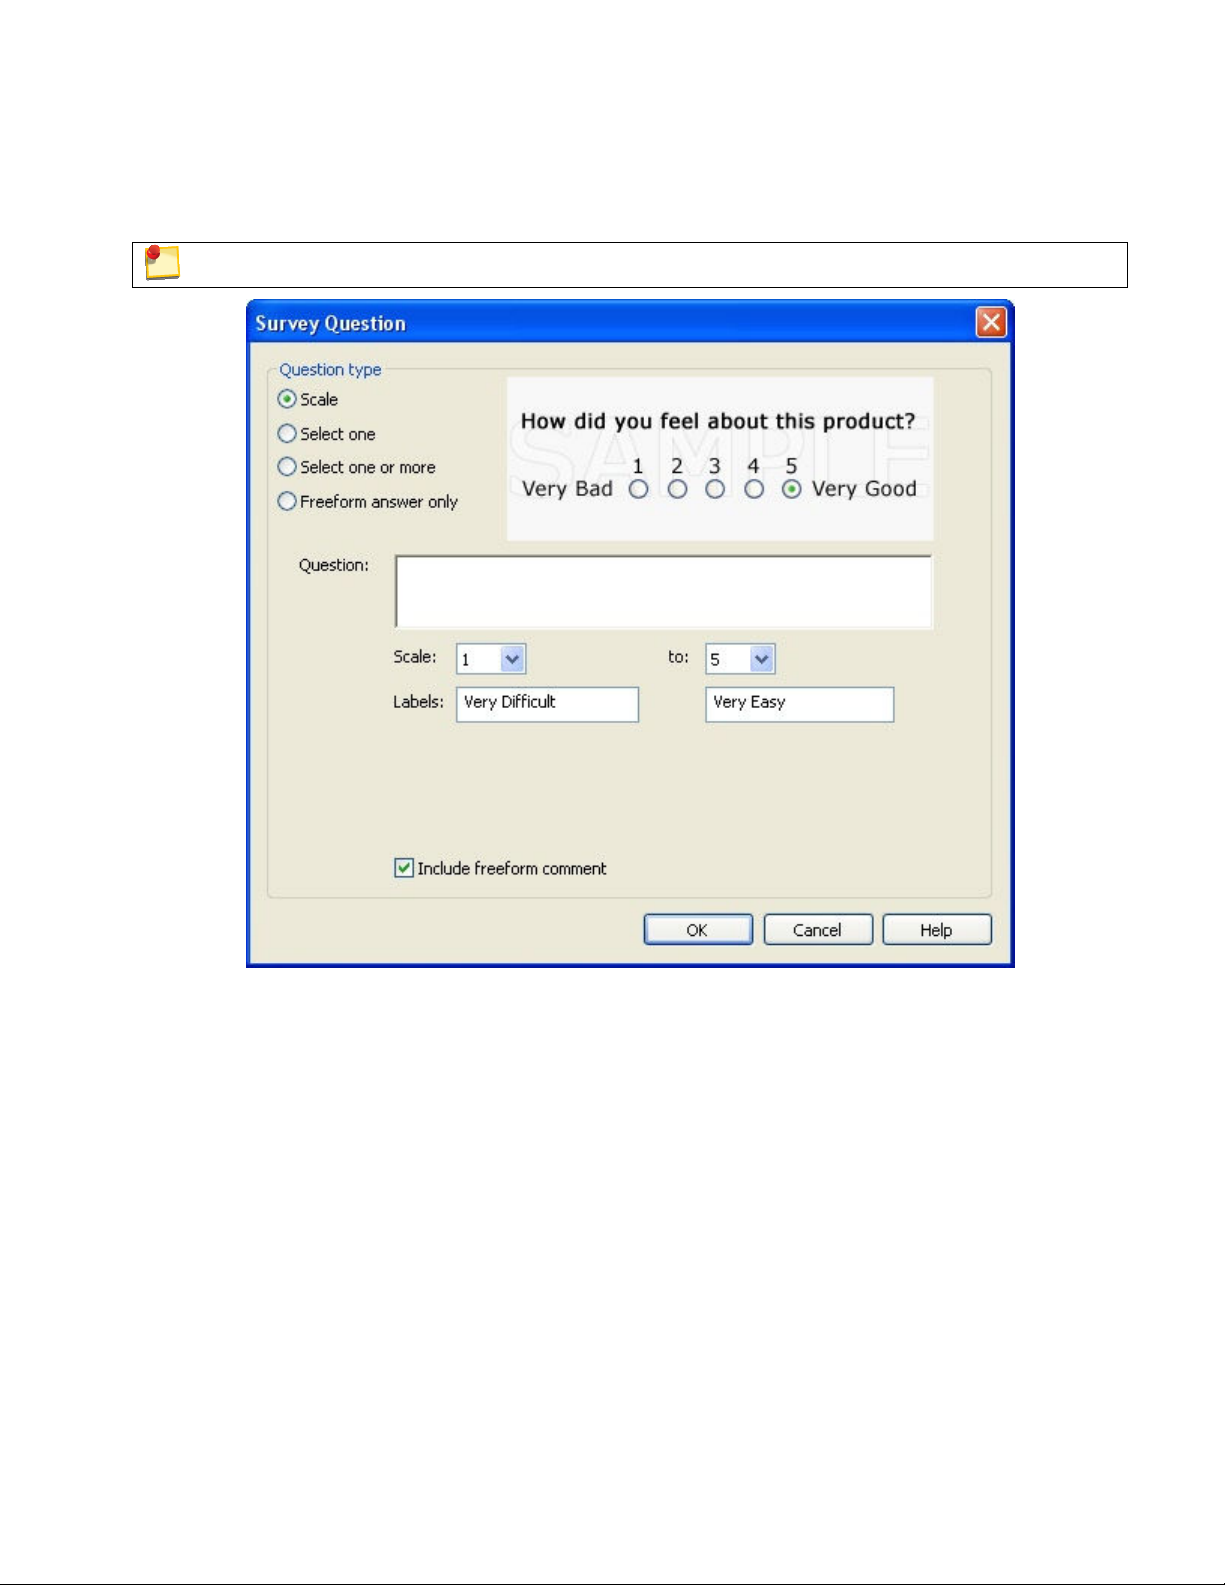
For a Scale question in a custom survey, you can define the question, the scale from 1-10, the labels for each
end of the scale and you can include a freeform comment.
You can add a freeform answer to the Scale custom questions.
Page 52
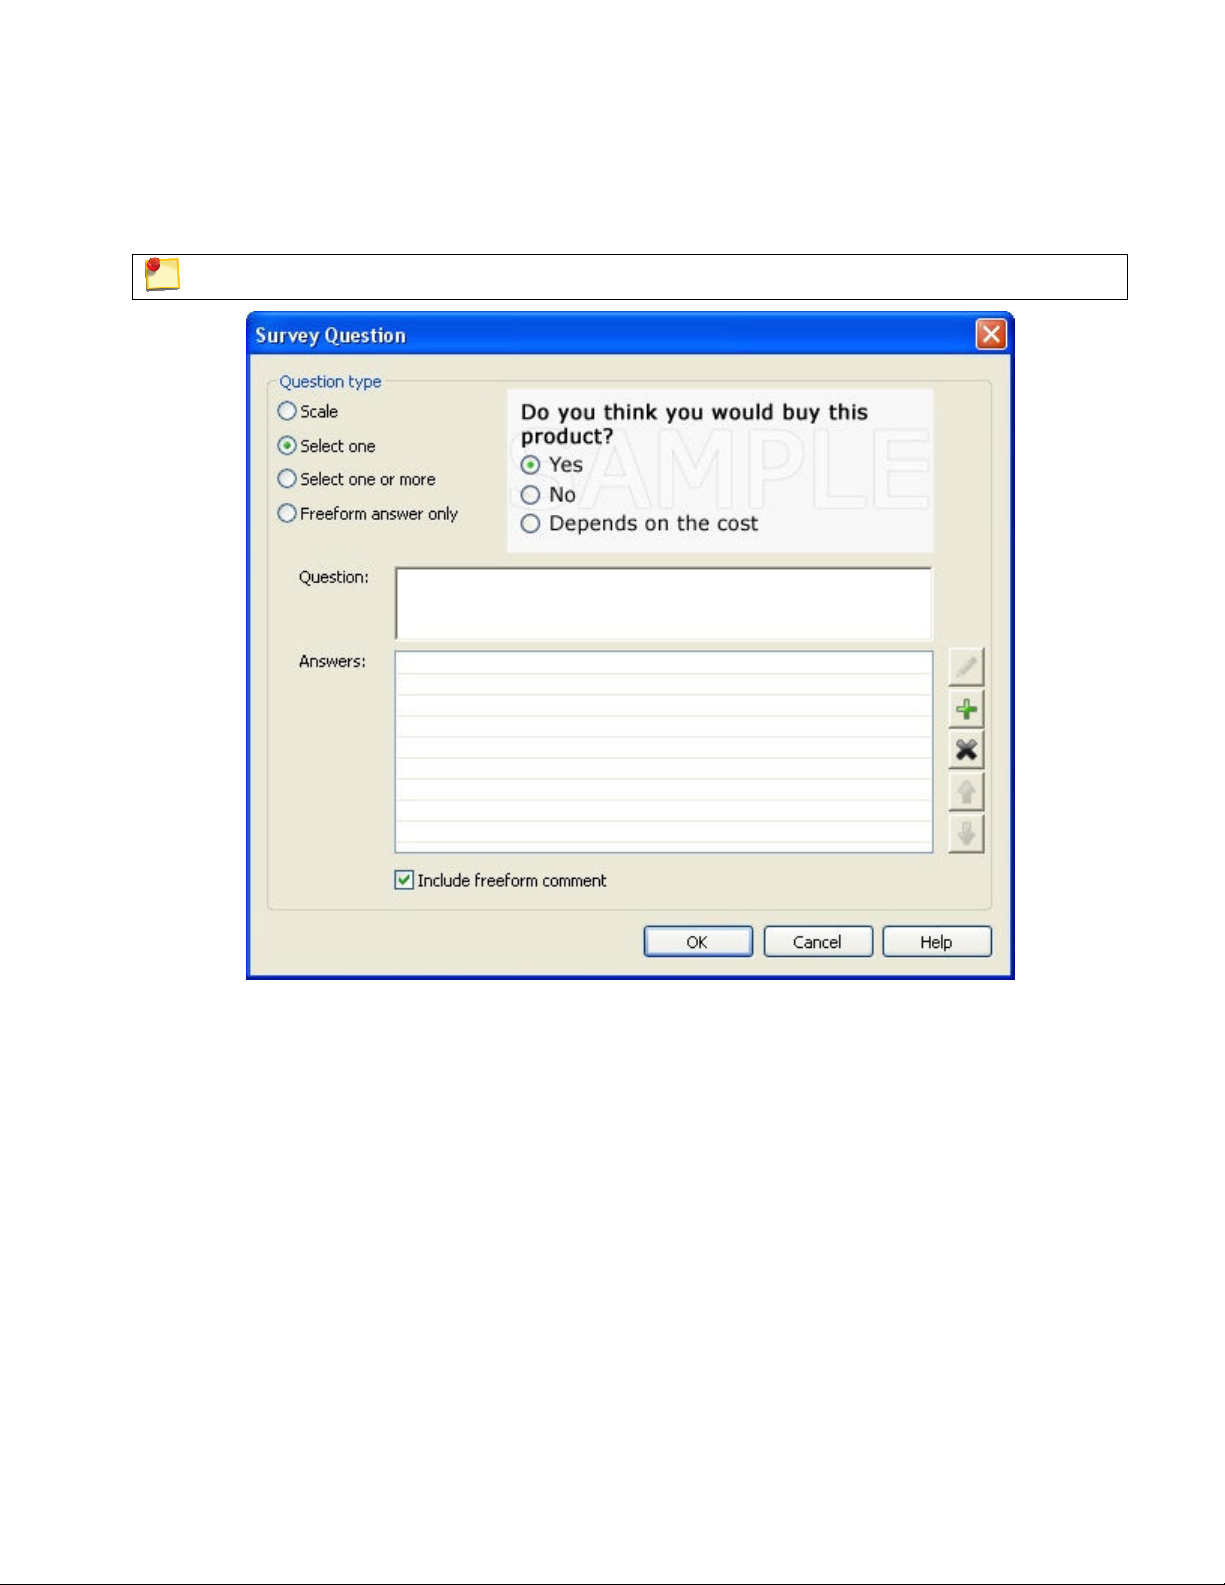
Select One Question
Morae Recorder
Help PDF
Page 50
www.techsmith.com
For a Select One question in a custom survey, you can define the question, the answers where participants
can only select one answer and if you want to include a freeform comment.
You can add a freeform answer to the Select one custom question.
Page 53
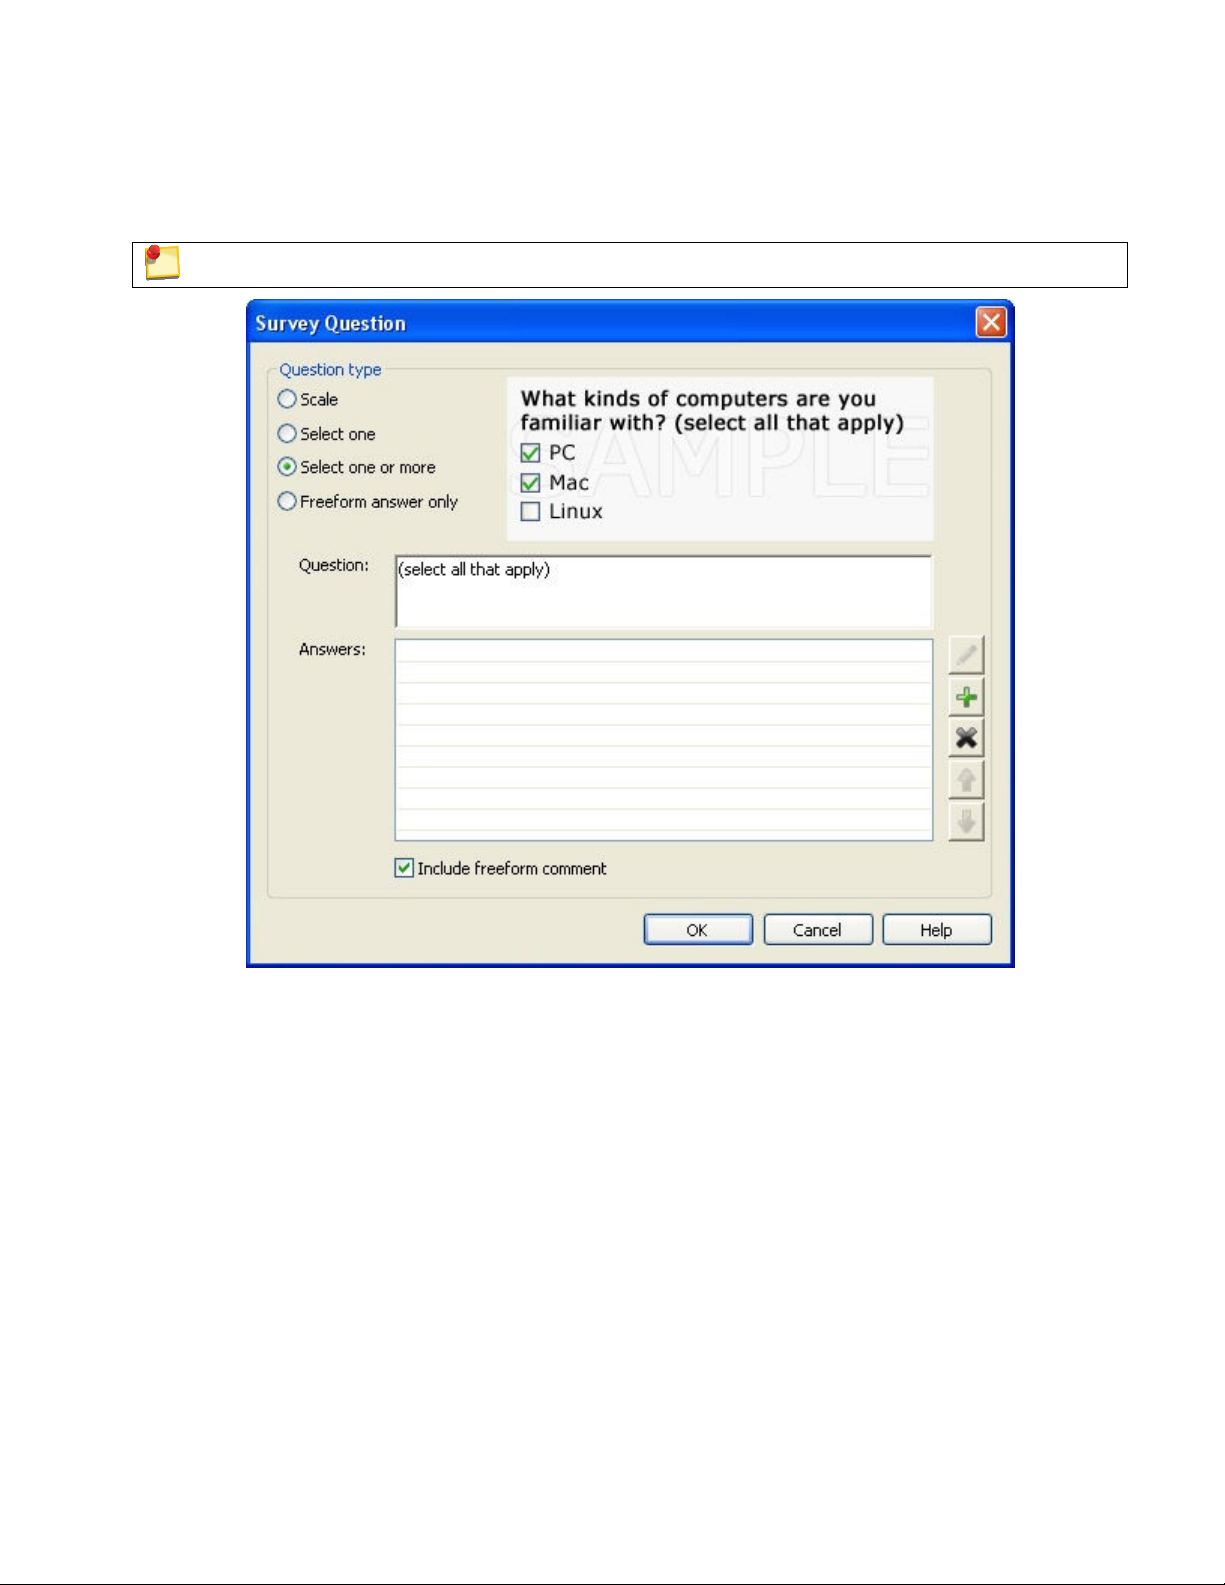
Select One or More Question
Morae Recorder
Help PDF
Page 51
www.techsmith.com
For a Select One or More question in a custom survey, you can define the question, the answers where
participants can select one or more of the answers and if you want to include a freeform comment.
You can add a freeform answer to the Select one or more answers custom questions.
Page 54
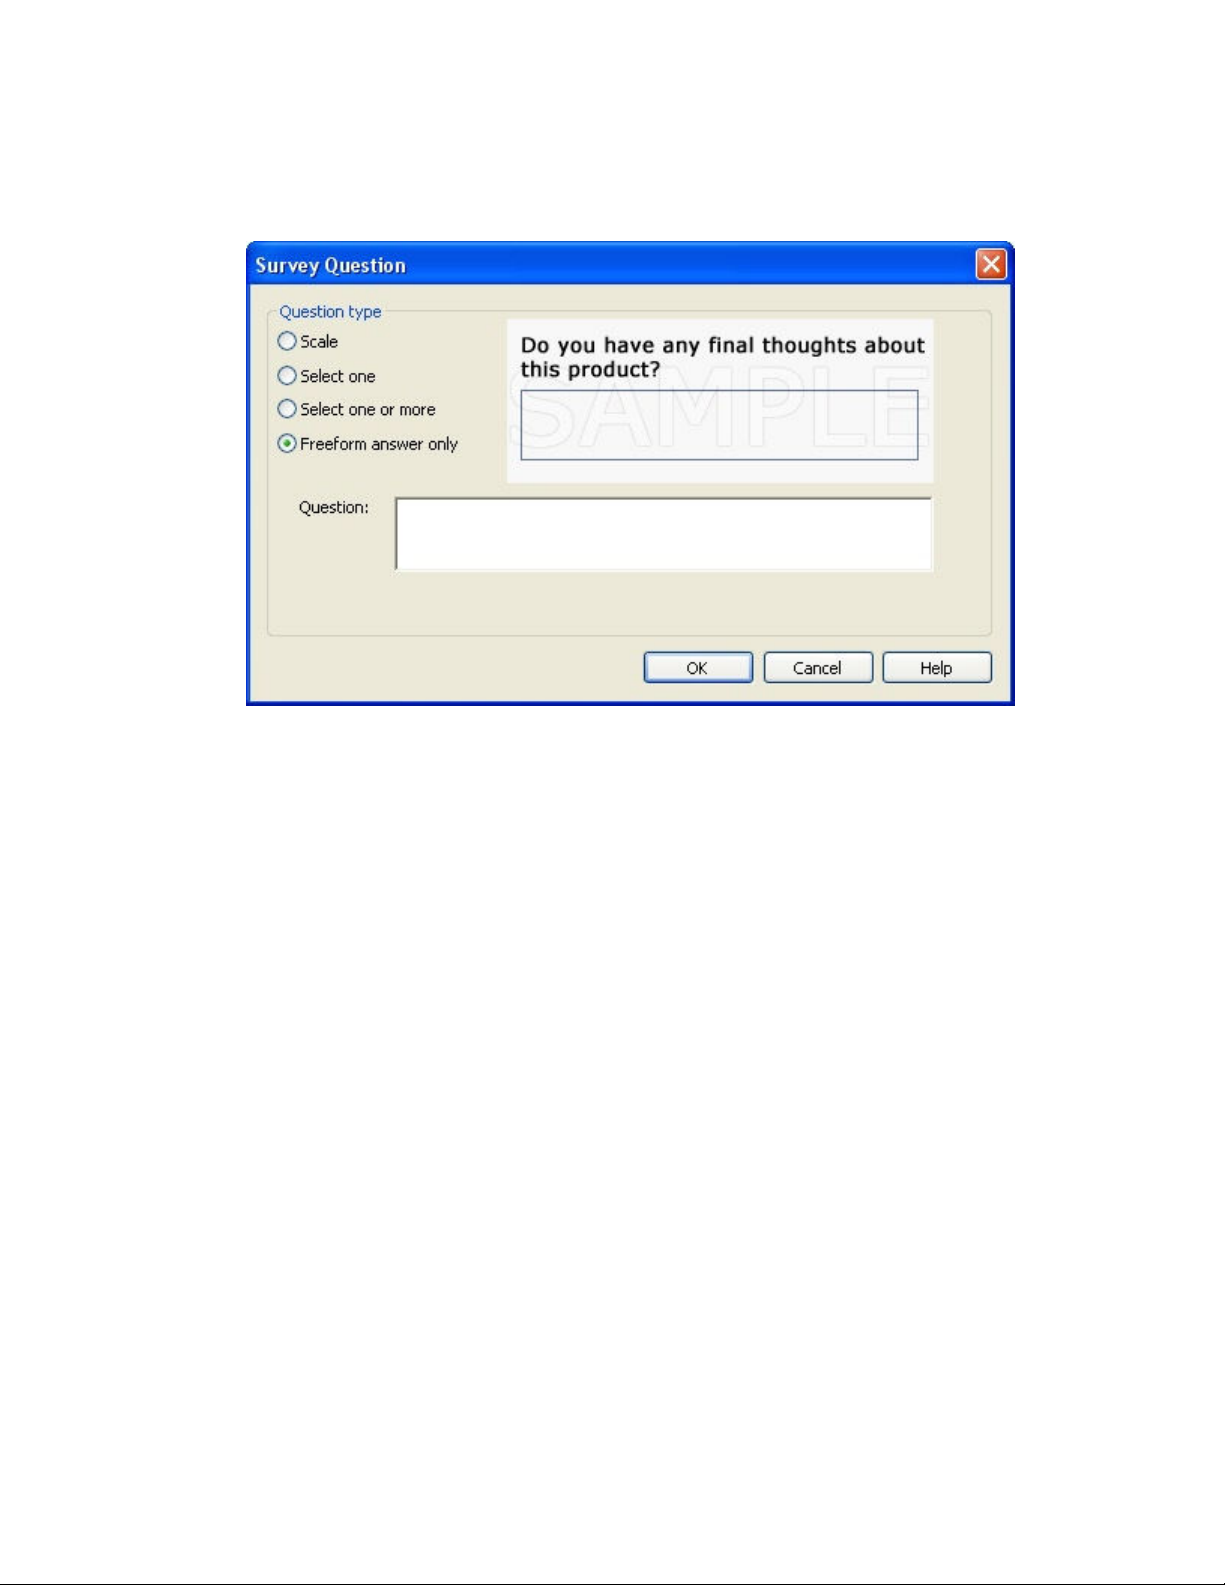
Freeform Question
Morae Recorder
Help PDF
Page 52
www.techsmith.com
For a Freeform question in a custom survey, you can define the question and have the participants enter a
text answer or ask for participant comments.
Page 55
Video and Audio Sources
Morae Recorder
Help PDF
Page 53
www.techsmith.com
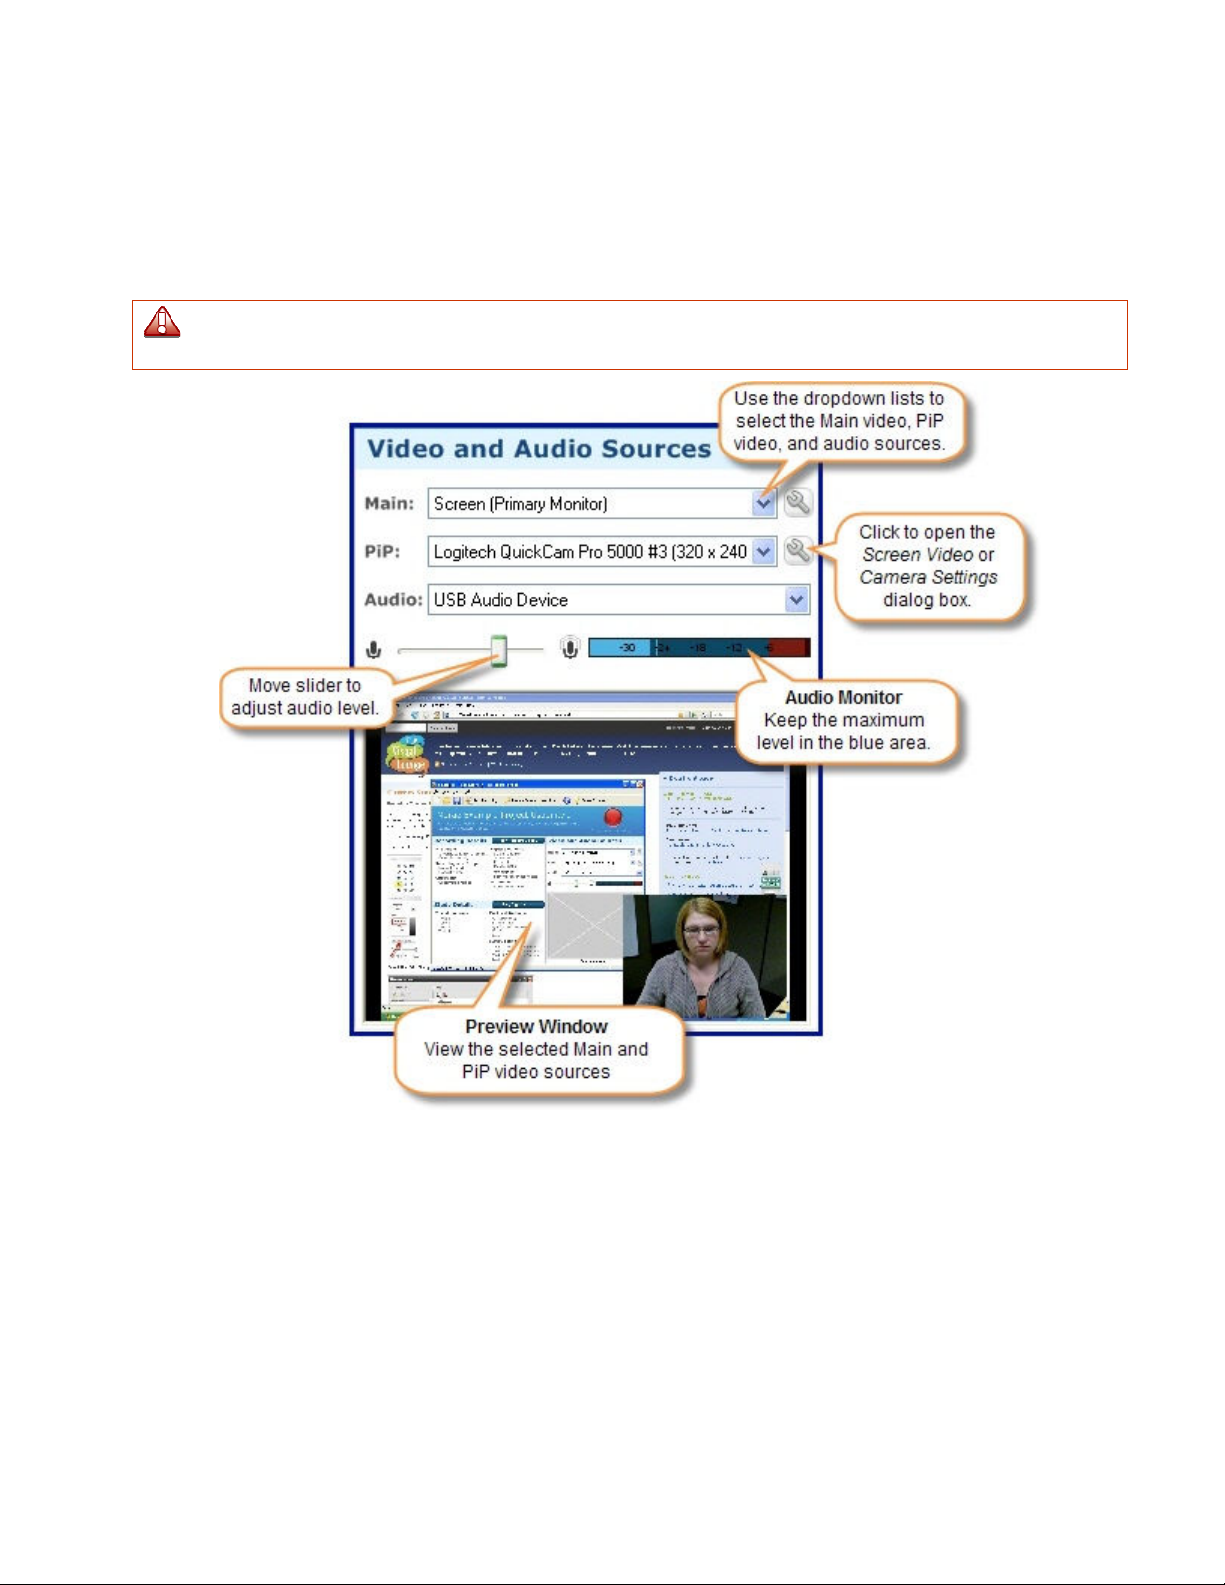
The Video and Audio Sources pane allows you to view and select the sources for the main video, Picture-inPicture (PiP) video, and audio. You can also adjust the audio level and preview the selected video sources.
Video and Audio Sources are affected by the hardware connected to the computer when Recorder
opens. Always verify the selected sources prior to recording start.
Page 56
Quick Tips for Setting Video and Audio Sources
Morae Recorder
Help PDF
Page 54
www.techsmith.com
• Record from the screen, camera, screen and camera, or two cameras. For more on the video options,
see Choose Video Sources.
• You can flip your camera video, both vertically and horizontally, so you can set up your camera out of
the way of the participant. To flip camera video, click Modify camera settings
• If the audio is going into the red in the Audio monitor, move the audio slider to the left. For more on
audio levels, see Adjust Audio Level.
• Click Test Recording in the Recorder toolbar to create a 15-second video test recording to verify the
video and audio. For more information, see Create a Test Recording.
• Need to save disk space? You can change the size and frame rate of the recording. See Modify
Video Settings.
• Morae chooses the recommended codec for screen and camera video. If you want to use a specific
codec, see Screen Video Compression Setup Options or Camera Camera Video Compression Setup
Options.
• If your video is too dark or you want to zoom in, some cameras allow you to adjust these settings. To
change the camera properties and preview the results, see Camera Properties Options.
See also:
• Choose Video Sources
• Examples
• Choose Audio Source
• Modify Video Settings
• Camera Video Settings
Choose Video Sources
.
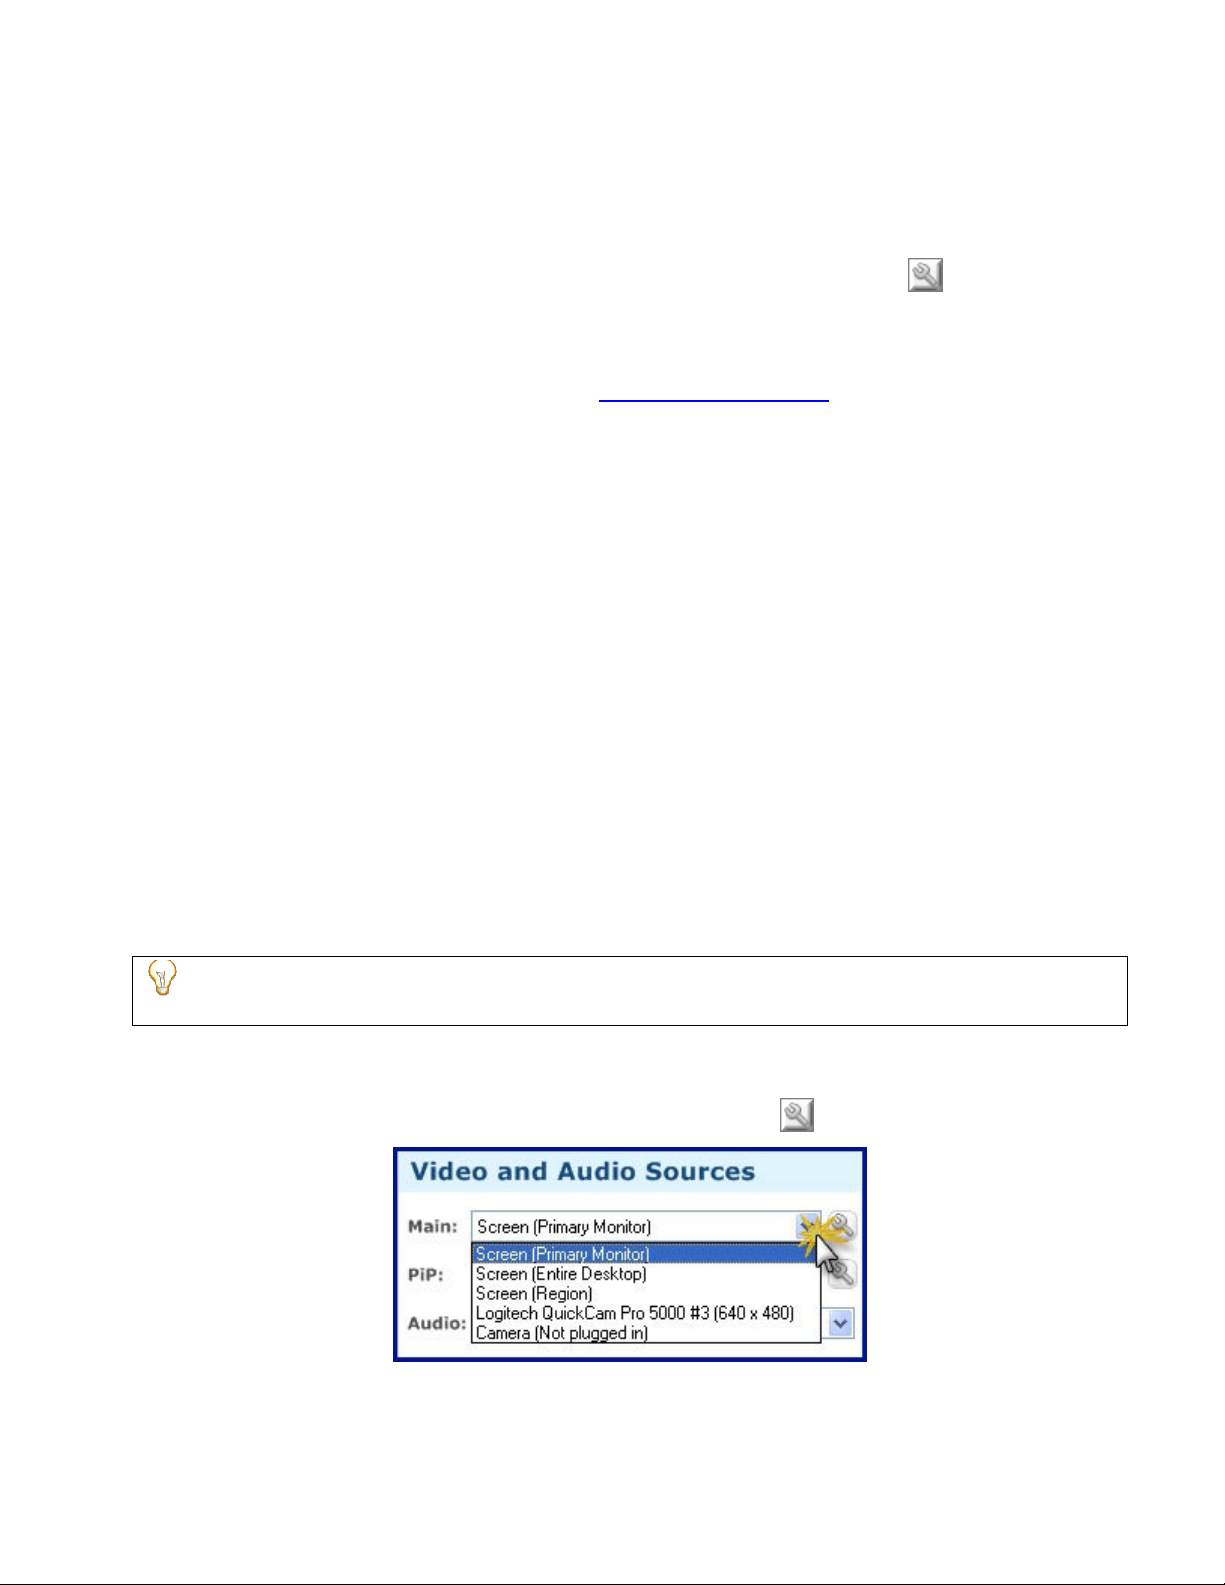
Use the dropdown lists to select from the various video sources. You can choose both a Main Video and a
PiP Video, or just a main video source.
To see examples screenshots of the various options, see Examples.
If you record both main and PiP videos, after you import the recording into Manager, you can produce
highlight videos with or without the PiP included. You can also adjust the location of the PiP.
Main Video
Select a video source and click Modify screen video/camera settings to adjust the video settings.
Page 57
For the main video source, select from screen or camera. You have the following options:
Morae Recorder
Help PDF
Page 55
www.techsmith.com
• Screen (Primary Monitor): Record the desktop of the monitor set as the primary monitor.
You can set the primary monitor in Start > Control > Display > Settings tab.
• Screen (Entire Desktop): Record the desktop of all monitors connected to the computer.
The more monitors you record, the larger the recording file size.
• Screen (Region): Select and record a portion of the desktop.
If you have multiple monitors, but only want to record from one that is not the primary monitor, use
Screen (Region) to select the desktop of only one monitor. For more information, see Select a
Region.
• Camera: Select from the connected cameras.
To set up a configuration without the session cameras connected, select Camera (Not plugged in) to
set a camera as the main video. Save the configuration and reopen it once a camera is attached. The
camera is automatically selected as the main video source.
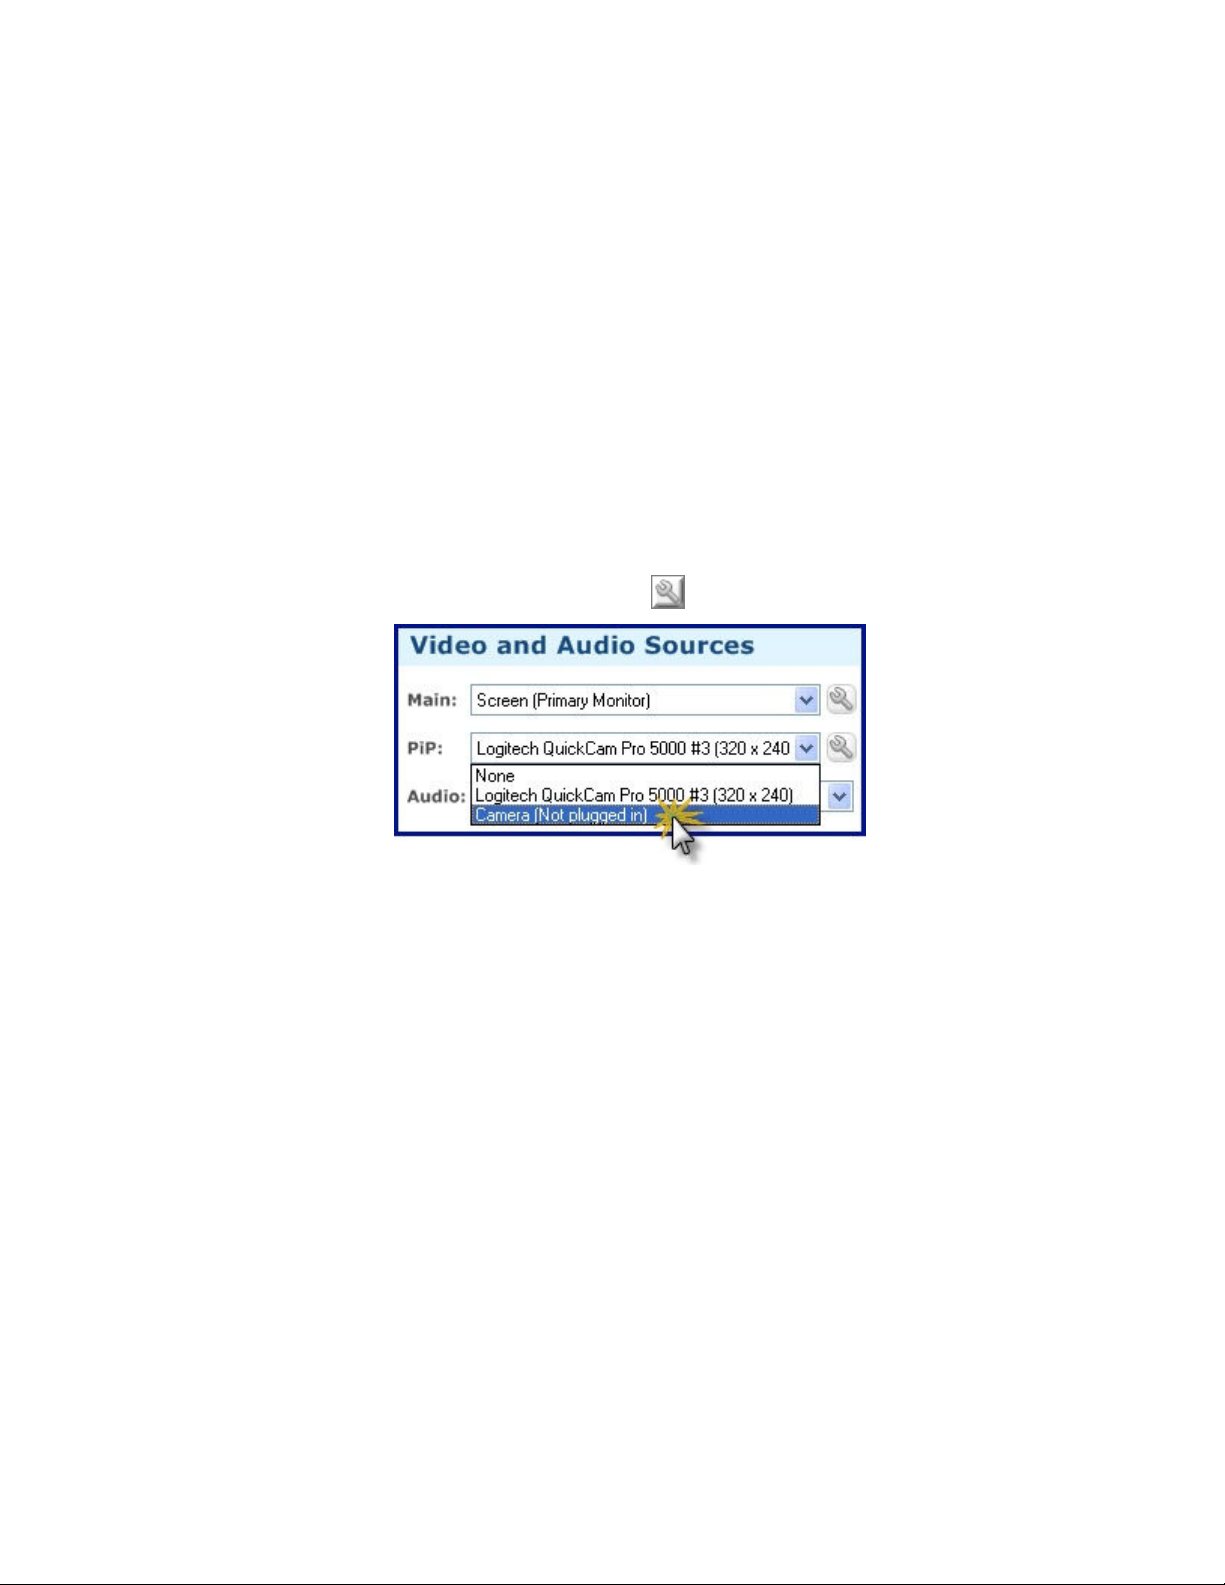
PiP Video
Select a video source and click Modify camera settings to adjust the video settings.
For the PiP video source, you can select a camera. You have the following options:
• None: Do not record a PiP video.
• Camera: Select from the connected cameras.
To set up a configuration without the session cameras connected, select Camera (Not plugged in) to
include a PiP video. Save the configuration and reopen it once a camera is attached. The camera is
automatically selected as the PiP video source.
See also:
• Examples
• Select a Region
• Choose Audio Source
• Modify Video Settings
• Camera Video Settings
Page 58
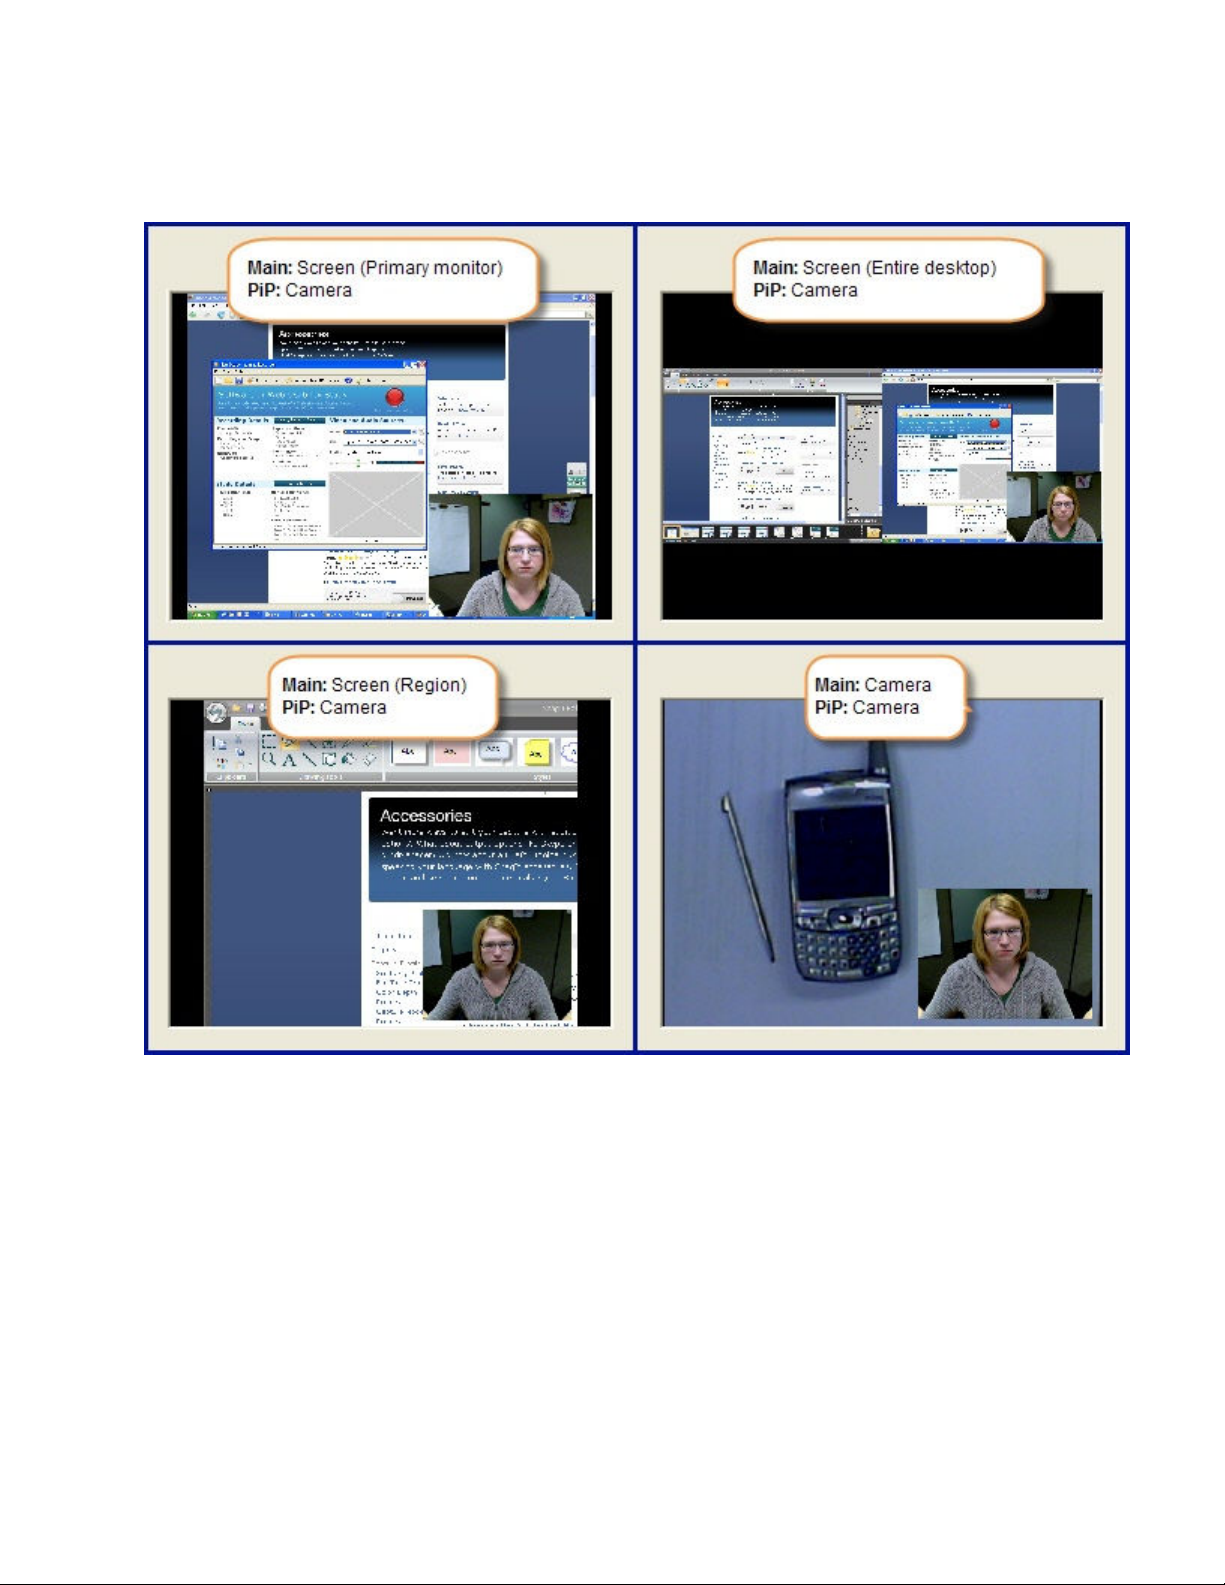
Examples
Morae Recorder
Help PDF
Page 56
www.techsmith.com
The following show example configurations as seen in the Preview Window.
See also:
• Choose Video Sources
• Select a Region
• Choose Audio Source
• Modify Video Settings
• Camera Video Settings
Page 59
Select a Region
Morae Recorder
Help PDF
Page 57
www.techsmith.com
To record only a portion of the full computer desktop, choose to record any rectangular Region of the desktop.
You may want to record a region for any of the following reasons:
• You want to capture one monitor that is not the primary monitor.
• You want to capture an area that spans more than one monitor but do not want to record the entire
desktop.
• You are only interested in what happens in one area of the desktop, possibly in one application.
(Saves file size while recording at full size.)
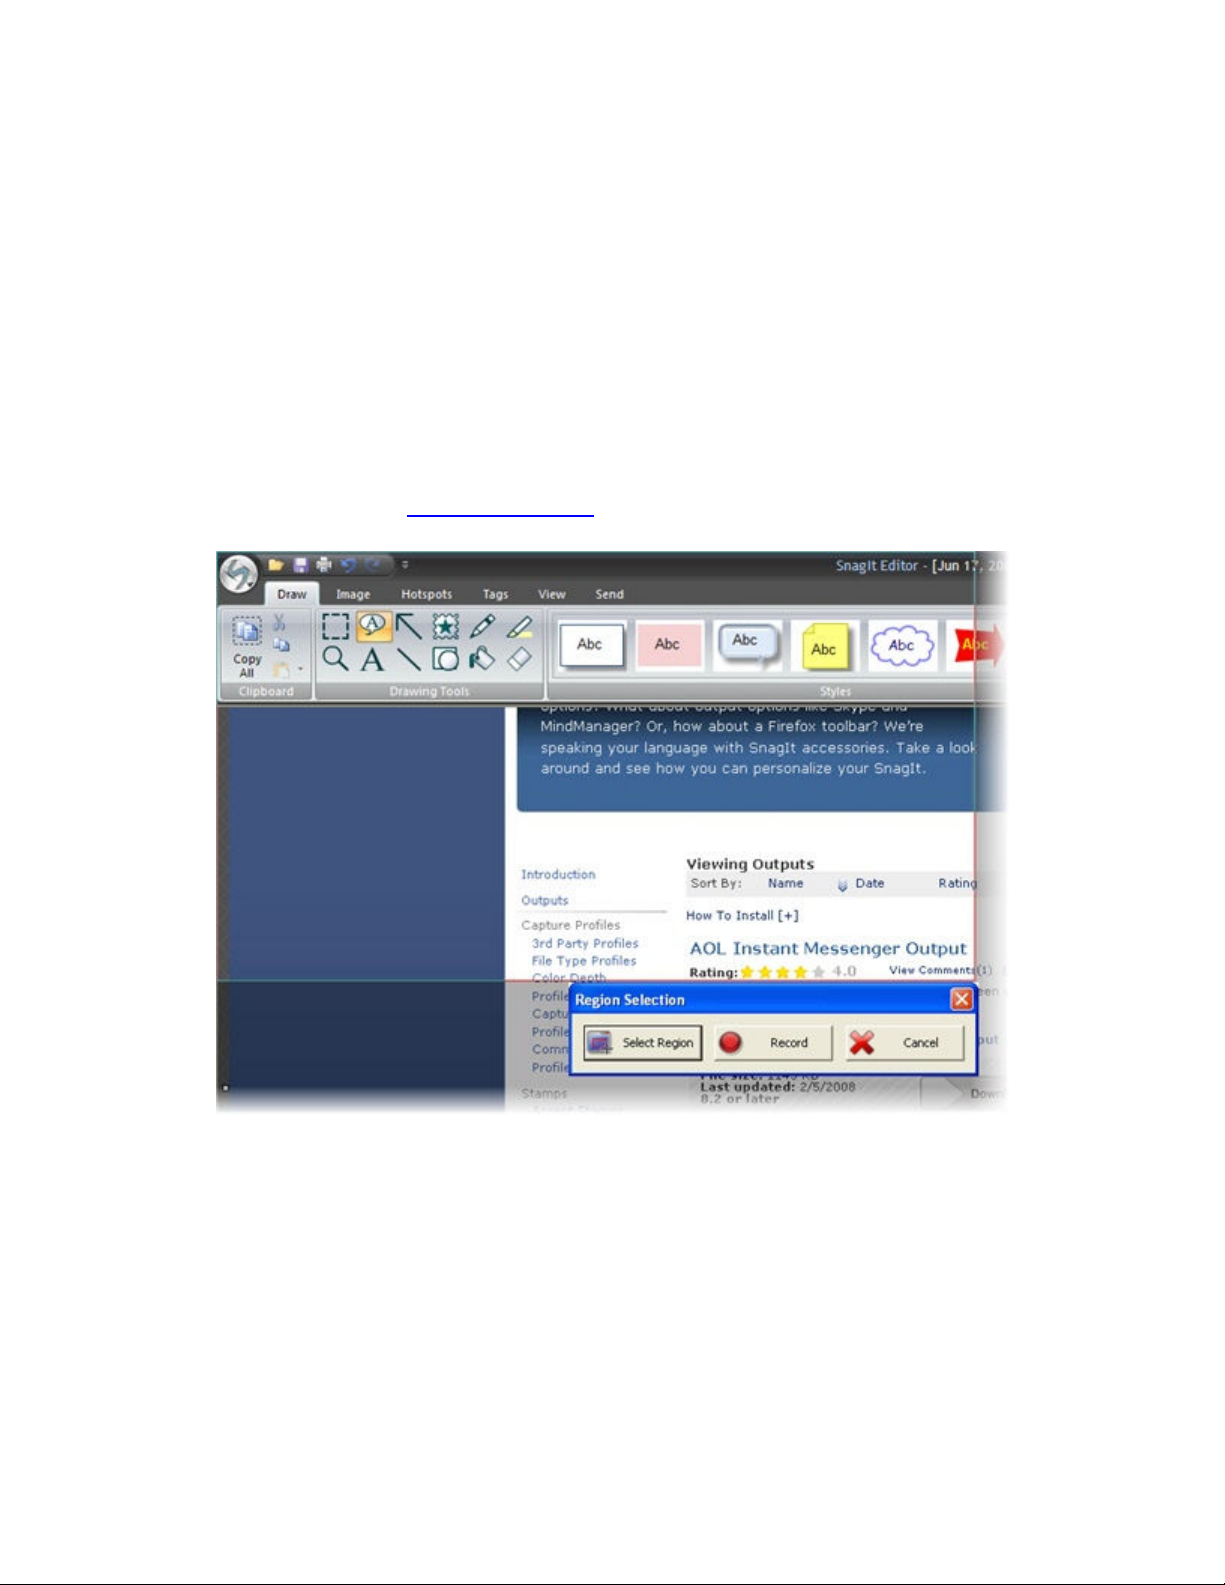
To record a region:
1. Open Recorder.
2. Select Screen (Region) in the Main video source dropdown list.
3. Define the rest of the
4. Click the Record button. The Region Selection dialog box opens.
study configuration.
5. Modify the selected region by:
o Click and drag the corners of the region box.
o Click the center of the region to move the entire region.
o Click Select Region in the Region Selection dialog box. Click and drag to select a region.
6. After you select the correct region, click Record in the Region Selection dialog box to begin recording.
Page 60

See also:
Morae Recorder
Help PDF
Page 58
www.techsmith.com
• Choose Video Sources
• Examples
• Choose Audio Source
• Modify Video Settings
• Camera Video Settings
Choose Audio Source
Use the dropdown list to select from the various audio sources or choose not to record audio. You can also
use the Adjust Audio Level to view and adjust the audio level.
Use the dropdown list to select the audio source. You have the following options:
• None: Do not record audio.
• Audio Devices: Select from the available audio devices, including stand-alone microphones,
computer sound cards, and camera microphones.
Page 61

Adjust Audio Level
Morae Recorder
Help PDF
Page 59
www.techsmith.com
Use the Audio Monitor to view and adjust the audio level. Use the following to help you adjust the audio level.
Before each recording, create a test recording to verify audio levels.
Good Audio Level
Low Audio Level
High Audio Level
Modify Video Settings
Click Modify screen video settings or Modify camera settings to adjust the video settings. The
exact settings available depend on the video sources you select.
See also:
• Screen Video Settings
• Camera Video Settings
Page 62

Screen Video Settings
Morae Recorder
Help PDF
Page 60
www.techsmith.com
In the Screen Video dialog box, choose the compression and performance options that match your recording
situation.
The Screen Video options apply to the capture of screen video only and not to the video input from a
camera.
The following are the settings available when you use screen as the main video source.
OPTION DESCRIPTION AND USE
Lossless video
(recommended)
Full motion
video
Custom
compression
(advanced)
Video
Compression
Setup
Frame rate Enter the frame rate (in frames per second). The default setting is five frames per
Disable display
acceleration
during capture
Remove
desktop
wallpaper
during capture
Restore Default Restores the screen video options to the default settings.
Provides the best quality video recording for most situations. If your screen video
contains full motion (such as video playback), this option may increase recording file
size.
Provides good quality with full motion recordings while keeping the recording file
sizes down.
Select a custom codec.
We do not recommend selecting this option unless you are an advanced
codec user.
Opens the Video Compression Setup dialog box with a list of available codecs. You
can also adjust any compression settings.
For more information, see Screen Video Compression Setup Options.
second. We recommend keeping this default.
Disables hardware acceleration during recording. Checking this box generally results
in better screen video recordings.
Disables any desktop wallpaper on the Recorder computer. Checking this box
generally results in better compression of recording files and better system
performance.
Page 63

Screen Video Compression Setup Options
Morae Recorder
Help PDF
Page 61
www.techsmith.com
In the Video Compression Setup dialog box, you can change your screen video codec selection and adjust
compression quality and key frame rate. Additional configuration options for the codec may be available by
clicking the Configure button in the Video Compression Setup dialog box.
For more information on codecs, see
Codecs in Morae.
The contents of this dialog box may differ and certain options may be disabled, depending on the screen
video codec chosen.
Each codec has unique configuration options. For more information about a particular codec's options,
consult the documentation from the company providing that codec.
The following table describes the Video Compression Setup dialog box.
OPTION DESCRIPTION
Compressor Select the codec from the dropdown list.
Compression
quality
Key frame
every (n)
frames
Data rate
(KB/Sec)
Configure Set configuration options for the selected compressor. For more information, see
Configures the codec to compress at a lower image quality and create a smaller file size,
or compress at a higher image quality, resulting in a larger file size.
Adjust the compression quality using the slider bar. For higher quality, move the bar to
the right. For lower quality, move the bar to the left.
Specify how often to record a key frame. We recommend that you accept the default
value for the codec.
The codec places key frames at regular intervals, either spacing them by number of
seconds or number of frames. Each codec has an optimized key frame setting.
Determine the number of bytes of data the codec transmits or receives in one second. A
higher data rate results in better quality and larger file sizes.
If this option is available for the codec, place a checkmark in the adjacent box and
specify the data rate in Kb/Sec.
Configure Video Compression Setups.
Page 64
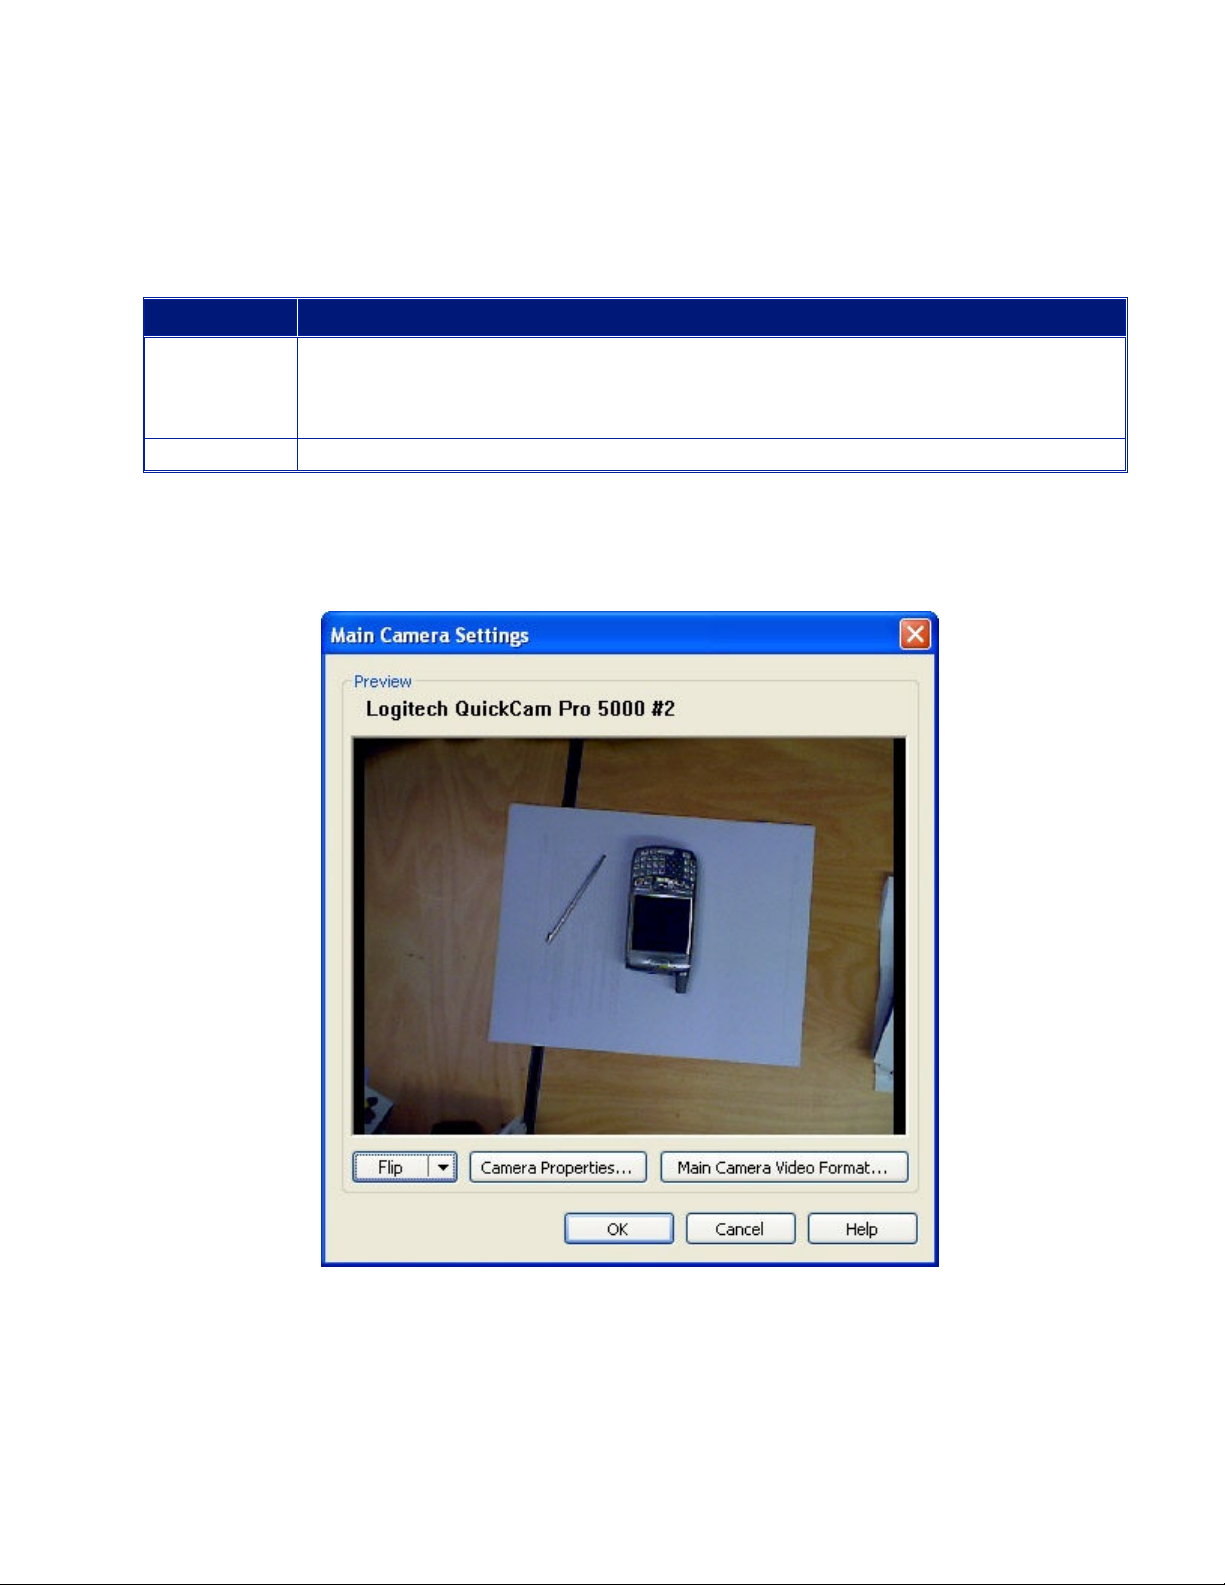
Configure Video Compression Setup
Morae Recorder
Help PDF
Page 62
www.techsmith.com
The Configure button in the Video Compression Setup dialog box allows you to customize the compression
settings for the video codec.
This table describes the TSCC codec. Each codec has its own unique configuration options. For information
on each of those options, consult the manufacturer's documentation.
OPTION DESCRIPTION AND USE
Compression
Control
Use the slider bar to choose faster compression (resulting in a larger file size) or better
compression (resulting in a smaller file size). In all cases, the TSCC video codec is 100%
lossless. Typically, you want faster compression during recording and a smaller file size
when producing/editing.
Default Resets the Compression Control slider to its default configuration.
Camera Video Settings
In both the Main Camera Settings and PiP Camera Settings dialog boxes, choose the compression and
performance options that match your recording situation.
Page 65
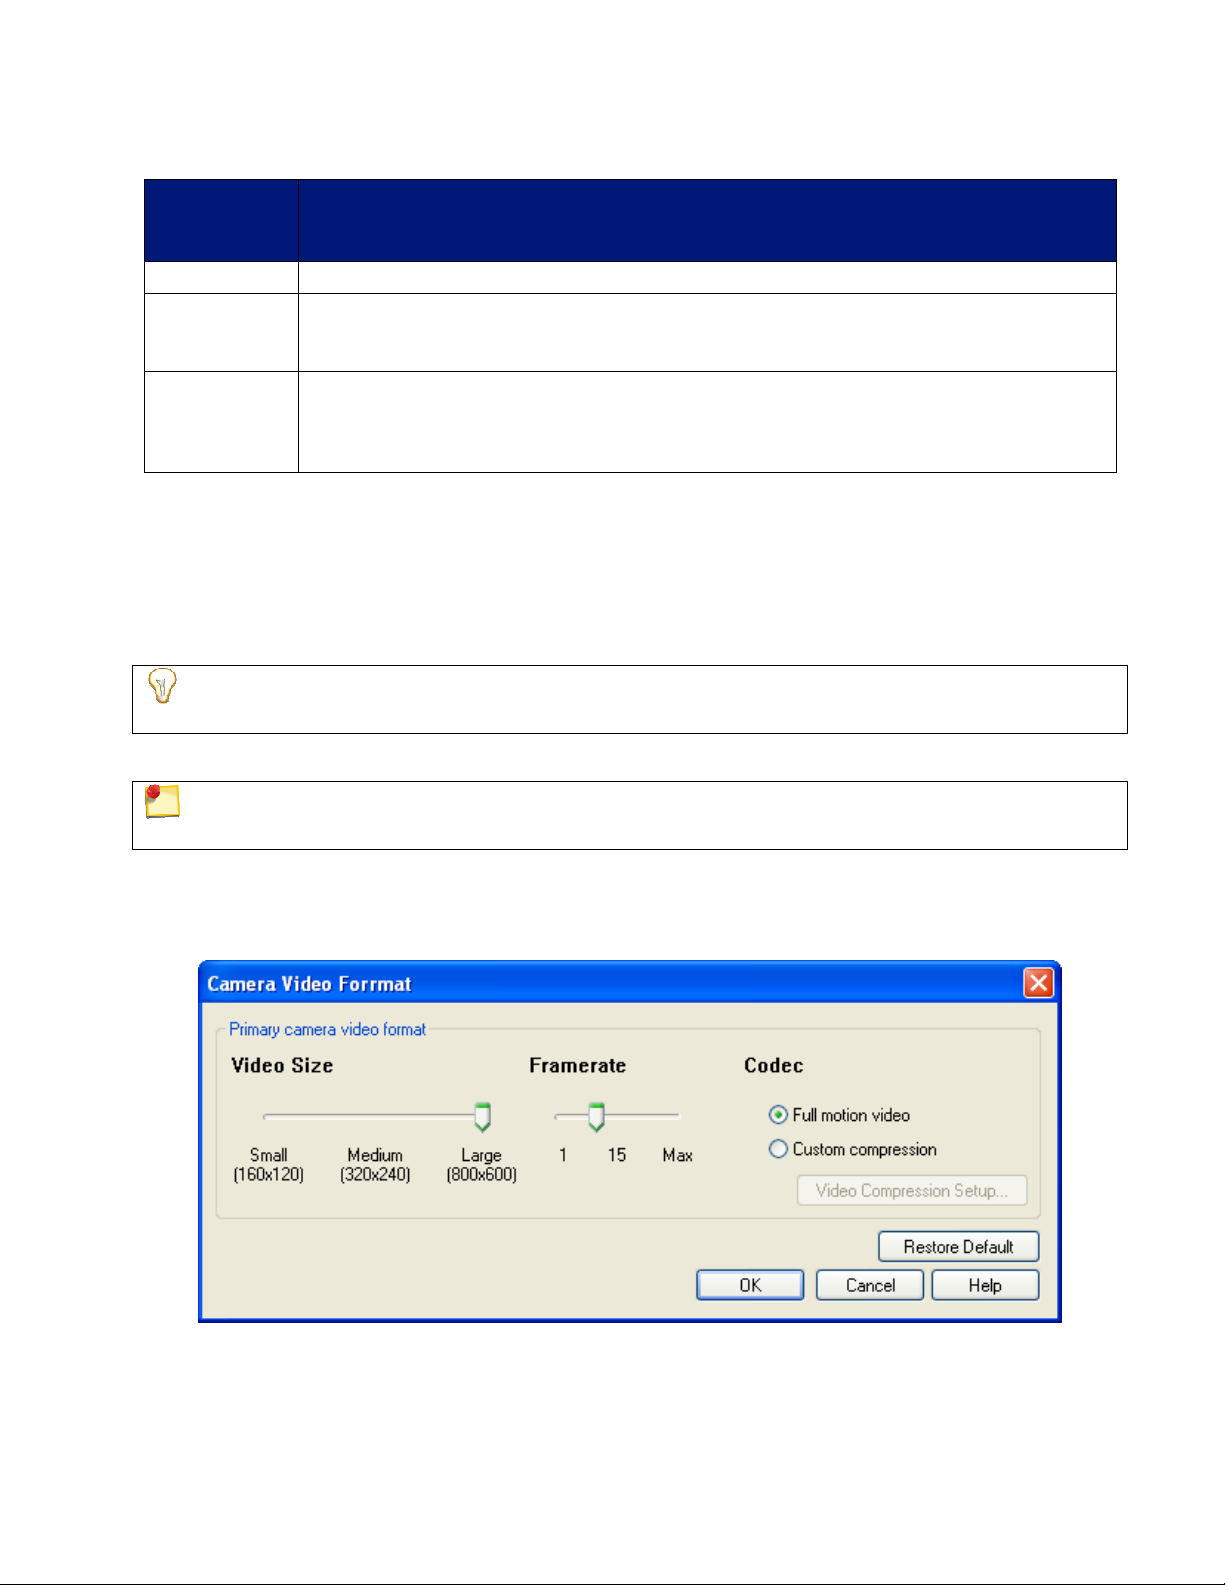
The following are the settings available when you use a camera as either the main or PiP video source.
Morae Recorder
Help PDF
Page 63
www.techsmith.com
CAMERA
TAB
OPTION DESCRIPTION AND USE
Flip Flip the video vertically, horizontally, or both.
Camera
Properties
Main
Camera
Video
Format
Opens the Camera Properties dialog box to adjust various aspects of video quality, such
as brightness, contrast, sharpness, RGB values, etc. For more information, see Camera
Properties Options.
Opens the Camera Video Format dialog box to adjust variables such as frame rate and
output size. For more information, see Camera Video Format.
Camera Properties Options
The camera manufacturer provides the information in Camera Properties dialog box and the options available
in the dialog box vary.
In general, you can adjust various aspects of image quality, such as brightness, contrast, gamma, sharpness,
RGB values and exposure.
The preview in the Main Camera Settings dialog box updates so that you can immediately see how the
settings affect the video.
For more information about the options in the camera Properties dialog box, consult the camera manufacturer.
We recommend using the default settings for your camera. The defaults are optimized to give you the
best overall video quality.
Camera Video Format
In the Camera Video Format dialog box, select the size of the video, the framerate, and the codec.
Page 66
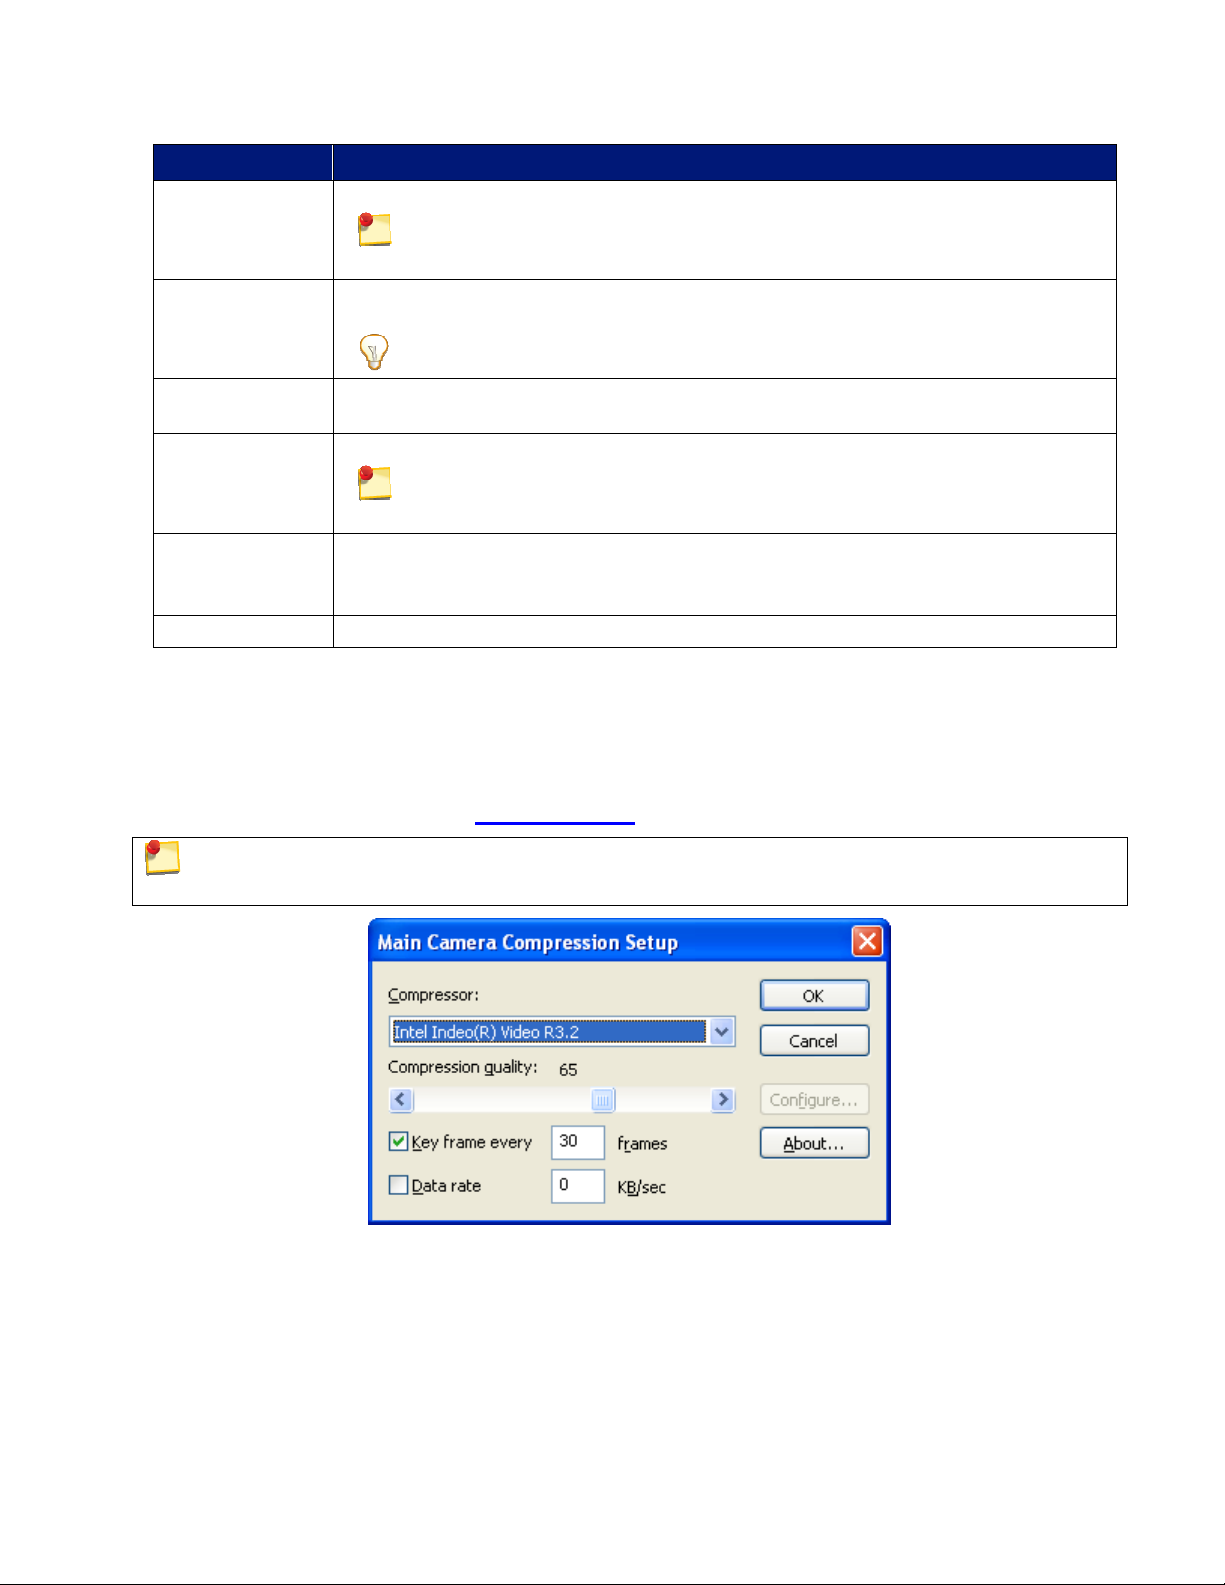
OPTION DESCRIPTION AND USE
Morae Recorder
Help PDF
Page 64
www.techsmith.com
Video Size Use the default sizes or lower the size for smaller video and file size.
The dimensions given with the Video Size slider are approximate and actually
video size may vary depending on your camera properties.
Framerate Select the framerate for the camera. The value of Max depends on your camera
properties.
If your captured video is choppy, try lowering the framerate setting.
Full motion
video
Custom
compression
Selects the recommended default camera video codec (Windows Media Video).
Selects a custom camera video codec.
We do not recommend selecting this option unless you are an advanced
codec user.
Video
Compression
Setup
Restore Default Returns the options on this dialog box to the default settings.
Camera Video Compression Setup Options
In the Video Compression Setup dialog box, you can change your camera video codec selection and adjust
compression quality and key frame rate. Additional configuration options for the codec may be available by
clicking the Configure button in the Video Compression Setup dialog box.
Opens the Video Compression Setup dialog box to browse through a list of available
codecs.
For more information, see Camera Video Compression Setup Options.
For more information on codecs, see
Codecs in Morae.
The contents of this dialog box may differ and certain options may be disabled, depending on the codec
chosen.
Each codec has unique configuration options. For more information about a particular codec's options,
consult the documentation from the company providing that codec.
Page 67
The following table describes the Video Compression Setup dialog box.
Morae Recorder
Help PDF
Page 65
www.techsmith.com
OPTION DESCRIPTION
Compressor Select the codec from the dropdown list.
Compression
quality
Key frame
every (n)
frames
Configures the codec to compress at a lower image quality and create a smaller file size,
or compress at a higher image quality, resulting in a larger file size.
Adjust the compression quality using the slider bar. For higher quality, move the bar to
the right. For lower quality, move the bar to the left.
Specify how often a key frame is recorded. We recommend that you accept the default
value for the codec you have chosen.
The codec places key frames at regular intervals, either spacing them by number of
seconds or number of frames. Each codec has an optimized key frame setting.
Data rate
(KB/Sec)
Configure Set configuration options for the selected compressor. For more information, see
Configure Video Compression Setup
The Configure button in the Video Compression Setup dialog box allows you to customize the compression
settings for the video codec.
Determine the number of bytes of data the codec transmits or receives in one second. A
higher data rate results in better quality and larger file sizes.
If this option is available for the codec, place a checkmark in the adjacent box and specify
the data rate in Kb/Sec.
Configure Video Compression Setup.
This table describes the TSCC codec. Each codec has its own unique configuration options. For information
on each of those options, consult the manufacturer's documentation.
OPTION DESCRIPTION AND USE
Compression
Control
Default Resets the Compression Control slider to its default configuration.
Use the slider bar to choose faster compression (resulting in a larger file size) or better
compression (resulting in a smaller file size). In all cases, the TSCC video codec is 100%
lossless. Typically, you want faster compression during recording and a smaller file size
when producing/editing.
Page 68
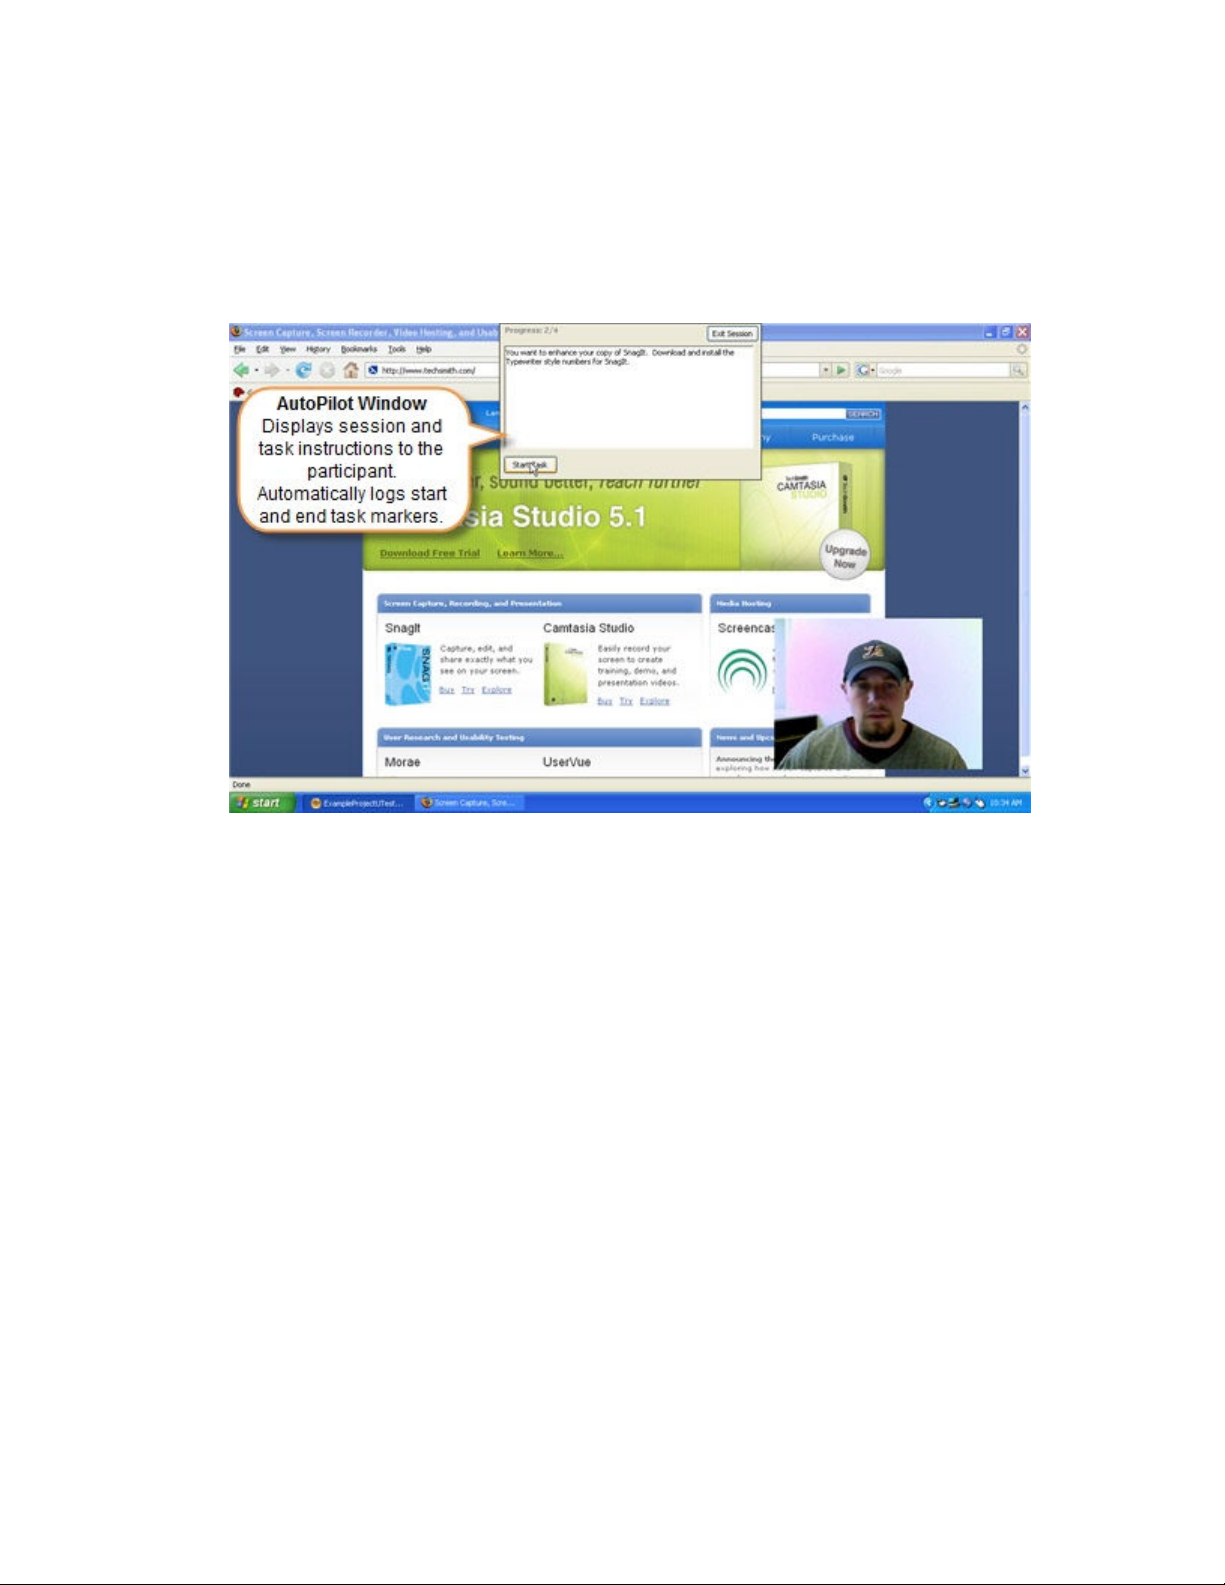
AutoPilot
Morae Recorder
Help PDF
Page 66
www.techsmith.com
Morae AutoPilot presents study and task instructions along with surveys right on the computer running
Recorder. By default, AutoPilot logs the start and end of tasks automatically, while Observers can still connect
and log markers.
Uses of AutoPilot
There are many reasons to use AutoPilot. Here are some examples:
• You do not have someone to log tasks with Observer.
• You want to conduct unmoderated sessions.
• You want to log tasks automatically.
• You want to present surveys automatically.
• You want to avoid the need print task and survey paperwork.
• For more information on how an AutoPilot session works, see Run an AutoPilot Session.
Set Up AutoPilot
To set up Recorder to use AutoPilot, you can either Use the Unmoderated Usability Study Template or
Add AutoPilot to a Study Configuration.
Page 69
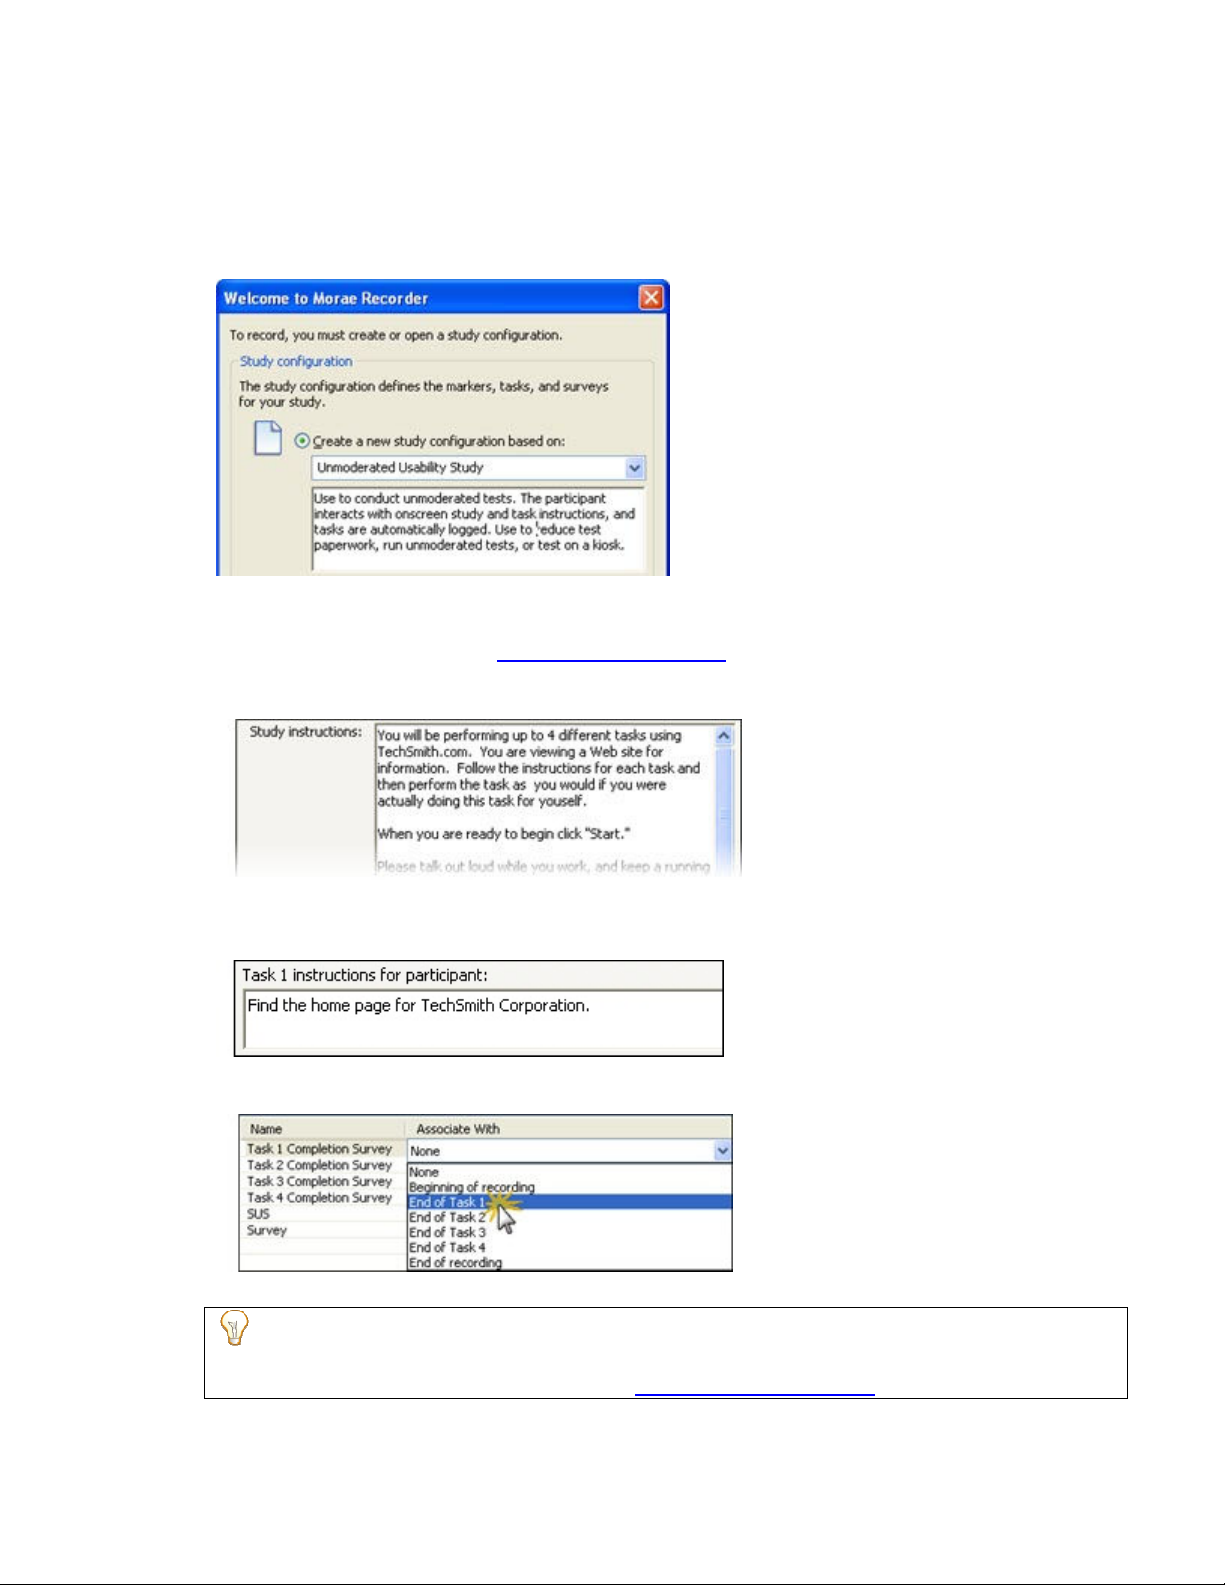
Use the Unmoderated Usability Study Template
Morae Recorder
Help PDF
Page 67
www.techsmith.com
1. Open Recorder. The Welcome to Morae Recorder dialog box opens.
2. Select Create a new study configuration based on.
3. Select the Unmoderated Usability Study template from the dropdown list.
4. Click OK. The template study configuration opens in Recorder.
5. Click Modify Study Details to open the Study Details dialog box.
6. In the Study Details dialog box,
o Description tab: Fill in the Study Instructions field with directions for the participant. This could
include an introduction to the test along with scenario information.
modify the study details making sure to include the following:
o Task Definitions tab: Fill in the Task instructions for participant field for all tasks. Include the
task and any information a participant needs to complete the task, such as a user name and
password.
o Survey Definitions tab: Create and associate surveys with session events, such as the end of
Task 1. Only associated surveys automatically display with AutoPilot.
7. Click OK.
The Recording Details are set up to run sessions with AutoPilot, record the screen and PiP,
automatically restart after a recording ends, defer recording processing, and allow Observers. If
you need the change these settings, click Modify Recording Details.
8. Save the study configuration file.
Page 70
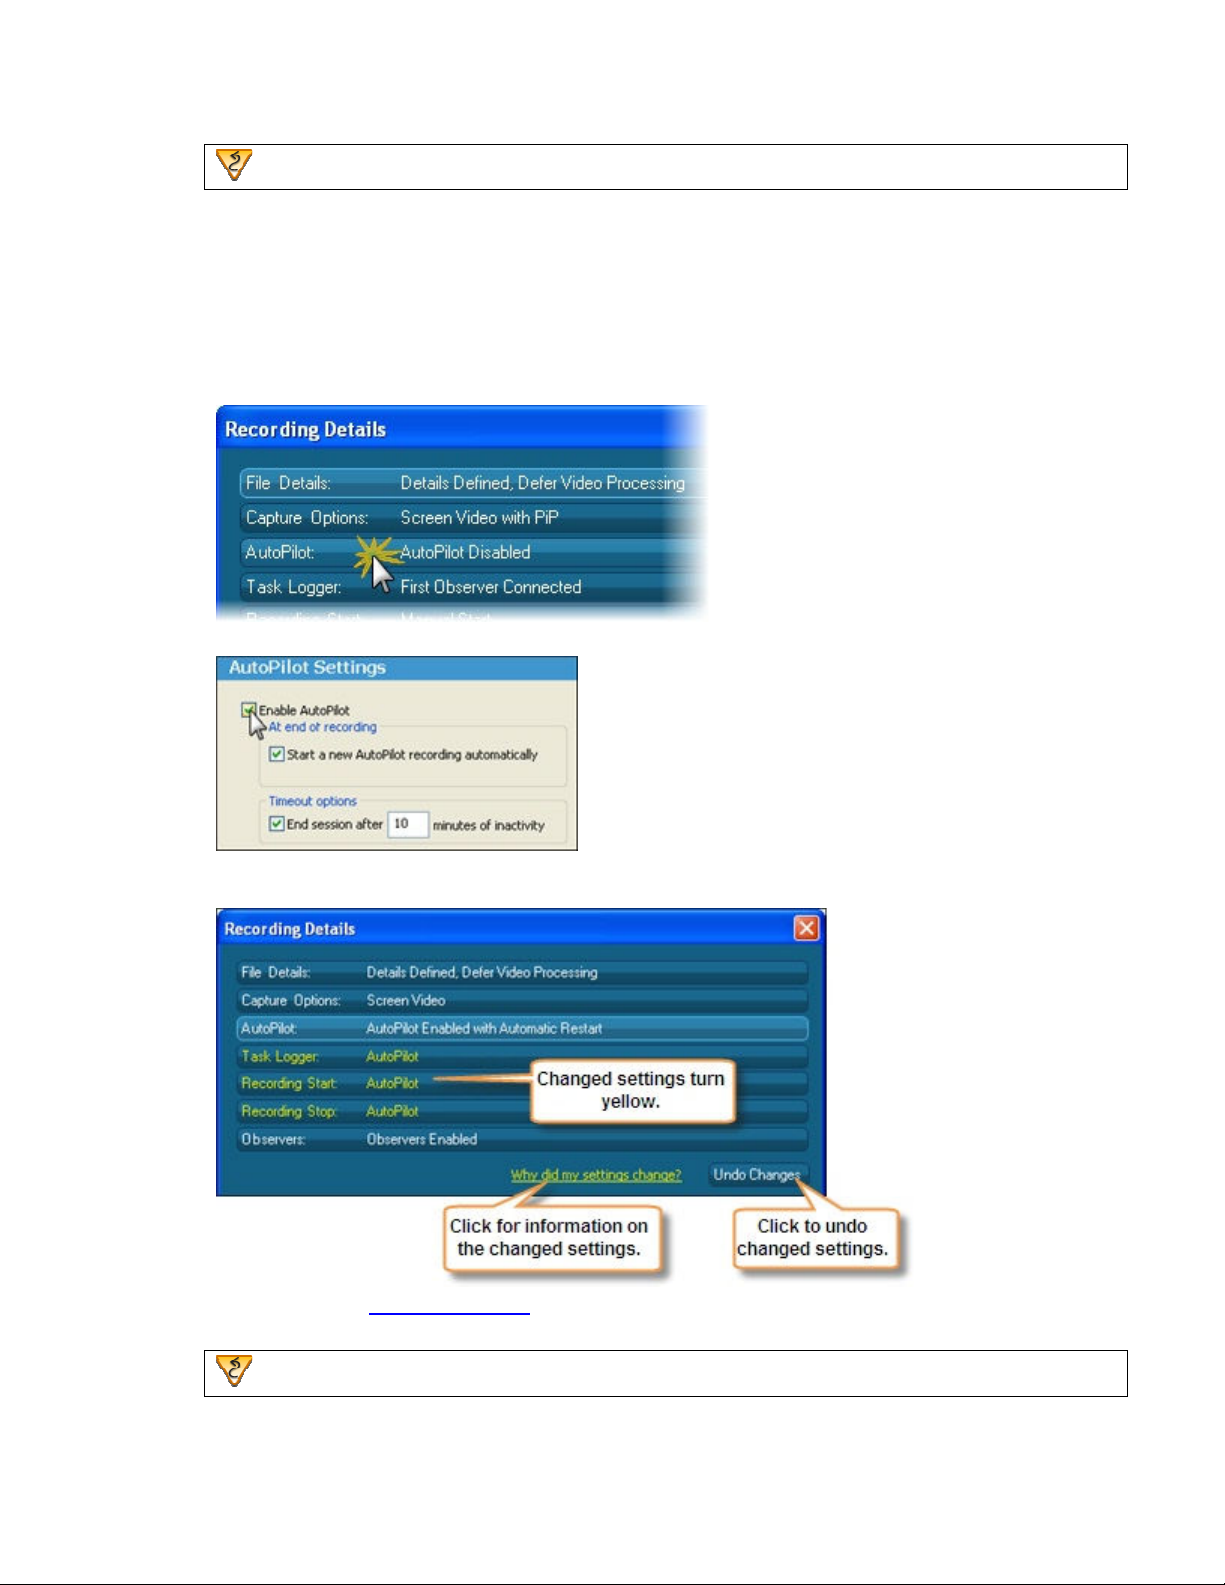
File > Save Study Configuration or click the Save Configuration icon.
Morae Recorder
Help PDF
Page 68
www.techsmith.com
Add AutoPilot to a Study Configuration
1. Click Modify Recording Details to open the Recording Details dialog box.
1. In the Recording Details dialog box, click AutoPilot.
2. Select to Enable AutoPilot.
3. When you enable AutoPilot, all other settings needed to run an AutoPilot session automatically
change to provide the recommended configuration.
4. Modify any other
5. Save the study configuration file.
recording details and click OK.
File > Save Study Configuration or click the Save Configuration icon.
Page 71
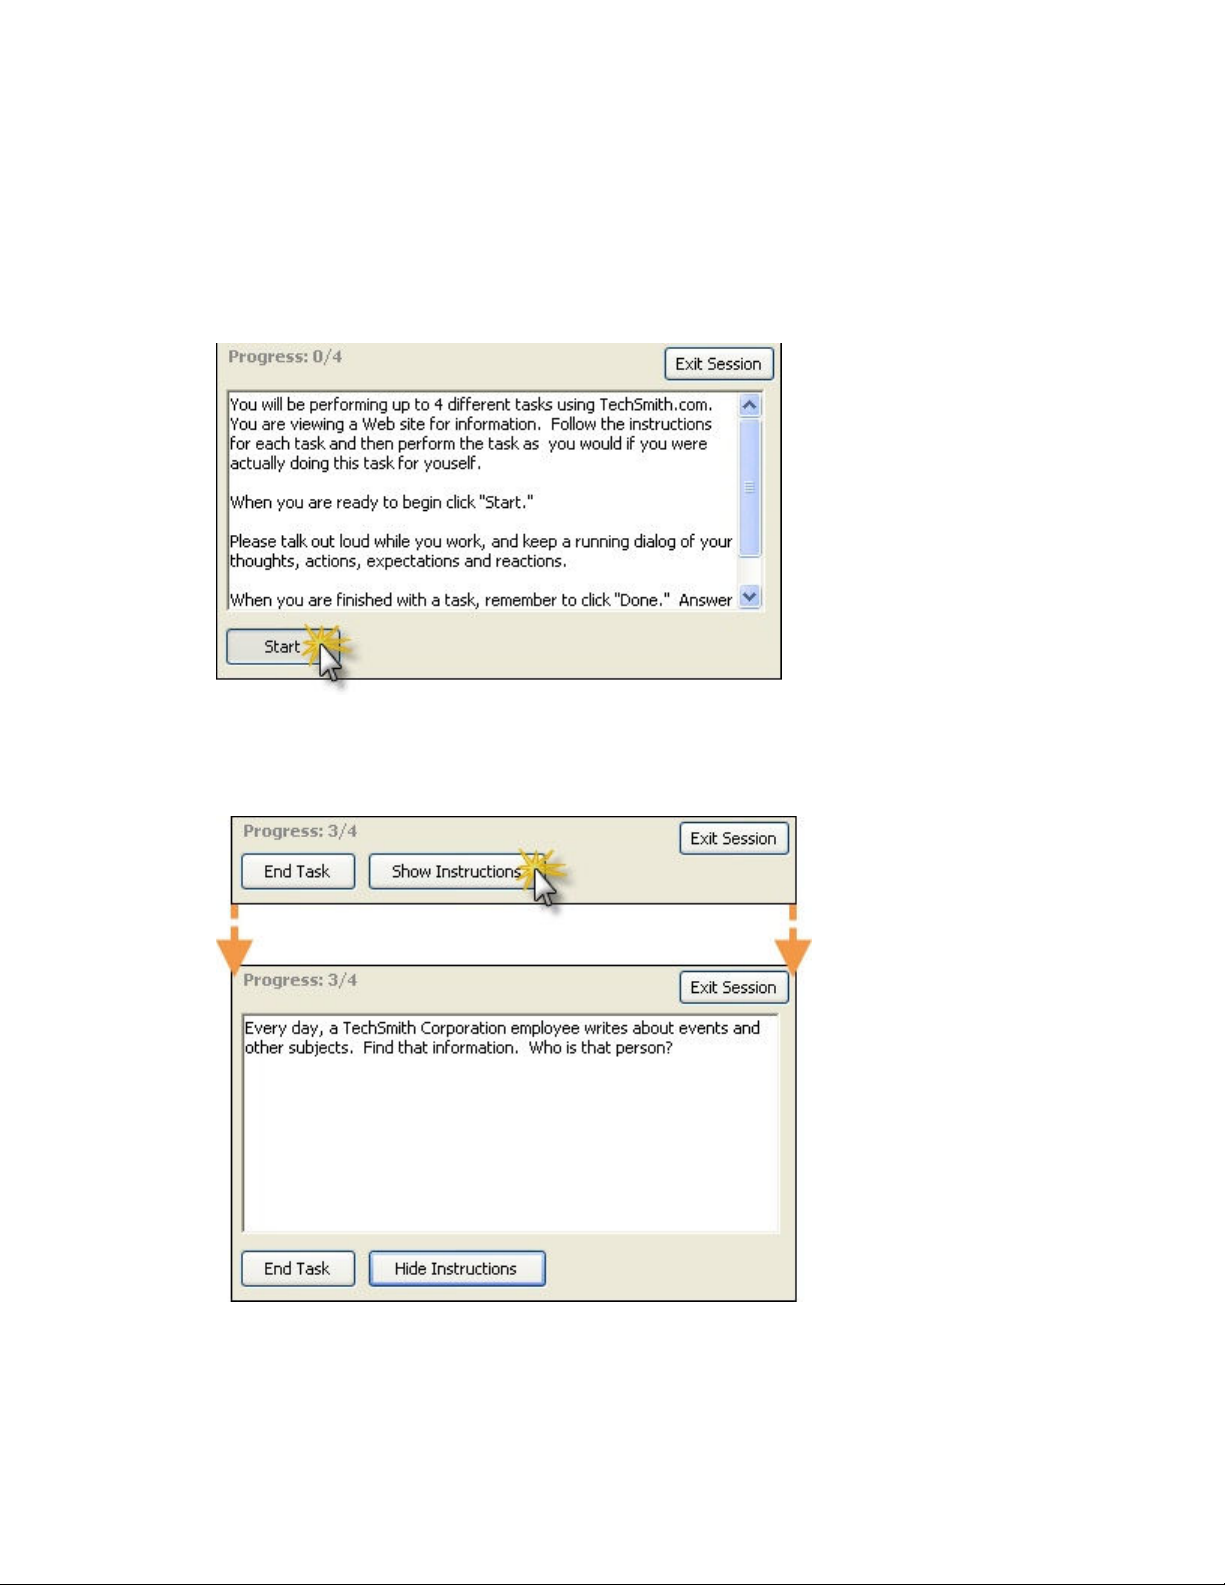
Run an AutoPilot Session
Morae Recorder
Help PDF
Page 69
www.techsmith.com
The following is the step by step of how an AutoPilot session works.
1. Open Recorder. The Welcome to Morae Recorder dialog box opens.
2. Select Open a saved study configuration and open your saved AutoPilot study configuration.
3. Click the Record button.
4. AutoPilot starts and displays the study instructions. The participant clicks Start.
5. The first task displays. The participant reads the task and clicks Start.
Recorder automatically logs a Start Task marker.
6. The AutoPilot window collapses and the participant works on the task.
The participant can click Show Instructions to view the task instructions for the task.
7. The participant finishes the task and clicks End Task.
Recorder automatically logs an End Task marker.
8. If there is a survey associated with the end of the task, it displays before moving to the next task.
9. The participant finishes the survey and clicks Done.
Page 72
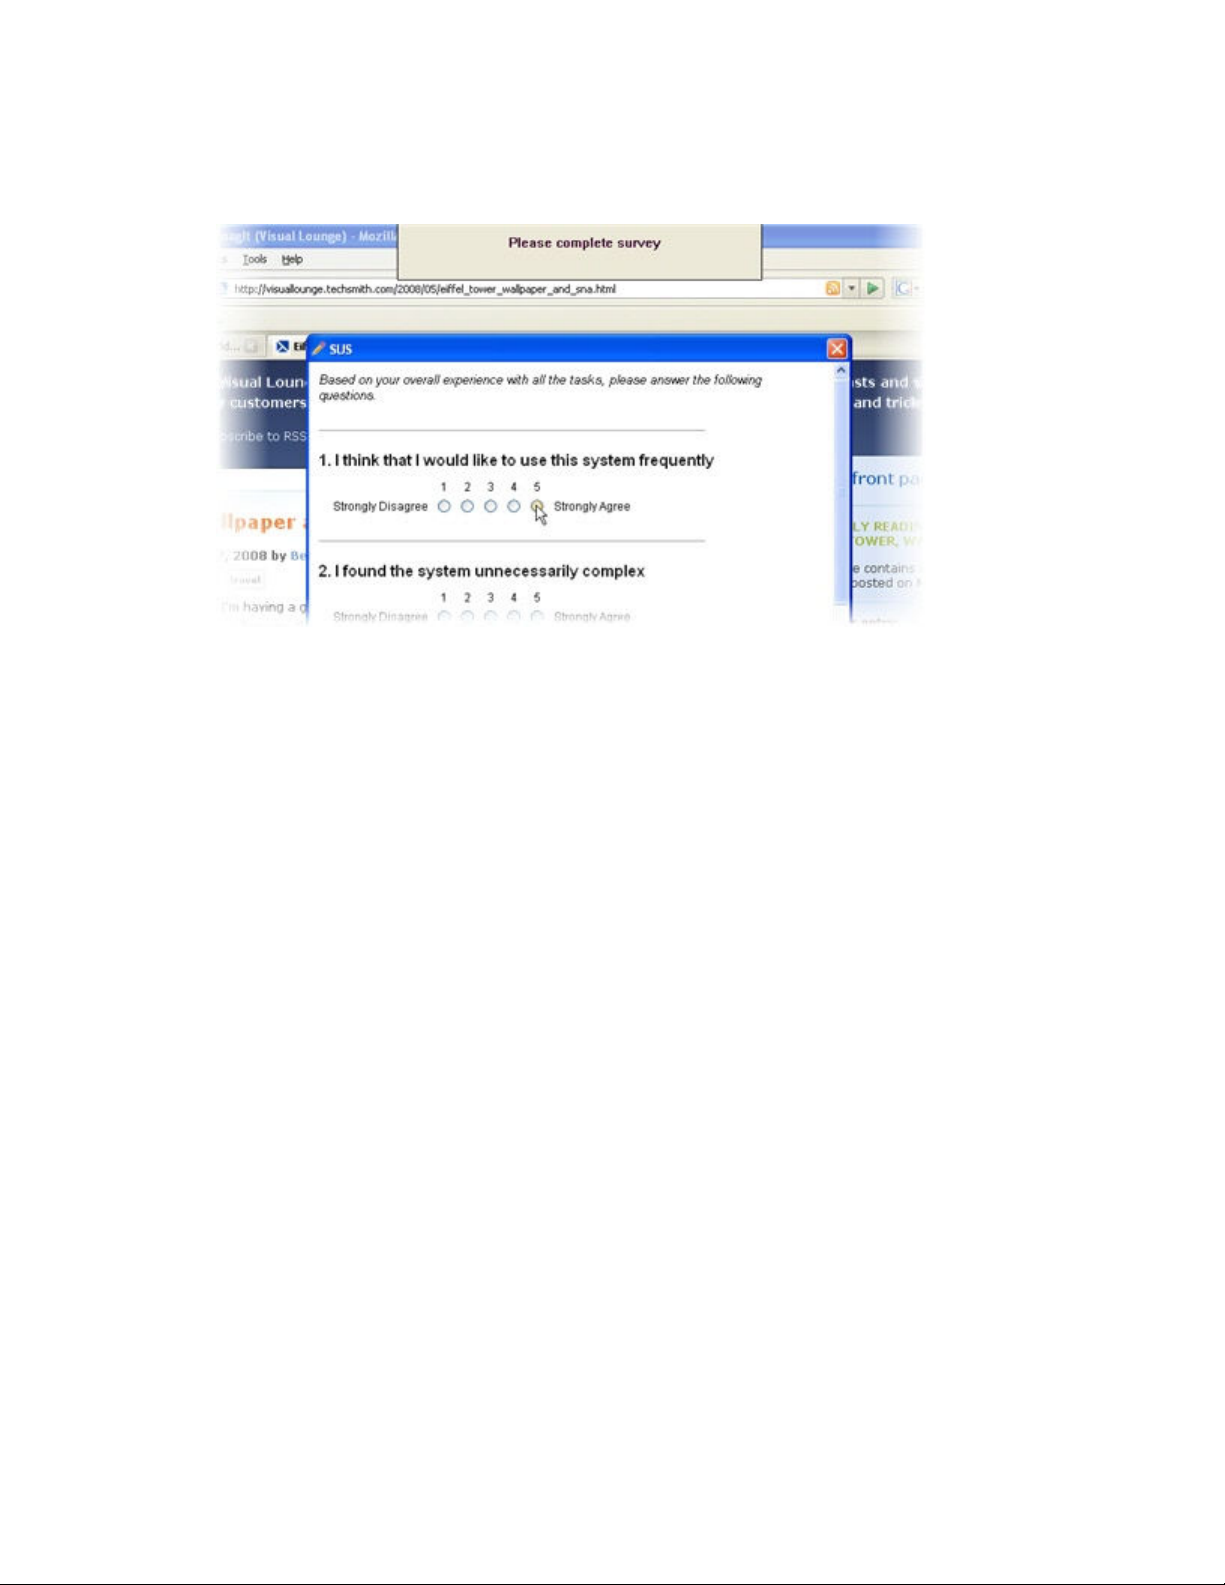
10. The next task displays. This process continues until the participant reaches the end of the test.
Morae Recorder
Help PDF
Page 70
www.techsmith.com
11. After the participant clicks End Task for the final task, if there is a survey associated with the end of
the test, it displays.
12. When the final survey is complete, a thank you message appears. The participant clicks OK to end
the test.
Page 73
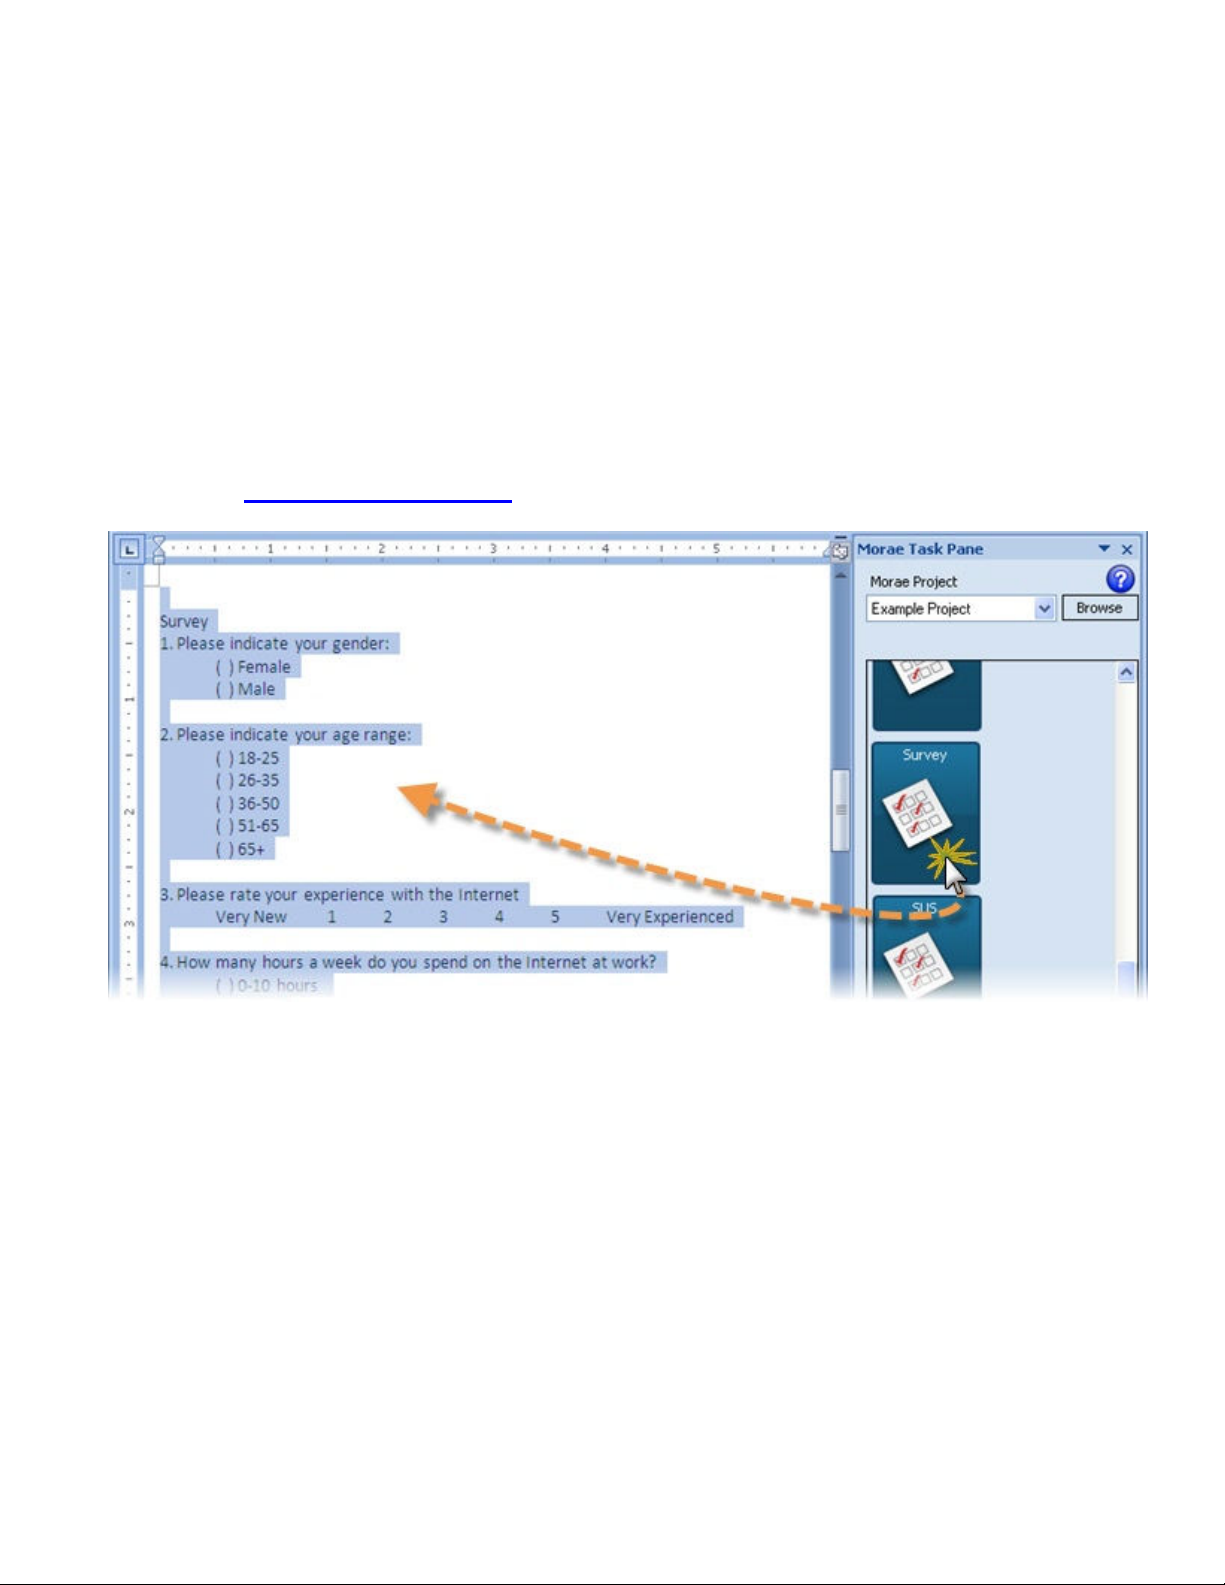
With the help of the Morae Add-In for Word, you can use a study configuration to create paper handouts for
Morae Recorder
Help PDF
Page 71
www.techsmith.com
your sessions.
To create session handouts from a study configuration:
1. In Recorder, create a study configuration, making sure to enter the Study Instructions and Task
Instructions in the Study Details dialog box.
2. Save the study configuration.
3. Open Microsoft Word and the Morae Task Pane.
o In Word 2003, click the Show Morae Wnd button in the Word toolbar to open or close the Morae
Task Window.
o In Word 2007, by default, the Morae Task Pane opens with Word. Open or close the Morae Task
Pane with the check box in Add-Ins tab > TechSmith Morae group.
4. In the Morae Task Pane, click Browse to locate the saved study configuration file (.mrcfg).
5. All
available study components open in the Morae Task Pane. Click and drag the task Instructions
and surveys to the open Word file.
6. Add page breaks and text formatting, as needed.
7. Save and print the handouts.
Page 74
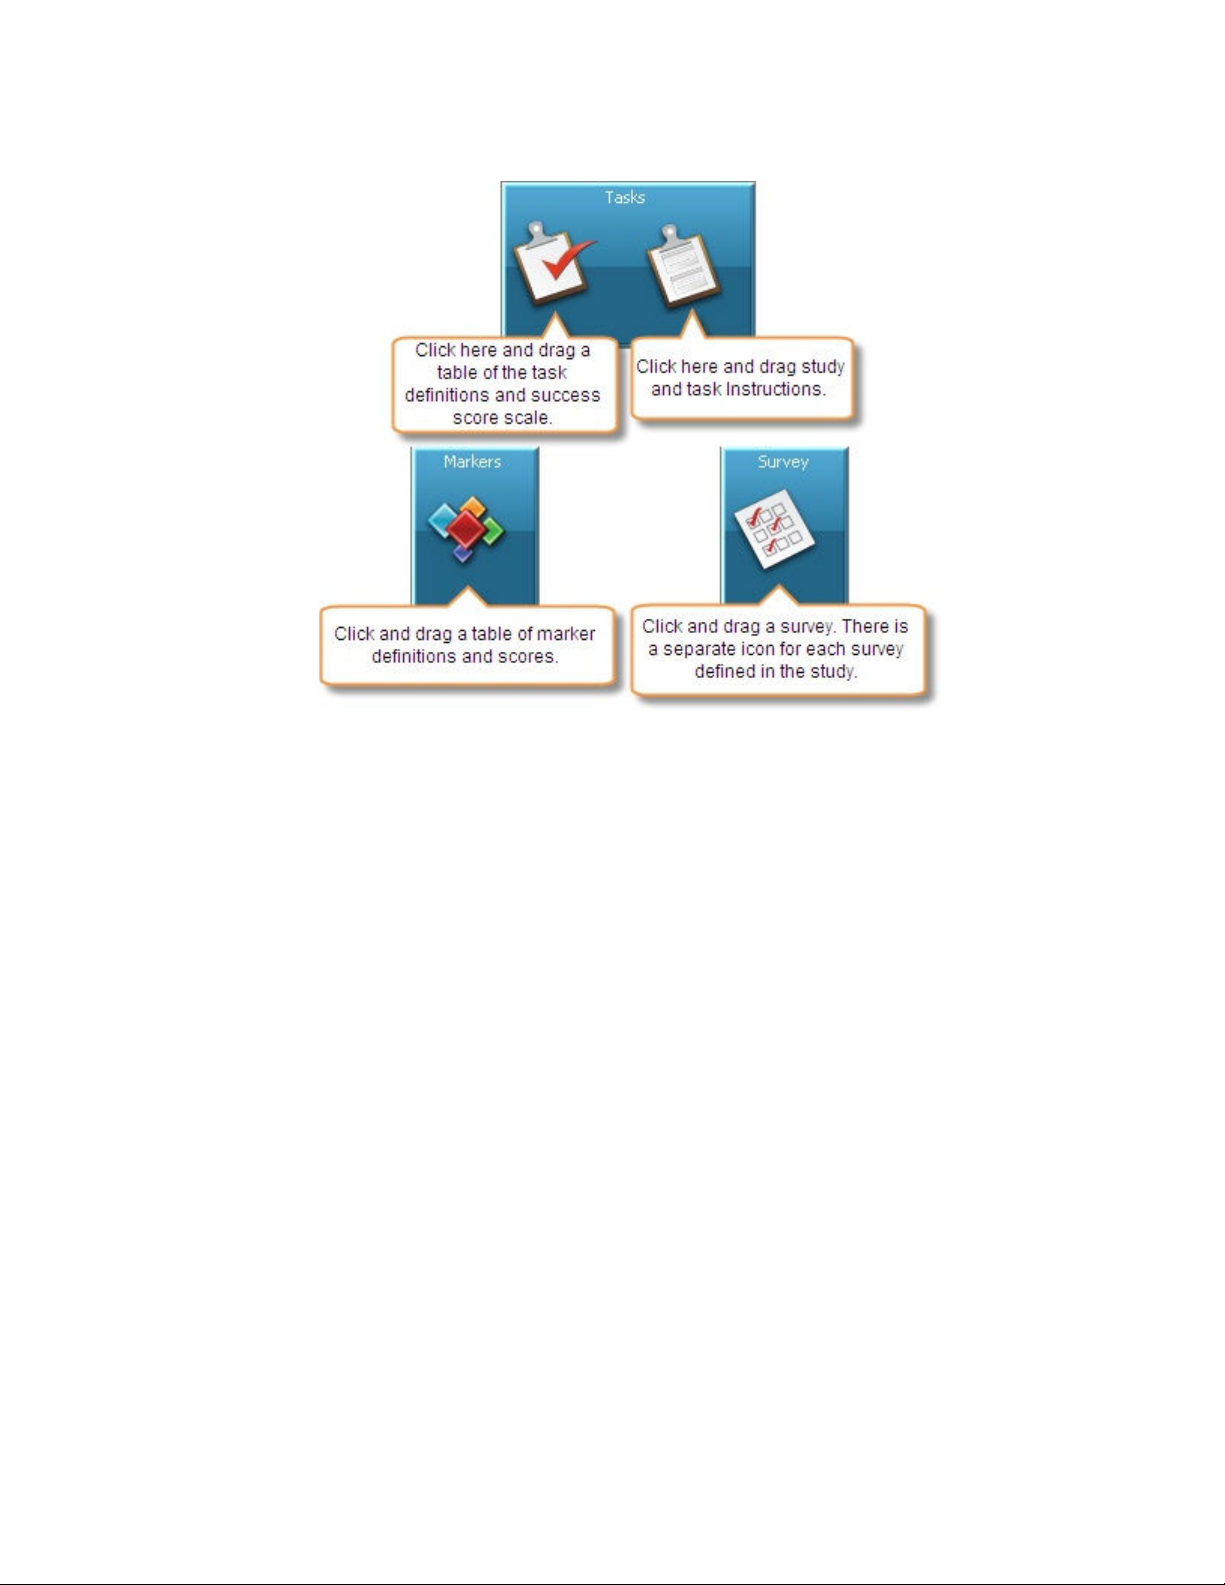
Study Components Available in the Morae Add-In for Microsoft Word
Morae Recorder
Help PDF
Page 72
www.techsmith.com
Page 75
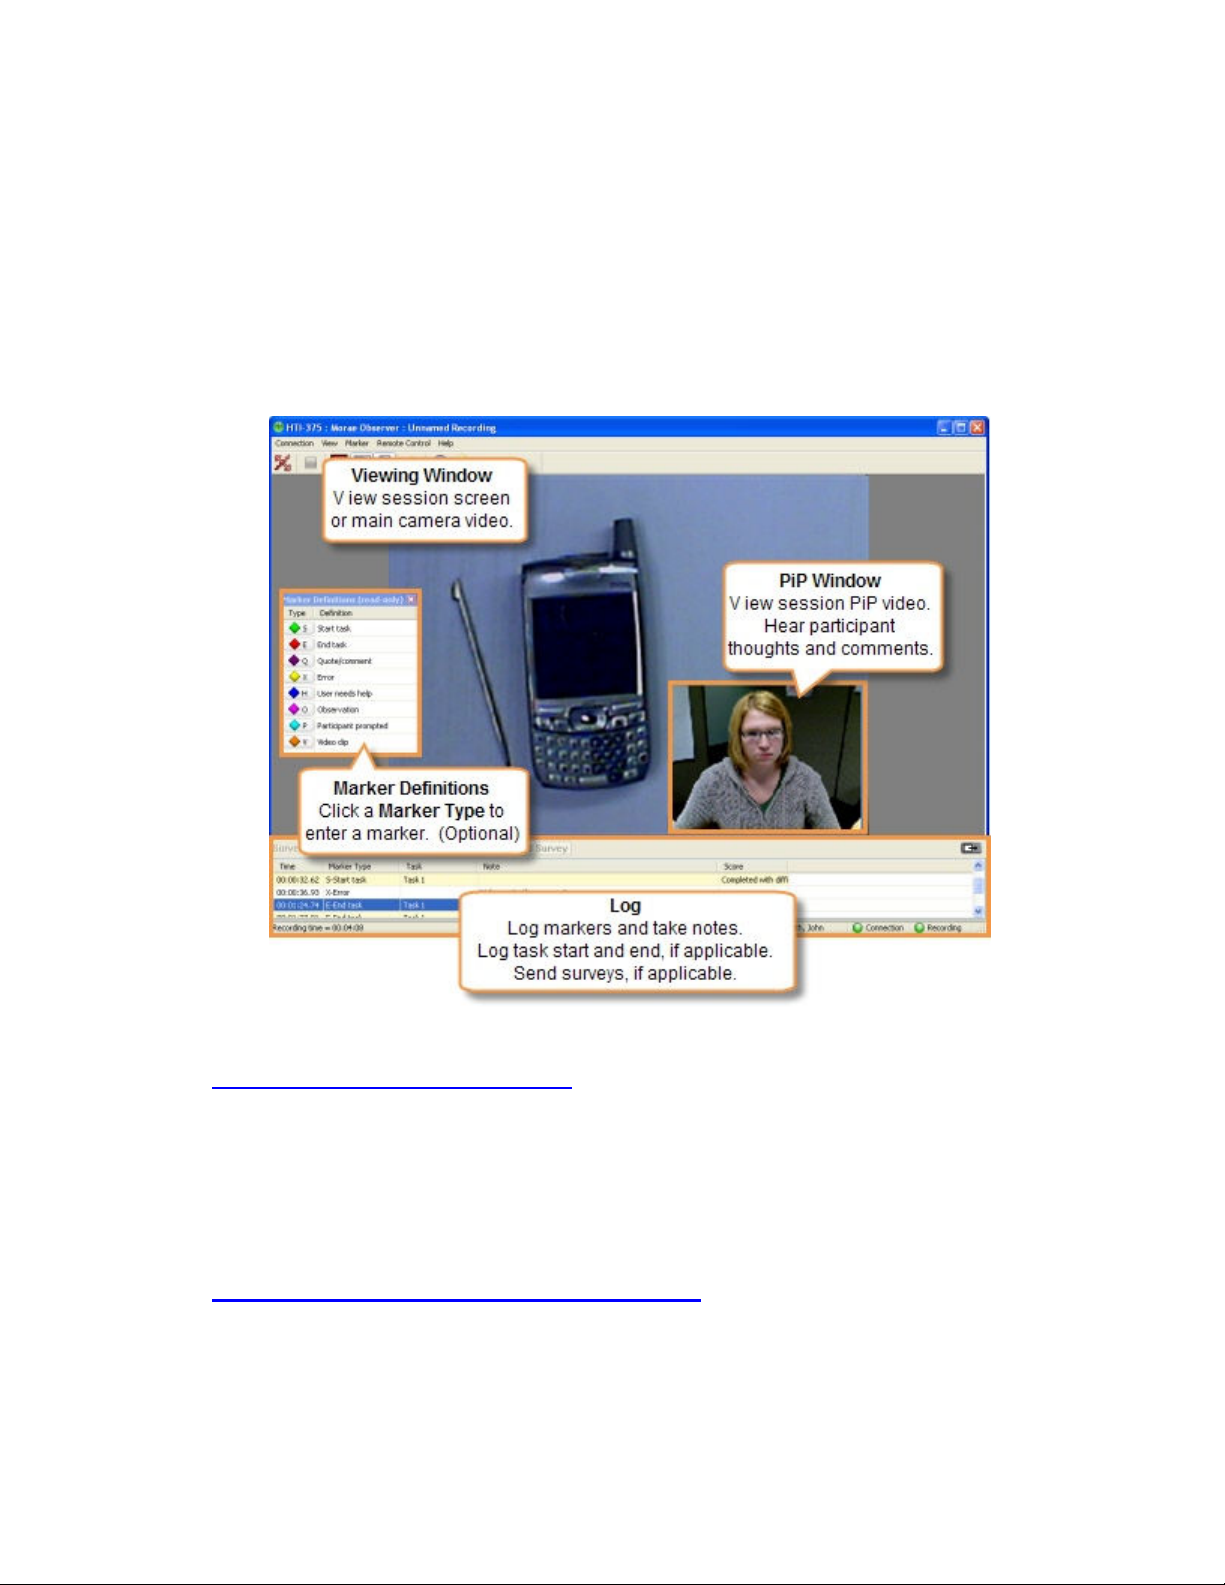
Log a Session
Morae Recorder
Help PDF
Page 73
www.techsmith.com
When recording only camera video, you are able to log on the computer running Recorder. You can log
markers, marker scores, and add text notes to save with the recording file. You can set up the Study
Configuration to allow the person logging with Recorder or an Observer to logs tasks and task scores. At the
end of a session, the tasks and task scores are saved with the recording.
The components used when logging with the computer running Recorder are:
See also:
Customize Observer for Your Session
•
• Get to Know the Log
• Quick Tips for Logging a Session
• Markers
• Tasks
• Surveys
• View Recording Details
•
View Your Notes and Markers Right After a Session
Page 76

Get to Know the Log
Morae Recorder
Help PDF
Page 74
www.techsmith.com
When logging, Recorder includes a Log displayed like a spreadsheet with rows and columns. The Log
displays all markers entered in Observer during the recording. If you are the logging tasks, the Log also
displays the tasks.The Log also displays the surveys, if applicable.
Quick Tips for Logging a Session
• There are several different ways to log markers and tasks. Review Different Ways to Log a Marker.
• Tasks only appear in the Log if you are the task logger. See How to Log a Task.
• During recording, you can go back and edit previously logged markers and tasks.
• The markers and tasks defined in the study configuration are available to log. See
Configuration in Recorder for information on setting up a study configuration.
• Log marker and task scores to use in Manager during analysis. For example, if you log marker scores,
you can create a graph that automatically calculates error severity rate.
• While you can add markers, tasks, and scores in Manager after importing the recording, you will save
time by logging tasks and markers during a session.
• You can save a copy of the Log after each session as a .txt file to print or open in other applications
(i.e. Microsoft Excel). See
• If you need immediate access to the recording, save a copy of the recording as a WMV. See
Recording as a WMV File.
See also:
• Get to Know the Log
• Markers
• Tasks
• Surveys
• View Recording Details
View Your Notes and Markers Right After a Session.
Define a Study
Save the
Page 77

Markers
Morae Recorder
Help PDF
Page 75
www.techsmith.com
Use markers to quickly log important points in a recording. During analysis, you can quickly find and review
the markers to identify points of interest. You can set an unlimited number of markers in a recording.
Markers are recording-specific (defined in the study configuration) and all observers for a recording use the
same set of pre-defined markers to work with.
During recording, you can go back and edit previously logged markers and tasks. You can also edit or add
markers, tasks, or scores in Manager after importing the recording.
The task logger log tasks by marking the start and end of a task the participant performs during the recording.
For more information, see Tasks.
Different Ways to Log a Marker
When you see a point in the recording to mark, do one of the following to log a marker:
• Choose <Ctrl+ [letter]> on the keyboard.
• In the Marker Type column, enter the letter of a marker.
• Pick a marker from the drop-down list in the Marker Type column.
• Click a defined Type button in the Marker Definitions window.
• Choose the Marker menu and select the letter (Type) from the menu. Defined markers appear at the
top of the menu.
To create markers without a type assigned, choose the generic option from the list marker types or use
the <Ctrl + Space> hotkey combination.
See also:
• Get to Know the Log
• Quick Tips for Logging a Session
• Tasks
• Surveys
• View Recording Details
Page 78

Tasks
Morae Recorder
Help PDF
Page 76
www.techsmith.com
While each observer can log markers, marker scores, and text notes, only the designated task logger can log
tasks and task scores. The task logger is defined in the study configuration. For more information, see Define
Task Logger Options.
The task logger logs tasks by entering start and end markers at the beginning and end of the tasks the
participant performs during the recording.
If you enter a start or end marker too early, you can enter another start or end marker. Manager uses
the last start or end marker for the task.
While you can add markers, tasks, and scores in Manager after importing the recording, you will save time by
logging tasks and markers during a session.
How to Log a Task
1. As the task logger, log a Start task marker. (For the various ways to log a marker, see Different
Ways to Log a Marker.)
2. In the Log, pick a task from the drop-down list in the Task column.
3. Add an optional Note.
4. Add markers during the task, as needed.
5. Log an End task marker.
6. Select a Score.
7. Send a task survey, if applicable. (See How to Deliver Surveys.)
Page 79

See also:
Morae Recorder
Help PDF
Page 77
www.techsmith.com
• Get to Know the Log
• Quick Tips for Logging a Session
• Markers
• Surveys
• View Recording Details
Surveys
You can open (deliver) surveys anytime during the recording. While logging, read the survey questions to the
participant and enter the answers in the open survey, or have the participant fill out the surveys on the
computer running Recorder. You can later graph the answers in Manager.
You can have multiple surveys. Some ways to use surveys include, but are not limited to
• Pre-session demographic questionnaire
• Task completion survey
• Post-test satisfaction survey
• Session follow-up questions
Surveys create and associate with session events, such as the end of a task, in the study configuration. See
Define the Study Surveys for information about setting up surveys.
How to Deliver Surveys
To deliver a survey
1. Select the survey from the survey dropdown list.
When you log an End Task marker, the survey associated with that task is automatically
selected in the dropdown list.
2. Click Send Survey.
If you send the wrong survey, you can click Recall to close the survey.
Page 80
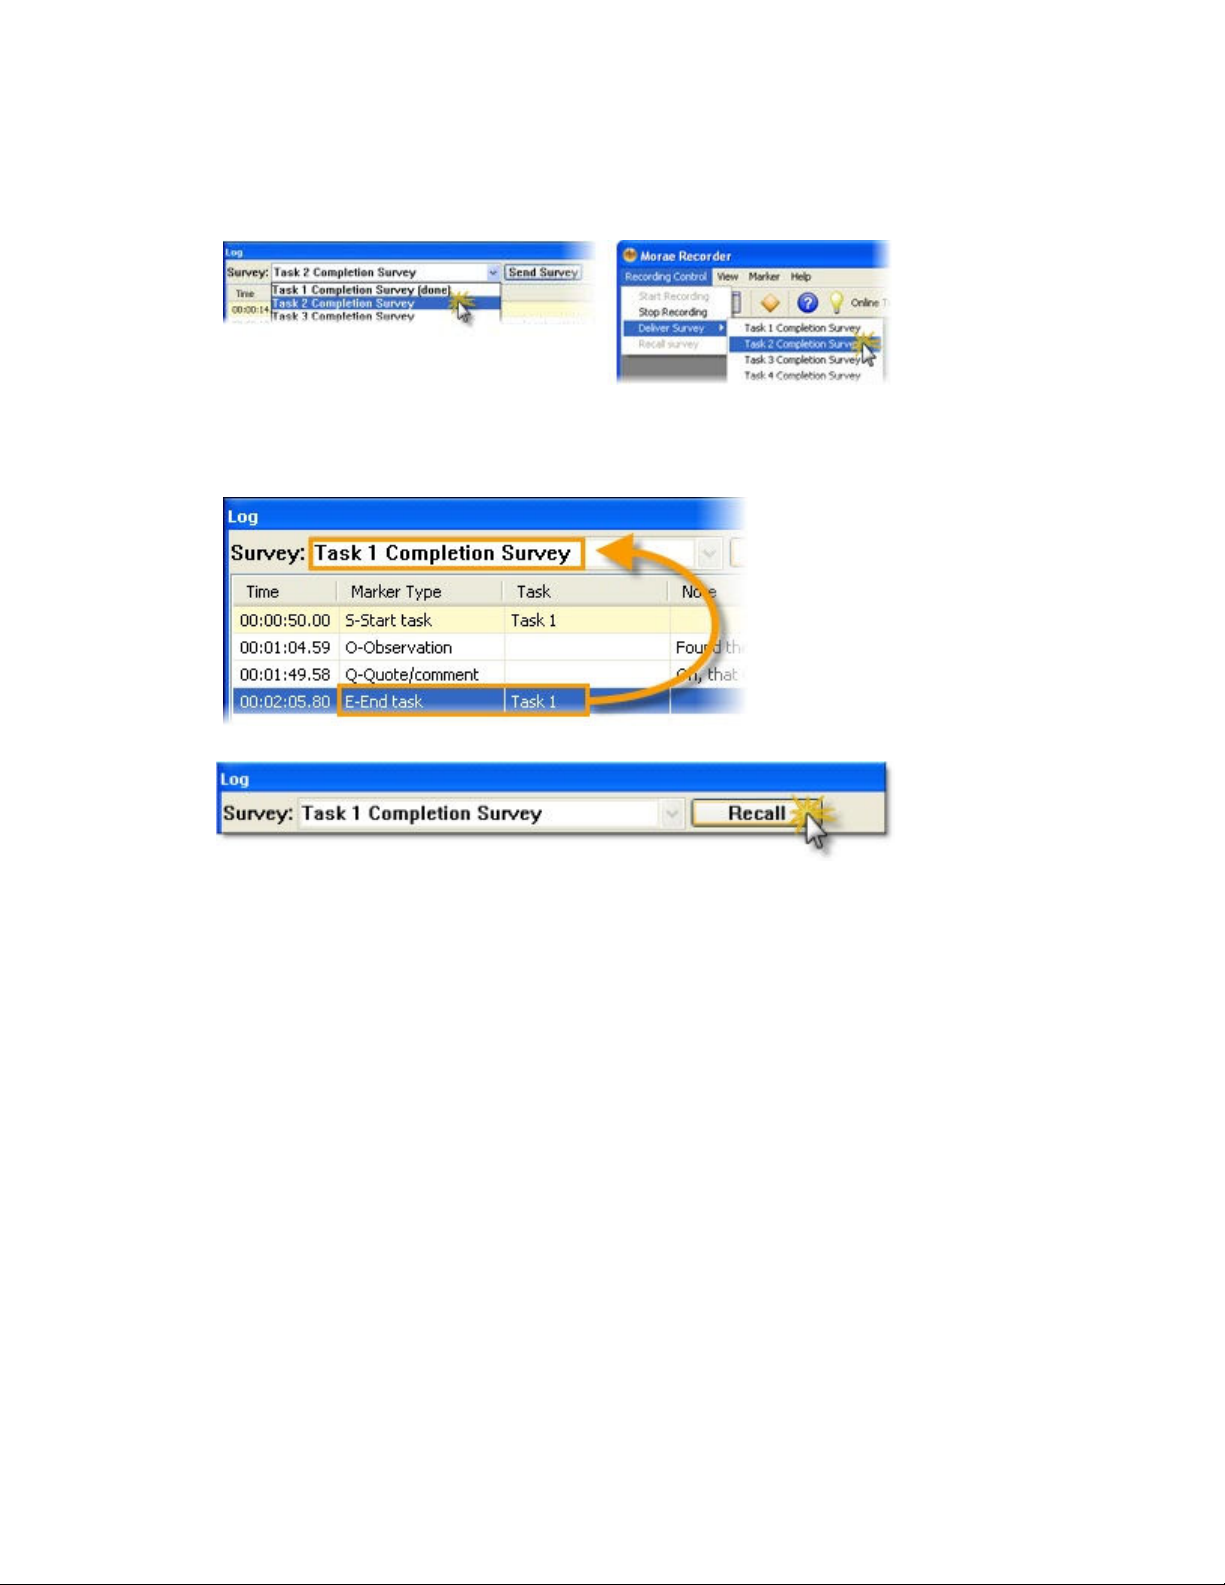
Quick Tips for Surveys
Morae Recorder
Help PDF
Page 78
www.techsmith.com
Surveys are available at the top of the Log and in the Recording Control menu.
• Surveys appear in the order they are entered into the study configuration.
• If linked to a session event, a survey is selected in the survey dropdown list when that session event
occurs. For example, at the end of Task 1, the survey associated with the end of Task 1 is selected in
the survey dropdown list.
• If you send the wrong survey, you can Recall a survey before it is complete.
• If a survey is already complete, you can Resend a survey. Any answers already filled are not
removed, but you can adjust the answers, if needed.
See also:
• Get to Know the Log
• Quick Tips for Logging a Session
• Markers
• Tasks
• View Recording Details
Page 81
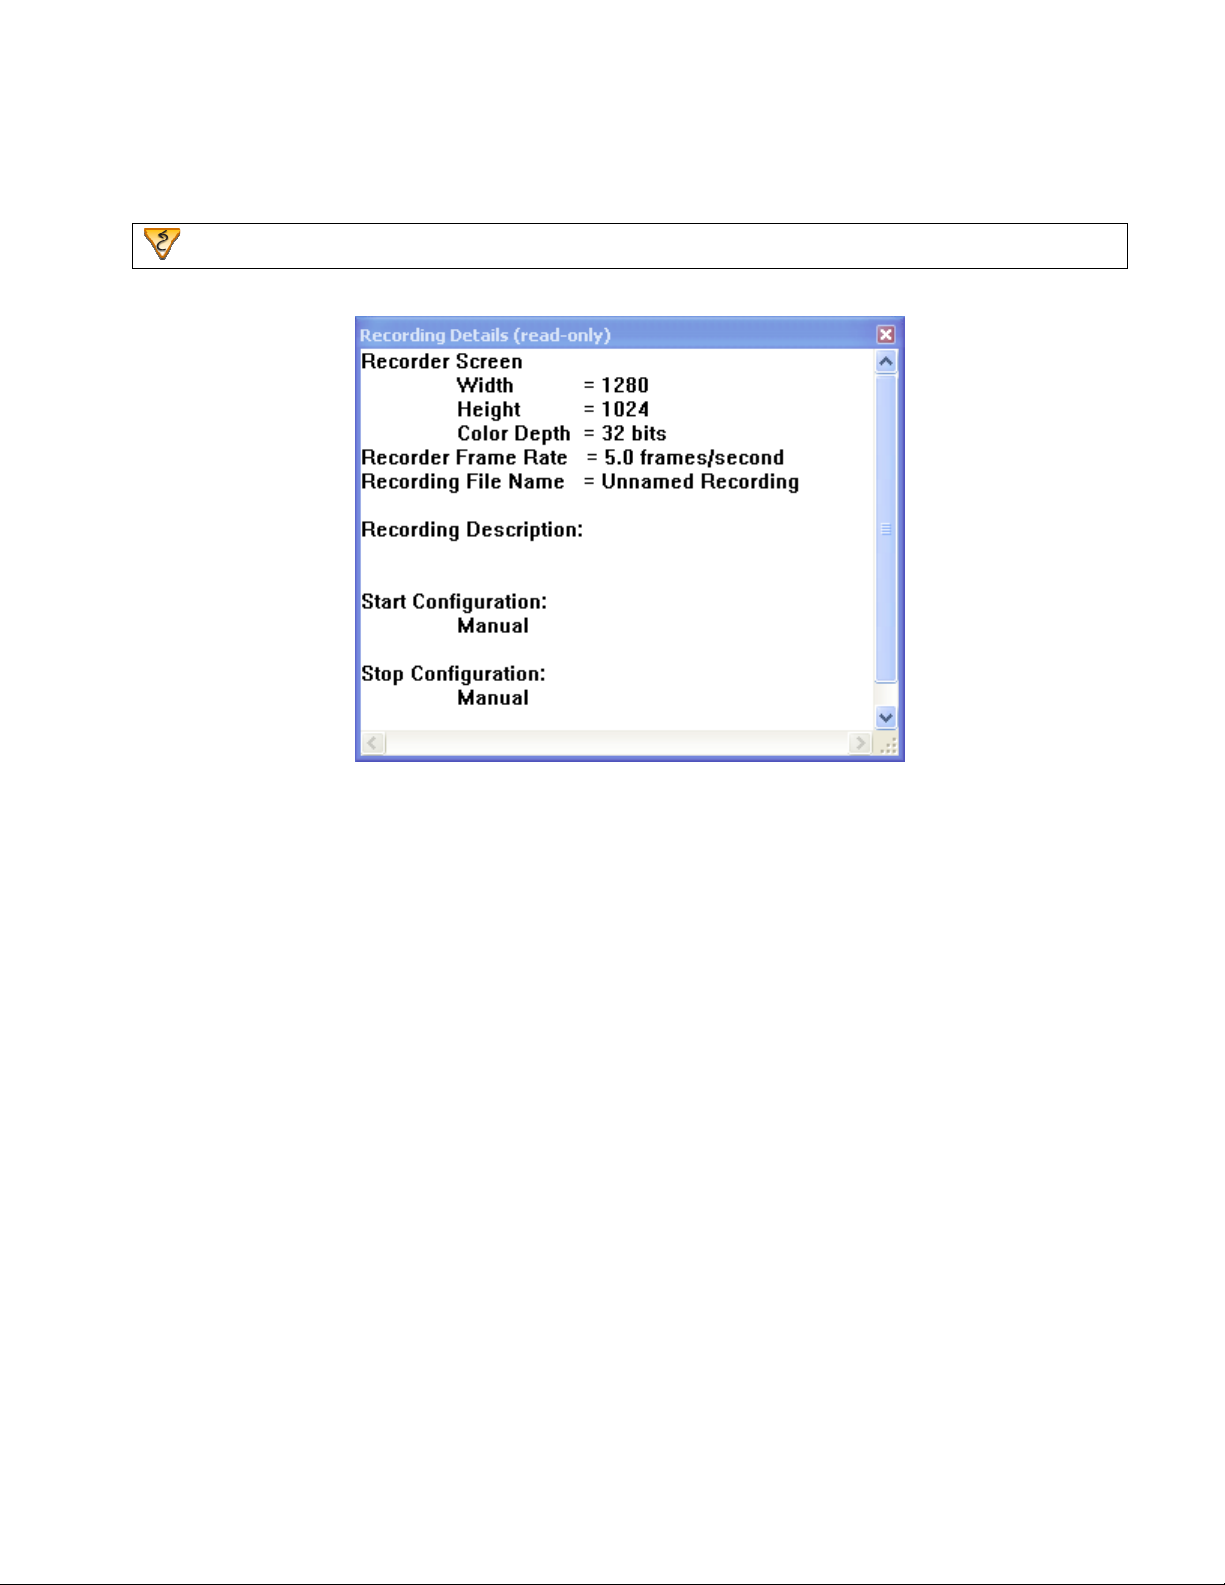
View Recording Details
Morae Recorder
Help PDF
Page 79
www.techsmith.com
View > Recording Details
The Recording Details dialog box displays data about the current recording session.
See also:
• Get to Know the Log
• Quick Tips for Logging a Session
• Markers
• Tasks
• Surveys
Page 82

View Your Notes and Markers Right After a Session
Morae Recorder
Help PDF
Page 80
www.techsmith.com
After observing and logging a session, you may want quick access to the notes and markers created during
the session. Use the following procedures to save and view your markers and notes.
• Save Your Notes and Markers
• View Your Notes and Markers
Save Your Notes and Markers
1. Prior to a session, open Observer and enable Marker > Prompt to save copy of log.
2. Proceed with the session, logging markers and notes.
3. After you disconnect from the session, you are prompted to save your log. Browse to the location to
save your log and click Save. The file is saved as a text only file (.txt).
View Your Notes and Markers
You can open your log as plain text in a program such as Microsoft® Word® or Microsoft® Notepad, or for
easier viewing, as a table in Microsoft Excel®.
To open a .txt file in Excel:
1. Open Excel and choose File > Open.
2. Choose Text Files in the Files of type dropdown list.
3. Select the file you want to open and click Open.
4. A message appears that Excel does not recognize the file format. Click OK to continue.
Page 83
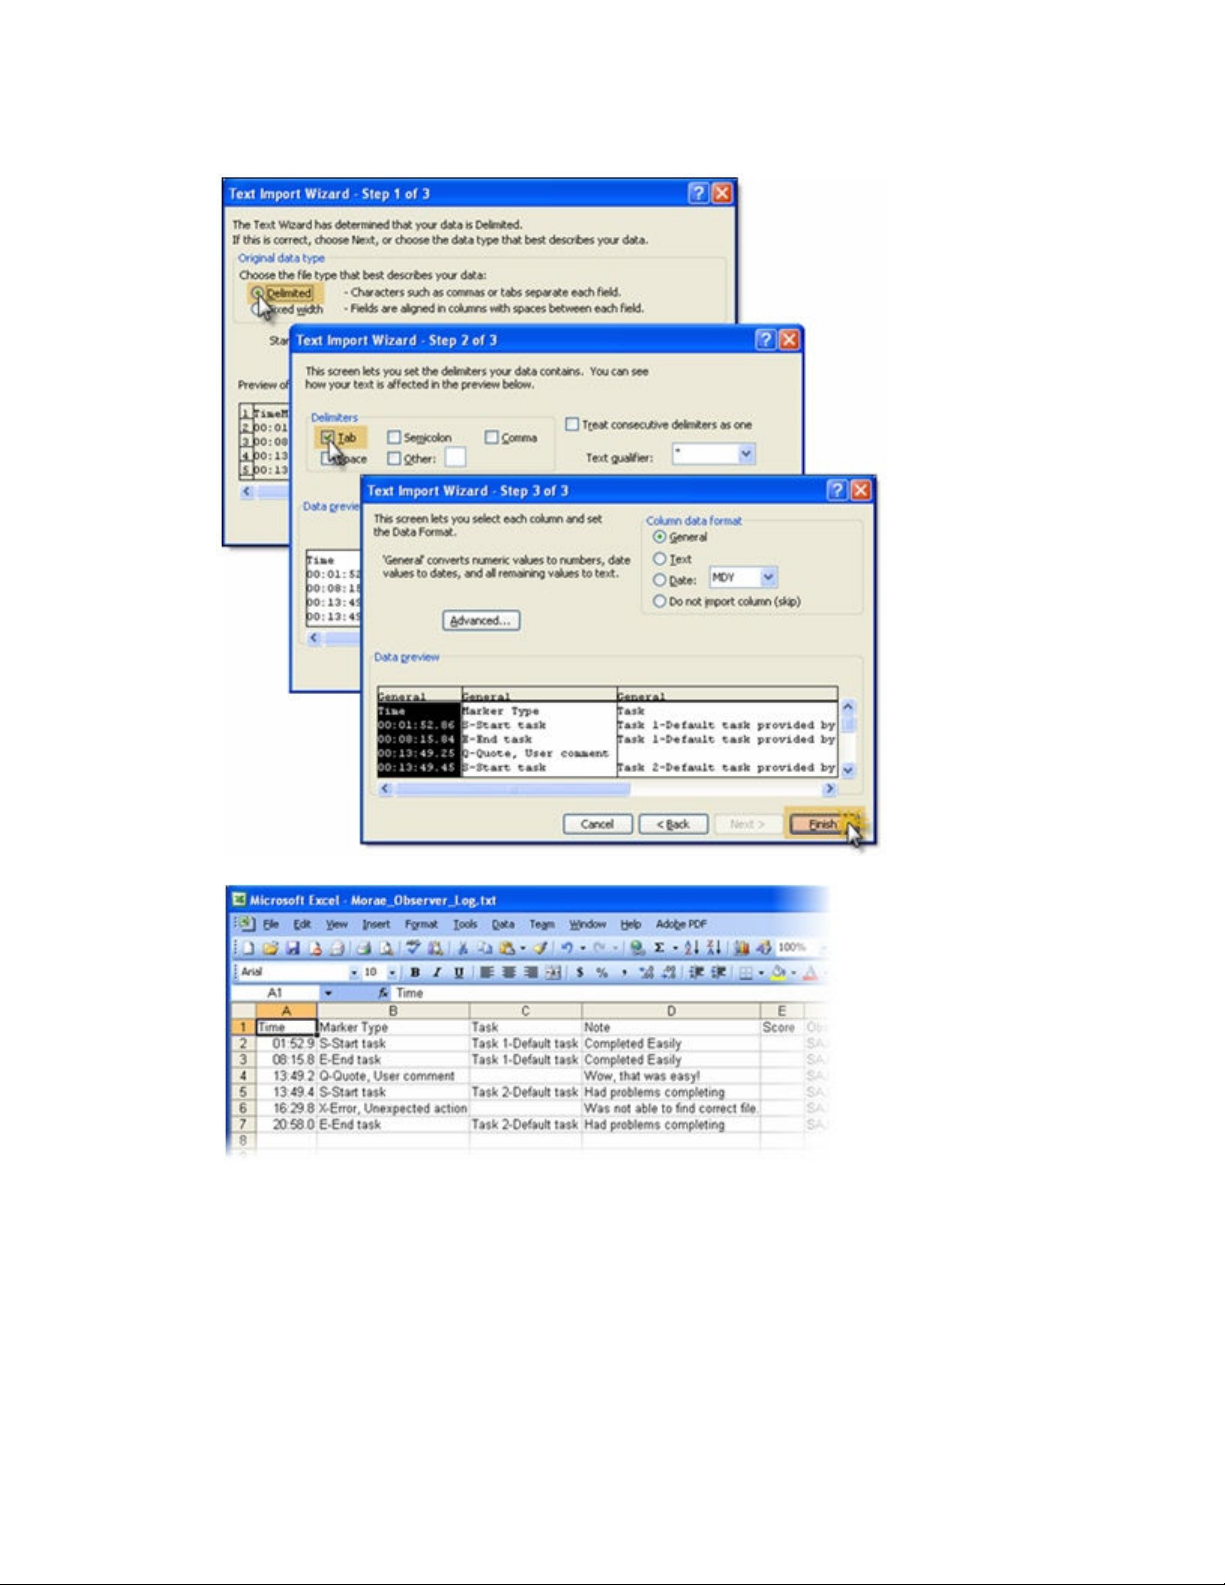
5. Follow the steps in the Text Import wizard.
Morae Recorder
Help PDF
Page 81
www.techsmith.com
The log opens in Excel.
Page 84
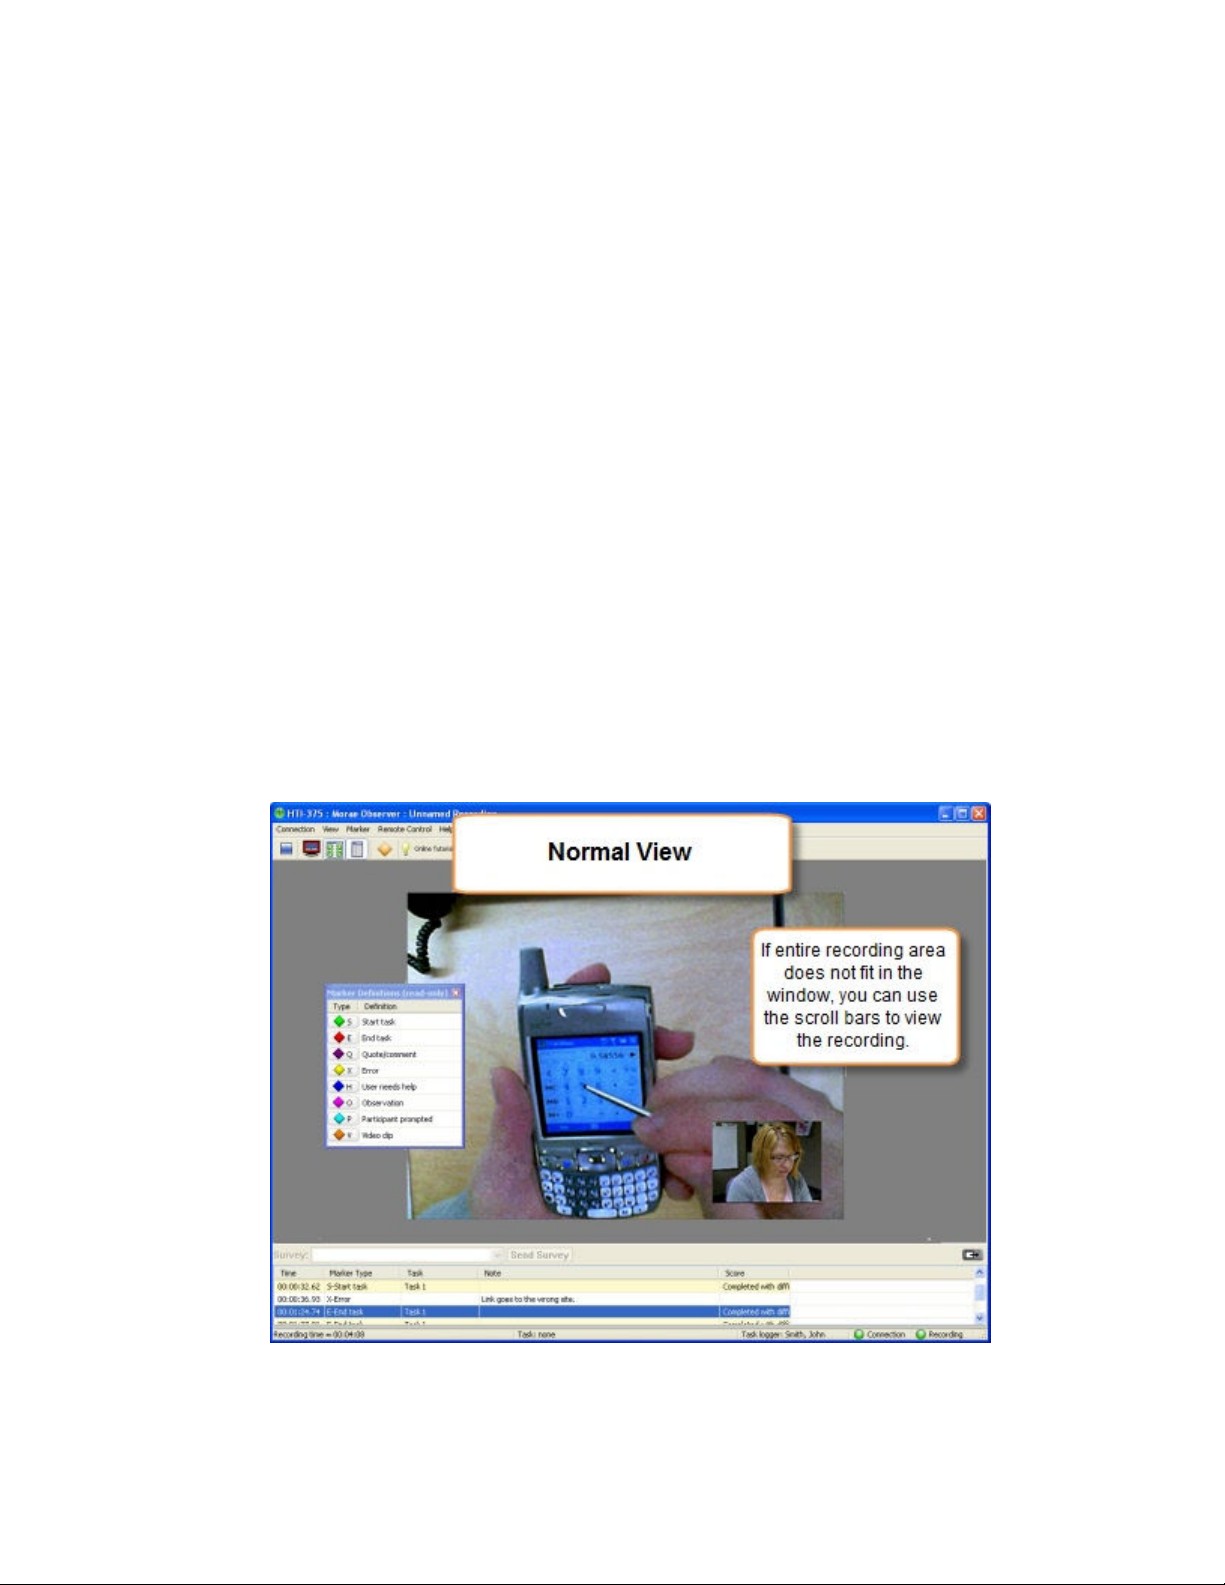
Customize Logging for the Session
Morae Recorder
Help PDF
Page 82
www.techsmith.com
To help you view the recording more easily, Morae allows you to customize how you view and log a session.
See the following topics for more information about the various ways to customize the interface:
• Adjust the View of the Recording Session
• Picture in Picture (PiP)
• Marker Definitions Window
Adjust the View of the Recording Session
To make it easier to view the recording, you may need to adjust the way the video appears. You can view the
screen and/or camera video being captured in several ways.
• Normal View (default)
• Full Screen View
• Scale to Fit View
Try the different views to find one that works well for your test. You can adjust the view at any time, prior to
and during a recording.
Normal View (default)
By default, the interface opens in the Normal view. This view shows the recording activity within a regular
window. The toolbar, status bar, menu bar, Marker Definitions window, and PIP window are visible by default.
Page 85

Full Screen View
Morae Recorder
Help PDF
Page 83
www.techsmith.com
The Full Screen view fills the entire screen with the recording and a floating toolbar appears.
To toggle the Full Screen view on/off, do one of the following:
• Click the Full Screen button .
• Use the <Alt + Enter> hotkey.
• Choose View > Full Screen.
Page 86
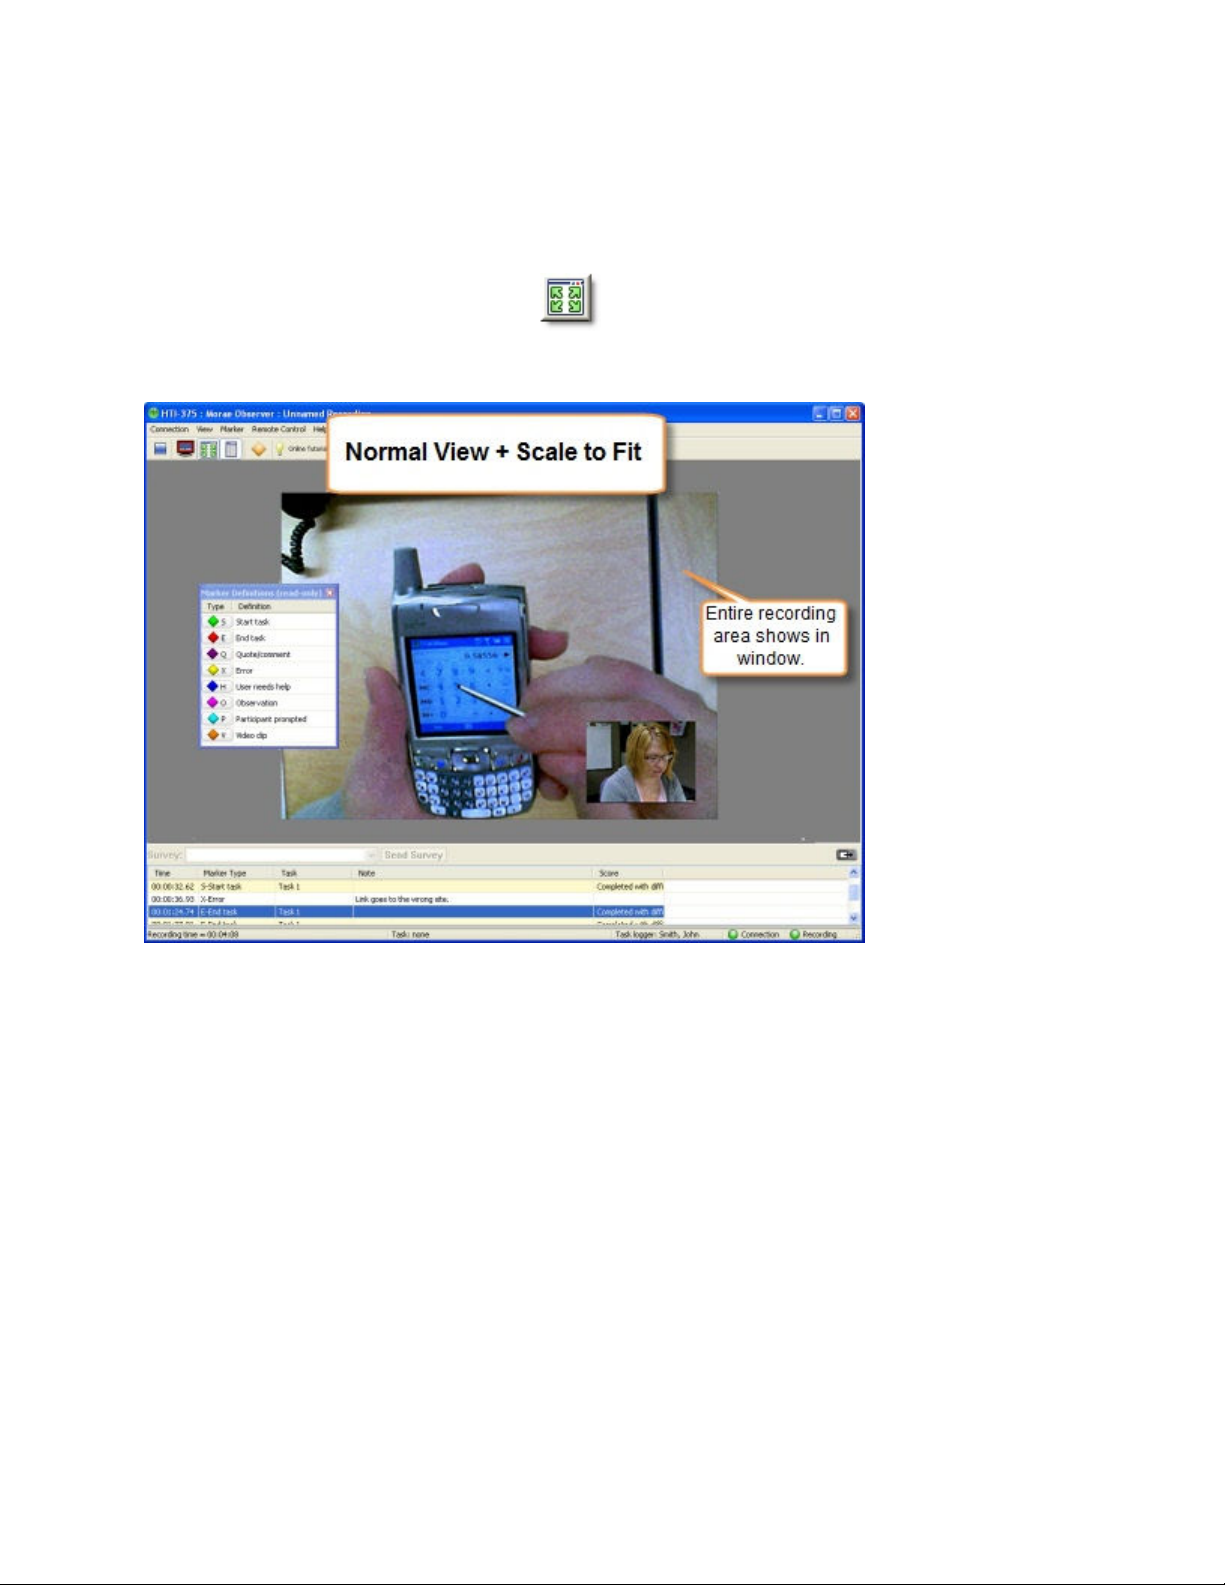
Scale to Fit View
Morae Recorder
Help PDF
Page 84
www.techsmith.com
If the recording is larger than the Viewing window, choose the Scale to Fit view. This view fits the entire
recording into the Viewing window. This option is available in both Normal and Full Screen view.
To toggle the Scale to Fit option on or off, do one of the following:
• Click the Toggle Scale-to-Fit button
• Use the <Ctrl + Alt + S> hotkey.
• Choose View > Scale to Fit.
.
See also:
• Picture in Picture (PiP)
• Marker Definitions Window
Page 87

Picture in Picture (PiP)
Morae Recorder
Help PDF
Page 85
www.techsmith.com
When recording begins, a window containing the Picture in Picture (PiP) camera video appears by default in
the lower right-hand corner of the Viewing window. You can move and resize the PiP window in the Viewing
window.
PiP is best viewed with the Scale to Fit option turned on. If you can’t find the PiP window, choose View
> Scale to Fit and the PIP window appears in the lower right-hand corner.
PIP WINDOW
ACTION DESCRIPTION
To move the PiP
window
To resize the PiP
window
To hide or show the
PiP window
See also:
• Adjust the View of the Recording Session
• Marker Definitions Window
Click in the PiP window and drag it to a different location.
1. Point at a corner of the window with your cursor and grab
the handles that appear.
2. Drag the corner out or in to make the window larger or
smaller.
Choose View > Picture in Picture (PIP).
Page 88

Marker Definitions Window
Morae Recorder
Help PDF
Page 86
www.techsmith.com
The Marker Definitions window displays the markers defined in the study configuration that you can use to log
events and tasks during the recording.
To log a marker, click a button in the Type column.
The Marker Definitions window is visible by default. To hide the marker definitions, choose View >
Marker Definitions.
See also:
• Adjust the View of the Recording Session
• Picture in Picture (PiP)
Page 89

Change the Communication Port
Morae Recorder
Help PDF
Page 87
www.techsmith.com
In some cases, Recorder and Observer cannot connect on the default communication port (5555). In this
case, the study configuration in Recorder and the communication port in Observer must be set to an
alternative port number.
If you change the post in Recorder, all observers must set the same port to connect. Make sure to give
the port number to all potential observers.
To use an alternative port:
1. Contact your system administrator to determine which port to use.
2. In Recorder, select Tools > Preferences.
3. When the Preferences dialog box opens, enter the port number in the Communication port field.
4. Open Observer. In the Connect to Recorder dialog box, click Change Port. Enter the new port
number.
o Click Test Port to verify that you can connect to Recorder with this port.
o Click Restore Default to return to the default port (5555).
Page 90

5. Click OK to apply the selected port and return to the Connect to Recorder dialog box.
Morae Recorder
Help PDF
Page 88
www.techsmith.com
If you have any problems with connecting on an alternative port, please contact the person who set up
the session and your system administrator.
Page 91

Troubleshoot Observer to Recorder Connection Issues
Morae Recorder
Help PDF
Page 89
www.techsmith.com
Trouble connecting to Recorder? Here are some answers to common questions:
• I cannot establish a connection between Observer and Recorder. What should I do?
• I got disconnected during a session. What should I do?
• My video is lagging behind the test. Can I make the video play in Observer in real-time?
I cannot establish a connection between Observer and Recorder. What should I do?
If you cannot connect, check the following items::
• Is Recorder installed and open on the recording computer?
• Is the Recorder computer name (or IP address) entered in the Connect to Recorder dialog box
correct?
If the computer name does not work, use the full domain name or IP address. For information on
finding the computer name or IP address, see Choose the Recorder Computer Name or IP
Address.
• Is there another Observer connected with the same user name?
• Are the Recorder and Observer computers connected to the same LAN or WAN network? Contact
your system administrator for network problems.
• Are the Observer and Recorder applications running the same version of Morae?
• Do you have Windows XP Service Pack 2? This includes its own firewall. When prompted the first
time you run Recorder, select to Unblock the firewall.
• Is there a firewall on the network? Ask your system administrator if there is a firewall blocking the
connection.
• Are Recorder and Observer set up to use the same communication ports?
The communication protocol used by Morae is TCP/IP with listening ports established on ports 5555
and 8080. The system administrator may have to intentionally allow traffic through these ports in
order for Observer to connect to Recorder.
If these ports are already in use, you can use different ports, as long as both Recorder and Observer
are set up to use the same ports. For more information, see
Communication Port.
Change the Recorder and Observer
I got disconnected during a session. What should I do?
My video is lagging behind the test. Can I make the video play in Observer in real-time?
At anytime during the session, if you get disconnected, you can reconnect to the same session.
1. In Observer, click Connect to a Recorder
2. Click Connect. You reconnect to the same session.
Depending on the Observer options you choose, you may experience a video delay in Observer. For more
information, see Video Delay in Observer.
to open the Connect to Recorder dialog box.
Page 92

Tips and Reference Information
Morae Recorder
Help PDF
Page 90
www.techsmith.com
This section contains additional information based on some frequently asked user questions. The topics
covered in this section include:
• How Rich Recording Technology (RRT) Works
• Check for Upgrade Settings Options
• Morae Player
• Recording File Recovery Options
• Codecs in Morae
• Morae Recorder COM Server
• Record Silently
How Rich Recording Technology (RRT) Works
During recording, Rich Recording Technology (RRT) collects and fuses two types of information: video input
(camera video, screen video and microphone audio) and data input (keyboard entry, screen text, mouse
clicks and system and application events). Morae Observer input is optional. The video streams are precisely
correlated in time with the data streams.
For example, where the data streams identify when a particular toolbar button is pressed in a specific
application, the screen recording shows the user pressing the toolbar button. The synchronized video and
data streams are saved in a recording file you can open within Morae Manager.
When the recording file is opened and indexed by Morae Manager, users can conduct a search of the data
input streams, select one of the search results and then see a specific event highlighted visually in the
indexed screen video, which appears in the Player window.
See also:
• Check for Upgrade Settings Options
• Morae Player
• Recording File Recovery Options
• Codecs in Morae
• Morae Recorder COM Server
Check for Upgrade Settings Options
All three components of Morae have an automatic Check for Upgrade feature. The first time you open a
component after installation, you are asked if you want Morae to check for available upgrades on the
TechSmith site.
To manually check for an upgrade, choose Help > Check for Upgrade > Check Now.
To change the settings for the automatic Check for Upgrade, choose Help > Check for Upgrade > Settings.
The Check for Upgrade Settings dialog appears.
The following options are available in all three components of Morae:
• Enable automatic check for upgrade - Morae automatically checks for available upgrades. If you
disable this option, Morae does not check for upgrades.
• Days between checks – Define how often you want Morae to check for available upgrades by
entering the number of days.
Page 93

• Prompt before checking for upgrade - Morae displays a dialog asking whether you want to check
Morae Recorder
Help PDF
Page 91
www.techsmith.com
for available upgrades. If you disable this option, the Check for Upgrade runs silently in the
background (without prompting you).
• Restore Default - Returns the settings in this dialog to the default values.
See also:
• How Rich Recording Technology (RRT) Works
• Morae Player
• Recording File Recovery Options
• Codecs in Morae
• Morae Recorder COM Server
Morae Player
Start > All Programs > Morae > Morae Player
Morae Player is a standalone video player, optimized for playing screen recordings. Morae Player always
plays videos at 100% of their original size so that they remain readable. The Player is a single .exe file that
does not need any setup, nor does it use the registry or any configuration files.
Command line options allow Morae Player to be invoked in various ways from CD-ROMs, multimedia
authoring tools and scripting languages or batch files. The command line options are listed in Morae Player
Command Line Customizations.
Morae Player only plays AVI video files. Morae Player has built-in support for the TechSmith Screen Capture
Codec (TSCC). This means that an AVI encoded with the TSCC codec always plays in the Morae Player,
even if the TSCC codec is not installed on the system. Any other audio or video codecs required by the AVI
file must be installed before Morae Player can play the video. Morae Player does not setup any shell
associations to become the default AVI player.
Morae Player Playback Controls
Page 94

Morae Player System Requirements
Morae Recorder
Help PDF
Page 92
www.techsmith.com
To run Morae Player, your system must meet the following requirements:
• Microsoft Windows 98, Me, NT, 2000, XP or later version.
• Windows-compatible sound card and speakers (recommended)
• 360 KB of hard-disk space for program installation
• Basic Windows multimedia and AVI file support must be installed. This is normally installed by default
with Windows.
• The standard Windows MCI Microsoft Video for Windows must be installed.
To check if the Windows MCI Microsoft Video for Windows is installed:
1. Choose Start > Control Panel > Sounds and Audio Devices > Sounds and Audio Devices >
Hardware tab.
2. Double-click on Media Control Devices.
3. Click on the Properties tab. The (MCI) Microsoft Video for Windows should appear.
Any audio or video codecs required by your AVI files must be installed. To check if a codec is installed:
1. Choose Control Panel > Sounds and Audio Devices> Sounds and Audio Devices > Hardware
tab.
2. Double-click on the Audio Codecs or Video Codecs category. Click on the Properties tab the
installed codecs.
See also:
• How Rich Recording Technology (RRT) Works
• Check for Upgrade Settings Options
• Recording File Recovery Options
• Codecs in Morae
• Morae Recorder COM Server
Morae Player Command Line Customizations
When you launch Morae Player, by default it has a title bar, a menu bar, a tool bar and a status bar. You can
customize those elements by specifying arguments on the command line when launching Morae Player. If
you have installed Morae Player in the default directory, the exact syntax for the command line arguments is:
MoraePlay.exe [<options>] [<file>]
where <options> can include any of the command line options described in the table below and <file> is the
path to any video file (including the file name is optional). Enclose the path to the file in quotes.
For example, you could set up Morae Player to run a specific file in full screen (/F) and then exit when finished
(/E), by using the following syntax:
MoraePlay.exe /F /E “[path to video file]”
If you get an error message that Morae Player cannot be found, type the entire path to the directory that
contains Morae Player with the pathname in quotes. For example:
"C:\Program Files\TechSmith\Morae\MoraePlay.exe"
Page 95

Morae Player Command Line Options
Morae Recorder
Help PDF
Page 93
www.techsmith.com
The following table describes all of the command line options available for Morae Player.
COMMAND
LINE OPTION DESCRIPTION
/A Launches with “Always on top” option.
/BC
RGB(255,0,255)
/D Launches without allowing “dragging” by the video area.
/E Exits after playing the video.
/F Launches in Full Screen mode.
/M Launches without a menu bar.
/MX Launches without its window maximized.
/open Opens the specified video (<file>) but does not play it.
/play Immediately plays the specified video (<file>); this is the default
/R Repeats the video indefinitely.
/S Launches without a status bar.
/ST Stays on last frame after playback.
/T Launches without a title bar.
/TB Launches without a tool bar.
Sets background color; the default is black. For more information,
see Change the Morae Player Background Colors from the
Command Line.
setting.
Examples of Command Line Use with Morae Player
Play an AVI with Morae Player’s default user interface, for example:
MoraePlay.exe “C:\MyVideos\[name].avi”
Open an AVI without a menu bar, for example:
MoraePlay.exe /M “C:\MyVideos\[name].avi”
Play an AVI full screen and fill the background with dark gray if the video does not fill the entire screen, for
example:
MoraePlay.exe /BC RGB(128,128,128) /F “C:\MyVideos\[name].avi”
Page 96
Change the Morae Player Background Colors from the Command Line
Morae Recorder
Help PDF
Page 94
www.techsmith.com
You can change the background color for the video files displayed in Morae Player. The background color
only shows when the video playing does not fill the entire frame. For example, if the player is maximized while
a 360x240 video is playing, the background color fills in around the edges of the video.
By default, the background is black. To change the background color, you must specify a color argument with
the syntax RGB (r,g,b) where r, g and b are the red, green and blue components of the color, respectively.
Values for r, g and b are in the range 0 to 255. For example:
• RGB(0,0,0) = black
• RGB(255,255,255) = white
• RGB(0,0,255) = blue
• RGB(255,0,255) = teal green
• RGB(128,128,128) = dark gray
How to determine the RGB values for a color
You can use Microsoft Paint to locate RGB numbers by following these steps:
1. Open Microsoft Paint.
2. Double-click on the paint box to open the Edit Color dialog box. Click on the Define Custom Colors
button. The Custom Color palette appears.
3. Click on a color in the color grid. The spectrum appears along with the RGB color code.
4. Find a color and read the RGB values from the boxes below the color spectrum.
5. Enter the RGB code in the command line.
Recording File Recovery Options
If you experience a crash during recording, Recorder has a file recovery feature that helps determine if the
data recorded prior to the crash can be recovered.
The size of the data file found may indicate how much information actually exists in the file.
If Recorder was unable to recover any recording data
If Recorder’s file recovery process finds data not recoverable after a crash, a dialog appears and prompts you
to archive or delete the data.
• Click Archive to create a zipped archive file containing the unrecoverable data. This option is helpful if
you want to send the data to TechSmith for further analysis.
• Click Delete to permanently delete the unrecoverable data.
Page 97

If Recorder finds data that might be recoverable
Morae Recorder
Help PDF
Page 95
www.techsmith.com
If Recorder’s file recovery process finds data that may be recoverable after a crash, a dialog appears with the
following options:
• If you want Recorder to attempt to recover the recording data immediately, select Recover the data
now.
• If you want Recorder to place the data in the batch processing queue for processing later, select
Recover the data later.
• If you want to permanently delete the data without recovering it, select Delete the data from my
system.
See also:
• How Rich Recording Technology (RRT) Works
• Check for Upgrade Settings Options
• Codecs in Morae
• Morae Recorder COM Server
Codecs in Morae
The word codec stands for compressor/decompressor. A codec compresses videos down to smaller sizes, or
decompresses videos for playback. A codec is the algorithm used to create a video. By default, Windows
comes with many different codecs you can use in Morae. Each codec has its own set of strengths and
weaknesses. Certain codecs are better to use in certain situations, because of the way they compress
content. This section describes the most commonly used codecs and the ideal content they are suited for and
how to select different codecs in Recorder and Manager.
The TechSmith Screen Capture Codec (TSCC) is the default codec used for recording screen video. TSCC
compression is lossless and provides the highest quality and smallest file sizes for low-complexity screen
content, like typical office-style application content.
The Full motion video option is the best choice for recordings created by Recorder and videos produced by
Manager that contain a lot of real-world motion.
For example, use Full motion video if the recording includes a Picture in Picture (PIP) window or if you are
recording a user interacting with a game or a similarly graphic-intensive application. Although lossless
compression can be used with full-motion content, the resulting file sizes will be large. The Full motion video
option results in some loss of video and audio quality, but the recording/video file sizes are manageable.
For more information on codecs, see
• Commonly Used Codecs
• Full Motion Video Default Settings
• Lossless Video Default Settings
• Video Compression Setup Options
See also:
• How Rich Recording Technology (RRT) Works
• Check for Upgrade Settings Options
• Morae Player
• Recording File Recovery Options
• Morae Recorder COM Server
Page 98

Commonly Used Codecs
Morae Recorder
Help PDF
Page 96
www.techsmith.com
TSCC is optimized for desktop screen video, where video quality is important. There are many codecs
designed to compress real-world, or full motion video. Morae can take advantage of any standard codec.
TechSmith Screen Capture Codec (TSCC)
The TechSmith Screen Capture Codec (TSCC) is the default codec used for recording screen video. TSCC
compression is lossless and provides the highest quality and smallest file sizes for low-complexity screen
content, like typical office-style application content.
The TSCC does not compress video that includes a Picture in Picture (PIP) window or if you are recording a
user interacting with a game or a similarly graphic-intensive application well. In some cases, such as video
from a camera, the file sizes of the recordings may be close to that of an uncompressed video. We do not
recommend using TSCC to compress the webcam video in Morae.
Microsoft Video 1
Microsoft Video 1 is a standard video codec that comes with Windows and provides mid-range compression,
with a relatively small amount of quality loss.
Microsoft Video 1 is lossy and does not compress videos as well as some of the newer video codecs, such as
Microsoft Mpeg 4 V2 or, in some situations, TSCC. Using the image below, displayed in a video for 10
seconds, the TSCC compressed video was almost half the size of the video compressed with Microsoft Video
1 because TSCC is designed specifically for this type of content – mostly large, solid blocks of color. When
creating a 10 second video with the tree image used earlier, the TSCC compressed video was nearly 60%
larger than the Microsoft Video 1 compressed video.
Microsoft Mpeg 4 V2
The Microsoft Mpeg 4 V2 codec is very effective at compressing most types of video, but sometimes with
notable quality loss. This codec, however, often produces the smallest file sizes when working with real world
video, such as the tree image, or when recording applications with many gradients or dithered images.
Microsoft Mpeg 4 V2 is also ideal for any application that contains a lot of movement on the screen. However,
this codec’s results in lower quality. While this can be controlled through the quality settings, the loss may
sometimes be much more pronounced than a codec like Microsoft Video 1.
While Mpeg 4 V2 may have more quality loss than other codecs, it compresses well. When using Mpeg 4 V2
to compress a 10 second video of the tree image, the file size was 37% of the size of the TSCC compressed
video and 45% of the size of the Microsoft Video 1 compressed video. Mpeg 4 V2 is the ideal codec for real
world images, gradients and dithered images.
Unfortunately, Microsoft Mpeg 4 V2 is not always distributed within Windows. Most systems should have this
codec available for use but not all may. If Microsoft Mpeg 4 V2 is not listed as a codec on your system, it may
not be installed. Currently, Microsoft is not distributing a standard Video for Windows version of this codec, so
you cannot install the codec from Microsoft’s Web site. However, there are viable third party options that are
very similar to Microsoft Mpeg 4 V2, such as the DivX codec.
Page 99
DivX
Morae Recorder
Help PDF
Page 97
www.techsmith.com
DivX is an advanced codec created and distributed by www.divxmovies.com. DivX provides excellent
compression with great quality, comparable and often better than Mpeg 4 V2. For general information on this
codec, please visit:
DivX is an excellent alternative to those who do not have Microsoft Mpeg 4 V2.
http://www.divxmovies.com/codec/
DivX is not supported for the Web cam recording in Morae. DivX can only be used for the screen
recording.
See also:
• Full Motion Video Default Settings
• Lossless Video Default Settings
• Video Compression Setup Options
Full Motion Video Default Settings
Recorder: Machine Settings button
Manager: Present tab > File > Produce Highlight Video.
The Full motion video option is the best choice for recordings created by Recorder and videos produced by
Manager that contain a lot of real-world motion.
For example, use Full motion video if the recording includes a Picture and Picture (PIP) window or if you are
recording a user interacting with a game or a similarly graphic-intensive application. Although lossless
compression can be used with full-motion content, the resulting file sizes will be large. The Full motion video
option results in some loss of video and audio quality, but the recording/video file sizes are manageable.
If you produce a video using the Full motion video option, the resulting file is in WMV format and plays back in
Windows Media Player.
Recorder default codec settings for Full Motion video
CODEC TYPE RECORDING FILE COMPRESSION
Audio codec Windows Media Audio
Camera video codec Windows Media Video
Screen video codec Microsoft Video 1
Manager default codec settings for Full Motion video
CODEC TYPE VIDEO FILE COMPRESSION
Audio codec Windows Media Audio
Video codec Windows Media Video
See also:
• Commonly Used Codecs
• Lossless Video Default Settings
• Video Compression Setup Options
Page 100
Lossless Video Default Settings
Morae Recorder
Help PDF
Page 98
www.techsmith.com
Recorder: Machine Settings button
Manager: Present tab > File > Produce Highlight Video.
The Lossless video option is the best choice for recordings and videos that contain primarily typical officestyle application content. The Lossless video option uses the TSCC codec to compress screen video. TSCC
compression is lossless and provides the highest quality and smallest file sizes for low-complexity screen
content.
If you produce a video using the Lossless video option, you will create an AVI file that plays back in the Morae
Player and other media players if the TSCC codec is available on the computer used to play the video.
Recorder default codec settings for Lossless video
CODEC TYPE RECORDING FILE COMPRESSION
Audio codec Windows Media Audio
Camera video codec Windows Media Video
Screen video codec TSCC
Manager default codec settings for Lossless video
CODEC TYPE VIDEO FILE COMPRESSION
Audio codec GSM 6.10
Video codec TSCC
See also:
• Commonly Used Codecs
• Full Motion Video Default Settings
• Video Compression Setup Options
Video Compression Setup Options
Recorder: Machine Settings > Screen Video tab > Custom compression > Video Compression Setup
button
In the Video Compression Setup dialog box, you can change your screen video codec selection and adjust
compression quality and key frame rate. The contents of this dialog box may differ and certain options may be
disabled, depending on the screen video codec chosen. Additional configuration options for the codec may be
available by clicking the Configure button in the Video Compression Setup dialog box.
Each codec has unique configuration options. For more information about a particular codec’s options,
consult the documentation from the company providing that codec. The following table describes the Video
Compression Setup dialog box.
 Loading...