


AIR TITAN
EPO
Our m odel ki ts are su bject t o const ant qua lity ch ecks th rough out the p roduc tion pr ocess , and we si ncere ly
hop e that yo u are com plete ly sati sfied w ith the c onten ts of you r kit. Ho wever, w e would a sk you to c heck al l
the p arts be fore yo u start c onstr uctio n, refe rring t o the Par ts List , as we can not exc hange c ompon ents wh ich
you h ave alr eady mo difie d. If you f ind any p art is no t accep table f or any re ason, w e will re adily c orrec t or
exc hange i t once we h ave exa mined t he faul ty comp onent . Just se nd the of fend ing par t to our Mo del
Dep artme nt. Ple ase be su re to inc lude th e enclo sed com plain t form, d uly com plete d. We are c onst antly
wor king on i mprov ing our m odels , and for t his rea son we mu st rese rve the r ight to c hange t he kit co ntent s
in te rms of sh ape or di mensi ons of pa rts, te chnol ogy, mat eria ls and fi tting s, with out pri or noti ficat ion.
Ple ase und ersta nd that w e canno t enter tain cl aims ag ainst u s if the ki t conte nts do no t agree i n every
res pect wi th the in struc tions a nd the il lustr ation s.
AIR TITAN
Thi s is a soph istic ated ho bby pro duct an d is NOT a to y. It must alw ays b e ope rat ed with cau tio n,
com mon sen se and so me basi c mecha nical a bility. Thi s manu al pr ovi des i nstruct ion s as
the a ssemb ly, safe o per ati on and main tai nen ce of t his ho bby pro duct. I t is hi ghl y
rec ommen ded tha t you fol low and r ead ful ly the in struc tions a nd warn ings st ated in t his
man ual inc ludin g, safe ty, asse mbl y, set- up an d fly ing g uidelin es in o rde r to op erate thi s
pro duct co rrect ly and av oid dam age or se rious i njury.
1
2
3
4
5
6
7
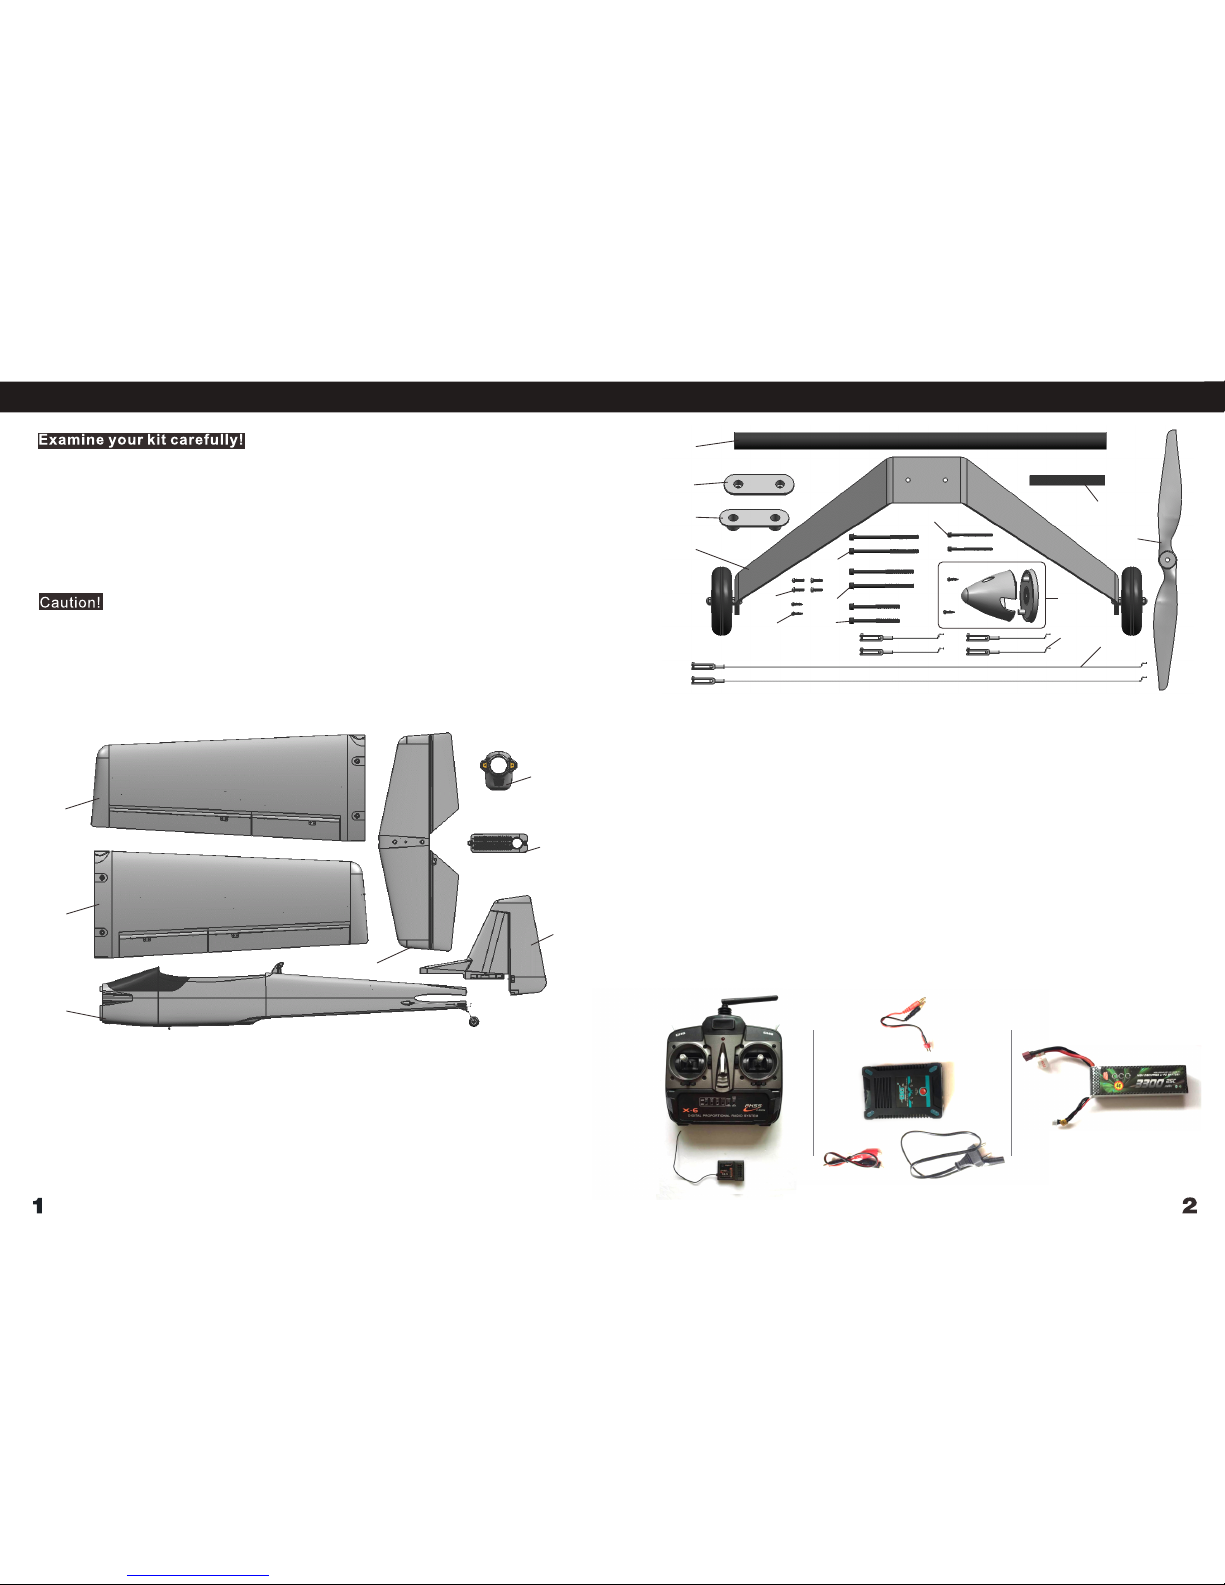
1. Fu selag e 1pc
2. R igh t wi ng 1 pc
3. L eft win g 1pc
4. E lev ato r 1p c
5. R udd er 1pc
6. Eq uipme nt cabi n 1pc
7. No se cove ring 1p c
8
9
10
11
12
13
14
15
16
17
18
19
20
21
22
8. Wi ng co nne cte d bat ten 1 1p c
9. Pl ast ic c ov er o f w ing t ra ili ng ed ge 1 pc
10. Pl ast ic co ver of w ing l ead ing e dge 1pc
11. W ing co nnec ted ba tte n2 1pc
12. L anding ge ar 1pc
13. S cre w( M3* 10m m) 4pcs
14. S cre w( M2 *14mm) 2pc s
15. S cre w( M4 *70mm ) 2pc s
16. S cre w ( M4* 65m m ) 2pc s
17. S cre w ( M4* 50m m) 2pc s
18. S cre w ( M3* 45m m) 2pc s
19. S pin ner 1pc
20. P ushr od1 4pcs
21. P ushr od2 2pcs
22. Pr ope ller 14* 7 1pc
The RTF include
AIR TITAN
RTF
AIR TITAN Specification
63 in (16 00 mm )
50.7 in ( 128 7 mm)
5.24 lb -5. 39 lb (23 80g -2450g)
SF147 0 pro p
AIR T ITAN 1600
160 0mm big t raine r that ca n take of f/l and ing on grou nd, w ate r and s nowf ield. I t's als o a good
pla ne for ni ght fly ing.I t has LED s ettin g.
1.A go od trai ner in ve ry big wi ngspa n 1600MM, wi th go od re sis tanc e eas y con tro l and c arry.
2.F usela ge main r eforc ement b atten c onstr uctio n,win g fixed c onstr uctio n,lan ding ge ar inst all
con struc tion, motor i nstal l const ructi on,an d tow sys tem con str uct ion ,th ey are a sso cia ted
ski llful ly and en sure th e stren gth of th e whole p lane.
3.U se the de sign of t ailwh eel air craft , and mat erial o f landi ng gear h ave bee n thick ened, ensur e
the s tabil ity and d urabi lity wh en take o ff and la ndi ng. M eanwhil e the t ail whe el lin ked with
rud der,an d can con trol we ll the fl ying st ance.
4.C an be eas ily cha nged to d iffer ent t aki ng off /la ndi ng mode, in clu din g gro und, snow fie ld an d
wat er.
5.Yo u can i nsta ll le d str ips o n pre-res erv ed sl ots f or night fl yin g. It 's ve ry eas y to op era te.
6.H as enou gh powe r to tow a gl ider wh ile fly ing. A tow const ruc tio n tha t cont rol led b y ser vo is
des igned .
7.W e use s imp le and reli abl e bol t way o f Batt ery cab in and se t at fuse lag e Abdo men ,it 's ver y
eas y to chan ge batt ery.
8.U se T-Mot or 35 20, ensure th e str ong p owe r of the p lane.
9.M ost of th e assem ble ste p have be en fini shed at f actor y,p eop le can enjo y the f lyi ng ve ry
eas ily. Sol id pa cka ging,si mpl e ass emb le,e asy fly ing, an d high co st perf orman ce, it' s reall y
goo d news fo r many mo del beg inner.
AIR TITAN
Battery
4S 14.8V 3300mAh
25C Li-Po
Mot or
AS3 520
KV 68 0
ESC
50A
Wit h BEC
Ser vos
17g s ervo
9g se rvo
Cha rger
B6 2 ce lls to 6c ells
Li- Po Char ger
Rec eiver
SR- 7
7-c hanne l recei ver
Tra nsmi tter
T-6 2. 4G
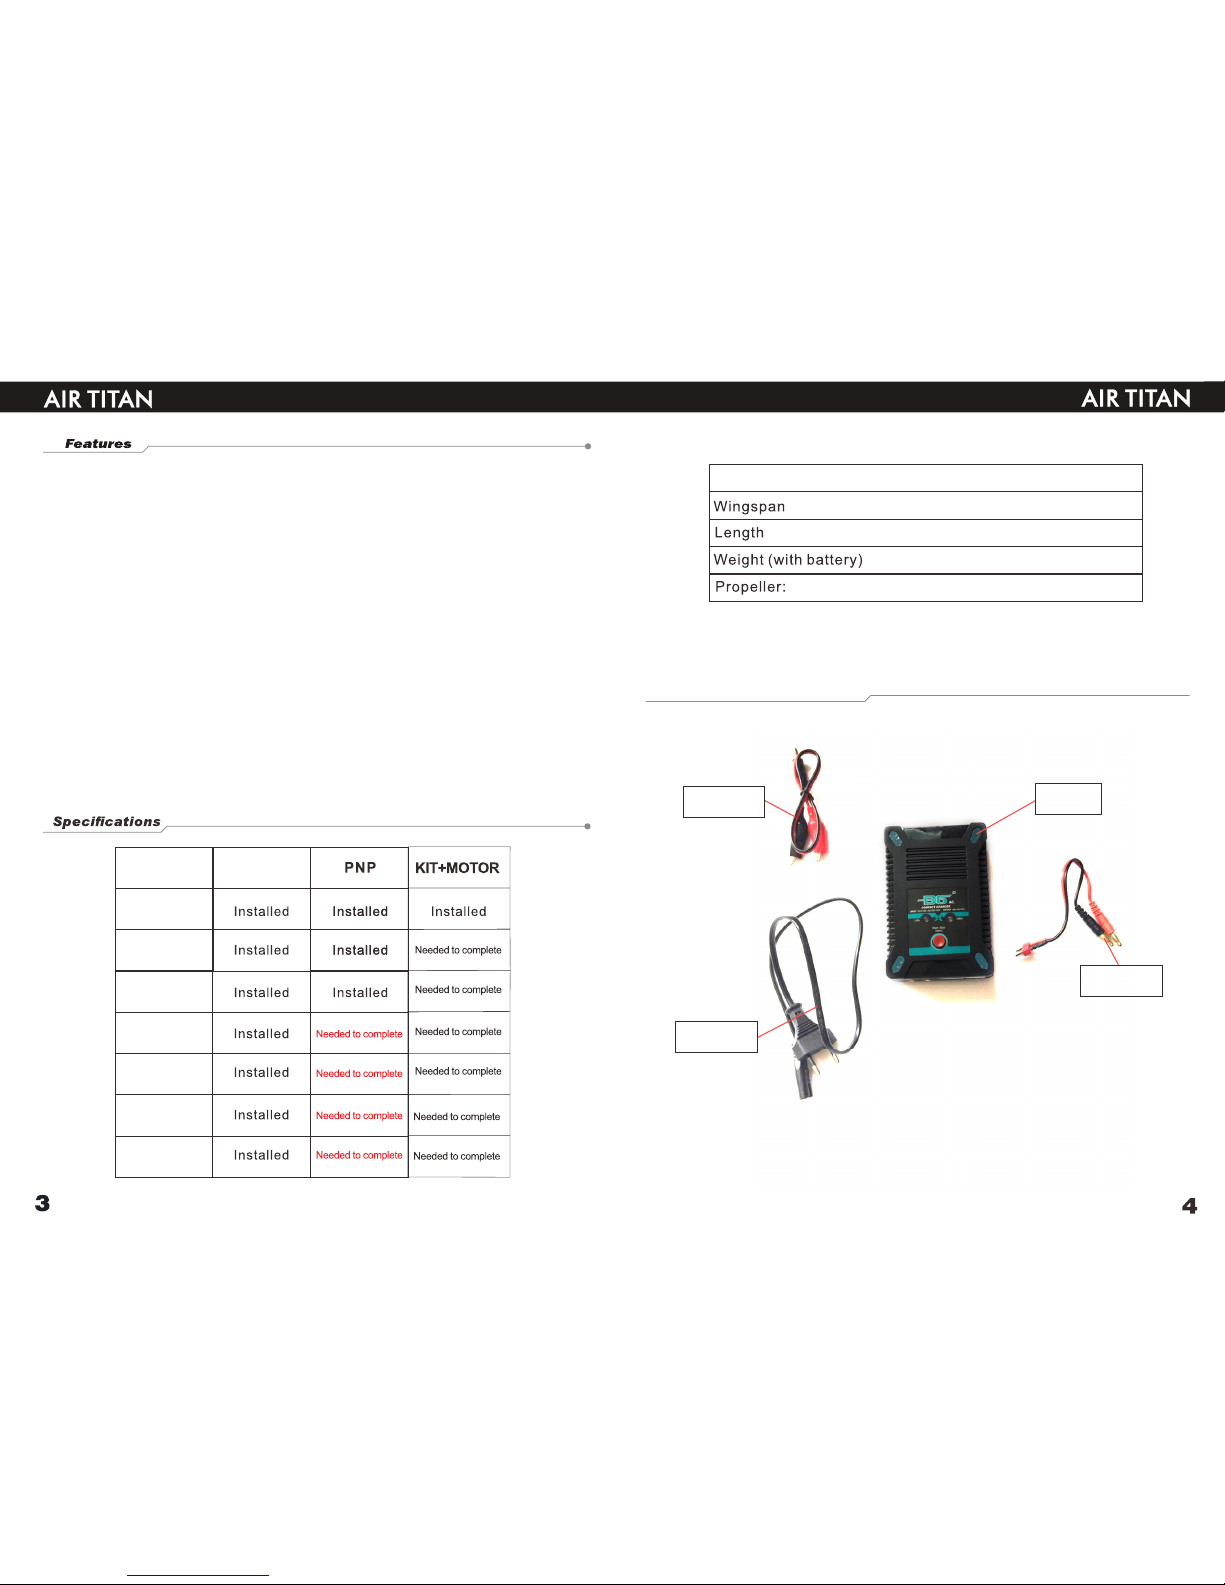
Charging the Fli ght Bat tery
DC In put cab le
AC In put cab le
Cha rger
Out put cab le
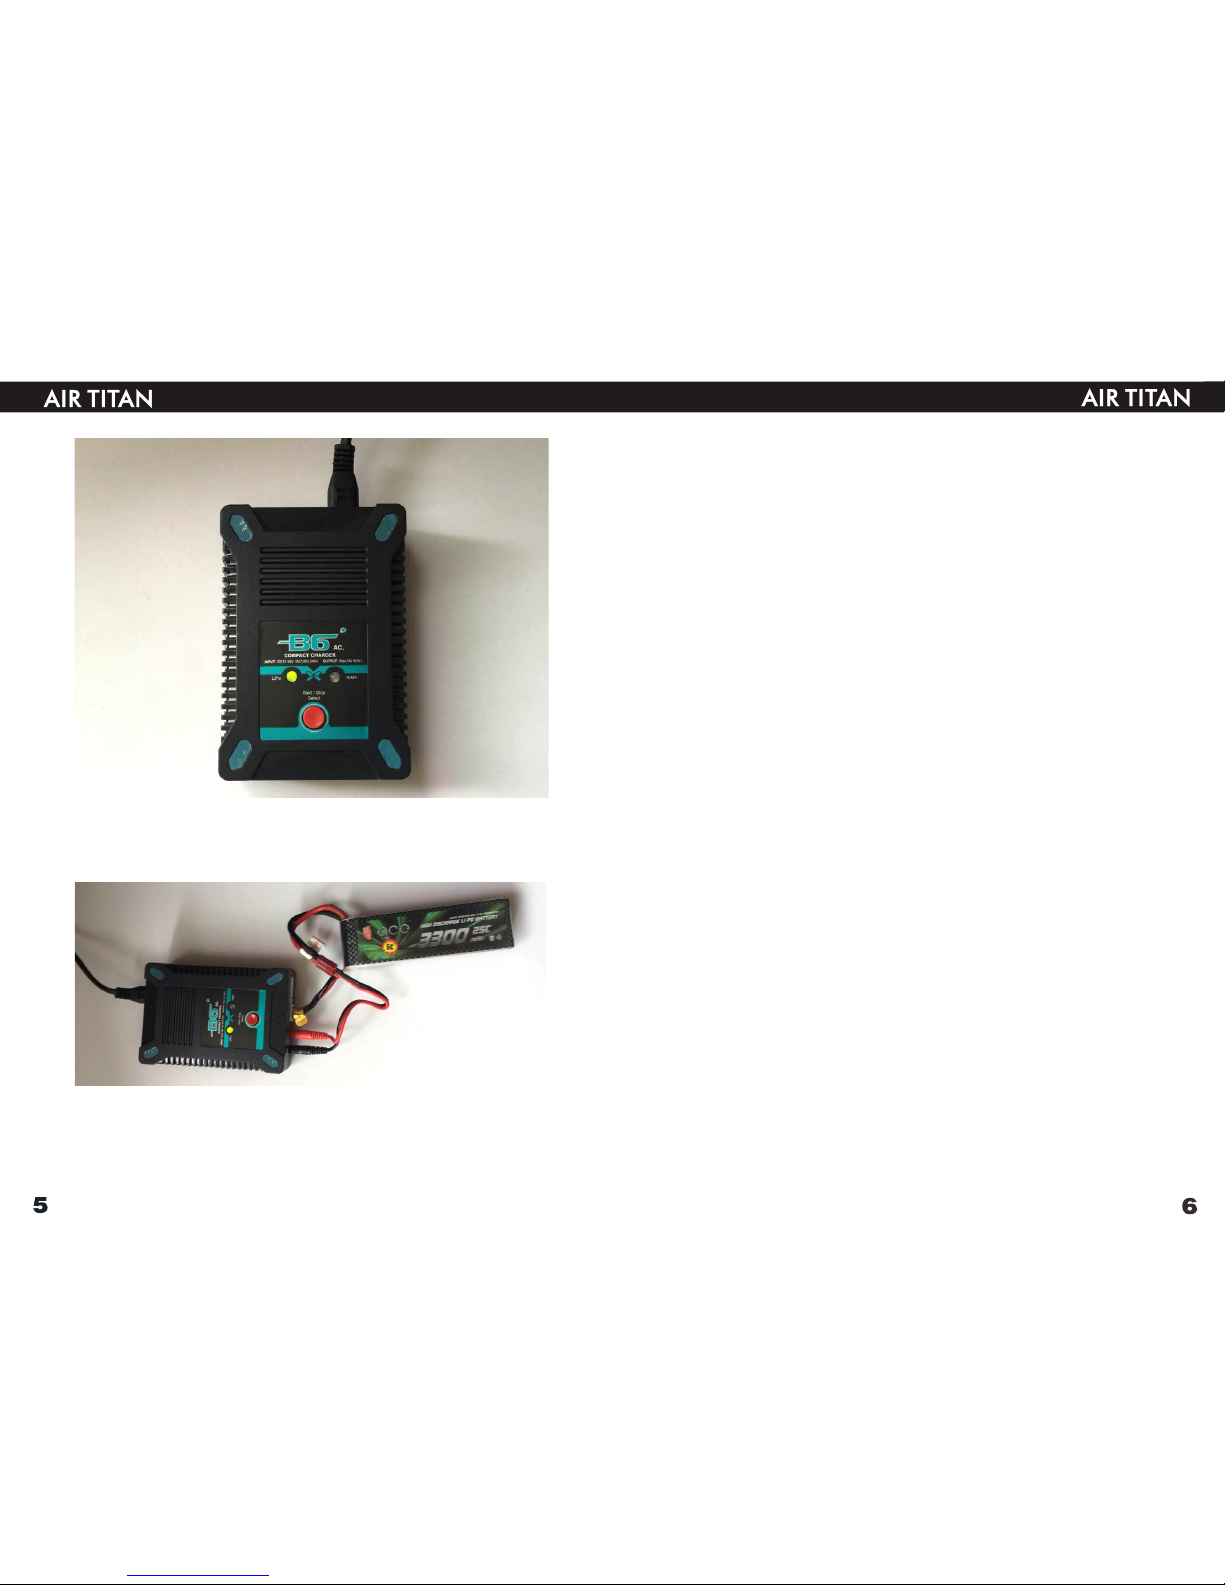
1.Con nec t tem por ary B 6 charger,t her e is on e LED g ree n light, cho ose b att ery
type th rou gh pr ess ing d own the red bu tto n,s wit ch tw o LED light br igh t. On ce
choos e Lip o,L ipo L ED li ght green; C hoo se Ni Mh, NiM h LED light gr een .
2.Con nec t the c har ger o f 4S battery p ack ,me anw hil e connect ou tpu t por t of
batte ry to c har ger t hro ugh output c abl e.P res s the r ed button an d loo se th e
butto n aft er LE D lig ht ch anged from g ree n to re d. Th e bat ter y is ch arging.
3.Whe n LED l igh t tur n fro m red to green ,4S b att ery p ack c harge comp let e.
CAUTI ON: W hen c onn ect ing the batt ery t o the b att ery c harger, mak e sur e the
two con nec tor s are c orr ectly orie nte d. Fa ilu re to d o so could cau se th e bat ter y
termi nal s to sh ort , res ulting in fir e, wh ich c oul d lea d to propert y dam age a nd
injur y.
Speci fic ati on
Opera tin g vol tag e ran ge: AC 11 0V-2 40 V, DC 11V- 18V.
Charg e pow er: 5 0Watts
Charg e cur ren t ran ge: 0 .5-5.0A
LiPo ba tte ry co nt: 2 -6 ce lls
NiMh ba tte ry co nt: 1 -15 c ells
Size: 130 mm * 9 0mm * 4 0mm
Wei ght: 355 g
Charg ing Wa rni ngs
·By handling , cha rgi ng or u sing the includ ed Li -Po b att ery, you as sum e all risks
assoc iat ed wi th li thi um batteri es.
·If at any time th e bat ter y beg ins t o balloon or s wel l, di sco ntinue use imme dia tel y.
If char gin g or di sch arg ing, disco nti nue a nd di sco nnect. Con tin uin g to us e, ch arge
or disc har ge a ba tte ry th at is balloo nin g or sw ell ing c an result in fi re.
·Always stor e the b att ery a t roo m temperat ure i n a dry a rea f or best results .
·Always tran spo rt or t emp ora rily store t he ba tte ry in a t emperature ra nge o f 40–
120º F (5 –49 º C). D o not s tor e battery or a irc raf t in a ca r or di rect sunli ght . If st ore d
in a hot ca r, the b att ery c an be d amaged or ev en ca tch fi re.
·Always char ge ba tte rie s away from flamma ble m ate ria ls.
·Always insp ect t he ba tte ry be fore charg ing a nd ne ver c harge dead o r dam age d
batte rie s.
·Always disc onn ect t he ba tte ry after cha rgi ng, a nd le t the charger coo l bet wee n
charg es.
·Always cons tan tly m oni tor the tempera tur e of th e bat tery pack while c har gin g.
·Never disch arg e Li- Po ce lls to below 3V und er lo ad.
·Never leave c har gin g bat teries unatte nde d.
·Never charg e bat ter ies o utside recomm end ed le vel s.
·Never attem pt to d ism ant le or a lter the cha rge r.
·Never allow m ino rs un der t he age of 14 to charg e bat ter y pac ks..
·Never charg e bat ter ies i n extremely hot o r col d pla ces ( recommen ded b etw een
40–12 0° F or 5 –49 ° C) or p lac e in direct su nli ght .

Trans mitte r
Mode 1
LED
CH5
Rudde r/
Eleva tor
Eleva tor
Tri m
Rudde r
Tri m
Throt tle
Tri m
CH6
Throt tle /
Ailer on
Ailer on
Tri m
Power
Switc h
Mode 2
LED
CH5
Rudde r/
Eleva tor
Eleva tor
Tri m
Rudde r
Tri m
Throt tle
Tri m
CH6
Throt tle /
Ailer on
Ailer on
Tri m
Power
Switc h
Insta lli ng th e Tran smi tter Batte rie s
Inser t inc lud ed ba tte ries in the tr ans mit ter
CAUTI ON: I f usi ng re cha rgeable ba tte rie s, ch arg e only recha rge abl e bat ter ies.
Charg ing n on- rec har geable bat ter ies m ay ca use t he batteri es to b urs t, re sul ting
in inju ry to p ers ons a nd/ or damage to p rop ert y.
CAUTI ON: D o not p ick u p the t ransmitt er by t he an ten na. D o not alter or p ut we igh t
on the an ten na. D ama ge to a ntenna par ts ca n dec rea se tr ansmitte r sig nal s tre ngt h,
which c an re sul t in lo ss of a ircraft co ntr ol, i nju ry or p roperty da mag e.
Fly control
For smo oth c ont rol o f you r aircraft , alw ays m ake s mal l control mo ves . All di rec tio ns
are des cri bed a s if yo u wer e sitting in t he ai rcr aft .
For exa mpl e, wh en th e air craft's no se is p oin tin g tow ard you, lef t ste eri ng (r udd er)
will tu rn th e air cra ft le ft (your rig ht wh ile h old ing t he transmi tte r).
Mode 1
Throt tvl e
Speed
Eleva tor
8

Rudde r
Ailer on
Model 2
Throt tle
Speed
Eleva tor
Rudde r
Ailer on

11
12
·Flyin g fas ter o r slo wer : When your ai rcr aft i s sta ble i n the air, push t he th rot tle
stick u p to ma ke th e air cra ft go faster, a nd pu ll th e thr ott le stick bac k to sl ow do wn.
The air cra ft wi ll cl imb w hen the thro ttl e is in cre ase d.
·Eleva tor u p and d own : Pus h the elevat or st ick f orw ard t o make the air cra ft go
down an d pul l the e lev ato r stick back t o go up .
·Steer ing r igh t and l eft : Move the rub ber o r ail ero n sti ck right to ma ke th e air cra ft
go righ t and m ove t he ru bbe r or aileron s tic k lef t to go l eft ( as if you are se ate d in
the coc kpi t).
Fligh t Trimming
Eleva tor t rim :
Only tr im th e air cra ft at h alf thrott le. W hen t rim med c orrectly, your aircraf t cli mbs
stead ily a t ful l thr ott le and will fly l eve l at ha lf th rot tle.
·When th e air cra ft' s nos e drifts up or d own w hil e the e lev ator stick i s at
neutr al (c ent ere d) po sition, pu sh th e ele vat or tr im button by o ne or t wo “b eep ”
incre men ts OP POS ITE t he directi on of d rif t.
·Adjus t tri m so th e air cra ft fl ies strai ght a nd le vel w hen t he elevato r sti ck is
neutr al.
Rudder trim:
·When th e air cra ft dr ift s left or righ t whi le th e rud der s tick is at the n eut ral p osi tio n
(cent ere d), p ush t he ru dder trim bu tto n by on e “be ep” i ncrement s OPP OSI TE th e
direc -ti on of d rif t.
·Adjus t tri m so th e air cra ft flies stra igh t whe n the c ont rol stick is n eut ral .
Aileron Trim
·When th e air cra ft ro ll le ft or right wh ile t he ai ler on st ick is at the ne utr al po sit ion
(cent ere d), p ush t he ai leron trim b utt on by o ne “b eep ” incremen ts OP POS ITE t he
direc -ti on of d rif t.
Steps of ASS EMBLY
1
12
17
1.Ins tal l the l and ing g ear on corre spo ndi ng sl ot of f uselage, a nd fi x wit h two p cs
screw s.

1413
2.Ins ert e lev ato r and r udder on the c orr esp ond ing s lot of fusel age ,me anw hil e
ensur e to in ser t the t ail w heel steel w ire t o the c orr esp onding slo t of ru dde r, and
fix wit h two p cs sc rew.
5
1
18
4
3.Tak e out 2 thread from w ing (th e fem ale head whi ch co nne ct th e air leon and
flap wi ng)
4.Ins ert t he th rea d of ai rleon serv o and f lap s erv o int o the corres pon din g slo t of le ft
wing, a nd pu t the s erv o on th e slot.
5.Fix t he ai rle on se rvo a nd flap serv o on le ft wi ng wi th sc rew.

15
16
6.Cro ss pu shr od1 o n ser vo arm.
20
20
3
20
20
7.Fix t he pu shr od 1 se rvo a rm on the serv o, pu t one h ead p las tic clip of pu shr od1
and fix o n ser vo wi th sc rew.
8.Co nnect the airleon servo thread and flap servo thread(male head) to correspondin g
fema le head.
9.Ins ert t he co nne cte d thread int o the c orr esp ond ing slot.
10.Re pea t the l eft w ing i nstallat ion s tep s fro m 3 to 9, a nd install r igh t win g wel l.

17
18
2
3
8
11
11.C onnect right an d lef t win g thr ough wing co nne cte d bat ten
12.In sta ll el eva tor s ervo and rud der s erv o in th e cor respodin g slo t of fu sel age w ith
screw.
13.Cr oss p ush rod 2 on se rvo harm.
14.Pu t and f ix th e ser vo ar m with pushr od2 o n ser vo.
21
5
15.In sta lle d one c lip h ead of pushr od2 o n rud der s erv o arm, fix on ru dde r wit h scr ew.

19
20
21
4
16.In sta lle d one c lip h ead of pushr od2 o n rud der s erv o arm, fix on ru dde r wit h
screw.
1
13
17.Fi x the m oto r on th e mot or mount wit h scr ew.
7
14
18.Pu t and i nst all t he no se coverin g on th e nos e wit h scr ew.
19.Pu t the E SC on t he ba tte ry renforc eme nt pl ate ,fi x with velcr o str ap.
20.C onnec t the three thread power line to ESC three thread, after connection,please
chec k if the moto r positive inversion, if by reversal way, pull up arbitrary two thr ead of
them , reconnect after excha nging ,ensu re the right direc tion of motor rota tion.

21
22
21.In ser t all s erv o wir es and esc sig nal l ine s to co rre spoding ch ann el of r adi o in tu rn.
22.In ser t the r adi o int o the fusela ge.
7
22
19
23.Fi x the p rop ell er on t he motor wit h scr ew,a nd th en fi x the spinne r wit h scr ew.
24.In ser t the c onn ect ed plug on the r igh t and l eft w ing t o socket on PC B of fu sel age .
2
3
10
9
15
16
25.Fi x the w ing o n fus ela ge with scre w.

23
24
26.Pu t the b att ery o n bat tery plate a nd fi x wit h vel cro s trap.
1
6
27.Pu t the e qui pme nt ca bin on the cor res pon din g of fu selage
Connect the Flig ht Batt ery
1.Low er th e thr ott le
stick a nd th rot tle
trim to t hei r low est
setti ngs a nd po wer
on your t ran smi tte r.
2.Con nec t the fl igh t
batte ry to t he ai rcr aft
2.Immo bil e for 5 s eco nds . Series of to nes .
CAUTI ON: Al way s kee p han ds away from t he pr ope lle r. Whe n armed, the m oto r wil l
turn th e pro pel ler i n res ponse to any t hro ttl e mov eme nt.
CAUTI ON: Al way s dis con nect the Li- Po fli ght b att ery f rom the airc raf t rec eiv er wh en
not flyi ng to a voi d ove r dis charging t he ba tte ry. Ba tte rie s dis charged to a v olt age
lower t han t he lo wes t app roved volt age m ay be com e dam aged, resu lti ng in l oss o f
perfo rma nce a nd po ten tial fire whe n bat ter ies a re ch arged.
Control Surfac e Test
1. Powe r on th e tra nsm itt er.
2. Inst all a f ull y cha rge d flight batt ery a nd al low t he ai rcraft's E SC to i nit ial ize .
MODE 2
MODE 1
Test t he Elevator
MODE 1 MO DE 2

25
26
·Test your E lev ato r con tro l by moving yo ur el eva tor s tic k down and up. M ake
sure th at th e ele vat or re sponds acc ord ing t o the i llu stration s.
Test t he Ai ler on
·Test your Ail eron co ntro l by moving your ai lero n stick down and up . Make sure
that the aile ron respond s accor ding to the illu strations.
Test the Rudder
·Test your r udd er co ntr ol by m oving your r udd er st ick l eft a nd right. Ma ke su re
that th e rud der r esp ond s accordin g to th e ill ust rat ions.
Test t he flap
Make su re th at th e rud der r esponds ac cor din g to th e ill ustratio ns.
Test t he Schlepp
Make su re th at th e rud der r esponds ac cor din g to th e ill ustratio ns.
Centre of Gravit y
CG:85 -95 MM

27
28
The cen tre o f gra vit y (CG ) should be at a p osi tio n of 85 mm- 95mm away fr om
leadi ng ed ge, Ple ase r efer to abov e pic tur e.
Safet y
Safet y is th e Fir st Co mma ndment whe n fly ing a ny mo del a ircraft.
Third p art y ins ura nce s hould be con sid ere d a bas ic es sential. I f you j oin a
model c lub s uit abl e cov er will usua lly b e ava ila ble t hrough the o rga nis ati on.
It is you r per son al re spo nsibilit y to en sur e tha t you r insuranc e is ad equ ate .
Make it y our j ob to k eep y our m odels and yo ur ra dio c ont rol s ystem in per fec t
order a t all t ime s. Ch eck t he correct c har gin g pro ced ure for the ba tte rie s you
are usi ng. M ake u se of a ll se nsible saf ety s yst ems a nd pr ecaution s whi ch ar e
advis ed fo r you r sys tem . An excellen t sou rce o f pra cti cal access ori es is t he
main ca tal ogu e, as o ur pr oducts are d esi gne d and
Techon e Hobby
manuf act ure d exc lus ively by pra cti sin g mod ell ers for othe r pra cti sin g
model ler s.
Alway s fly w ith a r esp ons ible attit ude . You may t hin k tha t flying low o ver
other p eop le' s hea ds is p roof of your p ilo tin g ski ll; o thers know b ett er. Th e
real ex per t doe s not n eed t o prove hims elf i n suc h chi ldi sh ways. Let o the r
pilot s kno w tha t thi s is wh at you think t oo.
Alway s fly i n suc h a way t hat y ou do not enda nge r you rse lf or o thers. Bea r in
mind th at ev en th e bes t RC sy stem in the wo rld i s sub jec t to ou tside
inter fer enc e. No m att er how many ye ars o f acc ide nt- free flyin g you h ave
under y our b elt , you h ave n o idea what wi ll ha ppe n in th e nex t minute.
The
team - ho pe yo u hav e man y hou rs of pleasu re
Techon e Hobby
build ing a nd fl yin g you r new model.
Wing
Fusel age
rudde r
nose co ver ing
Main la ndi ng ge ar
Spinn er
tail wh eel
wing co nne cte d bat ten
Plast ic co ver o f win g
servo h orn
Plast ic cl ip
Equip men t cab in
PCB
Auxil iar y lan din g gea r(used for )
float
Skid fo r sno wfi eld
Stabi liz er
Equip men t cab in
pushr od se t

29
Motor:3 520 K V68 0
9g micr o ser vo
Batte ry: 1 4.8 V 4S 33 00m Ah Li-po 25C
ESC : 50A mp
Prope lle r: 14 *7 SF p rop
2.4G Ra dio
Charg er
Servo : 17g m icr o ser vo
Notes
30
 Loading...