

TT-KS S
TT-KS N
TT-KS H
Installation and technical manual
Electric Combination Heaters TT-KS
GB
2
3
THESE INSTRUCTIONS SHOULD BE READ CAREFULLY AND RETAINED FOR FUTURE REFERENCE.
BE SURE TO OBSERVE ALL LABELS AND WARNINGS ON THE APPLIANCE.
Edition:07/15
Id_Nr. 911 360 950
2
Manual TT-KS
GB
1. Safety Information
Electrical Connections:
The wires in the mains leads are colored in accordance with the following code:
GREEN & YELLOW: EARTH
BLUE: NEUTRAL
BROWN: LIVE
WARNING – THIS APPLIANCE MUST BE EARTHED
The installation of this appliance should be carried out by a competent electrician in
accordanc e wi th I.E.E. Regulations for Electrical Equipment.
The radiator is fitted with a standard UK 3 pin plug or EURO plug that can be directly
connected to an e lectr ical sock et. Care must be taken when connecting radiators in this way
not to overload the ring main circuit. If you are unsure contact a qualified electrician.
Alternatively the mains cable can be cut to length and connected to a suitable fused 20 amp
double-pole switched spur adjacent to the radiator. Please ensure that the electricity supply
is disconnected prior to using this installation method.
Each supply circuit to the radiator must incorporate a Fused 20 Amp double pole
switched spur having a contact separation of at least 3mm.
1.2 Handling
This radiator is very heavy. Take adequate precautions when lifting and maneuvering it. Always
assess the load, and seek assistance with heavy or awkward loads that are beyond your
capabilities.
1.3 Positioning
This radiator is very heavy. Please refer to Technical Data information contained within this
document. In order to maintain stability and to ensure its future safety in use, it is essential
that the radiator is FIXED SOUNDLY TO A WALL and that the brackets are mounted on a
FIRM, LEVEL SURFACE. Castors or Feet can be purchased as an accessory. Care should be
taken to avoid irregular surfaces.
It is important that the following instructions are strictly followed.
Keep the following minimum safety distances to avoid fire risk due to high surface
temperatures of the appliance during heating cycles:
Lateral heating walls – masonry ................................................. 50 mm
Lateral heating walls – combustible ma t ter ................................ 100 mm
Heating walls above floo r ............................................................ 80 mm
Cover plate – combustible covering installed on top of it .......... 150 mm
Cover plate – non-combustible covering installed on top of it .. 100 mm
3
Manual TT-KS
GB
• Please note that our IPX4 rated models should be used in bathrooms.
• Portable radiators must not be fitted in bathrooms or wet areas.
• CAUTION – This radiator must not be located below or in front of a fixed socket outlet.
• DO NOT POSITION under windows where curtains may contact the radiator.
• DO NOT PLACE THE APPLIANCE in the vicinity of a swimming pool.
It is important that the fixing device chosen is appropriate t o the wall material to which the
radiator is being fixed. Some modern internal building materials are very low density block
and require specialized fixing devices to provide a safe, secure installation.
• CAUTION – If during any reassembly of the radiator, a part of the thermal insulation
shows damage or det erior ation which may im pair safety; it should be replaced wit h an
identical part.
• CAUTION – In order to avoid overheating, do not cover the radiator.
• DO NOT COVER OR OBSTRUCT the surfaces of the appliance.
• DO NOT PLACE OBJECTS in contact with the radiator
2.0 General Information
TECHNOTHERM Combination Electric radiators have been designed using the latest
technology to create an elegant solution for all hard to heat situations. They can be installed in
almost any location apart from the safety restrictions noted in this manual.
The range has been developed to provide a flexible solution for electric heating in Domestic
properties, Conservatories, Holiday homes, Offices and any other temporary heating
situation.
Our unique patented ’Magmatic’ heating tablets provide the heat source for your new
radiator. Whilst the radiator is classed as a 100% efficient Direct Acting appliance, the
heating tablets provide partial storage to prolong your heating comfort and to reduce
running costs. The radiator has a robust body which incorporates a spot welded high fin
surface area to ensure that there are no contraction noises during the heating cycle. The
high fin design boasts 6 times the normal radiator surface area to provide a balance of
Convection and Radiant heat for your added comfort.
The radiators can be simply plugged in to a “standard” socket or “hard” wired to an existing
spur connection. The range has the flexibility of being W all mounted or free standing on
Castors or Feet.
For added versatility we can supply Conservatory radiators w hi c h a re also ideal for use below
windows with low sills.
All our standard model sizes are supplied with a E4 manual room thermostat. In addition to
the above we also supply Radio Frequency controlled radiators which provide all the
benefits of the standard version however the control wiring is eliminated. These models
can be controlled by our digital transmitter TBF or TPF.
All TECHNOTHERM radiators are manufactured to the highest safety and quality
Standards. Each radiator is CE Marked and carries all the necessary European Approvals.
Each radiator is fully checked and tested prior to leaving the factory and as such is packed
with full Quality certification.
4
Manual TT-KS
GB
We hope you enjoy the comfort provided by this superior product and we look forward to
being of assistance to you in the future.
3.0 Preparation
1. Before beginning, remove the radiator and parts from the box and check everything is
present and correct. In addition to the radiator body, there should be a top grille, a pair of
mounting brackets, four suspension hooks, a set of mounting screws/ plugs and an
instruction manual.
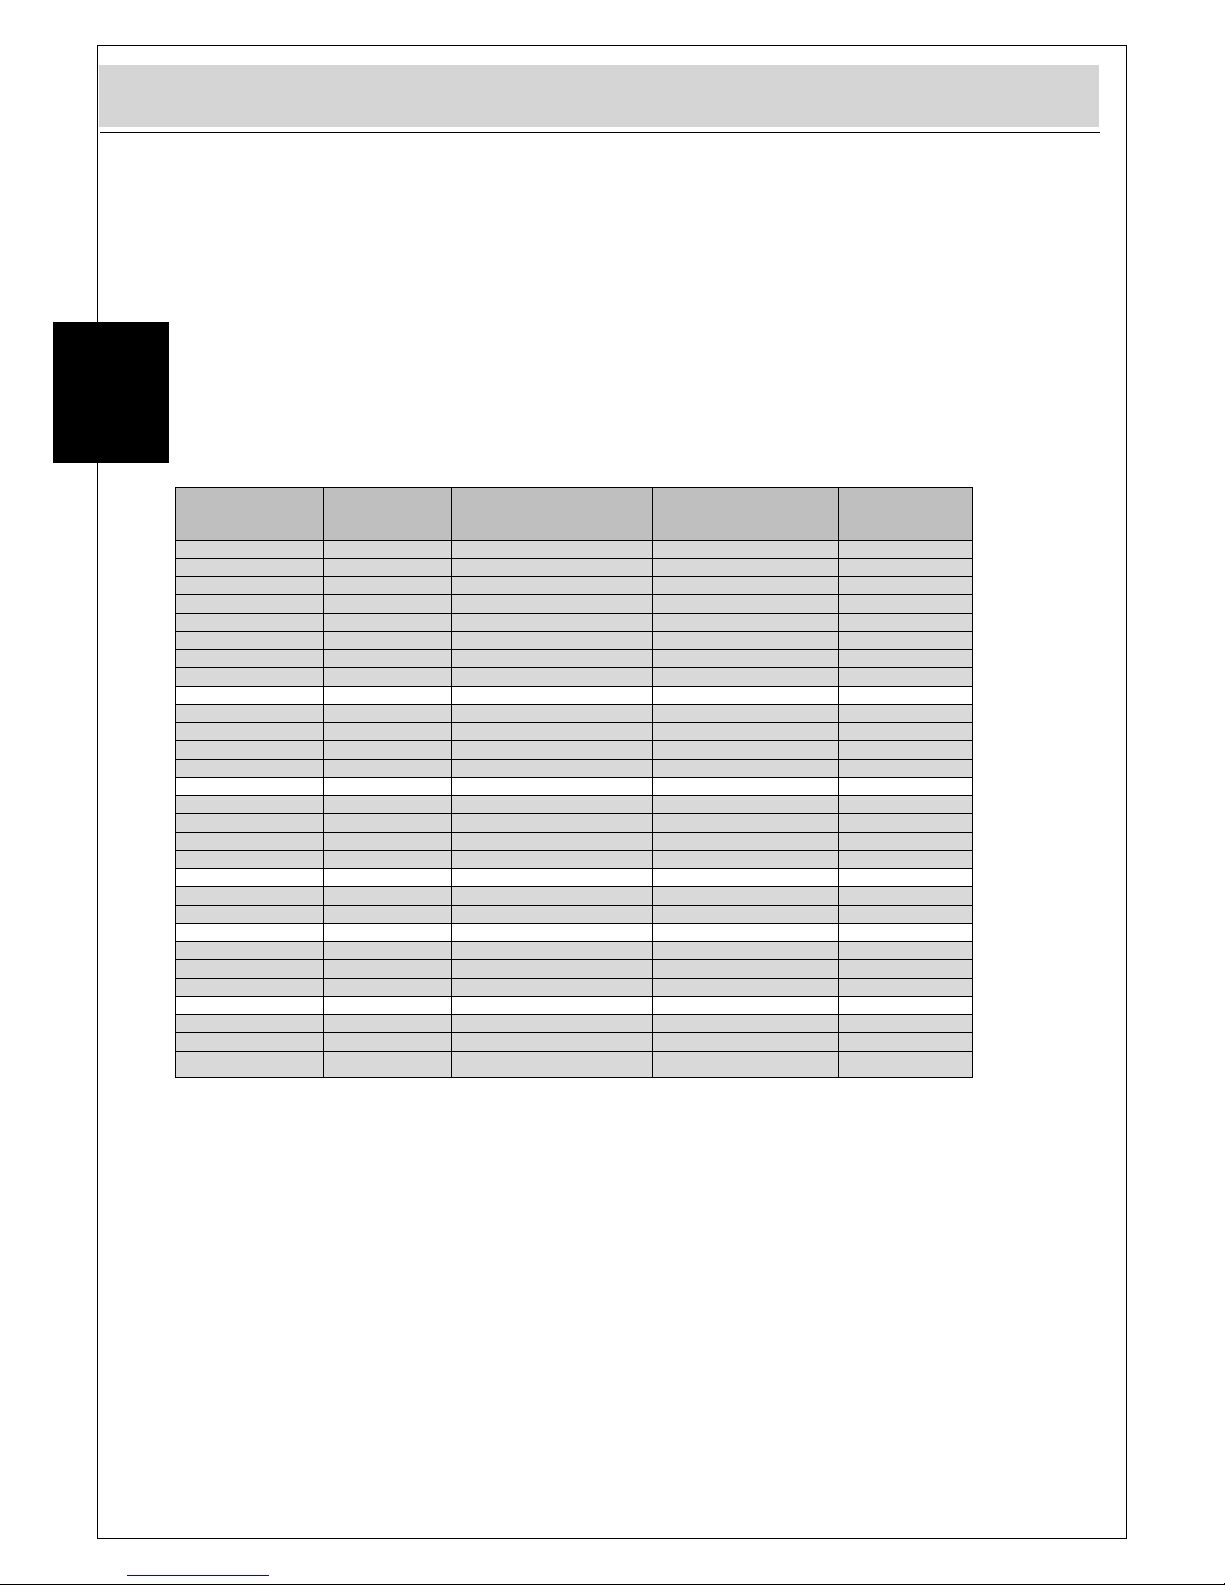
2. Mark the bracket positions on the wall according to the following diagrams
Model
Power
[Watt]
Dimensions
[cm]
Distance of drill holes
[cm]
Protection
class
TT-KS 500 S
500
38 x 63 x 7
20
IP 20
TT-KS 1000 S
1000
68 x 63 x 7
50
IP 20
TT-KS 1200 S
1200
68 x 63 x 7
50
IP 20
TT-KS 1500 S
1500
98 x 63 x 7
80
IP 20
TT-KS 1800 S
1800
98 x 63 x 7
80
IP 20
TT-KS 2000 S
2000
128 x 63 x 7
110
IP 20
TT-KS 2400 S
2400
128 x 63 x 7
110
IP 20
TT-KS 2800 S
2800
158 x 63 x 7
140
IP 20
TT-KS 500 S X4
500
38 x 63 x 7
20
IP 24
TT-KS 1000 S X4
1000
68 x 63 x 7
50
IP 24
TT-KS 1200 S X4
1200
68 x 63 x 7
50
IP 24
TT-KS 1500 S X4
1500
98 x 63 x 7
80
IP 24
TT-KS 800 N
800
68 x 34 x 7
50
IP 20
TT-KS 1200 N
1200
98 x 34 x 7
80
IP 20
TT-KS 1600 N
1600
128 x 34 x 7
110
IP 20
TT-KS 2000 N
2000
158 x 34 x 7
140
IP 20
TT-KS 800 N X4
800
68 x 34 x 7
50
IP 24
TT-KS 1200 N X4
1200
98 x 34 x 7
80
IP 24
TT-KS 1200 H
1200
38 x 124 x 7
20
IP 20
TT-KS 1800 H
1800
55 x 124 x 7
37
IP 20
TT-KS 2200 H
2200
68 x 124 x 7
50
IP 20
TT-KS 1200 H X4
1200
38 x 124 x 7
20
IP 24
HR 1200 KSB
1200
38 x 124 x 7
20
IP 24
HR 1200 deluxe 1200
52 (64) x 102 x 8,5 (14)*
43,5 IP 24

5
Manual TT-KS
GB
Note: The height of the bracket to the floor is the same height as the bottom of the radiator to
the floor.
Rad. Length
[cm]
Bracket separation
[cm]
38
55
20
37
68
50
85
67
98
80
128
110
158
140

6
Manual TT-KS
GB
3.1 Wall fixture and fittings
Drill, plug, and secure the brackets to the wall. Appropriate fixtures must be used
depending on the wall material:
Solid brick/High density block walls
These must be drilled and plugged with the Raw plug No. 10 size fiber inserts provided. The
correct size of drill (5.5mm) should be used and the hole should be drilled to a depth of 8
mm greater than the length of the Ra w plug so that the fixing is made below the plaster
layer.
Low density block walls
A special fixing, such as Unifix LB70 should be employed, following closely the
manufacturer’s instructions.
Paneled internal walls
It is preferable to locate the studding and use the No.10 size woodscrews provided. Where
it is not possible to locate the studding use Hollow wall anchors and securely fasten the
brackets to the plasterboard when this method is used we recommend that radiator feet are
used to take the full weight of the radiator. For other wall materials the wall panel
manufacturer s hould be consulted for details of suitable wall fixing devices.
Note: Radiators will be set to an approximate height of 185mm from the floor when support
feet are used.
Fit the two small suspension hooks into the bottom slots in the brackets, and hang
the bott om of the rad iator on them. Make s ure the radiator is sitting right back on the hooks
and not just resting on the fins
.
Fit the other two large suspension hooks in the top
slots of the brackets, and lift them up. Push the
radiator back against the wall and drop the suspension
hooks back down to lock it in position.
The top grille of the radiator can then be fitted and
secured with the securing screws at each end.

7
Manual TT-KS
GB
At the bottom of the radiator, next to the mains
connection there is a small temperature sensor.
Loosen the gland and pull the sens or do wn by 50 - 70
millimeters, then re-tighten the gland. This enables the
radiator to gauge the room’s temperature more
accurately
Installation of model:
HR 1200 deluxe
Note: “It is not allowed to mount the heater in front of a socket-outlet”
3.2 Electrical connection
All TECHNOTHERM TT-KS radiators come with a standard UK 3 pin plug that can be
directly connected to an electrical socket. Alternatively the mains cable can be cut to length
and connected to a suitable Fused 20 Amp double-pole switched spur adjacent to the
radiator. Please ensure that the electricity supply is disconnected prior to using this
installation method. The mains plug should be discarded safely and not re-used.

8
Manual TT-KS
GB
3.3 Radio frequency – wired versions model E4
The regulation of the desired
room temperature implements
a built-in temperature control
device.
position 0 : OFF
position 1 : approx. 5°C (frost
protection)
position 4 : approx. 20°C
position 6 : approx 30°C
An illuminated display indicates
the heating process of the
radiator.
CAUTION - After completion of works all electrical connections should be tested for
tightness. Addit ionally an electrical safety check should be carried out ie: short circuit, earth
continuity, resistance to earth and polarity check and all the relevant test certificates
produced.
3.4 Radio frequency – RF models
All Radio Frequency radiators come complete with a pre-wired TRF Receiver which is
controlled by either the TPF or TZF control.
TPF transmitter installation
a Follow the instructi on s outlined on page 27 for single radiator installations according
to the instructions included in the TPF transmitter packaging.
b Locate the TPF programmer on a suitable wall in the same room as the
radiator.
TBF digital transmitter installations
a Follow the information according the instruction in the TBF packaging.
b Locate the TBF digital room thermostat on a suitable wall in the same room
as the radiator.
c Configure the TBF digital room thermostat and TRF receiver located on the
radiator according to the instructions included in the TBF packaging.
d Set the required temperature by adjusting the +/- buttons.

9
Manual TT-KS
GB
CAUTION – After completion of works all electrical connections should be tested for
tightness. Addit ionally an electrical safety check should be carried out ie: short circuit, earth
continuity, resistance to earth and polarity check and all the relevant test certificates
produced.
3.5 Installing castors and feet
All radiators are supplied with wall mounting brackets, however with the exception of the
Towel Rail they can also be mounted on feet or cast or s . C onsu lt t he leaflet which comes with
them for fixing instructions. If not fixed to a wall, the official feet or castors must be used.
4.0 Operating safety
This appliance complies with the European Standards EN 60 335-1, EN 60 335-2-61, EN
61000-3-2, EN 61000-3-3, EN 55014 and EN55104 for Safety & Electromagnetic
Compatibility. These standards cover the requirement of the EMC Directives 89/336 & 73/23
RADIATOR POSITIONING - A m inimum c learan ce of 150mm t o t he f ront of the radiat or is
essential for safety, however to enable the radiator to attain its maximum performance
ensure that any furniture or other obstruction is not placed closer than 250mm.
THESE INSTRUCTIONS SHOULD BE READ CAREFULLY AND RETAINED FOR FUTURE
REFERENCE
CAUTION - THE SURFACE OF THIS RADIATOR CAN BE HOT.
The surface temperatures of this radiator are within the requirements of EN60-335 the
European Standard covering the safety requirements of electric heating appliances, and
momentary contact with any part of the radiator should not cause injury.
However, in order to be effective, radiators of any type do get hot, especially around the air
outlet grille.
Therefore, if aged or inf irm persons, or young childre n, are likely to be left unsupervised in
the vicinity of a radiator precautions should be taken to ensure that prolong ed contact with
the radiator cannot occur. We recommend t hat a guard is fitted aroun d the rad iator, as is
normal with some types of heating appliances in similar circumstances.
CAUTION - IN ORDER TO AVOID OVERHEATING, DO NOT COVER THE SURFACES
OF THE RADIATOR AND DO NOT OBSTRUCT AIR OUTLET GRILLES.
Surfaces of the radiator should not be covered or obstructed as this can cause excessive
temperatures that can be hazardous and may cause safety cut-outs to operate. For
example, do not put clothes, fabrics or any combustible materials on the radiator or allow
curtains to come within 75mm (3”) of the top and ends of the radiator. Do not allow furniture
to be pushed up against the radiator. A mi nimum clearance of 150mm is critical for safety,
however to ensure radiator performance is not affected a clearance of 250mm is
recommended.
DO NOT PLACE OBJECTS IN CONTACT WITH THE RADIATOR
CAUTION – The radiator must not be located below or of in front of a socket outlet.
PLEASE NOTE: THIS RADIATOR IS HEAVY AND MUST BE SECURELY FIXED TO A
SOUND WALL.

10
Manual TT-KS
GB
No attempt should be made to move the radiator without first seeking specialist advice. If you
are not happy that the radiator has been securely fixed, please inform your installer.
UNDER NO CIRCUMSTANCES SHOULD YOU ATTEMPT TO MOVE THE RADIATOR OR
LOOSEN WALL FIXINGS WITHOUT TAKING THE NECESSARY ADVICE.
DO NOT SIT OR STAND ON THE RADIATOR.
DO NOT SPILL LIQUIDS ONTO THE APPLIANCE. IF YOU DO, SWITCH THE RADIATOR
OFF AND GET A QUALIFIED ELECTRICIAN TO CHECK IT.
DO NOT POKE OBJECTS THROUGH THE GRILLE.
DO NOT PLACE OBJECTS IN THE SPACE BEHIND THE RADIATOR.
DO NOT USE POLISHES ON THE RADIATOR OR ON FURNITURE NEAR TO IT.
The hot interior of the radiator can produce paraffin smells from polish vapours which may
last for a number of hours. In c ase of breakdown or other failur e, switch of f the radia tor at
both wall switches and contact your supplier or the LHZ Help Desk on +49 (0) 3722 63370
Always ensure that the radiator is switched off at the wall and fuse is removed before any
repair is carried out.
IMPORTANT - Due to the newness of the materials the radi ator will pr oduc e a slight smell for
the first few days of operation.
ROOMS MUST BE WELL VENTILATED AND YOUNG CHILDREN, CAGED BIRDS OR
PERSONS WITH RESPIRATORY COMPLAINTS MUST NOT REMAIN IN CLOSE
PROXIMITY TO THE RADIATOR DURING THE FIRST 48 HOURS OF THE
COMMISSIONING PERIOD.
Running the radiator at maximum temperature for the first few days will help to dispel any
smells more quickly.
Please note that at high setting the room temperature will be warmer with a corresponding
increase in running costs.
Safety - Overheat Protection
For your safety, this appliance is fitted with thermal cut-outs. In the event that the product
overheats, the cut-outs switch the radiator off automatically. In the event of these safety cutouts activating please inform the installer or the LHZ Help Desk.

11
Manual TT-KS
GB
Cleaning
To maintain the external appearance of the radiator it need only be wiped over occasionally
with a dry duster. During the summer months, or at other times when the applian ce is not is
use and is completely cold, the opportunity should be taken to wipe over with a damp cloth.
Do not use abrasive cleaning powders or furniture polish. Discoloration of wall finishes can
sometimes occur immediately above a radiator due to the properties of some paints and
decorating materials or the presence of environmental impurities in the air (such as soot or
incense generated from the burning of candles etc.).
Lucht LHZ Elektroheizung GmbH & Co. KG
Obere Hauptstr. 61
D-09232 Hartmannsdorf
Fon: +49 (0) 3722 63370
Fax: +49 (0) 3722 633720
E-mail: info@technotherm.de
web: www.technotherm.de
Stand: 11/13
TECHNOTHERM Service:
Fon: +49 (0)911-93 78 32 10
 Loading...