

Page 1
17/04/2019 – TPF-Eco version u111
Technotherm Panels Control Guide – TPF-Eco + Eco Interface
Contents:
1. TPF-Eco – Thermostat Control
How To:
a. Connect Panels
b. Use Manual Mode
c. Program and Set Time
d. Use Auto Mode
e. Disconnect Panels
Menu Guides:
f. Pairing Menu
g. Configuration
2. Eco Interface – App Control
a. Setting up the Eco Interface
b. Setting up the App
c. Connecting to your Panels
d. Using the App
1 – TPF-Eco
Thermostat Control
The TPF-Eco thermostat is a necessary component for controlling your Technotherm
panels. It sends commands via RF to the receivers fitted on the back of the panels. It
measures the room temperature, turning all paired panels on or off to maintain your set
temperatures and programs. The TPF-Eco can be paired with up to 9 panels.
How To Guides
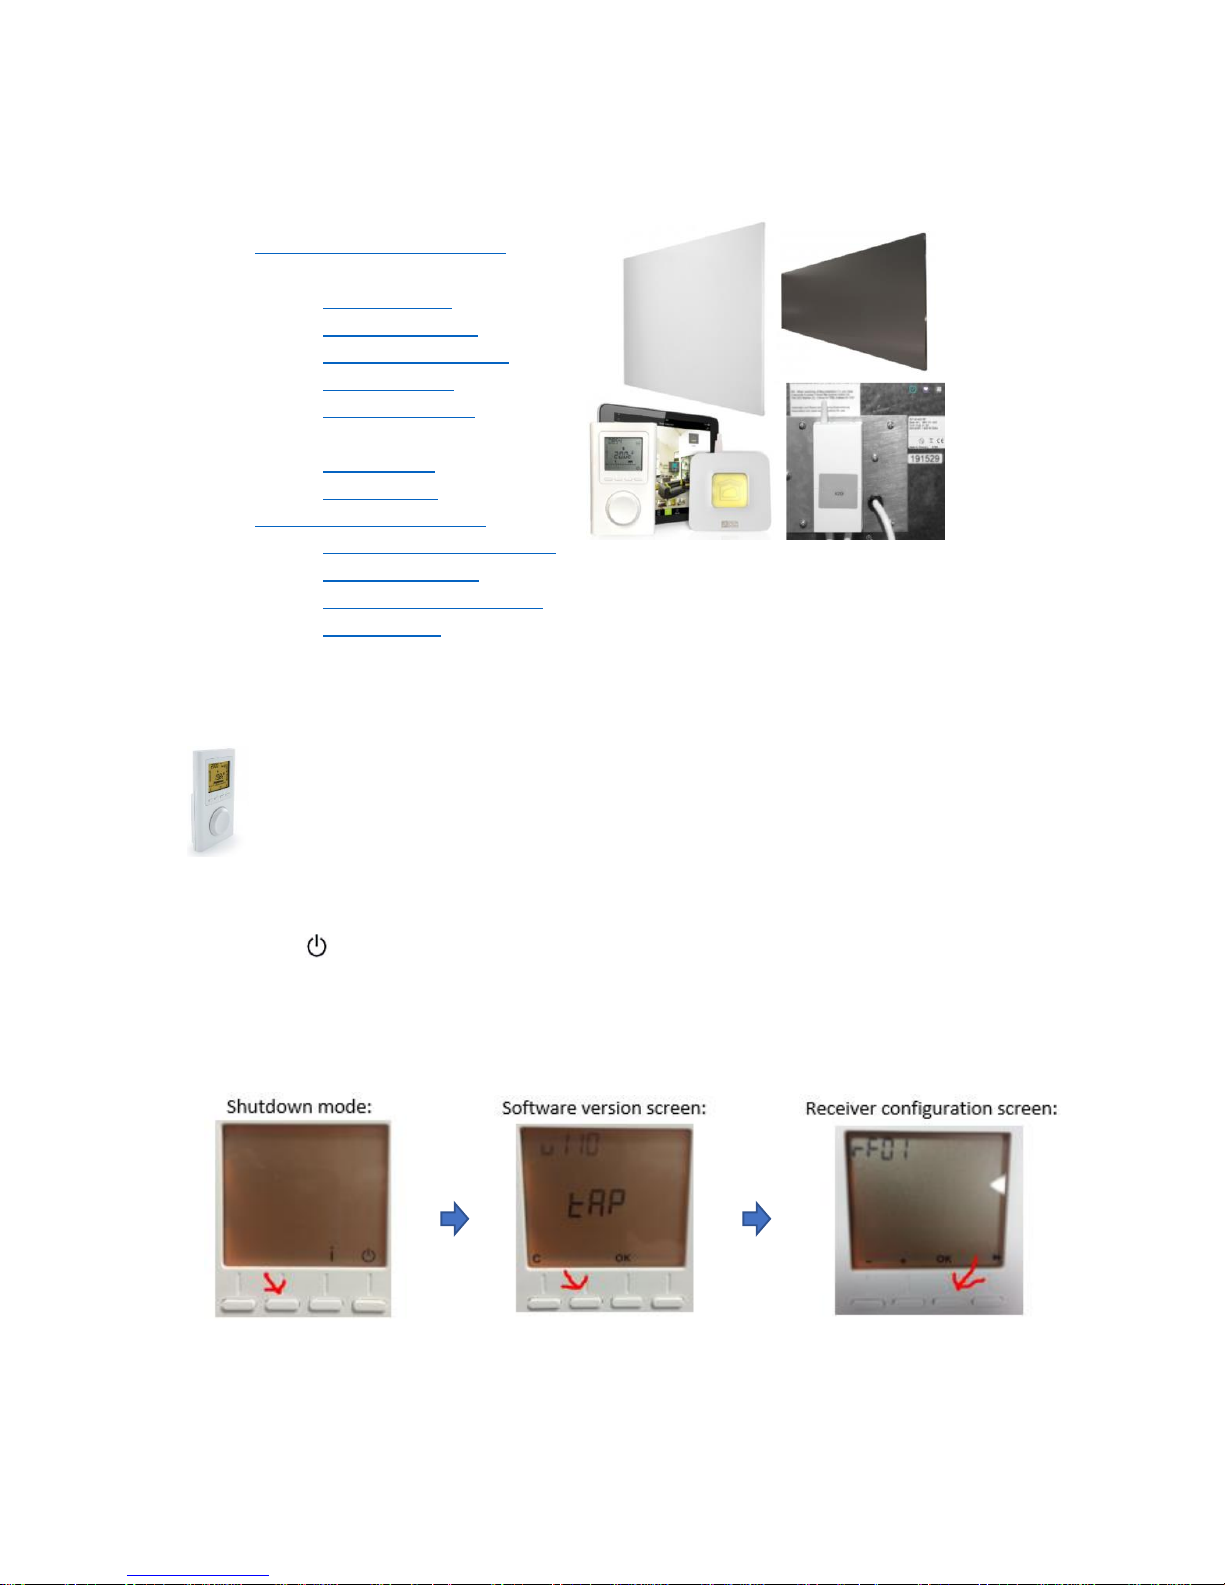
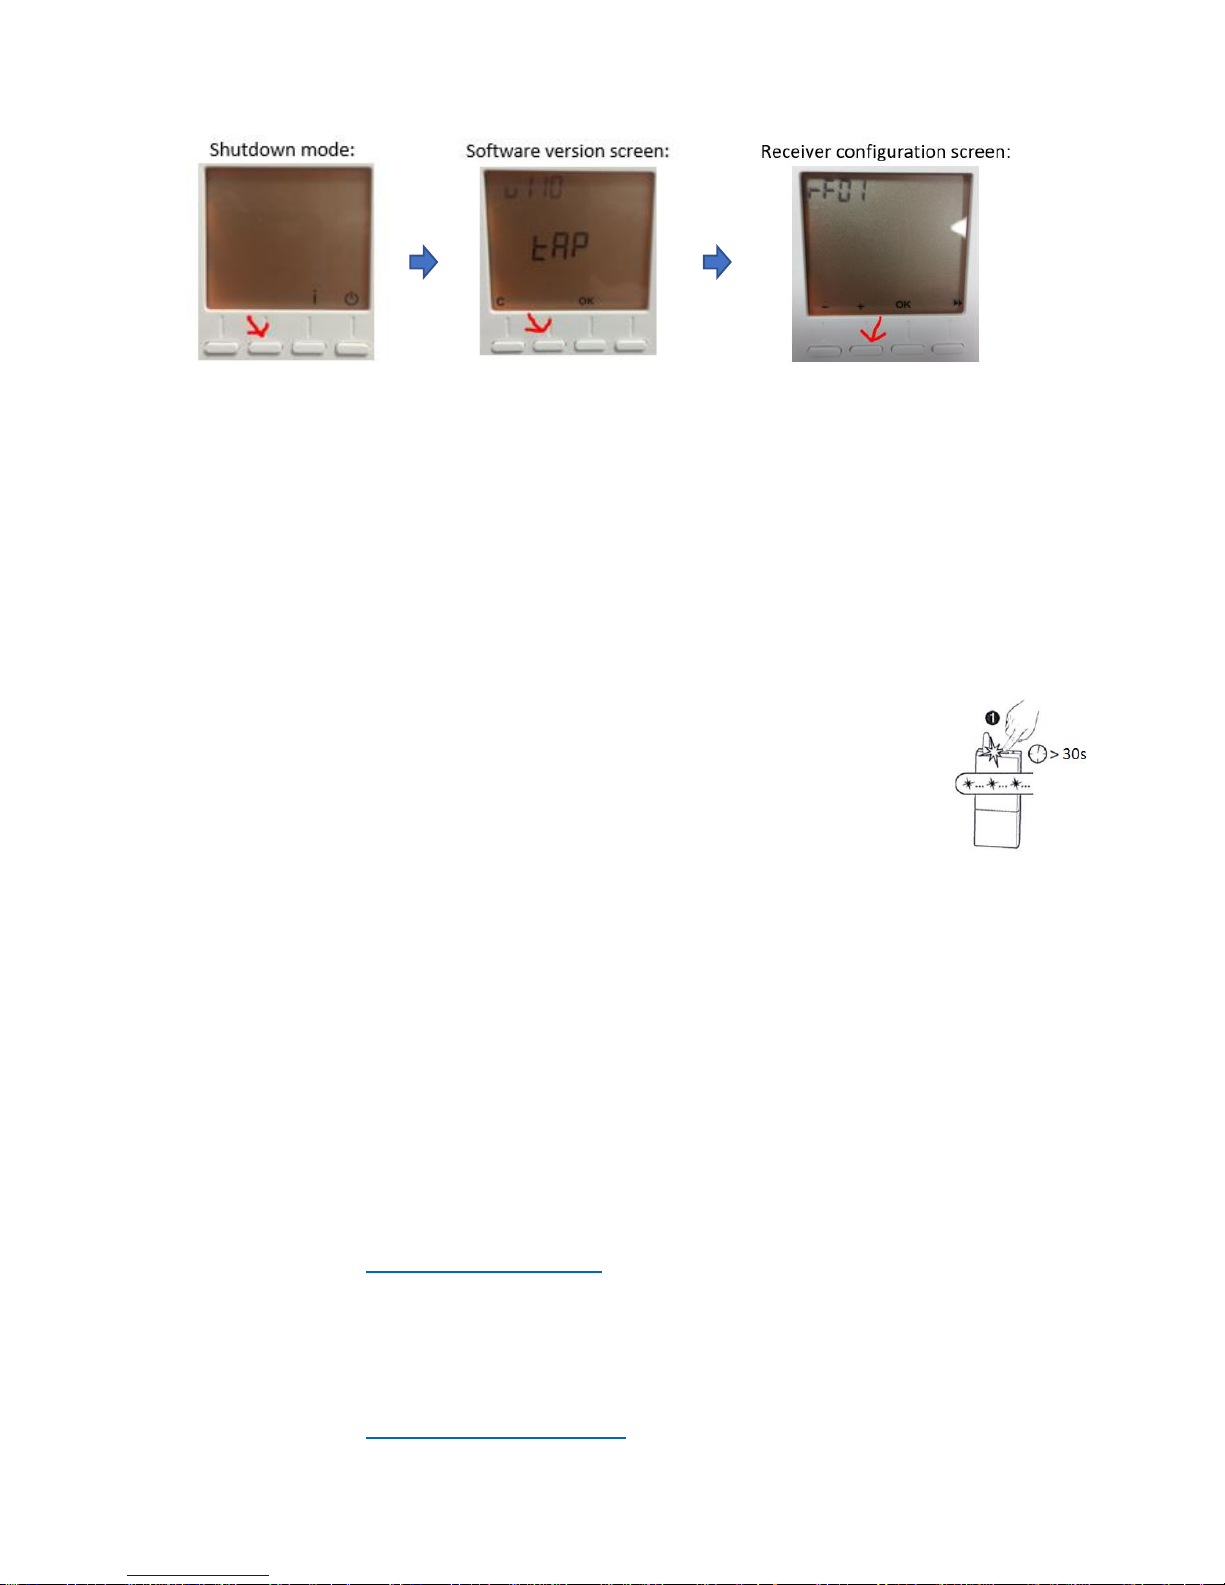
1A – How to Connect Your Panels
• Press to put the TPF-Eco in shutdown mode:
• Hold down the second button from the left until you see “tAP”, the software version screen.
• Again, hold down the second button from the left, until you see “rf01”, the receiver
configuration screen.
• Press OK to tell the TPF-Eco to search for receivers.
Page 2
17/04/2019 – TPF-Eco version u111
• Put your panel(s) into pairing mode by holding the button on the
receiver down for more than three seconds.
• The thermostat will flash to show it is searching for receivers. It will
do this for about 10 seconds before it solidifies on the number of
panels it’s found, i.e. “P03” for three panels.
• OPTIONAL – the last step is to set the wattage for each paired panel.
This allows the thermostat to measure the energy consumption of
your system. You can skip this step if you want.
o SET WATTAGES – The thermostat will show you the code for each panel in turn, i.e.
“P01”, “P02”, etc. The receiver of the relevant panel will “tick” when its code shows,
so you know which wattage to enter. Use the +/- buttons to set the wattage and
press OK. Repeat until all panels are set.
▪ NOTE – Earlier versions of the receiver do not tick. If your panels don’t tick,
you may find it easier to connect each panel separately.
o SKIP – You can skip this step by repeatedly pressing OK, cycling through the panels.
You can set wattages later via CF18 in the configuration menu.
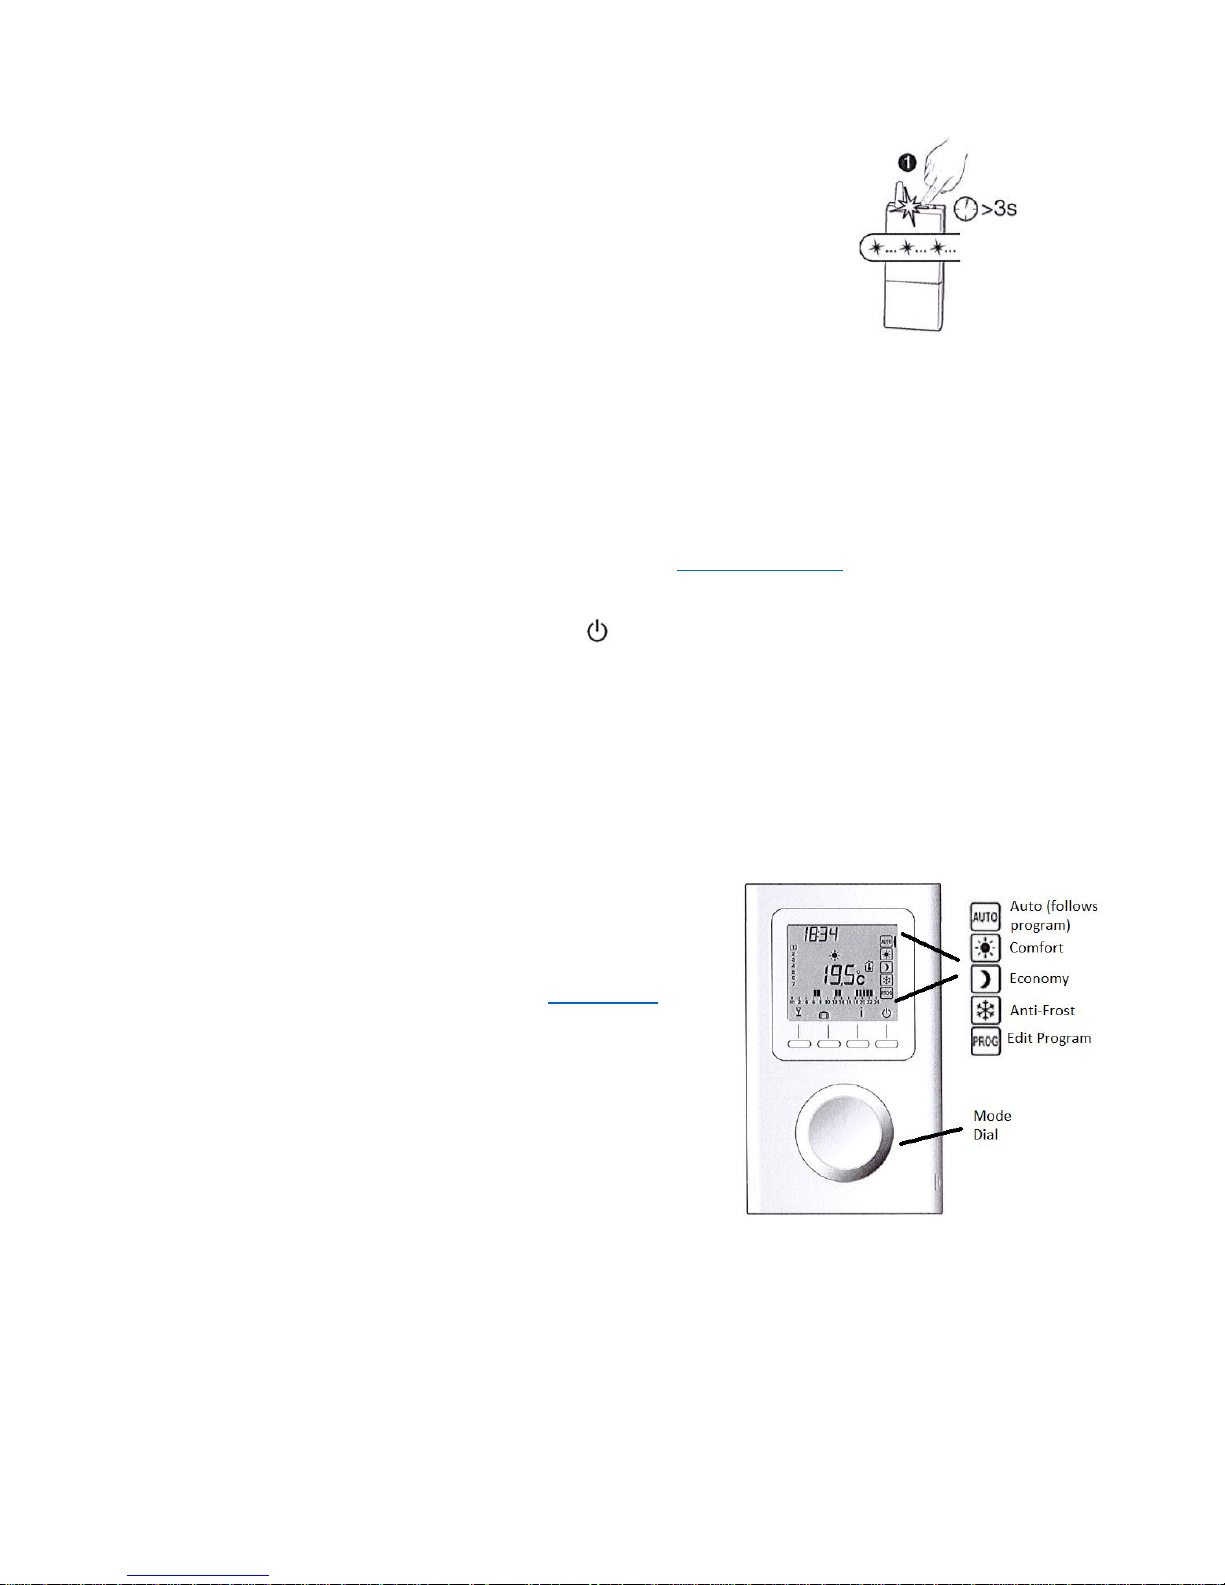
1B – Manual Mode
• Make sure the thermostat is on. (Press to toggle between shutdown and ON mode.)
• Turn the dial to switch between the modes: auto (follows program), comfort, economy, anti-
frost and program (edit your program).
• Comfort, economy and anti-frost are the three fixed heating modes. On these modes, the
TPF-Eco will tell the panels to switch on or off to maintain your set temperature for that
mode.
• To adjust the set temperatures, turn the dial to your chosen mode, use the +/- buttons and
press OK. Temperature choices are restricted as follows:
o Comfort – 5-30 °C (or maximum comfort temperature).
▪ The mode for occupied places where
you want to be warm. E.g. living rooms,
dining rooms, evenings.
▪ Maximum comfort temperature can be
set via CF10 in the config. menu. Can be
set between 22 – 30 °C. Default is 28 °C.
o Economy – 5-19 °C
▪ This is the mode for when you’re active
or absent from the room but don’t
want the temperature to drop too low.
E.g. overnight, bathrooms, gyms.
o Anti-Frost – 5-10 °C
Page 3
17/04/2019 – TPF-Eco version u111
▪ This is the mode for when you’re away from the house. The thermostat will
only engage the heating when the temperature drops
low enough to risk bursting your pipes.
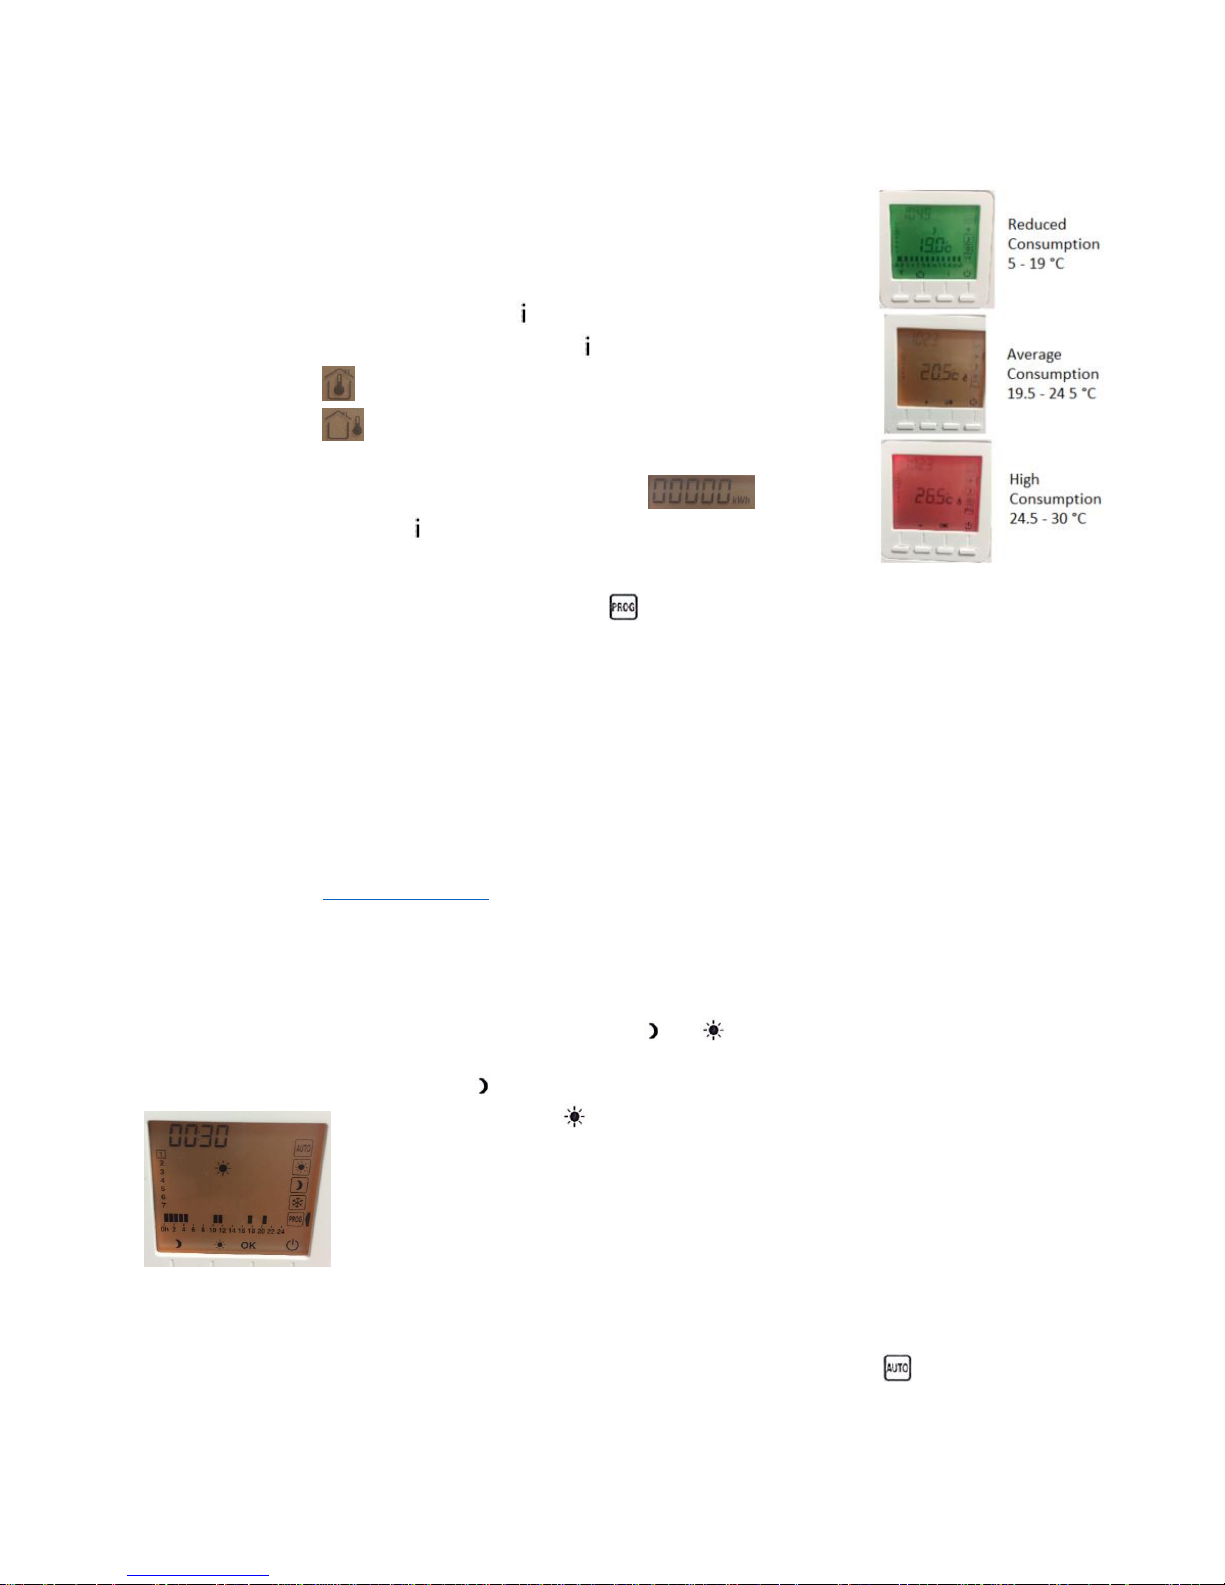
• Display colour – By default, the display backlight will change colour
based on your set temperature. The colours follow a traffic light system
to indicate when energy consumption is reduced, average or high.
• Information – You can use the button on any of the modes to check
information about your heating. Press repeatedly to cycle through:
o Room temperature
o Outside temperature (only available if you have an
outdoor sensor paired with the thermostat)
o Total consumption of paired heaters
• Lock – Hold down for 5 seconds to lock. Repeat to unlock.
1C – How to Program and Set Time
• Use mode dial to scroll to program mode
• Set the time:
o Hours will flash. Use +/- keys to adjust. (24-hour clock.) Press OK when done.
o Minutes will flash. Use +/- keys to adjust. Press OK when done.
• Set the date:
o The date will flash. Use +/- keys to adjust. Press OK when done.
o The month will flash. Use +/- to adjust. Press OK when done.
o The year will flash. Use +/- to adjust. Press OK when done.
o NOTE – the thermostat asks the date so that it can automatically update the time
when the clocks go back/forward. You can disable this feature via CF13 in the
configuration menu. You will no longer be prompted to set the date.
• Set program:
NOTE – this menu has a thirty second timeout. If it times out before you press OK, the day you were
programming will not be saved.
o Starting with Monday (day 1), use the and buttons to set economy and
comfort intervals through the day.
▪ E.g. press for every interval up to 6am if you want economy mode from
midnight to 6. Press repeatedly to switch to a comfort interval.
▪ The bars at the bottom of the display show which mode you have set – i.e.
full bar for comfort, no bar for economy.
▪ When you reach the end of the day the thermostat will go back to the
beginning of the day until you press OK – so you don’t need to get it perfect
the first time round.
▪ NOTE – you cannot set anti-frost intervals.
o Press OK to confirm and move onto the next day.
o Alternatively, hold down OK to copy the program on to the next day.
o When complete, the thermostat will switch directly to auto mode
Page 4
17/04/2019 – TPF-Eco version u111
NOTE – By default the thermostat sets modes to hourly intervals. However, if you prefer, you can set
it to program at half-hourly intervals, via CF11 in the configuration menu. When you set a program
to half-hourly intervals, the bars at the bottom will be unchanged – i.e. still just one bar per hour. In
the event there are two different modes set in one hour – i.e. comfort at 4, economy at 4:30 – the
bar will show as comfort but will heat as economy for the relevant half hour.
1D – Auto Mode
• Use mode dial to scroll to auto mode
• Panels will heat as per your set program (displayed at the bottom of the TPF-Eco display).
• You can temporarily suspend programming using the special event modes:
o Party mode
▪ Press key.
▪ Use +/- keys to set temperature for given period. (5 °C – max comfort).
▪ Press OK.
▪ Use +/- keys to set duration. (30 mins to 12 hours).
▪ Press OK.
▪ The thermostat will display the symbol and a countdown timer until the
timer finishes. Press C on this screen to cancel.
o Away mode
▪ Press key.
▪ Use +/- keys to set away days. (1 – 365 days).
▪ Press OK.
▪ Use +/- keys to set away temperature. (5 °C – max comfort).
▪ Press OK.
▪ The thermostat will display the symbol and a countdown timer until the
timer finishes. Press C on this screen to cancel.
• Information – You can use the button on auto mode to check information about your
heating. Press repeatedly to cycle through:
o Room temperature
o Outside temperature (only available if you have an outdoor sensor paired with
the thermostat)
o Total consumption of paired heaters
• Lock – Hold down for 5 seconds to lock.
1E – How to Disconnect Your Panels
• Press to put the TPF-Eco in shutdown mode:
• Hold down the second button from the left until you see “tAP”, the software version screen.
• Again, hold down the second button from the left, until you see “rf01”, the receiver
configuration screen.
• Use the + key to advance to “rf03”. Press OK to tell the TPF-Eco to search for receivers.
Page 5
17/04/2019 – TPF-Eco version u111
• Thermostat will display number of receivers found.
• Hold down OK for 5 seconds to remove the receivers. The thermostat will flash the number
of connected receivers until it reduces to 0. This removes the association from both the
panel and the thermostat.
NOTE – under rF03, the thermostat will only break associations with receivers that are in range. If
the number of connected receivers does not reduce to zero, this is because there are panels
associated with the thermostat that it cannot currently communicate with. This may be because the
panel is switched off at the wall or has been moved out of range.
• If you want to remove associations with panels you can’t connect to – for instance if the
panel has been lost or given away – follow the steps above but proceed to rF04.
o Press OK.
o Hold down OK for 5 seconds until the number of connected receivers
reduces to zero.
NOTE – This channel removes wireless associations from the thermostat but not the
receiver. If you later find the panel, you will need to remove its association with the
thermostat by holding down the top button on the receiver for over 30 seconds until
the indicator flashes.
Menu Guides
All the TPF-Eco’s adjustable settings can be accessed via two menus: the receiver menu and the
configuration menu. Both can be reached via shutdown mode:
• Hold down second button from left for 5 seconds
• To go to pairing menu, hold down 2nd button from left until you see “rf01”.
• To go to configuration menu, press OK.
1F – Pairing Menu
This menu allows you to add and remove associations with panels, as well as troubleshoot
connectivity issues. Use +/- keys to scroll through menu items and OK to select.
• rF01 – Thermostat searches for receivers.
o See “How to connect your panels” for full guide to pairing.
• rF02 – Displays signal strength between thermostat and receivers.
o Shows a number from 0 to 4, where 4 indicates maximum strength.
o You can use this for troubleshooting. If the number is low, move the thermostat
closer to the panels.
• rF03 – Remove wireless associations (from thermostat and receivers).
o See “How to disconnect your panels” for full guide.
Page 6

17/04/2019 – TPF-Eco version u111
• rF04 – Remove wireless associations (from thermostat only.)
o See “How to connect your panels” for full guide.
1G – Configuration Menu
All customisable settings can be found here. The menu takes you through each setting in turn. Use
+/- keys to adjust settings, press OK to confirm and move onto next setting.
See above for how to reach configuration menu.
• CF01 – Correcting the measured temperature
o This allows you to manually adjust for any discrepancy between the temperature
read by the thermostat and the actual temperature in the room.
o Use +/- keys to adjust from -5 °C to 5 °C.
▪ i.e. if the thermostat senses 24 °C but the actual temperature is 20 °C, set
CF01 to -4 °C to adjust down.
• CF02 – Temperature displayed in auto mode
o 0 = Set temperature (default)
o 1 = Actual temperature
• CF04 – Thermostat control type
o 0 = Chrono-proportional (PI) control (default)
▪ Thermostat checks temperature at time intervals and then tells heaters to
turn on/off.
o 1 = On/Off control
▪ Thermostat tells heaters to turn on/off as soon as it detects the temperature
dropping below/above the set level.
• CF05 – Display energy saving settings
o 0 = Display switches off after 10 seconds if nothing is pressed
o 1 = Displays switches off between midnight and 5am
o 2 = Display always on (default)
• CF06 – On/off symbol displayed in standby mode
o 0 = Not displayed
o 1 = Display (default)
• CF07 – Backlight
o 0 = Disabled
o 1 = Enabled (on when using thermostat, switches off after a timer) (default)
• CF08 – Open window detection function
o 0 = Disabled (default)
o 1 = Enabled
o NOTE – this function only works if you have paired the thermostat with a
door/window magnetic contact which tells the thermostat it has opened.
• CF09 – Presence detection function
o 0 = Disabled (default)
o 1 = Enabled
o NOTE – this function only works if you have paired the thermostat with a motion
detector
o If your motion detector senses absence, it will do the following after set periods of
absence:
▪ 1.5 hour -> Temperature of current setting is reduced by -1.5 °C
▪ 3.5 hour -> Temperature of current setting is reduced by -3.5 °C
Page 7

17/04/2019 – TPF-Eco version u111
▪ 48 hour -> Switches to anti-frost
• CF10 – Value of the maximum comfort setting
o Use + and – to adjust from 22 – 30 °C
• CF11 – Programming intervals
o 0 = 1 hour steps (default)
o 1 = ½ hour steps
• CF12 – Time display format
o 0 = 12 hour AM/PM
o 1 = 24 hour (default)
• CF13 – Automatic change to summer/winter time
o 0 = Disabled
o 1 = Enabled (default)
o If this is disabled, the thermostat will not ask you to set the date when set the time.
• CF15 – Display of the open window symbol when there’s an open window event
o 0 = Symbol steady
o 1 = Symbol flashes (default)
• CF16 – Display of the “currently heating” symbol
o 0 = Disabled
o 1 = Enabled (default)
• CF17 – Display of the presence symbol when there’s a presence detection event
o 0 = Symbol steady
o 1 = Symbol flashes (default)
• CF18 – Display energy consumption
o 0 = Disabled (default)
o 1 = Enabled
o The thermostat will then allow you to associate a wattage with each of the paired
panels.
▪ Shows you each panel in turn (P01, P02 etc.)
▪ Use +/- keys to adjust the wattage and press OK to go to the next panel.
o You can tell which panel you are setting because its receiver will “tick” when you’re
on the screen for that panel. (Latest versions of receiver only).
Later versions of the TPF-Eco – software version u111 and onward – also include the following
options:
• CF28 – Anticipation function (adaptive start)
o 0 = Disabled
o 1 = Enabled (default)
• CF29 – Anticipation sensitivity
o Use +/- keys to adjust from 1 °C to 6 °C. (default = 3 °C)
o This setting allows you to adjust the anticipation parameters depending on the
behaviour of the room. If the room is getting hot too early, increase the sensitivity to
a higher number of degrees. If the room is getting hot too late, decrease the
sensitivity to a smaller number of degrees.
• CF30 – Display of room temperature in shutdown mode
o 0 = Disabled
o 1 = Enabled (default)
Page 8

17/04/2019 – TPF-Eco version u111
2 – Eco Interface
To control your panels via WiFi you need to purchase the Eco Interface WiFi hub. Commands from
the app are received via the router and then the hub sends them to your panels via radio frequency.
The panels retain their connection to the TPF-Eco so that it can monitor the room temperature.
2A – Setting up the Eco Interface
• Connect the Eco Interface to your router with the supplied ethernet cable.
• Plug the hub into the mains with the supplied power adaptor.
2B – Setting up the App
• Install the TYDOM app
• Press New Home to set up your account
o Add name
o Add location (optional)
o Add Eco Interface identifier – last 6 digits of code on base
of Eco Interface.
o Press Add
o Add a password and press Connection
Note – NOT these related apps:
Tydom HD Lifedomus
Page 9

17/04/2019 – TPF-Eco version u111
NOTE – the app will not allow you to create an account if it
cannot detect your Eco Interface.
If you see the error message below, make sure the Eco Interface
is properly connected to the router and you have used the
correct code as the identifier. Then try again.
2C – Connecting to your Panels
• Go to Settings -> My devices -> Add a device -> Heating -> Electrical -> Minor 1000
• Hold down the receiver button on the panel until it flashes.
• Press “To Associate” and wait for the app to find the panel.
• Press OK.
• Repeat for every panel you want to control via the app.
Page 10
17/04/2019 – TPF-Eco version u111
Troubleshooting
If the panel will not connect to the app, it may be in the wrong mode. The
receiver is programmed with two pairing channels, to ensure it can connect to all
versions of the thermostat. To switch mode, hold down the button on the back
of the receiver for 40 seconds. Then repeat the steps above. The panel should
now connect.
Customise Your Panel
The next menu allows you to customise how your panel appears on the app. You
can change the following features:
• Name
• Icon – choice of the options below:
• Favourites (toggle) – favourited devices appear on the homepage
• Advanced options
o Locate – the panel’s receiver makes an audible ticking so you can find it
o Association mode
o Delete
2D – Using the App
The Delta Dore website is really helpful from this point on, explaining all the features available on
the app. https://www.deltadore.co.uk/tydom-app/instructions-for-use
NOTE – Infrequently, you may find the app lags or stops responding. It may do nothing for several
minutes and then perform the same action repeatedly – i.e. opening four new moments in a row.
This is just like any other computer program on a go-slow; the best solution is to close and restart
the app.
Setting Modes & Temperatues
• To change mode via the app, go to HEATING to view all your panels. The
first item on the list is always “General”, which allows you to control all
your panels at once. Press to access the options:
o To turn all panels on, press Heating . Panels will switch on at
the last temperature they were set to.
▪ NOTE – the app will not be able to switch to Heating if
all the associated panels are unplugged!
o To switch all panels to absence mode, press . Panels will heat
as per the frost protection temperature set at the TPF-Eco.
o To turn all panels off, press Off.
Page 11

17/04/2019 – TPF-Eco version u111
• Changing set temperatures can be done individually, per panel:
o Press the icon of the panel you want to change.
o Drag the arrows on the icon up or down. You can set temperatures
from 10 – 30 °C, via intervals of half a degree.
o To put the panel in absence/frost mode, drag the arrow to the
bottom until it says “Off”.
• Alternatively, you can create a Group and change the temperature of
multiple heaters at once. This is the easiest way to zone your heating.
Heating groups will appear in your list of heating devices.
Relationship with the TPF-Eco
It’s still possible to change modes or temperatures via the TPF-Eco; your panels will obey whichever
command they received last. The TPF-Eco and the app usually don’t interact, however there are
some cases where the settings on one will impact the other – including but not limited to the below:
• If you change the temperature via the TPF-Eco, the app will update to show the new set
temperature on each of your panels.
o NOTE – because the TPF-Eco goes down to 5 °C, while the app only goes down to 10
°C, temperatures of 9.5 °C and below will show up as blank on the app.
• If you turn all your heating off via the app – via General – the TPF-Eco will switch to
standby mode.
• If the app is on absence mode, it will resist being overwritten by the TPF-Eco. If you try to
twist the TPF-Eco dial to Auto or Comfort mode while absence mode is set, the TPF-Eco will
display the hand symbol , which shows it is being externally controlled. It will however
let you switch to Economy or Frost mode, from which you can switch back to Comfort.
However, this behaviour can change depending on what mode the TPF-Eco was on before
the app was set to absence mode. Confused? The main takeaway is that if you wiggle the
dial enough eventually the hand will disappear and the TPF-Eco will take
over. The best way to ensure conflict-free heating is to just use the app.
Troubleshooting
The app cannot function without the TPF-Eco because it has no other way to
measure the temperature. If your app has gone grayscale and won’t let you turn
on your panels, it may be because it has lost contact with the thermostat. Check
the following and then try turning your panels on again:
• Are all the panels connected to the TPF-Eco?
• Are all the panels in range of the TPF-Eco?
• Is the TPF-Eco functioning? Do its batteries need changing?
Page 12
17/04/2019 – TPF-Eco version u111
Programming
Programming via the app does not take place within each individual panel. Instead, you add all
heating “moments” to one central schedule. These moments include the panels coming on,
switching off and changing to a new temperature. One moment can control any number of panels.
If you have other types of device connected to the app, you can include them in your moments. E.g.
you could tell your panels to come on, your curtains to open and your security lights to switch off all
at the same time!
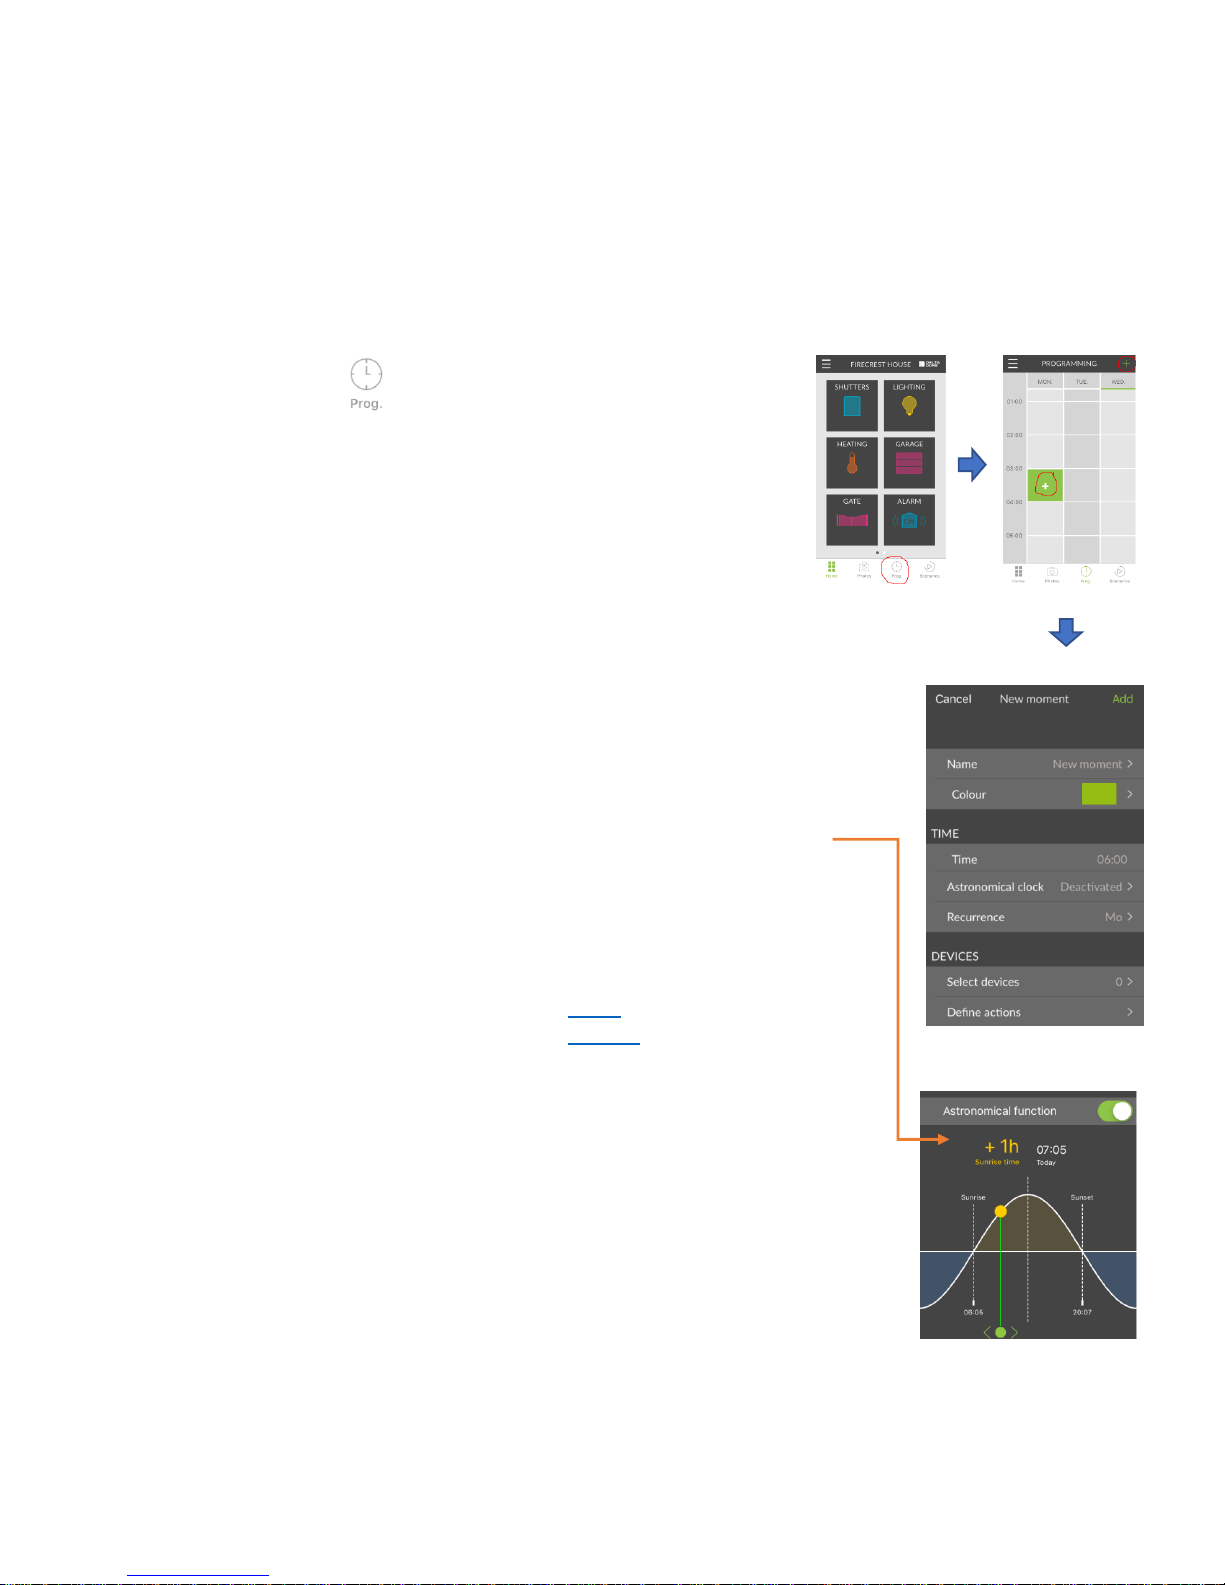
• Press Prog .
• Scroll down the schedule to the time where you want to add a
moment.
• Tap the time slot. A cross with a green background will appear.
Tap again to proceed.
o Alternatively, press the green cross in the top corner
and press “New moment”.
• Customise your moment:
o Name
o Colour
o Time
▪ Adjust hours and minutes to the specific time you want – i.e.
06:10.
o Astronomical Clock
▪ Once activated, this function allows you to select an interval
up to +/- 2 hours before or after sunrise or sunset as your
trigger for a moment.
o Recurrence
▪ Select any or all days of the week.
o Select devices
▪ Select any or all of your devices – i.e. which panels you
want to respond to the trigger.
▪ You can also select a Group, if you’ve created one.
▪ You can also select a Scenario, if you’ve created one. When
you select a scenario, you do not need to define an action.
▪ You can select any combination of devices, groups and
scenarios.
o Define an action
▪ Set how you want your panels to respond to the trigger.
They can switch off, or switch to any temperature from 10 –
30 °C.
▪ Each panel or group is set individually and can all be
different.
• Press Add. The schedule will be populated with your new moment(s).
• Continue to add moments until your schedule is complete.
Page 13
17/04/2019 – TPF-Eco version u111
Special Features
The TYDOM has a range of useful features that can enhance your smart heating experience. Look out
for the following:
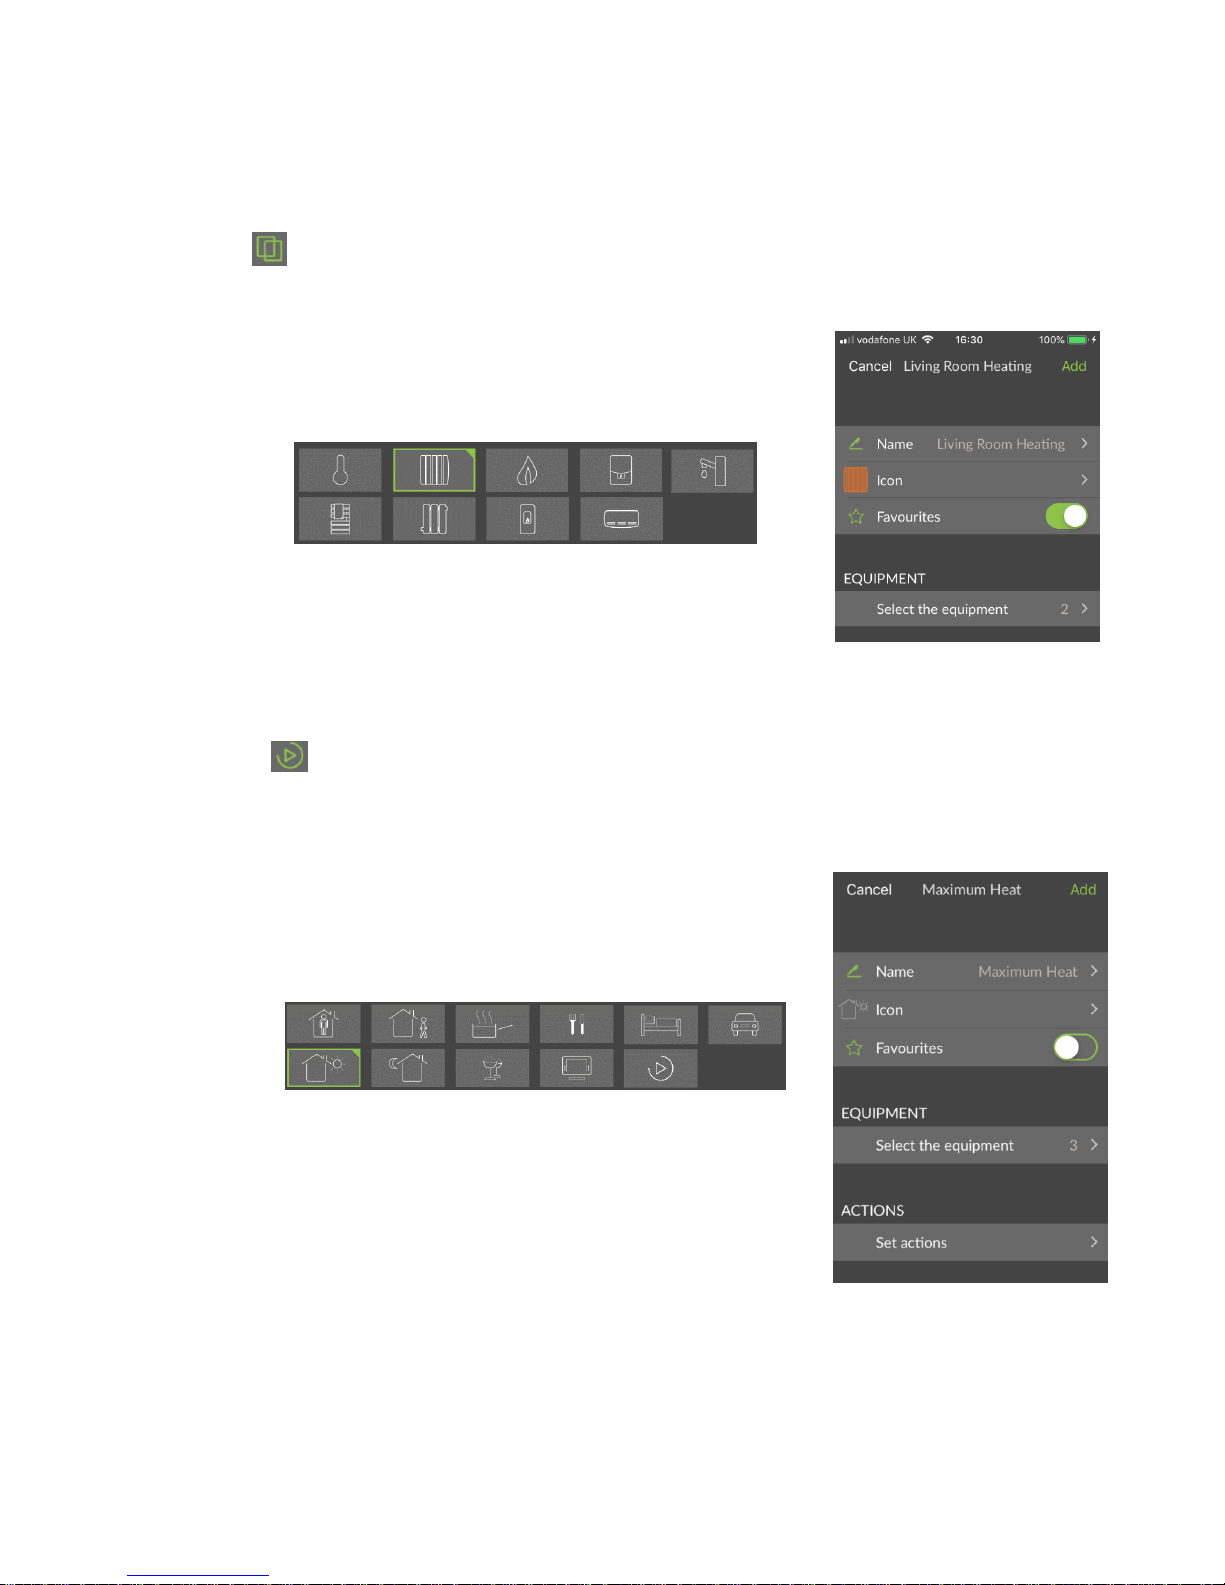
Groups
Combine multiple panels into groups so you can adjust their set temperature at the same time.
• Settings -> Groups -> Add a group -> Heating -> Setting
• Customise group
o Name
o Icon – choice of the options below
o Favourites (toggle) – favourited devices appear on the
homepage
o Select the equipment – choose the panels to group
• Press Add.
Scenarios
Scenarios work similarly to groups, except here you group together many different devices and
specify what you want them to do. When you trigger the scenario, all the associated devices perform
their set action.
• Settings -> Scenarios -> Create a scenario
• Customise scenario
o Name
o Icons – choice of the options below:
o Favourites (toggle) – favourited devices appear on the
homepage
o Select the equipment – choose groups and devices to
perform an action in the scenario
o Set actions – set an action for each group or device
▪ For heaters, this is always setting a temperature
• Press Add.
Page 14

17/04/2019 – TPF-Eco version u111
Photos
Photos are intuitive shortcuts that allow you to easily access and adjust your
panels.
• Settings -> Photos -> Add a photo
• Take a photo, by allowing the app to access your camera, or select a
photo from your photo library.
• Customise your photo
o Name
o Manage buttons – overlay shortcuts to your heaters over the
image
▪ A button can link to a device, a group or a scenario.
▪ Use the button to add more buttons
▪ Use the button to position buttons – i.e. drag them
over the corresponding heaters.
▪ Use the button to delete.
o Button design – customise button
▪ Adjust scale
▪ Adjust transparency
▪ Toggle display of name
o Edit photo – change the selected photo
• Press Add
• Go to Photos at any time to flick through your photo library.
• Tap any of your heater shortcuts to adjust the temperature.
 Loading...