

Page 1

www.technomate.com
104010030018 (REV.00:10,06,2009)
Page 2
1 2
CONTENTS
Setup 31
Games 55
Timer 56
3.4 PVR 58
1. Before You Begin 3
1.1 Safety Instructions 3
1.2 Specification 4
1.3 Accessories 5
1.4 Connections 6
2. Control and Function 7
2.1 Front Panel 7
2.2 Rear Panel 9
2.3 Remote Control Unit 11
3. Operation & Setting 15
3.1 Getting Started 15
3.2 Info-Bar 22
3.3 Menus 27
TV mode 27
Radio mode 27
File mode 28
Information 29
Reboot 30
TM-500/600
Page 3

Please read the safety instructions carefully before using the TM-500/600.
The Manufacturer takes no responsibility for incorrect handling of the
TM-500/600.
For sufficient ventilation, leave enough space.
If unused for a prolonged amount of time, turn the power OFF.
Do not cover the TM-500/600’s ventilation openings with items such as newspapers,
tablecloths, curtains etc.
Do not expose the TM-500/600 to liquid, moisture, direct sunlight and extreme
weather.
Do not place open flame sources, such as lighted candles, near or on the
TM-500/600.
Do not place any containers with liquid, such as vases, on the TM-500/600.
Do not connect or modify cables while the TM-500/600 is connected to the power.
Do not remove the cover. Risk of electric shock!
Do not touch the TM-500/600 with wet hands. Risk of electric shock!
Do not put any metal items into the slots or ventilation openings.
Please disconnect your TM-500/600 from the main power during thunder or heavy
storms.
Disconnect the main power cable if the power cord is damaged.
Cleaning: Disconnect the main power cord before cleaning the cover. Use a slightly
damp cloth without cleaning agents.
Connect the TM-500/600 only to suitable sockets. Do not allow overloads to occur.
The socket-outlet shall be installed near the equipment and shall be easily accessible.
4
1. Before You Begin
3
1.1 SAFETY INSTRUCTIONS
Fully DVB compliant
Linux open source ; Standard Linux API
Getting various Linux applications
252MHz IBM PowerPC Processor (350MIPS)
Internal Hard Disk Drive (HDD) support for PVR (TM-600)
Stream & Record to your PC via Ethernet
10/100M Ethernet interface
40/72MB SDRAM Memory (TM-500/600)
8/16MB Flash Memory (TM-500/600)
1x Smart Card Reader
S/PDIF interface (Optical) for Dolby bit stream out
Sharp Tuner (2~45 Msps, SCPC scan)
Firmware/Software upgrade through: Serial (RS232C), Ethernet & Internet
Unlimited TV/Radio channel storage
Very quick channel change time ; < 1 second
Support multiple LNB switching control & motor control (DiSEqC 1.0, 1.1, 1.2 & 1.3)
Full automatic satellite/service scan
Smart Electronic Program Guide (EPG)
OSD & VBI Teletext
Variable aspect ratio (4:3, 16:9)
25 OSD Language menu
Programmable event timer
Subtitle
Parental Control
C & Ku band reception
Video Out: RGB, CVBS, YPbPr selectable
3x USB (TM-600)
RF Modulator
1.2 SPECIFICATION
WARNING!
··
Modifications and changes to the TM-500/600 lead to loss of warranty.
··
We recommend that hard disk installation is undertaken by your local
dealer.
··
Incorrect hard disk & software installation leads to loss of warranty.
Page 4
65
1. Before You Begin
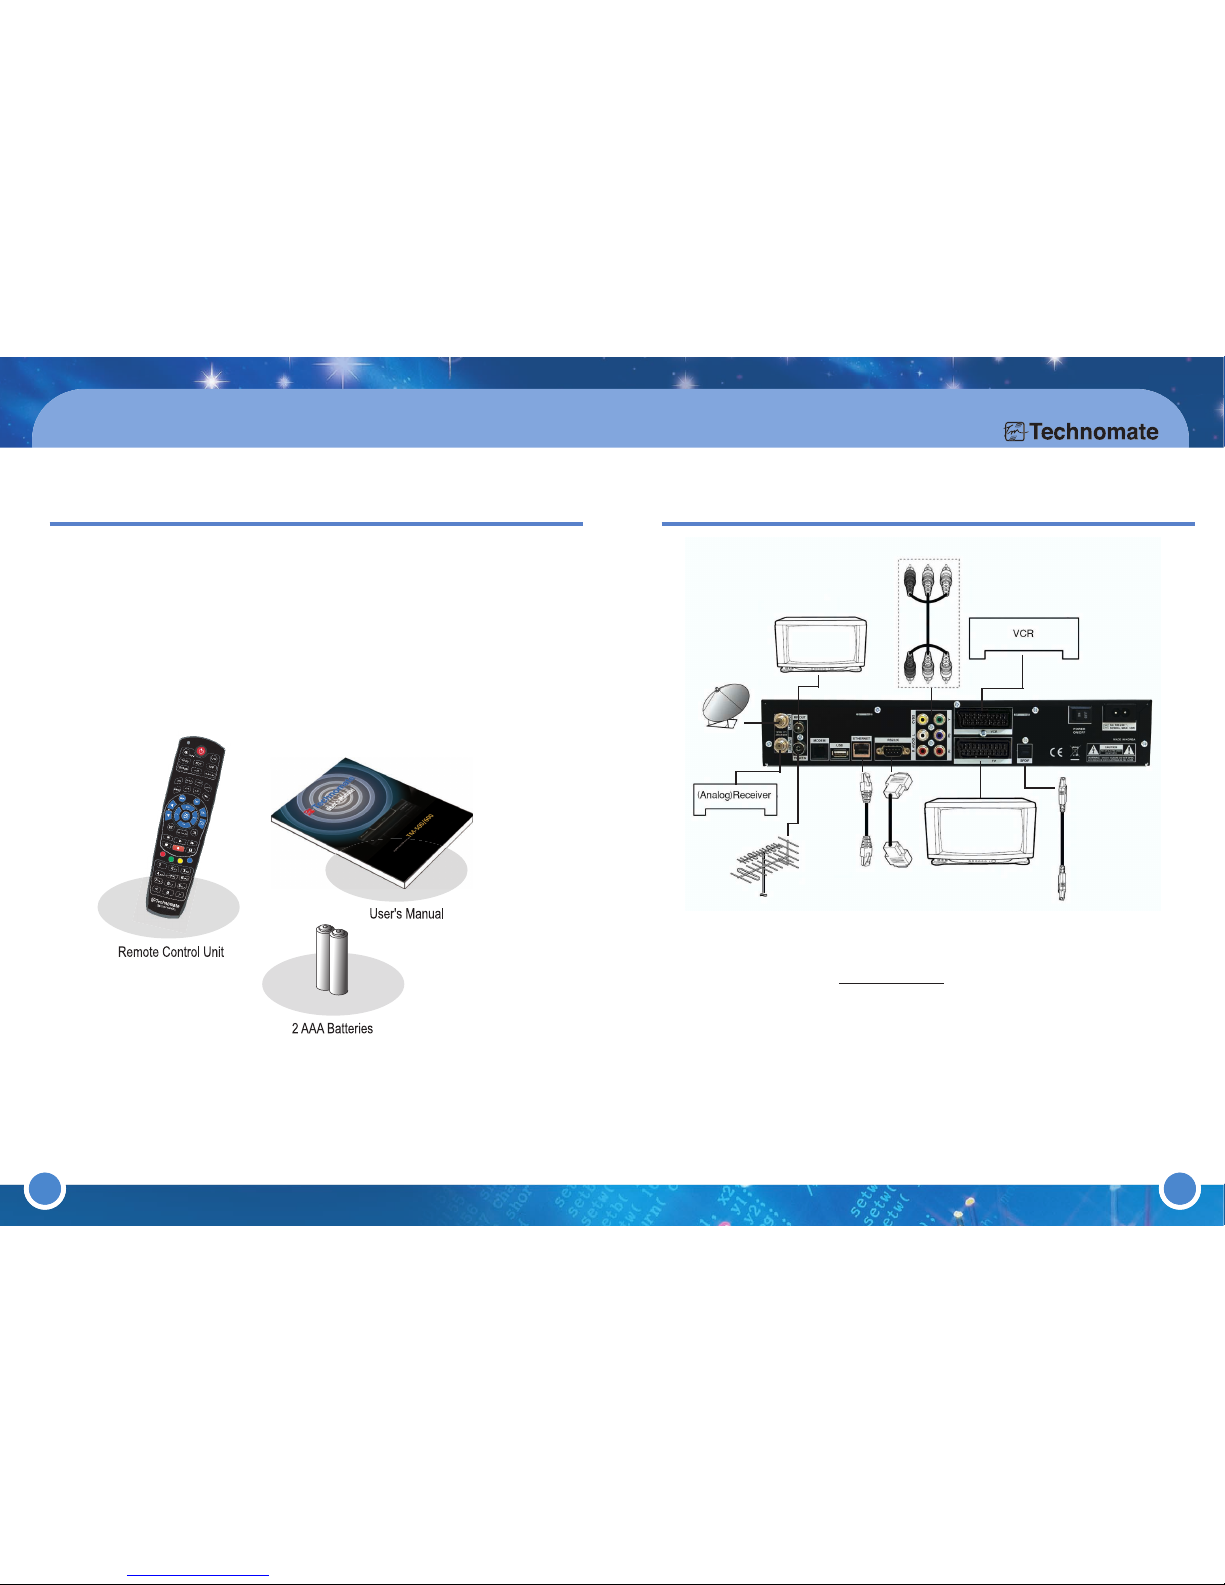
1.3 ACCESSORIES
User’s Manual
Remote Control Unit
Power Cord
2AAA Batteries
1.4 Connections
(Equipment Connection)
Mini-Glossary:
Services = channels
Service List = Channel List
Page 5
7
2. Control and Function
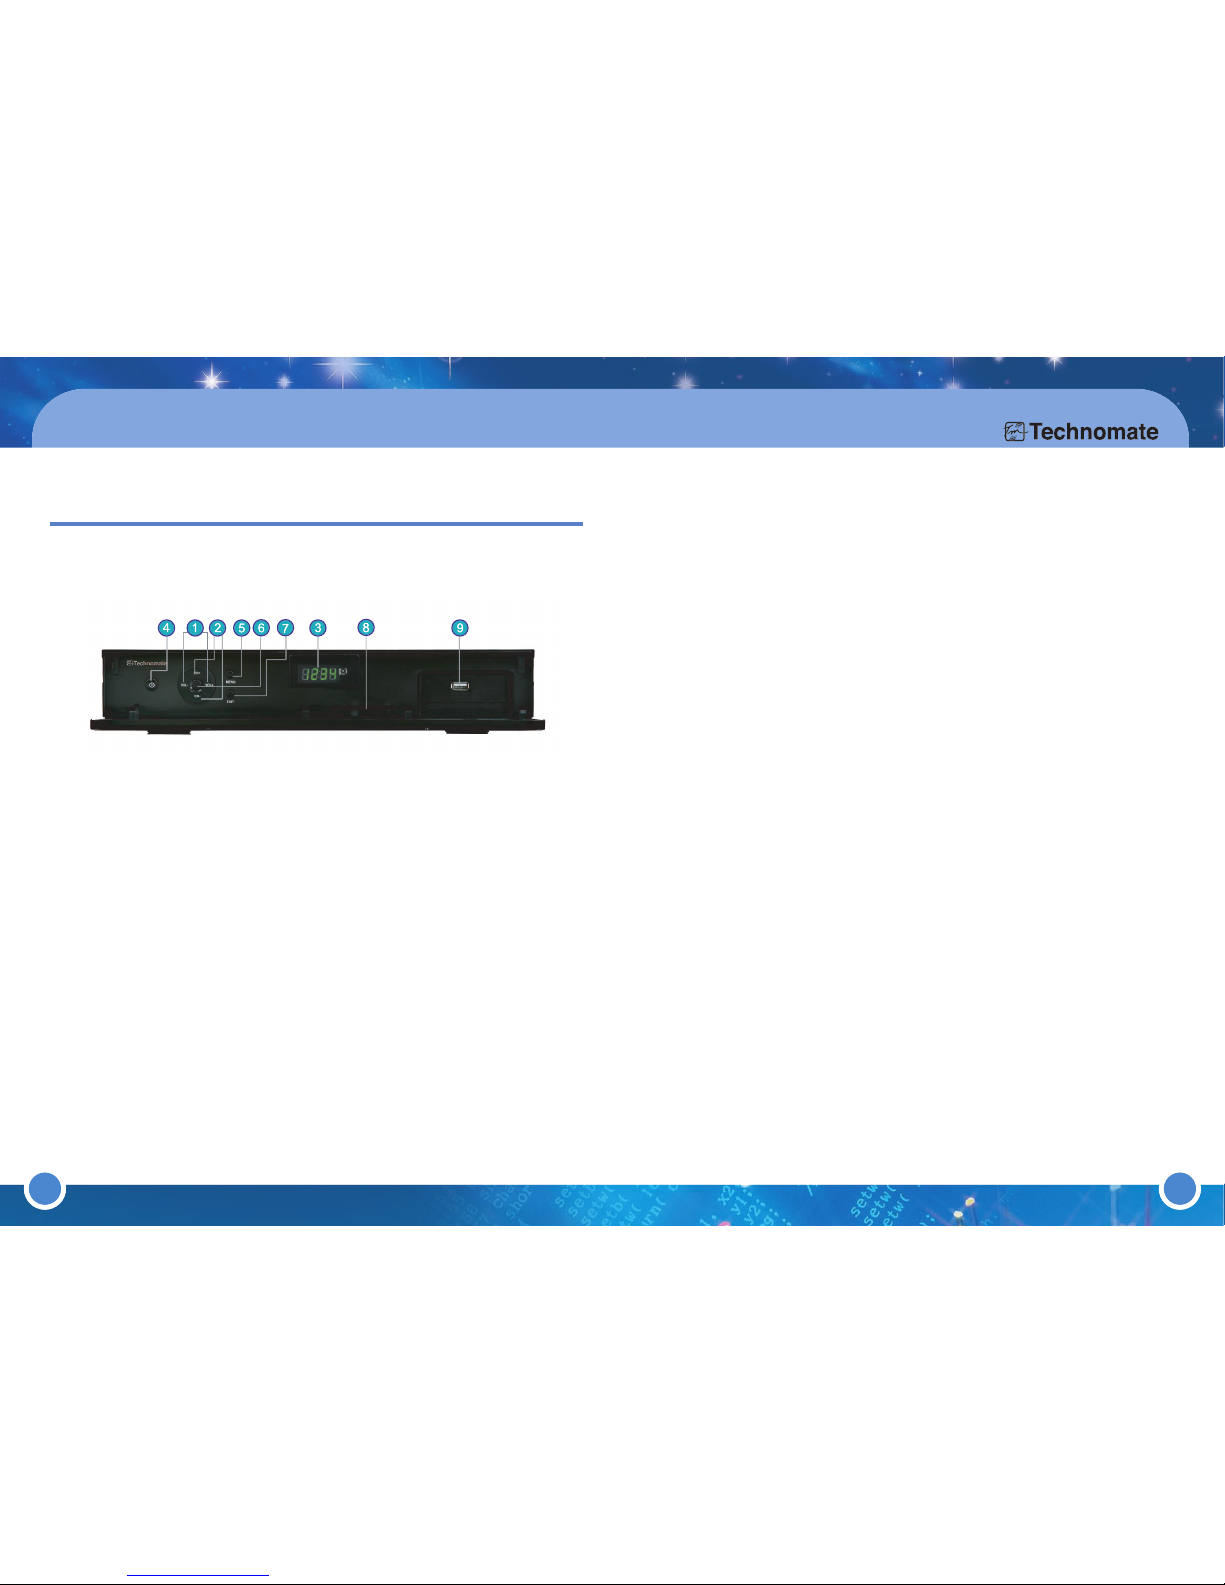
LEFT/RIGHT Cursor Buttons
Move Left/Right (Vol -/+)
UP / DOWN
Move Up/Down in Menu mode. (CH+/-)
Display (4-digit, 7-segment)
Displays program number or certain menu status. Displays local time in
Standby mode.
POWER
Turn the receiver ON/ Standby.
2.1 FRONT PANEL
1
2
3
4
MENU
Displays the Main menu. Enter Service Menu when Service List is opened.
OK
Opens Service List in viewing mode and you can enter a chosen menu or
function in Menu mode.
EXIT
Return to the previous menu or Exit.
SMART CARD Reader
Insert Smartcard with the IC down (Chip face down).
USB
Connect a USB 2.0 external HDD to upgrade software or to record/playback
(Max 500mA / TM-600 model only)
5
6
7
8
9
8
Page 6
9
2. Control and Function
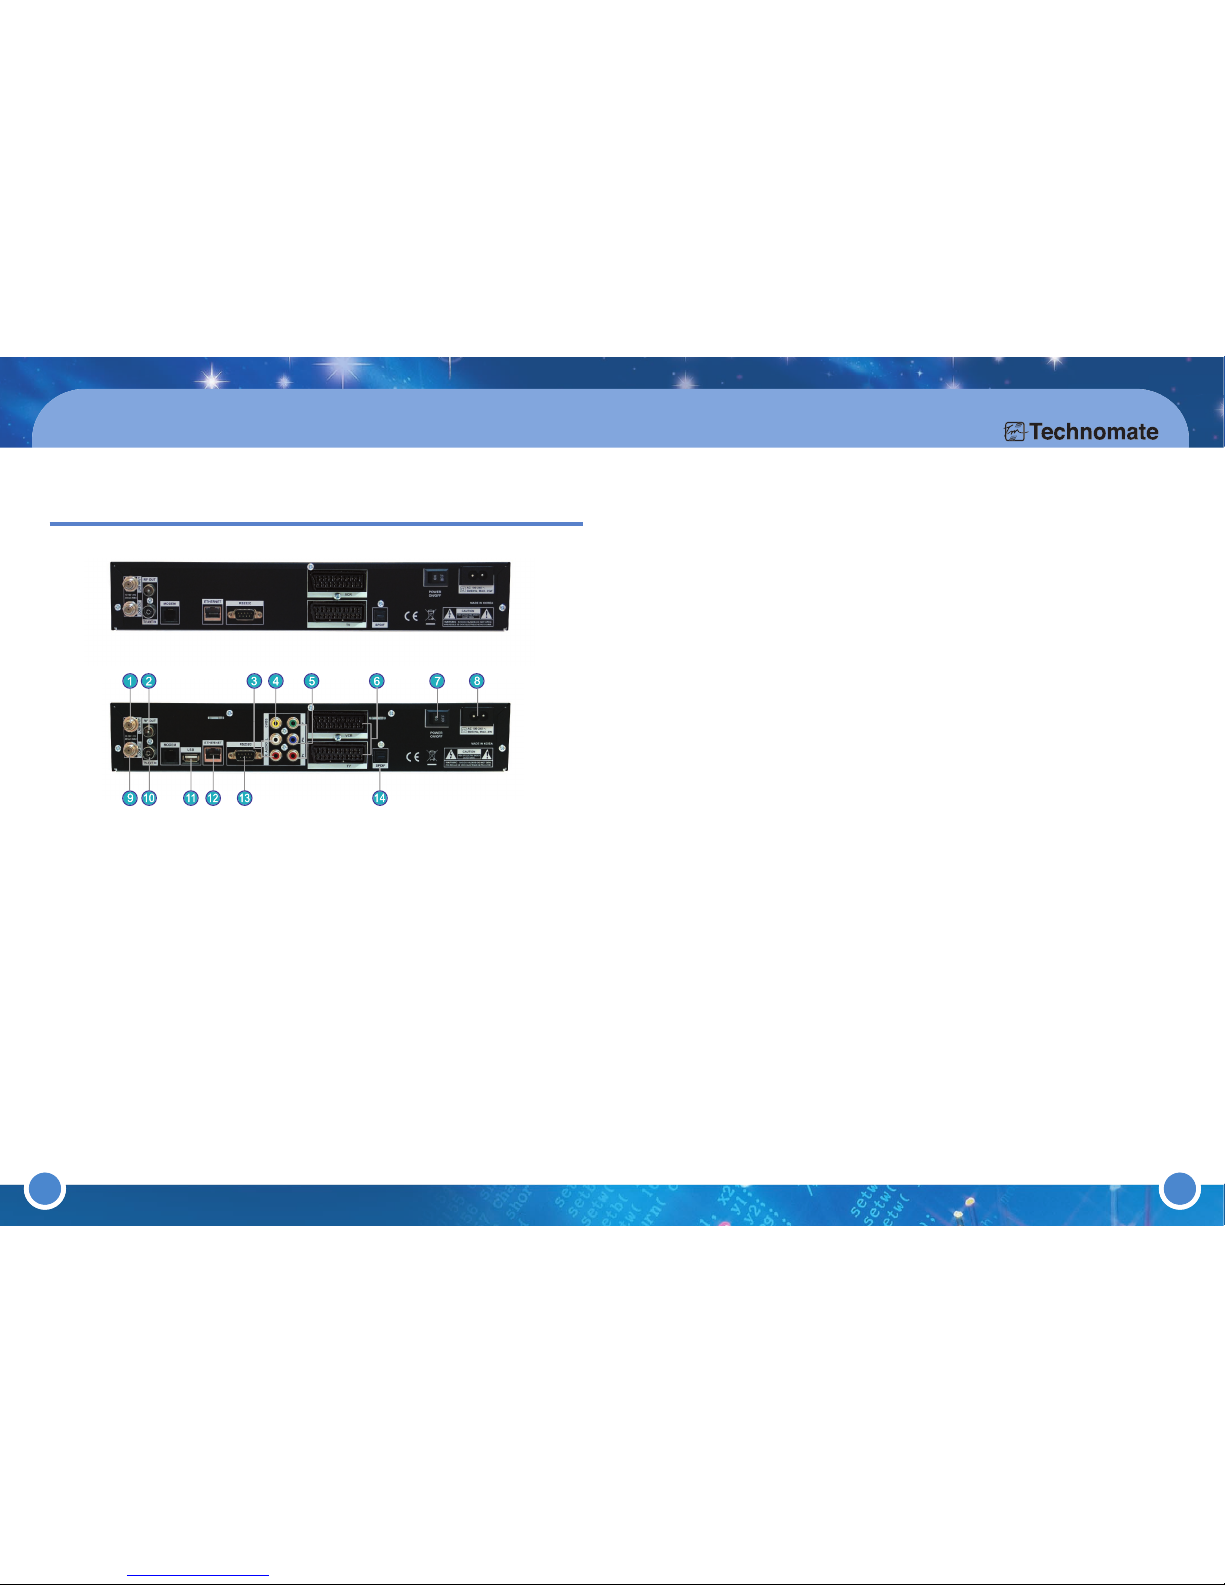
SAT IN
Satellite Dish/Antenna cable connection. Turn the receiver OFF first
before connecting.
RF OUT
Connect to TV or VCR.
AUDIO L, R
RCA/Cinch cable to HiFi-Amplifier connection.
VIDEO
Composite video output for connecting to TV, AV monitor, etc.
COMPONENT(Y Pb Pr)
Digital Video output for Y Pb Pr
2.2 REAR PANEL
1
2
3
4
5
6
TV / VCR SCART
SCART cable to TV/VCR(AUX) connection(RGB, CVB-S, YPbPr).
MAIN SWITCH
Turn ON/OFF the TM-500/600.
POWER CABLE (AC IN)
100~240V AC (Auto-selectable), 50~60Hz+/-5%. Check the power
specification.
LOOP OUT
Loop Out to other devices. If connecting an analogue receiver, turn OFF the
receiver to watch an analogue program.
ANT IN
TV Antenna connection.
USB
Connect a USB 2.0 external HDD to upgrade software or to record/playback
(Max 500mA / TM-600 model only)
Ethernet
Communication port via HTTP, FTP, NFS, Telnet and Samba to access your
Hard Drive or to upload channel lists. This is also used to update the
TM-500/600’s software.
RS-232C
Connect to the PC using a NULL Modem female-to-female RS232 cable to
upgrade the software by serial communication port.
S/PDIF (OPTICAL)
Connect with an appropriate optical cable to your HiFi-Amplifier or DSP. The
AC3 signal is also available if the selected channel transmits Dolby Digital
signals.
7
8
9
10
11
12
13
14
10
TM-500
TM-600
Page 7

11 1211
2. Control and Function
2.3 REMOTE CONTROL UNIT
POWER
Turns the
TM-500/600
ON/StandBy (Power OFF in viewing mode only).
If you hold (press) the button for more than 3 seconds, the Reboot/Sleep
Timer menu will appear.
Refer to "3.3 Menus (5)Reboot" instructions for further information.
MUTE
Turn the sound OFF/ON.
LAN
Opens Communication Setup menu.
TV/AV
Switch between Terrestrial and Satellite channels.
EDIT
Opens Channel list edit menu.
UHF
Opens UHF modulator setup menu
TV/RADIO
Opens TV or Radio channels.
PVR
Activates PVR mode. By pressing this button twice, if the Service List is
opened, it will change the layout/view of the Service List.
PLAYLIST
Opens Playlist menu where showing zapping history.
USB
Opens USB setup menu
SUB.T.
Shows subtitle or caption (if the broadcaster transmits it).
T.Text
Opens Teletext.
1
2
3
4
5
6
7
8
9
10
11
1211
Note
The Remote Control Unit’s design may be changed without any prior notice.
12
Page 8
1413
2. Control and Function
PROV
Opens Provider list.
AUDIO
Shows the available Audio Tracks (Audio Languages).
Fav.
Opens Favorite list.
EPG
Press the [EPG] button once to show the EPG info. Press it twice to enter the
EPG Style menu. Press the [OK] button to view further information.
INFO
Shows current program's stream information
MENU
Press the [MENU] button on the remote to open the Main Menu.
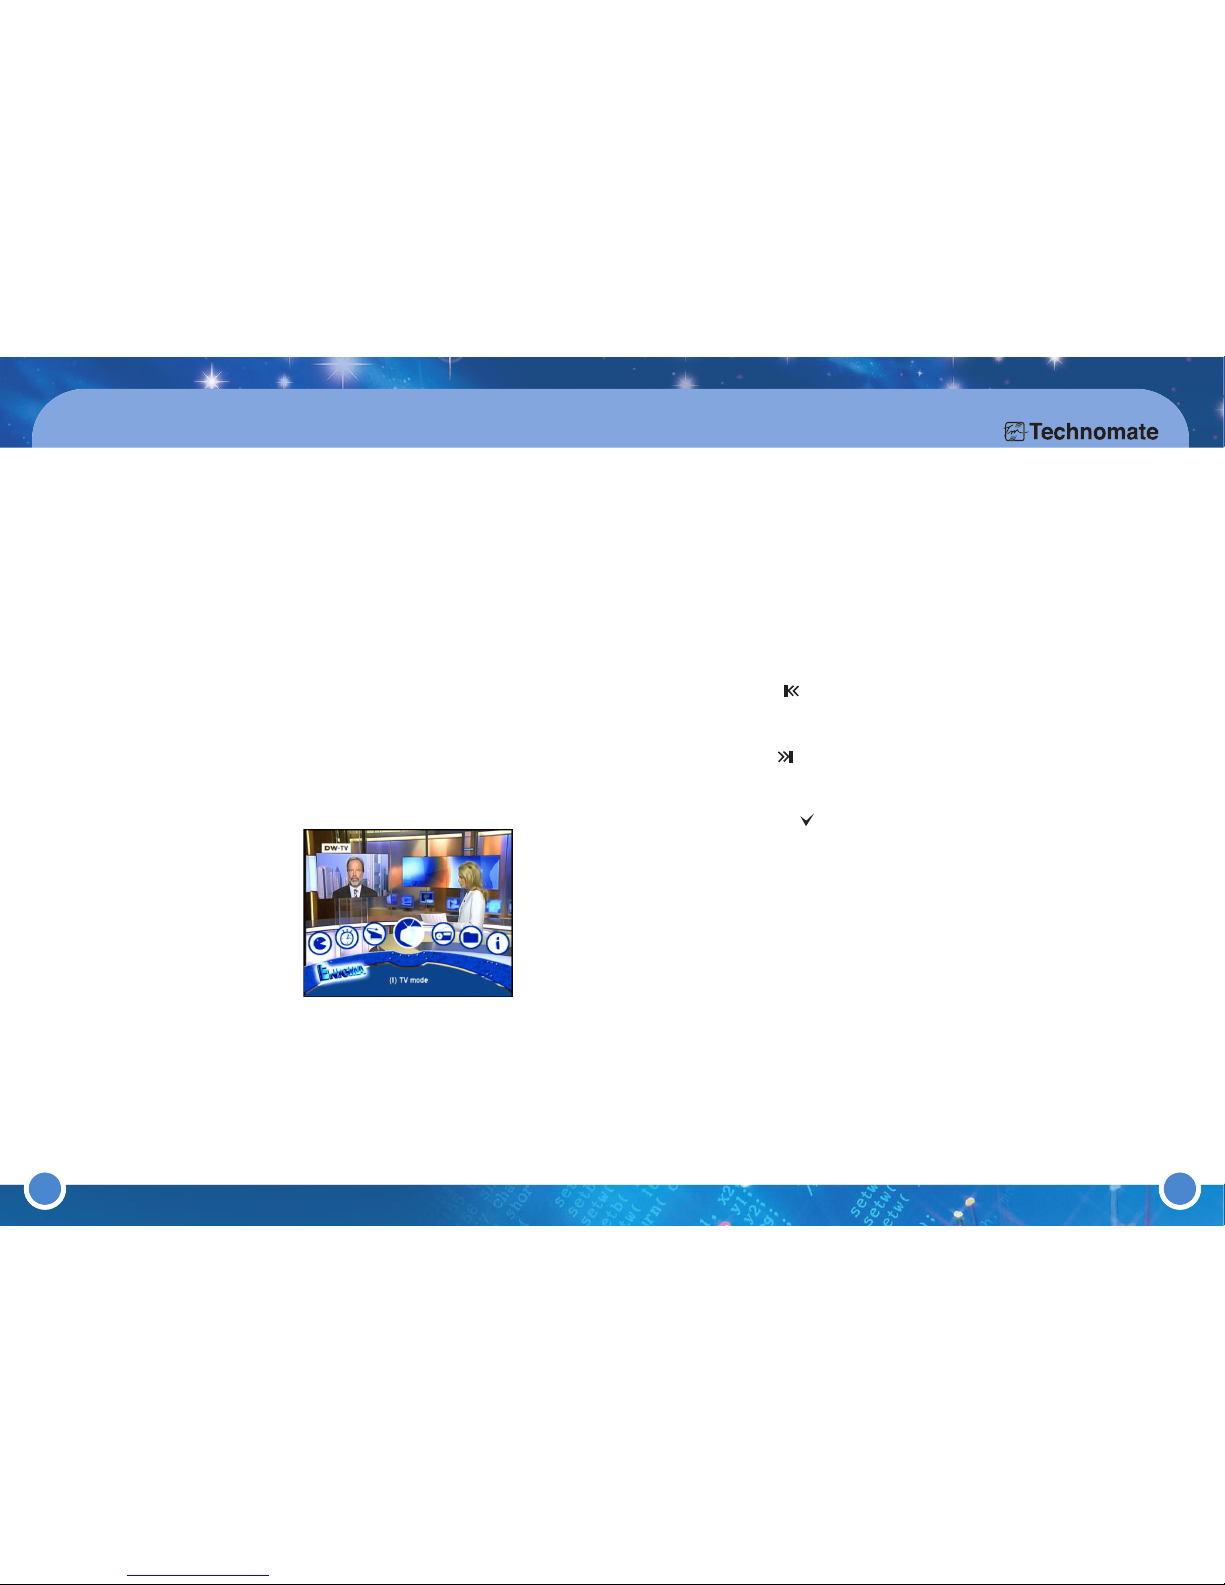
Use the [LEFT/RIGHT] Navigation buttons on the remote or press the
shortcut number of the Menus on the Numeric keypad to select a menu.
* Choose from the following:
(1) TV Mode
(2) Radio Mode
(3) File Mode
(4) Information
(5) Reboot
(6) Setup
(7) Games
(8) Timer
EXIT
Return to the previous menu or abort/exit operations.
VOL + / -
Increase/Decrease the Volume (volume up/down).
SAT
Opens Satellite Configuration menu.
13
14
15
16
17
18
19
20
21
22
23
FILELIST
Opens File mode
OK
Press the [OK] button to open the Service List in viewing mode and File
List in File mode.
Press [OK] to confirm a selection/function or to enter a chosen OSD Menu.
NAVIGATION BUTTONS
Move in menus. In viewing mode, you can open the Service List by
pressing the [UP/DOWN] button. To skip a page in the Service List, use the
[LEFT/RIGHT] buttons.
SEEK RW ( )
Press the [SEEK RW] button to jump the index backward to a bookmark
(chapter)
SEEK FF ( )
Press the [SEEK FF] button to jump the index forward to a bookmark
(chapter).
BOOKMARK ( )
Produces a bookmark (chapter) whilst watching a recorded program.
PVR FUNCTION
Control the PVR functions in PVR Mode
COLOR BUTTONS
Activates certain menu functions. Usage instructions are shown in each
OSD menu.
NUMERIC KEY (0-9)
Control the numerical operation and change the Channel/Service number
directly.
PREV (<)
Return to the previous channel/service or move to the end of the
Service List or the Play List.
NEXT (>)
Go to the next channel/service or move to the
beginning
of the
Service List
or the
Play List
.
24
25
26
27
28
29
30
31
32
Page 9
15 16
In the
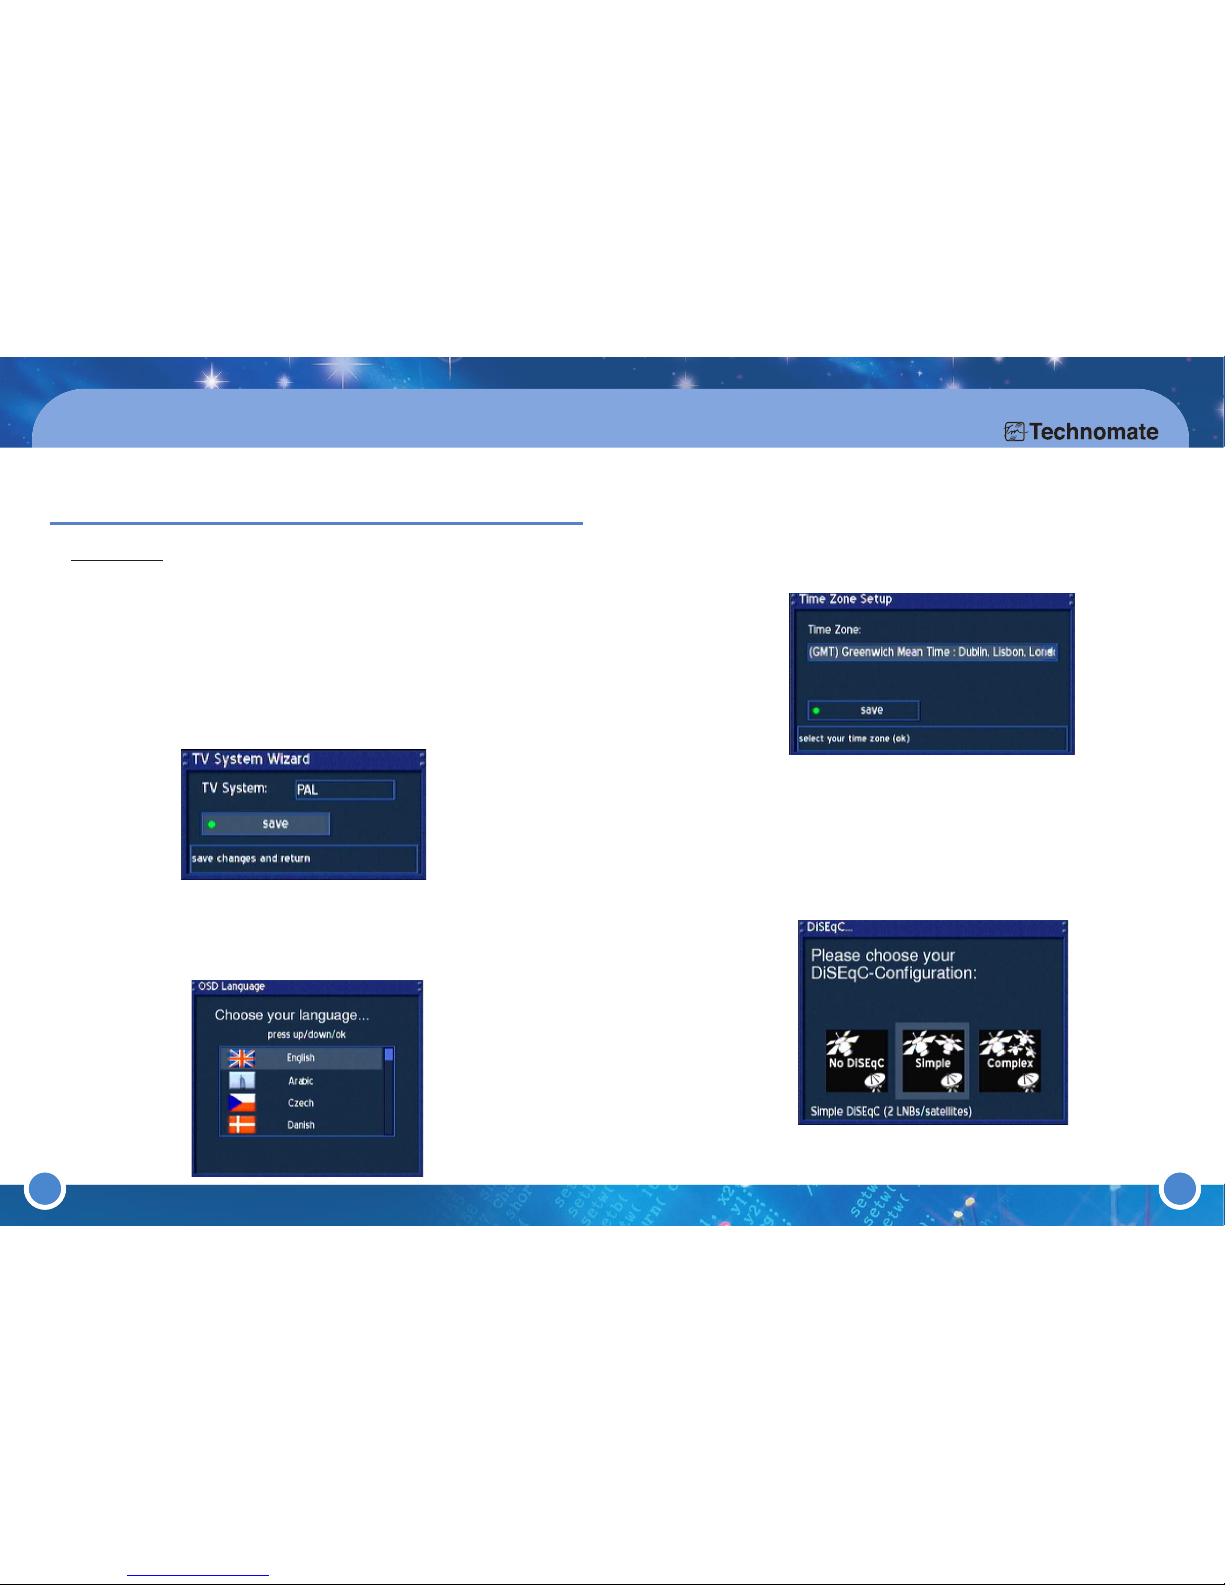
Time Zone Setup menu, press the [OK] button to open a dropdown list.
Use the [UP/DOWN] Navigation buttons to choose your Time Zone and press the
[OK] button to confirm. Press the [GREEN] button or press OK on save to save.
In the
DiSEqC...menu, choose your configuration.
a. No DiSEqC = Fixed dish/antenna on one satellite
b. Simple = When using a 2 / 4 Way DiSEqC switch for multiple satellites
c.i. Complex = For a USALS motorized dish/antenna
c.ii. Complex = For a DiSEqC 1.2 motorized dish/antenna
d. For a non-standard configuration, select any of the above and proceed to (6).
4
5
3. Operation & Setting
Mini-Glossary:
Services = channels
Service List = Channel List
In order to set up the receiver, follow the instructions below:
Turn on the TV and
TM-500/600
.
In the
TV System Wizard
menu, choose your TV system by [LEFT/RIGHT]
Navigation buttons. Press the [
GREEN
] button or press [OK]button on save to save.
3.1 GETTING STARTED
1
2
3
1615
In the OSD Language menu, use the [UP/DOWN] Navigation buttons
to choose a language. Press the OK button to confirm.
(The
OSD Language menu is in the Main Menu of (6)Setup (3)System
Settings
(6)OSD Language)
Page 10
17
3. Operation & Setting
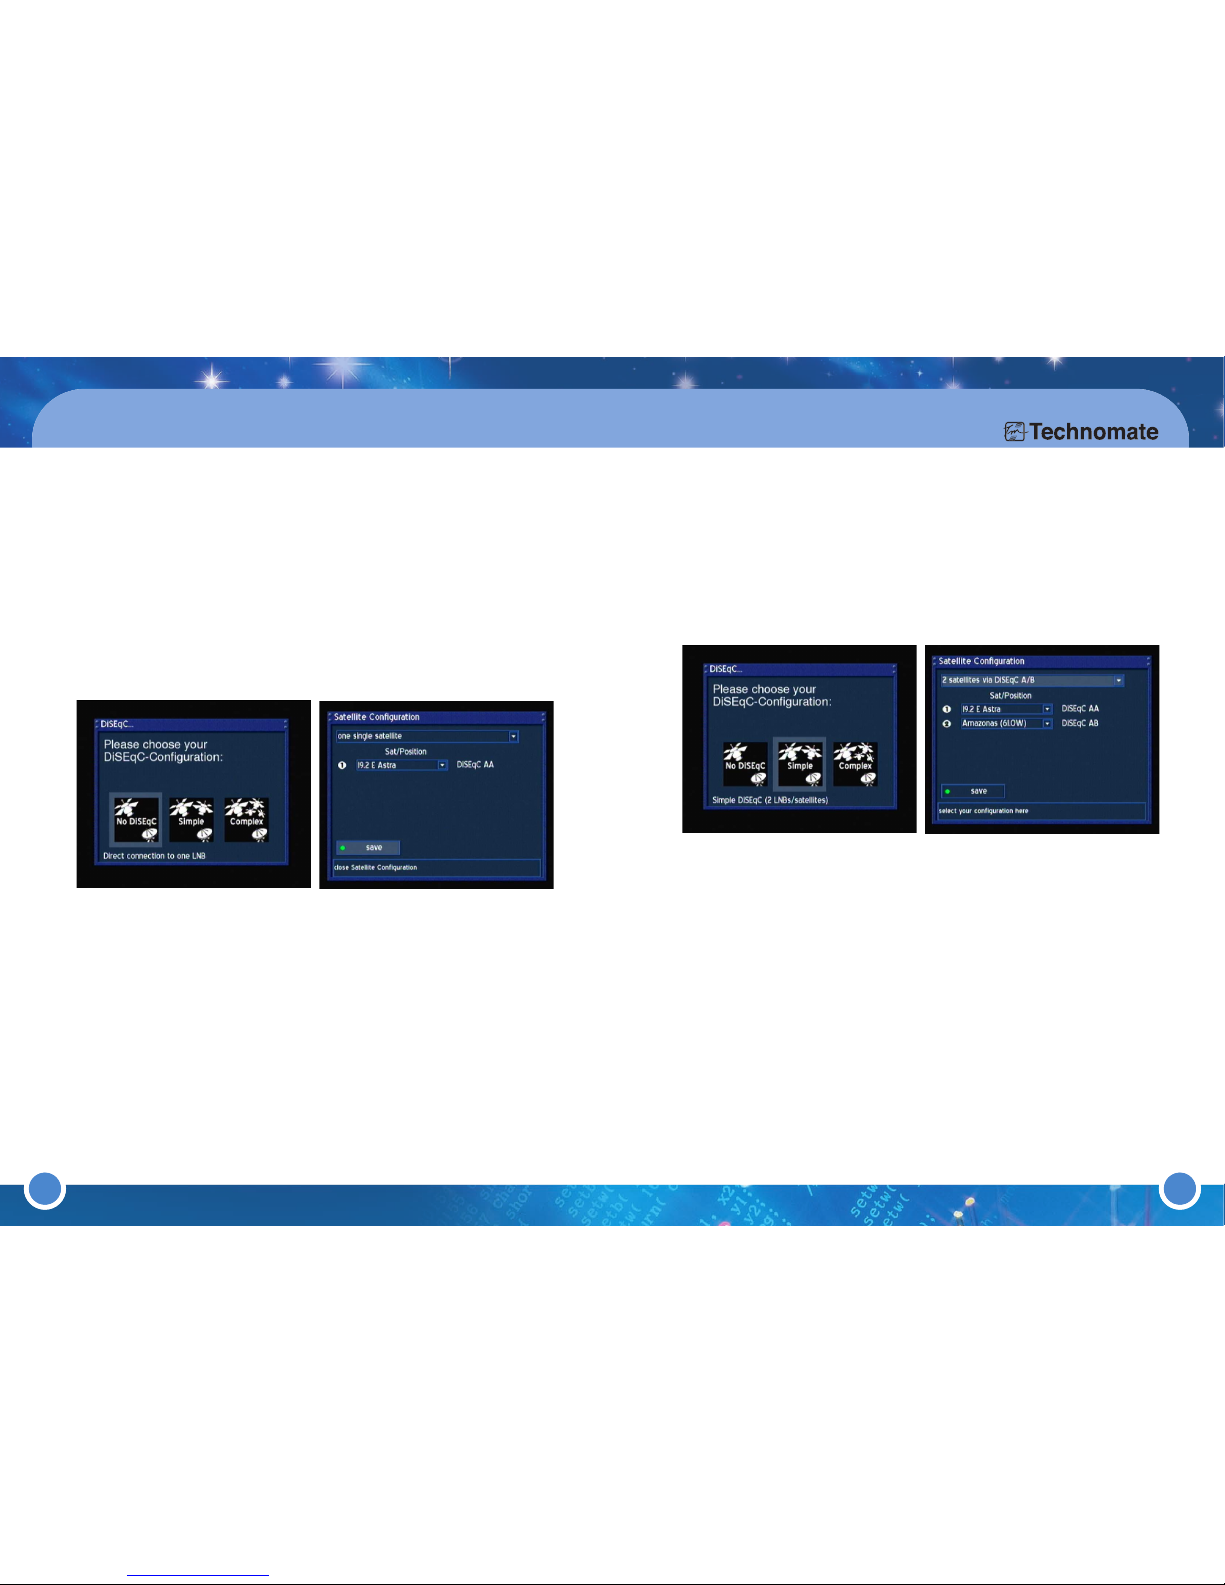
a.No DiSEqC
1. Go to the dropdown list (1) of satellites and press the [OK] button.
2. Select a satellite and press the [OK] button
3. Press the [GREEN] button or press [OK] on save to save
4. Select a satellite search method and press the [OK] button. Press [OK] on the satellite
in the dropdown list
5. Once a transponder is locked, press the [GREEN] button or press [OK] on search to
start scanning the satellite
5.
b.Simple
1.If you are using a 2-Way DiSEqC switch, proceed to step 3. If you are using
a 4-Way DiSEqC switch, proceed to step 2.
2.If you are using a 4-Way DiSEqC switch, go to dropdown list at the top of the menu
and press the [OK] button. Select ‘4 Satellites via DiSEqC OPT A/B’
3.Go to the dropdown lists of satellites and press the [OK] button in turn.
4.Select a satellite and press the [OK] button
5.
5.Press the [GREEN] button or press [OK] on save to save
6.Select a satellite search method and press the [OK] button. Press [OK] on a satellite
in the dropdown list
7.Once a transponder is locked, press the [GREEN] button or press [OK] on search to
start scanning the satellite
8.Repeat for other satellites
c.i Complex (Motor setup using USALS)
1.Press the [GREEN] button or press [OK] on save to save
2.Only if you know the mA of the Input Power of the motor, press the [OK] button on
"Use Motor Input Power" and enter the maximum current the Motor uses to move
the Dish/Antenna. If you do not know it, leave it unchecked.
3.Enter your Longitude and Latitude and press the [GREEN] button or press [OK] on
save to save. If you do not know your longitude and latitude, go to the Website
http://www.heavens-above.com to locate your geographical longitude and latitude.
4.Select a satellite search method and press the [OK] button. Press [OK] on a satellite
in the dropdown list
5.Once a transponder is locked, press the [GREEN] button or press [OK] on search to
start scanning the satellite
6.Repeat for other satellites
5.
18
Page 11
19
3. Operation & Setting
c.
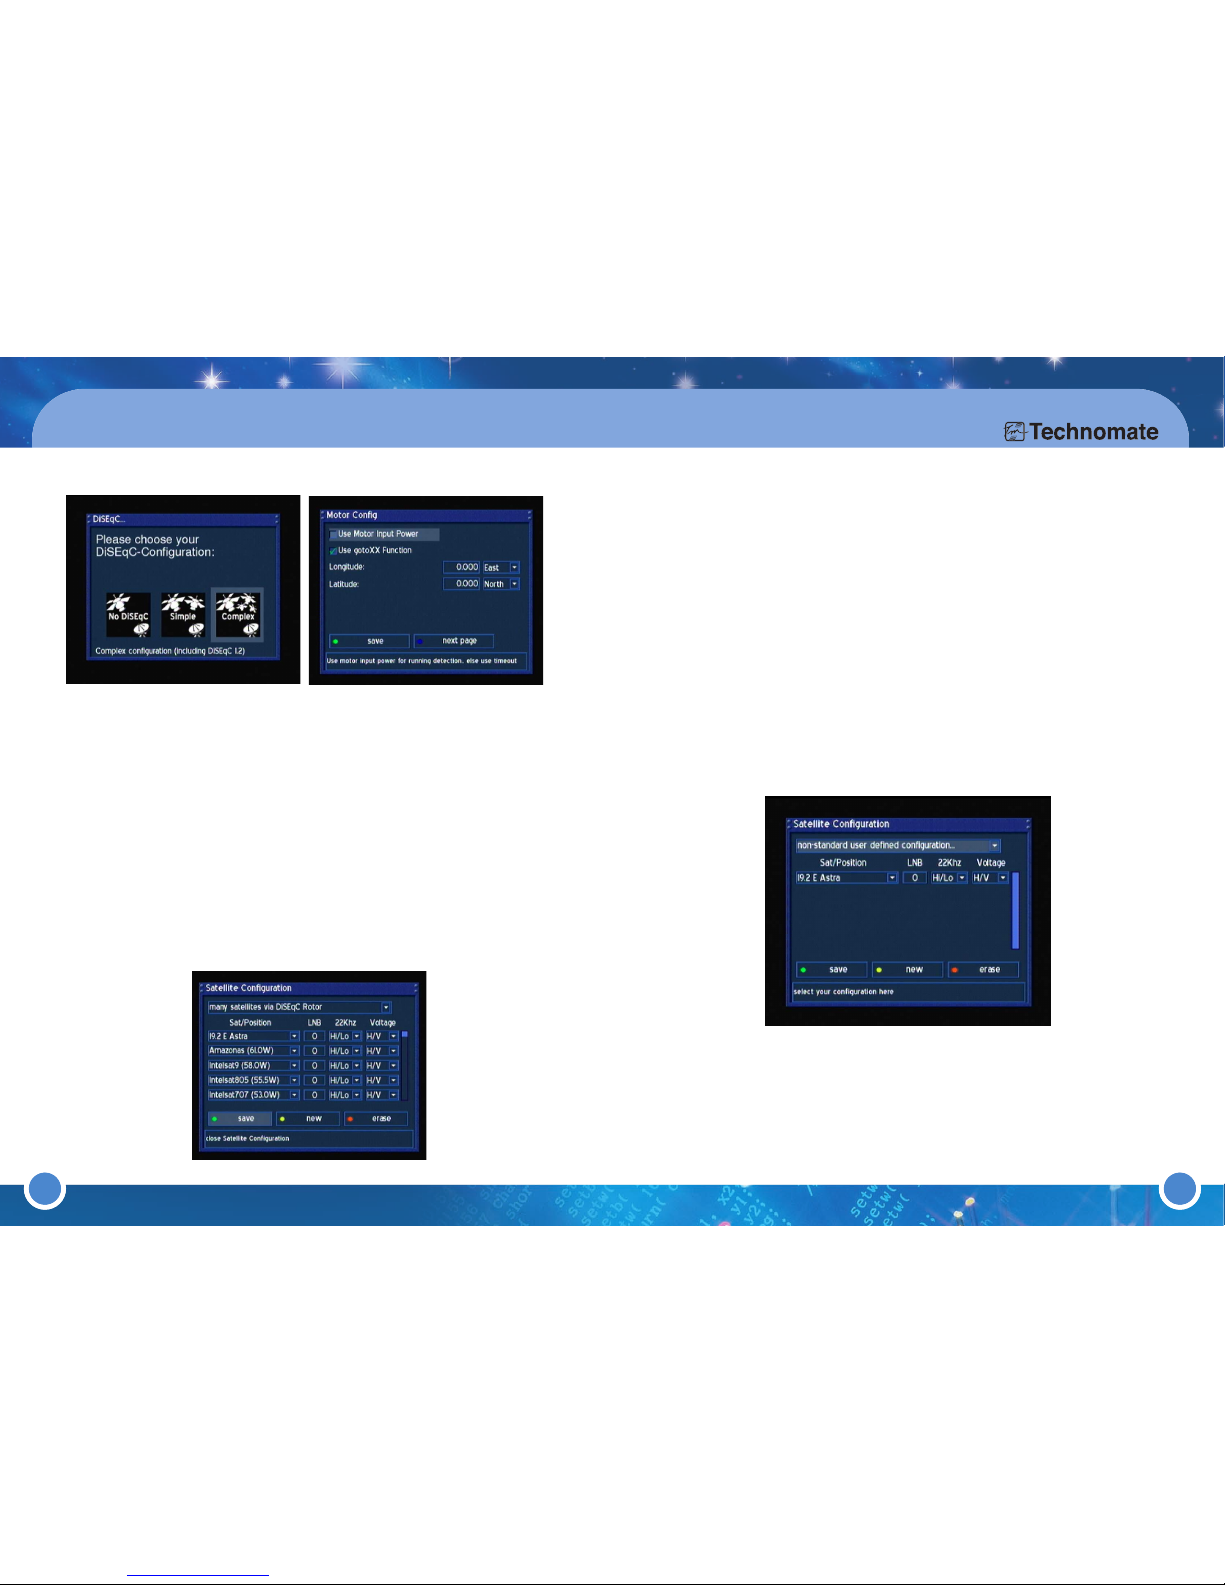
ii Complex (Motor Setup using DiSEqC 1.2)
1.Press the [GREEN] button or press [OK] on save to save
2.Exit all menus
3.Press the [MENU] button and go to - (6) Setup(2) Satellite Installation & TP Edit
(3) Motor Setup)
4.Find a satellite using Move and Move fine. Once you have found a satellite press
the [GREEN] button or press [OK] on store to save. Repeat for all other satellites.
5.Press the [BLUE] button on the remote or go to Search and press [OK]
6.Select a satellite search method and press the [OK] button. Press [OK] on a satellite
in the dropdown list
7.Once a transponder is locked, press the [GREEN] button or press [OK] on search to
start scanning the satellite
8.Repeat for other satellites
5.
d. Non-standard user defined configuration
1.To adjust the LNB Settings, go to dropdown list at the top of the menu and press the [OK]
button. Select "non-standard user defined configuration"
2.Go to the dropdown lists of satellites and press the [OK] button in turn.
3.Select a satellite and press the [OK] button
4.Adjust the settings accordingly
5.Press the [GREEN] button or press [OK] on save to save
6.Select a satellite search method and press the [OK] button. Press [OK] on a satellite in
the dropdown list
7.Once a transponder is locked, press the [GREEN] button or press [OK] on search to
start scanning the satellite
8.Repeat for other satellites
5.
20
Page 12
21
3. Operation & Setting
6
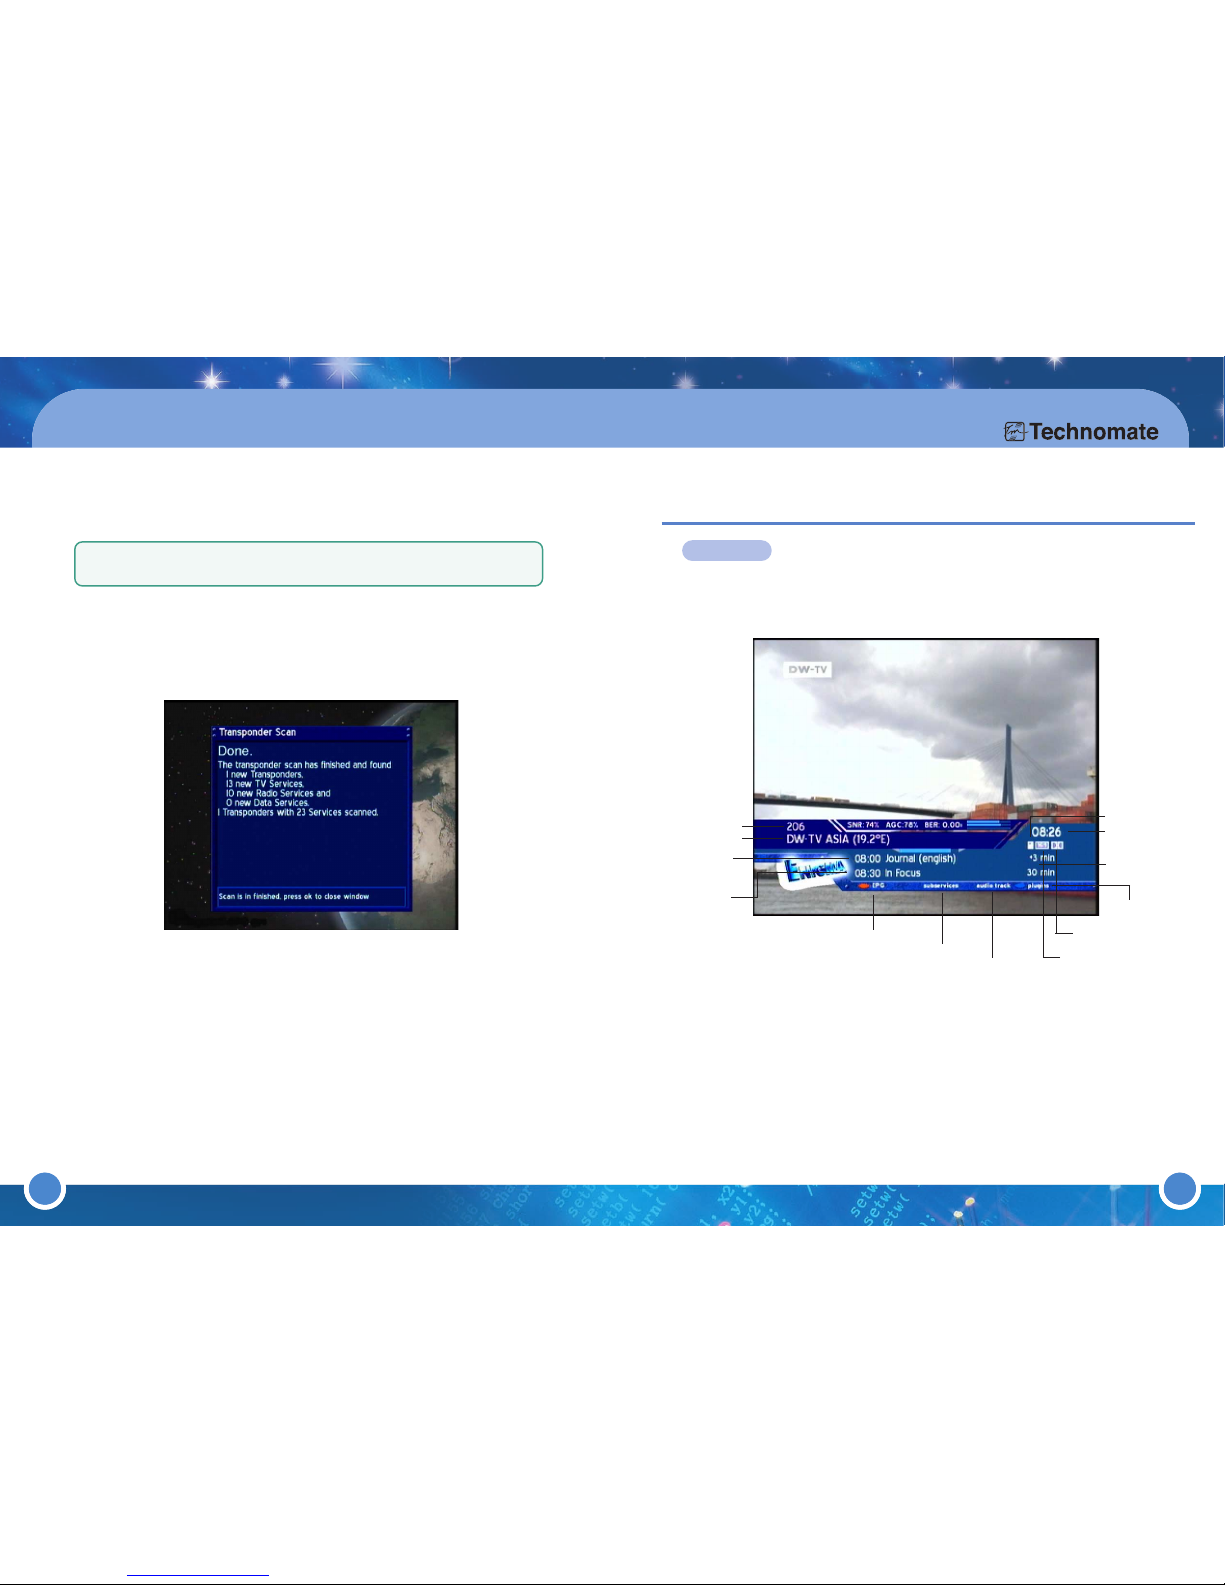
This window appears after scanning a satellite. Press the [OK] button to
proceed to the next satellite scan or to finish a scan. (The Satellite Search
menu is in the Main Menu of (6)
Setup
(2)
Satellite Installation & TP Edit
(5)Automatic Satellite Search)
Now you can enjoy your TV & Radio programs.
2221
INFO-BAR
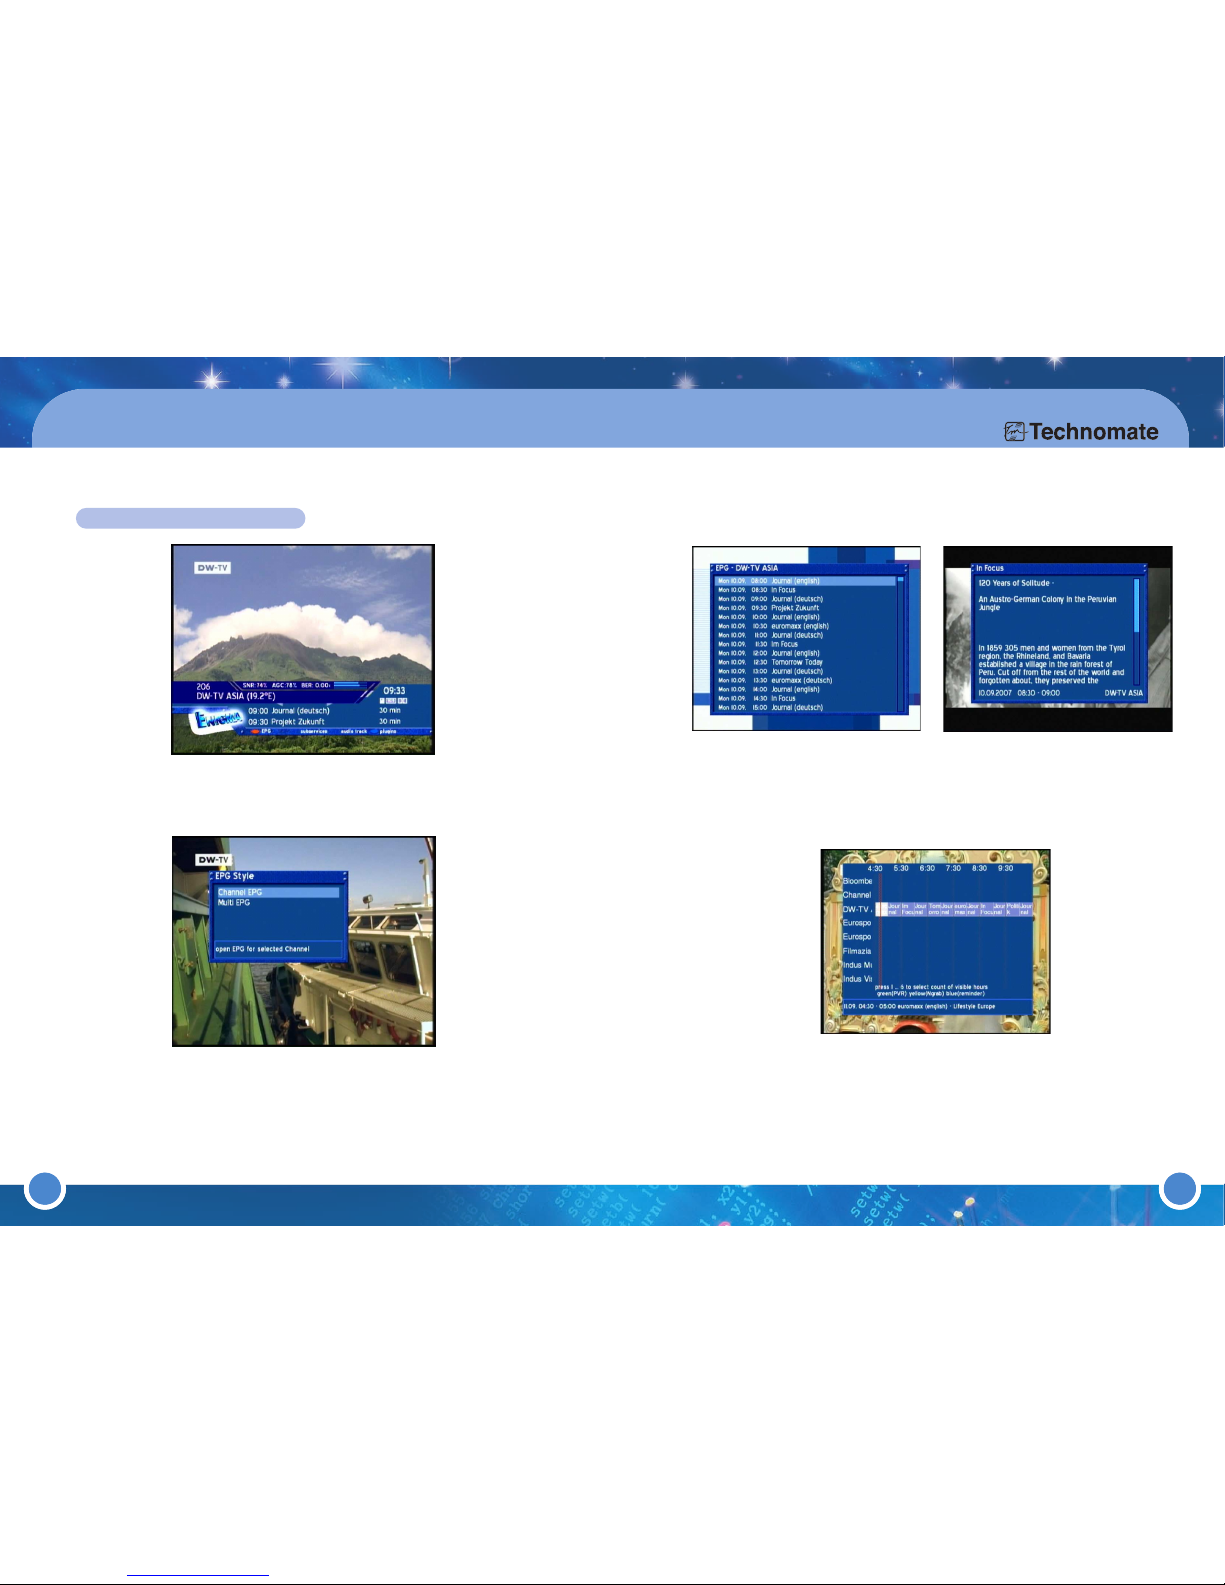
The Info-Bar appears and disappears by pressing the [OK] button in viewing mode.
The Info-Bar displays all the necessary information about the selected service.
If
Scrambled is orange, the transmitted Service is encrypted.
If
Aspect Ratio is orange, the Service is transmitted in 16:9 ; the usual Aspect
Ratio is 4:3.
If
Dolby Digital Program is orange, the Service is transmitted with Dolby Digital
Audio stream.
3.2 INFO-BAR
Current program
EPG available
Subservice available
Actual Time
Start time of
current program
Upcoming
Program
Aspect ratio
Audio
Overall Time
Dolby digital
Note If your LNB is not a C-Band LNB, then leave the tick/check
in the Checkbox of no circ polariz.
Channel program
Encryption type
Plugins
Page 13
24
3. Operation & Setting
23
EPG (Electronic Program Guide)
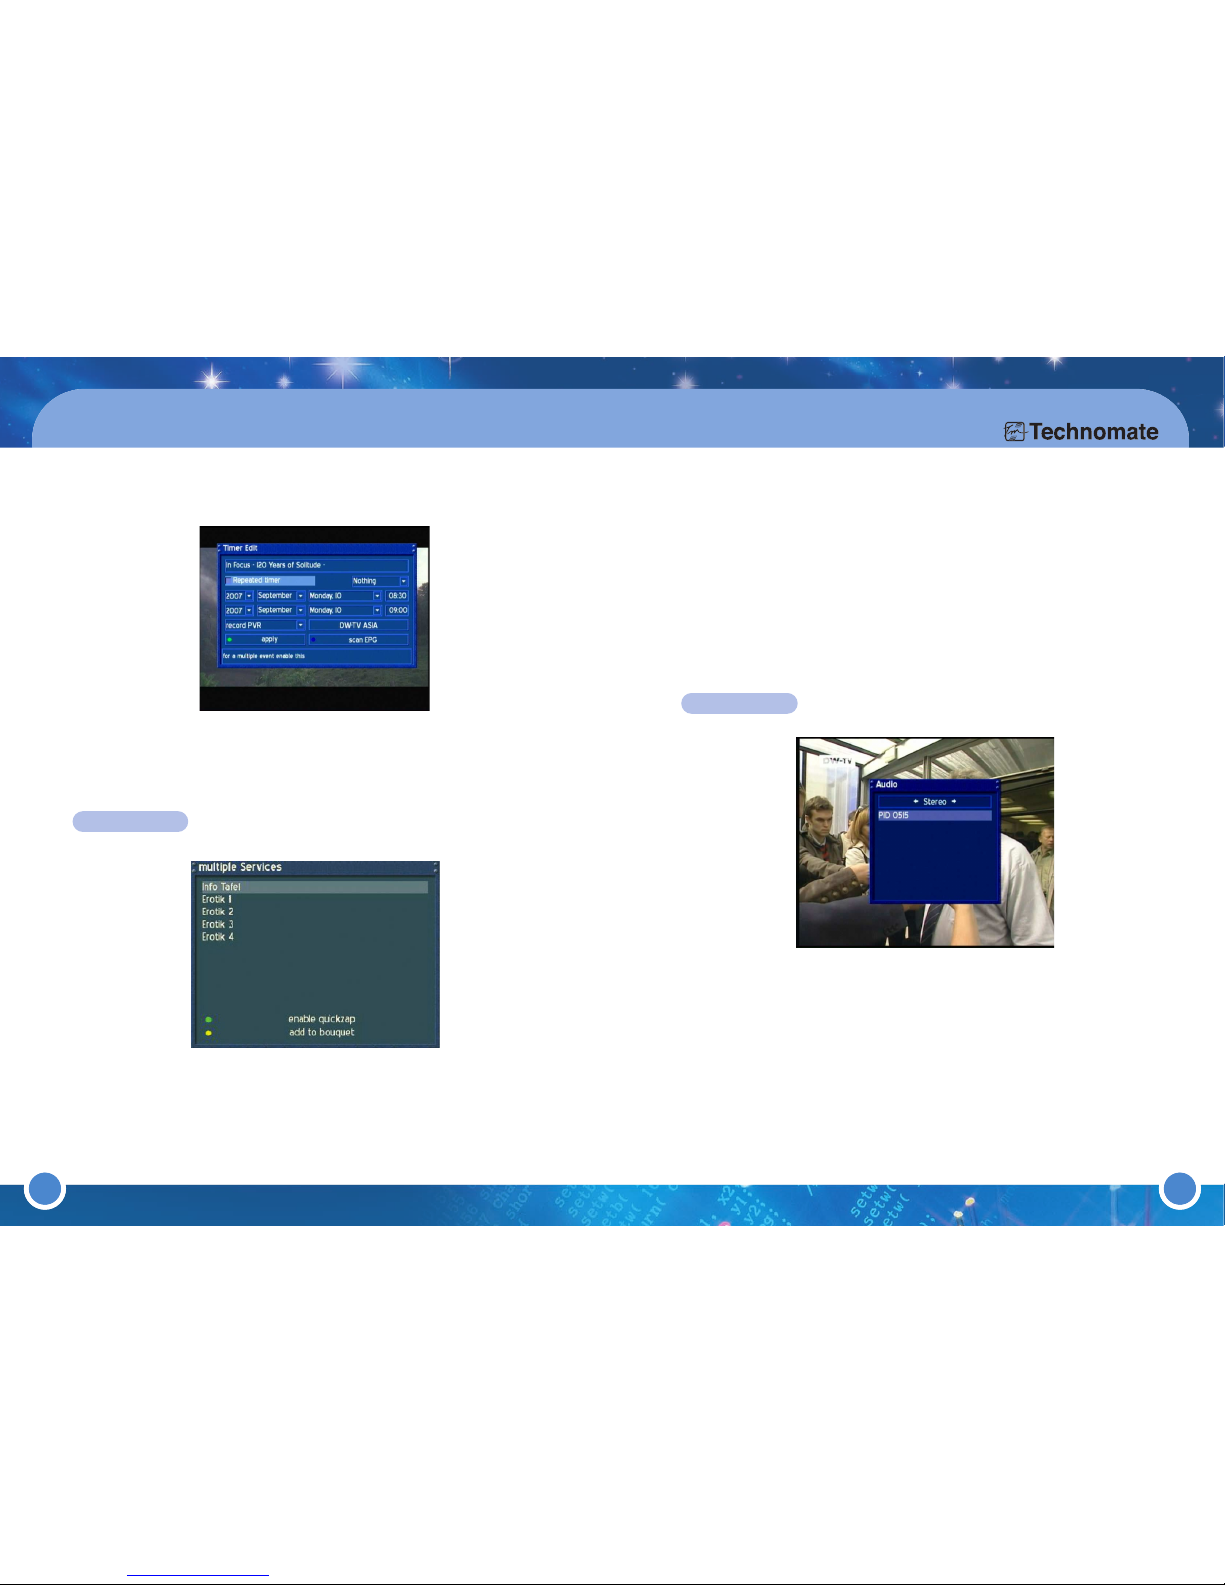
A red dot will appear in the Info-Bar if an EPG for the channel/service is available.
Press the [RED] or [EPG] button twice quickly to access the EPG Style menu
where you can select: Channel EPG (displays channel/service specific EPG) or
Multi EPG (displays EPG for all channels/services).
In Channel EPG, press the [OK] button on a program to view additional information.
In Multi EPG, you can adjust the timer/hours by using 1-6 on the Numeric Keypad
on the remote. Press the press the [OK] button to select a channel/service.
Page 14
25
To add a Timer to a channel/service, press the [GREEN] button to open the Timer Edit
menu. Adjust the settings accordingly (see Timer for further information).
*EDIT TIMER
SUBSERVICES
If a green dot in the Info-Bar appears, the channel/service has a Subservice.
Press the [
GREEN] button to enter the Multiple Services menu. Use the
[UP/DOWN] Navigation buttons to choose a service. Press the [OK] button to
select the service.
enable quick zap:
Press the [GREEN] button to enable the quick zap mode. You can now choose a
multiple service using the [LEFT/RIGHT] Navigation buttons without entering the
menu. Press the [
GREEN] button to open the menu and press the [GREEN]
button again to deactivate the quick zap mode.
add bouquet:
Press the [
YELLOW
] button to add the selected Service to a Bouquet of your choice.
AUDIO TRACK
If a yellow dot in the Info-Bar appears, the program/service transmits in multiple
Audio Tracks & Audio Languages. Use the [LEFT/RIGHT] Navigation buttons to
choose an Audio Track from: Left-Mono, Stereo & Right-Mono.
Use the [UP/DOWN] Navigation buttons to choose an Audio Language.
26
Page 15
27
3. Operation & Setting
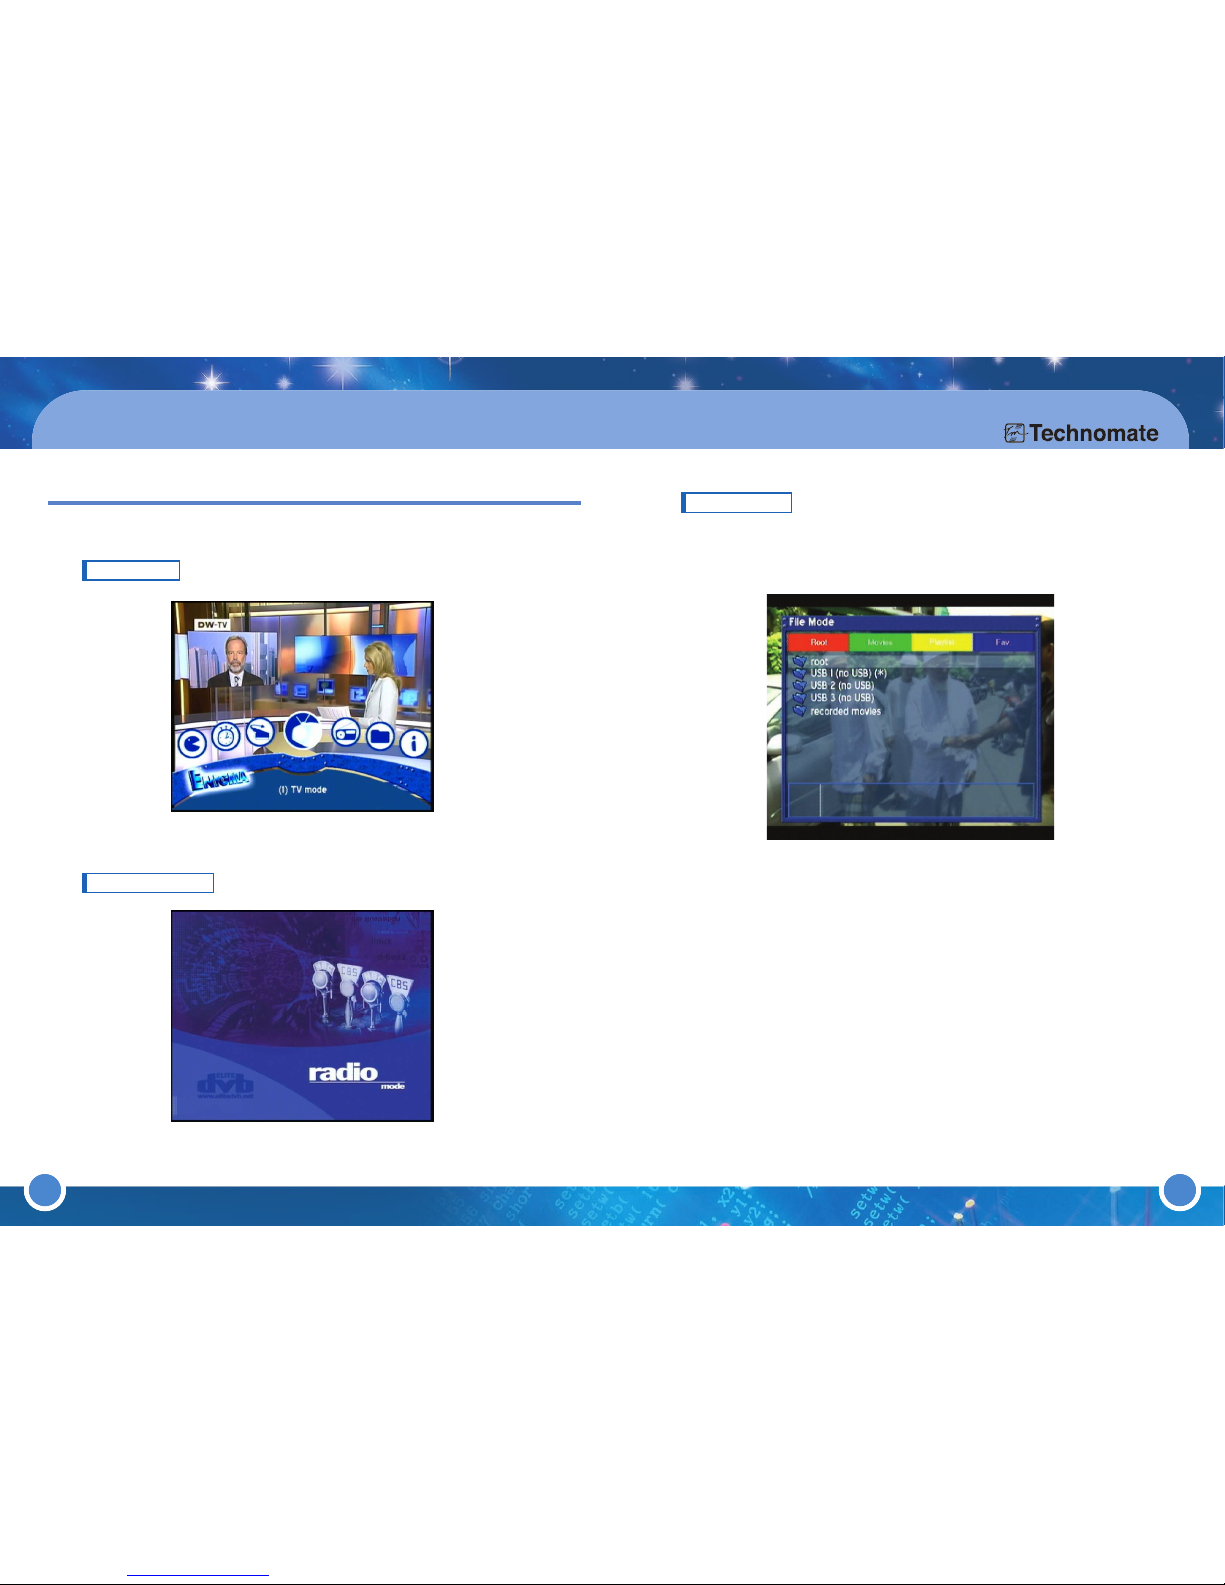
TV MODE
Select this menu to return to TV mode (TV channels).
RADIO MODE
Select this menu to return to Radio mode (Radio channels).
28
FILE MODE
Press the [MENU] button to go to the Main Menu. Go to - (3) File. Use the
colored Navigation buttons to choose from:
■ Root [RED] button: View the folder names
■ Movies [GREEN] button: View a list of your recorded files.
■Playlist [YELLOW] button: View a list of programs and recorded files
which have been selected.
■ Fav. [BLUE] button: View a list of your Favorites list. Press the [MENU]
button to go to the
Service Menu. Refer to “3.3 Menus (6)
Setup
Fav.List Edit
” for further information.
3.3 MENUS
To access the Main Menu, press the [MENU] button.
Page 16
29 30
3. Operation & Setting
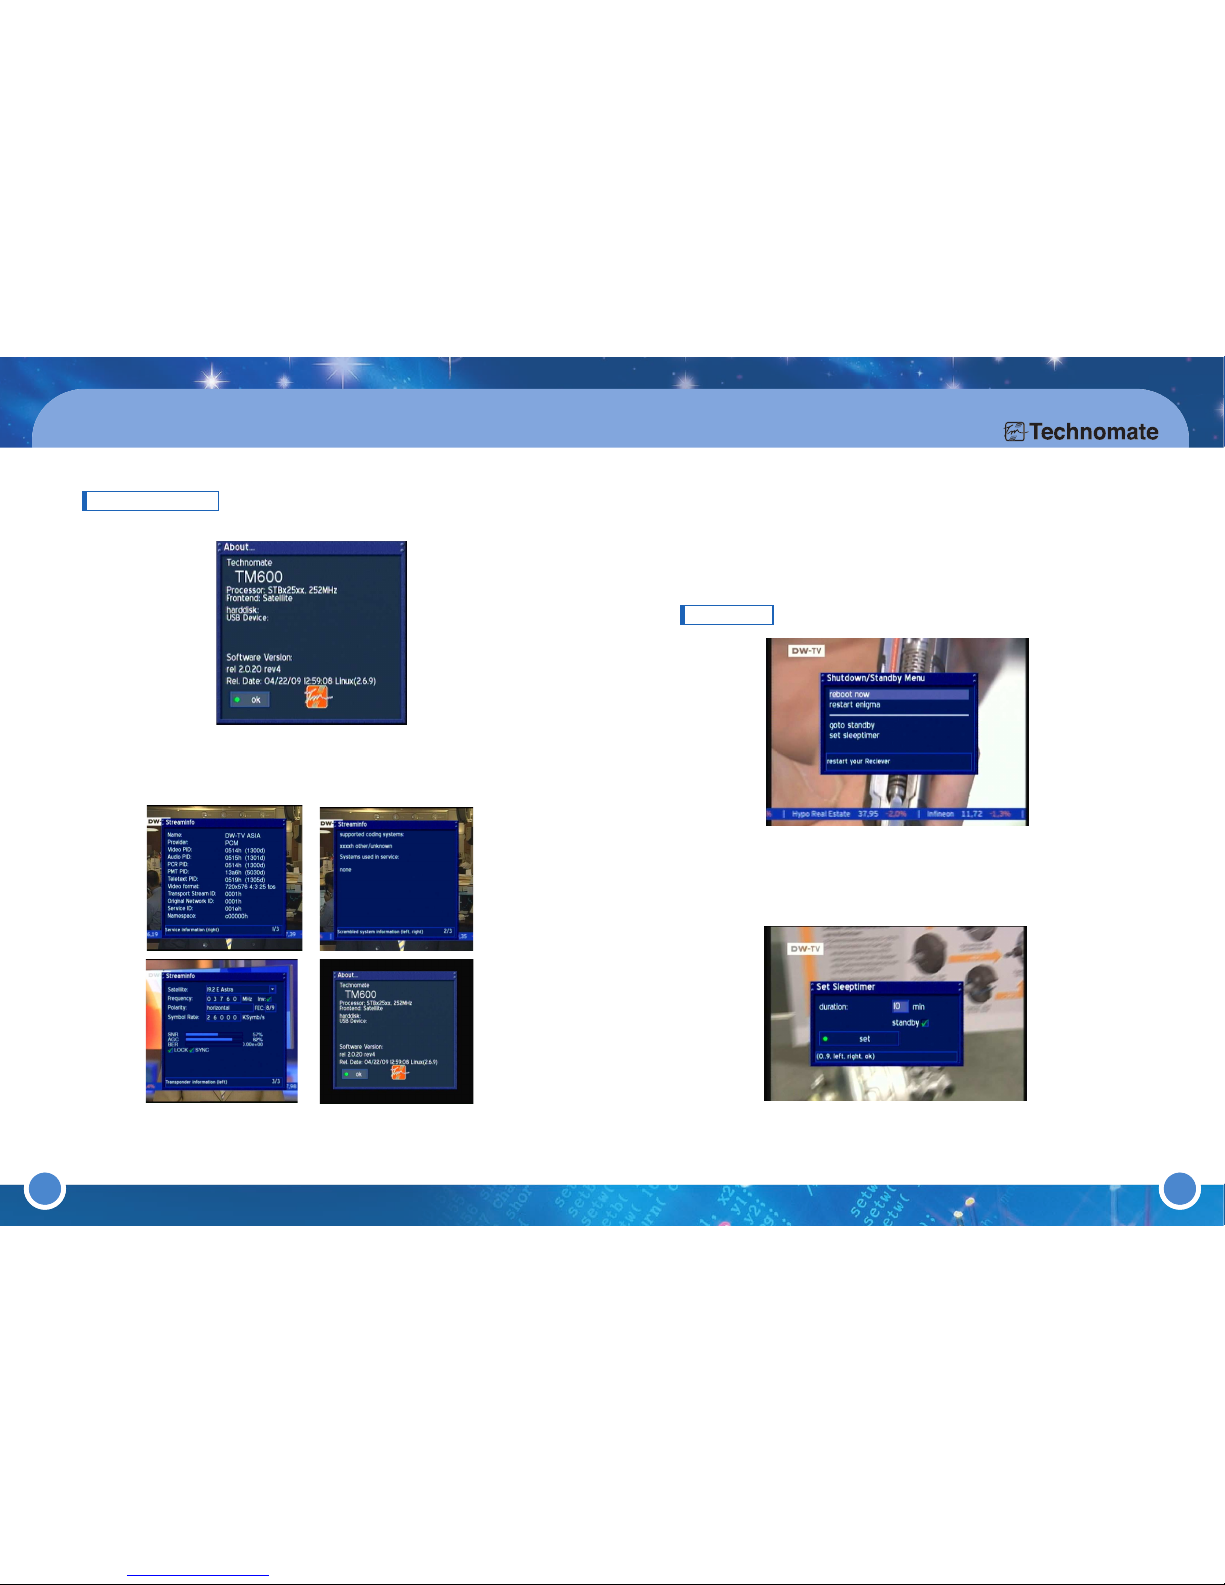
INFORMATION
View the Stream Information of a channel and the receiver’s information,
including HDD specification.
To view further information of a channel/service in the Streaminfo menu, use
the [RIGHT] Navigation button to open the next page of
Sreaminfo. Use the
[LEFT] Navigation button to go back to the previous menu.
In the
About...menu, view the
receiver
’s information, including software
version & HDD specification.
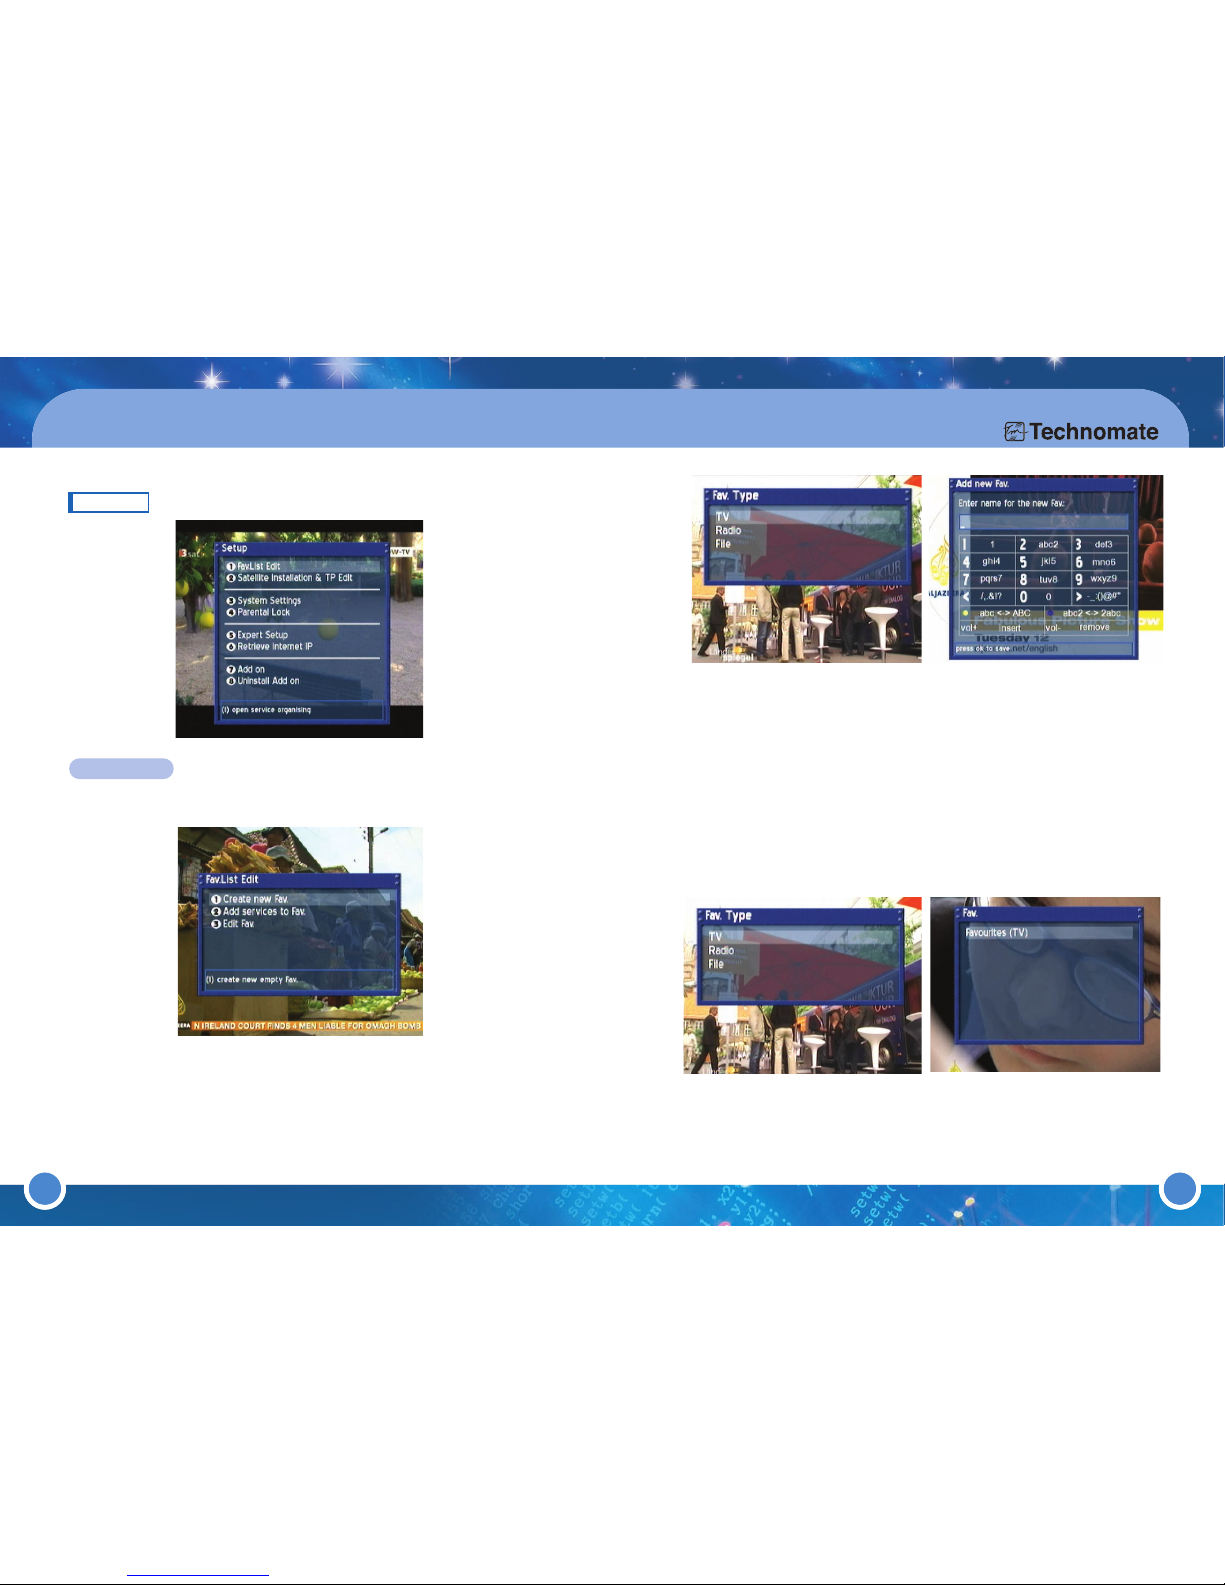
REBOOT
■ reboot now : Restart the receiver.
■ goto standby : Go to standby mode.
■ set sleeptimer : Set a maximum duration of 240 minutes. Press the
[
GREEN] button to set the sleep timer.
Page 17
32
3. Operation & Setting
31
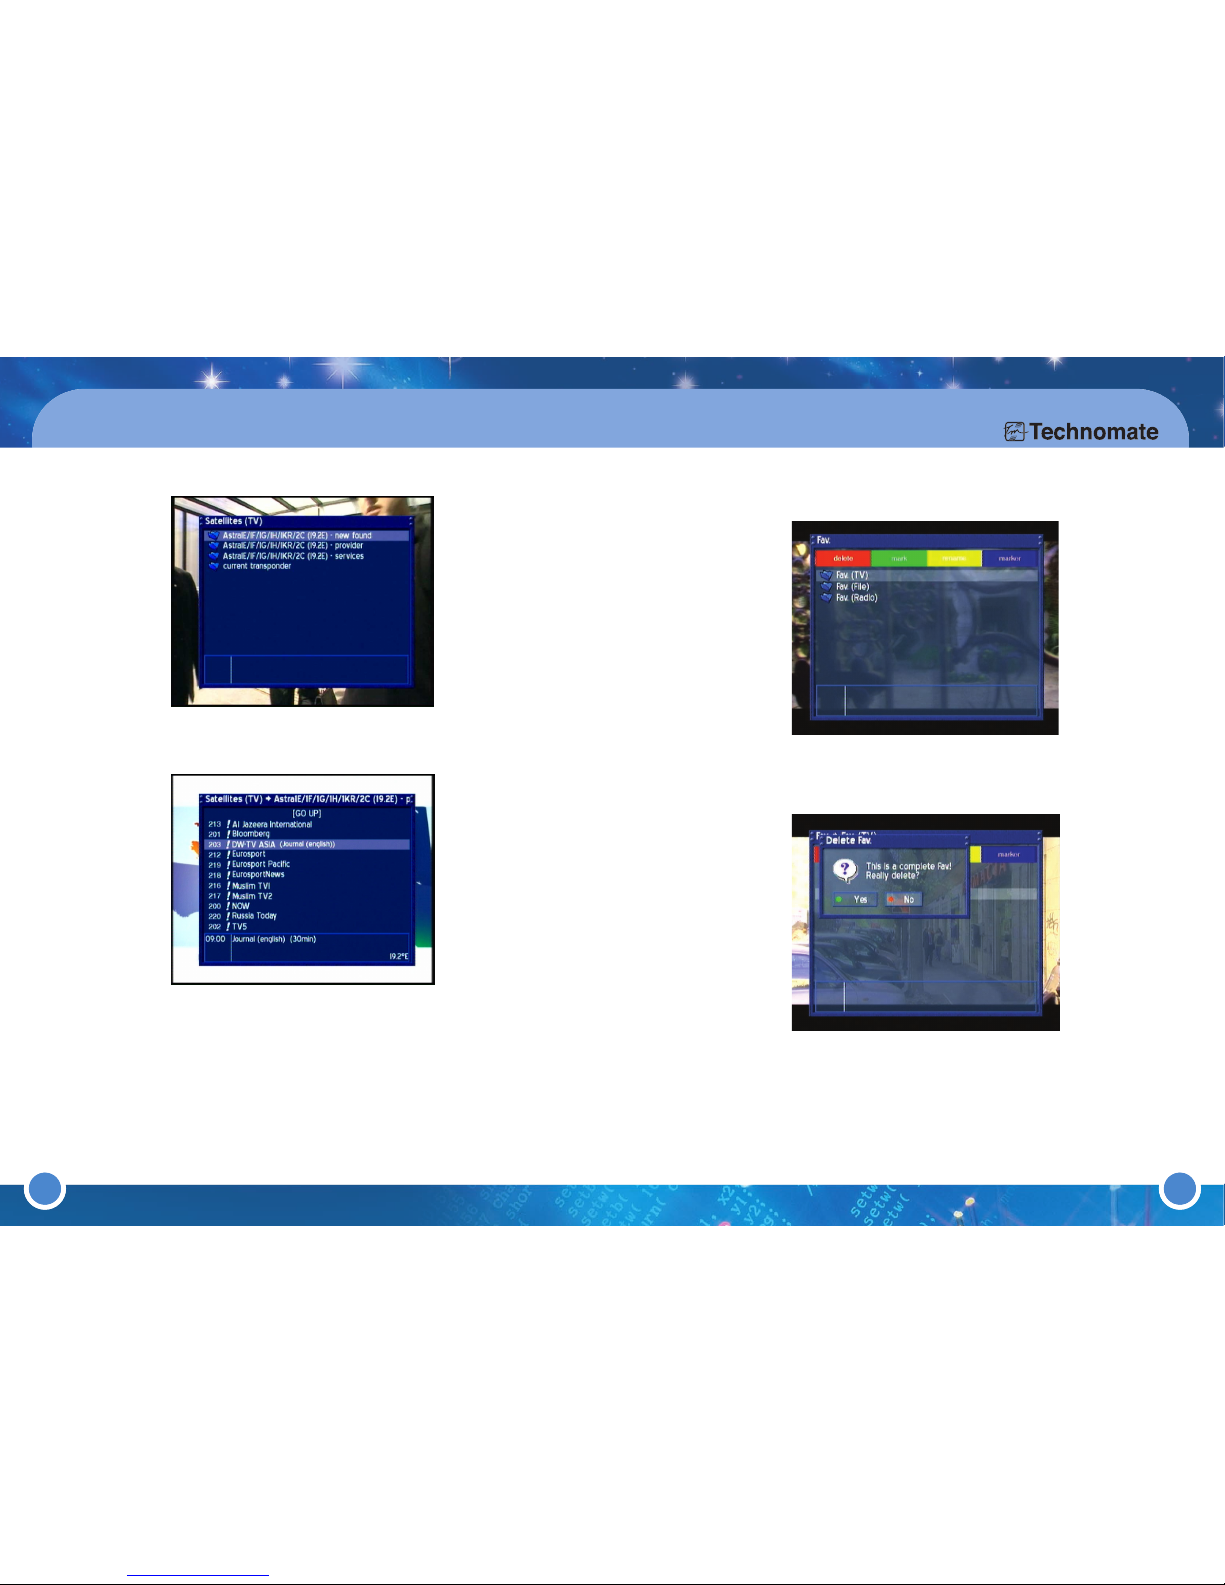
SETUP
Fav.List Edit
* CREATE NEW FAVORITE CHANNEL GROUP
Fav.List Edit is used to save your favorite channels/services from the Service
List in to one simple favorite list.
You can add: TV,Radio or File group. Press the [MENU] button to go to the Service
Menu. Refer to “
3.3 Menus (6)Setup (1) Fav.List Edit” for
further information.
Chooose a channel that you want to create from: TV, Radio or File. Enter a
name with the [NUMERIC KEYS] on your Remote Control.
■ Press the [YELLOW] button for lower or uppercase letters.
■ Press the [BLUE] button for numbers or letters to begin first.
■ Press the [VOL +] button to insert a letter or space.
■ Press the [VOL -] button to delete a letter or space.
■ Press the [OK] button to save. The system will guide you back to the menu.
To check/confirm the created channel press the [MENU] button to go to the
Main Menu. Go to - (6)Setup (1)Fav.List Edit (3)Edit Fav.
* ADD CHANNEL SERVICES TO A FAVORITE LIST
Press the [MENU] button to go to the Main Menu. Go to - (6) Setup
(1) Fav.List Edit (2) Add services to Fav.
Page 18
34
3. Operation & Setting
33
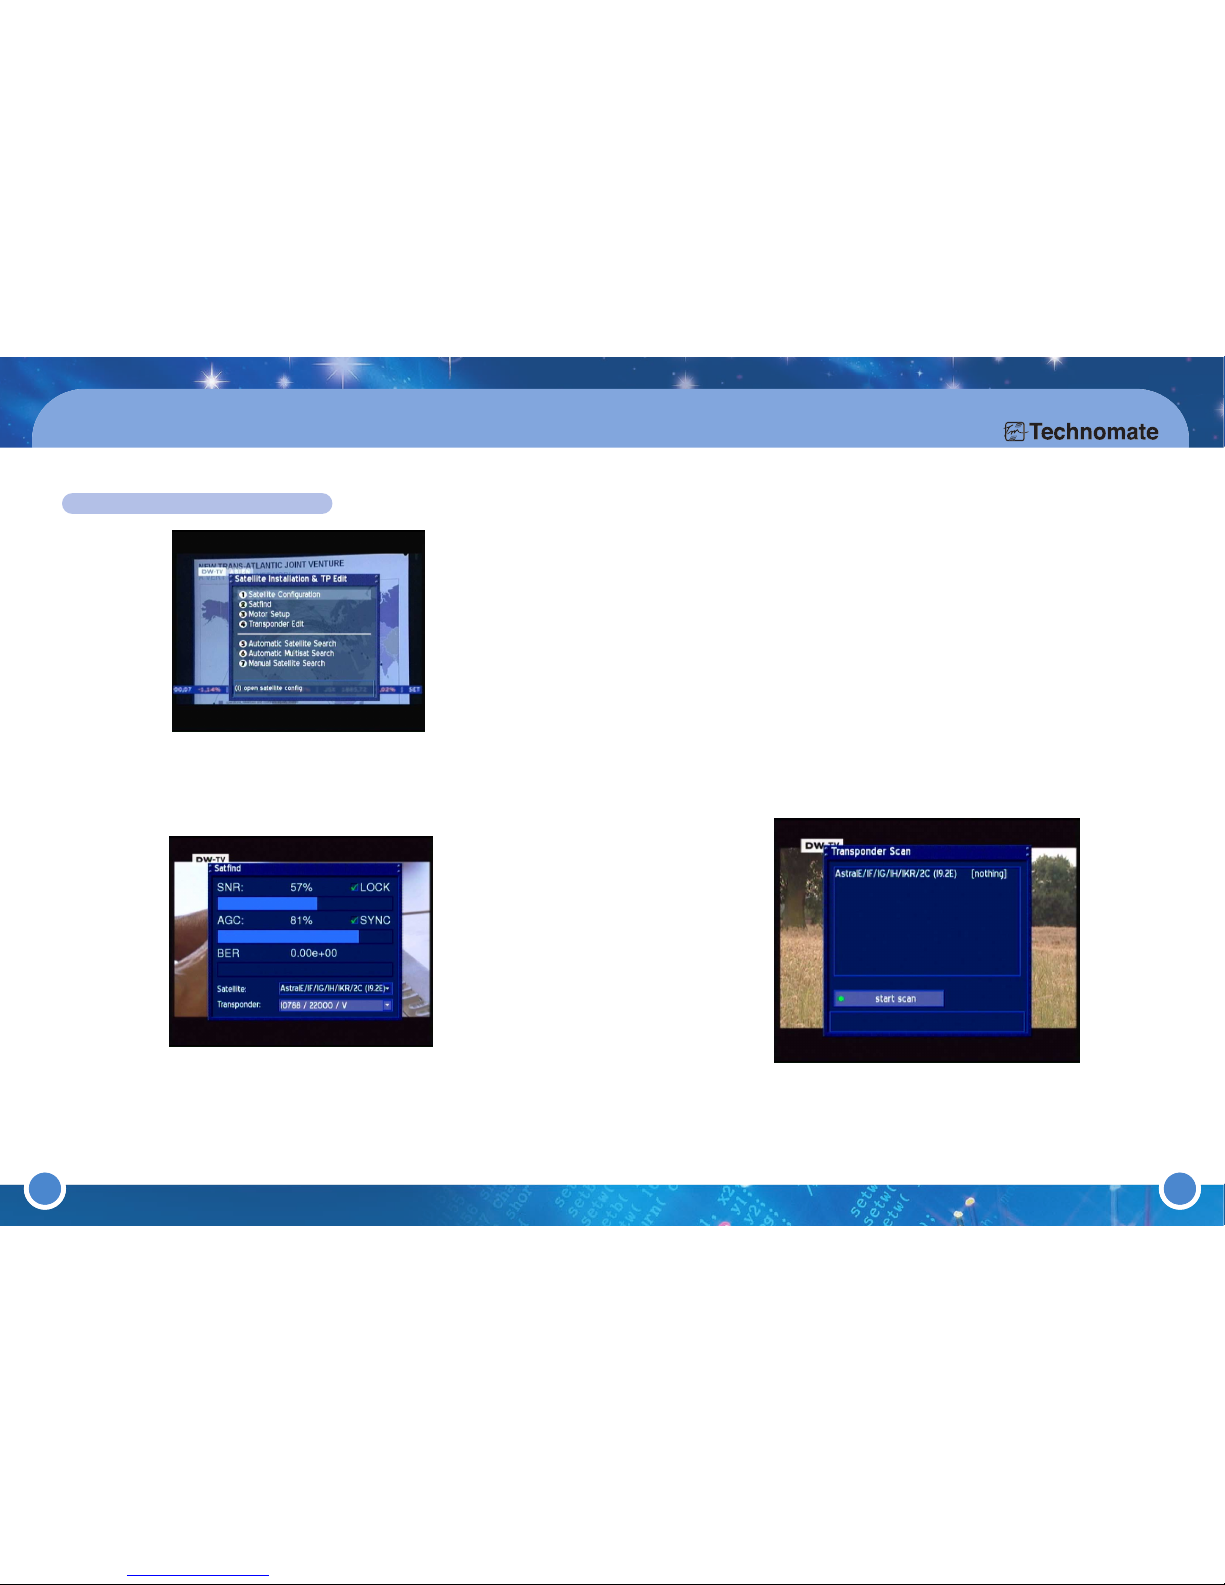
The Satellites menu shows all configured satellites. You can either add
channels/services from the Provider List or from the Services List. Select
your option by pressing the [OK] button.
Now choose your desired channels/services by navigating to them and
pressing the [OK] button to select/confirm your favorite channel. All selected
channels/services will appear red. To deselect a channel/service, press the
[OK] button on it again.
To finish your selection, press the [EXIT] button.
You will return to the
Fav.List Edit menu.
To check/confirm the selected channels/services, press the [MENU] button to
go to the
Main Menu. Go to - (6)Setup
(1)
Fav.List Edit
(3)
Edit Fav.
and go to your created channels.
select services Type - TV, Radio or File, and then select a service.
* Edit Fav. (Favorite Group)
Press the [MENU] button to go to the Main Menu. Go to - (6)Setup
(1)
Fav.List Edit
(3)Edit Fav. and select a channel to edit/rename a
channel/service, press the [
YELLOW] button. Press [OK] button to save.
Press the [RED] button to delete the selected channel.
Press the [GREEN] button to highlight a channel and move it up/down in
the list. Press the [
GREEN] button again to confirm/release.
Press the [YELLOW] button to rename a selected channel.
Press the [BULE] button to set a marker between two channels. A marker is
used to separate
channel. You can create as many markers as you want.
Press the [EXIT] button to Exit.
Page 19
36
3. Operation & Setting
35
SATELLITE INSTALLATION & TP EDIT
* SATELLITE CONFIGURATION
To set up your satellite configuration, refer to “3.1 Getting started”.
*
SATFIND
Press the [MENU] button to go to the Main Menu. Go to - (6)Setup
(2)
Satellite Installation & TP Edit
(2)Satfind.
This menu allows you to clear see the SNR, AGC and BER. Choose a satellite
and transponder from the dropdown list.
Adjust the dish towards the desired satellite until you have a high value on the
Signal strength AGC and on the Signal quality SNR indicator.
BER should always indicate a value of zero if the Satellite is locked and
synced.
SNR: Signal to Noise Ratio. This Indicator shows the Signal Strength.
AGC
: Automatic Gain Control. This Indicator shows the Signal Quality.
BER: Bit Error Rate. This Indicator shows the Signal Errors Rate.
* AUTOMATIC SATELLITE SEARCH
Go to Automatic MultiSat Search (press the [MENU] button to go to the
Main Menu). Go to - (6)
Setup (2)Satellite Installation & TP Edit
(5)Automatic Satellite Search and select the satellite that you want to
scan from the dropdown list. Press the [
GREEN] button to scan.
* AUTOMATIC MULTISAT SEARCH
To scan more than one satellite all at once, go to Automatic Multisat Search
(press the [MENU] button to go to the Main Menu. Go to - (6)
Setup
(2)
Satellite Installation & TP Edit
(6)
Automatic Multisat Search
Page 20
3837
and select the satellites that you want to scan from the list by pressing the
[OK] button. By pressing the [OK] button more than once, you can select
your searching method (All or Only Free). Press the [
GREEN] button to start
scanning.
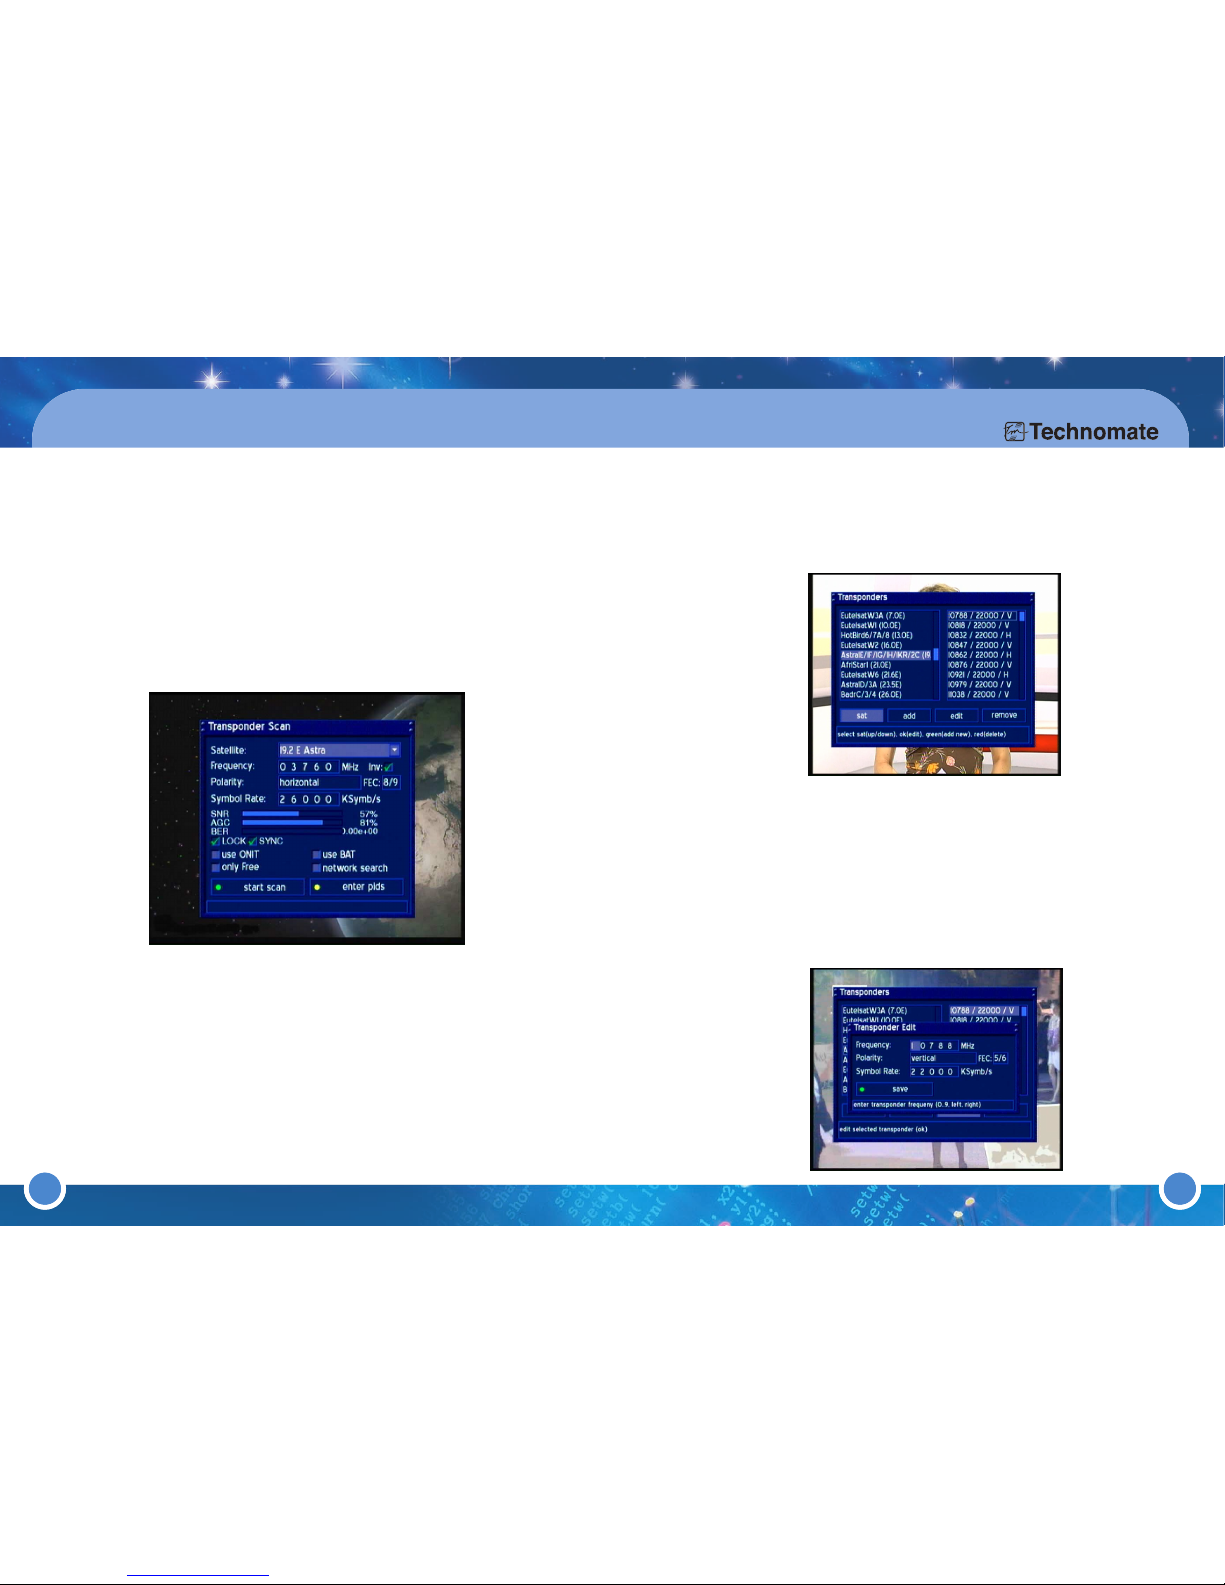
* MANUAL SATELLITE SEARCH
Press the [MENU] button to go to the Main Menu. Go to - (6)Setup
(2)Satellite Installation & TP Edit (7)Manual Satellite Search.
Press the [
OK] button on Satellite to open a dropdown list. Select a satellite
and press the [
OK] button.
Enter the Transponder values in the fields. Press the [
GREEN] button to start
scanning.
3. Operation & Setting
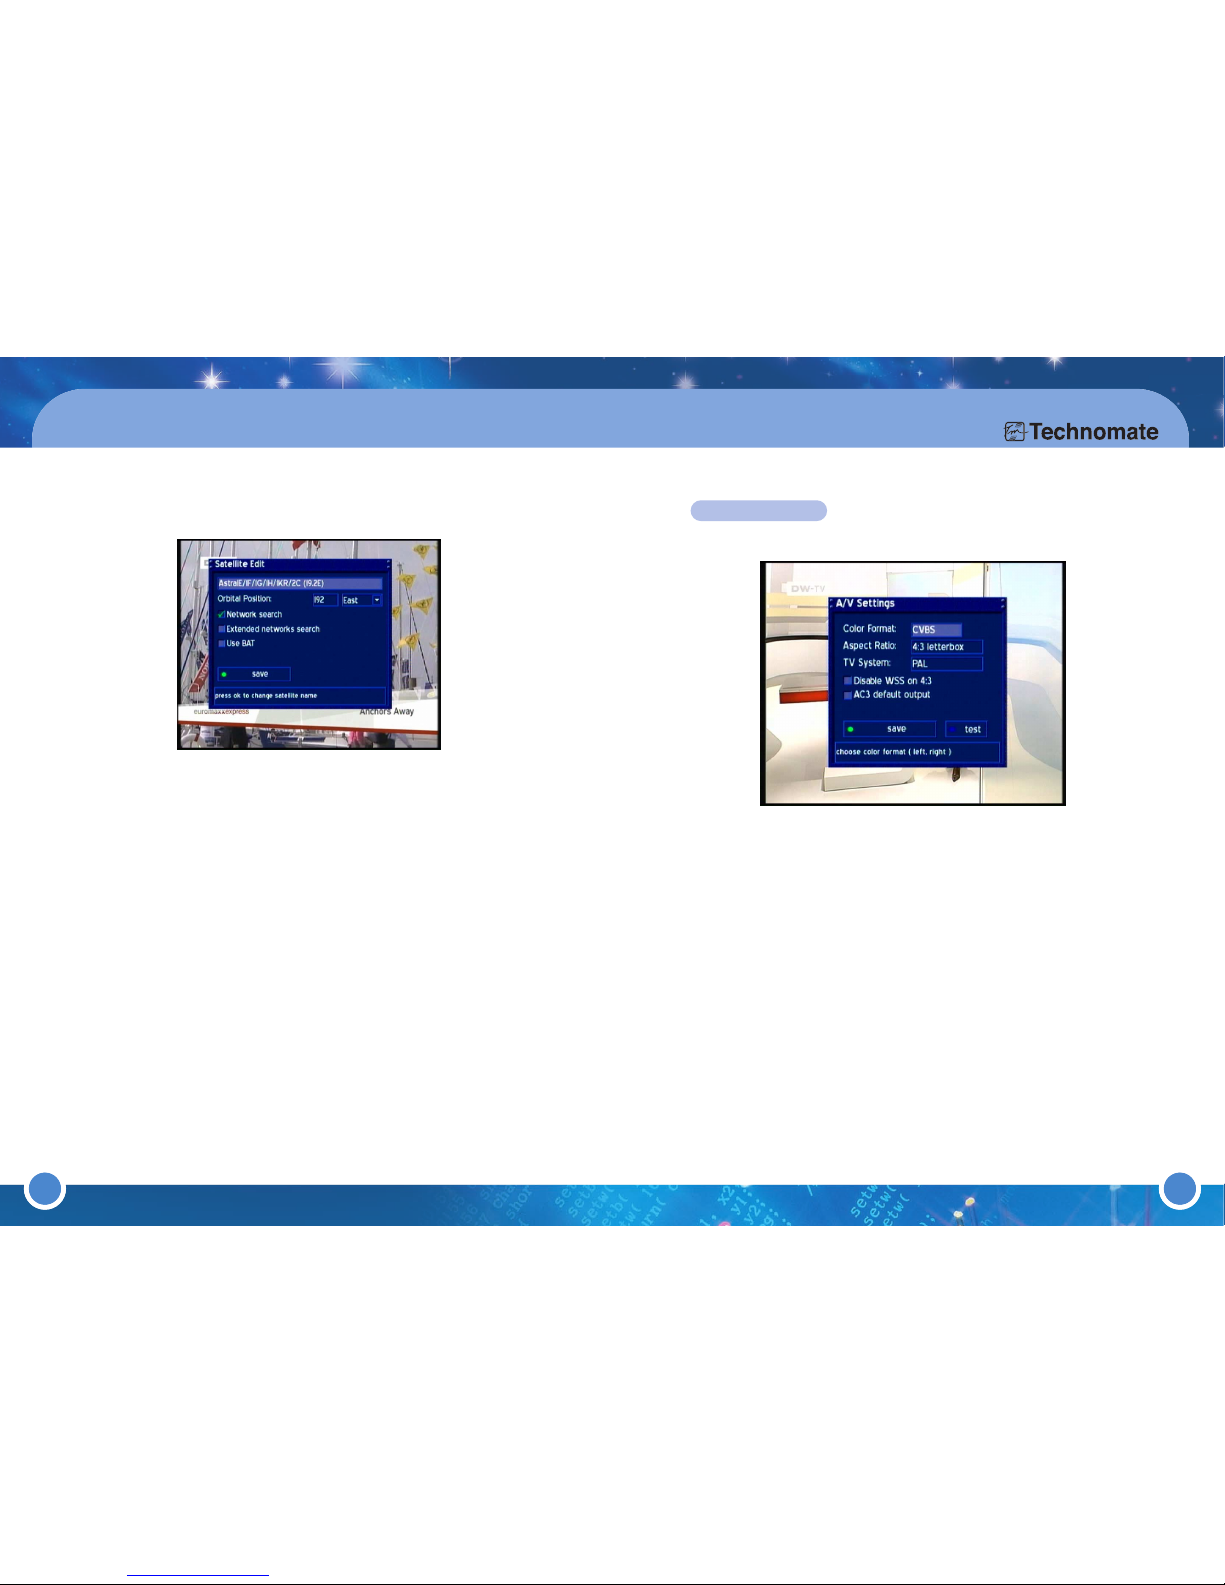
* TRANSPONDER EDIT
Press the [MENU] button to go to the Main Menu. Go to - (6)Setup
(2)Satellite Installation & TP Edit (4) Transponder Edit. To Add,
Edit or Remove a Satellite, use the [LEFT/RIGHT] Navigation buttons.
Press the [OK] button on a satellite - edit the satellite.
Use the [LEFT/RIGHT] Navigation buttons to go to the add menu- add a
new Satellite to the selected satellite.
Use the [LEFT/RIGHT] Navigation buttons to go to the edit menu- edit the
Satellite Values of the selected satellite.
Use the [LEFT/RIGHT] Navigation buttons to go to the remove menuremove/delete a Satellite from the selected satellite.
Press the [GREEN] button to add a new satellite.
Press the [RED] button to delete a satellite.
Page 21
40
3. Operation & Setting
39
Network search: The NIT contains the Information about the Satellites and
the TV/Radio Programs.
(NIT=Network Information Table)
Extended network search: Set a check to scan the NIT from other
Transponders
Skip known Networks: Unchecking this decreases the sat scan. The NIT
will not be used.
Use BAT: Bouquet Tables of the Provider will be used (if available).
(BAT=Bouquet Association Table)
Press the [
GREEN] button to save.
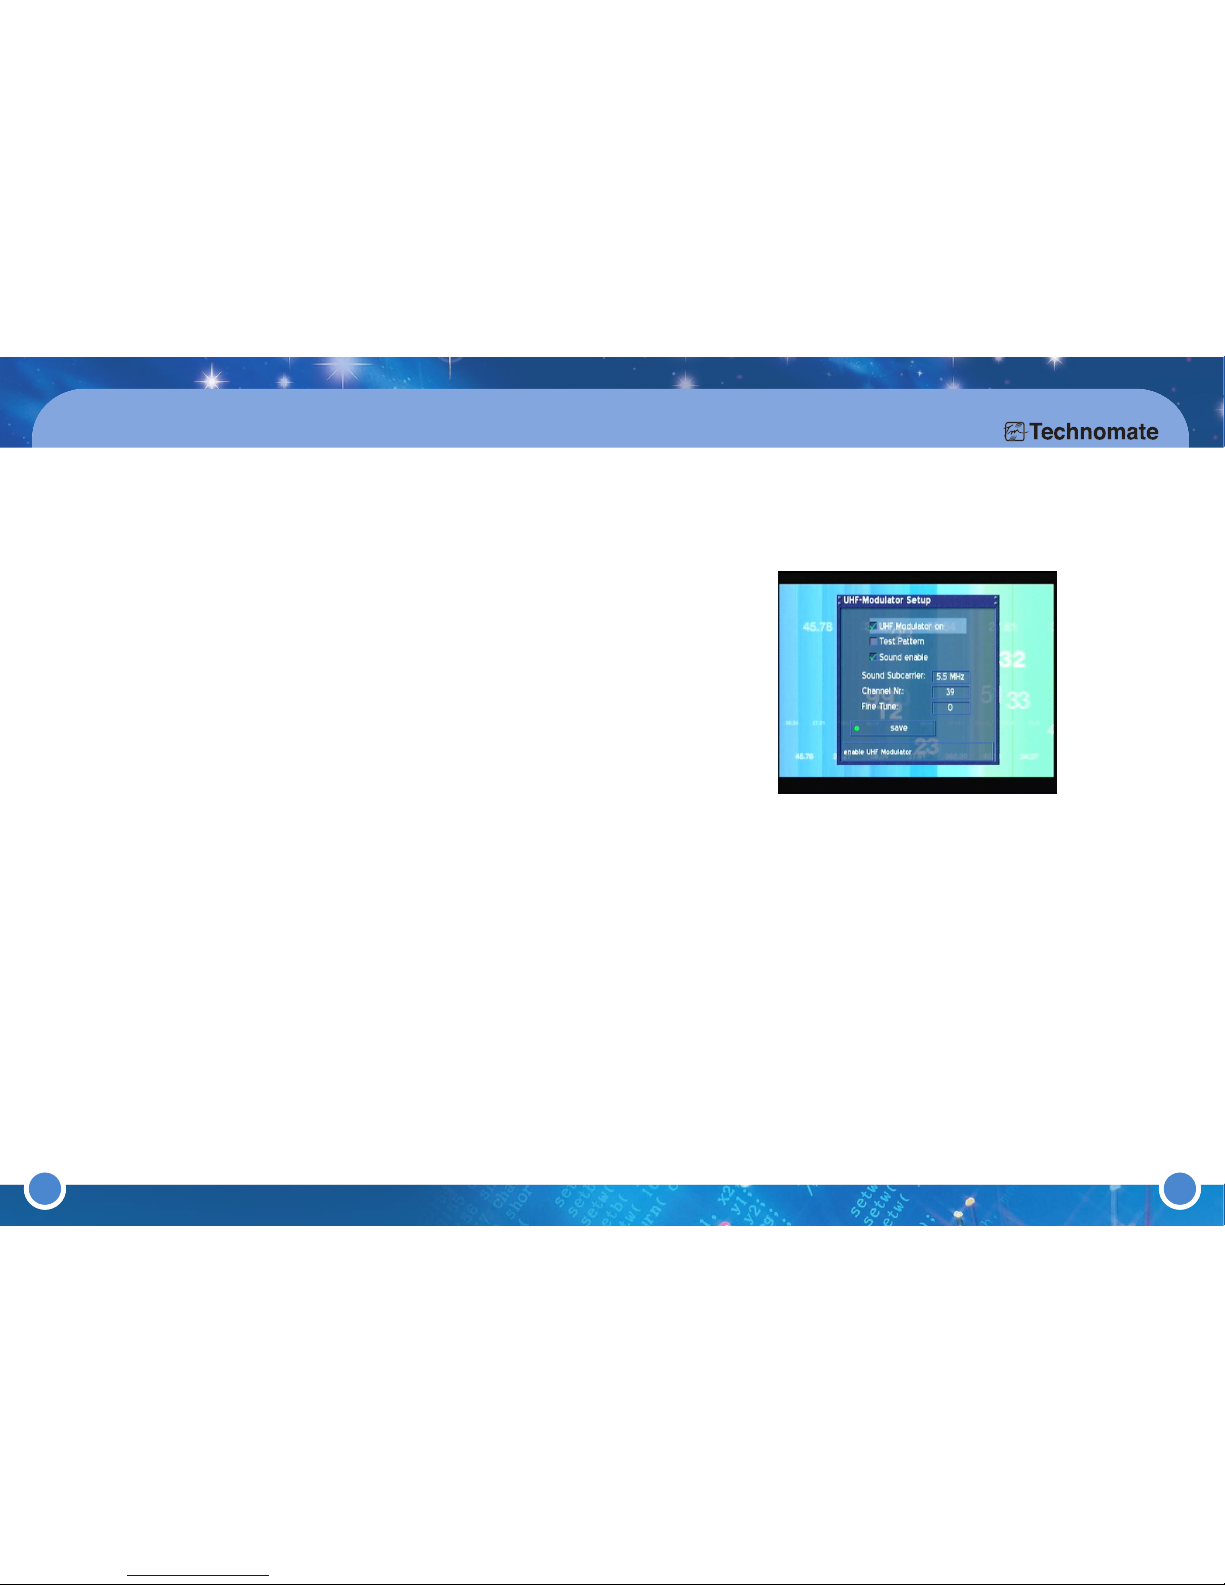
SYSTEM SETTING
* A/V Settings
Press the [MENU] button to go to the Main Menu. Go to - (6)Setup
(3)System Settings (2)A/V Settings.
Use the [LEFT/RIGHT] or the [OK] button to change or set the values.
Color Format
CVBS
(FBAS),
RGB
(Red, Green, Blue separated),
SVideo
(Color and
Brightness separated) and
YPbP
r (Component output e.g. for Projectors).
Aspect Ratio
4:3 letterbox
(standard), (16:9 programs will have black beams at the top
and bottom on a 4:3 TV)
4:3 panscan(16:9 programs will be zoomed in on 4:3 TV’s, therefore parts
of the picture on the left and right side will be cut off)
16:9(programs transmitted in 16:9 will be displayed automatically in 16:9 ;
on 4:3 TV’s, the picture will be reduced in height)
Page 22
42
3. Operation & Setting
41
TV SYSTEM
Choose from: PAL, PAL+PAL60, Multinorm and NTSC. Select the TV
System your TV supports. We recommend Multinorm.
DISABLE WSS ON 4:3
Press the [OK] button on Disable WSS on 4:3 to disable zooming in on
16:9 TV’s during 4:3 transmissions. A check/tick will appear in the checkbox.
AC3 DEFAULT OUTPUT
Press the [OK] button on AC3 default output(a check/tick will appear in the
checkbox). If a program transmits an AC3 Audio-Track (e.g. Dolby Digital),
the receiver will automatically output an AC3 Audio-Track. The AC3 Signal
will only be available at the optical socket.
The receiver does not have a built-in Dolby Digital Decoder, therefore the
AC3 signals are not available at the analogue socket. As a result, an external
Dolby Digital Amplifier is required to adjust the Volume.
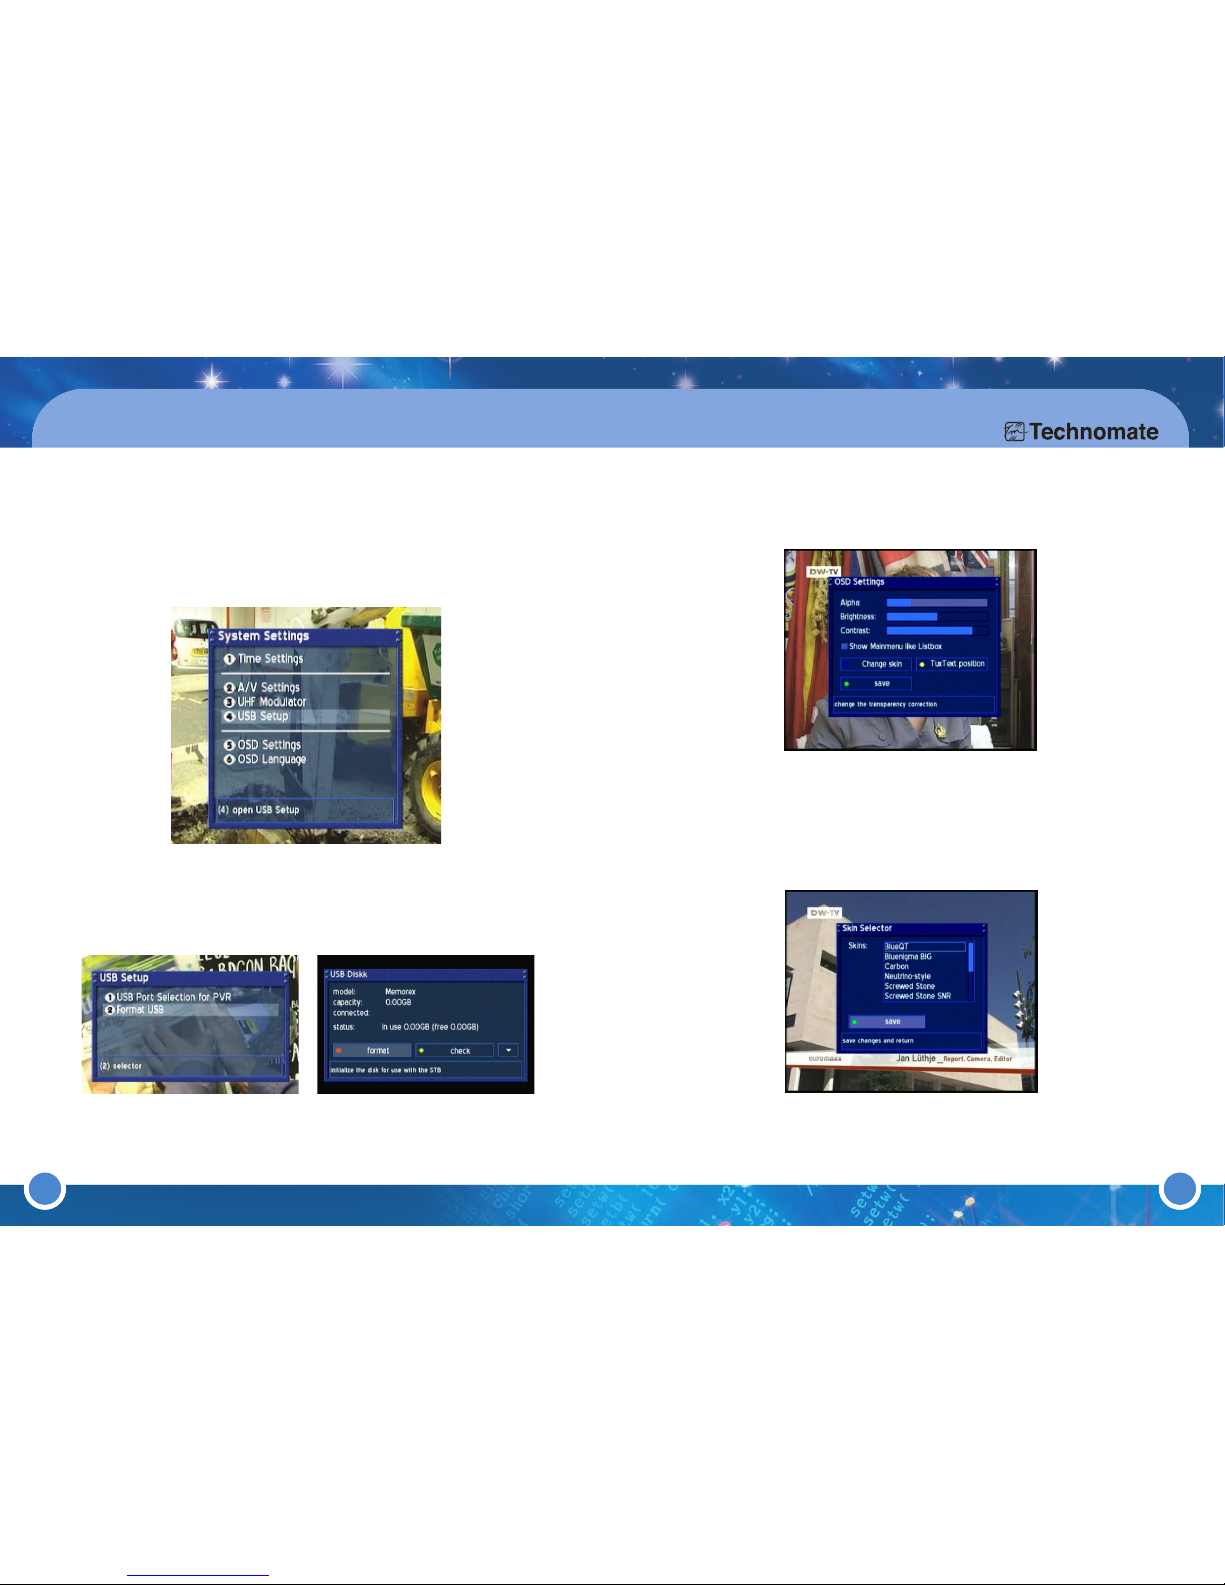
* UHF MODULATOR
Press the [MENU] button to go to the Main Menu. Go to - (6)Setup
(3)System Settings (3)UHF Modulator.
Connect a coaxial cable from the TV to the UHF-Output of the TM-500/600.
Start scan on your TV. The UHF Modulator of the TM-500/600 is set to
Channel 39 by default. To change the Channel Number, go to Channel Nr
and use the [LEFT/RIGHT] Navigation buttons.
Press the [
GREEN] button to save.
Page 23
44
3. Operation & Setting
43
* OSD SETTINGS
Press the [MENU] button to go to the Main Menu. Go to - (6)Setup
(3)System Settings (5)OSD Settings.
Use the [LEFT/RIGHT] Navigation buttons decrease or increase the
selected slider.
Alpha: The transparency of the OSD menu.
Brightness: The brightness of the OSD menu.
Contrast: The contrast of the OSD menu.
Show Mainmenu Iike Listbox: Press the [OK] button to enable OSD Main
Menu to be viewed as vertical list (A check/tick will appear in the checkbox.)
Change skin: Setup a new skin. A skin changes the appearance of the
OSD. Press the [BLUE] button or go to
Change skin and press [OK].
Choose a new skin and press the [OK] button. To apply the new skin, select
Yes to restart the TM-500/600. A Skin Preview is on the right column.
* USB Setup (TM-600)
To set the USB for recording(PVR)
Go to (6)Set up
(3)System settings (4)USB setup in the menu ;
USB Save(as default)
USB Port selection for PVR :
To set USB port for recording out of 3 ports.
USB Setup
Format USB: To format USB storage.
Page 24
46
3. Operation & Setting
45
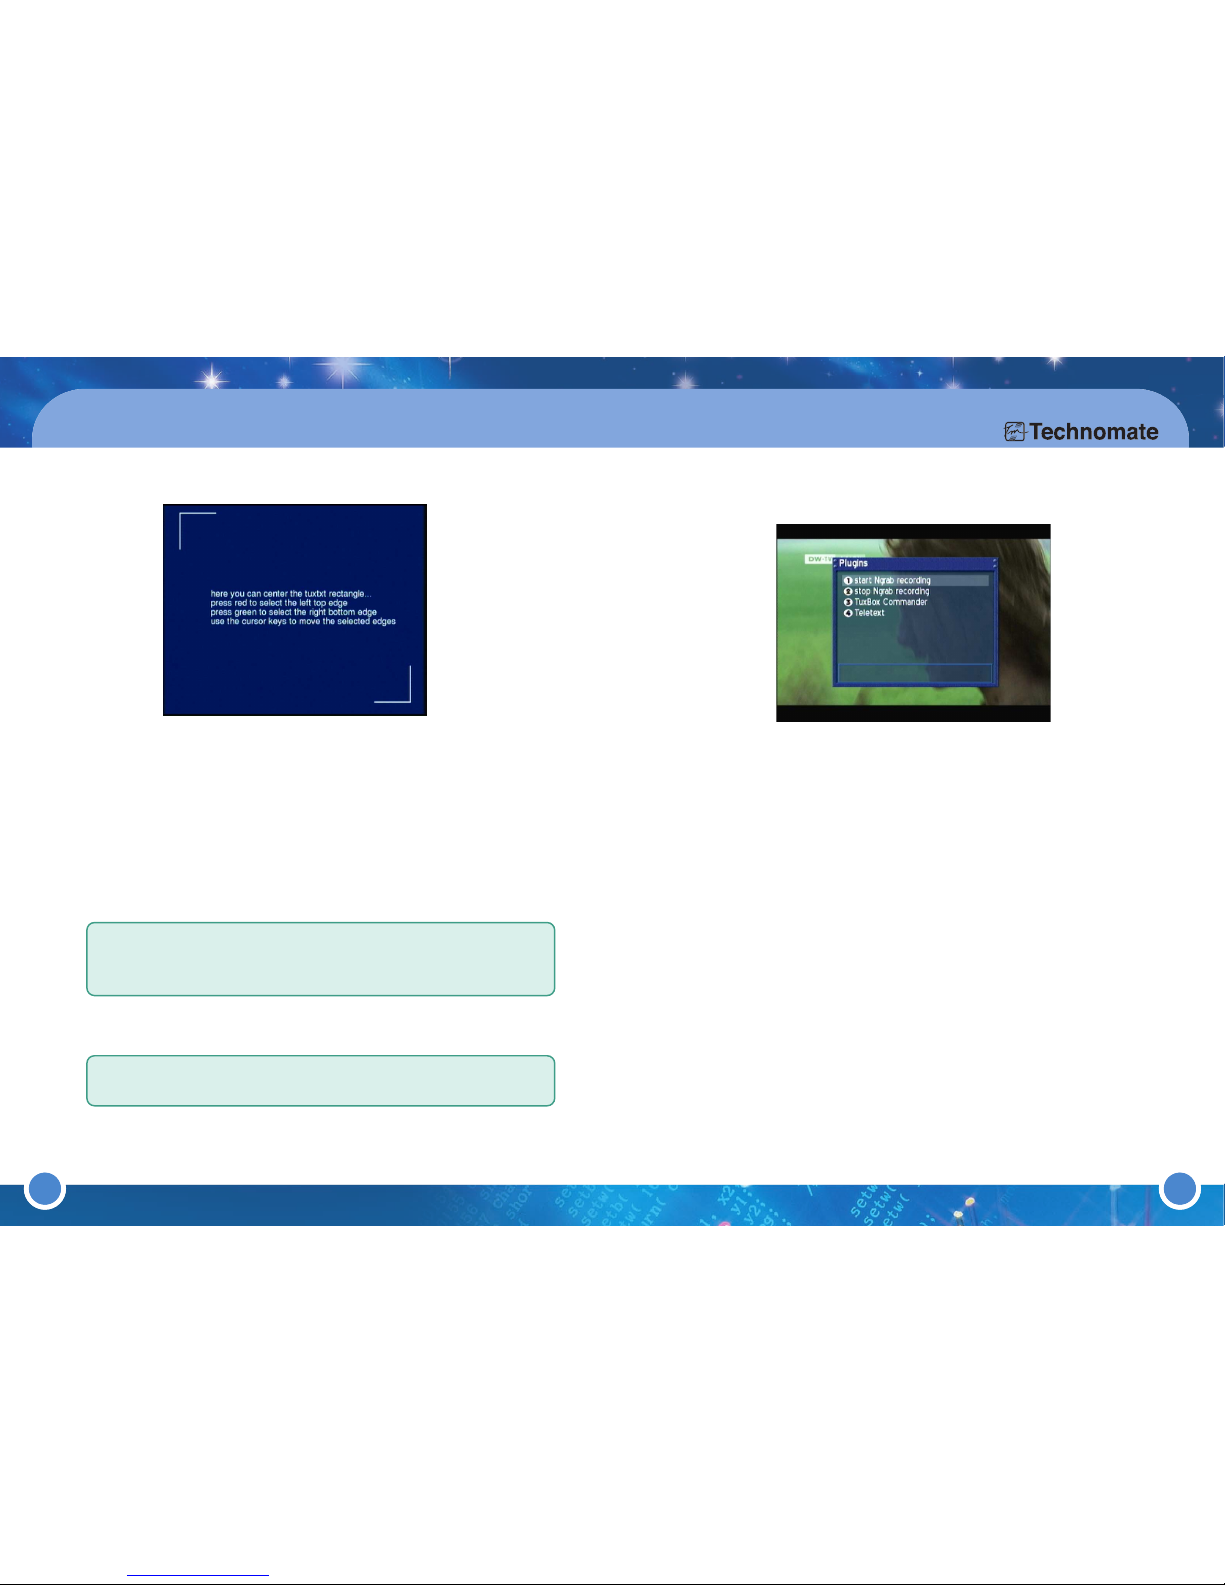
* TUXTEXT POSITION: Press the [MENU] button to go to the Main Menu.
Go to - (6)
Setup (3)System Settings (5)OSD Settings
press the [YELLOW] button (TuxText position)
.
To ensure that all transmitted information, clock, etc is displayed, you can adjust
the viewing border of your TV. Press the [HELP] button for further information.
Press the [RED] button to move the top left point of the rectangle and use
the [UP/DOWN/LEFT/RIGHT] Navigation buttons to adjust it.
Press the [
GREEN] button to move the bottom right point of the rectangle
and use the [UP/DOWN/LEFT/RIGHT] Navigation buttons to adjust it. Press
the [OK] button to exit. Press the [
GREEN] or [OK] button to save.
TuxtText is a Plugin (additional software) that allows the receiver to decode
digital Teletext.
Note
··
If you can not see the rectangle, then they are out of range. Please
adjust the rectangle into the middle of the screen.
··
TuxText = Teletext.
Note
··
Teletext is only available if the broadcaster transmits it.
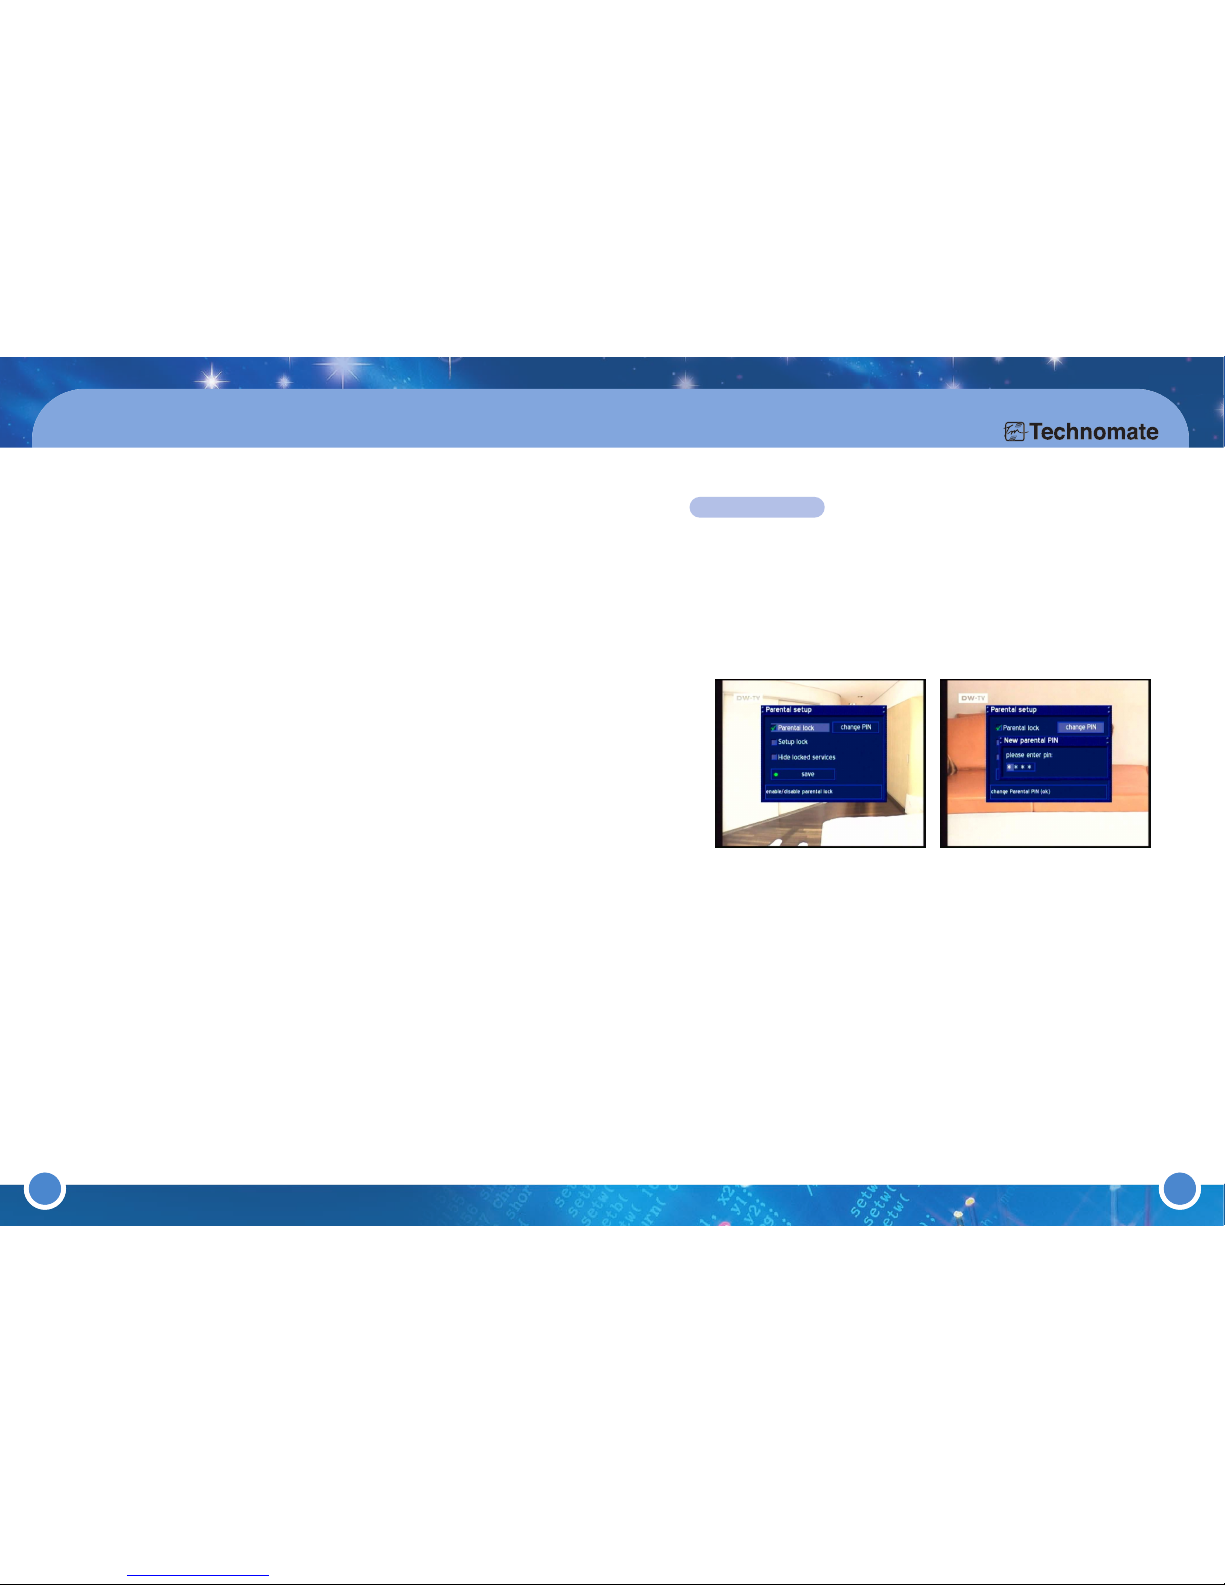
Press the [OK] button to open the Info-Bar to make sure that the PVR-Mode
is not activated. Press the [BLUE] button to open the Plugins menu.
Use the [UP/DOWN] Navigation buttons to go to Teletext and press the
[OK] button. Use the Navigation-Buttons to select a text page and press the
[OK] button to open the page. You do not need to type in a Text page
number in this mode.
Press the [EXIT] button to exit.
* TUXTEXT VIEWING OPTIONS
Press the [MUTE] button more than once to change between: Alpha mode,
Full mode and Invisible mode.
Alpha mode: Teletext is slightly transparent.
Full mode: Teletext is in original colors.
Invisible mode: Teletext is invisible.
Page 25
48
3. Operation & Setting
47
* TUXTEXT CONFIGURATIONS MENU
Press the [MENU] button whilst in the Teletext menu to enter the TuxText
configuration menu.
(1) Teletext Selection:
Use the [LEFT/RIGHT] Navigation buttons to choose another Teletext
provider from the current channel/service and press the [OK] button to view.
Screen Format:
(2) Standard mode 16:9
Press the [OK] button to turn ON the TuxText (Teletext) in 16:9 Aspect
Ratio. Default is OFF.
(3) Text/TV mode 16:9
Press the [OK] button to turn ON the TuxText (Teletext) in 16:9 Aspect
Ratio if the PIG-Mode is activated by the [VOLUME UP/DOWN] button.
Default is OFF.
(4) Brightness
Use the [LEFT/RIGHT] Navigation buttons to increase/decrease the
Brightness.
(5) Transparency
Use the [LEFT/RIGHT] Navigation buttons to increase/decrease the
Transparency.
(6) National Characterset
This is used to display the Teletext pages with the correct
characters/letters of your location. Press the [OK] button to turn ON/OFF.
Default is ON (enabled). If OFF (disabled), use the [LEFT/RIGHT]
Navigation-Buttons to choose your Characterset.
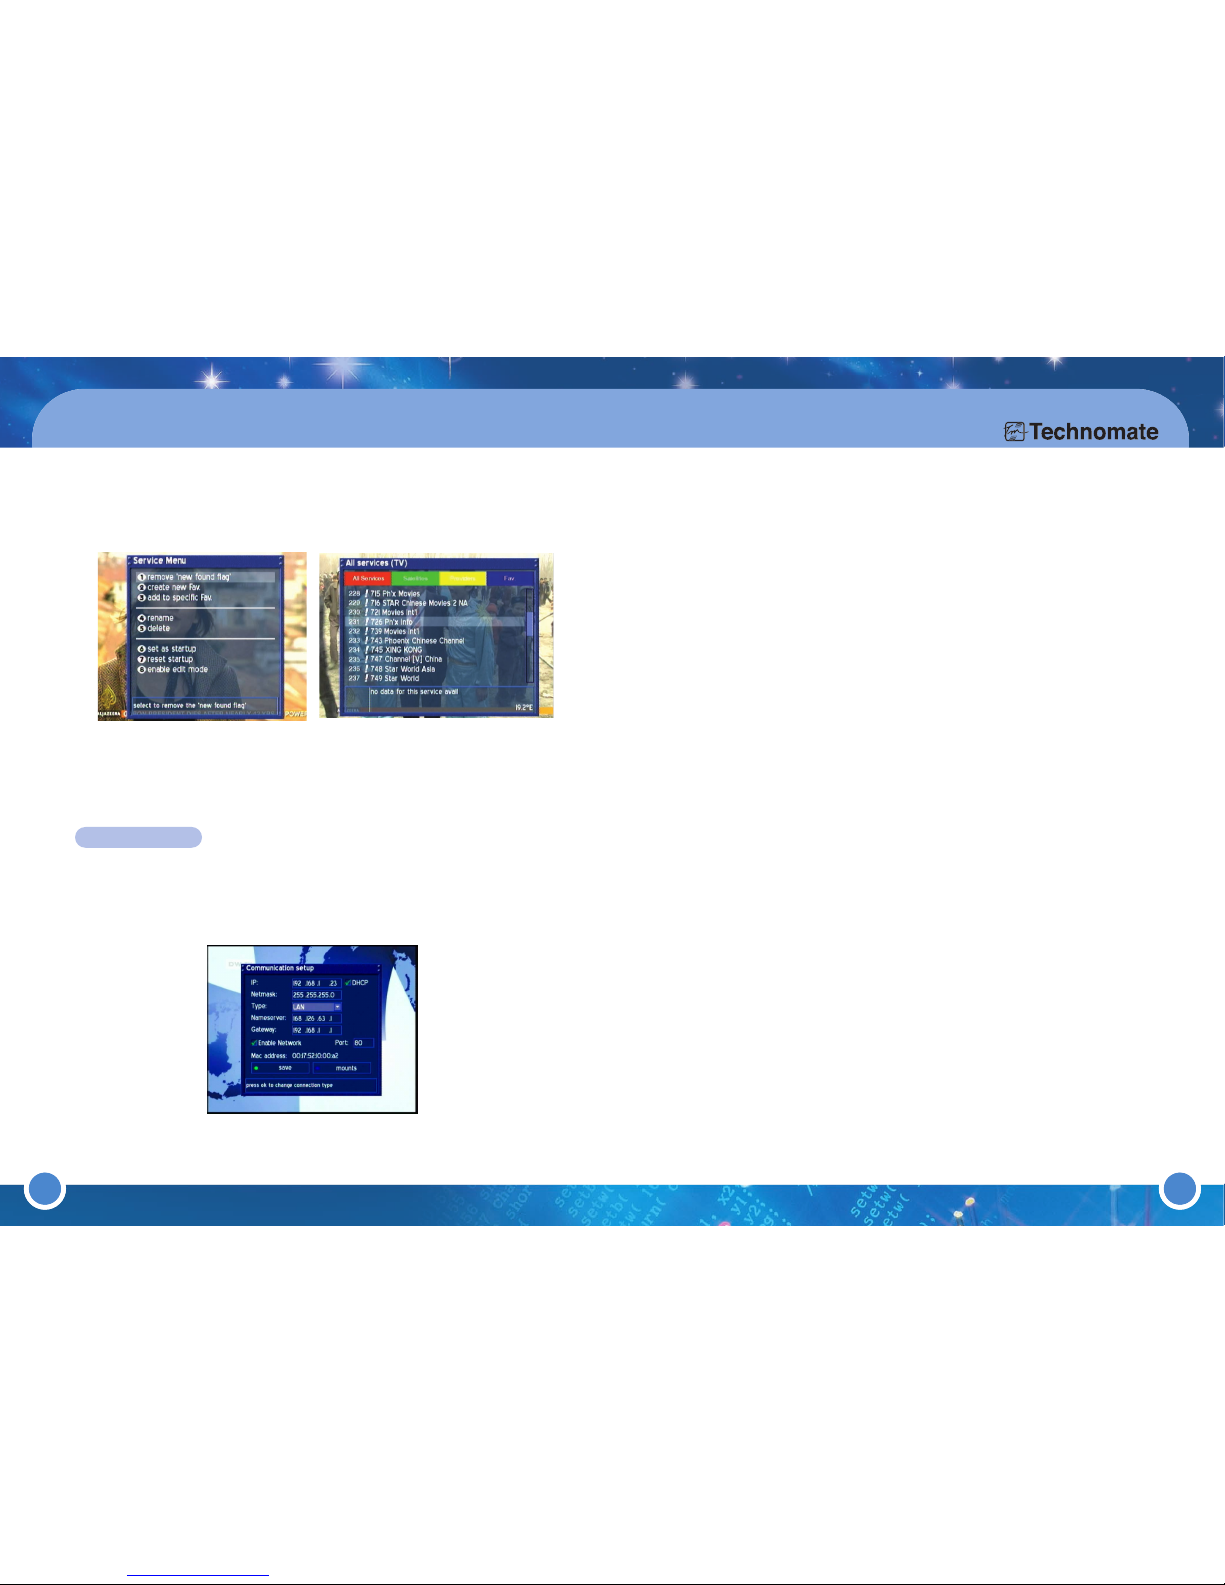
PARENTAL LOCK
Press the [MENU] button to go to the Main Menu. Go to - (6)Setup
(4)Parental Lock
Parental lock: To lock (password protect) channels/services of your
choice (in the Service list).
Setup lock: To lock (password protect) the Menu (6)Setup.
The Parental setup requires a four digit code of your choice (PIN) for
Parental lock and Setup lock.
To enable Parental lock, go to
Parental lock and press the [OK] button
(A check/tick will appear in the checkbox). Then go to
change PIN and press
[OK] button and enter a PIN of your choice. Re-enter the PIN to confirm.
If you do not want to view locked channels/services in the
Service List, press
[OK] button on
Hide locked services.
To disable Parental lock, press [OK] button on
Parental lock
and enter the PIN
to verify.
Press [GREEN] or [OK] button to save.
The same method applies for
Setup lock.
Once you have set up
Parental lock, you can lock/unlock any
channel/service in the
Service List. Go to Service List and press the [MENU]
button to enter the
Service Menu. There is now a new lock option.
Page 26
50
3. Operation & Setting
49
Go to lock/unlock and press the [OK] button to lock/unlock the selected
channel/service. For a locked channel/service, a padlock symbol will
appear. If you want to view a locked channel/service, you will be asked to
enter the PIN.
EXPERT SETUP
* COMMUNICATION Setup (Network & LAN Setup)
Press the [MENU] button to go to the Main Menu. Go to - (6)Setup
(5)Expert Setup (1)Communication Setup.
To automatically detect an IP Address: Ensure there is a check/tick next
to DHCP. If there is not, go to DHCP and press the [OK] button. To save,
press the [
GREEN] button or go to save and press the [OK] button. The menu
will automatically exit. To view the updated IP Address, press [OK] on
Communication setup.
To manually enter an IP Address: Ensure there is no check/tick next to DHCP.
If there is, go to DHCP and press the [OK] button. Use the [LEFT/RIGHT]
Navigation-Buttons and the Numeric-Buttons to set the Values.
IP: Enter the IP-Address here. The IP-Address is used to specify the Host IP-
Address.
Netmask: Enter the Netmask here. The Netmask is used to find a Host IP-
Address in its Subnet.
Type:
LAN
(Local Area Network) Connection to the home Network. Default is LAN.
Nameserver:Enter the DNS-Server IP-Address here. DNS is used to translate
a Domain name to an IP-Address. Normally, if the Type is set to LAN, there is
no need for a DNS entry. If the receiver is connected to the Internet by a
Router, enter the Router’s IP-Address here.
Gateway: Enter the Router’s IP-Address here (only if the receiver is
connected to the Internet by a Router.
Enable Network: Press the [OK] button to enable the Network (A check/tick
will appear in the checkbox). Default is disabled.
Port 80: Enter a Port of your choice to configure the HTTP Port for the
receiver’s Web Interface. Default is Port 80.
Page 27
52
3. Operation & Setting
51
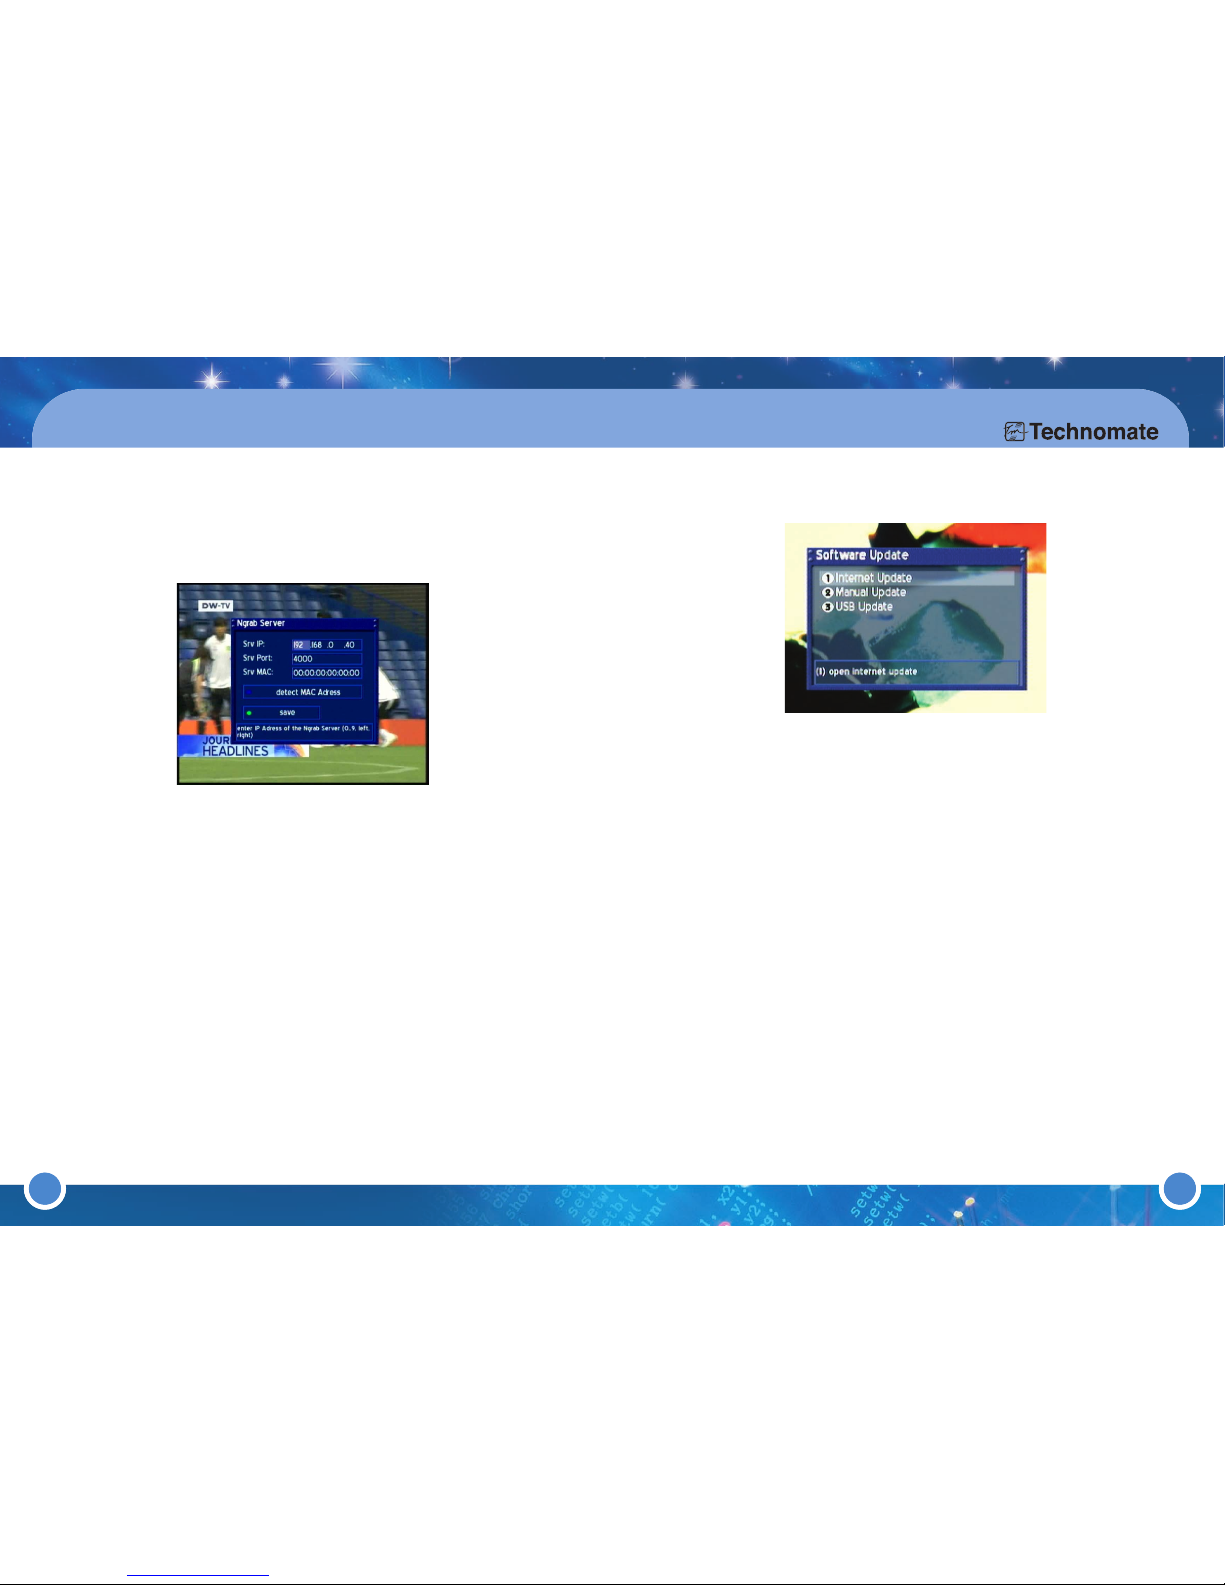
* NGRAB STREAMING SETUP
Press the [MENU] button to go to the Main Menu. Go to - (6)Setup
(6)Expert Setup (2)Ngrab Streaming Setup.
The Ngrab Server is used to record a movie over the Network to another
PC. First install the Ngrab Server Software on a PC and configure it.
Srv IP: Enter the IP-Address of the PC on which the Ngrab Server Software
runs.
Srv MAC: The Ngrab Server Software must be started and configured
before detecting the MAC-Address of the PC. Press the [BLUE] button to
detect the MAC-Address.
Srv Port: Enter the Server Port-Address which is configured in the Ngrab
Server Software. The MAC-Address is used for the WOL (Wake On LAN)
function, which must be supported by the PC’s NIC (Network Interface
Card). You can configure a PC to use full APM (Advanced Power
Management). The PC awakes upon access through the NIC and the Ngrab
recording starts.
* SOFTWARE UPDATE
SOFTWARE UPDATE VIA INTERNET
Press the [MENU] button to go to the Main Menu. Go to - (6)Setup
(6)Expert Setup (3)Software Update (1)Internet Update
Internet Software Update only works if you have configured the Network.
This window shows the currently installed Software. The latest software
version/release is always on the top of the list. Select the Software you want
by pressing the [OK] button and following the on-screen instructions.
SOFTWARE UPDATE VIA FTP OR SAMBA
Press the [MENU] button to go to the Main Menu. Go to - (6)Setup
(6)Expert Setup (3)Software Update (2)Manual Update
If the TM-500/600 is not connected to the internet but is configured for
Network LAN, yoo can manually update by FTP or Samba. Select the
Software you want by pressing the [OK] button and following the on-screen
instructions.
SOFTWARE UPDATE VIA SERIAL (RS-232C) CABLE
1.Download Technomate Control Center Loader Program from
www.technomate.com
2.Turn the TM-500/600
’
s AC Power Off
3.Hold the OK button on the front panel, and whilst still holding the
OK Button, turn the AC Power On. A black screen (uboot) will appear.
Page 28
53
3. Operation & Setting
4.Open Technomate Control Center and set up the COMPort.
5.Click on File and then go to Files of Type and click on the Down arrow next
to it. Select Image (.img). Select the Serial Image (noboot) and click on
Open.
6.Press the OK button on the front panel of the TM-500/600 to start
downloading. If it does not work, press the OK button again.
7.When it says Done on the receiver and Download Completed on the PC,
turn the AC Power Off/On.
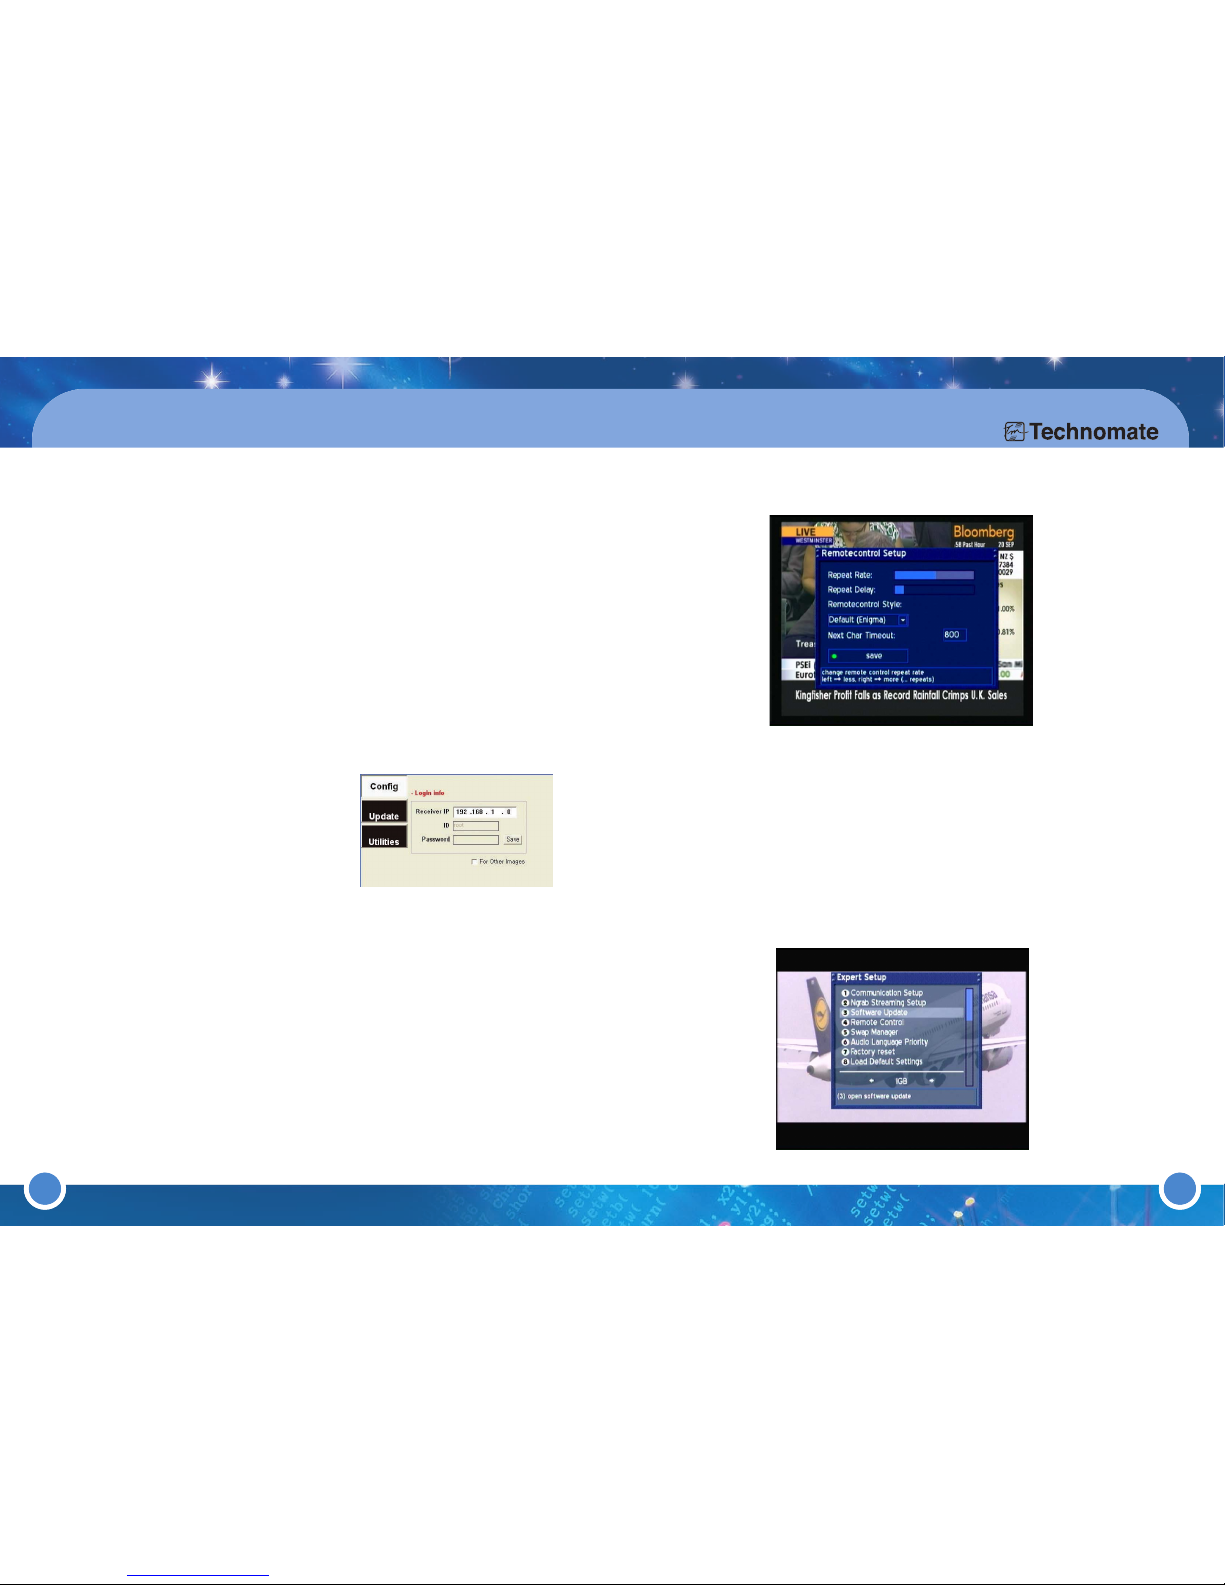
SOFTWARE UPDATE VIA ETHERNET
1.Download Technomate Control Center Loader Program from
www.technomate.com and Open it
2.Run the control center loader
3.Go to 'Config' menu & type the IP address
and password of your TM-500/600.
(Refer to the IP address as Menu
(6)Setup
(5)Expert Setup (1)Communication
Set up or press just 'LAN' button on the
remote control unit.)
4.Go to 'Update' menu & select 'UPDATE' icon.
5.Select the *.img file & Download/Upgrade procedure will be done automatically.
(TM-500/600 will reboot after the upgrade has finished)
SOFTWARE UPDATE VIA USB MEMORY S
TT II CC KK
1.Copy all the files in to a USB stick
2.Insert the usb stick into the usb port on the front of TM-600
3.Go to Software update
USB update menu
4.select the file in the usb stick & click OK button
5.Upgrade will be done automatically
54
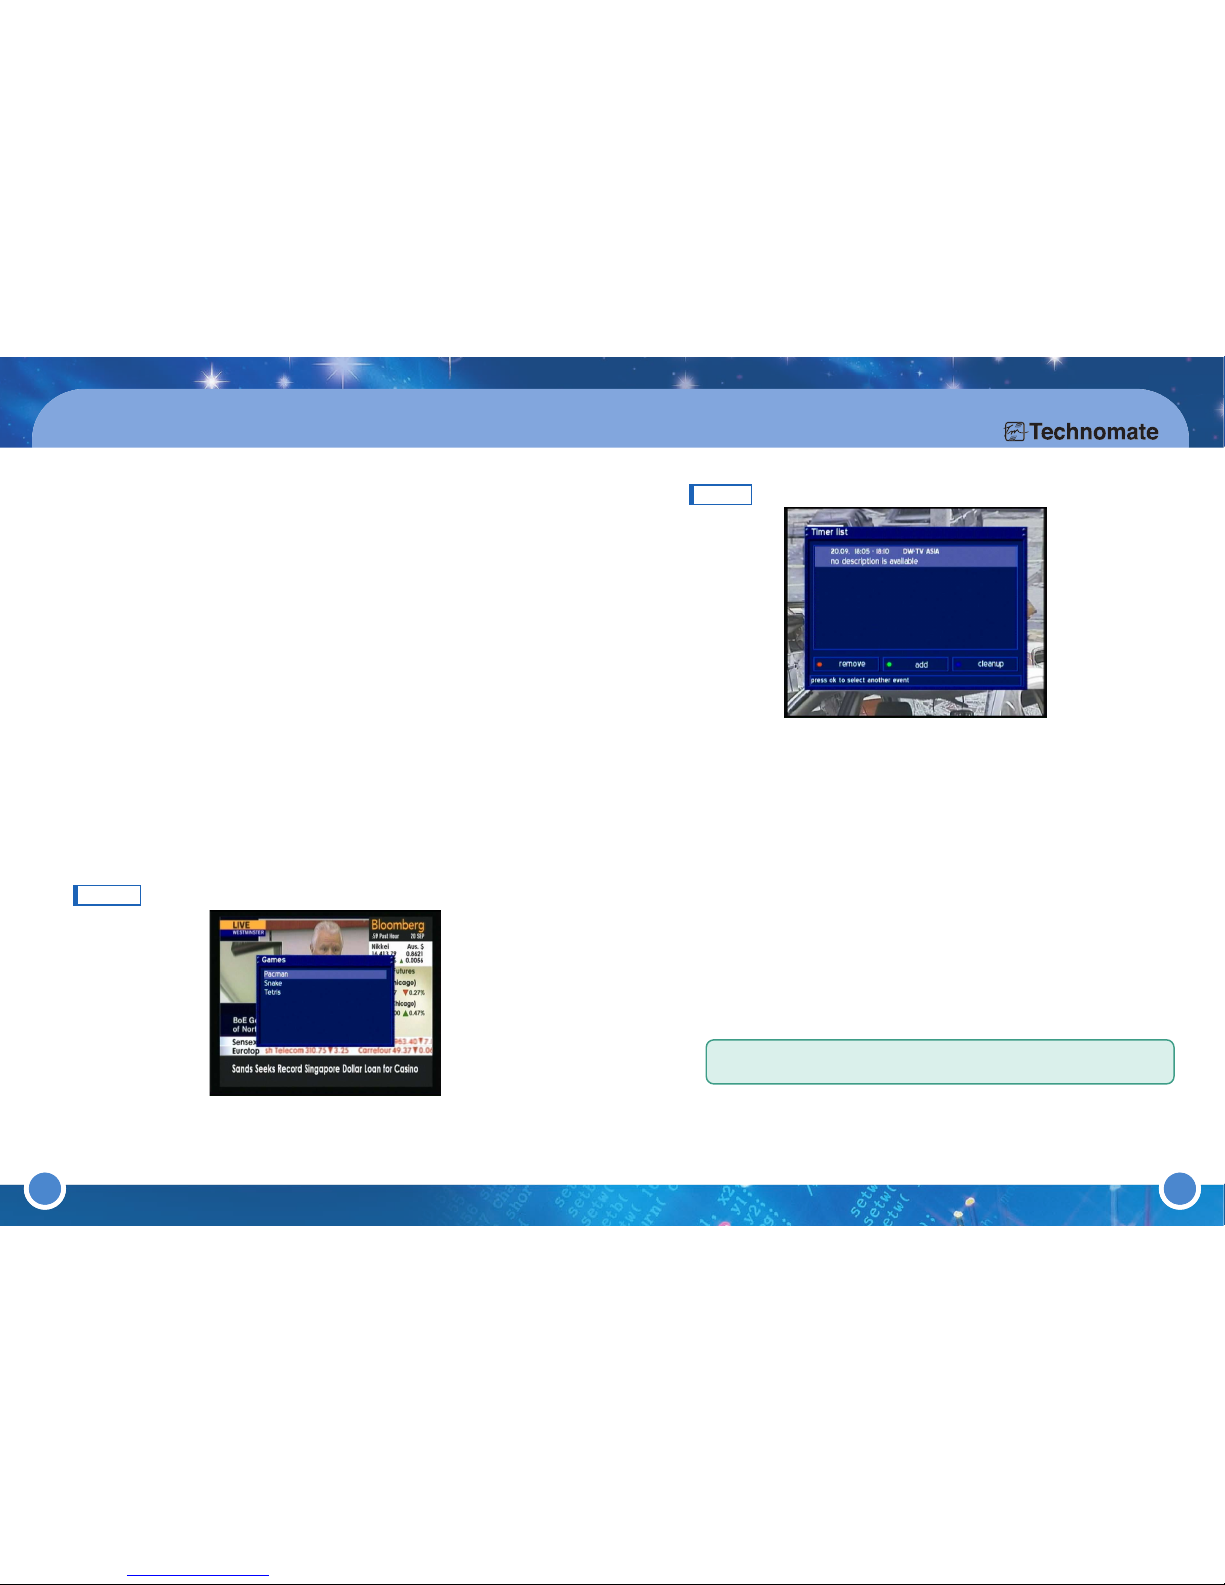
* REMOTE CONTROL CUSTOMIZATION
Press the [MENU] button to go to the Main Menu. Go to - (6)Setup
(6)Expert Setup (4)Remote Control
Use the [LEFT/RIGHT Navigation buttons to adjust the Repeat Rate and
Repeat Delay.
To change the Style, go to Remotecontrol Style and press the [OK] button
to open a dropdown list. Select a Style and press [OK].
Adjust Next Char Timeout value to what you want.
Press the [GREEN] or [OK] button to save.
* Customizing Expert Setup
Page 29
3. Operation & Setting
55
3. Operation & Setting
56
GAMES
Press the [MENU] button to go to the Main Menu. Go to - (7)Games
Play a variety of games on the receiver, such as: Pacman, Snake & Tetris.
1GB : Adjust accordingly to the filesize you want to split recordings
Infobar timeout 6 sec : Set the desired time for the Info-Bar to disappear
Skip confirmations : If enabled, all confirmation windows will be disabled,
therefore you will no longer be asked to confirm any selection.
Hide error windows : If enabled, no more error messages will be
displayed, for example, ‘service not found’ will not be displayed.
Show remaining Time : If enabled, the remaining time of the program
will be displayed instead of the total time
Use http authentication : If disabled, you will no longer need a username
and password to access the Web Interface
Auto bouquet change : If enabled, when you have reached the last
service/channel in a Bouquet, the next Bouquet will automatically open
Disable Teletext caching : If enabled, Teletext will no longer be cached
in the background
Enabled Zapping History : If enabled, you can change to a different
service type in file mode
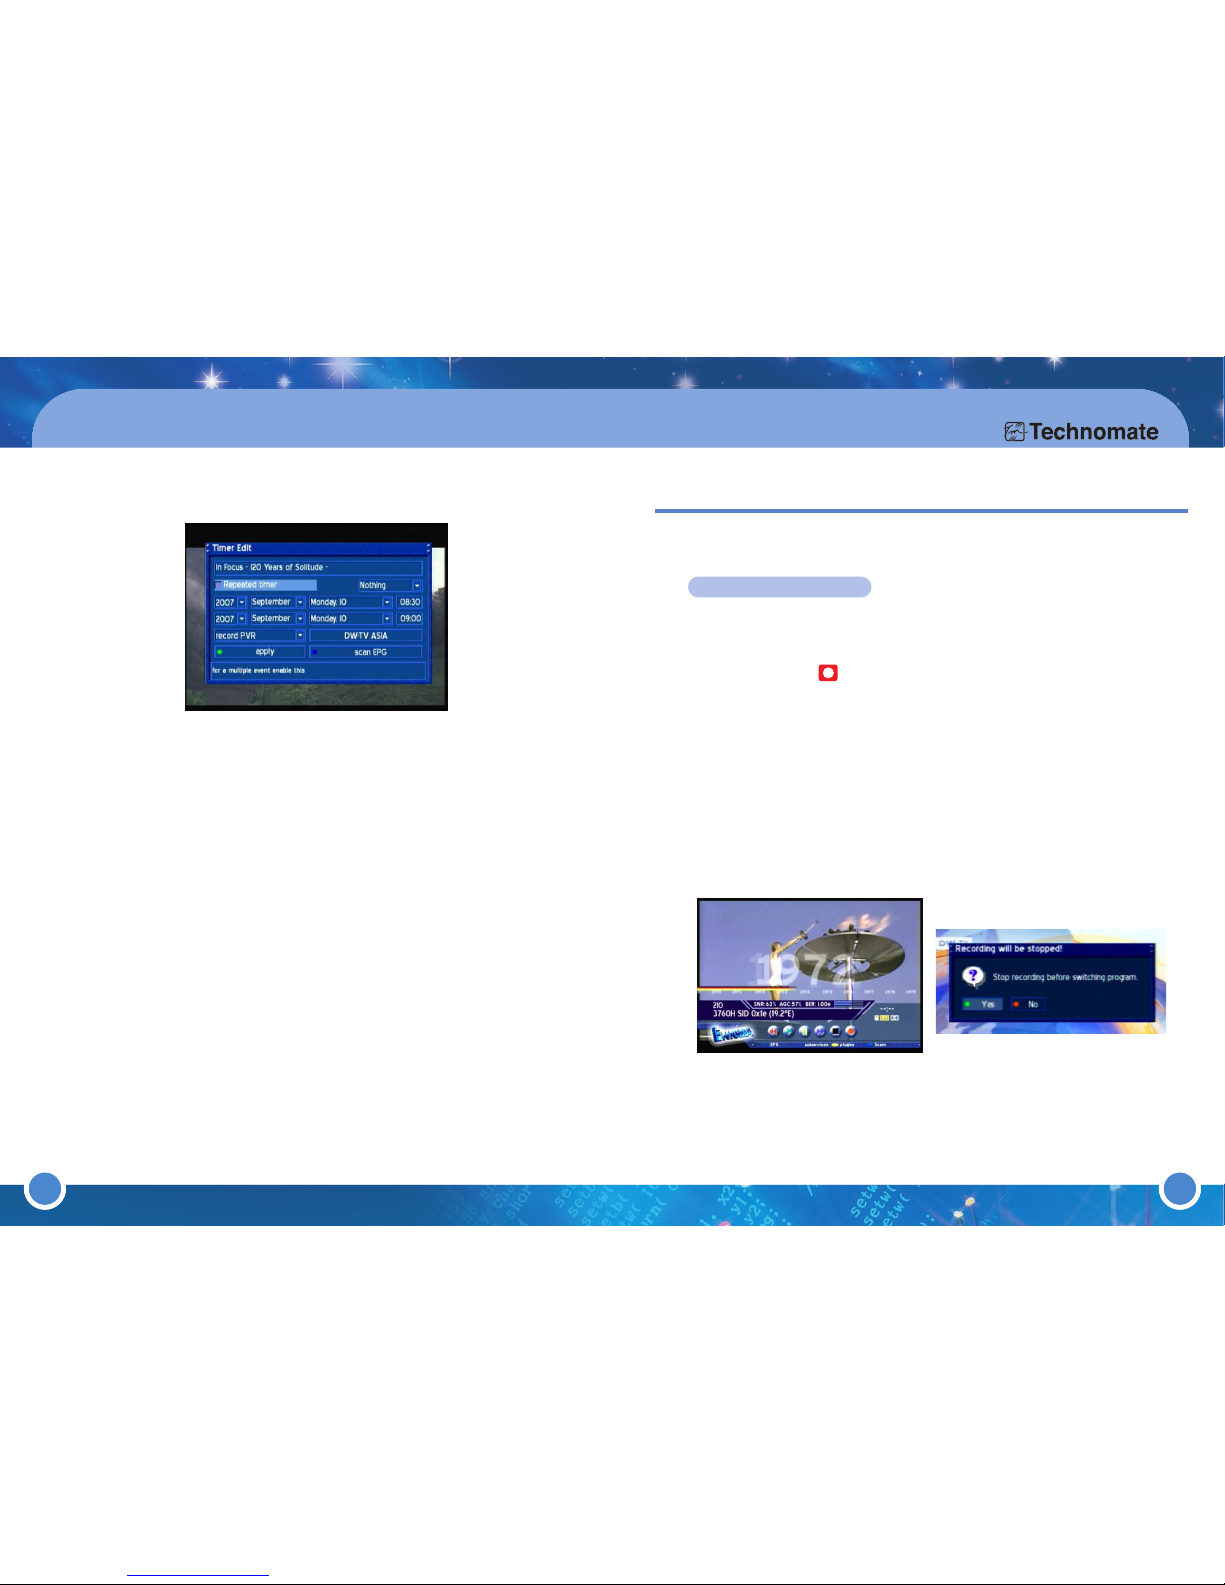
TIMER
Press the [MENU] button to go to the Main Menu. Go to - (8)Timer
To add a Timer, press the [GREEN] button on the remote. Enter the details
(date, start/end time) and go to the button/bar above the scan EPG. Press
the [OK] button to open the Service List and select the channel you want to
add a timer. On the left (the dropdown list above the apply button/bar, press
[OK] to choose from:
reminder : when the Timer starts, the TM-500/600 will automatically go to the
chosen channel
record PVR: when the Timer starts, it will start to record to the HDD
Ngrab: when the Timer starts, Ngrab will start
Press the [GREEN] button to save the Timer.
To set up a Timer from the EPG
Go to the service/channel to add a Timer to and press the [EPG] button or
press the [EPG] button twice and select Multi EPG to go to the
channel/service.
Press the [GREEN] button to set a PVR recording by Timer
Press the [YELLOW] button to set Ngrab
Press the [BLUE] button to set a Reminder
Note
··
Some channels/services do not provide EPG Information.
Page 30
57
3. Operation & Setting
Repeated Timer: Go to Repeated Timer and press the [OK] button (A
check/tick will appear in the checkbox). Select the day(s) and the Starttime
and Endtime.
Go to the record DVR dropdown list and press [OK] to change the
recording method.
Switch - the Timer switches to this event.
Record DVR - the Timer records this event.
Ngrab - the Timer records to an Ngrab PC.
Press the [GREEN] button to apply these settings. The Event will be marked
as a Timer event in the Service List. Press the [EXIT] button to exit the
Service List. To check a set Timer event, enter this menu to see Timer List.
58
RECORDING A SERVICE
Select a channel/service that you want to record from the Service List. This
could be either a TV or Radio channel/service. Press the [PVR] button to
activate the PVR mode. The Info-Bar shows the PVR control symbols.
Press the [Record ] button to start a spontaneous recording.
During the recording, a red dot will flash/blink in the Info-Bar and the REC
sign will appear on the front panel, indicating that a recording is in progress.
If another channel is selected during a recording, a confirmation window will
appear.
Select [No] to stop a recording and change channel ; or No to continue the
recording.
Press the [STOP] button to stop recording.
Refer to “3.3 Menus - (8)Timer” for Timer recording.
In future software versions, you can record, play, pause, etc without
pressing the [PVR] button.
3.4 PVR(HARD DISK INSTALLED)
Page 31
59
3. Operation & Setting
60
TRICK PLAY
You can enjoy Trick Play on recorded service in PVR mode.
ADD A INDEX (CHAPTER/BOOKMARK) IN A RECORDED PROGRAM
Whilst watching a recorded program, press the [INDEX MARK] button to
add a chapter.
You can add as many chapters as you want.
When you have finished, when you watch the program again, press the
[SEEK FF] or [SEEK RW] buttons to skip/move to the next/previous
chapter.
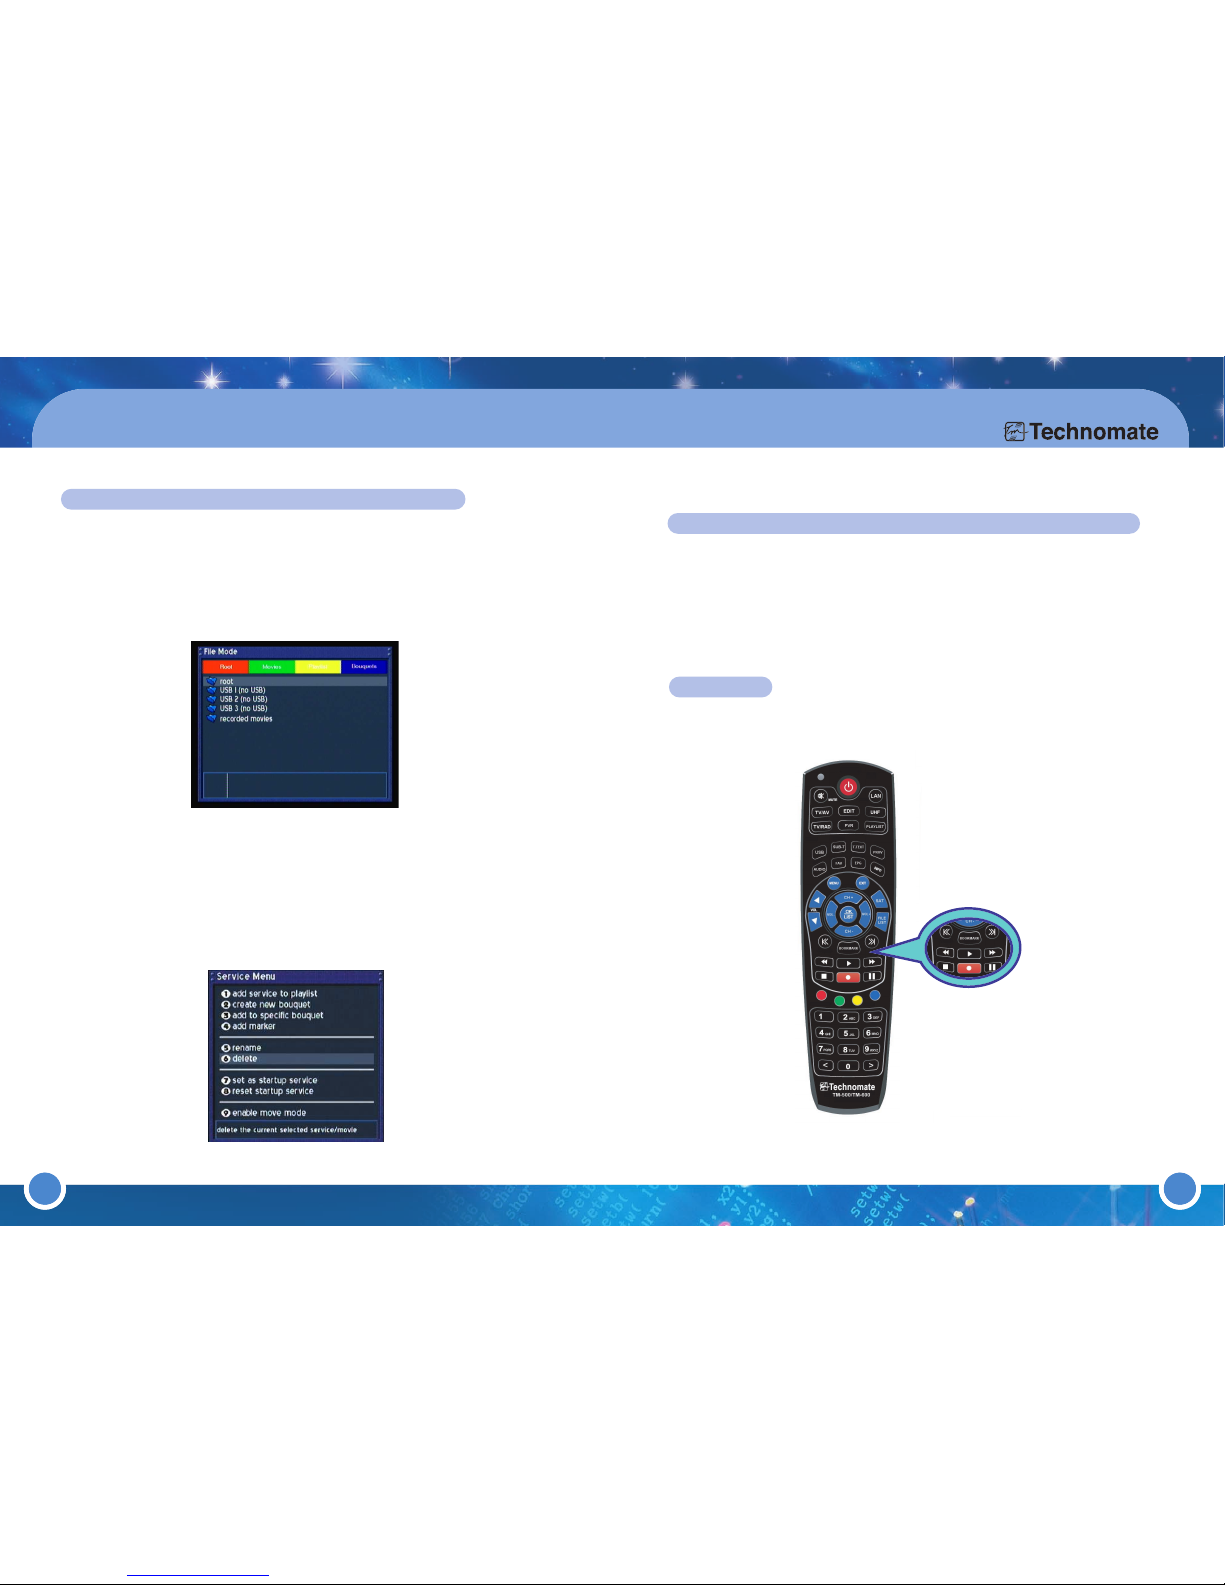
WATCHING / EDITING A RECORDED CHANNEL/ SERVICE
Press the [MENU] button to go to the Main Menu. Go to - (3)File Mode
Playback : To playback the recorded file, go to 'File' mode where you could
see the recorded file. You can see the recorded file in recorded movies folder.
If you have other storage on other USB port, you can go into each folder and
play them.
Deleting : Select a movie to delete using the [UP/DOWN] Navigation
buttons. Press the [MENU] button. The Service Menu will appear. Select
delete and press [OK].
Renaming: Select a movie to rename using the [UP/DOWN] Navigation
buttons. Press the [MENU] button. The Service Menu will appear. Select
rename and press [OK].
Edit the name in the next window.
Page 32
61
3. Operation & Setting
[REWIND] button
Press the [REWIND] button more than once to increase the rewinding
speed: x8, x16, x32, x64.
[PLAY] button
Starts playback or restarts play during trick play or pause.
[F.F] (FAST FORWARD) button
Press the [FORWARD] button more than once to increase the rewinding
speed: x8, x16, x32, x64.
[STOP] button
Stops playback or trick play.
[PAUSE] button
Pause playback. Press the button again to restart playback.
[REC] button
Press the [REC] button to start recording.
During a recording, a red dot will flash/blink in the Info-Bar and the REC
sign will appear on the front panel.
SEEK RW
Press the [SEEK RW] button to jump the index backward to a bookmark
(chapter)
SEEK FF
Press the [SEEK FF] button to jump the index forward to a bookmark
(chapter).
BOOKMARK
Produces a bookmark (chapter) whilst watching a recorded program.
62
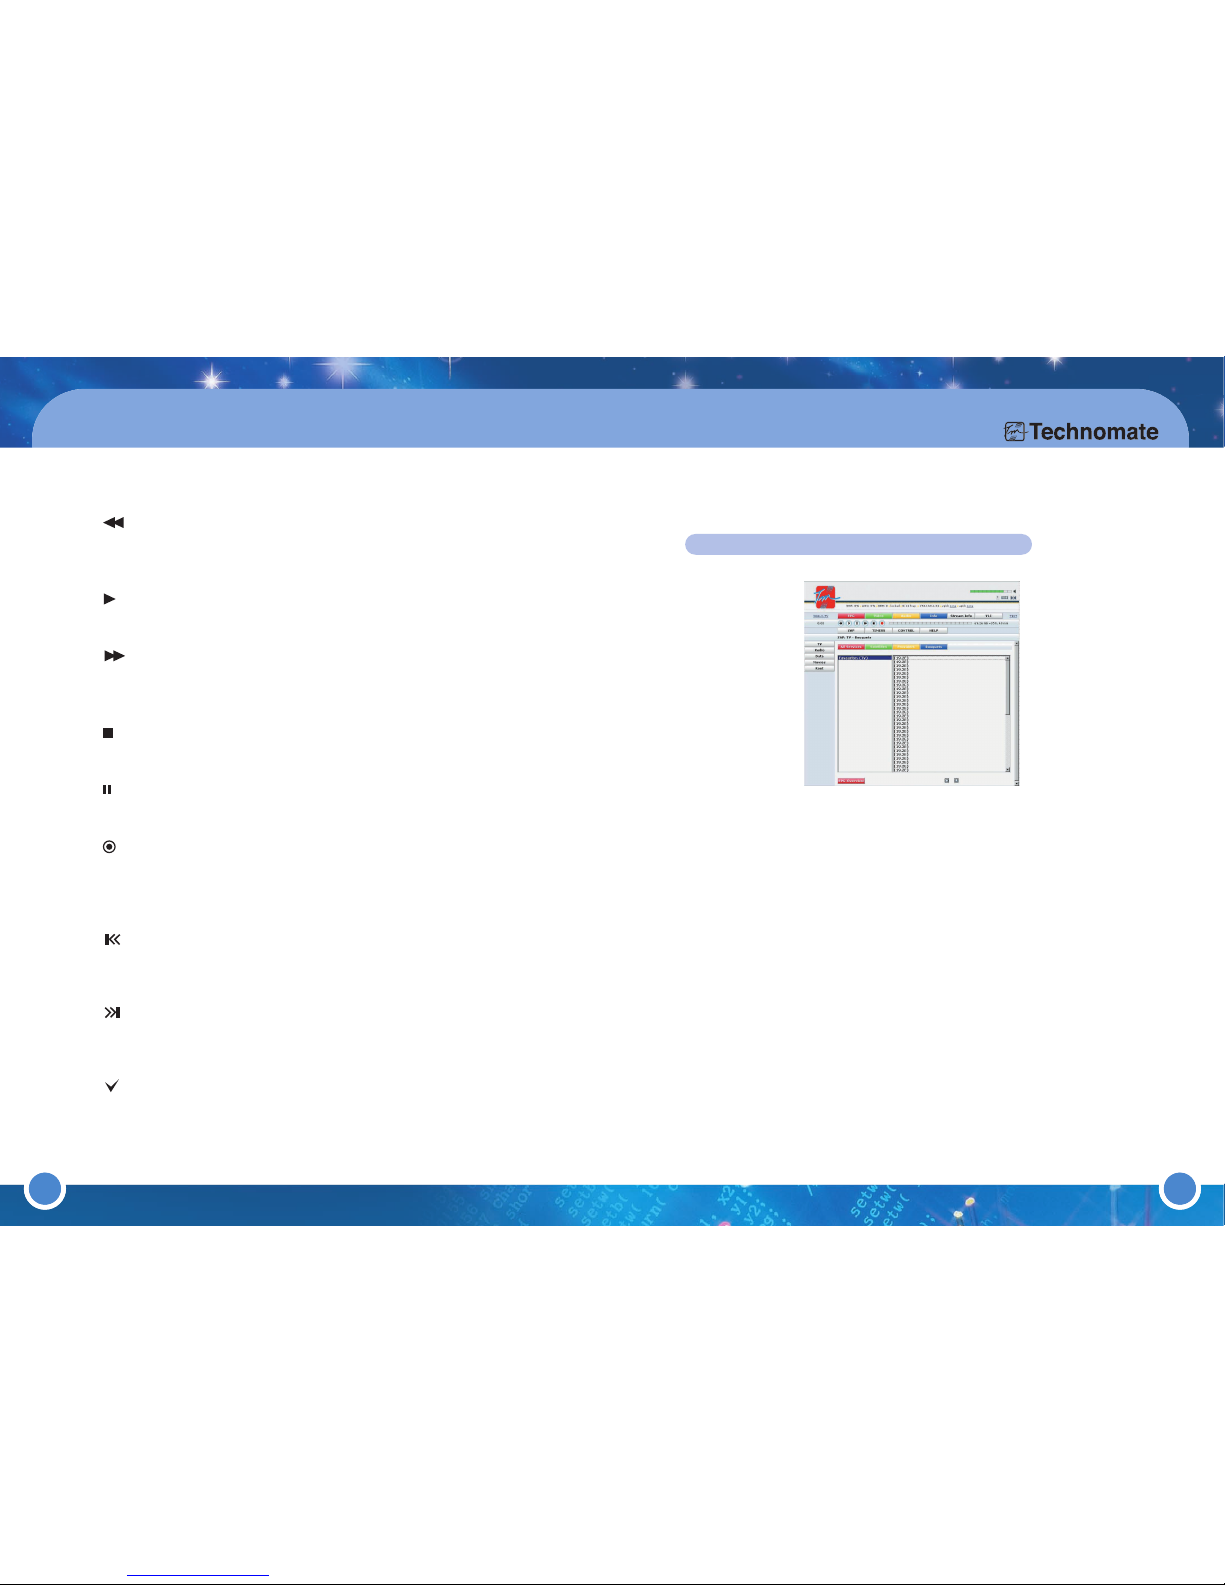
WEB INTERFACE (for streaming, interacting, etc)
You can watch and control your TM500/600 on your PC at your home or
anywhere in the world (for the latter, you will require to setup a DNS account).
Download a program called VLC Media Player from http://www.videolan.org/vlc/
and install it.
Open your Internet Web Browser and enter the IP Address of your TM-500/600
(Menu
(6)Setup(5)Expert Setup(1)Communication Set up)
User Name = root
Password = (there is no password unless you have created one)
Click on Web-x-TV and select the channel/service that you want to watch.
You can also control your TM-500/600, for example, restart/reboot, send messages
to the receiver, change channels, send recording commands, view EPG information,
change Audio Track, etc by using the Interface.
Page 33
63 64
3. Operation & Setting
3.6 Trouble Shooting
Problem
Possible cause
Solution
Scart Inputs
Check that you have interested
the scart correctly and that
the scart is fully functional
Faulty LNB
Change the LNB
Settings
Check that all your satellite
settings are correct in the
Satellite Configuration menu
Dish/antenna alignment
Check that your dish/antenna is
accurately aligned
TV
Check that your TV is in
working order and that the
correct AV input is selected
VCR mode
Ensure that you are not in VCR
mode (press Exit button to exit)
Batteries
Ensure that the batteries are
correctly inserted and that
they are working
No Video or
Audio
Remote control
is not working
WEEE
Disposal of your old appliance
1. When this crossed-out wheeled bin symbol is attached to a product
it means the product is covered by the European Directive 2002/96/EC.
2. All electrical and electronic products should be disposed of separately
from the municipal waste stream via designated collection facilities
appointed by the government or the local authorities.
3. The correct disposal of your old appliance will help prevent potential
negative consequences for the environment and human health.
4. For more detailed information about disposal of your old appliance,
please contact your city office, waste disposal service or the shop
where you purchased the product.
 Loading...