

Page 1
Technomad DragonFly PA System!
Technomad LLP • Made in USA
www.technomad.com • 800 464 7757
Owner’s Manual and Operation Guide
Page 2

Overview
!
The DragonFly™ is a highly portable, battery powered PA system which offers Technomad’s unsurpassed combination of audio quality, product flexibility and ruggedness. Fully weatherproof, the
DragonFly can easily be transported and set up by one person. A molded in stand-mount socket
on the bottom of the unit and threaded inserts on the sides for yoke mounting give the DragonFly
a range of deployment options. With a powerful, lightweight neodymium coaxial 6.5/1” coaxial driver,
the DragonFly is capable of producing articulate, clear audio at 122 dB SPL powered by a 200W
Class D amplifier module.
!
The DragonFly is highly expandable with an available expansion bay for use with Technomad’s
Schedulon™ MP3 player/recorder, a CD player module, a second wireless microphone or a link
interface, including wireless, ethernet and twisted pair configurations. Extended operation time is
available through an 18AH external battery pack option. Whether you need a self-contained, complete PA unit for field deployment or to expand or build an existing PA system with additional, compact output units, the DragonFly can meet your requirements.
!
Physical Construction
!
The DragonFly has a single piece rotomolded cabinet, making the unit extremely durable. When
the clear hatch covering the upper control surface is closed and latched, the unit is rated IP56.
The hatch should not be left open in rain or snow conditions. The front grill is designed to shield
the driver from the elements. The electronics are in a sealed interior chamber, fully protected from
moisture. Similarly, the access panel for the wireless microphone programming buttons should not
be opened in rain or snow conditions.
!
Standard Features
!
Compact, rugged design
Handheld wireless microphone system
Expansion bay for MP3 player/recorder, CD player, ethernet, twisted pair, or wireless interface
Stand–mount socket on bottom
Threaded inserts for yoke mounting
Low profile handle for easy carrying
Microphone input / balanced line level input (XLR-1/4 combo jack)
Line audio input
Aux. speaker output
AC power input (120-240 VAC)
DC power input (12-24 VDC)
4 hour battery operation, 20 hour stand-by capacity
!
!
!
Page 3

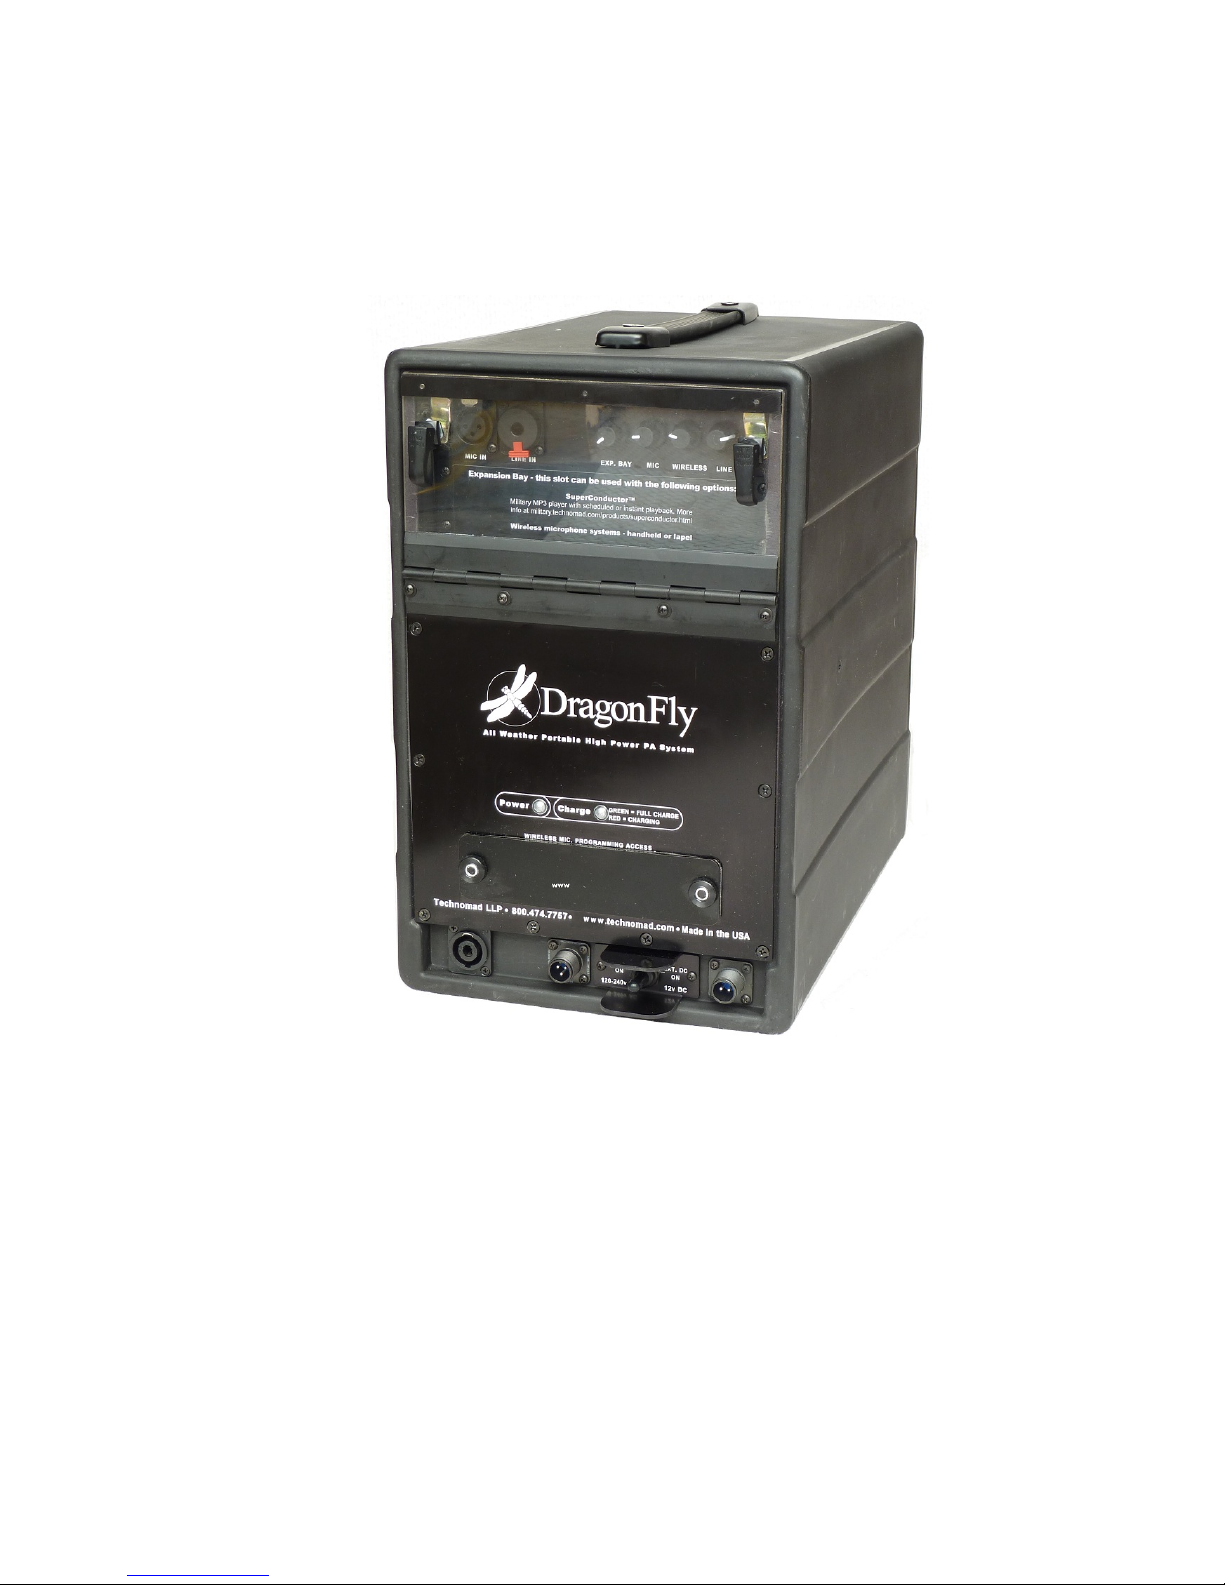
DragonFly rear panel overview
!
!
1) Expansion Bay Available installable options include Schedulon mp3 player/recorder, CD player,
second wireless microphone system, ethernet interface, wireless interface, twisted pair interface.
!
2) Microphone / balanced line input combo jack: XLR contacts are mic level and 1/4 TRS contacts are line level.
!
3) Line level audio input
!
4) Level controls for four
audio sources.
!
5) Power source LED
Red = Internal battery
Green = external DC
Blue = external AC
!
6) Battery charger LED
Green = full charge
Blue = charging
Off = charger off
!
7) Microphone access
panel
This panel can be removed
to access microphone controls for pairing handheld
transmitter or changing the
broadcast channel.
!
8) Aux. speaker output
Allows a DragonFly expansion unit to be powered
from DragonFly
!
9) AC power connector
Harwin 10SL-3P.
120-240VAC
!
10) On/Off switch
!
11) DC power connector
Harwin 10SL-4S.
12-24VDC
!
Note: DragonFly is shown without clear protective hatch for audio control surface for clarity.
!
Technomad LLP • 800.474.7757 • military.technomad.com • Made in the USA
WIRELESS MIC. PROGRAMMING ACCESS
4
1
2
3
5
6
7
8
9
10
11
Power Source Battery Charge
OFF - CHARGER OFF
GREEN - FULL CHARGE
BLUE - CHARGING
RED - Internal Battery
GREEN - Ext. 12-28VDC
BLUE - Ext. 110-240VAC
All Weather Portable High Power PA System
DragonFly
MIC AUX WIRELESS EXP. BAY
MIC IN
LINE IN
POWER
CLIP
INPUT LEVEL CONTROLS AUXILLIARY INPUTS
Page 4

Basic Operation
!
The DragonFly can be run from the internal battery pack, external 120-240VAC power or external
12-24VDC power. The DragonFly is designed to automatically detect the preferred power source
and to use that source on start-up. The default source is external AC, followed by external DC
then the internal battery back. The DragonFly has three operational modes - on/charging, on/not
charging and off/charging. On/charging is the most commonly used mode. On/charging is typically
only used when the external power source is also limited, such as an external battery pack, solar
panel or vehicle. Off/charging is used to charge the unit when audio system isn’t needed but the internal battery is drained.
!
To sta r t the uni t , press an d hold the power but t on until t he LED lig hts light up. Then r e lease
the power button and press the button until the desired operational state has been reached.
Press once for on/charging, twice for on/not charging and three times for off/charging. Press four
times to shut the unit off completely. The charge and power LEDs will show what the operational
state of the unit is.
!
If the unit is running from a source that becomes unavailable, then it will automatically switch over
to the next available default power source. If the unit is running from the internal battery and the
battery gets depleted then the unit will simply shut off.
!
After the unit is operational, you can set the volume level for whatever audio source you are using
by adjusting the appropriate level control knob on the upper panel of the DragonFly. You can use
all four audio inputs simultaneously.
!
Clip light - this LED signals when the inputs to the DragonFly are being overdriven. While it is acceptable for the Clip LED to flicker during operation, the LED should not stay constantly lit. If the
LED is fully lit, all active inputs levels should be reduced until the light is occasionally flickering.
The audio mixer of the DragonFly does incorporate a limiter circuit to reduce clipping.
!
Wireless Microphone operation
!
The wireless microphone system integrated into the DragonFly ships with the handheld transmitter
paired to the receiver inside the unit. To start using the wireless system, you can simply take the
handheld unit, press the power/mute button until the green light on the mic is on. To mute the microphone, press the button once. When muted, the indicator on the handheld transmitter should
be red. To shut the microphone off, simply press and hold the button until the light goes off. !
!
If you need to change the channel that the system is using, you will need to access the microphone receiver settings. First, remove the microphone access panel by undoing the two knurled
knobs. You can now see the programming panel of the unit. Press and release the channel button.
This will scan for an available channel and select that channel. Next, turn on the handheld unit
and remove the battery cover by unscrewing the lower part of the handheld transmitter. Point the
base of the unit towards the microphone receiver and press and hold the sync button on the receiver. Hold the button until the red lights on the receiver and handheld unit stop flashing. The receiver ready light should now be lit and the system should be set to operate on the new channel.
Re-attach the battery cover on the handheld unit.
!
The operational range of the wireless transmitter is approximately 300’.
!
!
Page 5

Battery System
!
The DragonFly has a 5AH NiMH battery which is charged by the integrated, internal battery
charger. Depending on the program material being reproduced by the DragonFly, the battery
should provide up to four hours of operational time. If the battery has become fully discharged, it
may be necessary to power the unit off for 5-10 minute to allow the battery pack to recover sufficiently for the battery charger to optimally recharge it. The battery charger is a smart charger design, meaning that it can quickly charge the battery pack to full charge within 6-8 hours without
harming the cells. The unit does not need to be on in order for the battery to charge, but does
need to be in charge mode. The DragonFly includes a LVD circuit to protect the battery from being
excessively depleted in the event that the unit is left on indefinitely.
!
IMPORTANT: NiMH batteries can continue to lose charge even when the unit is off. For best
performance, be sure to charge your DragonFly fully every three weeks.
!
Troubleshooting
!
Problem
Solution
The unit will not power on from battery pack
Check that the battery pack is charged by
connecting the DragonFly to an AC power
source.
No sound is being produced by the unit.
• Check that a working audio source is being
used. !
• Check that the appropriate level control has
been turned up. If you are uncertain if a source
is working, set the level control to 12 o’clock to
until you have the source working. !
• If using the wireless system, is the handheld
transmitter on? Check that the handheld unit is
not muted.
The unit is temporarily shutting off when used.
Check that the input being used is not being
overdriven. The DragonFly audio amplifier
incorporates clipping protection and will
temporarily shut down. Simply turn down the
level control for that source to prevent this
problem from reoccurring
The unit is not charging properly.
Shut the unit off completely and let sit for 15
minutes, then reconnect to AC power to
recharge the battery pack.
Microphone is causing feedback.
Move behind the loudspeakers when
speaking, if possible. If in front of the
loudspeakers keep the ‘live’ end of the mic
(the part you speak into) pointing AWAY from
the loudspeaker.) Switch the mic off when
you’re not speaking through it.
Page 6

!
Reset Function: The DragonFly can be reset by pressing and holding the power button for a full 10
seconds then releasing the button. This will reboot the internal controller board and may resolve
charging or power issues.
!
Expansion Bay Modules (one module can be installed per system):
!
Schedulon MP3 player/recorder CD player
Wireless Microphone, lapel system Wireless Microphone, handheld system
Twisted Pair Link Kit Ethernet Link Kit
Wireless Link Kit
!
Available Accessories/Options:
!
Optional color: olive drab, desert sand, white, gray
External battery pack (18AH SLA battery)
DragonFly Expansion Unit (aux. passive loudspeaker)
Tripod Stand
Yoke mount
DC power cord
Wired Microphone
Transport backpack
 Loading...