

Page 1

1062 User Guide.doc
Handscanner User Guide
Technology Solutions UK Ltd
Suite C
Loughborough Technology
Centre
Epinal Way
Loughborough
Leics
LE11 3GE
Tel: +44 (0) 1509 238248
Fax: +44 (0) 1509 220020
Email: enquiries@tsl.uk.com
Page 2

1062 User Guide.doc 1062
Technology Solutions (UK) Limited reserves the right to change its products, specifications and services at any time
without notice. Technology Solutions (UK) Limited provides customer assistance in various technical areas, but does
not have full access to data concerning the uses and applications of any customer’s products. Therefore, Technology
Solutions (UK) Limited assumes no responsibility for customer product design or for infringement of patents and/or
the rights of third parties, which may result from assistance provided by Technology Solutions (UK) Limited. No part
of this document may be reproduced in any form without the written consent of the author.
Page 2 of 39
Overview
This document provides general usage instructions for the Handscanner and
is applicable for both the 1D laser scanner and 2D imager versions.
Contents
1 Main parts of the Handscanner................................................................................ .................... 4
1.1 Handscanner ..........................................................................................................................4
1.2 Cradle ......................................................................................................................................6
2 Using the Handscanner ........................................................................ ........................................ 7
2.1 Charging the Handscanner........................................................................................ ........... 7
2.2 Removing the Handscanner battery....................................................................................8
2.3 Handscanner Readzones ..................................................................................................... 9
2.4 Operating modes........................................................ ........................................ .................. 10
2.5 Configurable features ........................................................................................ .................. 11
2.5.1 Introduction ................................................................................................................... 11
2.5.2 Bluetooth settings ................................ ........................................................................ 11
2.5.3 Functionality................................................................................ ..................................11
2.5.4 Prefix........................................................................ ........................................ .............. 11
2.5.5 Buzzer............................................................................................................................ 11
2.5.6 Vibrator ........................................................................................ .................................. 11
2.5.7 RFID multiblock read ................ ................................................................................... 11
2.5.8 Batch mode................................ ........................................ ...........................................11
2.5.9 Scan time ...................................................................................................................... 12
2.5.10 Power down time.......................................................................................................... 12
2.5.11 Firmware update .......................................................................................................... 12
3 Application Examples – PC ........ ........................................ ........................................................ 13
3.1 Introduction ........................................................ ................................................................... 13
3.2 Setting up the Bluetooth connection ................................................................................. 13
3.3 Using SmartWedge Basic................................ ................................................................... 15
3.3.1 Introduction ................................................................................................................... 15
3.3.2 Installation ................ ..................................................................................................... 15
3.3.3 Operation........................................................ ............................................................... 15
3.4 HyperTerminal ...................................................................................................................... 17
3.4.1 Introduction ................................................................................................................... 17
3.4.2 Configuring HyperTerminal......................................................................................... 17
4 Application Examples – Pocket PC ........................ ........................................ ........................... 19
4.1 Introduction ........................................................ ................................................................... 19
4.2 Setting up a Bluetooth connection – Symbol MC70 ........ ........................................ ....... 19
4.3 Setting up a Bluetooth Connection – Intermec CN3........ ............................................... 22
4.4 Using SmartWedge Basic................................ ................................................................... 28
4.4.1 Introduction ................................................................................................................... 28
4.4.2 Installation ................ ..................................................................................................... 28
4.4.3 Operation........................................................ ............................................................... 28
4.5 Using mToken ........................................ ........................................ ......................................32
4.5.1 Introduction ................................................................................................................... 32
4.5.2 Installation ................ ..................................................................................................... 32
4.5.3 Operation........................................................ ............................................................... 32
5 Regulatory........ ........................................ ..................................................................................... 36
5.1.1 Safety........................................................................................................................ .....36
5.1.2 FCC Statement............................................................................................................. 37
5.1.3 Bluetooth ........................................................ ............................................................... 37
5.1.4 Waste Electrical and Electronic Equipment (WEEE).............................................. 37
6 Troubleshooting ........................................................................................................................... 38
Page 3

1062 User Guide.doc 1062
Technology Solutions (UK) Limited reserves the right to change its products, specifications and services at any time
without notice. Technology Solutions (UK) Limited provides customer assistance in various technical areas, but does
not have full access to data concerning the uses and applications of any customer’s products. Therefore, Technology
Solutions (UK) Limited assumes no responsibility for customer product design or for infringement of patents and/or
the rights of third parties, which may result from assistance provided by Technology Solutions (UK) Limited. No part
of this document may be reproduced in any form without the written consent of the author.
Page 3 of 39
History
Version Date Modifications
1.0 15/02/07 Document Creation
1.1 13/06/07
Updates to Regulatory section.
1.2 6/07/07 Added new FCC ID information
Page 4

1062 User Guide.doc 1062
Technology Solutions (UK) Limited reserves the right to change its products, specifications and services at any time
without notice. Technology Solutions (UK) Limited provides customer assistance in various technical areas, but does
not have full access to data concerning the uses and applications of any customer’s products. Therefore, Technology
Solutions (UK) Limited assumes no responsibility for customer product design or for infringement of patents and/or
the rights of third parties, which may result from assistance provided by Technology Solutions (UK) Limited. No part
of this document may be reproduced in any form without the written consent of the author.
Page 4 of 39
1 Main parts of the Handscanner
1.1 Handscanner
The status LEDs on the top of the Handscanner provide an indication of the
operating status of the unit.
LED colour Status
Off The Handscanner is off.
Blue flashing The Handscanner is powered on and
waiting for a Bluetooth connection.
Continuous Blue The Handscanner is powered on and
connected via Bluetooth.
Battery cover release.
Docking connector
Status LEDs
Trigger Button
LASER LIGHT
DO NOT STARE INTO BEAM.
CLASS 2 LASER PRODUCT.
LASERSTRAHLUNG NICHT IN
DEN STRAHL BLICKEN.
LASER KLASSE 2.
LUMIÈRE LASER NE PAS
REGARDER DANS LE
FAISCEAU. APPAREIL À
LASER DE CLASSE 2.
630-670nm 1mW
Adjustable finger
strap
Page 5

1062 User Guide.doc 1062
Technology Solutions (UK) Limited reserves the right to change its products, specifications and services at any time
without notice. Technology Solutions (UK) Limited provides customer assistance in various technical areas, but does
not have full access to data concerning the uses and applications of any customer’s products. Therefore, Technology
Solutions (UK) Limited assumes no responsibility for customer product design or for infringement of patents and/or
the rights of third parties, which may result from assistance provided by Technology Solutions (UK) Limited. No part
of this document may be reproduced in any form without the written consent of the author.
Page 5 of 39
Red The Handscanner is charging.
Green The Handscanner is fully charged.
Red and Green The battery in the Handscanner has a
fault, or it is being charged outside
the recommended temperature range
(0°C to 45°C).
Page 6
1062 User Guide.doc 1062
Technology Solutions (UK) Limited reserves the right to change its products, specifications and services at any time
without notice. Technology Solutions (UK) Limited provides customer assistance in various technical areas, but does
not have full access to data concerning the uses and applications of any customer’s products. Therefore, Technology
Solutions (UK) Limited assumes no responsibility for customer product design or for infringement of patents and/or
the rights of third parties, which may result from assistance provided by Technology Solutions (UK) Limited. No part
of this document may be reproduced in any form without the written consent of the author.
Page 6 of 39
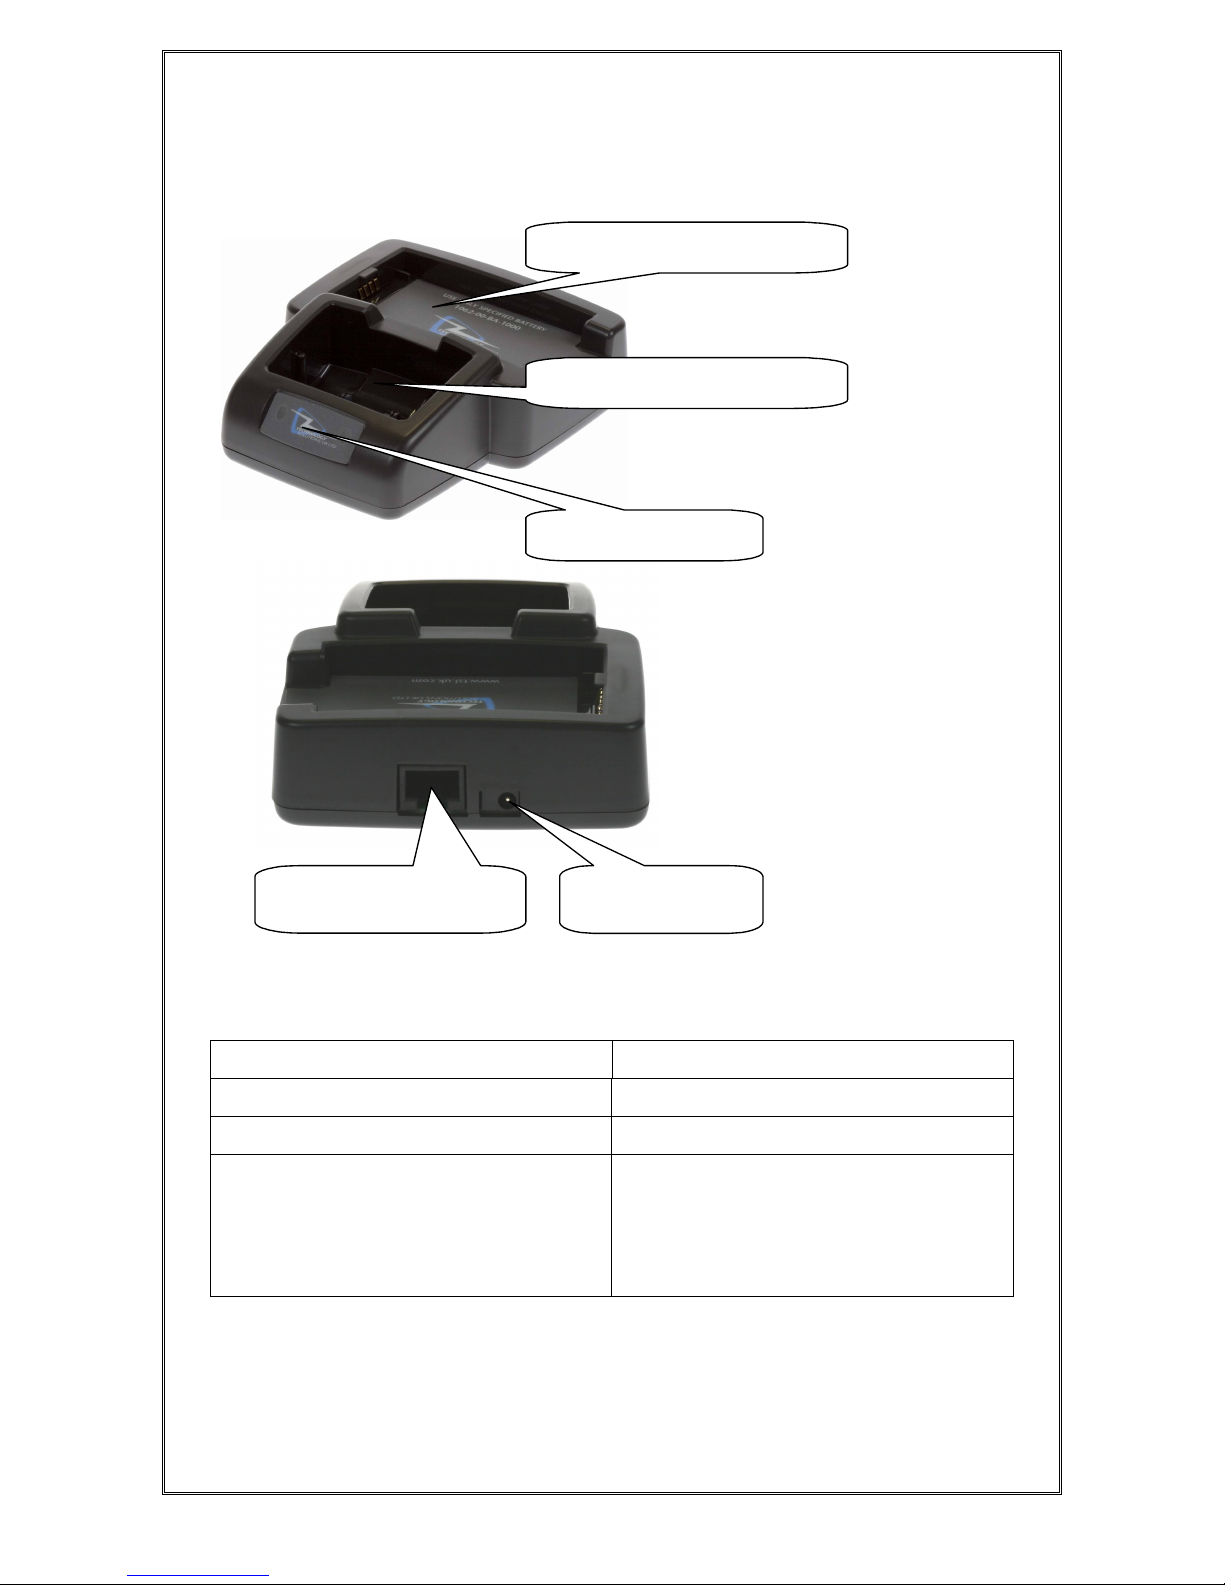
1.2 Cradle
The Charge Status LEDs indicate the state of the spare battery. The spare
battery charge feature is independent of the charging of the battery inside the
Handscanner.
LED Charge Status
Red on The spare battery is charging.
Green on The spare battery is fully charged.
Both red and green on. No spare battery is present, the spare
battery has a fault, or the spare
battery is being charged outside the
recommended temperature range
(0°C to 45°C).
Docking port for Handscanner.
Charge Status LEDs
Communications port
connector.
Charging slot for spare battery.
Input from power
supply.
Page 7

1062 User Guide.doc 1062
Technology Solutions (UK) Limited reserves the right to change its products, specifications and services at any time
without notice. Technology Solutions (UK) Limited provides customer assistance in various technical areas, but does
not have full access to data concerning the uses and applications of any customer’s products. Therefore, Technology
Solutions (UK) Limited assumes no responsibility for customer product design or for infringement of patents and/or
the rights of third parties, which may result from assistance provided by Technology Solutions (UK) Limited. No part
of this document may be reproduced in any form without the written consent of the author.
Page 7 of 39
2 Using the Handscanner
2.1 Charging the Handscanner
The Handscanner is charged by docking it in the cradle. Plug the power
supply provided with the cradle in to the power in socket on the back of the
cradle. The charge time will depend on how discharged the Handscanner
battery is. Typically a fully discharged battery will take 3-4 hours to fully
charge. The LEDs on the top of the Handscanner indicate the charge status;
Red for charge in progress, Green for charge complete. Both LEDs on
simultaneously indicates a fault condition. This will happen if the battery is
outside the recommended charging temperature (0°C to 45°C), or if the
battery has a fault.
The cradle is also capable of charging a spare battery at the same time as a
Handscanner. The spare battery drops into the holder at the back of the
cradle. The charge time in the cradle is the same as the Handscanner.
Charge status is indicated by the LEDs on the cradle. Red indicates charge in
progress, Green charge complete and Red and Green for fault (or battery not
present). Note that the charge status of the spare battery is independent of
the Handscanner.
Page 8
1062 User Guide.doc 1062
Technology Solutions (UK) Limited reserves the right to change its products, specifications and services at any time
without notice. Technology Solutions (UK) Limited provides customer assistance in various technical areas, but does
not have full access to data concerning the uses and applications of any customer’s products. Therefore, Technology
Solutions (UK) Limited assumes no responsibility for customer product design or for infringement of patents and/or
the rights of third parties, which may result from assistance provided by Technology Solutions (UK) Limited. No part
of this document may be reproduced in any form without the written consent of the author.
Page 8 of 39
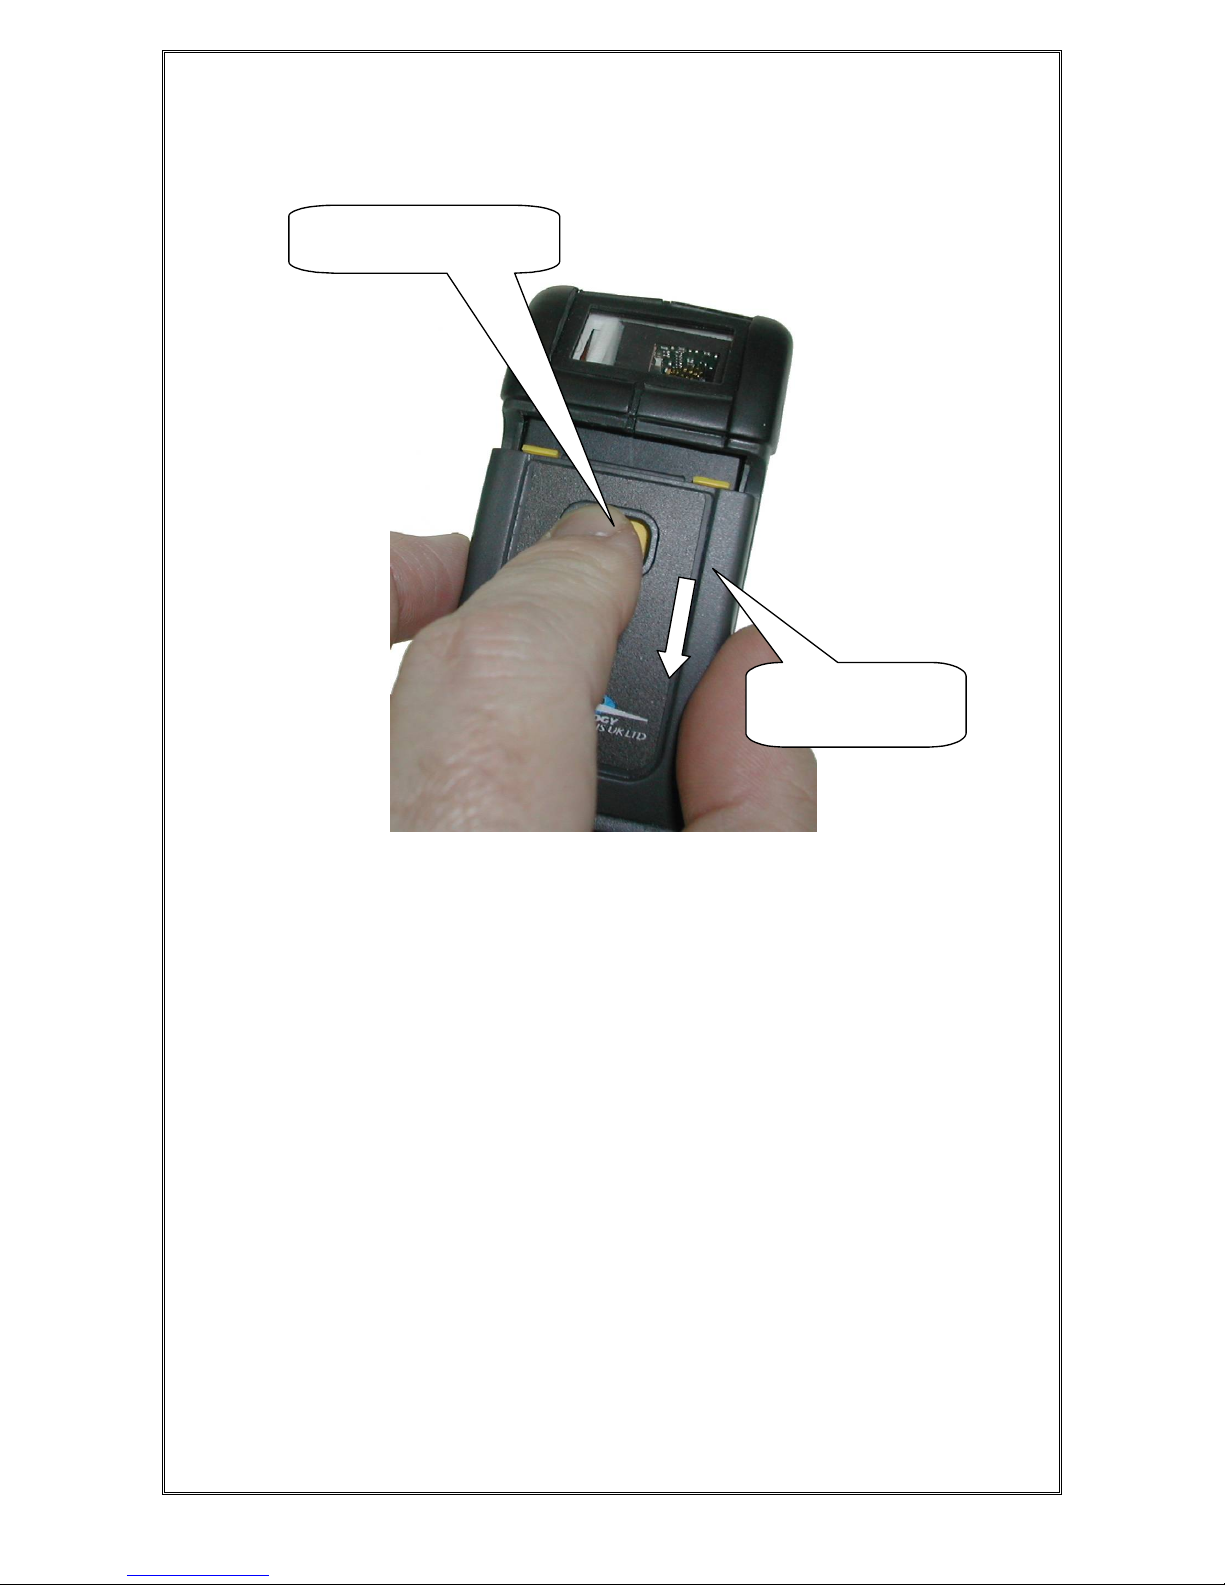
2.2 Removing the Handscanner battery
The battery can then be lifted out and replaced. Refit the cover by
sliding it back up until the button clicks in place.
1. Press in the yellow
button
2. Slide the battery
cover down and
lift it off.
Page 9
1062 User Guide.doc 1062
Technology Solutions (UK) Limited reserves the right to change its products, specifications and services at any time
without notice. Technology Solutions (UK) Limited provides customer assistance in various technical areas, but does
not have full access to data concerning the uses and applications of any customer’s products. Therefore, Technology
Solutions (UK) Limited assumes no responsibility for customer product design or for infringement of patents and/or
the rights of third parties, which may result from assistance provided by Technology Solutions (UK) Limited. No part
of this document may be reproduced in any form without the written consent of the author.
Page 9 of 39
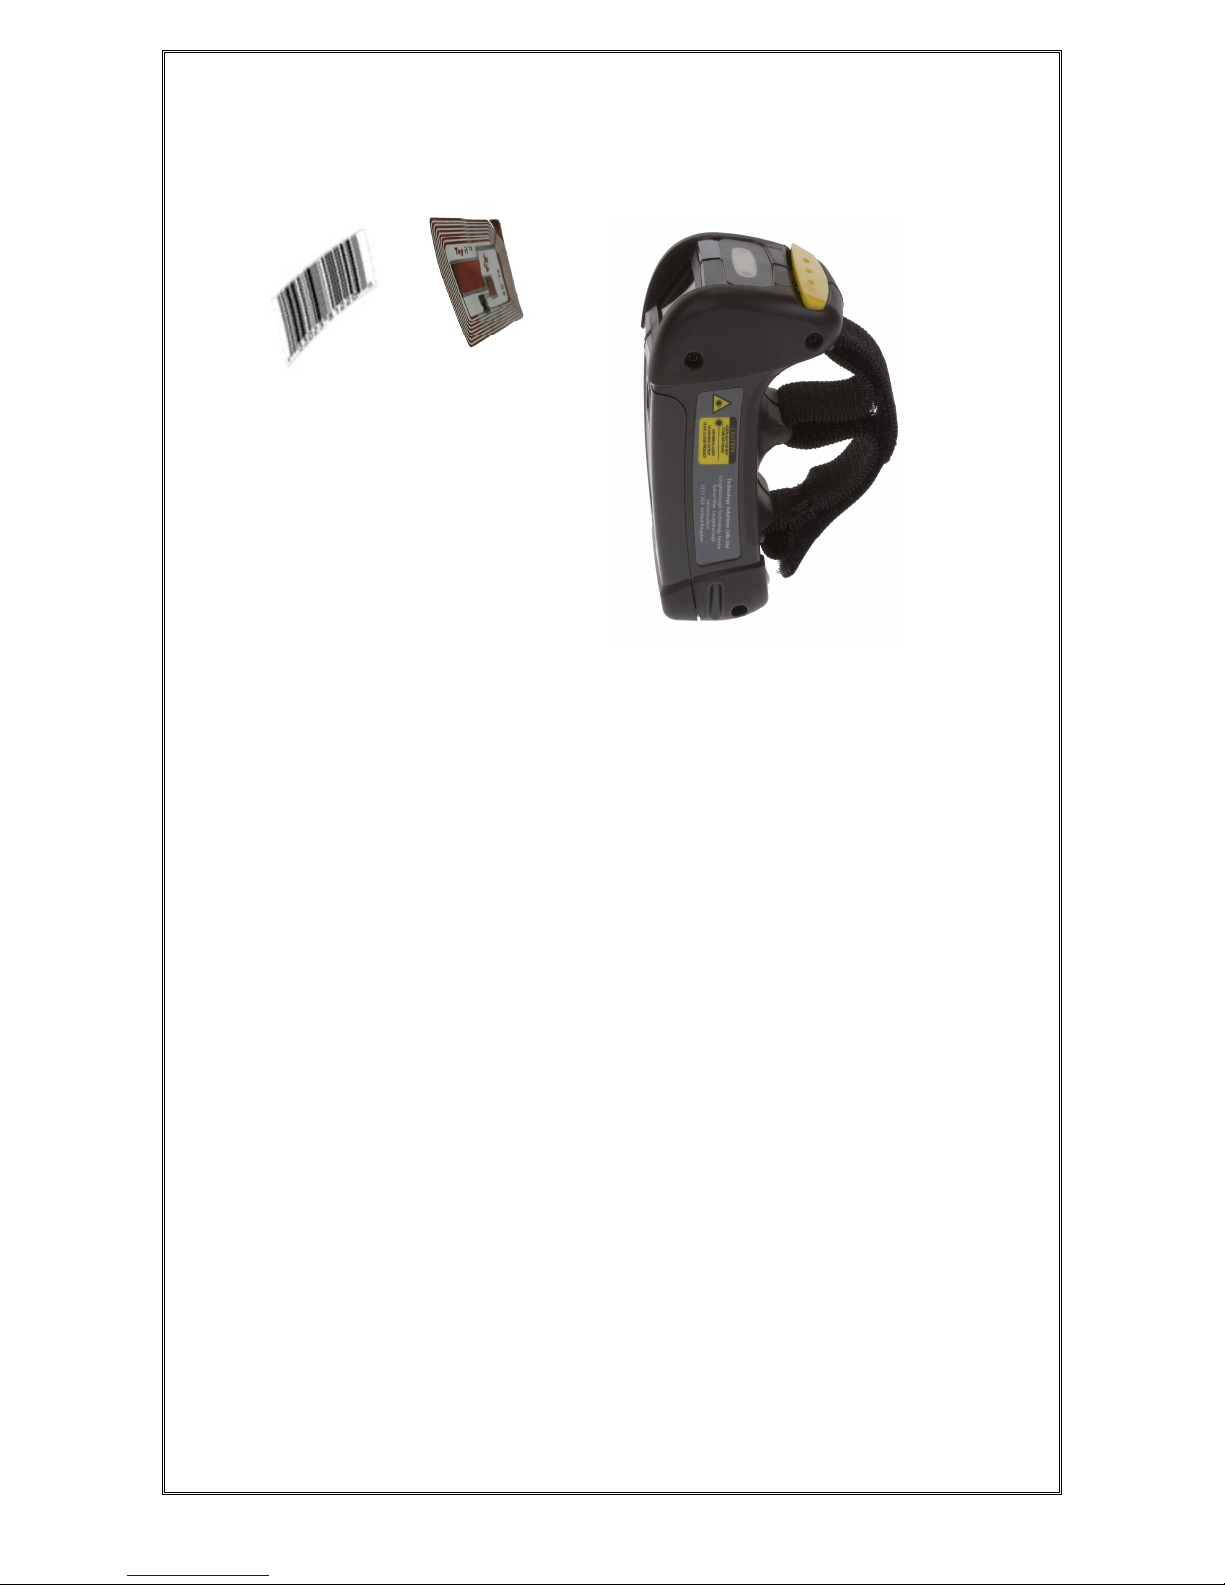
2.3 Handscanner Readzones
Both transponders and barcodes are read in front of the Handscanner as
shown above. The barcode is read when the red laser line completely scans
over it (1D) or it is enclosed in the projected red outline (2D). RFID
transponders are read in the same plane as barcodes. The RFID read range
is far less than the barcode. Typically an RFID device will be read at less than
10cm (dependent on the size and type of the RFID device). A barcode may be
read between 5cm and 1m depending on the scanner type, barcode
symbology, size and condition.
The Handscanner functionality depends on the software running on the host
device. Generally pressing the button on the Handscanner triggers a barcode
and/or RFID read. The RFID read zone is in front of the window on the
Handscanner.
Page 10

1062 User Guide.doc 1062
Technology Solutions (UK) Limited reserves the right to change its products, specifications and services at any time
without notice. Technology Solutions (UK) Limited provides customer assistance in various technical areas, but does
not have full access to data concerning the uses and applications of any customer’s products. Therefore, Technology
Solutions (UK) Limited assumes no responsibility for customer product design or for infringement of patents and/or
the rights of third parties, which may result from assistance provided by Technology Solutions (UK) Limited. No part
of this document may be reproduced in any form without the written consent of the author.
Page 10 of 39
2.4 Operating modes
The Handscanner has two fundamental operating modes; Host Command
Mode and Button Press mode. Both modes may be combined in an actual
deployed application.
Host Command Mode requires custom software to be developed and
deployed to the host. All of the functionality and features of the Handscanner
can be remotely controlled in Host Command Mode. The full command set is
documented in the ‘Handscanner Programming Guide’. To simplify custom
application development an API is available; this is documented in the
‘Handscanner API’ document. Both documents are available from the
Technology Solutions’ website (www.tsl.uk.com/downloads). Source code examples
are provided in the Software Development Kit available from Technology
Solutions (1062-0x-BT-HSCAN-KIT).
In Button Press Mode the Handscanner is initially configured to operate in a
particular way each time the button is pressed. A PC application; Desktop
Configuration is provided by Technology Solutions for configuring
Handscanners. An overview of the configurable features is given in Section
2.5.
Host Command Mode requires that the Handscanner has a Bluetooth link to
the host. Button Press Mode usually operates with a Bluetooth link, but it is
possible to configure the Handscanner to store scan data locally and
download it later. This is Batch Mode and is described in Section 2.5.8.
The method of establishing the Bluetooth link varies between different host
platforms. The Handscanner appears as a serial device (Bluetooth Serial Port
Profile) and so in some cases will be accessed over a virtual comm. port. The
Handscanner establishes a secure Bluetooth connection and therefore a PIN
will be required during the pairing process. The default PIN is ‘0000’, but this
can be changed using the Desktop Configuration software. When discovering
devices the Bluetooth Friendly Name of the Handscanner is set to be the
same as the serial number printed on the side of the Handscanner. Again, this
may be changed. Refer to the operating instructions of the host platform for
further information on establishing a Bluetooth link.
Page 11

1062 User Guide.doc 1062
Technology Solutions (UK) Limited reserves the right to change its products, specifications and services at any time
without notice. Technology Solutions (UK) Limited provides customer assistance in various technical areas, but does
not have full access to data concerning the uses and applications of any customer’s products. Therefore, Technology
Solutions (UK) Limited assumes no responsibility for customer product design or for infringement of patents and/or
the rights of third parties, which may result from assistance provided by Technology Solutions (UK) Limited. No part
of this document may be reproduced in any form without the written consent of the author.
Page 11 of 39
2.5 Configurable features
2.5.1 Introduction
The Desktop Configuration application supplied by Technology Solutions is
required for configuring Button Press Mode on a Handscanner. This
application is available for download from the Technology Solutions website
(www.tsl.uk.com/downloads) along with a full user guide. Configuration of the
Handscanner is only possible over the wired serial connection. A cradle and
serial data lead are therefore required. If the host PC does not have a serial
port it is possible to use a USB to serial converter lead.
The following sections provide an overview of the configuration options.
2.5.2 Bluetooth settings
The Bluetooth Friendly Name, the PIN and the Bluetooth RF power can be
modified.
2.5.3 Functionality
The RFID functionality can be enabled and disabled for each transponder
type. Barcode scanning, and the various symbologies included in a barcode
scan can be enabled and disabled.
2.5.4 Prefix
A prefix can be added to the scanned data to indicate whether it came from a
barcode, or from a particular RFID transponder type. A prefix can also be
added to all scanned data to indicate which Handscanner the data came from.
2.5.5 Buzzer
The buzz on successful read function can be enabled or disabled.
2.5.6 Vibrator
Vibrate on successful read can be enabled or disabled.
2.5.7 RFID multiblock read
An RFID transponder may contain multiple blocks of data in addition to the
unique serial number. The start block and number of subsequent blocks to
read when a transponder is present can be configured.
2.5.8 Batch mode
Batch mode allows the Handscanner to store all scanned data locally if there
is not a Bluetooth link to the host. With Batch mode enabled the Handscanner
continues to operate as normal, but stores scan data locally. This data can
then be downloaded from the Handscanner memory subsequently. If Batch
mode is not enabled the Handscanner will not respond to button presses
when a Bluetooth link is not established.
Page 12

1062 User Guide.doc 1062
Technology Solutions (UK) Limited reserves the right to change its products, specifications and services at any time
without notice. Technology Solutions (UK) Limited provides customer assistance in various technical areas, but does
not have full access to data concerning the uses and applications of any customer’s products. Therefore, Technology
Solutions (UK) Limited assumes no responsibility for customer product design or for infringement of patents and/or
the rights of third parties, which may result from assistance provided by Technology Solutions (UK) Limited. No part
of this document may be reproduced in any form without the written consent of the author.
Page 12 of 39
Batch mode is a useful feature in help to avoid data loss if the Bluetooth link
drops because the Handscanner has moved out of range of the host. There is
a risk of a short period of data loss because the Bluetooth link failure
indication is not immediate. Scan data obtained during the period between
moving out of range and the Bluetooth link indicating failure may not be
preserved.
2.5.9 Scan time
The maximum duration in seconds of a scan can be configured. The barcode
reader has an independent maximum scan duration (4s for 1D, 10s for 2D).
Setting the Scan Time to shorter than these times results in barcode and
RFID scanning stopping at the specified time, setting the Scan Time to longer
times results in the barcode scanning stopping before the RFID
2.5.10 Power down time
The time in seconds that the Handscanner stays powered on after the
Bluetooth link has dropped or the button has been pressed can be changed
from the default value of 120 seconds.
2.5.11 Firmware update
The Desktop Configuration application includes a firmware loader for updating
the Handscanner firmware.
Page 13

1062 User Guide.doc 1062
Technology Solutions (UK) Limited reserves the right to change its products, specifications and services at any time
without notice. Technology Solutions (UK) Limited provides customer assistance in various technical areas, but does
not have full access to data concerning the uses and applications of any customer’s products. Therefore, Technology
Solutions (UK) Limited assumes no responsibility for customer product design or for infringement of patents and/or
the rights of third parties, which may result from assistance provided by Technology Solutions (UK) Limited. No part
of this document may be reproduced in any form without the written consent of the author.
Page 13 of 39
3 Application Examples – PC
3.1 Introduction
These examples assume that the Handscanner is in its factory default state
and that it is being used on a PC running Windows XP. The same approach
can be taken with any other platform.
3.2 Setting up the Bluetooth connection
Establishing a Bluetooth connection requires the stages of Discovery and
Pairing. The Handscanner conforms to the Bluetooth Serial Port Profile and
therefore a Virtual Comm port will be created as part of the Bluetooth setup
process.
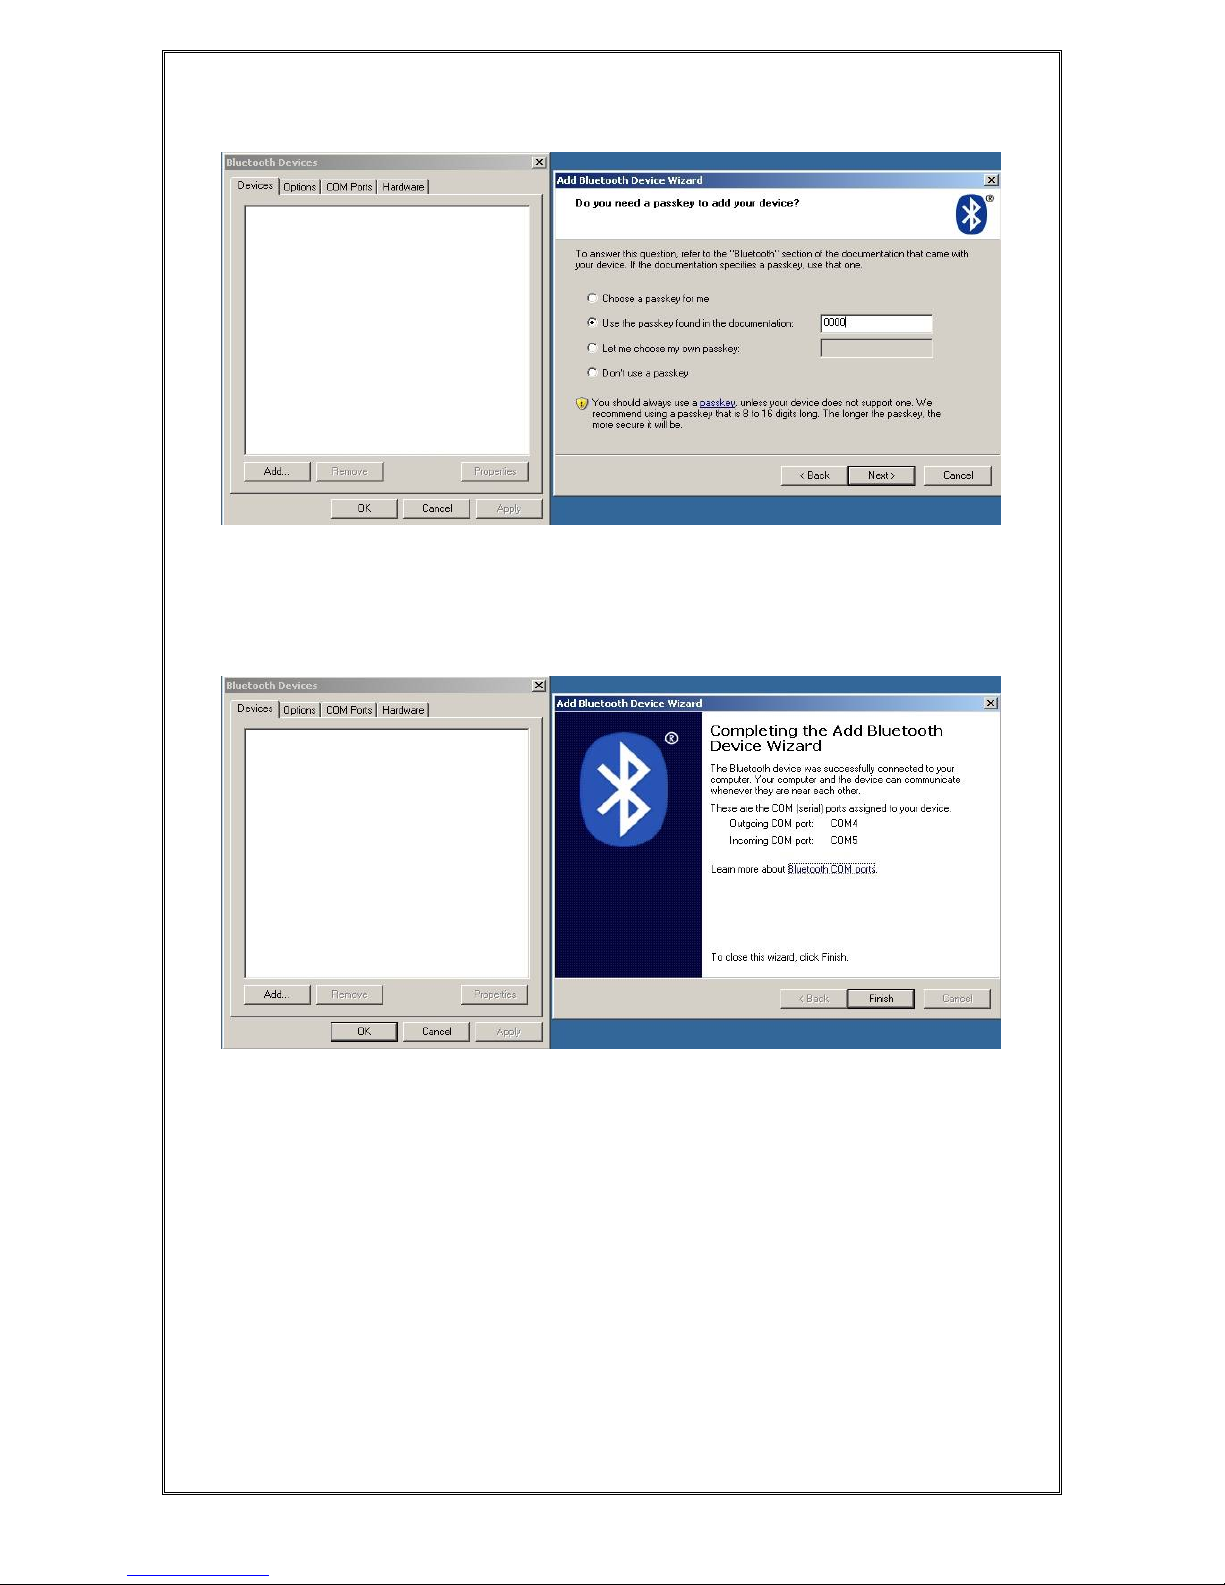
Launch the Bluetooth Device window (Start>Control Panel>Bluetooth
Devices). Click the ‘Add’ button, switch on the Handscanner by pressing the
yellow button. The Blue LED will start to flash slowly. Tick the ‘My device is
set up and ready to be found.’ box and click the ‘Next’ button. This starts the
Discovery process. When this is complete a list of devices will be shown,
including the Handscanner as shown below:
The Handscanner will be identified by its Bluetooth Friendly name which by
default is the serial number printed on the side of the Handscanner. Click on
the Handscanner and then on ‘Next’ to start Pairing. Enter the default PIN of
‘0000’ as shown below and then click ‘Next’.
Page 14
1062 User Guide.doc 1062
Technology Solutions (UK) Limited reserves the right to change its products, specifications and services at any time
without notice. Technology Solutions (UK) Limited provides customer assistance in various technical areas, but does
not have full access to data concerning the uses and applications of any customer’s products. Therefore, Technology
Solutions (UK) Limited assumes no responsibility for customer product design or for infringement of patents and/or
the rights of third parties, which may result from assistance provided by Technology Solutions (UK) Limited. No part
of this document may be reproduced in any form without the written consent of the author.
Page 14 of 39
The installation of the Handscanner will then continue. At this point the Virtual
COM port will be created. When this has successfully completed the window
shown below will be displayed.
Record the ‘Outgoing COM port’ number. This is the Virtual COM port that will
be used by any application that needs to connect to the Handscanner.
Page 15
1062 User Guide.doc 1062
Technology Solutions (UK) Limited reserves the right to change its products, specifications and services at any time
without notice. Technology Solutions (UK) Limited provides customer assistance in various technical areas, but does
not have full access to data concerning the uses and applications of any customer’s products. Therefore, Technology
Solutions (UK) Limited assumes no responsibility for customer product design or for infringement of patents and/or
the rights of third parties, which may result from assistance provided by Technology Solutions (UK) Limited. No part
of this document may be reproduced in any form without the written consent of the author.
Page 15 of 39
3.3 Using SmartWedge Basic
3.3.1 Introduction
SmartWedge Basic is an application for Windows XP which allows scanned
data to be directly entered into another Application as though it had been
typed on the keyboard. The data is inserted at the cursor of whichever window
has focus. This allows the Handscanner to be immediately used in existing
systems with no software development. The Handscanner can be configured
(see Section 2.5) to provide a certain set of actions on button press so that the
correct data is read and prefixed ready for use by the existing software. A
more advanced version of the SmartWedge software is available from
Technology Solutions which includes additional functionality such as data
filtering and formatting.
3.3.2 Installation
SmartWedge Basic for the PC is provided in a standard Windows Installer
(.msi) package. Double click to install the application.
3.3.3 Operation
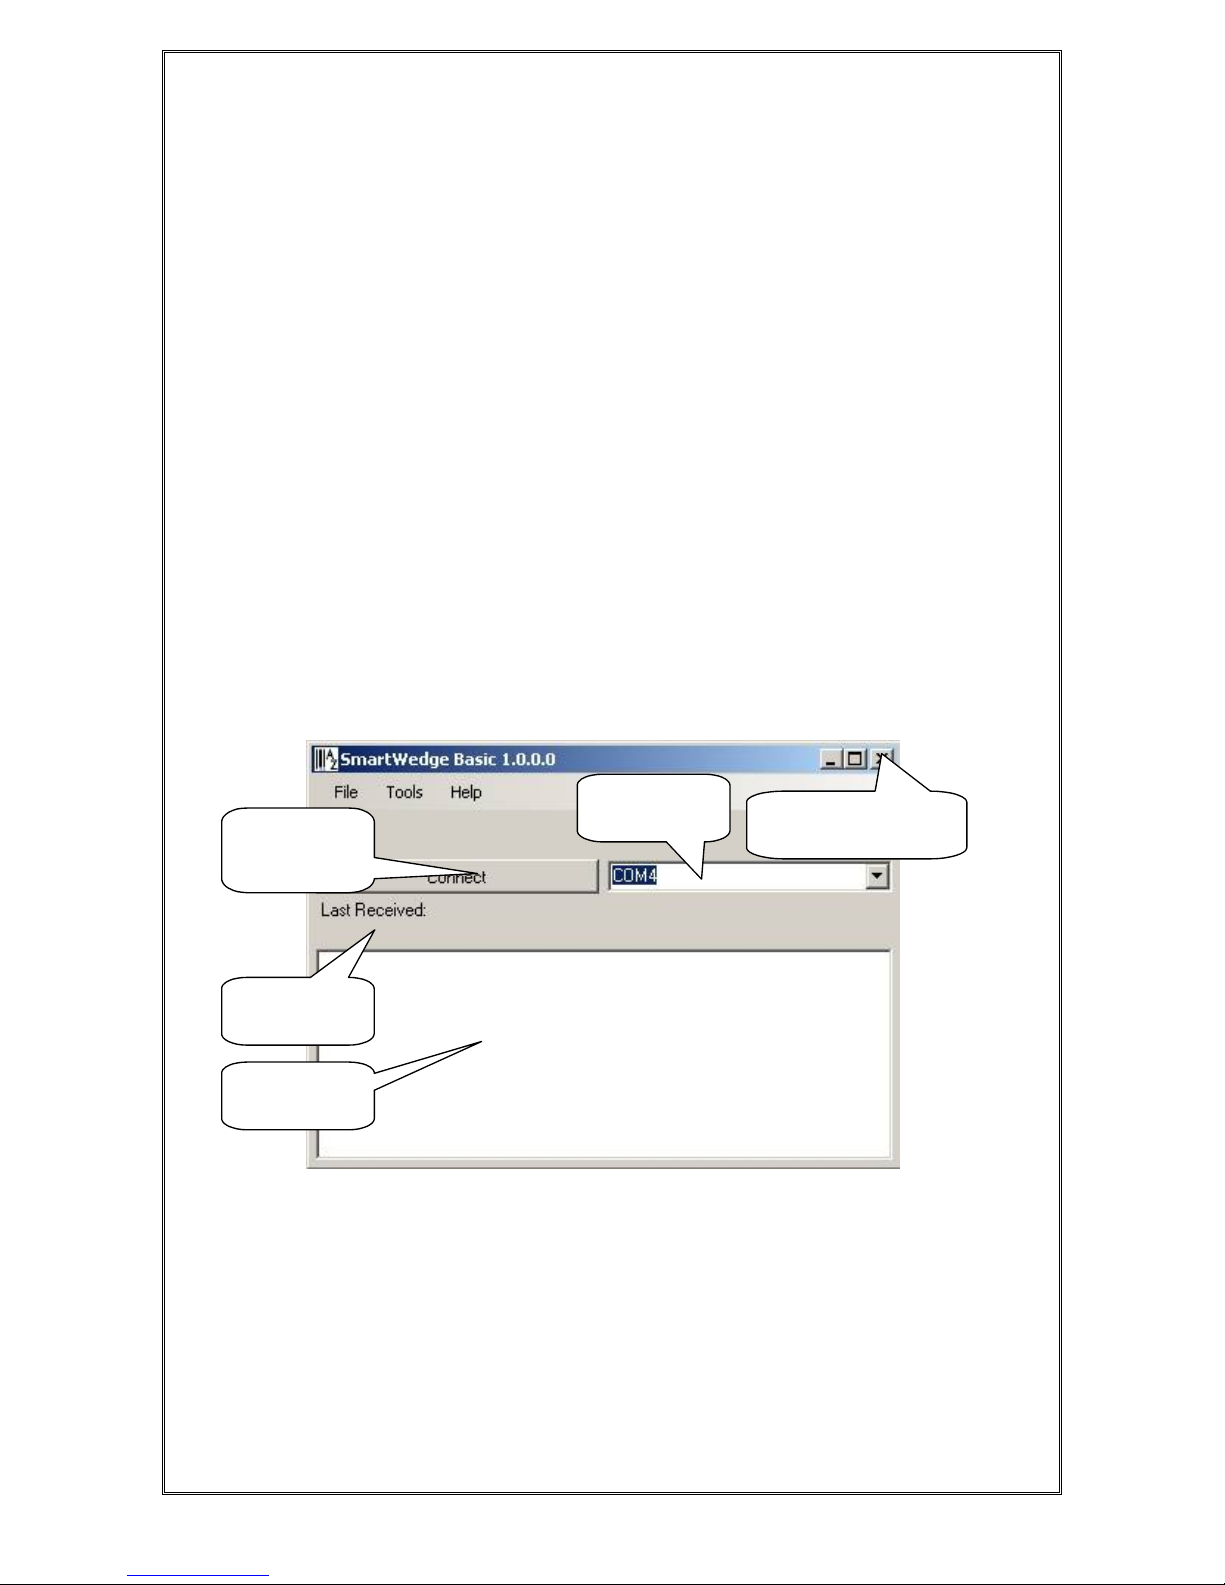
Start SmartWedge from ‘Start > All Programs > Technology Solutions >
SmartWedge Basic’. When the application starts it shows the configuration
window as below:
Before using SmartWedge Basic the Handscanner must be associated with a
virtual comm. port (see Section 3.2). Select the appropriate port number from
the ‘COM Port selector’, ensure the Handscanner is powered on and tap the
‘Connect’ button. If the correct virtual comm. port is not shown in the ‘COM
Port selector’ then it is possible to directly type in the port number.
Minimise
SmartWedge Basic
COM Port
selector
Most recent
scan data
Default text
window
Connect and
disconnect
the serial port
Page 16

1062 User Guide.doc 1062
Technology Solutions (UK) Limited reserves the right to change its products, specifications and services at any time
without notice. Technology Solutions (UK) Limited provides customer assistance in various technical areas, but does
not have full access to data concerning the uses and applications of any customer’s products. Therefore, Technology
Solutions (UK) Limited assumes no responsibility for customer product design or for infringement of patents and/or
the rights of third parties, which may result from assistance provided by Technology Solutions (UK) Limited. No part
of this document may be reproduced in any form without the written consent of the author.
Page 16 of 39
Any RFID or barcode data scanned by the Handscanner will then appear at
the top of the window and also in the ‘Default text window’ whilst SmartWedge
Basic has focus (the cursor is flashing in the ‘Default text window’). Launch
the application that is to receive the data, for example Excel, and position the
cursor at the data entry point. Scan data will then be entered into the target
application. By default all scanned data is terminated with CR LF characters to
automate data entry. A typical screenshot is shown below:
Note that if CAPS lock is selected on the PC keyboard all of the alphabetical
characters will have their case reversed so a lower case character from a
barcode will appear as an upper case character in the receiving application
and vice versa.
Minimise SmartWedge Basic using the cross in the top right hand corner of
the window. SmartWedge Basic minimises to the System Tray. Hover the
mouse over the icon to see the current status, double click to restore the main
window or right click to restore, disconnect or exit the application. Even when
SmartWedge Basic is minimised the ‘Most recent scan data’ entry is always
updated with the most recently received text.
When SmartWedge Basic is no longer required, click ‘Disconnect’ to close the
link to the Handscanner and exit SmartWedge Basic from ‘File > Exit’.
Page 17

1062 User Guide.doc 1062
Technology Solutions (UK) Limited reserves the right to change its products, specifications and services at any time
without notice. Technology Solutions (UK) Limited provides customer assistance in various technical areas, but does
not have full access to data concerning the uses and applications of any customer’s products. Therefore, Technology
Solutions (UK) Limited assumes no responsibility for customer product design or for infringement of patents and/or
the rights of third parties, which may result from assistance provided by Technology Solutions (UK) Limited. No part
of this document may be reproduced in any form without the written consent of the author.
Page 17 of 39
3.4 HyperTerminal
3.4.1 Introduction
HyperTerminal provides a simple way to display the data received from a
Handscanner for demonstration or test purposes.
3.4.2 Configuring HyperTerminal
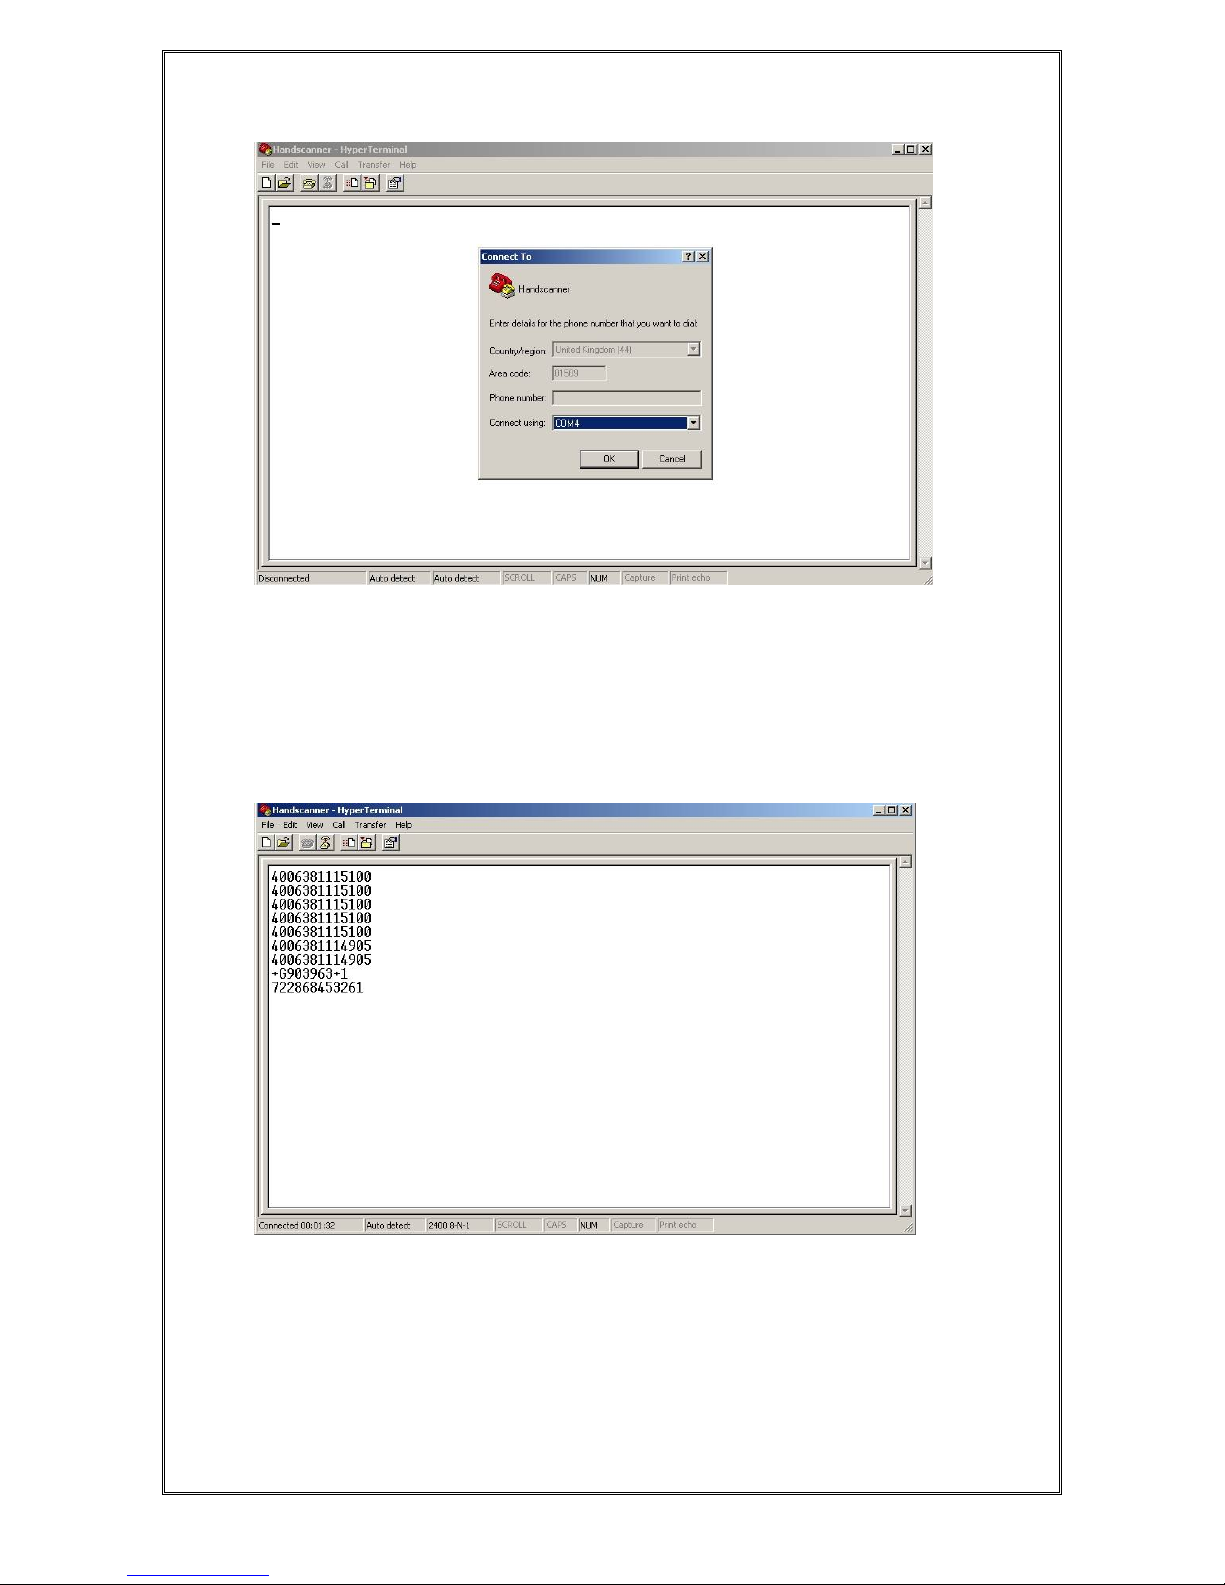
Launch HyperTerminal from ‘Start > All Programs > Accessories >
Communications > Hyperterminal.’ Name the new connection ‘Handscanner’
or something similar:
Click ‘OK’ and then chose the COM port that was displayed during the
Bluetooth setup (Section 3.2):
Page 18
1062 User Guide.doc 1062
Technology Solutions (UK) Limited reserves the right to change its products, specifications and services at any time
without notice. Technology Solutions (UK) Limited provides customer assistance in various technical areas, but does
not have full access to data concerning the uses and applications of any customer’s products. Therefore, Technology
Solutions (UK) Limited assumes no responsibility for customer product design or for infringement of patents and/or
the rights of third parties, which may result from assistance provided by Technology Solutions (UK) Limited. No part
of this document may be reproduced in any form without the written consent of the author.
Page 18 of 39
Check that the Handscanner is switched on, click ‘OK’ and the Bluetooth
connection will be established. Any barcodes or transponders read by the
Handscanner will be displayed by HyperTerminal. Note that the virtual comm.
port is opened at the default setting of 2400 baud. This does not affect
performance because only small amounts of data are being transferred. It is
possible to modify the baud rate and other connection settings by closing the
connection and using ‘File>Properties’.
Page 19

1062 User Guide.doc 1062
Technology Solutions (UK) Limited reserves the right to change its products, specifications and services at any time
without notice. Technology Solutions (UK) Limited provides customer assistance in various technical areas, but does
not have full access to data concerning the uses and applications of any customer’s products. Therefore, Technology
Solutions (UK) Limited assumes no responsibility for customer product design or for infringement of patents and/or
the rights of third parties, which may result from assistance provided by Technology Solutions (UK) Limited. No part
of this document may be reproduced in any form without the written consent of the author.
Page 19 of 39
4 Application Examples – Pocket PC
4.1 Introduction
These examples assume that the Handscanner is in its default state. Pocket
PC devices have a range of different Bluetooth Managers. The two examples
provided should cover the majority of devices. The fundamental approach will
be the same on all devices; discover the Handscanner and then pair to it. In
most cases it will also be necessary to define a virtual comm. port for use with
the Handscanner.
4.2 Setting up a Bluetooth connection – Symbol MC70
Ensure that Bluetooth is enabled and start BTExplorer
(Start>Programs>BTExplorer). If necessary tap ‘View>Explorer Mode’ to exit
the Wizard.
Tap ‘Tools>Discover Devices’ to start the Bluetooth Discovery. The screen will
look similar to the one below:
Once the Bluetooth Discovery is complete the Handscanner will appear in the
Untrusted Devices list. The Handscanner will be identified by its Bluetooth
Friendly name which by default is the serial number printed on the side of the
Handscanner:
Page 20

1062 User Guide.doc 1062
Technology Solutions (UK) Limited reserves the right to change its products, specifications and services at any time
without notice. Technology Solutions (UK) Limited provides customer assistance in various technical areas, but does
not have full access to data concerning the uses and applications of any customer’s products. Therefore, Technology
Solutions (UK) Limited assumes no responsibility for customer product design or for infringement of patents and/or
the rights of third parties, which may result from assistance provided by Technology Solutions (UK) Limited. No part
of this document may be reproduced in any form without the written consent of the author.
Page 20 of 39
Tap and hold the Handscanner and then select ‘Pair’ from the menu. Enter the
default PIN of ‘0000’ and tap ‘OK’:
Page 21

1062 User Guide.doc 1062
Technology Solutions (UK) Limited reserves the right to change its products, specifications and services at any time
without notice. Technology Solutions (UK) Limited provides customer assistance in various technical areas, but does
not have full access to data concerning the uses and applications of any customer’s products. Therefore, Technology
Solutions (UK) Limited assumes no responsibility for customer product design or for infringement of patents and/or
the rights of third parties, which may result from assistance provided by Technology Solutions (UK) Limited. No part
of this document may be reproduced in any form without the written consent of the author.
Page 21 of 39
The Pairing is then complete and the Handscanner will appear in the Trusted
Devices list:
Tap and hold the Handscanner and select ‘Explore’ from the menu. An ‘AT
serial’ port will be found:
Page 22

1062 User Guide.doc 1062
Technology Solutions (UK) Limited reserves the right to change its products, specifications and services at any time
without notice. Technology Solutions (UK) Limited provides customer assistance in various technical areas, but does
not have full access to data concerning the uses and applications of any customer’s products. Therefore, Technology
Solutions (UK) Limited assumes no responsibility for customer product design or for infringement of patents and/or
the rights of third parties, which may result from assistance provided by Technology Solutions (UK) Limited. No part
of this document may be reproduced in any form without the written consent of the author.
Page 22 of 39
Finally, tap and hold the Serial Port and select ‘Connect’. This will display the
Connection Information as shown below. Note the Local COM Port. This is the
port that an application will open to communicate with a Handscanner.
Tap ‘Cancel’ and confirm that the connection should be cancelled then close
BTExplorer.
4.3 Setting up a Bluetooth Connection – Intermec CN3
On the CN3 tap Start>Settings>Connections tab to get to the screen below:
Page 23

1062 User Guide.doc 1062
Technology Solutions (UK) Limited reserves the right to change its products, specifications and services at any time
without notice. Technology Solutions (UK) Limited provides customer assistance in various technical areas, but does
not have full access to data concerning the uses and applications of any customer’s products. Therefore, Technology
Solutions (UK) Limited assumes no responsibility for customer product design or for infringement of patents and/or
the rights of third parties, which may result from assistance provided by Technology Solutions (UK) Limited. No part
of this document may be reproduced in any form without the written consent of the author.
Page 23 of 39
Tap the Bluetooth icon and then select the Devices tab:
Ensure that the Handscanner is powered up by pressing the yellow button.
The blue LED will then be flashing.
Tap ‘Add new device…’ and the following screen will be shown:
Page 24

1062 User Guide.doc 1062
Technology Solutions (UK) Limited reserves the right to change its products, specifications and services at any time
without notice. Technology Solutions (UK) Limited provides customer assistance in various technical areas, but does
not have full access to data concerning the uses and applications of any customer’s products. Therefore, Technology
Solutions (UK) Limited assumes no responsibility for customer product design or for infringement of patents and/or
the rights of third parties, which may result from assistance provided by Technology Solutions (UK) Limited. No part
of this document may be reproduced in any form without the written consent of the author.
Page 24 of 39
Once the Device discovery has completed a list similar to the one shown
below will be shown:
By default the Handscanner name corresponds to the serial number printed
on the side of the unit. In this case it is’1062-01-BT-Hscan-000504’. Tap on
the Handscanner and then on ‘Next’.
A Passcode will be requested, enter 0000.
Page 25

1062 User Guide.doc 1062
Technology Solutions (UK) Limited reserves the right to change its products, specifications and services at any time
without notice. Technology Solutions (UK) Limited provides customer assistance in various technical areas, but does
not have full access to data concerning the uses and applications of any customer’s products. Therefore, Technology
Solutions (UK) Limited assumes no responsibility for customer product design or for infringement of patents and/or
the rights of third parties, which may result from assistance provided by Technology Solutions (UK) Limited. No part
of this document may be reproduced in any form without the written consent of the author.
Page 25 of 39
Once the authentication has completed successfully the following window will
be shown, tap in the box next to serial port:
Finally tap on ‘Finish’ to complete the process.
Once the Handscanner is in the Known Devices List the display will be similar
to the one below:
Page 26
1062 User Guide.doc 1062
Technology Solutions (UK) Limited reserves the right to change its products, specifications and services at any time
without notice. Technology Solutions (UK) Limited provides customer assistance in various technical areas, but does
not have full access to data concerning the uses and applications of any customer’s products. Therefore, Technology
Solutions (UK) Limited assumes no responsibility for customer product design or for infringement of patents and/or
the rights of third parties, which may result from assistance provided by Technology Solutions (UK) Limited. No part
of this document may be reproduced in any form without the written consent of the author.
Page 26 of 39
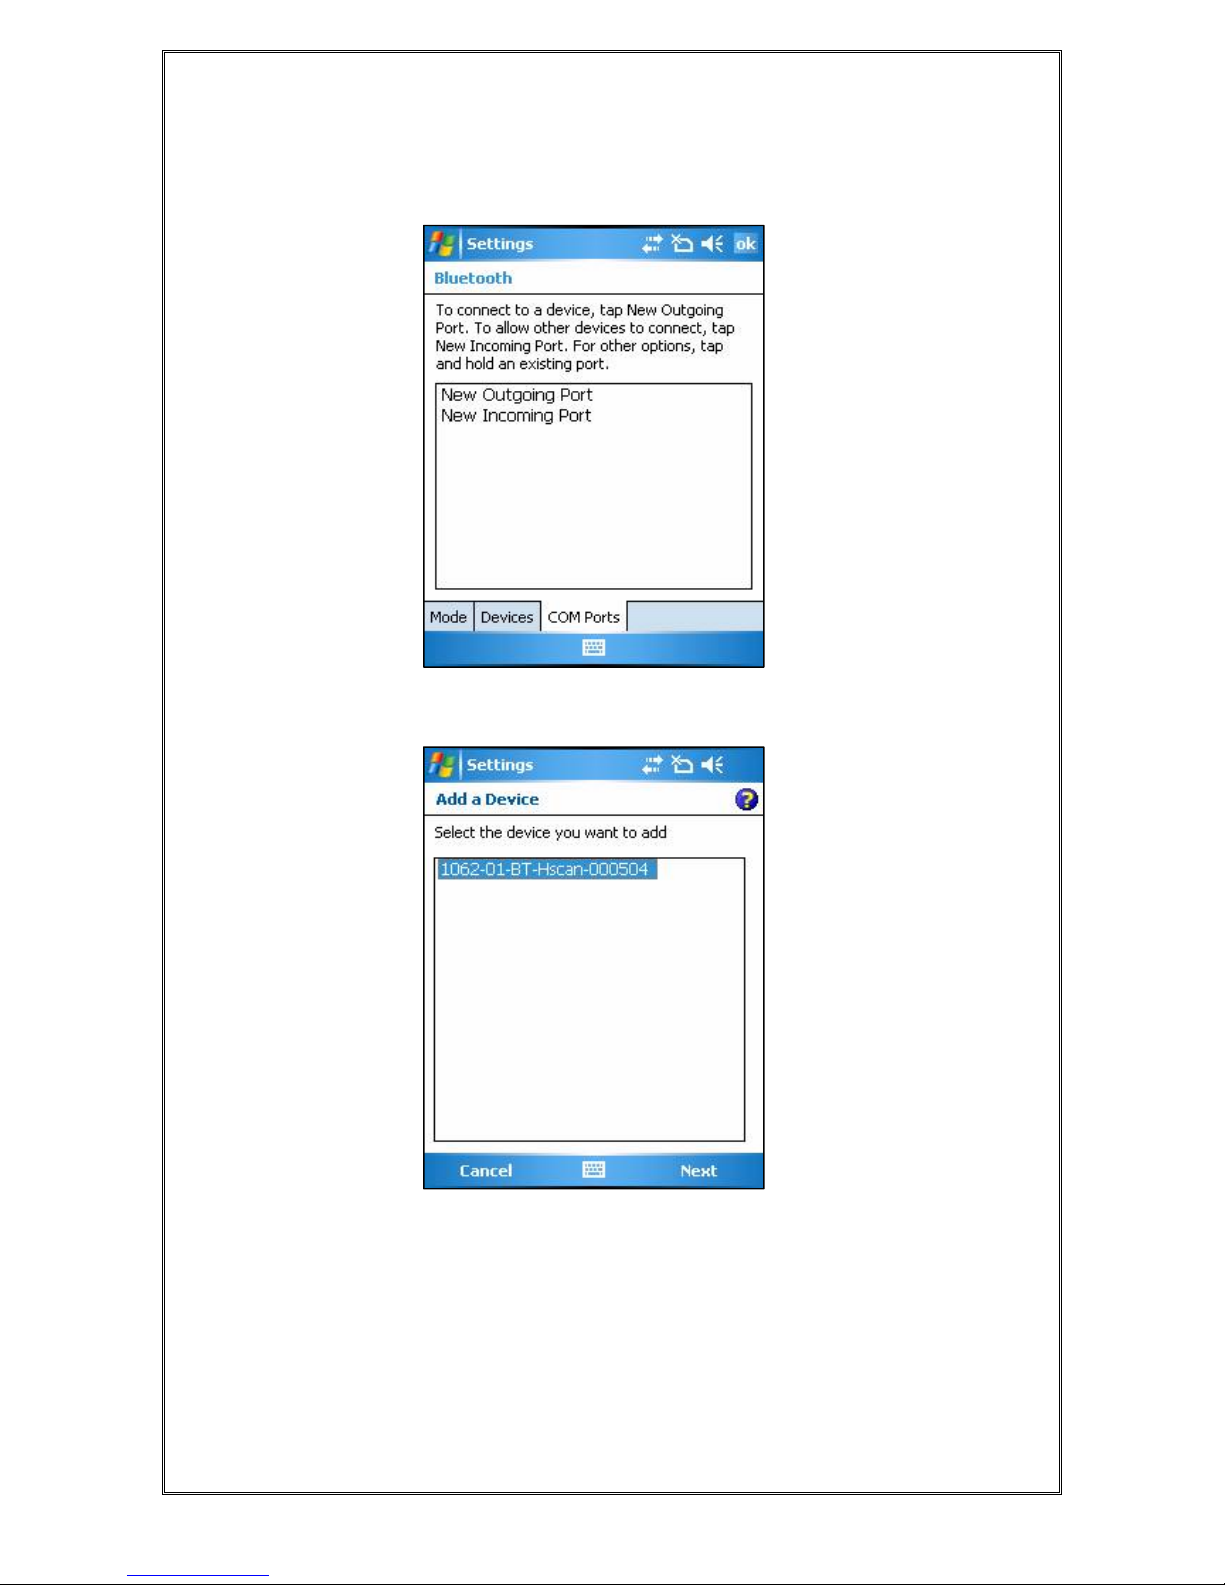
If the application connecting to the Handscanner needs to use a Bluetooth
virtual comm port then select the ‘COM Ports’ tab and tap ‘New Outgoing
Port’:
Tap on the Handscanner in the device list and tap ‘Next’:
Page 27
1062 User Guide.doc 1062
Technology Solutions (UK) Limited reserves the right to change its products, specifications and services at any time
without notice. Technology Solutions (UK) Limited provides customer assistance in various technical areas, but does
not have full access to data concerning the uses and applications of any customer’s products. Therefore, Technology
Solutions (UK) Limited assumes no responsibility for customer product design or for infringement of patents and/or
the rights of third parties, which may result from assistance provided by Technology Solutions (UK) Limited. No part
of this document may be reproduced in any form without the written consent of the author.
Page 27 of 39
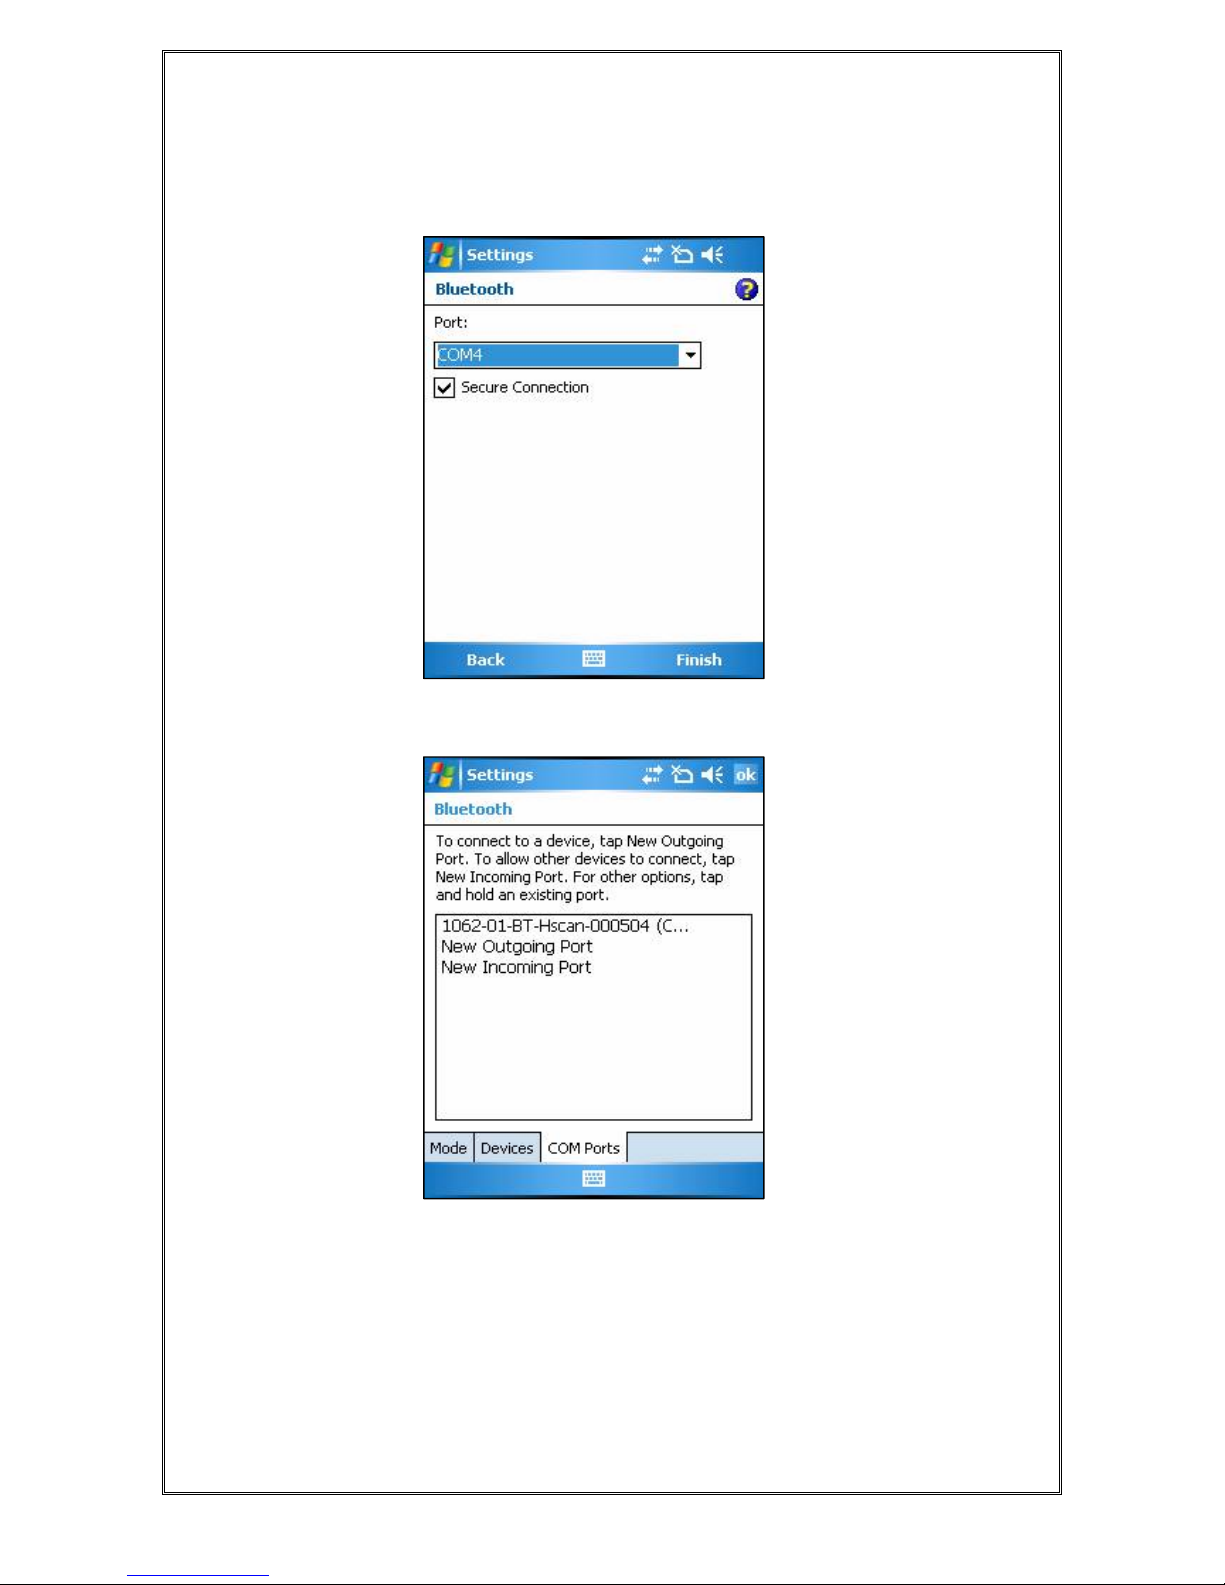
A list of the available ports will be displayed, select one and remember it. Tick
the ‘Secure Connection’ box and tap ‘Finish’.
The Handscanner will then be on the list of serial devices:
Any application which opens this virtual comm. port (COM 4 in this example)
will be connected to the Handscanner.
Page 28

1062 User Guide.doc 1062
Technology Solutions (UK) Limited reserves the right to change its products, specifications and services at any time
without notice. Technology Solutions (UK) Limited provides customer assistance in various technical areas, but does
not have full access to data concerning the uses and applications of any customer’s products. Therefore, Technology
Solutions (UK) Limited assumes no responsibility for customer product design or for infringement of patents and/or
the rights of third parties, which may result from assistance provided by Technology Solutions (UK) Limited. No part
of this document may be reproduced in any form without the written consent of the author.
Page 28 of 39
4.4 Using SmartWedge Basic
4.4.1 Introduction
SmartWedge Basic is a utility application for devices running Windows Mobile
5. It captures any text received over a serial port and sends it to the active
application as though it had been directly entered on the keyboard. This
allows the Handscanner to be immediately used with existing applications.
The Desktop Configuration application can be used to modify the
Handscanner operation, for example by adding prefixes, excluding
transponder types.
An advanced version of SmartWedge is available from Technology Solutions.
This includes advanced data handling and filtering allowing rules to be
constructed which modify the data processing based on the scanned data. It
also integrates directly with the Bluetooth stack on certain devices which
simplifies operation.
4.4.2 Installation
SmartWedge Basic is provided as a .cab file. ActiveSync to the target terminal
and run the file to deploy SmartWedge Basic.
4.4.3 Operation
The SmartWedge Basic screen is shown below:
Before using SmartWedge Basic the Handscanner must be associated with a
virtual comm. port (see Sections 4.2 and 4.3 for examples). Select the
appropriate port number from the ‘COM Port selector’, ensure the
Handscanner is powered on and tap the ‘Connect’ button.
Minimise
SmartWedge
Basic
Close
SmartWedge
Basic
Connect and
Disconnect to
serial port.
COM Port
selector
Default text
window
Most recent scan
data
Page 29

1062 User Guide.doc 1062
Technology Solutions (UK) Limited reserves the right to change its products, specifications and services at any time
without notice. Technology Solutions (UK) Limited provides customer assistance in various technical areas, but does
not have full access to data concerning the uses and applications of any customer’s products. Therefore, Technology
Solutions (UK) Limited assumes no responsibility for customer product design or for infringement of patents and/or
the rights of third parties, which may result from assistance provided by Technology Solutions (UK) Limited. No part
of this document may be reproduced in any form without the written consent of the author.
Page 29 of 39
The behaviour then depends on which Bluetooth manager is used on the
Pocket PC device. On the MC70 the following window appears the first time
that the virtual comm. port is opened:
Select the Handscanner and tap ‘Next’. The following window then opens:
Page 30

1062 User Guide.doc 1062
Technology Solutions (UK) Limited reserves the right to change its products, specifications and services at any time
without notice. Technology Solutions (UK) Limited provides customer assistance in various technical areas, but does
not have full access to data concerning the uses and applications of any customer’s products. Therefore, Technology
Solutions (UK) Limited assumes no responsibility for customer product design or for infringement of patents and/or
the rights of third parties, which may result from assistance provided by Technology Solutions (UK) Limited. No part
of this document may be reproduced in any form without the written consent of the author.
Page 30 of 39
Tap ‘Next’ to see the following Connection Summary window:
Finally, tap ‘Connect’ to open the link with the Handscanner. For other devices
these intermediate stages may not be required and the virtual comm. port will
be opened immediately. Once connected the button will change to show
‘Disconnect’ as above, and the blue LED on the Handscanner will light
continuously.
Any RFID or barcode data scanned by the Handscanner will then appear at
the top of the window and also in the ‘Default text window’ whilst SmartWedge
Basic is shown. Even when SmartWedge Basic is minimised the Most recent
scan data entry is always updated with the most recently received text.
Minimise SmartWedge Basic using the cross in the top right hand corner of
the screen.
Open the application that is to receive the scan data, for example Pocket
Excel and position the cursor at the data entry point. Scan data will then be
entered into the target application. By default all scanned data is terminated
with CR LF characters to automate data entry.
Note that if CAPS lock is selected on the terminal all of the alphabetical
characters will have their case reversed so a lower case character from a
barcode will appear as an upper case character in the receiving application
and vice versa.
Page 31
1062 User Guide.doc 1062
Technology Solutions (UK) Limited reserves the right to change its products, specifications and services at any time
without notice. Technology Solutions (UK) Limited provides customer assistance in various technical areas, but does
not have full access to data concerning the uses and applications of any customer’s products. Therefore, Technology
Solutions (UK) Limited assumes no responsibility for customer product design or for infringement of patents and/or
the rights of third parties, which may result from assistance provided by Technology Solutions (UK) Limited. No part
of this document may be reproduced in any form without the written consent of the author.
Page 31 of 39
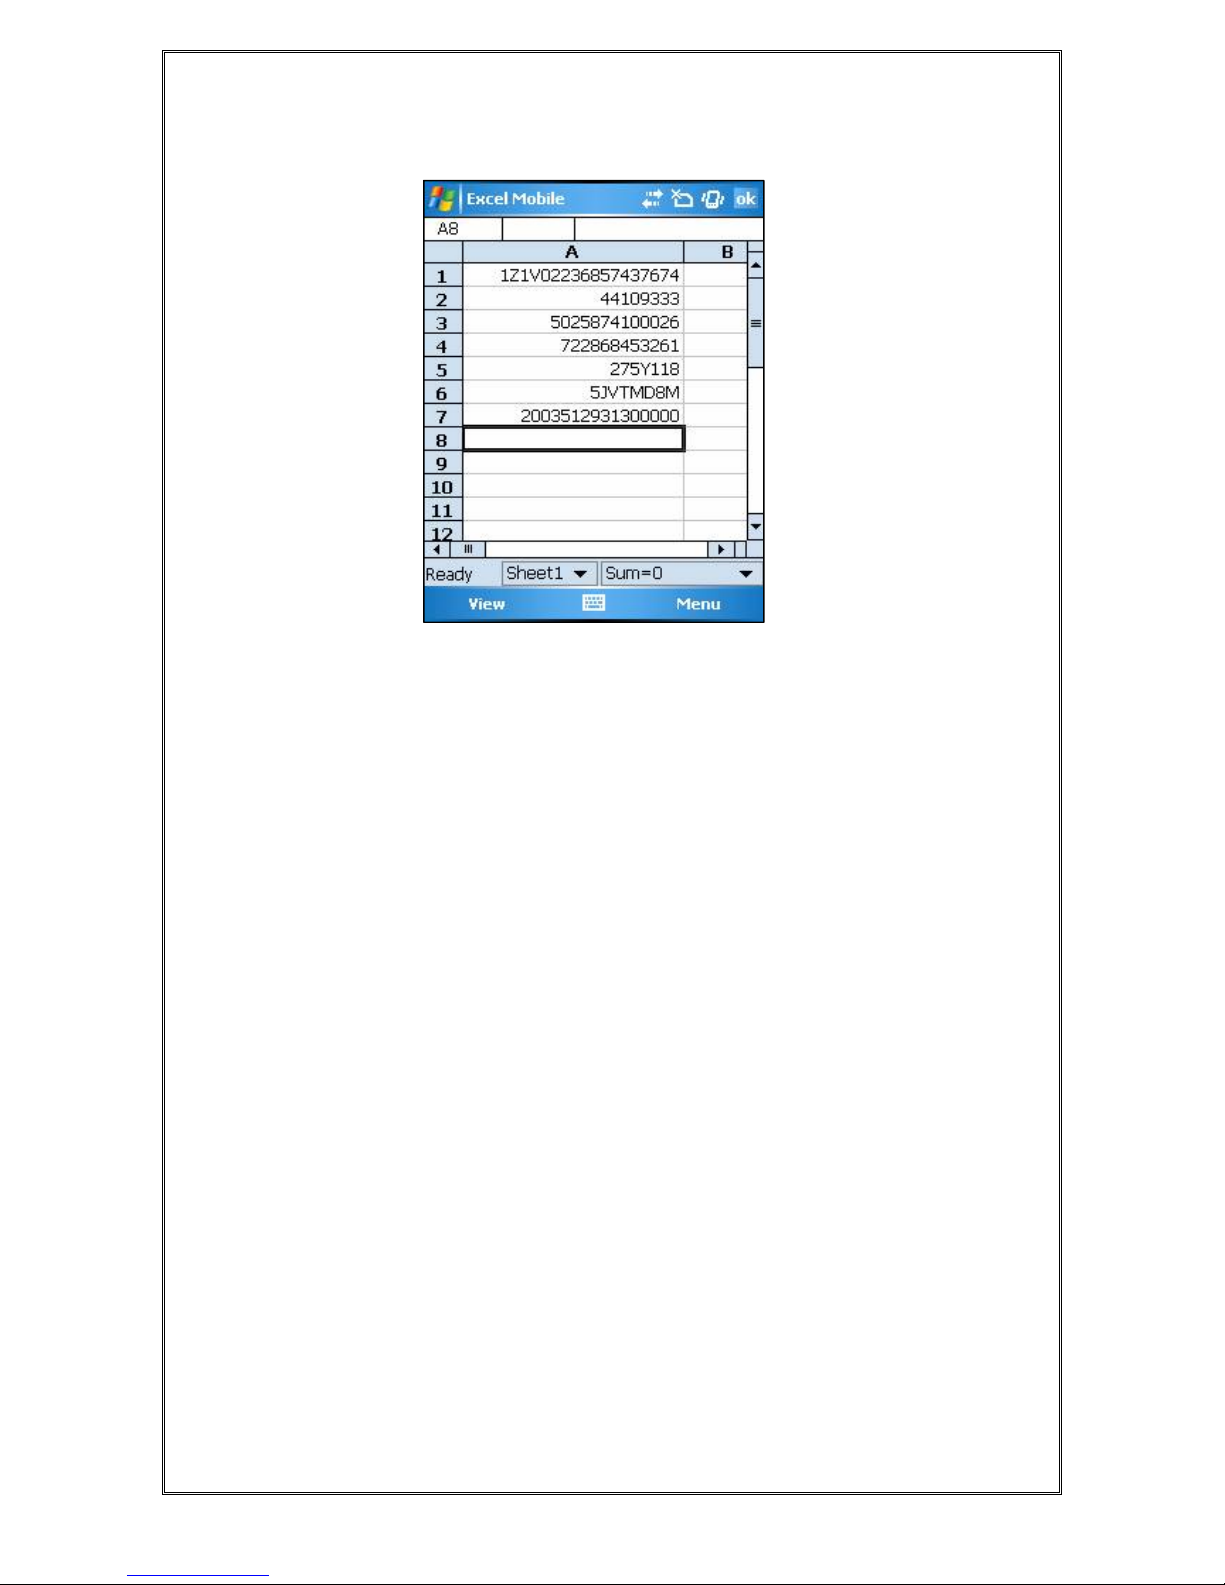
A typical screenshot is shown below:
When SmartWedge Basic is no longer required switch back to it (Tap on the
icon in ‘Programs’ or ‘Settings>System>Memory>Running Programs’), tap
‘Disconnect’ to close the link to the Handscanner and exit SmartWedge Basic
by tapping ‘Exit.’
If the terminal is put into Suspend state and then resumed the virtual comm.
port is not reopened although SmartWedge Basic will still show ‘Disconnect’
as though the port was open. This is a limitation of Bluetooth Virtual comm.
ports. Tap ‘Disconnect’ and then ‘Connect’ to re-establish the link. The direct
Bluetooth Stack integration included in the advanced version of SmartWedge
handles Bluetooth connection recovery.
Page 32

1062 User Guide.doc 1062
Technology Solutions (UK) Limited reserves the right to change its products, specifications and services at any time
without notice. Technology Solutions (UK) Limited provides customer assistance in various technical areas, but does
not have full access to data concerning the uses and applications of any customer’s products. Therefore, Technology
Solutions (UK) Limited assumes no responsibility for customer product design or for infringement of patents and/or
the rights of third parties, which may result from assistance provided by Technology Solutions (UK) Limited. No part
of this document may be reproduced in any form without the written consent of the author.
Page 32 of 39
4.5 Using mToken
4.5.1 Introduction
mToken is a Terminal Emulation application for Pocket PC devices. It is
available for download from http://www.choung.net/mToken
. A time limited
evaluation version is also available.
4.5.2 Installation
Connect to the Pocket PC device using ActiveSync and then run the mToken
install. This will deploy the application to the device.
4.5.3 Operation
Launch mToken and tap ‘Session>Direct COM Port’. Select the COM port
assigned during the Bluetooth connection setup and a baud rate of 57600 as
shown below:
Ensure that the Handscanner is powered on by pressing the yellow button and
tap ‘Connect’. The behaviour then depends on which Bluetooth manager is
used on the Pocket PC device.
Page 33

1062 User Guide.doc 1062
Technology Solutions (UK) Limited reserves the right to change its products, specifications and services at any time
without notice. Technology Solutions (UK) Limited provides customer assistance in various technical areas, but does
not have full access to data concerning the uses and applications of any customer’s products. Therefore, Technology
Solutions (UK) Limited assumes no responsibility for customer product design or for infringement of patents and/or
the rights of third parties, which may result from assistance provided by Technology Solutions (UK) Limited. No part
of this document may be reproduced in any form without the written consent of the author.
Page 33 of 39
On the MC70 the following window appears the first time that the virtual
comm. port is opened:
Select the Handscanner and tap ‘Next’. The following window then opens:
Page 34
1062 User Guide.doc 1062
Technology Solutions (UK) Limited reserves the right to change its products, specifications and services at any time
without notice. Technology Solutions (UK) Limited provides customer assistance in various technical areas, but does
not have full access to data concerning the uses and applications of any customer’s products. Therefore, Technology
Solutions (UK) Limited assumes no responsibility for customer product design or for infringement of patents and/or
the rights of third parties, which may result from assistance provided by Technology Solutions (UK) Limited. No part
of this document may be reproduced in any form without the written consent of the author.
Page 34 of 39
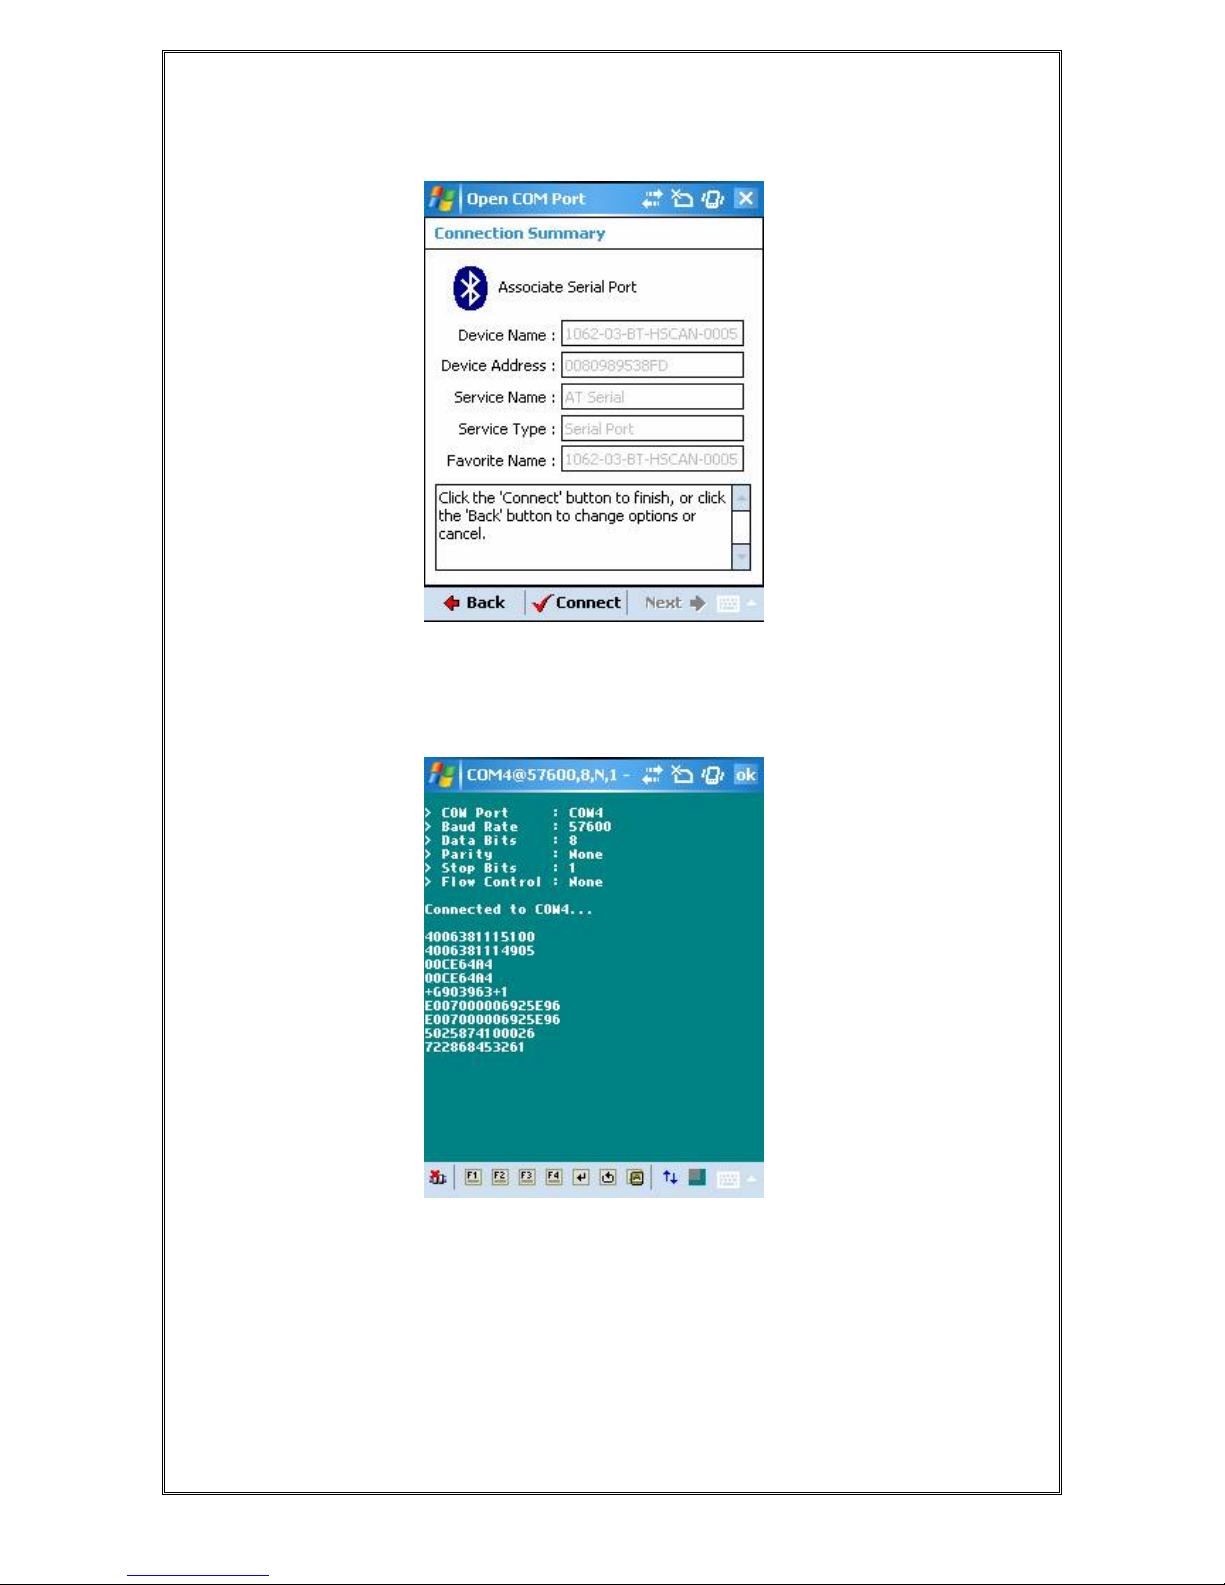
Tap ‘Next’ to see the following Connection Summary window:
Finally, tap ‘Connect’ to open the link with the Handscanner. For other devices
these intermediate stages may not be required and the virtual comm. port will
be opened immediately. Barcode and RFID data read by the Handscanner will
then appear in the mToken window as shown below:
The Handscanner is disconnected by tapping the Disconnect symbol in the
bottom left hand corner of the screen.
Page 35
1062 User Guide.doc 1062
Technology Solutions (UK) Limited reserves the right to change its products, specifications and services at any time
without notice. Technology Solutions (UK) Limited provides customer assistance in various technical areas, but does
not have full access to data concerning the uses and applications of any customer’s products. Therefore, Technology
Solutions (UK) Limited assumes no responsibility for customer product design or for infringement of patents and/or
the rights of third parties, which may result from assistance provided by Technology Solutions (UK) Limited. No part
of this document may be reproduced in any form without the written consent of the author.
Page 35 of 39
Subsequent opens of the virtual comm. port are more straightforward on the
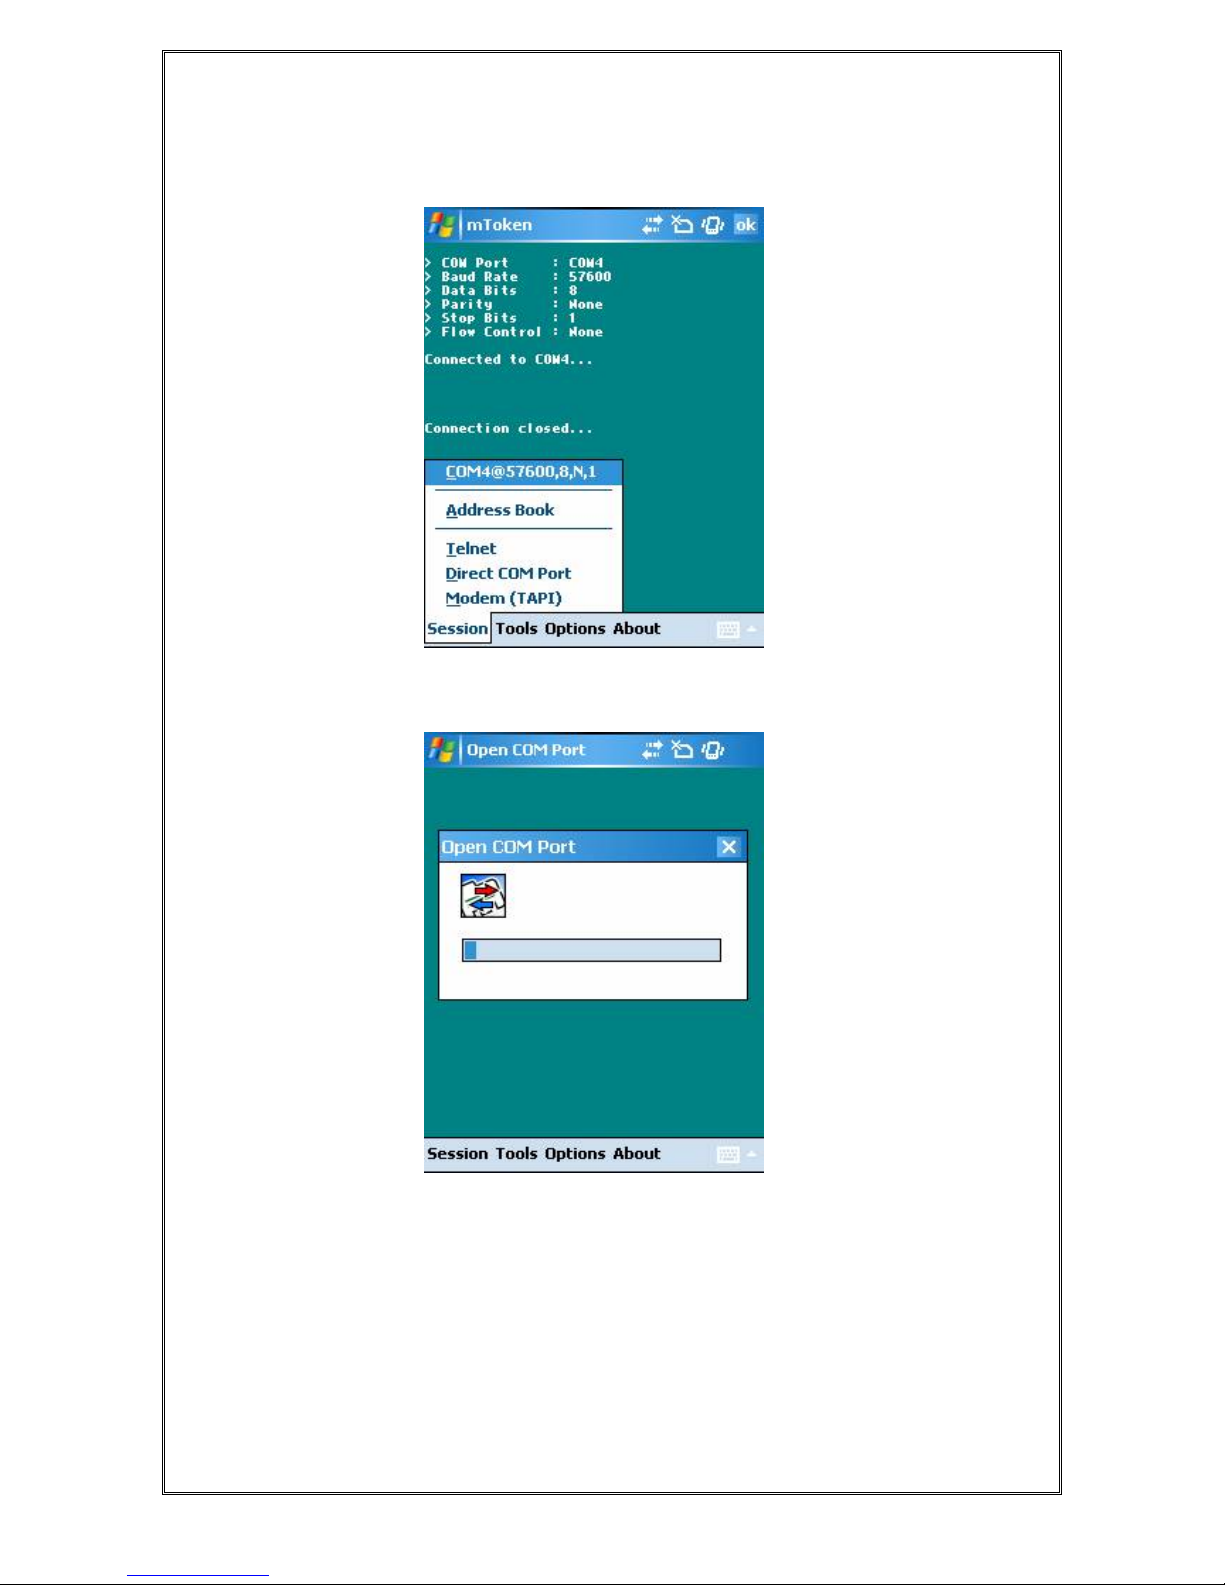
MC70. Tap ‘Session’ and then the stored connection will be on the list:
Tap on the stored entry and after a short delay with the window below shown
the port will be opened:
Page 36

1062 User Guide.doc 1062
Technology Solutions (UK) Limited reserves the right to change its products, specifications and services at any time
without notice. Technology Solutions (UK) Limited provides customer assistance in various technical areas, but does
not have full access to data concerning the uses and applications of any customer’s products. Therefore, Technology
Solutions (UK) Limited assumes no responsibility for customer product design or for infringement of patents and/or
the rights of third parties, which may result from assistance provided by Technology Solutions (UK) Limited. No part
of this document may be reproduced in any form without the written consent of the author.
Page 36 of 39
5 Regulatory
All Technology Solutions devices are designed to be compliant with
appropriate regulations and standards and are CE marked. Any changes or
modifications to Technology Solutions equipment, not expressly approved by
Technology Solutions, could void the user's authority to operate the
equipment.
5.1.1 Safety
The Handscanner complies with:
21CFR1040.10 and 1040.11 except for deviations pursuant to Laser
Notice No. 50, dated July 26, 2001.
EN60825-1:1994+ A1:2002 +A2:2001
IEC60825-1:1993+A1:1997+A2:2001
This information is repeated inside the battery compartment. The following
Laser Warning Label is printed on the side of the Handscanner:
Caution: Use of controls, adjustments or performance of procedures other
than those specified herein may result in hazardous laser light exposure.
Class 2 laser scanners use a low power, visible light diode. As with any very
bright light source, such as the sun, the user should avoid staring directly into
the light beam. Momentary exposure to a Class 2 laser is not known to be
harmful.
The operation of wireless devices in an aircraft is forbidden or restricted in
many cases. The Handscanner must not be operated in these situations.
The Handscanner transmits radio frequency energy and has the potential to
interfere with inadequately protected medical devices. It is good practice to
turn OFF the Handscanner within a hospital or other medical facility where
sensitive medical equipment is in use. In some countries, this is a legal
requirement applying to all mobile phones and related equipment.
You should not use Handscanner at a refueling point. You are reminded of the
need to observe restrictions on the use of radio devices in fuel depots,
chemical plants etc. and areas where the air contains chemicals or particles
Page 37

1062 User Guide.doc 1062
Technology Solutions (UK) Limited reserves the right to change its products, specifications and services at any time
without notice. Technology Solutions (UK) Limited provides customer assistance in various technical areas, but does
not have full access to data concerning the uses and applications of any customer’s products. Therefore, Technology
Solutions (UK) Limited assumes no responsibility for customer product design or for infringement of patents and/or
the rights of third parties, which may result from assistance provided by Technology Solutions (UK) Limited. No part
of this document may be reproduced in any form without the written consent of the author.
Page 37 of 39
(such as grain, dust, or metal powders) and any other area where you would
normally be advised to turn off your vehicle engine.
Use only Technology Solutions approved cradles, chargers and power
supplies with the Handscanner. Use of an alternative power supply will
invalidate any approval given to this device, void the warranty for the product
and may be dangerous.
5.1.2 FCC Statement
This device complies with part 15 of the FCC Rules. Operation is subject to
the following two conditions:
(1) This device may not cause harmful interference, and
(2) this device must accept any interference received, including interference
that may cause undesired operation.
The Handscanner contains Transmitter Module FCC ID: S6J01B
This equipment has been tested and found to comply with the limits for a
Class B digital device, pursuant to Part 15 of the FCC Rules. These limits are
designed to provide reasonable protection against harmful interference in a
residential installation. This equipment generates, uses and can radiate radio
frequency energy and, if not installed and used in accordance with the
instructions, may cause harmful interference to radio communications.
However, there is no guarantee that interference will not occur in a particular
installation. If this equipment does cause harmful interference to radio or
television reception, which can be determined by turning the equipment off
and on, the user is encouraged to try to correct the interference by one of the
following measures:
Reorient or relocate the receiving antenna.
Increase the separation between the equipment and receiver.
Connect the equipment into an outlet on a circuit different from that to
which the receiver is connected.
Consult the dealer or an experienced radio/TV technician for help.
5.1.3 Bluetooth
The Handscanner contains an approved Bluetooth Product, the Ezurio BISM2
Bluetooth Serial Module.
5.1.4 Waste Electrical and Electronic Equipment (WEEE)
For EU Customers: All products at the end of their life must be returned to
TSL for recycling. For information on how to return product please contact
TSL.
Page 38

1062 User Guide.doc 1062
Technology Solutions (UK) Limited reserves the right to change its products, specifications and services at any time
without notice. Technology Solutions (UK) Limited provides customer assistance in various technical areas, but does
not have full access to data concerning the uses and applications of any customer’s products. Therefore, Technology
Solutions (UK) Limited assumes no responsibility for customer product design or for infringement of patents and/or
the rights of third parties, which may result from assistance provided by Technology Solutions (UK) Limited. No part
of this document may be reproduced in any form without the written consent of the author.
Page 38 of 39
6 Troubleshooting
Symptoms Possible Cause Action
Nothing happens when
the yellow button is
pressed.
If no LEDs are on the
battery may be flat.
Fit a fully charged
battery, or charge the
Handscanner.
The Handscanner may
have been configured to
exclude barcodes.
Check the Handscanner
configuration using the
Desktop Configuration
software.
If the Blue LED is not lit
continuously the
Handscanner will only
operate in Batch Mode.
Connect the Bluetooth
link to the Handscanner
or use the Desktop
Configuration software
to enable Batch Mode.
The Handscanner scans
but does not vibrate or
beep.
The Handscanner may
not be configured for the
barcode symbology in
use.
Check the Handscanner
configuration using the
Desktop Configuration
software.
The vibrate and beep
functions may have
been disabled.
Check the Handscanner
configuration using the
Desktop Configuration
software.
The barcode symbol
may be damaged.
Try again with an
undamaged barcode.
The Handscanner may
not be at the correct
distance from the
barcode or transponder.
Change the distance or
angle between the
Handscanner and the
barcode or transponder.
The battery may be low. Fit a fully charged
battery, or charge the
Handscanner.
The red and green
LEDs light during
charging.
The battery pack has a
fault.
Replace the battery
pack.
The battery pack
temperature is outside
recommended limits.
Ensure that charging
only occurs between
0°C and 45°C.
Page 39

1062 User Guide.doc 1062
Technology Solutions (UK) Limited reserves the right to change its products, specifications and services at any time
without notice. Technology Solutions (UK) Limited provides customer assistance in various technical areas, but does
not have full access to data concerning the uses and applications of any customer’s products. Therefore, Technology
Solutions (UK) Limited assumes no responsibility for customer product design or for infringement of patents and/or
the rights of third parties, which may result from assistance provided by Technology Solutions (UK) Limited. No part
of this document may be reproduced in any form without the written consent of the author.
Page 39 of 39
Symptoms Possible Cause Action
The host Bluetooth
discovery does not find
the Handscanner
The Handscanner has
powered off.
Press the yellow button
and ensure that the Blue
LED is flashing.
The Handscanner is out
of range.
Move the Handscanner
closer to the host.
The Bluetooth Friendly
name of the
Handscanner has been
changed.
Check the Bluetooth
Friendly name using the
Desktop Configuration
software.
Opening the Bluetooth
virtual comm. port does
not connect to the
Handscanner.
The host has paired to a
different Handscanner.
Pair to the required
Handscanner.
The host Bluetooth
function has an error.
Warm boot the host.
If this does not help,
delete the Handscanner
from the paired devices
list and re-pair.
Bluetooth pairing fails The PIN on the
Handscanner has been
changed.
Set the Bluetooth PIN to
a known value using the
Desktop Configuration
software.
 Loading...