

Page 1
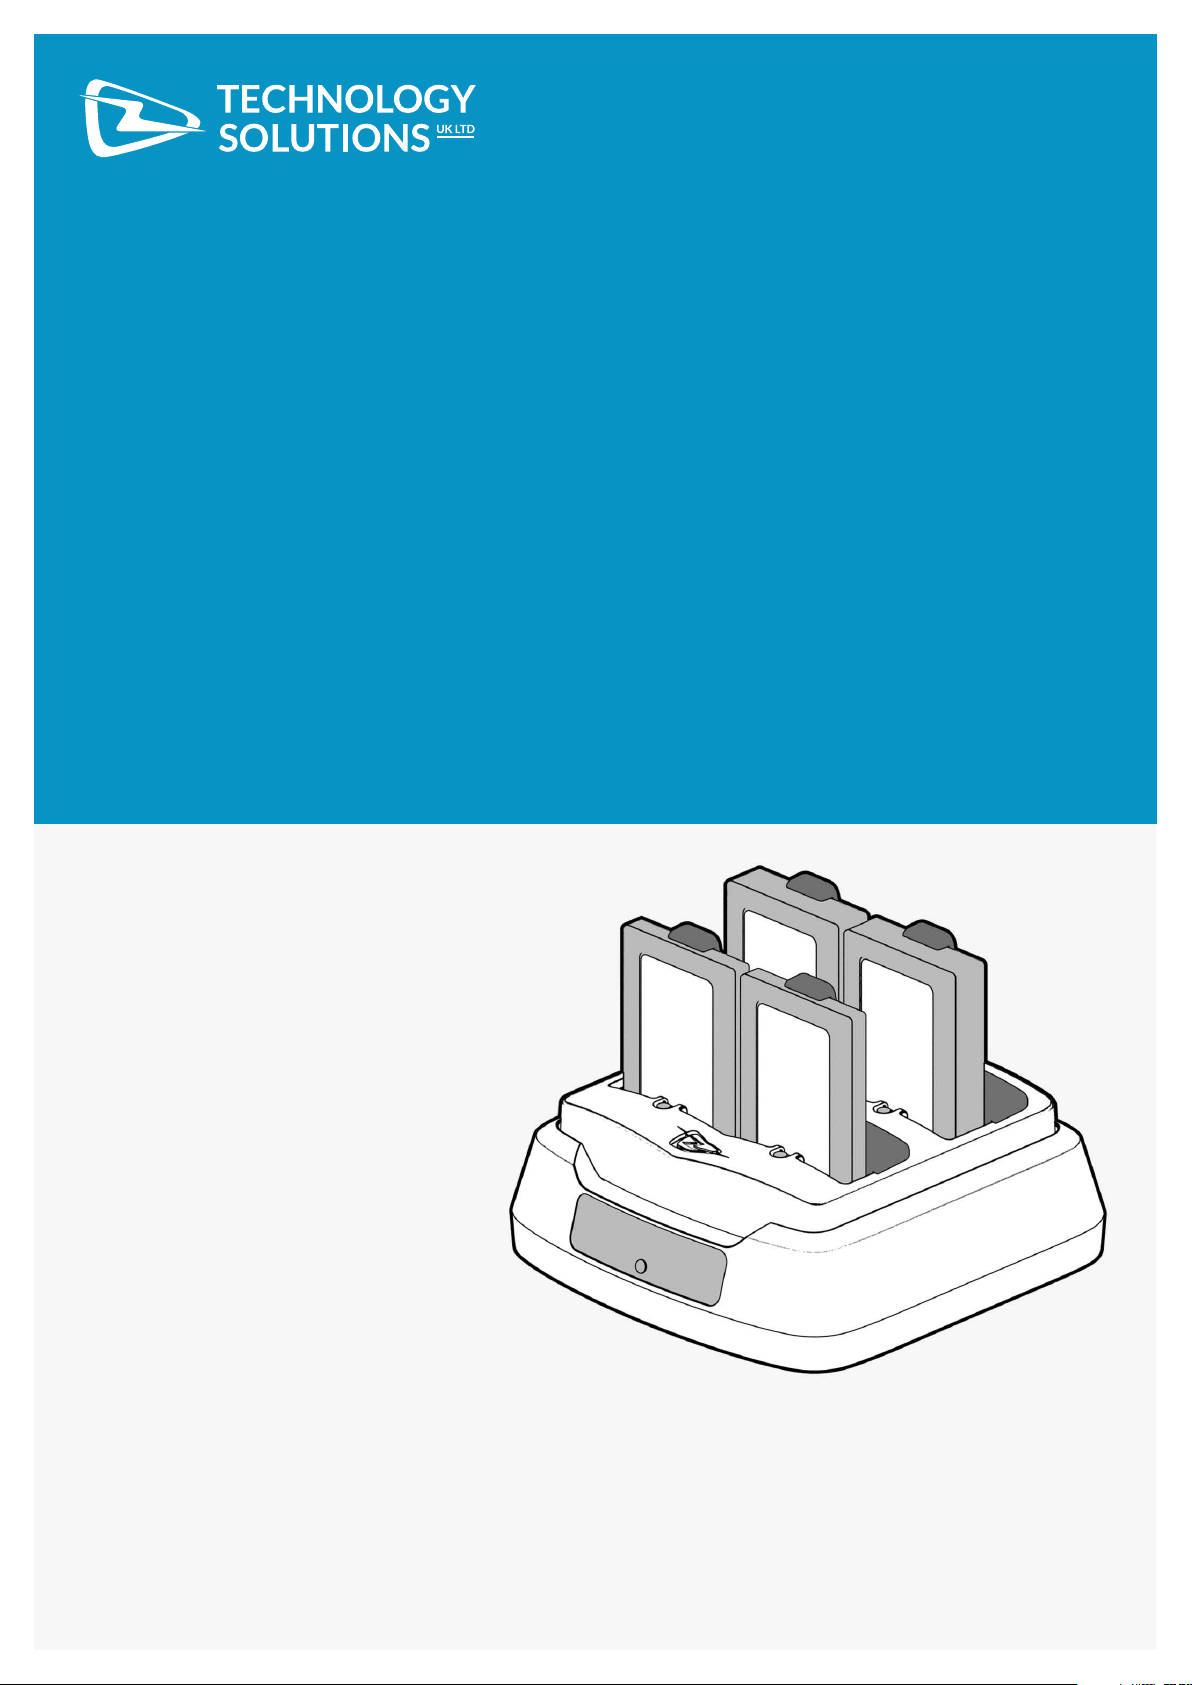
USER GUIDE:
2136 4-SLOT
BATTERY CHARGER
www.tsl.com
Design • Development • Manufacture
Page 2

www.tsl.com
TERMS & CONDITIONS
Copyright © 2019 Technology Solutions (UK) Ltd. All rights reserved.
No part of this publication may be reproduced or used in any form, or by any electrical or mechanical means,
without permission in writing from Technology Solutions (UK) Ltd. This includes electronic or mechanical means,
such as photocopying, recording, or information storage and retrieval systems. The material in this manual is
subject to change without notice.
Technology Solutions (UK) Ltd (TSL®) reserves the right to make changes to any product to improve reliability,
function, or design. TSL® does not assume any product liability arising out of, or in connection with, the application
or use of any product, circuit, or application described herein. No license is granted, either expressly or by
implication, estoppel, or otherwise under any patent right or patent, covering or relating to any combination,
system, apparatus, machine, material, method, or process in which TSL® products might be used. An implied
license exists only for equipment, circuits, and subsystems contained in TSL® products. TSL® and the TSL® logo are
registered trademarks of TSL®. Other product names mentioned in this manual may be trademarks or registered
trademarks of their respective companies and are hereby acknowledged.
All software is provided strictly on an “as is” basis. All software, including firmware, furnished to the user is on
a licensed basis. TSL® grants to the user a non-transferable and non-exclusive license to use each software or
firmware program delivered hereunder (licensed program). Except as noted below, such license may not be
assigned, sublicensed, or otherwise transferred by the user without prior written consent of TSL®. No right to copy a
licensed program in whole or in part is granted, except as permitted under copyright law. The user shall not modify,
merge, or incorporate any form or portion of a licensed program with other program material, create a derivative
work from a licensed program, or use a licensed program in a network without written permission from TSL®. The
user agrees to maintain TSL®’s copyright notice on the licensed programs delivered hereunder, and to include
the same on any authorized copies it makes, in whole or in part. The user agrees not to decompile, disassemble,
decode, or reverse engineer any licensed program delivered to the user or any portion thereof.
TSL® reserves the right to make changes to any software or product to improve reliability, function, or design.
TSL® does not assume any product liability arising out of, or in connection with, the application or use of any
product, circuit, or application described herein.
Symbol is a registered trademark of Motorola Technologies, Inc.
2
2136 4-Slot Battery Charger User Guide V1.00Copyright © 2018 Technology Solutions (UK) Ltd
Page 3

www.tsl.com
CONTENT
Introduction 4
Parts of the 2136 Battery Charger 4
Inserting and removing the battery retaining clips 5
Inserting and removing a battery 6
Connecting the power supply 7
Charging batteries 8
Troubleshooting and Maintenance 9
Maintenance 9
Troubleshooting 10
Regulatory Information 11
CAUTION 11
Power Supply 11
Batteries 11
Waste Electrical and Electronic Equipment (WEEE) 12
Warranty 12
About TSL
®
14
About 14
Contact 14
History
Version Date Modifications
1.00 12/12/2018 Document Creation
3
2136 4-Slot Battery Charger User Guide V1.00Copyright © 2018 Technology Solutions (UK) Ltd
Page 4
www.tsl.com
INTRODUCTION
The Technology Solutions 2136 4-Slot Battery Charger is intended for charging Varta Microbattery’s EasyPack™
’L’ and ‘XL’ rechargeable Li-Polymer battery packs. The charger can charge up to four batteries simultaneously.
The four batteries can all be the same type, or can be two of each type. The charger senses which type of battery
has been inserted and adjusts the charge rate accordingly. There is an individual charge status indicator for each
battery slot. The charger also monitors the temperature of each battery pack and adjusts the charge rate to provide
optimal charge rate whilst maintaining safe battery temperature.
The 2136 Battery Charger is powered by a 5.2V, 4.0A world traveller power supply.
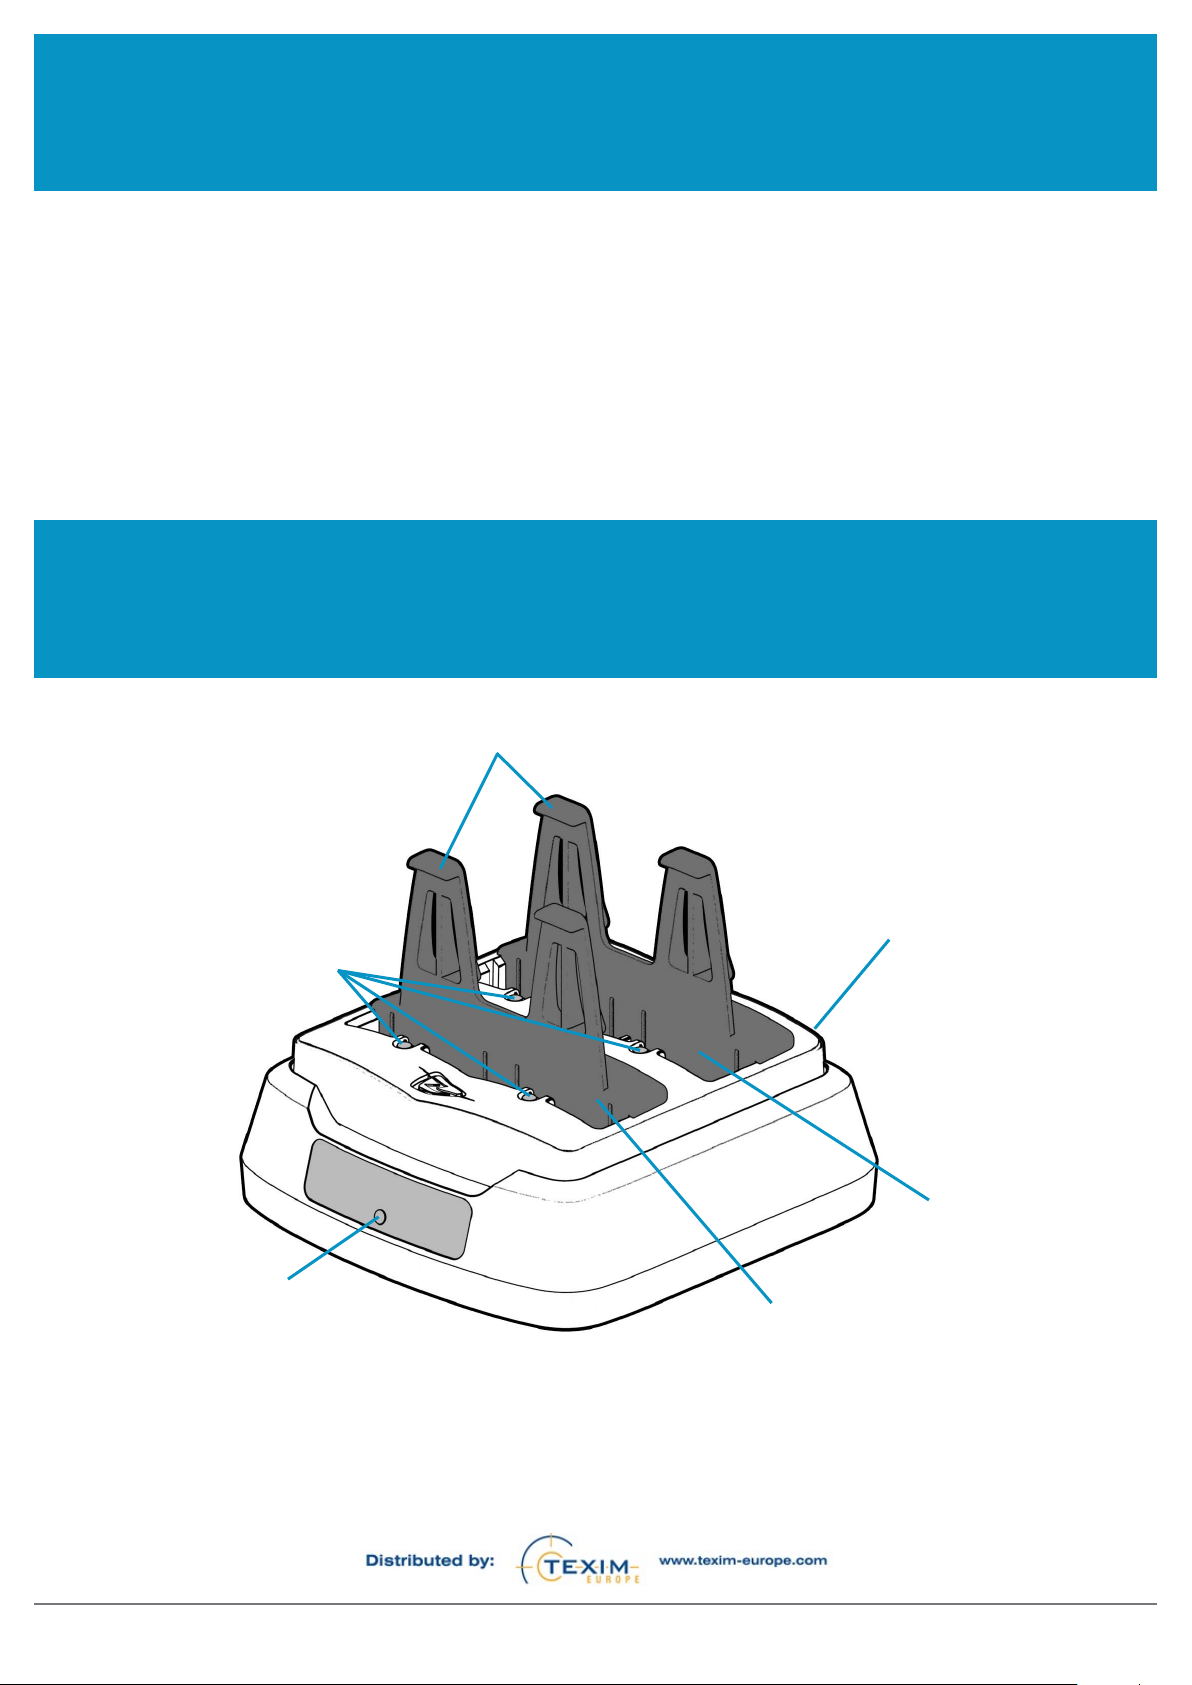
PARTS OF THE 2136 BATTERY CHARGER
Charge status
indicators
Power indicator
Battery retaining clips
Power input
socket on back
of charger
Back battery
compartment
Front battery
compartment
FIGURE 1: Parts of the 2136 Battery Charger
4
2136 4-Slot Battery Charger User Guide V1.00Copyright © 2018 Technology Solutions (UK) Ltd
Page 5
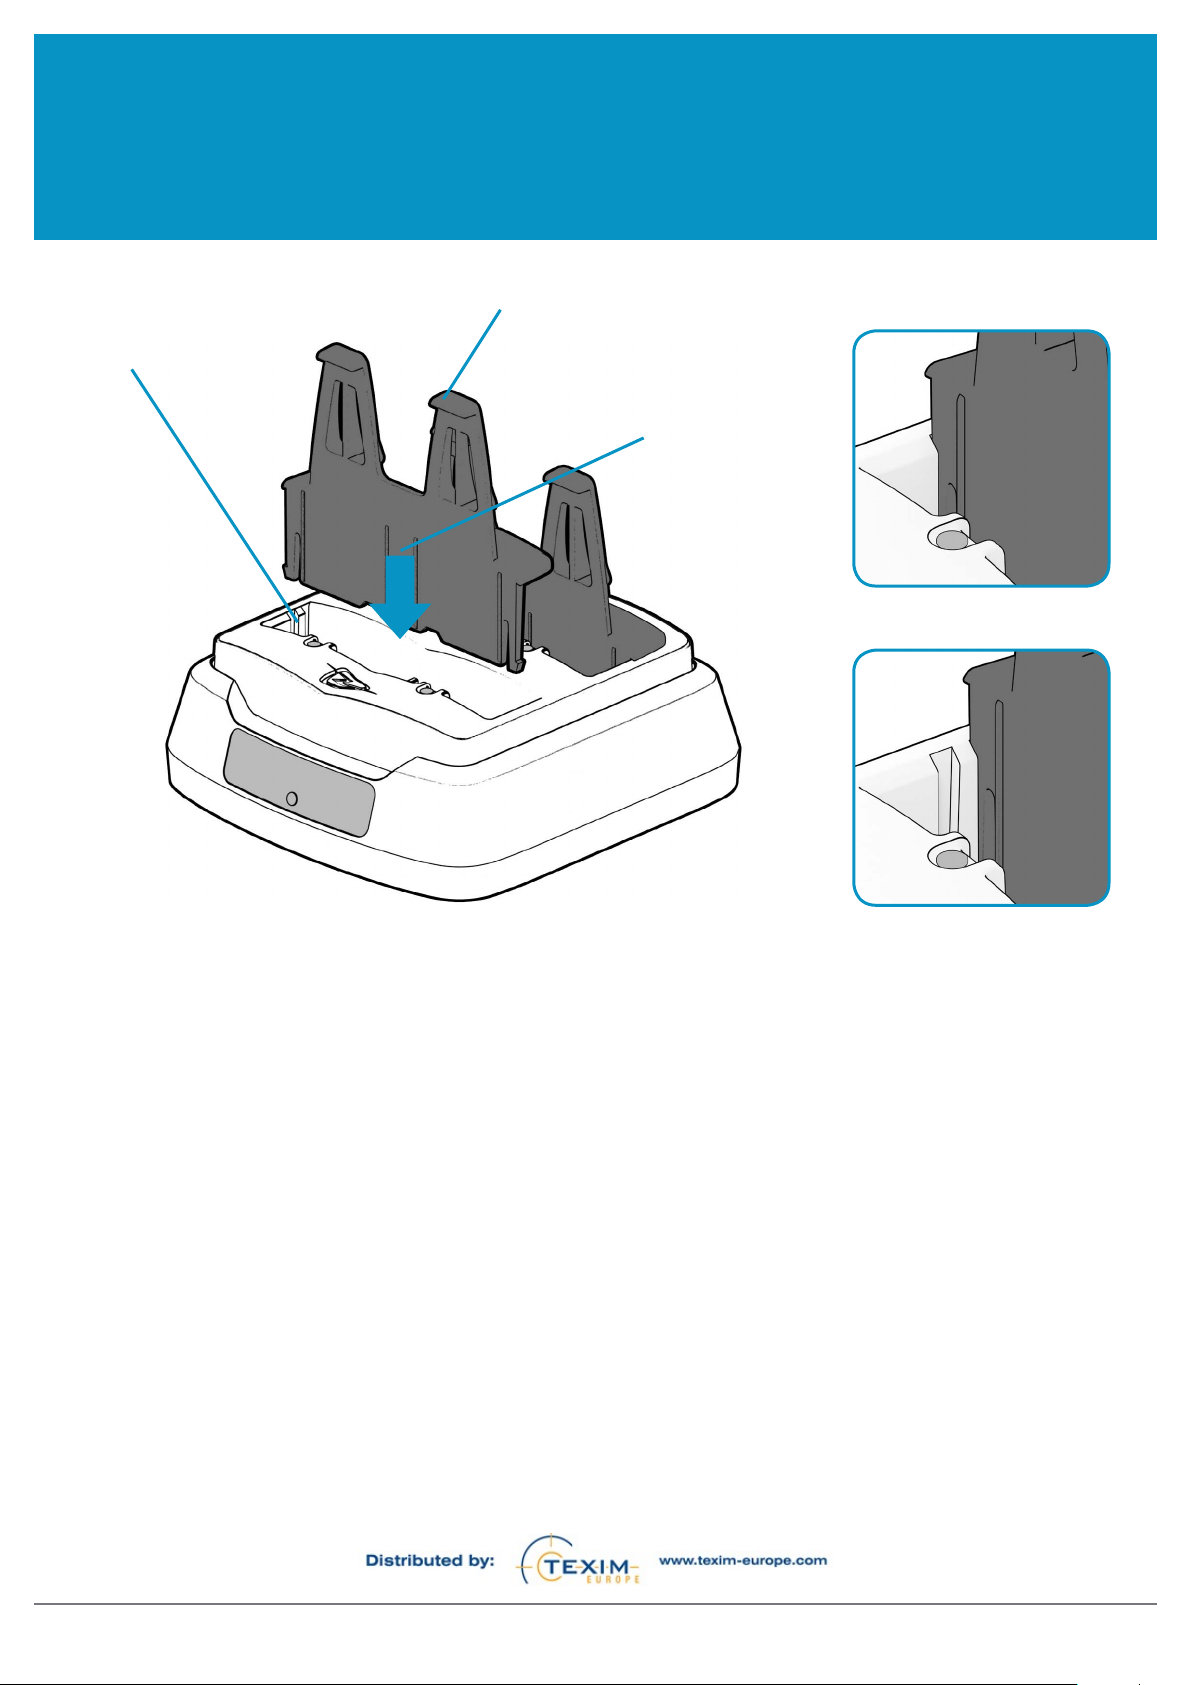
INSERTING AND REMOVING THE BATTERY RETAINING CLIPS
www.tsl.com
1) Align the battery
retaining clip with
the required slot.
2) The hook at the top of
battery retaining clip must
face forwards towards the
charge status indicator.
3) Push the battery
retaining clip down
until it clicks into
position.
Clip at front for EasyPack L
Clip at back for EasyPack XL
FIGURE 2: Inserting the battery retaining clips
The battery retaining clips are required to hold the battery in position during charge. The clips do not determine the
charge rate, but if they are not correctly positioned then the battery will not make the necessary electrical contact
and will not be charged. It is possible to have the front and back battery compartments set for the same or different
battery packs. It does not matter which compartment is set for which battery type.
The clips can be inserted in one of two slots. The front slot (nearest the charge status indicator) is for the smaller
EasyPack™ L battery. The rear slot (furthest from the charge status indicator) is for the larger EasyPack™ XL battery.
Insert the clip with the hook at the top nearest the charge status indicator.
Push the clip vertically downwards into the appropriate slot. When it is fully inserted it will click and lock into place.
If the clip needs to be moved to reconfigure the charger, pull it vertically upwards so that it releases and then lift it
out of the charger.
5
2136 4-Slot Battery Charger User Guide V1.00Copyright © 2018 Technology Solutions (UK) Ltd
Page 6

INSERTING AND REMOVING A BATTERY
www.tsl.com
Insertion
Insert the battery with the gold contacts next
to the label facing towards the charge status
indicator for that battery compartment. Slide
the battery down into the compartment and
push it backwards to make sure it hooks
under the battery retaining clip.
CAUTION!
RISK OF EXPLOSION IF
BATTERY IS REPLACED BY
AN INCORRECT TYPE.
DISPOSE OF USED
BATTERIES ACCORDING
TO THE INSTRUCTIONS.
Slide battery in to
compartment, gold
contacts and label
to the front.
Ensure battery
hooks under battery
retaining clip.
Removal
To remove the battery, pull the top forwards
towards the charge status indicator so that it
is clear of the hook on the battery retaining
clip. Lift the battery out of the charge
compartment.
FIGURE 3:
6
Pull the top of the
battery forwards
and lift the
battery out of the
compartment.
Inserting and removing a battery
2136 4-Slot Battery Charger User Guide V1.00Copyright © 2018 Technology Solutions (UK) Ltd
Page 7

www.tsl.com
CONNECTING THE POWER SUPPLY
Use only the provided 5.2V 4.0A power supply.
Plug the power supply into the socket on the back of the battery charger. Use an appropriate mains lead to connect
the power supply to the mains. It is recommended that when the charger is not in use that the power supply is
turned off and disconnected from the mains.
When the charger is powered the blue indicator on the front of the charger lights.
FIGURE 4: Battery Charger power input connector
7
2136 4-Slot Battery Charger User Guide V1.00Copyright © 2018 Technology Solutions (UK) Ltd
Page 8

www.tsl.com
CHARGING BATTERIES
Ensure that the battery retaining clips are positioned correctly for the required battery type (Section 3) and that the
power supply is connected (Section 5).
Insert the battery or batteries (Section 4). Batteries can be inserted and removed at any time. It is not necessary
to turn the charger power supply off to insert or remove a battery. Each charge compartment is independent of the
others. A fully charged battery can be removed whilst other batteries are still charging. A battery can be inserted
whilst other batteries are charging.
When a battery is inserted the charger senses whether it is an EasyPack™ L or EasyPack™ XL battery based on the
Identification Resistor built into the battery and selects the appropriate charge rate. The charger performs a test of
the battery to make sure it is safe to charge. So long as no problems are detected the charger starts to charge the
battery. Charge in progress is indicated by a slow flash of the charge status indicator.
When the battery is fully charged the charge status indicator changes to light continuously.
If a fault is detected with a battery, or if the battery temperature is too high or too for safe charging then the charge
status indicator shows a fast flash.
LED colour and pattern Status
Off No battery in charge compartment.
Slow flash (one per one and half seconds)
Fast flash (five per second)
Continuous
If the charger is located somewhere hot then it is possible that the additional heating of the battery whilst it is
charged will cause the charger to indicate a fault on a battery. This will automatically clear once the battery cools
down again. The battery charger adjusts the charge rate of each battery as necessary to attempt to avoid this from
happening. As a result, if the charger is used in a warm location the batteries will take longer to charge. Keeping
the charger in a cool location will ensure the fastest possible charge times.
The battery is being charged.
There is a fault with the battery or it is too cold or too
hot.
The battery is fully charged.
8
2136 4-Slot Battery Charger User Guide V1.00Copyright © 2018 Technology Solutions (UK) Ltd
Page 9

CHARGING BATTERIES
If all four compartments of the charger are used then the charger itself will warm up. This causes it to slow the
charge rate down. This means that charging four batteries will take longer than charging one, two or three batteries.
Approximate charge times for fully discharged batteries, assuming an ambient temperature of 20°C are shown
below:
www.tsl.com
Batteries being charged Approximate charging time
Single EasyPack L 150 minutes
Single EasyPack XL 220 minutes
Two EasyPack L 160 minutes
Two EasyPack XL 315 minutes
Four EasyPack L 180 minutes
Four EasyPack XL 360 minutes
TROUBLESHOOTING AND MAINTENANCE
MAINTENANCE
For trouble-free service observe the following precautions when using the 2136 Battery Charger:
● Do not store or use the 2136 Battery Charger in any location that is dusty, damp, or wet.
● Do not attempt to use any other power supply than the recommended ones.
● Do not attempt to charge other types of battery.
9
2136 4-Slot Battery Charger User Guide V1.00Copyright © 2018 Technology Solutions (UK) Ltd
Page 10

TROUBLESHOOTING AND MAINTENANCE
TROUBLESHOOTING
Symptoms Possible Cause Action
www.tsl.com
The charger indicates a fault
(fast flash)
The charger indicates full
charge (continuous indicator)
after a short period of time.
The charge status indicator
does not light when a battery
is inserted.
The battery is too hot. Leave the battery to cool down; the
charger will automatically start to
charge once the battery temperature
falls.
Move the charger to a cooler location.
The battery is too cold. Leave the battery to warm up; the
charger will automatically start to
charge once the battery temperature
rises.
Move the charger to a warmer location.
The battery has a fault Do not use the battery.
The battery is already charged. Use the battery.
The battery has a fault. Do not use the battery.
The charger is not powered. Verify that the power supply is
connected and powered. The blue
power indicator on the front of the
charger must be lit.
The battery retaining clip is not in the
correct location for the battery type.
The battery is not properly located. Ensure the battery has been fully
The battery has a fault. Do not use the battery.
Move the battery retaining clip to the
correct location.
pushed into the compartment and
is held by the hook on the battery
retaining clip.
10
2136 4-Slot Battery Charger User Guide V1.00Copyright © 2018 Technology Solutions (UK) Ltd
Page 11

www.tsl.com
REGULATORY INFORMATION
CAUTION
Only use TSL® approved accessories, batteries, battery chargers, cradles and power supplies.
Do not attempt to charge wet or damp batteries. All components should be dry before connecting to an external
power source.
Only use the product within the specified operating temperatures and environmental conditons.
POWER SUPPLY
Only use a TSL® approved power supply with an electrical output of 5.2V, 4.0A with the 2136 4-Slot Battery Charger.
Using an alternative power supply will invalidate any approvals given to this device, void the warranty for the
product, and may be dangerous.
BATTERY WARNING
CAUTION
RISK OF EXPLOSION IF BATTERY IS
REPLACED BY AN INCORRECT TYPE.
DISPOSE OF USED BATTERIES
ACCORDING TO THE INSTRUCTIONS.
● If the battery is replaced by an incorrect type, this could result in an explosion.
● Dispose of batteries according to instructions.
● Use only TSL
● Use only TSL
● There are limits on how long a battery can operate or be in storage before replacement is required. The life
cycle of a battery can be affected by factors such as heat, cold, harsh environments and impacts or drops.
®
-approved batteries.
®
-approved chargers.
11
2136 4-Slot Battery Charger User Guide V1.00Copyright © 2018 Technology Solutions (UK) Ltd
Page 12

www.tsl.com
WASTE ELECTRICAL AND ELECTRONIC EQUIPMENT (WEEE)
For EU Customers: All products at the end of their life must be returned to TSL® for recycling. For information on
how to return product please contact TSL®.
WARRANTY
(A) Warranty
TSL®’s hardware Products are warranted against defects in workmanship and materials for a period of twelve (12) months
from the date of shipment, unless otherwise provided by TSL
operated under normal and proper conditions. Warranty provisions and durations on software, integrated installed systems,
Product modified or designed to meet specific customer specifications (“Custom Products”), remanufactured products, and
reconditioned or upgraded products, shall be as provided in the applicable Product specification in effect at the time of
purchase or in the accompanying software license.
®
in writing, provided the Product remains unmodified and is
(B) Spare Parts
Spare parts (i.e. parts, components, or subassemblies sold by TSL® for use in the service and maintenance of Products) are
warranted against defects in workmanship and materials for a period of thirty (30) days from the date of shipment. Spare parts
may be new or originate from returned units under the conditions set forth in subsection D below.
(C) Repair of TSL branded hardware
For repairs on TSL® branded hardware Products under this Agreement, including repairs covered by warranty, the repair
services provided are warranted against defects in workmanship and materials on the repaired component of the Product
for a period of thirty (30) days from the shipment date of the repaired Product, or until the end of the original warranty period,
whichever is longer. Any such defects shall be notified to TSL
®
in writing within 7 days of the same becoming apparent.
(D) Product Service
Products may be serviced or manufactured with parts, components, or subassemblies that originate from returned products
and that have been tested as meeting applicable specifications for equivalent new material and Products. The sole obligation of
®
TSL
for defective hardware Products is limited to repair or replacement (at TSL®’s option) on a “return to base (RTB)” basis with
prior TSL
®
authorisation.
®
Customer is responsible for prompt shipment to TSL
shipment to the Customer will be at TSL
returned where TSL
eligible for warranty repair. No charge will be made to Buyer for replacement parts for warranty repairs. TSL
for any damage to or loss of any software programs, data or removable data storage media, or the restoration or reinstallation of
any software programs or data other than the software, if any, installed by TSL
®
determines there is no defect (“No Defect Found”), or for product returned that TSL® determines is not
®
’s expense. Customer shall be responsible for return shipment charges for product
and assumes all costs and risks associated with this transportation; return
®
is not responsible
®
during manufacture of the Product.
(E) Original Warranty Period
Except for the warranty applying solely to the repaired component arising from a repair service as provided in Section C above,
the aforementioned provisions do not extend the original warranty period of any Product that had either been repaired or
replaced by TSL
®
.
12
2136 4-Slot Battery Charger User Guide V1.00Copyright © 2018 Technology Solutions (UK) Ltd
Page 13

WARRANTY
(F) Warranty Provisions
www.tsl.com
The above warranty provisions shall not apply to any Product:
(i) which has been repaired, tampered with, altered or modified, except by TSL
®
’s authorized service personnel;
(ii) in which the defects or damage to the Product result from normal wear and tear, misuse, negligence, improper storage, water
or other liquids, battery leakage, use of parts or accessories not approved or supplied by TSL
handling and scheduled maintenance instructions supplied by TSL
®
;
®
, or failure to perform operator
(iii) which has been subjected to unusual physical or electrical stress, abuse, or accident, or forces or exposure beyond normal
use within the specified operational and environmental parameters set forth in the applicable Product specification; nor shall the
above warranty provisions apply to any expendable or consumable items, such as batteries, supplied with the Product.
EXCEPT FOR THE WARRANTY OF TITLE AND THE EXPRESS WARRANTIES STATED ABOVE, TSL
®
DISCLAIMS ALL
WARRANTIES ON PRODUCTS FURNISHED HEREUNDER INCLUDING ALL IMPLIED WARRANTIES OF MERCHANTABILITY
AND FITNESS FOR A PARTICULAR USE. ANY IMPLIED WARRANTIES THAT MAY BE IMPOSED BY LAW ARE LIMITED IN
DURATION TO THE LIMITED WARRANTY PERIOD. SOME STATES OR COUNTRIES DO NOT ALLOW A LIMITATION ON
HOW LONG AN IMPLIED WARRANTY LASTS OR THE EXCLUSION OR LIMITATION OF INCIDENTAL OR CONSEQUENTIAL
DAMAGES OR CONSUMER PRODUCTS. IN SUCH STATES OR COUNTRIES, FOR SUCH PRODUCTS, SOME EXCLUSIONS OR
LIMITATIONS OF THIS LIMITED WARRANTY MAY NOT APPLY.
The stated express warranties are in lieu of all obligations or liabilities on the part of TSL
®
for damages, including but not limited
to, special, indirect or consequential damages arising out of or in connection with the use or performance of the Product or
service. TSL
®
’s liability for damages to Buyer or others resulting from the use of any Product or service furnished hereunder shall
in no way exceed the purchase price of said Product or the fair market value of said service, except in instances of injury to
persons or property.
®
TSL
is not responsible for any damages incurred during shipment if the approved shipping container is not used. Shipping the
units improperly can possibly void the warranty. If the original shipping container was not kept, contact your local distributor or
®
TSL
to have another sent to you.
®
shall not be responsible for any injury, damage or loss of whatever kind caused directly or indirectly by the goods whether
TSL
as a result of their manufacture, operation, use or otherwise and the customer shall indemnify TSL
®
from any claim arising from
any loss suffered by any third party.
13
2136 4-Slot Battery Charger User Guide V1.00Copyright © 2018 Technology Solutions (UK) Ltd
Page 14

T
www.tsl.com
ABOUT TSL
®
ABOUT
®
SL
Technology Solutions UK Ltd (TSL®) is a leading manufacturer of high performance mobile RFID readers used to
identify and track products, assets, data or personnel.
For over two decades, TSL® has delivered innovative data capture solutions to Fortune 500 companies around the
world using a global network of distributors and system integrators. Specialist in-house teams design all aspects of
the finished products and software ecosystems, including electronics, firmware, application development tools, RF
design and injection mould tooling.
TSL® is an ISO 9001:2015 certified company.
ISO 9001: 2015
CONTACT
Address: Technology Solutions (UK) Ltd, Suite A, Loughborough Technology Centre, Epinal Way,
Loughborough, Leicestershire, LE11 3GE, United Kingdom.
Telephone: +44 1509 238248
Fax: +44 1509 214144
Email: enquiries@tsl.com
Website: www.tsl.com
Copyright © 2018 Technology Solutions (UK) Ltd. All rights reserved. Technology Solutions (UK) Limited reserves the right to change its
products, specifications and services at any time without notice.
14
2136 4-Slot Battery Charger User Guide V1.00Copyright © 2018 Technology Solutions (UK) Ltd
Page 15

Contact details
The Netherlands
Elektrostraat 17
NL-7483 PG Haaksbergen
T: +31 (0)53 573 33 33
F: +31 (0)53 573 33 30
E: nl@texim-europe.com
Germany North
Belgium
Zuiderlaan 14 bus 10
B-1731 Zellik
T: +32 (0)2 462 01 00
F: +32 (0)2 462 01 25
E: belgium@texim-europe.com
Germany South
UK & Ireland
St. Mary’s House, Church Lane
Carlton Le Moorland
Lincoln LN5 9HS
T: +44 (0)1522 789 555
F: +44 (0)845 299 22 26
E: uk@texim-europe.com
Austria
Bahnhofstrasse 92
D-25451 Quickborn
T: +49 (0)4106 627 07-0
F: +49 (0)4106 627 07-20
E: germany@texim-europe.com
Nordic region
Sdr. Jagtvej 12
DK-2970 Hørsholm
T: +45 88 20 26 30
F: +45 88 20 26 39
E: nordic@texim-europe.com
Martin-Kollar-Strasse 9
D-81829 München
T: +49 (0)89 436 086-0
F: +49 (0)89 436 086-19
E: germany@texim-europe.com
Italy
Via Matteotti 43
IT-20864 Agrate Brianza (MB)
T: +39 (0)39 971 3293
F: +39 (0)39 971 3293
E: italy@texim-europe.com
Warwitzstrasse 9
A-5020 Salzburg
T: +43 (0)662 216 026
F: +43 (0)662 216 026-66
E: austria@texim-europe.com
General information
info@texim-europe.com
www.texim-europe.com
2019 version 1.0
 Loading...