

Page 1
USER GUIDE:
®
1166
BLUETOOTH
UHF RFID READER
www.tsl.com
Design • Development • Manufacture
Page 2

www.tsl.com
TERMS & CONDITIONS
Copyright © 2019 Technology Solutions (UK) Ltd. All rights reserved.
No part of this publication may be reproduced or used in any form, or by any electrical or mechanical means,
without permission in writing from Technology Solutions (UK) Ltd. This includes electronic or mechanical means,
such as photocopying, recording, or information storage and retrieval systems. The material in this manual is
subject to change without notice.
Technology Solutions (UK) Ltd (TSL®) reserves the right to make changes to any product to improve reliability,
function, or design. TSL® does not assume any product liability arising out of, or in connection with, the application
or use of any product, circuit, or application described herein. No license is granted, either expressly or by
implication, estoppel, or otherwise under any patent right or patent, covering or relating to any combination,
system, apparatus, machine, material, method, or process in which TSL® products might be used. An implied
license exists only for equipment, circuits, and subsystems contained in TSL® products. TSL® and the TSL® logo are
registered trademarks of TSL®. Other product names mentioned in this manual may be trademarks or registered
trademarks of their respective companies and are hereby acknowledged.
All software is provided strictly on an “as is” basis. All software, including firmware, furnished to the user is on
a licensed basis. TSL® grants to the user a non-transferable and non-exclusive license to use each software or
firmware program delivered hereunder (licensed program). Except as noted below, such license may not be
assigned, sublicensed, or otherwise transferred by the user without prior written consent of TSL®. No right to
copy a licensed program in whole or in part is granted, except as permitted under copyright law. The user shall
not modify, merge, or incorporate any form or portion of a licensed program with other program material, create
a derivative work from a licensed program, or use a licensed program in a network without written permission
from TSL®. The user agrees to maintain TSL’s copyright notice on the licensed programs delivered hereunder, and
to include the same on any authorized copies it makes, in whole or in part. The user agrees not to decompile,
disassemble, decode, or reverse engineer any licensed program delivered to the user or any portion thereof.
TSL® reserves the right to make changes to any software or product to improve reliability, function, or design.
TSL® does not assume any product liability arising out of, or in connection with, the application or use of any
product, circuit, or application described herein.
iPad, iPad Air, iPad mini, iPad Pro, iPhone, iPod, iPod touch are trademarks of Apple Inc., registered
in the U.S. and other countries. IOS is a trademark or registered trademark of Cisco in the U.S. and other countries
and is used under license.
Use of the Made for Apple badge means that an accessory has been designed to connect specifically to the Apple
product(s) identified in the badge and has been certified by the developer to meet Apple performance standards.
Apple is not responsible for the operation of this device or its compliance with safety and regulatory standards.
The
Bluetooth
such marks by Technology Solutions (UK) Ltd is under license. Other trademarks and trade names are those of
their respective owners.
®
word mark and logos are registered trademarks owned by Bluetooth SIG, Inc. and any use of
2
1166 UHF Reader User Guide V1.07Copyright © 2019 Technology Solutions (UK) Ltd
Page 3

www.tsl.com
CONTENT
Introduction 4
Parts of the 1166 UHF Reader 4
Using the 1166 UHF Reader 5
Removing/Installing the Battery 5
Charging and USB Connection 8
Button Operation 9
Reading Transponders 10
Status LEDs 11
Connections 12
Bluetooth
Comparison of
Changing the
Setting up a
Embedded SD Card 21
Summary 21
Auto Run File (AUTO.TXT) 21
Log File (LOG.TXT) 21
Software Development 23
Troubleshooting and Maintenance 24
Maintenance 24
Troubleshooting 24
Regulatory information 25
Information to the user – FCC 25
RF Exposure Guidelines 25
Canadian Warning Statements 25
Laser Warning 27
Health and Safety Recommendations 28
Waste Electrical and Electronic Equipment (WEEE) 29
Warranty 29
About TSL
About 31
Contact 31
®
wireless technology connection 12
Bluetooth
Bluetooth
Bluetooth
®
31
®
Operating Modes 13
®
Operating Mode 14
®
Connection with an Apple Product 16
3
1166 UHF Reader User Guide V1.07Copyright © 2019 Technology Solutions (UK) Ltd
Page 4

www.tsl.com
INTRODUCTION
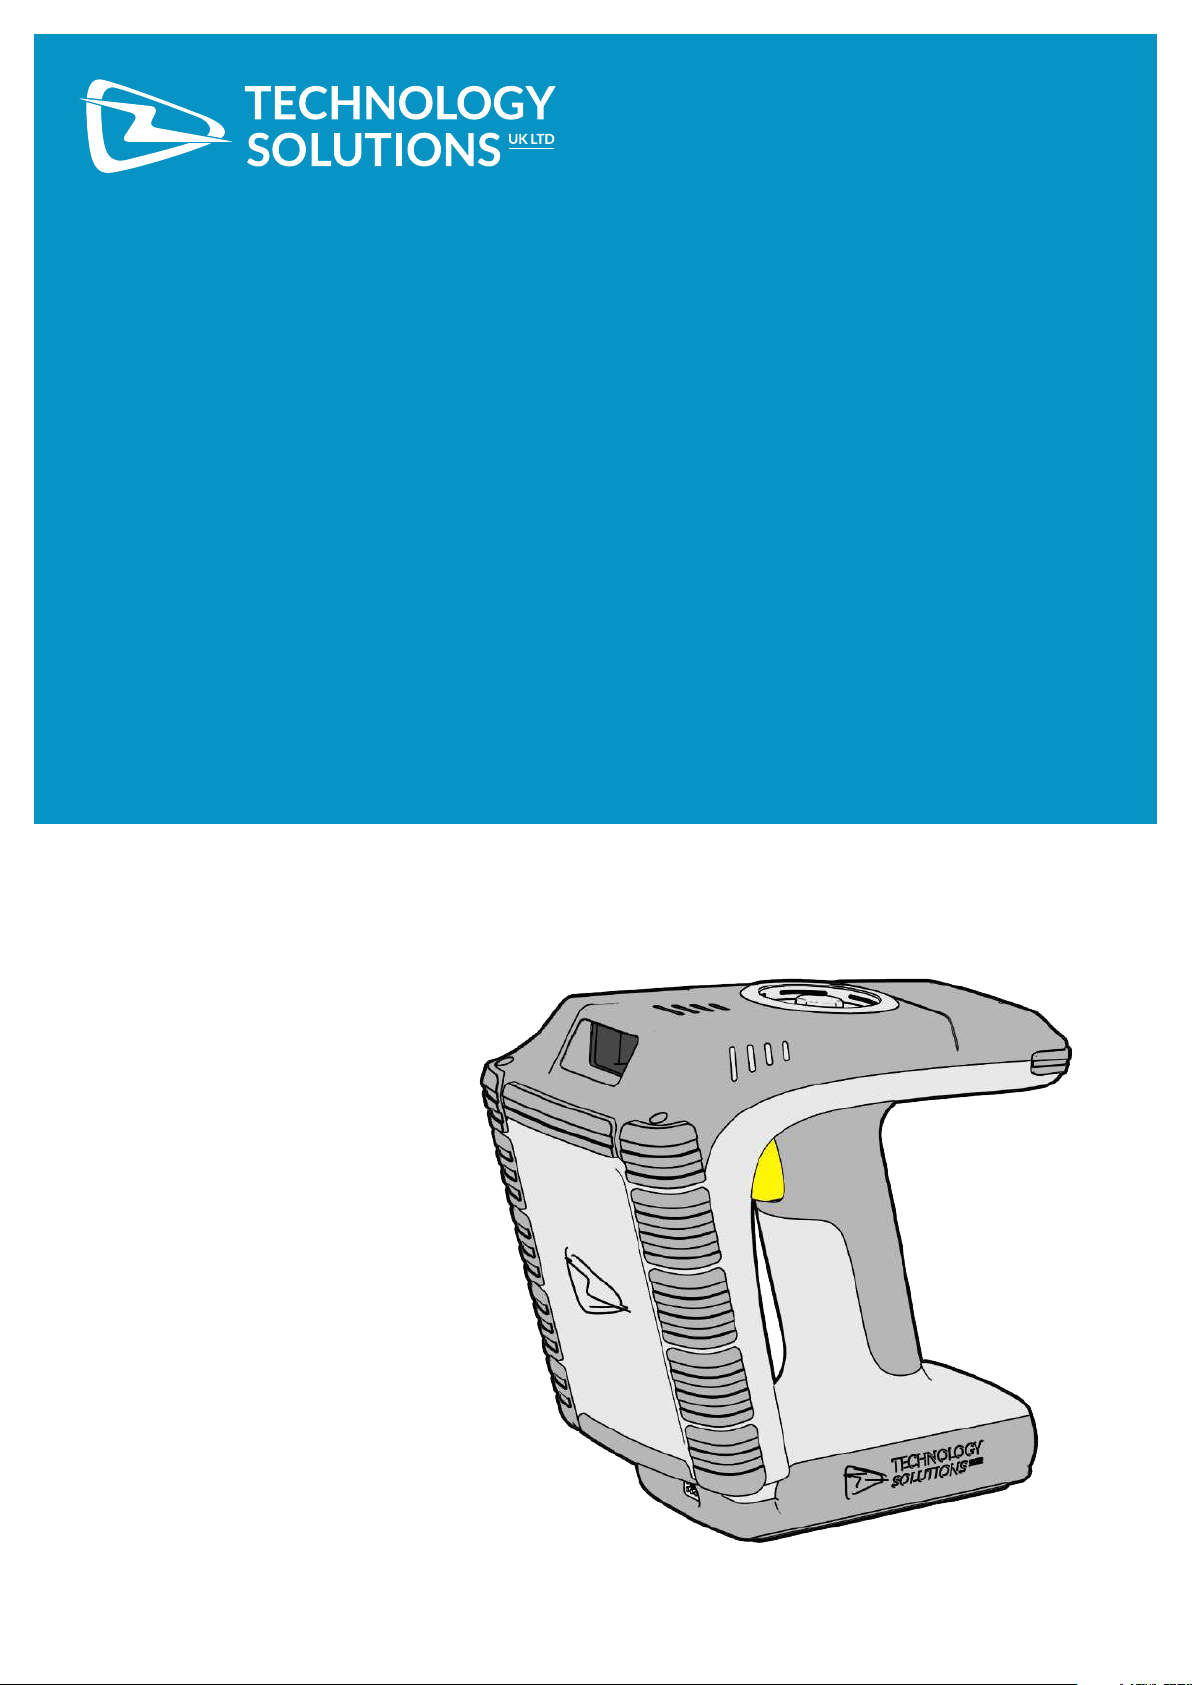
Technology Solutions’ 1166 UHF Reader provides Ultra High Frequency (UHF) Radio Frequency Identification
(RFID), with optional barcode scanning functionality. The unit can be used stand alone or paired with a
wireless technology enabled host device. It can be used with UHF transponders including the EPC Global Class 1
Generation 2 transponders.
Bluetooth
PARTS OF THE 1166 UHF READER
Pop-Loq Connector
Status LEDs
WARNING!
LASER LIGHT. DO NOT
STARE INTO BEAM. CLASS
2 LASER PRODUCT.
®
LASERSTRAHLUNG NICHT
IN DEN STRAHL BLICKEN.
LASER KLASSE 2.
LUMIÈRE LASER - NE
PAS REGARDER DANS LE
FAISCEAU. APPAREIL À
LASER DE CLASSE 2.
630-680nm, 1mW
UHF Antenna
Connection Status LED
Power Button
Trigger Button
On-screen Keyboard Toggle Button
(Apple HID Mode only)
Battery Cover
Battery Cover
Screw
Figure 1: Parts of the 1166 UHF Reader
4
Laser Warning
Label
1166 UHF Reader User Guide V1.07Copyright © 2019 Technology Solutions (UK) Ltd
Page 5

www.tsl.com
USING THE 1166 UHF READER
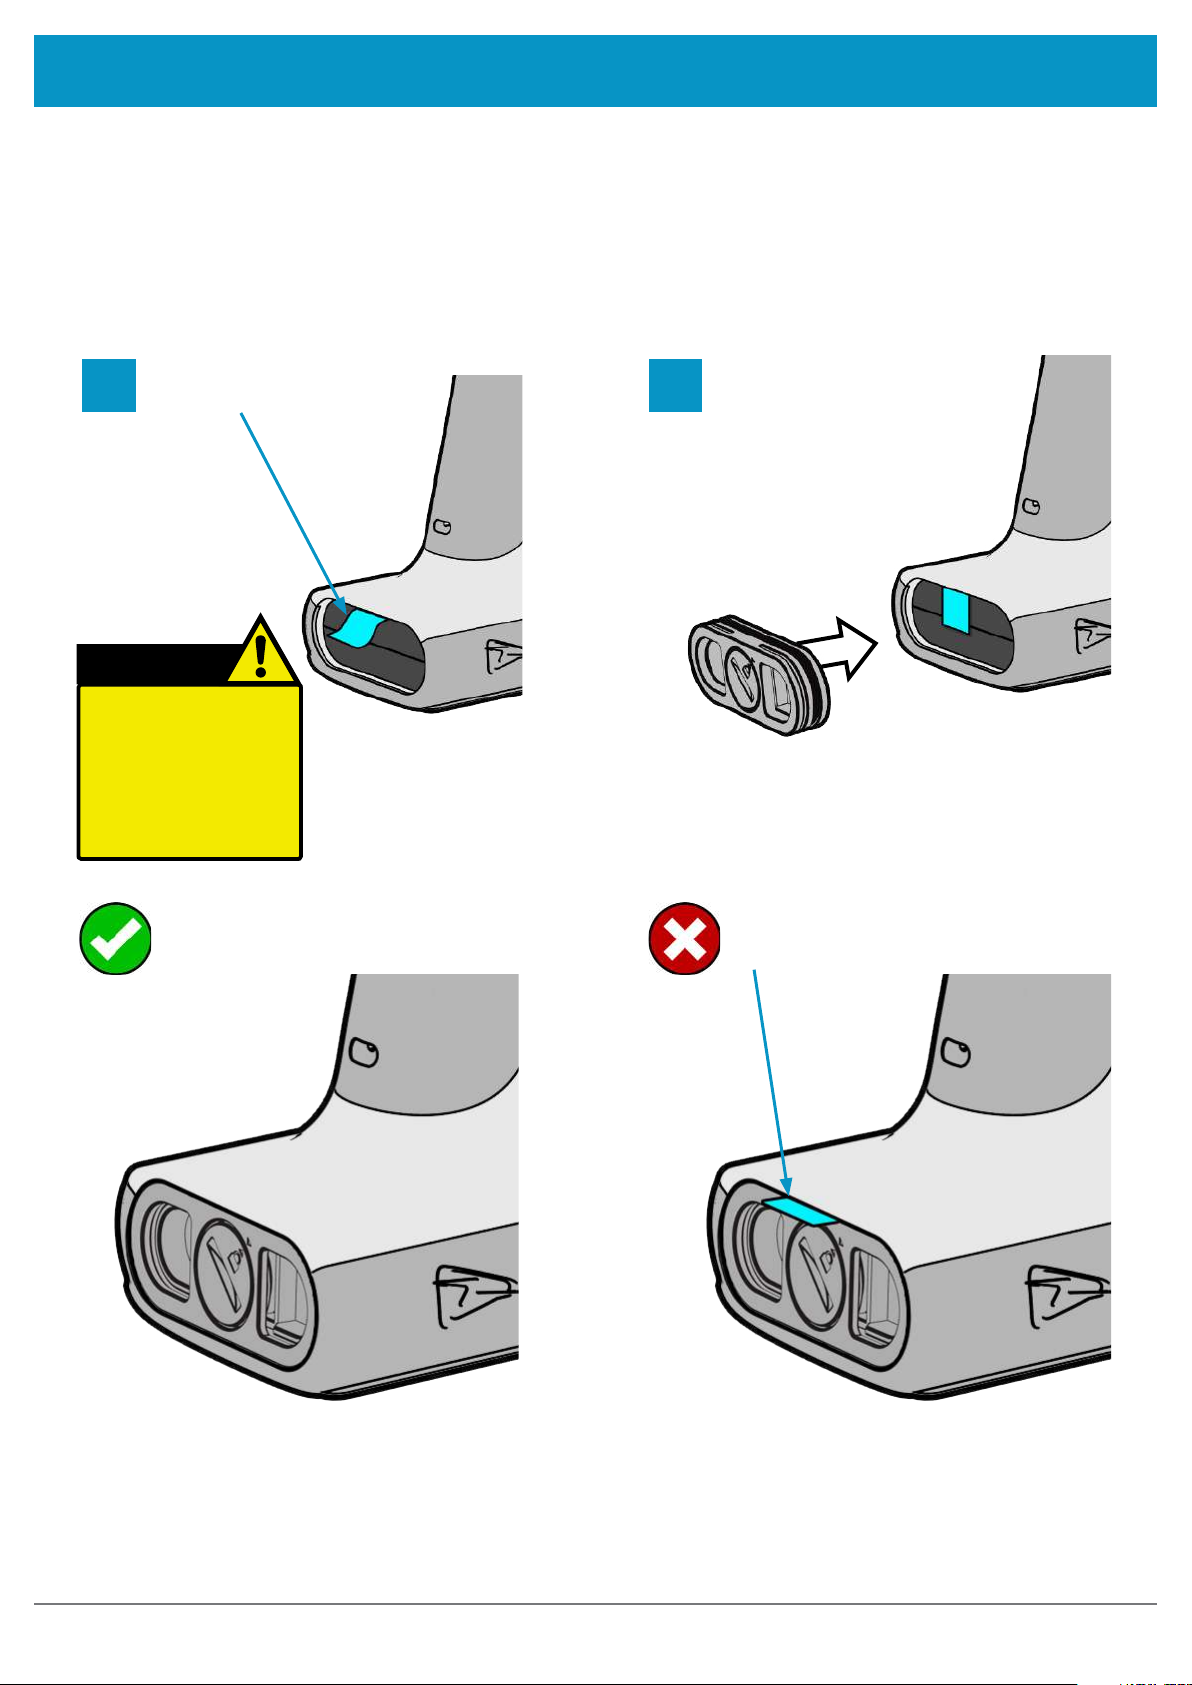
REMOVING/INSTALLING THE BATTERY
REMOVING THE BATTERY
To remove the battery, locate the screw on the Battery Cover and rotate it anti-clockwise using a mid-sized coin.
The Battery Cover can then be removed. The battery and ‘Battery Pull Tab’ will now be visible. Use the ‘Battery Pull
Tab’ to slide the battery out.
1
2
Locate ‘Battery Cover Screw’
Rotate ‘Battery Cover Screw’ anti-clockwise
by about two thirds of a turn.
Battery Cover
‘Battery Cover
Screw’
3
Battery Cover
Remove the ‘Battery Cover’ using the finger
holes and then pull on the ‘Battery Pull Tab’ to
slide the battery out
‘Battery Pull Tab’
Figure 2: Battery Removal
5
1166 UHF Reader User Guide V1.07Copyright © 2019 Technology Solutions (UK) Ltd
Page 6
USING THE 1166 UHF READER
www.tsl.com
INSTALLING THE BATTERY
To install the battery, first orientate the battery so that the electrical contacts on the battery line up with the contacts
inside the 1166 battery cavity. Slide the battery into the battery cavity, then replace the Battery Cover. Make sure
that the ‘Battery Pull Tab’ does not get stuck between the battery cover and the battery cavity - if this happens then
the environmental sealing will be compromised.
Tuck Battery Pull Tab
1 2
out of the way
CAUTION!
RISK OF EXPLOSION IF
BATTERY IS REPLACED BY
AN INCORRECT TYPE.
DISPOSE OF USED
BATTERIES ACCORDING
TO THE INSTRUCTIONS.
‘Battery Pull Tab’ is tucked behind
battery cover
Replace Battery Cover
‘Battery Pull Tab’ is trapped
between seal
Figure 3: Battery Pull Tab - Correct and Incorrect posiitoning
6
1166 UHF Reader User Guide V1.07Copyright © 2019 Technology Solutions (UK) Ltd
Page 7
USING THE 1166 UHF READER
www.tsl.com
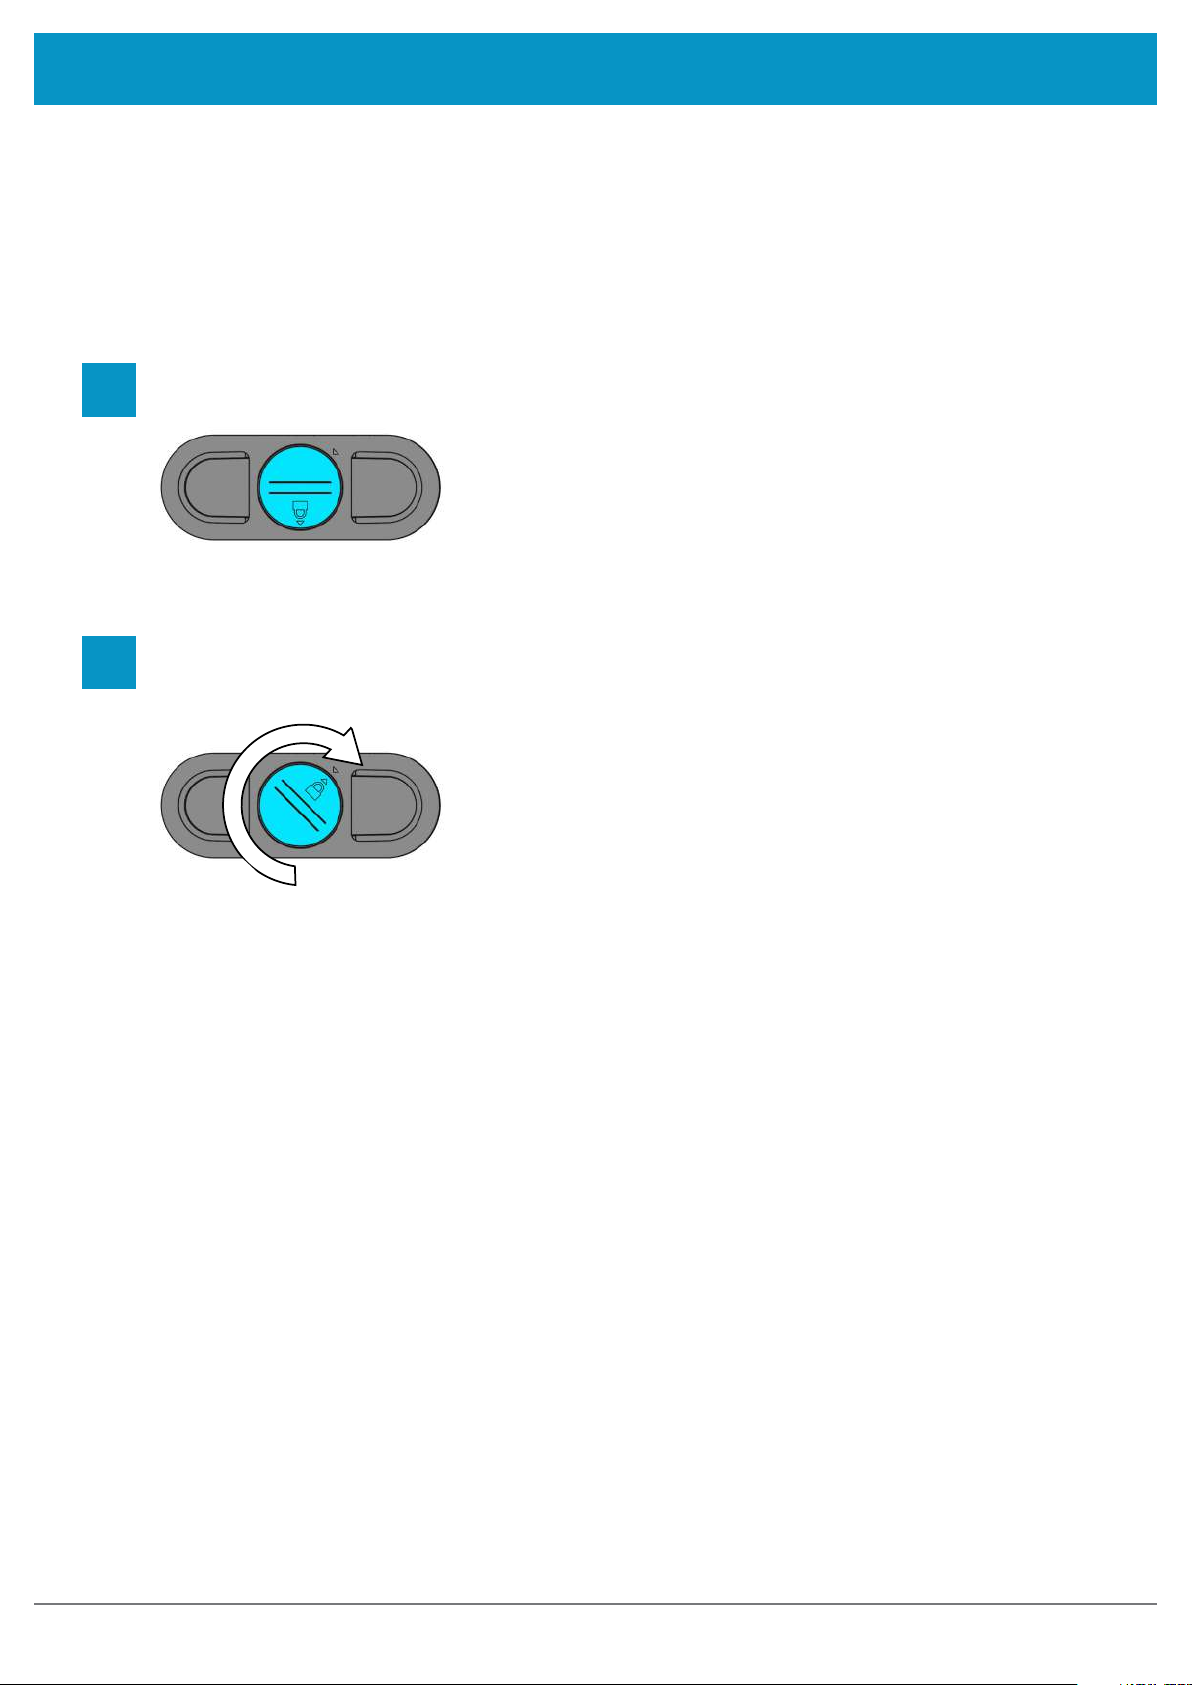
LOCKING THE BATTERY COVER
To lock the battery cover, lightly tighten the ‘Battery Cover Screw’ in a clockwise direction using a mid-sized coin.
Do not over-tighten the screw as this will damage the seal.
1
2
Locate ‘Battery Cover Screw’
Lightly rotate the ‘Battery Cover Screw’ clockwise until the padlock symbol meets the arrow. Do not overtighten or you will risk damaging the seal.
7
1166 UHF Reader User Guide V1.07Copyright © 2019 Technology Solutions (UK) Ltd
Page 8
USING THE 1166 UHF READER
www.tsl.com
CHARGING AND USB CONNECTION
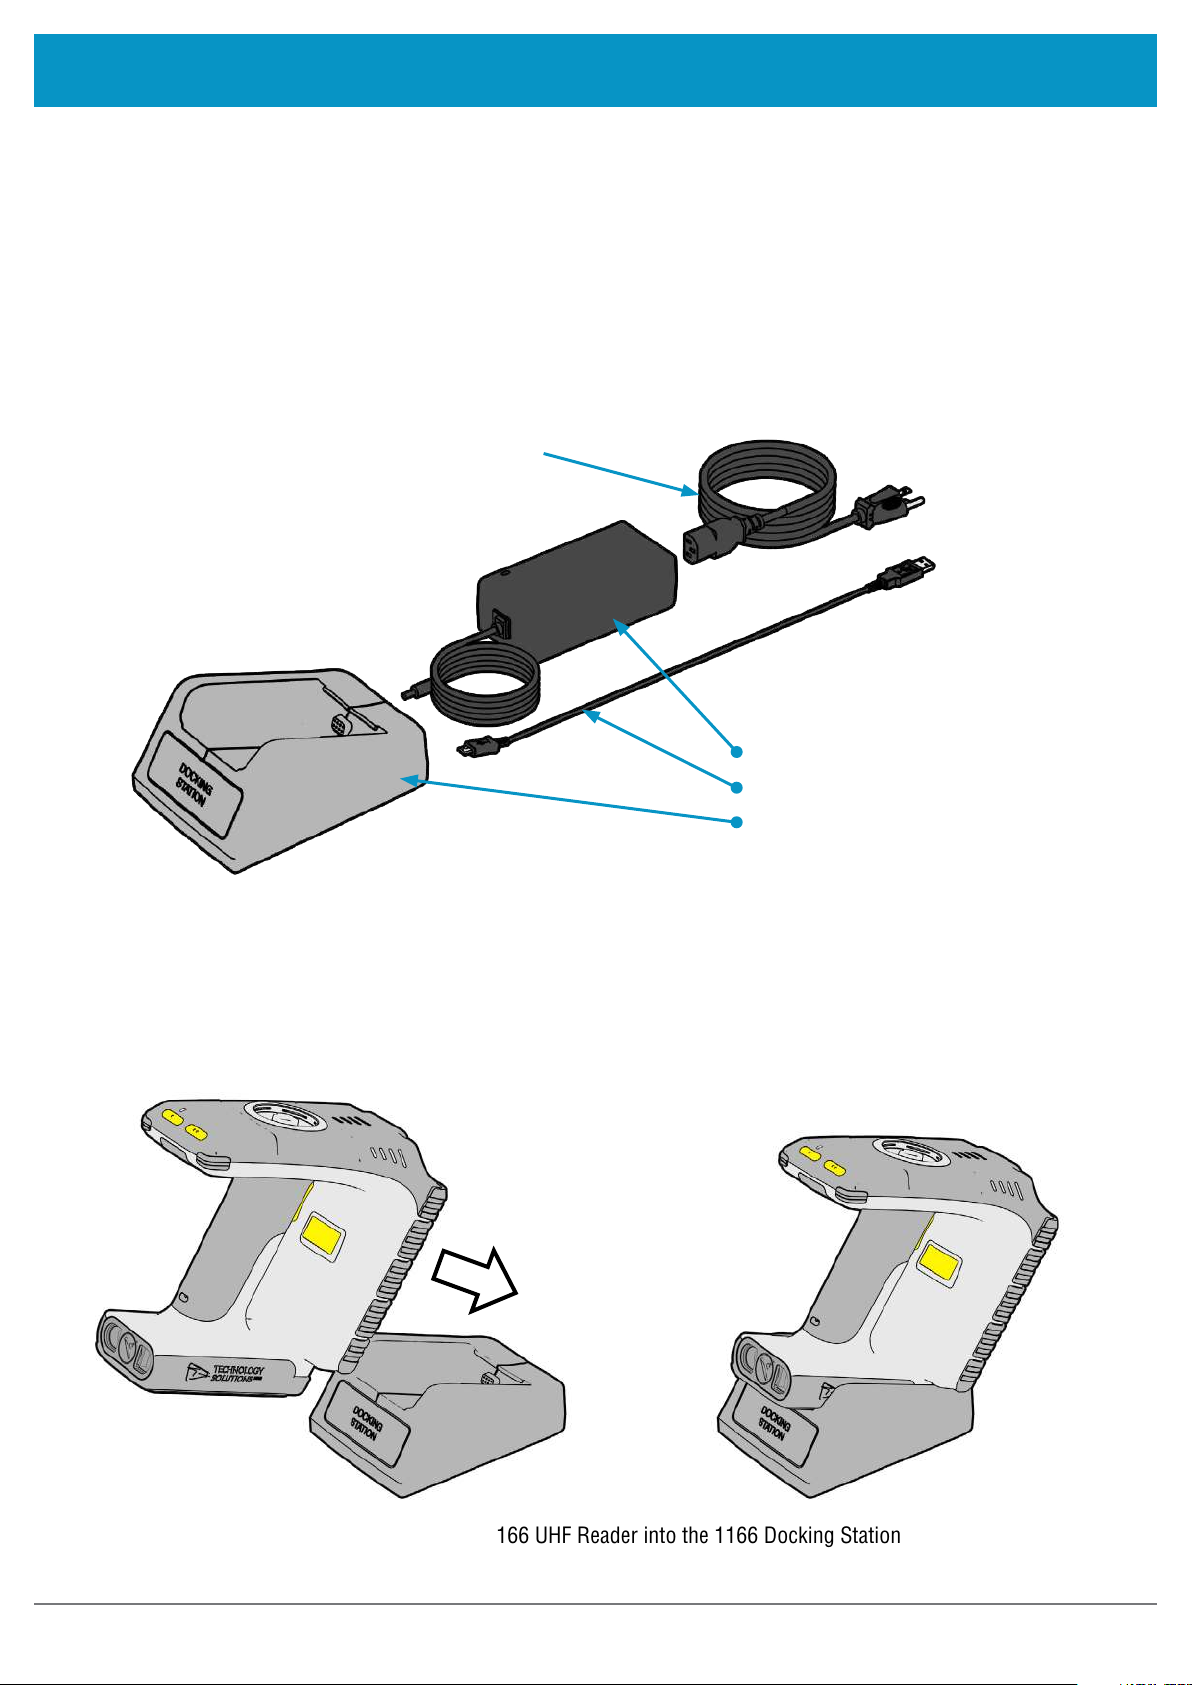
SETTING UP THE 1166 DOCKING STATION KIT
The 1166 UHF Reader kit uses a dedicated Docking Station for charging and synchronisation. The Docking Station
Kit includes the dock, a power supply unit and a Mini USB cable. A separately purchased IEC mains cable is also
required. The Mini USB cable and power cable are inserted into the 1166 Docking Station in the orientation shown
below. Note that both cables plug into the back of the docking station at a slight upwards angle.
IEC Mains Cable
(region specific)
1166-CRD-01-KIT:
65W Power Supply
Mini USB Cable
1166 Docking Station
Figure 4: Components required for charging the 1166 UHF Reader
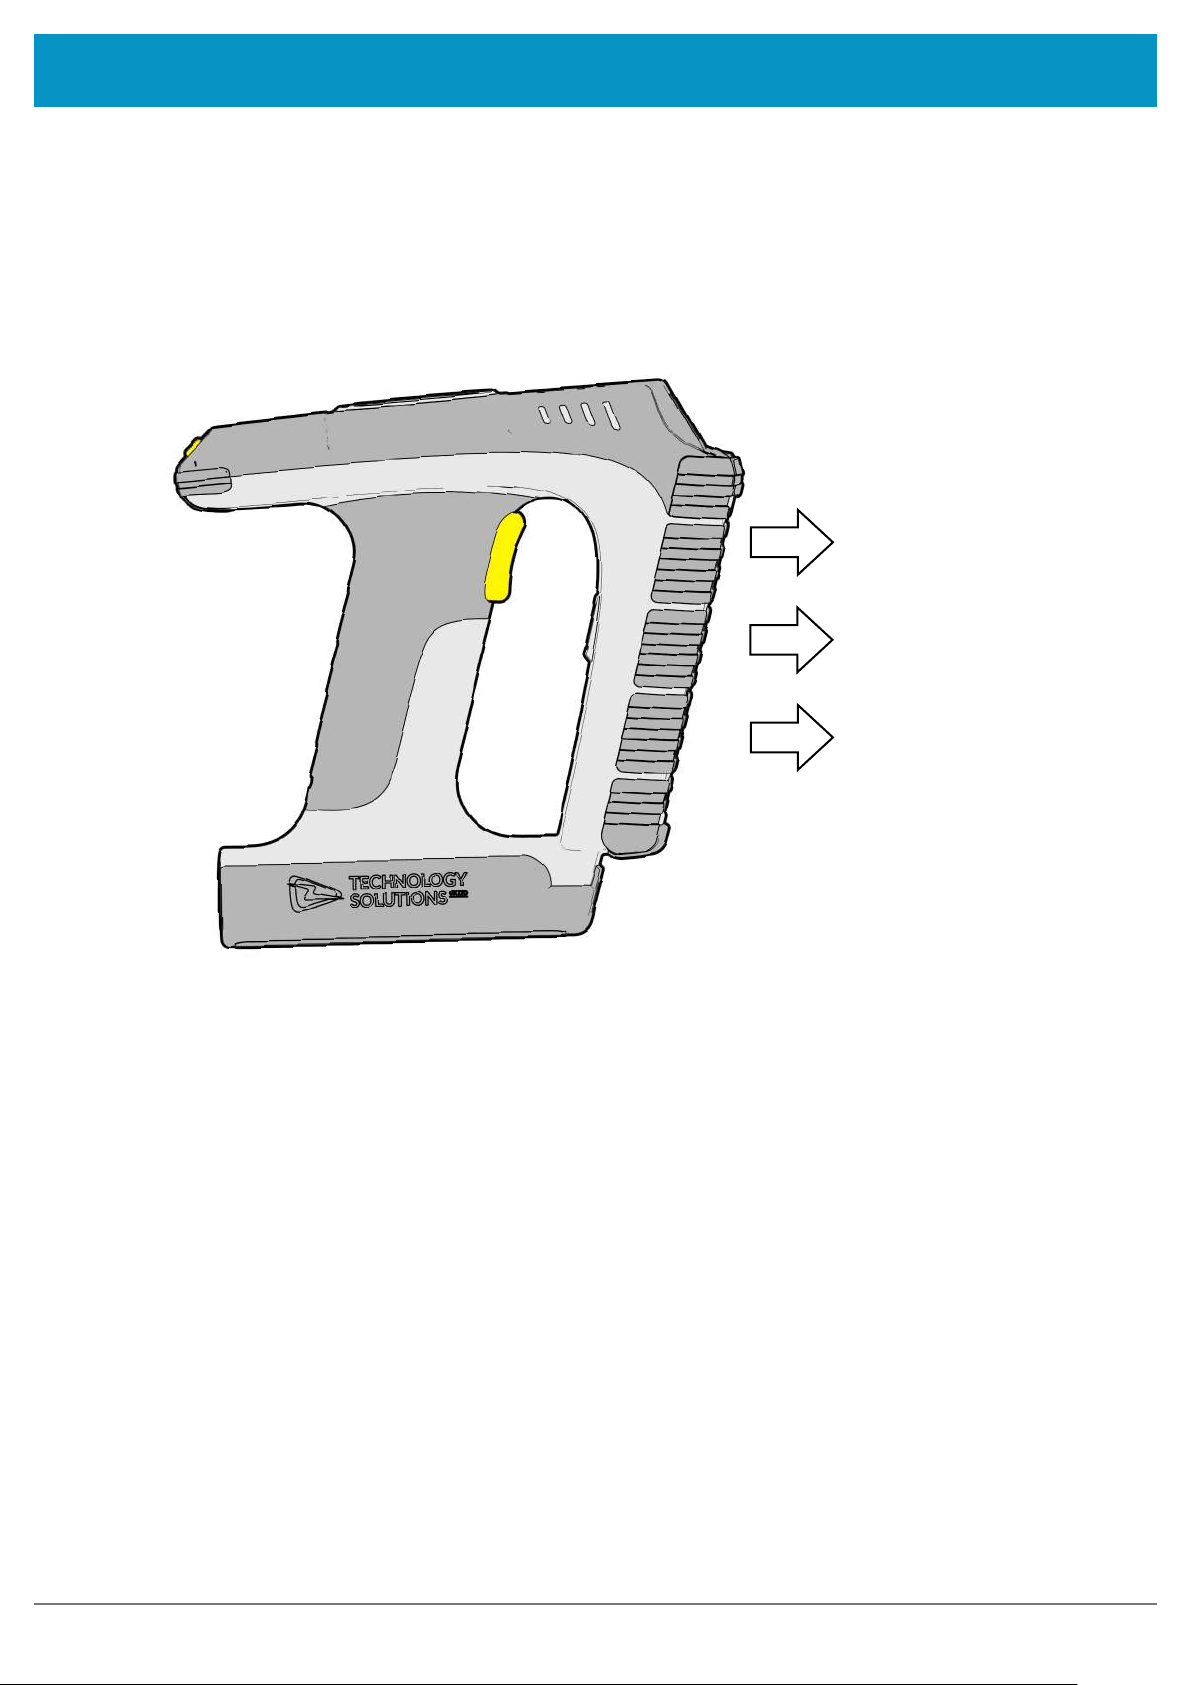
USING THE 1166 DOCKING STATION
To dock the 1166 UHF Reader, slide it into the docking station in the direction shown:
Figure 5: Inserting the 1166 UHF Reader into the 1166 Docking Station
8
1166 UHF Reader User Guide V1.07Copyright © 2019 Technology Solutions (UK) Ltd
Page 9
USING THE 1166 UHF READER
www.tsl.com
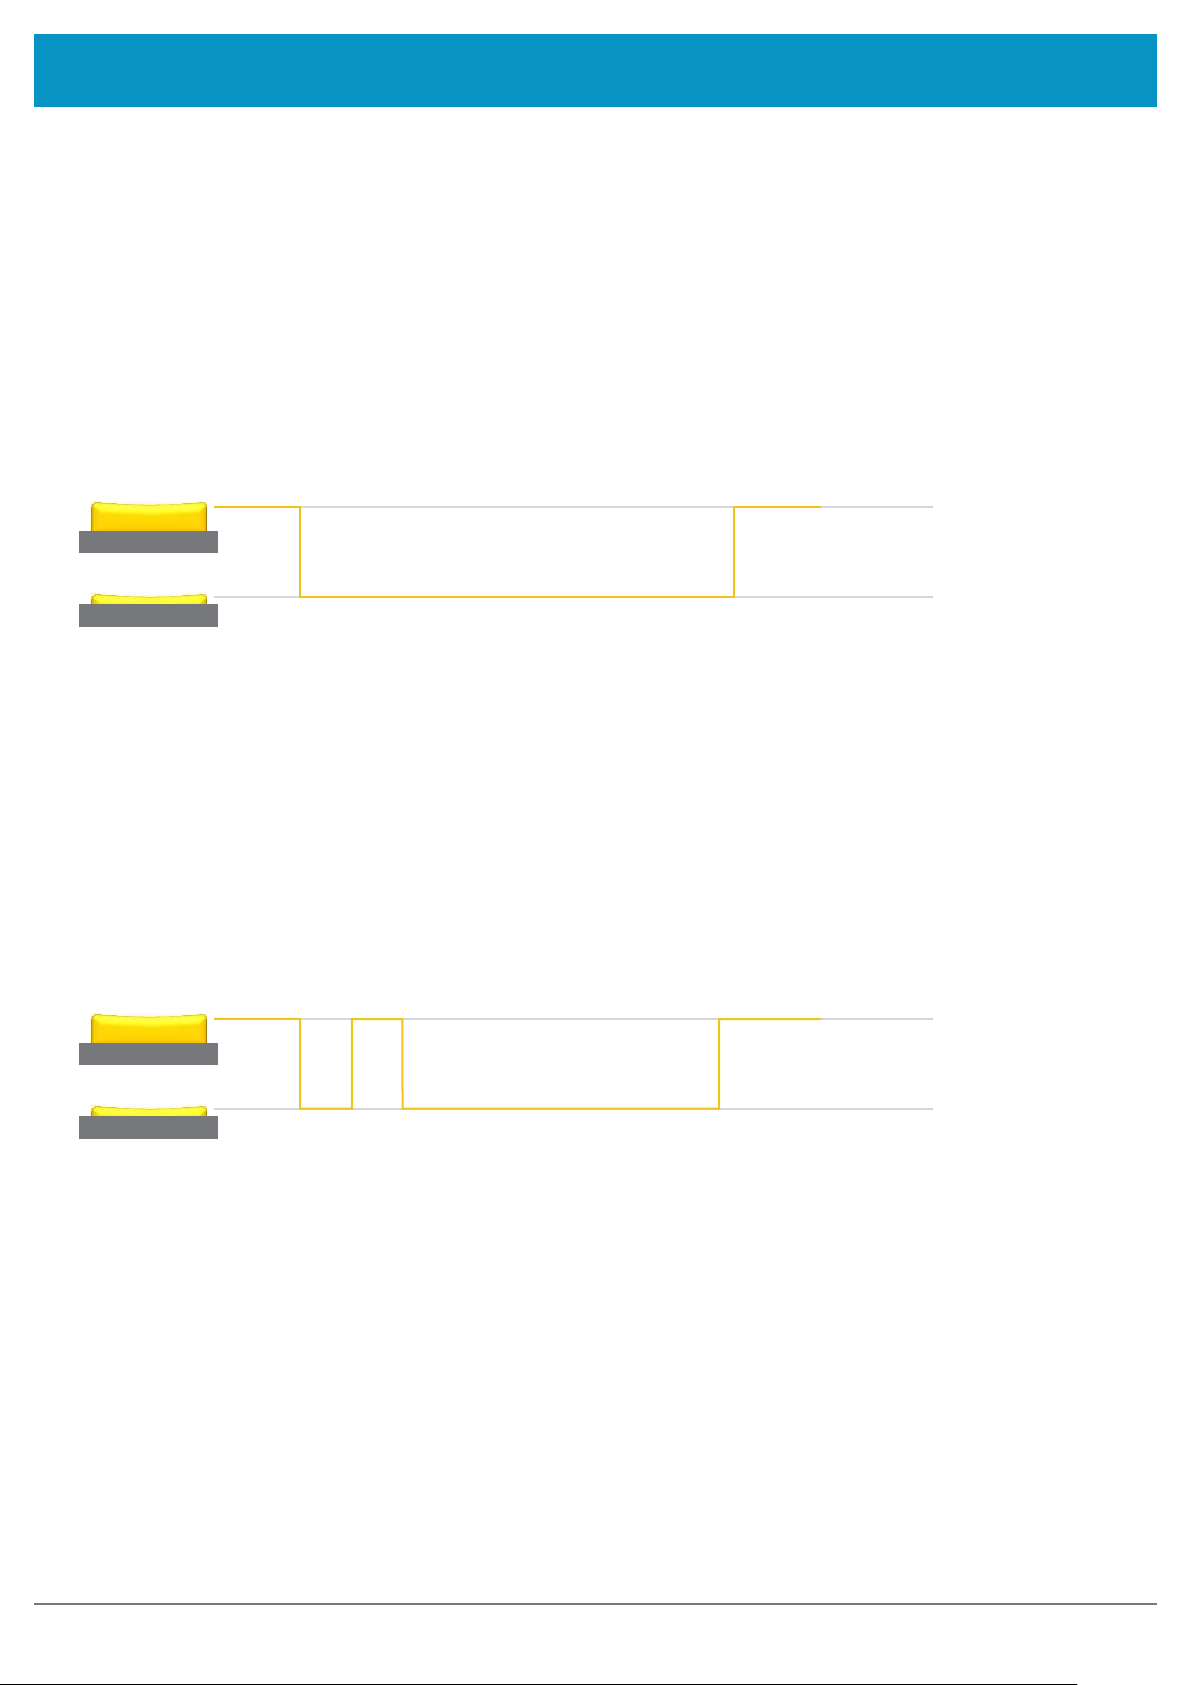
BUTTON OPERATION
The 1166 UHF Reader has a Primary button action and a Secondary button action which can be initiated by
different button clicks: By default, the Primary action scans for UHF transponders, whilst the Secondary action
initiates the laser barcode scanner (Barcode scanning is only available with the 2D Imager Antenna variant). Which
operation is performed depends on the way in which the button is pressed. The Single and Double press button
options are also programmable.
PRIMARY BUTTON CLICK AND HOLD
- UHF Transponder Read
>
>
The primary button click is a standard button action:
● To initiate a primary button click press and hold the trigger button.
● To terminate a primary button click release the trigger button.
In the default configuration the 1166 UHF Reader scans for UHF transponders as the primary function. The 1166
UHF Reader will continue to scan for UHF transponders while the button is pressed. It will stop scanning once the
button is released (and the current operation completes).
SECONDARY BUTTON DOUBLE CLICK AND HOLD
– Barcode Scan (2D Imager Variant only)
>
>
The secondary button click is a single click quickly followed by a second press (press-release-press).
● To initiate a secondary button click press then release then press and hold the trigger button.
>
● To terminate a secondary button click release the trigger button.
In the default configuration the 1166 UHF Reader scans for barcodes as the secondary function. The 1166 UHF
Reader will continue to scan for a barcode while the button is pressed. It will stop scanning when any of the
following conditions are met:
● A barcode is scanned.
● The button is released.
● The barcode engine times out.
9
1166 UHF Reader User Guide V1.07Copyright © 2019 Technology Solutions (UK) Ltd
Page 10
USING THE 1166 UHF READER
www.tsl.com
READING TRANSPONDERS
RFID transponders can be read when they are in range of the antenna. The antenna is located on the front of the
1166 UHF Reader. The range at which a transponder can be read depends on the transponder type and size, and
the number of transponders in the field.
The UHF reader reads
transponders in front
of the antenna
Figure 6: Antenna location and read direction
10
1166 UHF Reader User Guide V1.07Copyright © 2019 Technology Solutions (UK) Ltd
Page 11

USING THE 1166 UHF READER
STATUS LEDS
www.tsl.com
LEDS INDICATING TAG/
BARCODE READ
All off - nothing read
Tag/barcode
successfully read
LEDS INDICATING
CHARGING STATUS
All off - Not Charging
Battery Charging, battery level
less than 25%
Battery Charging, battery level
between 25 and 50%
Battery Charging, battery level
between 50 and 75%
Battery Charging, battery level
between 75 and 99%
Battery Fully Charged
LED INDICATING CONNECTION STATUS
Off - The reader is not awake
Flashing - Reader is awake but there is no connection
On - Reader is awake and connected to a host
Figure 7: Location of Status LEDs
11
1166 UHF Reader User Guide V1.07Copyright © 2019 Technology Solutions (UK) Ltd
Page 12

www.tsl.com
CONNECTIONS
The connection to the 1166 is either via Bluetooth or USB. Bluetooth connections use either a Virtual Com Port
(VCP) or via the iAP protocol for Apple devices. Over USB only VCP is available.
For VCP the connection is established at 115200 baud, 8 data bits, no parity, 1 stop bit and RTS/CTS (hardware)
flow control.
BLUETOOTH
®
WIRELESS TECHNOLOGY CONNECTION
COMPATIBLE APPLE PRODUCT MODELS
Figure 8: Compatible Apple Products
OTHER COMPATIBLE PRODUCTS
The 1166 Rugged
technology enabled host devices running Android, Windows CE, Windows Mobile 5/6.1/6.5 or Windows 10/8/7/
Vista/XP.
Bluetooth
®
Handheld UHF RFID Reader is compatible with many other
12
Bluetooth
1166 UHF Reader User Guide V1.07Copyright © 2019 Technology Solutions (UK) Ltd
®
wireless
Page 13

CONNECTIONS
www.tsl.com
COMPARISON OF
Our UHF RFID
reader always supports the TSL ASCII 2 protocol, but when connected over
to use the TSL ASCII 2 protocol (
Mode).
The comparison chart below is designed to help you understand the differences between the two operating modes:
Bluetooth
Apps need to be written with specific support for the
Reader
The Reader can be discovered and paired in the
Bluetooth Settings or from within the App but the App
controls the connection
Bluetooth
®
SPP Mode
BLUETOOTH
®
readers support two modes of operation over
Bluetooth
®
● Connects when instructed by the App
● Disconnects when instructed by the App
● The reader powers off when no longer connected and
idle
®
OPERATING MODES
Bluetooth
SPP Mode) or it can appear as a
Bluetooth
Apps can use the Reader without modification
Reader is discovered and paired in the Host Bluetooth
Settings (often appears as a Keyboard)
®
HID Mode
● After pairing the reader connects automatically
● If idle the reader sleeps and the connection is
dropped
● The reader, when woken, automatically reconnects to
the host device
®
. When connected via USB the
Bluetooth
Bluetooth
®
the reader can either be set
®
keyboard (
Bluetooth
®
HID
● The App needs to connect to restore
Apps receive and interpret TSL ASCII 2 Protocol
responses when the user triggers a UHF or barcode scan
The App can respond and react intelligently to responses
e.g.
● duplicate responses can be ignored or counted
● incoming tag data can be truncated, stripped or
transformed into alternative representations: Hex,
ASCII, GS1 EPC URI, etc…
Apps receive input as Key strokes from the reader
including Tab and Return/Enter keys
The reader types text for each barcode/UHF scan
received
● The tag values can be returned in Hex or ASCII
representations
● Up to 2 Additional characters can be inserted before
and after the text sent
● The reader cannot truncate or strip values from tag
data
The App can change the Reader’s behaviour The Reader can only send scanned data to the host, the
host cannot change the reader’s behaviour
The Reader’s behaviour and command parameters are
controlled in real time by the App e.g. the trigger action
can change to suit the task that the User is performing;
the App can allow the User to specify Inventory output
power
Configuration is held within the App (any configuration
in the AUTO.TXT is likely to be overridden by the App
settings)
The Reader’s behaviour, such as the action of the reader’s
trigger switch, the inventory output power, the idle
sleep timeout and other command parameters can be
configured only once at start-up.
All configuration is held in an AUTO.TXT file stored on an
SD-Card. Removing the SD-card or deleting the AUTO.
TXT and power-cycling the unit restores default settings.
All reader activity, by default, is saved to a log file if an
SD-Card is fitted.
All reader activity, by default, is saved to a log file if an
SD-card is fitted.
13
1166 UHF Reader User Guide V1.07Copyright © 2019 Technology Solutions (UK) Ltd
Page 14

CONNECTIONS
www.tsl.com
CHANGING THE
TSL®
Bluetooth
written application or in
The HID mode has two variantsi :
1.
HID mode
2.
HID Apple mode
The
Bluetooth
®
UHF RFID Readers can be operated in
Compatible with Android, Windows and Apple devices
®
operating mode of a TSL® UHF RFID Reader can be changed using the steps detailed below.
BLUETOOTH
HID mode
Compatible only with Apple devices providing an on-screen keyboard toggle
, where the Reader behaves like a
®
OPERATING MODE
SPP mode
PREPARATION:
Download and install the “
registration required)
https://www.tsl.com/downloads/tsl-products/1128-downloads/
https://www.tsl.com/downloads/tsl-products/1153-downloads/
https://www.tsl.com/downloads/tsl-products/1166-downloads/
TSL PC Firmware Downloader
” from the Reader product download page (free, one time,
where the Reader is controlled by a custom-
Bluetooth
®
Keyboard.
TO SWITCH TO
BLUETOOTH
®
HID MODE:
● First delete existing pairings to the UHF reader
● Launch the Firmware Downloader (
Desktop Firmware Loader
)
● Connect the UHF reader to the computer using the supplied USB cable.
● The driver should install automatically (*)
● The downloader should prompt as the com port arrives and select the com port automatically (“COMn
arrived”)
● Select Action>Reset Bluetooth to HID mode or Action>Reset Bluetooth to HID Apple mode (wait for the
process to complete)
● Disconnect the UHF reader from the computer (unplug USB)
● Wake the UHF reader (pull trigger, blue flashing LED)
● Pair to the reader on the device (it typically appears as a keyboard icon and connects automatically)
● Scanned data should now be typed into the current application on the device
TO SWITCH TO
BLUETOOTH
®
SPP MODE:
● First delete existing pairings to the UHF reader
● Launch the downloader (
Desktop Firmware Loader
)
● Connect the UHF reader to the computer using the supplied USB cable.
● The driver should install automatically (*)
● The downloader should prompt as the com port arrives and select the com port automatically (“COMn
14
1166 UHF Reader User Guide V1.07Copyright © 2019 Technology Solutions (UK) Ltd
Page 15

CONNECTIONS
● arrived”)
● Select Action>Reset Bluetooth to SPP mode (wait for the process to complete)
● Disconnect the UHF reader from the computer (unplug USB)
● Wake the UHF reader (pull trigger, blue flashing LED)
● Pair to the reader on the device
www.tsl.com
● Launch an Application (e.g.
(*) if not download from here
RFID Explorer
http://www.ftdichip.com/Drivers/VCP.htm
) to use the reader
FURTHER INFORMATION
Further information can be found from the Reader Download pages (free, one-time, registration required - see links
above)
Application Note – Bluetooth® HID mode
Application Note – Using the Micro SD log and auto-run files
TSL ASCII Protocol 2.4 Rev B
If you encounter any issue while following the above procedure please contact
following information:
: Details all the commands including for HID .st,.hs,.hc, and .hd
● The serial number of the UHF Reader
● The Firmware version of the UHF Reader
● The step at which the procedure failed
● A description of the fault that occurred
: Provides further examples for configuring HID mode
: Describes using the AUTO.TXT
support@tsl.com
providing the
iFirmware requirements: 1128 - v4.2.7 or greater; 1153 – v2.1.7 or greater; 1166 – v1.1.6 or greater
15
1166 UHF Reader User Guide V1.07Copyright © 2019 Technology Solutions (UK) Ltd
Page 16

BLUETOOTH
®
WIRELESS TECHNOLOGY CONNECTION
www.tsl.com
SETTING UP A
Awaken the 1166 UHF Reader by squeezing the trigger, which is confirmed by the flashing of the blue LED. To pair
with your iOS device, navigate to the
VIEW LIST OF
iPad® :
BLUETOOTH
Bluetooth
BLUETOOTH
®
CONNECTION WITH AN APPLE PRODUCT
®
option within the Settings menu on your iOS device.
®
DEVICES (iOS 7)
● Go to the Settings App.
®
settings in the left hand
column.
Figure 9: List of devices in
iPod® / iPhone® :
Bluetooth
®
settings
● Select the
Bluetooth
Figure 10: Select
Bluetooth
®
settings
● Go to the Settings App.
● Tap on the
Bluetooth
Bluetooth
®
settings
®
row to be taken to the
Figure 11: List of devices in
Bluetooth
®
settings
16
1166 UHF Reader User Guide V1.07Copyright © 2019 Technology Solutions (UK) Ltd
Page 17

BLUETOOTH
®
WIRELESS TECHNOLOGY CONNECTION
www.tsl.com
PAIR WITH TSL
In the list of
the corresponding row to pair with the reader.
®
iPad
Bluetooth
BLUETOOTH
®
devices, the 1166 UHF reader will be identified by its serial number (1166-xxxxxx). Click on
®
DEVICE
iPod® / iPhone
®
Figure 12: Identify device
After successfully pairing with the 1166 UHF Reader, the device will be shown as ‘connected’.
iPad
®
iPod
®
/ iPhone
®
Figure 13: Device connected
If RFID Explorer is installed on your device then a prompt will appear requesting a connection to the newly added
reader. Choose ‘Allow’ to launch RFID Explorer or ‘Ignore’ if the device is to be used with a different App.
iPad
®
iPod
®
/ iPhone
®
Figure 14: Allow connection
Open TSL’s RFID Explorer App.
The RFID Explorer App can be downloaded from the App Store.
17
1166 UHF Reader User Guide V1.07Copyright © 2019 Technology Solutions (UK) Ltd
Page 18

BLUETOOTH
®
WIRELESS TECHNOLOGY CONNECTION
www.tsl.com
If the app is starting up for the first time, no reader will be selected. To select a reader, tap on ‘Change Reader’ in
the menu to the left (iPad®) or ‘Paired Readers’ (iPod®/iPhone®).
iPad
®
iPod
®
/ iPhone
®
Figure 15: TSL RFID Explorer App on first load - no reader selected
If you have a reader selected from your device’s
Bluetooth
If the ‘No devices are available’ message in Figure 25 appears, you can also connect to a device through the RFID
Explorer app. Press the + sign presented in the top right corner of the Select Reader section/screen.
®
settings as previously shown, continue from Figure 28.
iPad
®
iPod
®
/ iPhone
®
Figure 16: No devices are available
18
1166 UHF Reader User Guide V1.07Copyright © 2019 Technology Solutions (UK) Ltd
Page 19

BLUETOOTH
®
WIRELESS TECHNOLOGY CONNECTION
This will open a ‘Select An Accessory’ dialog box.
There may be a small delay in loading available readers.
Once the available readers have loaded select the 1166 UHF reader.
www.tsl.com
®
iPad
Figure 17: Select the Reader to use
A list of compatible and currently paired
RFID Explorer App.
Bluetooth
iPod® / iPhone
®
devices will appear. Select the device to be used with the
®
iPad
®
Figure 18: List of paired
Bluetooth
®
iPod
devices
19
®
/ iPhone
®
1166 UHF Reader User Guide V1.07Copyright © 2019 Technology Solutions (UK) Ltd
Page 20

BLUETOOTH
®
WIRELESS TECHNOLOGY CONNECTION
www.tsl.com
The selected device’s image will appear, accompanied by relevant device information. The ‘Inventory’, ‘Read/
Write’, ‘Commands’ and ‘Find a Tag’ features can now be explored. To maximise battery life it is recommended to
release the 1166 UHF Reader from its
Bluetooth
®
connection if the reader is not to be used for a significant period
of time.
iPad
®
iPod® / iPhone
®
Figure 19: 1166 UHF Reader selected and ready to use
20
1166 UHF Reader User Guide V1.07Copyright © 2019 Technology Solutions (UK) Ltd
Page 21

www.tsl.com
EMBEDDED SD CARD
SUMMARY
The 1166 Rugged Bluetooth® UHF RFID Reader is factory fitted with an embedded 2GB internal NAND storage SD
card, allowing millions of tags to be stored with time and date stamping.
By default the SD card is presented as a mass storage device when the 1166 is docked into a cradle connected
over USB to a host computer. This allows rapid download of log data and editing of the Auto Run File. The standard
ASCII 2 SD card commands can still be used, but only when the SD card is not in mass storage mode.
AUTO RUN FILE (AUTO.TXT)
Once an SD card is installed an Auto Run file can be created on the SD card. The Auto Run file contains a list of
ASCII 2 commands that are executed as the 1166 powers up. The file should be located at the root of the card
and called “AUTO.TXT”. Although the file can contain any valid ASCII 2 commands, one per line, it is intended that
these have the take no action ‘-n’ flag specified to allow the default parameters for any command to be changed
from the firmware defaults as the unit boots without actually executing the command.
For example to change the carrier power of the inventory command from 29dBm to 20dBm
‘.iv -o20 -n’ would be appended to the Auto Run file. As is the behaviour with command parameters this will set
the output power for the inventory command until a new value is sent with this command. Therefore the inventories
executed by the trigger, which executes ‘.iv’ will use the modified output power.
The Auto Run file can be manually created on the card before it is inserted into the 1166 or the ASCII 2 command
Write Command to Auto Run File ‘.wa’ can be used. The Read Auto Run File ‘.ra’ can be used to read back the
contents of the Auto Run file or delete the file from the card.
LOG FILE (LOG.TXT)
Once an SD card is installed and logging is enabled a log file is created on the SD card. The file is located at the
root of the card and called “LOG.TXT”. All the lines from every response to every command that is executed by the
reader (including those performed from trigger actions) are appended to the end of the file. Events such as Power
up are also appended to the file.
The ASCII 2 Read Log File command (‘.rl’) is provided to enable or disable logging, to read the log file from the
card or to delete the log file from the card.
Please note that the log file can quickly become large relative to the speed at which it can be downloaded using
the Read Log File Command.
Start of a sample log output:
DT: 2013-11-15T16:46:58
EV: Log File created
CS: .ws -sa4 -sbepc -sd300833B2DDD9014000000000 -sl06 -so0002 -sts2 -dbepc -da330DE29525C0210005F5F88A
-dl06 -do0002
WW: 0
ME: No Transponder found
ER:005
DT: 2013-11-15T17:58:28
EV: Disconnected
DT: 2013-11-15T17:59:28
EV: Sleep
DT: 2013-11-18T09:18:21
21
1166 UHF Reader User Guide V1.07Copyright © 2019 Technology Solutions (UK) Ltd
Page 22

EMBEDDED SD CARD
EV: Wake up
CS: .al –dlon
OK:
DT: 2013-11-18T09:19:22
EV: Sleep
DT: 2013-11-18T10:07:42
EV: Wake up
DT: 2013-11-18T10:07:42
EV: Connected USB
CS: .al –dlon
OK:
CS: .iv LCMD 000000 -qss0 –qta
EP: 330DE29525C0210005F5F8F2
EP: 221001500000000000000027
OK:
www.tsl.com
22
1166 UHF Reader User Guide V1.07Copyright © 2019 Technology Solutions (UK) Ltd
Page 23

www.tsl.com
SOFTWARE DEVELOPMENT
To make full use of the functionality of the 1166 UHF Reader, a customised software application will be required.
The new 1166
application development. This sophisticated parameterised ASCII protocol provides the developer a powerful set
of commands that carry out multiple actions locally within the
tag operations executed using simple pre-configured ASCII commands which not only speeds integration of
the reader into applications but also abstracts the developer from some of the complexities of the underlying
Native API. Simple, text based commands are sent to the reader and responses are returned as text. This allows
straightforward access to RFID tag functions such as inventory, read and write. Details of the ASCII command
mode are available for download from https://www.tsl.com/1166-downloads/ .
Bluetooth
®
UHF RFID reader incorporates TSL’s unique ASCII protocol for faster and easier
Bluetooth
®
reader. This approach enables multiple
23
1166 UHF Reader User Guide V1.07Copyright © 2019 Technology Solutions (UK) Ltd
Page 24

TROUBLESHOOTING AND MAINTENANCE
MAINTENANCE
For trouble-free service please observe the following tips when using the 1166 UHF Reader:
● Protect the 1166 UHF Reader from temperature extremes. Do not leave it on the dashboard of a car on a hot
day, and keep it away from heat sources.
TROUBLESHOOTING
Symptoms Possible cause Action
www.tsl.com
Nothing happens when the trigger
button is pressed.
The orange LED flashes rapidly
when charging.
The host
not find the 1166 UHF Reader.
Opening the
port does not connect to the 1166
UHF Reader.
Bluetooth
Other symptoms. Other fault. Run
Bluetooth
®
pairing fails. The PIN on the 1166 UHF Reader
®
discovery does
Bluetooth
®
virtual com
If the LEDs are not on then the
battery may be flat.
The 1166 UHF Reader may have
button actions disabled.
Other. Work through
There is a battery fault. Replace the battery pack.
The battery pack temperature is
outside recommended limits.
The 1166 UHF Reader has powered
off.
The 1166 UHF Reader is out of
range.
Bluetooth
The
the 1166 UHF Reader has been
changed.
The host has paired to a different
Bluetooth
The host
error.
has been changed
®
friendly name of
®
device.
Bluetooth
®
function has an
Charge the 1166 UHF Reader.
Check the 1166 UHF Reader
configuration and restore to defaults
if unsure.
on TSL® Website
Ensure that charging only occurs
between 5°C and 40°C.
Press the trigger button and ensure
the blue LED is flashing.
Move the 1166 UHF Reader closer
to the host.
Check the
or restore the 1166 UHF Reader to
factory defaults if unsure.
Pair to the required 1166 UHF
Reader.
Warm boot the host. If this does not
help, delete the 1166 UHF Reader
from the favourites list and re-pair.
Set the
value
and email result to
com
problem.
Troubleshooting Guide
Bluetooth
Bluetooth
ASCII Remote Diagnostic
along with a description of the
®
friendly name
®
PIN to a known
support@tsl.
24
1166 UHF Reader User Guide V1.07Copyright © 2019 Technology Solutions (UK) Ltd
Page 25

www.tsl.com
REGULATORY INFORMATION
INFORMATION TO THE USER – FCC
FCC warning statement:
This device complies with Part 15 of the FCC Rules.
Operation is subject to the following two conditions:
(1) This device may not cause harmful interference, and
(2) This device must accept any interference received, including interference that may cause undesired operation.
To comply with FCC RF exposure compliance requirements this unit must be operated in the hand with a
minimum separation of 20cm from the body and other persons. Other operating configurations should be avoided.
This unit must not be co-located or operated in conjunction with any other transmitter / antenna except those
already approved in this filing. Handheld configurations that provide no belt-clips or other body-worn accessories
and only transmit while in the hand and that maintain 20cm from the body, excluding hands, wrists, feet and
ankles, are allowed.
Changes or modifications not expressly approved by the party responsible for compliance could void the user’s
authority to operate the equipment
RF EXPOSURE GUIDELINES
Safety information – To reduce RF exposure only use the device in accordance with the instructions supplied.
CANADIAN WARNING STATEMENTS
English
“Under Industry Canada regulations, this radio transmitter may only operate using an
antenna of a type and maximum (or lesser) gain approved for the transmitter by Industry
Canada.
To reduce potential radio interference to other users, the antenna type and its gain should
be so chosen that the equivalent isotropically radiated power (e.i.r.p.) is not more than that
necessary for successful communication.”
“This device complies with Industry Canada licence-exempt RSS standard(s). Operation is
subject to the following two conditions: (1) this device may not cause interference, and (2)
this device must accept any interference, including interference that may cause undesired
operation of the device.”
French
“Conformément à la réglementation d’Industrie Canada, le présent émetteur radio peut
fonctionner avec une antenne d’un type et d’un gain maximal (ou inférieur) approuvé pour
l’émetteur par Industrie Canada.
Dans le but de réduire les risques de brouillage radioélectrique à l’intention des autres
utilisateurs, il faut choisir le type d’antenne et son gain de sorte que la puissance isotrope
rayonnée équivalente (p.i.r.e.) ne dépasse pas l’intensité nécessaire à l’établissement
d’une communication satisfaisante.”
25
1166 UHF Reader User Guide V1.07Copyright © 2019 Technology Solutions (UK) Ltd
Page 26

REGULATORY INFORMATION
“Le présent appareil est conforme aux CNR d’Industrie Canada applicables aux appareils
radio exempts de licence. L’exploitation est autorisée aux deux conditions suivantes : (1)
l’appareil ne doit pas produire de brouillage, et (2) l’utilisateur de l’appareil doit accepter
tout brouillage radioélectrique subi, même si le brouillage est susceptible d’en
compromettre le fonctionnement.”
www.tsl.com
26
1166 UHF Reader User Guide V1.07Copyright © 2019 Technology Solutions (UK) Ltd
Page 27

REGULATORY INFORMATION
www.tsl.com
LASER WARNING
A warning label is also shown on the back of the antenna when a barcode reader is fitted.
The barcode reader module complies with 21 CFR 1040.10 and 1040.11 except for deviations pursuant to Laser
Notice No. 50, dated June 24, 2007, EN60825-1:2007 and IEC60825-1:2001 (Ed.1.2)
Avoid unnecessary exposure to the laser light.
Caution: Use of controls, adjustments or performance of procedures other than those specified herein may result
in hazardous laser light exposure.
Caution: Viewing the illumination from the barcode reader with optical instruments may result in increased hazard.
27
1166 UHF Reader User Guide V1.07Copyright © 2019 Technology Solutions (UK) Ltd
Page 28

www.tsl.com
HEALTH AND SAFETY RECOMMENDATIONS
Ergonomic Recommendations
Caution: In order to avoid or minimize the potential risk of ergonomic injury, follow the recommendations below.
Consult with your local Health & Safety Manager to ensure that you are adhering to your company’s safety
programs to prevent employee injury.
● Reduce or eliminate repetitive motion
● Maintain a natural position
● Reduce or eliminate excessive force
● Keep objects that are used frequently within easy reach Perform tasks at correct heights
● Reduce or eliminate vibration
● Reduce or eliminate direct pressure
● Provide adjustable workstations
● Provide adequate clearance
● Provide a suitable working environment
● Improve work procedures.
For vehicle installation and use
An air bag inflates with great force. DO NOT place objects, including either installed or portable wireless
equipment, in the area over the air bag or in the air bag deployment area. If in-vehicle wireless equipment is
improperly installed and the air bag inflates, serious injury could result.
RF signals may affect improperly installed or inadequately shielded electronic systems in motor vehicles (including
safety systems). Check with the manufacturer or its representative regarding your vehicle. You should also consult
the manufacturer of any equipment that has been added to your vehicle.
Power Supply
Use only TSL®-approved cradles, chargers and power supplies with the 1166 UHF Reader. Use of an alternative
power supply will invalidate any approval given to this device, void the warranty for the product and may be
dangerous.
28
1166 UHF Reader User Guide V1.07Copyright © 2019 Technology Solutions (UK) Ltd
Page 29

www.tsl.com
WASTE ELECTRICAL AND ELECTRONIC EQUIPMENT (WEEE)
For EU Customers: All products at the end of their life must be returned to TSL® for recycling. For information on
how to return product please contact TSL®.
WARRANTY
(A) Warranty
TSL’s hardware Products are warranted against defects in workmanship and materials for a period of twelve (12) months
®
from the date of shipment, unless otherwise provided by TSL
operated under normal and proper conditions. Warranty provisions and durations on software, integrated installed systems,
Product modified or designed to meet specific customer specifications (“Custom Products”), remanufactured products, and
reconditioned or upgraded products, shall be as provided in the applicable Product specification in effect at the time of
purchase or in the accompanying software license.
in writing, provided the Product remains unmodified and is
(B) Spare Parts
Spare parts (i.e. parts, components, or subassemblies sold by TSL® for use in the service and maintenance of Products) are
warranted against defects in workmanship and materials for a period of thirty (30) days from the date of shipment. Spare parts
may be new or originate from returned units under the conditions set forth in subsection D below.
(C) Repair of TSL® branded hardware
For repairs on TSL® branded hardware Products under this Agreement, including repairs covered by warranty, the repair
services provided are warranted against defects in workmanship and materials on the repaired component of the Product
for a period of thirty (30) days from the shipment date of the repaired Product, or until the end of the original warranty period,
whichever is longer. Any such defects shall be notified to TSL
®
in writing within 7 days of the same becoming apparent.
(D) Product Service
Products may be serviced or manufactured with parts, components, or subassemblies that originate from returned products
and that have been tested as meeting applicable specifications for equivalent new material and Products. The sole obligation of
®
for defective hardware Products is limited to repair or replacement (at TSL’s option) on a “return to base (RTB)” basis with
TSL
®
prior TSL
Customer is responsible for prompt shipment to TSL
shipment to the Customer will be at TSL’s expense. Customer shall be responsible for return shipment charges for product
returned where TSL
eligible for warranty repair. No charge will be made to Buyer for replacement parts for warranty repairs. TSL
for any damage to or loss of any software programs, data or removable data storage media, or the restoration or reinstallation of
any software programs or data other than the software, if any, installed by TSL
authorisation.
®
determines there is no defect (“No Defect Found”), or for product returned that TSL® determines is not
®
and assumes all costs and risks associated with this transportation; return
®
is not responsible
®
during manufacture of the Product.
29
1166 UHF Reader User Guide V1.07Copyright © 2019 Technology Solutions (UK) Ltd
Page 30

WARRANTY
www.tsl.com
(E) Original Warranty Period
Except for the warranty applying solely to the repaired component arising from a repair service as provided in Section C above,
the aforementioned provisions do not extend the original warranty period of any Product that had either been repaired or
®
replaced by TSL
.
(F) Warranty Provisions
The above warranty provisions shall not apply to any Product:
®
(i) which has been repaired, tampered with, altered or modified, except by TSL
(ii) in which the defects or damage to the Product result from normal wear and tear, misuse, negligence, improper storage, water
or other liquids, battery leakage, use of parts or accessories not approved or supplied by TSL
®
handling and scheduled maintenance instructions supplied by TSL
;
(iii) which has been subjected to unusual physical or electrical stress, abuse, or accident, or forces or exposure beyond normal
use within the specified operational and environmental parameters set forth in the applicable Product specification; nor shall the
above warranty provisions apply to any expendable or consumable items, such as batteries, supplied with the Product.
’s authorized service personnel;
®
, or failure to perform operator
EXCEPT FOR THE WARRANTY OF TITLE AND THE EXPRESS WARRANTIES STATED ABOVE, TSL
®
DISCLAIMS ALL
WARRANTIES ON PRODUCTS FURNISHED HEREUNDER INCLUDING ALL IMPLIED WARRANTIES OF MERCHANTABILITY
AND FITNESS FOR A PARTICULAR USE. ANY IMPLIED WARRANTIES THAT MAY BE IMPOSED BY LAW ARE LIMITED IN
DURATION TO THE LIMITED WARRANTY PERIOD. SOME STATES OR COUNTRIES DO NOT ALLOW A LIMITATION ON
HOW LONG AN IMPLIED WARRANTY LASTS OR THE EXCLUSION OR LIMITATION OF INCIDENTAL OR CONSEQUENTIAL
DAMAGES OR CONSUMER PRODUCTS. IN SUCH STATES OR COUNTRIES, FOR SUCH PRODUCTS, SOME EXCLUSIONS OR
LIMITATIONS OF THIS LIMITED WARRANTY MAY NOT APPLY.
The stated express warranties are in lieu of all obligations or liabilities on the part of TSL
®
for damages, including but not limited
to, special, indirect or consequential damages arising out of or in connection with the use or performance of the Product or
service. TSL’s liability for damages to Buyer or others resulting from the use of any Product or service furnished hereunder shall
in no way exceed the purchase price of said Product or the fair market value of said service, except in instances of injury to
persons or property.
®
TSL
is not responsible for any damages incurred during shipment if the approved shipping container is not used. Shipping the
units improperly can possibly void the warranty. If the original shipping container was not kept, contact your local distributor or
®
to have another sent to you.
TSL
®
shall not be responsible for any injury, damage or loss of whatever kind caused directly or indirectly by the goods whether
TSL
®
as a result of their manufacture, operation, use or otherwise and the customer shall indemnify TSL
from any claim arising from
any loss suffered by any third party.
30
1166 UHF Reader User Guide V1.07Copyright © 2019 Technology Solutions (UK) Ltd
Page 31

T
www.tsl.com
ABOUT TSL
®
ABOUT
®
SL
Technology Solutions UK Ltd (TSL®) is a leading manufacturer of high performance mobile RFID readers used to
identify and track products, assets, data or personnel.
For over two decades, TSL® has delivered innovative data capture solutions to Fortune 500 companies around the
world using a global network of distributors and system integrators. Specialist in-house teams design all aspects of
the finished products and software ecosystems, including electronics, firmware, application development tools, RF
design and injection mould tooling.
TSL® is an ISO 9001:2015 certified company.
ISO 9001: 2015
CONTACT
Address: Technology Solutions (UK) Ltd, Suite A, Loughborough Technology Centre, Epinal Way,
Loughborough, Leicestershire, LE11 3GE, United Kingdom.
Telephone: +44 1509 238248
Fax: +44 1509 214144
Email: enquiries@tsl.com
Website: www.tsl.com
Copyright © 2019 Technology Solutions (UK) Ltd. All rights reserved. Technology Solutions (UK) Limited reserves the right to change its
products, specifications and services at any time without notice.
31
1166 UHF Reader User Guide V1.07Copyright © 2019 Technology Solutions (UK) Ltd
 Loading...